Qualcomm Inc., 5775 Morehouse Drive, San Diego CA 92121. Three-Dimensional Imaging, Interaction, and Measurement, edited by J. Angelo Beraldin, et al.,.
3D image processing architecture for camera phones Kalin Atanassov, Vikas Ramachandra, Sergio R. Goma, Milivoje Aleksic Qualcomm Incorporated. ABSTRACT Putting high quality and easy-to-use 3D technology into the hands of regular consumers has become a recent challenge as interest in 3D technology has grown. Making 3D technology appealing to the average user requires that it be made fully automatic and foolproof. Designing a fully automatic 3D capture and display system requires: 1) identifying critical 3D technology issues like camera positioning, disparity control rationale, and screen geometry dependency, 2) designing methodology to automatically control them. Implementing 3D capture functionality on phone cameras necessitates designing algorithms to fit within the processing capabilities of the device. Various constraints like sensor position tolerances, sensor 3A tolerances, post-processing, 3D video resolution and frame rate should be carefully considered for their influence on 3D experience. Issues with migrating functions such as zoom and pan from the 2D usage model (both during capture and display) to 3D needs to be resolved to insure the highest level of user experience. It is also very important that the 3D usage scenario (including interactions between the user and the capture/display device) is carefully considered. Finally, both the processing power of the device and the practicality of the scheme needs to be taken into account while designing the calibration and processing methodology. Keywords: 3D capture, 3D video, stereo camera calibration, stereo convergence, accommodation, vergence, stereopsis, visual fatigue, object disparity, 3D zooming
1. INTRODUCTION Traditionally, 3D capture and display happen in a very controlled environment, e.g., in 3D movies or 3D graphics, where perfect control of the scene is possible and thus tight control on the 3D effect can be exercised. Moreover, the display of 3D images happens traditionally on known screen geometry and is static, i.e., does not allow user interactions. In contrast, the consumer model for 3D usage allows for the capture to occur in a more ad-hoc environment, where the scene geometry is not known beforehand nor are there means to influence it. Also, to be commercially viable, 3D technology needs to be interactive and portable, i.e., user preference aware and display-agnostic. The fact that scene and display geometry constraints are unknown a priori presents an interesting problem as it necessitates adding scene and display control at the algorithmic level (post processing). Also, limited power/processing capabilities of the mobile device strongly constrain the algorithm design. Making 3D technology appealing to the average user requires that it be made fully automatic and foolproof. The latter requires exposing only intuitive inputs to the user and hiding the advanced 3D processing. In this paper we propose an implementation friendly architecture for 3D image processing that is practical and within the processing power capabilities of a mobile phone device. Our conclusions that drive our design methodology indicate that • Relative positions of the two cameras need to be selected carefully to ensure minimal scene distortion and eye strain, • Mechanical tolerances related to the camera placement need to be compensated via post processing since it is not practical to expect that cameras will be perfectly aligned, • Scene dependent convergence control is needed to reduce eye strain considering that there is a ”safe” 3D effect area around the screen and the 3D scene geometry may cause the 3D effect to fall out of that area • Adding zoom/pan functionality is critical to 3D adoption since the user is already used to these operations when capturing/reviewing 2D content Qualcomm Inc., 5775 Morehouse Drive, San Diego CA 92121.
Three-Dimensional Imaging, Interaction, and Measurement, edited by J. Angelo Beraldin, et al., Proc. of SPIE-IS&T Electronic Imaging, SPIE Vol. 7864, 786414 · © 2011 SPIE-IS&T CCC code: 0277-786X/11/$18 · doi: 10.1117/12.872617 SPIE-IS&T/ Vol. 7864 786414-1
• Screen geometry needs to be taken into consideration during processing, • Every time the image conditions (zoom, pan) or display conditions change, the 3D processing algorithm needs to be re-run.
2. CAPTURE RATIONALE The capture methodology for 3D imaging aims to produce stereo images that can be rendered on a 3D display. Important considerations are desired camera position selection , fine position calibration , and convergence point adjustment.
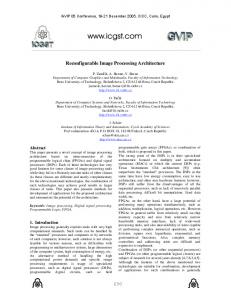
2.1 The desired camera pair orientation The left and right camera placement influences the 3D effect. Camera placement may introduce undesired artifacts and scale horizontal disparity. To better control these effects, two factors need to be considered : 1) camera orientation, and 2) camera baseline. The cameras must be oriented so that there is no vertical disparity and a minimum number of artifacts are introduced in the 3D image. The absence of vertical disparity requires that: • The sensors’ optical axes should be parallel.1 • The horizontal pixel rows through the centers of the sensors should lie in the same plane. There are two major configurations used for 3D imaging: • Parallel cameras: the optical axis of the two cameras are parallel. • Toe-in cameras: the optical axis cross somewhere in front of the cameras.
Figure 1. Toe-in (left) vs parallel (right) configuration
Although toe-in camera configurations resemble closely human eyes behavior, it introduces vertical parallax (key-stone distortion) and curvature of the depth planes.1 For the above reasons, parallel camera configuration is selected for general purpose 3D capture.
SPIE-IS&T/ Vol. 7864 786414-2
2.2 Camera baseline Camera baseline refers to the horizontal distance between the two cameras. To capture the best stereo images for 3D imaging, the baseline must be carefully selected. The camera baseline influences the 3D effect in the following manner: • A larger baseline produces a larger disparity range. A large disparity range produces a pronounced 3D effect on mid to far depth range scenes. The drawback is that for close scenes the disparity is too large and the scene may not be fusible (Fusibility refers to the left and right eye image being interpreted as a single 3D scene by the brain) • A smaller baseline produces a smaller disparity range which diminishes the 3D experience for scenes that are in the mid to far depth range. However, the advantage of a smaller baseline is that for scenes with objects close to the camera, the 3D image pair is still fusible. The baseline effects discussed above are illustrated in the following figure. The figure shows how large of a depth
Figure 2. Stereo camera baseline trade offs
range can be captured and displayed without eye strain∗ for two different camera baselines. For example, if the closest object is at 1.7m, a camera baseline of 3.25cm will be able to fuse objects up to infinity† while a baseline of 6.5cm can fuse objects only up to 3.7m (range of 2m). However, if the closest object is at 3.5m and the furthest object is at infinity, a baseline of 6.5cm will have full 3D effect range while a baseline 3.25cm will only use a fraction of the fusible 3D range (less pronounced 3D effect). It needs to be noted that if horizontal disparity exceeds the binocular fusion range it is very hard to design a reliable algorithm to control it, much less within real-time constraints. For a typical consumer device it is not practical to assume moving cameras so the baseline is usually fixed. Considering the trade-off between depth contrast and stereo image fusion, a baseline of 3.25cm was selected.
2.3 Cameras position calibration The desired stereo camera configuration is the one where there is no vertical disparity between the left and right camera images. This condition is met when the left and right camera optical axes are parallel to one another. In order to precisely align the stereo images, a three step solution is necessary. ∗ †
Horizontal disparity of 0.5◦ was assumed for a comfortable 3D fusion limit2 For illustration purpose typical image capture and display condition were used for the computation
SPIE-IS&T/ Vol. 7864 786414-3
• Mechanical positioning (coarse setup): Sensors are placed such as their optical axis are parallel to each other and pixel rows through the optical centers of the two sensors lie on the same line (the process is not accurate enough to ensure perfectly parallel cameras thus requiring further calibration) • Sensor calibration - The two sensor poses are estimated during factory calibration and stored on the sensor memory • Digital correction (fine setup): The captured images are precisely aligned in real time using the calibration data Camera pose is specified by 6 parameters: • 3 rotations around X, Y, and Z axes. • 3 shifts relative to X, Y, and Z axes. Estimation of the camera poses provides all the necessary information for the subsequent compensation (rectification) stage.
2.4 Convergence point adjustment As indicated before, for a typical consumer device such as a camera phone or a tablet, it is not practical to have moving cameras in order to achieve a desired convergence point. Moreover, the toe-in camera configuration causes perspective change or keystone distortion, with the latter introducing undesirable vertical disparity that causes discomfort. A simple and effective way of adjusting the convergence point (the depth at which objects appear with no horizontal disparity) is by introducing relative shift between the two images. The perceived effect of that would be the objects in the 3D images/video moving forward or backward in depth, relative to the screen surface. The purpose of the adjustment is to place the 3D scene in a small depth range “around” the viewing screen. This is done in order to alleviate the vergence-accommodation conflict.3 It needs to be noted that even this kind of adjustment would not be sufficient for scenes with big depth in which case special processing is needed.
3. PROCESSING ARCHITECTURE Our proposed architecture (illustrated bellow) relies on the following steps.
3.1 High level overview Fine geometry compensation: A method for digitally aligning the cameras on the desired orientation based on a projective transform.4 Key point detection: The first stage of the scene depth estimation module in which distinctive (high frequency) key points are detected Key point matching: The second stage of the scene depth estimation module in which key point map is used to find disparities between corresponding key points in left and right images. A reliability estimator is produced for every key point to ensure that erroneous matches are discarded. 3D Convergence control logic: The control logic for producing final 3D stream. Takes into consideration display geometry and (user configurable) 3D display parameters to produce a decision for manipulating the 3D stream as well as desired convergence adjustment. 3D plug-ins: A set of convergence control methods that can be selected based on the result from 3D convergence logic. At least two processing paths need to be present: 1) for a scene that is within convergence capabilities of the display and 2) for a scene that is not. Based on HW capabilities and as technology develops, more paths can be added. Post processing: Crop and border correction to mitigate the effects of convergence point adjustment (resulting in a horizontal shift) and field of view difference between left and right cameras.
SPIE-IS&T/ Vol. 7864 786414-4
Figure 3. Processing Architecture
3.2 Processing pathways 3.2.1 Video capture and preview The figure below describes the flow during 3D capture and display. There are a couple of important considerations. • 3D Indicator is a real time indicator that in essence shows the depth range of the scene (in terms of a fraction of the available range). This indicator notifies the user if the scene is within the configured display fusion capabilities. The user then can elect to change the scene by panning or stepping back. • The convergence algorithm needs to run every N frames while geometry compensation and convergence adjustment needs to run every frame. • Any optical of digital zoom happens transparently to the algorithm. • The display for preview may or may not be 3D (and hence the need for the 3D indicator).
Figure 4. Capture and preview path
SPIE-IS&T/ Vol. 7864 786414-5
3.2.2 Playback with zoom and pan It is the contention of the authors of this paper that for 3D technology to be appealing and competitive, it needs to be comparable to the conventional 2D paradigm, i.e., 3D technology needs to offer a similar user interactions capabilities. As such it is desired that in the playback mode, it should allow the user to control zoom and pan. Zoom and/or pan operations are inherently scene change operations so the 3D convergence point adjustment algorithm should run in the playback mode as well. For this reason, 3D processing adjustment should be contained in the 3D player, as shown in the following figure.
Figure 5. Playback path
Also, authors’ opinion is that using the phone (or other consumer device) as a player connected to a 3D display device, is a more practical scenario. As such any architecture design decisions should not be made assuming 3D display on the consumer device.
3.3 Algorithm description The 3D processing needed to accommodate different display and scene geometry consist of the following blocks: 1) key point detection and matching , 2) 3D control , and 3) 3D post processing. The algorithm for key point detection and matching can be generalized as sparse disparity vector estimation between the left and right images. The following are some important features of the algorithm: • Key (distinctive) points identification is typically done with high pass operations at different spatial resolutions; for this case only one resolution was found to be sufficient • Vertical variations are not needed since only horizontal shift is present (will be measured). • Horizontal variations (edges with some vertical component) are used. • Key point matching is done based on minimal mean squared error. • A reliability indicator is produced for every key point and used to accept or reject the corresponding disparity vector. • A processing frame of 5 frames-per-second was found to the lowest acceptable rate A typical result from disparity vectors estimation is shown in the figure below.
SPIE-IS&T/ Vol. 7864 786414-6
Figure 6. Disparity vectors estimation
3.4 Key point detection As indicated before, key point detection is done at one resolution. The algorithm can be described as follows. • Assuming a typical sensor horizontal field of view of 53◦ and sensor dimension ratio of 3:4, the luma component is sub-sampled to 180x240 pixels . The purpose of this is to improve algorithm robustness to noise and decrease demand for processing power. • The sub-sampled image is passed through a horizontal high pass filter. The filter support is a 3x4 kernel and has a response given by: ⎡
−1 H = ⎣−1 −1
−1 −1 −1
1 1 1
⎤ 1 1⎦ 1
• The output of the filter is squared and the local horizontal maximum is detected. The maximum is then compared to a threshold to be classified as a key point The key point detection flow is shown in the following figure
Figure 7. Key point detection
SPIE-IS&T/ Vol. 7864 786414-7
3.5 Key point matching Once the key point map is identified (in the lower resolution), the key point correspondence between left and right image needs to be established. This is done by conducting a horizontal search around each key point position by computing the mean square error as a function of the horizontal shift. R(J) =
N N � � �
Slef t (n − i, m − J) − Sright (n − i, m − j − J)
�2
i=−N j=−N
where (n, m) is the location of the key point and 2 × N + 1 = K is size of the window around the key point. It was found experimentally that N = 3 produces good results. Jˆ = argmin R(J) J
The disparity estimates is further refined with polynomial interpolation in order to achieve sub-pixel accuracy. Jf inal = Jˆ +
R(Jˆ − 1) − R(Jˆ + 1) ˆ ˆ 2(R(J + 1) + R(Jˆ − 1) − R(J))
3.6 3D Convergence control logic The 3D control logic is a function with a very small processing overhead that performs the following operations: • Crop disparity vectors from the window of interest (in case of zoom/pan) and scale disparity vectors to represent the desired image resolution • Build a histogram of disparity vectors. • Trim the tails of the histogram to ensure that any outliers (likely mismatches) are removed from the histogram and will not influence the final statistics. • Estimate scene disparity range as the difference between min and max values of the trimmed histogram. • Compute max acceptable disparity range using screen geometry parameters. • Make decision if scene is fusible (scene disparity range is smaller than max acceptable range) • If scene is fusible – Set the convergence point between the min and max values based on the screen geometry parameters. – Adjust one (or both) images by performing a horizontal shift corresponding to setting the desired convergence point to be at zero disparity. • If scene is not fusible (at least one option is needed here) – Switch to 2D stream (make left and right frames the same) – 2D to 3D conversion (if available). – Invasive disparity control (if available) - involves building a 3D model of the scene and either manipulating the depth or changing camera baseline (view synthesis). Computing maximum acceptable disparity range using screen geometry parameters is done in the following manner. Consider the following notation • Let the fusion limit be Γ = 0.25◦ − 1◦ (specified during configuration time).
SPIE-IS&T/ Vol. 7864 786414-8
• Let θ be the display viewing angle. • Let D be the scene depth , i.e., the difference between maximum (D2) and minimum (D1) disparity vectors in pixels. • Let W be image width in pixels. • Let L be the inter-ocular distance • Let the distance to screen be specified as multiples (k) of the inter-ocular distance
Figure 8. Angular disparity around eyes’ fixation point
From the figure α = tan−1 (2k) Assuming that fusion limits are roughly the same before and after the fixation point and noted by Γ/2 A=
L kL L kL − = − −1 2 tan(α + Γ/2) 2 tan(tan (2k) + Γ/2)
B=
L L kL kL − − = tan(α − Γ/2) 2 2 tan(tan−1 (2k) − Γ/2)
The angular horizontal disparity Γ will be projected on the screen as h=A+B = ¯
kL kL − tan(tan−1 (2k) − Γ/2) tan(tan−1 (2k) + Γ/2)
The projection on the screen disparity can be converted to pixels as ¯hpixel =
¯ h W 2kL tan( θ2 )
SPIE-IS&T/ Vol. 7864 786414-9
or if everything is substituted hpixel ¯
1 W 1 = − 2 tan( θ2 ) tan(tan−1 (2k) − Γ/2) tan(tan−1 (2k) + Γ/2)
For typical screen distances of 30cm to 10m which equates to k = 5 : 150 the term in the brackets for all practical purposes does not depend on k and is a linear function of Γ (range of Γ is typically 0.25◦ − 1◦ ). The expression then can be simplified to ¯hpixel = C
W Γ 2 tan( θ2 )
where C is a constant and can be be computed beforehand. The value of h ¯ pixel is then used as a maximum scene disparity range (in pixels) that can be fused on that particular screen and as shown depends only on the screen horizontal viewing angle and the image resolution. Once the max fusible range is computed and if the scene can be fused, the convergence point needs to be placed somewhere within the scene range. One constraint that can be used here is that the after screen linear disparity (shown as A in the above plot) can not exceed the inter-ocular distance, i.e., 2 × A < L. The latter is needed to ensure that the eyes do not diverge. From disparity angle point of view , this is equivalent to forcing tan−1 (2k) + Γ/2 < π/2 or �
γ = min
�
tan
A= B=
−1
(2k) + Γ/2 , π/2 − tan−1 (2k);
L kL − 2 tan(tan−1 (2k) + γ � )
L kL − 2 tan(tan−1 (2k) − (Γ − γ � )
The convergence point is then selected as Pconv = D1 + D Shown below is the value of
B A+B
B A+B
for different values of k and Γ = 1◦
It can be seen from the plot that screens which are closer to the viewer require the convergence point be put in the middle of the linear pixel disparity range. In contrast, screens that are placed at larger distance necessitate that convergence point is placed more toward objects at infinity to insure that largest on-screen linear depth disparity does not exceed the inter-ocular distance (eyes do not diverge). This is illustrated in the figure below.
SPIE-IS&T/ Vol. 7864 786414-10
Figure 9. Convergence point adjustment based on distance to screen
Figure 10. Convergence point selection
4. SUMMARY AND CONCLUSIONS For 3D technology to cross into consumer electronics domain, the 3D capture-processing-display pipeline should be made fully automatic. Several factors are identified as critical to 3D quality, namely camera calibration, scene depth profile, screen geometry and user requested zoom and pan. In this paper we have outlined our proposal for handling those issues automatically and have defined a processing architecture that fits the limited resources of a typical consumer device. The described architecture relies on camera calibration procedure that runs off-line and produces necessary parameters to align the two cameras. In real-time operation, the processing chain starts with camera rectification which is followed by distinctive points detection. Key points are then matched between left and right camera images to produce disparity histogram for the scene. 3D control logic then takes into account 3D effect settings, screen geometry and zoom/pan factor (in case of playback), and produces a decision on how to render the 3D scene with optimal parameters. The factors that affect the 3D quality the most are handled with manageable processing complexity. Some typical usage models are shown, and their accommodation into the proposed architecture is discussed.
REFERENCES [1] Woods, A., Docherty, T., and Koch, R., “Image distortions in stereoscopic video systems,” in [Proceedings of the SPIE Volume 1915, Stereoscopic Displays and Applications IV. ], (1993).
SPIE-IS&T/ Vol. 7864 786414-11
[2] Tyler, C., “Sensory processing of binocular disparity,” in [Basic and Clinical Aspects of Binocular Vergence Eye Movements.], (1983). [3] Hoffman, D., Girshick, A. R., Akeley, K., and Banks, M., “Vergence accommodation conflicts hinder visual performance and cause visual fatigue,” in [Journal of Vision ], (2008). [4] Trucco, E. and Verri, A., “A compact algorithm for rectification of stereo pairs,” in [Machine Vision and Applications], (2000).
SPIE-IS&T/ Vol. 7864 786414-12