ART 03
3D-Registered Interaction-Surfaces in Augmented Reality Space Christian Geiger#, Leif Oppermann#, Christian Reimann* # Hochschule Harz, *Paderborn University C-LAB
[email protected],
[email protected],
[email protected] usable user interfaces for AR applications is still a challenge. While HCI-researchers spend a lot of effort building new (e.g. tangible) 3D interfaces within AR, most AR developers just use 2D-Interfaces because they need a simple solution which is also easy and fast to implement.
Abstract Today the user interface and its ease of use are seen as a crucial point for the enduring success of almost any application. The creation of effective user interfaces is no simple task, especially within the domain of Augmented Reality. So a lot of developers still use traditional desktop-interfaces for their AR applications, even if they are not really suitable for the user, simply because the development of a usable 3D interface is much too complicated and thus consuming too much time and money. This paper describes the ARGUI system, which provides developers of ARToolkit applications with the possibility to create 2D Interaction-Surfaces registered in 3D. With ARGUI 2D interactions on 2D objects registered in 3D are possible, e.g. attached to a marker. The integration of a complete 2D GUI library is shown in detail, which simplifies the creation of the user interface even more.
In this paper we describe a pragmatic solution for creating user interfaces in AR application, which combines the simple creation of 2D interfaces with many advantages of real 3D interactions: ARGUI. The ARGUI system allows the author of an application to create two dimensional user interfaces as (s)he is used to and place them not only on the 2D-Desktop, but in 3D-Space or align them to a marker in AR-Space. With ARGUI developers can define Interaction-Surfaces in a virtual 3D environment that are input-sensitive allowing reaction to keyboard and mouse events. Interaction-Surfaces can also be assigned to ARToolkit marker patterns allowing integration in ARToolkit's video image. The user selects the surface (s)he wants to interact with by mouse pointing (point to focus) or right button click (right click to focus). The latter allows focussing permanently on the InteractionSurface.
1. Introduction Existing research in Augmented Reality (AR) has often been focussed on base technology issues with limited consideration of application or "content" development. While the available technology still imposes some serious limitations, solutions to many central problems of AR like tracking and rendering now exist that enable the creation of useful AR applications. This opens up the area of AR to a whole new group of developers who are interested more in the application, content and authoring aspects of AR and less in the underlying base technology. It also enables the use of AR in student projects of limited scope, as it is no longer necessary to develop a complete AR system from scratch. Instead, it becomes possible to use existing solutions to problems like tracking and rendering and extend them where necessary or simply focus on the development of AR applications that provide compelling content or services to the user. To make this approach viable it is necessary to provide the required AR functionality to developers in an accessible and usable format. Researchers working on Augmented Reality often state the idea of intuitive and natural user interfaces as their vision behind the AR technology. However creating
Technically ARGUI is an extended 2D Window System for augmented reality applications based on ARToolkit, OpenGL and GLUT.
2. Overview In section 3 we describe the different modes of interactions in augmented reality applications. Furthermore it is shown how the approach of ARGUI is related to these interactions and other existing work. Section 4 features our ARGUI approach and the concept of Interaction-Surfaces. The software architecture is described in general, while an in depth view is given to the integration of the glGUI library. The simpler sample applications using ARGUI are shown in section 5, leaving section 6 to describe an actual project in which ARGUI is used to create the user interfaces for an AR exhibition.
1
ART 03 [5]. Thomas et al. describe in [8] how ARToolKit was used to determine handpositions, enabling the use of simple gestures to interact with the world. Beside all this research on new interfaces to the user projects with a more pragmatic approach to user interfaces (e.g. ARVIKA [10]) state that often simple 2D augmentations and interfaces which are directly on the screen are a suitable solution.
3. Interactions in Augmented Reality AR-Space allows different modes of interaction: 2D GUI on top of a 3D window: 2D interaction as provided by mouse, keyboard or tablet. This is provided by the operating system / programming language used and can not per se be registered in 3D. This is used to provide standard 2D user interfaces and to embed the 3D view (or use the GUI as 2D layer). Most programmers are very familiar with this kind of interaction, so the development is usually uncritical.
4. The ARGUI Approach ARGUI tries to combine the easy creation and usability of 2D user interfaces with the flexibility and possibilities of 3D interfaces. Therefore it uses 2D GUIs registered in 3D: This allows interaction with augmented / computer generated objects. We distinguish two modes: cursor based and marker based interaction. This simply refers to the way the 2D cursor is positioned on an arPattern object (e.g. a plane aligned to an ARToolkit marker). Cursor based movement means that the 2D mouse cursor is moved using a suitable input device (mouse, tablet or GyroRemote - see example in section 6). Marker based movement means that the video camera is moved to position the arPattern-object under the "static" mouse cursor. We identified this mode useful in the mobile AR exhibition demo described later. A mixture of both modes is also possible.
2D GUI registered in 3D: This mode is supported by ARGUI and is described in detail in section 4. It allows the developer to create 2D-Interfaces (as usual) and put them into 3D with very little effort. 3D GUI registered in 3D: Often used in ARToolkit applications. Augmented 3D objects can be used with mouse, keyboard and other standard input devices. However, as mentioned in section “Related Work”, 3D user interfaces itself are subject of intensive research and are not well accepted by many users. Experimental GUIs registered in 3D. Other more advanced interfaces combine 2D and 3D and often use other input devices. Similar to 3D GUIs, we do not cover these approaches in this work.
4.1. 3D-Registered Interaction-Surfaces
Interaction in AR Toolkit applications is – in general – only supported by interacting with AR Toolkit markers realizing a kind of jigsaw metaphor. With ARGUI we provide an approach to interact on 2D surfaces in a 3D environment using the system’s cursor and 2D interaction.
Realization of complex 2D GUIs in ARToolkit applications requires the solution of two problems: • Detecting 2D-Cursor position on the marker • Construction of 2D GUIs with a suitable GUI toolkit
3.1. Related Work
Problem 1 is not merely a simple 3D object picking problem because the exact position on the plane object is needed to decide which 2D GUI element is selected.
The creation of 3D Widgets for user interaction as described in [4] offers a lot more flexibility for the developer than standard 2D interfaces. Also in the field of Mixed Reality there is no lack of generic 3D Widgets (e.g. [7]), which are easy to use. Nevertheless there are fewer guidelines for programming 3D widgets, than for 2D interfaces, like the “Microsoft Windows Guide to Programming” [6]. In [9] Paelke et al. describe a repository for interactiontechniques, which gives the developer an overview of different interaction-techniuqes and helps him to choose the appropriate technique for a given task. For Augmented Reality applications tangible user interfaces promise the biggest potential for handling interactions in a natural way, with virtual data linked to physical objects, as shown in “Windows on the world”
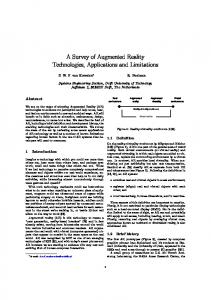
Fig. 1: Detect cursor position on an ARToolKit marker
2
ART 03 For our work we can constrain this problem to find the exact position of the 2D mouse cursor on a 2D planar plane (Interaction-Surface) that is registered with the marker (see Fig 1). We choose the following very simple approach solving this problem. For every ARtoolkit pattern a plane of size x*y is registered but not rendered in the application. This arPattern object allows determining the exact position of a 2D mouse cursor independent of the plane's position and orientation. This is realized by coloring the plane's vertices with red and green and interpolating between colors. If a plane object is picked with the mouse, it is selected and the pixel color under the cursor is retrieved. The color code is used to specify exact position of the cursor on the plane. This position is used together with key / mouse events to realize interactive interface elements. Figure 2 illustrates this idea using a simple video player. The color code approach could also be used to add support for interaction on arbitrary curved surfaces.
Fig 3a: Architecture – Abstraction-Layers Non interactive arObjects are simply used for visualization purpose similar to standard 3D objects in ARToolkit. The property “interactive” is determined by the arPattern object using slots for interaction and visualization. From the arObject class a number of classes for different types of media objects can be derived. Classes for 3D visualization implement simple 3D object loader for VRML objects or 3DS scenes. An integrated video player allows playing movies and a sound class is currently under development. For special purposes we developed a class for procedural animation effects (see examples). A class for developing complex 2D GUIs is described in the next section. All arObjects (sound, video, images, 2D GUIs, and procedural effects, 3D) can exchange messages using an internal simple messaging system. arObjects can also be combined (e.g. a 2D GUI with integrated video player). In the current prototype the number of slots for visualization and interaction is restricted to 1.
Fig. 2: Color picking of mouse position
4.2. Architecture ARGUI is built on top of OpenGL / GLUT / ARToolkit and allows rapid prototyping of 2D graphical user interfaces using glGUI, a 2D GUI system based on OpenGL. These libraries built an abstraction layer that can be used to create complex 2D user interfaces and additional multimedia object including 3D scenes, sound and videos (fig 3). The current prototype of ARGUI allows registering and managing an arbitrary number of patterns. For each pattern exactly one arPattern object (including the 2D plane) is created realizing the extended picking using the color coding approach described above. Each arPattern object can have a number of interactive and non-interactive arObjects using slots for each type. Interactive arObjects listen to mouse / key events when the pattern is active (visible and selected). These objects are used to realize the Interaction-Surfaces in ARGUI applications.
Fig 3b: Architecture – Class-Diagram With the concept of arObjects arbitrary 2D or 3D representations can be integrated into the rendering process using a uniform interface. 2D interaction is supported using the simple color matching approach
3
ART 03 described above. Rendering of an ARGUI application is realized using the following steps: • Detect patterns in current frame using camera or AVI input • visibility check for the assigned arPattern objects (2D planes) • find picked arPattern object (polygon picking) • find 2D mouse position on plane (color picking) • draw video background • inform all visible arPattern-objects to render their arObjects (2D, 3D, sound)
4.4. Integration of glGUI The construction of complex 2D graphical user interfaces with ARGUI is realized using the open source project glGUI [5]. The purpose of glGUI is to create a set of classes for a general purpose GUI, without platform or API restrictions for use in games and other applications that require only basic GUI functionality. glGUI is not meant to be a replacement for a full windowed GUI and as such does not include that level of functionality. Although not comparable to a complete GUI library this approach was selected because glGUI seamlessly integrates into OpenGL, is easily extendable and provides predefined standard UI-elements (e.g. buttons, sliders, menus). Other important criteria include an arbitrary size of GUI elements – 2D GUIs in AR have to be larger than in 2D – and support for mouse and key control. glGUI allows to define any number of separate and independent GUIs (called screens) that can be activated by the application. GUI elements in glGUI can be specified using an XML-based data file. Rendering of glGUIs is done via OpenGL but is encapsulated in a separate class. The rendering follows a shader / renderer concept that enables GUI attributes to be represented as shaders (e.g. the color black is defined as shader "black"). This allows efficient rapid prototyping of 2D interfaces. A number of small adaptations had been done to extend glGUI for use in ARGUI. The shader/renderer concept was extended by animated shaders that are rendered into textures. Having their own drawing surface this allows for procedural effects and other animation techniques. glGUI itself also renderes to an OpenGL texture. This allows placing glGUI interfaces on arbitrary 2D surfaces in OpenGL. With glGUI, 2D user interfaces in AR can be easily defined using two abstraction layers as illustrated in figure 3.
This easily allows to define a number of different arObjects (different types of interactive 2D, 3D) and use them in an ARToolkit application.
4.3. Integration of Flash using ActiveX ARGUI provides animated 2D content through Macromadia Flash. We integrated the standard Flash ActiveX Control rather than using a reimplementation of the SWF-Format. Implementation of this control was realized using the following steps: • Init of Active Template Library (ATL) • Creation of a hidden host windows with ATL support (CAxWindow) • Init control (QueryControl) • Create device independent bitmap (DIB) • Load Flash Movie The movie is then rendered into a DIB each frame and loaded into the OpenGL context. Rendering of sound is realized automatically using the Windows Mixer. Details how to integrate ActiveX-controls in ATL windows can be found in [11, 12]. While rendering Flash images and sound works perfectly on a 2D surface in a 3D environment, forwarding of user input is critical. Microsoft Window messages for mouse and keyboard events have to be emulated because the Flash movie now runs in a 3D environment and not on a 2D windows desktop. Due to direct communication of Flash with the Windows system the current prototype does not yet emulate all kinds of messages. Mouse position and MouseUp/MouseDown events can be emulated (see figure 5 left) but Keyboard events and Flash queries about events are still missing. This limits the use of Flash movies in ARGUI, e.g. movies with standard Flash buttons can not be used. A work-around and more details about this integration are described in [13]. Having completed this integration other ActiveX-Controls can be integrated into ARGUI with minor effort.
5. Simple Demo Applications The first demo contained the following arObjects: • a small custom user interface for playing videos • a procedural effect to test the glGUI extensions we developed • an interactive plane to distort images • a 2D user interface using glGUI The first test of ARGUI features a simple AVI-player. A video object was created by deriving from the arObject class and using the Video For Windows API for playing AVI files. Simple video player functionality was realized with custom buttons directly in the new arObject. This video-player was then instanciated several times and assigned to different markers to watch multiple videos at the same time as seen in Figure 4.
4
ART 03 The second procedural effect class implements a water ripple effect that distorts the underlying geometry (plane) in 3D. Interaction is realized with mouse cursor (figure 5). A small example with glGUI was realized with a dummy interface showing a number of 2D GUI elements (e.g. menus, buttons, sliders, text areas). A more advanced example scenario is described in section 6. Fig. 4 Video player on ARToolkit markers Other tests for the arObject class realized two simple procedural effects. A 2D effect animates a flare object with some trigonometric functions as animated texture. Interaction is realized with mouse and keyboard to allow changing animation parameters by a command line interface on the pattern.
Fig. 6 Sample application with glGUI interface
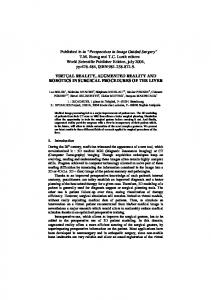
6. ARGUI in an AR-Exhibition A more complex application is currently under development. We will use ARGUI to implement 2D GUIs for augmented reality exhibitions. The idea is to augment real paintings with additional information about artist, painting techniques, historical information and other important information. For this scenario we selected low cost mobile AR equipment similar to approaches described in [1]. A HMD (Eyetrek) is used with a mounted USB cam (Phillips ToUcam) and a 3D notebook (Dell M40) carried in a backpack (see figure 7). For remote mouse pointing we use a remote control with gyro-technology (GyroControl [3]). For the described approach this was the best input device available. The visitor of a gallery can now use the equipment to enjoy the real image and – if desired – use the augmented representations to get detailed information about the art piece, painting technique, etc. Figure 7 shows a preview of the application showing a Vermeer painting and the different light setups the artist combined in his art piece. The visitor is informed about the (virtual) light sources Vermeer used when painting his piece. This application also features a 2D interface allowing the visitor to select more information about artist and painting. Using ARGUI a mixture of different media for augmented information is possible ranging from text, 2D graphics, images, video and 3D objects to completely animated scenes.
Fig.5 ActiveX/Flash and interactive procedural effect
5
ART 03 Additional information about the artist, used techniques and the creation process is available and can be easily accessed using ARGUI interfaces: The visitor looks at the art piece using the mobile AR tour guide. Images of the real artifact are augmented with a 2D screen with the real art piece in the center. Using the GyroRemote the visitor can select topics offered for this painting: • A description of the painting is given using text, images and sound (recorded speech of a tour guide). • Information about the artist is realized using a 2D sub menu with detailed information about the artist’s cv, her/his work and painting techniques. Flash is particularly well suited for this task. • The use of light is an essential aspect for most paintings. We illustrate the use of different light sources by overlaying the original painting with virtual copies where light sources have been removed (figure 8). • “Help” and “About” topics are used as usual. We used the video player integration to show how to use ARGUI in this context, i.e. how to use the GyroRemote to control the application.
Fig. 8 Prototype of the AR exhibition application (II)
7. Limitations and Future Work The results of this project are part of a diploma thesis [13] of one of the authors (L. Oppermann). This work showed that 2D interaction can be easily integrated on planar 2D surfaces in a ARToolkit environment and can be easily controlled using a GyroMouse. Limitations of the current prototype are: only one arObject per pattern can be interactive, the color coding approach requires true color resolution. It would be interesting to investigate 2D interaction on 3D objects but this is beyond the scope of this project. Further information can be found on the webpage [14].
Fig. 7 Prototype of the AR exhibition application (I) The idea is to show that the complete art work with enhanced information can be enjoyed using augmented reality technologies that allow easy navigation and interaction with the AR application. With ARGUI (and the underlying ARToolkit, glGUI, 3D scene loaders and sound libraries) we intend to bring AR to a wider range of users. First tests with users show that the audio-visual augmentation of paintings is a meaningful approach to directly provide information about art pieces. The GyroRemote is an acceptable input device but the used display technology is not acceptable for “real” visitors.
8. Acknowledgements First ideas of this project are from an internship at SIEMENS C-LAB, Paderborn. We would like to thank Waldemar Rosenbach for fruitful discussions.
6
ART 03 [12] http://kcn.org.ua/files/other/zflash.rar [13] Leif Oppermann. Interaction Surfaces in Augmented Reality. Diploma Thesis (in german). Hochschule Harz, Wernigerode, Germany 2003. [14] http://www2.hs-harz.de/~cgeiger/teaching/da/oppermann/
9. References [1] G. Reitmayr, D. Schmalstieg. Mobile Collaborative Augmented Reality. Proc. ISMAR 2001, NY USA,2001. [2] http://sourceforge.net/projects/glgui/ [3] http://www.gyration.com/gyroremote.htm [4] D. B. Conner, S. S. Snibbe, K. P. Herndon, D. C. Robbins, R. C. Zeleznik, and A. van Dam. Three-dimensional widgets. In Proceedings of the 1992 Symposium on Interactive 3D Graphics, Special Issue of Computer Graphics, volume 26, pages 183–188, 1992. [5] S. Feiner, B. MacIntyre, M. Haupt, and E. Solomon. Windows on the world: 2D windows for 3D augmented reality. In ACM UIST, pages 145–155, Atlanta, GA, Nov. 3–5 1993. [6] Microsoft Corporation. Microsoft Windows Guide to Programming. Microsoft Press, Redmond, Washington, 1990. [7] D. Schmalstieg, A. Fuhrmann, and G. Hesina. Bridging multiple user interface dimensions with augmented reality. In IEEE/ACM ISAR, pages 20–29, Oct. 5–6 2000. [8] Piekarski, W. and Thomas, B. H. Using ARToolKit for 3D Hand Position Tracking in Mobile Outdoor Environments. In 1st Int'l Augmented Reality Toolkit Workshop, Darmstadt, Germany, Sep 2002 [9] V. Paelke, C. Reimann, W. Rosenbach “A Visualization Design Repository for Mobile Devices”, in Proc. ACM Afrigraph 2003, Cape Town, February 2003 [10] http://www.arvika.de [11] http://www.cfxweb.net/hugi.php?issue=27&sub=code
10. Appendix The appendix shows a code snippet of the picking algorithm. The main idea can also be illustrated using the following pseudo code: Enter OpenGL Selection Mode Zoom Projection Matrix to Pixel under the Mouse Render all Planes Exit OpenGL Selection Mode Count Hits If (Hits>0) { Find Frontmost Plane Set Selected Plane to Frontmost Plane Render Frontmost Plane to Screenbuffer Get Pixel under the Mouse Convert Color to X/Y Coordinates }
void checkMouseCollisions(struct chain **listRoot, double currentTime) { // 1. render in selection mode and check if any plane is under the mouse // 2. get its colour and compute coordinates (red=x, green=y) // credits: nehe.gamedev.net // required for picking GLuint buffer[512]; GLint hits; GLint viewport[4]; GLfloat pixel[4];
// selection buffer // number of objects under the mouse // viewport-dimensions (0..3 = x, y, length, width) // space for one pixel from screenbuffer (step 2)
// misc struct chain *a=0; arPattern *tp=0; int name=0; int i=0; // empty list? nothing to do -> quit if (*listRoot==0) return; // === Step 1, Polygon/Plane Picking === g_selection=-1; glGetIntegerv(GL_VIEWPORT, viewport); glSelectBuffer(512, buffer); glRenderMode(GL_SELECT); glInitNames(); glPushName(0);
// reset selection // get current viewport // use this buffer for selection mode // enter selection mode. nothing will be drawn // init name stack
7
ART 03
// zoom to the pixel under the mouse glMatrixMode(GL_PROJECTION); glLoadIdentity( ); gluPickMatrix((GLdouble) g_xpos, (GLdouble) (viewport[3]-g_ypos), 1.0f, 1.0f, viewport); glFrustum(-4.0f, 4.0f, -2.704225f, 2.704225f, 4.0f, 4096.0f); glTranslatef(0,0,-1); // render all visible patterns glMatrixMode(GL_MODELVIEW); a=*listRoot; while (a!=0) { glLoadName(++name); tp = a->pattern; if (tp->isVisible()) tp->renderSelectionMode(currentTime, g_xpos, g_ypos); a = a->next; } // exit selection mode, count hits under mouse hits=glRenderMode(GL_RENDER); // find frontmost polygon if (hits>0) { g_selection = buffer[3]; int depth = buffer[1];
// select first polygon // store distance
for (int loop = 1; loop < hits; loop++) { // polygon closer? if (buffer[loop*4+1] < GLuint(depth)) g_selection = buffer[loop*4+3]; depth = buffer[loop*4+1]; } } }else g_selection = -1;
{ // polygon is closer // store distance
// === Step 2, Color Picking === // redraw selected plane // this is necessary since GL_SELECT mode doesn't write to screenbuffer, hence no color to read out! if (g_selection != -1) { // render hit plane again to get its color (for getting x/y coordinates) a=*listRoot; for (i=1; inext;} tp = a->pattern; tp->renderSelectionMode(currentTime, g_xpos, g_ypos); // optain locale mouse-coordinates from color-code glReadPixels( g_xpos, g_ypos, 1, 1, GL_RGBA, GL_FLOAT, pixel); g_sel_xpos= pixel[0]; // x=red g_sel_ypos= pixel[1]; // y=green // modify system cursor SetCursor(faceHit); }else SetCursor(noFaceHit); }
8