Linux is an open source, multi-user, multitask and free OS that is going to be
used as ..... Red Hat Linux Unleashed, a very good and complete reference:.
In The Name of ALLAH Sharif University of Technology Computer Engineering Department Operating System Course Spring 1386
A Preliminary Tutorial to Linux Linux is an open source, multi-user, multitask and free OS that is going to be used as widely as the world. It was first developed by Linus Torvalds at University of Helsinki in Finland and so it is an academic OS. It is a UNIX based as; every Linux command has a similar one in UNIX Systems. Now let's go to know it. First of all, you must login to the system, and be careful: Linux is case sensitive. After your login you must see something like this: “[jack@localhostjack]$”,this is your command prompt and here you must enter your commands to system. The $ sign shows that you are an ordinary user (for root it is usually #).In Linux you have files and directories like DOS, but no partition, because in Linux everything is file even directories and also other I/O devices has a file that if you write in that file it is like sending data to that device, You have an environment like DOS , but more wonderful and powerful. Most of Linux commands have some options that start with a dash or double dash. By these options, any command can do various things. Now let's see some of its commands: •
clear: clear the screen, like cls in DOS.
•
ls: (list) it lists your files on the screen. Some of its useful options: -a: list all, -I: long list, -s: sort by size, -t: sort by
modification time,
and...
•
passwd: change your password .
•
ps: process state. Some of its useful options: -A: all, -x: all process not under tty, -I: long form, -u: user
•
kill : kill a process, terminates a process by its PID (Process ID). Options: -9
•
pwd: print working directory.
•
cd : change directory.
•
touch : to create an empty file.
•
mkdir : make a directory.
•
mv [options] : moving file(s) from source to dest. Options: -b: backup, of: force to move, -i: overwrite without ask, -u: not overwrite if dest has newer modification time
•
cp [options] : copy file(s).Its options approximately similar to mv.
•
rm [options] : remove file(s).
•
rmdir : remove directory.
One of the most beautiful features of Linux is its online help and manual pages. In Linux they are called manpages and you can write “man ls ”. You can see a powerful help about ls commands and all of its options. I highly recommend you to use Linux man pages for above commands and other commands you need. Sometimes you know that what you want to do, for example you want to delete a file, but you don't know which command to use. Here again manpages are the best solutions for you: “man -k ”, it searches all man pages for that key word and show you any commands that match the search. Exercise: see these commands in manpages: more, less, env, cat, chown, chmod, tar. Until now, you have a basic knowledge about Linux itself, and you want to write a C program and compile it. There is a famous program gcc (GNU C Compiler) that compiles your C files, links them and makes an executive program for you. You write “gcc myfile.c” and if you don't have any error you have an “a.out” file that is the executive file of myfile.c. Write “gcc -c myfile.c” It only compiles your code and makes an object file myfile.o. You can write “gcc -o myfile myfile.o” Which lets you chose a name for output file. For more information and other options see “man gcc” and “info gcc”. There is also g++ which is used for C++ codes and compiling codes included C++ libraries. Its options are like gcc. Note: There is a very powerful program, called mc which is similar to nc in DOS. It has a good colored editor in which you can write your codes in multicolor format. Other famous editors in Linux are vi, vim, Emacs (for X). The vi quick reference is attached to this tutorial.
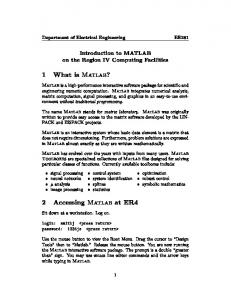
An Example of compilation a code and usage of MakeFile A Simple Compilation
Compiling a small C program requires at least a single .c file, with .h files as appropriate. Although the command to perform this task is simply “gcc file.c”, there are 3 steps to obtain the final executable program, as shown: 1. Compiler stage: All C language code in the .c file is converted into a lower level language called Assembly language; making .s files. 2. Assembler stage: The assembly language code made by the previous stage is then converted into object codes which are fragments of code which the computer understands directly. An object code file ends with .o. 3. Linker stage: The final stage in compiling a program involves linking the object code to code libraries which contain certain “built-in” functions, such as printf. This stage produces an executable program, which is named a.out by default.
Separate compilation
When your program becomes very large, it makes sense to divide your source code into separate easily-manageable .c files. The figure above demonstrates the compiling of a program made up of two .c files and a single common .h file. The steps taken in creating the executable program can be divided up in to two compiler/assembler steps circled in red and one final linker step circled in yellow. The two .o files may be created separately, but both are required at the last step to create the executable program. Here your code is something like this: $gcc -c green.c common.h -- here you give green.o $gcc -c blue.c cornmon.h -- here you give blue.o $gcc green.o b1ue.o -- here you give a.out
Dependency graphs
Suppose that you have gone through the process of compiling the program, and while you are testing the program, you realize that one function in io.c has a bug in it. You edit io.c to fix the bug. The figure above shows io.c outlined in red. By going up the graph, you notice that io.o needs to be updated because io.c has changed. Similarly, because io.o has changed, project1 needs to be updated as well. Translating the dependency graph
Each dependency shown in the graph is circled with a corresponding color in the Makefile, and each uses the following format: target : source file(s) command (must be preceded by a tab)
Using the Makefile with make Once you have created your Makefile and your corresponding source files, you are ready to use make. If you have named your Makefile either Makefile or makefile, make will recognize it. If you do not wish to call your Makefile one of these names, you can use “make -f mymakefile”. The order in which dependencies are listed is important. If you simply type make and then return, make will attempt to create or update the first dependency listed. You can also specify one of the other targets listed in the Makefile, and only that target (and its corresponding source files) would be made. For example, if we typed make the output of make would look as follows: % make cc cc cc cc %
-c data.c -c main.c -c io.c data.o main.o io.o -o projectl
When making its targets, make first checks the source files and attempts to create or update the source files. That is why data.o, main.o and io.o were created before attempting to create the target: projectI.
VI Quick Reference Using Vi for the first time can be a very daunting task. It's definitely not the most user friendly editor, but it's very, very powerful it can do just about anything you want with amazing speed and flexibility. This reference gives just the basics you need to use Vi. Command and Insert Modes Unlike a PC editor, Vi has two different modes of operation, command mode and insert mode.
Command Mode Command mode in Vi is a state where whatever you type is considered to perform some type of action. (Example of actions are saving the file or exiting Vi.) Most editors don't have a command mode; actions in these editors are done via the mouse or using CTRL or ALT while you press another key. Vi initially starts off in command mode, so before you can enter new text, you must put Vi into insert mode. If you don't know whether you're in command mode or not, just hit ESC a couple of times --Vi will beep when you're back in command mode. Insert Mode To get into insert mode from command mode, press one of the following letters: i, I, a, A, o, 0 -see below for details. Insert mode works like a PC editor does normally. Once you're in insert mode you can type what you want, and what you type appears on the screen. You get out of insert mode by typing the ESC key. Moving Around In command mode, you can use the 4 arrow keys to move 1 character in the desired direction. You can also use these keyboard keys: h -- move 1 character left j -- move 1 line down k -- move 1 line up l -- move 1 character right o -- move to start of line $ -- move to end of line You can also more around your document by textual elements, by using these letter keys: (space) -- move 1 character to the right w -- move 1 word to the right b -- move 1 word to the left e -- move to the end of the current word
Common Commands This section lists the most common things that people use when editing a file, These all work from command mode. Where you see a command like :q, this means press you must first type a : character, and then the letter q. (Colon commands put you into yet another mode, in which you're in fact using another editor that's embedded in Vi, called “Ex”.) Command ESC i I a A o O x X u
Action Exit insert mode and re-enter command mode Lets you start typing at the current cursor position Lets you start typing at the start of the current line Lets you start typing after the current cursor position Lets you start typing after the end of the current line Inserts a line below the current line and let you start typing Inserts a line above the current line and let you start typing Delete the character under the cursor Delete the character before the cursor Undo the last change (Note: typing “u” again only re-does what you just undid.)
:w :x :q /word n lineG .(period)
Save changes without exiting Vi Save changes and exit Vi Exit Vi without saving changes (It will ask "Are you sure?") Search for “word” in the file, forward from the current location Search for the next occurrence of "word" in the file Move to line “line” in the file: for example, 100G moves to line 100 Re-do the thing you just did, whatever it was
Other Topics There is a very powerful search and replace capability, also within Ex -- in its simplest form, you can type something like: :s /oldword/newword/ Throughout the whole file, the word “oldword” will be replaced by the word “newword” the first time it occurs on a line. To replace every occurrence on every line, add “g” onto the end of the command line. You can delete more than one character at a time, by typing “d”, then a character telling how much to delete: dw -- delete word de -- delete to end or word d$ -- delete to end of line d() -- delete to beginning or line dd -- delete whole line Finally, you can use counts to move by or delete more than one text element at a time -- for example: 4w -- move ahead by 4 words d3w --delete next 3 words 6x --delete next 6 characters d12d – delete 12 lines, starting with this one References: - Red Hat Linux Unleashed, a very good and complete reference: http://sunsite.iisc.ernet.in/virlib/linux/rh_unleash/httoc.htm - Advanced Linux Programming: http://www.advancedlinuxprograrnming.com/advanced-linux-programrning.pdf - A Make Tutorial: http://www.eng.hawaii.edu/Tutor/Make/ - The GNU Make Reference: http://www.gnu.org/manual/make/html_node/make_toc.html
Prepared by: Mehdi Bizhani