27 Jan 2013 ... BuzzTouch iOS Push Notifications. Introduction. 1. An overview of Apple's Push
Notifications. 5. 1.1. On the Mac with Keychain Access utility. 2.
Nov 30, 2011 ... Before you can actually run your application, you'll need to make sure it's ... You
should have an Android Virtual Device set up in Eclipse per my ...
The Interconnect Penalty of Small Size Switches. Jean-François Labourdette. Tellium. Carriers are often faced with the need to scale the switching capacity of a ...
Particular attentiont to adaptation in Web applications ... It varies more with mobile devices than desktop ones ... Avoid overloading the user interface with many.
In a previous column1, I talked about the interconnect penalty incurred when building a switching node complex with small size switches. In this column, we.
Disini kita akan mencoba menghilangkan jerawat dengan cepat dan mudah ...
Atur diameter/besar lingkaran Healing dengan ukuran jerawat (untuk mengganti
...
Jul 6, 2007 ... 1. IMS tutorial: Is the IMS Service Platform a. Solution for Next Generation.
Network Providers to Be. More Than Bit Carriers? Dr. Antonio ...
Dimensional Modeling. Mohammad A. Rob. 1. Basics of Dimensional Modeling.
Data warehouse and OLAP tools are based on a dimensional data model.
SolidWorks Motion Analysis allows you to study two major types of problems
relating to the motion of ..... This is the appearance in SolidWorks 2012 version.
IAR Embedded Workbench tutorial describes a typical development cycle using
the ... The C programming language and the IAR MSP430 assembly language.
Page 1 ..... with MPC_Printf. â Printing hostname of the machine executing host-process ... The second difference is the construct [host] before printf function call.
Tutorial – CalculiX meshing for OpenFOAM: pipe mesh. Previous steps: The 2D
mesh was created in Blender with the use of the fbd export script.
How to join OmniJoin group video call. TheInnerRevolution.Org ... conferencing platform from Brother: ... you can't get
Hive with Hortonworks HDP 2.0. Learn how to create an SAP BusinessObjects
Universe on top of Apache Hive 2 using the Hortonworks HDP 2.0 distribution.
Sep 24, 2008 - APAC. 17.9 M. (2007.9). Japan. 12.2 M. (2008.3). Number of FTTH Subscribers in the W orld ..... Center. Distribution. Center. Roppongi. Odaiba. Itabashi. Musashi- .... FTV got strong support from industry in response to the call.
Se completeaza campurile, Numar factura si Data, cu numarul, respectiv data
facturii primite. Numar NIR se completeaza daca este cazul. In campul DOC.
Aug 13, 2014 - 1If you want to learn how to create reference tracks, please refer to the .... be saved from this Workflow when it is run - in this case, the output of ...
Tutorial. How to join OmniJoin group video call ... In order to join our group video calls, just click on ... your PC or
The primary electron/hole pair is amplified (photodetector with internal gain). From photons to an .... PIN photodiodes first large scale application of Si sensors for low light level detection. They were ...... Sourcemeter. Interactive SiPM demo ...
ECOTECT. SIMULATIONS AND ANALYSIS. Shadows Range. Daylighting. Visual
Impact. Solar Radiation. Acustics. Wind. URBAN SCALE. Estefania Tapias ...
Jul 27, 2004 ... This command will test each element of sex to see whether or not it is equal to F.
If it is, the ... The plots in this tutorial have been inserted.
Tutorial. Setup. Reference http://www.openflowswitch.org/foswiki/bin/view/
OpenFlow/MininetGettingStarted for more thorough Mininet walkthrough if
desired.
Figure 3. The StandardDataSets directory in the CTS hierarchy. the CTS
hierarchy. Getting Started. Getting Started. In order to run the COLLADA
conformance.
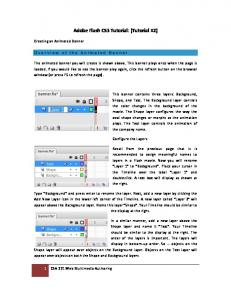
1 CSA 221 Web Multimedia Authoring. Adobe Flash CS3 Tutorial: (Tutorial #2).
Creating an Animated Banner. Overview of the Animated Banner. The animated ...
In this tutorial we are going to see how to implement the Airpush Notifications in
BT 1.5 and 2.0 Android apps. A video tutorial is also available on the below link.
Integrating Airpush SDK in BT 1.5 and 2.0 Android Apps In this tutorial we are going to see how to implement the Airpush Notifications in BT 1.5 and 2.0 Android apps. A video tutorial is also available on the below link.
http://youtu.be/jmsosb_12r0 After registering a new app on your air push account, download the SDK zip package file which contains: 1. Airpush JAR file 2. Read me file 3. Sample project file There is also an option to download the SDK documentation in PDF format which shows detailed steps to integrate the Android SDK in your app. Each SDK file is unique for the app you register so, you will need to download the new SDK file and instructions files for each separate app you create. In short same jar file cannot be used in any other project.
Step 1 – Adding the JAR Create libs folder in your project file and then copy paste the Airpush JAR file in libs folder. • • • • • • •
Right-click on your project from the Package Explorer tab and select “Properties” Select “Java Build Path” from the left panel Select “Libraries” tab from the main window Click on “Add JARs...” Select the JAR that's been copied to the libs folder Click “OK” to add the SDK to your Android project Select “Order and Export” tab from the main window and check the SDK.
Step 2 – Editing Your Manifest File First you will need to note your Airpush which was given to you when registering your Android application. It is a numeric code and can be found by locating your app in the apps dashboard. Remember the following code should only be used as reference and the metadata, app id, api key, etc. may differ for your project since each jar file and the pdf file with instructions is uniquely created for each app seperately. Just before the closing tag of your AndroidManifest.xml file, you will need to add these things from the pdf file you receive. : 1: Copy and paste the following code just before the closing tag just under where the map library is used (line 74 or something):
For banner push, we need to copy the airpush_notify.xml file that is included along with SDK download to project layout folder. Do not make any changes to that file. An image with push_icon.jpg name is required. It will be displayed with push notification on status bar. The said image goes to res--->drawable folder in case of BT 2.0 apps and BT 1.5 apps. Note: Rename one of your app icons with push_icon.jpg.
Step 4 – Setting Test Mode: While integrating Airpush SDK into your application it is recommended that you use test mode. This will help you verify that your application is working fine with integrated SDK and test ads are returned every few minutes on an emulator or real device before publishing your app to Google Play. To enable test mode, please pass true as parameter while calling push notification as illustrated in the code below:
Once you have verified SDK installation, use false to turn off the test mode. Note: Test mode is available for Push Notification Ads only.
Important Instructions: • If you are upgrading/updating SDK then please do not forget to clean & build the project after completing all steps successfully. • android:textAppearance="@android:style/TextAppearance.StatusBar.EventContent" Since BT apps use Android API lower than 2.3 for development we remove the above line from TextView in the the layout file.