MacOS – Canon Copier 2-sided B&W Printing. Setting your Mac to default to 2-‐
sided printing and/or black & white. MacOS uses “Presets” to define defaults.
CANON IR5000 Digital Copier. Rental Rate. - 15 000 MIN COPY. FREE
SERVICE, PARTS AND CONSUMABLE. Specification: (26110“ iR5000. 4 IN-1
Digital ...
1. OBD II & ABS Scan Tool. Print Data. Note: Scanning Suite should already be
installed on the PC. If it is not, install the. Scanning Suite CD included in your kit.
If the document is large or has lots of images it may print extremely slowly. Send
a test print (one or two pages) and make sure they print successfully before.
Advanced performance and simplicity in perfect harmony. iR 5570. iR 6570. iR
5570 / iR 6570. The intelligent black and white high - speed network solution.
The Canon Copiers will act as a printer for you as well as a copier, scanner and
fax. To print to you copier please follow the instructions below. 1. Open or create
...
For printing you must use YOUR student card or UOW Casual Copy Card Only. ...
Send a test print (e.g. the first one or two pages) and make sure they print ...
Page 2 of 12. CORPORATE SYSTEMS. If your corporate workgroup or department is like most,. chances are your information w
man-38\canon-copier-service-manual.pdf. man-38\canon-copier-service-manual.pdf. Open. Extract. Open with. Sign In. Main
There was a problem previewing this document. Retrying... Download. Connect more apps... Try one of the apps below to op
3M™ and Post-it® Business Cards are designed for use with laser printers, inkjet
printers or both. To determine which printer your product is designed for, refer ...
Sep 9, 2011 - All other company, brand and product names are trademarks or registered trademarks of their respective hol
Feb 2, 2012 ... the Control Module Finder in section 28 of this manual. The Display ... The
following screen-shot is from an Audi A6 (C6/4F): [Clear All DTCs].
Printing LABELS or. SPECIAL PAPER STOCKS on Canon Devices. All labels or
special paper stocks must be laser rated. For laser labels, the Avery brand is a ...
AND COLOR. OCà COLORWAVE® 500. PRINTING SYSTEM. Productive all-in-one large format systemâ monochrome and color. OCÃ
advanced in papers ' . . or printed in its publications (7.1.3). Authorization to ...
The empirical data are based on steady flow model tests that are applicable to ...
Xerox 2101. Overview. The Xerox 2101 Digital Copier/Printer ... 50 sheet Duplex
Automatic Document Feeder ... Fiery Downloader™ for downloading PS, PDF
and EPS .... Market-tested technology maximizes uptime to let you run with
limited.
Thank you for purchasing a Canon product. The Canon Speedlite 380EX is a
Canon EDS-dedicated autofocus zoom flash unit featuring the newly-developed
...
effortless, Canon's EOS 7D Mark II camera has ... EOS 7D Mark II's advanced
predictive Ai Servo AF III so ... The display is also customizable through the
camera's user .... Viewfinder II Display • Multiple Aspect Ratios • FE Lock •
Fe
Do-it-yourself performance management. âUnlike any other tool that I have evaluated, I managed to build the whole appl
The included software can be used on the following computers. Adobe. Reader is required to ...... iFrame is a video form
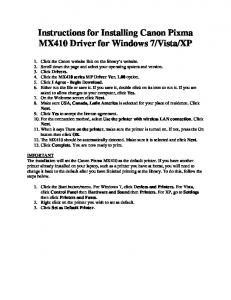
Instructions for Installing Canon Pixma. MX410 Driver for Windows 7/Vista/XP. 1.
Click the Canon website link on the library's website. 2. Scroll down the page ...
Confirming Canon copier printing setup. Open the Start menu, and then click on
Printers and Faxes. Right click on the printer named Canon iR7086-7105 ...
Confirming Canon copier printing setup Open the Start menu, and then click on Printers and Faxes.
Right click on the printer named Canon iR7086-7105 PCL5e and select Printing Preferences.
Confirm that the Output Method is set to store, then click on the button to the right of the Output Method.
Confirm that your room number is entered in the Name field, and that the correct Department is selected in the Inbox Name Column.
Press OK on all open dialog boxes. If these setting are correct, when printing to the Canon copier the job will save in the correct inbox using the room name to identify the job.
Printing to the Canon copier from inside a program Select File, and then click Print from the Menu (Microsoft Word for this example).
In the Name dropdown box, select the Canon iR7086-7105 PCL5e printer.
Click the Properties button to edit any printing or finishing options.
On the Page Setup tab, options like Page Layout, Page Size, and the number of copies can be set.
On the Finishing tab, options like Collating and Stapling can be set.
Press OK and complete the printing process.
On the Canon Copier Click on the mailbox tab. Select the appropriate mailbox. Enter the department password, then hit OK. Select the document to print, as identified by the room it was printed from. Press print. Select “Change Pr. Setting” to change any of the finishing options. If there are no more copies of the file that need to be printed, select “Erase Doc After Print” to delete the document from the copier after it has printed. If you do not choose to delete the file it will be automatically deleted after three days.