After completing this chapter, you should have the knowledge to: ... Many PLC
applications require some form of alarming when abnormal conditions or events
...
CHAPTER 23 Alarm & Event Programming Objectives After completing this chapter, you should have the knowledge to:
Understand alarm programming. Apply the various techniques to capture alarm and event information.
Many PLC applications require some form of alarming when abnormal conditions or events occur. PLCs are well suited for this task and in fact, many PLC manufacturers provide special instructions designed just for this purpose. Some of these special instructions will be covered later in this chapter. Alerting operating or maintenance personnel of abnormal conditions or problems saves time and increases machine or process up‐time. When detailed alarming is provided, many problems can be resolved by operators themselves rather than calling a technician to find the problem saving time and increasing productivity. When a PLC system is connected to one of the many HMI interfaces available on the market today, the HMI can provide all of the alarming functions necessary with minimal additional PLC programming. Most HMI software packages provide some form of alarming and event recording. These HMI systems continually monitor the PLC’s internal data files or tags and based on how the HMI is programmed will alarm accordingly. When HMI interfaces with built‐in alarming features are not part of the overall system or when events must be captured faster than an HMI system can monitor, the alarming and event recording must be programmed in the PLC. This chapter is dedicated to showing the reader some of the techniques and instructions used to program alarm and event information in PLCs.
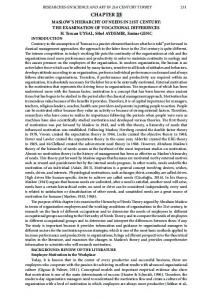
BASIC ALARM LOGIC Alarms and events can be triggered from digital information such as a motor failing to start or run. They can be triggered from process analog values such as a high temperature or low pressure. Whether monitoring a digital or analog value the end result is the same, a bit or tag is typically set to a 1 or ON indicating that a problem has been detected. Figure 23‐1 illustrates an example of this basic logic.
Figure 23‐1 Basic Alarm Logic Example Rung 1 in Figurre 23‐1 monittors the moto or on/off swittch and corre sponding mo otor starter sttatus input to set an n alarm if the e motor is nott running whe en the switch is in the ON position. Thee second rungg monitors an n an nalog temperrature input (N7:1) and alaarms if the temperature exxceeds 100° FF. In both rungs the outputt is an n internal bit or tag that, w when ON, indicates an abn normal condittion. This inteernal bit or tag can be replaced w with an actual output that iilluminates a light, sounds a horn, or lefft as an intern nal memory aaddress that iis m monitored by aan HMI interfface system. Affter studying Rung 1 in Figgure 23‐1, you u should see aa basic probleem with this aalarm logic. W When the mo otor sw witch is turne ed ON, the staatus input from the motor starter does not change sstate immediaately and th herefore the m motor alarm will be ON for a fraction of a second ass the motor co ontactor chan nges state. Th his frraction of a se econd may no ot seem like m much but it caan trigger falsse alarms that can cause p problems with h otther PLC logicc that uses this alarm inforrmation or falsely turning on an alarm o output. A similar probllem can be se een in the seccond rung witth the over teemperature alarm. If the teemperature reeached 101° ffor only a split second caussing the high temperaturee alarm to turrn ON shutting down the prrocess, the op perator may n not know what happened. Bo oth problemss described ab bove can be ccorrected with some simp le changes to o the alarm lo ogic as shown beelow in Figure e 23‐2.
Figurre 23‐2 Enhan nced Basic Alaarm Logic In n the first rung an On‐Delay Timer (TON N) has been ad dded that alloows for a smaall delay befo ore the motorr allarm is activated which is e enough time for the motor contactor too change statte and preven nt a false alarrm. Th he second run ng uses a sealing circuit to o seal‐in the aalarm until thee alarm is resset by the opeerator. In ourr exxample we haave used the start push bu utton as the reset method.. Of course, the temperatu ure must be b below th he alarm set‐p point before tthe alarm can n be reset. Th he start buttoon can be rep placed with almost any dessired acction. See Ch hapter 22 for an example o of a motor fau ult and monittoring logic th hat can be useed to alarm ab bnormal motor conditionss.
C CAPTURING G ALARM EEVENTS Caapturing and retaining alarm informatio on can be done in multiplee ways. A sim mple method iis to use a seaaling circuit as was sshown in Figu ure 23‐2, Rungg 2 and some e means to reest the alarm. This method d is non‐reten ntive, m meaning the alarm status w will be lost if the processorr loses power . Latching insstructions can n be used to m make th he alarm retentive as show wn in Figure 2 23‐3. Other m methods, such as moving daata, will be discussed laterr in th his chapter.
Fiigure 23‐3 Lattching Alarm Logic Yo ou will notice e in Figure 23‐‐3 that the alaarm reset (un nlatch) rung iss located abo ove the alarm set (latch) ru ung. Th his is done to o ensure that the alarm rem mains set for the entire PLLC program sccan if the starrt button is pu ushed while tthe alarm is still active.
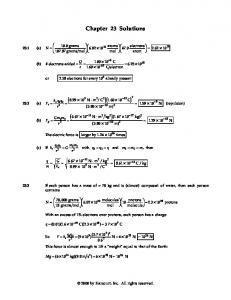
A ANALOG RA ATE‐OF‐CH HANGE ALA ARM LOGIC So ome applicatiions require tthat analog vaalues such as temperaturee, pressure, leevel, etc. be m monitored forr a raapid rate of ch hange and alaarm if such a condition exiists. The logicc in Figure 23‐‐4 uses a timeer, compare, m move, and bit instructions tto create a rate of change alarm. Rung 2 in Figure 233‐4 is a free running timer set to o the evaluatiion period (30 0 seconds). Th his evaluation n period can be set to anyy desired value by simply ch hanging the timer preset vvalue. Rung 4 compares the current anaalog value sto ored in F8:0 w with the previious an nalog value (FF8:1) that was stored at th he end of the last evaluatioon period. The maximum aallowable rate of ch hange is store ed in F8:2 and d can be chan nged to any desired value. The alarm o output is latch hed using the latch in nstruction and d requires a ccorrespondingg unlatch insttruction to resset the alarm m. Rung 1 is ussed to store tthe cu urrent analogg value when the PLC is firsst started so tthat a false allarm is not geenerated the first time thee timer is done. This logic mo onitors for a p positive (incre easing) rate off change, which can be eaasily changed to ed. allarm on a deccreasing rate of change or both if desire
Figure 23‐4 Rate‐o of‐Change Alaarm Logic
A ANNUNCIA ATOR LOGIC C Eaarly alarming methods use ed an annunciator board to o notify oper ators of prob blems. These aannunciator bo oards used a light behind aan opaque window. The opaque windoow would havve the name o of the alarm en ngraved on th he window. W When the alarrm was active e the window w would be illu uminated. Th hese alarm an nnunciators w would use thrree modes to indicate an aalarm conditioon. If the alarm had been triggered but not yeet acknowledged by the op perator, the aalarm window w would flashh indicating th he problem. O Once the alarm w was acknowled dged, the alarrm window w would stop flaashing and eitther remain illluminated orr turn off deepending on the state of tthe alarm. Op perators could d monitor thee annunciatorr board and teell which alarrms haad occurred ((flashing), which are still acctive (illuminated), and whhich were nott active (non‐‐illuminated).. Th he PLC ladderr logic to mim mic the early aannunciators is shown Figuure 23‐5. Herre we have ussed the same over teemperature aalarm as was sshown in Figu ure 23‐2 and aadded the neecessary logicc so that the aalarm functions as deescribed abovve. The “Flassher” contact is a ½ second d On/Off inte rnal memoryy address. Seee Chapter 22 ffor an exxample on ho ow to program m this flasherr.
Figure e 23‐5 Basic A Annunciator TType Logic Th he over temp perature alarm m could be a hardwired ou utput to a lighht on an annu unciators board or it could be an n internal me emory address monitored by an HMI that has been pprogrammed to mimic an annunciator bo oard.
If you only havve a handful o of alarms to p program, then n the methodd shown in Figgure 23‐5 will work just fin ne. e more than aa handful or e even a few hu undred alarm s to deal with h, then this m method may But if you have beecome cumbersome requiiring addition nal programm ming time, meemory usage, and scan time. A much beetter w way to handle a large numb ber of alarms is to use bitw wise logic alonng with word and file movve instructions. If yo ou recall from m Chapter 6 “Digital Logic G Gates” that digital logic nootations such as AND, OR, XOR, etc. opeerate att the bit level to make logical decisions. If you are no ot familiar witth digital logiic notations then a review of Ch uld be strongly recommend ded before prroceeding. hapter 6 wou In n the example e that followss we will proggram the alarm m logic for 166 alarms (one 16 bit word) by manipulaating w words of data. Later in this chapter we w will show how w you can takee this basic approach and deal with hu undreds of alarms at one ttime. We will use the Alle en‐Bradley PLCC‐5 for this exxample, but aany PLC with w word, file, and bitwise operrators can be used. Th he first step is to create fo our (4) integerr memory wo ords (16 bit) aand label as fo ollows:
Word 1 (N7:0) Raw Alarms – thiss word contaiins the actuall alarm bits seet in your useer program. Word 2 (N7:1) Current Alarms – contains all ccurrent alarm ms that are eitther acknowleedged or unackn nowledged. Word 3 (N7:2) Ackn nowledged Alarms – contaains the statuss of all acknowledged alarrms. Word 4 (N7:3) Unaccknowledged d Alarms – con ntains the staatus of all unaacknowledged d alarms thatt are still active.
Th he second ste ep is to program each of yo our raw alarm m bits using oone of the 16 bits availablee in word N7:0 0 as sh hown in Figurre 23‐6.
Figure 23‐6 Alarm Staatus Logic Usiing N7:0 Bits
Th he third step is to program m the logic to find all unackknowledged aand acknowleedged alarmss. In Figure 23 3‐7 w we are using tw wo Compute (CPT) instrucctions to perfo orm this task.. You will notice in Figure 2 23‐7 that we are ussing logical op perators in th he expression ns of each com mpute instrucction to updatte the acknow wledged and un nacknowledgged alarm words.
23‐7 Logic to Find Unackno owledged andd Acknowledged Alarms Figure 2 To o better unde erstand what each expresssion is doing iin the two CPPT instructions refer to thee matrix in Figgure 23 3‐8a (unacknowledged) an nd Figure 23‐8 8b for acknow wledged alarm ms. Only the ffirst five bits of each word d are sh hown for easyy of understanding.
Figure 2 23‐8a Unackn nowledged Al arm Matrix
Figure e 23‐8b Ackno owledged Ala rm Matrix In n step four we e program the e logic to cleaar the unackn nowledged alaarms and move the curren nt alarms (N7 7:1) in nto the acknowledged alarrm word when the acknow wledged push button is preessed. See Figgure 23‐9.
ure 23‐9 Alarm m Acknowledgge Logic Figu
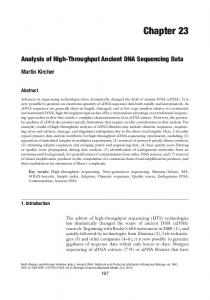
Sttep five uses another CPT instruction to o update the current alarm m word (N7:1). See Figure 23‐10.
Figure e 23‐10 16‐Bit Alarm Logicc Example Reefer to the matrix in Figure e 23‐11 to be etter understaand the logicaal operation b being perform med in the lasst CPT in nstruction of FFigure 23‐10.
Figure 23‐11 Current Alarms Matrix Rungs 3, 4 and d 5 in Figure 2 23‐10 monitorr all 16 alarms and providee the user witth status information on eeach allarm such as w whether the alarm has been acknowled dged, unacknnowledged, orr currently in an active alaarm sttate. This info ormation can be used in many differentt ways such ass turning on w warning lights or annunciaator bo oards, or sounding a horn if there are aany unacknow wledged alarm ms. The real b benefit to thiss type of alarm m lo ogic is that it o operates in a single scan and will trap the status of aany alarm eveen if the alarm m was only on n for on ne scan.
M MULTIPLE A ALARM & EVENT CAPTURING LLOGIC To o increase the e number of aalarms (above sixteen) is aa simple mattter of replacin ng the CPT insstructions witth file tyype instructio ons that operaate on multip ple words at o one time suchh as the Allen‐‐Bradley FAL instruction. TThe prrogram in Figgure 23‐12 rep places the CPT, MOV, and CLR instructi ons with FAL, COP, and FLLL instructionss that m monitor the status of 80 (16 6x5) alarms. YYou can incre ease or decreaase the numb ber of alarms by simply ch hanging the le ength or word ds to operate e on. It is reco ommended thhat if you havve a large num mber of alarm ms or pllan to increasse the numbe er in the futurre that you create a separaate file for each alarm stattus (raw, currrent, un nacknowledgged and ackno owledged) as shown in Figure 23‐12. N7:0 through N N7:4 contain the raw alarm ms that are prrogrammed i nto the user PLC logic. N10:0 through N N10:4 ontain the staatus of all currrent alarms, both acknowledged and uunacknowledgged. N11:0 th hrough N11:4 co co ontains all ackknowledged aalarms and N12:0 through h N12:4 the unnacknowledgged alarms.
Figure 23‐12 Alarm Logic Example For Up To 80 Alarms
The reset output instruction that follows each FAL instruction ensures that the FAL is reset before the next program scan so that no alarms are lost. The examples shown so far in this chapter are only some of the many ways that alarming information can be handled in the PLC. Most HMI systems today have very extensive alarming and event recording capabilities that make programming alarm logic in the PLC almost obsolete. The questions you must ask yourself is, does the HMI update fast enough to capture your alarms without adding additional PLC logic.
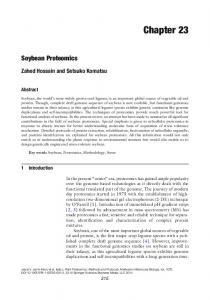
ALLEN‐BRADLEY LOGIX5000 ALMD & ALMA INSTRUCTIONS The Allen‐Bradley Logix family of PLC processors has two alarm/event instructions designed specifically for monitoring digital and analog data for abnormal conditions as programmed by the user. These Logix‐based alarm instructions are available for use in relay ladder, structured text, and function block diagram programs. The advantage to using these two instructions is that when an alarm is detected, the controller will publish the event to FactoryTalk View Alarms and Events servers that propagate alarms to FactoryTalk View SE clients (HMIs) that subscribe to receive notifications. The Digital Alarm (ALMD) instruction detects digital alarms based on Boolean (true/false) conditions. The instruction is an output instruction that obtains its alarm condition from the rung condition. Some of the features of the ALMD instructions include alarm acknowledge, latch, minimum duration timer, alarm counter, time stamp, severity, etc.. Figure 23‐13 Rung 1 shows and example of the ALMD instruction. The Analog Alarm (ALMA) instruction detects analog alarms based on the level or rate of change of an analog value. The instruction is an output instruction and is typically placed on an unconditional rung. Some of the features of the ALMA instructions include alarm acknowledge, high and high/high limits, low and low/low limits, dead band, rate‐of‐change, minimum duration timer, alarm counter, time stamp, severity, etc.. Figure 23‐13 Rung 2 shows an example of the ALMA instruction. Because of the many features of both of these instructions it is not practical to include a complete description here. Please refer to the manufacturer’s instruction manual for a complete description.
Figure 23‐13 A F Allen‐Bradleyy ALMD and A ALMA Instructtions
C Chapter Summary M Many PLC applications requ uire some form of alarmingg when abno rmal conditio ons occur. Wh hen adequatee allarming is pro ovided, machine or process down‐time can be minim mized which in turn increases productivvity. W When program mming alarm logic, the pro ogrammer sho ould take intoo consideratio on how alarm ms will be caaptured, annu unciated, acknowledged, aand reset. In ssmall PLC proogram applicaations the alarm logic can be prrogrammed in conjunction n with the loggic that contro ols the machiine or processs. On the oth her hand, if th he PLC prrogram is largge with manyy alarms it maay be easier to o create dedi cated alarm llogic to proceess and updatte all allarms at one ttime which w will save time, increase PLC C scan time, aand decrease memory usagge. It is not un ncommon to find PLC proggrams that haave been creaated with deddicated program files for ju ust handling allarms. M Most HMI systtems today haave extensive e alarming and d event captuuring featuress that can red duce or elimin nate th he need for PLC programm med alarm loggic. These HM MI systems cann be program mmed to moniitor the PLC tag an nd data files tthat contain tthe machine o or process infformation succh as pressurre, level, runn ning, fault, etcc.
R Review Que estions 1. What p pair of PLC instructions can be used to capture and retain alarmss? 2. How does the logical XOR instruction work? 3. Write the alarm loggic that will alarm if a process temperatture should riise above 250 0° F or fall bellow 100° F. 4. In Figu ure 23‐12 whaat would you change to inccrease the nuumber of alarrms to 128? 5. In the PLC logic belo ow, when will the flow alaarm be active??