The CiscoWorks Common Services tutorial provides self-paced training ... The
tutorial explores the architecture, features, and installation of Common Services.
CiscoWorks Common Services Tutorial Release v3.0
CiscoWorks Common Services v3.0 Tutorial
© 2005 Cisco Systems, Inc. All rights reserved.
Introduction 1-1
About This Tutorial
• Describe CiscoWorks Common Services • Highlight the various features within Common Services • View various scenarios explaining how to deploy CiscoWorks Common Services and use its features • Provide guidelines for System Administrators • Provide links to documentation on CiscoWorks Common Services
CiscoWorks Common Services v3.0 Tutorial
© 2005 Cisco Systems, Inc. All rights reserved.
Introduction 1-2
About This Tutorial The CiscoWorks Common Services tutorial provides self-paced training focused on using the key features of CiscoWorks that are common to all applications found in the bundled set of CiscoWorks products. Common Services is the underlying software that applications within the CiscoWorks bundled solution sets rely upon. One such bundle is the CiscoWorks LAN Management Solution (LMS). LMS is a suite of network management applications used for configuring, administering, monitoring, and troubleshooting a Cisco-based network. The tutorial is structured as a series of self-paced modules, or chapters, that conclude with self-administered exercises. The tutorial explores the architecture, features, and installation of Common Services. Also included as part of the tutorial is a helpful reference section containing links to technical documents on component products, concepts, and terminology. The tutorial material is presented through text, illustrations, hypertext links, and typical scenarios. This tutorial is an excellent resource to introduce you to using the many features found in the CiscoWorks Common Services.
CiscoWorks Common Services v3.0 Tutorial
© 2005 Cisco Systems, Inc. All rights reserved.
Introduction 1-2
How the Tutorial Is Organized Chapter 1
Describe CiscoWorks and its underlying software – Common Services
Introduction to CiscoWorks Using Common Services
Chapter 2
Learn about the core software of CiscoWorks – Common Services
Common Services Features
Chapter 3
Using several examples, learn how to deploy CiscoWorks and use the Common Services features
Scenarios
Chapter 4 System Administration Guidelines
Review important system requirements, installation guidelines, and system administrative functions
Chapter 5
A comprehensive set of links to information on CiscoWorks Common Services
Helpful Links to Reference Material CiscoWorks Common Services v3.0 Tutorial
© 2005 Cisco Systems, Inc. All rights reserved.
Introduction 1-3
How This Tutorial Is Organized The tutorial is divided into five chapters: Chapter 1: Introduction to CiscoWorks Common Services This chapter identifies the Cisco network management applications that rely on Common Services for the underlying processes and core features found in most CiscoWorks products. Chapter 2: Common Services Features This chapter discusses the key features of the CiscoWorks Common Services through both discussions of the major functional components and screen shots of specific tasks. Chapter 3: Scenarios This chapter walks you through step-by-step examples to provide hands-on experience using the CiscoWorks Common Services features. The case studies begin with steps on how to get started, followed by using various features to achieve specific results: Configuring Multi-Server Environments and Optionally, Integrating with Cisco Secure ACS for AAA Services. Chapter 4: System Administration Guidelines This chapter provides information about the CiscoWorks client and server requirements, software installation guidelines, and additional administrative tasks. Additional information is provided here on optionally installing the Integration Utility with a third-party NMS. Chapter 5: References This chapter contains a list of additional product information, such as links to related white papers and documentation.
CiscoWorks Common Services v3.0 Tutorial
© 2005 Cisco Systems, Inc. All rights reserved.
Introduction 1-3
Introduction to CiscoWorks Common Services Chapter 1
CiscoWorks Common Services v3.0 Tutorial
© 2005 Cisco Systems, Inc. All rights reserved.
Introduction 1-4
Chapter 1 Outline
• CiscoWorks Overview - What Is CiscoWorks? - Cisco Family of Network Management Products
• CiscoWorks - Common Services - What is Common Services? - Management services shared by other applications in the CiscoWorks family - Version specific to CiscoWorks bundles
CiscoWorks Common Services v3.0 Tutorial
© 2005 Cisco Systems, Inc. All rights reserved.
Introduction 1-5
Chapter 1 Outline Welcome to the CiscoWorks Common Services v3.0 tutorial! Before introducing Common Services, we must first introduce CiscoWorks. This will set the stage and introduce you to a family of products that rely on a common set of management services that are shared by CiscoWorks applications. Chapter 2 will then focus on all the features provided by Common Services, followed by several scenarios in Chapter 3 that illustrate how to use some of the key features of Common Services. Chapter 4 will present system administration topics, including installation requirements, post installation tasks, features or tasks specific to the system administrator, installing and using the Integration Utility, and troubleshooting tips. Finally, use Chapter 5 as a way to find all your links to important information on Common Services.
CiscoWorks Common Services v3.0 Tutorial
© 2005 Cisco Systems, Inc. All rights reserved.
Introduction 1-5
What Is CiscoWorks? A family of Cisco products organized into solution sets for … ELEMENT and INFRASTRUCTURE MANAGEMENT • LAN Management Solution (LMS) • Small Network Management Solution (SNMS)
IP TELEPHONY and CRITICAL TRAFFIC MANAGEMENT • IP Telephony Environment Monitor (ITEM)
SECURITY and IDENTITY MANAGEMENT • VPN/Security Management Solution (VMS) CiscoWorks Common Services v3.0 Tutorial
© 2005 Cisco Systems, Inc. All rights reserved.
Introduction 1-6
What is CiscoWorks? CiscoWorks is a family of products, bundled into various solution sets, and based on Internet standards for managing Cisco enterprise networks and devices. These solution sets include: • CiscoWorks LAN Management Solution (LMS) is a suite of powerful management tools that simplify the configuration, administration, monitoring and troubleshooting of Cisco networks. LMS consists of applications such as Resource Manager Essentials, CiscoView, Campus Manager, Device Fault Manager, and Internetwork Performance Monitor. • CiscoWorks SNMS is a solution set for managing small to large networks. with 40 or fewer Cisco internetworking devices such as switches, routers, hubs, and access servers. CiscoWorks SNMS consists of Resource Manager Essentials and CiscoView. • The CiscoWorks IP Telephony Environment Monitor (ITEM) is a suite of applications that continuously evaluates and reports the operational health of converged IP networks and IP telephony implementations. CiscoWorks ITEM provides tools to manage daily customer care responsibilities of help-desk personnel and the capability to capture performance and capacity management data. • The CiscoWorks VPN/Security Management Solution (VMS) is a solution set for configuring, monitoring, and troubleshooting VPNs, firewalls, network intrusion detection systems (IDSs), and host intrusion prevention systems (IPSs). CiscoWorks VMS also includes network device inventory, change audit, and software distribution features.
CiscoWorks Common Services v3.0 Tutorial
© 2005 Cisco Systems, Inc. All rights reserved.
Introduction 1-6
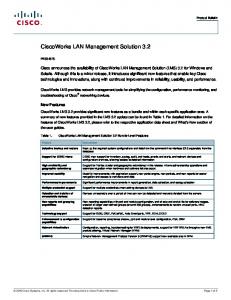
Network Management Framework Where Does CiscoWorks Fit In?
Enterprise Manager
Element Network Manager (Vendor SpecificSpecific-Cisco)
Examples: • HP OpenView • NetView
Element System Manager (Class Specific)
Element Application Manager (Task Specific)
CiscoWorks LAN Management Solution (LMS) v2.5 Resource Manager Essentials
Campus Manager
Device Fault Manager
Internetwork Performance Monitor
Common Services v3.0 (CiscoView , Device Center, Integration Utility)
CiscoWorks Common Services v3.0 Tutorial
© 2005 Cisco Systems, Inc. All rights reserved.
Introduction 1-7
Where Does CiscoWorks Fit In? It is reasonable to expect that no single network management product can effectively manage all types and makes of network components. Certainly no network component vendor is going to expend critical resources to develop management products for devices of 3rd party vendors. Hence, element managers developed by specific vendors are best used to manage the details of a particular element (class or vendor type of network component) within a network; and enterprise managers are best used to manage the overall network infrastructure for availability and event notification. So where does CiscoWorks fit in? The CiscoWorks family of products is an example of an element manager, developed specifically to manage Cisco products. Products by other vendors would be best managed using an element manager specific to them. The use of element managers, such as CiscoWorks, does not necessarily alleviate the need for an overall enterprise-level view. Enterprise managers, or network management systems (NMS), can be used to provide an enterprise-wide network map, display alarms and events, and poll non-Cisco device MIB variables. Optionally, the CiscoWorks family of products can be integrated with some well-known NMS, such as HP OpenView Network Node Manager, to make it easier to utilize both the global features of the enterprise manager for all devices, and the more comprehensive features of the element manager for Cisco devices. (The integration of CiscoWorks is discussed later along with the Integration Utility.) CiscoWorks focuses primarily on configuration, performance, and fault management and some aspects of security management. The Cisco Secure line of products like Access Control Server (ACS) provide support for many Authentication and authorization services. ACS can be integrated with CiscoWorks to provide a flexible, secure environment. Note: • Common Services is the foundation that all bundled CiscoWorks applications rely upon. Common Services v3.0 is the foundation for LMS v2.5. Please be aware that other CiscoWorks bundles may utilize an earlier version of Common Services and the required version must be used per CiscoWorks bundle.
CiscoWorks Common Services v3.0 Tutorial
© 2005 Cisco Systems, Inc. All rights reserved.
Introduction 1-7
What is Common Services? LMS Resource Manager Essentials
Internetwork Performance Monitor
Campus Manager
Device Fault Manager
Common Services
Cisco Network Devices
SNMP, Telnet, SSH Syslog, RCP
Device & Credentials Repository (Central & Secure Database)
NETWORK SERVICES SYSTEM SERVICES RUNTIME SERVICES CiscoView CiscoView
ANI (Asynchronous Network Interface) Network Device Discovery Database Engine, Job Management, Software Updates, Utilities, Event Distribution Desktop, Web Services, Security, Process Management, Help
CiscoWorks Common Services v3.0 Tutorial
Device Device Center Center © 2005 Cisco Systems, Inc. All rights reserved.
HTTP / HTTPS
Web Browser User Interface
Introduction 1-8
What is Common Services? CiscoWorks Common Services are a set of management services that are shared by network management applications in a CiscoWorks solution set. Common Services provides the foundation for CiscoWorks applications to share a common model for data storage, login, user role definitions, access privileges, security protocols, as well as navigation. It creates a standard user experience for all management functions. It also provides the common framework for all basic system level operations such as installation, data management including backup-restore and import-export, event and message handling, job and process management, and software updates. The CD-ROM that contains CiscoWorks Common Services 3.0 also includes the following components: • CiscoView —A graphical device management tool • Integration Utility —An integration module that supports third-party network management systems (NMS) • Device Center – A feature that provides a one-stop place where you can see a summary for a device, and launch troubleshooting tools, management tasks, and reports for the selected device. Some of Cisco’s management products integrate CiscoWorks Common Services into their general installation and runtime environments. Providing this support enables a common user experience and allows the application to leverage information from other Common Services-based applications. Information on installation, usage and available updates for Common Services versions bundled with these Cisco management products are generally located on the primary product’s web pages.
CiscoWorks Common Services v3.0 Tutorial
© 2005 Cisco Systems, Inc. All rights reserved.
Introduction 1-8
Thank You! Continue on to Chapter 2 to discover the many features of Common Services.
CiscoWorks Common Services v3.0 Tutorial
© 2005 Cisco Systems, Inc. All rights reserved.
Introduction 1-9
CiscoWorks Common Services v3.0 Tutorial
© 2005 Cisco Systems, Inc. All rights reserved.
Introduction 1-10
Common Services Features Chapter 2
CiscoWorks Common Services v3.0 Tutorial
© 2005 Cisco Systems, Inc. All rights reserved.
Features 2-1
Chapter 2 Outline
• Common Services Overview • Management Services – Homepage – Security – Device Management – Software Center – Administration
Common Services v3.0 Tutorial
© 2005 Cisco Systems, Inc. All rights reserved.
Features 2-2
Chapter 2 Outline Hopefully Chapter 1 has excited you to the possibilities of using CiscoWorks to help manage your network. Common Services is the foundation (in fact it is often also called the Common Management Foundation or CMF) for all CiscoWorks applications. This chapter discusses the key features and services provided by Common Services for CiscoWorks. First, an overview of Common Services is provided to introduce the key services it provides. Also discussed are some of the applications that are included on the Common Services installation disk. Next, each of the management services will be discussed in more detail to provide the reader with an understanding of the purpose and benefit. By the conclusion of this chapter, the reader should have a good understanding of the services provided by Common Services. Chapter 3 will then provide the jump start to using CiscoWorks through a series of scenarios that detail some of the common configurations for Common Services.
CiscoWorks Common Services v3.0 Tutorial
© 2005 Cisco Systems, Inc. All rights reserved.
Features 2-2
Common Services Overview
¾ Common Services Overview •
Management Services – Homepage – Security – Device Management – Software Center – Administration
CiscoWorks Common Services v3.0 Tutorial
© 2005 Cisco Systems, Inc. All rights reserved.
Features 2-3
Common Services Overview What is It?
Common Common Services Services represents represents aa common common set set of of management management services services that that are are shared shared by by CiscoWorks CiscoWorks Applications Applications CiscoWorks Applications
Homepage • Common Launch Point • Resource Links • Product News
Device Management
Security • BrowserServer • Login • Task Authorization
• Device & Credentials Repository • Device Grouping
Software Center • Software Updates • Device Package Updates
Admin • Backups • Process Management • Server Status • Licensing
Common Services Common Services v3.0 Tutorial
© 2005 Cisco Systems, Inc. All rights reserved.
Features 2-4
Common Services Overview Common Services is a collection of common management services that are shared and used by all CiscoWorks applications. Common Services provides a foundation for CiscoWorks applications to share a common repository for devices and their associated credentials, login, and access privileges. It also provides the common framework for all basic system level operations such as installation, backup, event and message handling, job and process management, and licensing. Common Services consists of the following five major service categories: Homepage - Provides a launch point and top level navigation for CiscoWorks applications installed on local and remote servers, CiscoWorks resources, Cisco.com resources, other web-based applications, product updates, and urgent messages regarding CiscoWorks. Security – Provides local or remote AAA services, secure communication between client and server, secure communication between servers in multi-server deployment allowing for shared resources. Device Management – Provides a common centralized repository for devices and their access credentials to be used by all CiscoWorks applications. Also provides the framework for creating groups of devices to assist in troubleshooting and reporting activities. Software Center – Provides a mechanism to retrieve the most current CiscoWorks software updates and device package updates used by CiscoWorks applications. Admin – Provides administration services for managing the CiscoWorks server including backups, process management, job status, diagnostic tools, and server licensing. Each of these services will be examined in more detail in the next section.
CiscoWorks Common Services v3.0 Tutorial
© 2005 Cisco Systems, Inc. All rights reserved.
Features 2-4
Common Services Overview Features
¾ Home Page provides a launch point for CiscoWorks applications and other resources ¾ Device And Credentials Repository (DCR) provides a central place for managing devices and their credentials that all CiscoWorks applications can access ¾ Grouping Services provide a mechanism to logically group devices together and share between CiscoWorks applications for task execution against ¾ Software Center keeps CiscoWorks applications up-to-date ¾ Multi-server environment – new security mechanisms for secure communications and data sharing ¾ ACS integration for enhanced access and execution security ¾ SNMP v3 authNoPriv and IPv6 support
Common Services v3.0 Tutorial
© 2005 Cisco Systems, Inc. All rights reserved.
Features 2-5
Features The features of Common Services are best defined by what Common Services is: a collection of common management services shared by all CiscoWorks applications. This leads to a consistent interface and use of all CiscoWorks tools simplifying its use. For example, instead of learning how to add devices to several applications for management purposes, the user only needs to populate the Common Services Device and Credentials Repository (DCR) which is then shared by all CiscoWorks applications. Now, if one application modifies a device credential, such as a password or SNMP read community string, all other CiscoWorks applications are aware of the change since the modifying application notifies the DCR of the change. This same benefit is realized through the use of other services provided by Common Services including: • Application launch is simplified using a common CiscoWorks Home Page. • AAA services are enhanced by implementing Cisco Secure ACS (Access Control Server) for flexible and customizable authentication and task authorization. • Keep the CiscoWorks software and device package up-to-date, using the improved Software Center. • Deploy CiscoWorks in a multi-server environment to meet your network management needs and scalability concerns. • Network management communication between the server and the managed devices is more secure using SNMP v3 by providing support for encrypted usernames and passwords. • IPv6 addresses are allowed and can be stored and viewed in the user interface. Next, let’s take a brief look at the applications that are included on the Common Services installation disk.
CiscoWorks Common Services v3.0 Tutorial
© 2005 Cisco Systems, Inc. All rights reserved.
Features 2-5
Common Services Overview
Applications Included with Common Services – CiscoView CiscoView CiscoView is is aa graphical graphical representation of representation of the the device device for monitoring or configuring for monitoring or configuring
Monitor Monitor device device or or ports ports Configure Configure device, device, module, module, or or ports ports
Common Services v3.0 Tutorial
© 2005 Cisco Systems, Inc. All rights reserved.
Features 2-6
CiscoView CiscoView is an application that is part of the Common Services software. CiscoView is a graphical device management tool that uses SNMP v2/v3 to retrieve or set performance and configuration data from networked Cisco devices. Using the performance data retrieved, CiscoView provides real-time views of Cisco devices. These views deliver a continuously updated physical/logical picture of device configuration and performance conditions. With the proper user authorization, the user can also configure a Cisco device, its cards and interfaces. The user can also monitor real-time statistics for interfaces, resource utilization, and device performance. CiscoView simply uses SNMP to query the configuration and performance of the device and displays the information graphically. Given the proper user authorization privileges, CiscoView can also be used to change or modify the configuration of the device using SNMP. CiscoView is a powerful SNMP configuration and monitoring tool for Cisco devices and alleviates the need for using the command line interface (CLI) to perform device configuration and monitoring.
CiscoWorks Common Services v3.0 Tutorial
© 2005 Cisco Systems, Inc. All rights reserved.
Features 2-6
Common Services Overview
Applications Included with Common Services – Device Center Device Device Center Center provides provides aa device device centric centric view view
Device Device summary summary information information
(Includes (Includesinfo infofrom fromall allregistered registeredCiscoWorks CiscoWorksapplications) applications)
Quick Quick links links to to tools, tools, reports, reports, and and tasks tasks for for device device (Includes (Includestasks tasksfor forall allregistered registeredCiscoWorks CiscoWorksapplications) applications)
Common Services v3.0 Tutorial
© 2005 Cisco Systems, Inc. All rights reserved.
Features 2-7
Device Center The Device Center is an application that is part of the Common Services software. The Device Center provides a “Device Centric” view for a single device that includes both data and links to execute tasks in various applications. Device Center allows you to perform device-centric activities, such as changing device attributes, updating inventory, Telnet etc. depending on the applications which are installed on the Common Services server. You can also launch Element Management tools, reports, and management tasks all specific to the selected device.
CiscoWorks Common Services v3.0 Tutorial
© 2005 Cisco Systems, Inc. All rights reserved.
Features 2-7
Common Services Overview
Applications Included with Common Services – Integration Utility
rd party Install Install the the Integration Integration Utility Utility (IU) (IU) on on 33rd party
NMS NMS to to integrate integrate CiscoWorks CiscoWorks applications applications into into the menus; add Cisco icons, MIBs, the menus; add Cisco icons, MIBs, and and traps traps
Support Support for for integration integration with with NMS NMS Platforms Platforms •• HP HP OpenView OpenView Network Network Node Node Manager Manager •• Tivoli Tivoli NetView NetView
Install Install IU IU on on 33rdrd Party Party NMS NMS and and be be able able to: to: •• Add Add Cisco Cisco device device icons icons to to NMS NMS topology topology maps maps •• Launch Launch CiscoWorks CiscoWorks applications applications •• Browse Browse Cisco Cisco MIBs MIBs •• Integrate Integrate traps traps Common Services v3.0 Tutorial
© 2005 Cisco Systems, Inc. All rights reserved.
Features 2-8
NMS Integration Utility CiscoWorks Integration Utility (IU) is a utility that integrates CiscoWorks applications with third-party Network Management Systems (NMS). The Integration Utility is installed on the platform hosting the NMS. The operating systems supported are: • Solaris 2.8, 2.9 • HPUX 11.0 • AIX 5.1 • Windows 2000 Professional, Server, or Advanced Server with SP3 or SP4 • Windows 2003 Server Standard or Enterprise Edition The NMS systems supported are: • HP OpenView Network Node Manager (NNM) versions 6.4, 7.0, and 7.0.1 • NetView version 7.1 This utility adds Cisco device icons to topology maps, allows Cisco MIB browsing from NMS, integrates traps, and sets up menu items on the NMS to launch remotely installed CiscoWorks applications, such as CiscoView and Device Center. Refer to Chapter 4 of this tutorial for more information on installing the IU and changing the Integration Options.
CiscoWorks Common Services v3.0 Tutorial
© 2005 Cisco Systems, Inc. All rights reserved.
Features 2-8
Common Services Overview Server Deployment Options Option Option 1: 1: Stand-Alone Stand-Alone All AllCiscoWorks CiscoWorksapplications applications reside resideon onaasingle singleserver server
Option Option 2: 2: Multi-Server Multi-Server Domain Domain •• •• ••
CiscoWorks CiscoWorksapplications applicationsspread spreadover overseveral severalservers servers Different servers manage different regions Different servers manage different regions Redundant Redundantservers servers
Trust Trust Environment Environment for for Secure Secure Communications Communications •• Single SingleSign-On Sign-On(SSO) (SSO)––Log Logon ononce oncefor for seamless seamlessnavigation navigationto toall allservers serversin indomain domain •• Shared SharedDCR DCR––all allservers servershave haveexact exactcopies copiesof of DCR DCRto toensure ensurecredential credentialintegrity integrity Common Services v3.0 Tutorial
© 2005 Cisco Systems, Inc. All rights reserved.
Features 2-9
Server Deployment Options CiscoWorks includes a number of applications which can all be hosted on a single server given enough resources. Of course, having all applications on a single server simplifies the configuration of the server and the sharing of services. However, many users wish to deploy CiscoWorks across many servers whether for redundancy purposes, regional management purposes, or resource considerations. In a multi-server environment, the administrator may wish for certain information to be shared to minimize configuration and maintenance aspects. As we shall see in the upcoming pages, Common Services includes mechanisms to configure secure communication between CiscoWorks servers that allows for a common DCR on all servers, and for one server to act as the authentication server for all servers in the management domain to allow seamless navigation (Single Sign-On (SSO)) between all CiscoWorks applications on all servers. These features allow for the sharing of device attributes and credentials among servers and applications.
CiscoWorks Common Services v3.0 Tutorial
© 2005 Cisco Systems, Inc. All rights reserved.
Features 2-9
CiscoWorks Common Services v3.0 Tutorial
© 2005 Cisco Systems, Inc. All rights reserved.
Features 2-10
Management Services Homepage
•
Common Services Overview
¾ Management Services ¾Homepage – Security – Device Management – Software Center – Administration
CiscoWorks Common Services v3.0 Tutorial
© 2005 Cisco Systems, Inc. All rights reserved.
Features 2-11
Homepage Overview
Server Server Name Name
(default (default==hostname) hostname)
External External Resource Resource Links Links
Remote Remote CiscoWorks CiscoWorks Application Application (server (servername) name)
Common Common Launch Launch Point Point for local and remote for local and remote CiscoWorks CiscoWorks applications applications Common Services v3.0 Tutorial
© 2005 Cisco Systems, Inc. All rights reserved.
Name Name and and contents contents customizable customizable
News News and and urgent urgent messages messages from from Cisco Cisco Features 2-12
Homepage Overview The CiscoWorks Homepage (CWHP) basically provides common launch points and top level navigation and is broken down into three sections: • The main section (left-hand side of the homepage) provides launch points for all CiscoWorks applications including the features within Common Services. Each application is displayed in its own panel and includes launch points for the major functions (tabs) of the application. Selecting any application launches the application to its homepage or selecting a function within the application launches the application navigated to the selected function. The Homepage can also be configured to include launch points for CiscoWorks applications installed on a remote server for support in a multiserver environment. • The RESOURCES section in the upper right-hand corner of the homepage provides launch points for other web-based resources including links to Cisco.com for technical support, and CiscoWorks related resources. CWHP can also be configured to include launch points for any web-based product or site under the Third-Party and Custom Tools headers. This section can be hidden by customizing the homepage settings. • The final section in the lower right-hand side of the homepage provides links to CiscoWorks product updates, as well as, any urgent messages concerning CiscoWorks. These messages are automatically retrieved from Cisco directly; the list of important messages also includes alerts to users on disk usage thresholds being reached.
CiscoWorks Common Services v3.0 Tutorial
© 2005 Cisco Systems, Inc. All rights reserved.
Features 2-12
Homepage
Customize Homepage Headings Common Services > Homepage > Settings
Change Change homepage homepage server server name name from from default default server server hostname hostname ((Note: Note: new new homepage homepage name name can can also also
be be used used for for Provider Provider Group Group Name Name –– must must be be unique unique among among servers servers -requires requires daemon daemon to to be be restarted) restarted)
Rename Rename the the headings headings for for Third Third Party Party and and Custom Custom Tools Tools resources resources
Polling Polling of of Cisco.com Cisco.com for for urgent urgent messages messages
Common Services v3.0 Tutorial
© 2005 Cisco Systems, Inc. All rights reserved.
Features 2-13
Customize Homepage Settings By default the title (display name) of the Homepage displays the Hostname of the CiscoWorks server. This name can be changed to something perhaps more meaningful. The homepage can also be customized to include links to other web-based tools and resources. These links are listed in the resources section of the homepage under the headings of either Third Party or Custom Tools. Again, these names may not be suitable for the links added. Homepage allows you to customize the Homepage name as well as the customizable link headings using the Common Services > Home Page > Settings task. When groups are discussed later, it will be seen that the top level group (or Provider Group Name) is in the form of CiscoWorks_Application@server_hostname, for example: CS@LMS-EastCoast, where CS refers to the Common Services DCR and LMS-EastCoast is the server hostname. When changing the Server Name of the Homepage, the administrator will be prompted to use the new homepage name as the Provider Group Name. This option requires the CiscoWorks Daemon Manager to be restarted (see Chapter 3 Getting Started scenario for more information). The Hide External Resources checkbox will allow you to hide the Resources and CiscoWorks Product Updates panel in the CiscoWorks Home Page. The Urgent Message Polling Interval specifies the period of time after which the CiscoWorks server will check for important messages that need to be shown to the users of this server. The list of important messages includes alerts to users on disk usage thresholds being reached. The time you set here decides the polling interval for disk watcher messages and messages you want to broadcast using the Notify Users features. To disable this feature, select DISABLE from the drop-down list. Disk watcher is a utility that monitors the file system. If the file system size goes above 90 percent, it displays an alert to logged in CiscoWorks users. You can use this to monitor critical file systems. Note(s): • The display name specified for the CiscoWorks Home Page should be unique across any group of CiscoWorks servers in a multi-server environment.
CiscoWorks Common Services v3.0 Tutorial
© 2005 Cisco Systems, Inc. All rights reserved.
Features 2-13
Homepage
Customize – Add Application Links and Website Bookmarks Common Services > Homepage > Application Registration > Registration
Add Add remote remote CiscoWorks CiscoWorks applications applications to to local local server server homepage homepage •• “Register “Register From From Templates” Templates” may may require require Multi-Server Multi-Server Trust Trust to to be be configured configured ifif the the template template represents represents an an application application from from another another server server
Common Services > Homepage > Links Registration > Registration
•• “Import “Import from from Other Other Servers” Servers” requires requires Multi-Server Multi-Server Trust Trust to to be be configured configured
Add Add links links to to web-based web-based tools tools and and resources resources
Common Services v3.0 Tutorial
© 2005 Cisco Systems, Inc. All rights reserved.
Features 2-14
Customize - Add Application Links and Website Bookmarks Two separate tasks exist that allow you to easily add CiscoWorks applications on remote servers to the local homepage and to add links to web-based tools and resources. Use the Common Services > Home Page > Application Registration task to register CiscoWorks applications on remote servers. In doing so, note the following: • A remote server’s applications can be registered from templates or imported from a remote server (this includes any custom links configured on the remote server as well. A trust relationship needs to be configured first between the servers. • Refer to the next section – Security – for more information on defining a trust relationship between servers. Adding custom links is simple and straight forward using the Common Services > Home Page > Links Registration task. Simply provide a display name, the URL, and which heading you wish the link to appear under. Refer to a scenario in Chapter 3 for more details on modifying the homepage.
CiscoWorks Common Services v3.0 Tutorial
© 2005 Cisco Systems, Inc. All rights reserved.
Features 2-14
Management Services Security
•
Common Services Overview
¾ Management Services – Homepage ¾Security – Device Management – Software Center – Administration
CiscoWorks Common Services v3.0 Tutorial
© 2005 Cisco Systems, Inc. All rights reserved.
Features 2-15
CiscoWorks Security Topics
¾ Browser-Client Secure Communication ¾ Self-Signed Certificates ¾ Multi-Server Trust Management ;
Single-Sign On (SSO)
¾ CiscoWorks AAA (default) ; User Roles ; Create Users
¾ Integration with ACS (optional) ; Custom User Roles ; Secured Views Common Services v3.0 Tutorial
© 2005 Cisco Systems, Inc. All rights reserved.
Features 2-16
CiscoWorks Security Topics Many tasks within the suite of CiscoWorks tools can be used to modify the configuration of a device. Therefore, it is imperative to control who has access to those tasks. This section looks at how to setup secure communication between the client browser and server, two servers in a multi-server environment, and access to the server and the devices managed by the server. In the default mode, access security (both to the server and to the various tasks) is controlled by Common Services. For flexibility, Common Services can also be configured to use an external mechanism to control login authentication. Further, if a Cisco Secure Access Control Server (ACS) is used as the external mechanism, it can also provide device authorization services as well.
CiscoWorks Common Services v3.0 Tutorial
© 2005 Cisco Systems, Inc. All rights reserved.
Features 2-16
CiscoWorks Security
Browser-Server Secure Communication Enable Enable SSL SSL for for secure secure communication communication between between client client browser browser and and CiscoWorks CiscoWorks Server Server
(Note: (Note:default defaultisisstandard standardHTTP HTTP using usingport port1741, 1741,except exceptfor for login loginwhich whichredirects redirects to toHTTPS) HTTPS)
https://CWserver:443
HTTPS
Client Access Via Standard Web browser
Single-Server Management > Browser-Server Security Mode Setup
CiscoWorks Server •• IfIf using using Integration Integration Utility, Utility, enabling enabling // disabling disabling SSL SSL requires requires you you to to perform perform the the integration integration again again •• IfIf using using Multi-Server Multi-Server environment, environment, the the new new port port number number must must be be updated updated as as well well
Common Services v3.0 Tutorial
© 2005 Cisco Systems, Inc. All rights reserved.
Features 2-17
Browser-Server Secure Communication By default, communication between the client browser and the CiscoWorks server uses HTTP on the default port of 1741, except for the login exchange which uses HTTPS. If desired, all communication between the client browser and the CiscoWorks server can be secured using HTTPS on port 443. To enable SSL communication between the browser and server, use the Common Services > Server > Security > Single-Server Management > Browser-Server Security Mode Setup task. For the new security mode to take effect, the CiscoWorks daemon will need to be restarted using the following commands. From Windows command prompt: net stop crmdmgtd net start crmdmgtd From Solaris Command prompt: /etc/init.d/dmgtd stop /etc/init.d/dmgtd start Note(s): • It may take up to 5 minutes for all service to start even though a command prompt is returned almost immediately. • The first secure access of the server will require the client to install the security certificate from the server. • If your CiscoWorks Server is integrated with any Network Management Station (NMS) in your network using the Integration Utility (NMIM), you must perform the integration every time you enable or disable SSL in the CiscoWorks Server. This is required to update the application registration in NMS. • Later in this chapter, multi-server environments will be discussed. Thus, keep in mind, if using a multiserver environment, the new port number (443) must be updated as well. CiscoWorks Common Services v3.0 Tutorial
© 2005 Cisco Systems, Inc. All rights reserved.
Features 2-17
CiscoWorks Security Self-Signed Certificates
Common Services > Server > Security > Single-Server Management > Certificate Setup •• Secure Secure communication communication with with and and between between multiple multiple CiscoWorks CiscoWorks servers servers are are enabled enabled by by aa trust trust model model addressed addressed by by certificates certificates and and shared shared secrets secrets •• Certificates Certificates are are required required as as part part of of aa secure secure trust trust relationship relationship •• Modifying Modifying the the certificate certificate require require the the Daemon Daemon Manager Manager to to be be restarted restarted Common Services v3.0 Tutorial
Initial Initial certificate certificate is is created created at at installation; installation; use use this this task task to to modify modify certificate certificate © 2005 Cisco Systems, Inc. All rights reserved.
Features 2-18
Self-Signed Certificates To use SSL (Secure Socket Layer) communication between two entities (client/server or server/server) requires the use of security certificates. When installing Common Services, a certificate was generated based on the information at hand. The Common Services > Server > Security > Single-Server Management > Certificate Setup task allows you to modify the certificate by filling in the fields left blank when first created for additional security. Security certificates are used for secure browser-server communication, and server to server communication in a multi-server environment. Self-signed certificates are valid for five years from the date of creation. When the certificate expires, the browser prompts you to install the certificate again from the server where you have installed CiscoWorks. Note(s): • If you re-generate the certificate,when you are in multi-server mode, any existing peer relationship will break. The peers will need to re-import the modified certificate. • If you modify the certificate, the Daemon Manager will need to be restarted.
CiscoWorks Common Services v3.0 Tutorial
© 2005 Cisco Systems, Inc. All rights reserved.
Features 2-18
CiscoWorks Security Multi-Server Trust Management Multi-Server Multi-Server Trust Trust required required for: for: •• Single Single Sign-On Sign-On (SSO) (SSO) –– Sign Sign on on once once for for access access to to all all servers servers in in domain domain •• Shared Shared DCR DCR –– all all servers servers have have exact exact copies copies of of DCR DCR to to ensure ensure credential credential integrity integrity •• Import Import remote remote applications applications to to local local homepage homepage •• Sharing Sharing of of group group information information between between servers servers
System System Identity Identity Account Account
Password is Shared Secret
System System Identity Identity Account Account
Peer PeerServer Server Account Account
Peer Account used to access remote server
Peer PeerServer Server Account Account
(Equal to remote server’s System Identity Account)
Certificate Certificate
Certificate Certificate
Exchange Certificates
Common Services v3.0 Tutorial
© 2005 Cisco Systems, Inc. All rights reserved.
Features 2-19
Multi-Server Trust Management In the first section of this chapter, it was noted that CiscoWorks could be deployed in a multi-server fashion. This may be done in order to distribute CiscoWorks applications, add redundancy, or allow for regional management. Whatever the reason, Common Services has a few security features useful in multi-server environments. Let’s explain these features below. • Single-Sign-On Mode – allows for transparent browsing between servers without the need to reauthenticate on each server. One server is configured as the Master (Single Sign-on (SSO) Authentication server) and all others are configured as Slaves (SSO Regular servers). • DCR Master/Slave Mode – ensures that all servers have the exact same DCR contents. One server is configured as the Master and all others are configured as Slaves. Updates to the device list and credentials are made to the Master DCR who then updates the DCRs of all slaves. The administrator can choose to implement none, one, or both of these features as they see fit. The communication between the CiscoWorks servers is enabled by a trust model addressed by certificates and shared secrets. The setup of the “trust” relationship between the servers consists of three parts: • System Identity Account - used to create a “trust” user on each server with the password being used as a shared secret key to set up the trust. All servers’ System Identity accounts must have the same password. The user ID should also be the same (though not required) to simplify the configuration of the Peer Server Account. Note that the System Identity Account is used for communication between servers and can not be used to access the CiscoWorks user interface. • Peer Server Account - users who can programmatically log into CiscoWorks servers and perform certain tasks. The name and password of the Peer Server account must match the name and password of the System Identity account on the remote server. • Certificates - allows CiscoWorks servers to communicate using SSL. The certificate of one CiscoWorks server is added into the trusted store of another CiscoWorks server in order to set up a trust relationship. The Master server needs the certificate of all Slave servers; the Slave servers only need the certificate of the Master server.
CiscoWorks Common Services v3.0 Tutorial
© 2005 Cisco Systems, Inc. All rights reserved.
Features 2-19
CiscoWorks Security
Multi-Server Trust Management – Single Sign On
ACS ACS Optional Optional
Define DefineMaster MasterSSO SSO Server Server
For Foreach eachslave, slave, define definethe the Master MasterSSO SSOServer Server Common Services v3.0 Tutorial
© 2005 Cisco Systems, Inc. All rights reserved.
Features 2-20
Multi-Server Trust Management – Single Sign On (SSO) As mentioned, Single Sign On helps the user to use a single session to navigate to multiple CiscoWorks servers without having to authenticate to each of them. Communication between multiple CiscoWorks servers is enabled by a trust model addressed by certificates and shared secrets. Using SSO can be summarized as follows: • When you first log in to the slave servers, you’re redirected to the master server for logging in. Check the URL while you log in. The login page should be that of the master server. After the login is successful, you’re redirected to the slave server home page. • When you successfully log into the master server, you can access any slave server home page without having to log in again. • The Master server is used for authentication purposes only. To set up Single Sign On, one of the CiscoWorks servers must be setup as the SSO Authentication server or Master SSO server. Then using self-signed certificates, build trust between the CiscoWorks servers. A trusted certificate can be created by adding it in the trust key store of the server. CiscoWorks TrustStore or KeyStore is maintained by the certificate management framework in Common Services. Then, each slave SSO CiscoWorks server sets up a shared secret with the Master SSO authentication server. The System Identity user password acts as a secret key for SSO. The SSO authentication server is called the Master, and the SSO regular server is called the Slave.
CiscoWorks Common Services v3.0 Tutorial
© 2005 Cisco Systems, Inc. All rights reserved.
Features 2-20
CiscoWorks Security AAA Modes
Option Option1: 1:
Non-ACS Non-ACSMode Mode ¾¾
Select SelectLogin LoginModule Module(Authentication) (Authentication) ¾¾ ¾¾
Local LocalCiscoWorks CiscoWorksLogin Login External Method (I.e. External Method (I.e.Active ActiveDirectory, Directory, TACACS, TACACS,etc.) etc.)––must mustalso alsohave haveaaCiscoWorks CiscoWorks local user account for defining local user account for defininguser userroles roles
¾¾
Option Option2: 2:
¾¾
Assign Assignrole(s) role(s)totouser userlogin login(System (SystemAdmin, Admin, Network Admin, etc.) Network Admin, etc.)
¾¾
Role Rolelimits limitstask taskexecution execution
Integration Integrationwith withAccess AccessControl ControlServer Server (ACS Mode) (ACS Mode) ¾¾ ¾¾
Common Services v3.0 Tutorial
Predefined PredefinedUser UserRoles Roles(Authorization) (Authorization)
Customize CustomizeUser UserRoles Roles Limit Limitaccess accesstotospecific specificdevice devicegroups groups
© 2005 Cisco Systems, Inc. All rights reserved.
Features 2-21
AAA Modes CiscoWorks Common Services supports two modes of user authentication and authorization: • Non ACS Mode - This mode is the default. Authentication (validation of username and password) can be provided by the CiscoWorks server or an external module, such as Microsoft’s Active Directory or TACACS, depending upon your platform type. After authentication, your authorization is based on the privileges that have been assigned to you. A privilege is a task or operation defined within the application. The set of privileges assigned to you defines your role and dictates how much and what type of system access you have. The CiscoWorks Server authentication scheme has five user roles that will be discussed shortly. Regardless of the login module used for authentication, a local CiscoWorks user ID and password on the server is necessary for each user so that each user can be assigned the correct roles and the user IDs on the CiscoWorks server must be identical to those in the external authentication source. • ACS Mode - In this optional mode, authentication and authorization services are provided by an Access Control Server. To use this mode, you must have a Cisco Secure ACS (Access Control Server) installed on your network. Check the release notes and Chapter 4 of this tutorial for the supported ACS versions. Using the ACS Mode provide more flexibility when trying to limit access to specific devices or customize the default CiscoWorks user roles.
CiscoWorks Common Services v3.0 Tutorial
© 2005 Cisco Systems, Inc. All rights reserved.
Features 2-21
CiscoWorks Security
Non-ACS Mode – Select Login Module CiscoWorks Server
External User Authentication
Username and Password (Encrypted)
Client
Authenticate Authenticate according accordingto to Login Login Module Module selected selected below below
Obtain ObtainUser Userroles rolesfrom from local local CiscoWorks CiscoWorksaccount account
User Roles
CiscoWorks User Accounts (Authentication & Roles)
Default Default Login Login Module Module
Alternative Alternative External External Login Login Modules Modules
Common Services v3.0 Tutorial
© 2005 Cisco Systems, Inc. All rights reserved.
Features 2-22
Non ACS Mode – Select Login Module Common Services supports two modes for supporting AAA services: Non ACS and ACS. In the non-ACS mode, several mechanisms are available for user authentication. By default, Common Services performs the authentication check using user accounts added to its local database. The login module can also be set to a number of different external mechanisms (listed in the figure above) to perform the authentication service. Regardless of the method used to perform the authentication services, authorization, or task permission, is always handled by Common Services in the non-ACS mode.
CiscoWorks Common Services v3.0 Tutorial
© 2005 Cisco Systems, Inc. All rights reserved.
Features 2-22
CiscoWorks Security
Non-ACS Mode – Create Local CiscoWorks User Accounts Common Services > Server > Security > Single-Server Management > Local User Setup
•• Create Createlocal local CiscoWorks CiscoWorksusers usersin in non-ACS non-ACSmode mode •• Create Createlocal localuser user account accountwhen whenusing using any anynon-ACS non-ACSlogin login module module •• Assign Assignuser userroles rolesto to determine determineauthority authorityto to execute executetasks taskswith with CiscoWorks CiscoWorksapps apps User User Roles Roles
Common Services v3.0 Tutorial
© 2005 Cisco Systems, Inc. All rights reserved.
Features 2-23
Non-ACS Mode - Create Local CiscoWorks User Accounts Common Services allows users with the System Administration user role to create CiscoWorks user accounts and assign user roles to the account. Creating a new user is simple and straight forward using the Common Services > Server > Security > Single-Server Management > Local User Setup task. A dialog is displayed listing all the currently defined users, click Add to create a new user. Simply enter a name and password for the account and assign the user roles that user is to have. The E-mail address is optional for all user roles except Approver (E-mail is how CiscoWorks informs an Approver user of a job to approve – See RME tutorial or User Guide for more information about approving jobs). All users can view their account using the same task, except selecting ModifyMe instead of Add. Only the password and e-mail address can be modified by the user, unless they have the System Administrator user role.
CiscoWorks Common Services v3.0 Tutorial
© 2005 Cisco Systems, Inc. All rights reserved.
Features 2-23
CiscoWorks Security
Non-ACS Mode – CiscoWorks User Roles • User roles determine the tasks that can be performed by a user • User can be assigned more than 1 user role System Administrator
Server configuration and user accounts
Network Administrator
Device configuration
Network Operator
Backup for most configuration management tasks
Approver
Approve jobs that change device software or configuration
Help Desk
View reports (Default User Role – assigned to all users)
• Tasks displayed change depending on users assigned roles • Tasks per user role can not be changed / customized in non-ACS mode Common Services v3.0 Tutorial
© 2005 Cisco Systems, Inc. All rights reserved.
Features 2-24
Non ACS Mode – CiscoWorks User Roles CiscoWorks contains many critical tasks that can modify the behavior of a network, as well as, many totally benign tasks that simply display information. Obviously, it would not be wise to allow all types of users access to the critical functions, but at the same time it would be beneficial to allow all types of users access to the basic information. To allow for proper access to all types of users, CiscoWorks employs the concept of User Roles (also known as user privileges or permissions). Use of the various functions or tasks within all CiscoWorks applications is based upon the “roles” assigned to user accounts. In fact, if a task is not permitted to the user role assigned to the logged in user, then that task will not even be displayed in the navigation tree of the application. CiscoWorks uses five User Roles; users can be assigned more than one user role, and all are assigned the basic user role – Help Desk. The five user roles and their basic access ability are: System Administrator – Can perform CiscoWorks system administration tasks Network Administrator – Can perform tasks that result in network configuration changes or data collection Network Operator – Can perform tasks related to network data collection, but cannot perform any tasks that requires write access on the network Approver – Can approve jobs that change device software or configuration Help Desk – View only.
CiscoWorks Common Services v3.0 Tutorial
© 2005 Cisco Systems, Inc. All rights reserved.
Features 2-24
CiscoWorks Security
Non-ACS Mode – CiscoWorks Permission Report Common Services > Server > Reports > Permission Report
User UserRoles Roles Permission Permission Report Reportlists listsall all tasks tasksfor forall all CiscoWorks CiscoWorks applications applications installed installed Permission Permissionper pertask task per perUser UserRole Role
Common Services v3.0 Tutorial
© 2005 Cisco Systems, Inc. All rights reserved.
Permission Permissionto to perform performtasks tasks are arebased basedon on user userroles roles
Features 2-25
Non-ACS Mode - Permissions Report The tasks that are executable by a user role are static and cannot be changed in the Non-ACS mode. Common Services includes a report that displays every CiscoWorks task for every application on the local server and which user roles have permission to execute it. To view the Permissions Report, select Common Services > Server > Reports, on the dialog displayed select Permissions Report and click Generate.
CiscoWorks Common Services v3.0 Tutorial
© 2005 Cisco Systems, Inc. All rights reserved.
Features 2-25
CiscoWorks Security
Non-ACS Mode – Example: Multi-Server Environment (SSO) Authentication Authentication is is done done using using SSO SSO Authentication AuthenticationServer Server
Local or External User Authentication
SRV2 SRV1
CiscoWorks Bill - HelpDesk
CiscoWorks Bill - SysAdmin
SSO Regular Server
SSO Authentication Server
Client Task Task Authorization Authorizationis is based based on on User Userpermissions permissions in inserver server accessed accessedCiscoWorks CiscoWorksaccount account
Example: Example: •• User User account, account, Bill, Bill, needs needs to to be be created created on on both both servers servers and and roles roles assigned. assigned. Roles Roles (task (task execution execution allowed) allowed) may may be be different different on on each each server. server. •• Bill Bill (Client) (Client) logs logs in in to to SRV2, SRV2, and and is is authenticated authenticated by by SRV1 SRV1 and and given given HelpDesk HelpDesk access access to to tasks tasks on on SRV2. SRV2. •• IfIf he need to to re-authenticate, re-authenticate, but but would would have have SysAdmin SysAdmin privileges privileges on on he then then accessed accessed SRV1, SRV1, he he would would not not need SRV1 SRV1 •• Refer Audit Log Log to to view view user user access access to to the the servers servers Refer to to Common Common Services Services >> Server Server >> Reports Reports >> Audit Common Services v3.0 Tutorial
© 2005 Cisco Systems, Inc. All rights reserved.
Features 2-26
Non ACS Mode- Example: Multi-Server Environment (SSO) So what does this mean in the case of a multi-server environment with SSO enabled. Users attempting to login to any of the servers will have their login request forwarded to the SSO Authentication Server. This server will then process the login using whichever login module is enabled: either the database on the SSO Authentication Server or the external mechanism assigned. As far as task authorization within CiscoWorks, the user is assigned permissions based on the user roles (defined in the upcoming pages) assigned to their account on the server they are accessing. The same user account must be defined on each server, but the user roles could be different. So, this means that if a user is to have privileges on each server, they must have an user account defined on each server. Similarly, user access to tasks can be different on each server by assigning different roles to their local accounts on each server. User roles can be different on different machines. But this is not a suggested configuration. Ideally, in local security mode, we want all users to have the same roles in all machines. So in essence, the SSO Authentication server is only for authenticating the user logging into the server and not authorizing the user for task execution. The later, task authorization, is handled by the local server and the user’s roles defined on the local server which is being accessed.
CiscoWorks Common Services v3.0 Tutorial
© 2005 Cisco Systems, Inc. All rights reserved.
Features 2-26
CiscoWorks Security Integration with ACS (optional)
• ACS is an alternative security mode in CiscoWorks for authorization & authentication of users • LMS v2.5 supports ACS v3.2 (& v3.3.2 with Common Services SP1) • New user roles can be created in ACS to finetune the CiscoWorks tasks allowed by a user • Configure ACS after all CiscoWorks applications have been installed Common Services v3.0 Tutorial
© 2005 Cisco Systems, Inc. All rights reserved.
Features 2-27
Integration with ACS – (Optional) If planning to use ACS, configure it after all CiscoWorks applications are installed. If you have installed an application after configuring the CiscoWorks Login Module to the TACACS+ mode, then the users of that application are not granted any permissions. However, the application is registered to Cisco Secure ACS. Multiple instances of same application using the same ACS server will share settings. Any changes will affect all instances of that application. If an application is configured with ACS and then the application is reinstalled, the application will inherit the old settings. You can create new roles using ACS. The role you create is not shared across all the LMS applications. The role is shared across the same application in different CiscoWorks Servers registered to that particular ACS. You have to create new roles for each of the LMS applications that are running on the CiscoWorks Server. For example: Assume you have configured 10 CiscoWorks Servers with an ACS server and you have created a role in RME (say, RMESU). This role is shared for the RME application that runs on all 10 CiscoWorks Servers. System Identity User in ACS Mode: There can only be one System Identity User per machine. The System Identity User you configure has to be a Peer Server User. In ACS mode, the System Identity user needs to be configured in ACS, with all the privileges the user has in CiscoWorks.
CiscoWorks Common Services v3.0 Tutorial
© 2005 Cisco Systems, Inc. All rights reserved.
Features 2-27
CiscoWorks Security ACS Mode CiscoWorks Server Username and Password (Encrypted)
Client
User Roles
Access Control Server
•• ACS ACS used used to to authenticate authenticate (username (username // password) password) and and provide provide user user authorizations authorizations (task (task permission) permission) •• CiscoWorks CiscoWorks user user roles roles are are imported imported into into ACS ACS and and can can be be customized customized or or new new roles roles can can be be created created •• Local Local CiscoWorks CiscoWorks user user roles roles are are not not used used to to authorized, authorized, but but instead instead are are imported into the ACS can be customized imported into the ACS can be customized •• Tasks Tasks are are authorized authorized by by the the ACS ACS and and the the ACS ACS user user roles roles •• Use Use ACS ACS to to limit limit access access to to device device groups groups (secure (secure views) views) Common Services v3.0 Tutorial
© 2005 Cisco Systems, Inc. All rights reserved.
Features 2-28
ACS Mode The ACS mode differs from the non-ACS mode in that the ACS not only authenticates the user, but also provides the user permissions (authorization); the local CiscoWorks accounts are not used in this mode. When enabling the ACS mode, the administrator is asked to register the applications with ACS. ACS will now know about the 5 standard user roles and every application and task on the CiscoWorks server. As we will see shortly, this allows for the customization of task execution.
CiscoWorks Common Services v3.0 Tutorial
© 2005 Cisco Systems, Inc. All rights reserved.
Features 2-28
CiscoWorks Security
ACS Mode - Define ACS Server in CiscoWorks
Common Services > Server > Security > AAA Mode Setup
Common Services v3.0 Tutorial
© 2005 Cisco Systems, Inc. All rights reserved.
Features 2-29
ACS Mode – Define ACS Server in CiscoWorks To use an Access Control Server for AAA functions, Select the AAA Mode Setup feature and change the AAA mode type to ACS. The system administrator will need to define the IP address, TACACS port and login information for the ACS in the network. When the Apply button is clicked, the following actions take place. • A list of tasks in the CiscoWorks applications is registered with the ACS Server. • A list of default user roles i.e. System Administrator, Network Administrator, Network Operator, Approver and Help Desk is registered with the ACS Server. • A mapping of the tasks that the above user roles can execute is also registered with the ACS user. In the case of the LMS bundle, many tasks can be executed in the following products, i.e. Campus Manager, Resource Manager Essentials, Internetwork Performance Monitor, Device Fault Manager and Common Services. The mapping between user roles and these tasks are registered with the user. Note that this is a default mapping of user roles and tasks. This default mapping can be accessed in the LMS Server by traversing to Common Services panel Æ Server Æ Reports Æ Permission Report link and generating the report. Note that the default mapping between tasks and the roles can be changed in the ACS Server and the changed mapping won’t be reflected in the Permission Report.
CiscoWorks Common Services v3.0 Tutorial
© 2005 Cisco Systems, Inc. All rights reserved.
Features 2-29
CiscoWorks Security
ACS Mode - Customize User Roles
Create/Assign Create/Assign new new user user roles roles or modify tasks for the or modify tasks for the standard standard CiscoWorks CiscoWorks user user roles roles (Per (PerCiscoWorks CiscoWorksApplication) Application)
Common Services v3.0 Tutorial
© 2005 Cisco Systems, Inc. All rights reserved.
Features 2-30
ACS Custom User Roles ACS allows the administrator to either modify the 5 standard user roles or create new user roles on a per application basis. For example, in the figure above, a new user role is being created called NetNightOps with the goal of giving the night supervisor some System Administration privileges to fix the CiscoWorks server, if necessary, but not enough privileges to make major changes to the server. Notice that this particular user role is for Common Services. All Common Services tasks are listed and the ACS administrator simply selects which tasks this user role will be capable of executing. Note that using ACS, users can only be assigned one user role unlike in the non-ACS mode. Therefore, a new user roles giving complete access to all tasks will need to be created in order for the Admin user to have the same privileges as in the non-ACS mode (Admin user has all user roles assigned basically giving him total access).
CiscoWorks Common Services v3.0 Tutorial
© 2005 Cisco Systems, Inc. All rights reserved.
Features 2-30
CiscoWorks Security
ACS Mode – Creating Secured Views
Assign Assign user user roles roles per per network device group network device group per per CiscoWorks CiscoWorks application application Users Usersin inthis thisGroup Group •• Allowed Allowedaccess accessto todevices devicesininNDG1 NDG1 with withNetwork NetworkOperator Operatorprivileges privileges •• Allowed Allowedaccess accessto todevices devicesininNDG3 NDG3 with withSystem SystemAdmin Adminprivileges privileges
ACS ACSUser UserGroup GroupConfiguration Configuration Common Services v3.0 Tutorial
Refer Refer to to Chapter Chapter 33 Scenarios Scenarios for for detailed detailed steps steps on on configuring configuring the the ACS ACS server server for for use use
© 2005 Cisco Systems, Inc. All rights reserved.
Features 2-31
ACS Secured Views In ACS mode, privileges can be assigned on a per user or group of users basis depending on the configuration of ACS. Regardless of this fact, a user or group of users can be assigned a different user role per CiscoWorks application. Previously it was stated that each user could only be given one user role per application, this is not totally true. A better way to say this would be that each user can only have one user role per network device group (NDG - a set of devices in ACS ) per application. This results in incredible flexibility to operate on some devices and view only others. Now using ACS for authorization, a user can be given Network Administration rights for one group of devices, but only Help Desk privileges for another set of devices. The user doesn’t need to keep track of this fact because they will only see the devices they have privilege to see for a selected task. This is known as Secured Views. For example: • Two users Joe and Frank are configured in ACS. • Two Network Device Groups NDG1 (contains device D1) and NDG2 (contains device D2) are configured in ACS. • Network Administrator role is mapped to task “Edit Device Configuration”. • Joe has a Network Administrator role on NDG1 network device group. This means he is authorized to perform “Edit Device Configuration” task on device D1 in NDG1. • Frank has a Network Administrator role on NDG2 network device group. This means he is authorized to perform “Edit Device Configuration” task on device D2 in NDG2. • When Joe logs into the LMS Server and accesses the “Config Editor” screen, he will see only device D1. This is because his view of devices is restricted to only devices on which he can execute task “Edit Device Configuration”. The same is applicable to Frank as well, where he can see only device D2 in the “Config Editor” screen.
CiscoWorks Common Services v3.0 Tutorial
© 2005 Cisco Systems, Inc. All rights reserved.
Features 2-31
CiscoWorks Common Services v3.0 Tutorial
© 2005 Cisco Systems, Inc. All rights reserved.
Features 2-32
Management Services Device Management
•
Common Services Overview
¾ Management Services – Homepage – Security ¾Device Management – Software Center – Administration
CiscoWorks Common Services v3.0 Tutorial
© 2005 Cisco Systems, Inc. All rights reserved.
Features 2-33
Device Management Overview
¾ Device and Credentials Repository (DCR) ;
Common repository of devices and their credentials used by all CiscoWorks applications
;
When used in the multi-server environment, the DCR can be replicated among the Master and Slave servers
¾ Grouping Services ;
Logical grouping of devices to expedite task execution
;
System or user-defined device groups
Common Services v3.0 Tutorial
© 2005 Cisco Systems, Inc. All rights reserved.
Features 2-34
Device Management All management tools have one common configuration required before any management task can commence - configuring the tool to tell it which devices it needs to manage. The LMS CiscoWorks solution is not just one tool, but a collection of tools; all needing to be told which devices to manage. The adding of devices to a tool along with any necessary credentials (passwords, SNMP strings) can be a time consuming process. Fortunately, rather than perform this task for each CiscoWorks application, Common Services provides a centralized Device and Credentials Repository (DCR) that each application can then pull the desired subset of devices and credentials from in which to manage. This assists in the maintenance of the tools – for example, if a device credential is changed, rather than updating a number of tools, only the DCR needs to be updated ensuring that all CiscoWorks applications are using the most up-to-date information. It was mentioned previously that CiscoWorks could be deployed multi-server environment. Taking advantage of the trust relationship, employed by Common Services, allows the possibility of sharing the DCR among the servers. One server is configured as the Master and the rest of the servers are configured as Slaves. Any changes to the DCR (Add, Edit, Delete) are performed on the Master DCR and then copied to the Slave DCRs automatically. This insures that all applications on all servers are sharing the same device and credential information. CiscoWorks tasks are often run against a set of devices. Selecting the desired devices from a list of possibly thousands of devices could be time consuming and frustrating. Therefore, devices can be grouped using rules based on device attributes. Now, a group can simply be selected as the input for a task, saving time. Each CiscoWorks application has a number of pre-defined System Groups (i.e. in Common Services System Groups are by device type) and a user can also create their own groups. These groups can be shared between applications. Note that the membership of a group is determined by applying a set of rules. These rules define the set of devices to be managed by the application. Thus, membership of a group could be different between two applications, if they are managing a different group of devices.
CiscoWorks Common Services v3.0 Tutorial
© 2005 Cisco Systems, Inc. All rights reserved.
Features 2-34
Device Management
DCR Overview (Contents and Interfaces)
CiscoWorks LMS Applications
The TheDCR DCRdoes doesnot not communicate communicatewith withthe theCisco Cisco devices. devices. The TheCiscoWorks CiscoWorks applications applicationsinterface interfacewith withthe the devices devicesdirectly. directly.
Events Events
Third-Party Applications, Slave CiscoWorks servers DCR -Bound API North DCRNorthNorth-Bound API
DCR Contents • Device Attributes (hostname, domain name, IP address, sysObjectID, MDF-Type, and DCR id) • User-Defined Attributes (I.e. location, building) • Encrypted Credentials (device username/pwd, enable password, SNMP community strings)
DCR DCRCommand CommandLine Line Interface Interface
Device Device and andCredential CredentialAdmin Admin GUI GUI
(Add, (Add,Edit, Edit,Delete, Delete,Import, Import,Export) Export)
Common Services v3.0 Tutorial
(Add, (Add,Edit, Edit,Delete, Delete,Import, Import,Export) Export)
© 2005 Cisco Systems, Inc. All rights reserved.
Features 2-35
DCR Overview (Contents and Interfaces) First, it should be re-iterated that the DCR is a common repository for device and credential information shared by all CiscoWorks applications. The DCR does not talk or poll Cisco devices and no additional device data, such as config files, syslog messages, etc., is stored in the DCR; device data is collected by the individual CiscoWorks applications from the devices using the credentials in the DCR and is then stored in their own databases. As you will learn shortly, the device attribute and credential information in the DCR can be managed in several ways. Most commonly, the Device and Credentials Administration or DCA GUI provides easy access to the information. Alternatively, the system administrator can management the DCR contents at the Command Line Interface (CLI)of the CiscoWorks server. The user can add, delete, modify devices, change/view DCR modes, and list the DCR attributes from the CLI of the server using the dcrcli subcommand in a shell environment or at the CLI of the server. (For more information on the DCR CLI, refer to the Common Services User Guide and White Paper found in Chapter 5.) Individual CiscoWorks applications interact with the DCR to get the device list, device attributes, and device credentials. Applications can read the information as well as update the information in the DCR so that it can be shared with other applications. Let’s now look at how CiscoWorks RME and Campus Manager not only read the DCR information put also add and edit the information in the DCR.
CiscoWorks Common Services v3.0 Tutorial
© 2005 Cisco Systems, Inc. All rights reserved.
Features 2-35
Device Management
DCR Overview – Management and Use of Information
Applications Applicationscan can manage manageall all devices devicesin in the DCR or a subset the DCR or a subsetof of them them
& Credentials
Device & Credentials
Device & Credentials
Discover Device Type
• • • •
DCR
IPM IPM Source, Target
CiscoView CiscoView
DFM DFM
Device & Credentials
Discover Device Type Auto-Discovery (Add Devices)
Campus Campus
Device & Credentials
Discover Device Type Credential Update (NetConfig)
RME RME
Device IP address, name SNMP v2/v3 credentials Access Passwords User Defined Fields
DCR DCRAdministration Administration •• •• ••
Manually Manually Add Add Device Device Information Information
Standard StandardCisco Cisco devices devices AUS AUS managed managed devices devices Cluster Clustermanaged managed devices devices
Common Services v3.0 Tutorial
Bulk Bulk import import device device information information from from file file or or rd rd 33 party party NMS NMS
© 2005 Cisco Systems, Inc. All rights reserved.
Features 2-36
DCR Overview – Management and Use of Information This illustration clearly identifies how the information in the DCR is populated, managed, and used by other applications. One of the first tasks to be performed by the CiscoWorks administrator is the population of the DCR. As illustrated, this can be done by using the DCA GUI to manually add devices, by bulk importing devices from a file or a third party NMS (see note below), or by using the auto-discovery feature of the Campus Manager product. Common Services also includes tools to edit the information to ensure all devices are associated with the proper access credentials (SNMP community strings, login and enable passwords, etc.). As illustrated in Chapter 3, Scenarios, information on three different types of devices is stored in the Device and Credentials Repository. • Standard devices. All other Cisco devices that are not cluster managed devices or AUS managed devices are referred to as “standard devices”. • Auto Update Server (AUS) managed devices. The Auto Update server (AUS) supports a pull model of configuration that can be used for the initial configuration, configuration updates, operating system updates and periodic configuration verification. The DCR provides the means to store the association between AUS and AUS-managed devices. For AUS managed devices, the Display Name and AUS Device ID (device_identity) are mandatory. • Cluster managed devices that form a cluster are stored in a special format. DCR provides means to store the association between the cluster members and the cluster. For cluster managed member devices, the member number, display name and cluster name are mandatory. Note(s): • Different CiscoWorks applications need different credentials to perform their tasks. The basic credential needed by all CiscoWorks applications is the SNMP v2 or v3 credentials. • Once populated, each CiscoWorks application can subscribe to all or a subset of the devices in the DCR. • Applications like RME, DFM, and Campus Manager discover the device type and update the device type in the DCR. • Import from the local NMS is available for HPOV NNM 6.x and NetView 7.x. Import from a remote NMS is available for HPOV NNM 6.x, NetView 7.x, as well as ACS. Refer to Chapter 3 for details. CiscoWorks Common Services v3.0 Tutorial
© 2005 Cisco Systems, Inc. All rights reserved.
Features 2-36
Device Management
DCR Master/Slave Synchronization Common Services > Device And Credentials > Admin > Mode Settings > Change Mode Slave DCR DFM
Campus Notify Notify Changes Changes
DCR Slave
Ensure Ensure all all servers servers in in Multi-Server Multi-Server Trust Trust Domain Domain have have identical identical device device and and credential credential information information
Add, Add, Edit, Edit, Delete, Delete, Import, Export Import, Export Device, Device, Attributes, Attributes, && Credentials Credentials
Notify NotifyDCR DCRslaves slavesfor for changes changes(add, (add,update, update, delete) delete)to to DCR DCR
Push Push updated updated device device and andcredentials credentials(at (at startup, periodically, startup, periodically, and in response and in responseto to notification) notification)
Master DCR Synchronization DCR CLI RME
Fetch/Update Fetch/Update devices devicesand and credentials credentials
DCA User Interface Common Services v3.0 Tutorial
© 2005 Cisco Systems, Inc. All rights reserved.
Features 2-37
DCR Master/Slave Synchronization When CiscoWorks is deployed in a multi-server manner, they can be configured to be part of a management domain that effectively shares the device list and device credentials. This sharing is based on a Master/Slave mechanism. The DCR Master refers to the repository which contains the device list and credentials data that can be shared with DCR Slaves in the management domain. DCR Slaves replicate the DCR Master device lists and credentials and provide transparent access to applications installed in those servers. Any changes to the device list and/or their credentials will first occur in DCR Master and then be propagated to the Slaves. Note: • In case of repository data updates on a Slave server, the Slave DCR server will first update Master DCR Server and then update its own repository data.
CiscoWorks Common Services v3.0 Tutorial
© 2005 Cisco Systems, Inc. All rights reserved.
Features 2-37
Device Management DCR Device List
Common Services > Device and Credentials > Reports > Device List Report
- User Defined Fields •• These These fields fields can can be be used used to to associate associate additional additional attributes attributes to to aa device device for for grouping grouping services services or or adding adding descriptions descriptions (i.e. (i.e. location) location) •• The The 44 default default user user fields fields can can be be renamed renamed and and more more can can be be added added ifif necessary necessary Common CommonServices Services>>Device Deviceand andCredentials Credentials>>Admin Admin >User >UserDefined DefinedFields) Fields)
View View complete complete DCR DCR device device list list with with identity identity attributes attributes and and user-defined user-defined fields fields Common Services v3.0 Tutorial
© 2005 Cisco Systems, Inc. All rights reserved.
Features 2-38
DCR Device List To see the devices in the DCR, as well as, the identifying device attributes, use the Common Services > Device and Credentials > Reports > Device List Report task. By default, the DCR contains 4 user-defined attribute fields that can be populated with any value to help the users identify the device. Common Services allows the default names to be changed and additional fields to be defined, if desired. Note: The user-defined fields can help in the creation of meaningful device groups or add additional descriptive information about the device.
CiscoWorks Common Services v3.0 Tutorial
© 2005 Cisco Systems, Inc. All rights reserved.
Features 2-38
Device Management Grouping of Devices
• View is a Logical Grouping of Devices -
Use to simplify the selection of devices for various operations
• System (predefined) -
Pre-defined collection of devices (i.e. MDF device types)
-
Each CiscoWorks application has different types of System Groups
• User Defined -
Membership based on set of rules or criteria
-
Membership can be Static (manually changed only) or Dynamic (automatically changed when membership rules are applied)
-
Groups can be Private (available to creator only) or Public (usable by all)
System
User Defined
All Cisco 3700 Routers
All devices in subnet 192.168.2.0
Common Services v3.0 Tutorial
© 2005 Cisco Systems, Inc. All rights reserved.
Features 2-39
Grouping of Devices Many CiscoWorks tasks are executed against a set of devices. When thousands of devices are being managed, selecting specific devices for the task could be difficult. For instance, a thousand devices are being managed and a detailed hardware report needs to be run for only the 7200 routers. CiscoWorks uses the concepts of groups to simplify the selection of devices. All CiscoWorks applications introduce default groupings. For example, Common Services has default system groups that categorize devices by MDF-types in a hierarchical manner (routers, 7200 router, etc). (MDF-type is the normative name for the device type as described in Cisco’s Meta Data Framework (MDF) database. Each device type has a unique normative name defined in MDF. All CiscoWorks applications also allow users to create their own groups. These groups are created using a set of rules and can be configured to automatically populate based on adherence to the group rules or only with user intervention basically making for dynamic and static groups. Further, groups can be limited to only the creator of the group (private), or for use by all (public). This powerful feature further simplifies the use of CiscoWorks if meaningful groups are created. As previously mentioned, each device has 4 (or more) user fields associated with it (stored in the DCR) that can be used to help define groups. For example, User Field 1 could be assigned to device location. Then, a device group could be dynamically created based on the value of the location user field. Tasks can then be executed for devices belonging to a specific location. When selecting devices for a task, these system-defined or user-defined groups can be used. A device can belong to multiple groups depending upon the definition of the group.
CiscoWorks Common Services v3.0 Tutorial
© 2005 Cisco Systems, Inc. All rights reserved.
Features 2-39
Device Management System Groups
Provider Provider Group Group Application@server-hostname Application@server-hostname
MDF-Types MDF-Types
Common Common Service Service System System Groups Groups are are based based on on device device MDF-types. MDF-types. Only Only devices devices types types currently currently in in the the DCR DCR are are listed. listed. Groups Groups can can be be used used (shared) (shared) by by any any CiscoWorks CiscoWorks application application (In (InMulti-Server Multi-ServerMaster/Slave Master/SlaveDCR DCR mode, mode,group grouphierarchy hierarchywill willinclude includeall all applications applicationson onall allservers) servers)
Provider Provider Group Group
Different Different apps apps have have different different predefined predefined System System Groups Groups Common Services v3.0 Tutorial
© 2005 Cisco Systems, Inc. All rights reserved.
Features 2-40
System Groups Each application has its own System Groups that are populated as devices are added. In the case of Common Services, the system groups are based on device types. A device based system group will only be listed if a device of that type has been added to the DCR. These pre-defined groups come under the Provider Group (or the root group), which, by default, is of the format Application@server-hostname. A Provider Group exists for each CiscoWorks application installed and is the parent for all the groups defined for a particular application. Note: • Groups defined by any application are available for use by other applications.
CiscoWorks Common Services v3.0 Tutorial
© 2005 Cisco Systems, Inc. All rights reserved.
Features 2-40
Device Management User-Defined Groups
Groups
Provider Provider Group Group Common CommonServices Serviceson on East EastCoast Coast Ops OpsServer Server
Multi-Server Multi-Server Environment Environment •• Common Common Services Services groups groups can can only only be be created created in in the the Master Master server server •• User User interface interface in in slave slave will will be be disabled disabled Common Services v3.0 Tutorial
© 2005 Cisco Systems, Inc. All rights reserved.
Features 2-41
User-Defined Groups Because groups are so beneficial to the execution of CiscoWorks tasks, the administrator can create their own groups for use. As illustrated above, these groups are defined under the User-Defined heading also found as a child group to the Provider Group and a sibling to the System Group. User-defined groups are created using rules based on devices attributes in order to determine membership. Rules can be combined using Boolean operators for greater granularity. Groups can be defined in a hierarchical fashion with each child group being a sub-group of the parent. Each application can create their own user-defined groups, and will have different device attributes to use for rule definition based on the information collected by the application about the device. Note: • When operating in a multi-server environment, the Group Admin tasks will be disabled on a Slave server. All Common Services groups can only be created on the Master server.
CiscoWorks Common Services v3.0 Tutorial
© 2005 Cisco Systems, Inc. All rights reserved.
Features 2-41
Device Management
User-Defined Groups, continue …
User-Defined User-Defined group group creation creation based based on on aa set set of of rules rules to to define define membership, membership, using using multiple multiple possible possible variables variables and and operators operators
Entering Entering no no rules rules creates creates aa Container Container Group Group in in which which other other sub-groups sub-groups can can be be held. held.
Variables Variables differ differ depending depending on on the the Application Application
(Relates (Relatesto toinformation informationcollected collected by byapplication application––in inCS CSititisis the the device deviceidentity identityinformation) information)
Common Services v3.0 Tutorial
© 2005 Cisco Systems, Inc. All rights reserved.
Features 2-42
User-Defined Groups, continue … As will be illustrated in Chapter 3 in a scenario, the creation of user-defined groups in a simple 4 step process of defining its descriptive properties, the criteria or rules for being included in the group, adding more, deleting, or fine-tuning devices in the group, and finally a quick review of the group before its all done. As noted, each application can create their own user-defined groups, and will have different device attributes to use for rule definition based on the information collected by the application about the device. In the case of Common Services, the attributes used for rule creation are based on the device attributes defining a device in the DCR including the user-defined fields. Sometimes it might be helpful to have a group that simply hold the grouping of other groups. Container groups are groups with no rule, whose membership is the union of the membership of its children. The Create Rules dialog box allows you to check the syntax in the Rules Text field. You can use this facility to validate the rules you have created. If you leave the rule blank, it creates a Container group.
CiscoWorks Common Services v3.0 Tutorial
© 2005 Cisco Systems, Inc. All rights reserved.
Features 2-42
Device Management Sharing Groups
From From Common Common Service Service perspective, perspective, this this group group has has 44 devices devices
CiscoWorks Server Common Services DCR A
B
C
D
RME DCR A
B
Client •• CiscoWorks CiscoWorks Server Server managing managing 44 routers, routers, but but RME RME may may be be only only managing managing aa subset subset of of the the devices devices •• Group Group membership membership is is created created from from the the application’s application’s local local DCR DCR Common Services v3.0 Tutorial
© 2005 Cisco Systems, Inc. All rights reserved.
From From RME RME perspective perspective this this group group (shared) (shared) has has 22 devices devices
(A (Ashared sharedgroup groupmembership membershipisis determined determinedby bygroup grouprules rulesin inrespect respect to to the thedevices devicesbeing beingmanaged managedby bythe the application applicationbeing beingaccessed) accessed)
Features 2-43
Sharing Groups Keep in mind that membership in a group is evaluated at the time of task execution and only the devices in the application’s local DCR is used for the group membership. Any application can use another applications group for running a task within the application. However, the membership of the group may be different between the two applications depending on the devices they are managing. For example, 4 routers have been added to the DCR, therefore the membership of the Routers System Group for Common Services contains 4 devices. When RME was configured, only two of the routers were subscribed to from the DCR for management by RME. So if RME selects the Common Services Router group to run one of its reports against, the report will be run against only two routers managed by RME even though under Common Services the group has 4 devices in it. In other words, when an application selects another applications group, the devices selected are determined by evaluating the group’s rules against the set of devices being managed by the requesting application. Note(s): • In the ACS-mode, group membership can be further limited based on the current user’s access rights for devices. So, if the task selected in the RME example above required a user to have Network Administrator privileges to execute, and the current user only had Network Administrator privileges for router A, then the Router Group for this task would only have a single member. • When operating in a multi-server environment, the Group Admin tasks will be disabled on a Slave server. All Common Services groups can only be created on the Master server.
CiscoWorks Common Services v3.0 Tutorial
© 2005 Cisco Systems, Inc. All rights reserved.
Features 2-43
CiscoWorks Common Services v3.0 Tutorial
© 2005 Cisco Systems, Inc. All rights reserved.
Features 2-44
Management Services Software Center
•
Common Services Overview
¾ Management Services – Homepage – Security – Device Management ¾Software Center – Administration
CiscoWorks Common Services v3.0 Tutorial
© 2005 Cisco Systems, Inc. All rights reserved.
Features 2-45
Software Center Overview
Software Center is the facility for retrieving all CiscoWorks software updates and most current device packages used by CiscoWorks applications ;
Requires configuration of Cisco.com account (Common Services > Security > Cisco.com Connection Management > Cisco.com User Account Setup)
;
Software Updates are downloaded to file system
;
Device Package Updates can be installed directly from Web interface or downloaded to file system
;
Device Packages can be scheduled for periodic download Cisco.com
Staging Area (On Server)
Scheduled Scheduled download download of of Device Device Package Package Updates Updates to to file file system system Common Services v3.0 Tutorial
© 2005 Cisco Systems, Inc. All rights reserved.
Updates Updates installed installed from from file file system system instead instead of of directly directly from from Cisco.com Cisco.com Features 2-46
Software Center Many of CiscoWorks tasks require specific knowledge about a device. However, since Cisco is frequently updating and adding new device types and versions, CiscoWorks could be out-of-date for these devices. To combat this, Cisco releases Incremental Device Updates (IDU) once a quarter. Likewise, some device software may have a new release and may require updates. The Software Center function of Common Services simplifies the updating of CiscoWorks by checking Cisco.com for software and device support updates, downloading them to the server file system along with the related dependent packages, and installing the device updates (software updates must be performed offline). Most of the device family-based packages can be installed directly from the web interface while the device support packages such as IDU have to be installed based on the installation instructions documented in the respective readme files. Device Updates downloads can occur on demand or in a scheduled fashion. For downloads from Cisco.com to work, the server requires login access to Cisco.com. This can be configured using the Common Services > Server > Security > Cisco.com Connection Management > Cisco.com User Account Setup task.
CiscoWorks Common Services v3.0 Tutorial
© 2005 Cisco Systems, Inc. All rights reserved.
Features 2-46
Software Center
Check for Software Updates
Software Software Center Center provides provides application application updates updates and and IDUs IDUs
Common Services v3.0 Tutorial
Additional Additional ways ways to to retrieve retrieve software software updates updates
© 2005 Cisco Systems, Inc. All rights reserved.
Features 2-47
Check for Software Updates From time to time, updates to all CiscoWorks applications are made available on Cisco.com. Typically, Incremental Device Updates (IDUs) are made available every 3 months. The CiscoWorks Home Page provides numerous ways to retrieve these updates: • The lower right hand corner of the home page presents CiscoWorks Product Update notes with a link to all available updates. • The Resource section of the home page (upper right-hand corner) contains a link to all CiscoWorks Software including updates. • The Common Services Software Center contains a Software Update task. Selecting this task will display the currently installed CiscoWorks applications and a mechanism to retrieve updates. Note(s): • Incremental Device Updates (IDUs)can be downloaded from Cisco.com at: http://www.cisco.com/cgi-bin/tablebuild.pl/cw2000-campus • If the Common Services server is behind a firewall, the proxy settings are used to download messages from Cisco.com. CiscoWorks Homepage provides an Admin user interface to accept the proxy settings. CiscoWorks Homepage alerts you if any urgent messages are found. By default, the polling interval is one minute. You can change the polling interval.
CiscoWorks Common Services v3.0 Tutorial
© 2005 Cisco Systems, Inc. All rights reserved.
Features 2-47
Software Center Software Updates
Common Services > Software Center > Software Update
Click Clickon onthe theProduct ProductName Name to toview viewany anypatches patchesor or information informationon oncomponents components installed installedwith withproduct product Common Services v3.0 Tutorial
© 2005 Cisco Systems, Inc. All rights reserved.
Features 2-48
Software Updates When accessing the Common Services > Software Center > Software Updates task, a dialog is displayed showing the bundles and individual applications installed. Clicking on an application will give the details about the Applications and Packages installed with a Product page that gives the details of the installed applications, patches, and packages of the product. To download updates for selected applications, select the desired applications and click the Download Updates button. The user will then be prompted for a location on the file server to download any updates to. If the user wishes to first select which updates to actually download, click the Select Updates button which will present a list of available updates for the selected applications. Note: Each software update is accompanied by a readme file which will provide steps for installation. Software updates are done from a server command line and not the CiscoWorks GUI.
CiscoWorks Common Services v3.0 Tutorial
© 2005 Cisco Systems, Inc. All rights reserved.
Features 2-48
Software Center Device Updates
Common Services > Software Center > Device Update
Display DisplayPackage PackageMap Mapto to view viewDevice DevicePackages Packages already installed already installed Common Services v3.0 Tutorial
© 2005 Cisco Systems, Inc. All rights reserved.
Features 2-49
Device Updates When accessing the Common Services > Software Center > Device Updates task, a dialog is displayed showing the applications installed and a count of device types supported for each product installed in the system (some applications may have none and this is OK). Click on the device type count link to view the Device Map that lists the SysObjectID, Device Name, Package Name, and Version. Click on the application to view a Package Map that lists all the installed device support packages of the product, and the version of each package. To check for updates for an application, select the application and click Check for Updates. The user can select where to check for newer packages either at Cisco.com or on a file system (typically the file system is selected if the packages were automatically downloaded using the scheduling feature and now need to be installed). Software Center will compare the current Package Map against the current Package Map on Cisco.com. Any newer packages will be listed. Packages to download and install can be selected from this list.
CiscoWorks Common Services v3.0 Tutorial
© 2005 Cisco Systems, Inc. All rights reserved.
Features 2-49
Software Center
Scheduled Device Downloads Common Services > Software Center > Scheduled Device Downloads
Required Required Fields Fields
Specify Specify Download Download Policy Policy –– what what to to download download from from Cisco.com Cisco.com Notify Notify User User When When Done Done
Common Services v3.0 Tutorial
© 2005 Cisco Systems, Inc. All rights reserved.
Features 2-50
Scheduled Device Downloads A system administrator can schedule device package downloads and specify the time, frequency of the downloads, as well as the download policies. Software Center supports the following download policies: • Download all latest device packages of products installed in the machine • Download newer versions of currently installed packages • Download the specified packages (comma separated) The user must provide their Cisco.com credentials and the location to which the packages should be downloaded.
CiscoWorks Common Services v3.0 Tutorial
© 2005 Cisco Systems, Inc. All rights reserved.
Features 2-50
Software Center Event Log
Details Details about about Software Software Center activities Center activities Common Services > Software Center > Activity Log > Event Log
Common Services v3.0 Tutorial
© 2005 Cisco Systems, Inc. All rights reserved.
Features 2-51
Event Log The Software Center Event Log (Common Services > Software Center > Activity Log > Event Log) can be used to see the details of Software Center behavior. For instance, if device updates were scheduled, the event log could be used to see how many packages were downloaded.
CiscoWorks Common Services v3.0 Tutorial
© 2005 Cisco Systems, Inc. All rights reserved.
Features 2-51
CiscoWorks Common Services v3.0 Tutorial
© 2005 Cisco Systems, Inc. All rights reserved.
Features 2-52
Management Services Administration
•
Common Services Overview
¾ Management Services – Homepage – Security – Device Management – Software Center ¾Administration
CiscoWorks Common Services v3.0 Tutorial
© 2005 Cisco Systems, Inc. All rights reserved.
Features 2-53
Administration Overview
Common Services includes several administrative features to set up the server and to ensure that the server is performing properly: ; Processes: Provides details on managing processes. ; Backup: Provides scheduling of backup. ; Licensing: Manages licensing. ; Collect Server Information: Provides running of collect server information. ; Selftest: Provides ability to create and delete selftest information. ; Notify Users: Broadcasts messages to all logged on users. ; Job Browser: Provides details about managing jobs. ; Resource Browser: Provides details about managing resources. ; System Preferences: Configures the SMTP server, rcp user, and CiscoWorks e-mail ID.
Common Services v3.0 Tutorial
See See Chapter Chapter 44 of of this this tutorial tutorial for for more more details details on on these these topics topics © 2005 Cisco Systems, Inc. All rights reserved.
Features 2-54
Administration Overview Common Services is the home for all tasks concerning the management and maintenance of the server itself. These tasks include Backups, job and process management, and diagnostic tests. For more information on the administrative features of Common Services, see Chapter 4.
CiscoWorks Common Services v3.0 Tutorial
© 2005 Cisco Systems, Inc. All rights reserved.
Features 2-54
Thank You! Continue on to Chapter 3 to learn how to use the management services of Common Services through a series of scenarios.
CiscoWorks Common Services v3.0 Tutorial
© 2005 Cisco Systems, Inc. All rights reserved.
Features 2-55
CiscoWorks Common Services v3.0 Tutorial
© 2005 Cisco Systems, Inc. All rights reserved.
Features 2-56
Common Services Scenarios Chapter 3
CiscoWorks Common Services v3.0 Tutorial
© 2005 Cisco Systems, Inc. All rights reserved.
Scenarios 3-1
Common Services Scenarios
• Getting Started - Single Server • Configuring Multi-Server Environments • Using ACS for AAA Services
Common Services v3.0 Tutorial
© 2005 Cisco Systems, Inc. All rights reserved.
Scenarios 3-2
Common Services Scenarios CiscoWorks LAN Management Solution (LMS) is a feature packed collection of tools used to both save time and to help simplify common network management tasks for Cisco-based networks. The foundation of these tools is the Common Services portion of LMS. All CiscoWorks applications rely on these services to perform their respective management tasks. Chapter 2 introduced the reader to the features in Common Services. In this chapter, three scenarios will be presented detailing the steps required to configure and effectively use the features in Common Services. The first scenario, Getting Started, provides the basics required to begin using CiscoWorks – server access, navigation, adding devices to the DCR, creating user accounts, as well as ways to enhance the use of CiscoWorks – creating device groups, and homepage customization. The second scenario, Configuring Multi-Server Environments, demonstrates how to configure some of the features in Common Service when operating in a multi-server environment including enabling Single-SignOn and shared DCR modes. The final scenario, Using ACS for AAA Services, explains how to configure Common Services to use an Access Control Server as the authentication and authorization mechanisms for CiscoWorks login authentication and task authorization. To enhance the effectiveness of the chapter as a learning resource, the reader is encouraged to follow along on an operational system, and to explore the other function options not covered by this tutorial. It would also be wise to view the help screens associated with all functions to better understand the many different options available for most tasks. Launch help by selecting the Help link in the upper right-hand corner of the Common Services desktop. The help is content sensitive.
CiscoWorks Common Services v3.0 Tutorial
© 2005 Cisco Systems, Inc. All rights reserved.
Scenarios 3-2
Scenarios Overview
Single Sign-On to allow transparent Browsing (Only need to authenticate once)
DCR Master/Slave Mode (Create Common DCR on both servers)
East Coast Operations
West Coast Operations
DCR
Access Control Server Common Services v3.0 Tutorial
© 2005 Cisco Systems, Inc. All rights reserved.
Scenarios 3-3
Scenarios Overview The scenarios presented in this chapter will demonstrate the basics for configuring a single server and then look at some of the features available when operating in a multi-server environment. Note that neither the Single Sign-On mode or the DCR Master/Slave mode are required when operating in a multi-server environment, and that these features may also be implemented independently of each other. The prerequisites for these two modes, however, are basically identical consisting of the setup of trust between servers. The use of ACS as the AAA mechanism for CiscoWorks is an optional feature that greatly enhances the use of the product. The steps for configuring this feature is illustrated in the last scenario.
CiscoWorks Common Services v3.0 Tutorial
© 2005 Cisco Systems, Inc. All rights reserved.
Scenarios 3-3
CiscoWorks Common Services v3.0 Tutorial
© 2005 Cisco Systems, Inc. All rights reserved.
Scenarios 3-4
Getting Started
¾ Getting Started •
Configuring Multi-Server Environments
•
Using ACS for AAA Services
CiscoWorks Common Services v3.0 Tutorial
© 2005 Cisco Systems, Inc. All rights reserved.
Scenarios 3-5
Getting Started
• Server Access • Homepage Navigation • Homepage Customization • DCR Management • Grouping Services • User Accounts
Common Services v3.0 Tutorial
© 2005 Cisco Systems, Inc. All rights reserved.
Scenarios 3-6
Getting Started In this first scenario, the user will first learn how to access the server and learn the basic layout and navigation of both the Homepage and Common Services desktop. This will be followed by a look at how to customize the CiscoWorks Homepage. Before any of the applications can begin to perform any management activity, the Device and Credentials Repository (DCR) must be populated with devices. The scenario will look at how to achieve this by both adding devices manually and performing bulk device import using a file. Note(s): • The DCR can also be populated by bulk importing devices from a supported NMS and by using the auto-discovery feature of the Campus application. Refer to the Campus tutorial or User Guide for more information about device auto-discovery. • Once the DCR is populated, each application must then choose which devices in the DCR that each CiscoWorks application will manage. By default, most CiscoWorks LMS applications synchronize with the DCR and use all devices. See the User Guide or tutorial for each application for more on this subject. After the DCR is populated, the scenario discusses how to create a user-defined group, which will help in device selection when using various CiscoWorks applications. The final step in this first scenario will show how to create a local CiscoWorks user and assign permissions. In the default mode, all AAA services are performed by Common Services. (Scenario 3 will look at how to “farm out” this service to an external ACS.)
CiscoWorks Common Services v3.0 Tutorial
© 2005 Cisco Systems, Inc. All rights reserved.
Scenarios 3-6
Getting Started Server Access
http://:1741 Forwarded Forwardedto to secure securelogin loginscreen screen
https:///CSCOnm/servlet/login/login.jsp
Login Login screen screen is is secure secure (https) (https) thus thus aa certificate certificate is is required required 1 3
Select Select View View Certificate Certificate to to install install security security certificate certificate and and avoid avoid this this dialog dialog in in the the future future
2 Common Services v3.0 Tutorial
© 2005 Cisco Systems, Inc. All rights reserved. Install Certificate
Scenarios 3-7
Server Access Accessing the CiscoWorks server is easy, simply enter the DNS name or IP address of the CiscoWorks server followed by the http port being used (port 1741 is used by default during installation) as a URL in a standard web browser (refer to Chapter 4 for complete client requirements): http://:1741 The login to the CiscoWorks server is done with a secure transaction, using https. Follow these steps to understand the security dialogs and get to the CiscoWorks login screen: 1.
Prior to being redirected to a secure page displaying the login banner, a pop-up Security Alert is displayed informing you of a Security Alert. To simply continue, select Yes or continue to the next step.
2.
Optional step: The Security Alert will continue to be presented at each subsequent login until the user installs the certificate by selecting View Certificate. •
In doing so, the Certificate dialog will be displayed; select Install Certificate and follow the instructions presented. When finish select OK in the Certificate dialog, and then Yes on the Security Alert window.
3.
To access the CiscoWorks homepage, enter your assigned User ID and password provided by the CiscoWorks system administrator.
4.
Click Login.
CiscoWorks Common Services v3.0 Tutorial
© 2005 Cisco Systems, Inc. All rights reserved.
Scenarios 3-7
Getting Started
CiscoWorks Homepage http://stage-1:1741/cwhp/cwhp.applications.do Launch Launch Common Common Services Services main main window window or or select select aa task task
After After login, login,return returnto to unsecured unsecuredweb web page page
Server ServerHostname Hostname
On-line On-line help help
External External Resources Resources
Common Services v3.0 Tutorial
CiscoWorks CiscoWorks applications applications installed installed on on local local server server © 2005 Cisco Systems, Inc. All rights reserved.
Urgent UrgentMessages Messages from fromCisco.com Cisco.com
Scenarios 3-8
CiscoWorks Homepage After successful login authentication, the CiscoWorks homepage will be displayed. The homepage will display the different registered CiscoWorks applications. Also, the upper right-hand corner of the homepage displays some links to helpful external resources at Cisco.com as well as other homepage links to third party applications or tools added to the CiscoWorks homepage (refer to Homepage Customization). These external resources can be hidden; refer to Homepage Customization. Keep informed about important updates from Cisco in the lower right-hand panel. Information about new releases or service packs will be announced here. By default, Cisco.com is polled every minute for information. This can be changed; refer to Homepage Customization. To launch Common Services, find the Common Services panel and click on the header to take you to the main window for Common Services, or select one of the Common Services tasks listed to go directly to that task.
CiscoWorks Common Services v3.0 Tutorial
© 2005 Cisco Systems, Inc. All rights reserved.
Scenarios 3-8
Getting Started
Homepage Navigation - Layout Each Each tab tab represents represents aa different different Common Common Services Services functions, functions, each each containing containing numerous numerous tasks tasks The The available available options options for for the the selected selected tab tab Navigation Navigation bar bar lists lists the the current current task task Table Table of of Contents Contents (TOC) (TOC) displays displays submenu submenu for for selected selected option option
Content Content for for selected selected task task
(Note: (Note:not notall all options optionshave haveaa TOC) TOC)
(Note (Notetask taskmy my open openin inseparate separate window) window)
Tasks Taskslisted listeddepend depend on onthe theuser userrole(s) role(s) assigned assignedto to the theuser user Common Services v3.0 Tutorial
© 2005 Cisco Systems, Inc. All rights reserved.
Scenarios 3-9
Homepage Navigation - Layout Prior to using Common Services, it would be beneficial to discuss the basic layout to help you understand how to navigate through Common Services. Since all CiscoWorks applications use Common Services for desktop support, all registered applications will have the same user interface and navigation features. The Common Services desktop appears as a series of folders representing the major task categories. The contents of these folders are accessible by selecting the appropriate folder tab. The currently selected folder is identifiable by the different color of the tab and its text. Immediately under the tabs are the options associated with the selected major task category. Notice that this bar is the same color as the selected tab helping to further identify which tab is selected. To select one of these options, simply click on it. The selected option will be in bold text. At this point, the selected option may have a dialog box associated with it, which will be displayed in the content area. The selected option may also have sub-tasks associated with it. These will be listed in a Table of Contents (TOC) dialog on the lefthand side of the screen. Again, to select one of the sub tasks, simply click it and its text will now become bold to identify it as the selected task. When the selected task has no further sub-tasks, a dialog box with further instructions or simply displaying the requested information will be shown in the content display area. To determine where the user currently is, the display line (appropriately titled “You Are Here”) under the tab options indicates the path currently selected. Tutorial Annotation: To help reduce the number of pages in this tutorial, the entire desktop is not always shown. To facilitate the user in understanding what task is being displayed, the following notation is used to represent the options clicked: application > option > task > sub-task. For example to access the local user setup task, the user would be in the Common Services application, click the Server tab and then click the Security option, and finally the Local User Setup task from the TOC; in other words, Common Services > Server > Security > Local User Setup.
CiscoWorks Common Services v3.0 Tutorial
© 2005 Cisco Systems, Inc. All rights reserved.
Scenarios 3-9
Getting Started
Homepage Customization Common Services > Homepage > Settings
• Have the name of the server reflect that it is managing the East Coast Operations center
Modify Modify desktop desktop heading heading or or names names for for external external resources resources
• Create a link to our internal tools
Urgent UrgentMessages Messages from fromCisco.com Cisco.com
Dialog Dialog prompts prompts to to change change Provider Provider Group Group Name Name
(Must (Mustbe be unique unique&& requires requires Daemon DaemonManager Managerto tobe be restarted) restarted)
Update Common Services v3.0 Tutorial
© 2005 Cisco Systems, Inc. All rights reserved.
Scenarios 3-10
Homepage Customization The homepage acts as a common launch point for all CiscoWorks applications installed on the local server, as well as, remote CiscoWorks applications registered with the local server. The homepage can also be configured with links to other web-based external resources. Two headings are included for these external resources, labeled by default as Custom Tools and Third Party. Here we introduce Ted who is the IT manager for a large east coast based corporation. He recently purchased CiscoWorks LMS to facilitate and ease the management of their Cisco-based network. He has tasked one of his engineers, Sally, to help him configure and customize CiscoWorks for their network. The first task was to change the name displayed on the homepage from the default name of the server to something more meaningful. Also, he wishes to use the Custom Tools heading for links to internal webbased tools and hence want to also change that name. Before, presenting the steps, notice in the figure above that the Home Page tab has been selected and that the options include: Application Registration (use this task to add CiscoWorks applications on a remote server to the homepage), Links Registration (use this task to add URLs to other resources to be listed under either the Third Party or Custom Tools headers in the resource area of the homepage), and Settings (which Sally will use to carry out Ted’s requests). 1. Sally logs into the CiscoWorks server, and selects Common Services from the homepage. Select the Home Page tab, and then the Settings option. 2. The Homepage Settings dialog is displayed. Sally changes the Homepage Server Name to EastCoastOps and the Custom Name for the Custom Tools header to Internal Tools. Click Update to apply the changes. 3. A dialog is displayed that asks the user if the new name should also be used as the Provider Name. The Provider Name is shown as an extension to the application name in the Group Selector and helps to differentiate between applications on different servers when in DCR Master/Slave mode. Selecting Yes requires the Daemon Manager to be restarted. If necessary to restart the daemons on a Windows server, enter “net stop crmdmgtd” from the CiscoWorks server’s command line followed by “net start crmdmgtd” Note: it takes at least 5 minutes for all the services to restart. On a Solaris platform use: /etc/init.d/dmgtd stop and /etc/init.d/dmgtd start.
CiscoWorks Common Services v3.0 Tutorial
© 2005 Cisco Systems, Inc. All rights reserved.
Scenarios 3-10
Getting Started
Homepage Customization - Results Server Server Name Name on on Login Login Screen Screen and and Homepage Homepage
Custom Custom name name for for one one of of the the resources resources categories categories
Provider Provider Name Name
Common Services v3.0 Tutorial
© 2005 Cisco Systems, Inc. All rights reserved.
Scenarios 3-11
Homepage Customization - Results The figure above shows the results of the previous page. The new Server Name is displayed on the login banner, at the top of the homepage, and as the Provider Name on the group selector. Also note the name change of the former Custom Tools header in the Resource area of the homepage to Internal Tools.
CiscoWorks Common Services v3.0 Tutorial
© 2005 Cisco Systems, Inc. All rights reserved.
Scenarios 3-11
Getting Started
DCR Management – Set User Field Labels
Common Services > Device and Credentials > Admin > User Defined Fields
Select Select field field to to change change
Add a descriptive field to the DCR to indicate the location of a device
Enter Enter new new name name
Common Services v3.0 Tutorial
© 2005 Cisco Systems, Inc. All rights reserved.
Scenarios 3-12
DCR Management – Set User Field Labels The DCR is used as the common repository for all devices to be managed by CiscoWorks along with access credentials (passwords, SNMP community strings) and descriptive attributes. The user can choose to add custom attributes to help in the identifying and grouping process. By default, there are 4 user fields for this purpose, the CiscoWorks administrator can rename the fields and also choose to add more fields. Ted wants to help identify devices based on their building location and has asked Sally to rename User Field 0 to a more descriptive heading, called Location. Then everyone will know the purpose of the user field. To perform this task, Sally performed the following steps: 1. Select Common Services > Device and Credentials > Admin > User Defined Fields. 2. The User Defined Fields dialog is displayed showing the number of currently defined fields and their label. Sally selects user_defined_field_0 and clicks Rename. 3. A new dialog is displayed asking for the new Label and Description. After entering the information, select Apply to make the changes.
CiscoWorks Common Services v3.0 Tutorial
© 2005 Cisco Systems, Inc. All rights reserved.
Scenarios 3-12
Getting Started
DCR Management - Adding Devices Manually Common Services > Device and Credentials > Device Management
Select Select type type of of devices devices to to add add Note: Note: Devices Devices can can also also be be added added to to DCR DCR using using Campus Campus auto-discovery auto-discovery
(See (SeeCampus CampusTutorial Tutorialfor fordetails) details)
Enter Enter device device identity identity information information
Now let’s populate the DCR
Common Services v3.0 Tutorial
Add Add more morethan than one one device deviceat ataa time time
Go Go to to next next step step in in wizard wizard © 2005 Cisco Systems, Inc. All rights reserved.
Scenarios 3-13
DCR Management – Adding Devices Manually Now it’s time to add the devices, their credentials, and attributes. In this step, Sally adds the devices manually, using the user interface: 1.
Select Common Services > Device and Credentials > Device Management.
2.
The Device Summary dialog is displayed showing the applications installed locally (if in the DCR Master/Slave mode, then the applications from the other servers would also be displayed and distinguished by a unique Provider Name). Select Add to add a new device.
3.
A multiple step Device Information wizard is displayed (the number of steps vary depending on the type of device being added). Select the Standard radio button as the type of device to be added. Enter the information necessary to identify the device and click the button Add To List. This feature allows more than one device to be added at a time when the devices have the same credentials and user field attributes). When done adding devices, select Next > to go to the next step of the wizard.
CiscoWorks Common Services v3.0 Tutorial
© 2005 Cisco Systems, Inc. All rights reserved.
Scenarios 3-13
Getting Started
DCR Management - Adding Devices Manually, continue …
Notice Noticenew new field field name name
Enter Enter User User Field Field information information Add Add the the same same credentials credentials for for the the device(s) device(s) being being added added
Common Services v3.0 Tutorial
© 2005 Cisco Systems, Inc. All rights reserved.
Scenarios 3-14
DCR Management – Adding Devices Manually, continue … 4.
The Add Credentials Template dialog is displayed as the next step of the add device(s) wizard. Use this template to add the access credentials for the devices being added. The only mandatory credential is SNMP read access (either v2 or v3). However, some CiscoWorks applications require access information to perform their tasks. When credential information has been entered, select Next > to go to the final step of the wizard.
5.
The User Defined Fields dialog is displayed as the last step of the add device(s) wizard. Notice that the first entry is label Location as changed previously. Enter the appropriate Location for all devices being added. Click Finish to add the device(s).
Note: that all devices added to the list in the first step of the wizard get the same credentials and User Field values. Note: SNMPv3 requires setup on a device to allow users different access to different parts of the MIB (view). The following commands allow a user read/write access to all MIB variables. (CatOS requires ‘set’ in front of the commands): Create View – snmp view 1.3.6.1 included nonvolatile Set Security Model for group and view access – snmp access security-model v3 authentication read write nonvolatile Create User and authentication protocol – snmp user authentication md5 Create a group and associate the user with it – snmp group user securitymodel v3 nonvolatile Note: SNMP v2 and v3 can both be set, but if v3 is enabled it takes precedence.
CiscoWorks Common Services v3.0 Tutorial
© 2005 Cisco Systems, Inc. All rights reserved.
Scenarios 3-14
Getting Started
DCR Management – Importing Devices from a File
Header Header determines determines fields fields of of data data that that can can be be entered entered
Enter Enter device device information information I have a lot of devices to enter. Let me use a bulk import from a file.
To Tosee seepotential potentialfields: fields: From Fromaacommand command line lineenter: enter: dcrcli dcrcli –– uu Enter Enterpassword password when when prompted prompted Enter: Enter: lsattr lsattr Edit Edit NMSROOT\objects\dcrimpexp\conf\Export_Format_CSV.xml NMSROOT\objects\dcrimpexp\conf\Export_Format_CSV.xml or or Export_Format_XML.xml Export_Format_XML.xmlto tospecify specifythe theattributes attributesto to be be imported imported
Common Services v3.0 Tutorial
© 2005 Cisco Systems, Inc. All rights reserved.
Scenarios 3-15
DCR Management – Importing Devices from a File Manually adding devices can be a very labor intensive process. Common Services also allows for bulk import of devices from a file. The Help screens for the Bulk Import processes includes a link to sample files to help define the format and set them up. The above figure shows the DCRCSV version 3.0 file. The fields listed in the header determine what is to be imported (and exported as well). To control these fields edit the following file: $NMSROOT\objects\dcrimpexp\conf\Export_Format_CSV.xml. To know what the potential fields are, use the DCR CLI task. From the command line of the CiscoWorks server, ender dcrcli –u username where username is a CiscoWorks account. Enter the password when prompted. Enter lsattr to view a list of all possible fields. Modify the header line in the file accordingly. Note(s): •
Version 2.0 of the CSV which is fixed and a little more straight forward can also be used, but may not always be supported
•
The CSV export is always in Version 3.0 format.
CiscoWorks Common Services v3.0 Tutorial
© 2005 Cisco Systems, Inc. All rights reserved.
Scenarios 3-15
Getting Started
DCR Management – Importing Device from a File, continue … Common Services > Device and Credentials > Device Management
Enter Enter the the file file to to import import
Create Create aa list list of of device device not not to to Add Add or or Import Import into into the the DCR DCR
Results Results of of Import Import Can Can be be scheduled scheduled
Common Services v3.0 Tutorial
© 2005 Cisco Systems, Inc. All rights reserved.
Scenarios 3-16
DCR Management – Importing Devices from a File (Cont) Once the file has been created, use these steps to import the file: 1. Select Common Services > Device and Credentials > Device Management. 2. The Device Summary dialog is displayed showing the applications installed locally (if in the DCR Master/Slave mode, then the applications from the other servers would also be displayed and distinguished by a unique Provider Name). Select Bulk Import. 3. The Import Devices dialog is displayed. Select File as the source of the import and enter the location and type of file. Since we want to use this new information being imported, select “Use Data from Import Source” as the conflict resolution option. If desired, the import can be scheduled, here we select Immediate. Click Import to import the devices listed into the file into the DCR. 4. The results of the import will be displayed in the Import Status dialog. If devices are listed in the Not Imported area of the dialog, click on the number to see details. Note(s): • If using this mechanism for simply changing credentials or attributes, the devices are not imported and will be listed as Conflicting Devices. This is correct behavior since no device are actually imported only the credentials or attributes have been changed. • See the Campus Manager tutorial or User Guide for information on how to populate the DCR using the device auto-discovery feature of Campus. • The “Exclude” feature allows you to specify a file that contains the list of the devices that should not be added to DCR using the Add or Import operations. During Add or Import operations, DCR makes sure that the device being added or imported is not listed in the Exclude Device List. A device can be excluded based on its hostname+domain name, IP address and device-identity fields.
CiscoWorks Common Services v3.0 Tutorial
© 2005 Cisco Systems, Inc. All rights reserved.
Scenarios 3-16
Getting Started
DCR Management – Importing Devices from Local or Remote NMS Let me also try importing devices from our remote HPOV server.
Import Import from from Local Local NMS NMS •• HP HP OpenView OpenView Network Network Node Node Manager Manager 6.x 6.x (Solaris, (Solaris, HPUX) HPUX) •• Tivoli Tivoli NetView NetView 7.x 7.x (Solaris, (Solaris, AIX) AIX) Import Import from from Remote Remote NMS NMS •• HP HP OpenView OpenView Network Network Node Node Manager Manager 6.x 6.x (Solaris, (Solaris, HPUX) HPUX) •• Tivoli Tivoli NetView NetView 7.x 7.x (Solaris, (Solaris, AIX) AIX) •• ACS ACS on on Windows2000 Windows2000
Common Services v3.0 Tutorial
© 2005 Cisco Systems, Inc. All rights reserved.
Scenarios 3-17
DCR Management – Importing Devices from Local or Remote NMS Even adding devices using a text file can be a very labor intensive process. Common Services also allows for bulk import of devices from local or remote third party network management system (NMS), such as HP OpenView, Tivoli NetView, and ACS (remote server). If importing from a remote NMS, you must have permissions to log into the remote NMS without a password. Common Services uses remote login to log into the Server and get device details. The rhosts file should be modified to enable you to login without a password.
CiscoWorks Common Services v3.0 Tutorial
© 2005 Cisco Systems, Inc. All rights reserved.
Scenarios 3-17
Getting Started
DCR Management – Results Common Services > Device and Credentials > Reports
List List devices devices and and credentials credentials in in the the DCR DCR
Common Services v3.0 Tutorial
Audit Auditreport reportshows shows changes changesto toDCR DCR © 2005 Cisco Systems, Inc. All rights reserved.
Scenarios 3-18
DCR Management – Results of Adding Devices After the devices have been added to the DCR, verify the contents of the DCR by generating a Device List Report: 1.
Select Common Services > Device and Credentials > Reports.
2.
The Report Generator dialog is displayed listing the possible reports. Click on the Device List Report. Click on the options displayed to see more details about the devices and click Generate.
The DCR Device list report is displayed showing the devices in the DCR and associated attributes (if the options for the report were selected). Note: to see changes to the DCR, select the Audit Report and pick a time frame to report on.
CiscoWorks Common Services v3.0 Tutorial
© 2005 Cisco Systems, Inc. All rights reserved.
Scenarios 3-18
Getting Started Grouping Services
Common Services > Groups> Group Admin
While While in in Common Common Services, Services, groups groups can can only only be be created created under under the the CS CS User User Defined Defined Groups Groups folder folder
Reports and tasks will probably be executed based on the location of the device Let’s start by grouping devices in the same building together Common Services v3.0 Tutorial
© 2005 Cisco Systems, Inc. All rights reserved.
Scenarios 3-19
Grouping Services Groups are used to logically organize devices together based on some common attribute. When using CiscoWorks, tasks are often run against a set of devices. Having carefully thought out how tasks and reports will be used, user-defined groups can assist and simplify the device selection process. Ted suspects that many reports and tasks will be run against all devices in a building, and that was one reason why he added the user-defined field “Location” and populated the field with the building that the device resided in. Ted tasks Sally to use this fact to create groups based on the location of a device. Sally uses the following steps to create a group: 1.
Select Common Services > Groups.
2.
The Group Administration and Configuration dialog is displayed containing a Group Selector which lists the different CiscoWorks applications known to this server.
3.
Sally expands the Common Services entry to revel the group categories for Common Services. When using Common Services to create groups, the groups must be created under the User Defined Groups category; so Sally selects it. If user-defined groups were already defined under Common Services, Sally could have selected one of them, thus creating a hierarchy of groups. The right side of the dialog displays information about the selected group.
4.
Click Create to perform the next step.
CiscoWorks Common Services v3.0 Tutorial
© 2005 Cisco Systems, Inc. All rights reserved.
Scenarios 3-19
Getting Started
Grouping Services - Properties
Enter Enter meaningful meaningful name name Inherit Inherit rules rules
Dynamic Dynamic or or static static membership membership Usable Usable only only by by current current user user (Private) (Private) or or by by all all CiscoWorks CiscoWorks users users (Public) (Public)
Common Services v3.0 Tutorial
© 2005 Cisco Systems, Inc. All rights reserved.
Scenarios 3-20
Grouping Services - Properties By clicking Create on the Group Administration dialog, the four step Create Group wizard is launched. The first step is to set the group properties: 5.
Enter a meaningful name for the group.
6.
If attributes are to be selected from an existing Common Services system or user-defined group use the Select Group button.
7.
If creating a hierarchy of sub-groups, use the Change Parent button to change the group parent.
8.
Membership updates can be Automatic meaning that if a device meets the rules of membership at any time, then it becomes a member, or loses membership if it no longer matches the membership rules. This is known as a dynamic group. Conversely, selecting Only Upon User Request effectively makes a static group whose membership is only changed by the group creator regardless if a device meets or no longer meets the membership rules after the group was created.
9.
The Visibility Scope defines who will see this group in the device selector. If Sally were to select Private, then Ted would not be able to use this group when he logged into CiscoWorks unless he also has created a similar group.
10. Click Next > to go to the next step in the Create Group wizard.
CiscoWorks Common Services v3.0 Tutorial
© 2005 Cisco Systems, Inc. All rights reserved.
Scenarios 3-20
Getting Started
Grouping Services – Membership Rules
Create Create one one or or more more rules rules to to define define membership, membership, using using multiple multiple possible possible variables variables and and operators operators Rich Rich set set of of variables variables to to create create rules rules
Note Note the the new new name name for for User_Field_0 User_Field_0 Rules Rules can can be be combined combined with with Boolean Boolean operators operators
Tip: Tip: Create Create aa Static Static List List of of Devices Devices Common Services v3.0 Tutorial
•• Do Donot notenter enterany anyrules rules •• Add Adddevices devicesmanually manuallyby byselecting selectingfrom fromaalist listin inStep Step3: 3: Membership Membership © 2005 Cisco Systems, Inc. All rights reserved.
Scenarios 3-21
Grouping Services - Membership Rules The next step of the Create Group wizard is to define the rules that determine membership in the group. Rules can be created using just about every variable in the DCR using multiple operators including equals, contains, etc. Rules can be combined with Boolean operators to create very detailed membership rules. 11. From the variable pull down list, Sally selects Location (This is the former user_defined_field_0 variable) 12. From the Operator Pull down list, select equals. 13. In the value field enter Bldg10 (all devices added to the DCR should have had their Location variable populated with their location). 14. Click Add Rule Expression to add membership rule (the rule is placed into the rule text area, additional rules could be added using Boolean logic if necessary. Note that when adding multiple rules, the user may need to edit the Rule Text to add appropriate parenthesis for proper rule interpretation). 15. Click Next> to go to the next step in the Create Group wizard.
CiscoWorks Common Services v3.0 Tutorial
© 2005 Cisco Systems, Inc. All rights reserved.
Scenarios 3-21
Preparing RME for Use
Grouping Services– Verify/Fine Tune Membership
List List of of devices devices meeting meeting rules rules just just created created
Add Add or or delete delete to to fine fine tune tune list list (appropriate (appropriate rules rules will will be be added) added)
Common Services v3.0 Tutorial
© 2005 Cisco Systems, Inc. All rights reserved.
Scenarios 3-22
Grouping Services – Verify / Fine-Tune Group Membership Step 3 of the Create Group wizard displays the membership of the group on the right side of the dialog box based on the membership rules just created. The left side of the dialog box is a list of the remaining available devices in the parent group. This step can be used to fine tune membership in the group by adding and/or removing devices. Devices added or removed will cause the appropriate membership rules to be generated. 16. If necessary, fine-tune the device selection and then click Next> to go to the final step in the Create Group wizard.
CiscoWorks Common Services v3.0 Tutorial
© 2005 Cisco Systems, Inc. All rights reserved.
Scenarios 3-22
Getting Started
Grouping Services - Summary
Summary Summary of of group group attributes attributes
New New group group added added
Common Services v3.0 Tutorial
© 2005 Cisco Systems, Inc. All rights reserved.
Scenarios 3-23
Grouping Services - Summary The final wizard step shows a summary of the group just created. 17. Click Finish to create the group. The device selector now displays the Bldg10 group as a child group to the User Defined Groups entry.
CiscoWorks Common Services v3.0 Tutorial
© 2005 Cisco Systems, Inc. All rights reserved.
Scenarios 3-23
Getting Started User Accounts
Common Services > Server > Security > Local User Setup
The The “guest” “guest” user user account account was was created created during during install install with with the the Help Help Desk Desk user user role role
Bill Crane will be using CiscoWorks and needs Network Operator privileges
Define Define user user roles roles for for user user account account
Common Services v3.0 Tutorial
© 2005 Cisco Systems, Inc. All rights reserved.
Scenarios 3-24
User Accounts At this point, Common Services is configured and ready for use (other CiscoWorks applications require additional setup prior to their use). Sally simply needs to create new CiscoWorks users and assign appropriate permission (user roles) so others can begin to use CiscoWorks. 1.
Select Common Services > Server > Security > Local User Setup.
2.
The Local Users Setup dialog is displayed showing all currently configured users. Select Add to create a new user.
3.
The User Information dialog is displayed. Enter the following: •
Username
•
Password
•
Optional E-mail address (required for Approver user role)
•
One or more user permissions (roles) to be assigned to this user.
Remember, the assigned user roles dictate the tasks that can be performed by this user. If they do not have the correct user permission for a certain task, then that task will not even be listed in the navigation structure. To view the tasks associated with each user role, review the Permissions Report using the following task: Common Services > Server > Reports > Permissions Report. 4.
Click OK to create the new user.
CiscoWorks Common Services v3.0 Tutorial
© 2005 Cisco Systems, Inc. All rights reserved.
Scenarios 3-24
Configuring MultiServer Environment
•
Getting Started
¾ Configuring Multi-Server Environments •
Using ACS for AAA Services
CiscoWorks Common Services v3.0 Tutorial
© 2005 Cisco Systems, Inc. All rights reserved.
Scenarios 3-25
Configuring Multi-Server Environments • Update Self-Signed Certificates • Configure System Identity Account • Configure Peer Server Account • Exchange Certificates
The West Coast Operation folks have got their server in place. Let’s create a multi-server environment so we only need to log in once and have a common DCR
• Configure Single Sign-On • Configure DCR Master/Slave • Application Registration
Note: Note: SSO SSO and and DCR DCR Master/Slave Master/Slave Mode Mode can can be be used used independently independently or or together together
(Both (Bothhowever howeverrequire requiremulti-server multi-servertrust trust to tobe beconfigured) configured)
Common Services v3.0 Tutorial
West System System Identity Identity Account Account Peer Peer Server Server Account Account Certificate Certificate
East Password is Shared Secret
Peer Account used to access remote Server (System Identity Account) Exchange Certificates
DCR Slave SSO Slave © 2005 Cisco Systems, Inc. All rights reserved.
System System Identity Identity Account Account Peer Peer Server Server Account Account Certificate Certificate
DCR Master SSO Master
Scenarios 3-26
Configuring Multi-Server Environments There are many reasons to deploy more than one CiscoWorks server: to add redundancy, to distribute applications, or to regionalize network management services. Whatever the reason, Common Services includes some multi-server features to enhance the use of CiscoWorks in a multi-server environment. The first multi-server feature is Single-Sign-On (SSO). This allows for a user to authenticate once and then browse and use any server in the management domain without having to authenticate with every server. SSO mode requires one server to be the authentication master. Since all others servers must now securely access this server to process logins, trust must be setup between the servers. Another multi-server feature is the duplicating of DCRs to ensure all servers in the domain have the same device and credential information. This mode also requires trust between the servers and a way to login to each other. And once trust has been established between the CiscoWorks servers, it is easy to have the homepage of one server registered with all other servers to facilitate browsing and task execution. Now a few caveats. All these modes described above are optional in a multi-server environment and can also be used independently of each other. However, they all require some form of trust between the servers to be used. Therefore, the main goal of this scenario is to setup the trust between the CiscoWorks servers. Although all of these steps are not required for each mode, it is easiest to simply just configure them all to ensure proper trust between the servers.
CiscoWorks Common Services v3.0 Tutorial
© 2005 Cisco Systems, Inc. All rights reserved.
Scenarios 3-26
Configuring Multi-Server Environments Update Self-Signed Certificate
Perform Perform step step on on all all servers servers
Common Services > Server > Security > Single-Server Management> Certificate Setup A A certificate certificate is is generated generated during during installation. installation. This This step step allows allows you you to to add add more more information, information, ifif desired. desired.
Changing Changing the the certificate certificate requires requires the the CiscoWorks CiscoWorks Daemon Daemon Manager Manager to to be be restarted. restarted. IfIf multi-server multi-server trust trust is is already already established, established, the the certificates certificates Common Services v3.0 must must be be exchanged exchanged again again Tutorial
© 2005 Cisco Systems, Inc. All rights reserved.
Scenarios 3-27
Update Self-Signed Certificates Secure communications between servers require the use of certificates. When CiscoWorks is installed a selfsigned certificate is generated that can be used. The administrator, however, may wish to include additional information in the security certificate. Use these steps to update a self-signed certificate: 1. Select Common Services > Server > Security > Single-Server Management> Certificate Setup. 2. The Self Signed Certificate Setup dialog is displayed with the field used for the current certificate filled in. Enter or change information as appropriate. Select Apply to install the certificate. 3. To start using the new certificates, the CiscoWorks Daemons will need to be restarted. To restart the daemons on a Windows server enter “net stop crmdmgtd” from the CiscoWorks server’s command line followed by “net start crmdmgtd” Note: it takes at least 5 minutes for all the services to restart. To restart the daemons on a Solaris platform use: /etc/init.d/dmgtd stop and /etc/init.d/dmgtd start. Note: Anytime a certificate is regenerated it will need to be exchanged with partners in the trust domain to continue server to server communication. We will discuss certificate exchange shortly.
CiscoWorks Common Services v3.0 Tutorial
© 2005 Cisco Systems, Inc. All rights reserved.
Scenarios 3-27
Configuring Multi-Server Environments Create New User for System Identity
Common Services > Server > Security > Single-Server Management> Local User Setup Perform Perform on on all all Servers Servers (System (System Identity Identityaccount accountpasswords passwords must mustbe be identical, identical,user username nameshould shouldalso alsobe beidentical identical to toease easePeer PeerServer ServerAccount Accountsetup) setup)
By By default, default, the the admin admin user user created created at at install install is is the the System System Identity Identity User User System SystemIdentity IdentityUser User requires requires ALL ALL privileges privileges
(Creating (Creatingnew newSystem SystemIdentity Identityuser user may mayreduce reduceconfusion) confusion)
Common Services v3.0 Tutorial
© 2005 Cisco Systems, Inc. All rights reserved.
Scenarios 3-28
Create New User for System Identity Secure server to server communication requires each peer server to use the same shared secret. The System Identity account password is used as that shared secret. Also, DCR Master/Slave mode requires servers to login to each other, this account will also serve that purpose. Note: At install time, the admin account is used as the System Identity account and the installer has the choice of selecting the password for this account. To avoid any confusion since the admin account is used to configure the system, a new user account is created here whose sole function is as the trust user. Note: All servers participating in the management domain need to have the same setup performed. 1. Select Common Services > Server > Security > Single-Server Management> Local User Setup. 2. The Local Users Setup dialog is displayed showing all currently configured users. Select Add to create a new user. 3. The User Information dialog is displayed. Enter a username, password, E-mail address (required for Approver user role) and select all user permissions (required for the System Identity User). 4. Click OK to create the new user.
CiscoWorks Common Services v3.0 Tutorial
© 2005 Cisco Systems, Inc. All rights reserved.
Scenarios 3-28
Configuring Multi-Server Environments Configure System Identity Account
Common Services > Server > Security > Multi-Server Trust Management> System Identity Setup
Set Set the the System System Identity Identity to to the the user user just just created created
Perform Perform on on all all Servers Servers (Only (Onlyrequired requiredon onSlave SlaveServer Server–– System System Identity IdentityAccount Accountisisused usedby by the theMaster Master to toaccess accessslave. slave.Doing Doing on onall allservers serverssimplifies simplifies configuration) configuration)
Common Services v3.0 Tutorial
Remember Remember the the System System Identity Identity password password acts acts as as the the Shared Shared Secret Secret
© 2005 Cisco Systems, Inc. All rights reserved.
Scenarios 3-29
Configure System Identity Account Now that we have created a user to handle all trust activities, we must set this user as the System Identity Account on all servers in the domain. 1. Select Common Services > Server > Security > Multi-Server Trust Management> System Identity Setup. 2. The System Identity Setup dialog is displayed showing the current System Identity user (admin by default). Enter the user name and password just created on the previous page. 3. Click Apply. If you entered a user not in the local database, then an error message is displayed. If the user entered does not have ALL user roles, then an error message will also be displayed.
CiscoWorks Common Services v3.0 Tutorial
© 2005 Cisco Systems, Inc. All rights reserved.
Scenarios 3-29
Configuring Multi-Server Environments Configure Peer Server Account
Perform Perform on on all all Servers Servers (Only (Onlyrequired requiredon onMaster Masterserver server–– Peer PeerServer Server Account Account to toaccess access each eachslave. slave.Doing Doingon onall allservers servers simplifies simplifiesconfiguration) configuration)
Common Services > Server > Security > Multi-Server Trust Management> Peer Server Account Setup
Setting Setting the the System System Identity Identity automatically automatically adds adds that that user user as as aa Peer Peer Server Server Account Account
Server1 Server1 Peer Peer Server Server Account Account should should equal equal System System Identity Identity account account of of Server2 Server2 Common Services v3.0 Tutorial
© 2005 Cisco Systems, Inc. All rights reserved.
Scenarios 3-30
Configure Peer Server Account In DCR Master/Slave mode, the master periodically needs to login to the Slave servers. This is done by logging into the System Identity Account. To set this up, set the Slave’s System Identity Account in the Peer Server Account. To simplify all this, the Peer Server Account on all servers should simply be the System Identity account previously created. In fact to make this even simpler, when the System Identity User is setup (previous page), it is automatically also configured in the Peer Server Account, thus basically requiring no setup. To verify the System Identity User is also a Peer Server Account: 1. Select Common Services > Server > Security > Multi-Server Trust Management> Peer Server Account Setup. 2. The Peer Server Account Setup dialog is displayed. At least two accounts should be listed, the admin account (former System Identity account) and the new user account we created and set as the System Identity Account. (Other user accounts that have all user roles assigned may also be displayed.) 3. No need for any further action.
CiscoWorks Common Services v3.0 Tutorial
© 2005 Cisco Systems, Inc. All rights reserved.
Scenarios 3-30
Configuring Multi-Server Environments Exchange Certificates
Common Services > Server > Security > Multi-Server Trust Management> Peer Server Certificate Setup
Peer Peer Server Server
Perform Perform on on all all Servers Servers
Common Services v3.0 Tutorial
© 2005 Cisco Systems, Inc. All rights reserved.
Scenarios 3-31
Exchange Certificates The final part of the secure server to server communications is the exchanging of certificates between the Master and Slave servers. This is necessary for both SSO and DCR Master/Slave modes. The Master server will need certificates from all Slave servers and the Slave servers will need the certificate of the Master server. Slaves should also exchange certificates in order to display shared groups. 1. Select Common Services > Server > Security > Multi-Server Trust Management> Peer Server Certificate Setup. 2. The Peer Server Certificate Setup dialog is displayed listing any current peer certificates already imported. Select Add. 3. The Peer CiscoWorks Certificate dialog is displayed. Enter the IP Address or Hostname of the peer CiscoWorks server to import its certificate. Use the HTTP port for the server, and click OK. 4. The Details of Client Certificate will be displayed. Click Accept to import the certificate into the server’s trusted store. At this point, the configuration for secure communication between the servers is complete.
CiscoWorks Common Services v3.0 Tutorial
© 2005 Cisco Systems, Inc. All rights reserved.
Scenarios 3-31
Configuring Multi-Server Environments Configure Single Sign-On (SSO) Mode
Common Services > Server > Security > Multi-Server Trust Management> Single Sign-On Setup Perform Perform first first on on Master Master (SSO (SSO Authentication) Authentication) Server Server
Perform Perform on on Slave Slave (SSO (SSO Regular) Regular) Server Server
Set Set as as Master Master Set Set as as slave, slave, point point to to master master
New New Mode Mode
Common Services v3.0 Tutorial
New New Mode Mode
© 2005 Cisco Systems, Inc. All rights reserved.
Scenarios 3-32
Configure Single Sign-On Mode There are two types of servers in the Single Sign-On mode: the SSO Authentication server (Master), and the SSO Regular server (slave). Both servers use the same task to configure their SSO role, but with different parameters, as illustrated above and described below: 1. Select Common Services > Server > Security > Multi-Server Trust Management> Single Sign-On Setup. 2. The Single Sign-On Setup dialog is displayed showing the current SSO configuration for the server (default is Standalone). 3. SSO Master Configuration – Select the Master radio button and click Apply for the new configuration to take effect. SSO Slave Configuration – Select the Slave radio button and enter the IP address or Hostname of the SSO master. Also enter the SSL port (remember this is secure communications), and click Apply for the new configuration to take effect. Now, when a user attempts to login to a SSO slave, the login request will be forwarded to the SSO Master for authentication. The user will see the login banner for the SSO Master server, but when authentication is completed, the homepage of the Slave server will be displayed. Of course, this means all users must have an account in the SSO Master server. The authorization or user permissions, however, are based on the permissions assigned to the user account on the server being accessed.
CiscoWorks Common Services v3.0 Tutorial
© 2005 Cisco Systems, Inc. All rights reserved.
Scenarios 3-32
Configuring Multi-Server Environments DCR Master/Slave Mode
Common Services > Device and Credentials > Admin > Mode Settings Perform Perform first first on on Master Master Server Server
Perform Perform on on Slave Slave Server Server
Set Set as as Master Master Set Set as as slave, slave, point point to to master master
New New Mode Mode
Common Services v3.0 Tutorial
New New Mode Mode
© 2005 Cisco Systems, Inc. All rights reserved.
Scenarios 3-33
DCR Master/Slave Mode Again, the configuration for the two types of servers in the DCR Master/Slave mode uses the same task with different parameters: 1. Select Common Services > Device and Credentials > Admin > Mode Settings. 2. The Mode Settings dialog is displayed showing the current DCR Mode configuration for the server (default is Standalone). Click Change Mode. 3. DCR Master Configuration – Select the Master radio button and click Apply for the new configuration to take effect. DCR Slave Configuration – Select the Slave radio button and the entered hostname must exactly match the hostname in the Master’s self-signed certificate. Also enter the SSL port (remember this is secure communications). If the Slave DCR has devices in it, select the “Add new devices to Master” check box, and click Apply for the new configuration to take effect. Now, all servers in the management domain should synchronize their DCR so they should all be identical. All device and credential administration will now take place on the DCR Master server.
CiscoWorks Common Services v3.0 Tutorial
© 2005 Cisco Systems, Inc. All rights reserved.
Scenarios 3-33
Configuring Multi-Server Environments Slave Server Update
All All DCR DCR operations operations are are now now done done from from the the DCR DCR Master Master Server Server
Notice: Notice: Only Only one one operation operation available available under under Device Device and and Credentials Credentials tab tab on on slave slave server server
All All Common Common Service Service Group Group activities activities are are also also now now done done from from DCR DCR Master Master Server Server Common Services v3.0 Tutorial
© 2005 Cisco Systems, Inc. All rights reserved.
Scenarios 3-34
Slave Server Update Since the DCR Master server is now responsible for all manipulation of the DCR, some of the menus on the DCR Slave server will be different. • When selecting the Device and Credentials tab on the DCR Slave server, the only task available is the ability to change the DCR mode. • Selecting the Groups tab on the DCR Slave server will display an informational message reminding the administrator that no manipulation of the DCR is available on the DCR Slave.
CiscoWorks Common Services v3.0 Tutorial
© 2005 Cisco Systems, Inc. All rights reserved.
Scenarios 3-34
Configuring Multi-Server Environments DCR Update
Common Services > Device and Credentials > Reports > Audit Log View View the the devices devices from from Slave Slave server server being being added added to to Master Master DCR DCR
Common Services v3.0 Tutorial
Devices Devices added added to to the the DCR DCR by by the the System System Identity Identity User User © 2005 Cisco Systems, Inc. All rights reserved.
Scenarios 3-35
DCR Update Use the DCR audit report on the Master server (Common Services > Device and Credentials > Reports > Audit Log) to see the Slave devices being imported into the Master DCR. The imported devices will be indicated by the “Device Added” value in the Changed Information Field. Notice that these devices are added by the System Identity User.
CiscoWorks Common Services v3.0 Tutorial
© 2005 Cisco Systems, Inc. All rights reserved.
Scenarios 3-35
Configuring Multi-Server Environments Application Registration
Common Services > Homepage > Application Registration
Perform Perform on on All All Servers Servers
(Allows (Allows for foreasier easiernavigation navigationbetween between two twoservers) servers)
Import Import from from Other Other Servers Servers requires requires Multi-Server Multi-Server Trust Trust to to already already be be configured configured
Common Services v3.0 Tutorial
© 2005 Cisco Systems, Inc. All rights reserved.
Scenarios 3-36
Application Registration A possible configuration in a multi-server environment is to add the applications of a remote server to the homepage of the local server. This can be done using templates if secure communication is not established between the servers, or by importing the applications if a trust relationship has been established. Having the remote applications on the local homepage facilitates the browsing within the management domain. If SSO is enabled, browsing to a remote application will not require re-authentication. To import applications from a remote server, follow these quick steps: 1. Select Common Services > Homepage > Application Registration. 2. The Registration Location wizard dialog is displayed. Select Import from Other Servers and click Next > to go to the next step of the wizard.
CiscoWorks Common Services v3.0 Tutorial
© 2005 Cisco Systems, Inc. All rights reserved.
Scenarios 3-36
Configuring Multi-Server Environments Application Registration, continue …
Enter Enter Server Server to to retrieve retrieve information information about about applications applications and and links links installed installed Enter Enter name name to to be be displayed displayed for for imported imported links links on on local local homepage homepage
Installed Installed applications applications and and links links that that can can be be imported imported for for display display on on local local servers servers home home page page Select Selectthe the Application Application Name Nameto to import import
Common Services v3.0 Tutorial
© 2005 Cisco Systems, Inc. All rights reserved.
Scenarios 3-37
Application Registration (Cont) 3. Enter the remote servers hostname or IP address, the name you wish to be associated with the applications on the local homepage (to indicate the remote server), and the secure SSL port being used for secure communications. Click Next > to go to the next step of the import applications wizard. 4. A list of all CiscoWorks applications and custom resource links configured on the remote server are displayed. Select the applications and links you wish to import to the local server and click Next > to go to the final step of the wizard.
CiscoWorks Common Services v3.0 Tutorial
© 2005 Cisco Systems, Inc. All rights reserved.
Scenarios 3-37
Configuring Multi-Server Environments Application Registration, continue …
Links Links from from remote remote server server imported imported as as well well Application Application registration registration import import summary summary
New New local local Homepage Homepage listing listing imported imported application application headings headings
Selecting Selecting remote remote application application will will launch launch application application without without needing needing to to re-authenticate re-authenticate with with SSO SSO mode mode enabled enabled Common Services v3.0 Tutorial
© 2005 Cisco Systems, Inc. All rights reserved.
Scenarios 3-38
Application Registration (Cont) 5. The final step of the wizard presents a summary of the items to be imported. Select Finish to execute the import. The homepage of the local server will now include the imported CiscoWorks applications annotated with the name of the server entered during import to indicate the remote server, and the imported links will now be included in the Resources portion of the homepage.
CiscoWorks Common Services v3.0 Tutorial
© 2005 Cisco Systems, Inc. All rights reserved.
Scenarios 3-38
Using ACS for AAA Services
•
Getting Started
•
Configuring Multi-Server Environments
¾ Using ACS for AAA Services
CiscoWorks Common Services v3.0 Tutorial
© 2005 Cisco Systems, Inc. All rights reserved.
Scenarios 3-39
Using ACS for AAA Services Optional
Benefits Benefits of of Using Using ACS ACS
The West Coast Operation folks have got their server in place. We have created a multi-server environment. Now, let’s use the Access Control Server for enhanced AAA Services.
•• Centralized Centralized user user account account management management •• Provides Provides device device level level authorization authorization and and restricts user to specific restricts user to specific tasks tasks •• Map Map CiscoWorks CiscoWorks User User Roles Roles and and customize customize roles roles to to meet meet AAA AAA needs needs
CiscoWorks Server
End-User Client Common Services v3.0 Tutorial
AAA Client
Access Control Server
© 2005 Cisco Systems, Inc. All rights reserved.
Scenarios 3-40
Using ACS for AAA Services Cisco Secure Access Control Server (ACS) provides authentication, authorization, and accounting (AAA) services to network devices that function as AAA clients, such as a network access server, PIXFirewall, or router, and even the CiscoWorks server. This final scenario will look at the steps required to configure the CiscoWorks server as an AAA Client and use ACS for AAA services. CiscoWorks can be optionally integrated with an ACS server to address the following tasks: • Provide centralized user management for a group of CiscoWorks servers • Provide device level authorization. Device level authorization restricts user access to perform certain tasks such as configuration updates and software image updates by authorizing the user for the task. • Provide editable user roles. The user roles are mapped to tasks that the user is authorized to perform on the devices. ACS allows for the modification of the existing CiscoWorks user roles and for the creation of a new user role. • Using ACS, groups of users can be assigned user roles per group of devices on a per application basis for the ultimate in authorization control.
CiscoWorks Common Services v3.0 Tutorial
© 2005 Cisco Systems, Inc. All rights reserved.
Scenarios 3-40
Using ACS for AAA Services Configuration Checklist
¾ Define CiscoWorks Server as a AAA Client in the Network Device Groups within ACS ¾ Add / Verify CiscoWorks System Identity User ¾ Change CiscoWorks Login Module to ACS Mode ¾ Edit ACS Groups ¾ Add Users in ACS and Assign to Groups ¾ System Identity User ¾ Regular Users
•• Refer Refer to to Chapter Chapter 3, 3, Scenarios, Scenarios, for for detailed detailed steps steps on on using using ACS ACS for for AAA AAA services services with with CiscoWorks CiscoWorks •• Refer Refer to to more more important important tips tips in in the the Notes Notes Section Section
Common Services v3.0 Tutorial
© 2005 Cisco Systems, Inc. All rights reserved.
Scenarios 3-41
Using ACS for AAA Services The illustration above highlights the tasks for configuring ACS with CiscoWorks for AAA services. Note(s): • If planning to use ACS, configure it after all CiscoWorks applications have been installed and the trust relationships have been established. • Multiple instances of same application on multiple CiscoWorks servers using the same ACS server will share settings. Any changes will affect all instances of that application. • If an application is configured with ACS and then the application is reinstalled, the application will inherit the old settings. • You can create new roles using ACS. The role you create is not shared across all the LMS applications. The role is shared across the same application in different CiscoWorks Servers registered to that particular ACS. You have to create new roles for each of the LMS applications that are running on the CiscoWorks Server. For example: Assume you have configured 10 CiscoWorks Servers with an ACS server and you have created a role in RME (say, RMESU). This role is shared for the RME application that runs on all 10 CiscoWorks Servers. • System Identity User in ACS Mode: There can only be one System Identity User per machine. The System Identity User you configure has to be a Peer Server User. In ACS mode, the System Identity user needs to be configured in ACS, with all the privileges the user has in CiscoWorks.
CiscoWorks Common Services v3.0 Tutorial
© 2005 Cisco Systems, Inc. All rights reserved.
Scenarios 3-41
Using ACS for AAA Services
Defining NDGs for the CiscoWorks Servers
• Register the CiscoWorks server as an AAA client with the ACS server – Login to the ACS as administrator – Click Network Configuration – Click Add Entry to define a Network Device Group (NDG) for one or more AAA clients, the CiscoWorks server(s)
Common Services v3.0 Tutorial
© 2005 Cisco Systems, Inc. All rights reserved.
Scenarios 3-42
Defining NDGs for the CiscoWorks Servers The first step to using ACS for CiscoWorks authentication and authorization is to define the CiscoWorks server within the ACS server. The CiscoWorks server will be defined as a AAA client, just like network devices are. Just like when a user tries to login to a network device, when a user tries to login to the CiscoWorks server, the CiscoWorks server (AAA client) sends a request to the ACS server (AAA server). Follow these steps to define the CiscoWorks server as a AAA client within ACS. 1. Login to the Cisco Secure ACS server. 2. From the ACS navigation menu, choose Network Configuration. 3. In order for the Network Device Groups table to be displayed in the ACS server, the Network Device Groups option must be enabled. To enable the Network Device Groups table, click Advanced Options. Select the Network Device Groups check box. Click Submit+Restart. The Network Device Groups table will now be available. 4. In the Network Device Group (NDG) table, click Add Entry. This will allow you to create a NDG for containing one or more AAA clients, such as our CiscoWorks servers.
CiscoWorks Common Services v3.0 Tutorial
© 2005 Cisco Systems, Inc. All rights reserved.
Scenarios 3-42
Using ACS for AAA Services
Defining NDGs for the CiscoWorks Servers Defining Defining NDGs NDGs for for the the CiscoWorks CiscoWorks Server(s) Server(s)
Common Services v3.0 Tutorial
© 2005 Cisco Systems, Inc. All rights reserved.
Scenarios 3-43
Defining NDGs for the CiscoWorks Servers, continue … When Add Entry is selected in the Network Device Group (NDG) table, the New Network Device Group is displayed. If you have multiple CiscoWorks servers in a region that all users with the same privileges will access, they can be groups together. In this scenario, we want to separate the three servers into their own groups. Create three separte NDGs: CiscoWorks Server NOC, CiscoWorks Server SF, and CiscoWorks Server LA.
CiscoWorks Common Services v3.0 Tutorial
© 2005 Cisco Systems, Inc. All rights reserved.
Scenarios 3-43
Using ACS for AAA Services
Define the CiscoWorks Server as AAA Client
CiscoWorks CiscoWorks Server(s) Server(s)
Common Services v3.0 Tutorial
© 2005 Cisco Systems, Inc. All rights reserved.
Scenarios 3-44
Define CiscoWorks as an AAA Client Now you are ready to define each of the CiscoWorks servers as AAA Clients. Follow these steps to define the CiscoWorks server(s). 1. When the Add AAA Client dialog box appears, enter: •
The host name of the CiscoWorks server.
•
The IP address of the CiscoWorks server.
•
The Key value. *Be sure to give a value to the Key field so that the CiscoWorks server can contact the ACS server. You will need this key when changing the CiscoWorks AAA mode.
2. Leave the NDG as (Not Assigned). 3. Click Submit if you have more clients to enter or click Submit +Restart if that was the last one. 4. Repeat for all CiscoWorks server NDGs.
CiscoWorks Common Services v3.0 Tutorial
© 2005 Cisco Systems, Inc. All rights reserved.
Scenarios 3-44
Using ACS for AAA Services Verifying the System Identity User •• Create Create account account ifif itit doesn’t doesn’t already already exist exist from from creating creating aa multi-server multi-server environment environment •• System System Identity Identity User User required required for for communication communication between between CiscoWorks CiscoWorks and and ACS ACS server server •• Must Must then then create create user user on on ACS ACS
System SystemIdentity IdentityUser User requires requires ALL ALL privileges privileges
Set Set the the System System Identity Identity to to the the user user just just created created Common Services v3.0 Tutorial
© 2005 Cisco Systems, Inc. All rights reserved.
Remember Remember the the System System Identity Identity password password acts acts as as the the Shared Shared Secret Secret Scenarios 3-45
Verifying the System Identity User By default the admin user can be used as the System Identity user; it has all the user roles already assigned. In some environments, system administrators will create a separate local user with all the user roles and define this new user as the System Identity user. In either case, the System Identity user must be defined on both the CiscoWorks server and the ACS server, just like in the multi-server environment. This user is needed for communication between the servers. When back on the ACS server, create an identical user on ACS. Remember the passwords used; this acts as the shared secret key.
CiscoWorks Common Services v3.0 Tutorial
© 2005 Cisco Systems, Inc. All rights reserved.
Scenarios 3-45
Using ACS for AAA Services
Change the CiscoWorks Login Module to ACS Mode
Perform Perform this this step step on on all all the the CiscoWorks CiscoWorks Servers Servers
ACS ACS Server Server
•• Applications Applicationsand and their theirtasks tasksare are registered registeredwith with ACS ACS •• AAmapping mapping of of tasks tasksand andCiscoWorks CiscoWorks users usersroles rolesare areregistered registeredwith with ACS ACS
Key Key entered entered in in ACS ACS Common Services v3.0 Tutorial
© 2005 Cisco Systems, Inc. All rights reserved.
Scenarios 3-46
Change the CiscoWorks Login Module to ACS Mode With the CiscoWorks server defined as an AAA client within ACS, you are now ready to change the CiscoWorks Login Module from non-ACS mode to ACS mode. Follow these steps in doing so: 1.
Go to the Common Service panel, then choose Server > Security.
2.
As illustrated above, select AAA Mode Setup from the TOC menu options. The AAA Mode Setup dialog box appears.
3.
Select the ACS radio button in the AAA Mode Setup window.
4.
Enter all the ACS server details (including the Key value entered on the ACS server). In the corresponding ACS TACACS+ port numbers fields, the default port is 49. Secondary and Tertiary IP address and hostname details are optional. The values true and false will not be accepted in the Primary, Secondary, and Tertiary IP Address/Hostname fields.
5.
Mark the checkbox Register all installed applications with ACS. This option will register all the installed applications with the ACS server. Note that if an application is already registered with ACS, the current registration will overwrite the previous one.
6.
Click Apply to begin the registration process with the ACS server. The following actions take place: •
A list of tasks in the products is registered with the ACS server.
•
A list of default user roles—System Administrator, Network Administrator, Network Operator, Approved, and Help Desk—is registered with the ACS server.
•
A mapping of the applications tasks that the above user roles can execute is registered with the ACS user. The mapping between user roles and these tasks are registered with the user. Note that this is a default mapping of user roles and tasks and can be viewed in the CiscoWorks Permissions Report (Common Services > Server > Reports > Permission Report).
CiscoWorks Common Services v3.0 Tutorial
© 2005 Cisco Systems, Inc. All rights reserved.
Scenarios 3-46
Using ACS for AAA Services CiscoWorks Login Change - Results
• After clicking Apply on the AAA Mode Setup dialog, verify that all CiscoWorks applications got registered with the ACS server • Restart the CiscoWorks Daemon Manager to make changes effective
Common Services v3.0 Tutorial
© 2005 Cisco Systems, Inc. All rights reserved.
Scenarios 3-47
CiscoWorks Login Change – Results After clicking Apply in the AAA Mode Setup Window, the above summary screen will be displayed. Verify that all the CiscoWorks applications successfully registered with the ACS server. Then restart the CiscoWorks Daemon Manager to make changes effective. To restart the Daemon Manager: From Windows command prompt: net stop crmdmgtd net start crmdmgtd From Solaris Command prompt: /etc/init.d/dmgtd stop /etc/init.d/dmgtd start
CiscoWorks Common Services v3.0 Tutorial
© 2005 Cisco Systems, Inc. All rights reserved.
Scenarios 3-47
Using ACS for AAA Services Creating Secure Views Karen Mike
NOC/Mgmt Center
CiscoWorks Server (Master)
ACS 3.3
DCR
Charles
George
DCR
HPOV NNM
Los Angeles Server
San Francisco Server
DFM Alerts
CiscoWorks Regional Servers (Slaves)
DCR
DFM Alerts
Separate Networks San Francisco
Common Services v3.0 Tutorial
Los Angeles
© 2005 Cisco Systems, Inc. All rights reserved.
Scenarios 3-48
Creating Secure Views Secure Views allows access to perform a task on a AAA client to be restricted. Secure Views are applicable only when CiscoWorks server is in ACS Login mode. Secure Views enable filtering of group membership based on the user and the application task context in which a request is made. In creating the secure views, let’s first understand the restrictions in this scenario: •
George is the network administrator in San Francisco. He will only manage the devices in the San Francisco network.
•
Charles is the network administrator for Los Angeles. He will only manage the devices in the Los Angeles network.
•
Karen and Mike both work in the NOC at the data center. They have the responsibility for all the network management servers and can manage all the devices, if needed.
CiscoWorks Common Services v3.0 Tutorial
© 2005 Cisco Systems, Inc. All rights reserved.
Scenarios 3-48
Using ACS for AAA Services Defining New Users in ACS User Group x George
User Group 1
User Role + (NDG1, NGG2, NDG3, …) Network Administrator Network Device Groups:
• San Fran CiscoWorks Server • San Fran network devices
Charles
Network Administrator Network Device Groups:
User Group 2
User Group 3
=
• LA CiscoWorks Server • LA network devices
Karen Mike
Common Services v3.0 Tutorial
Network Administrator, System Administrator Network Device Groups: • • • •
© 2005 Cisco Systems, Inc. All rights reserved.
San Fran CiscoWorks Server LA CiscoWorks Server San Fran network devices LA network devices Scenarios 3-49
Defining the New Users The illustration above will help with defining the users and groups within ACS. Remember that the CiscoWorks servers are AAA Clients, as well as the network devices themselves. In the previous steps, we saw how the CiscoWorks applications were registered with the ACS. In addition, the CiscoWorks user roles are also registered. The default mapping between tasks and the roles can be changed in the ACS server, but note that the changed mapping won’t be reflected in the Permission Report in CiscoWorks.
CiscoWorks Common Services v3.0 Tutorial
© 2005 Cisco Systems, Inc. All rights reserved.
Scenarios 3-49
Using ACS for AAA Services Defining a New User Role in ACS
Karen Mike
CiscoWorks User Roles Needed • Network Administrator • System Administrator
CiscoWorks CiscoWorks applications applications registered registered with with ACS ACS Common Services v3.0 Tutorial
© 2005 Cisco Systems, Inc. All rights reserved.
Scenarios 3-50
Defining New User Roles in ACS In ACS, the administrator can assign only one role for a user on a Network Device Group. If a user requires privileges other than those associated with the current role, to operate on a Network Device Group, a custom role should be created. All necessary privileges to enable the user operate on the Network Device Group should be given to this role. In this scenario, Karen and Mike need to have System Administrator and Network Administrator privileges to operate on the devices and CiscoWorks servers for San Francisco and Los Angeles. In the upcoming steps, create a new role with Network Administrator and System Administrator privileges, and assign the role to the users so that they can operate on the appropriate network device groups.
CiscoWorks Common Services v3.0 Tutorial
© 2005 Cisco Systems, Inc. All rights reserved.
Scenarios 3-50
Using ACS for AAA Services Defining a New User Role in ACS
New Newrole role
Repeat Repeat (add (add new new role) role) for for all all the the CiscoWorks CiscoWorks applications applications registered registered with with ACS ACS (if (if necessary) necessary)
Common Services v3.0 Tutorial
© 2005 Cisco Systems, Inc. All rights reserved.
Scenarios 3-51
Defining New User Roles in ACS, continue … Cisco Secure ACS allows you to modify the privileges to these roles. You can also create custom roles and privileges that help you customize Common Services client applications to best suit your business workflow and needs. If another instance of RME is registered with the same Cisco Secure ACS, your instance of RME will inherit those role settings. Furthermore, any changes you make to RME roles will be propagated to other instances of RME through Cisco Secure ACS. If you reinstall RME, your Cisco Secure ACS settings will automatically be applied upon RME restart. To modify the CiscoWorks roles and privileges on Cisco Secure ACS: 1.
Select Shared Profile Components > Resource Manager Essentials and click on the RME roles that you want to modify.
2.
Select or deselect any of the RME tasks that suit your business workflow and needs.
3.
Click Submit.
CiscoWorks Common Services v3.0 Tutorial
© 2005 Cisco Systems, Inc. All rights reserved.
Scenarios 3-51
Using ACS for AAA Services Creating New Users in ACS User Group 1 George
User Group 2 Charles
User Group 3 Karen Mike
Common Services v3.0 Tutorial
•• Repeat Repeat (add (add new new user) user) and and assign assign to to appropriate appropriate group group for for all all users users •• Don’t Don’t forget forget to to create create the the System System Identity Identity user, user, too. too. © 2005 Cisco Systems, Inc. All rights reserved.
Scenarios 3-52
Creating New Users in ACS Now let’s create the users George, Charles, Karen, and Mike in ACS by following these steps: 1.
From the main window of the ACS server, click User Setup. The User Setup dialog box appears.
2.
Enter the following information:
3.
4.
•
Enter a username (in this example, “George”), then click Add/Edit.
•
Assign a password to the user George.
•
Assign him to group named Group1, then click Submit
Similarly, create the other users by repeating these step. •
Create Charles and assign him to Group 2.
•
Create Karen and assign her to Group 3.
•
Create Mike and assign him to Group 3.
Finally, create the System Identity user. Use the same user information that was created on the CiscoWorks server. In ACS mode, the System Identity user needs to be configured in ACS, with all the privileges the user has in CiscoWorks.
CiscoWorks Common Services v3.0 Tutorial
© 2005 Cisco Systems, Inc. All rights reserved.
Scenarios 3-52
Using ACS for AAA Services Creating Device Groups in ACS
San Francisco
Los Angeles
Common Services v3.0 Tutorial
© 2005 Cisco Systems, Inc. All rights reserved.
Scenarios 3-53
Creating Device Groups in ACS Now let’s create two device groups for the Cisco devices located in San Francisco and the other Cisco devices located in Los Angeles. 1.
From the main window in ACS, click Network Configuration. The Network Device Groups dialog is displayed.
2.
Click Add Entry.
3.
Create two Network Device Groups—San Francisco and Los Angeles as shown above. Click Submit after each entry.
CiscoWorks Common Services v3.0 Tutorial
© 2005 Cisco Systems, Inc. All rights reserved.
Scenarios 3-53
Using ACS for AAA Services Adding Devices to the Device Groups
San Francisco
Los Angeles
Add Add the the Cisco Cisco devices devices (configured (configured already already for for TACACS) TACACS) to to the the appropriate appropriate NDG NDG Common Services v3.0 Tutorial
© 2005 Cisco Systems, Inc. All rights reserved.
Scenarios 3-54
Adding Devices to the Device Groups Now let’s add devices into the two device groups just created for the Cisco devices located in San Francisco and the other Cisco devices located in Los Angeles. 1.
From the Network Device Groups dialog, click the San Francisco link and in the San Francisco AAA Client dialog box, click Add Entry to add a single device that is located in San Francisco, a subnet, or a range of devices based on IP addresses. You can use the wildcard asterisk (*) for an octet in the IP address. For example, if you want every AAA client in your 192.168.13.1 Class C network to be represented by a single AAA client entry, enter 192.168.13.* in the AAA Client IP Address box. You can define ranges within an octet of an IP address. For example, if you want every AAA client with an IP address between 192.168.13.12 and 192.168.13.221 to be represented by a single AAA client entry, enter 192.168.13.12-221 in the AAA Client IP Address box.
2.
Enter the Key value. The Key is the shared secret that the TACACS+ or RADIUS AAA client and Cisco Secure ACS use to encrypt the data. The key must be configured in the AAA client and Cisco Secure ACS identically, including case sensitivity.
3.
Click Submit if you have more devices or subnets to enter or click Submit +Restart if that was the last one.
4.
Repeat for all devices that require AAA services.
5.
Repeat steps for the Los Angeles NDG and its devices.
CiscoWorks Common Services v3.0 Tutorial
© 2005 Cisco Systems, Inc. All rights reserved.
Scenarios 3-54
Using ACS for AAA Services Configuring User Groups
George
Network Administrator
User Group 1
Network Device Groups:
• San Fran CiscoWorks Server • San Fran network devices
Scroll Scroll through through group group settings settings to to locate locate CiscoWorks CiscoWorks applications applications to to assign assign ONE ONE role role to to NDGs NDGs Common Services v3.0 Tutorial
© 2005 Cisco Systems, Inc. All rights reserved.
Scenarios 3-55
Configuring User Groups Now we need to tie it all together. The users were assigned to user groups when created. We can now rename these user groups. And now that the CiscoWorks applications have been registered with ACS, we can permit the users with a group to use the applications. Additionally, the flexibility of ACS will allow you to allow the users in the group to only has access to specific NDGs as well as specified task authorization on these devices, by assigning a user role to the NDG. Note that only one user role can be assigned per NDG. (For this reason, the ACS role of Administrators was created earlier. This role allows all tasks to be executed.) 1.
From the main window in ACS, click Group Setup.
2.
Select Group 1 from the pull-down menu to define George’s group and permissions.
3.
Click Rename Group. Enter San Fran – Net Admin to define the group for the network administrators located in San Francisco.
4.
Now define the NDG associations for the CiscoWorks applications in this group. Click Edit Settings.
5.
Scroll through the settings and find the CiscoWorks applications.
6.
The CiscoWorks Resource Manager Essentials application is illustrated. Click the radio button “Assign Resource Manager Essentials on a per Network Device Group Basis”.
7.
Since George will only have network administrator privileges on the San Francisco devices, select San Francisco from the Device Group pull-down menu. Change the role for this NDG to be Network Administrator. Click Add Association.
8.
Click Submit to make the changes. (You will need to click Submit+Restart when you are done making changes to the Groups.)
CiscoWorks Common Services v3.0 Tutorial
© 2005 Cisco Systems, Inc. All rights reserved.
Scenarios 3-55
Using ACS for AAA Services Configuring User Groups, continue …
User Group 3
Karen Mike
Network Administrator, System Administrator Network Device Groups: • • • •
San Fran CiscoWorks Server LA CiscoWorks Server San Fran network devices LA network devices
Use Usenew newrole rolecreated created
Scroll Scroll through through group group settings settings to to locate locate CiscoWorks CiscoWorks applications applications to to assign assign ONE ONE role role to to each each NDGs NDGs Common Services v3.0 Tutorial
© 2005 Cisco Systems, Inc. All rights reserved.
Scenarios 3-56
Configuring User Groups, continue … Now let’s repeat this process for the NOC Data Center users, Karen and Mike, who are in Group 3. 1. 2.
From the Group Setup window, select Group 3 from the pull-down menu to define Mike and Karen’s group and permissions. Click Rename Group. Enter NOC Administrators to define the group. Remember that Karen and Mike has permission for all tasks in CiscoWorks for all device in San Francisco and Los Angeles. Therefore, the user role in ACS, Administrators, was created since NDGs can only have one role. The default roles imported from CiscoWorks limit the user to select tasks.
3.
Now define the NDG associations for the CiscoWorks applications in this group. Click Edit Settings.
4.
Scroll through the settings and find the CiscoWorks applications that the user needs access to. For example: Check the checkboxes next to cwhp if access to the CiscoWorks HomePage is needed.
5.
The CiscoWorks Resource Manager Essentials application is illustrated. Click the radio button “Assign Resource Manager Essentials on a per Network Device Group Basis”.
6.
Karen and Mike will have all privileges on the San Francisco and Los Angeles devices.
7.
•
Select San Francisco from the Device Group pull-down menu. Change the role for this NDG to be Administrators. Click Add Association.
•
Secondly, select Los Angeles from the Device Group pull-down menu. Change the role for this NDG to be Administrators. Click Add Association.
Click Submit+Restart to make the changes and restart ACS.
Secured Views is now operational!
CiscoWorks Common Services v3.0 Tutorial
© 2005 Cisco Systems, Inc. All rights reserved.
Scenarios 3-56
Using ACS for AAA Services Secure Views in CiscoWorks (Tasks)
San Francisco Network Administrator George
• • For Fortask-based task-basedauthorization, authorization, check checktask tasktotorole rolemapping mappinginin ACS ACSserver server(Shared (SharedProfile Profile Components) Components) • • Factory Factorysettings settingsfor fortask tasktoto role rolemapping mappingisisshown showninin Permission PermissionReport Report Common Services v3.0 Tutorial
Excerpt Excerptof ofPermission PermissionReport Report © 2005 Cisco Systems, Inc. All rights reserved.
Scenarios 3-57
Secure Views in CiscoWorks (Tasks Authorization) With AAA services operational with ACS, George can now login to the San Francisco CiscoWorks server. His login is authenticated from the ACS server. George was assigned the role of Network Administrator in ACS. The Network Administrator role was imported from CiscoWorks when registered. Unless the Network Administrator role was modified in the Shared Profile Components, the tasks take on the factory settings as illustrated in the CiscoWorks Permissions Report.
CiscoWorks Common Services v3.0 Tutorial
© 2005 Cisco Systems, Inc. All rights reserved.
Scenarios 3-57
Using ACS for AAA Services
Secure Views in CiscoWorks (Device Authorization) However, However,Karen Karenand andMike Mikecan canmanage manage all the devices in San Francisco all the devices in San Franciscoand and Los LosAngeles. Angeles.
When Whenviewing viewingall alldevices, devices,George Georgecan can now nowmanage manageonly onlythe thedevices devicesininSan San Francisco. Francisco.
Same SameView, View,Different DifferentDevices Devices
All Devices in both San Francisco and Los Angeles San Francisco Only George
Common Services v3.0 Tutorial
Karen Mike
• • For Fordevice-based device-basedauthorization, authorization,check checkwhether whetherdevices devices have havebeen beenadded addedtotothe theNDG NDGininthe theACS ACSserver. server. • • The Theuser usermust mustbe beininaagroup groupthat thatthen thenhas hasaccess accesstotothe the NDG the appropriate role © 2005 Ciscoappropriate Systems, Inc. All rightsrole reserved. NDGwith with the
Scenarios 3-58
Secure Views in CiscoWorks (Device Authorization) With AAA services operational with ACS, the same device views can restrict a user’s view of devices to execute tasks on and run reports. As illustrated above, George can now only manage the devices in San Francisco. However, Karen and Mike can manage all the devices in San Francisco and Los Angeles.
CiscoWorks Common Services v3.0 Tutorial
© 2005 Cisco Systems, Inc. All rights reserved.
Scenarios 3-58
Thank You! Continue on to Chapter 4 to learn about some of the administrative tasks not yet discussed.
CiscoWorks Common Services v3.0 Tutorial
© 2005 Cisco Systems, Inc. All rights reserved.
Scenarios 3-59
CiscoWorks Common Services v3.0 Tutorial
© 2005 Cisco Systems, Inc. All rights reserved.
Scenarios 3-60
Common Services System Administration Chapter 4
CiscoWorks Common Services v3.0 Tutorial
© 2005 Cisco Systems, Inc. All rights reserved.
System Admin 4-1
Chapter 4 Outline
• System Requirements - CiscoWorks Server - Client
• Installation Guidelines - Tips, Upgrades, and Post Installation Steps - Integration Utility
• Common Services Administration • NMS Integration Utility • Troubleshooting
CiscoWorks Common Services v3.0 Tutorial
© 2005 Cisco Systems, Inc. All rights reserved.
System Admin 4-2
Chapter 4 Outline This chapter starts out by covering some basic requirements for both the CiscoWorks server, hosting the CiscoWorks Common Services v3.0 software, and the client workstation used to access the CiscoWorks applications. The next section in this chapter highlights key information for installing CiscoWorks Common Services. For detailed installation procedures or information on upgrading from previous versions of Common Services, refer to the Installation and Setup Guide or the LMS Getting Started Guide. A link to these guides can be found in Chapter 5. The next section briefly covers some remaining administrative maintenance tasks that are optionally, but allow the system administrator to customize or fine-tune the overall configuration of the CiscoWorks Common Services and to integrate with Cisco Secure ACS for authorization and authentication of tasks. And finally, some common troubleshooting tips are summarized at the end of this chapter for common issues that may arise while using the features in Common Services.
CiscoWorks Common Services v3.0 Tutorial
© 2005 Cisco Systems, Inc. All rights reserved.
System Admin 4-2
System Requirements
¾ System Requirements •
Installation Guidelines
•
Common Services Administration
•
NMS Integration Utility
•
Troubleshooting
CiscoWorks Common Services v3.0 Tutorial
© 2005 Cisco Systems, Inc. All rights reserved.
System Admin 4-3
Server Requirements Windows Platform
Network Size / Clients Less than 500 network devices
Platform / CPU
• 2 GB RAM 1G Hz or better Pentium processor
And 1 client connected at a time Greater than 500 network devices Or more than 1 client connected at a time *
Memory (RAM) & Virtual Memory
• 4 GB Virtual Memory
• 4 GB RAM 1G Hz or better Multi-processor
• 8 GB Virtual Memory
Disk Space 80 GB hard disk (NTFS format) 16 MB in Windows temporary directory 80 GB hard disk (NTFS format) 16 MB in Windows temporary directory
Installing multiple CiscoWorks applications on the same server may require additional resources.
CiscoWorks Common Services v3.0 Tutorial
© 2005 Cisco Systems, Inc. All rights reserved.
System Admin 4-4
Windows Server Requirements Two different types of software licenses are available for LMS, restricted and unrestricted. The restricted license will allow CiscoWorks to manage up to 300 devices. The unrestricted license allows for CiscoWorks to manage an unlimited number of devices, theoretically. The server resources required for Common Services depends on how many devices the server will be managing and how many clients will be accessing the server for information. The above chart provides minimum system requirements for a Windows server for several usage scenarios based on the number of managed devices and connected clients. Note(s): • It should be noted that the system configurations above are for a CiscoWorks server with Common Services only. Installing additional CiscoWorks applications may require additional resources. • Common Services v3.0 must be installed prior to all CiscoWorks LMS v2.5 applications. • As far as the physical disk drive, the Common Services software requires only 4 GB of disk space. Additional disk space is required for collected device data and paging space. For security and space reasons, the hard disk must be formatted as NTFS. • Always check the latest CiscoWorks release notes for up-to-date information regarding system requirements.
CiscoWorks Common Services v3.0 Tutorial
© 2005 Cisco Systems, Inc. All rights reserved.
System Admin 4-4
Server Requirements, Continue … Windows Platform
- Windows Operating System (only US-English and Japanese versions) • Windows 2000 Professional or Server with Service Pack 3 or 4; Terminal Services can be enabled in Remote Admin mode only or • Windows 2003 Server and Enterprise Edition; Terminal Services can be enabled in Remote Admin mode only or • Windows Advanced Server with Service Pack 3 or 4 (disable Terminal Services) • ODBC Driver Manager 3.5.10 or later • Do no install CiscoWorks on a system configured as a primary or backup domain controller; Do not install CiscoWorks in an encrypted directory.
- Browser (optional; required to access CiscoWorks from server platform) • Microsoft Internet Explorer 6.0.26 and Microsoft Internet Explorer 6.0.28. • Java Virtual Machine (JVM) 5.0.0.3802 and later, and Java Plug-in version 1.4.2_04 or 1.4.2_06 (Common Services SP 1). CiscoWorks Common Services v3.0 Tutorial
© 2005 Cisco Systems, Inc. All rights reserved.
System Admin 4-5
Windows Server Requirements Common Services is tested and supported for a finite number of system configurations. The previous page detailed minimum hardware requirements and this page lists the software and configuration requirements. Common Services is supported on Windows 2000 Professional and Server with Service Pack 3 or later. Additionally, Windows 2003 Server and Enterprise Editions are supported. Using only these operating systems, you can install Common Services on a system with Terminal Services enabled in Remote Administration mode only; Terminal Services enabled in Application mode is not supported. If you have a enabled Terminal Server in Application mode, disable the Terminal Server, reboot the system, and start the installation again. Windows Advanced Server is also supported; however, Terminal Services must be disabled. If you have a enabled Terminal Server, disable the Terminal Server, reboot the system, and start the installation again. The only other system software required is ODBC Driver Manager 3.5.10. When configuring the CiscoWorks server, do not configure the server as a primary or backup domain controller and do not install CiscoWorks in an encrypted directory. Browser Requirements On the CiscoWorks server, a web browser is not required. It can be installed, if a user wishes to access CiscoWorks directly from the server platform. Note(s): • A vulnerability in the Java Plug-in 1.4.2_04 may allow an untrusted applet to escalate privileges, through JavaScript calling into Java code, including reading and writing files with the privileges of the user running the applet. For more details, refer Sun Alert ID: 57591. This is fixed in Java Plug-in 1.4.2_06. • To modify your CiscoWorks installation to use Sun Java Plug-in 1.4.2_06, refer to Common Services Install Guide. • Also, Common Services, Service Pack 1, now installs Java Plug-in 1.4.2_06.
CiscoWorks Common Services v3.0 Tutorial
© 2005 Cisco Systems, Inc. All rights reserved.
System Admin 4-5
Server Requirements Solaris Platform
Network Size / Clients Less than 500 network devices
Platform / CPU Sun Ultra SPARC IIIi (see notes)
Memory (RAM) & Swap Space
Disk Space
• 2 GB RAM
80 GB hard disk
• 4 GB swap
/tmp must be on swap partition
• 4 GB RAM
80 GB hard disk
• 8 GB swap
/tmp must be on swap partition
And 1 client connected at a time Greater than 500 network devices Or more than 1 client connected at a time
Sun Ultra SPARC10 (see notes)
* Installing multiple CiscoWorks applications on the same server may require additional resources. CiscoWorks Common Services v3.0 Tutorial
© 2005 Cisco Systems, Inc. All rights reserved.
System Admin 4-6
Solaris Server Requirements The server resources required for Common Services depends on how many devices the server will be managing and how many clients will be connected to the server simultaneously. The above chart provides minimum system requirements for a Solaris server for several usage scenarios based on the number of managed devices and number of concurrent CiscoWorks users or clients. Note(s): • It should be noted that the system configurations above are for a CiscoWorks server with Common Services v3.0 only. Installing additional CiscoWorks applications may require additional resources. • As far as the physical disk drive, the Common Services software requires only 4 GB of disk space. Additional disk space is required for the data collected; thus, an 80 GB hard drive should be sufficient. • Common Services v3.0 must be installed prior to all CiscoWorks LMS v2.5 applications. • CiscoWorks Common Services also supports Ultra SPARC II, IIi, and IIe and Ultra SPARC III and III Cu machines. • Always check the latest CiscoWorks release notes and install guides for up-to-date information regarding system requirements.
CiscoWorks Common Services v3.0 Tutorial
© 2005 Cisco Systems, Inc. All rights reserved.
System Admin 4-6
Server Requirements, Continue … Solaris Platform
- Solaris Operating System (only US-English and Japanese versions)
• Solaris 2.8, 2.9 • Use the showrev -p command to verify that these patches have been applied. – Required and recommended patches for server and client listed in Install Guide – Patch 106292-05 must not be installed
- Browser (optional) • Netscape 7; Use Netscape downloaded only from the Sun site. • Java plug-in version 1.4.2_04 or 1.4.2_06 (see notes)
CiscoWorks Common Services v3.0 Tutorial
© 2005 Cisco Systems, Inc. All rights reserved.
System Admin 4-7
Solaris Server Requirements In the Solaris environment, Common Services has currently only been tested and certified to run on USEnglish and Japanese versions of Solaris 2.8 or 2.9. The installation and setup guide lists the required and recommended Sun patches. A link to this guide can be found in Chapter 5. Web Browser / Java Notes • Obtain Netscape 7 only from the Sun web site. • Both Java Plug-in 1.4.2_04 and 1.4.2_06 are supported. However, a vulnerability in the Java Plug-in 1.4.2_04 may allow an untrusted applet to escalate privileges, through JavaScript calling into Java code, including reading and writing files with the privileges of the user running the applet. For more details, refer Sun Alert ID: 57591. This is fixed in Java Plug-in 1.4.2_06. • CiscoWorks neither exploits nor is impacted by this vulnerability. If you choose to use Sun Java Plugin 1.4.2_06 instead of the one provided in Common Services (1.4.2_04), you can choose the plug-in manually. • To modify your CiscoWorks installation to use Sun Java Plug-in 1.4.2_06, refer to the Common Services Install Guide.
CiscoWorks Common Services v3.0 Tutorial
© 2005 Cisco Systems, Inc. All rights reserved.
System Admin 4-7
Client Requirements System Hardware (One of the listed)
• IBM PC Compatible, 300 MHz Pentium or better • Sun UltraSparc IIIi or better Color Monitor with video card set to 24-bits color depth
System Software
• • • •
Memory
• 512 MB or more - Set virtual memory / swap space to twice the size of RAM
Browser
• Windows
(one of the listed)
(One of the listed)
Windows 2000 SP3 Windows 2000 Professional or Server SP4 Windows XP SP1 or 2 Windows 2003 Server and Enterprise edition without terminal services • Solaris 2.8 or 2.9
• • • •
2000/XP – Microsoft IE 6.0.26 or 6.0.28 2003 – Microsoft IE 6.0.3790.0 Netscape Navigator 7.1, 7.2* Mozilla 1.7, 1.7.5*
• Solaris
• Netscape Navigator 7.0 • Mozilla 1.7, 1.7.5*
Java CiscoWorks Common Services v3.0 Tutorial
* (Supported with Common Services SP 1)
Java plug-in version 1.4.2_04 or 1.4.2_06 (Common Services SP 1) © 2005 Cisco Systems, Inc. All rights reserved.
System Admin 4-8
Client Requirements Access to the installed CiscoWorks applications is achieved using a standard web browser. On Windows based platforms, CiscoWorks has been tested and certified using Microsoft Internet Explorer (6.0.26 and 6.0.28 for Windows 2000/XP and 6.0.3790.0 for Windows 2003), Netscape Navigator 7.1, and Mozilla 1.7. Solaris based platforms running US-English or Japanese versions of Solaris 2.8 or 2.9 can use Netscape Navigator 7.0 or Mozilla 1.7. Client systems should have at least 512 MB of memory or more; and configure the virtual memory / swap space twice that of the installed RAM. Web Browser / Java Notes: • Obtain Netscape 7 only from the Sun web site. • Both Java Plug-in 1.4.2_04 and 1.4.2_06 are supported. However, a vulnerability in the Java Plug-in 1.4.2_04 may allow an untrusted applet to escalate privileges, through JavaScript calling into Java code, including reading and writing files with the privileges of the user running the applet. For more details, refer Sun Alert ID: 57591. This is fixed in Java Plug-in 1.4.2_06. • CiscoWorks neither exploits nor is impacted by this vulnerability. If you choose to use Sun Java Plugin 1.4.2_06 instead of the one provided in Common Services (1.4.2_04), you can choose the plug-in manually. • To modify your CiscoWorks installation to use Sun Java Plug-in 1.4.2_06, refer to the Common Services Install Guide. • In Common Services Service Pack 1 Java Plug-in 1.4.2_06 is installed. Additional Note(s): • It is always a good idea to check the latest CiscoWorks release notes for up-to-date information regarding client requirements. • Client platforms not conforming to the above requirements may also work, but have not been tested and certified by Cisco and therefore will not be supported should problems arise. CiscoWorks Common Services v3.0 Tutorial
© 2005 Cisco Systems, Inc. All rights reserved.
System Admin 4-8
Web Browser Configuration 9 Enable Java and Java Script 9 Set browser cache to at least 6 MB 9 Configure your browser to accept all cookies 9 Configure your browser to compare each page with its cached version every time it loads a page 9 Change the default timeout to 20 minute 9 Enable style sheets 9 Change the default font to sans-serif for improved readability 9 Disable any pop up blocker utility,installed on your client system CiscoWorks Common Services v3.0 Tutorial
© 2005 Cisco Systems, Inc. All rights reserved.
System Admin 4-9
Web Browser Configuration As discussed in the Client Requirements, Internet Explorer, Netscape, and Mozilla are supported web browsers to access CiscoWorks. The Install and Setup Guide describes the exact steps for configuring each of the above configuration items for each browser type. (Refer to Chapter 5 for a link to the Install Guide.) If you have browser problems after configuring your browser, increase your disk cache settings. After the web browser is installed on the client system, there are no additional disk space requirements. However, because the browser uses the local disk to store cached information, ensure that you have enough disk space for the amount of cached information you want to store. All information related to Common Services is stored on the CiscoWorks server.
CiscoWorks Common Services v3.0 Tutorial
© 2005 Cisco Systems, Inc. All rights reserved.
System Admin 4-9
CiscoWorks Common Services v3.0 Tutorial
© 2005 Cisco Systems, Inc. All rights reserved.
System Admin 4-10
Installation Guidelines
•
System Requirements
¾ Installation Guidelines •
Common Services Administration
•
NMS Integration Utility
•
Troubleshooting
CiscoWorks Common Services v3.0 Tutorial
© 2005 Cisco Systems, Inc. All rights reserved.
System Admin 4-11
Installation Guidelines • Use Administrator (Windows) or Root (Solaris) accounts • If installing CiscoWorks applications on multiple servers, synchronize clocks on servers • Verify server requirements and Required and Recommended Service Packs or Patches for operating system are installed (server and client updates exist) • User need to enter System Identity Account Password during new installation and upgrade • Name resolution is required and tested during install; if name lookup does not exist, installation will abort. • Static IP address required for CiscoWorks server, if DHCP is enabled, user is warned CiscoWorks Common Services v3.0 Tutorial
© 2005 Cisco Systems, Inc. All rights reserved.
System Admin 4-12
Installation Requirements • Installation of Common Services should be performed according to the steps detailed in the Installation and Setup Guide. (A link to this guide can be found in Chapter 5.) • All CiscoWorks applications should be installed using the root user account on Solaris platforms or the Administrator (not a cloned account) user account on Windows platforms. • Additionally, if the applications within CiscoWorks LMS is split between multiple servers, synchronize the clock on the servers so that the sharing of information using security certificates works properly. • If required server patches are missing, the install script prompts whether to continue installation or not. Note that there are required and recommended service packs or patches for clients as well as server. Remember that client patches are not necessary if the system is used only as a Server. • During new installation and upgrade, the user needs to enter the System Identity Account Password. System Identity account password has to be the same for all the serves in a multi-server setup. • In prior releases, installation issues a warning message if the machine is not in DNS. In release v3.0 and later, instead of a DNS check, the installation script will check for host name resolution. If the host name lookup does not exist, the installation will abort. • If DHCP is enabled the user is also issued a warning because when the IP address changes, CiscoWorks will no longer work.
CiscoWorks Common Services v3.0 Tutorial
© 2005 Cisco Systems, Inc. All rights reserved.
System Admin 4-12
Installation Guidelines Continue …
• If IIS is enabled, installation will abort • Verify TCP, UCP ports are available for use (Refer to Chapter 5) • Install Common Services v3.0 before any CiscoWorks LMS applications; CiscoWorks applications are installed in same directory as Common Services – Install CiscoView from Common Services CD – Install Integration Utility from Common Services CD
• Refer to LMS v2.5 Quick Start Guide for installation procedure - License file required - Refer to upcoming section – “Common Services Administration” for more information on managing licenses CiscoWorks Common Services v3.0 Tutorial
© 2005 Cisco Systems, Inc. All rights reserved.
System Admin 4-13
Installation Requirements • If IIS (Microsoft's Internet Information Services) is enabled, the installation will abort due to a port conflict between Web Server and IIS. If IIS is disabled, the installation will issue a warning message noting the conflict between the Web Server and IIS. • It should be noted that the Common Services CD also includes two applications/utilities: CiscoView and the Integration Utility. Like all CiscoWorks applications, these applications depends on services supplied by the Common Services software. Therefore, prior to installing the applications, Common Services should first be installed and the machine rebooted. • And finally, starting with LMS v2.5, CiscoWorks applications require a license file to be installed to work efficiently. The licensing mechanism is discussed next.
CiscoWorks Common Services v3.0 Tutorial
© 2005 Cisco Systems, Inc. All rights reserved.
System Admin 4-13
Installation Guidelines CiscoWorks Licenses
• LMS v2.5 has various licensing mechanisms to manage the devices in the DCR – Evaluation License – Valid for 90 days (no device limit) – Purchased License - Available in various device limits • Restricted device limit Software Center > Software Update. The link to download from Cisco.com is: http://www.cisco.com/pcgi-bin/tablebuild.pl/cw2000-cd-one CiscoWorks Software Updates panel, on the CiscoWorks desktop, is located at the lower right corner of the page. It displays informative messages about CiscoWorks product announcements, and help related topics. If you click the More Updates link, a popup window appears with all the Cisco Product Update details. (Refer to next page for more details.) After any updates are installed for Common Services, it should then be fine-tuned as listed above. If the applications on the LMS bundle have been split up onto multiple servers, register the remote applications with Common Services. Secondly, add the devices to the CiscoWorks Device and Credentials Repository. This can be done in a number of ways as noted earlier in the tutorial. One of these ways is to have Campus Manager discovery them. Additionally, create user accounts and assign user roles. Authentication and authorization of tasks can be customized by optionally using Cisco Secure ACS. The supported ACS versions are Cisco Secure ACS 3.2 and Cisco Secure ACS 3.2.3 for Windows. Support for Cisco Secure ACS 3.3.2 is available with Common Services SP 1. It is recommended that you install the Admin HTTPS PSIRT patch, if you are using ACS3.2.3. To install the patch: 1. Go to http://www.cisco.com/kobayashi/sw-center/ciscosecure/cs-acs.shtml 2. Click Download CiscoSecure ACS Software (Windows) link. You can find the link to the Admin HTTPS PSIRT patch in the table.
CiscoWorks Common Services v3.0 Tutorial
© 2005 Cisco Systems, Inc. All rights reserved.
System Admin 4-16
Common Services Administration
•
System Requirements
•
Installation Guidelines
¾ Common Services Administration •
NMS Integration Utility
•
Troubleshooting CiscoWorks Common Services v3.0 Tutorial
© 2005 Cisco Systems, Inc. All rights reserved.
System Admin 4-17
Common Services Administration Overview
Common CommonServices Servicesincludes includesthe thefollowing followingadministrative administrativefeatures featuresto toset set up upthe theserver serverand andto toensure ensurethat thatthe theserver serveris isperforming performingproperly: properly: ; Licensing: Manages CiscoWorks license file ; Database Management: Provides scheduling of database backups ; Job Browser: Provides details about managing jobs ; Resource Browser: Provides details about managing resources ; System Preferences: Configures the SMTP server, RCP user, and CiscoWorks e-mail ID ; Notify Users: Broadcasts messages to all logged on users
CiscoWorks Common Services v3.0 Tutorial
© 2005 Cisco Systems, Inc. All rights reserved.
System Admin 4-18
Common Services Administration Overview Common Services is the home for all tasks concerning the management and maintenance of the server itself. These tasks include managing the CiscoWorks license file, database management, system preferences and more. This section provides more information on these topics.
CiscoWorks Common Services v3.0 Tutorial
© 2005 Cisco Systems, Inc. All rights reserved.
System Admin 4-18
Common Services Administration Licensing
Common Services > Server > Admin > Licensing
Restricted Restrictedor or Unrestricted Unrestricted license type license type
•• Go Go to to www.cisco.com/go/license www.cisco.com/go/license •• Enter Enter CiscoWorks CiscoWorks Product Product Authorization Authorization Key Key (PAK) (PAK) ## •• Register Register CiscoWorks CiscoWorks applications applications •• Receive Receive license license file file to to begin begin using using application application
Locate Locateand andread read new new license licensefile file CiscoWorks Common Services v3.0 Tutorial
© 2005 Cisco Systems, Inc. All rights reserved.
System Admin 4-19
Licensing The system administrator must register the CiscoWorks software and obtain a product license before starting to use an application. The licensing feature within CiscoWorks allows the system administrator to obtain a product license and license the application, view details of the current software license or update to a new license. To obtain a product license for the CiscoWorks applications, register the software at one of the following websites. The Product Authorization Key (PAK) (aka Serial Number), which is printed on a label affixed to the Bundle sub-box, will need to be supplied •
If you are a registered user of Cisco.com, use this website: www.cisco.com/go/license
•
If you are not a registered user of Cisco.com, use this website: www.cisco.com/go/license/public
The product license will be sent to the e-mail address you entered during registration. After a product license is obtained, perform these steps to license your software: 1. Copy the license file to the CiscoWorks server, with read permission for casuser/casusers (user/group) 2. Go to Common Services > Server > Admin > Licensing. The License Information dialog box appears, as illustrated above. The License Information page displays the name, version, device limit, status, and expiration date of the license. 3. Click Update. 4. Enter the path to the new license file in the License field, or click Browse to locate the new file. 5. Click OK. The system verifies whether the license file is valid, and updates the license. The updated licensing information appears in the License Information page. Otherwise an error message is displayed. CiscoWorks Common Services v3.0 Tutorial
© 2005 Cisco Systems, Inc. All rights reserved.
System Admin 4-19
Common Services Administration Database Management
Common Services > Server > Admin > Backup
•• Backup Backup the the CiscoWorks CiscoWorks database database on on aa regular regular basis basis •• CLI CLI can can also also be be used used to to generate generate backups backups (see (see notes notes for for perl perl script script to to run) run)
CiscoWorks Common Services v3.0 Tutorial
Schedule ScheduleJob Job
© 2005 Cisco Systems, Inc. All rights reserved.
System Admin 4-20
Database Management It is important that the CiscoWorks database be periodically backed up. The system administrator can schedule immediate, daily, weekly, or monthly automatic database backups. The database should be backed up regularly so that you have a safe copy of the database. Common Services uses multiple databases to store client application data. These databases are backed up whenever you perform a backup. To perform an immediate backup or schedule a new one, follow these steps: 1. Go to Common Services > Server > Admin > Backup. The Set Backup Schedule dialog box appears. 2. Enter the location of the Backup Directory. It is recommend that your target location be on a different partition than where CiscoWorks is installed. 3. Enter the number of backup Generations to be stored in the backup directory 4. Enter the Time for the backup to occur. Use a 24-hour format. 5. Enter the Frequency for the backup schedule to be one of the following: •
Immediately - The database is backed up immediately
•
Daily - The database is backed up every day at the time specified
•
Weekly - The database is backed up once a week on the day and time specified. Select a day from the Day of week list.
•
Monthly - The database is backed up once a month on the day and time specified. Select a day from the Day of month list.
6. Periodically, examine the log file at the following location to verify backup status: •
Solaris: var/adm/CSCopx/log/dbbackup.log
•
Windows: NMSROOT/log/dbbackup.log
Note: You can Backup data using CLI on Windows and Solaris by running the following command: $NMSROOT/bin/perl $NMSROOT/bin/backup.pl [LogFile] [Num_Generations] CiscoWorks Common Services v3.0 Tutorial
© 2005 Cisco Systems, Inc. All rights reserved.
System Admin 4-20
Common Services Administration Job Browser
Common Services > Server > Admin > Job Browser
CiscoWorks CiscoWorkstask task that thatstarted startedJob Job
Select SelectJob; Job; then thenapply apply action action
Actions: Actions: Cancel Cancel // Delete Delete jobs jobs CiscoWorks Common Services v3.0 Tutorial
© 2005 Cisco Systems, Inc. All rights reserved.
System Admin 4-21
Job Browser Common Services provides a Job Browser for managing jobs scheduled by the various CiscoWorks applications. Using the Job Browser you can view a list of jobs, view details of each job, stop a job, and also delete a job from the list. All users (including Help Desk) can access the Job Browser page. Users in Helpdesk, Approver, and Network Operator roles are not allowed to stop and delete jobs. The Refresh button in Job Browser is available for all users. Note(s): • When integrated with the ACS login module, the System Identity user that you configured should have all the Job Management related tasks enabled. The job_browser, job_stop, and, job_delete tasks should be enabled.
CiscoWorks Common Services v3.0 Tutorial
© 2005 Cisco Systems, Inc. All rights reserved.
System Admin 4-21
Common Services Administration Resource Browser
Common Services > Server > Admin > Resource Browser
Applications Applications use use job job management management services services to to ensure ensure requirements requirements are are met, met, schedule schedule the the task, task, and and secure secure the the resources resources (devices). (devices). View View the the Resources Resources locked locked by by the the Job Job id. id.
CiscoWorks Common Services v3.0 Tutorial
© 2005 Cisco Systems, Inc. All rights reserved.
System Admin 4-22
Resource Browser Common Services provides a Resource Browser for managing resources. You can view and sort resources, and free locked resources, using this option, if you have appropriate privileges. All users (including Help Desk) can access the Resource Browser page. The Refresh button in the Resource Browser is available to all users.
Note(s): •
When you are using the ACS login module, the System Identity User you configure should have all the Resource Management related tasks enabled. The resource_browser and free_resource tasks should be enabled.
•
To browse locked resources, you can sort the column by column header.
•
To free locked resources (in case they have been erroneously orphaned), select the check box corresponding to a Job ID and click Free Resources. The Free Resources button appears only if you have system administrator, network administrator or network operator privileges.
CiscoWorks Common Services v3.0 Tutorial
© 2005 Cisco Systems, Inc. All rights reserved.
System Admin 4-22
Common Services Administration System Preferences
Common Services > Server > Admin > System Preferences
Variables Variables that that are are common common to to several several applications applications are are defined defined below below
SMTP SMTP Email Email Server Server
User Useraccount account for for Remote Remote Copy CopyProtocol Protocol
CiscoWorks Common Services v3.0 Tutorial
© 2005 Cisco Systems, Inc. All rights reserved.
Email Emailaddress addressto to send send job job information information to to
System Admin 4-23
System Preferences The System Administrator can configure these system-wide variables on the Common Services Server using the System Preferences option. It allows the System Administrator to centrally locate information that is used by Common Services applications. These variables are: • SMTP Server - Specifies the system-wide name of the SMTP server used by Common Services applications to deliver reports. The default server name is localhost. • CiscoWorks E-mail ID - This is the CiscoWorks E-mail ID from which applications send mail. There is no default E-mail ID. • RCP User - Name used by network device when it connects to Common services server to run the rcp (remote copy protocol). The user account must exist on UNIX systems. It should also be configured on devices as local user in the ip rcmd configuration command. The default RCP username is cwuser.
CiscoWorks Common Services v3.0 Tutorial
© 2005 Cisco Systems, Inc. All rights reserved.
System Admin 4-23
Common Services Administration Who is Logged On
Common Services > Server > Reports > Who is Logged On
Generate Generatereport report on on all all CiscoWorks CiscoWorksusers usersand and see their roles and see their roles and status status
CiscoWorks Common Services v3.0 Tutorial
© 2005 Cisco Systems, Inc. All rights reserved.
System Admin 4-24
Who Is Logged On This option can be used if the CiscoWorks server administrator may need to know who is currently logged into the server for system administration purposes. This information can be viewed by generating one of the Common Services reports, “Who is Logged On”. This report lists all CiscoWorks users. The list illustrates who currently has an active session with the CiscoWorks server. Users who do have an active session are classified as Online; others are classified as Offline. The system administrator can then use this information to review the users’ roles, time logged in, last active time, and client’s IP address.
CiscoWorks Common Services v3.0 Tutorial
© 2005 Cisco Systems, Inc. All rights reserved.
System Admin 4-24
Common Services Administration Notify Users
Common Services > Server > Admin > Notify Users
Send Send aa broadcast broadcast message message to to users users who who are are logged logged in. in.
Message Message above above will will be be displayed displayed on on the the desktop desktop for for each each user. user. CiscoWorks Common Services v3.0 Tutorial
© 2005 Cisco Systems, Inc. All rights reserved.
System Admin 4-25
Notify Users This option can be used to view a list of users who currently have an active session with the CiscoWorks server. System administrators can then use this option to broadcast messages to online users. You can post messages to users with active CiscoWorks browsers. The users receive this message within 60 seconds. For example, the Broadcast Message field could be used to send a message indicating that the CiscoWorks server is going to be restart in 5 minutes, please logout. To send a broadcast message, enter the text of the message in the message field and click Send. Message status will be displayed in the Status box. Note(s): •
If you are using Microsoft Internet Explorer, make sure your browser is set to “Check for updates on every visit to the page”. See the Installation Guide for instructions.
CiscoWorks Common Services v3.0 Tutorial
© 2005 Cisco Systems, Inc. All rights reserved.
System Admin 4-25
Common Services Administration User Audit Logs
Common Services > Server > Reports > Audit Log
Generate Generatereport reportto to view view details details of of user user logging logging in inand and out of the server out of the server
CiscoWorks Common Services v3.0 Tutorial
© 2005 Cisco Systems, Inc. All rights reserved.
System Admin 4-26
Audit Log Audit log maintains a log of user logins into Common Services. The report will differ based on the configuration of the server: non-ACS mode or ACS mode. In non-ACS mode, audit log report provides information on user logins to CiscoWorks Homepage and other applications launched from the Homepage. For example: the date and time on which the task was carried out, the user who performed the task, the status of the task, the application that the user accessed and the task that was performed, and a brief description of the task. In ACS mode, audit log report log messages maintained by ACS. The information is similar to the nonACS mode, but additional information on the user group and access privileges for the user is provided. Additionally, in ACS, you can add additional fields to be logged in the report. This can be done on the ACS server: System Configuration > Logging > CSV TACACS+ Administration. Audit Logs are stored as comma-separated value lists (CSVs). If you are using local authentication, the files are stored on the local server. If you are using ACS authentication, the files are stored on the ACS server and you can view them from within both ACS and CiscoWorks Common Services. To view Audit Log Report from the CiscoWorks server: 1. Select Common Services > Server > Reports > Audit Logs in the CiscoWorks Common Services navigation tree. 2. Click Generate Report. The Audit Log Data Viewer appears with a list of audit logs. The Audit Logs are listed in chronological order, with the most recent logs appearing at the top of the list. The logs are named and listed by the date on which they were created, for example Audit-Log-2004-1027.csv. 3. Click an audit log link to view the audit log details. To view Audit Log Report from ACS: 1. From the ACS Navigation bar, click Reports and Activity. 2. A list of report types appears. Click TACACS+ Administration. A list of Audit Logs appears. CiscoWorks Common Services v3.0 Tutorial
© 2005 Cisco Systems, Inc. All rights reserved.
System Admin 4-26
Common Services Administration Log File Management
Common Services > Server > Reports > Log File Status Manage Managethe thesize size of of the the log log files files
Higher Higherthan than recommended recommended size size
Log Log Files Files
• •Command Commandline linePerl Perlscript script(logBackup.pl) (logBackup.pl)monitors monitors the thelog logfile filesizes sizes • •Script Scriptbacks backsup upfiles filesatat90% 90%ofofsize sizelimit limitand andempties empties original originallog logfile file • •Logrot Tool isisrecommended way logs Logrot Tool recommended waytotomaintain maintain logs CiscoWorks Common Services v3.0 Tutorial © 2005 Cisco Systems, Inc. All rights reserved.
Change Change size size limit limit in in \conf\ logstat.conf logstat.conf
System Admin 4-27
Log File Management Log files can grow and fill up disk space. There are ways to view the logs, their size, and locations, as well as ways to control their growth. Using the Log File Status task, you can view information on all the log files used by CiscoWorks. File Size displayed in red means the file exceeds its size limit. File System Utilization displayed in red means the file exceeds 90% utilization. You should reduce the size of your log files if your file system utilization is over 90%. Since log files can grow and fill up disk space, there is a Perl script (logBackup.pl) that enables you to control this growth by backing up the log file and clearing it. Only log files that reach 90% of their size limits are backed up and the original log file is emptied. Stop all CiscoWorks processes first before using the script. Files maintained by this script include the Daemon Manager and Daemon process log files. Most log files are located in directories in the PX_LOGDIR directory. On UNIX systems, this directory is /var/adm/CSCOpx/log and on Windows it is %NMSROOT% /log. Logrot Utility The logrot utility helps you manage the log files in a better fashion and is recommended. Logrot is a log rotation program that can: •
Rotate log when CiscoWorks is running
•
Optionally archive and compress rotated logs
•
Rotate log only when it has reached a particular size
Logrot helps add new files easily. Logrot should be installed on the same machine where you have installed Common Services. To configure Logrot, refer to the Common Services User Guide, Configuring the Server.
CiscoWorks Common Services v3.0 Tutorial
© 2005 Cisco Systems, Inc. All rights reserved.
System Admin 4-27
CiscoWorks Common Services v3.0 Tutorial
© 2005 Cisco Systems, Inc. All rights reserved.
System Admin 4-28
NMS Integration Utility
•
System Requirements
•
Installation Guidelines
•
Common Services Administration
¾ NMS Integration Utility •
Troubleshooting
CiscoWorks Common Services v3.0 Tutorial
© 2005 Cisco Systems, Inc. All rights reserved.
System Admin 4-29
NMS Integration Utility Overview
Support For 2
1
4 rd Install InstallIU IUon on33rdParty PartyNMS NMSand andbe beable ableto: to: 1.1.Add Cisco device icons to NMS topology Add Cisco device icons to NMS topologymaps maps 2.2.Launch LaunchCiscoWorks CiscoWorksapplications applications 3.3.Browse BrowseCisco CiscoMIBs MIBs 4.4.Integrate Integratetraps traps CiscoWorks Common Services v3.0 Tutorial
© 2005 Cisco Systems, Inc. All rights reserved.
System Admin 4-30
NMS Integration Utility - Overview The CiscoWorks Integration Utility (IU) is provided on the Common Services Install CD and is a utility that integrates CiscoWorks applications with third-party Network Management Systems (NMS). As illustrated above, this utility adds Cisco device icons to NMS topology maps, allows Cisco MIB browsing from NMS, and sets up menu items on the NMS to launch remotely installed CiscoWorks applications, such as CiscoView and Device Center. The IU needs the Network Management Integration Data Bundle to perform these tasks. Use the IU to download the latest NMIDB from Cisco.com. Following are the Network Management Systems (NMS) supported for importing device information into the CiscoView application: • HP Network Node Manager 6.4 • HP Network Node Manager 7.0 • HP Network Node Manager 7.0.1 • NetView 7.1 See User Guide for CiscoWorks Common Services 3.0 and the Online help for information about importing devices. See User Guide for CiscoWorks Integration Utility 1.6 for information about installing and using Integration Utility.
CiscoWorks Common Services v3.0 Tutorial
© 2005 Cisco Systems, Inc. All rights reserved.
System Admin 4-30
NMS Integration Utility Install Requirements
¾ Install IU on platform containing the NMS (HP OpenView, NetView) ¾ Platform may also contain CiscoWorks Common Services v3.0, unless you are using Windows and want to use NNM with dynamic view feature (IIS is required and not supported with Common Services ¾ Hardware: 256 MB RAM; 300 MB disk space for extracting NMIDB database ¾ Unix Platforms:
• Solaris 2.8 and 2.9 • HP-UX 11.0 • AIX 5.1
¾ Windows Platforms: • Windows 2000 Professional with SP3 or SP4
• Windows 2000 Server with SP3 or SP4 • Windows 2000 Advanced Server with SP3 and SP4 • Windows 2003 Server Standard Edition • Windows 2003 Server Enterprise Edition
CiscoWorks Common Services v3.0 Tutorial
© 2005 Cisco Systems, Inc. All rights reserved.
System Admin 4-31
Install Requirements The Integration Utility must be installed on the platform containing the HP OpenView NNM or NetView NMS application. If CiscoWorks is also on the NMS platform, you can install the Integration Utility as part of CiscoWorks Common Services installation or as a standalone product on a remote NMS system. The CiscoWorks Integration Utility 1.6 is part of the CD-ROM that contains CiscoWorks Common Services 3.0 and CiscoView 6.1.You can choose to install Integration Utility 1.6 when you install CiscoWorks Common Services 3.0. If using HP OpenView Network Node Manager (NNM) on Windows and if you want to use NNM with dynamic view, it is recommended that you install Common Services 3.0 on a separate server. Internet Information Services (IIS) is needed to access dynamic view or extended topology on Network Node Manager. However, IIS should be disabled or uninstalled for CiscoWorks to work properly. In such scenarios, we recommend you install Common Services 3.0 on a separate machine and Integration Utility as a standalone application on the machine where NNM is installed. This is applicable only on Windows. You must be running one of these operating systems: On Unix: • Solaris 2.8 and 2.9 • HP-UX 11.0 • AIX 5.1 On Windows: • Windows 2000 Professional with SP3 or SP4 • Windows 2000 Server with SP3 or SP4 • Windows 2000 Advanced Server with SP3 and SP4 • Windows 2003 Server Standard Edition • Windows 2003 Server Enterprise Edition CiscoWorks Common Services v3.0 Tutorial
© 2005 Cisco Systems, Inc. All rights reserved.
System Admin 4-31
NMS Integration Utility Using the Integration Utility
• Use the Integration Utility to: – Download and upgrade to a new NMIDB version available on Cisco.com; the NMIDB contains the Cisco device MIB definitions, icons, and application-specific information – Change your CiscoWorks application server location – Register a new CiscoWorks application with the NMS – Change the NMS with which you want to integrate your CiscoWorks applications – Get a new vendor adapter script
• Start the Integration Utility – NMS menu – UNIX server: ./nmic.sh – Windows server: nmic.exe or from the Programs menu CiscoWorks Common Services v3.0 Tutorial
© 2005 Cisco Systems, Inc. All rights reserved.
System Admin 4-32
Using the Integration Utility CiscoWorks Integration Utility uses Network Management Integration Data Bundle (NMIDB) to integrate CiscoWorks applications, icons, MIBs, and traps with third-party Network Management Systems (NMS). A new release of the NMIDB may periodically need to be download and installed. Therefore, use the Integration Utility to: • Download and upgrade to a new NMIDB version available on Cisco.com. • Change your CiscoWorks application server location. • Register a new application. • Change the NMS with which you want to integrate your CiscoWorks applications. • Get a new vendor adapter script.
CiscoWorks Common Services v3.0 Tutorial
© 2005 Cisco Systems, Inc. All rights reserved.
System Admin 4-32
NMS Integration Utility
Using the Integration Utility – Update NMIDB
Selecting Selecting Update Update Cisco Cisco Device Device Support Support will will also also retrieve retrieve the the latest latest NMIDB NMIDB
Check Check File File location, location, Cisco.com, Cisco.com, or or FTP FTP server server for for aa newer newer NMIDB NMIDB
CiscoWorks Common Services v3.0 Tutorial
© 2005 Cisco Systems, Inc. All rights reserved.
System Admin 4-33
Using the Integration Utility – Update NMIDB When the Integration Utility is launched, the first dialog asks to check for a new NMIDB. As mentioned, a Network Management Integration Data Bundle (NMIDB) contains all the information required to add Cisco devices to a Network Management System (NMS), such as HP OpenView Network Node Manager. The bundle is updated frequently, and you must use the latest version to successfully use your NMS with CiscoWorks applications. When you upgrade device support, a new NMIDB is often downloaded. If the Integration Utility detects a later version of the NMIDB, it prompts you to install it. Alternatively, you can manually retrieve the latest NMIDB from a file on your local machine, from Cisco.com, or from another system. If the Integration Utility has already been integrated into your NMS, you can download the data bundle from the Update Cisco Device Support menu. Select Update Cisco Device Support from the appropriate top-level menu (the location varies depending on where CiscoView applications have been installed on your system). The new NMIDB is automatically retrieved and integrated into the NMS. You must log in as root on UNIX or have administrator privileges on Windows to run the Integration utility.
CiscoWorks Common Services v3.0 Tutorial
© 2005 Cisco Systems, Inc. All rights reserved.
System Admin 4-33
NMS Integration Utility
Using the Integration Utility – Register Applications CiscoWorks Application Registration with NMS Register Register CiscoWorks CiscoWorks applications applications with with the the NMS NMS in in order order to to integrate integrate its its features features into the NMS into the NMS menus menus
http http // https https CiscoWorks CiscoWorks
CiscoWorks Common Services v3.0 Tutorial
© 2005 Cisco Systems, Inc. All rights reserved.
System Admin 4-34
Using the Integration Utility – Register Applications Use the next dialog box, Application Integration, to select the CiscoWorks applications that you want to integrate into the NMS. Integrating an application allows you to launch that application from an icon or menu in your NMS. Before you register applications with the NMS, you must complete downloading the data bundle for this device. If you do not download the data bundle, the Integration utility uses the already-installed NMIDB. To integrate CiscoWorks applications to your NMS: 1. Select an application tab. There is one tab for each available application. If you are updating NMIDB for new device support only and do not need to make any application registration changes, skip the following steps and click Next. 2. To designate a default application that launches from the NMS, check the Set as default application to be launched from NMS check box. Some Network Management System adapters do not support this option. After integration takes place, double-click the device icon on the NMS map. 3. Change the registration parameters as follows: •
•
To register web-based applications, enter or select: •
HTTP/HTTPS protocol
•
CiscoWorks web server host name or IP address
•
CiscoWorks web server port number
•
Browser executable with the full path to launch the application
To register another application, select another application tab
4. Click Next after completing the registration process for all applications. If you made any application registration updates, a confirmation dialog box prompts you to save or cancel your changes.
CiscoWorks Common Services v3.0 Tutorial
© 2005 Cisco Systems, Inc. All rights reserved.
System Admin 4-34
NMS Integration Utility
Using the Integration Utility – Change NMS Adapter Script
Changing Changing the the NMS NMS Adapter Adapter Script Script Use Use this this option option ifif you have changed you have changed the the NMS NMS or or NMS NMS version version
IfIf not not listed, listed, obtain obtain adapter adapterfrom fromfile file location or location or FTP FTP server server
Final Step CiscoWorks Common Services v3.0 Tutorial
© 2005 Cisco Systems, Inc. All rights reserved.
System Admin 4-35
Using the Integration Utility – Changing the NMS Adapter Script You can update or change the Network Management System (NMS) with which you integrate your CiscoWorks applications. For example, you can upgrade from HP Network Node Manager 6.4 to 7.0 or you can use a different NMS. To preserve the integration with CiscoWorks applications, you must acquire a new adapter script. Adapter scripts integrate icons, MIBs, and applications from the NMIDB into the NMS. Before you run the adapter script to integrate your CiscoWorks applications, make sure the NMS for that script is available. To update the adapter script, follow these steps: 1. Select an adapter script from the Available Adapters list. You can select an adapter script from the list of NMS adapters provided with the Integration Utility or use an adapter script provided by the NMS vendor. When you select a script from the Available Adapters list, a description of that script appears in the Adapter Description dialog box. 2. Optionally, to add an adapter script to the list, click Add. Select either a file location on the server or a FTP server. 3. Click Integrate to run the selected script. applications into the NMS.
The adapter script integrates the icons, MIBs, and
Note(s): •
If you have Cisco.com access, you can download adapters from the URL: http://www.cisco.com/kobayashi/sw-center/cw2000/cmc3rd.shtml.
CiscoWorks Common Services v3.0 Tutorial
© 2005 Cisco Systems, Inc. All rights reserved.
System Admin 4-35
CiscoWorks Common Services v3.0 Tutorial
© 2005 Cisco Systems, Inc. All rights reserved.
System Admin 4-36
Troubleshooting
•
System Requirements
•
Installation Guidelines
•
Common Services Administration
•
NMS Integration Utility
¾ Troubleshooting CiscoWorks Common Services v3.0 Tutorial
© 2005 Cisco Systems, Inc. All rights reserved.
System Admin 4-37
Troubleshooting Process Management
Common Services > Server > Admin > Processes
Select SelectProcess Process to toStart/Stop Start/Stop
Select SelectProcess Process Name Namefor fordetails details
CiscoWorks Common Services v3.0 Tutorial
View View status status of of all all CiscoWorks CiscoWorks processes processes and and start start and and stop stop them them ifif necessary necessary
© 2005 Cisco Systems, Inc. All rights reserved.
System Admin 4-38
Process Management Process Management is a Common Services task used to monitor and start/stop one or more CiscoWorks processes. In the event something doesn’t quite seem right with one of the CiscoWorks applications, the system administrator should first check the processes to ensure that they are running. If not, they can be restarted, or stopped and restarted, in an attempt to fix the problem. The processes can be viewed by running the Common Services > Server > Admin > Processes task. Process Name, State, PID, RC, SigNo.,Start Time and Stop Time are displayed. Core and Information field are not displayed here. The “Refresh” button is for refreshing the entries in the table. The Tomcat and Apache processes can not be stopped from this display since communication would be cut between the server and the browser.
CiscoWorks Common Services v3.0 Tutorial
© 2005 Cisco Systems, Inc. All rights reserved.
System Admin 4-38
Troubleshooting Process Status
Common Services > Server > Reports > Process Status
Run Run Report Report Generator Generator
Displays Displays status status of of all all processes. processes. Process Process State State column column is is displayed displayed in in GREEN GREEN color color for for the the started started processes processes and and in in RED RED color color for for the the processes which failed to start processes which failed to start
CiscoWorks Common Services v3.0 Tutorial
© 2005 Cisco Systems, Inc. All rights reserved.
System Admin 4-39
Process Status Process Status is a Common Services task used to manage all CiscoWorks processes. This report displays the status of all processes. Process State column is displayed in GREEN color for the started processes and in RED color for the processes which failed to start. The processes can be viewed by running the Common Services > Server > Report > Process Status task. The Admin task under the Server tab in Common Services also has tasks to run self-tests and collect information on the CiscoWorks server. We will look at these tasks next.
CiscoWorks Common Services v3.0 Tutorial
© 2005 Cisco Systems, Inc. All rights reserved.
System Admin 4-39
Troubleshooting Self-Test
Common Services > Server > Admin > Selftest Run Run Selftest Selftest to to obtain obtain information information on: on: •• Backup script available and if Backup script available and if scheduled scheduled •• Test Test on on database database processes processes •• Check on available Check on available memory memory •• Test Test of of lookback lookback address address •• Check Check on on recommended recommended DLL DLL versions versions •• Check Check platform platform type type supported supported •• Check Check SNMP SNMP processes processes
Select Select test test to to view view results results (see (see notes notes for for example) example)
Run Run new new test test CiscoWorks Common Services v3.0 Tutorial
© 2005 Cisco Systems, Inc. All rights reserved.
System Admin 4-40
Server Self-Test The Selftest option can display and create self-test reports. You can use this option to test the health and integrity of the system. The option executes various Perl scripts and reports whether or not the test passed or failed. Your login and user role determines whether you can use this option. To create a new report, click Create. To display the new report or a previously generated report, click the report name. Self-test reports indicate whether the tests passed or failed. Reports reflect the server time. Excerpts from a selftest report are illustrated below.
CiscoWorks Common Services v3.0 Tutorial
© 2005 Cisco Systems, Inc. All rights reserved.
System Admin 4-40
Troubleshooting
Collection Server Information Common Services > Server > Admin > Collect Server Information
Select Selectinfo info to tocollect collect
Select Select report report name name to to view view results results (see (see notes notes for for example) example)
Run Run new new report report CiscoWorks Common Services v3.0 Tutorial
© 2005 Cisco Systems, Inc. All rights reserved.
System Admin 4-41
Collect Server Information The System Administrator can gather troubleshooting information about the status of the server using this option. (A command line script is also available at /opt/CSCOpx/bin/collect.info). If you collect server information through the user interface, data is stored in /opt/CSCOpx/htdocs/collect. The user’s login and user roles determines whether you can use this option. (See Permissions Report) To create a new report, click Create. A list of report modules and options are displayed. Select the modules you want to include and click OK. By default, all the modules are selected. To display a report, click its name in the list of available reports. The report appears with information about the product database, the operating system, disk utilization statistics, Tomcat log files and so on. Reports reflect the server time. Excerpts from a report are illustrated below.
CiscoWorks Common Services v3.0 Tutorial
© 2005 Cisco Systems, Inc. All rights reserved.
System Admin 4-41
Troubleshooting
Log Files and Location • Log File Location: – Default location for all the logs will be under: • /var/adm/CSCOpx/log in Solaris and • $NMSROOT/log in Windows
• Log File Names: – Licensing: license.log – Windows DCR: DCRServer.log – Solaris DCR: daemons.log
CiscoWorks Common Services v3.0 Tutorial
© 2005 Cisco Systems, Inc. All rights reserved.
System Admin 4-42
Log Files and Locations For troubleshooting purposes, the log files provide a wealth of information that can provide answers to issues that may arise. The default location for all the logs will be under the following directories. • /var/adm/CSCOpx/log in Solaris • $NMSROOT/log in Windows There are several log files. The following is a list of processes and their associated log file names. • Default discovery log is discovery.log • Default data collection log is ani.log • Default User Tracking acquisition log is ut.log • All User Tracking user interface related logs will be in Cmapps.log • OGS logs - CampusOGSClient.log, CampusOGSServer.log • Spanning Tree Protocol (STP) advanced reports log is stpeng.log
CiscoWorks Common Services v3.0 Tutorial
© 2005 Cisco Systems, Inc. All rights reserved.
System Admin 4-42
Troubleshooting MDC Support Utility
• MDC provides diagnostics results valuable to a Cisco Technical Assistance Center (TAC) representative • MDC collects the following information and compresses it into a single file to support the MDCs installed – Log Files – Configuration Settings – Memory Information – Complete System Information – Process Status – Host Environment
CiscoWorks Common Services v3.0 Tutorial
© 2005 Cisco Systems, Inc. All rights reserved.
System Admin 4-43
MDC Support Utility The MDC Support utility collects log files, configuration settings, memory info, complete system related info, process status and host environment information. It also collects any other relevant data, into a deliverable tar (compressed form) file to support the MDCs installed. The MDC Support utility also queries CCR for any other support utilities registered, and run them. Other MDCs need to register their own support utilities that will collect their relevant data. Windows: Go to: $NMSROOT\MDC\bin\ Run: MDCSupport.exe The utility creates a tar file in NMSROOT\MDC\etc directory. If \etc directory is full, or if you want to preserve the data collected previously by not over writing the tar file, you may create another directory by running the following command: MDCSupport.exe Directory Solaris: Go to: /opt/CSCOpx/MDC/bin Run: ./mdcsupport The utility creates a tar file in CSCOpx/MDC/etc directory. If \etc directory is full, or if you want to preserve the data collected previously by not over writing the tar file, you may create another directory by running the following command: ./mdcsupport Directory Before you close the command window, ensure that the MDC Support utility has completed its action. If you close the window prematurely, the subsequent instances of MDCSupport Utility will not function properly. If you happen to close the window, delete the mdcsupporttemp directory from NMSROOT\MDC\etc directory, for subsequent instances to work properly. CiscoWorks Common Services v3.0 Tutorial
© 2005 Cisco Systems, Inc. All rights reserved.
System Admin 4-43
Troubleshooting
Resetting Login Module IfIf not not using using local local CiscoWorks CiscoWorks login login module module and and alternative alternative login login module module fails fails and and no no fallback fallback method method is is define, define, then then reset reset the the login login module module (see (see notes notes on on procedure) procedure)
Recommended Recommended
Non-Default Non-Default CiscoWorks CiscoWorks Login Login Module Module is is used used
CiscoWorks Common Services v3.0 Tutorial
No No fallback fallback option option is is set set
© 2005 Cisco Systems, Inc. All rights reserved.
System Admin 4-44
Resetting the Login Module If using an alternative module login, instead of the default CiscoWorks Local Module, and it fails, all users will be locked out of the CiscoWorks server if no fallback option exists. Therefore, the following CLI procedure is available to reset the login module to allow access again using the default CiscoWorks Local module for login. Stop Daemon Manager: • Solaris:
/etc/init.d/dmgtd stop
• Windows: net stop crmdmgtd Run the following script: • Solaris: /opt/CSCOpx/bin/perl ResetLoginModule.pl • Windows: $NMSROOT/bin/perl ResetLoginModule.pl Restart Daemon Manger. • Solaris:
/etc/init.d/dmgtd start
• Windows: net start crmdmgtd
CiscoWorks Common Services v3.0 Tutorial
© 2005 Cisco Systems, Inc. All rights reserved.
System Admin 4-44
Thank You! We hope that you have enjoyed reading this chapter and have found its contents to be helpful in using the CiscoWorks Common Services. Cisco Systems
CiscoWorks Common Services v3.0 Tutorial
© 2005 Cisco Systems, Inc. All rights reserved.
System Admin 4-45
CiscoWorks Common Services v3.0 Tutorial
© 2005 Cisco Systems, Inc. All rights reserved.
System Admin 4-46
CiscoWorks Common Services v3.0 References Chapter 5
Reference Materials Many Cisco reference documents have been created to help users understand the use of CiscoWorks Common Services. However, finding help and documentation can often be a challenge. This reference chapter has been created to assist you in your pursuit of additional product information. Below are links to documents and Web pages that provide further details on Common Services.
•
CiscoWorks Common Services v3.0 Information
♦
Common Services Home Page (URL) http://www.cisco.com/en/US/partner/products/sw/cscowork/ps3996/index.html
♦
Install and Setup Guides (URL) http://www.cisco.com/en/US/products/sw/cscowork/ps3996/prod_installation_guides_ list.html
♦
TCP and UDP Ports Used by CiscoWorks – See Chapter 2 of Install Guide (URL) http://www.cisco.com/en/US/products/sw/cscowork/ps3996/prod_installation_guides_ list.html
♦
Release Notes (URL) http://www.cisco.com/en/US/products/sw/cscowork/ps3996/prod_release_notes_list.h tml
♦
User Guide (URL) http://www.cisco.com/en/US/products/sw/cscowork/ps3996/products_user_guide_bo ok09186a00801e8b82.html
♦
Frequently Asked Questions (URL) http://www.cisco.com/en/US/products/sw/cscowork/ps3996/products_user_guide_ch apter09186a008022f962.html#wp1091220
♦
Common Services Service Packs (URL) http://www.cisco.com/cgi-bin/tablebuild.pl/cw2000-cd-one
CiscoWorks Common Services v3.0
© 2005 Cisco Systems, Inc
References 5-1
•
Other CiscoWorks Related Material ♦
CiscoWorks LAN Management Solution (LMS) (URL) Learn more about CiscoWorks solutions bundled in LMS: www.cisco.com/go/lms/ ♦
LMS 2.5 Data Migration Guidelines (URL) http://www.cisco.com/en/US/partner/products/sw/cscowork/ps24 25/products_quick_start09186a00803ed826.html
♦
LMS 2.5 Quick Start Guide (URL) http://www.cisco.com/en/US/partner/products/sw/cscowork/ps24 25/products_quick_start09186a008036dfa9.html
♦
LMS 2.5 Deployment Guide (URL) http://www.cisco.com/en/US/products/sw/cscowork/ps2425/prod _white_papers_list.html
♦
CiscoWorks Integration Utility v1.6 (User Guide) (URL) http://www.cisco.com/en/US/products/sw/cscowork/ps3996/products_user_g uide_book09186a008036d46b.html
♦
Network Professionals Connection (URL) http://forums.cisco.com/eforum/servlet/NetProf?page=main
♦
Cisco’s SNMP Object Navigator (URL) http://tools.cisco.com/Support/SNMP/do/BrowseOID.do?local=en
♦
Solaris Patches (URL) To obtain the patches, contact your Sun Microsystems representative or download them from the Sun web site: sunsolve.sun.com/
CiscoWorks Common Services v3.0
© 2005 Cisco Systems, Inc
Reference 5-2
•
Online Bug Tracker Search for known problems on the Cisco bug tracking system tool, called Bug Toolkit. To access Bug Toolkit, perform the following steps: o Click on the link above (www.cisco.com/cgi-bin/Support/Bugtool/launch_bugtool.pl) o Login to Cisco.com o Click Launch Bug Toolkit. o Locate CiscoWorks Device Fault Manager from the list of Cisco Software Products o Then click Next.
•
Technical Notes / White Papers ♦
Network Management Systems: Best Practices White Paper (URL) http://www.cisco.com/en/US/tech/tk869/tk769/technologies_white_paper09186a00800ae a9c.shtml The objective of this paper is to provide some deployment guidelines for all areas of network management: Fault, Configuration, Accounting, Performance, and Security (FCAPS).
♦
CiscoWorks LAN Management Solution White Papers (URL) www.cisco.com/en/US/products/sw/cscowork/ps2425/prod_white_papers_list.html ♦
Common Services v3.0 White Paper Review important features of Common Services: Homepage, DCR, SSO, Grouping Services, and ACS Integration.
♦
LMS Deployment Guide The objective of this paper is to review the steps to properly deploying the LMS suite of applications.
♦
Cost Analysis Using CiscoWorks LAN Management Solution The CiscoWorks product family can provide a quantifiable financial and IT benefit to an organization, through the automation of routine labor, as well as helping to mitigate network degradation due to device failures. While it is difficult to derive an exact figure of the true and potential cost savings for every customer situation, the Cost Analysis Tool can provide an understanding of the scale of savings involved. At this point, the question that needs to be asked is not "What is the cost of the product?" but "What is the cost of NOT using CiscoWorks?"
CiscoWorks Common Services v3.0
© 2005 Cisco Systems, Inc
Reference 5-3
CiscoWorks Common Services v3.0
© 2005 Cisco Systems, Inc
Reference 5-4
a.
Common Services v3.0 Tutorial Assessment Questions
Chapter Questions
Common Services v3.0 Tutorial
Questions - 2
© 2005 Cisco System Inc.
CiscoWorks Common Services v3.0 Tutorial
Common Services v3.0 Tutorial
Based on the information in the Common Services v3.0 product tutorial, please answer the following questions. Q1)
Q2)
Q3)
The Common Services CD contains which of the following? Choose all that apply. A)
All CiscoWorks Common Services software
B)
CiscoView
C)
Integration Utility
D)
Device Center
E)
All of the above
Common Services provides many features for CiscoWorks applications. Which of the following is not provided by Common Services? Choose all that apply. A)
CiscoWorks Homepage
B)
Login authentication to the CiscoWorks server
C)
Task authorization using predefined user roles
D)
Customization of user roles for task authorization
E)
A common repository for Cisco devices and their credentials
F)
Discovery of Cisco devices to manage
G)
Software updates for the CiscoWorks applications
H)
Process status, licensing, and backups
Common Services v3.0 provides support for SNMP v2 as well as v3 authNoPriv. Choose one. A)
True
B)
False
CiscoWorks Common Services v3.0 Tutorial
© 2005 Cisco Systems, Inc
Questions - 3
Common Services v3.0 Tutorial
Q4)
Q5)
Q6)
Q7)
Questions - 4
The Integration Utility is always installed on the same platform as the third-party NMS (HP OpenView NNM or Tivoli NetView). Choose one. A)
True
B)
False
The Integration Utility provides which of the following features? Choose all that apply. A)
Integration of Cisco MIBs and traps into the NMS
B)
Integration of CiscoWorks applications into the menus of the NMS
C)
Integration of Cisco device icons into the NMS topology maps
D)
All of the above
Which statement best describes the Single Sign-On (SSO) feature of Common Services? Choose one. A)
In a multi-server environment, the DCRs are replicated across the servers providing a single view of devices
B)
In a multi-server environment, CiscoWorks users can be authenticated using an ACS
C)
In a multi-server environment, simply login once for a seamless navigation to all registered CiscoWorks servers in the domain
The communication between the web browser CiscoWorks client and the CiscoWorks server can be secured by enabling which protocol? Choose one. A)
Secure Socket Layer (SSL)
B)
Secure Shell (SSH)
C)
TACACS+
D)
Data Encryption Standard (DES)
E)
MD5
© 2005 Cisco System Inc.
CiscoWorks Common Services v3.0 Tutorial
Common Services v3.0 Tutorial
Q8)
Q9)
Q10)
Why should you install the Root Certificate when logging in to CiscoWorks for the first time? Choose one. A)
You cannot access CiscoWorks without installing the root certificate
B)
The password needs to be saved for future use
C)
To avoid seeing the Security Alert screen every time a user logs in
D)
To disable https on future logins
Before the SSO Master/Slave mode can be enabled, what steps must be taken first? Choose all that apply. A)
The servers must possess the certificate of the CiscoWorks server they wish to communicate with
B)
The servers must export their certificates to a CSV or XML file
C)
A Peer Server account must be established on both servers
D)
The Network Administrator must sign the certificates
E)
A job must be scheduled for the Approver user to authorize the certificates
The System Identity must be have the same user id and password on both communicating servers. Choose one. A)
True
B)
False
CiscoWorks Common Services v3.0 Tutorial
© 2005 Cisco Systems, Inc
Questions - 5
Common Services v3.0 Tutorial
Q11)
Q12)
Q13)
Questions - 6
Which of following statements is true? Choose all that apply. A)
The non-ACS mode CiscoWorks Local login allows you to customize user roles.
B)
The default non-ACS mode authenticates and authorizes the user using TACASC+.
C)
The ACS mode requires the user to be created in the CiscoWorks database and on the ACS server.
D)
In the non-ACS mode, a user can be assigned a combination of roles, but cannot be customized.
Which of the following best describes the feature Application Registration? Choose one. A)
Registers application licenses with Cisco.com
B)
Registers applications from remote servers on the local homepage
C)
Register applications from third party vendors on the local CiscoWorks homepage
D)
Register applications to receive updates as they become available.
Which of following statements are true regarding the Device and Credential Repository? Choose all that apply. A)
The DCR polls the network based on defined seed devices and populates the DCR
B)
Devices can be manually added to the DCR using the DCA user interface
C)
Devices can be imported into the DCR using a CSV file
D)
The DCR can be populated from the RME application
E)
The CiscoWorks applications always duplicate the entire DCR contents into their local DCRs
F)
The DCR can be managed (add, delete, edit, export, etc.) using the DCR command line at the command line of the CiscoWorks server © 2005 Cisco System Inc.
CiscoWorks Common Services v3.0 Tutorial
Common Services v3.0 Tutorial
Q14)
Q15)
Which of following statements are true regarding enabling a DCR Master / Slave environment? Choose all that apply. A)
The DCR Master contains a device list and credentials that are replicated on all CiscoWorks applications.
B)
The DCR Master contains a device list and credentials that are replicated on all DCR Slaves in a management domain.
C)
The DCR standalone will only communicate with other standalone servers.
D)
There can be more than one DCR Slave in a management domain.
E)
There can be multiple DCR masters in a domain, if they exchange selfsigned certificates.
F)
The DCR Slave will update the Master first and then its own repository data.
G)
There can be only one DCR Master in a domain.
Which statement is not true about group hierarchy? Choose all that apply. A)
Common Services manages groups in a hierarchical fashion and supports sub grouping.
B)
Static groups are refreshed only when explicitly requested.
C)
A container group contains the rules based on multiple dynamic groups.
D)
A dynamic group is effectively computed every time its members are viewed.
E)
Groups can be private the owner or public for viewing by all users
CiscoWorks Common Services v3.0 Tutorial
© 2005 Cisco Systems, Inc
Questions - 7
Common Services v3.0 Tutorial
Q16)
Q17)
Questions - 8
Application groups will always have the same number of devices that appear in the Common Services group. Choose one. A)
True
B)
False
Which of the following statements is true about User-Defined Groups? Choose one. A)
A sub-group created on the DCR Master in the CS@Master group will appear on the Slave in the CS@Slave group if they are in the same domain.
B)
A sub-group created on the DCR Master in the RME@Master group will appear on the Slave in the RME@Slave group.
C)
Groups can be created in Common Services in both the Master and the Slave mode.
D)
A sub-group cannot be created in an application group on a DCR Slave.
© 2005 Cisco System Inc.
CiscoWorks Common Services v3.0 Tutorial
a.
Common Services v3.0 Tutorial Assessment Questions & Answers
Chapter Questions
Common Services v3.0 Tutorial
Answers - 2
© 2005 Cisco System Inc.
CiscoWorks Common Services v3.0 Tutorial
Common Services v3.0 Tutorial
Based on the information in the Common Services v3.0 product tutorial, please answer the following questions. Q1)
Q2)
Q3)
The Common Services CD contains which of the following? Choose all that apply. A)
All CiscoWorks Common Services software
B)
CiscoView
C)
Integration Utility
D)
Device Center
E)
All of the above
Common Services provides many features for CiscoWorks applications. Which of the following is not provided by Common Services? Choose all that apply. A)
CiscoWorks Homepage
B)
Login authentication to the CiscoWorks server
C)
Task authorization using predefined user roles
D)
Customization of user roles for task authorization
E)
A common repository for Cisco devices and their credentials
F)
Discovery of Cisco devices to manage
G)
Software updates for the CiscoWorks applications
H)
Process status, licensing, and backups
Common Services v3.0 provides support for SNMP v2 as well as v3 authNoPriv. Choose one. A)
True
B)
False
CiscoWorks Common Services v3.0 Tutorial
© 2005 Cisco Systems, Inc
Answers - 3
Common Services v3.0 Tutorial
Q4)
Q5)
Q6)
Q7)
Answers - 4
The Integration Utility is always installed on the same platform as the third-party NMS (HP OpenView NNM or Tivoli NetView). Choose one. A)
True
B)
False
The Integration Utility provides which of the following features? Choose all that apply. A)
Integration of Cisco MIBs and traps into the NMS
B)
Integration of CiscoWorks applications into the menus of the NMS
C)
Integration of Cisco device icons into the NMS topology maps
D)
All of the above
Which statement best describes the Single Sign-On (SSO) feature of Common Services? Choose one. A)
In a multi-server environment, the DCRs are replicated across the servers providing a single view of devices
B)
In a multi-server environment, CiscoWorks users can be authenticated using an ACS
C)
In a multi-server environment, simply login once for a seamless navigation to all registered CiscoWorks servers in the domain
The communication between the web browser CiscoWorks client and the CiscoWorks server can be secured by enabling which protocol? Choose one. A)
Secure Socket Layer (SSL)
B)
Secure Shell (SSH)
C)
TACACS+
D)
Data Encryption Standard (DES)
E)
MD5
© 2005 Cisco System Inc.
CiscoWorks Common Services v3.0 Tutorial
Common Services v3.0 Tutorial
Q8)
Q9)
Q10)
Why should you install the Root Certificate when logging in to CiscoWorks for the first time? Choose one. A)
You cannot access CiscoWorks without installing the root certificate
B)
The password needs to be saved for future use
C)
To avoid seeing the Security Alert screen every time a user logs in
D)
To disable https on future logins
Before the SSO Master/Slave mode can be enabled, what steps must be taken first? Choose all that apply. A)
The servers must possess the certificate of the CiscoWorks server they wish to communicate with
B)
The servers must export their certificates to a CSV or XML file
C)
A Peer Server account must be established on both servers
D)
The Network Administrator must sign the certificates
E)
A job must be scheduled for the Approver user to authorize the certificates
The System Identity must be have the same user id and password on both communicating servers. Choose one. A)
True
B)
False
CiscoWorks Common Services v3.0 Tutorial
© 2005 Cisco Systems, Inc
Answers - 5
Common Services v3.0 Tutorial
Q11)
Q12)
Q13)
Answers - 6
Which of following statements is true? Choose all that apply. A)
The non-ACS mode CiscoWorks Local login allows you to customize user roles.
B)
The default non-ACS mode authenticates and authorizes the user using TACASC+.
C)
The ACS mode requires the user to be created in the CiscoWorks database and on the ACS server.
D)
In the non-ACS mode, a user can be assigned a combination of roles, but cannot be customized.
Which of the following best describes the feature Application Registration? Choose one. A)
Registers application licenses with Cisco.com
B)
Registers applications from remote servers on the local homepage
C)
Register applications from third party vendors on the local CiscoWorks homepage
D)
Register applications to receive updates as they become available.
Which of following statements are true regarding the Device and Credential Repository? Choose all that apply. A)
The DCR polls the network based on defined seed devices and populates the DCR
B)
Devices can be manually added to the DCR using the DCA user interface
C)
Devices can be imported into the DCR using a CSV file
D)
The DCR can be populated from the RME application
E)
The CiscoWorks applications always duplicate the entire DCR contents into their local DCRs
F)
The DCR can be managed (add, delete, edit, export, etc.) using the DCR command line at the command line of the CiscoWorks server © 2005 Cisco System Inc.
CiscoWorks Common Services v3.0 Tutorial
Common Services v3.0 Tutorial
Q14)
Q15)
Which of following statements are true regarding enabling a DCR Master / Slave environment? Choose all that apply. A)
The DCR Master contains a device list and credentials that are replicated on all CiscoWorks applications.
B)
The DCR Master contains a device list and credentials that are replicated on all DCR Slaves in a management domain.
C)
The DCR standalone will only communicate with other standalone servers.
D)
There can be more than one DCR Slave in a management domain.
E)
There can be multiple DCR masters in a domain, if they exchange selfsigned certificates.
F)
The DCR Slave will update the Master first and then its own repository data.
G)
There can be only one DCR Master in a domain.
Which statement is not true about group hierarchy? Choose all that apply. A)
Common Services manages groups in a hierarchical fashion and supports sub grouping.
B)
Static groups are refreshed only when explicitly requested.
C)
A container group contains the rules based on multiple dynamic groups.
D)
A dynamic group is effectively computed every time its members are viewed.
E)
Groups can be private the owner or public for viewing by all users
CiscoWorks Common Services v3.0 Tutorial
© 2005 Cisco Systems, Inc
Answers - 7
Common Services v3.0 Tutorial
Q16)
Q17)
Answers - 8
Application groups will always have the same number of devices that appear in the Common Services group. Choose one. A)
True
B)
False (Depends on the devices in the application’s local DCR)
Which of the following statements is true about User-Defined Groups? Choose one. A)
A sub-group created on the DCR Master in the CS@Master group will appear on the Slave in the CS@Slave group if they are in the same domain.
B)
A sub-group created on the DCR Master in the RME@Master group will appear on the Slave in the RME@Slave group.
C)
Groups can be created in Common Services in both the Master and the Slave mode.
D)
A sub-group cannot be created in an application group on a DCR Slave.
© 2005 Cisco System Inc.
CiscoWorks Common Services v3.0 Tutorial