Step 2 - Import code signing keys in Eclipse® IDE. Once you receive your code
signing keys via email, follow these instructions to import them into Eclipse: 1.
QUALIFYING EXAMINATION which is being given for the Accounting Technician
... You should also set aside time to practice doing the things that are ...
May 27, 2011 ... specification BS EN378-1:2008 (Refrigerating systems and heat .... refrigeration-
grade copper pipe (specified to BS EN 12735-1) shall always.
P. Tzeferacos1 (Viscosity, MHD, STS, Finite-Difference). (petros.tzeferacos@ph.
unito.it). G. Muscianisi3 (Parallelization, I/O). T. Matsakos4 (Resistivity, Thermal ...
2 May 2008 ... Example: The struts framework has a validator engine, which relies on regular
...... package com.pcs.necronomicon ...... yyyy-MM-dd. #.
Resistor Color Code Guide. Note: I took this chart off of the web. In my experience
, the tolerance band is NOT usually separated from the other bands as shown ...
The first non-comment lines of most C# source files is the using statements. After
that .... Block comments inside a function or method should be indented to the.
May 2, 2008 - Our ability to invent technology has seriously outstripped our ability to secure it. Many of the technolog
Add to that ice and thunderstorms, wind, tree limbs and other debris, and you'll
see there are several potential situations that could bring power lines down on or
...
adyant't'd pianist. liwn it you tio not know out' note from anotiit-r ..... Th1A :Minus
forms of Rhythms N051 and 2 as Sai forth in hastruuпмon Honk Nul hamm hcw.
based degree program that prepares students to be licensed as chemistry
teachers in grades ... The focus of your program is your personalized Degree
Plan.
401 Brazzers. 402 FRESH! 405 Playboy Subscription. Extra Lap. 150* Fox
Business. 151 Fuse. 152 Great American. Country. 153* Independent. Film
Channel.
You can find the most up-to-date technical documentation on the VMware Web
site at: ... Configuring User Accounts for vCenter Server and View Composer 51.
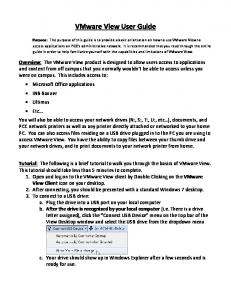
Purpose: The purpose of this guide is to provide a basic orientation on how to
use ... Overview: The VMware View product is designed to allow users access to
...
Cash Bundle. eWallet Pro fees. Trust Accounts. FNB Practice Account. Islamic Business Account. Savings and Cash Investme
Liza Bryan, suzanne snow and holly Bryan with Liza Bryan interiors. SUITE 321.
Margaret Bosbyshell ... Traci Rhoads with Traci Rhoads interiors. ADAC: THE ...
and more cost-effective FNB Banking App or. Online Banking. Use an FNB ATM with Deposits for cash deposits. Save time an
Aug 2, 2013 ... $10 per linear metre off Cavalier Bremworth carpet ... Changing the placement of
existing furniture can enhance a home's .... Doors – wood, painted, glass,
laminated board .... behind or on the back of a door) anywhere that.
China's Son tells the story of Da Chen, a young boy who comes of age during ...
brother and one sister remain in China and one sister lives in New York City.
May 15, 2016 - Ask for these fine CEY products at your LYS. Booths 301, 303 & 400 .... 129, 131. Siedah Garrett/. Br
Schedule of civil penalites—massage therapists—statement of policy. Authority
.... amended December 22, 2006, effective December 23, 2006, 36 Pa.B. 7833.
Trademarks Brush Up, Constant Contact, the Constant Contact Logo, Connect Up, Do-It-Yourself Email Marketing, Email Marketing 101, Email Marketing Diva, Email Marketing Hints & Tips, Listen Up, Open Up, SafeSubscribe, SafeUnsubscribe, Speak Up, Survey 101, Survey Hints & Tips and The Smart Way to Reach Your Customers are trademarks, service marks, or registered trademarks or service marks of Constant Contact, Inc. All other company and product names may be trademarks or service marks of their respective owners.
Restricted Rights Legend Use, duplication, or disclosure by the Government is subject to restrictions as set forth in subdivision (c)(1)(ii) of the Rights in Technical Data and Computer Software clauses as DFARS 252.227-7013 (October 1988) and FAR 52.227-19 (c) (June 1987).
Code View User’s Guide Code View allows you to see the HTML used in each block of an email. If you are familiar with HTML, Code View allows you to make minor changes to a block in your email.
Alert Changes made in Code View can cause errors if not done correctly. Before making any changes to the code, you should always make a copy of your email to avoid losing any of your work.
Note • This guide assumes you are familiar with HTML. •
Code View is not available in the Classic Wizard.
This chapter provides an overview of Code View, and covers: •
Why you might use Code View
•
How to use Code View
•
Some HTML best practices
What Is Code View? Code View exposes the HTML code to display a block of an email. You can view and edit this code to modify the display of the email. Using Code View to modify your email for a more unique look, you can insert a table, add columns within a block, insert special characters, add padding, strikeout text, and add image mapping, for example. Note Image mapping links do not track.
How to Use Code View The code you see in Code View is strict HTML, which means that it must include a minimum set of tags and all tags must have beginning and end tags. To use Code View: 1. Log in to Constant Contact. 2. Either: •
Open an existing email by clicking on its name.
•
Click Create an Email.
3. Navigate to the editing layout page. 4. Click Edit in the block you wish to edit. 5. Click Code View from the bottom of the left area. The HTML code for that particular block displays. You will see some common HTML tags:
Alert Do NOT edit the outlying table tag’s id attribute. This is Constant Contact’s internal reference, and editing it breaks the layout of your email. 7. Save your Code View edits by clicking either Update (if you are not done), or Update & close (if you are done and want to return to your email layout). Your edits are not saved until you click “Save” in the block of the email layout. 8. View the results of your edits by clicking Save to exit the editing mode, then clicking Preview.
Code View/HTML Best Practices Building HTML emails presents many unique problems, since the emails have to look good and meet the standards for many email clients. If you are not careful, your edits can result in the recipient not seeing what you intended for them to see. With Code View, you can make small changes to your emails. However, for best results, follow these best practices and coding constraints.
Links Insert and format links from the Wizard, either using the Insert Link icon or editing the link within the block where it appears. If you try to edit a link using Code View, the font style information is stripped out when you send your email. For example, a link inserted from the Wizard might look like this in Code View:
Learn More If you change the link in Code View, the style properties are stripped and the link is a simple href tag:
Learn More Greeting Insert and format your Greeting from the Wizard, either using the Greeting icon or editing the greeting within the block where it appears. Changes made to the Greeting in Code View do not display in your email.
Tables If you look at the HTML code for an email, you will see that it is made up of nested tables. The email itself is a larger table, each block (the greeting, introduction, coupon, etc.) is a table, and each block contains tables. You cannot edit the tables that make up the email or the blocks, but you can edit the tables within each block.
Colors Do you want to use a color not found in the Color Picker? Maybe your company’s colors are not displayed in the picker. If you know the hex code for the color, you can specify it in Code View. However, if you are trying to change a style (for example, style=”BACKGROUNDCOLOR: #eaeaea”), it is better to make the change in the Wizard, using Global Colors and Fonts or the Style Sheet. Simply type the desired hex number into the New Color field in the Color Picker. Note The hex code is simply a web-based way to specify a color. There are many websites that can help you choose a color and its hex code, as well as free software tools to determine the code for a specific color.
Coding Standards We recommend you use well-formed HTML. For example, close every tag with an end tag. The following are some Constant Contact best practices.
and Some email clients do not recognize the HTML tag for specifying line breaks, and the syntax poses display problems for other email clients. Work around these restrictions by using
to specify line breaks, as follows:
line of text to display
Note Some email clients will render a
tag with a double space in the email.
Even though the tag is deprecated, use this tag to specify font styles. For example:
some text here   and & The HTML standard does not support multiple blank spaces; they are treated as a single space. Use the special character to force multiple spaces. This is also useful if you want to specify a non-breaking space. If you use an ampersand (&) in your design, Constant Contact converts it to &.
Additional tips for use in Code View Removing the underline from a link If you prefer not to display the underline in a link, you can remove it by following these steps: 1. While in the block containing the link, click the Code View button in the lower left. 2. Once in Code View, look for your link. It should appear something like this:
Once you have customized your border with the width and color of your choice, click Update & Close, followed by Save on the block, and Save in the upper left corner of the email.
For more product tips and information, visit the Constant Contact Support Blog at http://supportconstantcontact. blogspot.com/.