such a âprivate cloudâ for neuroimaging and deployed it to users of the Beckman. Institute Bioimaging Center. This thesis aims to demonstrate the scientific ...
COMPUTATION CLOUD TO ENABLE HIGH THROUGHPUT NEUROIMAGING
BY NATHANIEL CRAIG WETTER TAYLOR
THESIS Submitted in partial fulfillment of the requirements For the degree of Master of Science in Bioengineering In the Graduate College of the University of Illinois at Urbana-Champaign, 2015
Urbana, Illinois Adviser: Associate Professor Bradley P. Sutton
i
Abstract Neuroimaging studies require significant computational power in order to perform nonlinear registrations, 3D volumetric segmentations, and statistical analysis across a large group of subjects. In addition to the need for this large computational infrastructure, the large number of open-source programs being used to process data has increased in recent years making it standard for several packages, each one frequently and independently updated, to be used in a single analysis. Due to these needs, the focus of computational infrastructure in neuroimaging is transitioning from user-owned hardware, to virtualized, shared, and scalable “cloud”-based hardware. We have implemented such a “private cloud” for neuroimaging and deployed it to users of the Beckman Institute Bioimaging Center. This thesis aims to demonstrate the scientific advantage for neuroimaging from such a system, to serve as a guide for users and administrators, and to provide implementation details to other groups who may wish to build a similar cloud of their own. In the final chapter, we present a sample application—a novel, open source method for the detection and quantification of multiple sclerosis lesions on MRI images. Like many neuroimaging applications, this method takes a great deal of time to process all subjects, highlighting the practicality of the flexible, shared infrastructure of the private cloud for bioimaging research.
ii
Table of contents Chapter 1: Background ...........................................................................................................................................................................1 Computational requirements in neuroimaging ...................................................................................................................................1 Cloud Computing ...............................................................................................................................................................................1 BioImaging Center Cloud ..................................................................................................................................................................6 Chapter 2: Implementation ....................................................................................................................................................................10 Eucalyptus architecture ...................................................................................................................................................................10 Our implementation .........................................................................................................................................................................11 Figures .............................................................................................................................................................................................17 Tables ..............................................................................................................................................................................................19 Chapter 3: User guide ...........................................................................................................................................................................20 Introduction ......................................................................................................................................................................................20 Getting started .................................................................................................................................................................................20 Starting an instance .........................................................................................................................................................................22 Accessing an instance .....................................................................................................................................................................26 Customizing an instance .................................................................................................................................................................26 Stopping / terminating an instance ..................................................................................................................................................29 Instance types .................................................................................................................................................................................30 Machine images ..............................................................................................................................................................................31 Data storage and access .................................................................................................................................................................31 NITRC-CE .......................................................................................................................................................................................33 Command line tools .........................................................................................................................................................................35 Tables ..............................................................................................................................................................................................36 Chapter 4: Sample cloud application: A novel automated lesion mapping method ..............................................................................38 Introduction ......................................................................................................................................................................................38 Methods ...........................................................................................................................................................................................40 Results .............................................................................................................................................................................................47 Discussion .......................................................................................................................................................................................50 Conclusion .......................................................................................................................................................................................53 Figures .............................................................................................................................................................................................55 Tables ..............................................................................................................................................................................................60 References ............................................................................................................................................................................................65 Appendix A: Eucalyptus configuration files ...........................................................................................................................................68 Cloud controller ...............................................................................................................................................................................68 Cluster controller .............................................................................................................................................................................72 Node controller ................................................................................................................................................................................76 Appendix B: Eucalyptus configuration properties .................................................................................................................................78 Appendix C: Installing a new Node Controller ......................................................................................................................................85
iii
Chapter 1: Background Computational requirements in neuroimaging As shown in Chapter 3, computational demands can be quite high for a structural of functional neuroimaging data set where inside a single subject, steps in nonlinear registration, anatomical parcellation, and statistical processing are required. When there are a hundred subjects in a single study, the computational resources required easily exceed a single high-powered workstation. Fortunately, the advent of reasonably priced cloud resources enables the user to scale up their computational resources to match the data and operate in an environment that they are accustomed to.
Cloud Computing Traditional use of computers for work and research has been to purchase a sufficiently powerful desktop computer for each user, and to perform tasks locally on this computer. If additional computational resources are required, additional machines are purchased for a group, or time on a large cluster is applied for or purchased. The former can be cost-inefficient, and the latter inconvenient. Ownership of hardware can allow for great flexibility in terms of software, but is expensive as enough hardware must be purchased to support the maximum anticipated computational load. If that load is not maintained, the expensive hardware sits unused and the purchase cost is inefficient. On campus there are computation clusters which users can buy into, buy time on, or apply for 1
grants on, which can alleviate the problem of paying for hardware that becomes underutilized. However, a limitation with clusters is software flexibility, as the user does not have supreme control over the operating system and installed software.
Cloud computing has the potential to alleviate the limitations described above, combining the flexibility of user-owned hardware with the cost-benefits of shared resources such as the computation clusters available on campus. There are three main types of cloud services: Infrastructure as a Service (IaaS), Platform as a Service (PaaS), and Software as a Service (SaaS).1
SaaS is a concept that most users will likely be familiar with, if not by name. These services most often take the form of software that is accessed via a web browser, which may replace software the user is familiar with operating on his or her local machine.1 A Popular early example of this is Google Docs,2 which allows users to create documents in a web browser is a manner similar to operating a word processor locally. Since the introduction of Google Docs, Google has added other services enabling users to create spreadsheets,3 drawings,4 presentations,5 and forms.6 This concept has become mainstream and now available is a plethora of SaaS options from many different vendors, with cloud elements even becoming integrated into traditional software such as Microsoft Office7 and even operating systems such as iCloud backup in Apple IOS.8
2
PaaS is a concept that will be less familiar to users and more familiar to web developers. In this model, the vendor provides back-end processing and scalability, freeing the developer to worry only about writing his or her code.1 One popular example of this is Heroku,9 which allows a developer to deploy a web application very quickly by simple uploading code in one of several languages such as Ruby, PHP, Python, Javascript, or Java, with the end user never knowing the difference.10
IaaS will be of the greatest interest to scientists in need of computational resources. Under this model, the vendor provides virtual hardware that can be used for any purpose the user desires, and is paid for by the hour or partial hour that the hardware is running.1 This model offers great flexibility, as the user is provided with administratorlevel access to the virtual hardware, allowing him or her to run any compatible operating system and install potentially any software, including popular neuroimaging packages. Users may start up additional machines when additional resources are needed, such as when a deadline is near, and shut them down when not, enabling great cost-efficiency.
Amazon Web Services (AWS)11 has been and is still the industry leader in Iaas, which began as Amazon.com offering to users the infrastructure that it uses itself to back its own web services. The basis of AWS is the Elastic Compute Cloud (EC2),12 which is a pure infrastructure service on which users can start up a great variety of virtual hardware which they refer to as instances. These include different categories of instances such as general purpose, compute optimized, GPU, memory optimized, and 3
storage optimized. Pricing is available on-demand, with discounts available with the purchase of bulk hours with "reserved instances", or by bidding against other users with the "spot price" which fluctuates minute-to-minute based on user demand of that instance type. The cheapest instance type available on AWS is the t2.micro instance which grants 1 GB memory and shared CPU for 0.6 cents per hour with a 3-year contract for a reserved instance to 1.3 cents per hour for an on-demand instance. Compute-optimized instances offer 2 CPUs and 3.75 GB memory (c4.large) at $0.043/hour to $0.11/hour, to 32 CPUs and 60 GB memory (c3.8xlarge) at $0.6281 to $1.68/hour. Memory optimized instances offer 2 CPUs and 15 GB memory (r3.large) to 32 CPUs and 244 GB memory (r3.8xlarge) at $0.0614 to $2.80/hour. GPU optimized instances (g2.2xlarge and g2.8xlarge) offer 1-4 GPUs with 1,536 cores and 4 GB memory each, at $0.282 to $2.60/hour. Storage optimized instances offer 1x 800 GB Solid State Drive (SSD) (i2.xlarge) to 24x 2 TB Hard Disk Drive (HDD) (d2.8xlarge) at $0.6281/hour to $5.52/hour.13 AWS has grown to offer many additional services, including some in the PaaS category, and hosts services for over one million customers,14 including many high-profile companies, such as Netflix, Comcast, and NASA.15
Private cloud is the concept of hosting cloud services on local host machines in an organization’s own data center. This does limit some of the advantages of public cloud services in that an organization must purchase and administer hardware and cloud software. Also, scalability is limited to hardware purchased, and utilization may be low 4
during periods of low demand. However, there are some advantages. The most significant advantage for a University may be that a private cloud would allow for the utilization of cloud services when policies prevent the hosting of data off-site. Another advantage is that if utilization is high, the up-front purchase cost may be cheaper longterm than the per-hour rates of public cloud services.1
A hybrid cloud combines a public cloud with the means to access a private cloud in order to gain the benefits of both. A cost-effective way of building a hybrid cloud would be to provision enough private cloud hardware to cover the base demand from users, and allow public cloud access during peak demand, a concept referred to as “bursting”.1
Eucalyptus is an open-source, private cloud platform purchased by Hewlett Packard in September, 2014. The main focus of the Eucalyptus project is to create a private cloud platform to be API-compatible with AWS. Given that AWS is, by a wide margin, the industry leader in public cloud services, this is an advantage when choosing a private cloud platform. Users already familiar with AWS will instantly be familiar with the operation of a new Eucalyptus cloud. Users who have never before used cloud resources, who are introduced to such on the Eucalyptus cloud, will be easily transitioned to AWS where they will have resources available to them that are practically limitless. Finally, this high degree of cross-compatibility is an optimal starting point for a hybrid cloud.16
5
BioImaging Center Cloud The Biomedical Imaging Center (BIC) collects data for many studies, with nearly 1000 subjects scanned per year. For each of these datasets, BIC has provided a bestpractices scanning protocol and now many studies are using similar acquisitions. For these acquisitions many of the first steps in processing are shared across studies, including data conversion, fiber tracking, motion correction, normalization, and brain extraction. The initial data processing steps can take significant computing time for users. Performing probabilistic fiber tracking using bedpostx can take 16-24 hours per subject. We propose to build a private cloud platform to provide resources for the basic analysis of collected data for all studies scanned at BIC. This will provide significant value added for users collecting data at BIC.
The main benefit of a private cloud with IaaS functionality for BIC is that users will have access to the computational resources needed to process their data in a timely manner, without the up-front cost of hardware they may not need long-term. Typically, current users will process data on their own machines located in their own offices, which often do not perform well enough. Sometimes they will purchase new machines in order to process a particular study, which is not cost-efficient. Another benefit is that BIC may offer standard machine images, loaded with common software packages, which could encourage homogeneity in process and results across multiple labs. This would not come at the expense of being restrictive--labs would not necessarily be prevented from creating their own machine image with their own preferred versions of software 6
packages. Rather, users would have full administrator access to each of their virtual machines, giving them the freedom to do anything that they would be able to do with their own physical machines.
Though beyond the scope of the project at this time, a private cloud would also lay the foundation for PaaS and SaaS functionality for users of BIC. Eventually, preliminary and standard processing of collected data could begin automatically at the time of the scan. Quality control could be performed automatically as well: Are all the files present? Did the data conversion work? Is the signal-to-noise ratio of the acquisition within normal range? Are there spikes in the data, were the parameters estimated (such as blood flow) in the correct range? Currently, BIC relies on users to process their own data, which may not fully happen until much time has passed. If a problem in a protocol is noticed after a year, there likely were many additional subjects that were collected incorrectly in that time. If a problem is noted early, protocol issues can be addressed and problems can be avoided. Currently, our data quality control is performed on phantoms to address MRI system problems, not protocol or procedural issues. Automatic data processing built on a private cloud will enable BIC to process the data at the rate it is collected and provide a new service to the user: data in a form that is ready for high-level analysis with best practice steps already applied.
There are three additional benefits that result from this shared environment: (1) Many users do not have the resources or knowledge to perform processing of ever7
increasingly complex data sets. They want to take advantage of existing pipelines and computational resources to process data such as functional connectivity. We will be able to support a variety of processing pipelines that are tuned to work with our local data and environment. (2) We are running more complex acquisitions that require more computation to create a result. Magnetic Resonance Elastography acquisitions require off-line reconstruction of 3D spiral acquisitions, the MRI scanner cannot create images from this data. The inversion of the elastography data to get stiffness is also computationally intensive, requiring a cluster and many hours per subject to generate stiffness maps. (3) The reproducibility of MRI data is a cause for concern among funding organizations. Our design of the analysis platform will enable people to run various versions of processing software to enable reliable reanalysis of data or to continue a particular analysis of data across multiple years, despite updates of processing software. For example, a recent update of FSL changed the indexing of structures in one of the atlases. This change causes scripts designed to pick out a region of interest in one version of FSL to pick out a completely different structure in a different version of FSL. We saw that one lab was working across multiple workstations running different versions of FSL. No error message is generated but data processed on one version had significantly lower values of fractional anisotropy than that from another version. This difference was entirely due to the different versions of FSL. In our platform, users will be able to run scripts designed for a specific version of FSL with that version of FSL. Users will maintain access to older versions of the software despite
8
upgrades. If users want to upgrade to the latest version, they will also have access to that version.
The flexibility of our private cloud will allow us to offer scalable computation power with whatever computation environment each user is familiar with. A typical use will be to use the Eucalyptus web interface to start a NITRC-CE virtual machine with several computation cores. The user can then connect to the machine via terminal, graphical interface through the web browser, or via a popular data processing pipeline client from UCLA called LONI, depending on preference. Input data is either moved onto the cloud, or the user’s own network file storage can be connected. When processing is complete, the user shuts down the virtual machine. If changes to the machine configuration are made, these can be saved to a new machine image if desired.
9
Chapter 2: Implementation Eucalyptus architecture Eucalyptus consists of software components divided into three levels. At the top is the cloud level, which consists of the Cloud Controller (CLC) and Scalable Object Storage (SOS). The SOS further consists of the Object Storage Gateway (OSG) and a storage platform such as Walrus, a basic platform supplied by Eucalyptus, or RiakCS,17 a thirdparty open-source distributed storage platform.18 Below the cloud level is the cluster level, also known as an availability zone. Cluster-level components include the Cluster Controller (CC) and Storage Controller (SC), which provides block-level storage for the cluster. At the bottom is the node level, which consists of one or more Node Controllers (NC) which actually run the Virtual Machines (VM), also known as instances. There is a great deal of flexibility in how to install these components: Each component may be installed on a separate physical host, they could all be installed on a single host, or any combination in-between.19
Networking Eucalyptus offers several different networking modes, one of which must be chosen for a given deployment. The choice of networking mode will have implications for what features will be available and for how the system will perform. The main differences between the modes are whether Eucalyptus will use existing network and routing infrastructure (system mode),20 run its own routing on the CC (static21 or managed22 10
modes) or run it on each NC (edge mode).23 Another networking option is whether to have all hosts and instances attach to a single network, or to have separate public and private networks.24
Our implementation We implemented the BIC cloud with five hosts running Eucalyptus 4.1.1. Two of the hosts run all cloud level and cluster level components, respectively. Additionally, the cloud level host runs Eucaconsole, the web interface. This leaves the remaining three hosts to run as NCs. We chose to run the edge networking mode. Introduced in Eucalyptus 4.0, edge mode offers the best possible performance by running networkrelated services on each NC rather than require all traffic to go through the CC.23 We also chose to run separate private and public networks. The main reason for this decision was that either way, each instance will require both a public and private IP. With a single network, this means an instance will use two public IP addresses, which would be wasteful. Running two networks means an instance will use a single public IP and a private one on a 192.168.x.x network.
Host machines From a previous uncompleted project, we had possession of 4 Dell PowerEdge R720 server chassis, each with two 2.5GHz 10-core CPUs (Intel Xeon E5-2670 v2), minimal amounts of memory, and unsuitable notebook hard disks. Three of these servers had eight 2.5” hard disk bays, while one had 16 bays. We chose to use the machine with 16 11
bays for the cluster level components, the remaining three for node controllers, and to purchase a new machine for the cloud level components. For this, we chose a Dell PowerEdge R720xd, which has 12 4” hard disk bays accessible from the front of the chassis, and two 2.5” bays accessible from the back. This configuration allows us excellent economy for the object level storage. This chassis was configured with two 2.5GHz 4-core CPUs (Intel Xeon E5-2609 v2). These hosts are located in a shared rack in Beckman Institute, room 4129 (Figure 2.1). Any questions about these machines unanswered in this document should be answered in the official PowerEdge R720/R720xd technical guide.25
Storage The CLC host was ordered with the Dell PowerEdge RAID Controller (PERC) H710P Redundant Array of Inexpensive Disks (RAID) controller, and the four existing hosts were upgraded to this controller from the PERC H310. Each host’s root file system runs on two 300GB 10,000RPM hard disks in a mirrored array. Each type of cloud storage has its own array separate from the host’s root file system. The CLC has 12 4TB 7,200RPM disks in a RAID6 array (4TB accessible) for Walrus-backed object level storage. The CC has 14 900GB 10,000RPM disks in a RAID6 array (10.8TB accessible) for EBS volumes. Each NC has 6 300TB 10,000RPM disks in a RAID5 array (1.5TB accessible) for ephemeral storage and image caching. When a disk fails, the integrated Dell Remote Access Controller (iDRAC) will send an email alert to the administrator. One cold spare disk of each disk type is located in the rack, and should be swapped in 12
for the faulty drive immediately, while a replacement is ordered. Great care should be taken when replacing the hard disks. Aftermarket drive trays are used, as genuine Dell trays are not officially available. The 4” trays are of particularly low quality and sometimes do not fit well.
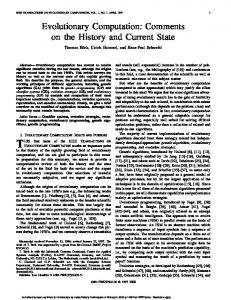
Network Beckman Information Technology Services (ITS) was able to provide 1GbE (gigabit ethernet) ports, but did not have faster ports immediately available. With this constraint, we implemented our Eucalyptus cloud with a public network using these ports, and a separate, high-performance private network within the rack. For this, we chose 56GbE technology from Mellanox, in the form of a package which included the SX1012 switch, two ConnectX-3 Pro single port adapters, software licenses to upgrade the switch from 40GbE to 56GbE and to enable Infiniband support, 1 year of silver level support, and several cables and adapter modules.26 Additional ConnectX-3 Pro single port adapters and cables were then purchased for the remaining three hosts. Network details are shown in the network diagram (Figure 2.2) and network table (Table 2.1).
The Mellanox SX1012 is a powerful and flexible switch that has ample headroom to grow with the cloud. The switch only has 12 56GbE ports, but if the cloud is upgraded beyond 12 hosts, each of these ports can be reconfigured as four separate 10GbE ports by use of proprietary fanout cables and the web administration console. This allows for up to 48 10GbE ports--much more than this project is anticipated to need. Another 13
feature of this switch is that it supports Mellanox’s Virtual Protocol Interconnect (VPI).27 This allows one switch to carry both ethernet and infiniband traffic. Though infiniband is currently not supported by Eucalyptus, if later versions add support, this switch could be configured to handle infiniband traffic via the SSH administration console. Most administration features may be accessed by either the web or SSH console at bicloudswitch.beckman.illinois.edu (128.174.219.2). When purchasing new hosts, note that 56GbE is nonstandard and proprietary to Mellanox, so if this type of connection is desired, Mellanox cards and Mellanox VPI cables must be used. Otherwise, the switch is compatible with IEEE standard 40GbE and 10GbE.28
Because of the disparity in performance between the public and private networks, we desired to configure Eucalyptus to use the private network for all component-tocomponent traffic. This was accomplished by registering all components on the private network rather than the public network. One unexpected problem was that instances are intended to access the cloud and cluster level components over the public network, and therefore access is blocked in the iptables configuration of the NC host. This was resolved by creating an iptables rule to mark traffic intended for the private network to be allowed through the firewall (iptables -t nat -A EUCA_NAT_PRE_PREUSERHOOK s 192.168.1.0/24 -d 192.168.1.0/24 -j MARK --set-xmark 0x2a/0xffffffff).
Each host is physically connected to the public network via port 2 of the networking daughtercard (interface em2), and the private network via the QSFP connector of the 14
Mellanox PCI card (interface p3p1). Port 4 of each daughtercard and the management port of the Mellanox switch are connected to a Top of Rack (TOR) switch for management/iDRAC access.
Memory MRI processing is often memory-limited, and therefore we added as much memory to each NC as was feasible. This meant populating each of 24 slots with 16GB modules for a total of 384GB per NC, or 19.2GB per core. At this density, memory bus speed is limited to 1333MHz. In order to not increase complexity, it is recommended when adding additional NCs to keep this ratio of memory per core, and to consider how instance types will fit into the number of cores. Existing 8GB were used to populate the CLC (12 modules totalling 96GB) and CC (14 modules totalling 112GB). Each host has a maximum capacity of 1536GB, using 64GB modules.
Power The CLC was configured with, and the remaining hosts upgraded to, dual-redundant 750 watt power supplies. The SX1012 switch is configured with redundant power supplies as well. Battery backup is attained via two (one 3000 watt and one 2200 watt) Uninterruptible Power Supply (UPS) units provided by Beckman ITS. Currently, these units are dedicated to the cloud hosts.
15
Configuration details Eucalyptus was installed and configured according to the official installation guide.29 When instructions were unclear, community support was consulted via Internet Relay Chat (IRC) and the euca-users mailing list.30 Numerous properties exist for customization via Euca2ools (sic) commands and configuration files. The status of these properties are detailed in appendices A and B. A complete list of commands to install and configure a new NC are given in appendix C. Note that while these commands could be run as a script, it is recommended that each command be understood and run manually so that faults arising from hardware differences or software updates can be detected and resolved.
16
Figures
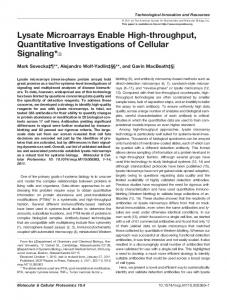
Figure 2.1: Host machines, network switch, and two uninterruptible power supplies, located in a shared rack in Beckman Institute, room 4129. 17
Figure 2.2: Network diagram
18
Tables Table 2.1: Network details CLC
CC
NC1
NC2
NC3
Hostname
bicloud
bicloud-cc
bicloud-nc1
bicloud-nc2
bicloud-nc3
IP
130.126.123.130
130.126.123.131
130.126.123.132
130.126.123.133
130.126.123.134
MAC
B8:2A:72:DF:C7:66
F8:BC:12:44:11:E1 C8:1F:66:EF:79:53
C8:1F:66:EF:BB:89
C8:1F:66:EF:61:88
Port (Back Wall, P2) 17
23
18
22
21
Hostname
bicloud-rac
bicloud-cc-rac
bicloud-nc1-rac
bicloud-nc2-rac
bicloud-nc3-rac
IP
128.174.219.19
128.174.219.20
128.174.219.21
128.174.219.22
128.174.219.23
MAC
B8:2A:72:DF:C7:68
F8:BC:12:44:11:E3 C8:1F:66:EF:79:55
C8:1F:66:EF:BB:8B
C8:1F:66:EF:61:8A
Port (TOR Switch)
1
2
3
4
5
IP
192.168.1.130
192.168.1.131
192.168.1.132
192.168.1.133
192.168.1.134
E4:1D:2D:01:E3:90
F4:52:14:75:67:E0
FE:01:06:26:7B:BC
F4:52:14:63:6F:70
F4:52:14:63:6E:B0
1
2
3
4
5
Public Network (Port 2)
iDRAC/MGMT (Port 4)
Private Network (56Gbe) MAC Port
19
Chapter 3: User guide Introduction The BIC cloud provides very flexible computational resources, primarily to meet the processing needs of MRI users. The main benefit to using the cloud is that the user will be able to run a virtual machine (or instance) with any Linux-based operating system, with any desired software packages, and have administration rights to perform any tasks desired. Another benefit is that a virtual machine image may be archived for posterity, ensuring absolute reproducibility, which may not necessarily come with archiving base data and written methods. The cloud is implemented with Eucalyptus, an open-source project built to mimic Amazon Web Services (AWS), the industry leader in cloud services. Therefore, user familiarity with Eucalyptus will symbiotically lead to familiarity with AWS and vice versa. Additional help can be obtained from AWS31 and Eucalyptus32 official documentation. As AWS offers many additional services not currently implemented in Eucalyptus, it may be helpful to focus on Amazon EC2,33 EBS,34 and S335 documentation for help with computational and storage resources.
Getting started Credentials for the cloud consist of an account, a user name, and a password. It is useful to have an account for a group of researchers within a lab or who otherwise
20
share resources. Users within a group can share quotas and see each other’s running instances, though they will not necessarily be able to access them if it is not desired.
The user will first request access to the cloud from the cloud administrator. In the future, an email alias could be configured for this, but for now the administrator must be contacted directly. After receiving credentials by email, the user will then access the web console at bicloud.beckman.illinois.edu and login with the account name, user name, and temporary password. In the future, the cloud may be integrated with the university authentication system so the user will use his or her enterprise password and netid, but for now the credentials will remain separate. If the user has credentials on AWS, those may be entered after selecting log in to AWS from the login screen. This will allow the user to use AWS resources from the familiar Eucalyptus console. It is important to note that these services are physically located outside the university, and charges may apply.
After logging in, the user is presented with the dashboard page, which shows an overview of resources being used by the account, along with convenient links to access those resources. Along the top of the page are links to other tabs, which categorize access to all resources. The first action a user should take upon logging in for the first time should be to change the password. This is accomplished by clicking on the user name at the top-right corner of the page, and selecting manage credentials.
21
Starting an instance Select an image From the instances tab within the web console, select launch new instance, then select the desired machine image. This page provides some options to filter the images presented, such as by who owns the image, or the root device type. Alternately you may open the images tab, click the gear icon next to the desired image, and click launch instance. Finally, you may follow a link to a specific image from this document, click actions, then launch instance.
Image details Any of the above actions will bring you to 2: Details within the launch new instance dialog. On this page, you can select the number of instances to launch, optionally name your instances, and select instance type. The instance type will determine the computational resources that will be provisioned for your instance, and therefore the level of performance. This is explained further in another section. Availability zone can be ignored, as our cloud currently has only a single availability zone. Tags are an advanced option that can also be ignored.
Security Clicking next will bring you to 3: Security. Eucalyptus has some security features that will be familiar to you if you have used AWS, but otherwise you may not have seen 22
before. You may be used to accessing machines remotely using a name and password, but generally with AWS and Eucalyptus you will use a key pair instead. On this page, you will select your key pair from the drop-down menu next to key name. If you have not yet created a key pair, you will instead select create key pair, give it a name, and download the private key. Some images, such as NITRC-CE, do not require the use of a key pair, and so none (advanced option) may be selected. More information on key pairs is available below. The other option related to security is the security group. This selection will determine firewall rules which will allow network traffic to reach your instance only on particular ports. You will need to select or create a security group which will open ports for the services you intend to use. More information on security groups can be found below. Role is an advanced option that can be ignored. From here, you can click launch instance or select advanced options.
Key pairs
Typically, a password will not be used to access an instance. Rather, a key pair will be used. A key pair consists of a public key and a private key. The public key will reside on the cloud system and will be retrieved by each instance when it starts. Then, the user uses the private key to verify his or her identity when connecting to the instance. A key pair can be generated by navigating to the network & security tab in the web console, and selecting key pairs. Here, the user may import a public key which is part of a key pair created previously, or create a new key pair. When creating a new key pair, the user specifies a name and then downloads the private key. This will be the only 23
opportunity to download the private key, so if it is lost, the user must create a new one. The private key should not be shared with other users, and permissions should be modified to prevent access by other users. On a Linux system, this will be accomplished with the command chmod 400 my-key-pair.pem. A specific key pair will be chosen by the user to attach to each instance when started.36
Security groups
Eucalyptus and AWS accomplish network security or firewalling through the use of security groups, which can be managed via the network & security tab in the web console. From this page, a new security group may be created, or an existing security group may be modified by adding or removing rules. By default, no inbound network traffic will reach an instance, unless there is a rule in the security group which specifically allows it. Rules can be added to accept traffic on a specific port or a range of ports, and for convenience some popular services can be selected from a dropdown menu. Likely selections include TCP port 22 for SSH, TCP ports 80 and 43 for HTTP and HTTPS, and ICMP for ping. For additional security, you may restrict access to a particular IP address, a range of IP addresses using CIDR notation, or click use my IP address. However, unless heightened security is necessary for the user’s particular application, it is acceptable and more convenient to select open to all addresses. Another advanced option that will be unnecessary for most users is that a rule can allow access only to other instances that are part of a specified security group. Tags are an advanced option which can be ignored. Once the security group is created or modified, 24
it may be associated with an instance when started as explained in another section. Multiple security groups can be associated with an instance at start. Once running, a user may not modify which security groups are associated, though rules within a security group may be modified and will take effect immediately.37
Advanced options 4: Advanced options is an optional page that can be bypassed by launching an instance directly from 3: Security. User data are commands that will run on the instance automatically as soon as it starts, before the user logs in. This is useful for customizing a base image by installing or configuring software, if creating a custom image is not desired. These commands can be entered directly by selecting enter text, or by uploading a file containing the commands. Kernel ID, RAM disk ID, and enable monitoring can be ignored. Use private addressing only will cause the instance to connect only to the back-end private network without any routing to the university network. With this selected, the instance will not be accessible directly. One possible use of this option would be for launching an old image that has not been kept up to date with security patches, and therefore would be against university policy to connect to the university network.
Launch instance Clicking the launch instance button from 3: Security or 4: Advanced options will bring you to the instances tab of the web console, where you will see your new instance with 25
pending status. Depending on the type and size of the image, it may take a few seconds to a few minutes until the instance is done booting and the status changes to running, and the instance becomes accessible.
Accessing an instance From the instances page, find the running instance that is desired to connect to. Hi-light the public IP address and copy it to the clipboard. Use your preferred SSH client with your private SSH key to connect to this IP address. Using the linux command line, the command would be: ssh -i [path to private key] [user name]@[IP address]. The user name will vary depending on the image, and should be indicated in the image description. It will often be root or the name of the linux distribution, e.g. centos or ubuntu.
Customizing an instance It isn’t feasible to have available the perfect machine image for every user. However, a great advantage in cloud computing is that a user may be empowered with administrative access on his or her instances, enabling any customization desired. In the starting an instance section, we have already discussed one method of customization--by attaching commands as user data that will run on boot. If resourceintensive customization is required, or a static custom image is otherwise desired, a user may perform customizations on a running instance and then generate a new image from it. To do so, from the instances page, click the gear icon next to the running 26
instance and select create image. From here, the user will choose a name and optionally enter a description. Under advanced, the the size of the root filesystem may be increased, additional EBS volumes may be attached, as well as ephemeral storage or instance-backed storage. If the desired customization requires installing large packages, an intermediate image with a larger root file system may need to be created before the final customized image. More information on customizing volumes is available in another section below.
Creating the image will cause the instance to be rebooted. Under advanced there is an option to bypass this reboot, but it is not recommended as the image could be corrupted. Tags are an advanced option that can be ignored. Upon clicking create image, the user is reminded to delete any private information such as command history or private keys, and is instructed to run 2 commands to remove udev networking rules. If these rules are not removed, the instance may not be accessible. Once these actions are confirmed completed, the new image will be created. This may take a long time (up to multiple hours) to complete, especially if the instance is large.
In order to not needlessly waste storage resources, please delete any intermediately created images once the final customized image is verified to work correctly.
27
Customizing volumes When creating a new image, under advanced are options for customizing storage volumes associated with an image: the root device may be resized, additional volumes may be attached, and ephemeral storage may be attached. Additional commands may need to be run on an instance to access new storage. These commands can be attached as user data, or they may be run manually on an instance and then another new image saved.
Resizing root device
Increasing the size of the root device may be necessary if additional storage is needed for the installation of software packages. To accomplish this, simply enter the desired size in the text field, and make sure delete on terminate is selected. After creating the image and starting a new instance from it, connect to the instance and verify that the correct size is reported available (df -h). If the new size is not reported, it may be necessary to manually resize the filesystem (resize2fs /dev/vda1).
Attaching ephemeral storage
Ephemeral storage is an instance-store backed volume that exists on the local storage of the physical machine running the instance, and therefore may potentially perform better than other types of storage. Its size will depend on the instance type selected when starting an instance. On the BIC cloud, this size is 40GB per CPU. All data contained in ephemeral storage will be deleted when an instance is stopped or 28
terminated. To attach ephemeral storage, under add another device, under volume, select ephemeral0. Enter a device mapping (e.g. /dev/sdb). Note that these tend to be renamed (e.g. /dev/vdb). Click add device, then launch instance. After launching and connecting to the instance, you can see the device by running fdisk -l. The device will need to be partitioned (fdisk /dev/vdb), formatted (mkfs.ext3 /dev/vdb1) and mounted (mkdir /storage; mount /dev/vdb1 /storage). The volume should now be available (df -h).
Attaching EBS volumes
It is possible to attach additional EBS volumes to an EBS-backed or instance storebacked instance. The process is largely the same as attaching ephemeral storage as explained above, except for a few additional notes. These volumes will persist when the instance is stopped, and even when terminated if desired. Though, unless there is a specific need for persistence after termination, make sure delete on terminate is selected, so that resources will not be wasted. Another option for EBS volumes is that instead of attaching a blank volume, you may attach a volume with data generated from a snapshot. This may be useful for example if public datasets become available as snapshots.
Stopping / terminating an instance In order to make efficient use of resources, it is good practice to stop or terminate the instance when work is completed. When an instance is terminated, all data on that instance is deleted, any customizations made to the operating system will be lost, and 29
all resources will be freed. If the running instance is EBS-backed, an additional option is available to stop the instance rather than terminate. This will free CPUs for other instances, but the root storage device will persist. This means that the instance can be started again later, with any customizations to the operating system intact. To stop or terminate an instance, navigate to the instances tab of the web console, click the gear icon next to the running instance, and select stop or terminate. Alternatively, the user can run the shutdown command via ssh, which will by default stop an EBS-backed instance or terminate an instance store-backed instance. Best practice would be to include the shutdown command in the data processing pipeline so that it will occur automatically upon the completion of computation.
Instance types When starting an instance, you must choose an instance type, which will determine the virtual hardware allocated to your instance and therefore the level of performance. Instances are available with from one to 20 cores, with 18 GB memory and 40GB ephemeral storage per core. The default instance type, m1.small, has a single core. Supported instance types are listed in Table 3.1, or via the Eucalyptus API command euca-describe-instance-types. When running this command or selecting a type for your instance in the web console, you will also see several other instance types with 1 CPU, 256 MB memory, and 5GB ephemeral storage. The reason for this is that the Eucalyptus instance types are based on AWS instance types, and a current limitation of Eucalyptus is that their names are hard-coded in the source. Because of this, unused 30
types cannot be hidden, and we are stuck with a strange naming convention for the ones we do use.
Machine images When starting a new instance, you must choose which machine image to use. The machine image contains the operating system and installed software. We offer images that are preinstalled with software useful for image processing, as well as well as images that are only barebones installations of some distribution of Linux, to serve as a starting point for creating your own image.
Data storage and access As with AWS, there are three types of data storage a user may access: Simple Storage Service (S3) buckets,38 Elastic Block Store (EBS) volumes,39 and instance storage.40
S3 S3 buckets are object level storage, which means that objects (files) may be uploaded to and downloaded from a bucket, which is analogous to a file folder. This works much like familiar cloud storage services such as Dropbox.41 Do to the nature of the underlying infrastructure, in AWS, performance can be gained by distributing data across multiple buckets. In the BIC cloud, S3 is implemented on top of a flat file system, eliminating any performance considerations to how users should arrange their data in buckets. Buckets can be managed and accessed through the web console under the 31
storage tab, by selecting buckets (S3). In both services, the name of a new bucket must be unique across the entire cloud, including all accounts and users.
Elastic Block Store (EBS) As explained further under customizing volumes, EBS allows users to create volumes of block-level storage. This differs from S3 in that the user will mount volumes onto an instance, format, and partition them, much like installing a new hard disk. Like an external hard disk, they may be detached from an instance and reattached to another. In addition to creating new volumes when an image is customized, volumes can be created and attached to running instances via the storage tab by selecting volumes. A snapshot may be taken of a volume, allowing the data on that volume to be restored at a later time. Likewise, a new volume may be created from the data on a snapshot. Snapshots may be managed under the storage tab.
Instance storage As explained further under customizing volumes, instance storage is also block-level storage like EBS, except that data is always deleted when an instance is stopped or terminated. As this storage exists on the same machine that the instance is running on, performance may be higher than that of other types of storage.
32
Network file shares In addition to accessing storage services provided by the cloud, users may also mount any university or department network file shares that they are already using. As the instance behaves as any other machine connected to the university network, the process for mounting the file share would be the same as a computer in the user’s office.
NITRC-CE The Neuroimaging Informatics Tools and Resources Clearinghouse Computational Environment (NITRC-CE) is a very good image to start with for image processing. It was developed by the Neuroimaging Informatics Tools and Resources Clearinghouse (NITRC)42 to be a single image that will provide most or all of the tools a neuroimaging researcher would be familiar with. It takes the concept of NeuroDebian,43 a neuroimaging package repository, one step further by providing a turn-key image processing solution with all software pre-loaded. It was originally developed for AWS,44 but later an installation script has been released45 which, in theory, allows any Ubuntu Server 12.04 base image to be converted to NITRC-CE.
Using NITRC-CE When starting a new instance per the instruction in a previous section, choose a NITRC-CE image. It is not necessary to assign a key pair. At a minimum, make sure the security group attached has open ports 80 (http) and 43 (https). A full list of all ports that 33
may be required by NITRC-CE is listed in Table 3.2, but 80 and 43 are sufficient for most users. As this is a large image containing a lot of software packages, the instance may take a couple of minutes to start. When the instance is listed as running, copy the public IP address and paste it into your web browser of choice. This is a web server running on the instance. It will instruct you to “Click here to open an encrypted connection over SSL.” You may then need to accept an unsigned SSL certificate. The process for this will vary depending on your browser. Then, you will be prompted to create a username and password that will be used to access the instance. You may also be prompted to enter the instance ID. This can be copied from the instances tab, or may be easier to select after clicking on it, bringing you to an instance details page. By default, the instance will send usage statistics back to the NITRC team, and send you an email after 6 hours to remind you that the instance is still running. You must enter your email if the latter feature is desired, and you may change the time delay before the reminder is sent. Any of these features may be disabled by unchecking the boxes next to them. Click submit. Click control panel. This is the NITRC-CE web console. From here the user may navigate to the licenses tab to view installed software packages. Here, licenses for FreeSurfer and SOLAR may be added. Under the settings tab, users may mount S3 buckets. This is not recommended, as S3 buckets were not designed to be mounted this way, and unexpected problems may occur. Under the console tab, click connect. Log in using the username and password chosen earlier for this instance. Under all connections, click NITRC-CE Desktop. Now, the user is presented with a familiar graphical desktop, and may begin work! 34
Command line tools Most of the instructions in this guide have relied on the web console interface. Advanced users may wish to connect to the BIC cloud via a command line interface. This is possible by installing and configuring Euca2ools, the official Eucalyptus toolkit, or any third party Eucalyptus/AWS-compatible toolkit. Full instructions for installing, configuring, and using Euca2ools are available within the official Eucalyptus documentation.46
35
Tables Table 3.1: Available instance types Name
CPUs
Memory (GB)
Disk (GB)
m1.small*
1
18
40
m1.medium
2
36
80
c1.medium
4
72
160
m1.large
6
108
240
m1.xlarge
8
144
320
m2.xlarge
10
180
400
m3.xlarge
12
216
480
m2.2xlarge
16
288
640
m3.2xlarge
20
360
800
*Default instance type
36
Table 3.2: Available machine images ID
Name
OS
Username
Backing
emi-92b70cb0
centos-6.6-03-10-15
CentOS 6.6
centos
instance
emi-397704e4
centos-7-03-31-15
CentOS 7
centos
instance
emi-36ccbcb5
fedora-21-03-31-15
Fedora 21
fedora
instance
emi-dc40a7ee
ubuntu-utopic-03-31-15
Ubuntu 10
ubuntu
instance
emi-4786f438
NITRC-CE-06-24-2015
Ubuntu 12.04
N/A
EBS
emi-1a60c832
ubuntu-precise-base
Ubuntu 12.04
root
EBS
emi-50155f11
ubuntu-trusty-base-06-10-15 Ubuntu 14.04.2
root
EBS
37
Chapter 4: Sample cloud application: A novel automated lesion mapping method1 Introduction One potential application for the BioImaging Center (BIC) computation cloud is the development and validation of image processing methods, such as the one described in this chapter to automatically quantify multiple sclerosis (MS) brain lesions on MRI images. The increased processing power allows for a faster development cycle, when data must be reprocessed after every change to the method, which can take many hours. The flexibility of the cloud is important when specific requirements exist for dependent software packages and operating system.
Multiple Sclerosis, Lesions, and MRI MS is a disease of the central nervous system resulting from the autoimmune destruction of the myelin sheath surrounding the axons of neurons. This causes the conduction of electrical impulses along the axon to become impaired, in turn causing neurological symptoms. Symptoms vary depending on the location of the defect, and as this can occur at any location in the white matter, a great range of symptoms may occur. MS is the most common disease of demyelination, affecting approximately 0.1% of
1
This chapter is based on Fully-automated open-source lesion mapping with FSL is predictive of clinical disability in MS, by Wetter, Hubbard, Motl, and Sutton, as submitted to Brain and Behavior.
38
people in the United States and Europe, and as such is the subject of a large body of research.47
Regions of demyelination (lesions) appear as plaques in the white matter of the brain or spinal cord, which appear much brighter (hyperintense) than normal tissue on a T2weighted MRI image. These have long been a defining feature of the clinical diagnosis and tracking of MS, becoming incorporated into the McDonald Criteria in the 2010 revisions.48, 49 Lesions further have been a primary end-point of trials examining the efficacy of disease-modifying therapies in MS.50, 51 Such lesions presumably reflect periods of immune-mediated disease activity within the CNS.52-54
The identification and measurement of lesions on T2 MRI images has been an important aspect of research in MS, enabling direct viewing of impact on brain tissue through T2 Lesion Volumes (T2LV).55 Imaging contrast and lesion delineation have improved with recent advances in MRI acquisition sequences56 to include high resolution, 3D acquisitions of Flow Attenuated Inversion Recovery (FLAIR) T2-weighted imaging.57 However, reliable and automated methods for quantification of lesions, along with open source methods for reproducible research, are severely lacking in this area. This inhibits more direct comparisons of measures across imaging sites or studies.
Several computational methods have been proposed to quantify T2LV, yet they often are proprietary, require human intervention, or require multispectral (or multicontrast) 39
imaging data sets.58, 59 Our goal was to create robust, fully automated T2LV quantification using an approach that is openly available and easy to use. We have built upon the open-source image processing toolkit FSL (fMRIB Software Library, fMRIB, Oxford, http://fsl.fmrib.ox.ac.uk/fsl)60 to create lesion-measuring software that requires only the T2 image. We demonstrate the utility of this approach by estimating associations between T2LV and metrics of clinical disability in a group of MS subjects. This tool will benefit research in MS by providing a common approach to quantify lesions and help to make methods and results of studies more comparable with one another.
Methods Subjects Of 64 total subjects recruited for this study, 52 (11 male, 41 female, see Table 4.1) completed the imaging study and all clinical disability measures, and remained after exclusion of outliers. The subjects included 40 with Relapsing-Remitting MS (RRMS), 7 with Secondary Progressive MS (SPMS), and 3 with Primary Progressive MS (PPMS). The average age was 51 years and average disease duration was 12 years. MS subtype and disease duration were unavailable for 2 subjects. Potential subjects were recruited through a database of participants from our previous studies and flyers distributed amongst patients in the North American Research Committee on Multiple Sclerosis (NARCOMS) registry. The following inclusion criteria were utilized: (1) MS 40
diagnosis, verified by physician; (2) relapse-free within the past 30 days; (3) age 18-64 years, (4) ambulation with or without assistive device, and (5) physician’s approval for participation. All participants provided informed consent in accordance with the Institutional Review Board.
MRI acquisition Volunteer subjects were scanned on a Siemens (Erlangen, Germany) Trio 3 T MRI scanner with a 12-channel head coil. Two structural acquisitions were used to assess the performance of the T2LV quantification method: a Fluid Attenuated Inversion Recovery (FLAIR) T2-weighted sequence to obtain T2LVs, and a Magnetization Prepared Rapid Acquisition of Gradient Echo (MPRAGE) T1-weighted scan to obtain atrophy measures for comparison. The T2 FLAIR scan was a 3D Turbo Spin Echo (TSE) using a variable flip angle. The scan was used to acquire 1 mm isotropic resolution with coverage of the whole brain in 7 minutes with a sagittal prescription. Relevant parameters for the T2 FLAIR sequence were 2.2 s inversion time, TE/TR of 388 ms/ 6 s, and parallel imaging with a Generalized Autocalibrating Partial Parallel Acquisition (GRAPPA) factor of 2.61 The T1 MPRAGE scan was a 3D gradient echo, using an inversion time of 900 ms. The scan was used to acquire 0.9 mm isotropic resolution with coverage of the whole brain in 4.5 min with a sagittal prescription. Relevant parameters of the T1 MPRAGE sequence are TE/TR of 2.32 ms/ 1.9 s, and a parallel imaging acceleration factor of 2.
41
Image analysis Quantification of lesion volumes
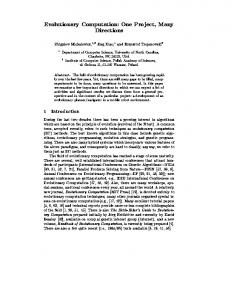
We developed a new, unsupervised, single-image method for generating lesion masks and volumes based on the commonly-used open source software FSL. This software package is used in many neuroimaging labs to perform structural and functional image processing.60 In particular, we used the following tools: Brain Extraction Tool (BET),62 FMRIBs Automated Segmentation Tool (FAST),63 FMRIBs Linear Image Registration Tool (FLIRT),64, 65 FMRIBs Nonlinear Image Registration Tool (FNIRT),66 and FSLmaths. We scripted these tools to create a lesion map and T2LV from the T2-weighted FLAIR image (Figure 4.1).
We started with skull-stripping via BET on the FLAIR image. Then, the image was slightly blurred (σ=0.5 mm) using FSLmaths to reduce false positives resulting from noise. Most central to our method was FAST, which uses gaussian fitting of the intensity histogram to segment brain images by tissue type (Gray Matter (GM), White Matter (WM), and nonbrain/CSF).63 The basis for our method stemmed from noticing that because voxels making up T2 hyperintensities are much brighter than other voxels in the brain, they lie outside the fitted gaussian distribution of brain tissue on the histogram, and therefore were erroneously labelled as nonbrain/CSF. If one then looked only at the voxels classified as nonbrain, it was trivial to separate these hyperintense regions from CSF, blood, and dura, which are dark in this fluid-attenuated sequence.
42
We accomplished this by simply iteratively removing the darkest bin from the histogram until an empty bin was found. This bin value was then used to threshold the “nonbrain” voxels, removing true nonbrain tissue, leaving the hyperintensities.
This process sensitively marked lesions, but also erroneously marked the septum pellucidum, small regions of peripheral GM, and several midbrain GM structures that are consistently bright. We ran two additional steps to remove these. First, we created a FLAIR-like standard space image by subtracting the ICBM CSF mask from the ICBM T2 standard mask. We used FLIRT64, 65 and FNIRT66 with this standard to nonlinearly warp the ICBM WM mask to subject space. Voxels with WM probability above 0.7 were included in the mask. We then selected lesions that had at least one voxel within the WM mask, thereby eliminating false positives from outside the WM. Next, we removed midline false positives such as the septum pellucidum by eliminating any lesions that touch or come close (within 4 mm) to touching the midsaggital plane. This was also accomplished with standard space masking. Because some subjects had periventricular lesions that were contiguous with the false-positive septum, removal was truncated to a maximum distance from midline (9 mm), beyond which lesion-labeled pixels were not removed. Final T2LV was expressed as a percentage of brain volume as calculated from FAST results.
43
Gray and white matter atrophy Since we were interested in the ability of the estimated T2LVs from our method to uniquely correlate with disability status in MS, we compared the T2LVs with other MRI measures that have demonstrated success in predicting behavior and performance: Gray Matter Volume (GMV) and White Matter Volume (WMV).67 These measures were produced by the FSL60 tool SIENAX, and were normalized to intracranial volume via registration to standard space, such that a smaller value corresponded to a smaller portion of the intracranial space, and therefore a greater degree of atrophy of that tissue type.68 For input, SIENAX takes either a T1 or T2 weighted image, but not both. This is suboptimal, as neither image alone is well-suited for the complete task. The T1 image is necessary as T2-weighted imaging provides insufficient contrast between GM and WM. However, the T2 image has poor contrast between brain and nonbrain tissues such as blood and dura. To reduce errors in identifying these as GM or WM, we modified SIENAX and the dependent program BET to utilize both images, to capitalize on their corresponding advantages: The T2 FLAIR image was used to distinguish brain from nonbrain, and T1 distinguished GM from WM. The overall functionality is the same–GM and WM atrophy were represented as their volumes normalized to intracranial volume by standard space registration.
Clinical Outcomes To determine the ability of our T2LVs to predict disease severity, we assessed its correlation with four commonly used measures of clinical disability: Expanded Disability 44
Status Scale (EDSS), Six-Minute Walk (6MW), Timed 25 Foot Walk (T25FW), and Symbol Digit Modalities Test (SDMT).
Timed 25 Foot Walk
The T25FW is a measure of walking speed. The T25FW consisted of the participant walking 25 feet as quickly and safely as possible in a hallway clear of obstacles.69 Two trials were performed, and the main outcome measure was mean speed, reported in feet/second.70
Six-Minute Walk
The 6MW is a measure of walking endurance. It was performed in a rectangular, carpeted corridor with hallways exceeding 50 m length and clear of obstructions and foot traffic. We provided standardized instructions and emphasized walking as far and fast as possible for 6 minutes on a surface consistent with the original validation work in MS71. One researcher followed alongside for safety, while another followed 1 m behind recording distance traveled (feet) using a measuring wheel (Stanley MW50, New Briton, CT)72 longer distances reflect better walking endurance.71
Expanded Disability Status Scale
EDSS is based on an evaluation of 8 functional systems (FS), including visual, brainstem, pyramidal, cerebellar, sensory, bowel/bladder, cerebral, and other as well as ambulatory function (i.e., 500 meter walk). The FS scores receive ‘step’ scores which 45
are combined with ambulatory function into an overall score. The EDSS score can range between 0 (no disability) and 10 (death from MS).73
Symbol Digit Modalities Test
We included the Symbol Digit Modalities Test (SDMT)74 as a measure of information processing speed (IPS) consistent with previous research;75 the measure was administered by personnel who were not involved in the MRI acquisition or analyses. The oral response form of the SDMT provides a relatively quick assessment and is valid in persons with MS76. The SDMT captures visual/spatial processing speed and working memory. The main outcome measure of the SDMT was the total number of correctly provided numbers (maximum of 110) in the 90-second period74, 76 with higher scores reflecting better IPS.
Statistics Data analysis was performed using Statistical Package for the Social Sciences Version 21.0 (SPSS, IBM Corp, Armonk, NY). All dependent variables (DV: EDSS, 6MW, T25FW, and SDMT) and independent variables (IV: age, WMV, GMV, and T2LV) were examined for normality and outliers by visual inspection of histograms (Figure 4.2) and normal Q-Q plots (Figure 4.3). Non-normal variables were transformed by square root, logarithmic, or inverse functions to result in a normal distribution, and outliers were defined as being at least three standard deviations from the mean. Scatter plots were generated between all IV and DV (Figure 4.4). 46
Pearson correlations were computed between all variables. Age had significant correlation with all other DVs and IVs (except SDMT which trended toward significance), and so it was identified as a nuisance variable. To exclude the effects of age from further analysis, we examined partial correlations between the DVs and IVs, controlled for age. If no significant correlation existed between IV and DV after correction for age, then the pairing was dropped from further analysis.
We next performed Hierarchical Multiple Regression (HMR)77 to answer two questions: First, is a significant amount of additional variance explained by adding T2LV to a model already containing the other significant IVs? Second, how much additional variance is explained when these other IVs are added to a model of age only? Examination of normalized ß coefficients in the final model also yielded the relative importance of each IV in explaining that clinical measure for MS.
Results Our T2LV script ran successfully without human intervention on all 52 subjects. Average T2LV was 0.86% of total brain volume. Average WMV was 721215 normalized mm3 and average GMV was 662147 normalized mm3. Median EDSS was 5.5, while average 6MW, T25FW, and SDMT were 1131 feet, 3.87 feet/second, and 46 correct numbers, respectively (Table 4.1). Average computation time for our T2LV measurement was 3.6 hours per subject with the nonlinear registration steps taking the majority of this time, at
47
2.5 hours per subject. Figure 4.5 shows a few representative examples of output lesion maps.
Statistical analysis All measures were normally distributed except T2LV, which became normal after a log10 transform. One subject was removed from analysis as an outlier due to an SDMT score of 102, which was 3.8 standard deviations above the group mean. Significant Pearson correlations (Table 4.2) were found between all MRI and disability measures except GMV vs. EDSS (p=.166) and GMV vs. T25FW, which approached significance (p=.056). Age was also significantly correlated with all MRI and disability measures except for SDMT which approached significance (p=.068), so we examined partial correlations (Table 4.3) between DVs and IVs, controlled for age. MRI measures were still significantly correlated with each other, but GMV was no longer significantly correlated with any disability measure except SDMT (p=.006). WMV and T2LV continued to be significantly correlated with all disability measures except for EDSS, which approached significance (p=.051 and p=.060 respectively).
We performed HMR (Table 4.4) to examine the specific contribution of lesion volume on the disability metrics when controlled for other variables. EDSS was excluded because statistical significance was not achieved in the previous step. For 6MW, T25FW, and SDMT, a 3 stage regression was performed. The first model contained age as the only predictor. The second model added WMV for all three disability measures, as well as 48
GMV for SDMT. T2LV was added in the final model. This revealed how much additional variance WMV (and GMV in the case of SDMT) accounts for after controlling for age, and then how much additional variance T2LV accounts for after controlling for all nuisance variables. ß coefficients were then examined in the final models to determine the relative importance of all predictors (Table 4.5).
For 6MW, HMR showed that 14.3% (p=.006) of variance was explained by age alone, an additional 9.8% (p=.015) by adding WMV, and an additional 8.2% (p=.020) by adding T2LV. T2LV (ß=-.255; p=.020) had the highest ß and was the only significant predictor of 6MW in the final model. The complete model accounted for 32.2% (28.0% adjusted, p=.000) of variance in 6MW.
For T25FW, HMR showed that 16.4% (.003) of variance was explained by age alone, with an additional 13.5% (p=.003) by adding WMV. Adding T2LV explained an additional 4.3%, which approached significance (p=.083). The complete model accounted for 34.1% (p=.000), with Age (ß=-.235; p=.07), WMV (ß=.264; p=.063), and T2LV (ß=-.255; p=.083) approaching significance.
For SDMT, 6.5% (p=.068) of variance was explained by age alone, which approached significance. Adding WMV and GMV explained an additional 44.2% (p=.000). Adding T2LV explained an additional 2.8%, which approached significance (p=.098). The
49
complete model accounted for 53.5% (p=.000), with WMV (ß=.713; p=.000) achieving significance and T2LV (ß=-.215; p=.098) approaching significance.
Discussion Quantification of lesions has been important in the diagnosis and monitoring of MS,48, 49 and as a measure of efficacy in drug trials,50, 51 yet automated methods have been lacking. Further, by building our method upon widely-used open source software, our technique will be highly accessible to neuroimaging and MS researchers.
In our analysis of the clinical utility of our T2LV measure, we observed that it was a significant predictor of clinically relevant disability measures. This indicates that our measure captured specific information about the disease state in our MS subjects. Significant correlations were observed between T2LV and metrics of clinical disability (Table 4.2) even when controlling for age (Table 4.3). The correlations of T2LV with the clinical and behavioral measures were all statistically significant with coefficients ranging from r=.266 to r=.513, except for EDSS after controlling for age (p=0.060). This non-significant result for EDSS trended very close to significance and would be expected to become significant with a slightly larger sample.
Though significant (p> /etc/sysconfig/network-scripts/ifcfg-br0 echo "BOOTPROTO=static" >> /etc/sysconfig/network-scripts/ifcfg-br0 echo "IPADDR=${PRIVATE_IP}" >> /etc/sysconfig/network-scripts/ifcfg-br0 echo "NETMASK=255.255.255.0" >> /etc/sysconfig/network-scripts/ifcfg-br0 echo "ONBOOT=yes" >> /etc/sysconfig/network-scripts/ifcfg-br0 # Configure jumbo frames ifconfig ${PRIVATE_INTERFACE} mtu 9000 ifconfig br0 mtu 9000 echo "MTU=9000" >> /etc/sysconfig/network-scripts/ifcfg-${PRIVATE_INTERFACE} echo "MTU=9000" >> /etc/sysconfig/network-scripts/ifcfg-br0 service network restart ##### # Reconfigure resolv.conf to add private network nameserver ##### echo "search beckman.illinois.edu" > /etc/resolv.conf echo "search bicloud.beckman.illinois.edu" >> /etc/resolv.conf echo "nameserver 192.168.1.130" >> /etc/resolv.conf echo "nameserver 130.126.2.131" >> /etc/resolv.conf ##### # Configure SELinux ##### rm -f /etc/selinux/config echo "SELINUX=permissive" >> /etc/selinux/config echo "SELINUXTYPE=targeted" >> /etc/selinux/config setenforce 0 ##### # Configure NTP ##### chkconfig ntpd on service ntpd start ntpdate -u 0.centos.pool.ntp.org hwclock --systohc ##### # Enable packet routing ##### mv -f newnc/sysctl.conf /etc/sysctl.conf
86
##### # Install Eucalyptus ##### yum -y install http://downloads.eucalyptus.com/software/eucalyptus/4.1/centos/6/x86_64/eucalyptus-release-4.1.el6.noarch.rpm yum -y install http://downloads.eucalyptus.com/software/euca2ools/3.2/centos/6/x86_64/euca2ools-release-3.2.el6.noarch.rpm yum -y install http://downloads.eucalyptus.com/software/eucalyptus/4.1/centos/6/x86_64/epel-release-6.noarch.rpm yum -y install eucalyptus-nc eucanetd virsh net-destroy default virsh net-autostart default --disable chown --reference=/var/lib/eucalyptus/instances /maindisk/instances # Generate eucalyptus.conf EUCACONF="/etc/eucalyptus/eucalyptus.conf" echo "EUCALYPTUS=\"/\"" > $EUCACONF echo "EUCA_USER=\"eucalyptus\"" >> $EUCACONF echo "CLOUD_OPTS=\"--bind-addr=${PRIVATE_IP}\"" >> $EUCACONF echo "NC_PORT=\"8775\"" >> $EUCACONF echo "HYPERVISOR=\"kvm\"" >> $EUCACONF echo "USE_VIRTIO_ROOT=\"1\"" >> $EUCACONF echo "USE_VIRTIO_DISK=\"1\"" >> $EUCACONF echo "USE_VIRTIO_NET=\"1\"" >> $EUCACONF echo "NC_WORK_SIZE=850000" >> $EUCACONF echo "NC_CACHE_SIZE=550000" >> $EUCACONF echo "INSTANCE_PATH=\"/maindisk/instances\"" >> $EUCACONF echo "VNET_MODE=\"EDGE\"" >> $EUCACONF echo "VNET_PRIVINTERFACE=\"br0\"" >> $EUCACONF echo "VNET_PUBINTERFACE=\"${PUBLIC_INTERFACE}\"" >> $EUCACONF echo "VNET_BRIDGE=\"br0\"" >> $EUCACONF echo "VNET_DHCPDAEMON=\"/usr/sbin/dhcpd\"" >> $EUCACONF echo "NC_ROUTER=\"Y\"" >> $EUCACONF #echo "NC_ROUTER_IP=\"${PRIVATE_IP}\"" >> $EUCACONF echo "METADATA_USE_VM_PRIVATE=\"Y\"" >> $EUCACONF echo "METADATA_IP=\"192.168.1.130\"" >> $EUCACONF echo "MAX_CORES=\"20\"" >> $EUCACONF
##### # Configure firewall ##### iptables -I INPUT 1 -i br0 -p tcp --dport 8775 -j ACCEPT iptables --table nat --append POSTROUTING --out-interface br0 -j MASQUERADE; # Allow instance private network access to CLC and CC iptables -t nat -A EUCA_NAT_PRE_PREUSERHOOK -s 192.168.1.0/24 -d 192.168.1.0/24 -j MARK --set-xmark 0x2a/0xffffffff /sbin/service iptables save ##### # Start Eucalyptus ##### service eucalyptus-nc start service eucanetd start
87