Every effort has been made to ensure that the information in this manual is .....
recommend you follow the instructions to understand how the WatchGuard ...
VPN Configuration Guide WatchGuard Firebox X – Peak and Core Series
equinux AG and equinux USA, Inc.
Apple, the Apple logo, iBook, Mac, Mac OS, MacBook, PowerBook are trademarks of Apple Computer, Inc., registered in the U.S. and other countries.
© 2009 equinux USA, Inc. All rights reserved. Core, Firebox, Fireware, Peak, WatchGuard are either registered trademarks or trademarks of WatchGuard Technologies, Inc. in the United States and/or other countries.
Under the copyright laws, this manual may not be copied, in whole or in part, without the written consent of equinux AG or equinux USA, Inc. Your rights to the software are governed by the accompanying software license agreement.
equinux shall have absolutely no liability for any direct or indirect, special or other consequential damages in connection with the use of the quick setup guide or any change to the router generally, including without limitation, any lost profits, business, or data, even if equinux has been advised of the possibility of such damages.
The equinux logo is a trademark of equinux AG and equinux USA, Inc., registered in the U.S. and other countries. Every effort has been made to ensure that the information in this manual is accurate. equinux is not responsible for printing or clerical errors. Created using Apple Pages. www.equinux.com
2
Step 4 - Set the Tunnel Passphrase ............................................................28 Step 5 – Select where Internet Traffic is Directed ................................29 Step 6 – Set the Resources that can be accessed through the VPN Tunnel ....................................................................................................................30 Step 7 – Set the Virtual IP Address Pool ..................................................31 Step 8a – Add a User to the Mobile User VPN Group ........................32 Step 9 – Finish Adding the Mobile User VPN Group and Policy ....35 Required Changes in VPN Tracker ..............................................................36
Introduction .....................................................................5 Important Prerequisites.....................................................................................6 Scenario ...................................................................................................................7 Terminology ...........................................................................................................8
Task 1 – Configure your VPN Device ..........................9 Step 1 – Access the WatchGuard System Manager...............................9 Step 2 - Add a New Mobile User VPN Group .........................................10 Step 3 - Set the Mobile User VPN Group Name....................................11 Step 4 - Set the Tunnel Passphrase ............................................................12 Step 5 – Select where Internet Traffic is Directed ................................13 Step 6 – Set the Resources that can be accessed through the VPN Tunnel ....................................................................................................................14 Step 7 – Set the Virtual IP Address Pool ..................................................15 Step 8a – Add a User to the Mobile User VPN Group ........................16 Step 9 – Finish Adding the Mobile User VPN Group and Policy ....19
Configuring VPN Tracker Personal Edition ..............37 Follow Task 1 and 2 for the basic configuration ..................................37 Required Changes on the Firebox..............................................................37 Required Changes in VPN Tracker ..............................................................38
Troubleshooting ............................................................39 VPN Connection Fails to Establish ..............................................................39 No Access to the Remote Network ............................................................40 Obtaining a VPN Log on the Firebox ........................................................41 Further Questions? ...........................................................................................43
Task 2 – Configure VPN Tracker .................................20 Step 1 - Create a New Connection ............................................................20 Step 2 – Select a VPN Device........................................................................21 Step 3 – Configure IP Addresses .................................................................22 Step 4 – Configure Authentication ............................................................23 Step 5 – Configure Identification ...............................................................24
Appendix: Terminology Matrix ..................................44
Task 3 – Test the VPN Connection ............................25 It‘s time to go out!.............................................................................................25 Test your connection .......................................................................................25
Setting up a Host to Everywhere Connection .......27 Steps 1 - 2: Follow Steps 1- 2 of “Task 1 – Configure Your VPN Device” ...................................................................................................................27 Step 3 - Set the Mobile User VPN Group Name....................................27
3
4
Introduction This document describes how VPN Tracker can be used to establish a connection between a Mac running Mac OS X and a WatchGuard Firebox VPN router. Note This documentation is only a supplement to, not a replacement for, the instructions that have been included with your WatchGuard device. Please be sure to read those instructions and understand them before starting.
WatchGuard Configuration The first part of this document will show you how to configure a VPN tunnel on a WatchGuard Firebox that has not yet been configured for VPN. The configuration described is just one example for such a setup. It is not the only known working configuration, and also may not be suitable for all situations. However, it is a configuration which quickly provides you with a ready-to-use VPN tunnel, and it is still flexible enough to be easily extended if your VPN requirements grow in the future. Advanced Users
While the instructions in this document describe how to set up VPN on your WatchGuard from scratch, they also apply if you are configuring VPN Tracker for your existing WatchGuard VPN setup. In this case, we recommend you follow the instructions to understand how the WatchGuard settings relate to the VPN Tracker settings, adapting the settings in VPN Tracker to your setup, if necessary.
VPN Tracker Configuration In the second part, this document will show you how to configure VPN Tracker to easily connect to your newly created VPN tunnel.
5
Important Prerequisites Your WatchGuard Device This document applies to WatchGuard Firebox Core and Peak series devices. All tests have been performed using Fireware 9.1.
Your Mac ‣ VPN Tracker runs on Mac OS X 10.4, 10.5 and 10.6 ‣ The configuration described in this guide requires VPN Tracker 6. Make sure to use a recent VPN Tracker version, if possible. The latest VPN Tracker release can always be obtained from http://www.vpntracker.com ‣ You will need one VPN Tracker license for each Mac running VPN Tracker
6
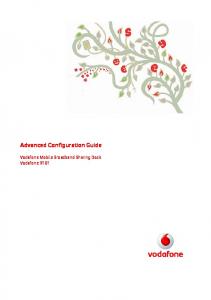
Scenario In our example, we need to connect an employee's Mac to an office network. The following diagram illustrates this scenario:
VPN Connection WatchGuard Firebox VPN Gateway
Mac running VPN Tracker
vpn.example.com
Office Network
192.168.1.0 / 255.255.255.0
This guide assumes that the Mac running VPN Tracker already has internet connectivity. The office's WatchGuard Firebox (the “VPN Gateway”) is also already connected to the Internet and can be accessed through a static IP address or DNS host name. In our example setup, we will be using a host name: vpn.example.com. The Firebox has a second network interface which is connected to the internal office network (LAN). In our example, the office network has the IP range 192.168.1.0/24 (which is the same as 192.168.1.0/255.255.255.0). This is the network that will be accessed from the employee’s Mac through the VPN. It is called the “Remote Network” in VPN Tracker.
7
Terminology A VPN connection is often called a “tunnel” (or “VPN tunnel”). Every VPN tunnel is established between two “endpoints”. In our example one endpoint is VPN Tracker and the other endpoint is the VPN gateway. Please note that for each endpoint, the settings on the other endpoint are considered to be “remote”, while its own settings are considered to be “local”. That means a “local” setting from VPN Tracker’s perspective, is a “remote” setting from the VPN gateway’s perspective, and vice versa. The sample configuration described in this guide is called a “Host to Network” configuration: A single computer, called a “Host” establishes a VPN tunnel to an entire “Network” behind the VPN gateway. A list of terms used by WatchGuard, and their corresponding terms in VPN Tracker can be found in Appendix: Terminology Matrix.
8
Task 1 – Configure your VPN Device This section describes the configuration of your WatchGuard VPN router. TIP
To set up your VPN connection, you'll need to keep track of certain pieces of information. Those details are indicated by red numbers. Throughout this guide we will be referencing those numbers.
Step 1 – Access the WatchGuard System Manager ‣ Start WatchGuard System Manager ‣ Select your WatchGuard device from the list ‣ Start the Fireware Policy Manager by clicking its icon
9
Step 2 - Add a New Mobile User VPN Group ‣ In the Fireware Policy Manager’s menu, click “VPN” > “Remote Users...”
‣ Click “Add...”
‣ Click “Next”
10
Step 3 - Set the Mobile User VPN Group Name ‣ Authentication Server: Select “Firebox-DB” ‣ Group Name: Enter a group name, e.g. “VPNTrackerGroup” ‣ Click “Next”
1
Note The group name is case-sensitive. Make sure to write down the group name, including capitalization.
11
Step 4 - Set the Tunnel Passphrase ‣ Select “Use this passphrase” ‣ Tunnel Passphrase: Enter a password for the VPN connection. The password you set here, will be entered as the pre-shared key in VPN Tracker later 2 2
‣ Retype Passphrase: Repeat the password you have entered in the previous field ‣ Click “Next”
12
Step 5 – Select where Internet Traffic is Directed ‣ Select “No, allow Internet traffic to go directly to the mobile user’s ISP” ‣ Click “Next”
Tip
If you rather have all Internet traffic directed through the VPN, please see the chapter on “Setting up a Host to Everywhere Connection”.
13
Step 6 – Set the Resources that can be accessed through the VPN Tunnel ‣ Click “Add” to add the network that can be accessed through the VPN tunnel
‣ Choose Type: Select “Network IP” ‣ Value: Enter the network that is to be accessed through the VPN, e.g. 192.168.1.0/24. This will in most cases be identical to the LAN network of the WatchGuard
3
‣ Click “OK”
‣ Click “Next”
14
Step 7 – Set the Virtual IP Address Pool In this step, you will be configuring the virtual IP addresses that are assigned to the VPN clients. ‣ Click “Add...”
1
‣ Choose Type: Select “Host Range” ‣ Choose a range of unused IP addresses from the remote network. Make sure the range comprises at least as many IP addresses as you expect users to use this VPN connection ‣ Value: Enter the first IP address of the range ‣ To: Enter the last IP address of the range ‣ Click “Next”
15
Step 8a – Add a User to the Mobile User VPN Group ‣ Check the box “Add users to VPNTrackerGroup” ‣ Click “Finish”
‣ Click “Add...”
16
‣ Name: Enter a user name ➍ ‣ Passphrase: Enter a password for the user ➎ ‣ Confirm: Repeat the password ➎
4 5
‣ Firebox Authentication Groups: Add the user to the newly added group (here: “VPNTrackerGroup”) by selecting the group from the “Available” list and moving it to the “Member” list by clicking “