3 Sep 2007 ... Accessing and downloading orthophotos from MassGIS – using an index ......
computer screen, a powerpoint presentation, a web site, or word ...
Format the Page in Layout View (Optional) . ... Insert Map Elements in Layout
View . .... ArcMap, from ESRI's ArcGIS Desktop Help file, for a brief introduction to
...
Adobe Flex On-Demand Training. Creating Custom MXML. Components. Move
code to a component. 1. In Flex Builder from the Navigator view, right click on the
...
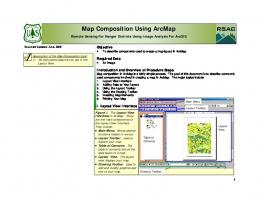
Making maps in ArcMap is very easy: Browse geospatial data in ArcMap and
choose an appropriate presentation. This workshop will guide you through all ...
Place all desired components (outlets, filler, drain, etc.) where they are needed. ...
any area of the radiator where clearance may be a factor. 4. Read, fill-out, sign ...
Choose Template. Choose Form Type. Edit Appearance of Form. Appearance of
web form parts. Edit Web Form Content. Add Custom Fields. Add Popular Fields.
www.library.carleton.ca/madgic. Source: Brock University Map Library. January
2010. Page 1. Creating Custom Google Maps. Use the following steps to ...
a) uses information from TEMPLATE XML b) to create CTS SEED c) containing
SOURCE SENSOR RESULT DATA d) and runs CTS SENSOR using created ...
You can work through the entire tutorial or complete each lesson .... ARCMAP
TUTORIAL. 9. Zooming in on the page. The Layout toolbar controls your view of ...
There was a problem previewing this document. Retrying... Download. Connect more apps... Try one of the apps below to op
To appear in the proceedings of the International Conference on Generative Programming and Component ..... a source pin as simple as making a function call.
GIS DataReViewer, a custom product developed for the ESRI. ®. ArcMap ... orthophotos, database, topology and accuracy of the physical blocks vectorization.
Learn how to create well-designed web forms in seconds. Pick your ... Above the
form preview, click the buttons to Add New Field, Add Text, Add Image and Add.
Taught by the author of Core Servlets and JSP, More. Servlets and JSP, and this
tutorial. Available at public venues, or customized versions can be held on-site ...
To describe components used to create a map layout in ArcMap. Required Data.
• An image. Introduction and Overview of Procedure Steps. Map composition in ...
183. TEMPLATE FOR CREATING A QUALITY QUESTION. State Curriculum Standard(s) Related to This Lesson: Essential Question:
This document explains the process for creating a custom signature appearance
in Adobe Reader 9 using a pdf file. Other image files (e.g. *.jpg, *.gif, *.png) are ...
Nov 11, 2010 - Users can import default array specifications, import probe sequences for a ... tion features, as well as custom software for communi- cating how a probe ... tion file for Affymetrix arrays is called a Chip Definition. File (CDF) and .
Creating a custom column in the Blackboard Grade Center is a very easy process and provides flexibility for using the Bl
To order, call 800-434-2555. For permissions, or to share comments, e-mail editor@ waterfordpress.com. For information o
What to Expect When You're Expecting a Custom Template Design. As you've
seen in our online community and weekly training series for your DonateNow ...
E.g., SmartGWT (it is also a thin JSNI wrapper). – You basically have to learn
GWT-like library all over again. 9. Third-Party GWT Widget Libraries: What to
Watch ...
Science and engineering gateways and portals, Web interfaces, multidisciplinary projects ... we are identifying the social and technical enablers and barriers of successful ...... http://www.nsf.gov/od/oci/ci_workshop/index.jsp. [8] Awards made ...
You will learn how to create a custom ArcMap template in this guide. ... Most field
office staff want to have a separate ArcMap template to use for a “quick and ...
Wisconsin Toolkit Task Guide
Creating a Custom ArcMap Template Abstract You will learn how to create a custom ArcMap template in this guide. Steps: Open Existing TK Template – Add Additional layers – Save Template in new location and named differently Details Most field office staff want to have a separate ArcMap template to use for a “quick and dirty” map for when a landowner comes in and just wants a soils map or something else like that. There are two ways to do this: • Use the Toolkit Template as a start and save the template to a different folder and different filename (the easy method). • Make one from scratch (the harder method). Using the Toolkit Template 1.
Navigate to the C:\Program Files\USDA\Toolkit5\Templates folder.
2.
Open up the ToolkitGIS_Template_countyname.mxd file by double-clicking on it.
3.
Add any other data into the map if you want to.
4.
Save the new template by: • Saving the ArcMap document to a completely different location than the one that is used with Toolkit. A good example that we use is in a folder that we created called C:\ArcMap_Templates. • Make sure to give the ArcMap document a completely different name than the one used for Toolkit. A good example would be something like countyname_county.mxd
Creating a template from scratch 1.
Open up ArcMap and create a new ArcMap document by clicking on the little white sheet of paper in the upper left of ArcMap or File>>New.
2.
button. Navigate to the folder that has the data in it Add all of the desired data using the that you want to display. (e.g. C:\countyname_geodata\Soils, etc…)
3.
Change the symbology for each layer to whichever color you like.
4.
Change the layer name on each file so that it makes more sense than the filename itself (ie…the 2005 NAIP is named something like naip_1-1_1n_s_wi045_2005_1.sid. Changing the name to 2005 FSA Compliance Imagery makes more sense).
5.
Change the layer’s transparency if you need to “see through” the layer to the imagery at the bottom of the data frame (digital ortho, NAIP imagery, Topographic mosaic, etc…)
6.
Continue to do so until you get the layers that you want.
7.
Save your ArcMap document. (Using the same convention as was outlined in using the TK template).
Note: If you have any questions or need some assistance with creating you own template, please contact your Area GIS Specialist.