Database Concepts. Using Microsoft Excel lab. 8. 157. Objectives: Upon
successful completion of Lab 8, you will be able to. ○. Identify the records and
fields in ...
lab08_p157-176
8/21/07
11:02 AM
Page 157
lab
Database Concepts Using Microsoft Excel
8
Objectives: Upon successful completion of Lab 8, you will be able to ● Identify the records and fields in a table or list of items ● Use Excel to find specific items in a list ● Use Excel to sort a list over several fields, including a subfield sort ● Use the Excel AutoFilter feature to filter a list using specific criteria
Resources required: ●
A computer running any recent version of Excel
Starter file: ●
students.xls
Prerequisite skills: ● ●
● ●
General keyboarding skills Comfortable editing an Excel worksheet or another electronic spreadsheet application Ability to find files using Windows Explorer or Windows search feature Ability to open and save a file in a Windows application
NRC’s Top Ten Skills, Concepts, and Capabilities: ●
●
●
Skills Use a database to access information • Use Excel to store lists of information • Identify fields and records • Sort fields • Use search and AutoFilter to filter records Concepts Structuring information Capabilities Manage complexity Navigate a collection
157
lab08_p157-176
8/21/07
158
11:02 AM
Page 158
Computer Skills Workbook for Fluency with Information Technology, Third Edition
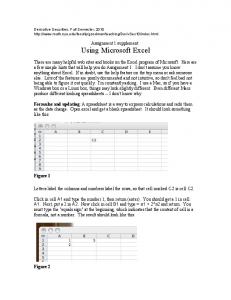
Lab Lesson There seem to be lists everywhere you turn. We have lists of friends, lists of expenses, lists of things to do, lists of items in our homes, and even lists of lists. A business might have lists of employees, lists of products, lists of purchases, lists of projects, and many more. We can maintain lists using a pencil and paper, sticky notes, or memory. Or we may find ourselves looking up information rather than maintaining lists. As lists grow, however, none of these methods is very efficient. We need to find ways to manage our lists so that we can find items. A manual method might include an index card for each item and a box to contain them, or in the case of contacts, a Rolodex. These days information is more likely to be stored electronically. Personal contacts can be stored using Microsoft Outlook or a personal information manager. Other lists can be stored using a spreadsheet package or a database package. A database is simply one or more lists of items. Once a list grows, finding specific items becomes more challenging. You may also wish to sort the list in different ways, search for items that meet certain criteria, and view statistics. There are several computer applications designed to work with databases and perform these tasks. If the list is fairly small, a spreadsheet package such as Excel will do the trick. As the list becomes larger, with thousands or even millions of items, a database package such as Microsoft Access is required.
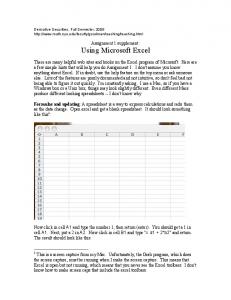
Database Terminology To illustrate some of the basic database terminology and tasks, let’s look at an example of student records stored in an Excel file. Open the students.xls file. This file contains information about students who have completed courses in CS1, Math, and Psychology, as shown in Figure 8.1. The data contained in a column is all the same type of data; this is called a field. The data contained in a row is all related to a particular student, in this case. The column headings are called field names. The data in a row contains different types of data about a single entity, and is called a record. This database contains one table consisting of 8 fields and 193 records. Large databases can contain many tables, but we will concentrate on a database using only one table.
lab08_p157-176
8/21/07
11:02 AM
Page 159
Lab 8: Database Concepts Using Microsoft Excel
Figure 8.1
159
Excel with students.xls showing parts of the database.
Data Types As we look through the table of information we can see that there are different types of data. The Last Name, First Name, and Gender fields contain text. Text data can include numbers, letters, and special characters like spaces and punctuation. For example telephone numbers and street addresses are also stored in text fields. The grades for CS1, Math, and Psychology are numbers. As numeric fields, we can perform math functions such as calculating the average grade. The Student ID field is also a numeric field. It’s not likely that we will be performing math functions on this field and sometimes numbers such as student number, employee number or credit card numbers are stored as text. The Birthdate field is a date field. We may do some date arithmetic with this field such as determining age. Dates are not stored as text because we cannot use date arithmetic on text. Other examples of date fields might include invoice issue date, retirement date, course completion date, and so forth. Date arithmetic might include calculating the number of years to retirement or the number of months an invoice is past due.
lab08_p157-176
8/21/07
160
11:02 AM
Page 160
Computer Skills Workbook for Fluency with Information Technology, Third Edition
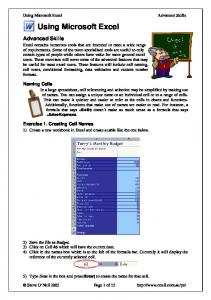
Sorting One of the first things we tend to do with a table is to sort the records. We can sort a table on any field, and sort on additional fields within that if necessary. Let’s sort our list alphabetically by Last Name. Activate any cell in the Last Name field. Click the Sort & Filter button as shown in Figure 8.2. Click the menu option Sort A to Z as shown in Figure 8.2. Excel automatically detects the cells containing the entire table and sorts the list on the column of the active cell. The Last Name field should be sorted in ascending order as shown in Figure 8.2.
Figure 8.2
Excel students.xls with Last Name field sorted in ascending order.
lab08_p157-176
8/21/07
11:02 AM
Page 161
Lab 8: Database Concepts Using Microsoft Excel
161
Scroll through the list to verify that the Last Name field is sorted in ascending order. Ascending order sorts the data from smallest to largest. Descending order sorts the list from largest to smallest. Let’s sort the CS1 grade field in descending order. Activate any cell in the CS1 field. Click the Sort & Filter button as shown in Figure 8.3. Click the menu option Sort Largest to Smallest as shown in Figure 8.3. Again, Excel detects the cells that contain the table and sorts the list on the column containing the active cell. The CS1 field should be sorted in descending order as shown in Figure 8.3.
Figure 8.3 Excel students.xls with CS1 field sorted in descending order (largest to smallest).
lab08_p157-176
8/21/07
162
11:02 AM
Page 162
Computer Skills Workbook for Fluency with Information Technology, Third Edition
We’ve sorted a text field (Last Name) and a numeric field (CS1). We can also sort a date field. Let’s sort the Birthdate field in ascending order. Activate any cell in the Birthdate field. Click the Sort & Filter button as shown in Figure 8.4. Click the menu option Sort Newest to Oldest as shown in Figure 8.4. Again, Excel has detected the cells that contain the table and sorted all records on the Birthdate field from newest to oldest, as shown in Figure 8.4.
Figure 8.4 Excel students.xls with Birthdate field sorted by Birthdate. The table is now sorted by Birthdate from newest to oldest. Since we stored the birthdates as date
lab08_p157-176
8/21/07
11:02 AM
Page 163
Lab 8: Database Concepts Using Microsoft Excel
163
information, the sort performs perfectly. If we had stored the birthdates as text, this would not be an easy maneuver. For instance, if we had stored the dates in a form such as “April 22, 1984” without converting to a date, then the field would be sorted alphabetically, with April at the top of the list. Understanding data types is important for completing tasks such as sorting, searching, and filtering. We can also perform sorts within sorts. For instance, we may wish to sort the list on the Last Name field and discover that several students have the same last name. For students with the same last name, we may wish to sort additionally on the First Name field. To do this, we will be using the menu commands. Let’s give this a try. Activate any cell in the table. You do not have to activate a cell in the sort column in order to use this method. Click the Sort & Filter button. Click the menu option Custom Sort. The Sort dialog box appears as shown in Figure 8.5. We will sort by Last Name, then by First Name. In order to do this, we will need to add another level of sort options. Click the Add Level button. Click the drop-down arrows to select the options to sort by Last Name, from A to Z in the first level as shown in Figure 8.5. Click the drop-down arrows to select the options to sort by First Name, from A to Z in the second level as shown in Figure 8.5.
Figure 8.5
Excel Sort dialog box.
lab08_p157-176
8/21/07
164
11:02 AM
Page 164
Computer Skills Workbook for Fluency with Information Technology, Third Edition
As you clicked the drop-down arrow, you probably noticed that the list contained the field name headings. Excel detected the table and used the first row of cells as the field names. Notice that the Sort dialog box contains a checkbox specifying that the data range has Headers. The Headers are the field names. Click the OK button to perform the sort. Scroll through the list and notice that there are several records that contain the same Last Name, such as “Catbog” and “Patel.” Notice that for those last names, the first names are also sorted in ascending order.
Searching for Records Now that the list is sorted, one method we can use to search for records is to sort a field and simply scroll through the list until we find what we’re looking for. This method may be fine for a small list, but as the list grows to hundreds or thousands of records, this method is inefficient and just takes too long! Another simple method we can use is the Find feature. The Find feature will activate a cell that contains the search criteria. Let’s use this method to find the records for students whose last name is Patel. Click the Find & Select button as shown in Figure 8.6. Click the Find menu command. The Find and Replace dialog box will appear, with the Find tab activated, as shown in Figure 8.6. If you are using an earlier version of Excel, only Find options are available. In the Find what: box, type: Patel, as shown in Figure 8.6.
Figure 8.6
Excel Find and Replace dialog box.
lab08_p157-176
8/21/07
11:02 AM
Page 165
Lab 8: Database Concepts Using Microsoft Excel
165
Click the Find Next button. The first cell containing the last name “Patel” will be activated. Click the Find Next button again. The next cell containing the last name “Patel” will be activated. As you click the Find Next button Excel activates the next cell that contains the search information. After the last cell, Excel activates the first cell again. In this case, there are only two instances of “Patel” and Excel will activate one, then the other, as you click the Find Next button several times. Click the Close button to close the Find and Replace dialog box. The Find feature is ideal when searching for a record that contains information that is not common in the list. For instance, if we were to search for “an” we would quickly find that “an” appears within many first and last names in the list. The Find feature is not suitable for numeric searches such as “all students whose CS1 grade is 80 or higher.” It is also not suitable for range searches such as “all students whose last name begins with the letter S” or “all students born in 1985.” For those searches, we will use the AutoFilter and Advanced Filter methods.
AutoFilter The AutoFilter will find records that match certain criteria, and hide records that do not match the criteria. This is called filtering the list. Let’s filter the list to display male students only. Activate any cell in the table. Click the Sort & Filter button as shown in Figure 8.7. Click the menu option Filter. Scroll to the top of the table so that the field names are visible, as shown in Figure 8.7.
lab08_p157-176
8/21/07
166
11:02 AM
Page 166
Computer Skills Workbook for Fluency with Information Technology, Third Edition
Figure 8.7
Excel students.xls with Filter.
Notice that Excel has added filter drop-down arrows in each cell containing a field name. Let’s use the filter arrow to display only the records that contain an “M” in the Gender field. Click the filter arrow in the Gender field, as shown in Figure 8.8. Click the Select All checkbox to remove the check mark. Click the checkbox for the selection M, as shown in Figure 8.8.
lab08_p157-176
8/21/07
11:02 AM
Page 167
Lab 8: Database Concepts Using Microsoft Excel
Figure 8.8
167
Excel students.xls displaying Gender Filter options.
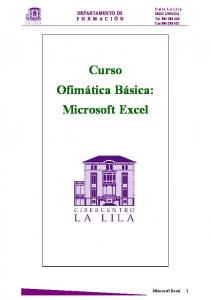
Click the OK button to filter the records. Notice that all records displayed contain “M” in the Gender field, as shown in Figure 8.9. Also notice the row numbers. The numbers skip as the records that contain “F” in the Gender field have been hidden. They are not lost or deleted, and will be displayed when we display all records. Notice that the row numbers seem to skip as the hidden records are not displayed.
lab08_p157-176
8/21/07
168
11:02 AM
Page 168
Computer Skills Workbook for Fluency with Information Technology, Third Edition
Figure 8.9 Excel students.xls displaying “M” in the Gender field. Since the list was sorted in ascending order by last name, the filtered list displays records for male students, sorted by last name. Let’s add more criteria to the filter. Let’s filter for all male students whose math grade is 80 or greater. We can add criteria by selecting another field and using the AutoFilter drop-down menu to add criteria. The filtered records will satisfy all criteria specified in all fields. Click the Filter drop-down arrow for the Math grade field, as shown in Figure 8.10. Click the menu options Number Filters and Greater Than Or Equal To, as shown in Figure 8.10. The Custom AutoFilter dialog box will appear, as shown in Figure 8.10. We will add the criteria shown in Figure 8.10.
lab08_p157-176
8/21/07
11:02 AM
Page 169
Lab 8: Database Concepts Using Microsoft Excel
169
Figure 8.10 Excel Custom AutoFilter dialog box and Filter menu. Click the upper right box and type: 80, as shown in Figure 8.10. Click the OK button to filter the list. Notice that the list has been further filtered to display only the records that have a Math grade of 80 or greater. Let’s filter the list to display the records that also have a CS1 grade of 80 or greater. Click the Filter drop-down arrow for the CS1 grade field, as shown in Figure 8.11. Click the menu options Number Fields and Greater Than Or Equal To, as shown in Figure 8.11. Add the criteria to the Custom AutoFilter dialog box as we did with the Math grade, as shown in Figure 8.11. Click the OK button to filter the list.
lab08_p157-176
8/21/07
170
11:02 AM
Page 170
Computer Skills Workbook for Fluency with Information Technology, Third Edition
Figure 8.11 Excel students.xls displaying “M” in the Gender field, Math grade field >=80 and CS1 grade field >=80. Figure 8.11 also shows the list of records that satisfy the criteria of “M” in the Gender field, CS1 grade greater than or equal to 80, and Math grade greater than or equal to 80. Again, notice that all other rows are hidden, as indicated by the row numbers. Let’s display all records, progressively. Click the Filter drop-down arrow for Gender. Click the Select All checkbox and click the OK button. Now the list is filtered to display records for all students (both genders) with CS1 and Math grades of 80 or greater.
lab08_p157-176
8/21/07
11:02 AM
Page 171
Lab 8: Database Concepts Using Microsoft Excel
171
Click the Filter drop-down arrow for Math. Click the Select All checkbox and click the OK button. Now the list is filtered to display records for all students with CS1 grades of 80 or greater. Click the Filter drop-down arrow for CS1. Click the Select All checkbox and click the OK button. Now the list shows all records for all fields and is no longer filtered. The Filter drop-down menu also contains options for sorting. As you would expect, we can filter records on numeric fields using criteria for “less than,” “greater than,” and “equals.” We can also search for records that have numeric data between two values as well. Let’s filter for all records for students born in 1985. In this case, we will specify records that have a Birthdate between January 1, 1985 and December 31, 1985. Click the Filter drop-down arrow for Birthdate. Click the menu options Date Filters and Between as shown in Figure 8.12. Enter the criteria as shown in Figure 8.12 to specify greater than or equal to 01/01/1985 and less than 01/01/1986. Notice that the “And” radio button is selected. The “And” selection ensures that the criteria is “greater or equal to 01/01/1985 And less than or equal to 01/01/1986.”
lab08_p157-176
8/21/07
172
11:02 AM
Page 172
Computer Skills Workbook for Fluency with Information Technology, Third Edition
Figure 8.12 Excel students.xls Custom AutoFilter for the Birthdate field. Click the OK button to filter the list. Notice that all Birthdates in the filtered list contain the year 1985, as shown in Figure 8.13.
lab08_p157-176
8/21/07
11:02 AM
Page 173
Lab 8: Database Concepts Using Microsoft Excel
173
Figure 8.13 Excel students.xls records filtered by Birthdate in 1985. Let’s display all of the records again. Click the Filter drop-down arrow for Birthdate. Click the Select All checkbox and click the OK button. Sometimes we wish to filter a text field based on only part of the text. For instance, we may wish to filter the list to display only the records where the last name begins with the letter H. Other examples might include displaying all records for street address on Main Street, or account ID containing CA. Let’s filter the list to display records where the Last Name begins with the letter H. Click the Filter drop-down arrow for Last Name. Click the menu options Text Filters and Begins With, as shown in Figure 8.14.
lab08_p157-176
8/21/07
174
11:03 AM
Page 174
Computer Skills Workbook for Fluency with Information Technology, Third Edition
The Custom AutoFilter dialog box will appear as shown in Figure 8.14. Click the upper right box and type: H, as shown in Figure 8.14. Click the OK button to filter the records.
Figure 8.14 Excel students.xls Last Name beginning with the letter H. Notice that the Last Name field now contains records where the last name begins with H. Let’s remove the Filter and display all records. Click the Sort & Filter button and click the Filter option to remove the Filter drop-down arrows from the field name cells.
lab08_p157-176
8/21/07
11:03 AM
Page 175
Lab 8: Database Concepts Using Microsoft Excel
175
Review This has been a busy lab! We have covered the following topics: ● Database terminology: table, record, field, field heading, filter, and criteria ● Simple data types including text, numeric, and date ● Sorting records in a table using Excel’s sort buttons Sorting records in a table using multiple fields ● Using the Find feature to find specific data ● Using the Filter feature to filter records using specific text and numeric range criteria
Exercises Use the students.xls file to complete the following exercises. 1.
Sort the records so that the Psychology grade is in order from highest to lowest, with the highest grade at the top. For records that have the same Psychology grade, sort the records by Last Name alphabetically.
2.
Sort the records so that the Student IDs are listed with the highest numbers at the top of the list, to the lowest at the bottom.
3.
Sort the records by Birthdate so that the youngest student is at the top of the list and the eldest student is at the bottom of the list.
4.
Use the Filter feature to filter the list as follows: a. All female students who achieved a grade of 50 or less in CS1 and Psychology. b. All students born in 1987 who also have a grade of 70 or more in Math. c. All students whose last name begins with the letter “S” who also have a Psychology grade between 80 and 89 (including 80 and 89).
lab08_p157-176
8/21/07
11:03 AM
Page 176