37. 4. Accessing a Database using ADO/ASP.Net. • 4.1 .NET in a Nutshell … ...
An “aspx” file for Inserting Data in your 'Orders' table …….. 42. • 4.4 ADO.NET …
School of Science and Engineering Alakhawayn University in Ifrane CSC3326 Lab Manual
Using SQL Server 2OOO and ADO/ASP .NET in Database Instruction
HTTP
Client
ASP. NET
Web Server
DB ADO.NET
SQL Server
Author: R.Abid –
[email protected] A Microsoft Granted RFP Proposal
www.alakhawayn.ma
Contents 1. Introducing MS SQL Server 2000 • 1.1 Client/Server Databases Overview .....……………………………... 4 • 1.2 The SQL Server 2000 IDE ………………………………………… 5 • 1.3 How to Connect to an SQL Server using an SQL client. ………….. 6 • Practice ……………………………………………………..……… 6 • 1.4 Introducing basic Tools ……………………………………….…… 7 • 1.4.1 Service Manager …………………………………………….. 7 • 1.4.2 Enterprise Manager ………………………………………….. 8 • 1.4.3 Query Analyzer …………………………………………….. 12 2. Using The Enterprise Manager • 2.1 Introducing Server Roles …………………………………...…….. 13 • 2.2 Introducing Database Roles …………………………………….… 14 • 2.2.1 Fixed Database Roles ………………………………………. 14 • 2.2.2 Creating your Own Database Roles ………………………... 15 • Practice ………………………………………………………. 15 • 2.3 Creating User Accounts and setting their properties ……………... 16 • Practice...………………………………………………………….. 16 • 2.4 How an SQL Server Database is stored (Log and Data Files) ….... 18 • 2.5 Available System Databases and their use …………………..…… 18 • 2.6 Creating Databases – Tables, Data Types, Primary/Foreign Keys .. 19 • Practice – Creating your first database ………………………….... 19 • Practice – Creating Tables, Data Types, Primary/Foreign keys .… 21 • Practice – Filling the Tables with Data …………………………... 21 • 2.7 Creating Diagrams – Implementing Relationships ……………….. 22 • Practice ………………………………………………………….... 22 • 2.8 Creating Views ………………………………………………….... 24 • Practice ………………………………………………………...…. 24 • 2.9 Creating Stored Procedures ………………………………………. 25 • Practice ……………………………………………………...……. 25 • 2.10 Creating Rules – Defaults ……………………………………….. 26 • Practice – Creating Rules ………………………………………… 26 • Practice – Creating Defaults ……………………………………… 26 • 2.11 Creating User Defined Data Types and Binding Rules/Defaults .. 27 • Practice ………………………………………………………….... 27 3. SQL Commands using The “Query Analyzer” tool • 3.1 Create Database …………………………………………………... 29 • 3.2 Create Table ……………………………………………………… 30 • 3.3 Insert ……………………………………………………………… 31 • 3.4 Select ……………………………………………………………... 32 • 3.5 Delete …………………………………………………..…………. 33 • 3.6 Update …………………………………………………………….. 33 • 3.7 Create View ……………………………………………………..... 34
2
www.alakhawayn.ma
• • • •
3.8 Create Rule/Default ……………………………….……………… 35 3.9 Create Procedure …………………………………………….…… 35 3.10 Creating User-Defined-Data-Types …………………………….. 36 3.11 Create Trigger …………………………………..………………. 37
4. Accessing a Database using ADO/ASP.Net • 4.1 .NET in a Nutshell ……………………………………………. 38 • 4.2 Understanding ASP/ADO.NET through a Typical Scenario … 38 • 4.3 ASP.NET ……………………………………………….…….. 39 • Your Fisrt “aspx” file ………………………………………... 39 • An “aspx” file for Inserting Data in your ‘Orders’ table …….. 42 • 4.4 ADO.NET ……………………………………………………. 43 • 4.4.1 SqlConnection …………………………………………. 43 • Setting Up a Connection to the SQL Server …………….. 44 • 4.4.2 SqlCommand …………………………………...……… 45 • Setting Up a SqlCommand Object for Insertion …..…….. 45 • 4.4.3 DataReader ………………………………………….…. 47 • Displaying the Contents of the ‘Orders’ table ……..……. 47 • 4.4.4 DataSet ………………………………………………… 48 • 4.4.5 DataAdapter …………………………………………..... 48 • Populating a DataSet ………………..…………………… 48 • Updating a DataSet …………………………………….... 50 • 4.4.6 DataGrid …………………………………………….…. 52
3
www.alakhawayn.ma
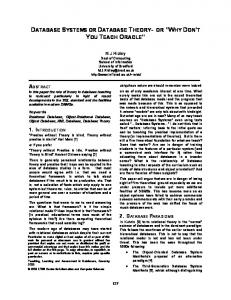
Module1: Introducing SQL Server 2000 SQL Server is much more than a Database. It is a coherent set of tools, utilities and interfaces collaborating to provide excellent Data-Handling. SQL Server2000 is a full Client/Server RDBMS – Relational DataBase Management System – whose utilities range from simple database creation/maintenance to Data Warehousing, OLAP services and Web Applications using XML.
1.1 The Client/Server Database Architecture The Client/Server is the base of all “n-tier” applications. The server “Serves” “Services” following a “Request” from the Client. The communication between both ends is set according to Well-Defined Protocols. Using the HTTP Protocol a client gets as a web page as a “Response”; using FTP a client gets a file …. Using SQL Server2000 a teacher gets the list of “Engineering Students”! The Client/Server Architecture is an “Area” that merges “Distributed” Computer Science branches. In this lab, the Client/Server Databases contrasts to Desktop Databases by allowing a SQL Client to request “Services” from the “SQL Server Engine” In short scenario: • The client sends a request to the server. • The server checks security issues and processes the request. • The server sends back a response. • The Client processes the response.
Internet/ Intranet OR ! Within the same
DB
station
SQL Client
SQL Server
4
www.alakhawayn.ma
What to install: The SQL Server2OOO exists in many versions varying in terms of capabilities, hardware requirement and cost. The most relevant one, rated by features, are: • Enterprise Edition: For large/powerful Database Capabilities. • Developer Edition: Same as Enterprise except it is not licensed for “Production”. Hence, serves only Developing and Testing. Also, runs only under XP, NT and MS2000 Professional. • Standard Edition: Saves good money and offers all needed capabilities of a “GOOD” Database. • Personal Edition: For Personal use, it does not allow for others clients to connect. To run a Real Server, you need one of the first three versions. To practice and have a SQL Client, you need only the Personal Edition. The three other versions embed also the Client Part.
1.2 The SQL Server 2000 IDE:
SQLServer2000 IDE exposes the following main tools: • Books Online: a rich library for “queries” about Server related points. It would accompany you through your SQLServer2000 investigation. • Client Network Utility: To set the client side network protocols to be used for the connection with the Server. • Import and Export Data: To send and receive data (Databases, security logins …) with various settings. • Profiler: Used basically to view and trace the performance and events of the server. Serves also for debugging and testing. • Query Analyzer: a console application to execute SQL Queries, Stored Procedures, Triggers, Administration commands… • Server Network Utility: To set the server side network protocols to be used when a client requests connection. • Service Manager: To Manage (Start/Stop) SQL Server Services. o Distributed Transactions Coordinator o Microsoft Search
5
www.alakhawayn.ma
•
o SQL Server o SQL Server Agent (Referred to in Section 1.4.1 of this Manual) Enterprise Manager: The most important entry as it links to most utilities: Server Content viewing, security management, network connection ….
1.3 How to connect to an SQL Server form the Client Before you proceed you need to check the “Protocols” used by your SQL Client and this by referring to “The Client Network Utility” entry. The protocols used should be compliant with the ones at the level of the server: “The Server Network Utility”
Practice 1. Open the Enterprise Manager 2. Right click “SQL Server Group” 3. Make a “New SQL Server Registration”
4. The “SQL Wizard window” pops up. Do check “From now on, I want to perform this task without using a Wizard” then click “Next” 5. Type the “Server Name” OR the corresponding “IP Address” 6. Supply your “SQL Server Identification” 7. If successful, your screen would look as follows:
6
www.alakhawayn.ma
- You can register/connect to more than one server.
1.4 Introducing Basic Tools: • • •
Service Manager Enterprise Manager Query Analyzer
1.4.1 Service Manager: Used to start/stop SQL Services and to check their actual status (Running/Stopped).
7
www.alakhawayn.ma
The SQL “Services” that you can manage using the “Service Manager” are:
DTC - Distributed Transaction Coordinator: Used to handle “Distributed Transactions”: Transactions running in multiple Servers. (Out of Lab Scope) (Transaction: A set of “processes“ making altogether a unit of work for which every process should COMMIT in order for the whole transaction not to ROLLBACK.)
Microsoft Search: To enable “Text-search” using Indexing.
SQL Server (Engine): The Core of the SQL Server. It is the part that processes/manages all Database related aspects (Storing Databases, tracking updates, executing SQL queries ….) and this may involve interaction with other active services.
SQL Server Agent: An auxiliary operator used for automated maintenance of the Database by running scheduled tasks, tasks to be executed when a condition set by the administrator occurs and replication operations. “Alerts” and “Jobs” are the means.
1.4.2 Enterprise Manager:
a GUI that gives access to quite all tasks that can performed on a SQL Server.
8
www.alakhawayn.ma
NB: - Due to the nature of this manual, this section is meant to be as much brief and descriptive. Basically, the Enterprise Manager shows 7”folders” allowing for distinct set of tasks. 1. Databases: Basically allows for “Creating/Viewing/Updating/Deleting” Databases. Creating Diagrams, tables, tables, users, roles, stored procedures, user-defined data type...
2. DTS - Data Transformation Services: Used to “move/transform” data between different data sources, merging data from dissimilar sources (Oracle, dBase, FoxPro, Access ..) and scheduling data collection. It basically defines how data will be moved by setting conversions, restrictions, exception handlings… The key is to create a DTS Package that sets the source, destination and how data will be transformed (See Figure below)
9
www.alakhawayn.ma
3. Management:
Used to graphically manage the “Maintenance” of the server. Main Maintenance tasks consist on: backing up Data, checking database integrity, checking space, backing up and viewing transaction logs. These tasks can be scheduled using SQL Server Agent “Alerts/Jobs”. 4. Replication: It is the process of sending data from one server to another. In a nutshell, replication involves three agents: • A Distributor: The server that manages the Replication • A Publication: The “Data” to be replicated • A Subscriber: The server to get the replicated data
10
www.alakhawayn.ma
5. Security:
Used to configure security aspects. Basically, you can set: • Users Identification/Authentication • Roles (User Groups) permissions/settings. • Identification/Authentication when creating links to OLE DB data sources also called linked servers. • Setting up security for executing remote procedure calls (RPC) against a remote server. NB: We will back to security issues in Part2 of this Manual
11
www.alakhawayn.ma
6. Support Services:
Gives access to three services: • DTC – Distributed Transaction Coordinator: Managing Transactions • Full-Text-Search: a search service implemented through Indexing • SQL Mail: enables SQLServer to send mails. 7. Meta Data Services: A quite advanced feature of SQLServer2000. It goes around storing and managing Meta Data (Data about Data). In fact, it is a whole architecture; refer to “Meta Data Services Architecture” in “SQL Server Books online” for more information.
1.4.3 Query Analyzer: A Command-line Interface. Some developers never use “Enterprise Manager”, they do all their work by uniquely using “Query Analyzer”. However, this involves mastering SQL Commands. The “Query Analyzer” has 2 panels: one for typing commands, and the other for viewing results, debugging and tracing the execution. (See figure down)
- We will back to “Query Analyzer” in coming sections.
12
www.alakhawayn.ma
Module2: Using the Enterprise Manager 2.1 Introducing Server Roles Security is a primary issue in Client/Server DBMSs. Hence it has to be assigned a paramount importance. SQL Server security is based on the concepts of users, roles, objects and permissions. Roles are “Users / User Groups” sharing the same permissions. Instead of assigning individual permissions for users sharing the same permissions, roles are to avoid such overhead by assigning a user to specific roles. - A user can belong to multiple Roles. SQL Server has the following predefined Roles:
• • • • • • • •
sysadmin - “System Administrator”: The “highest” Role in terms of allowed activities and privileges, a user belonging to this roles can perform any kind of activity on the server. dbcreator – “Database Creator”: A user in this Role has the right to Create/Alter Databases. bulkadmin – “Bulk Insert Administrator”: Can execute Bulk Insert commands (A kind of Insert suitable for migrating large amount of data from a FILE to a DB). securityadmin – “Security Administrator”: Can manage logins and CREATE DATABASE permissions, also read error logs and change passwords. processadmin – “Process Administrator”: Can view and kill running SQL Processes. serveradmin – “Server Administrator”: Can configure the server-wide settings such as setting up full-text searches, shutting down the server. setupadmin – “Setup Administrator”: Can manage linked servers (OLE DB sources) and execute Stored Procedures. diskadmin – “Disk Administrator”: Can manage Disk space. 13
www.alakhawayn.ma
2.2 Introducing Database Roles Like Server Roles, Database Roles share settings for Database “access and administration”. Actually, there are 2 types of Database Roles: Fixed ones, and userdefined ones.
2.2.1 Fixed Database Roles
NB: - To get the window above: From “Enterprise Manager”, expand the “Northwind” database, right click “user” then select “New Database User …” SQL Server 2000 provides the following fixed Database Roles: • public: Every user is by default a member of this Role. Hence, it is a kind of “Minimum Permission Level”. To see/adjust the permissions for the “public” Role, click “properties” button when “public” box is activated. - Be careful when changing “public” properties, as this would affect all users except “sysadmin” ones! • db_owner: Gives the “Ownership” right for its members. Hence, a user in this Role can perform any kind of activity on this Database. • db_accessadmin: Can Add/Remove users for the database, the user will have the default permissions. Cannot assign Permissions and Roles. • db_securityadmin: Can assign Permission/Roles to users. • db_ddladmin: can execute DDL (Data Definition Language) commands: Create, Alter and Drop. Cannot execute other commands such as “Revoke, Deny and Grant” (The commands will be covered later in Module3). • db_backupoperator: Can perform database backing up operations. 14
www.alakhawayn.ma
• • • •
db_datareader: Can read all data in Database db_datawriter: Can modify/add data in the Database db_denydatareader: Cannot read any data from Database db_denydatawriter: Cannot modify/add any data in Database
2.2.2 Creating your Own Database Roles Actually, there are 2 types of Roles: Standard and Application Roles: • The Application Roles require a password and they are meant for Applications (such as a VB application) to access the Database without referring to a specific user. • On the other hand, Standard Roles, referred to by “user-defined” Roles, can have users adhered to them. You will create “Standard Roles” in this Lab.
Practice 1. In the “Enterprise Manager”, expand the Database node for which you want to create a new Role: “Northwind” for instance. 2. Right Click the “Roles” node then select “New Database Role …” 3. Select “Standard Role”, the default one 4. Type a Role name – i.e. “Read_Only” 5. Click on the “ADD” button to adhere specific users 6. The “Read_Only” Role will show up in the Right Panel 7. Double Click the “Read_Only” Role then, Click “Permissions” 8. Uncheck the “Insert, Delete and Update” boxes for the “Categories” Table and Click “OK”
15
www.alakhawayn.ma
2.3 Creating User Accounts and Setting their Properties To add a new Database user, you can do it through 2 ways: • Using the “Server Security” utility. • Using the “Database Users” utility The difference between the 2 options is in that the first option does list all users whereas the second lists only the Concerned Database users. Also, only “sysadmin” users can use the first option, whereas the second option can be investigated also by db_owners.
Practice 1. 2. 3. 4.
From “Enterprise Manager”, do expand your “Database” Double Click “Users” to view current users Right Click “Users”, then select “New Database User …” Click the “Arrow Down” of the “Login Name” textbox and select “New”. You can also add an “Existing” user. 5. The following window pops up. It shows three basic “Tabs”: • General • Server Roles • Database Access
6. Do specify the following: • User name • Authentication Method (Windows OR SQL Server) 16
www.alakhawayn.ma
• •
Default Database Default Language
7. Switch to the “Server Roles” tab and Select the adequate “Server Role” 8. Switch to the “Database Access” tab 9. Check the “Databases” for which you want to grant access along with the corresponding “Database Roles
10. Once you click “OK”, SQL Server would ask for “Password Confirmation” 11. “toto_foo” will be added to the “Right Panel” – Check it! 12. To add the user to a specific Database Role, Double Click the Role then click the “Add” button. The added user would show up – See figure below.
17
www.alakhawayn.ma
2.4 How a SQL Server Database is stored Logically a SQL Server Database can be viewed/managed through a set of Objects (Tables, views, diagrams …) called “Logical Components”. Physically, a SQL Server Database is stored in 2 types of files, Data files and Log files usually named respectively as follows: • Primary File (.mdf): The file that stores Data • Log File (.ldf): a file that stores Log information about the Database. I.e. basically the information about the updates made to the Database. This file is crucial for “Database Recovery”. In addition to the Primary file, a Database can have many other Data files called “Secondary files” with an extension of “.ndf”. The secondary files will be used once the allocated space for the Primary file is over. However, every SQL Server Database should have ONE UNIQUE Primary File that holds reference to other secondary files if existing. - We will be back to these files in Section 2.6 of this Manual
2.5 Available System Databases and their use There are 2 categories of SQL Server Databases: • User Databases: Created by a user to hold specific user-data. • System Databases: Databases created when SQL Server in installed. These Databases are used by the System (SQL Server) and they have a very deterministic role. In fact, with installation, SQL Server creates four “System Databases” and 2 “Samples Databases” serving as learning tools – See figure below:
18
www.alakhawayn.ma
The functionalities of these “System Databases” are: • master: stores all system information, i.e. all other databases’ file locations, system configuration, logins, roles … • model: serves as template for any user database. I.e. when a user creates a database, this later will inherit the properties of the “model” database. For instance: The size, users, database roles … • tempdb: used to store temporary data when needed. • msdb: used by the SQL Server Agent to create Alerts and Jobs ”Northwind” and “pubs” are the sample databases.
2.6 Creating Databases – Tables, Data Types, Primary/Foreign keys At this stage, we are investigating how to create a Database using the “Enterprise Manager”: the easiest way – “Mouse and Click”. However, we will recover this task and other tasks remaining in this Module using “SQL Commands” in Module3
Practice – Creating your first database 1. 2. 3. 4.
Right Click the “Database” folder in “Enterprise Manager” Select “New Database” Supply a “Name” for your database Switch to the “Data files” tab to configure the “Primary Files” talked about in section 2.4 – See next steps
19
www.alakhawayn.ma
5. Set the “initial size” to 2MB 6. In the same window you can configure the following: • File Growth: How much space will be added to the “Database” if its size reaches the set “initial size”. It is expressed in terms of “Percentage” or “Fixed Quantity”. Set it to 20% • Maximum File Size: Either Restricted OR unrestricted. Set it “restricted” to 3MB 7. Switch to the “Transaction Log” tab to set the Log file 8. Make the followings settings: • Initial Size: 1 MB. • Unrestricted Size • File Growth: 20% 9. Click “OK”, and then expand the “Databases” folder to ascertain the creation of your database.
20
www.alakhawayn.ma
Practice – Creating Tables, Data Types, Primary/Foreign keys As you have seen in the lecture, a relational database is abstracted as a set of tables (entities) related between each other using relationships. And these relationships are implemented through “Primary/Foreign Keys” In this practice, you will create 2 tables “Order, Customer”: • Order: o Order_id o Customer_id o Date_of_order o Delivered_flag (Delivered or not) o Paid_flag (Paid or not) • Customer: o Customer_id o Customer_name o Address o Amount_to_pay Steps: 1. Expand the Database node you created in last practice 2. Right Click “Tables” and Select “New Table” 3. Fill in the “Column” names, the corresponding “Data Types”, “Length” and the “Allow Nulls” property
4. Set the “Primary Key” by selecting the right column and clicking the “Key” button. See figure above. 5. Once done, click “Save” and supply the table name “Order” 6. Repeat the same steps for the “Customer” table - Pay attention to the Data Type of “customer id” as this serves as a foreign key in the “Order” table: “Referential Integrity”
Practice – Filling the Tables with Data 1. Double click the “Tables” folder and check for the existence of your lately created tables. You can easily work them out by looking at the “Type” attribute! 2. Right Click the “Customer” table
21
www.alakhawayn.ma
3. Click “Open Table” and then select ”Return all rows”
4. Type in some data 5. Once done, click the “Run” button to save – the “!” button. 6. Do the same with the “Order” table - Be careful with “Referential Integrity”- Refer only to existing “customer_id’s”
2.7 Creating Diagrams – Implementing Relationships A Diagram is a Database object in which you map the entity relationships you have in your database
Practice 1. Right Click “Diagrams” and the select “New Diagram” 2. The “wizard” pops up – Close it by clicking “Cancel” 3. Click the “Add tables” button 4. Add the “Tables” you want to “include” in the diagram. I.e. “Order” and “customer” in this case 5. Implement the “Relationship” by “Dragging” the “Primary key” from the “Customer” table and putting it over the corresponding “Foreign Key” in the “Order” table – See Figure below
22
www.alakhawayn.ma
6. Check the boxes for “Referential Integrity” and click “OK” 7. Once done, click “OK” 8. If “Everything” is OK you would see the following “Relationship”:
- Once you click the “OK” of the “save as” dialog box, if you get an error, this would pertain to “Referential Integrity”: Basically, you are referring in the “Order” table to a customer that does not exist in the “customer” table!
23
www.alakhawayn.ma
2.8 Creating Views A view is a “logical table” that results from querying 1 or more tables. Views are used basically to enhance good performance. For instance, let’s say we have one “Big” student table. An operator works only on “GE” – General Engineering – students’ data. Hence, instead of making his queries against the whole table, we would create a “view” that maps only “GE” students, this way, he is increasing query performance by shrinking the size of data set.
Practice 1. Right click the “Views” folder and select “New View” 2. Click the “Add table” button to “Add” the tables from which data will be selected in the view – In this example, select “Order” and “customer” 3. Check the “Columns” you want to map in the view 4. You can also set “Criteria” and “Sorting orders” – See figure below 5. As you long as you proceed, the corresponding “SQL Statements” are generated automatically – See Figure below 6. Once done, click the “Run” button 7. The view is generated as a “Table”
8. Click “save” and assign a name to your view 9. To get back to the saved view, right click the “views” folder 10. Right Click your view 11. Select “Open View”
24
www.alakhawayn.ma
2.9 Creating Stored Procedures A Stored Procedure is a “Set of Commands” (SQL Commands – OR PL/SQL Commands) compiled and saved for later use. A stored procedure is similar to “functions” in Computer Programming, and this basically is in terms of: • Reusability • Accepting input parameters • Returning output values In Module3 – “Query Analyzer” – we will be back for more details about creating Stored Procedures as this involves “SQL Statements”. At this point, you will see how to “Graphically” create a stored procedure using the “Enterprise Manager”
Practice 1. Expand your database 2. Right click the “Stored Procedures” node then select “New Procedure” 3. Give a name for your stored procedure and type a simple “Select statement” – See figure below
4. Click “OK” to save 5. Check the creation of your “sp” in the “Right Panel” - We will be back to how to “Execute” the “sp” in Module3
25
www.alakhawayn.ma
2.10 Creating Rules - Defaults Rules are database objects meant to “Constrain” the values of a Column OR of a UserDefined Data Type. For instance, if you create a Data Type named month, the accepted values should be between 1 and 31. Once a Rule is created, it can then be applied/bound to a specific User Data Type.
Practice – Creating Rules 1. Expand your Database node 2. Right Click the “Rules” node then select “New Rule” 3. Type a Name for it and supply the corresponding text – See Figure below
4. Save - You will “Bind” your “Rule” to a created “User-Defined-Data-Type” in next section Defaults are “values” to be assigned for specific Columns when no value is supplied.
Practice – Creating Defaults 1. Right Click the “Defaults” node of you Database 2. Select “New Default” 3. Supply a “Name” and the Corresponding “Value”, see figure below
26
www.alakhawayn.ma
4. Save - Like “Rules”, “Defaults” are to be bound to specific Columns / Data Types, See next Section
2.11 Creating User Defined Data Types and Binding to rules “User Defined Data Types” are based on existing System Data Types. They allow for more narrowing of constraints by binding “Rules”. The “User Defined Data Type” can then be used as a normal System Data Type. In the following Practice, you will create a Data Type “_month” and you will bind to it the “Rule” and “default” objects created in Section 2.10
Practice 1. Right Click the “User Defined Data Types” node in your Database 2. Select “New User Defined Data Type” 3. Supply the corresponding values –See Figure Below
4. Save 27
www.alakhawayn.ma
- To check the “functionality” of the created data type, do: 1. Create a Table “Months” with a Column of type “_month”: The “User Defined Data Type” you created formerly.
2. When filling the table with data, do supply values not obeying to the bounded rule - “on_month”- and notice system reaction to it! – See figure below
28
www.alakhawayn.ma
Module3: SQL Commands using the “Query Analyzer” tool This module investigates the basic “SQL Commands” using the “Query Analyzer”. Some of the tasks to see have been already covered in Module2 using the “Enterprise Manager”. However, we will recover them as “Command Line” abilities are considered to be an indispensable asset for a SQL Server Developer. The basic commands to be covered in this Module are: • Create Database • Create Table • Insert • Select • Delete • Update • Create view • Creating Rules / Data Types / Defaults • Create Procedure • Create trigger Throughout this module we will use the “Query Analyzer”, a utility to be accessed either from the “Tools” menu of the “Enterprise Manager” OR from the general SQL Server2000 IDE:
3.1 Create Database Syntax: CREATE DATABASE “Database_Name” ON PRIMARY ( Name = Logical_Name, Filename = Physical_Name, // .mdf extention
29
www.alakhawayn.ma
Size = _size, // Default unit: MB Maxsize = _maxsize OR UNLIMITED, Filegrowth = _filegrowth // specified in “%” or other fixed units, MB is the default ) LOG ON ( Name = Logical_Name, Filename = Physical_Name, // .ldf extention Size = _size, Maxsize = _maxsize OR UNLIMITED, Filegrowth = _filegrowth ) Execution Sample: -To execute your “SQL Commands” once typed, click the “RUN” the “F5” key.
button OR Press
- To delete a Database: Drop Database “database_name”
3.2 Create Table Once a Database is created, the next step is to create tables. When creating tables, you should specify the relevant Database, i.e. the database where these tables will be created. And this should be done in one of these ways: • Specify the “Current Database” in the “Query Analyzer” – See next Execution Sample • Precede the “Create Table” command by a “use database_name“ Command
30
www.alakhawayn.ma
Syntax: CREATE TABLE ‘Table_name’ ( ColumnName1 Datatype [Null|Not Null] [Primary Key] [DEFAULT Defautlvalue] [Foreirgn Key References Tablename], ColumnName2 …… ) Execution Sample:
-To delete a Table: Drop Table ‘tableName’
3.3 Insert Syntax: INSERT INTO tableName VALUES() • The can be omitted. In such a case, the database engine would expect values – in the to match the “Order” of the “Columns” as they are in the table design – See examples down. • If is specified, the order should be respected, i.e. the values should match the ones of the Execution Sample:
31
www.alakhawayn.ma
Exercise: Insert data into the “orders” table. Insert at least 5 orders for each customer with different “date_of_order”, “delivered_flag”, “paid_flag” and “cost” values.
3.4 Select Syntax: SELECT select_list FROM table_source [ WHERE search_condition ] [ GROUP BY group_by_expression ] [ HAVING search_condition ] [ ORDER BY order_expression [ ASC | DESC ] ] Execution Sample:
- When having more than one SQL command – like in example above, and you want to execute only one command regardless of the others, do select it and press F5 Exercise: •
Select the unpaid orders during last year for each customer
•
Select the amount to pay for each customer
•
Select the number of “unpaid orders” for customer 1
32
www.alakhawayn.ma
•
Make a “join” select by selecting undelivered orders – from Orders table - along with the corresponding data for concerned customers – from Customers table.
3.5 Delete Syntax: DELETE FROM tableName WHERE Execution Sample: We want to delete all the orders that have been paid and delivered
3.6 Update Syntax: UPDATE tableName SET WHERE Execution Sample: Customer ‘1’ paid all his unpaid orders. Let’s update his records.
33
www.alakhawayn.ma
3.7 Create View Syntax: CREATE VIEW viewName AS Execution Sample: Make a view for unpaid orders.
- The created view behaves as a logical table that can respond to normal queries – See execution window below.
Exercise: • Create a view joining the order table with the customers table – The view shold list only unpaid orders • Update the view for the “customer.amount_to_pay” to be equal to the sum of corresponding unpaid orders. Check the update in the “customers” table.
34
www.alakhawayn.ma
3.8 Create Rule/Default Syntax: • CREATE RULE ruleName AS • CREATE DEFAULT defaultName AS Execution Sample:
3.9 Create Procedure Syntax: CREATE PROCEDURE procedureName [parameters] AS Execution Sample:
35
www.alakhawayn.ma
- To execute the Stored Procedures, Run “Exec procedureName Parameters” in the “Query Analyzer” – See figure below
Exercises: • Create a Stored Procedure that deletes orders by their order_id • Create a Stored Procedure that inserts an order
3.10 Creating User-Defined-Data-Types User-defined-Data-Types area created using the “sp_addtype” system procedure Syntax: sp_addtype typeName, system_data_type, ‘null_type’ Once the Data Type is created, it can then be bound to a rule using the “sp_bindrule” procedure. See Following Execution Sample.
36
www.alakhawayn.ma
3.11 Create Trigger Triggers are a kind of “Stored Procedures” triggered when a special event happens. The events are basically a Select, Update or Delete Syntax: CREATE TRIGGER triggerName ON tableName|view FOR|INSTEAD OF AS Execution Sample:
Exercises: Implement triggers for the following events: • When you insert a new order, the updated set of orders should show up • When you insert a new order, update the “amount_to_pay” for the corresponding customer in the “customers” table.
37
www.alakhawayn.ma
Module4: Accessing a Database using ADO/ASP .Net 4.1 .NET in a Nutshell .NET is a Framework. It is the “Programming Environment” for the new Microsoft .NET Platform. .NET provides a set of powerful utilities for application development in the highly distributed environment of Internet. The .NET environment has two main components: 1. The Common Language Runtime (CLR): Responsible for “Executing Compiled Code” by managing memory, threads, security …The compiled code – called also managed code - can be produced by a wide set of .NET-enabled compilers (C#, C++, Fortran, Perl, Cobol, Python, Eiffel…). It is much like the JVM – Java Virtual Machine – in the sense that this later executes the produced ‘Byte-Code’ by providing a kind of JIT – Just In Time – compiler for different kinds of hardware platforms. This way, .NET provides a very important/new feature, which is “Support for Cross-Language Integration”. 2. The .NET Class Library: It is an object-oriented collection of reusable types that you can use to develop applications ranging from traditional command-line or graphical user interface (GUI) applications to applications based on the latest innovations provided by ASP.NET, such as Web Forms and XML Web services. The building blocks for the .NET class library are: • ASP.NET classes • ADO.NET classes
4.2 Understanding ASP/ADO.NET through a Typical Scenario A user wants to check your email box at “Hotmail.com”. • The user receives an “html”/”aspx” file on his desktop • User fills data (password/username) and submits • The ‘web server’ receives the Request • ‘Web Server’ reads the submitted ‘password/username’ using ASP.NET • The ‘web server’ establishes a connection – using ADO.NET - with the ‘Database Server’ holding ‘usernames/passwords’ • The ‘web server’ sends a Select SQL-Statement to get the right password using ADO.NET • The Database server answers the Request
38
www.alakhawayn.ma
•
Once the right ‘username/password’ are received, the ‘web server’ would implement the following “IF ……. ELSE ….”: If (password right) Give access Else Redirect the user to the login page This algorithm is implemented again using ASP.NET as HTML is concerned only with ‘Presentation’
4.3 ASP.NET ASP.NET is more than the next generation of Active Server Pages. ASP.NET is the new development environment for writing “Server-Side” code. The strength of ASP.NET takes after the solid available ASP.NET classes. Unlike, old ASP, ASP.NET brought the new notion of the “code-behind” aiming at separating the Client-Side code from the Server-Side code. The “code-behind” can be implemented using a quite large set of languages (C#, J#, VB.NET, Perl, …). Throughout this lab, we will adopt C# as being the language specifically drafted by Microsoft for the .NET Platform. C# is an object-oriented language taking much after C++/Java and throwing away the C++ ‘shortcoming’ as pointers, garbage collection, complex syntax instances …
4.3.1 Your First “aspx” file Steps: 1. Open Visual Studio.Net and Create a new “C# ASP.NET Web Application” 2. Specify the “Web Server” to be used for running your aspx code.
39
www.alakhawayn.ma
3. Click OK 4. The “Web Server” will ask for a “username/password” 5. In the “Solution Explorer”, Right Click your project folder and “Add” a new Web Form
6. Name it “Display_date.aspx” 7. Visual Studio provides 2 ways to interact with your form: • Design: Allows to interact with your forms in a “WYSIWYG” mode • HTML: Allows you to interact with your forms by manipulating HTML code 8. Keep the “Design” Mode 9. In the “Tool Box” panel, click the “Web Forms” tab 10. Drag a “Label” and a “Button” controls
40
www.alakhawayn.ma
11. Click the “Label” control and set its “Text” from the “Properties Window” – at the bottom right corner – to “Time at the server is:”, See figure below 12. Do the same with the button. Change its text to: “Display DateTime”
13. Switch to the “code-behind” by clicking “F7” – Or just “Double Click” the button. 14. Add code to the function to display the “DateTime” at the server – - See code below:
41
www.alakhawayn.ma
15. Once done, right click your form in the “Solution Explorer” and select “View in Browser” 16. Click the Button to show the DateTime – See figure below.
4.3.2 An “aspx” file for Inserting data in your “Orders” table • • • •
Create another form to get data about an “Order” to be inserted in the “Orders” table your created in Module3 Do implement just the GUI. As we want to give feedback about submitted data, do add a “Label” beneath the “Submit” to display the feedback. Your GUI should look some how as follows:
42
www.alakhawayn.ma
•
Add code to the “Submit_onclick( )” function to give feedback on the submitted data - See figure below
•
“View in Browser” your form. You should see the feedback in the Label down:
- Now that you can read data sent by the user, the next step is to “Insert” the data in the Database. ADO.NET is the means to accomplish this.
4.4 ADO.NET ADO.NET provides access to various data sources (SQL Server, Oracle, FoxPro, Access ….). ADO.NET is a set of reusable rich classes allowing for flexibility in accessing data. By flexibility we mean mainly: Retrieving, Inserting, Updating and Deleting Data. ADO.NET allows also access to XML Data. ADO.NET is based on the following main classes: • Connection • Command • Dataset • DataReader • DataAdapter
4.4.1 SqlConnection In fact there are four types of Connections: • OleDBConnection • SqlConnection 43
www.alakhawayn.ma
• OdbcConnection • OracleConnection Each of these connection classes allows access to a specific kind of data source. They do vary in terms of accessed Database Drivers. Throughout this lab, we will be using the “SqlConnection” as we are interfacing our application to a Microsoft SQL Server. The “SqlConnection” class has the following main methods and properties: • ConnectionString: Sets parameters for the connection with the Database • Open( ): Opens the connection to the Database specified in the “ConnectionString” property • Close( ): Closes the connection The “SqlConnection” has a large set of properties and methods. Do refer to the “SqlConnection” topic in the MSDN Library for more details. Seeking simplicity, we are referring only to the crucial ones for establishing a connection. Setting Up a Connection to the SQL Server
• • •
Switch to the code-behind your web form and do declare a “SqlConnection” object in your class. - protected System.Data.SqlClient.SqlConnection my_conn;
Always in your class, do expand the “Web Form Designer Generated” node and do “Construct” your connection object in the “InitializeComponenet( )” function - my_conn = new System.Data.SqlClient.SqlConnection();
Switch to the “Button1_Click( )” function and set the ConnectionString property of your Connection. Basically, the “ConnectionString” should have three attributes: o Server: The SQL Server Name or IP address to which you want to connect o Database: The Database in the Server o User id: Your User-id o Password: Your Password - my_conn.ConnectionString = "server=R_Abid;database=R_Abid2;user id=toto; password=totototo";
• •
Open your connection Set the Label text to “Connection Established” in case of success. – See Figure below.
44
www.alakhawayn.ma
•
Run your code and you should see the feedback in the Label if connection successful.
- Now that you successfully established a connection to your Database, the next step is to “Insert” the data submitted by the user. The means is an “SqlCommand” Object.
4.4.2 SqlCommand There are also four types of command classes: o OleDBCommand o SqlCommand o OdbcCommand o OracleCommand The commands above also vary in terms of the type of database drivers you are trying to connect to. Again, we will use “SqlCommand” objects as we are interfacing to a SQL Server. The “SqlCommand” class has the following main methods and properties: o CommandText: Sets the SQL-Statement or the Stored Procedure to be executed. o Connection: Sets the Connection against which the CommandText will be executed o ExecuteNonQuery: To be used in case of a SQL-Statement not returning a Result, i.e. Delete, Update and Insert. It returns the number of affected rows o ExecuteQuery: To be used in case of a query, i.e. Select. It returns the resulting set of Rows. o ExecuteReader: used with the ‘DataReader’ object – To be seen in Section 4.4.3 Like the “SqlConnection” class, the “SqlCommand” class has a quite wide set of properties and methods. Again, do refer to the “SqlCommand” topic in the MSDN library for more details. Setting Up a SqlCommand Object for Insertion
• •
As you did previously with the “SqlConnection” Object do: o Declare a “SqlCommand” object o Construct your object Set the “CommandText” Property to an “insert statement” meant to insert the data submitted by the user into the “Orders Table” of your database. - Set the values of your “RadioButtonLists” to 1’s and 0’s instead of text (Delivered, Undelivered, Paid, Unpaid) as the Paid_flag and Delivere_flag are of type bit. Also,
45
www.alakhawayn.ma
rename your Textboxes, RadioButtonLists and the Dropdownlists to have mnemonic names. For instance: Order_id, customer_id, month, day, year, delivered_flag, paid_flag and cost.
- my_command.CommandText = "insert into orders values('" +Order_id.Text + "','" + customer_id.SelectedValue + "','" +month.SelectedValue+""+day.SelectedValue+"-"+year.SelectedValue+"'," +delivered_flag.SelectedValue + "," +paid_flag.SelectedValue+ "," +cost.Text +")";
• Set the “Connection” property to your established connection - my_command.Connection = my_conn; • Set the Label text to “Row Inserted” for feedback - Label7.Text = "Row Inserted"; • Execute your command using the appropriate execute method - my_command.ExecuteNonQuery();
•
Run your code, and check for the “inserted row” in the Orders table. See next figures:
46
www.alakhawayn.ma
- The 2 other SQL-statement, Delete and Update, can be implemented using the same analogy as they both use the “ExecuteNonQuery( )”, whereas the “Select” statement uses instead the “ExecuteQuery( )”function and involves other ADO.NET Objects to hold the result of the query, mainly the DataReader and DataAdapter.
4.4.3 DataReader DataReader as its name implies is a class used to Read the Data, hence suitable for queries made using the select statement and specifically using the “ExecuteReader( )” method of the Command Object. DataReader provides only a Forward-Only type of cursor. So, it is mostly used for quick iteration over a result. Accordingly, DataReader is the best way to go when you want to make quick checks against your Data. For instance, to check if the ‘password’ is correct OR if a certain record exists or not. As a Practice let’s display the set of orders existing in the ‘Orders’ table: Displaying the Contents of the ‘Orders’ table We want to display only unpaid orders made by customer ‘3’ Steps: 1. Add a new Web Form, 2. Declare a Connection and a Command Object 3. Initialize your 2 objects in the “InitializeComponent( )” function 4. In the “Page_Load( )” function, Do set your objects – This time the “CommandText” attribute of your ‘Command” object is a “Select Statement” 5. Declare a “SqlDataReader”. - Make sure you add the ‘System.Data.SqlClient’ namespace 6. Assign the “Result” of your command object – using the ‘ExecuteReader( )’ method to the ‘SqlDataReader’ 7. Use the ‘Read( )’ method of the ‘SqlDataReader’ object to loop through the result. - See code below: private void Page_Load(object sender, System.EventArgs e) { my_conn.ConnectionString = "server=R_Abid;database= R_Abid2;user id=toto;password=totototo"; my_conn.Open(); my_command.CommandText = "select * from orders"; my_command.Connection = my_conn; SqlDataReader myreader = my_command.ExecuteReader(); while (myreader.Read()) { for(int i = 0; i < myreader.FieldCount; i++) { if (myreader.GetValue(1).Equals("3")&& myreader.GetValue(4).Equals(false)) { Response.Write(myreader.GetValue(i) + "-"); if (i == myreader.FieldCount-1) Response.Write("
"); } } } Response.Write ("===> It Works :)"); }
47
www.alakhawayn.ma
8. Execute
4.4.4 DataSet DataSets are used to work in a “Connectionless” mode with your Database. In other words, a DataSet is similar to a Relational Database as it contains Tables, Constraints and Relationships but stored locally and not implemented as a real Database. The advantage of using a DataSet is to minimize round-trips to the Database Server as the DataSets are stored in the client station. Basically, besides relationships and constraints, a DataSet contains tables represented by the DataTable Class. In its turn a DataTable contains rows and column represented by the DataRow and DataColumn Classes Respectively. For more information about DataSets, refer to the “DataSet” topic in your MSDN. - To fill your data, you need a “DataAdapter” object. Also, to update the changes made locally to your DataSet into the Database you need also the “DataAdapter” object. Hence, “DataAdapters” are crucial for working in the connectionless mode. And this is the coverage of next topic.
4.4.5 DataAdapter a DataAdapter serves as a bridge between your database and the DataSet where data will be held locally in your station. And as mentioned formerly in last section this allows for high performance by minimizing the round-trips to the Database Server. The most important methods of the “DataAdapter” class are the Fill( ) and the Update( ) serving respectively to fill the DataSet and to Update the changes made in the Dataset into the Database. To illustrate these functions, Let’s make a practice where we will have to populate a DataSet with 2 Tables: One containing ‘UnpaidOrders’ and the other ‘PaidOrders’ Populating a DataSet
1. Add a new Web Form to your Project 2. Declare 2 Command objects and a Connection Object 3. Instantiate the 3 Objects 48
www.alakhawayn.ma
4. Set the parameters for the 3 objects in the “Page_Load( )” function. Command1 is for retrieving ‘UnPaid’ orders whereas Command2 is for “PaidOrders” 5. Declare a “SqlDataAdapter” Object and instantiate it. - Make sure you include the “System.Data.SqlClient” namespace! 6. Set the “SelectCommand” property of the “SqlDataAdapter” to the Command1 7. Declare and instantiate a DataSet object. 8. Run the Fill( ) method, which takes basically 2 arguments: .Fill(DataSet ds, String tableName) 9. Then change the ‘SelectCommand’ property and fill the second table in the same DataSet. 10. You can then access each Table using the “Tables[tableName]” attribute of the DataSet object. - See Code Sample Below private void Page_Load(object sender, System.EventArgs e) { my_conn.ConnectionString = "server=R_Abid;database= R_Abid2;user id=toto;password=totototo"; my_conn.Open(); command1.CommandText = "select * from orders where paid_flag = 0"; command1.Connection = my_conn; command2.CommandText = "select * from orders where paid_flag = 1"; command2.Connection = my_conn; DataSet myDataSet = new DataSet(); SqlDataAdapter da = new SqlDataAdapter(); da.SelectCommand = command1; da.Fill(myDataSet, "UnpaidOrders"); da.SelectCommand = command2; da.Fill(myDataSet, "PaidOrders"); DataTable UnpaidOrders = myDataSet.Tables["UnpaidOrders"]; foreach (DataRow elt in UnpaidOrders.Rows) Response.Write(elt["order_id"] + "-" + elt["paid_flag"] + "
"); Response.Write("==> Your DataSet contains 2 Tables,"); }
11. Execute
49
www.alakhawayn.ma
Important - You can actually work with a DataTable if you are not willing to implement relationships between your tables. And this can be accomplished by simply passing the “DataTable” object to your SqlDataAdapter: DataTable Result = new DataTable(); da.Fill(Result); foreach (DataRow elt in Result.Rows) Response.Write(elt["order_id"] + "-" + elt["paid_flag"] + "
");
Implementing relationships is not mandatory and DataSet can serve to group tables in DataSets instead of having a large of ungrouped tables! However, to implement a relationship, you need to use a “DataRelation” object that as arguments: § Relation Name § The Primary Key § The Foreign Key Example: Let’s say we added another table ‘Customers’ in our former DataSet, to create a relationship between the ‘Customers’ and ‘PaidOrders’ tables, you need only to add the following lines of code: o
o
DataRelation myRelationship = new DataRelation( "CustomersToOrders" ,myDataSet.Tables["Customers"].Columns ["Customer_id"], myDataSet.Tables["PaidOrders"]. Columns["customer_id"]); myDataSet.Relations.Add(myRelationship);
For more details on how to work with Relations, please do refer to the “DataRelation” Topic in your MSDN. Updating a DataSet
When working with your DataSet/Tables, you will surely get to make updates, deletions and insertions. And since, the DataSet is stored locally in your station, you will need to migrate the updates to your database.
50
www.alakhawayn.ma
To perform this, you have to use the ‘Update( )’ method of the corresponding ‘SqlDataAdapter’ Object. To illustrate this, lets continue with the code you made in former section by adding code to update the ‘paid_flag’ column for customer ‘3’ then check the changes in the Database. Steps: 1. Let’s select the “Orders” for Customer one 2. Call the update( ) method. You need a ‘SqlCommandBuilder’ object to commit the updates. The CommandBuilder is necessary for generating Update Commands. - See Code Below: string filter = "customer_id = '3'"; DataRow[] selected = myDataSet.Tables["UnpaidOrders"].Select(filter); for (int i = 0; i < selected.Length; i++) { selected[i]["paid_flag"] = 1; } SqlCommandBuilder cb = new SqlCommandBuilder(da); da.Update(myDataSet, "UnpaidOrders");
3. Execute 4. Check your ‘Customers’ table for Updated data
- Similarly, when Adding or Deleting you need to use the ‘Add( )’ and ‘Delete( )’ methods of the “DataTable” object: o myDataSet.Tables["UnpaidOrders"].Rows[index].Delete();
51
www.alakhawayn.ma
o
DataRow elt = myDataSet.Tables["Customers"].NewRow(); elt["Customer_id"] = "777"; elt["customer_name"] = "Azerty"; elt["address"] = "A1"; elt["Amount_to_pay"] = 700; myDataSet.Tables["Customers"].Rows.Add(elt); da.Update(myDataSet, "Customers");
- Don’t forget to use a ‘SqlCommandBuilder’ Object
4.4.6 DataGrid The Last ADO to cover in this manual. DataGrids are objects used to display Data in a fashionable way. You can actually set the outlook of your DataGrid to different styles. The most important attributes of the DataGrid are ‘DataSource’ and ‘DataBind( )’ To illustrate its functionality, lets bind a DataGrid to the “Unpaid_Orders” Table in the former DataSet. Steps: 1. Do Drag/Drop a DataGrid object from “ToolBox/Web Forms” bar 2. In the “Design” mode, click the DataGrid and do set some of its properties such as: o Header o ItemStyle o AlternatingItemStyle o AllowPaging / PageSize / PagerStyle o ….. o - Refer to the “DataGrid” topic in your MSDN for a complete set of DataGrid’s properties and methods 3. Set the “DataSource” property and the “DataBind( )” method. DataGrid1.DataSource = myDataSet.Tables["UnpaidOrders"];
DataGrid1.DataBind(); 4. Execute
52