Let's begin by examining some basic information about servlets. The Java Servlet
Specification2 defines a servlet as a: …Java technology based Web ...
Jun 10, 2009 - 2American University in Cairo, Computer Science Department. AUC Avenue ... to make sure that there are no security violations. For example ...
Introduction to Java application development for DB2 1. Supported drivers for .....
DB2 technical library in hardcopy or PDF format. 370. Ordering .... application
programming on DB2 Database for Linux, UNIX, and Windows. v “Installing the
IBM ...
901 San Antonio Road. Palo Alto, CA 94303 USA. 415 960-1300 fax 415 969-
9131. A Division of Sun Microsystems, Inc. Java™ Servlet API. Specification.
Jan 2, 2001 ... Send comments about this document to: [email protected]. JDBC™ 3.0
Specification. Final Release. Jon Ellis & Linda Ho with Maydene ...
Thread-safe Collections. ⢠Queues. ⢠Thread Pools and Work Queues. ⢠Executor Framework. ⢠Futures. ⢠Synchron
JPA supports “The Persistence of Memory”—which is the title of a well known
Salvador Dali painting. Salvador Dalí. The Persistence of Memory. 1931.
26 Aug 1999 ... in Java. Richard Gillam. Unicode Technology group. Center for Java Technology,
Cupertino. I'm Richard Gillam from the Unicode Technology ...
4 JSP & JavaBeans ... page import="java.io.*, java.util.*" %>. Thierry Lecroq (Univ
. Rouen). JSP ... la transmission de l'exception pour un éventuel traitement.
accessibility design and development of Java Swing applications. 1 Introduction ... troduced as most of the existing tools support only web applications.
applets and applications intended to run on the Java platform or creating a clean
... THE PROGRAM(S) DESCRIBED IN THE SPECIFICATION AT ANY TIME.
Java Servlet 2.3 Specification - PROPOSED FINAL DRAFT• October 20, 2000.
Conditional GET .... Configuration of Filters in a Web Application ................... 45.
1. 1. Lecture 9: Java Servlet and JSP. Wendy Liu. CSC309F – Fall 2007. 2 ...
JavaServer Pages (JSP). 3 ... When the servlet is first requested, just before the.
There was a problem previewing this document. Retrying... Download. Connect more apps... Try one of the apps below to op
applications and provides access to session initiation protocol ... service creation, Ericsson Research has developed a composition engine that uses core IMS ...
has been applied in the development of safety-critical applications. In this paper, we propose a ... desktop computer, in a cell phone or in a security subsystem.
Designing the program from the ground up with this kind of customization in .... application in such a way as to prevent
Java Card smart card applications, using the B Method. Its main .... A Java Card applet is a class written in the Java Card subset of the Java language that.
Jan 15, 2013 ... Developing Java EE 6. MongoDB ... Developing Todo Application. – Deploying to
.... OpenShift Application using Eclipse. 1) Download Eclipse.
PDF Java Servlet Programming: Help for Server Side Java Developers (Java Series) Download ..... Language : English q ...
the column to update and the new value to put in that column. As with the ResultSet.getXXX methods, the parameter design
Developing Data-Driven Applications Using JDBC and Java Servlet ...
paper will provide server-side Java examples that you can use to build Web
applications ... Web applications using Java Servlet™ and Java Server Pages™.
Paper 49-28
Developing Data-Driven Applications Using JDBC and Java Servlet/JSP Technologies Chad Ferguson, SAS Institute Inc., Cary, NC Sandra Brey, SAS Institute Inc., Cary, NC
use a TextEntry as your cell editor and then you can set a validator to maintain the valid values during the data entry process.
ABSTRACT Many enhancements have been made to the SAS Java component library available with Version 3 of AppDev Studio™ (ADS). Several of the improvements include the development of new TransformationBeans™ and JDBC™ adapters for building custom table and form-based, data-driven applications. This paper will provide server-side Java examples that you can use to build Web applications which will allow the end user to: • edit data via a table or a custom form • sort the data • navigate through the data using a flexible NavigationBar component • filter the data • add computed items • export the data to Excel • and much more.
The TableView’s model must implement Java’s Swing TableModel interface. The SAS component library provides multiple adapters for the TableView that allow it to connect to different data sources. One of these adapters is the JDBCToTableModelAdapter, which allows the TableView to take advantage of the JDBC technology and communicate with a relational database or data source. If you are interested in building Web applications for data entry or editing, you will also want to take a look at the DataBeanForm component. This component is also new to Version 3 and allows the end user to view and edit data from a JDBC data source as well. Unlike the TableView component which presents data in a spreadsheet view, the DataBeanForm is used to build form-based Web applications that display or edit one row of data at a time. The DataBeanForm also takes advantage of the NavigationBar component’s functionality, allowing the end user to scroll through the data row by row. Using the GoTo field which is part of the NavigationBar, the end user can also enter the row number they want to scroll directly to – a short cut which quickly gets them to the right place in their data.
INTRODUCTION Due to the increased need for Web-based applications, Version 3 of ADS includes enhanced support for developing data-driven Web applications using Java Servlet™ and Java Server Pages™ (JSP) technology. The new release includes new component viewers that can access relational data sources via JDBC™ technology. Using WebAF™, AppDev Studio’s interactive Java development environment, you can easily create a Java Servlet or JSP project by dragging and dropping the desired components onto the servlet or JSP. The servlet or custom tag code will be generated automatically for you.
The model for the DataBeanForm is a databean generated by WebAF’s DataBean Wizard. The DataBean Wizard creates a JavaBean which models a row in your data source and provides properties for selected columns in the data source. The databean’s properties are then set on various form elements within the DataBeanForm.
This paper will focus on the powerful TableView component and how it is used to display data from JDBC data sources. Other components in the SAS Java component library will be described as well, such as the DataBeanForm, JDBC adapters, and various data selectors.
The JDBC adapters that are new with Version 3 of ADS allow JDBC data sources to be models for a variety of viewers requiring Java’s Swing models. In addition to the TableView, the JDBCToTableModelAdapter can also be used by many of the new chart components in ADS. Other JDBC adapters available in ADS are: • JDBCToTreeModelAdapter for viewers requiring a Java Swing TreeModel • JDBCToListModelAdapter for viewers requiring a Java Swing ListModel • JDBCToComboBoxModelAdapter for viewers requiring a Java Swing ListModel.
Extending on the TableView component, the TableViewComposite is a composite component. It is made up of several sub-components, including the TableView, which assist in the manipulation of the data. The NavigationBar component, for example, assists the TableView in scrolling through the rows or columns of data. The TableView allows you to set the number of rows and/or columns that will be visible on each page. Using the visible controls displayed by the NavigationBar, the end user can scroll forward and backwards through the pages of data. Another component, the RelationalMenuBar, gives you an area in the table to display any desired data selectors. The data selectors work in conjunction with the TableView to allow functionality such as filtering the data, adding computed items, sorting the data and exporting the data to Excel. The TableView also allows you to set cell renderers on a per cell basis. This gives you a way to customize the TableView and display your data any way that you like.
Also new in Version 3 of ADS is a set of BusinessQuery adapters. These adapters use an Intelligent Query technology which provides a business view of the data where the end user is unaware of where physical data is located. Similar to the JDBC adapters, these will allow you to use Intelligent Query data sources as models for a variety of viewers. The TableView, for example, uses the BusinessQueryToTableModelAdapter. The examples in this paper will use tag extensions from the SAS Custom Tag Library. The tag extensions allow you to take advantage of the TransformationBeans without knowing the required APIs for the underlying TransformationBeans. For more information on SAS custom tags, refer to the paper, Introduction to the SAS Custom Tag Library.
An exciting new feature in the TableView for Version 3 is editing. This allows you to build Web-based servlet or JSP applications which enable the end user to edit data via HTML. The data may be edited one row at a time or all at once (like a spreadsheet). When editing, you can set a cell editor which gives you more control over valid values. For example, you can use a ChoiceBox as your cell editor and the ChoiceBox will contain a list of valid values to choose from while editing a particular cell. Or you can
The examples will also make use of the Model 2 or M-V-C (ModelView-Controller) architecture. The Model 2 architecture allows you
-1-
to separate the business logic from the presentation. Basically, the code needed to control the flow of the application or initialization of the data models can be put into a servlet. Other responsibilities of the controller servlet include managing the application state and verifying authentication and security. The JSP should be responsible for producing the HTML for the Web browser. Thus, the code for the viewers, such as the TableView, should be put into the JSP.
any manipulation of the data would be lost. Sections of code such as this should be added to the controller servlet.
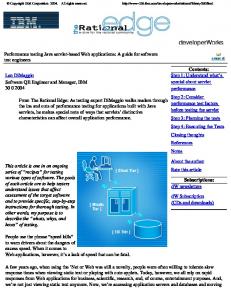
DISPLAYING THE DATA Now that you have connected to a JDBC data source, the next step is to display the data in a viewer such as the TableView component. The TableView component displays the data in an HTML table. In the following example, we assume the controller servlet has already been set up and an instance of the JDBCToTableModelAdapter has been place on the session object as “tableModel”. We use the TableView custom tag and display all rows and columns of the data source. Then we simply attach the data model to the TableView and entire data source is displayed in the browser.
CONNECTING TO A JDBC DATA SOURCE New to Version 3 of ADS are a group of adapters that translate the JDBC data model into one of Java’s Swing models. These adapters can be found in the com.sas.storage.jdbc package of our API. These adapters help in translating the JDBC data models into a model that can be used by one of our many viewers.
The JDBC adapters require a model object that implements the java.sql.Connection interface, such as the com.sas.storage.jdbc.JCBCConnection. The JDBCConnection class allows you to set the information needed to create a java.sql.Connection object, which it creates using the appropriate java.sql.DriverManager create methods. In addition to the Connection object, the adapters also need the sql query select statement specified. The adapters can connect to any type of JDBC data source. The following sample of code shows how to connect to a SAS DataSet through the SAS IOM Server. The instantiated JDBCToTableModelAdapter can then be used as the model for the TableView component.
Figure 1. Default TableView
HttpSession session = request.getSession(); JDBCToTableModelAdapter tableModel = (JDBCToTableModelAdapter)session. getAttribute(“tableModel”); if (tableModel == null) { JDBCConnection connection = new JDBCConnection(); connection.setDriverName( “com.sas.rio.MVADriver”); connection.setDatabaseURL( “jdbc:sasiom://localhost:5310”); String query = “select * from sasuser.class”; tableModel = new JDBCToTableModelAdapter( connection, query); session.setAttribute(“tableModel”, tableModel); }
As you can see in the image, the table is displayed with the default look. The table can be modified with different html styles to change the default look. There are also cell renderers that can be used on a per cell basis to modify the default look of the TableView. For more information on what cell renderers are available and how they are used you can view the API for the com.sas.servlet.tbeans.tableview.html package.
ACTIONS ON THE VIEWER To take full advantage of the functionality of the TableView, you can use the TableViewComposite component along with the ActionProvider framework. Using all this together, the default actions on the TableView and NavigationBars are active. These actions include sorting and scrolling. The TableViewComposite is a composite component which is a group of subcomponents. The subcomponents include the TableView component, NavigationBar components, and a MenuBar component. The components work in conjunction to manipulate the data source. For example, the NavigationBar provides controls to scroll back and forth through the rows and/or columns of the data source.
The JDBCToTableModelAdapter and TableView will work best with JDBC drivers that create scrollable result sets. This is because the TableView will need to scroll backwards to support all the scrolling capabilities. However, the JDBCToTableModelAdapter can handle the scroll backward features of the TableView even if the JDBC driver supports forward-only result sets (ResultSet.TYPE_FORWARD_ONLY). This is accomplished by reapplying the query when needed. There is a performance penalty for doing this since the server has to reapply the query and adapter has to be reinitialized.
The ActionProvider framework is an integrated set of classes that work with JSP component viewers to provide actions for each renderable portion of the view. The framework also provides mechanisms for customizing viewer functionality. For more information on the ActionProvider framework, you can refer to the HttpActionProvider API. The recommended use of the ActionProvider is to place it in the controller servlet of your application. The code would look like:
In the previous example, you will notice that we check the session object for an instance of the JDBCToTableModelAdapter and then later we set the instance of the JDBCToTableModelAdapter on the session object. This is done to prevent a new instance of the JDBCToTableModelAdapter every time. If a new instance of the JDBCToTableModelAdapter is created every time, then the TableView would always display the data in the initial state and
HttpActionProvider actionProvider = session.getAttribute(“actionProvider”); if (actionProvider == null) {
2
actionProvider = new HttpActionProvider(); session.setAttribute(“actionProvider”, actionProvider);
Sort the table by a specific column. Nested sorting is supported by default as you continue to click on additional columns. The last column selected is used as the primary sort key. Rearranging the order of the columns in the table using the Move command.
BUSINESSQUERY ADAPTERS In addition to the JDBC adapters, there are also a set of BusinessQuery adapters. The BusinessQuery adapters help integrate the viewers with the new Business Intelligence Platform. Before reviewing these adapters, a brief summary of the BusinessQuery is useful. The BusinessQuery is an integral part of the Intelligent Query Services. Intelligent Query (IQ) is a set of components that provide all aspects of query functionality resulting in the correct information to the right people. A key aspect of this functionality is meta-driven queries. IQ includes components that leverage the information provided by the metadata, components for creating and updating this metadata, as well as ad-hoc query components. IQ leverages the knowledge stored in the physical data and metadata. Some examples include where data is stored, joins, calculations, and database specific knowledge. The BusinessQuery covers both relational tables and cubes.
Once again you will see that we use the session object and place the ActionProvider on the session. This is so that the custom tags can use and reference the ActionProvider. Now that we have an ActionProvider and JDBCToTableModelAdapter, we can put it all together in the JSP with the TableViewComposite.
These BusinessQuery adapters work in much the same way as the JDBC adapters. Instead of beginning with a JDBC ResultSet, you can start with a BusinessQuery. That BusinessQuery can then be transformed, via the adapters, into a number of different models. For example, the TableView can use the BusinessQueryToTableModelAdapter. There are many advantages to using IQ technology in a Web application, such as the ability to Filter and Rank the results. While this technology is new it builds on the JDBC technology. The Query is defined through the IQ Service, but the relational data is returned to the application in the form of a JDBC ResultSet. The adapter conveniently executes the BusinessQuery and transforms the JDBC ResultSet to whatever model is needed by the various viewers.
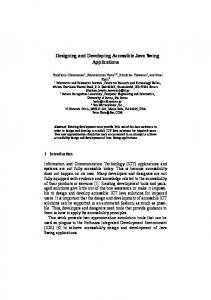
Figure 2. Column Scrollers
The next code sample shows how to connect to a data source via one of the new BusinessQuery adapters: BusinessQueryToTableModelAdapter tableModel = (BusinessQueryToTableModelAdapter) session.getAttribute(“tableModel”); if (tableModel == null) { System.setProperty(“java.security.policy”, ”C:\\AppDevStudio\\WebAF\\ resources\\policy”); System.setProperty( “java.security.auth.policy”, ”C:\\AppDevStudio\\WebAF\\ resources\\auth.policy”); System.setProperty( “java.security.auth.login.config”, ”C:\\AppDevStudio\\WebAF\\ resources\\login.config”); System.setProperty(“cache.auth.policy”, ”true”);
Figure 3. Row Scrollers
Figure 4. Default Pop-up Menus The previous three figures show the default actions that become visible when using an ActionProvider and JDBCToTableModelAdapter. In figures 2 and 3, you can see the default NavigationBar that displays at both the top and bottom of the table. The NavigationBar enables the user to easily scroll through the remaining rows or columns that are not currently visible in the table. Figure 4 shows the default items that are available on the popup menu when the user clicks on a column label in the table. Using these actions you can
once(similar to a spreadsheet). The default mode is to edit in the single row mode. To enable editing, editing options must be set on both the model must be enabled on the model (JDBCToTableModelAdapter) and the viewer (TableView). The following code shows how to enable editing on the model:
tableModel = new JDBCToTableModelAdapter(connection, query); tableModel.setReadOnly(false);
InformationMap informationMap = queryService.getInformationMap( sessionContext, new PathURL( “SBIP://Repository/BIP Tree/ Organization(BriefInformationMap)”));
and on the viewer:
DataSelection dataSelection = DataSelectionFactory.newDataSelection( informationMap); List items = informationMap.getObjects( false, DataItem.class); dataSelection.addResultItems(items, Role.COLUMN); BusinessQueryToTableModelAdapter tableModel = new BusinessQueryToTableModelAdapter( dataSelection); session.setAttribute(“tableModel”, tableModel); } The following images show the default actions that are available when connecting to the BusinessQueryToTableModelAdapter.
Figure 6. SingleRow Edit Mode In Figure 6 you can see the edit actions enabled. Each row has a set of actions to edit that row. In this figure, you can notice that row 2 is the only row that is editable. The followingPage: 4 Makes the given row editable. In Figure 6, the pencil has nd been clicked on row 2. This is why the 2 row is editable. Deletes the given row. Commits changes. Cancels changes. Inserts a row. When the “+” image is on the row, then a new row is inserted above the given. When the “+” image is at the end, as pictured in Figure 6, then the new row will be add at the default location in the model.
Figure 5. BusinessQuery Pop-up Menus Because of the IQ layer that we’ve added to this example, there are many more default actions available to the end user when the popup menu is invoked on an item in the table. Along with sorting and moving items, there are default selectors that display. These selectors enable the end user to: • Add new calculated items • Create filters to subset the data displayed in the table • Apply ranking criteria to view things like “top 10” or “bottom 5 percent” • Specify row or column totals • Change what is displayed on the columns and rows of the table using the Query selector • Export data to excel
To change the edit mode and place the TableView in all rows edit mode, then you can use the following code:
EDITING The new TableView in Version 3 allows you to create an HTML editable table. The TableView has two modes of editing: • single row mode which allows the end user to edit one row at a time • all row mode which allows all rows to be edited at
4
Company:
Department:
Name:
ID:
Title:
Contained within the DataBeanForm are SAS Version 3 Form elements. The name attribute of these form elements should be set to correspond to a property of the databean. This is how the DataBeanForm determines which databean property to access and set on the form element. In the example above sas:TextEntry tags are used, but any of the SAS Version 3 form element tags can be used within the DataBeanForm tag. The NavigationBar provided with the DataBeanForm allows the end user to scroll through the data row by row. The end user can also “page” forward or backward a specified number of rows, or use the go to field to quickly move to a specific row when the JDBC driver support scrollable result sets. Forward-only result sets may also be used with the DataBeanForm, but row navigation will be limited, with the row paging, back buttons, and go to rows being disabled. You can provide editing capability in the DataBeanForm when the JDBC driver you are using supports result sets that can be updated. As illustrated in the example above, you need to set the resultSetConcurrency attribute in the DataBean tag to java.sql.ResultSet.CONCUR_UPDATABLE. By default the
5
databean is read only. When editing is enabled the DataBeanForm’s editing buttons are visible and enabled. This allows the end user to update, insert and delete rows.
CONCLUSION AppDev Studio gives application developers a simple way to build data-driven Web applications that utilizes JDBC technologies. Using a combination of the new TransformationBeans available in Version 3 – tables, charts, treeviews, listboxes, comboboxes and more – combined with the new JDBC adapters, you can easily build sophisticated data-driven applications using server-side Java.
ADDITIONAL RESOURCES AVAILABLE The AppDev Studio Developer’s Web site is designed to help you develop and implement enterprise applications that use the power of SAS software to support information delivery and decision making. The AppDev Studio Developer’s Web site is continuously updated with new information, including comprehensive tutorials, how-to topics, and technical papers. A snapshot of the AppDev Studio Developer’s Web site is installed to you local Web server when you install AppDev Studio. You can always access the most current version of this site at http://support.sas.com/rnd/appdev/index.htm.
CONTACT INFORMATION Your comments and questions are valued and encouraged. Contact the authors at: Chad Ferguson SAS Institute Inc. Work Phone: (919) 531-6127 Email: [email protected] Sandra Brey SAS Institute Inc. Work Phone: (919) 531-2544 Email: [email protected]