Advanced Life Support done by professionals includes many other steps, including .... A tablet PC with a touch screen to allow interaction between the user and the system. .... use of the combo pillow, the manual head tilt and chest compressions. ..... A limitation of the single value aquisition mode triggered by the timer in the ...
Hochschule f¨ ur Angewandte Wissenschaften Hamburg Fachbereich Naturwissenschaftliche Technik
Development and Testing of a Basic Life Support System Providing Just-in-Time Training for Lay Responders Diplomarbeit im Studiengang Medizintechnik vorgelegt von Matthias G¨orges Hamburg, Salt Lake City am 22.06.2004
Gutachter: Prof. Dr. Kay F¨orger (HAW-Hamburg) Prof. Dr. Dwayne R. Westenskow (University of Utah)
Die Diplomarbeit wurde betreut und erstellt im Department of Anesthesiology, University of Utah, Salt Lake City, USA
Acknowledgments I’d like to express my thanks to all the people who made my research work possible and supported me during my time in the Bioengineering Lab, Anesthesia Department, University of Utah. First of all I would like to thank Prof. Dwayne Westenskow, Ph.D., Director of the Bioengineering division in the Anesthesia department for inviting me to his lab and giving me the opportunity to work on this project for my thesis. As my advisor in Salt Lake City, his advice and support were invaluable. His ideas, encouraging comments and always having an open ear for me were really helpful. I would also like to thank Prof. Dr. Kay F¨orger, my advisor from the Hochschule f¨ ur Angewandte Wissenschaften Hamburg. It was always helpful to talk to him, especially during the final phase of my thesis. The ability to call and e-mail him anytime if necessary gave me security while writing my thesis when I was not able to talk to him in person. Thanks for your help with the bureaucratic aspects of writing my thesis. Your help with revisions helped to make some sections a lot clearer. I would also like to thank Dipl.-Ing. Kai K¨ uck, Ph.D., for lecturing “Intensive Care Instrumentation and Monitoring” and providing me with a contact to this lab, as I would never have gotten here without him. His thoughts and comments during the weekly group meeting were valuable and always beneficial for the discussion. I am most thankful to Lara Brewer for editing this thesis and for her help with the studies. Thanks to the Anesthesia department staff and my Lab fellows: Darryl Zitting, Nishant Gopalakrishnan, Rachana Visaria and Sandeep Manyam. Thanks to Srinath Lingutla, Santosh Balakrishnan and Noah Syroid for discussions about the modelling, Frank Drews, Ph.D. and Joseph Orr, Ph.D. for tips and discussions, Jim Agutter, Ph.D. for the animations, Diane Tyler, R.N. for helping me with the studies and Steve Bott, M.D. for letting us do the preliminary OR studies. Finally I would like to thank my parents who supported my time in the United States. Knowing they became comfortable with letting me go abroad for a long time made my work in the lab and the writing of this thesis a lot easier. Their support, especially during the final phase of writing, was very helpful and invaluable. Thank you for encouraging me to take this step and for helping me become the person I am today.
Contents
1. Introduction
1
2. Therories for Cardiopulmonary Resuscitation and Just-In-Time Training 2.1. American Heart Association Guidelines for Basic Life Support . . . . . 2.1.1. The ABC (D) [5][35] . . . . . . . . . . . . . . . . . . . . . . . . 2.1.1.1. A as in Airway . . . . . . . . . . . . . . . . . . . . . . 2.1.1.2. B as in Breathing . . . . . . . . . . . . . . . . . . . . 2.1.1.3. C as in Circulation . . . . . . . . . . . . . . . . . . . . 2.1.1.4. D as in Defibrillation [6] . . . . . . . . . . . . . . . . . 2.1.2. Chest Compressions Only CPR . . . . . . . . . . . . . . . . . . 2.2. Target group for this project . . . . . . . . . . . . . . . . . . . . . . . 2.3. Language Based Instructions . . . . . . . . . . . . . . . . . . . . . . . 2.4. Just-In-Time Training Using Animations . . . . . . . . . . . . . . . . . 2.5. Tools that Support CPR . . . . . . . . . . . . . . . . . . . . . . . . . .
. . . . . . . . . . .
. . . . . . . . . . .
. . . . . . . . . . .
. . . . . . . . . . .
3 3 3 3 3 3 4 4 5 5 6 6
3. Components of the Basic Life Support System 3.1. Overview . . . . . . . . . . . . . . . . . . . . . . . . . . . . . 3.1.1. Components in this Basic Life Support System . . . . 3.1.2. Additional Components Used in the Studies . . . . . . 3.2. Description of the Individual Components . . . . . . . . . . . 3.2.1. Masks . . . . . . . . . . . . . . . . . . . . . . . . . . . 3.2.2. Oxygen tank . . . . . . . . . . . . . . . . . . . . . . . 3.2.3. Head strap . . . . . . . . . . . . . . . . . . . . . . . . 3.2.4. Pillow . . . . . . . . . . . . . . . . . . . . . . . . . . . 3.2.4.1. Combo pillow . . . . . . . . . . . . . . . . . 3.2.4.2. Using a Bicycle Helmet As the Combo Pillow 3.2.5. Tablet PC . . . . . . . . . . . . . . . . . . . . . . . . . 3.2.6. The Animations . . . . . . . . . . . . . . . . . . . . . 3.2.7. Sensors . . . . . . . . . . . . . . . . . . . . . . . . . . 3.2.8. Automatic External Defibrillator (AED) . . . . . . . . 3.2.8.1. Introduction . . . . . . . . . . . . . . . . . . 3.2.8.2. Zoll AED . . . . . . . . . . . . . . . . . . . . 3.2.9. Artificial Airways . . . . . . . . . . . . . . . . . . . . . 3.2.10. Novametrix CO2 SMO . . . . . . . . . . . . . . . . . . 3.2.11. Fluke Gas Flow Analyzer . . . . . . . . . . . . . . . . 3.2.12. Laerdal Little Anne CPR Training Manikin . . . . . . 3.2.12.1. Modifications of the Little Anne . . . . . . . 3.2.12.2. The Circuit . . . . . . . . . . . . . . . . . . . 3.2.12.3. Calibration . . . . . . . . . . . . . . . . . . . 3.2.12.4. Logging Software . . . . . . . . . . . . . . . .
. . . . . . . . . . . . . . . . . . . . . . . .
. . . . . . . . . . . . . . . . . . . . . . . .
. . . . . . . . . . . . . . . . . . . . . . . .
. . . . . . . . . . . . . . . . . . . . . . . .
7 7 7 7 7 7 8 8 9 10 10 10 11 11 12 12 12 13 14 14 14 14 16 16 17
I
. . . . . . . . . . . . . . . . . . . . . . . .
. . . . . . . . . . . . . . . . . . . . . . . .
. . . . . . . . . . . . . . . . . . . . . . . .
. . . . . . . . . . . . . . . . . . . . . . . .
. . . . . . . . . . . . . . . . . . . . . . . .
Contents 4. Human Factors Studies 4.0.1. Studies in this Chapter . . . . . . . . . . . . . . . . . 4.0.2. Structure of the tests . . . . . . . . . . . . . . . . . . . 4.1. Mask Assortment Study . . . . . . . . . . . . . . . . . . . . . 4.1.1. Purpose of this Study . . . . . . . . . . . . . . . . . . 4.1.2. Test setting . . . . . . . . . . . . . . . . . . . . . . . . 4.1.3. Results . . . . . . . . . . . . . . . . . . . . . . . . . . 4.1.3.1. Times to Place Mask and Head Strap . . . . 4.1.3.2. Correct Placement of the Masks . . . . . . . 4.1.4. Conclusion . . . . . . . . . . . . . . . . . . . . . . . . 4.2. Head Strap Design Selection Study . . . . . . . . . . . . . . . 4.2.1. Purpose of this Study . . . . . . . . . . . . . . . . . . 4.2.2. Test setting . . . . . . . . . . . . . . . . . . . . . . . . 4.2.3. Results . . . . . . . . . . . . . . . . . . . . . . . . . . 4.2.3.1. Times to Place Mask . . . . . . . . . . . . . 4.2.3.2. Correct Head Strap Use . . . . . . . . . . . . 4.2.3.3. Errors Made in Using the Head Straps . . . 4.2.4. Conclusion . . . . . . . . . . . . . . . . . . . . . . . . 4.3. Animation Just-In-Time Training Study . . . . . . . . . . . . 4.3.1. Purpose of this Study . . . . . . . . . . . . . . . . . . 4.3.2. Test Setting . . . . . . . . . . . . . . . . . . . . . . . . 4.3.3. Results . . . . . . . . . . . . . . . . . . . . . . . . . . 4.3.3.1. Errors Using the Equipment . . . . . . . . . 4.3.3.2. Head Tilt Quality . . . . . . . . . . . . . . . 4.3.3.3. Mask Seal . . . . . . . . . . . . . . . . . . . . 4.3.3.4. Average Time to Give One Effective Breath 4.3.4. Manual Head Tilt Animations Conclusions . . . . . . 4.3.5. Pillow Conclusions . . . . . . . . . . . . . . . . . . . . 4.4. Objective assessment of pillow function . . . . . . . . . . . . 4.4.1. Purpose of this Study . . . . . . . . . . . . . . . . . . 4.4.2. Test setting . . . . . . . . . . . . . . . . . . . . . . . . 4.4.3. Results . . . . . . . . . . . . . . . . . . . . . . . . . . 4.4.4. Conclusions . . . . . . . . . . . . . . . . . . . . . . . . 4.5. Improved Animations study . . . . . . . . . . . . . . . . . . . 4.5.1. Purpose of this Study . . . . . . . . . . . . . . . . . . 4.5.2. Test Setting . . . . . . . . . . . . . . . . . . . . . . . . 4.5.3. Results . . . . . . . . . . . . . . . . . . . . . . . . . . 4.5.3.1. Errors in Use of Equipment . . . . . . . . . . 4.5.3.2. Head Tilt . . . . . . . . . . . . . . . . . . . . 4.5.3.3. Mask Seal . . . . . . . . . . . . . . . . . . . . 4.5.3.4. Volume of Inspired / Expired Air and Leak 4.5.3.5. Average Time to Give One Effective Breath 4.5.4. Conclusions . . . . . . . . . . . . . . . . . . . . . . . . 4.6. The Final Combo Pillow Study . . . . . . . . . . . . . . . . . 4.6.1. Purpose of this Study . . . . . . . . . . . . . . . . . . 4.6.2. Test Setting . . . . . . . . . . . . . . . . . . . . . . . . 4.6.3. Results . . . . . . . . . . . . . . . . . . . . . . . . . . 4.6.3.1. Equipment Handling . . . . . . . . . . . . . . 4.6.3.2. Head Tilt Quality . . . . . . . . . . . . . . . 4.6.3.3. Applied Mask Seal Pressure . . . . . . . . . . 4.6.3.4. Volumes of the Successful Breaths . . . . . .
II
. . . . . . . . . . . . . . . . . . . . . . . . . . . . . . . . . . . . . . . . . . . . . . . . . .
. . . . . . . . . . . . . . . . . . . . . . . . . . . . . . . . . . . . . . . . . . . . . . . . . .
. . . . . . . . . . . . . . . . . . . . . . . . . . . . . . . . . . . . . . . . . . . . . . . . . .
. . . . . . . . . . . . . . . . . . . . . . . . . . . . . . . . . . . . . . . . . . . . . . . . . .
. . . . . . . . . . . . . . . . . . . . . . . . . . . . . . . . . . . . . . . . . . . . . . . . . .
. . . . . . . . . . . . . . . . . . . . . . . . . . . . . . . . . . . . . . . . . . . . . . . . . .
. . . . . . . . . . . . . . . . . . . . . . . . . . . . . . . . . . . . . . . . . . . . . . . . . .
. . . . . . . . . . . . . . . . . . . . . . . . . . . . . . . . . . . . . . . . . . . . . . . . . .
. . . . . . . . . . . . . . . . . . . . . . . . . . . . . . . . . . . . . . . . . . . . . . . . . .
19 19 20 20 20 20 20 20 20 22 22 22 22 22 22 23 23 23 25 25 25 25 25 26 26 28 28 29 29 29 30 30 31 32 32 32 32 32 33 33 35 35 37 38 38 38 39 39 39 40 40
Contents 4.6.3.5. Average Times to Complete the Different Task in this 4.6.4. Conclusion . . . . . . . . . . . . . . . . . . . . . . . . . . . . . 4.7. First Preliminary Operating Room Study . . . . . . . . . . . . . . . . 4.7.1. Purpose of the study . . . . . . . . . . . . . . . . . . . . . . . . 4.7.2. Test setting . . . . . . . . . . . . . . . . . . . . . . . . . . . . . 4.7.3. Results . . . . . . . . . . . . . . . . . . . . . . . . . . . . . . . 4.7.4. Conclusions . . . . . . . . . . . . . . . . . . . . . . . . . . . . . 4.8. Second Preliminary Operating Room Study . . . . . . . . . . . . . . . 4.8.1. Purpose of the study . . . . . . . . . . . . . . . . . . . . . . . . 4.8.2. Test setting . . . . . . . . . . . . . . . . . . . . . . . . . . . . . 4.8.3. Results . . . . . . . . . . . . . . . . . . . . . . . . . . . . . . . 4.8.4. Conclusions . . . . . . . . . . . . . . . . . . . . . . . . . . . . . 4.9. Chest Compression Animation Study . . . . . . . . . . . . . . . . . . . 4.9.1. Purpose of this Study . . . . . . . . . . . . . . . . . . . . . . . 4.9.2. Test Setting . . . . . . . . . . . . . . . . . . . . . . . . . . . . . 4.9.3. Results . . . . . . . . . . . . . . . . . . . . . . . . . . . . . . . 4.9.3.1. Hand Placement Location . . . . . . . . . . . . . . . . 4.9.3.2. Time to the First Compression . . . . . . . . . . . . . 4.9.3.3. Body and Hand Position . . . . . . . . . . . . . . . . 4.9.3.4. Compression Frequency . . . . . . . . . . . . . . . . . 4.9.3.5. Compression Depth . . . . . . . . . . . . . . . . . . . 4.9.3.6. Exhaustion . . . . . . . . . . . . . . . . . . . . . . . . 4.9.4. Conclusion . . . . . . . . . . . . . . . . . . . . . . . . . . . . . 4.10. Are Headrest and Animations Equivalent to CPR Training Study . . . 4.10.1. Purpose of this Study . . . . . . . . . . . . . . . . . . . . . . . 4.10.2. Test Setting . . . . . . . . . . . . . . . . . . . . . . . . . . . . . 4.10.3. Results . . . . . . . . . . . . . . . . . . . . . . . . . . . . . . . 4.10.3.1. Statistical Information on the Students . . . . . . . . 4.10.3.2. Compression to Ventilation Ratio . . . . . . . . . . . 4.10.3.3. Steps Before Starting CPR . . . . . . . . . . . . . . . 4.10.3.4. Head Tilt Quality . . . . . . . . . . . . . . . . . . . . 4.10.3.5. Hand Placement Location . . . . . . . . . . . . . . . . 4.10.3.6. Instructions in the CPR Schema Followed Correctly . 4.10.3.7. Compression Depth . . . . . . . . . . . . . . . . . . . 4.10.3.8. Compression Frequency . . . . . . . . . . . . . . . . . 4.10.3.9. Duration of the Sets . . . . . . . . . . . . . . . . . . . 4.10.3.10.Exhaustion . . . . . . . . . . . . . . . . . . . . . . . . 4.10.4. Conclusion . . . . . . . . . . . . . . . . . . . . . . . . . . . . .
Study . . . . . . . . . . . . . . . . . . . . . . . . . . . . . . . . . . . . . . . . . . . . . . . . . . . . . . . . . . . . . . . . . . . . . . . . . . . . . . . . . . . . . . . . . . . . . . . . . . . . . . . . . . . . . . . . . . . . . . . . . . . . . . . . . . . . . . . . . . . . . . . . . . . .
42 42 43 43 43 44 44 44 44 44 44 44 44 44 45 45 45 45 46 46 46 48 48 49 49 49 50 50 51 51 51 53 53 53 53 56 56 56
5. Modeling 5.1. Chest Compression Model . . . . . . . . . . . . . . . . . . . . . . . . . . . . . 5.1.1. Overview . . . . . . . . . . . . . . . . . . . . . . . . . . . . . . . . . . 5.1.2. Equations Used for the Model . . . . . . . . . . . . . . . . . . . . . . . 5.1.2.1. Calculating the Flows . . . . . . . . . . . . . . . . . . . . . . 5.1.2.2. Calculating the Pressures . . . . . . . . . . . . . . . . . . . . 5.1.2.3. Calculating the Volumes . . . . . . . . . . . . . . . . . . . . 5.1.3. Validation . . . . . . . . . . . . . . . . . . . . . . . . . . . . . . . . . . 5.1.4. General Results of the Babbs Circulation Model Usage . . . . . . . . . 5.1.5. Applying the Model to the High School Study Compression Results. . 5.1.5.1. Converting the Depths to Internal Pressures . . . . . . . . . 5.1.5.2. Modifiying the Babbs Matlab Model for using external files for the chest pressure waveforms . . . . . . . . . . . . . . . .
58 58 58 58 58 59 60 60 62 62 62
III
63
Contents 5.2. Blood Pressures and Cardiac Outputs Produced by the High School Students 5.3. Gas Exchange Model . . . . . . . . . . . . . . . . . . . . . . . . . . . . . . . . 5.3.1. Overview . . . . . . . . . . . . . . . . . . . . . . . . . . . . . . . . . . 5.3.2. Equations Used in This Model . . . . . . . . . . . . . . . . . . . . . . 5.3.2.1. Gas Flow to the Lungs . . . . . . . . . . . . . . . . . . . . . 5.3.2.2. Calculating the Arterial Gas Content . . . . . . . . . . . . . 5.3.2.3. Mass Balance Equations for Brain and Tissue . . . . . . . . 5.3.2.4. Calculating Venous Blood Concentrations . . . . . . . . . . . 5.3.2.5. Helper equations . . . . . . . . . . . . . . . . . . . . . . . . . 5.3.2.6. Validation of the Model . . . . . . . . . . . . . . . . . . . . . 5.3.2.7. Combining the Gas Exchange Model With the Circulation Model . . . . . . . . . . . . . . . . . . . . . . . . . . . . . . . 5.4. Pressures and Saturations Obtained By Three Minutes of 15:2 Ratio CPR . . 5.5. Pressures and Saturations Obtained by Three Minutes of Chest Compressions 5.6. Pressures and Saturations Obtained by Three Minutes of Chest Compressions with One Breath Every Minute . . . . . . . . . . . . . . . . . . . . . . . . . . 5.7. Outlook . . . . . . . . . . . . . . . . . . . . . . . . . . . . . . . . . . . . . . .
64 64 64 66 67 67 67 67 67 67 68 68 71 73 73
6. Summary
75
Bibliography
76
A. Matlab Source Code A.1. Babbs Circulation Model . . . . . . . . . . . . . . . . . . . . . . . . . A.2. Chiari Gas Exchange Model . . . . . . . . . . . . . . . . . . . . . . . . A.2.1. The Main Function . . . . . . . . . . . . . . . . . . . . . . . . . A.2.2. The Saturation Calculation Function . . . . . . . . . . . . . . . A.2.3. The Partial Pressure and Concentration Calculation Functions A.2.3.1. Carbon Dioxide Partial Pressure to Concentration . . A.2.3.2. Oxygen Partial Pressure to Concentration . . . . . . . A.2.3.3. Carbon Dioxide Concentration to Partial Pressure . .
. . . . . . . .
. . . . . . . .
. . . . . . . .
. . . . . . . .
81 81 84 84 87 87 87 88 88
B. C++ Source Code For Depth Recording Program
89
C. Example Animation Screenshots C.1. Manual Head Tilt Instructions (no ghosting) . . . C.1.1. Placing the Mask . . . . . . . . . . . . . . . C.1.2. Performing the Head Tilt . . . . . . . . . . C.1.3. Applying Pressure to the Mask . . . . . . . C.1.4. Giving Two Breaths . . . . . . . . . . . . . C.2. Instructions for the Use of the Combo Pillow . . . C.2.1. Placing the Pillow . . . . . . . . . . . . . . C.2.2. Placing the Mask . . . . . . . . . . . . . . . C.2.3. Applying Pressure and Giving Two Breaths C.3. Chest Compression Instructions . . . . . . . . . . . C.3.1. Place the Hands Correctly . . . . . . . . . . C.3.2. Showing One Compression in Detail . . . . C.3.3. Loop Compressions . . . . . . . . . . . . . .
. . . . . . . . . . . . .
92 92 92 92 92 93 93 93 93 94 94 94 95 95
D. Score Sheet Examples D.1. Combo Pillow Test . . . . . . . . . . . . . . . . . . . . . . . . . . . . . . . . D.2. Chest Compression Animation Test . . . . . . . . . . . . . . . . . . . . . . . . D.3. CPR Trained Test . . . . . . . . . . . . . . . . . . . . . . . . . . . . . . . . .
96 96 96 97
IV
. . . . . . . . . . . . .
. . . . . . . . . . . . .
. . . . . . . . . . . . .
. . . . . . . . . . . . .
. . . . . . . . . . . . .
. . . . . . . . . . . . .
. . . . . . . . . . . . .
. . . . . . . . . . . . .
. . . . . . . . . . . . .
. . . . . . . . . . . . .
. . . . . . . . . . . . .
. . . . . . . . . . . . .
. . . . . . . . . . . . .
. . . . . . . . . . . . .
List of Figures
3.1. Anesthesia mask . . . . . . . . . . . . . . . . . . . . . . . . . . . . . . . . . . 3.2. Respironics SealEasy mask . . . . . . . . . . . . . . . . . . . . . . . . . . . . 3.3. Laerdal Inflate-A-Shield . . . . . . . . . . . . . . . . . . . . . . . . . . . . . . 3.4. The wide ski goggles strap . . . . . . . . . . . . . . . . . . . . . . . . . . . . . 3.5. The adjustable double strap . . . . . . . . . . . . . . . . . . . . . . . . . . . 3.6. The adjustable tripple strap . . . . . . . . . . . . . . . . . . . . . . . . . . . . 3.7. The soft foam pillow . . . . . . . . . . . . . . . . . . . . . . . . . . . . . . . . 3.8. The styrofoam bar pillow . . . . . . . . . . . . . . . . . . . . . . . . . . . . . 3.9. The U-shaped pillow . . . . . . . . . . . . . . . . . . . . . . . . . . . . . . . . 3.10. The bar with heigthened ends . . . . . . . . . . . . . . . . . . . . . . . . . . . 3.11. The foam headrest with stiff neck piece . . . . . . . . . . . . . . . . . . . . . 3.12. The combo pillow . . . . . . . . . . . . . . . . . . . . . . . . . . . . . . . . . . 3.13. Modified bycycle helmet as combo pillow . . . . . . . . . . . . . . . . . . . . . 3.14. Tablet PC Examples . . . . . . . . . . . . . . . . . . . . . . . . . . . . . . . . 3.15. Open Zoll AED with pads . . . . . . . . . . . . . . . . . . . . . . . . . . . . . 3.16. Zoll AED pads . . . . . . . . . . . . . . . . . . . . . . . . . . . . . . . . . . . 3.17. The Mallinckrodt COPA . . . . . . . . . . . . . . . . . . . . . . . . . . . . . . 3.18. The Nellcor Combitube . . . . . . . . . . . . . . . . . . . . . . . . . . . . . . 3.19. The LMA . . . . . . . . . . . . . . . . . . . . . . . . . . . . . . . . . . . . . . 3.20. The EMS CopraPLA . . . . . . . . . . . . . . . . . . . . . . . . . . . . . . . 3.21. Fluke VT Gas Flow Analyser . . . . . . . . . . . . . . . . . . . . . . . . . . . 3.22. Novametrix CO2 SMOplus . . . . . . . . . . . . . . . . . . . . . . . . . . . . . 3.23. Laerdal Little Anne . . . . . . . . . . . . . . . . . . . . . . . . . . . . . . . . 3.24. The circuit for measuring the compression depth . . . . . . . . . . . . . . . . 3.25. The open Little Anne with A/D converter and potentiometer attached to spring 3.26. The calibration curve and reproduced calibration curve with individual measured values . . . . . . . . . . . . . . . . . . . . . . . . . . . . . . . . . . . . . 3.27. Screenshot of the data aquisition software’s GUI . . . . . . . . . . . . . . . .
8 8 8 9 9 9 9 9 9 9 9 10 11 11 13 13 13 13 13 13 15 15 15 16 16
4.1. Average times to place mask / attach headstrap including min/max ranges . 4.2. Correct mask placement . . . . . . . . . . . . . . . . . . . . . . . . . . . . . . 4.3. Average time to place the anesthesia mask with 3 different headstraps attached (including min/max ranges) . . . . . . . . . . . . . . . . . . . . . . . . . . . . 4.4. Number of students who used the headstrap correctly . . . . . . . . . . . . . 4.5. Errors while placing the mask with 3 different head straps . . . . . . . . . . . 4.6. Number of students who did not make a mistake when giving two breaths with mask . . . . . . . . . . . . . . . . . . . . . . . . . . . . . . . . . . . . . . . . . 4.7. Head tilt quality on 1st, 2nd and 3rd attempt . . . . . . . . . . . . . . . . . . 4.8. Subject delivering an effective breath at the 1st, 2nd and 3rd attempt . . . . 4.9. Average mask seal pressure and min/max ranges . . . . . . . . . . . . . . . . 4.10. Average time comparison (mean ± SD) . . . . . . . . . . . . . . . . . . . . . . 4.11. Favorite pillow selection . . . . . . . . . . . . . . . . . . . . . . . . . . . . . . 4.12. Pillow scores in the three different categories . . . . . . . . . . . . . . . . . .
21 21
V
17 18
23 24 24 26 27 27 28 29 30 31
List of Figures 4.13. Correct handling of the provided equipment . . . . . . . . . . . . . . . . . . . 4.14. Head tilt quality on first, second and third attempt . . . . . . . . . . . . . . . 4.15. Number of subjects deliverying an effective breath at the first, second and third attempt . . . . . . . . . . . . . . . . . . . . . . . . . . . . . . . . . . . . 4.16. Mask seal pressure and min/max ranges . . . . . . . . . . . . . . . . . . . . . 4.17. Subjects with audible leaks . . . . . . . . . . . . . . . . . . . . . . . . . . . . 4.18. Leaks and exhaled volume of the best breath . . . . . . . . . . . . . . . . . . 4.19. Average time comparison (mean ± SD) . . . . . . . . . . . . . . . . . . . . . . 4.20. Correct handling of the provided equipment . . . . . . . . . . . . . . . . . . . 4.21. Head tilt quality . . . . . . . . . . . . . . . . . . . . . . . . . . . . . . . . . . 4.22. Average mask seal pressure and ranges . . . . . . . . . . . . . . . . . . . . . . 4.23. Number of subjects delivering an effective breath . . . . . . . . . . . . . . . . 4.24. Expired volumes and leaks and inhaled volumes for the live victim . . . . . . 4.25. Average times and ranges for all required steps in this animation . . . . . . . 4.26. Hand placement location . . . . . . . . . . . . . . . . . . . . . . . . . . . . . . 4.27. Correct body position and hand heel contact . . . . . . . . . . . . . . . . . . 4.28. Average compression frequencies and min/max ranges . . . . . . . . . . . . . 4.29. Average compression depth and min/max ranges as well as the recommanded range . . . . . . . . . . . . . . . . . . . . . . . . . . . . . . . . . . . . . . . . . 4.30. Exhaustion and possibility to continue for two more minutes . . . . . . . . . 4.31. Time elapsed since last CPR training . . . . . . . . . . . . . . . . . . . . . . . 4.32. Duration of the last CPR training . . . . . . . . . . . . . . . . . . . . . . . . 4.33. Used compression to ventilation ratio . . . . . . . . . . . . . . . . . . . . . . . 4.34. Percentage of students performing the correct steps before starting CPR . . . 4.35. Individual head tilt quality and summary . . . . . . . . . . . . . . . . . . . . 4.36. Hand placement location . . . . . . . . . . . . . . . . . . . . . . . . . . . . . . 4.37. Misc. correctly following CPR schema instructions . . . . . . . . . . . . . . . 4.38. Average compression depth and recommanded ranges . . . . . . . . . . . . . 4.39. Average compression frequency . . . . . . . . . . . . . . . . . . . . . . . . . . 4.40. Times for the completion of 12 sets of compressions and breaths . . . . . . .
33 34
5.1. Illustration of the Babbs circulation model . . . . . . . . . . . . . . . . . . . . 5.2. Pressure waveforms of the first 15 compressions . . . . . . . . . . . . . . . . 5.3. Flow waveforms for the first 15 compressions . . . . . . . . . . . . . . . . . . 5.4. Volumes produced by the first 15 compressions . . . . . . . . . . . . . . . . . 5.5. A single compression pressure waveform of the 100th compression . . . . . . 5.6. A single compression flow waveform of the 100th compression . . . . . . . . . 5.7. Chiari gas exchange model . . . . . . . . . . . . . . . . . . . . . . . . . . . . 5.8. Partial pressures obtained by three minutes of 15:2 ratio CPR . . . . . . . . . 5.9. Saturations obtained by three minutes of 15:2 ratio CPR . . . . . . . . . . . . 5.10. Partial pressures produced by 3 minutes of chest compressions without ventilation 5.11. Oxygen concentration produced by 3 minutes of chest compressions without ventilation . . . . . . . . . . . . . . . . . . . . . . . . . . . . . . . . . . . . . . 5.12. Carbon dioxide concentration produced by 3 minutes of chest compressions without ventilation . . . . . . . . . . . . . . . . . . . . . . . . . . . . . . . . . 5.13. Saturations produced by 3 minutes of chest compressions without ventilation 5.14. Saturations after 3 minutes of chest compressions with 1 breath per minute . 5.15. Partial pressures after 3 minutes of chest compressions with 1 breath per minute
59 60 61 61 62 62 66 69 69 71
VI
34 35 36 36 37 39 40 41 41 42 43 46 47 47 48 49 50 51 52 52 53 54 54 55 55 56
72 72 72 74 74
1. Introduction Every year about 340,000 people in the United States suffer sudden cardiac death (SCD), mostly caused by ventricular fibrillation [4]. Ventricular fibrillation (VF) itself can have multiple effects that all cause lack of oxygen supply to the heart. Conditions leading to ventricular fibrillation include ischemia from coronary artery disease, shock, congenital heart disease, heart surgery, cardiomyopathy, electrocution or direct trauma to the heart [56]. If the heart is in the state of ventricular fibrillation, the best way to restore the normal heart rhythm is to deliver a shock to depolarize the heart muscle cells and hope for spontaneous reoccurrence of normal cardiac rhythm. Otherwise, chest compressions are necessary [31]. The efficacy of early defibrillation led to the placement of automated external defibrillators (AED) in public places like airports and shopping malls. Currently, the user of an AED is required to complete a training course before use. The knowledge of Cardio Pulmonary Resuscitation (CPR) skills in the US is not wide spread. The exact percentage of the population that is CPR trained nationwide is unknown [8]; the only information available is from single cities. The best-trained place is Seattle, Washington, where about 50% are trained. Seattle offers a free CPR training program (Medic II) [15] and CPR training is mandatory for high school students. Large cities such as San Francisco (6%), Los Angeles (3%) or New York City (1%) have much lower CPR/AED training rates [29]. This knowledge of CPR is decreased further by the lack of good skill retention after the training. Woollard [67] observed an increase in time to the first shock by 23% when the rescuer uses an AED 6 months after training. Some CPR skills, such as opening the airway during rescue breaths and chest compressions, were not significantly deministed. Swor [61] found even lower skill retention rates in elderly people, no matter wheter they use the simplified chest compression only approach or the regular one. Handley [35] mentions poor skill retention for professionals that don’t use their skills often. This highlights the need for the recommended refresher training every two years. It is difficult for a bystander or layperson to give correct CPR, especially as the person finds himself in a stressful situation because someone close to them collapsed and needs their immediate help. The fear of doing something wrong or worsening the victim’s condition is very strong. Even if there is telephone support provided by the emergency dispatcher of 911 (US emergency number), it is difficult for the rescuer to perform CPR [41]. Following the American Heart Association’s ABC schema is quite complex and difficult. Therefore regular CPR courses usually last 6 hours. Providing the rescuer with just-in-time training may be beneficial, as it teaches the rescuers the skills they may have forgotten since their last CPR training or may have never learned before. The aim of this thesis is to develop and test a Basic Life Support System that provides a lay responder with just-in-time training for CPR. The goal was to create a supporting system that simplifies CPR tasks and provides the user with feedback on their actions. The following chapter gives the reader a more detailed introduction into CPR basics [Chapter 2]. It is followed by a description and evolution of the components used in this system [Chapter 3] and their evaluation in studies using high school students [Chapter 4]. Subsequent chapters deal with numeric modeling of CPR processes as circulation and gas exchange and their combination with the studies’ results [Chapter 5] as well as the conclusions in the summary [Chapter 6]. The Appendix contains the source codes for the programs written in
1
1. Introduction this thesis [Appendix A and B], example screenshots of the animations [Appendix C] and example score sheets used in the studies [Appendix D].
2
2. Therories for Cardiopulmonary Resuscitation and Just-In-Time Training This chapter gives the reader an introduction into the current situation of cardiopulmonary resuscitation, the need for just-in-time training and the use of supporting tools.
2.1. American Heart Association Guidelines for Basic Life Support The American Heart Association (AHA) began teaching of CPR skills in the early 1970s. The last protocol modification advisory was made in fall 1997 [35]. These guidelines fed into the latest International CPR Guidelines in 2000 [28]. The next revision of the CPR guidelines is expected for Fall 2005. The recommendations of the CPR procedure published by the American Heart Association are followed by most of the world’s countries and organizations. As one of the last to change the protocol, the Netherlands Resuscitation Council in 2003 to go conform with the protocol used by the rest of the world [45].
2.1.1. The ABC (D) [5][35] After checking for dangers, the first and probably most important step is the activation of the emergency medical system (EMS) by calling 911 or asking another person to do so. 2.1.1.1. A as in Airway Keeping the airway open by tilting the head and performing a chin lift is the first important step to ensure oxygen delivery to the body. Checking for signs of breathing (looking for chest movements, listening for breath sounds or feeling of air leaving the victim’s nose or mouth) ensures that the victim is not breathing. After turning the victim on his back (supine position) objects causing obstructions, as dentures, mucus or vomit need to be removed from the victim’s mouth. 2.1.1.2. B as in Breathing Two effective rescue breaths, should be given to make the chest rise and fall. The rescuer should ensure the head tilt and chin lift, clamp the nose with two fingers and blow steadily into the victims mouth. If a breath is not effective, no more than 5 attempts for two successful breaths shall be made. The recommended volume of a breath is 400 − 600 ml [19] and each breath should take about 3 seconds (1.5 − 2 sec for the inflation) to avoid insufflating of the stomach. 2.1.1.3. C as in Circulation After checking for signs of circulation such as movement or feeling a heart beat, (checking the carotid pulse has been removed from the protocol), chest compressions need to be started. The heel of the hand should be placed on the sternum (breast bone) on a line connecting the two nipples with the second hand on top of it. The fingers should be interlocked to minimize the pressure area and not press on the ribs directly.
3
2. Therories for Cardiopulmonary Resuscitation and Just-In-Time Training Fifteen compressions should be made by pressing down with straight arms to a depth of 1.5 − 2 inch at a rate of about 100 compressions a minute. Compression and relaxation should take an equal amount of time. (50 : 50 ratio) The steps B and C are repeated, giving 2 breath and 15 compression cycles until the victim shows signs of life, the rescuer becomes exhausted or professional help arrives. If the rescuer is unwilling to perform mouth-to-mouth ventilations, chest compression-only cardiopulmonary resuscitation (CC-CPR) by opening the airway (step A) and then starting continuous chest compressions (step C) should be done. Oschatz [52] found no significance that lay responders break more ribs performing chest compressions, which is a common event during CPR, than professionals by posthumously x-rays. Lederer [47] argues that x-rays find less fractured ribs than autopsies but agrees that there is no bleeding caused by the fractured ribs. 2.1.1.4. D as in Defibrillation [6] The use of a defibrillator was limited to use by professionals in the past. The introduction of the automated external defibrillators (AED) has made available a method of restoring a stable heart condition if the victim has ventricular fibrillation or extreme tachycardia by delivering an electric shock by lay responders. A trained rescuer uses the AED by following the instructions to power on the AED and place the adhesive pads. The AED analyzes the heart rhythm and, if necessary, deliver a shock. If no shockable rhythm is found, the rescuer is required to continue the normal CPR algorithm for one minute until the AED asks the rescuer to clear the victim and reanalyzes the rhythm again. Wik [66] recommends to defibrilate first during the first 5 minutes of ventricular fibrillations and to give compressions only after 5 minutes (reoxygenating the myocard tissue before shocking improves the result). Gundry [33] compared naive six-grade students with trained professionals and showed that students use of the AED was only slightly slower than the professionals. The students had no previous training and were instructed only by the verbal commands and the icon instructions on the AED. This shows the potential of using animations to improve the students speed, by providing better visualisable and easier understandable instructions on the AED usage. Advanced Life Support done by professionals includes many other steps, including the use of drugs, intubation to secure the open airway and 5 : 2 compression to ventilation ratio when using a bag to deliver oxygen.
2.1.2. Chest Compressions Only CPR In the US there is a great fear of contracting infections by giving mouth-to-mouth resuscitation [21]. There are several approaches to simplify the CPR instructions and omit the contact with the unconscious person such as suggesting to use chest compression-only cardiopulmonary resuscitation (CC-CPR) (also called continuous chest compression cardiopulmonary resuscitation (CCC-CPR)). These simpler CPR techniques lead to better skill retention after training and improved their willingness to perform CPR on strangers [64]. Chest compression-only is an idea where the helper only does chest compressions at a 1 frequency of about 100 min since the oxygen supplies in the lungs and the alveolar dead space provide enough oxygen for the first couple of minutes after cardiac arrest. By performing chest compression-only, the helper moves oxygen through the body to keep the important organs like brain, kidneys and heart alive until paramedics or other trained personal arrive. A big advantage of using this method is that the cardiac output produced by compressions using this method is higher [43] due to the lack of interruptions in the compressions to deliver
4
2. Therories for Cardiopulmonary Resuscitation and Just-In-Time Training a breath. After pausing for breaths (at least 3 seconds) the blood pressure must buildup again [22]. The problem with chest compression-only CPR is that after about 3 − 4 minutes hypoxia starts to develop [64]. The quality of chest compressions decrease due to the substantial effort of giving 100 compressions a minute while pressing 2 inches down on the chest. Spontaneous gasping by the victim [37], that occurs in up to 13 of the cases, may improve the oxygenation as it provides some additional gas exchange. The chest compressions themselves create a flow of about 53 ml per compression. With the head tilted, chest compressions create 156 ml in an intubated patient [54]. There are studies that say that the oxygen may last for at least 10 minutes [41], and even a totally occluded airway doesn’t change the outcome [42], but the oxygen consumption of the tissue and the organs doesn’t stop during cardiac arrest. The time between the occurrence of the arrest and the beginning of CPR may be a couple of minutes, so it is reasonable to assume that the oxygen may be sufficient for only 3 − 5 minutes. (At the Chicago Airports the AEDs are placed a 60 − 90 second walk apart increasing survival rates significantly [24].) Studies [34] show that there are no statistically significant differences in 24-hour survival rate between persons giving chest compression only or the standard CPR (alternating two breaths and 15 chest compressions).
2.2. Target group for this project We defined our target group for this project to be the average adult with cardiac arrest due to ventricular fibrillation in a public place where an AED would be available, such as large shopping malls, airports, public transport systems or companies. Braslow [23] says: “While the typical cardiac arrest victim is 64 years of age, and the family member at home is about 55 years old, the average age of CPR trainees is 31 years, with a small minority 55 years and older. [...] In addition, 74% or more of cardiac arrests occur in the home, and less than 7% occur in public places.” We may need to rethink our target group and instead focus on the large home market for our development. People offered a device that could save the life of a beloved one are generally willing to spend a lot of money, as can be seen by the overwhelming growth of the home AED market. Using high school students for studies is a lot easier and cheaper than using older people. The students allow us to see if a certain task is feasible and act as an optimal reference group. In later studies, elderly people need to be used to make sure their performance is maximized as well. Considering the home market, the rescuer is willing to do more things (e.g. removing vomit from the mouth with a finger sweep) to save a loved one than a regular person helping a complete stranger in a shopping mall.
2.3. Language Based Instructions Giving written instructions or language-based instructions that are not internationally understood is problematic since using language to describe something excludes all persons not capable of understanding the language from using the equipment. In the US there are large minorities, especially the Spanish speaking minority, who are lacking in good English comprehension skills. The idea of using static images to give the user instructions for how to use the provided equipment was not successful [44], as the subjects didn’t realize how to perform the complex task of placing the mask and applying pressure to it to give two breaths. This led to the conclusion that another approach should be taken, although verbal feedback and encouragement might be beneficial for the improvement of the rescuer’s performance.
5
2. Therories for Cardiopulmonary Resuscitation and Just-In-Time Training
2.4. Just-In-Time Training Using Animations Another way of providing information to the rescuer is to use short animation sequences that show a single task, following the KISS principle1 [14]. The animations should contain as little information as possible yet just enough to fulfill the given task so the user is not distracted from what he is supposed to do. Just-in-time training is a method to instruct persons that are novices to perform a complex task by mimicking instructions, rather than by cognition of the task and training. From observations in our studies, students were good at mimicking instructions given by animations. Some pressed on the mask and pulled it up after pressing, just as the animations erroroneously did as they looped over the sequence of sealing the mask and applying pressure to it. An average person is able to memorize 7±2 chunks of information [49]. Cowan [27] reduced this to 4 ± 1 chunks. A chunk is an item in short-term memory, e.g. an easy sentence, just a word or even a singe letter. In a stressful situation or when dealing with very inexperienced people, this might be reduced. This fact increases the need of splitting complex task into small pieces the rescuer can memorize and perform before moving to the next step. Chamberlain [25] elucidated that by increasing the efficiency of the CPR training the patient survival, relative to the theoretic potential (perfect guideline, efficient education and well-functioning Chain of Survival), can be increased from actual 20% to 32%. Also increasing the chain of survival could improve the patient survival to an ideal 72%. This illustrates a great potential for our animation based just-in-time training.
2.5. Tools that Support CPR Using additional tools, such as a pillow to maintain the head tilt or a mask to deliver breaths, increases the performance a rescuer significantly due to a simplification of the CPR process and a reduction in unpleasant mouth-to-mouth contact. They are built to compensate problems or lack of knowledge and skills observed in the high school student’s studies. The tools in the box support the rescuer in doing tasks for which he would need a second person and provide him which a large variety of things (e.g. face mask, oxygen tank etc.) he would otherwise need to carry around with him. They also enable the student to perform better and faster compared to other students using their CPR training skills. Using sensors to give the user feedback allows a layperson to act as a professional in an unfamiliar situation due to just-in-time training. They try to simulate an expert looking over the rescuer’s shoulder and giving him small hints how to do better. Modeling (see Chapter 5) can also be used as a kind of feedback device by estimating produced cardiac output from a given chest compression. The outcome can be compared L with an optimal theoretical approach that produces 2.05 min of cardiac output. Modeling could roughly estimate the status of the patient by assuming the person collapsed before the emergency box was pulled off the wall mount. The time could be estimated by doubling the time required to walk from the wall to the patient. This could be used for selecting the best approach in this specific case on which part of the CPR process should be begun with. The different best sequence of approaches can be found by using the given models and simulating wide-spread cases with different initial conditions, such as time of the victim lying on the ground in cardiac arrest, and concepts, such as chest compression-only or 15 : 2 compressions to breaths.
1
keep it stupid simple or keep it simple, stupid!
6
3. Components of the Basic Life Support System 3.1. Overview This chapter describes the components of the Basic Life Support systems used in our studies. It should give the reader an overview of the modifications we made to the individual parts and the design of the system.
3.1.1. Components in this Basic Life Support System This list contains all potential components, however not all components are used in the final system. Pictures of the individual components can be found later in this chapter. • A mask and an oxygen tank to deliver oxygen to the patient. • A head strap to hold the mask in place while the rescuer performs other tasks such as chest compressions. • A pillow to produce and maintain a head tilt. • A tablet PC with a touch screen to allow interaction between the user and the system. The screen also displays the animations and monitored patient parameters. • An A/D converter for the acquisition of the pressure and flow values from differential pressure sensors. • An automated external defibrillator (AED) with integrated compression depth measuring sensor. • An artificial airway to secure the airway (see 3.2.9).
3.1.2. Additional Components Used in the Studies • A CO2 SMO+, made by Novametrix, to measure flow, volumes and CO2 content of the breaths given. • A VT Gas Flow Analyzer, made by Fluke, to measure the mask cuff pressure . • A Little Anne CPR training manikin, made by Laerdal. • A linear potentiometer circuit for measuring the compression depth, which is built into our Laerdal Little Anne manikin.
3.2. Description of the Individual Components 3.2.1. Masks Three masks as different from each other as possible were chosen by the team from the huge pool available on the market, to get an overview of a wide span of different designs. There
7
3. Components of the Basic Life Support System
Figure 3.1.: Anesthesia mask
Figure 3.2.: Respironics SealEasy mask
Figure 3.3.: Laerdal InflateA-Shield
are many masks similar to the normal Anesthesia mask, with slight modifications in the connector angle, the dead space and the geometry. A more detailed look was taken into the normal Smith Medical Anesthesia mask (see Figure 3.1) used in the University Medical Center, the Respironics SealEasy (see Figure 3.2) mask because it has no required orientation and the Laerdal Inflate-A-Shield facemask (see Figure 3.3) because of its specific purpose for CPR use [44]. To make sure that the rescuer is protected from the patient, a bacteria filter and a singleway valve (which lets the patient’s exhaled air escape to the side) are included in the tube between the mask and the mouthpiece.
3.2.2. Oxygen tank An oxygen tank to deliver 100% oxygen to the patient still needs to be selected. It needs to be small and light and should have sufficient volume for the first 15 − 20 minutes of CPR L before the paramedics arrive. (Maximum of 12 min · 20 min = 240 L, so a C -cylinder storing L 240 L will be sufficient) Oxygen tanks intended for emergency use which deliver at least 6 min of oxygen don’t require a prescription according to the Food and Drug Administration (FDA) [62].
3.2.3. Head strap To secure the mask’s position over the mouth and nose of the patient, the use of a head strap was proposed. Three following designs were evaluated in a study (see 4.2) [44]: • A 2 inch wide elastic strap glued to the mask which looks like a ski goggle strap (see Figure 3.4) . • A double strap glued to the mask with a Velcro part to enable tightening of the strap (see Figure 3.5 [44]) . • A triple strap, similar to a design of a strap holding the CPAP1 mask in place during sleep, also adjustable with three Velcro parts (see Figure 3.6 [44]). The narrowed version of the ski goggle head strap was later combined with the mask and the head shaped pillow to form a new unit, the “combo pillow”. 1
Continuous positive airway pressure (CPAP) is used to treat sleeping apnea by applying a continuous positive pressure to the patients airway to keep it from collapsing
8
3. Components of the Basic Life Support System
Figure 3.4.: The wide ski goggles strap
Figure 3.5.: The adjustable double strap
Figure 3.6.: The adjustable tripple strap
Figure 3.7.: The soft foam pillow
Figure 3.8.: The styrofoam bar pillow
Figure 3.9.: The U-shaped pillow
Figure 3.11.: The foam headrest with stiff neck piece
Figure 3.10.: The bar with heigthened ends
3.2.4. Pillow The idea of the pillow design was developed by observing of the students struggling to establish an open airway by maintaining a sufficient head tilt while giving the breath. The first idea was a soft pillow made of foam (see Figure 3.7). After trying this on the manikin and seeing that a compressible part didn’t help, I designed a large variety of pillows made from Styrofoam. Styrofoam has three advantages; it is very light, it is sufficienty stiff and it is easy to model. Figure 3.8 shows the Styrofoam bar pillow similar in shape to the soft foam pillow used before; Figure 3.9 a U-shaped pillow similar to the ones worn in a airplane for a comfortable sleep position; Figure 3.10 a bar with highlighted ends to enhance its intuitiveness; Figure 3.11 the soft foam pillow with a stiff Styrofoam neck piece and finally Figure 3.12 a head shaped Styrofoam headrest.
9
3. Components of the Basic Life Support System
Figure 3.12.: The combo pillow 3.2.4.1. Combo pillow Figure 3.12 shows the Styrofoam headrest built to fit the head of 95% of the population by making its inner dimensions at least 233×164 mm ≈ 9.1×6.5 inch (height × width). The 95% value for the width was obtained by a 1975 Law Enforcement Officers study [48] containing 2,060 male persons, while the height came from a 2002 Female Firefighter study [58]. The pillow basically consists of two parts, the lower part with the neckpiece and an outer ring to give it the head shape. It was later colored light blue to increase the contrast with the white background in the animations. The important part of the combo pillow is the neck support. It has the dimensions of 2.8 × 6.0 × 1.4 inches [H × W × L]. The middle part is a little bit lower (about 0.2 inches) and the compressible Styrofoam makes it more comfortable. (Although this doesn’t matter very much as the user will be unconscious!, but it could make the rescuer more comfortable with placing the victims head inside.) 3.2.4.2. Using a Bicycle Helmet As the Combo Pillow To study the pillow on human subjects in the operating room (OR), the pillow had to be modified so that it could be wiped with alcohol. A replacement also had to be made in case it brakes during the study. Covering it in a plastic wrapper and taping it with duct tape were considered as options, it seemed better to build an exact replacement. For this reason two cheap bicycle helmets were bought and modified by removing the straps, cushions and the plastic topping. The bottom part was cut off for better stability and a small pillow tilt. The edge was flattened and the neck part was cut and modeled to be close to the original pillow’s dimensions. After undergoing a preliminary test in the OR, the second helmet pillow (see Figure 3.13) was built with a higher (3.25 inch) neck support. As this helmet was also deeper, due to a shift in the bottom cutting line and it was made of hard material, an additional 0.25 inch foam ring was placed inside to make its use more comfortable.
3.2.5. Tablet PC We decided to buy a small tablet PC for the final prototype. The advantage of the tablet PC is that we can use a small battery powered unit with USB connectors for the A/D converter
10
3. Components of the Basic Life Support System
Figure 3.13.: Modified bycycle helmet as combo pillow
HP Compaq Tablet PC tc1100
Acer TravelMate C110
Figure 3.14.: Tablet PC Examples and touch screen ability to ask the user questions. Not needing to build a custom system from standard components will probably reduce the price of the overall system since small LCD screens are extremely expensive. An example of a tablet PC can be seen in Figure 3.14 [10, 12]. The tablet PC has two main functions: It should play the animations and give the user feedback on the data acquired by the sensors for compression depth, mask seal pressure, breath volume etc. (see 3.2.7) integrated in the system.
3.2.6. The Animations The animations are the method used to provide the user with just-in-time training on how to perform the different steps of the CPR process. An Architect from the University of Utah used Macromedia Shockwave Flash to create our animations cycling through a small number of still images. Example screenshots from the animations can be seen in Appendix C on page 92 for the use of the combo pillow, the manual head tilt and chest compressions.
3.2.7. Sensors The measurement of variables the studies was done with the devices mentioned in 3.1.2. For the final product some sensors are still in development: • A pressure sensor for the mask seal pressure uses a differential pressure sensor with the reference port left open to the environment. It is used for feedback on the seal quality and is combined with the flow measurement for the detection of leaks. The first prototype of this sensor was already used in the last Cottonwood high school
11
3. Components of the Basic Life Support System study (see 4.9) with the same software written for the depth-measuring circuit using the PMD-1208LS A/D converter (see 3.2.12). • A pressure sensor can be used to detect whether the head is in the pillow by placing a balloon in the neckpiece of the pillow. • A differential pressure sensor between the mask and the mouthpiece can be used to detect flow and airway pressures for an estimate of the volumes given. It can also detect whether the airway is open. • A pulse oximeter with an ear clip2 could potentially be used for measuring the effectiveness of the compressions. (Placing it at the back of the neck in a way that it is pressed against the pillow doesn’t work because of the lack of light reflection by bones and the possibility of hair in the way. Placing it on the finger may cause a delay in the signal and incorrect readings due to centralisation.) The effectiveness of a pulse oximeter during CPR is controversial! E.g. Stratmann [59] says it is useful for quality control during CPR while Spittal [57] says that the readings are unreliable and hard to be obtained using an ear probe, but that it is still a good thing to use. Narang [51] describes that it could be used when pulses are not palpable but the SpO2 sensor still showed correct pressure waveforms produced by compressions. Moorthy [50] says that pulse oximeter readings show incorrect values due to noise and movement artifacts and therefore should not replace ECG, RR and pulse palpation. For the conversion of the analog signals and power supply of the circuits the PMD-1208LS (Measuring Computing), a USB-based A/D converter was used. This is a low cost, easy to interface device. The USB A/D converter provided the supply voltage for the sensor circuits. The supply voltage is limited to 5 V and 500 mA by the USB bus.
3.2.8. Automatic External Defibrillator (AED) 3.2.8.1. Introduction Most cases of cardiac arrest are caused by precedent ventricular fibrillation. The best way to restore the normal heart rhythm is to deliver a shock to depolarize the heart muscle cells and hope for spontaneous reoccurance of normal heart function (rhythm). Otherwise, chest compressions are nesessary. For this reason, an AED must to be included in our Basic Life Support System. The AED is used to perform step D (see 2.1.1.4) of the AHA’s ABC(D) guideline. Widely used defibrillators include Philips HeartStart, Zoll AED+, Medtronic (PhysioControl) CPR+, Cardiac Science Powerheart, HeartStrem ForeRunner. 3.2.8.2. Zoll AED It was found that only the Zoll AED+ measures compression depth (see Figure 3.16). Zoll uses an accelerometer in the hand placement part of the pads (see figure 3.15) to measure the depth of the compressions, while the adhesive AED pads keep the hand placement part in place. Aase’s paper [1] describes the method of using two accelerometers (one as a reference for moving environments) for the measurement of the compression depth with an error of 2
In a test, we used an anesthetized pig that was primarily used for another study, and killed it with Halothane to get cardiac arrest. We placed two pulse oximeter sensors on the ear and on the lip of the pig and obtained readings for the first three attempts of chest compressions (with good mean arterial pressure) and got return of spontaneous circulation every time. After the fourth attempt we were unable to get any more sensor readings.
12
3. Components of the Basic Life Support System
Figure 3.16.: Zoll AED pads Figure 3.15.: Open Zoll AED with pads
Figure 3.17.: The Mallinckrodt COPA Figure 3.18.: The Nellcor Combitube
Figure 3.20.: The EMS CopraPLA
Figure 3.19.: The LMA
4.33 mm ≈ 0.15 inches in moving environments. As the depth only needs to be a rough estimate with an error of less than about 0.25 inches this approach may be used to give the user feedback. The Zoll AED doesn’t seem to be very user-friendly (e.g. pad placement problems and use) but this problem could be overcome by giving the user simple and easy instructions with our animations (see [2, 30]).
3.2.9. Artificial Airways Inspired by a meeting with an external consultant who mentioned Saissy’s paper [55] on the L effectiveness of jet ventilation (Sassy found that continous insufflation of 15 min oxygen, using a modified tube that was left open to the atmosphere and had small oxygen outlets at the end, was as effective as regular IPPV 3 .) and his disbelief in maintaining an airway by a head tilt without a jaw thrust, we looked at four different devices: • A Mallinckrodt COPA, a Cuffed OroPharyngeal Airway similar to a CobraPLA but does not end in a flat part but instead looks more like an oral airway (see Figure 3.17 [7]). 3
intermittent positive pressure ventilation
13
3. Components of the Basic Life Support System • The Nellcor Combitube, which is blindly inserted in the patient and has two airway ports and two cuffs. It does not depend on correct placement in the trachea or the esophagus (see Figure 3.18 [11]). • The LMANA Laryngeal Mask Airway (LMA), which is placed over the laryngeal opening (see Figure 3.19 [9]). • The EMS CobraPLA, a device similar to the a LMA but doesn’t go into the airway as deeply and just needs to be placed behind the back part of the tongue to keep the airway from collapsing (see Figure 3.20). There are several studies mentioning benefits from using an artifical airway. Fukui [32] says that artifical airways increase gasping and arterial oxygen saturation. Jawan [38, 39] says that artifical airways help avoid aspiration. (A 10◦ head down placement of the patient or L transtracheal oxygen insufflation with 10 min of oxygen, such as jet ventilation, has the same benefit. ) The CopraPLA was tried with our METI Patient Simulator to get an idea about the ease of placement. In a meeting discussing the devices, participants sensed that lay persons would be intimidated and therefore it was decided not to create animations for their placement. A second problem was that they come in different sizes and the user would need to choose the correct one. Maybe they should be included in case an expert using the box wants additional equipment for more sophisticated treatment of the patient.
3.2.10. Novametrix CO2 SMO For our studies, we used the Novametrix CO2 SMO+ (see Figure 3.22) to measure flow, volumes and CO2 content of the breaths given. The probe was placed between the mask and the one way valve before the mask and the filter. The difficulty in not getting volume results in the first studies was caused by the probe placement above the one way valve so that the expired air didn’t flow through it. The expired air was needed for the calculation of the flow/volume values of the CO2 SMO device. A second problem was, that the values are recalculated after each breath and the next breath triggers the calculation. This caused measurement errors in the last breath delivered.
3.2.11. Fluke Gas Flow Analyzer A Fluke VT Gas Flow Analyzer (see Figure 3.21) was used to measure the mask cuff pressure in all the studies but the last Cottonwood high school study. In the last study,a new pressure measuring circuit was tested for the first time. The Fluke device also had the disadvantage of making manual recordings of the values necessary. It was also too large for just measuring the pressures.
3.2.12. Laerdal Little Anne CPR Training Manikin We used a Laerdal Little Anne CPR training manikin for the high school studies. (see Figure 3.23) As we needed a way to measure the compression depth without giving the user feedback with the built in clicking device that clicks at the correct compression depth. I modified the manikin to record depth waveforms. 3.2.12.1. Modifications of the Little Anne A simple approach was needed to measure the depth of the compressions. The easiest solution was to attach a linear potentiometer to the spring that is compressed by the chest compressions.
14
3. Components of the Basic Life Support System
Figure 3.21.: Fluke VT Gas Flow Analyser
Figure 3.22.: Novametrix CO2 SMOplus
Figure 3.23.: Laerdal Little Anne
15
3. Components of the Basic Life Support System
R=10k
Pin 1: UInput Pin 3: Ground Pin 4: UReference Pin 30: +5V
�� � PMD 1208LS
USB +5V
A/D
Figure 3.24.: The circuit for measuring the compression depth
Figure 3.25.: The open Little Anne with A/D converter and potentiometer attached to spring 3.2.12.2. The Circuit A small circuit was built to supply the potentiometer from the PMD 1208LS A/D converter and to measure the reference voltage (see Figure 3.24). The reference voltage is dependent on the USB port supplied power and therefore needs to be measured once before the acquisition starts. The potentiometer was attached to the bottom of the manikin as well as to the lower part of the spring, about 1.5 inches from the bottom (see Figure 3.25). The spring resistance was assumed to be linear. Therefore the point of measuring the compression is equal at any point on the spring, as long as it is calibrated. 3.2.12.3. Calibration The depth to voltage relation was calibrated using a drill stand with a length scale on the fixed part. By adding a metal block with a diameter of 2.5 inches on the manikin’s chest, the voltages were calculated in 0.125 inch steps on a scale from 0 − 2.375 inches. This step was repeated 5 times and the average was used to find a best fit curve (variance R2 = 0.997). The resulting depth voltage relation was: d = 0.0148 · U 3 − 0.0836 · U 2 + 0.5705 · U − 0.0231 where U is the meassurement of voltage and d is the resulting depth in inches. The cubic
16
3. Components of the Basic Life Support System 2.5
Measured values of series 1 Measured values of series 2 Measured values of series 3 Measured values of series 4 Measured values of series 5 Measured values of series 6 Measured values of series 7 Measured values of series 8 calibration curve used in this paper average of series 1−8 (reproduced values)
2
d [in]
1.5
1
0.5
0
0
0.5
1
1.5
2
2.5 U [V]
3
3.5
4
4.5
5
Figure 3.26.: The calibration curve and reproduced calibration curve with individual measured values solution was used as it produced the highest R2 and best fit in the lower depth range. A voltage range of 0 − 5 V causes no numeric problems with the cubic solution. To make sure the correct calibration curve was used the experiment was reproduced after the study. The potentiometer had to be removed from theStudent spring as ofthe moveable bar had Version MATLAB been dislocated, causing detatchment from the original point. Due to the high variability in the upper depth region, the linear equation d = 0.4284 · U + 0.1209 has a sufficiently good fit (variance R2 = 0.993). Figure 3.26 shows the two calibration curves and the newly measured values. The original measured values were thrown away after a water leakage in the lab and can therefore not be included in the Figure. 3.2.12.4. Logging Software To acquire the data, a small program was written in C++ using Borland’s CBuilder to make the conversion from measured voltage to depth, and to calculate the frequency of the compressions by taking the time between two maximums and writing the results to a comma separated values file (CSV). It uses the function library that came with the A/D converter for an easy interface to plot the depth waveform, so it could also be used to give the user feedback on it. This also allows processing in Microsoft Excel and Mathworks Matlab. //Get value from BoardNumber, Channel, VoltageRange //(Integer constant from Library) and OutputVariable cbAIn (BoardNum, 0, Range, &DataVal1); //Convert to Engineering Units from //BoardNumber, VoltRange, InputVariable to OutputVariable cbToEngUnits (BoardNum,Range,DataVal1,&Voltage); A limitation of the single value aquisition mode triggered by the timer in the program is the response time of the USB bus. The minimum time from request to answer is 20 ms,
17
3. Components of the Basic Life Support System
Figure 3.27.: Screenshot of the data aquisition software’s GUI 1 which limits the maximum sampling frequency to fmax = 50 Hz = 3, 000 min . An additional 20 − 30% should be removed for safety reasons, e.g to allow writing to the file, therefore I choose a sampling frequency of fs = 40 Hz. This is sufficient to acquire the waveform data but if more than one channel is used for measuring, the integrated circular buffer with a size of 4 kB entries should be used. A view of the GUI displaying some chest compressions can be seen in Figure 3.27, the Source Code is in Appendix B on page 89.
18
4. Human Factors Studies The term “Human factors” [13] is mainly used in the United States. In the rest of the world it is usually called ergonomics. It is a field of science that focuses on the interaction between people and products, tools, procedures or processes. It involves research in human performance and capabilities, anthropometrics, usability and design. The field’s origin was in the design and use of airplanes during World War II although it has only been widely known and used in recent times. The goal of Human factors is to make something work in a way that is obvious and seems natural to its users. The studies described in this chapter evaluate the performance of lay responders as they complete steps of the Cardio Pulmonary Resuscitation (CPR) process. The goal was to determine whether each stepwise design change improved the performance of the lay responder who was giving CPR. CPR performance was evaluated for the effectiveness of a procedure or use of a tool as well as time required to complete a task.
4.0.1. Studies in this Chapter There are ten studies (including two preliminary) in this chapter, of which two focus on the chest compressions and six focus on respiratory support. The first two studies are preparatory work for selecting a mask design. 1. Mask selection: The goal was to choose a intutive mask design (see 4.1) . 2. Head strap selection: The goal was to pick a good method of securing the mask’s position on the patients head with a strap (see 4.2). 3. Opening the airway by performing a head tilt and giving a breath: This study was compared the performance of students performing a manual head tilt using animations with students who use a soft bar pillow (see 4.3). 4. Combo pillow evaluation: The first study’s goal was to decide the general direction for the pillow design (see 4.4). The second study’s goal was to see how the student’s performance benefited from using the Combo pillow (see 4.5). The third study’s goal was to see the effects of improved animations and a tighter head strap (see 4.6). A fourth OR study was to get a first impression of performance while using the bycycle helmets (see 4.7). A fifth OR study was to test the higher bycycle helmet’s performance to open the airway (see 4.8). 5. Chest compressions: The goal was to evaluate the students performance using animations for just-in-time training to perform chest compressions (see 4.9). 6. CPR training: This study was done to measure CPR trained student’s performance, to be able to compare their results with those from just-in-time trained students (see 4.10).
19
4. Human Factors Studies
4.0.2. Structure of the tests The test have the following structure: • Purpose of the study • Test setting • Results • Conclusions
4.1. Mask Assortment Study 4.1.1. Purpose of this Study The purpose of this study was to choose one of three different mask types. The primary task was to place the mask on an styrofoam head and to attach the head strap securely.
4.1.2. Test setting Seventeen first semester psychology students, with no or only little medical training, were given three masks, in a random order. The randomness was created by a predetermined shuffled order of the three masks. The masks were the Smiths Medical normal anesthesia mask, the Laerdal Inflate-a-Shield mask and the Respironics SealEasy mask. The test ended when the student placed the mask and stated that he/she was finished doing so. The observers rated the studens performance and asked the student for his/her opinion on this mask. The correct placement (e.g. correct orientation, seal over mouth and nose) was judged by the observers. There was no time based abortion criteria defined in this test. These three different masks were selected to test very different mask types as there were many masks available that are similar to the anesthesias mask design. Using each student for all three tests made sure that there were enough subjects testing each individual mask with the disadvantage of a learning effect by using a mask for the second and the third time.
4.1.3. Results 4.1.3.1. Times to Place Mask and Head Strap The 17 students who used the normal anesthesia mask placed the mask fastest; average of 12 ± 8 sec (mean ± SD). Using the SealEasy mask took 21 ± 26 sec and using the Laerdal mask took 29 ± 16 sec. (see Figure 4.1) The time to place the head strap correctly was 65 ± 32 sec with the anesthesia mask, 69±30 sec with the SealEasy mask and 91±46 sec with the Laerdal mask. 4.1.3.2. Correct Placement of the Masks All students placed the regular anesthesia mask correctly after an average of 1.18 attempts (see Figure 4.2). The anesthesia mask had some problems with the correct orientation (rotating it 180◦ ) and fastening the strap tightly. No student needed more than two attempts to complete this task. Twelve of 17 students (76.5%) were able to place the SealEasy mask correctly and 15 of 17 students (88.2%) placed the Laerdal mask correctly.
20
4. Human Factors Studies
250
Anesthesia mask SealEasy Mask Laerdal mask
200
t [s]
150
100
50
0
mask placement
headstrap in place
Figure 4.1.: Average times to place mask / attach headstrap including min/max ranges
18
16
Student Version of MATLAB
14
number of subjects
12
10
8
6
4
2
0
correct wrong Anesthesia mask
SealEasy Mask
Laerdal mask
Figure 4.2.: Correct mask placement
21 Student Version of MATLAB
4. Human Factors Studies
4.1.4. Conclusion An anesthesia mask was placed more quickly and with fewest errors in this study. This mask should be used for the upcoming studies. The strap needs improvement and the mask orientation should be made more clear. The Laerdal SealEasy mask confused some students because it is circular and has no right side up or down. Therefore the students didn’t know how to place it correctly. It also had the problem that it’s opening had to be placed over the mouth rather than over the nose or in between to make an effective seal and to deliver the air at the correct position. The Laerdal mask had the most problems. The instructions for use printed on the mask took the students a lot of time to read and closing the nose seemed to not be obvious for some of them. They also had problems with the correct placement and tightening of the strap. The anesthesia mask had the best placement but there were still errors even when using the animations. This was finally solved by its integration into the combo pillow.
4.2. Head Strap Design Selection Study 4.2.1. Purpose of this Study The purpose of this study was to choose the simplest and most intuitve of three different head straps. The subjects were asked to place the anesthesia mask on a stryofoam head and attach the head strap securely.
4.2.2. Test setting Three different headstraps were build to hold the standart anesthesia mask in place. We gave eleven first semster psychology students each of the three straps to hold the mask in place. The three different types of head straps were: 1. A 2 inch1 wide wide ski goggle-like strap (see Figure 3.2). 2. A double strap joined together at the back of the head (see Figure 3.3). 3. A CPAP-like strap with three straps connected to the mask (See Figure 3.1). The ski goggle strap was glued to the mask while the double strap was glued on the mask on one end and connected with Velcro on the other. This gave the users two adjustable pieces. The tripple head strap had a Velcro connection on each of the three straps, which allowed the user to tighten all straps as necessary. The test ended when the student placed the mask and head strap , either correctly or incorrectly. The observer than rated the correct placement and the student was asked about the intuitiveness of the head strap.
4.2.3. Results 4.2.3.1. Times to Place Mask The students placed the ski goggle mask correctly in an average of 12 ± 7 sec (mean ± SD), while with the CPAP-like strap required 25 ± 26 sec. The double strap took 12 ± 5 sec (see Figure 4.3). 1
Conversion to SI units: 1 inch = 2.54 cm
22
4. Human Factors Studies 55 50 45 40 35
t [s]
30 25 20 15 10 5 0
Ski goggles strap
Pair of straps
CPAP mask strap
Figure 4.3.: Average time to place the anesthesia mask with 3 different headstraps attached (including min/max ranges) 4.2.3.2. Correct Head Strap Use The ski goggle strap mask was tight enough if it was placed correctly, but it was only placed correctly in 73% of the cases. Seven of 11 students (64%) adjusted the double strap to make it tighter while only two students (18%) succeeded in using the CPAP triple strap (see Figure Student Version of MATLAB 4.4). All of the students found the ski goggle strap to be intuitive, 7 students (64%) did so with the double strap and 9 students (82%) with the CPAP strap. Seven students (64%) placed the mask correctly in of all cases. 4.2.3.3. Errors Made in Using the Head Straps Two students (18%) using the double strap mask disregarded the strap when securing the mask on the head. Two students (18%) didn’t use the straps correctly with the ski goggle strap and the double strap groups, while 8 students (73%) had problems with the CPAP triple strap (see Figure 4.5). Even though the mask orientation was labeled, it was not obvious to the students . The ski goggle mask was rotated 180 degrees by 3 students (27%). Two students rotated the double strap mask 180 degrees and another two students (18%) rotated it 90 degrees. The 90 degree rotation was only possible with this strap design. With the triple strap mask, 1 student (9%) placed it incorrectly, rotating it 180 degrees and ignored the third strap.
4.2.4. Conclusion The anesthesia mask with the fixed wide strap (ski goggle style) was placed with fewest errors. Adjustable straps were not intuitive or effective in providing a good seal, as the user didn’t realize this possibility. The ski goggle strap took the least time for proper placement. Therefore, the anesthesia mask with the ski goggle style wide strap should be used for the
23
4. Human Factors Studies
11
Ski goggles strap Pair of straps CPAP mask strap
10 9
number of subjects
8 7 6 5 4 3 2 1 0
Headstrap tight
Headstrap intuitive
Mask placement right
Figure 4.4.: Number of students who used the headstrap correctly
11
Ski goggles strap Pair of straps CPAP mask strap
10
Student Version of MATLAB
9
number of subjects
8 7 6 5 4 3 2 1 0
No headstrap
Headstrap wrong
Mask 180°
Mask 90°
Figure 4.5.: Errors while placing the mask with 3 different head straps
24 Student Version of MATLAB
4. Human Factors Studies further studies. The final solution for the placement problems and a tight head strap was solved by the integration in the combo pillow.
4.3. Animation Just-In-Time Training Study 4.3.1. Purpose of this Study The purpose of this study was to test how well the students could follow the directions presented in a looping animation. The primary task was to put the mask on the manikin (Laerdal Little Anne, see 3.2.12). Subsequent tasks included pressing down the mask to make a good seal, performing a head tilt, and delivering two breaths. The second objective was to evaluate whether a soft foam pillow would produce a good head tilt and help the rescuer with his task.
4.3.2. Test Setting Thirtynine Olympus high school students (age approximately 14-18 years) from three different health classes (having had no or only very little CPR training) were observed and timed. Each of the students was randomly (in blocks of five) placed in one of the three groups. Those in group 1 used the animations with ”Arrows with ghosting2 ”. Those in group 2 used ”Arrows without ghosting”, and those in group 3 used the ”pillow”. There were 13 students in each group. The ghosting was a technique were the shapes of the previous image were left in the picture to enhance the visualisation of the head tilt. The students where given the following instructions immediately before performing the task: ”Imagine the following situation: You work at the airport and arrive for an early morning shift. As you walk into the office, you find one of your co-workers lying on the floor unconscious. You find an emergency rescue box lying next to him. You open the box to receive your supplies. Your instructions are on the computer screen to tell you how to properly give two breaths.”. Each student entered the room one by one so they wouldn’t see the other student’s performance or the equipment before their own attempt. The test ended when the student gave two successful breaths or was unable to do so after six consecutive attempts. When a mistake occurred that prevented the student from giving two breaths, the student was requested to ”Leave the mask in place, watch the animation again and give two breaths”. Two observers rated the correct usage of the equipment on a score sheet (see Appendix D.1 for the combo pillow) and recorded the maximum applied mask pressure measured with the Fluke Gas Flow Analyser (see 3.2.11).
4.3.3. Results 4.3.3.1. Errors Using the Equipment Twelve of 13 students (92%) in the “arrows no ghosting” group placed the mask correctly, while in the “arrows with ghosting” group only 10 of 13 (77%) placed it correctly. In the pillow group 11 students (88%) completed this task successfully (see Figure 4.6). The head strap placement was correct by 12 students (92%) of the “arrows no ghosting” and “pillow” groups and all students of the “arrows with ghosting” group. The group given the pillow as an additional aid for the head tilt placed it correctly in only 58% (7.5 students due to one student correcting himself after the first attempt) of the cases. The most common error was not using it at all, since they didn’t realize that there was one 2
Ghosting is a technique leaving the shadows of the previous image in place used to highlight the head tilt.
25
4. Human Factors Studies
12
10
[%]
8
6
4
2
0
Arrows no ghosting Arrows with ghosting Pillow Mask placement
Headstrap
Pillow
Figure 4.6.: Number of students who did not make a mistake when giving two breaths with mask at all or didn’t see it with the first attempt. In addition to this, two students used their hand instead of the pillow as a headrest to maintain a good head tilt. 4.3.3.2. Head Tilt Quality Student Version of MATLAB
In all groups, the students performed head tilts that were inadequate to open the airway. This was the case for 77% (10 students) in “arrows with ghosting” group and 77% in the “arrows no ghosting” group and 92% (12 students) of the pillow animation group. Three students (23%) in the “arrows no ghosts” group performed a good head tilt while only one student (8%) did so in the “pillow” group (see Figure 4.7). In the “arrows with ghosting” animation group, 2 students (15%) performed a good head tilt and one student (8%) got a perfect score. The head tilt quality improved to 44% in “the arrows with ghosting” group while both other groups didn’t improve significantly. The subjects from the “pillow” group who were not successful in the second attempt all failed with the third attempt. This resulted in the possibility of giving an effective breath of 8 students (61%) in both of the arrows animation groups and only 6 students (46%) of the bar pillow group (see Figure 4.8). 4.3.3.3. Mask Seal The subjects in all groups applied relatively high mask pressures, considering that a mask pressure of about 50 − 60 cmH2 O 3 was considered to be sufficient for a good seal. The students applied an average pressure of 84 ± 35 cmH2 O ranging from 40 − 180 cmH2 O in the “arrows no ghosting” group, 76 ± 24 cmH2 O (40 − 130) in the “arrows with ghosting” group and 86 ± 26 cmH2 O (45 − 130) in the “pillow” group (see Figure 4.9). 3
Conversion of the mask pressure to SI units: 1 cmH2 O = 98.0663 Pa
26
4. Human Factors Studies
10
10
8
8
%
12
%
12
6
6
4
4
2
Mask placement
Headstrap
0
Pillow
no poor good great Mask placement
Headstrap
Pillow
12
10
8
%
Student Version of MATLAB
Student Version of MATLAB
6
4
2
0
no poor good great Mask placement
Headstrap
Pillow
Figure 4.7.: Head tilt quality on 1st, 2nd and 3rd attempt 1st 2nd 3rd
12 Student Version of MATLAB
10
number of subjects
0
2
no poor good great
8
6
4
2
0
Ghost
Arrows
Pillow
Figure 4.8.: Subject delivering an effective breath at the 1st, 2nd and 3rd attempt
27
4. Human Factors Studies 180
160
140
p [cm H2O]
120
100
80
60
40
20
0
Ghost
Arrows
Pillow
Figure 4.9.: Average mask seal pressure and min/max ranges Without performing a good head tilt, the pressure alone was not sufficient to give an effective breath because the airway was closed. 4.3.3.4. Average Time to Give One Effective Breath MATLAB For this analysis, only those students who gave an effective Student breathVersion wereofincluded. The time for the first breath was 54 ± 26 sec in the “arrows no ghosting” group, 53 ± 13 sec in the “arrows with ghosting” group and 50 ± 15 sec for the “bar pillow” group. (see Figure 4.10) The time to the first step of placing the mask or the pillow in the pillow group was 20±7 sec in the “arrows no ghosts”, 26 ± 9 sec in the “arrows with ghosting” group and 21 ± 17 sec in the “pillow” group.
4.3.4. Manual Head Tilt Animations Conclusions The students using the “arrows with ghosting” animations were only one second faster than the students not having the ghosting. This time difference is too small to keep the ghosting in the animations as the complexity of the images in the animation is increased by the ghosting. The long times for completing the whole task were due to the student’s failure to perform an adequate head tilt to deliver an effective breath and to watch the longer animations. The longer sequences reduced the number of iterations an individual saw. More than five students missed the part for the head tilt because they were putting the mask on the manikin after they saw the animation for this and had to watch the whole animation again to get to the point were they missed one step. The reason for the longer time in the ghosting group for placing the mask was probably the complexity of the animation with the remaining ghost image which needed a second look. To reduce the total time to give one effective breath and to increasing the overall effectiveness, the animations should be split into smaller segments that can be looped over again and again in the case of an error, so the rescuer doesn’t have to watch over the whole animation
28
4. Human Factors Studies 70
Ghost Arrows Pillow
60
50
t [s]
40
30
20
10
0
step one
step two
first effective breath
Figure 4.10.: Average time comparison (mean ± SD) again. Feedback based on the sensors readings would be beneficial, as the user seemed to be expecting this from the animations already and just repeated the mistake they made in the previous attempt. This study shows that animations alone are not effective in performing a good head tilt and thereby opening the airway to allow breaths. This was also finally solved by the use of Student Version of MATLAB the combo pillow which performed the head tilt for the student.
4.3.5. Pillow Conclusions The students in the “pillow” group were fastest in delivering an effective breath. The pillow had several problems. The most important one was that it was not used at all, mostly due to not being seen in the box next to the manikin. The pillow was too thin, but its width was adequate. Some students performed a good head tilt, but when they put the mask on and pushed down, they lost the head tilt because they were rolling the head toward the chest. To improve the visibility of the pillow the color, in the animation should be changed to blue to match the color of pillow in the emergency box. Increasing its height and making it stiffer for the next study should help the rescuer in maintaining a good head tilt.
4.4. Objective assessment of pillow function 4.4.1. Purpose of this Study The purpose of this study was to obtain the user’s preference regarding the usability of six different pillow prototypes (see 3.2.4). The subject’s task was to choose the best pillow out of the six available models and to place this under a volunteer’s head.
29
4. Human Factors Studies
4
number of subjects
3
2
1
0 styrofoam
soft pillow (old)
headrest (combo)
heightened end bar
styrofoam
Figure 4.11.: Favorite pillow selection
4.4.2. Test setting Eleven psychology students from a “Human Factors and Ergonomics” class were observed in this study. Sending half of the class out of the classroom randomly chose the students. A medical student trained as a paramedic rated the effectiveness of the head tilt. The students Student Version of MATLAB were given instructions to enter the room (one by one), to choose their favorite pillow, and to place it under a volunteering student’s head. The test ended when the pillow was in place and the person was asked for a rating between 0 (poor) and 10 (great) on how easy it was to place it under the neck and how user friendly the chosen pillow was.
4.4.3. Results Three students picked the Styrofoam pillow and four decided on the old soft pillow made of foam. The Styrofoam headrest (which became the combo pillow after the mask integration) and the bar pillow with highlighted ends where each chosen two times. (see Figure 4.11) No student preferred the yellow foam headrest or the U-shaped bar. The head tilt was rated perfect (10) for the Styrofoam headrest, good (5) for the Styrofoam bars with highlighted ends and poor (4) for the soft foam pillow and the Styrofoam bar pillow. (see Figure 4.12) The average individual ratings on their favorite pillow were 7.55 ± 1.92 (mean ± SD) for the ease of neck placement and 8.73 ± 1.19 for the user friendliness 4 . The Styrofoam headrest got the highest ranking with an average 9.5 for user friendliness while the easiest placement was felt to be with the soft foam pillow. 4
The user friendliness is the subjective usability of the pillow rated by the student.
30
4. Human Factors Studies 10 9 8 7 6 5 4 3 2 styrofoam soft pillow (old) headrest (combo) heightened end bar
1 0
easy to place
user friendly
good head tilt
Figure 4.12.: Pillow scores in the three different categories
4.4.4. Conclusions The subjective user friendliness and ease of neck placement correspond very well, while the Student Version of MATLAB students favourite pillow selection did not comply with the best available head tilt. The conclusion from this is that a student is not able to judge the effectiveness of the head tilt from the pillow shape but has to try it. The personal opinions obtained in this test have no individual value but in their entireness give us an idea about which pillows should be looked into in more detail and which should be ignored. The Styrofoam headrest worked impressively well by performing the best head tilt and easy to place, It got very good ratings for the user friendliness. Sliding the pillow from the side under the head was the easiest way the students could imagine with the bar pillows. One student had difficulties getting the bar with the heightened ends under the neck by trying to slide it in from the side until he lifted up the neck with his second hand, which enabled him to complete the task The soft pillow might have been taken so often because some students were biased by having the least height, as in a conversation before the test, one student mentioned the risk of aggravating spine injuries by lifting up the neck. The medical student had the idea of using scoops from both sides of the head reduce the movement of the spine and also to add some value, as it could be used in the operating room or by adding a protective collar part in case of spine injury. It could be closed with interlocking parts or heavy-duty Velcro strips. The collar was not build for the next tests, but might be considered for the final product. An additional support under the shoulders like a triangle pillow and also a higher headrest could help in big, heavy persons.
31
4. Human Factors Studies
4.5. Improved Animations study 4.5.1. Purpose of this Study We wanted to test how well the students could follow the directions presented by an improved animation with feedback and some verbal feedback (predefined words). We also wanted to evaluate the benefit of giving them pillows to ensure a head tilt. The task was to put the mask on the manikin (Laerdal Little Anne), pressing to get a good mask seal, tilting the head, and delivering two breaths.
4.5.2. Test Setting Subjects included 84 Cottonwood student from four different health classes having had no or only very little CPR training (mostly from boy scouts). Each of the students was randomly (in blocks of five) assessed in one of the four groups who saw the animations “manual head tilt”, “bar pillow”, “combo pillow with verbal help” and “combo pillow without verbal help” so there were 20 students in each group. The students where given the following instructions “Imagine the following situation: You work at the airport and arrive for an early morning shift. As you walk into the office, you find one of your co-workers lying on the floor unconscious. You find your emergency supllies in the box lying next to him. Open the box to receive your supplies. Follow the instructions on the computer screen to give two / three breaths to the victim.” and where asked to enter the room one by one so they wouldn’t know exactly what to expect and couldn’t see the performance of their fellow students. The remaining four students were used to measure the intuitiveness of the equipment by giving them no animations and no feedback at all. They were told to use the provided equipment and give three breaths. The animations were shown while the students performed the tasks and the clock stated running with the start of the animations. Two observers rated the correct usage of the equipment individually. If their assessment didn’t agree, the student received a half point instead of a full point. A sucessfull breath was judged by a medical expert looking for a chest rise of the Laerdal Little Anne CPR manikin. The same observer rated the head tilt on a scale from no (0) to great (3). The delivered volumes and flows were recorded using the CO2 SMO+ and 400 − 500 mL was considered to be an adequate amount [5]. In this study, the mask pressure was recorded when the student tried to give the breath. Two different masks were used in the combo pillow groups and the two other (manual head tilt and bar pillow) groups due to the integration of the mask in the combo pillow. The cuff pressure was equal in both cases. The mask pressure was measured by the Fluke Gas Analyzer and a sufficient low leak was assumed if the pressure was greater than 35 cmH2 Oon the manikin during the breath phase. The pressures need to be a little bit higher than on a human face due to the stiffness of the manikin’s face. The time for each individual step and the effectiveness of each individual breath was measured and rated to obtain the time to the first effective breath. The supervisor ended the test when the student gave two (three) successful breaths or was unable to do so in nine consecutive attempts. The groups with verbal feedback got the verbal cues “correct, proceed ” or “return to the previous step”.
4.5.3. Results 4.5.3.1. Errors in Use of Equipment All students attached the headstrap correctly. In the groups who had a pillow, 98% used the combo pillow correctly while 80% of the bar pillow group performed correctly. Most errors
32
4. Human Factors Studies 100 90 80 70
[%]
60 50 40 30 20 Manual head tilt bar pillow Combo pillow Combo pillow no verbal Combo pillow no help
10 0
Pillow
Mask placement
Headstrap
Figure 4.13.: Correct handling of the provided equipment where from not finding the bar pillow or placing it under the head and not under the neck. (see Figure 4.13) The bar pillow group performed nearly as well (93%). The manual head tilt group placed the mask correctly in 70% of the cases. Most problems were in using the wrong mask orientation and putting the mask on the rescuer instead of the manikin. Student Version of MATLAB
4.5.3.2. Head Tilt Figure 4.14 shows that the group using the combo pillow performed a great or good head tilt in 90% of the cases. The group using the bar pillow performed a good head tilt in 70% and a perfect head tilt in 15% of the cases. The group with the manual head tilt performed a great head tilt in 60% and a good head tilt in 30% of the cases. In the cases with a perfect or good manual head tilt, the head tilt deteriorated to a poor or no headtilt because the average head tilt quality decreased a little bit more than one (1.05) step . The second and third head tilt attempts were in average worse that the first attempt (see Figure 4.15). The 10% poor head tilts in the combo pillow group may have been caused by the compression of the neck part of the pillow due to repeated use (44 times in this study and many times before during the development). This resulted in the possibility of giving an effective breath of 95% in the combo pillow cases and 85% of the bar pillow group. The manual head tilt group got only 35% due to the problem of losing the head tilt while pressing the mask down and giving a breath. 4.5.3.3. Mask Seal The average cuff pressure was 48 ± 15 cmH2 O (range 17 − 74) in the manual head tilt group, 41 ± 10 cmH2 O (21 − 60) in the bar pillow group , 32 ± 11 cmH2 O (9 − 54) in the combo pillow with verbal feedback and 37 ± 18 cmH2 O (16 − 83) in the combo pillow no verbal group (see
33
4. Human Factors Studies 20 18 16
16
14
14
12
12
10
10
8
8
6
6
4
4
2
2
0
Manual head tilt
bar pillow
Combo pillow
no poor good great
18
%
%
20
no poor good great
0
Combo pillow no verbal
Manual head tilt
20
bar pillow
Combo pillow
Combo pillow no verbal
no poor good great
18 16 14
%
12 10
Student Version of MATLAB
Student Version of MATLAB
8 6 4 2 0
Manual head tilt
bar pillow
Combo pillow
Combo pillow no verbal
Figure 4.14.: Head tilt quality on first, second and third attempt 20 18 Student Version of MATLAB
16
number of subjects
14 12 10 8 6 4 2 0
1st 2nd 3rd Manual head tilt
bar pillow
Combo pillow
Combo pillow no verbal
Figure 4.15.: Number of subjects deliverying an effective breath at the first, second and third attempt
34
4. Human Factors Studies 90
80
70
p [cm H2O]
60
50
40
30
20
10
0
Manual head tilt
bar pillow
Combo pillow
Combo pillow no verbal
Figure 4.16.: Mask seal pressure and min/max ranges Figure 4.16). Audible leaks were recorded in 45% of the manual head tilt group, in 25% of the bar pillow group and in 40% in the combo pillow groups. Only 20% audible leaks occured in the combo pillow with verbal feedback group (see Figure 4.17). 4.5.3.4. Volume of Inspired / Expired Air and Leak
Student Version of MATLAB
The average volume of air being given to the manikin was 363 ± 590 mL (range 0 − 1.56 L) in the manual head tilt group, 1.05 ± 0.71 L (0 − 2.19 L) in the bar pillow group, 1.18 ± 0.66 L (0 − 2.42 L) in the combo pillow with verbal feedback group and 1.14 ± 0.37 L (0.55 − 1.91 L) in the combo pillow no verbal group. The expired volume from the manikin was considerably lower due to the mask leak. It was 29 ± 28 mL in the manual head tilt group, 378 ± 481 mL in the bar pillow group, 388 ± 438 mL in the combo pillow with verbal feedback group and 517 ± 399 mL in the combo pillow no verbal feedback group. The difference between these values was assumed to be the leak out of the mask. An audible leak occurred in 45% of the manual head tilt group, in 25% of the bar pillow group, in 40% of the combo pillow group and in 20% of the combo pillow no verbal feedback group (see Figure 4.18). The amount of insufflated air was usually too large as 400 − 500 mL was considered to be an adequate amount while performing CPR [5]. Some students filled the complete bag representing the lungs in the manikin and stopped only when it was full. 4.5.3.5. Average Time to Give One Effective Breath The time for the first breath in the manual head tilt group was 58 sec, and was 63 sec in the bar pillow group. The two groups using the combo pillow where very close with 52 sec without verbal feedback vs. 50 sec with verbal feedback (see Figure 4.19). The people in the bar pillow group spend most of their time placing the pillow after placing the mask, which caused them to be the slowest group of all.
35
4. Human Factors Studies
100 90 80 70
%
60 50 40 30 20 10 0
Manual head tilt
bar pillow
Combo pillow
Combo pillow no verbal
Figure 4.17.: Subjects with audible leaks
1200
Student Version of MATLAB
1000
V [ml]
800
600
400
200
0
exhaled leak Manual head tilt
bar pillow
Combo pillow
Combo pillow no verbal
Figure 4.18.: Leaks and exhaled volume of the best breath
36 Student Version of MATLAB
4. Human Factors Studies
90 80
Manual head tilt bar pillow Combo pillow with verbal Combo pillow no verbal
70
t [s]
60 50 40 30 20 10 0
step one
step two
apply pressure
first effective breath
Figure 4.19.: Average time comparison (mean ± SD)
4.5.4. Conclusions The mask placement was perfect in all combo pillow groups due to the integrated design of the mask and the pillow. Using the combo pillow enabled a lay person to give the first effective breath within 52 sec in 95% of the cases. It effectively eliminated the problem of losing the head tilt while pressing the mask down to give a breath. This result isofvery promising and Student Version MATLAB leads to the conclusion to use the combo pillow or a similar device in the final product. Using the students for this evaluation is probably the gold standart, as they are smart, fast and in good physical shape. Using older people will certainly decrease the time slightly, but with good animations we should be able to keep the performance at a very high level. Instructions in chest compressions and mouth-to-mouth ventilations by a telefone dispatcher takes 2.4 min [34]. This time for instructions is lost in the chain of survival, while using our system we have allready given a breath in less than half of the time and we can start on the chest compressions or AED use! By observing the last four students who recieved no assistance and still succeeded in putting the combo pillow in place, placing the mask and trying to give a breath, it seems to be very intuitive. They didn’t press on the mask, which resulted in only one person getting a breath in. After getting a hint to applying pressure, all got a breath in. Ninety−95% of the students delivered an effective breath even though an audible mask leak was observed in 40% of all breaths delievered. The given volume (363 ± 590 mL) was usually too big. The big difference between inspired and exspired volume can be a leak which was detected by air fizzling out of the mask but may also have been a problem with the data acquisition which needs to be eliminated if present for the next study. The cause for the bad performance of the manual head tilt was that the subjects lost the head tilt as soon as they tried to give a breath. The cause of the poor performance of the bar pillow is that some students still didn’t see it the first and second time although we enhanced the contrast compared to the last study (blue bar on white ground). This leads
37
4. Human Factors Studies to the conclusion of excluding both tests from the next studies and staying focused on the combo pillow only. Some students looked confused and searched for the mask as they didn’t see the mask on the combo pillow. The animation didn’t show the mask was stored ontop of the pillow. This was identified as a problem of the animations and will be highlighted for the next study to eliminate this problem. A couple people didn’t put the mouthpiece in their mouth, and just pressed their lips against it, which usually resulted in no flow or very low volume. This is a problem with the animations as the head in the animation didn’t clearly put the mouthpiece in its mouth. This must be modified for the next study. Most of the students followed the animations literally. Some pressed down on the mask and let it go again and some also did this with the head tilt. They tilted back and forwards. This leads to the conclusions that students follow the animations literally which makes it necessary to have very exact animations. This also shows that it is possible to instruct lay people, giving them just in time training with animations! The animations are good enough to give the student the instructions they need to give two / three effective breaths. The additional verbal instructions seemed to make the persons to much focused to them and not working only from the instructions shown in the animations. Verbal instructions should be reduced for the next studies and the final system. The mask cuff pressures were significantly lower than in the last study which may have contributed to the large leaks. The combo pillow head strap was modified to make sure it creates a higher pressure by placing the mask and providing a better seal, although the strap pressure is not sufficient to create a good mask seal without additional pressure on the mask.
4.6. The Final Combo Pillow Study 4.6.1. Purpose of this Study The purpose of this study was to test how the improvements in the animations and the tightened head strap performed in a new set of students.
4.6.2. Test Setting Seventeen Cottonwood high school students5 from four different health classes participated in this study (A total of 53 students were used in this test day). These students were randomly (in blocks of five) assessed from the total of 53 students, minus the 20 who had CPR training, used in this day’s test. After having a sufficent amout of 12 students in the animation groups, 5 additional students were told to place the pillow and give two simulated breaths to a live “victim” to simulate more of the threatening “real” situation. The students were told:” Imagine the following situation: You work at the airport and arrive for an early morning shift. As you walk into the office, you find one of your coworkers lying on the floor unconscious. You find an emergency rescue box lying next to him. You open the box to receive your supplies. Your instructions are on the computer screen to tell you how to properly give 3 sets of two breaths to the victim.” The test was ended when the student gave three sets of breaths or was unable to do so in six consecutive attempts. 5
20 CPR trained, 12 combo pillow animations, 12 chest compression animations, 5 live victim and 4 compression with feedback students were used in this test
38
4. Human Factors Studies 100
Combo pillow Live victim
90 80 70
[%]
60 50 40 30 20 10 0
Pillow
Mask placement
Subjects with help
Audible leaks
Figure 4.20.: Correct handling of the provided equipment
4.6.3. Results The students who had to handle a live “victim” found one of the observers lying on the ground, not moving, his eyes closed and trying to relax his muscles to make the head placement in the combo pillow little bit more difficult and realistic. A single-way valve was connected in the wrong direction Student so that the ofrescuer’s Version MATLAB breath left the tube before the mask. This allowed the inspired volumes to be recorded without the risk of harming the victim. This also prevented the victim from being able to inhale as the mask seal was very good and the single way valve in the wrong direction. Thus the victim needed to lift the mask to get a breath after the second set of breaths was given by the rescuer. 4.6.3.1. Equipment Handling All students were able to place the combo pillow correctly (see Figure 4.20). The mask placement was correct in all cases with the live victim, while one student in the animation group placed it over the chin. This led to an effectiveness of 96%. Ten (85%) of the animation students needed a pressure reminder in order to give an effective breath, while the entire live victim group depended on it. This was probably because of the fear to hurt the live victim. This led to 42% leaks in the animations group. 4.6.3.2. Head Tilt Quality The head tilt was not rated in the live victim group (see Figure 4.21). The students performed a poor head tilt at 17% of the first, and 25% in the second and third set. The 50% perfect head tilt decreased to 33% in the following two sets. The head tilt was good in 33% of the first set and 41% of the following sets. Two subjects had a poor head tilt during all of their attempts. Thus, this group performed worse than the group in the previous study utilizing the combo pillow.
39
4. Human Factors Studies 12
no poor good great
10
number of subjects
8
6
4
2
0
1st set
2nd set
3rd set
Figure 4.21.: Head tilt quality 4.6.3.3. Applied Mask Seal Pressure The average mask pressure was around 41 cmH2 O (41 ± 29 cmH2 O on the first and 42 ± 27 cmH2 O on the second attempt) on the first set. After being given a pressure reminder (“Apply pressure to the mask and give two breaths”) the pressure increased to 64 ± 29 cmH2 O on the third and even 77 ± 20 cmH2 O on the fourth attempt. The average pressures of the Student Version of MATLAB last set, 63 ± 31 cmH2 O on the fifth and 63 ± 17 cmH2 O on the sixth attempt, were lower again as there was no second reminder to apply more pressure. The pressure ranges were significant with an overall minimum pressure of 9 cmH2 O and a maximum pressure of 127 cmH2 O (see Figure 4.22). The students coming across the live victim applied lower average pressure, probably because feared hurting the person lying on the ground. They applied an average pressure of 15 ± 7 cmH2 O on the 1st, 17 ± 7 cmH2 O on the 2nd, 51 ± 45 cmH2 O on the 3rd, 55 ± 32 cmH2 O on the 4th, 16 ± 9 cmH2 O on the 5th and 36 ± 15 cmH2 O on the 6th attempt. The pressure ranges were 6 − 129 cmH2 O. The combination of the low mask pressure and the poor head tilt caused the problems with breath delivery. In the first set of breaths, only 30% of the students using the combo pillow on the manikin successfully delivered two effective breaths and only 42% delivered one effective breath. After being given the pressure reminder they performed much better in the second set, with 78% giving two effective breaths and 83% at least one. As there was only a pressure reminder on the second attempt, the third attempt’s results were again worse, decreasing to 74% for two effective breaths and 75% for at least one effective breath (see Figure 4.23). 4.6.3.4. Volumes of the Successful Breaths The average volume of the breaths given was very large. The inspired volumes were 1.43 ± 0.79 L at the first breath, 1.57 ± 1.12 L at the second, 1.62 ± 0.95 L at the third, 1.40 ± 0.70 L at the fourth and 1.11 ± 0.40 L at the fifth breath (see Figure 4.24).
40
4. Human Factors Studies
140
Combo pillow Live victim
120
p [cm H2O]
100
80
60
40
20
0
breath 1
breath 2
breath 3
breath 4
breath 5
breath 6
Figure 4.22.: Average mask seal pressure and ranges
100
All breaths effective One effective breath per set
90
Student Version of MATLAB 80
number of subjects [%]
70 60 50 40 30 20 10 0
1st set
2nd set
3rd set
Figure 4.23.: Number of subjects delivering an effective breath
41 Student Version of MATLAB
4. Human Factors Studies 1600
2500
exhaled leak
inhaled
1400 2000 1200
1500 V [ml]
V [ml]
1000
800
1000
600
400 500 200
0
breath 1
breath 2
breath 3
breath 4
0
breath 5
breath 1
breath 2
breath 3
breath 4
breath 5
Figure 4.24.: Expired volumes and leaks and inhaled volumes for the live victim The exhaled volumes from the manikin were 355 ± 518 mL for the first, 537 ± 377 mL for the second, 686 ± 595 mL for the Student third, 768 ± 326 mL for the fourth and 777 ± 401 Student mL Version for ofthe Version of MATLAB MATLAB fifth breath. They were all (the first one is slightly smaller) larger than the required minimum expired volume of 400 mL recommended by Baskett [19] or the American Heart Association [5]. With the live victim, only the inspired volumes were recorded due to the modified mask one-way valve setting. The inspired volumes were even larger as there was no resistance in the airway. The students administered 2.26 ± 0.94 L for the first breath, 1.79 ± 0.56 L for the second, 1.92 ± 0.29 L for the third breath. One student administered 2.04 L for the fourth and 1.83 L for the fifth breath, while all others stopped before. These breaths were so large as the tube construcion had no resistance and the student could use their complete lung volume to deliver a breath. 4.6.3.5. Average Times to Complete the Different Task in this Study The students with the animations and the manikin needed an average of 17 ± 6 sec to place the pillow, 30 ± 8 sec to place the mask, 37 ± 8 sec to apply pressure and only 43 ± 8 sec to their first breath attempt. The average student completed six breath attempts within only 73 ± 11 sec (see Figure 4.25). With this they were only slightly slower in the breathing part than the live victim group that took 17 ± 6 sec to place the pillow, 28 ± 7 sec to place the mask, 37 ± 1.4 sec to apply pressure and only 38 ± 6 sec to their first breath attempt. They had an average time to finish the task of 65 ± 6 sec.
4.6.4. Conclusion The combo pillow needs to be tested with anesthetized humans to observe how often it keeps the airway open as it maintains a head tilt. If a jaw thrust is required in addition to the head tilt to keep the tongue out of the airway and allow an adequate flow, the animations need to be modified to include this. It may be possible to modify the pillow so that it can maintain a jaw thrust rather than requiring the lay person to do a manual jaw thrust. The problem with the students not getting a breath in was probably related to humidity in the lung bag inside the manikin, which made the trachea part stick together and prevent flow. The combo pillow shows signs of yielding after beeing used in three studies. The reduced
42
4. Human Factors Studies
breath 6 breath 5 breath 4 breath 3 breath 2 breath 1 pressure mask end pillow Combo pillow Live victim
start pillow 0
10
20
30
40
t [s]
50
60
70
80
90
Figure 4.25.: Average times and ranges for all required steps in this animation
head tilt could to be improved by reattaching the hair of the manikin better and repairing the upper part of the combo pillow. The decrease of the mask seal pressure combined with the tighter head strap lead to a very good fit, on the live victim’s face but still makes pressure on the mask necessary because Student Versionarea. of MATLAB the manikin’s face is stiff and leaks usually occur in the eyehole (orbit) The improved animations with a better visalisation on pressing down the mask and giving a breath also helped a lot. Testing with the live victim showed that the students did not hesitate too much when giving breaths and placing the pillow on a real human, although they were irritated more by this. This might change significantly if the victim is bloody, smelly etc.
4.7. First Preliminary Operating Room Study 4.7.1. Purpose of the study The purpose of this study was to learn how much the “combo pillow” needed to tip the head for the proposed OR study.
4.7.2. Test setting In this preliminary study we used a single male patient that underwent kidney transplantation. The patient was big and had a short neck and a large head. The anesthesiologist used the bicycle helmet and the combo pillow without the attached mask covered in a pillowcase, so he couldn’t see which one he was using.
43
4. Human Factors Studies
4.7.3. Results The anesthesiologist placed the regular anesthesia mask on the patient’s mouth as he became unconscious and tried to bag the patient. He applied mask pressures in the range of 30 − 53 mmHg. After the patient has lost consciousness his airway collapsed and the anesthesiologist was unable to get a breath in by placing the pillow and trying to bag the patient. Using the bicycle helmet, which has a higher neckpiece, also failed to open the airway so a breath could go in without using a higher airway pressure than 30 mmHg. By applying a simple chin lift, the anesthesiologist was able to give adequate breath volumes of 650 mL. Therefore, he didn’t have to perform the more difficult jaw thrust maneuver with this patient.
4.7.4. Conclusions This may led to the conclusion that a bigger study with more patients should be undertaken, but first another one or two preliminary studies should be made to find the optimal neck piece height, as it might be possible to open the airway with only a head tilt.
4.8. Second Preliminary Operating Room Study 4.8.1. Purpose of the study The purpose of this study was to learn how much better the higher bycycle helmet tipped the head for the proposed OR study.
4.8.2. Test setting In this preliminary study we used a single female patient that underwent spinal surgery. The patient was skinny, small and young (age < 25 years). The anesthesiologist used the bicycle helmet covered in a pillowcase, so he couldn’t see the new modifications.
4.8.3. Results The anesthesiologist placed the regular anesthesia mask on the patient’s mouth as she became unconscious and tried to bag the patient. He applied mask pressures in the range of 30 − 60 mmHg. After the patient has lost consciousness her airway did not collapse fully and the anesthesiologist was able to get a breath in by just tilting the head. Using the bicycle helmet, with the higher neckpiece, also opened the airway so a breath could go in.
4.8.4. Conclusions The higher bycycle helmet didn’t worsen the situation of the airway by overextending the neck. After one additional study with a big patient the bycycle helmet is probably ready for the OR study.
4.9. Chest Compression Animation Study 4.9.1. Purpose of this Study In this study we wanted to evaluate how well students with no CPR training were able to perform chest compressions instructed only by the new chest compression animations.
44
4. Human Factors Studies
4.9.2. Test Setting Sixteen Cottonwood high school students from four different health classes participated in this study. These students were randomly (in blocks of five) assessed from the total of 53 students, minus the 20 who had CPR training, used in this day’s test. After having a sufficent amout of 12 students in the animation groups, 4 additional students were told to give chest compressions to the manikin (Laerdal Little Anne) following the animations and recieving feedback about the compression depth. The students who were presented the chest compression animations were told: ”Your victim is laying down in front of a computer screen. Follow the instructions on the screen to give chest compressions until the paramedics arrive. We will tell you when the paramedics are here and you can stop.” Two observers rated the hand placement and the body and heal positions (see D.2 for score sheet). The compression depth and frequency were retrieved from the depth measuring device built in the Resusci Anne (see Appendix 3.2.12). The compression depth and frequency were averaged in 10 sec pieces over the full time of the chest compressions. The test was ended three minutes after doing the first chest compression.
4.9.3. Results The animation played a beep using a standard windows sound every time the hand on the compression went down in order to simplify getting and maintaining the correct rhythm. 1 The target chest compression frequency of 76 min was created by the computer playing the 6 animations . A problem with the animations was that the producer forgot to put an additional pause at the end of the looping sequence that resulted in a triple beep every 12 compressions, which was one looping cycle. 4.9.3.1. Hand Placement Location Not a single student placed his hand correctly on the midsternum line as shown by the crosshair in the animations. In the animation the midsternum line was crossed by a line connecting the two nipples. Five (42%) of the students placed their hand left of the sternum line. This may have had at least two different causes. Many people believe that their heart is on the left side of their chest. The left side was also closer to the rescuer. Four students (33%) placed their hand below the nipple line and left and 2 students (17%) placed it low on the midsternum line. One (8%) student placing the hand high and left put it as close to his own body as possible (see Figure 4.26). Compressing the stomach rather than the heart decreases the perfusion created by the chest compressions dramatically, while placing it incorrectly on the ribcage area close to the optimal point doesn’t make a big difference. This might also be caused by left handed students as our animations showed the right hand as the dominant hand to be placed on the sternum with the left one on top of it as Kundra[46] reports a significant increase of incorrect placements while using the non-dominant hand. 4.9.3.2. Time to the First Compression The students needed an average time of 10.6 ± 5.4 sec (range 4 − 26 sec) to start the first 1 compression . They started doing the fast 76 min compressions at 22.7 ± 8 sec(range of 11 − 45 sec). 6
1 Due to a problem with the computer playing the animations it was not the expected 100 min .
45
4. Human Factors Studies
17%
low & left nipple line & left high & left low & centered
33%
8%
42%
Figure 4.26.: Hand placement location
4.9.3.3. Body and Hand Position Fourtyfive % of the students used the heel of the hand (thenar) to make the compressions and 25% of them locked the elbows, which allowed them to compress using their body weight more than their arm muscle power (see Figure 4.27). 90% of the people getting verbal feedback tilted their hand correctly and all of them locked their elbows on their own as the feedback Student Version of MATLAB was given. The feedback focused only on the compression depth.
4.9.3.4. Compression Frequency The average frequency as seen in figure 4.28 is pretty close to the target frequency of 76 ± 1 12 compressions fluctuating by only ±8 min after the initial phase and matching better over the min time as the students adapted more to the rhythm. The big frequency ranges at the beginning were caused by the students trying to follow the triple beep and their need to adjust their compression frequency to the predetermined frequency of the beep in the animation. When asked after the study if they found the beep helpful, only 12% found the triple beep annoying or preferred the visual animations while all the others (88%) found it very helpful. All the students in the feedback group agreed it was useful.
4.9.3.5. Compression Depth The average compression depth was lower than the target range of 1.5 − 2 inches [5]. It remained quite steady at an average of 1.2 ± 0.4 inches which can be seen in figure 4.29. The students who received verbal feedback (either “Press harder ” or ”Don’t press so hard ”) maintained their compression depth very well between the two given boundaries representing the optimal compression depth range. The compression range displayed is the one recommended by the American Hearth Association.
46
4. Human Factors Studies
100
animations only verbal feedback
90 80 70
[%]
60 50 40 30 20 10 0
compression method (heel)
ellbows locked
Figure 4.27.: Correct body position and hand heel contact
140
students animation
120
Student Version of MATLAB
100
f [1/min]
80
60
40
20
0
0
20
40
60
80
100 t [s]
120
140
160
180
200
Figure 4.28.: Average compression frequencies and min/max ranges
47 Student Version of MATLAB
4. Human Factors Studies
2
depth [in]
1.5
1
0.5
0
min max students verbal feedback 0
20
40
60
80
100 t [s]
120
140
160
180
200
Figure 4.29.: Average compression depth and min/max ranges as well as the recommanded range 4.9.3.6. Exhaustion After performing three minutes of continuous chest compressions, Four students (33%) said they were not exhausted and did not have sore arms or hands. 2 students (17%) were slightly exhausted and 6 students (50%) were exhausted. Four students (33%) slightly sore arms Student Versionhad of MATLAB or hands and the same number had sore arms and/or hands (see Figure 4.30). This result is amazing and shows that our high school students were well trained and in good shape. (The students in this group were around 16 years old and 32 of the students were girls.) Ashton [3] finds significant decrease in depth while the frequency was kept very good during three minutes of continous chest compressions for 6 minutes with a 30 sec break after 3 minutes. Ashton also found a correlation of height, weight and therefore female sex as criteria for faster exhaustion. All students answered yes or probably, which was also counted as a yes, when asked if they could continue for two more minutes.
4.9.4. Conclusion The students followed the frequency beep very well, except for the students confused at the beginning by the tripple beep. The students reported that the beep was helpful for establishing rate of compressions. For deaf people or noisy environments, a secondary signal such as a visual aid still needs to be developed. Feedback about the correct depth of the compressions seems to be mandatory as the students generally did to small compressions (1.2 ± 0.4 inches). This still needs to be developed. The chest compression animations need to be modified to make sure the correct hand placement is done. The triple beep and the wrong frequency component need to be fixed. If the Zoll AED pads are to be used in the final product, the hand placement for the chest compressions is simplified by the pressing pad in the middle of the two electrodes. Therefore
48
4. Human Factors Studies 12
no slightly yes
10
8
6
4
2
0
Exhausted
Sore arms/hands
Go for two more minutes?
Figure 4.30.: Exhaustion and possibility to continue for two more minutes animations of the Zoll pads placement and handling need to be created. The first two deliberately slow compressions at the beginning of the animation waste nearly 10 sec of critical time and should be removed, since the students usually picked up the correct 1 compression rate with the fast compression animation at the 100 min frequency. Student Version of MATLAB
4.10. Are Headrest and Animations Equivalent to CPR Training Study 4.10.1. Purpose of this Study In this study we wanted to evaluate how students with CPR training performed CPR without any further help in order to evaluate their knowledge, retention skills and overall performance. This allows us to compare their performance with those who used our head rest and animations.
4.10.2. Test Setting 53 Cottonwood high school students from four different health classes participated during this study day. At the beginning of each class, the students who had had CPR training before were separated from the rest of the group. There were 20 CPR trained students used in this study. The students were told: “Imagine the following situation: Your victim is laying on the ground in front of you. Perform CPR as you have been taught in your CPR course. The persons in the room are for observation only and can’t answer any questions. You have to perform CPR until the paramedics have arrived and we tell you to stop” and where asked to enter the room one by one so they wouldn’t know exactly what to exspect and couldn’t see the performance of their fellow students. The first group of 5 students was waiting for their turn in front of the room as a group, which may have had some influence on the results if
49
4. Human Factors Studies
Pp) F = 1; end %The external pressure on the chest in considered to be an half %sine wave with the Amplitude of Pmaxch. Pchestnew = max(0,sin(2*pi*t*(freq/60)))*Pmaxch*Tfactor; dPchest = Pchestnew-Pchest; Pchest = Pchestnew; %calculating the flows (l/s) Ia = 1/Ra*(Pao-Paa); Ih = 1/Rh*(Pcar-Pjug); Iht = 1/Rht*(Pao-Prh); Ii = F/Ri*(Prh-Pp); Ij = N/Rj*(Pjug-Prh); Io = E/Ro*(Pp-Pao); Is = 1/Rs*(Paa-Pivc); Iv = 1/Rv*(Pivc-Prh); Ic = 1/Rc*(Pao-Pcar); flow(count,:)=[t,Ia*60,Ih*60,Iht*60,Ii*60,Ij*60,Io*60,Is*60,Iv*60,Ic*60]; %calculating the delta pressures dPabd = 0; % No Abdominal pressure with CC-only
82
A. Matlab Source Code dPaa = dPabd + dt/ Caa*(Ia-Is); dPivc = dPabd+dt/Civc*(Is-Iv); dPcar = dt/Ccar*(Ic-Ih); dPjug = dt/Cjug*(Ih-Ij); dPao = TPfactor*dPchest+dt/Cao*(Io-Ic-Ia-Iht); dPrh = TPfactor*dPchest+dt/Crh*(Ij+Iv+Iht-Ii); dPp = dPchest+dt/Cp*(Ii-Io); %calculating the pressures of the different compartments (mmHg) Pao = Pao+dPao; Paa = Paa+dPaa; Pivc = Pivc+dPivc; Pcar = Pcar+ dPcar; Pjug = Pjug+dPjug; Prh = Prh+dPrh; Pp = Pp+dPp; press(count,:)=[t,Pao,Paa,Pivc,Pcar,Pjug,Prh,Pp,0,Pchest,N,E,F]; %calculating the volumes (l) dVa = Ia*dt; dVh = Ih*dt; dVht = Iht*dt; dVi = Ii*dt; dVj = Ij*dt; dVo = Io*dt; dVs = Is*dt; dVv = Iv*dt; dVc = Ic*dt; if (count>1) vol(count,:)=[t,vol(count-1,2)+dVa,vol(count-1,3)+dVh, vol(count-1,4)+dVht,vol(count-1,5)+dVi, vol(count-1,6)+dVj,vol(count-1,7)+dVo, vol(count-1,8)+dVs,vol(count-1,9)+dVv, vol(count-1,10)+dVc]; end end %%%%%%%%%% visualization of the results %%%%%%%%%% figure(1); plot(press(startvalue+1:endvalue,1),press(startvalue+1:endvalue,2:10)); xlabel(’t [s]’); ylabel(’p [mmHg]’); legend(’Thoracic aortic’,’Abdominal aorta’,’Inferior vena cava’, ’Carotid artery’,’Jugular veins’,’Right heart & sup. v. cava’, ’Chest pump’,’Abdomen pressure’,’Chest pressure’); figure(2); plot(flow(startvalue+1:endvalue,1),flow(startvalue+1:endvalue,2:10)); xlabel(’t [s]’); ylabel(’flow [l/min]’); legend(’I aortic’,’I head, arms’,’I coronary’,’I pump input’,’I jugular’, ’I pump output’,’I systemic’,’I venous’,’I carotid’); figure(3);
83
A. Matlab Source Code plot(vol(startvalue+1:endvalue,1),vol(startvalue+1:endvalue,2:10)); xlabel(’t [s]’); ylabel(’volumes [l]’); legend(’Va’,’Vh’,’Vht’,’Vi’,’Vj’,’Vo’,’Vs’,’Vv’,’Vc’);
A.2. Chiari Gas Exchange Model A.2.1. The Main Function function gas(endtime) % gas(endtime), where endtime is the ending time in seconds % % This is a Matlab implementation of the Chiari L gas exchange model %clean up first!!! close all; %%%%%%%%%% Constants %%%%%%%%%% %Misc. constants z = 0.8668; % circulation fraction of the tissue Q = 5.04; % Cardiac output (l/min) s = 0.024; % pulmonary shunt fraction tauB = 320; % Brain to CSF diffusion time(s) alphaCO2 = 6.67E-4; % CO2 solubility factor (l/(l*mmHg)) alphaO2 = 3.17E-5; % O2 solubility factor (l/(l*mmHg)) Vpoint = 4.28; % Alveolar Ventilation (l/min) lamda = 863; % Conversion coefficient (mmHg) %Volumes in l VA = 3.28; % Alveolar Volume VB = 0.9; % Brain Volume VT = 38.74; % Tissue Volume %Partial pressures in mmHg PAO2 = 100.2; % Alveolar O2 PACO2 = 40.28; % Alveolar CO2 PBO2 = 30.89; % Brain O2 PBCO2 = 44.87; % Brain CO2 PcsfCO2 = 44.87; % Cerebrospinal fluid CO2 PIO2 = 149; % Inspired air O2 PICO2 = 0; % Inspired air CO2 %concentrations in l (STPD)/l CeO2 = 0.193; % end capillary O2 CeCO2 = 0.570; % end capillary CO2 CvO2 = 0.114; % mixed venous O2 CvCO2 = 0.610; % mixed venous CO2 CvbO2 = 0.118; %Brain venous O2 CvtO2 = 0.148; %tissue venous O2 CBO2 = 9.78E-4; %Brain O2 CBCO2 = 0.645; %Brain CO2 CTO2 = 13.0E-4; %Tissue O2 CTCO2 = 0.605; %Tissue CO2 %Metabolic production / consumption rates (l/min) MPBO2 = -0.05; %Brain O2 consumption MPBCO2 = 0.05; %Brain CO2 production MPTO2 = -0.192; %Body tissue O2 consumption
84
A. Matlab Source Code MPTCO2 = 0.15; %Body tissue CO2 production %Setting the initial time conditions startvalue = 0; dt = .005; endvalue =endtime/dt; t = 0; %time %initialize arrays valcO2(endvalue,8) = 0; valcCO2(endvalue,6) = 0; valp(endvalue,5) = 0; valSat(endvalue,4) = 0; dPs(endvalue,3) = 0; dCs(endvalue,5) = 0; %circulation flows and adjustment to seconds Q = Q/60; QT = Q*z; QB = Q-QT; Vpoint = Vpoint/60; MPBO2 = MPBO2/60; MPBCO2 = MPBCO2/60; MPTO2 = MPTO2/60; MPTCO2 = MPTCO2/60; kcr = kcr/60; %%%%%%%%%% Looping the calculations %%%%%%%%%% for count= 1:endvalue t= t+dt; %Increase the time %alveolar partial pressures (1) dPAO2 = (Vpoint*(PIO2-PAO2)+lamda*Q*(1-s)*(CvO2-CeO2))/VA*dt; PAO2 = PAO2+dPAO2; dPACO2 = (Vpoint*(PICO2-PACO2)+lamda*Q*(1-s)*(CvCO2-CeCO2))/VA*dt; PACO2 = PACO2+dPACO2; %arterial gas content (2) CaO2 = (1-s)*CeO2+s*CvO2; CaCO2 = (1-s)*CeCO2+s*CvCO2; %Henry O2 solubility (7), assumption (I) PBO2 = CBO2/alphaO2; PTO2 = CTO2/alphaO2; %Assumption (II) PvbO2 = PBO2; PvtO2 = PTO2; PeO2 = PAO2; PeCO2 = PACO2; %Sharan O2 blood solubility (8) CvtO2 = calcO2(PvtO2,’no’); CvbO2 = calcO2(PvbO2,’no’); CeO2 = calcO2(PeO2,’no’); %Combined CO2 in compartments (14)
85
A. Matlab Source Code % The % and % the CeCO2
equality of the Brain and Tissue concentrations in the compartment the blood leaving it was not documented in the paper but found in Chiari’s Simulink files. = calcCO2(PeCO2,PeO2);
%cerebral compartment mass balance (3) %Assumption: if the PO2 is =1.5 &&tfreq>=.25){ freq=60/tfreq; tfreq=0; } if (tfreq>1.5) freq=0; //If there are no compressions within 1.5s set the Volt2old=Voltold; //frequency to zero. Voltold=Voltage; char buffer2[50]=""; //update the display of the frequency every 0.2s if ((t>0) && (i%20==0)){ sprintf(buffer2," f=%2.1f 1/min, t=%3.1f s, d=%1.2f in",freq,t,depth); Label1->Caption=buffer2; } //draw the depth waveform on the Canvas with the optimal ranges in red //and the baseline and Values in black in a looping way val=floor(50*depth); Canvas->LineTo(i,mline-(3*val)); Canvas->Pen->Color=clBtnFace; Canvas->Rectangle(i+1, 25, i+5, Form1->ClientHeight); Canvas->MoveTo(i+1,mline); Canvas->Pen->Color=clBlack; Canvas->LineTo(i+5,mline);
90
B. C++ Source Code For Depth Recording Program Canvas->Pen->Color=clRed; Canvas->MoveTo(i,mline-150*1.5); Canvas->LineTo(i+5,mline-150*1.5); Canvas->MoveTo(i,mline-200*1.5); Canvas->LineTo(i+5,mline-200*1.5); Canvas->Pen->Color=clBlack; Canvas->MoveTo(i,mline-(3*val)); oldval=val; i++; if (i>=Form1->ClientWidth){ //If reaching the right boarder of the Canvas i=0; //go to the left side and continue. Canvas->MoveTo(0,mline); } } //--------------------------------------------------------------------------//Open a new File, write the caption to the CSV file and draw the baseline void fastcall TForm1::FileName1Click(TObject *Sender) { SaveDialog1->Title = "Please select Filename for Data values"; SaveDialog1->Filter= "Comma separated value files (*.csv)|*.csv"; if (SaveDialog1->Execute()){ myfile = (fopen ((SaveDialog1->FileName).c str(),"w")); fprintf(myfile,"time [s], depth [V], frequency [1/min], depth [in]\n"); Timer1->Enabled=true; } Canvas->MoveTo(0,mline); Canvas->LineTo(Form1->ClientWidth,mline); Canvas->Pen->Color=clRed; Canvas->MoveTo(0,mline-150*1.5); Canvas->LineTo(Form1->ClientWidth,mline-150*1.5); Canvas->MoveTo(0,mline-200*1.5); Canvas->LineTo(Form1->ClientWidth,mline-200*1.5); Canvas->MoveTo(0,mline); Canvas->Pen->Color=clBlack; FileName1->Enabled=false; Save1->Enabled=true; } //--------------------------------------------------------------------------//Close file by calling Closefunction on exit void fastcall TForm1::FormClose(TObject *Sender, TCloseAction &Action) { Quit1Click(Form1); } //--------------------------------------------------------------------------//Close file and disable timer if file is saved void fastcall TForm1::Save1Click(TObject *Sender) { fclose (myfile); Timer1->Enabled=false; Save1->Enabled=false; FileName1->Enabled=true; t=0; freq=0; //Set times back to zero }
91
C. Example Animation Screenshots C.1. Manual Head Tilt Instructions (no ghosting) The images are played in the order from upper left to lower right.
C.1.1. Placing the Mask
C.1.2. Performing the Head Tilt
C.1.3. Applying Pressure to the Mask
92
C. Example Animation Screenshots
C.1.4. Giving Two Breaths
C.2. Instructions for the Use of the Combo Pillow C.2.1. Placing the Pillow
C.2.2. Placing the Mask
93
C. Example Animation Screenshots
C.2.3. Applying Pressure and Giving Two Breaths
C.3. Chest Compression Instructions C.3.1. Place the Hands Correctly
94
C. Example Animation Screenshots
C.3.2. Showing One Compression in Detail
C.3.3. Loop Compressions
1 These two images alternate for the 100 min frequency compressions. The last two animation steps will need to be modified to show the compressions with a more realistic, scaled depth. The audible beep (Windows Standard Noise) plays simultaneous with the first image.
95
D. Score Sheet Examples D.1. Combo Pillow Test Subject No
Part 1: Time to pillow placement Part 2: Time to place mask Part 3 & 4. Time to apply pressure Time to 1st breath Time to 2nd breath Time to 3rd breath End time
Subject No
1
[s]
effective ?
1
Part 1: Pillow placement
right
(y/n or 1/0)
didn't use it
wrong
2nd
1st
Head tilt Part 2: Mask placement Headstrap Part 3: Mask seal [mm H2O] Part 4: Breath goes in
3rd
(scale: no, poor, good, great) (or 0, 1, 2, 3)
Number of helps (e.g. 0, 1/1, 1/2, 2/2)
D.2. Chest Compression Animation Test Subject No
1
Part 1: right Hand placement thenar contact time to 1st compession (s)
wrong
Part 2: depth 0-10 s 10-20 s 20-30 s 30-40 s 40-50 s 50-60 s Part 3: Exhaused / sore arms Could go 2 more minutes? Comments:
frequency
(or location) elbows locked
1:00-1:10 1:10-1:20 1:20-1:30 1:30-1:40 1:40-1:50 1:50-2:00
right
wrong
(scale: 0 (no), 1 (poor), 2 (good), 3 (great)) 2:00-2:10 2:10-2:20 2:20-2:30 2:30-2:40 2:40-2:50 2:50-3:00
(scale: 0 (not) to 10 (depleted)) Was the beep helpful? (y/n or 1/0)
96
D. Score Sheet Examples
D.3. CPR Trained Test Subject No
1
Part 1: time from last CPR training what kind of training / hours where was the training have you practised afterwards Part 2: Check for unresponsiveness active EMS system open airway time checking response/circulation
wrong
order
Part 3: (breaths) 1st set 2nd set check for breathing (look, feel, listen) --> 2 s / breath, 1 breath / 5s head tilt quality clamped nose if mtm number of breaths given number of effective breaths Part 3: (compressions) 1st set 2nd set check for ciculation (breathing, coughing, movement) carotid pulse also okay correct hand placement (and too high or low) compr. method (heel of hand) number of compressions depth of compression (click)
3rd set
Part 4: (breaths) 7th set 8th set check for breathing (look, feel, listen) --> 2 s / breath, 1 breath / 5s head tilt quality clamped nose if mtm number of breaths given number of effective breaths Part 4: (compressions) 7th set 8th set check for ciculation (breathing, coughing, movement) carotid pulse also okay correct hand placement (and too high or low) compr. method (heel of hand) number of compressions depth of compression (click)
9th set
Part 5: Compression-ventilation ratio Part 6: Exhaused / sore arms Could go 2 more minutes? Comments:
right
15:2 corr. 5:3 wrong yes
no
97
3rd set
4th set
4th set
5th set
5th set
6th set
6th set
y (1) / no (0) poor to great y (1) / no (0) (e.g. 2) (e.g. 2/2) y (1) / no (0) y (1) / no (0) y (1) / no (0) (e.g. 15) (e.g. 12/15)
10th set
11th set
12th set (or 0 … 3)
9th set
other
10th set
11th set
12th set


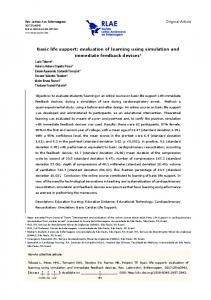


![[PDF] Basic Life Support (BLS) - Google Sites](https://m.moam.info/img/260x300/pdf-basic-life-support-bls-google-sites_6477a36a097c474c228c3fa6.jpg)
![[PDF] Basic Life Support (BLS) - Google Sites](https://m.moam.info/img/260x300/pdf-basic-life-support-bls-google-sites_64771828097c474b228bb024.jpg)


![[PDF] Basic Life Support (BLS) - Google Sites](https://m.moam.info/img/260x300/pdf-basic-life-support-bls-google-sites_64771821097c4786708b5339.jpg)
