Excerpted from Stunning CSS3: A project-based guide to the latest in CSS by
Zoe ... In Chapter 2 of my book Flexible Web Design: Creating Liquid and Elastic.
Different Screen Size, Different Design
6
It’s no secret or surprise that the variety of ways people browse the web is increasing. People may view your web pages on widescreen TVs, desktop computers, netbooks, mobile phones—even a refrigerator. While you can’t make a site that looks identical on every single device at every screen size and text size, you can make a site that adapts to the users’ settings so that it looks good and works well in the screen space available. In this chapter, you’ll learn how to use CSS3 media queries to tailor a web page’s design to various screen sizes on the fly, making your web pages more dynamic, responsive, and usable.
Excerpted from Stunning CSS3: A project-based guide to the latest in CSS by Zoe Gillenwater. Copyright © 2011. Used with permission of Pearson Education, Inc. and New Riders.
206
Chapter 6: Different Screen Size, Different Design
W h at You’ll Le a rn We’ll be restyling an entire page layout to work with different screen sizes and devices using these pieces of CSS3:
�� Media queries to apply styles selectively based on the visitor’s device properties �� Multi-columns to flow text into side-by-side columns
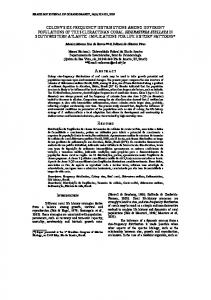
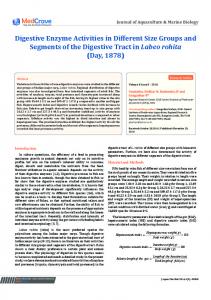
The Base Page Figure 6.1 shows a layout for a fictional bakery. The layout is liquid (also known as fluid) so that it adjusts to the width of the browser window, making it work at a variety of screen sizes without generating horizontal scrollbars or causing elements to overlap. But it certainly looks better at some screen sizes than at others. On very wide or very narrow windows, the design is still usable and looks OK, but it’s not as attractive as it is within the 800- to 1200-pixel range (Figure 6.2). F igure 6.1
The fictional Little Pea Bakery home page, as seen in a browser window that’s 1024 pixels wide.
Excerpted from Stunning CSS3: A project-based guide to the latest in CSS by Zoe Gillenwater. Copyright © 2011. Used with permission of Pearson Education, Inc. and New Riders.
The Base Page
207
Fi gu r e 6 . 2 The design looks OK, but not great, in very narrow and
very wide windows.
In Chapter 2 of my book Flexible Web Design: Creating Liquid and Elastic Layouts with CSS, I show that flexible layouts don’t have to be plain or ugly to work at a variety of screen sizes. You can build pages with flexible images, reasonable text-line lengths, and creative use of space to make sure the design works well at a large range of widths. But I don’t deny that it’s impossible to create a design that looks every bit as good condensed into 300 pixels as it does stretched out to 2000 pixels. I’ve always advocated using min-width and max-width, as well as separate styles for mobile devices, in order to get around this problem. Since the writing of Flexible Web Design in 2008, however, a new tool for creating layouts that work at any ridiculously large range of sizes you want has gained good browser support: media queries.
Excerpted from Stunning CSS3: A project-based guide to the latest in CSS by Zoe Gillenwater. Copyright © 2011. Used with permission of Pearson Education, Inc. and New Riders.
208
Chapter 6: Different Screen Size, Different Design
What are Media Queries? Not e: All the available media features are listed and described fully at www.w3.org/TR/css3mediaqueries/#media1. The ones you’ll probably need most often are min-width, max-width, min-device-width, max-device-width, orientation (portrait or landscape), color, and resolution.
Ti p: If you want to use the media type all in your media query, you can make your CSS shorter by leaving out the media type entirely, as well as the word and, like so: @media (max-width:600px).
Media queries let you customize styles based on the characteristics of the user’s device or display, such as the viewport width, whether it’s in portrait or landscape mode, or whether it shows color. This is different from the media types, such as screen and print, that you can specify for your style sheets in CSS 2.1. With media queries, you specify not only the media type to which you want to apply a set of styles, but also one or more characteristics of the user’s display. Here’s an example: @media screen and (max-width: 600px) { body { font-size: 88%; } #content-main { float: none; width: 100%; } }
The above media query starts with the @media rule, and then specifies a media type (in this case, screen). Next there’s the word and, followed by the characteristic we want to match against, called the media feature. This particular media feature, max-width: 600px, tells the browser that the styles for this media query, which are contained within a set of curly brackets for the media query as a whole, should apply only up to a maximum width of 600 pixels. If the viewport width exceeds 600 pixels, the browser will ignore the styles inside the media query. This media query can be dropped right into your main style sheet, keeping all your styles in one place for easy debugging and maintenance, as well as saving an HTTP request. If you want, however, you can apply media queries to separate style sheets on the link element or @import rule: @import url(narrow.css) only screen and (max-width:600px);
Here, I’ve added the keyword only in front of the media type screen to keep some older browsers that don’t understand media queries from downloading and applying the style sheets universally. Most non-supporting browsers will not use the sheet anyway, but this is Excerpted from Stunning CSS3: A project-based guide to the latest in CSS by Zoe Gillenwater. Copyright © 2011. Used with permission of Pearson Education, Inc. and New Riders.
Changing the Layout for Large Screens
extra insurance. The only keyword isn’t needed when you place the @media rule directly in your main style sheet. Whether embedded with other CSS or in separate sheets, media queries are a powerful new tool in web design. We can use them to customize and fine-tune our styles to each user’s device and settings with more precision than we’ve ever been able to before. This can improve not only the attractiveness of our web pages, but also their usability. We can change text line lengths, leading, and font sizes to make sure the text remains readable at different widths. We can rearrange columns and resize or remove images on small screens to make better use of the space and let users get right to the content they want. We can make links larger on touch-screen mobile devices to make them easier for people to activate with their fingers. And we can do all this without having to involve complicated scripting for browser sniffing, feature detection, or style-sheet switching. You just continue to use the CSS that you already know to write different styles for different scenarios. Let’s use media queries now on our example page to customize the design to large screens, small screens, and mobile devices.
Changing the Layout for Large Screens We’ll start with the styles for large screens. Download the exercise files for this chapter at www.stunningcss3.com, and open mediaqueries_start.html in your code editor. Its CSS is contained in a style element in the head of the page. The design of this example page starts looking a bit stretched out at around 1200 pixels wide, so let’s add a media query that will apply only when the window is 1200 or more pixels wide. Add the following CSS after all the existing styles in the style element in the head: @media screen and (min-width: 1200px) { }
This media query has to be at the end of the styles so that it will override the earlier styles, using the cascade of CSS. It tells the browser that we want the styles within this media query to apply to screen media types, but only if the user’s viewport width is 1200 pixels at a
Excerpted from Stunning CSS3: A project-based guide to the latest in CSS by Zoe Gillenwater. Copyright © 2011. Used with permission of Pearson Education, Inc. and New Riders.
209
210
Chapter 6: Different Screen Size, Different Design
minimum. Of course, right now there are no styles in the media query, just empty brackets waiting to be filled. Since we have so much extra space in viewports over 1200 pixels wide, how about we fill those brackets with styles to change the layout from two columns to three? To do this, we’ll change the positioning of the navigation div, as well as the widths and margins of the two content divs. Here are the current styles of these three divs, outside the media query: #nav-main { float: right; margin: 40px 0 0 0; } #content-main { overflow: hidden; float: left; width: 70%; margin-bottom: 40px; } #content-secondary { float: right; width: 25%; margin-bottom: 40px; } Not e: Opera 10.6 has a strange bug that makes the navigation div disappear when you first expand the window past 1200 pixels. When you hover over the area where it should be, it shows up. There’s no workaround for this right now; hopefully the Opera team will fix this bug soon.
Modify these styles for viewports over 1200 pixels wide by adding new rules within the media query you just created: @media screen and (min-width: 1200px) { #nav-main { position: fixed; top: 136px; width: 13%; margin: 0; } #content-main { width: 58%; margin-left: 18%; } #content-secondary { width: 20%; } }
This positions the navigation div under the logo, creating a third column. To make room for it, it was necessary to decrease the width of the content-secondary div from 25 percent to 20 percent, decrease the width of the content-main div from 70 percent to 58 percent, and add a left margin to content-main.
Excerpted from Stunning CSS3: A project-based guide to the latest in CSS by Zoe Gillenwater. Copyright © 2011. Used with permission of Pearson Education, Inc. and New Riders.
Changing the Layout for Large Screens
Let’s also change the widths of the about and credits divs in the footer to match the widths of the columns above them. Add their IDs onto the #content-main and #content-secondary rules in the media query: #content-main, #about { width: 58%; margin-left: 18%; } #content-secondary, #credits { width: 20%; }
Now all the page elements are better positioned to work well in the width available (Figure 6.3). Save your page, and view it in an up-todate browser. Resize your window to see how the layout automatically changes when you get past 1200 pixels wide.
Fig u re 6.3 The elements of the page now make better use of the space in wide windows.
Excerpted from Stunning CSS3: A project-based guide to the latest in CSS by Zoe Gillenwater. Copyright © 2011. Used with permission of Pearson Education, Inc. and New Riders.
211
212
Chapter 6: Different Screen Size, Different Design
The low dow n on medi a querie s Media queries are described in a module of the same name, found at www.w3.org/TR/css3mediaqueries. They let you customize styles based not only on media type, such as screen and print, but also on characteristics of the user’s display, such as viewport width. These characteristics, called media features, are listed at www.w3.org/TR/css3-mediaqueries/#media1; not all browsers that support media queries support all of them. A media query can be written within a style sheet, using the @media rule, followed by the media type and one or more media features. Media queries can also be written onto link elements and @import rules, omitting the @media rule. You can include more than one media feature in a single media query, such as @media screen and (min-width:320px) and (max-width:480px). You can also include more than one media
query in the same @media rule, separated by commas, such as @media screen and (color), projection and (color), similar to a grouped selector. You can write the word not at the start of a media query to apply its styles only when the media query is not true, such as @media not print and (max-width:600px). Other than changing layout at different screen sizes, you might want to use media queries for:
�� Adjusting text size and leading to keep text more readable at different line lengths; see http://forabeautifulweb.com/blog/about/proportional_leading_with_css3_media_queries
�� Increasing text size of buttons, tabs, and links on mobile devices to make these elements easier to activate with your finger on touch screens
�� Decreasing body-text size on small mobile screens since the user is effectively zoomed in, making the text seem larger than on desktop screens
�� Revealing in-page links to jump to content down the page on small mobile screens �� Swapping in higher resolution images on high-resolution devices, such as the iPhone 4; see http://dryan.com/articles/posts/2010/6/25/hi-res-mobile-css-iphone-4 as well as the example later in this chapter
�� Swapping in differently sized images for different viewport sizes �� Applying different print styles for different sizes of paper
Ta bl e 6 .1 Media queries browser support IE
Firefox
Opera
Safari
Chrome
Partial, 9+
Partial, 3.5+
Partial
Partial
Partial
I’ve listed all of these browsers as having partial support because they don’t support all the available media features. The details for each browser are too long and, well, detailed to cover here; however, all listed browsers support most of the media features, including the ones you are most likely to use regularly.
Excerpted from Stunning CSS3: A project-based guide to the latest in CSS by Zoe Gillenwater. Copyright © 2011. Used with permission of Pearson Education, Inc. and New Riders.
Changing the Layout for Large Screens
213
From Horizontal Nav Bar to Vertical Menu Although everything is now in the place we want it, some of the page elements could use further cosmetic updates. For instance, the li elements in the nav-main div are floated and have left margins in order to align them all horizontally and space them out from each other, but this keeps them from stacking on top of each other, only one to a line, as we want in a vertical menu. They also have slightly rounded top corners, which looks good when they’re horizontal, but not when they’re sitting right on top of each other. We no longer need these styles now that we’re styling the links as a vertical menu, so we’ll override them with new styles within the media query: #nav-main li { float: none; margin: 0; } #nav-main a { -moz-border-radius: 0; -webkit-border-radius: 0; border-radius: 0; }
Now each link is on its own line and takes up the full width of the menu (Figure 6.4). Next, let’s apply some styling to the menu as a whole to make it look more similar to the email newsletter box on the other side of the page, which has a semitransparent background, slightly rounded corners, and a soft drop shadow: #nav-main { position: fixed; top: 136px; width: 13%; margin: 0; -moz-box-shadow: 0 0 8px hsla(0,0%,0%,.1); -webkit-box-shadow: 0 0 8px hsla(0,0%,0%,.1); box-shadow: 0 0 8px hsla(0,0%,0%,.1); -moz-border-radius: 3px; -webkit-border-radius: 3px; border-radius: 3px; background: hsla(0,0%,100%,.3); text-align: right; }
F i g u r e 6 . 4 Each link
now takes up the full width of the menu.
Excerpted from Stunning CSS3: A project-based guide to the latest in CSS by Zoe Gillenwater. Copyright © 2011. Used with permission of Pearson Education, Inc. and New Riders.
214
Chapter 6: Different Screen Size, Different Design
Since the menu has its own background color now, tone down the semitransparent gradients on the links within it, so that the two colors layered over each other don’t get too opaque:
F igure 6.5 The menu in the left column has been restyled to resemble the newsletter subscription box in the right column.
#nav-main a { -moz-border-radius: 0; -webkit-border-radius: 0; border-radius: 0; background: -moz-linear-gradient(hsla(0,0%,100%,.3), ¬ hsla(0,0%,100%,0) 15px); background: -webkit-gradient(linear, 0 0, 0 15, ¬ from(hsla(0,0%,100%,.3)), to(hsla(0,0%,100%,0))); } #nav-main a:hover { background: -moz-linear-gradient(hsla(0,0%,100%,.6), ¬ hsla(0,0%,100%,.2) 15px); background: -webkit-gradient(linear, 0 0, 0 15, ¬ from(hsla(0,0%,100%,.6)), to(hsla(0,0%,100%,.2))); }
These changes complete the navigation’s transformation from horizontal bar to vertical menu (Figure 6.5).
Multi-column Text Not e: You can learn more about line length in Chapter 1 of Flexible Web Design, which you can download for free at www.flexiblewebbook. com/bonus.html.
One of the main complaints people have with layouts that adjust to viewport width is that the length of lines of text can become either too short or too long to be read comfortably or look attractive. Some of this fear of “non-standard” line lengths is based on assumption and myth. In reality, there is no magic line length that is ideal for everyone; a person’s age, reading level, native language, disability, and other factors all influence which line length he finds easiest to read. However, it’s true that line lengths on the extreme ends of the range don’t work well for the majority of readers and don’t always look very attractive. One way that we can now control line lengths is with the new multi-column properties in CSS3. These properties allow you to flow the content of a single HTML element into multiple columns, similar to a newspaper layout. You create the columns using either the column-count or columnwidth properties; in the latter case, the browser will decide how many columns to make based on the available space. (You can also use both properties together, though you may get unexpected results; see “The lowdown on multi-columns” for more information.)
Excerpted from Stunning CSS3: A project-based guide to the latest in CSS by Zoe Gillenwater. Copyright © 2011. Used with permission of Pearson Education, Inc. and New Riders.
Changing the Layout for Large Screens
Let’s break the introductory paragraph into two columns in both the regular layout and the wide layout. Find the existing h1 + p rule in the styles outside of the media query; it should be on line 102, about a third of the way down the style element. Add the column-count property, plus the three browser-specific versions, to the rule: h1 }
+ p { -moz-column-count: 2; -o-column-count: 2; -webkit-column-count: 2; column-count: 2; color: #7F4627; text-shadow: -1px -1px 0 hsla(0,0%,100%,.6); font-size: 120%;
Right now, no browser supports the non-prefixed column-count property, and Opera doesn’t do anything with the -o-column-count property since it doesn’t yet support multi-columns, but it’s wise to include both for future compatibility. The property tells supporting Mozilla- and Webkit-based browsers that you want to break the paragraph into two column-boxes. These column boxes are not actual elements in the document tree of the HTML, rather just virtual boxes that the browser creates to flow the content of the paragraph into. The paragraph is now what the W3C calls a multicol element—it’s a container for a multiple-column layout. You can control the space between the columns using the column-gap property. Set it to 1.5 ems in the h1 + p rule: h1 }
+ p { -moz-column-count: 2; -moz-column-gap: 1.5em; -o-column-count: 2; -o-column-gap: 1.5em; -webkit-column-count: 2; -webkit-column-gap: 1.5em; column-count: 2; column-gap: 1.5em; color: #7F4627; text-shadow: -1px -1px 0 hsla(0,0%,100%,.6); font-size: 120%;
If you don’t set a column-gap value, each individual browser decides how much space to add by default, so it’s best to standardize it by
Excerpted from Stunning CSS3: A project-based guide to the latest in CSS by Zoe Gillenwater. Copyright © 2011. Used with permission of Pearson Education, Inc. and New Riders.
215
216
Chapter 6: Different Screen Size, Different Design
explicitly setting the value you want. Here, we’ve used a value in ems so that the gap will grow larger as the text grows larger, keeping the text more readable. Now the introductory paragraph is broken into two columns in both the regular layout and the wide layout created with the media query (Figure 6.6). This completes all the styling for the wide version of the bakery page (Figure 6.7). F igure 6.6 The text of the introductory paragraph flows into two columns in Firefox, Safari, and Chrome.
F igure 6.7
The completed design for wide viewports
Not e: The page with all the changes to this point is named mediaqueries_1.html in the exercise files for this chapter.
Excerpted from Stunning CSS3: A project-based guide to the latest in CSS by Zoe Gillenwater. Copyright © 2011. Used with permission of Pearson Education, Inc. and New Riders.
Changing the Layout for Large Screens
217
P ro b lems w ith mult i -columns Although CSS3 multi-columns work well for the introductory paragraph in our bakery page, there are a number of problems with them that limit their usefulness, which you should be aware of before you use the feature. Some of these problems are technical in nature, so as the W3C refines the specification and browsers fix bugs and improve support, they should disappear or at least lessen. These problems include:
�� Balancing column heights. If there’s not enough content to fill each column equally, the browser has to decide which column gets the extra height. Different browsers choose differently, with sometimes unexpected results. �� Flowing margin, padding, and borders across columns. Webkitbased browsers allow margin, padding, and borders to be split across columns, creating a very strange appearance.
N ot e : For a demo of the first two problems in this list, see http:// zomigi.com/blog/dealbreaker-problems-withcss3-multi-columns.
�� Breaking content across columns. Being able to control where content breaks across columns is important, as you want to be able to ensure that a heading stays with its associated text, for instance. The column-break properties control this, but no browser supports them now. �� Overflowing columns or content. Browsers are currently inconsistent about how to handle overflow when not all of the content or columns can fit in the container (the multicol element); it may overflow to the right or below, or just be truncated. An individual piece of content that is too large to fit in a column box, such as an image that is wider than the column width, is supposed to be cut off in the middle of the column gap, but Firefox lets it overflow and Webkit cuts it off at the edge of the column, not within the gutter as the spec dictates. �� Floating content within columns. Floats within a multicol element are supposed to be positioned relative to the column box in which they appear. Firefox does this; Webkit, strangely, puts the float outside of the multicol element entirely. �� Pagination when printed. When a multicol element has to break across two or more pages when printed, the columns are not supposed to break across the pages. The content should run through the columns on the first page, then run through the columns on the second page, and so on. Older versions of Webkit-based browsers didn’t follow this; current versions simply make the content go back to a single column when printed, avoiding the issue entirely. Excerpted from Stunning CSS3: A project-based guide to the latest in CSS by Zoe Gillenwater. Copyright © 2011. Used with permission of Pearson Education, Inc. and New Riders.
218
Chapter 6: Different Screen Size, Different Design
But some problems with multi-columns are more inherent to the idea of columns on the web to begin with. Having to scroll down to read a column and then back up to read the next column, over and over again, is just plain annoying and tiresome. This isn’t a technical problem—it’s a usability problem with breaking up content that’s taller than a constrained screen. Treating the web like print often doesn’t work well. For more on the usability and design problems inherent to CSS3 multi-columns, see “Multicolumn layout considered harmful” by Roger Johanssen (www.456bereastreet.com/archive/200509/css3_ multicolumn_layout_considered_harmful), “More on multi-column layouts” by Richard Rutter (www.clagnut.com/blog/1590), and “CSS3 Multi-Column Thriller” by Andy Clarke (www.stuffandnonsense. co.uk/archives/css3_multi-column_thriller.html). Because of all of these problems, I strongly recommend only using multiple columns in a limited manner. I think they’re fine for a couple paragraphs or a list, for instance. I don’t think they work very well for long blocks of body copy or content that is complex, with several paragraphs, types of elements, or images within it. Just keep this in mind, and use multi-columns wisely.
Workaroun ds for N o n- s u pp o rti ng B r ows er s Multi-columns are a quintessential progressive enhancement technique, since browsers that don’t support the multi-column properties simply see the text as it started out—in one column. If you must provide a workaround for non-supporting browsers, there are several scripts that can flow content into multiple columns. The CSS3 Multi Column script by Cédric Savarese (www.csscripting. com/css-multi-column) is a nice one because it reads the multicolumn properties already in your CSS and makes them work in nonsupporting browsers. You may also want to check out:
�� Columnizer jQuery plugin, by Adam Wulf (http://welcome.totheinter.net/columnizer-jquery-plugin) �� MooColumns MooTools class, by Jason J. Jaeger (http://greengeckodesign.com/moocolumns) �� Multi-column script, by Randy Simons (http://randysimons.nl/125,english/129,multi-column-text) �� Column script, by Michael van Ouwerkerk (http://13thparallel.com/archive/column-script)
Excerpted from Stunning CSS3: A project-based guide to the latest in CSS by Zoe Gillenwater. Copyright © 2011. Used with permission of Pearson Education, Inc. and New Riders.
Changing the Layout for Large Screens
The low dow n on multi-columns Multi-columns are described in the Multi-column Layout module found at www.w3.org/TR/css3-multicol. They’re created using either the columncount or column-width properties (or both). You can set both using the columns shorthand property, but Firefox doesn’t yet support it. The column-width property lets the browser decide how many columns to make based on the space available. The value you set in column-width is actually more like a minimum width; for instance, if you set column-width to 100 pixels inside a 250-pixel-wide container, and you set the column-gap to zero, the browser will make two columns that are both 125 pixels wide. The column-count property allows you to set the number of columns explicitly, with their widths determined by the space available. If you set both column-count and column-width, the column-count value acts as a maximum number of columns. For instance, in the same 250-pixelwide container, if you set column-width to 100 pixels and columncount to 3, the browser will not make three columns but only two. You can use the column-gap property to create spaces between the columns, and the column-rule property to create a vertical line within each gap as a visual separator. The column-span property allows elements to span across multiple columns, but is not yet supported by any browser. The break-before, break-after, and break-inside properties control where content is broken across columns, but they are not yet supported by any browser. Other than breaking short pieces of body text into multiple columns, as we’ve done in this chapter, I think the only safe use for multi-columns currently is to break a single list of short items into multiple columns; see http://trentwalton.com/2010/07/19/css3-multi-column-layoutcolumn-count for an example.
Tab le 6.2 Multi-columns browser support IE
Firefox
Opera
Safari
Chrome
No
Partial
No
Partial
Partial
Excerpted from Stunning CSS3: A project-based guide to the latest in CSS by Zoe Gillenwater. Copyright © 2011. Used with permission of Pearson Education, Inc. and New Riders.
219