Research on XML access control has handled some of the above issues ..... counterintuitive and is not an legal security view specifica- tion in SSX under the ...
the right-hand column. Many thanks for your help. .... increases salinity in the immediate surroundings and affects the biota nearby. The challenge involved in ...
Aug 19, 1998 - http://www.w3.org/TR/1998/NOTE-xml-ql-19980819.html. Latest version: .... An article is similar, but its year element is optional, it omits the ...
Minimal support for SAP BW modeling in Framework Manager 13. Chapter 2: ... It
also provides the steps ... IBM Cognos Business Intelligence has accessibility.
In the database world, it is common to translate a query language into an algebra; this happens in SQL, OQL, and NRA, among others. The purpose of the algebra is ..... The reason why is that p, b, and c have different types. p : Part b : Basic.
algebra is powerful enough to capture the semantics of many XML query ..... We
use semicolon rather than comma to separate function arguments, since comma
...
XPath. Ease of browsing and navigation is significantly improved through the use
of XPath searches. To perform a sample XPath search, open the document ...
... them by means of an edge table in a standard commercial RDBMS (in our case MS SQL ... adopt the edge representation supported by MS SQL Server 2000. ... ParentID NodeType Label. Text. 0. NULL. 1 bib. NULL. 2. 0. 1 book. NULL. 3. 2.
It exploits the latency offered by GUI-based visual query formulation to prefetch ... that is at least comparable to SQL. However, in ... summarized by: we have moved from SQL to XQuery. At best we .... a database reference to the cell category of PD
Setting up connectivity for SAP ECC data sources . .... 61 iv IBM Cognos
Business Intelligence Version 10.2.1: Dynamic Query Guide ..... If you decide to
use the dynamic query mode, complete the following tasks to configure the mode,
set up ...
such as image processing or data warehousing analysis. ... We have implemented an extensible query process- ...... formix.com answers, February 1998.
will be able or willing to learn sophisticated XML query languages. ... specific
need for XML query systems targeted at end users. ..... We use the semicolon.
Feb 2, 2004 ... The XQuery effort at W3C is lead by the XML Query Working Group (http://www.
w3.org/XML/Query). XQuery ...... followed by a semicolon.
book[author=//book[title='Moby Dick']/author]. 3. Semantics of the query result. The result of a query can be defined in terms of the current content of the database ...
Apr 13, 2016 - directions as our motivation for accelerating XML query processing on ... provide the quick answers to queries and an approach called path ..... using the start values in labeling codes as keys and the ... 4.3 Query processing.
Nov 6, 2009 - ... enterprises also store large amounts of business data permanently as XML, to fulfill ...... the row-generating item and rejects the query with a message that explains why the ..... [6] IBM, DB2 pureXML at UCLA Health System,.
Consider an XPath query Q1 that finds the subject name of the book with the ... actual values to answer the queries that ask for property values or object details, which is not efficient ... Example 1 shows the twig patterns for an XQuery expression.
lows it to model significant fragments of current XML query languages; in ... [5] queries into special-purpose SQL queries, endowed with some ... âfree nesting philosophyâ of OQL, and allow one to put a query or a ..... In the reference paper abo
4.4 Example of query answers using equal operator cost scheme. . . . 55 .... 3.2 Answers to the queries Q, S1, S2, and S3 from XML data in Fig- ure 3.4. .... maintain sanity during the Ph.D program by way of occasional emails and phone calls. ... Sum
Oct 31, 2002 - In this paper we present novel techniques for query optimization in federations of ..... The XML queries are immediately passed on to the Execution Engine, ..... as: Qx2 âM31â, âcomponents.xmlâ, â/Components/Supplier[@SCo-.
âEndeâ and whose books have the title âMomoâ. Here, two characteristics of XML query processing are revealed: Que- ries referring to structure represented by ...
become the major issues in modern database system and next generation information ... fuzzy example in more phase of computer science, a simple and robust way of ..... We use OpenMP to implement parallel execution. OpenMP uses ...
the syntax of the basic XQuery query that can be formulated using our GUI is as follows. ..... all time taken depends on the execution time the SQL query(s) corresponding to the ..... edu.sg/home/assourav/papers/cais-03-2005-TR.pdf). 3.
The results from our study should provide some answers to the ... SQL (DSQL; Sengupta and Dalkilic 2002) is an example of a declarative query ... this example, the publisher information is underneath the structure for a book requiring that this.
Jun 4, 2006 ... The “Dynamic XML Query Table Editor” (DQT) is a web application for the ......
written as a string into the text field, and a semi-colon is used to ...
information engineering group
Dynamic XML Query Table Editor
Sebastian Skritek Wolfgang Aigner Silvia Miksch
Vienna University of Technology Institute of Software Technology & Interactive Systems (ISIS) Asgaard-TR-2006-4
June 2006
Authors:
Sebastian Skritek Wolfgang Aigner Silvia Miksch sebastian.skritekgmx.at, {aigner, silvia}@ifs.tuwien.ac.at http://ieg.ifs.tuwien.ac.at
Contact:
Vienna University of Technology Institute of Software Technology & Interactive Systems (ISIS) Favoritenstraße 9-11/188 A-1040 Vienna Austria, Europe Telephone: +43 1 58801 18833 Telefax: +43 1 58801 18899 Web http://ieg.ifs.tuwien.ac.at
Dynamic XML Query Table Editor Sebastian Skritek, 0226286 [email protected] June 2006
10.0PR Projektpraktikum (mit Bakkalaureatsarbeit) a. o. Univ. Prof. Dr. Silvia Miksch Dipl.-Ing. Dr. Wolfgang Aigner
Abstract The “Dynamic XML Query Table Editor” (DQT) is a web application for the management and presentation of data collections. It was implemented within a practical course using the “Ajax” approach, a new way to create web applications that perform like desktop applications. This thesis contains the documentation for DQT: A description of the DQT features, an installation guide, an explanation of the configuration possibilities, a user manual and a high level documentation of the DQT implementation.
The “Dynamic XML Query Table Editor” (DQT) is a web/database application that was developed using the new “Ajax” [Garret,2005a] approach. DQT can be used for the management of data collections as well as for accessing (viewing, searching, exporting) the stored information. As DQT is a web application, it can also be used for the presentation of such data bases on the web. Using the “Ajax” approach provides a simplified handling of DQT for the user compared to “traditional” web applications. In those “traditional” web application, sending and receiving of data is done by sending a request to a webserver. In response, the webserver returns a new complete webpage, that replaces the existing one. The “Ajax” approach enables DQT to send data to/load data from the server without this need to load a new webpage. Therefore, although it runs without any plugins (only JavaScript is needed) in the webbroweser, DQT behaves like a desktop application. The user can save, delete or load data to/from the server without any interruptions due to page reloads. The functionality of DQT includes editing (insert, update, delete) and presentation of stored data. It also provides a search functionality in the data sets and a data export. The exported data is XML formatted, but this output can be transformed by DQT using user defined XSLT stylesheets. A simple user management system allows to control the access to these functionalities. This thesis contains the high level documentation of DQT. In the first sections (2-7) of this documentation, background information about DQT is given. This includes the motivation for the developement of DQT (section 2), the design goals (section 3), the target users and application areas (section 4), the features (section 5) and limitations (section 6) of DQT as well as a short description of its basic structure (section 7). Necessary requirements and steps for installing DQT on a webserver are described in section 8. Section 9 describes the individual configuration of a DQT installation and explains specific implementation details as well as background information for configuration. Unlike the other sections, the user manual in section 10 is intended for DQT end-users and describes the handling of the client side of DQT. Section 11 contains information about the implementation of DQT for experienced users who want to change or extend DQT. In the appendix, an overview of the tables used for saving the specific data collected by Wolfgang Aigner [Aigner,2006] is given.
2
Background and Motivations
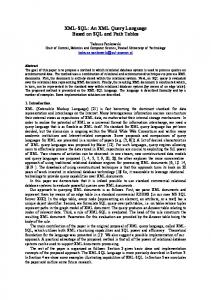
In 2005, Wolfgang Aigner was working on his PhD Thesis about visualization techniques for temporal data [Aigner,2006]. Within that thesis, different visualization techniques have been classified by a set of approximately 40 properties. These information were stored in tables like the one shown in Table 1, formatted and saved as LaTeX files. The rows of the table represent information about the different techniques, while the columns contain the attributes by which the techniques are classified. Handling of these tables and the data stored in them was quite unhandy; data-sharing 5
attribute 1
attribute 2
attribute 3
attribute 4
attribute 5
attribute 6
attribute 7
attribute 8
value value
value value
value value
value value
value value
value value
value value value
value value
•
• •
entry(Method 1)
•
•
•
• •
entry(Method 2)
•
•
•
• •
•
•
entry(Method 3)
• •
•
•
•
•
• •
entry(Method 4)
•
•
•
•
◦ • •
◦
• ...completely fulfilled, ◦ ...partly or implicitly fulfilled
Table 1: Example of the existing LaTeX-tables was complicated and search for specific entries was totally impossible. Therefore, a new application was strongly required that allows a more comfortable handling. Such an application, the “Dynamic XML Query Table Editor” (DQT), has been developed within a 12.5 ETCS practical course and is described within this bacchelor thesis.
3
Requirements and Design Goals
The application for collected data management ought to provide following features: • easy editing of the stored data (including inserting and deleting of data) • data access via the www (for presentation as well as for management) using available web-browsers • a search functionality to retrieve only entries that fulfill certain criteria • a possibility to (easily) export the data into other formats • a simple user and rights management system to allow restricted access to certain features of the application Additional design goals were an easy configuration (adding or removing attributes/classification properties), and the possibility to adopt the application to similar tasks with moderate effort.
4
Application Areas and Target Users
The DQT can be used for management of any data that can be well presented tabularly within one table. This means the data consists of attributes (the columns) and entities 6
(the rows), that are classified or described by those attributes. DQT is mainly intended to manage 1:1 relations between the stored entities and their attributes. This means that for each entry in the table (row), exactly one value for each attribute (column) exists. DQT also supports some simple list types, that handle short lists as one value. Typical applications for DQT are classification tasks (like the one DQT has been originally created for) or comparisons of entities with respect to certain criteria (e.g., product comparisons). So DQT can assist creation, management and publication of databases containing collected data of a specialized domain. Target users (as hoster of the DQT) are primary persons that already have or want to create such a data collection. Originally, target users were supposed to be experienced IT professionalists. Therefore, for hosting and configuring DQT, skills in XML, SQL and XSLT are needed. But also for users accessing a hosted version of DQT, some pre-knowledge is assumed. This is because the DQT client (a JavaScript application running in standard web-browsers) requires JavaScript to be enabled, what is not fulfilled for all users. But the assumption was made that the target users are able to create an environment (or have access to) that is capable of running the DQT client. The DQT client is only tested with the two mostly applied web-browsers, Firefox (1.5) and IE 6 (having some minor problems in IE6), but might run in other browsers too (especially in all Mozilla/Firefox based browsers).
5
DQT - Features
DQT is a web application that provides an easy way of managing (insert, edit, delete) table data saved in a database. The use of the “Ajax” [Garret,2005a] approach allows client-server communication to be performed in the ”background”. Because of this, loading or saving data neither interrupts the user’s online workflow nor requires a reload of the current webpage. The behaviour of DQT is therefore similar to the behaviour of desktop applications, without needing any browser plugins. DQT also contains a module for tabulating the stored data. The use of JavaScript also allows dynamically display of certain selected rows and columns of the table. It therefore provides comparison of data subsets that are currently of interest. Also, the displayed data can be exported to an XML formatted output which can be further transformed using XSLT to any output format needed. A search function allows to display entries that fulfill the defined constraints. Again, search and export requests are performed in the background, without interrupting the user’s work flow. To restrict the access to certain features, a simple user- and rights management system was implemented. It allows to grant or deny user access to the different features of DQT. For displaying each entry in detail and separated from others, DQT offers a page that only contains the information of one data row.
6
Limitations of DQT
This section describes the ”not”- features of DQT, and the current limitations of the software. 7
• DQT is not a management tool for the structure of the used database (like phpMyAdmin [PHPMyAdmin,2006] for example). This must be done otherwise, as DQT assumes a correctly configured database. • DQT should only be used to manage small/medium sized data bases (with a typical upper limit of approximately 7000 - 10 000 table cells). This number varies depending on the clients used, as rendering of the tables by the browser requires considerable time and the presentation of such tables needs a lot of memory. It is therefore no management tool for databases simply collecting big amounts of data for later evaluation. • DQT does not support statistical evaluation of the stored data. • There is no concurrency control for the editing of entries. If two users change data at the same time, they do not know about each other and are not informed about the changes the other one made. • No graphical interface exists for installation or configuration of DQT. Skills in XML, SQL and probably XSLT are needed to configure DQT. • The export feature allows to transform the output using XSLT to different data formats, but no XSLT stylesheet is included in the DQT. They therefore first need to be created.
7
Basic Structure
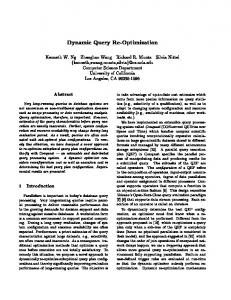
As a web application, DQT consists both of a server side, and a client software. The latter is loaded by a web browser (Firefox, Internet Explorer 6). The application logic on the server is implemented using php and intentionally runs on a webserver. The data is stored using a MySQL database. (See Fig. 1. A detailed description of this figure is given in section 11.1.1 “Components of DQT”) Before starting the implementation of DQT, the author of this thesis has analyzed within a term paper whether the possible use of Ajax [Garret,2005a] for the implementation of the client part, or whether a “traditional” website interface should be implemented. The main advantage of Ajax is, that it enables the user interface to adopt user actions without reloading the entire page, even if this action requires data to be sent/retrieved to/from the server. The conclusion was, that using Ajax would allow an improved user interface and would result in a better user acceptance than a traditional web interface. Therefore use Ajax was chosen for the development of DQT [Skritek,2005].
8
Figure 1: The basic components of DQT
9
8
Installation
This section describes the system requirements and steps necessary to install DQT.
8.1
System Requirements
Server: On the server side, following software is necessary to run DQT: • MySQL 5.0 (might run with older versions, too) • PHP 5.1 (will not run with older versions) with following modules installed and active: - mysql - xsl (XSL (libxslt, tested with version 1.1.15) and EXSLT (libexslt, tested with version 0.8.12)) • a webserver (tested with apache httpd 2.0.54) Client: The client needs following software to run the application: • Browser: Firefox (tested with 1.5; may run with 1.0, too) or Internet Explorer (tested with 6.0) • Not tested with other browsers; minimal browser requirements: - support of JavaScript - support of the XMLHttpRequest - support of DHTML Hint: The configuration of XAMPP [XAMPP,2006] (at least version 1.5.1 for windows) contains all modules necessary.
8.2 /src /lib /bin /doc /data /html
Directory Structure of the complete DQT Package contains the full-length sourcecode files contains files from external libraries contains the executables and used libraries (this directory is referred to as (application Root) in this paper) documentation (javadoc and further documentation) (example) datafiles webpage (brief project information)
The /src and the /bin directories contain the same files and structures, but the code in the /bin directory is compressed ( all comments and unnecessary whitespaces are removed).
10
The content of both directories is: /src /src/conf /src/cssStyles /src/helpfiles /src/icons /src/install /src/js /src/logs /src/screens /src/XMLData /src/XMLData/exportStylesheets
8.3
all php files needed for the server part of DQT configuration files for DQT CSS files used XHTML files for the online help all icons used in the application; png format SQL files with the initial database content and predefined configuration files all javascript files the directory where DQT stores its logfiles the directory where DQT stores the screenshot images XSLT stylesheets to transform the structure definition of the table and the structure definition itself XSLT stylesheets for export of data into different formats
Installation Steps
1. Unpack (unzip/unrar/...) the /bin/DynamicXMLQueryTableEditor .(zip—rar) archive into the destination folder (). • Make sure the webserver has write permission on the /logs directory (as the logfiles of the server side of DQT are stored there) • The webserver also needs write permissions on the /screens directory (as the screenshots are stored there) 2. Create a new database on MySQL for the application (optional) 3. Go to /conf/ and make the following changes on: 3.1 config.php – line 11: change $conf urlPrefix to the base-URL of your installation of DQT (must end with / ) – lines 16-19: update the values corresponding to your database settings: $db name: contains the name of the database $db user: contains the username that shall be used to connect to the database $db pw: the password for the defined user $db host: The host name or address where the database is placed. – line 29: $conf appName defines the content of the tag of the webpages. 3.2 config.xml – line 5: change the value of to the same value as $conf urlPrefix 4. Run the /install/initialize.sql script on the database. This will create a user “admin” with full rights (pw = “admin”). A test database table is created too. 11
5. Open your webbrowser (best choice for use of DQT is Firefox), and try to open DQT. The screen should look like as shown in Figure 2.
Figure 2: Screenshot of the index page like after successful DQT-installation 6. Login as admin user (pw = “admin”), and go to the “view” page. This should look like as shown in Figure 3.
Figure 3: Screenshot of the view page after successful installation 7. Go to the “edit” page. It should look similar to Figure 4. If this is the fact: Congratulation. You have just finished installing the DQT. Setting up a Data Collection Next, one has to configure its installation. To use the collected data about “Techniques for Visualization of temporal data” (by Wolfgang Aigner), follow the next steps. If you want to set up your own data structure, please go to the “Configuration of DQT” section of this paper. Hint: If you made an error in setting the database access data (e.g. given a wrong password), php can be very obstinate in using these erroneous values. 12
Figure 4: Screenshot of the edit page after successful installation Goto /sessionManagement.php and uncomment line 34. Reload the application (by pressing the reload function of the browser), and then comment the line out again. This should force php to use the new values from /conf/config.php Installing the Data Collection “Techniques for Visualization of Temporal Data” 1. DQT must have been successfully installed 2. Run the script /install/vistechs/initializeVisTechs.sql on the database. This will remove the test database and insert information about 84 visualization techniques to the database 3. Copy the file /install/vistechs/conf/config.php to the folder / conf (overwrite the existing config.php file). Do step 3 of section “Installation Steps” again 4. Copy all files from /install/vistechs/XMLData to /XMLData (overwrite the existing files) 5. Copy all files from /install/vistechs/XMLData/exportStylesheets to /XMLData/exportStylesheets 6. (Re-)Start the DQT client (This will reload the server as well) 7. If DQT now contains the new data: Congratulations. You have just completed the configuration of the DQT with the data about “Techniques for Visualization of Temporal data”
13
9
Configuration of the Dynamic XML Query Table Editor
This section explains the configuration features of DQT. First an overview over the configuration steps is given. Then all steps and actions are explained in detail.
9.1
Configuration Step by Step
1. Installation of DQT (see previous section 8: “Installation”) 2. Defining the structure of the data base (see section 9.2: “Defining the Table Structure”) 3. Creating the database tables (see section 9.3: “Configuring the Database”) 4. Defining filters for which attributes shall be shown on certain pages (see section 9.4: “Defining Attributes to be Displayed”) 5. Updating the file /conf/config.php file (see section 9.8: “Configuration File /conf/config.php”) 6. Creating and adding export stylesheets (see section 9.7: “Export”) 7. Further configurations
9.2
Defining the Table Structure
This section describes how the table structures used to represent the stored data can be defined. Therefore, first an explanation of the table model (including the exact meaning of “table structure” and of which parts this structure consists) is given. As the table structure is defined by an XML formatted file, afterwards a description is given how it is mapped to that file. 9.2.1
”Table Model”
As DQT is designed to manage data represented in table form, the main structure of DQT is the table. Similar to tables in relational database systems, DQT understands a table as a tuple of attributes (the table columns). Therefore, with respect to the description of a table, in this thesis “attribute” and “column” is used synonymously). Each row contains exactly one value for each table column. Unlike relational database systems, DQT allows to organize columns into groups, and also to combine groups to lager groups. This can be used to structure the attributes. For each group or column, a unique identifier and a name used for labeling the column/group in the table exists. Furthermore, for each column or group a text may exist that describes the column/group. The structure of the groups must result in a tree, so each column or group can be only part of exactly one parent group. An example for such a grouping of columns is given in Figure 5. Each black dot represents one group of columns/groups. DQT provides different levels for grouping attributes/columns (Fig. 6):
14
Figure 5: Example of column grouping for a table. Each black dot represents a group.
Figure 6: A possible DQT table structure for the grouping shown in Fig. 5 (cg... column group, au... attribute unit, sg... semantic group). Column Groups At the lowest level, attributes can be combined to “column groups” (or “attribute groups”). A column group may contain one or more columns. If a column is not explicitly assigned to a column group, an “anonymous” column group that only contains this column is implicitly created by the application. The column groups can be used for example to put the name of a column into a context (e.g., in [Aigner,2006] there exist the attributes “linear”, “periodic” and “branching” that are combined in the column group “organization”). This may allow to use shorter names (e.g. “linear” instead of “linear organization”) for the columns, and to make the structure and coherences of the attributes more clearly. Semantic Groups The highest level of grouping is called “semantic group”. Each column must be exactly part of one semantic group (not directly, but transitive over groups it belongs to). Semantic groups are intended to define the rough domain of the columns belonging to the group, and to distinguish between columns whose semantic fields are completely different. Semantic groups can be used to partition the set of attributes into independent subsets, each representing completely different features of the stored entities. Because of the great differences that may exist between the semantic groups, for each semantic group an own database table is created. The idea behind this was, that for a stored entry, very often not the values for all available attributes will be accessed. Instead, only subsets of attributes which are part of the same semantic groups are of interest. For example, some of the semantic groups in [Aigner,2006] are called “general information” (attributes belonging to this groups are “name”, “description”, “references”,...), “data aspects” or “supported tasks 15
and application areas”. Attribute Units Between semantic groups and column groups, an arbitrary number of so called “attribute units” can be defined. These attribute units can be used to further restrict the domain of the attributes, in order to give a more detailed explanation of the classification or to distinguish more clearly between those attributes. Unlike column groups or semantic groups, where each column is only allowed to belong to (a maximum of) one group, now each column can belong to an arbitrary number of nested attribute units. An attribute unit may therefore not only contain columns or column groups, but can also contain attribute units. On the edit page of DQT, only semantic groups, column groups and columns are shown in the table headers (to restrict the headers size). On the view page, only semantic groups, columns groups and columns can be activated/deactivated directly by the user. This is again made to restrict the user interface complexity. The grouping of the columns shown in Figure 5 could be realized in DQT as shown in Figure 6. 9.2.2
Table Structure Definition File
The structure of the table attributes is defined in an XML file located in / XMLData. In the standard installation, it is named tableStructure.xml. Herein the columns, column groups, attribute units and semantic groups can be defined. “Anonymous” attribute units or column groups need not to be defined in this file. This defines a tree, with the columns as leave nodes, typically similar to Fig. 6. The defined grouping of the columns is visualized in the table head. Therefore, for each depth in the tree, one row is inserted to the table head. A row contains one cell for each node of the tree in the corresponding depth. The number of columns being descendants of the node denote the colspan of the cell. As Fig. 6 shows, because the different leave nodes of the tree have different depths, if this transformation is performed on a typical tree defined by the table structure XML file, not all rows would have the same number of cells. Therefore, whenever the XML file is processed by the application, the tree is completed, so that a table can be built from it. For this “completion”, following transformation is applied: • For all missing column groups “anonymous column groups” are inserted into the tree. Thereby “missing” means, that for a column no column group was defined. • For all missing attribute untis, “anonymous attribute units” are inserted into the tree. Thereby, for each column x, the number of “missing” attribute units equals the difference between the length of the longest path within the tree from the root to a leave node and the path length from the root node to the leave node x. To fill in the required number of “anonymous attribute units”, the user defined attribute units (“named attribute units”) are pushed toward the root of the tree, and then the “anonymous attribute units” are inserted between the user defined attribute units and the column groups.
16
For example, the tree shown in Fig. 6 is implicitly mapped to the tree shown in Fig. 7 by DQT. This completion of the tree is only done on a logically level, the definition in the XML-file remains unchanged.
Figure 7: The “completed” table structure from the table shown in Fig. 6. (cg... column group, cg... anonym column group, au... attribute unit, au... anonym attribute unit, sg... semantic group) The completed tree of Fig. 7 can then easily be transformed to the table head shown in Fig. 8.
Figure 8: The completed tree of Fig. 7 is transformed to this table head
Table Structure XML File Syntax The definition of the table structure must be valid for the following DTD: Listing 1: DTD for the table structure defintion file
>
a t t r i b u t e ( name , shortName , type , d e s c r i p t i o n ? , v a l u e ∗) v a l u e ( name , shortName , o r d e r )> d e s c r i p t i o n (#PCDATA)> name (#PCDATA)> o r d e r (#PCDATA)> shortName (#PCDATA)> type ( fpn | i n t | s t r i n g | s t r i n g l i s t | u r l l i s t | t e x t | s e t | md5 | extended )>
Table Structure XML File Semantic The information stored in the elements defined by the DTD given above is as follows: semantic group: This tag defines a semantic group. As mentioned above, each column (attribute) must belong to exactly one semantic group. The optional description tag may contain some textual description of the semantic group. If more than one description tag is defined for one semantic group, only the content of the first is displayed. The “tName” (abbr. for tableName) attribute of the semanticGroup tag must contain the identifier of the semantic group. This identifier must be unique within all identifiers of semantic groups defined for this installation of DQT. Note, that it is therefor not enough for the identifier to be unique within the identifiers of the semantic groups defined in the same file. DQT support more than one table structure definition files for the DQT installation (see “Managing different data collections”). A semantic group identifier must therfore be unique within all these files. Further, the identifier must not start with “sys ” (abbr. for system; this prefix is reserved for identifiers used by DQT) and must not contain the “;” (semi-colon) character. The “name” attribute may contain any text. It stores a name that is used to label the semantic group for the user. It is, for example, shown in the table head, an should therefore be reasonable short. The “maud” attribute must hold the deepest nesting of elements in this semantic group. (For example => maud = 1; => maud = 2; ...) attributeUnit: This tag defines an attribute unit. The “shortName” attribute contains the identifier for the attribute unit. This identifier must be unique for all attributeUnit elements within the same semantic group. The shortNames of the attributeUnits again must neither start with “sys ” nor contain the “;” 18
character. To each “anonymous attribute unit” DQT applies an identifier of the form {shortName of the attribute} aau{depth}, where... • {shortName of the attribute} is the identifier of the attribute that belongs to this attribute unit. • “aau” is short for “anonymous attribute unit”. • {depth} indicates at which depth in the tree the anonymous unit is added. (Counting starts at 0.) To avoid name clashes, the postfix “ aau{number}” should not be used for named attribute units as well. Otherwise the user is responsible to assure that no name clash occurs. The “name” attribute defines the text that is displayed to label the attribute unit for the user. Again it should be reasonable short, as this text is displayed in the table head. As for the semantic group, the description element is optional. Only the content of the first description element is taken into account. attributeGroup: With this tag, an attribute (column- ) group can be defined. The “shortName” attribute defines an identifier for the attribute group. This identifier must be unique for all attribute groups within the semantic group. It must not start with “sys ” and must not contain the “;” character. DQT creates for those attributes, for which no attribute group is defined, an anonymous attribute group. For these attribute groups, the identifier is created by appending “ aag” (abbr. for anonym attribute group) to the attribute identifier. The identifier of a user defined attribute group should therefore not end with “ aag”. The “name” attribute may contain any string. This string is used to label the attribute group for the user. As it is displayed within all table heads where the attribute group is part of, it should contain only a few characters. As for the semantic group, the description element is optional, and only the content of the first description element is taken into account. attribute: This element defines an attribute (one table column). The content of the child element “shortName” defines the identifier for the attribute. Again it must be unique for all attributes within one semantic group. The content of the “name” child element contains the string that is used to label the attribute for the user. To fit into the cell in the table head, it should be as short as possible. The child-node “type” defines the data type of the column (see section “Data Types”). The optional description element may contain arbitrary text. This text is used to provide the end-user of DQT further information about the attribute. The “value” child element is only needed if the datatype of the attribute is “enum” or “set”. (See the description of these data types - section “Data Types” - for more information about this element.) The first attribute of each semantic group must have the shortName and name “id”. This attribute must uniquely define each data row. (See next section 9.3 “Configuring the Database” for details.) Each table structure XML file defines one table. (More than one table structure file may exist. See 9.9 “Managing Different Data Collections”.) 19
9.3
Configuring the Database
A data row (or table row) is a tuple that contains a value for each defined attribute in the XML file (= column of the table). These data rows are saved in the database. 9.3.1
Mapping of the Table Structure XML File to the Database
The table structure definition file(s) contain(s) all information which DQT needs to create the tables for the display and the export output. It also stores all information DQT needs to load entries from the database (or to save it to the database). Therefore, the attribute (structure) needs to be mapped to the database tables. This is done according to the following rules: Each semantic group is mapped to an own database table. The value of the tName attribute (the identifier) of the semanticGroup element is used as table name. Beacuse all tables of one DQT installation DQT are stored in the same database, it is necessary that the value of the tName attribute is unique for all semantic groups of the application. All attributes belonging to a semantic group and having one of the basic data types (see “Data Types” for details) are mapped to fields in the corresponding database table. (How attributes with an extended type are handled: see section “Extended Types”) Thereby, the value of the element is used as field name. Thus, values of one table defined in the table structure XML file are saved in different database tables. So for each data row in the table, there must exist an entry in each of the corresponding database tables. To rebuild the complete data entry again, information is needed which rows in the different database tables belong together (a foreign key). Therefore, each database table must have a field named “id”. It must be the first field of each database table. This field is the mapping of the “id” attribute required in each semantic group (see “Table Structure XML File Semantic”). It must contain a unique value for each entry. This value is automatically assigned by DQT when a new entry is saved for the first time. It must not be defined by the user. As mentioned before, this field must be the first in each database table. The order of the other fields is arbitrary. Attributes of extended types are stored differently. Therefore for attributes with extended types, no fields in the database table needs to exist. The attribute units and attribute groups are not mapped to the database.
9.4
Defining the Attributes to be Displayed
The tables shown on the “edit-” and “view page” are created using the information of the table structure XML file. This file contains the complete list of fields that are stored in the database. But maybe not all fields shall be displayed in all tables. For example, it would not make sense showing the “id” field in the “edit table”. (As the id is assigned by the system.) Therefore, before the “view” or “edit” tables are created, the table structure XML file is transformed using an XSLT stylesheet. Using this stylesheets, it is possible to define filters that prevent copying of certain attributes to the resulting table. For both, the view and the edit table different stylesheets can be defined. The default stylesheets are stored in /XMLData/TS2editTS.xsl (for the edit tables) and /XMLData/TS2viewTS.xsl (for the view table). 20
The XSLT stylesheet used for the transformation can be defined in the /conf/ config.php by the values $conf ts2editTs and $conf ts2viewTs. They must contain the name and location of the *.xsl file to use relative to /XMLData/. For a description of the structure of these filters, please see the inline documentation of the default files.
9.5
Adding/Removing an Attribute
Following, a step by step description for adding or removing of an attribute (with a basic data type) is given: 1. Change the database: Delete or add a field from/to the database table corresponding to the semantic group to which the new attribute belongs to. 2. Change XML file defining the table structure: Delete or add an tag to the file. This tag must be a descendant of the tag the new attribute shall belong to. It must be the semantic group whose corresponding table has been updated in step 1. The child element of the new element must contain the name of the field added/removed from the database table. (See 9.2 “Defining the Table Structure” and 9.3 “Configuring the Database”.) - If a new attribute shall not be shown in the “edit” or the “view” table, update the filters in the TS2...TS.xsl files. (See 9.4 “Defining the Attributes to be Displayed”.) 3. Reload the application. If the application has been loaded before, php can be very obstinate in keeping the old table structure. Go to /sessionManagement.php and uncomment line 36. Then reload the application (using the reload function of the browser), comment this line out again, and reload the application once more. Now the new table structure should be completely loaded by the application. To change the grouping of the attributes or to redefine the description texts, only the XML file storing the table structure definition needs to be changed. Afterwards DQT needs to be reloaded.
9.6
Data Types
To each attribute/column, a data type must be assigned. It restricts the values that can be entered into this column. In DQT, two main datatype classes exist: The • “basic types” and the • “extended types”. The main difference between these data types is their implementation: Basic types are a fixed part of the system, and are more deeply integrated into the software compared to extended types. Extended types shall provide an interface to append new datatypes to the system easily. 21
Another differentiator is the kind of data “basic” and “extended” types are able to store. The basic data types could be called scalar types, as their values can be saved in one database field. Also, for each basic type, only one value exists for each data entry. The screenshot type (which is an extended type) needs 5 database fields in an extra database table and a directory on the webserver to store the images in. There can be also more than one screenshot for each data entry. This differentiator is only valid in the current version, but must not keep valid for data types implemented in the future. This classification of datatypes may help to decide whether a new datatype shall be implemented as extended or basic type. On the client, each data type is implemented in an own object. Such an object is assigned to each table cell. This “type object” handles all actions from the cell object that are somehow related to or dependent on the datatype. (All type objects are defined in the /js/types.js file) 9.6.1
Basic Types
In the current implementation, 9 basic types are provided. In this chapter, only details of the datatypes are explained which are important for the configuration of DQT (or for changing the implementation of DQT). Information how the datatypes are presented to the user and the user interfaces is explained in the user manual. The data type of a column is defined in the table structure XML file. For each element, the child element must contain the name of the datatype. int (Object: IntType) The “int” type is capable of handling integer numbers. For the database, it is mapped to the SQL INTEGER (INT) type (at the MySQL database this allows values between -2147483647 and 217483647). DQT allows to search for exact matches or to search for values within a given interval. For the comparison of two “int” values, the standard order of integer values is used. string (Object: StringType) The “string” type is used to store short string values (up to 200 characters). For the database, it is mapped to the VARCHAR type (with a maximum length of 200 characters). The string is allowed to contain any character defined by UTF-8. DQT allows fulltext search in attributes of this type (and therefore uses the fulltext search functionality of the MySQL database). For the comparison of two “string” values, all characters are normalized to upper case and then an alphabetical comparison is performed (as it is provided by javascript). md5 (Object: StringType) The “md5” type is very similar to the “string” type. It stores md5 hashed strings [Rivest,1992]. Within the client, the md5 type is identical to the “string” type, as it uses the same implementation. On the server, whenever a md5 value is saved, the string that is received from the client is hashed before it is stored in the database. In the database, the hashed string is stored as VARCHAR. For md5 values, the same comparison algorithm is used as for “string” values.
22
text (Object: TextType) The “text” type is intended to store longer string values. It is stored in the database as LONGTEXT value (MySQL database allows LONGTEXT values up to 4GB). The string may contain any character defined by UTF-8. DQT allows fulltext search in this data type (using fulltext search functionality of the MySQL database). For “text” values, the same comparison is used as for “string” values. stringlist (Object: StringlistType) The “stringlist” type is a primitive list type, whose entries can contain string values. The whole list is stored as a LONGTEXT field in the database. The different list entries are separated by a semi-colon (“;”). Because the list must be defined by the user in exactly this way (by typing the list entries separated by a “;” character to a text field), the list entries must not contain “;”. DQT allows fulltext search within different list entries. That means it is possible to search for lists that contain at least one entry containing a certain string, and another entry containing another string. When comparing two lists, first the length (that is the number of (not empty) list items) of the lists is compared. If two lists have the same length, an alphabetical comparison of the strings defining the whole list is used (after all characters are converted to upper case letters). If one list has more entries than the other, it is regarded to be bigger. urllist (Object: UrllistType) The “urllist” type is a variation of the “stringlist” type. The “urllist” type expects the list items to contain URLs. This does not lead to any difference how to edit the items, but when displaying the list, the list items are linked to the values defined in the items. Everything else is equal to the “stringlist” type. enum (Object: EnumType) The “enum” type allows to select one value out of a predefined set of values. This set can be defined by the host of the DQT. This is done using the tag that can be inserted as child node to the value in the XML file, which defines the table structure. For each chosen value, one element must be defined. The child element defines the string that is used to label the value towards the user. It can be any string value. The element defines the identifier for the value. This is used to save the value in the database. It must be unique within the element of the attribute, and must not contain the “,” character (as this leads to problems with the database). The element should contain a number. This number is used for the comparison of two values. The value with the higher order number is regarded to be bigger than the value with the lower order number ( v1 > v2 order(v1) > order(v2) ). This datatype is mapped to the ENUM type of the MySQL database. The set of defined values must be defined in the database as well. Additionally, a possibility to save an empty entry (””) must be defined in the database. For example, an attribute (with idName “att”) of type “enum” with the possible values “id1”, “id2” and “id3” is saved in a database field created by the SQL statement “att ENUM(”,’id1’,’id2’,’id3’)”. Whereby “id1”, ... are the values defined in the 23
element of the tag. DQT allows to search for exact matches (that means for entries having a specific value of the set selected). fpn (Object: FPNType) The “fpn” type is a certain enum type. The attribute value of “fpn” types can be one out of three values: (completely) fulfilled (f), partly or implicitly fulfilled (p), not fulfilled (n). (So “fpn” is the acronym of these values.) These values are related to the attribute. They describe whether the property of the attribute is fulfilled by the entry. Unlike the normal “enum” type, where the possible values can be defined by the host of DQT, these values are fixed. Also, “fpn” type offers a different user interface than the “enum” type. (See the user manual for details.) For storing in the database, this type is mapped to an ENUM type with the possibilities ’f’,’p’,’n’. (ENUM(’f’,’p’,’n’)). These three letters are always used to describe/define the current value of an entry. DQT allows to search for exact matches (entries with the value ’f’, ’p’ or ’n’). The comparison of two values of the “fpn”-type is done according to the following transitive order: (completely) fulfilled > partly/implicitly fulfilled > not fulfilled. set (Object: SetType) The “set” type allows to select an arbitrary number of values out of a predefined set of values. This set can be defined by the host of DQT in the table structure XML file . For each value of the set, a element must be appended to the corresponding element. The child element of the element defines the string that is used to label the value towards the user. It may contain any string value. The element defines the identifier for the value. It is used to save the selected set of values in the database (and to identify the different values). This identifier needs to be unique within the values of an attribute, and must not contain the “,” character (as this leads to problems with the database). The element should contain a number that defines the order in which the values of the set shall be displayed on the screen. The values are shown in ascending order. In the database, this type is mapped to the SET type. For each value defined in the table structure XML file, an entry in the set of possible values of the database must exist. The names of the set items defined in the database must equal the values of the element defined in the table structure file. DQT allows to search for entries, whose set of selected values is a superset of the set defined in the search request. So DQT returns all entries where at least the values defined by the search are selected. When comparing the selected sets of two entries, first the number of selected entries is compared. The entry with more selected values is regarded to be bigger than the one with less entries selected. If both selected sets have the same size, for each set the identifiers of the selected values are combined by “,” and all letters are converted to uppercase letters. Then an alphabetical comparison between these two strings is made.
24
Creating a new Basic Type Following, a step by step description for creating/adding a new basic type, that can be saved in one table field, to DQT is given. 1. Define a new object that implements the new data type (type object). This object must handle all type-related actions of the cell object. Therefore, the following interface must be implemented: • int compare(Cell myCell, Cell otherCell): Takes two Cell objects as arguments; returns -1 if the value of the first cell is smaller than the value of the second cell, 0 if the values of the cells are equal, and 1 if the value of the first cell is bigger than the value of the second cell. • void setValue(String value): Stores the value passed in the “value” argument as current value of the corresponding cell object. The value is saved in the actValue field of the cell object. The correct representation of the value is displayed on the screen. Furthermore, this type object must create and manage the user interface of the corresponding cell. That means the type object is responsible for the creation of the user interface elements, and for attaching them to the screen. It also must react to input of the user and must display the correct value in the cell. The object must support two kind of states for the interface: One where the user can change the value in the cell, and one that is read only. 2. In the constructor functions of the EditableCell (js/editableTable.js) and ViewCell (viewTable.js) objects, add a ”case” statement to the switch-construct. In this new branch, the correct type object for the new data type must be created. 3. Go to the /save.php file at about line 180. Check whether the new data type can be inserted using the default branch of the switch statement, or whether a new case needs to be created. Do the same for the switch-construct located around line 380 in the same file. 4. Go to the /search.php file. About line 310 a huge switch statement starts. Insert a new case-branch for the new data type. 9.6.2
Extended Types
Structure of Extended Types As mentioned above, the idea of the extended types was to provide a possibility to introduce new types without the need to change critical parts of the software. A further advantage of the chosen implementation is, that it allows easy creating of non-scalar (following the definition for scalar given above) data types. As for the basic types, also a type object for each extended type must exist. In addition to the tasks of the type object of basic types, the type objects of extended types are responsible for loading, saving and deletion of the values. (For the basic types, this is done by the Row object.) On the server side, these actions are not done by the /save.php, /delete.php or similar kinds of loading scripts. For each extended data type, 25
an own php file exists, that implements all these actions. During the export process, the creation of the export values for extended type is not done directly in the createExportXML(argsArray) function (defined in /exportFunctions.php). For each extended type, an own function must exist that creates the export output. createExportXML(argsArray) only calls the getExportData(arg1, arg2) function (defined in /exportExtendedTypes.php). This function then passes the request further to the function that creates the export output for the extended type. This function should also be located in / exportExtendedTypes.php. Also the call to the constructor function for extended type object is not directly in the constructor of the EditableCell (or ViewCell). Only a call to the getExtendedType(arg1, arg2, arg3) function (defined in /js/types.js) is performed. There the correct type object is created and returned. One disadvantage of extended types is, that it is yet not possible to define a search constraint for them. So, no constraints for values of extended types can be made in search requests. At the basic types, the value of the child element of the element was used to identify the attribute uniquely. It was therefore used as name of the database table field too. The individual type was defined by the element. For the extended types, the value of the element is always the same (“extended”). Therefore, the value of the is not only the identifier for the attribute, but also defines the extended of type the attribute. This value is used in the getExtendedType() function and the getExportData() function to distinguish between the different extended types. If the same extended type is used for more than one attribute, there’s no need to repeat the implementation of the whole data type. Only a list of case statements (case "type1": case "type2" ... case "typen":) is required within these two functions to map all attributes with the same extended type to the same implementation. Adding/Removing an Attribute with Extended Data Type: The following steps are necessary to add a new extended data type: 1. Create a new type object, which implements the interface described below and which implements the other requirements given below. 2. Go to /js/types.js and alter the getExtendedType(arg1, arg2, arg3) method: Add a new branch to the “switch-statement”. This case shall be true if the first argument equals the name of the new extended type. Within this case, a new instance of the the type object responsible for the new data type must be created and returned. 3. Create a new php file in . In this file, implement all scripts necessary to save, load and delete data of the new type. This file is called directly from the type object defined in step 1 and instantiated in step 2. 4. Go to /exportExtendedType.php and create a new function. It should be named following the scheme get{nameOfExtendedType}Content(arg1[,...]). 26
This function must load all values of the specified attribute for the given row (defined by the first argument). It should create an XML formatted string out of these values and return this string. (See function getScreenshotContent(techId) for an example.) 5. Go to /exportExtendedTypes.php and alter the getExportData(arg1, arg2) function: Add a new “case”-branch to the switch-statement. This case shall become active if the value of the second argument of the function equals the name of the new extended type. If this case statement is executed, the function defined in step 4 shall be called. The value returned by this function shall be returned to the caller of the getExportData(arg1, arg2) function. If the defined extended data type is used for more than one attribute, don’t forget to repeat steps 3 and 5 for each attribute with this type. Type Object for an Extended Type An object that shall be used as “type object” for an extended data type must perform the following tasks: Like all type objects, it is assigned to a cell object. For this cell object, it is responsible to load the data from the server. This must be done when it is created. It is also responsible for deletion of the values. If the value of its specialSave (see interface description below) field is true, it must also save the data to the server (otherwise this is done by the Row object to which the corresponding cell object belongs). As type objects for basic type values, this object must react to inputs of the user and must support two kind of states for the interface: One where the user can change the value in the cell, and one that is read only. A type object for an extended type must also implement the following interface: • int compare(Cell myCell, Cell otherCell): This method takes two Cell objects as arguments. It returns -1 if the value of the first cell is smaller than the value of the second cell, 0 if the values of the cells are equal, and 1 if the value of the first cell is bigger than the value of the second cell. • void deleteEntry(int id): This method deletes all values of the attribute for the data entry defined by the given “id” argument. • void save(): This function shall save the current value of the corresponding cell to the permanent storage. This function is called by the save() method of the Row object the cell belongs to. If the value of the cell is saved else when and not when this call happens (like for the “Screenshots” type), it can implement any functionality needed (or have an empty function body too). • specialSave: This must be a field of boolean type that is readable from the Row object the corresponding cell belongs to. If it is true, this means that saving is done by the type object. If the value of this field is false, this means that the value of the cell shall be saved by the Row object. This assumes, that there exists a database field with the 27
name equal to the “shortName” of the attribute, to which the data can be written. Additionally, if specialSave is false, the value of the “shortName” of the attribute must not equal the name of any existing basic data type. Further, the default branches of the switch-statements in /save.php (in lines 180 and 380) must be sufficient for writing the data to the persistent storage. Predefined Extended Types In the current version, only the extended data type “screenshots” exists. It stores screenshots. For each data entry, more than one screenshot can be saved. Each screenshot consists of: • A name (as string) • The id of the data row to which the screenshot belongs • A number identifying the screenshot within the data row • A description (a string) • The name of the image • Three images: one original image, one thumbnail whose longer side is reduced to 50 pixels, and one thumbnail whose longer side is reduced to 100 pixels All information is stored in a database, except the images which are stored separately. For an EER diagram of the database used to store the screenshots please see Figure 13.1.1 in the Appendix. An overview of the database table used to store the data is given here (Table 2).
name
values/type
constraints
comments
number
INT(10)
NOT NULL
PRIMARY KEY (with techId)
techId
INT(10)
NOT NULL
PRIMARY KEY (with number)
name
VARCHAR(200)
NOT NULL
FULLTEXT index
path
VARCHAR(200)
NOT NULL
FULLTEXT index
description
LONGTEXT
NOT NULL
FULLTEXT index
Table 2: The fields of the database table used to store values of “screenshot” type. The images are stored in subfolders of the /screens directory. Thereby, following directory structure is used: For each data row containing a screenshot, a directory exists as direct subfolder of /screens. It’s named with the id of the entry. Within this directory, for each screenshot a further directory exists. This is named according to the number of the screenshot within the entry. Within this directory, the original image is saved under its original name. The names of the thumbnails are created according to the following schema: • {originalName} preview.{type} (the larger one) 28
• {originalName} preview.{type} (the smaller one) They are saved in the same directory. Once all screenshots of a data row are deleted, the directory for the data row is removed as well. WARNING: If running DQT under windows, there’s a problem removing the empty directories. They remain on the server. The screenshots are not defined or edited directly in the table cell, but in a popupwindow that can be opened by clicking an icon. Also saving is done using this popupwindow. This is why the save() method of the ScreenshotsType object is empty. The page that is shown in the popup-window is /screensEditPage.php. The php file that is responsible for saving, loading and deletion of screenshots on the server side is /manageScreenshots.php. When comparing two screenshot values, their number of screenshot items are compared. The one with more entries is regarded to be larger than the other.
9.7
Export
This sections explains how to create and add an XSLT stylesheet which implements a transformation of the export output. 9.7.1
Export Format Syntax
The XML output created by the export functionality of DQT follows the DTD given in listing 2. Listing 2: DTD for the output of the export functionality of DQT
> Design Aspects of the Export Format The XML format used for the export is similar to how a table is defined in HTML. It consists of a head part, which contains information about the data structure (which attributes exist and how are they structured), and a body part that contains the values of the different entries. The structure of this XML data allows a very simple transformation of the output to any 30
type of table (html - table, a table defined in LaTeX, ... ). Because DQT is supposed to deal mainly with data that can be very clearly laid out as table, this structure has been chosen and preferred over a structure like shown in listing 3. Listing 3: Possible format for the XML output of the export function that has not been chosen value value ... ... ... ... ... Although the data is organized as in a table, and therefore a lot of information could be retrieved from the context an element is in, the chosen XML output also provides a lot of redundant information. (For example: for each element, the names and ids of the attribute, the attribute group and column group it belongs to are given explicitly. Each of these information could be retrieved out of the structure of the document.) The reason for this redundant information is, that the XML document is transformed by XSLT. Retrieving all these information during the transformation process would make the transformation very slow. This is because the XSLT processors are not optimized to select specific information out of a file. To speed up the transformation, several information is therefore stored locally in the element, so that the XSLT processor does not have to search intensively during transformation. 9.7.2
Export Format Semantic
In this section, an explanation of the elements that may appear in the export XML output is given.
Output Head The head of the output consists of: • One semantic group row (
) • A number n of attribute unit rows (
), where n is the maximum number of nested attribute units within the exported attributes 31
• One attribute group row (
) • One attribute row (
) The semantic group row contains one element for each semantic group exported. For each element, the idName attribute contains the identifier of the group. The number of attributes belonging to this semantic group which are also exported is given in the colspan attribute. The text content of the element is the full name/label of the semantic group. Each attribute unit row contains an element for each exported attribute unit in the level of attribute units which the row represents. Before the attribute unit rows are created, the table is “completed” as described in 9.2.2 ”Table Structure Definition File”. For each missing attribute unit, an “anonymous attribute unit” is inserted. The uId (unitId) attribute of the element must contain the identifier of the attribute unit (for anonymous attribute units an identifier is created as described in 9.2.2 ”Table Structure Definition File”). The semG attribute contains the full name of the semantic group to which the attribute unit belongs. (It is the string defined by the name attribute of the element in the table structure XML file). The semId attribute contains the identifier of the semantic group. The colspan attribute contains the number of attributes covered by this attribute unit. The text content of the element is the full name/label of the attribute unit (empty if anonym). The attribute group row contains one element for each exported attribute/column group. If attributes are exported for which no attribute group has been explicitly declared, an “anonymous attribute group” is created, according to the rules described in section ”Table Structure Definition File”. The gId attribute of the element contains the identifier of the attribute group. The semG attribute contains the full name of the semantic group to which the attribute group belongs to. (It is the string defined by the name attribute of the element in the table structure XML file.) The semId attribute contains the identifier of the semantic group. The colspan attribute contains the number of attributes covered by this attribute group. The text content of the element is the full name/label of the attribute group (empty if anonym). The attribute row contains one element for each exported attribute (column). The attId attribute of these elements contain the identifier of the attribute. The semG attribute contains the complete name of the semantic group to which the attribute belongs. The semId attribute contains the identifier of the semantic group. attG stores the complete name/label of the attribute group to which the attribute belongs, and attGid contains the identifier of this group. The parAnonym attribute of the element indicates whether the attribute belongs to an anonymous column group (value = “t”) or not (value = “f”). dataType defines the data type of the attribute/column. The text content of the element defines the full name/label of the attribute. Output Body The body of the output consists of a set of data rows. Each of these data rows contains the values of one table row. Each
element in the body has three attributes: • entryId contains the identifier of the row. 32
• entryName contains the complete name/label of the row. • type contains the string “dataRow”. Each data row contains one element for each exported attribute. Each of these elements posses the following attributes: • semG contains the full name/label of the semantic group to which the value belongs. • semid contains the identifier of the semantic group. • attG contains the full name/label of the attribute group to which the value belongs. • attGid contains the identifier of the attribute group. • att contains the full name/label of the attribute the value describes. • attId contains the identifier of the attribute. • type defines the data type of the value. The content of the element depends on the data type: int, string, text, enum, fpn, md5 : If the attribute is of one of these data types, the value is simply added as text content to the element. enum: If the attribute is of type “enum”, the label of the selected entry is written to the output. fpn: If the attribute is of type “fpn”, one of the characters ’f’, ’p’ or ’n’ is written to the output. set, stringlist, urllist: For attributes of one of these data types, the selected entries (“set”-type) or the list items are not directly added to the content of the element. For each entry or list item an element (abbr. for value) is added as child element to the element. The content of these elements is the label for the entry (not the identifier) for the set type, and the list entry defined by the user for one of the list types. For example, the output of the list stored as “item1;item2” is “item1item2”. screenshot: . The output for screenshot values is more complex. For each screenshot, a (ScreenShot) element is appended to the element. The number attribute of this element holds the number which identifies the screenshot uniquely within the entry. The child element contains the name of the screenshot as defined by the user. The element contains the text defined by the user to explain the screenshot, and the element contains the name of the original size image (with type ending). 9.7.3
Export Stylesheets
The XML output described in the previous section can be transformed using an XSLT stylesheet. These stylesheets are stored in the /XMLFiles/exportStylesheets directory. When the /viewPage.php file is called, each file present in this directory is 33
automatically added to the list of available transformations. Then the user can chose one out of it. To add (or remove) a transformation, only an XSLT file implementing the transformation needs to be added (or removed) to (from) this directory. WARNING!! The application does not check whether the files in this directory are “*.xsl” files or whether they are valid XSLT files. All files in the directory are added to the list of available transformations. If a file is not a valid XSLT file, trying to use this file for transformation will lead to an error. Instead of the transformed output, the error message created by the XSLT processor will be displayed. (Make therefore always sure this directory only contains proper XSLT files.) HINT: There is a maximum time a php script is allowed to run on the webserver (defined by the max execution time value in the php.ini). If this time is exceeded by a script, it is killed. Because the XSLT transformation is done within a php script, the transformation time must be less than this specified maximal runtime. As XSLT transformations often are quite time consuming, the standard value for this timespan (30 seconds) may be too small.
9.8
Configuration File /conf/config.php
This file stores all parameters and values necessary to configure/customize DQT. It is included by all server script files. To distinguish between configuration variables and other variables as well as to avoid name clashes, all variable names defined in the config.php file, and only these names, start with the prefix “conf ”. The only exception from this rule are the four values that are needed to connect to the database, whose names start with the prefix “db ”. A detailed description of the values that can be defined in this file is given by the inline documentation of the file and in the section 9.9 “Managing Different Data Collections”.
9.9
Managing Different Data Collections
The XML Table Query Editor supports the management of different data collections within the same installation of DQT. (For example: in the installation containing the data collection about the techniques for visualization of temporal data, besides this data also the data about existing users for the installation can be handled.) 9.9.1
Handling of Different Data Collections within one DQT Installation
When calling a server page (editPage.php, viewPage.php, ...) or a server script (save.php, delete.php, ...) DQT expects an URL parameter cfg pref (abbr. for “configuration prefix”). This is supposed to have an integer value >= 0. If it is not defined, the default value is 0. This value defines the data collection that shall be accessed by the call. (For example, in the installation about techniques for visualization of temporal data, cfg pref = 0 as default value is assigned to the data about visualization techniques, and cfg pref = 1 is assigned to the data for user management.) In the /conf/config.php file, which is included by all server script files (see 9.8 34
“Configuration File /conf/config.php” or its inline documentation), all configuration values, which are dependent of the data collection to access, are set according to the value of the cfg pref URL parameter. Currently, these are the following values: • $conf nameTable and $conf nameField: They define the field in the database that stores the name of a row (the name that is displayed in the first cell of each row). • $conf defaultClientOrderSG and $conf defaultClientOrderAtt: They define the attribute that shall be used for the default table order. The first one defines the id of the semantic group. The second defines the attribute within this group. This uniquely defines one attribute. • $conf defaultOrder: It defines the field that shall be used to sort the result of the SELECT statement on the database. • $conf ts: Stores the name of the XML file containing the table structure of the current data collection. The value must be defined as “name.xml ”. The file must be stored in /xmlValues. (See 9.2.2 ”Table Structure Definition File”.) • $conf ts2editTs: Stores the name of the XSLT file that shall be used to filter those columns from the table structure XML file, which shall be displayed on the edit page. (See section 9.4 “Defining the Attributes to be Displayed”.) • $conf ts2viewTs: Has the same function as $conf ts2editTs, but only for the view page. (See section 9.4 “Defining the Attributes to be Displayed”.) • $conf lastUpdateTable and $conf lastUpdateField: They define the database table and field that stores the date of the last update of each entry. This must be a field of type TIMESTAMP. If these values are defined, each update of an entry in the database sets the value of this field to now();. • $conf edit loadTable: Stores the URL of the file that shall be used for loading the table structure on the edit page. The URL must be given relative to without leading “/”. • $conf edit save: Stores the URL of the file that shall be used for saving values to the database. The URL must be given relative to without leading “/”. • $conf edit loadData: Stores the URL of the file that shall be used to load from the server on the edit page. The URL must be given relative to without leading “/”. • $conf edit delete: Contains the URL of the file that shall be used to delete data from the database. The URL must be given relative to without leading “/”. • $conf view loadTable: Stores the URL of the file that shall be used for loading the table structure on the view page. The URL must be given relative to without leading “/”.
35
• $conf view export: Contains the URL of the file to use to export data. The URL must be given relative to without leading “/”. • $conf searchData: Defines the URL of the file to use to search for entries. The URL must be given relative to without leading “/”. • $conf showDetailsLink: This field defines whether the name of rows shown in the manage cells shall be linked to the “details page” or not. For more details see the inline documentation of the /conf/config.php file. The values of the files storing the insert, delete, ... scripts will probably be the same for most data collections, with only a different value for the cfg pref URL parameter. The config.php file further stores the value of the cfg pref URL parameter to a session variable named “cfg pref”. It can therefore be accessed from all server scripts. (Because the config.php file is called whenever a php file on the server is accessed by the client, the value of the “cfg pref” session variable is rewritten with every call from the client. It is therefore not capable of remembering the value from one request to another. Therefore, the cfg pref parameter must be set for each request. If it is not set, the default value is used.) Besides the config.php file, only the user objects may have to be changed for introducing a new data collection. On the server as well as on the client, the user objects provide methods that return whether the current user has a certain privilege or not. Because a user may have different privileges on different data collections, the return values of these methods also depend on the current value of cfg pref. On the server, each of these methods expects the cfg pref value as last parameter. If it is not defined, the 0 (the default value) is applied. On the client, the cfg pref value is passed as argument to the constructor function of the user object, and is stored in the mode field of the user object. When one of the methods mentioned above is called, the value stored in this field is used to return the correct value. The user objects are defined in /userObject.php for the server, and /js/indexJS.js for the client.
9.9.2
Adding a new Data Collection
When adding a new data collection, following steps have to be performed: 1. Create a new XML file defining the table structure for the new data. (See section 9.2.2 “Table Structure Definition File”.) Also create the corresponding database table(s) to store the data in. (See section 9.3.1 “Mapping of the Table Structure XML File to the Database”.) 2. Define a new value for the cfg value for this data collection. 3. Make sure that the edit and/or view page for the new data collection is called with the cfg pref URL parameter set to the correct value. (For adding the link to the navigation bar, change the getNavigationBar() method of the userObject in the /userObject.php file.)
36
4. Extend the switch($cfg pref) statement in the /conf/config.php file for a case that catches the cfg pref value of the new collection. Define the values described above (and already defined in the default case) according to the new data collection. (When defining the URLs for script and loading server files, remember that they must not start with “/”, and that the must already contain the proper cfg pref URL parameter.) 5. Change the user objects (in /userObject.php and /js/ indexJS.js), so that all methods, whose output or return values depend on the cfg pref value, return/output the correct values. This step is only necessary if the rights needed to perform an operation on the new data collection differs from the rights required to perform the same operation on the data collection assigned to cfg pref == 0.
9.10
User, User Rights and User Related Configurations
DQT includes a simple right management system which can be used to restrict access to certain functionalities of the application. Therefore, different users can be created, and different privileges can be granted to them. A list of the privileges that can be granted to a user is given in section 9.10 “User Rights”. Each user then has the combination of all rights/access granted to her/him. DQT allows all combinations of privileges to be given to a user. But not all possible combination of user rights are useful, as some rights require the user to posses other privileges. It’s left to the one who grants rights to other users to only assign combinations of privileges that provide the user with all intended rights. 9.10.1
User Rights
This section lists the existing user rights and explains the privileges needed for specific action. In the following, besides the fact that a user is allowed to open the according page, “access to the x- page is granted” or “provides access to the x- page” means, that a link to this page is shown in the navigation bar. read The user has only the right to view the data. One therefore has access to the view page, but not to the edit page. On the view page, the view table is displayed as well as the table with the hidden rows and the area with the display controller checkboxes for the view tables. On the edit page, this right affects that the data rows are loaded into the edit tables. But it requires at least one out of the further rights “insert”, “edit”, “delete” to display these tables. insert It provides the right to insert new rows/data entries. It does not allow to view existing entries, neither to edit nor to delete them. It only provides access to the edit page, not to the view page. 37
If the user possesses this right only, no row from the database is loaded into the edit tables. However, the user can add rows, edit their values and save them to the database. But once a row has been saved, the user is not allowed to change the values of this row any more, nor to delete this row again. The row stays visible in the edit table, but it’s impossible for the user to save the row values. On the edit page, this right shows the (empty) edit tables, and activates the button for adding new rows. It also shows the save button in new data rows. The “insert” right has no effect on the view page. edit This provides the right to change values of already existing rows/data entries, and therefore only grants access to the edit page. The right to edit data does not imply the right to read/view existing data as well. If a user has the “edit” right, but not the “read” permission, no data is loaded on the edit page, so there’s nothing to edit for the user. Therefore, the read right must be assigned to the user as well. This right also does not allow to insert new data rows, so the button for adding new rows is not displayed on the screen. If this right is only combined with the insert right, then the user still can edit the entries s/he inserted after they were saved for the first time. Deleting existing entries from the database is also not included in this right, so the rows shown on the edit page do not provide the “delete button”. On the edit page, this right shows the (empty) edit tables, as well as the “save” buttons in data rows loaded from the server. The “edit” right has no effect on the view page. delete It provides the right to delete existing rows/data entries from the database, and therefore grants access to the edit page. This right does not include the right to read/view the data as well. So if the read right is not explicitly assigned to the user, no data row is loaded and shown. So the user has no possibility to delete any row. Therefore if the user shall be able to delete rows from the database, s/he needs at least the “delete” and the “read” right. If this right is combined with the “insert” right only, then the user can delete the entries made by him/her after the first saving. On the edit page, the “delete” right shows the (empty) edit tables, as well as the delete buttons in all displayed data rows. It has no effect on the view page. search It provides the right to use the search functionality of the application. If this right is assigned, the search part of the view page (see the user manual for details) is shown, and the user is allowed to define and submit search requests. The “search” right therefore provides access to the view page. This right does not imply the read right. As using the search functionality without the right to see the results would not make sense, it is strongly recommended to grant the “read” right to the user as well. If only the “search” right is granted, the search functionality will 38
not work properly (e.g., there won’t be the possibility to choose the columns for the search tables). export It provides the right to use the export functionality of the application. That means to output the data shown in the view table after performing a transformation on it. It grants access to the view page. On the view page, this right is responsible for loading the “export area” (see the user manual). This right does not apply the “read” right implicitly. This must be explicitly granted to make the export functionality work. If the user only has the “export” right, the UI elements for the export are loaded, but no export can be done. (This is because without “read” permission, there’s no view table and without view table there’s no data that could be exported.) It is therefore strongly recommended to always combine the “read” right to the export permission. users It provides the right to manage the user rights (create-, delete users, set passwords, assign rights). In the user edit-mode (see 9.9 ”Managing Different Data Collections” for details), this right grants access to the edit page, and includes the “read”, “insert”, “edit” and “delete” rights for this mode. It does not grant any right in the “normal” mode. 9.10.2
Default (guest)
To users that are not logged in (“guest”), only the read right is applied. The set of default rights is defined in the /conf/config.php file by the value of the $conf defaultRights field. It contains an array of boolean of length 7. Each entry in this array defines whether a certain right is applied to the default user. The following list shows the corresponding indices in the array: index: name of right (value for guest user) 0: insert (false) 1: edit (false) 2: delete (false) 3: export (false) 4: read (true) 5: user (false) 6: search (false) As an example, in the current version the declaration of this array is: $conf defaultRights = array(false,false,false,false,true,false,false); If a user logs in, these default rights are completely overwritten with the rights of the user. So if the “read” right is not explicitly granted to the user, it does not have it as long as s/he’s logged in, although s/he has it while s/he’s logged out.
elements can be directly inserted to the page. For each semantic group, one
exists. The elements contains further information about the semantic group/attribute group or attribute: the full name, the id and a description text. The elements of attribute groups also contain the id of the semantic group they belong to. For anonymous attribute groups, the (!) element contains “sys anonym”, and the element (!) contains the id of the attribute group (consisting of {name of the attribute}” aag”). The elements of the attributes further contain the id of the attribute group they belong to, and about their data type (copied from the table structure XML file) The elements are only present if the type is “set” or “enum”.
response(failure): If the user has no rights to access the edit page, the following response is sent: Listing 9: Server response of loadEditTable.php if the user is not allow to enter this page.
A c c e s s denied
You don ’ t have t h e r i g h t s t o e n t e r th e u s e r management c e n t e r .
You might have t o l o g i n f i r s t ?
You might have to log in first?
is only sent if there’s no user logged in.
105
11.2.6
Load Edit Data
Figure 95: UML sequence diagram shoqing the loading of rows for the edit tables and how they are inserted into these tables. loadEditData.php: argument/return values: request: POST - data (url encoded): • sys semGroups: a semicolon separated list of semantic group ids (= database table names), that defines from which tables data shall be loaded • [semGroup]: for each entry in the list in sys semGroups, there must be a POST argument with the id of the semantic group as name. Each of these entries contains 106
i d o f s e m a n t i c group i d o f a t t r i b u t e group name id type v a l u e name v a l u e id i n t e g e r ... name
... ..... The table head consists of the following rows: One row with the cells and names for the semantic groups. Then one row for each depth of attribute units, followed by one row with the cells for the attribute groups and one row with the cells for the attributes. After the elements have been removed, the
element can be directly inserted to the page. The elements contains further information about the semantic/attribute group, attribute unit or attribute: the full name, the id and a description text. The elements of attribute units further contain a list of attributes that are grouped by this attribute unit. For each of these attributes, their id as well as the id of the semanticand attribute group they belong to are given. For anonymous attribute units, the element is empty, and the element contains the string “sys anonym”. The elements of attribute groups also contain the id of the semantic group they belong to. For anonymous attribute groups, the (!) element contains 118
“sys anonym”, and the element (!) contains the id of the attribute group (consistent of {name of the attribute}” aag”). The elements of the attributes further contain the id of the attribute group they belong to, and about their data type (copied from the table structure xml file) The elements are only present if the type is “set” or “enum”.
response(failure): no sys part argument: Listing 22: Response of the loadViewTable.php script if the sys part argument is not defined.
ERROR
Data Missing
no rights: Listing 23: Response of the loadViewTable.php file if the user is not allowed to read the entries.
ACCESS DENIED
You have no r i g h t s t o a c c e s s t h i s f u n c t i o n a l i t y
You may l o g i n f i r s t . . . < / h2>
You may log in first...
is only shown if no user is logged in.
119
11.2.14
Load View Data
Figure 103: UML sequence diagram showing the loading of rows for the view table. For a description of the argument/return values of search.php, see the next section.
120
11.2.15
Search
Figure 104: UML sequence diagram showing the steps of the search functionality. (Without the creation of the search tables.) search.php: argument/return values: request: POST - data (url encoded): • sys semGroups: a semicolon separated list of the ids of the semantic groups (= names of the database tables) from which attributes (fields) shall be displayed. (not the attributes for which constraints were defined by the user, but the ones that shall be in the output) • [semGroups]: For each entry in sys semGroups, an argument with the id of the semantic group as name must exist that contains a semicolon separated list of database table field names (= id of attributes) that shall be selected from the database table. • sys numbTable: must contain the number of search tables that were used to define the search constraints
121
• sys semGroups[tNumb]: for each search table (tNumb = 1... sys numbTables), a semicolon separated list with the names of the database tables that contain fields for which constraints has been defined by this search table must be given. • [semGroups] [tNumb]: for each database table defined by an entry in one of the sys semGroups[tNumb] arguments (tNumb = 1 ... sys numbTables) described above, a semicolon separated list with the names of the fields for which constraints exist must be given. • sys numbRows[tNumb]: the number of rows the searchTable “tNumb” has (always one in the actual configuration). • [semGroup] [field][tNumb] [rNumb]: the value (=constraint) for the field [field] in the database table [semGroup], belonging to the [tNumb] searchTable on row [rNumb] (So each value submitted by the client can be identified by the table, the field, and number of search table and row) EXAMPLE: assume a database table human(id,name,homeCountry,motherTongue,size), and two search tables st1(name,homeCountry) and st2(name,size), each having one search row. st1:(’anonym’,’Austria’), st2(’anonym’,180). Assuming that all fields of the DB entries that fit the query should be transmitted, the search tables would be encoded like this: sys semGroups = human human = id;name;homeCountry;motherTongue;size (or human = * , as these values are only transformed to the part in ”SELECT FROM ....”) sys numbTables = 2 sys numRows1 = 1 sys numRows2 = 1 sys semGroups1 = human human1 = name;homeCountry sys semGroups2 = human human2 = name;size human name1 1 = anonym human homeCountry1 1 = Austria human name2 1 = anonym human size2 1 = 180
Listing 24: Response of the search.php file containing the results of the search. idNameOfField1 VALUE 122