Aug 11, 2014 - To sign a Query request, you calculate a digital signature using a ... Elastic Load Balancing supports Si
Elastic Load Balancing Developer Guide API Version 2012-06-01
Elastic Load Balancing Developer Guide
Elastic Load Balancing: Developer Guide Copyright © 2014 Amazon Web Services, Inc. and/or its affiliates. All rights reserved. The following are trademarks of Amazon Web Services, Inc.: Amazon, Amazon Web Services Design, AWS, Amazon CloudFront, Cloudfront, Amazon DevPay, DynamoDB, ElastiCache, Amazon EC2, Amazon Elastic Compute Cloud, Amazon Glacier, Kindle, Kindle Fire, AWS Marketplace Design, Mechanical Turk, Amazon Redshift, Amazon Route 53, Amazon S3, Amazon VPC. In addition, Amazon.com graphics, logos, page headers, button icons, scripts, and service names are trademarks, or trade dress of Amazon in the U.S. and/or other countries. Amazon's trademarks and trade dress may not be used in connection with any product or service that is not Amazon's, in any manner that is likely to cause confusion among customers, or in any manner that disparages or discredits Amazon. All other trademarks not owned by Amazon are the property of their respective owners, who may or may not be affiliated with, connected to, or sponsored by Amazon.
Elastic Load Balancing Developer Guide
Table of Contents What Is Elastic Load Balancing? ...................................................................................................... 1 How Elastic Load Balancing Works ........................................................................................... 2 Architectural Overview of Elastic Load Balancing ................................................................ 3 Supported Platforms .............................................................................................................. 4 Concepts ............................................................................................................................. 4 Load Balancer .............................................................................................................. 5 Availability Zones and Regions ........................................................................................ 5 Request Routing ........................................................................................................... 6 Configuring EC2 Instances for Load Balancing ................................................................... 7 Health Check ................................................................................................................ 7 Connection Draining ...................................................................................................... 8 Idle Connection Timeout ................................................................................................. 8 Sticky Sessions ............................................................................................................. 9 HTTP Methods ............................................................................................................. 9 HTTPS Support ........................................................................................................... 10 Proxy Protocol ............................................................................................................. 10 Tagging ...................................................................................................................... 11 X-Forwarded Headers .................................................................................................. 11 Interfaces ........................................................................................................................... 13 Regions and Endpoints ......................................................................................................... 13 Limits ................................................................................................................................ 14 Related Services ................................................................................................................. 14 Next Steps ................................................................................................................. 15 Setting Up .................................................................................................................................. 16 Sign Up ............................................................................................................................. 16 AWS Management Console ................................................................................................... 17 AWS Command Line Interface ............................................................................................... 18 Query Requests .................................................................................................................. 19 Signing Query Requests ............................................................................................... 19 AWS SDKs ......................................................................................................................... 20 Next Steps ......................................................................................................................... 20 Getting Started ............................................................................................................................ 21 Create a Basic Load Balancer in EC2-Classic ........................................................................... 21 Configure Listeners for Your Load Balancer ...................................................................... 22 Configure Health Check for Your Amazon EC2 Instances .................................................... 24 Register Amazon EC2 Instances .................................................................................... 25 Review Settings and Create Your Load Balancer ............................................................... 26 Verify the Creation of Your Load Balancer ......................................................................... 26 Delete Your Load Balancer ............................................................................................ 28 Create a Basic Load Balancer in EC2-VPC .............................................................................. 29 Configure Listeners for Your Load Balancer ...................................................................... 30 Configure Health Check for Your Amazon EC2 Instances .................................................... 32 Select a Subnet for Your Back-end Instance ...................................................................... 33 Assign a Security Group to Your Load Balancer ................................................................. 34 Register Your Amazon EC2 Instances ............................................................................. 34 Review Settings and Create Your Load Balancer ............................................................... 35 Verify Creation of Your Load Balancer ............................................................................. 36 Delete Your Load Balancer ............................................................................................ 37 Create a Basic Load Balancer in Default VPC ........................................................................... 39 Configure Listeners for Your Load Balancer ...................................................................... 40 Configure Health Check for Your Amazon EC2 Instances .................................................... 41 Assign a Security Group to Your Load Balancer ................................................................. 42 Register Your Amazon EC2 Instances ............................................................................. 43 Review Settings and Create Your Load Balancer ............................................................... 43 Verify Creation of Your Load Balancer ............................................................................. 44 API Version 2012-06-01 iii
Elastic Load Balancing Developer Guide
Delete Your Load Balancer ............................................................................................ 46 Listener Configurations ................................................................................................................. 47 Listeners ............................................................................................................................ 47 Using TCP/SSL Protocol with Elastic Load Balancing ................................................................. 48 Using HTTP/HTTPS Protocol with Elastic Load Balancing .......................................................... 48 Using SSL Server Certificates ................................................................................................ 49 Using SSL Negotiation Configuration with Elastic Load Balancing ................................................ 49 Advantages of Using the HTTPS/SSL Protocol with Elastic Load Balancing ................................... 49 Using Back-End Server Authentication with Elastic Load Balancing .............................................. 50 Listener Configurations Quick Reference ................................................................................. 50 Next Steps ......................................................................................................................... 52 SSL Negotiation Configurations ...................................................................................................... 54 SSL Security Policies ........................................................................................................... 55 SSL Security Policy Table ...................................................................................................... 55 SSL Certificates .......................................................................................................................... 61 Install and Configure OpenSSL .............................................................................................. 62 Create a Private Key ............................................................................................................ 63 Create a Certificate Signing Request ...................................................................................... 63 Submit CSR to Certificate Authority ........................................................................................ 64 Upload the Signed Certificate ................................................................................................ 64 Verify Server Certificate ........................................................................................................ 67 Sample Certificates .............................................................................................................. 67 Elastic Load Balancing in Amazon EC2-Classic ................................................................................ 69 Create HTTPS/SSL Load Balancer ......................................................................................... 71 Using the AWS Management Console ............................................................................. 71 Using the AWS Command Line Interface ......................................................................... 81 Add or Remove Availability Zones ........................................................................................... 95 Add Availability Zone ................................................................................................... 95 Remove Availability Zone .............................................................................................. 97 Security Groups .................................................................................................................. 99 Locking down traffic between Elastic Load Balancing and back-end Amazon EC2 instance ....... 99 Internet Protocol version 6 (IPv6) .......................................................................................... 107 IPv6 and CNAME records for Elastic Load Balancing ....................................................... 107 IPv6 and Hosted Zones for Elastic Load Balancing .......................................................... 108 Elastic Load Balancing in Amazon VPC ......................................................................................... 109 Understanding Public and Private Subnets ............................................................................. 110 VPC Security Groups for Your Load Balancer .......................................................................... 111 Default VPC ...................................................................................................................... 111 Internet-facing and Internal Load Balancers ............................................................................ 112 Configure Amazon VPC for Elastic Load Balancing .................................................................. 114 Create an Internal Load Balancer ......................................................................................... 115 Using the AWS Management Console ........................................................................... 116 Using the AWS Command Line Interface ........................................................................ 120 Using the Query API ................................................................................................... 123 Attach Subnet ................................................................................................................... 125 Using AWS Management Console ................................................................................ 125 Using the Query API ................................................................................................... 126 Using the Command Line Interface ............................................................................... 126 Detach Subnet .................................................................................................................. 127 Using AWS Management Console ................................................................................ 127 Using the Query API ................................................................................................... 127 Using the Command Line Interface ............................................................................... 127 Security Groups ................................................................................................................. 129 Using the AWS Management Console ........................................................................... 129 Using the Query API ................................................................................................... 129 Using the Command Line Interface ............................................................................... 130 Managing Load Balancers ........................................................................................................... 131 Add Listener ..................................................................................................................... 131 API Version 2012-06-01 iv
Elastic Load Balancing Developer Guide
Using the AWS Management Console ........................................................................... Using the Command Line Interface ............................................................................... Using the Query API ................................................................................................... Delete Listener .................................................................................................................. Using the AWS Management Console ........................................................................... Using the Command Line Interface ............................................................................... Using the Query API ................................................................................................... Deregister and Register Instances ........................................................................................ De-Registering Your Amazon EC2 Instances from Your Load Balancer ................................ Registering Your Amazon EC2 Instances with Your Load Balancer ...................................... Update SSL Certificate ....................................................................................................... Using the AWS Management Console ........................................................................... Using the Query API ................................................................................................... Using the Command Line Interface ............................................................................... Update SSL Negotiation Configuration ................................................................................... Custom Domain Names ...................................................................................................... Associating Your Custom Domain Name with Your Load Balancer Name .............................. Disassociating Your Custom Domain Name From Your Load Balancer Name ........................ Cross-Zone Load Balancing ................................................................................................. Enable Cross-Zone Load Balancing .............................................................................. Disable Cross-Zone Load Balancing .............................................................................. Connection Draining ........................................................................................................... Enable Connection Draining ......................................................................................... Disable Connection Draining ........................................................................................ Idle Timeout ...................................................................................................................... Using the AWS Management Console ........................................................................... Using the Elastic Load Balancing Command Line Interface ................................................ Using the Query API ................................................................................................... Proxy Protocol ................................................................................................................... Enable Proxy Protocol Using the Command Line Interface ................................................ Enable Proxy Protocol Using the Query API .................................................................... DNS Failover ..................................................................................................................... Prerequisites ............................................................................................................. Use the Console to Configure DNS Failover for Your Load Balancers ................................... Sticky Sessions ................................................................................................................. Duration-Based Session Stickiness ............................................................................... Application-Controlled Session Stickiness ...................................................................... Tags ................................................................................................................................ Add Tags .................................................................................................................. Remove Tags ............................................................................................................ Delete Your Load Balancer ................................................................................................... Using the AWS Management Console .......................................................................... Using the Query API .................................................................................................. Using the Command Line Interface ............................................................................... Monitoring and Logging ............................................................................................................... Monitoring Load Balancers .................................................................................................. Available Metrics ........................................................................................................ View Metrics ............................................................................................................ Create Alarms ........................................................................................................... Access Logs ..................................................................................................................... Access Log File ......................................................................................................... Access Log Entry ....................................................................................................... Log Processing .......................................................................................................... Enable Access Logs ................................................................................................... Disable Access Logs ................................................................................................. Configure an Amazon S3 Bucket for Storing Access Logs ................................................. Elastic Load Balancing API Call Logs .................................................................................... Configure CloudTrail Event Logging ............................................................................... API Version 2012-06-01 v
132 135 135 137 137 137 138 139 139 140 141 142 143 143 145 147 147 151 152 152 154 158 158 161 165 165 165 166 169 170 173 180 180 180 184 184 188 191 191 194 198 198 198 198 200 201 201 208 209 211 211 212 214 215 219 222 226 226
Elastic Load Balancing Developer Guide
Elastic Load Balancing Event Entries in CloudTrail Log Files .............................................. Controlling User Access to Your Load Balancer ............................................................................... Using IAM Policy to Grant Permissions ................................................................................. IAM Policy Syntax ...................................................................................................... Allow or Deny Permissions in an IAM Policy .................................................................... Specifying ELB Actions in an IAM Policy ........................................................................ Specifying ELB Resources in an IAM Policy .................................................................... Specifying Condition Keys in an IAM Policy ..................................................................... Example IAM Policies for Elastic Load Balancing ............................................................. Troubleshooting ......................................................................................................................... API Response ................................................................................................................... CertificateNotFound: undefined .................................................................................... OutofService: A Transient Error Occurred ....................................................................... Error Messages ................................................................................................................. HTTP 400: BAD_REQUEST ........................................................................................ HTTP 405: METHOD_NOT_ALLOWED ......................................................................... HTTP 408: Request Timeout ........................................................................................ HTTP 502: Bad Gateway ............................................................................................. HTTP 503: Service Unavailable or HTTP 504 Gateway Timeout ......................................... Response Codes ............................................................................................................... What is Response Code Metrics? ................................................................................. HTTPCode_ELB_4XX ................................................................................................ HTTPCode_ELB_5XX ................................................................................................ HTTPCode_Backend_2XX .......................................................................................... HTTPCode_Backend_3XX .......................................................................................... HTTPCode_Backend_4XX .......................................................................................... HTTPCode_Backend_5XX .......................................................................................... Health Check .................................................................................................................... Registered instances failing load balancer health check .................................................... Stopped and started instances failing load balancer health check ....................................... Registering Instances ......................................................................................................... Taking too long to register back-end instances. ................................................................ Unable to register instance launched from a paid AMI. ...................................................... Resources ................................................................................................................................ Document History ...................................................................................................................... Appendices ............................................................................................................................... Appendix A: Using the Elastic Load Balancing Command Line Interface ...................................... Task 1: Download the Command Line Interface ............................................................... Task 2: Set the JAVA_HOME Environment Variable .......................................................... Task 3: Set the AWS_ELB_HOME Environment Variable ................................................... Task 4: Set the AWS_CREDENTIAL_FILE Environment Variable ........................................ Task 5: Set the Region ................................................................................................ Verify if Elastic Load Balancing Command Line Interface(CLI) is Installed ............................ Appendix B: Using the SOAP API ......................................................................................... Endpoints ................................................................................................................. WSDL and Schema Definitions ..................................................................................... Programming Language Support .................................................................................. Request Authentication ............................................................................................... The Response Structure ............................................................................................. Web Services References ........................................................................................... AWS Glossary ...........................................................................................................................
API Version 2012-06-01 vi
226 229 229 229 230 230 231 232 233 236 237 237 237 238 238 238 238 238 238 239 239 239 239 239 239 240 240 240 240 241 241 241 241 243 244 251 251 252 252 253 254 255 255 258 258 258 258 258 260 261 262
Elastic Load Balancing Developer Guide
What Is Elastic Load Balancing? Amazon Web Services (AWS) provides Elastic Load Balancing to automatically distribute incoming web traffic across multiple Amazon Elastic Compute Cloud (Amazon EC2) instances. With Elastic Load Balancing, you can add and remove EC2 instances as your needs change without disrupting the overall flow of information. If one EC2 instance fails, Elastic Load Balancing automatically reroutes the traffic to the remaining running EC2 instances. If the failed EC2 instance is restored, Elastic Load Balancing restores the traffic to that instance. Elastic Load Balancing offers clients a single point of contact, and it can also serve as the first line of defense against attacks on your network. You can offload the work of encryption and decryption to Elastic Load Balancing, so your servers can focus on their main task. When you use Elastic Load Balancing to manage traffic to your application, you get the following benefits: • Distribution of requests to Amazon EC2 instances (servers) in multiple Availability Zones so that the risk of overloading one single instance is minimized. And if an entire Availability Zone goes offline, Elastic Load Balancing routes traffic to instances in other Availability Zones. • Continuous monitoring of the health of Amazon EC2 instances registered with the load balancer so that requests are sent only to the healthy instances. If an instance becomes unhealthy, Elastic Load Balancing stops sending traffic to that instance and spreads the load across the remaining healthy instances. • Support for end-to-end traffic encryption on those networks that use secure (HTTPS/SSL) connections. • The ability to take over the encryption and decryption work from the Amazon EC2 instances, and manage it centrally on the load balancer. • Support for the sticky session feature, which is the ability to "stick" user sessions to specific Amazon EC2 instances. • Association of the load balancer with your domain name. Because the load balancer is the only computer that is exposed to the Internet, you don’t have to create and manage public domain names for the instances that the load balancer manages. You can point the instance's domain records at the load balancer instead and scale as needed (either adding or removing capacity) without having to update the records with each scaling activity. • When used in an Amazon Virtual Private Cloud (Amazon VPC), support for creation and management of security groups associated with your load balancer to provide additional networking and security options. • Supports use of both the Internet Protocol version 4 (IPv4) and Internet Protocol version 6 (IPv6). Pricing As with all Amazon Web Services, you pay only for what you use. For Elastic Load Balancing, you pay for each hour or portion of an hour that the service is running, and you pay for each gigabyte of > MyLoadBalancer 2012-09-28T17:57:27.580Z 6 HTTP:80/ 2 5 2 HTTP 80 HTTP 80 AWSConsole-SSLNegotiationPolicy-MyLoadBalancer HTTPS 443 HTTP arn:aws:iam::000011112222:server-certi ficate/scert 80 i-f5ab7988
API Version 2012-06-01 103
Elastic Load Balancing Developer Guide Locking down traffic between Elastic Load Balancing and back-end Amazon EC2 instance i-fbab7986 AWSConsole-SSLNegotiationPolicy-MyLoadBalancer us-east-1e MyLoadBalancer-91948427.us-east1.elb.amazonaws .com Z3DZXE0Q79N41H internet-facing amazon-elb amazon-elb-sg MyLoadBalancer-91948427.us-east-1.elb.amazonaws.com a8a2955f-61db-4e5e-b138-e2be7EXAMPLE 000011112222 sg-9cd8a3f4 MyTestSecurityGroup This is an example tcp 0 0 amazon-elb sg-843f59ed amazon-elb-sg tcp 3389 3389 amazon-elb sg-843f59ed amazon-elb-sg tcp 22 22
API Version 2012-06-01 105
Elastic Load Balancing Developer Guide Locking down traffic between Elastic Load Balancing and back-end Amazon EC2 instance 0.0.0.0/0 tcp 80 80 0.0.0.0/0
4.
[optional] If your security group has rules that are less restrictive than the rule you added in the previous step, use the RevokeSecurityGroupIngress action to remove the less restrictive rules. For example, an existing rule might allow ingress traffic from the CIDR range 0.0.0.0/0 (all IPv4 addresses). The following example calls the RevokeSecurityGroupIngress action with the following parameters to remove a rule that allows HTTP traffic from all IPv4 addresses from a security group named MyTestSecurityGroup. • GroupName = MyTestSecurityGroup • IpPermissions.1.FromPort = 80 • IpPermissions.1.IpRanges.1.CidrIp = 0.0.0.0/0
Note If you want to connect directly to your back-end instances, do not revoke ingress rules that allow you to do so. For example, you might have rules that allow ingress traffic on ports 22 (SSH) and 3389 (RDP).
API Version 2012-06-01 106
Elastic Load Balancing Developer Guide Internet Protocol version 6 (IPv6)
Use IPv6 with Elastic Load Balancing Elastic Load Balancing supports both Internet Protocol version 6 (IPv6) and Internet Protocol version 4 (IPv4). Clients can connect to your load balancer using either IPv4 or IPv6. Communication between the load balancer and its back-end instances uses only IPv4 (regardless of how the client communicates with your load balancer). This means that your back-end Amazon EC2 instances do not need native IPv6 support. Elastic Load Balancing provides a public DNS name that combines your load balancer's name and Region. For example, a load balancer named myLB in the US-East Region might be represented by the DNS name myLB-1234567890.us-east-1.elb.amazonaws.com. This base public DNS name returns only IPv4 records. In addition to the base public DNS name, Elastic Load Balancing provides two additional public DNS names. The first combines the string ipv6 with the name of your load balancer and Region. This might look like ipv6.myLB-1234567890.us-east-1.elb.amazonaws.com. The ipv6-prefixed DNS name returns only IPv6 records. The second public DNS name combines the string dualstack with the name of your load balancer and Region.This might look like dualstack.myLB-1234567890.us-east-1.elb.amazonaws.com. The dualstack-prefixed DNS name returns both IPv4 and IPv6 records. Most customers will want to use the dualstack-prefixed DNS name to enable IPv6 support for their load balancers. Because the dualstack-prefixed DNS name returns both IPv6 and IPv4 records, clients are able to access the load balancer using either IPv4 or IPv6 as their individual connectivity needs dictate. The ipv6-prefixed DNS name returns only IPv6 addresses, which means that clients with only IPv4 connectivity will not be able to reach the load balancer if they use the ipv6-prefixed DNS name. Elastic Load Balancing supports X-Forwarded-For request headers for clients that connect using either IPv4 or IPv6. If a client connects using IPv6, Elastic Load Balancing inserts the IPv6 address of the client into the request header. For more information on X-Forwarded-For support, see Terminology and Key Concepts (p. 4). Elastic Load Balancing allows you to map DNS names to your load balancer with IPv6 in much the same way as you map DNS names with IPv4. If you use a CNAME record to map your DNS name to your load balancer, you can continue to use that method. If you use an Amazon Route 53 hosted zone, you can use the same Elastic Load Balancing command to create a resource record for both IPv4 and IPv6.
Note IPv6 support is currently not available for load balancers in Amazon VPC (EC2-VPC).
IPv6 and CNAME records for Elastic Load Balancing If you use a CNAME record to map a DNS name such as www.example.com to your load balancer, you can use any of the three public DNS names as the alias in a CNAME record. For example, the following CNAME record maps www.example.com to a load balancer's IPv4 address. www.example.com
CNAME
myLB-1234567890.us-east-1.elb.amazonaws.com
The following example maps www.example.com to a load balancer's IPv6 address. www.example.com
CNAME
ipv6.myLB-1234567890.us-east-1.elb.amazonaws.com
To handle a mixture of IPv4 and IPv6 address resolution, use the dualstack prefix in your CNAME record.
API Version 2012-06-01 107
Elastic Load Balancing Developer Guide IPv6 and Hosted Zones for Elastic Load Balancing
www.example.com
CNAME
dualstack.myLB-1234567890.us-east-1.elb.amazonaws.com
IPv6 and Hosted Zones for Elastic Load Balancing If you use an Amazon Route 53 hosted zone to map a domain name or zone apex to your load balancer, you can use the elb-associate-route53-hosted-zone command to create resource records that work with IPv4, IPv6, or both. To create an IPv4 resource record, specify the value A for the --rr-type parameter. You can also omit this parameter because its default value is A. elb-associate-route53-hosted-zone myLB --rr-name example.com --rr-type A -hosted-zone-id Z123456789 --weight 100
To create an IPv6 resource record, specify the value AAAA for the --rr-type parameter. elb-associate-route53-hosted-zone myLB --rr-name example.com --rr-type AAAA -hosted-zone-id Z123456789 --weight 100
To create the equivalent of a dualstack resource record, create a resource record that specifies the value A for the --rr-type parameter and another resource record that specifies the value AAAA. elb-associate-route53-hosted-zone myLB --rr-name example.com --rr-type A -hosted-zone-id Z123456789 --weight 100 elb-associate-route53-hosted-zone myLB --rr-name example.com --rr-type AAAA -hosted-zone-id Z123456789 --weight 100
For more information about using Amazon Route 53 with Elastic Load Balancing, see Option 2: Create an Amazon Route 53 Hosted Zone (p. 149).
API Version 2012-06-01 108
Elastic Load Balancing Developer Guide
Elastic Load Balancing in Amazon VPC Amazon Virtual Private Cloud (Amazon VPC) lets you define a virtual networking environment in a private, isolated section of the Amazon Web Services (AWS) cloud. Within this virtual private cloud, you can launch AWS resources such as, ELB load balancers and EC2 instances. This section covers information that is specific to creating and managing your load balancers launched within Amazon VPC and provide procedural instruction and examples. To use load balancers to monitor and route traffic to your EC2 instances launched within VPC, you must create your load balancer within the same VPC as your EC2 instances. Before you can create your load balancer within a VPC, you must first create a VPC. You define your Amazon VPC by assigning IP address in the classless inter-domain routing (CIDR) range of your choice (for example, 10.0.0.0/16). For more information on CIDR and what ‘/16’ means, see Classless InterDomain Routing. You can create a VPC that spans multiple Availability Zones then add one or more subnets in each Availability Zone. A subnet in Amazon VPC is a subdivision within an Availability Zone defined by a segment of the IP address range of the VPC. A subnet resides entirely within the Availability Zone it was created in. You launch your EC2 instances and load balancers into a subnet you select. You create a subnet by specifying the CIDR block for the subnet. The CIDR block of a subnet can be the same as the CIDR block for the VPC (for a single subnet in the VPC), or a subset (to enable multiple subnets). When you add a new subnet to your VPC, you can optionally set up the routing and security you want for the subnet. To enable communication between the Internet and the load balancer in your subnet, you must create and attach an Internet gateway (IGW) to your VPC. An Internet gateway enables your load balancer within the subnet to connect to the Internet through the Amazon EC2 network edge. Communication between the clients and your load balancer and also between the load balancer and your back-end instances uses Internet Protocol version 4 (IPv4). Internet Protocol version 6 (IPv6) is currently not available for load balancers in Amazon VPC.
API Version 2012-06-01 109
Elastic Load Balancing Developer Guide Understanding Public and Private Subnets
Understanding Public and Private Subnets Each subnet you create is automatically associated with a route table. The route table controls the routing for the internet. By default, the subnet is associated with a main route table that enables communication within the VPC. You can change the association of the route table for your subnet at any time. To enable a subnet to communicate with the Internet, you must associate the subnet's route table with the Internet gateway. If a subnet's traffic is routed to an Internet gateway, the subnet is known as a public subnet. If a subnet's traffic is not routed to an Internet gateway, the subnet is known as a private subnet. Use a public subnet for load balancer that must be connected to the Internet, and a private subnet for load balancer that need not be connected to the Internet. The following figure shows an example of Elastic Load Balancing within Amazon VPC.
In this example, the Availability Zone 1A has load balancer in its own subnet and the EC2 instances in another subnet. The load balancer is in a public subnet. It means that the traffic from the subnet is routed to the Internet gateway which allows the load balancer to communicate with the Internet.The EC2 instances are in a private subnet. It means that the traffic from the subnet is not routed to the Internet gateway. The EC2 instances in the private subnet cannot communicate with the Internet. In Availability Zone 1B, the load balancer and the EC2 instances are both in the same public subnet. The traffic from the subnet is routed to the Internet gateway. Both the load balancer and EC2 instances can communicate with the Internet. You can configure your VPC architecture either way, depending on your specific security and routing requirements. If you are planning on creating more than one subnets in your VPC, be sure to configure the security group rules and network ACLs to allow traffic to be routed between the subnets in your VPC. If your rules are not configured correctly, instances in other subnets may not be reachable by load balancer nodes in a different subnet.
API Version 2012-06-01 110
Elastic Load Balancing Developer Guide VPC Security Groups for Your Load Balancer
VPC Security Groups for Your Load Balancer A security group acts as a virtual firewall that controls the traffic allowed into an instance. You create security group by adding a set of rules that control the inbound traffic to instances, and a separate set of rules that control the outbound traffic. There is a significant difference between the way the security groups function on Amazon VPC and Amazon EC2. In Amazon EC2, Elastic Load Balancing provides a special Amazon EC2 source security group that you can use to ensure that a back-end Amazon EC2 instance receives traffic only from the ELB load balancers. You cannot modify the source security group. Within Amazon VPC, you have control over the security groups assigned to your load balancer. Having control over your load balancer's security groups allows you to choose the ports and protocols to accept. For example, in Amazon VPC you can open Internet Control Message Protocol (ICMP) connections for the load balancer to respond to ping requests (however, ping requests will not be forwarded to any registered instances). When creating your load balancer if you don't specify a particular security group, your load balancer automatically belongs to the VPC's default security group. See Also • What is Default VPC? (p. 111) • Internet-facing and Internal Load Balancers (p. 112) • Configure Amazon VPC for Elastic Load Balancing (p. 114)
What is Default VPC? If your AWS account comes with a default virtual private cloud (default VPC), your instances are launched within the default VPC, by default, unless you specify a subnet from a nondefault VPC. For more information, see Detecting Your Supported Platforms and Whether You Have a Default VPC. A default VPC combines the benefits of the advanced networking features provided by Amazon VPC platform (EC2-VPC) with the ease of use of the Amazon Elastic Compute Cloud platform (EC2-Classic). Your default VPC automatically comes with a default subnet in each Availability Zone, an Internet Gateway connected to your default VPC, and a default security group associated with your default VPC, among other default configurations. For more information on default VPC and Subnets, see Your Default VPC and Subnets. When you launch your EC2 instances within default VPC without specifying a subnet, it is automatically launched into a default subnet in your default VPC. By default, we select an Availability Zone for you and launch the instance into the corresponding subnet for that Availability Zone. Alternatively, you can select the Availability Zone for your instance by selecting its corresponding default subnet. To load balance your EC2 instances launched in default VPC, you have to create your load balancers within your default VPC. When you create a load balancer within default VPC, Elastic Load Balancing automatically creates a security group by defining the ports specified for the load balancer to be opened. If you are using the AWS Management Console to create your load balancer with default VPC, you can choose the default VPC security group associated with your default VPC, choose any other pre-existing security group associated with your AWS account, or modify the existing security group to create a new one. If you choose a non-default pre-existing security group, ensure that it allows ingress to the ports that you configured the load balancer to use. If you choose to create a security group, the console will define these ports to be open for you. The security group you create using the AWS Management Console is associated with your load balancer. You cannot delete the security group as long as it is associated with a load balancer.
API Version 2012-06-01 111
Elastic Load Balancing Developer Guide Internet-facing and Internal Load Balancers
If you are using the Elastic Load Balancing command line interface (CLI) or the Query API to create your load balancer within your default VPC, a default security group; default_elb_special number will be created for 0.0.0.0/0 with the ports specified for the load balancer. Currently, Elastic Load Balancing does not support the option to choose a security group to associate with your load balancer when you use either the CLI or the Query API. A security group created for your load balancer within default VPC using either the CLI or the Query API is associated with your AWS account. Only one security group will be created per AWS account. Subsequent calls to create new load balancers will re-use the same security group. If you add listeners to an existing load balancer, you will need to review the security groups that are applied to the load balancer; otherwise, traffic may not reach the load balancer. If you create a load balancer that uses this default security group and the new load balancer has a different listener configuration, you will need to review and update the security groups that are applied to the load balancer. If you are using the CLI to create a load balancer for your EC2 instances in default VPC, you can see the security group associated with your load balancer by using the -show-long option with elb-describelbs command.The load balancer security group is listed as SOURCE_SECURITY_GROUP in the CLI output and the query response. This security group can be used to limit ingress to your instance from only the selected security group. Whether you are using the console, CLI, or the Query API, if you update the listeners of your load balancer within default VPC, the security groups associated with the load balancer will not change. If you delete your load balancer, the security group will not be deleted automatically. For information on creating a basic load balancer for your EC2 instances within default VPC, see Create a Basic Load Balancer in Default VPC (p. 39).
Internet-facing and Internal Load Balancers When you create your load balancer in VPC, you can make your load balancer internal (private) or Internetfacing (public). When you make your load balancer internal, a DNS name will be created, and it will contain the private IP address of the load balancer. Internal load balancer is not exposed to the internet. When you make your load balancer Internet-facing, a DNS name will be created with the public IP address. The DNS records are publicly resolvable in both cases. By combining both internal and Internet-facing load balancers, you can balance requests between multiple tiers of your application. For example, let us say you have web servers at your front-end that takes requests from the internet and passes it on to your back-end application instances.You can create an internal load balancer in your VPC and then place your back-end application instances behind the internal load balancer. You can create an Internet-facing load balancer with the DNS name and public IP address and place it in front of your web server. Your web server will take requests coming from the Internet-facing load balancer and will make requests to the internal load balancer, using private IP addresses that are resolved from the internal load balancer’s DNS name. The internal load balancer will route requests to the backend application instances, which are also using private IP addresses and only accept requests from the internal load balancer. With this multi-tier architecture, all your infrastructure can use private IP addresses and security groups so that the only part of your architecture that has public IP address is the Internetfacing load balancer. For an Internet-facing load balancer to be connected to the Internet, the load balancer must reside in a subnet that is connected to the Internet using the Internet gateway. The application instances behind the load balancer do not need to be in the same subnet as the load balancer. The following diagram shows Elastic Load Balancing within Amazon VPC combining both Internet-facing and internal load balancers.
API Version 2012-06-01 112
Elastic Load Balancing Developer Guide Internet-facing and Internal Load Balancers
API Version 2012-06-01 113
Elastic Load Balancing Developer Guide Configure Amazon VPC for Elastic Load Balancing
Configure Amazon VPC for Elastic Load Balancing To create and use ELB load balancers within Amazon VPC, you have to first configure your VPC environment by creating a VPC, creating one or more subnets, and then launch your instances in the subnets. Here are some tips on configuring your VPC and subnets for Elastic Load Balancing. • Create your Amazon VPC with an Internet Gateway in the region where you want to launch your instances and load balancer. • If you are a new customer or if you are using the region you have not previously used, you are likely to get a default VPC, by default. You can either use the default VPC or create your own. • Create subnets in each Availability Zone in which you want to launch your instances. Depending on your use case, your security and operational requirements, the subnets where you want to launch your instances can either be a private subnet or a public subnet. Instances launched in a private subnet cannot communicate with the Internet. If you want your instances in private subnet to have outbound internet access only, place a network address translation (NAT) instance in a public subnet. A NAT instance enables instances in the private subnet to initiate outbound traffic to the Internet, but prevents them from receiving inbound traffic. • You can optionally create a separate subnet for your load balancer. Your instances do not need to be in the same subnet that has your load balancer. If you plan to place your load balancer and your backend instances in separate subnets, make sure to configure the security group rules and network ACLs to allow traffic to be routed between the subnets in your VPC. If your rules are not configured correctly, instances in other subnets may not be reachable by the load balancer in a different subnet. To ensure that your load balancer can scale properly, make sure that the subnet in which you plan to place your load balancer has CIDR block of at least a /27 bitmask (e.g., 10.0.0.0/27) and also has at least 20 free IP addresses. When you create your load balancer and place it in a subnet, this defines the subnet that traffic must enter to forward the request to registered instances.
Important If you are creating an Internet-facing load balancer, make sure to place your load balancer in a public subnet. After you create the public subnet, make sure to associate the route table of your public subnet with the Internet gateway to enable your load balancer in the subnet to connect with the Internet.
The most common VPC scenarios are documented in the Scenarios for Amazon VPC. Each of these scenarios has a link to a detailed explanation of the scenario. At the end of the section is a section called Implementing the Scenario that gives you instructions on how to create a VPC for that scenario. You can follow the instructions from the scenario that best suits your use case to create your VPC environment. If your scenario is not listed in the Scenarios for Amazon VPC section, you can create your VPC environment by stepping through the instructions in the following sections of the Amazon Virtual Private Cloud User Guide. Description
Documentation
Learn about Amazon VPC
What is Amazon VPC?
Create VPC
Your VPC
Learn about subnets and creating subnets
Subnets in Your VPC
API Version 2012-06-01 114
Elastic Load Balancing Developer Guide Create an Internal Load Balancer
Description
Documentation
Learn about creating security groups and Security in Your VPC network ACLs Learn about NAT instance
NAT Instances
Learn about route tables
Route Tables
Learn about Internet gateways
Adding an Internet Gateway to Your VPC
Launch EC2 instances in your subnet
Launching an Instance into Your Subnet
You can also launch EC2 dedicated instances in your subnet.
Using EC2 Dedicated Instances
When you have completed creating your VPC environment, be sure to make a note of the VPC ID, subnet ID, and the security group associated with your VPC. You will need them later when you create your load balancer. And also make sure to launch your instances in the subnets. Next Steps • To learn how to create a TCP load balancer in Amazon VPC, see Create a Basic Load Balancer in EC2-VPC (p. 29) • To learn how to create TCP load balancer in default VPC, see Create a Basic Load Balancer in Default VPC (p. 39) • To learn how to create an internal load balancer, see Create a Basic Internal Load Balancer in Amazon VPC (p. 115) • To learn how to attach a subnet to your load balancer, see Attach Your Load Balancer to a Subnet (p. 125) • To learn how to detach a subnet from your load balancer, Detach Your Load Balancer from a Subnet (p. 127) • To learn how to manage security groups for your load balancer in VPC, see Manage Security Groups in Amazon VPC (p. 129)
Create a Basic Internal Load Balancer in Amazon VPC You can make your load balancer internal (private) or Internet-facing (public) when creating it within a VPC. When you make your load balancer internal, a DNS name will be created, and it will contain the private IP address of the load balancer. Internal load balancer is not exposed to the internet. When you make your load balancer Internet-facing, a DNS name will be created with the public IP address. The DNS records are publicly resolvable in both cases. For information on using both internal and Internetfacing load balancer to support multiple tier architecture, see Internet-facing and Internal Load Balancers (p. 112). This topic uses an example to walk you through the process for creating a basic internal load balancer within your VPC and registering your EC2 instances with the newly created internal load balancer. This example uses default configurations for security group, listener protocols and ports, and for the health check. If you want to create an Internet-facing load balancer, see Create a Basic Load Balancer in EC2VPC (p. 29).
API Version 2012-06-01 115
Elastic Load Balancing Developer Guide Using the AWS Management Console
When you create your internal load balancer, you can optionally assign tags for your load balancer. Tags help you to categorize your load balancers in different ways, for example, by purpose, owner, or environment. For more information, see Tagging (p. 11). If you have not yet created your VPC environment for using an internal load balancer, create one before you proceed further. For information about creating a VPC environment, see Configure Amazon VPC for Elastic Load Balancing (p. 114). The following task list gives you a general overview of what you'll need to create a basic internal load balancer in Amazon VPC. Then you'll step through detailed procedures for each part of the creation process.
Creating a Basic Internal Load Balancer in VPC 1
Configure the listeners for your load balancer by specifying the ports and protocols to use for front-end connection (client to load balancer) and back-end connection (load balancer to back-end instance).
2
Configure a health check for your Amazon EC2 back-end instances.
3
Select the subnets in which to launch your load balancer.
4
Select security groups to assign to your load balancer.
5
Add Amazon EC2 instances to your load balancer.
6
[optional] Add tags to your load balancer.
7
Review settings.
8
Create your load balancer.
You can choose to create your load balancer in EC2-VPC using the AWS Management Console, the AWS command line interface (AWS CLI), or the Query API. Topics • Using the AWS Management Console (p. 116) • Using the AWS Command Line Interface (p. 120) • Using the Query API (p. 123)
Using the AWS Management Console To create a basic internal load balancer in VPC 1.
Start the Create Load Balancer wizard: a.
On the Amazon EC2 console Resources page, in the EC2 Dashboard pane, under NETWORK & SECURITY, click Load Balancers.
API Version 2012-06-01 116
Elastic Load Balancing Developer Guide Using the AWS Management Console
b.
2.
On the Load Balancers page, click Create Load Balancer.
On the Define Load Balancer page, enter a name for your Amazon VPC load balancer (e.g., myinternal-loadbalancer).
4. 5.
The load balancer name you choose must be unique within your set of load balancers, must have a maximum of 32 characters, and must only contain alphanumeric characters or hyphens. Click the Create LB inside dialog box and select the Amazon VPC in which you want to create your load balancer. If it is not already selected, click Create an internal load balancer box. Leave the Listener Configuration set to the default value.
6.
Click Continue to configure the health check for your instances.
7.
On the Configure health Check page, configure the health check settings that your application requires. Click Continue to select the subnet in which you want to launch your load balancer instance.
3.
8. 9.
On the Select Subnets page, in the Available Subnets table, click the button in the Action column to select a subnet in which to create your internal load balancer.
API Version 2012-06-01 117
Elastic Load Balancing Developer Guide Using the AWS Management Console
Your selected subnets are displayed in the Selected Subnets table.
10. Click Continue to select a security group to assign to your load balancer. 11. This tutorial uses the default security group associated with your virtual private cloud. On the Assign Security Groups page, click Select an existing security group and then select the default VPC security group. 12. If you use a pre-existing security group, ensure that it allows ingress to the ports that you configured the load balancer to use. If you create a security group in this step, the console will define these ports to be open for you.
13. Click Continue to register EC2 instances with your load balancer. 14. On the Add EC2 Instances page, in the Add Instances to Load Balancer table, select the boxes in the Instance column to register instances with your load balancer.
API Version 2012-06-01 118
Elastic Load Balancing Developer Guide Using the AWS Management Console
Note When you register a multi-homed instance (an instance that has an elastic network interface (ENI) attached) with your load balancer, the load balancer will route traffic to the primary IP address of the instance (eth0). For more information on using ENIs, go to Elastic Network Interfaces. When you stop and then start your back-end EC2 instances associated with your load balancer, we recommend that you de-register your stopped instance from your load balancer, and then re-register the restarted instance. Failure to do so may prevent the load balancer from routing the traffic to the restarted instance. For procedures associated with de-registering and then registering your instances with your load balancer, see Deregister and Register Amazon EC2 Instances (p. 139). 15. Click Continue to set tags for your load balancer. 16. Skip this step if you do not want to assign tags to your load balancer at this time and click Continue to review the details of your load balancer. On the Add Tags page, specify a key and a value for the tag. 17. To add multiple tags, click Create Tag and continue to specify key and value for the tags.
18. After you are done adding tags for your load balancer, click Continue to review the details of your load balancer. API Version 2012-06-01 119
Elastic Load Balancing Developer Guide Using the AWS Command Line Interface
19. On the Review page of the Create Load Balancer wizard, check your settings. You can make changes by clicking the edit link for each setting. 20. Click Create to create your load balancer. 21. The Create Load Balancer wizard displays the status of your newly created load balancer. Click Close after confirming that your load balancer was successfully created. 22. Your new load balancer is listed in the load balancer page. Select the check box next to your load balancer. 23. The bottom pane displays the description of your load balancer. Verify that the descriptions match your specifications. Note that the DNS name and the description in the row titled Scheme, both indicate that your newly created load balancer is internal.
Using the AWS Command Line Interface Important Elastic Load Balancing CLI has been replaced by AWS Command Line Interface (AWS CLI), a unified tool to manage multiple AWS services. New features released after ELB CLI version 1.0.35.0 (dated 7/24/14) will not be included in the ELB CLI but will be included in AWS CLI. We recommend that you start using the AWS CLI. For a list of the functionality supported in previous ELB CLI versions, see Elastic Load Balancing API Tools. Before you get started make sure that you have installed and configured your AWS CLI environment. For more information, see Getting Set Up with the AWS Command Line Interface. By default, Elastic Load Balancing creates an Internet-facing load balancer with a publicly resolvable DNS name that resolves to public IP addresses. You can choose to create an internal load balancer with a DNS name that resolves to private IP addresses. This example walks you through the process for creating a basic HTTP internal load balancer on Amazon VPC and registers Amazon EC2 instances with the newly created VPC load balancer. This example uses a default security group that is open to the Internet on port 80. To create a basic internal load balancer in EC2-VPC 1.
Enter the create-load-balancer command as in the following example. aws elb create-load-balancer --load-balancer-name my-internal-loadbalancer --listeners Protocol=HTTP,LoadBalancerPort=80,InstanceProtocol=HTTP,Instan cePort=80 --subnets subnet-4e05f721 --scheme internal --security-groups sg-b9ffedd5 --tag "Key=department,Value=digital-media"
API Version 2012-06-01 120
Elastic Load Balancing Developer Guide Using the AWS Command Line Interface
Note Use --scheme option to create an internal load balancer. You need not specify this option if you're creating an Internet-facing (public) load balancer. --tag is an optional parameter. Do not use this option if you do not want to assign tags to your load balancer at this time. 2.
Elastic Load Balancing returns the following: { "DNSName": "internal-my-internal-loadbalancer-786501203.us-east1.elb.amazonaws.com" }
To register your Amazon EC2 instances with your VPC load balancer You should only register instances that are in the Pending or Running state and are in an Amazon VPC. •
Enter the register-instances-with-load-balancer command as in the following example. aws elb register-instances-with-load-balancer --load-balancer-name my-in ternal-loadbalancer --instances i-4f8cf126 i-0bb7ca62
Elastic Load Balancing returns the following: { "Instances": [ { "InstanceId": "i-4f8cf126" }, { "InstanceId": "i-0bb7ca62" } ] }
Note When you register a multi-homed instance (an instance that has an elastic network interface (ENI) attached) with your load balancer, the load balancer will route traffic to the primary IP address of the instance (eth0). For more information on using ENIs, go to Elastic Network Interfaces. When you stop and then start your back-end EC2 instances associated with your load balancer, we recommend that you de-register your stopped instance from your load balancer, and then re-register the restarted instance. Failure to do so may prevent the load balancer from routing the traffic to the restarted instance. For procedures associated with de-registering and then registering your instances with your load balancer, see Deregister and Register Amazon EC2 Instances (p. 139). To verify that an internal load balancer was created 1.
Enter the describe-load-balancers command as in the following example. aws elb describe-load-balancers --load-balancer-name my-internal-loadbalancer
API Version 2012-06-01 121
Elastic Load Balancing Developer Guide Using the AWS Command Line Interface
2.
Elastic Load Balancing returns the following: { "LoadBalancerDescriptions": [ { "Subnets": [ "subnet-4e05f721" ], "CanonicalHostedZoneNameID": "Z3DZXE0Q79N41H", "VPCId": "vpc-5ba9473e", "ListenerDescriptions": [ { "Listener": { "InstancePort": 80, "LoadBalancerPort": 80, "Protocol": "HTTP", "InstanceProtocol": "HTTP" }, "PolicyNames": [] } ], "HealthCheck": { "HealthyThreshold": 10, "Interval": 30, "Target": "TCP:80", "Timeout": 5, "UnhealthyThreshold": 2 }, "BackendServerDescriptions": [], "Instances": [ { "InstanceId": "i-4f8cf126" }, { "InstanceId": "i-0bb7ca62" } ], "DNSName": "internal-my-internal-loadbalancer-786501203.us-east1.elb.amazonaws.com", "SecurityGroups": [ "sg-b9ffedd5" ], "Policies": { "LBCookieStickinessPolicies": [], "AppCookieStickinessPolicies": [], "OtherPolicies": [] }, "LoadBalancerName": "my-internal-loadbalancer", "CreatedTime": "2014-05-22T20:32:19.920Z", "AvailabilityZones": [ "us-east-1" ], "Scheme": "internal", "SourceSecurityGroup": { "OwnerAlias": "803981987763", "GroupName": "ELB Security Group" } }
API Version 2012-06-01 122
Elastic Load Balancing Developer Guide Using the Query API
] }
Note that both the DNS name and the entry in the Scheme field indicate that the load balancer is internal.
Using the Query API By default, Elastic Load Balancing creates an Internet-facing load balancer with a publicly resolvable DNS name that resolves to public IP addresses. You can choose to create an internal load balancer with a DNS name that resolves to private IP addresses. This example walks you through the process for creating a basic HTTP internal load balancer on Amazon VPC and registers Amazon EC2 instances with the newly created VPC load balancer. This example uses a default security group. To create a basic internal load balancer in EC2-VPC 1.
Use the CreateLoadBalancer action and specify the following parameters: • Subnets = subnet-450f512c • Scheme = internal
Note Use this parameter to create an internal load balancer.You need not specify this parameter if you're creating an Internet-facing load balancer. • Listener • Protocol = HTTP • InstanceProtocol = HTTP • InstancePort = 80 • LoadBalancerPort = 80 • LoadBalancerName = my-internal-loadbalancer The load balancer name you choose must be unique within your set of load balancers, must have a maximum of 32 characters, and must only contain alphanumeric characters or hyphens. • SecurityGroups = sg-b9ffedd5 • Tags.member.1.Key = department Tags.member.1.Value = digital-media
2.
The operation returns the DNS name of your load balancer. You can then map any other domain name (such as www.example.com) to your load balancer's DNS name using CNAME or some other technique.
To register your Amazon EC2 instances with your VPC load balancer You should only register instances that are in the Pending or Running state and are in an Amazon Virtual Private Cloud (VPC). •
Use the RegisterInstancesWithLoadBalancer action and specify the following parameters: • LoadBalancerName = my-internal-loadbalancer • Instances.member.1 = i-4f8cf126 API Version 2012-06-01 123
Elastic Load Balancing Developer Guide Using the Query API
Instances.member.2 = i-0bb7ca62
Note When you register a multi-homed instance (an instance that has an elastic network interface (ENI) attached) with your load balancer, the load balancer will route traffic to the primary IP address of the instance (eth0). For more information on using ENIs, go to Elastic Network Interfaces. When you stop and then start your back-end EC2 instances associated with your load balancer, we recommend that you de-register your stopped instance from your load balancer, and then re-register the restarted instance. Failure to do so may prevent the load balancer from routing the traffic to the restarted instance. For procedures associated with de-registering and then registering your instances with your load balancer, see Deregister and Register Amazon EC2 Instances (p. 139). To verify that an internal load balancer was created 1.
Enter the DescribeLoadBalancers action and specify the following parameter: • LoadBalancerName = my-internal-loadbalancer
2.
The operation returns the description of your load balancer. The description in the Scheme field indicates that your newly created load balancer is internal.
For detailed descriptions of the Elastic Load Balancing API actions, see Elastic Load Balancing API Reference.
API Version 2012-06-01 124
Elastic Load Balancing Developer Guide Attach Subnet
Attach Your Load Balancer to a Subnet Topics • Using AWS Management Console (p. 125) • Using the Query API (p. 126) • Using the Command Line Interface (p. 126) This example walks you through the process of attaching a subnet to an existing load balancer using either the AWS Management Console, the Query API, or the command line interface (CLI). Before you get started, be sure you've created your Amazon VPC with an Internet gateway and created subnets in each Availability Zone in which you want to load balance your instances. For information on creating an Amazon VPC and subnets for Elastic Load Balancing, see Elastic Load Balancing in Amazon VPC (p. 109).
Using AWS Management Console To attach your load balancer to a subnet 1. 2.
Open the Amazon EC2 console at https://console.aws.amazon.com/ec2/. On the Amazon EC2 console Resources page, in the EC2 Dashboard pane, under NETWORK & SECURITY, click Load Balancers.
3.
On the Load Balancers page, select the load balancer that you created for your Amazon VPC.
4.
The bottom pane displays the details of your load balancer.
5.
Click the Instances tab.
6.
Click Edit Availability Zones.
7.
The Add and Remove Subnets page is displayed.
8.
In the Available Subnets table, click the button in the Action column to select your subnet. You can select only one subnet per Availability Zone.
9.
The selected subnet is displayed in the Selected Subnets table.
10. Click Save to attach the subnet to your load balancer.
API Version 2012-06-01 125
Elastic Load Balancing Developer Guide Using the Query API
Using the Query API To attach your load balancer to a subnet 1.
Call AttachLoadBalancerToSubnets with the following parameters: • Subnets = subnet-4e05f721 • LoadBalancerName = MyVPCLoadBalancer
2.
The operation returns the subnet ID of the attached subnet.
For detailed descriptions of the Elastic Load Balancing API actions, see the Elastic Load Balancing API Reference.
Using the Command Line Interface To attach your load balancer to a subnet 1.
Enter the command elb-attach-lb-to-subnets as in the following example. PROMPT> elb-attach-lb-to-subnets
2.
MyVPCLoadBalancer --subnets subnet-450f512c
The operation returns the subnet ID of the attached subnet.
For detailed descriptions of the Elastic Load Balancing commands, see Elastic Load Balancing Quick Reference Card.
API Version 2012-06-01 126
Elastic Load Balancing Developer Guide Detach Subnet
Detach Your Load Balancer from a Subnet Topics • Using AWS Management Console (p. 127) • Using the Query API (p. 127) • Using the Command Line Interface (p. 127) This example walks you through the process of detaching a subnet from your load balancer using either the AWS Management Console, the Query API, or the command line interface (CLI).
Using AWS Management Console To detach your load balancer from subnet 1. 2.
Open the Amazon EC2 console at https://console.aws.amazon.com/ec2/. On the Amazon EC2 console Resources page, in the EC2 Dashboard pane, under NETWORK & SECURITY, click Load Balancers.
3.
Select the load balancer that you created for your Amazon VPC.
4.
The bottom pane displays the details of your load balancer.
5.
Click the Instances tab.
6.
Click Edit Availability Zones.
7.
On the Add and Remove Subnets page, in the Selected Subnets table, click the button in the Actions column to select the subnet you want to detach. The detached subnet becomes available and is displayed in the Available Subnets table. Click Save to detach the subnet from your load balancer.
8. 9.
Using the Query API To detach your load balancer from a subnet 1.
Call DetachLoadBalancerFromSubnets with the following parameters: • Subnets = subnet-450f512c • LoadBalancerName = MyVPCLoadBalancer
2.
The operation returns a list of subnet IDs the load balancer is now attached to.
For detailed descriptions of the Elastic Load Balancing API actions, see the Elastic Load Balancing API Reference.
Using the Command Line Interface To detach your load balancer from a subnet 1.
Enter the command elb-detach-lb-from-subnets as in the following example.
API Version 2012-06-01 127
Elastic Load Balancing Developer Guide Using the Command Line Interface
PROMPT> elb-detach-lb-from-subnets 450f5127
2.
MyVPCLoadBalancer --subnets subnet-
The command returns a list of subnet IDs the load balancer is now attached to.
For detailed descriptions of the Elastic Load Balancing commands, see the Elastic Load Balancing Quick Reference Card.
API Version 2012-06-01 128
Elastic Load Balancing Developer Guide Security Groups
Manage Security Groups in Amazon VPC Topics • Using the AWS Management Console (p. 129) • Using the Query API (p. 129) • Using the Command Line Interface (p. 130) A security group acts as a virtual firewall that controls the traffic allowed into an instance. When you launch an instance in an Amazon Virtual Private Cloud, you can assign the instance to up to five VPC security groups. The groups act at the instance level, not the subnet level. Therefore, each instance in a subnet in your Amazon VPC could belong to a different set of security groups. If you don't specify a particular security group at launch time, the instance automatically belongs to the VPC's default security group. For each security group you create, you add rules that control the inbound traffic to instances, and a separate set of rules that control the outbound traffic. The security groups you've created for Amazon EC2 (i.e., EC2 security groups) are not available to use in your VPC. You must create a separate set of security groups to use in your Amazon VPC (i.e., VPC security groups). The rules you create for a VPC security group can't reference a EC2 security group in your account, and vice versa. Also, VPC security groups have additional capabilities not available to EC2 security groups. For information on Amazon VPC security groups, go to Security Groups for Your VPC. This section walks you through the process to update or reset the VPC security group assigned to your existing load balancer in Amazon VPC. You can use the AWS Management Console, the Query API or the command line interface (CLI) to update or reset the VPC security group.
Using the AWS Management Console To update a security group assigned to your load balancer 1.
In the AWS Management Console, click the Amazon EC2 tab.
2.
On the Amazon EC2 console Resources page, in the EC2 Dashboard pane, under NETWORK & SECURITY, click Load Balancers.
3.
On the Load Balancers page, select the load balancer that you created for your VPC.
4.
The bottom pane displays the details of your load balancer.
5.
Click the Security tab.
6.
In the Security Groups pane, click Edit.
7.
On the Edit security groups page, select your new security group and click Save.
Using the Query API To assign a security group to an existing load balancer 1.
Call ApplySecurityGroupsToLoadBalancer with the following parameters: • SecurityGroups = sg-53fae93f • LoadBalancerName = MyVPCLoadBalancer
2.
The operation returns the security group ID of the assigned security group. API Version 2012-06-01 129
Elastic Load Balancing Developer Guide Using the Command Line Interface
For detailed descriptions of the Elastic Load Balancing API actions, see Elastic Load Balancing API Reference.
Using the Command Line Interface To assign a security group to your existing load balancer in Amazon VPC Enter the command elb-apply-security-groups-to-lb as in the following example. PROMPT>elb-apply-security-groups-to-lb 53fae93f
MyVPCLoadBalancer --security-groups sg-
The operation returns the security group ID of the assigned security group. For detailed descriptions of the Elastic Load Balancing commands, see the Elastic Load Balancing Quick Reference Card.
API Version 2012-06-01 130
Elastic Load Balancing Developer Guide Add Listener
Managing Load Balancers This section covers information about the Elastic Load Balancing features you are most likely to use to manage your load balancers launched either in EC2-Classic or in ELB-VPC platforms, and provides procedural instruction and examples. Topics • Add a Listener to Your Load Balancer (p. 131) • Delete a Listener from Your Load Balancer (p. 137) • Deregister and Register Amazon EC2 Instances (p. 139) • Update an SSL Certificate for a Load Balancer (p. 141) • Update SSL Negotiation Configuration of Your Load Balancer (p. 145) • Configure Custom Domain Name for Your Load Balancer (p. 147) • Enable or Disable Cross-Zone Load Balancing for Your Load Balancer (p. 152) • Enable or Disable Connection Draining for Your Load Balancer (p. 158) • Configure Idle Connection Timeout (p. 165) • Enable or Disable Proxy Protocol Support (p. 169) • Configure DNS Failover for Your Load Balancer (p. 180) • Sticky Sessions (p. 184) • Add or Remove Tags (p. 191) • Delete Your Load Balancer (p. 198)
Add a Listener to Your Load Balancer Topics • Using the AWS Management Console (p. 132) • Using the Command Line Interface (p. 135) • Using the Query API (p. 135) Elastic Load Balancing supports the load balancing of applications using HTTP, HTTPS (Secure HTTP), TCP, and SSL (Secure TCP) protocols.You can specify the protocols for the front-end connections (client to load balancer) and the back-end connections (load balancer to back-end instance) independently. You choose configurations for the front-end and the back-end connections when you create your load balancer. By default, your load balancer is set to use HTTP for both the connections. The Elastic Load Balancing API Version 2012-06-01 131
Elastic Load Balancing Developer Guide Using the AWS Management Console
Listener Configurations Quick Reference (p. 50) table provides information on different configurations, along with the use case best suited for that configuration. This section describes how to add a new listener on your existing load balancer. Before you get started, be sure you've done the following: • Created a load balancer with Elastic Load Balancing. For information on how to set up an HTTPS/SSL load balancer with the AWS Management Console, command line interfaces (CLI), or Query API, see Create a HTTPS/SSL Load Balancer (p. 71). To learn how to set up a HTTP/TCP load balancer with the AWS Management Console, go to the Get Started with Elastic Load Balancing (p. 21). • Installed the Elastic Load Balancing tools that you plan to use to perform load balancing tasks. You can add or delete listeners on your existing load balancer using the AWS Management Console, command line interface (CLI), or the Query API. For information on installing the CLI or the Query API, see Setting Up Elastic Load Balancing Interfaces (p. 16). • For detailed descriptions of the Elastic Load Balancing Query API actions, see Elastic Load Balancing API Reference. • For detailed descriptions of the Elastic Load Balancing commands, see the Elastic Load Balancing Quick Reference Card. The following sections include instructions for adding a listener to your existing load balancer using the AWS Management Console, command line interface (CLI), or the Query API. In this example, you configure a new listener for your existing load balancer MyLoadBalancer that accepts HTTPS requests on port 443 for the front-end connection and HTTP requests on port 80 for the back-end connection. Topics • Using the AWS Management Console (p. 132) • Using the Command Line Interface (p. 135) • Using the Query API (p. 135)
Using the AWS Management Console To add a new listener to your load balancer 1.
3. 4.
Sign in to the AWS Management Console and open the Amazon EC2 console at https://console.aws.amazon.com/ec2/. On the Amazon EC2 console Resources page, in the EC2 Dashboard pane, under NETWORK & SECURITY, click Load Balancers. On the Load Balancers page, select your load balancer. The bottom pane displays the details of your load balancer.
5. 6.
Click the Listeners tab. In the Listeners pane, click Edit.
7. 8.
In the Edit Listeners page, click Add. In the Load Balancer Protocol column, click the dialog box and select HTTPS (Secure HTTP) from the drop-down box. This populates the box in the Load Balancer Port column. In the Instance Protocol column, click the dialog box and select HTTPS from the drop-down box. The box in the Instance Port column gets populated.
9.
The Elastic Load Balancing service provides you with security policies that have predefined SSL negotiation configurations used for negotiating SSL connections between the client and the load balancer. You can select one of the predefined security policies, or Custom to create your own security policy.
2.
API Version 2012-06-01 132
Elastic Load Balancing Developer Guide Using the AWS Management Console
For more information about the Security Policies, see SSL Negotiation Configurations for Elastic Load Balancing (p. 54). For information about the current configuration for all Security Policies, see SSL Security Policy Table (p. 55). By default, Elastic Load Balancing pre-selects ELBSecurityPolicy-2014-01 for your HTTPS/SSL listener. This is the recommended setting. This policy uses server order preference (the order listed in the SSL Security Policy Table (p. 55) ) to negotiate SSL connections. a.
To specify a Security Policy, in the Cipher column, click Change.
b.
On the Select a Cipher page, select a Security Policy from the following options:
To keep the recommended setting, •
On the Select Cipher page, make sure that Predefined Security Policy is selected and the drop-down pane is showing ELBSecurityPolicy-2014-01. Click Save and then go to step 8.
To select a policy from the predefined security policy list, a. b. c.
On the Select a Cipher page, select Predefined Security Policy. In the security policy drop-down pane, select a policy. Click Save and then go to step 8.
To create your own security policy, a. b. c. d.
Select Custom. Under SSL Protocols, select one or more protocols to enable or disable. Under SSL Options, select Server Order Preference if you want to use the order listed in the SSL Security Policy Table (p. 55) for SSL negotiation. Under SSL Ciphers, select one or more ciphers to enable or disable.
Note You must enable at least one protocol and one cipher for SSL negotiation to take place. The DSA and RSA ciphers are specific to the signing algorithm and are used to create the SSL certificate. If you already have your SSL certificate, make sure to enable the cipher that was used to create your certificate. e.
Click Save.
10. To enable HTTPS support for your listeners, you must install an SSL server certificate on your load balancer. The load balancer uses the certificate to terminate and then decrypt requests before sending them to the back-end instances. If you already have certificate installed on your load balancer and want to continue using it, skip the following steps for installing a new one and go to step 13. If you do not have an SSL certificate, see SSL Certificate for Elastic Load Balancing (p. 61) for instructions on creating and uploading SSL certificates and then complete the following steps to install the certificate on your load balancer. To install an SSL server certificate, in the SSL Certificate column, click Change.
API Version 2012-06-01 133
Elastic Load Balancing Developer Guide Using the AWS Management Console
11. To use a previously uploaded certificate a.
On the Select Certificate page, in the Certificate Type: field, select Choose from an existing SSL Certificate.
b. c.
Click the Certificate Name: dialog box and select your certificate. Click Save and then go to step 13.
12. To upload a signed certificate On the Select Certificate page, in the Certificate Type: field, select Upload a new SSL Certificate. Before you upload, check if your certificate meets the criteria described in Upload the Signed Certificate (p. 64)
Note If your certificate does not meet the criteria, you might get an error when you upload it. Create a new SSL certificate and upload the certificate using IAM. For instructions on creating and uploading the SSL certificate, see SSL Certificate for Elastic Load Balancing (p. 61). If your certificate meets the criteria, step through the following instructions to continue uploading your SSL certificate. a. b.
Enter the name of the certificate to upload. Copy and paste the contents of the private key file (PEM-encoded) in the Private Key box.
Note The private key cannot be retrieved after you are finished uploading it. c. d.
Copy and paste the contents of the public key certificate file (PEM-encoded) in the Public Key Certificate box. Copy and paste the contents of the certificate chain file (PEM-encoded) in the Certificate Chain box.
Note You can skip this step if you are using a self-signed certificate and it's not important that browsers implicitly accept the certificate.
13. In the Edit Listeners page, click Save to add the listener you just configured. API Version 2012-06-01 134
Elastic Load Balancing Developer Guide Using the Command Line Interface
Click Add to add additional listeners.
Using the Command Line Interface To enable HTTPS support for your listeners, you must install an SSL server certificate on your load balancer. The load balancer uses the certificate to terminate and then decrypt requests before sending them to the back-end instances. If you do not have an SSL certificate, see SSL Certificate for Elastic Load Balancing (p. 61) for instructions on creating and uploading SSL certificates.
To add a new listener to your load balancer 1. 2.
Get the Amazon Resource Name (ARN) of your SSL certificate. Enter the command elb-create-lb-listeners as in the following example. PROMPT> elb-create-lb-listeners MyLoadBalancer --listener "protocol=HTTPS,lbport=443,instance-port=80,instance-protocol=HTTP, certid=arn:aws:iam::55555555555:server-certificate/production/myCert"
3.
Enter the command elb-describe-lbs as in the following example to view the updated details of your load balancer MyLoadBalancer. PROMPT> elb-describe-lbs MyLoadBalancer
The operation returns a list of updated configurations of your load balancer.
Using the Query API To enable HTTPS support for your listeners, you must install an SSL server certificate on your load balancer. The load balancer uses the certificate to terminate and then decrypt requests before sending them to the back-end instances. Elastic Load Balancing uses AWS Identity and Access Management (IAM) to upload your certificate to your load balancer. If you do not have an SSL certificate, see SSL Certificate for Elastic Load Balancing (p. 61) for instructions on creating and uploading SSL certificates.
To add a new listener to your load balancer 1. 2.
Get the Amazon Resource Name (ARN) of your SSL certificate. Call CreateLoadBalancerListeners with the following parameters: • Listener • Protocol = HTTPS • InstanceProtocol = HTTP • InstancePort = 80 • LoadBalancerPort = 443 • SSLCertificateId = arn:aws:iam::55555555555:server-certificate/production/myCert • LoadBalancerName = MyLoadBalancer
3.
Call DescribeLoadBalancers as in the following example to view the updated configuration information of your load balancer.
API Version 2012-06-01 135
Elastic Load Balancing Developer Guide Using the Query API
• LoadBalancerName = MyLoadBalancer The operation returns a list of updated configurations of your load balancer. For detailed descriptions of this Elastic Load Balancing API action, see CreateLoadBalancerListeners in the Elastic Load Balancing API Reference.
API Version 2012-06-01 136
Elastic Load Balancing Developer Guide Delete Listener
Delete a Listener from Your Load Balancer Topics • Using the AWS Management Console (p. 137) • Using the Command Line Interface (p. 137) • Using the Query API (p. 138) This section describes how to delete a listener from your existing load balancer. Before you get started, be sure you've done the following: • Created a load balancer with Elastic Load Balancing. For information on how to set up a HTTPS/SSL load balancer with the AWS Management Console, command line interface (CLI), or Query API, see Create a HTTPS/SSL Load Balancer (p. 71). To learn how to set up a HTTP/TCP load balancer with the AWS Management Console, see Get Started with Elastic Load Balancing (p. 21). • Installed the Elastic Load Balancing tool that you plan to use to perform load balancing tasks. You can add or delete listeners on your existing load balancer using the AWS Management Console, the command line interface (CLI), or the Query API. For information on installing the CLI, or the Query API, see Setting Up Elastic Load Balancing Interfaces (p. 16). • For detailed descriptions of the Elastic Load Balancing Query API actions, see Elastic Load Balancing API Reference. • For detailed descriptions of the Elastic Load Balancing commands, see the Elastic Load Balancing Quick Reference Card. The following sections include instructions for deleting a listener from the specified port of your existing load balancer using the AWS Management Console, command line interface (CLI), or the Query API. In this example, you delete a listener from port 80 of your load balancer MyLoadBalancer.
Using the AWS Management Console To delete a listener from your load balancer 1.
3.
Sign in to the AWS Management Console and open the Amazon EC2 console at https://console.aws.amazon.com/ec2/. On the Amazon EC2 console Resources page, in the EC2 Dashboard pane, under NETWORK & SECURITY, click Load Balancers. On the Load Balancers page, select your load balancer.
4.
The bottom pane displays the details of your load balancer.
5. 6. 7.
Click the Listeners tab. In the Listeners pane, click Edit. In the Edit Listeners page, click the delete icon next to the listener you want to delete.
8.
Click Save.
2.
Using the Command Line Interface To delete a listener from your load balancer 1.
Enter the command elb-delete-lb-listeners as in the following example. PROMPT> elb-delete-lb-listeners MyLoadBalancer lb-ports 80
API Version 2012-06-01 137
Elastic Load Balancing Developer Guide Using the Query API
2.
Enter the command elb-describe-lbs as in the following example to view the updated details of your load balancer MyLoadBalancer. PROMPT> elb-describe-lbs MyLoadBalancer
The operation returns a list of updated configurations of your load balancer.
Using the Query API To delete a listener from your load balancer Call DeleteLoadBalancerListeners with the following parameters: • LoadBalancerPorts = 80 • LoadBalancerName = MyLoadBalancer Call DescribeLoadBalancers as in the following example to view the updated configuration information of your load balancer. • LoadBalancerName = MyLoadBalancer The operation returns a list of updated configurations of your load balancer. For detailed descriptions of this Elastic Load Balancing API action, see the DeleteLoadBalancerListeners in the Elastic Load Balancing API Reference.
API Version 2012-06-01 138
Elastic Load Balancing Developer Guide Deregister and Register Instances
Deregister and Register Amazon EC2 Instances Elastic Load Balancing registers your EC2 instance with your load balancer using the associated IP address. When your EC2 instance launched in EC2-Classic is stopped and then started, the IP address associated with your instance changes.Your load balancer does not recognize the new IP address. When you stop and then start your registered EC2 instance launched in EC2-Classic, you must deregister your stopped instance from your load balancer, and then reregister the restarted instance. Failure to do so may prevent the load balancer from routing the traffic to the restarted instance. If you have launched your instance in EC2-VPC, by default, the IP address associated with your instance does not change when you stop and then start the instance. However, when you stop and then start your EC2-VPC instance, your load balancer might take sometime to recognize that the stopped instance has started. During this time your load balancer is not connected to the restarted instance. We recommend that you reregister your restarted instance with the load balancer. For information on reregistering your instance, see Registering Your Amazon EC2 Instances with Your Load Balancer (p. 140). In this example you deregister your stopped back-end instance from load balancer, and then register your restarted instance with the load balancer. Before you get started, be sure you've done the following: • Stop one of your back-end Amazon EC2 instance. For more information, go to Stopping and Starting Instances.
The following sections include instructions for deregistering and registering your back-end instances using the AWS Management Console, the Query API, or the command line interface.
De-Registering Your Amazon EC2 Instances from Your Load Balancer Using AWS Management Console To deregister your back-end instance from your load balancer 1. 2.
Sign in to the AWS Management Console and open the Amazon EC2 console at https://console.aws.amazon.com/ec2/. On the Amazon EC2 console Resources page, in the EC2 Dashboard pane, under NETWORK & SECURITY, click Load Balancers.
3.
In the Load Balancers page, select your load balancer.
4.
The bottom pane displays the details of your load balancer.
5.
Click Instances tab.
6.
In the Instances table, in the Actions column, click Remove from Load Balancer in the row of the instance that you want to deregister.
Using the Query API To deregister your back-end instance from your load balancer • Call DeregisterInstancesFromLoadBalancer with the following parameters: • Instances = i-4e05f721 • LoadBalancerName = MyLoadBalancer API Version 2012-06-01 139
Elastic Load Balancing Developer Guide Registering Your Amazon EC2 Instances with Your Load Balancer
The operation returns an updated list of remaining instances registered with the load balancer. For detailed descriptions of this Elastic Load Balancing API action, see DeregisterInstancesFromLoadBalancer in the Elastic Load Balancing API Reference.
Using the Command Line Interface To de-register your back-end instance from your load balancer • Enter the command elb-deregister-instances-from-lb as in the following example. PROMPT> elb-deregister-instances-from-lb MyLoadBalancer --instances i-4e05f721
The operation returns an updated list of remaining instances registered with the load balancer. For detailed descriptions of the Elastic Load Balancing commands, see the Elastic Load Balancing Quick Reference Card.
Registering Your Amazon EC2 Instances with Your Load Balancer If you haven't done so yet, you should now restart the instance that you stopped in the previous step.
Using AWS Management Console To register your back-end instance with your load balancer 1. 2.
Sign in to the AWS Management Console and open the Amazon EC2 console at https://console.aws.amazon.com/ec2/. On the Amazon EC2 console Resources page, in the EC2 Dashboard pane, under NETWORK & SECURITY, click Load Balancers.
3.
In the Load Balancers page, select your load balancer.
4.
The bottom pane displays the details of your load balancer.
5.
Click Instances tab.
6.
In the Instances pane, click Edit Instances.
7.
In the Add or Remove Instances table, in the Instance column, select the instance you want to your load balancer.
8.
Click Save to register your instances.
Using the Query API To register your back-end instance with your load balancer Call RegisterInstancesWithLoadBalancer with the following parameters: • Instances = i-802ffe77b • LoadBalancerName = MyLoadBalancer The operation returns an updated list of instances registered with the load balancer. API Version 2012-06-01 140
Elastic Load Balancing Developer Guide Update SSL Certificate
For detailed descriptions of this Elastic Load Balancing API action, see RegisterInstancesWithLoadBalancer in the Elastic Load Balancing API Reference.
Using the Command Line Interface To register your back-end instance from your load balancer Enter the command elb-register-instances-with-lb as in the following example. PROMPT> elb-register-instances-with-lb MyLoadBalancer --instances i-802ffe77b
The operation returns an updated list of instances registered with the load balancer. For detailed descriptions of the Elastic Load Balancing commands, see the Elastic Load Balancing Quick Reference Card.
Update an SSL Certificate for a Load Balancer If you are using HTTPS/SSL protocol for your listeners, you might have an SSL server certificate installed on your load balancer. Your SSL certificate comes with a validity period. You must replace the certificate after its validity period ends. To replace the certificate you must create and upload the new certificate by following the same steps you used when you created your certificate for the first time.This section describes how to update an SSL certificate for your HTTPS/SSL load balancer. Before you get started, be sure you've done the following: • Created a new SSL server certificate to replace the expired server certificate and have uploaded it using the AWS Identity and Access Management (IAM). For information on how to create and upload an SSL certificate, see SSL Certificate for Elastic Load Balancing (p. 61). All your SSL server certificates are managed by AWS Identity and Access management (IAM). By default, IAM allows 10 server certificates per AWS account. If you try to upload a new server certificate after reaching this limit, you'll get an error. You can request for more certificates using this form - IAM Limit Increase Contact Us Form. • Installed the Elastic Load Balancing tools that you plan to use to perform load balancing tasks. You can update your SSL certificate installed on your HTTPS/SSL load balancer using the AWS Management Console, the Elastic Load Balancing command line interface (CLI), the AWS command line interface, or the Query API. For information on installing the CLI, or the Query API, see Setting Up Elastic Load Balancing Interfaces (p. 16). • For detailed descriptions of the Elastic Load Balancing Query API actions, see Elastic Load Balancing API Reference. • For detailed descriptions of the Elastic Load Balancing commands, see the Elastic Load Balancing Quick Reference Card. The following sections include instructions for updating an SSL certificate using the AWS Management Console, the command line interface (CLI), or the Query API. Topics • Using the AWS Management Console (p. 142) • Using the Query API (p. 143) • Using the Command Line Interface (p. 143)
API Version 2012-06-01 141
Elastic Load Balancing Developer Guide Using the AWS Management Console
Using the AWS Management Console To update an SSL certificate for an HTTPS load balancer 1. 2.
Sign in to the AWS Management Console and open the Amazon EC2 console at https://console.aws.amazon.com/ec2/. On the Amazon EC2 console Resources page, in the EC2 Dashboard pane, under NETWORK & SECURITY, click Load Balancers.
3. 4.
On the Load Balancers page, select your load balancer. The bottom pane displays the details of your load balancer.
5. 6.
Click the Listeners tab. In the Listeners pane, click Change in the SSL Certificate column of the certificate you want to update. On the Select Certificate page, select Choose from an existing SSL Certificates if you have already uploaded your SSL certificate using IAM. Click the Certificate Name: dialog box and select your certificate. Click Save. Or, select Upload a new SSL Certificate if you have an SSL certificate and want to upload it.
7.
8.
Before you upload, ensure that your certificate meets the criteria described in Upload the Signed Certificate (p. 64) If your certificate does not meet the criteria listed in this step, you might get an error when you upload it. Create a new SSL certificate and upload the certificate using AWS Identity and Access Management (IAM). For instructions on creating and uploading the SSL certificate, see SSL Certificate for Elastic Load Balancing (p. 61). Step through the following instructions to continue uploading your SSL certificate. a. b.
Enter the name of the certificate to upload. Copy and paste the contents of the private key file (PEM-encoded) in the Private Key box.
Note The private key cannot be retrieved after you are finished uploading it. c. d.
Copy and paste the contents of the public key certificate file (PEM-encoded) in the Public Key Certificate box. You can skip this step if you are using a self-signed certificate and it's not important that browsers implicitly accept the certificate. If you are not using self-signed certificate, copy and paste the contents of the public key certificate chain file (PEM-encoded) in the Certificate Chain box.
Note The certificate chain must be ordered such that the root certificate is the last certificate in the chain. If you use a certificate chain in a different order, you will receive an error.
API Version 2012-06-01 142
Elastic Load Balancing Developer Guide Using the Query API
9.
Click Save.
Using the Query API To update an SSL certificate for an HTTPS load balancer 1.
2.
3.
If you have an SSL certificate and have uploaded it using the AWS Identity and Access Management (IAM), use the IAM action GetServerCertificate to get the ARN of the certificate, and then go to step 3. If you have an SSL certificate and want to upload it, step through the instructions described in Upload the Signed Certificate (p. 64). Make a note of the ARN of the certificate. Call SetLoadBalancerListenerSSLCertificate to replace the expired certificate with the new one. • LoadBalancerName = test-lb • LoadBalancerPort = 443 • SSLCertificateId = arn:aws:iam::322191361670:server-certificate/newCert
Using the Command Line Interface To update an SSL certificate for an HTTPS load balancer 1.
If you have an SSL certificate and have uploaded it using the AWS Identity and Access Management (IAM), use the AWS CLI command get-server-certificate to get the ARN of the certificate, and then go to step 3.
2.
If you have an SSL certificate and want to upload it, step through the instructions described in Upload the Signed Certificate (p. 64). Make a note of the ARN of the certificate.
API Version 2012-06-01 143
Elastic Load Balancing Developer Guide Using the Command Line Interface
3.
Enter the command elb-set-lb-listener-ssl-cert with an HTTPS listener, as in the following example. PROMPT> elb-set-lb-listener-ssl-cert test-lb --lb-port 443 --cert-id arn:aws:iam::322191361670:server-certificate/newCert
API Version 2012-06-01 144
Elastic Load Balancing Developer Guide Update SSL Negotiation Configuration
Update SSL Negotiation Configuration of Your Load Balancer Elastic Load Balancing service provides you with security policies that have predefined SSL negotiation configurations used for negotiating SSL connections between the client and the load balancer. If you are using a HTTPS/SSL protocol for your listener, it is likely that you are either using one of the predefined security policies, or using your own custom security policy for negotiating SSL connections between the client and your load balancer. For more information about the security policies, see SSL Negotiation Configurations for Elastic Load Balancing (p. 54). For information about the current configuration for all the security policies provided by Elastic Load Balancing, see SSL Security Policy Table (p. 55). If you have an existing load balancer with an SSL negotiation configuration that does not use the latest protocols and ciphers, we recommend that you upgrade your load balancer to the latest version of the ELBSecurityPolicy-YYYY-MM. If you prefer not to use any of the predefined security policies, you can create a custom configuration. We strongly recommend that you first test the new security policies before you upgrade your load balancer configuration.
Note If you have created a HTTPS/SSL listener without associating any security policy, Elastic Load Balancing will, by default, associate the latest version of the ELBSecurityPolicy-YYYY-MM with your load balancer. When you update the SSL negotiation configuration for your load balancer, be sure to associate a security policy with your load balancer. This section steps you through the process for updating the SSL negotiation configuration of your load balancer. Prerequisites Before you get started, be sure that you have done the following: • Created a HTTPS/SSL load balancer with Elastic Load Balancing. For information on how to set up an HTTPS/SSL load balancer with the AWS Management Console, the command line interface (CLI), or the Query API, see Create a HTTPS/SSL Load Balancer (p. 71). • Installed the Elastic Load Balancing tools that you plan to use to perform this task. You can update the SSL negotiation configuration enabled on your HTTPS/SSL load balancer port using the AWS Management Console, the Elastic Load Balancing command line interface (CLI), the AWS command line interface, or the Query API. For information on installing the CLI, or the Query API, see Setting Up Elastic Load Balancing Interfaces (p. 16). • For detailed descriptions of the Elastic Load Balancing Query API actions, go to Elastic Load Balancing API Reference. • For detailed descriptions of the Elastic Load Balancing commands, see the Elastic Load Balancing Quick Reference Card. The following section includes instructions for updating the SSL negotiation configuration for the HTTPS/SSL listener on your load balancer using the AWS Management Console. For instructions on updating the SSL negotiation configuration using the command line interface, see Step 2: Configure SSL Security Policy (p. 84).
To update SSL negotiation configuration for an HTTPS/SSL load balancer 1.
Sign in to the AWS Management Console and open the Amazon EC2 console at https://console.aws.amazon.com/ec2/.
API Version 2012-06-01 145
Elastic Load Balancing Developer Guide Update SSL Negotiation Configuration
2. 3. 4.
On the Amazon EC2 console Resources page, in the EC2 Dashboard pane, under NETWORK & SECURITY, click Load Balancers. On the Load Balancers page, select your load balancer. The bottom pane displays the details of your load balancer.
5. 6.
Click the Listeners tab. Click Change in the Cipher column of the listener you want to update.
7.
On the Select Cipher page, select a security policy from the following options:
To select a policy from the predefined security policy list 1.
Select Predefined Security Policy.
2. 3.
In the security policy drop-down list, select a policy. Click Save.
To create your own security policy 1. 2. 3. 4.
Select Custom. Under SSL Protocols, select one or more protocols to enable. Under SSL Options, select Server Order Preference if you want to use the order listed in the SSL Security Policy Table (p. 55) for SSL negotiation. Under SSL Ciphers, select one or more ciphers to enable.
Note You must enable at least one protocol and one cipher for SSL negotiation to take place. The DSA and RSA ciphers are specific to the signing algorithm and are used to create the SSL certificate. If you already have your SSL certificate, make sure to enable the cipher that was used to create your certificate. 5.
Click Save.
API Version 2012-06-01 146
Elastic Load Balancing Developer Guide Custom Domain Names
Configure Custom Domain Name for Your Load Balancer Topics • Associating Your Custom Domain Name with Your Load Balancer Name (p. 147) • Disassociating Your Custom Domain Name From Your Load Balancer Name (p. 151) Each Elastic Load Balancing instance that you create has an automatically created Domain Name System (DNS) name. Typically, the DNS name includes the name of the AWS region in which the load balancer is created. For example, if you create a load balancer named myLB in the US-East region, your load balancer might have a DNS name such as myLB-1234567890.us-east-1.elb.amazonaws.com. You just have to paste the DNS name generated by Elastic Load Balancing into the address field of an Internetconnected web browser to connect to your load balancer. If you'd rather use a user-friendly domain name, such as www.example.com, instead of the load balancer DNS name, you can create a custom domain name and then associate the custom domain name with the load balancer DNS name. When a request is placed to your load balancer using the custom domain name that you created, it resolves to the load balancer DNS name. To use a custom domain name for your load balancer instance, you’ll have to first register your domain name with a DNS service provider. When you register a domain name, you reserve not only the domain name itself, but also an entire set of subdomain names. For example, if you register example.com as your custom domain name, you can create subdomain names such as foo.bar.example.com, foo.myLB.example.com, and so on. This set of a domain and its subdomain names is called a zone. A domain name that you reserve, such as example.com, is called the zone apex because it sits at the top of the zone's hierarchy.
Associating Your Custom Domain Name with Your Load Balancer Name After you register your custom domain name, you have two ways to associate your custom domain name with the load balancer DNS name. • Option 1: Create a canonical name (CNAME) record for your zone with your existing domain name provider. To associate your custom domain name with your load balancer, first create a canonical name (CNAME) record for your zone with your existing domain name provider. A CNAME record specifies that a domain name is an alias of another CNAME domain name. For example, the following CNAME record associates an alias, www.foo.example.com, with a canonical name, the DNS name of an Elastic Load Balancing instance. www.foo.example.com CNAME myLB-1234567890.us-east-1.elb.amazonaws.com
For more information on CNAME records, go to the Wikipedia article http://en.wikipedia.org/wiki/ CNAME_record. The creation of CNAME records is a simple process. Many domain name registrars provide self-service tools that you can use to create the CNAME record yourself. However, you can't use a CNAME record to associate your zone apex with your Elastic Load Balancing instance. DNS rules prohibit the creation of a CNAME record at the zone apex (e.g., example.com). For example, if you own the example.com API Version 2012-06-01 147
Elastic Load Balancing Developer Guide Associating Your Custom Domain Name with Your Load Balancer Name
domain name, you can use a CNAME record for the foo.example.com subdomain name, but not for the example.com zone apex. You can use the next option if you want to associate a zone apex with your load balancer DNS name. • Option 2: Create a domain using Amazon Route 53 as the DNS service Amazon Route 53 stores information about your domain in a hosted zone. A hosted zone is an Amazon Route 53 concept that is similar to a zone file on a DNS name server. Like a zone file, a hosted zone contains information about your domain name, including the subdomain names within the domain and mappings between names and IP addresses. For more information about Amazon Route 53, go to What is Route 53 and How Does it Work? Use this option to associate a zone apex with your load balancer DNS name. You’ll use Amazon Route 53 to create a hosted zone for your domain (for example, example.com), and then create alias resource record sets. An alias resource record set contains a pointer to a resource record set that contains your DNS resource records. For example, an alias resource record set for your domain, example.com, can point to the DNS name of your Elastic Load Balancing load balancer instance myLB-1234567890.useast-1.elb.amazonaws.com. After you create a hosted zone, you can also create alias resource record sets to associate subdomain names with your Elastic Load Balancing instance. DNS Failover: When you use Route 53 to create and associate a custom domain name with your load balancer you have an option to enable DNS failover for your load balancer. If DNS failover is enabled, Route 53 responds to the queries to your alias record set, example.com based on the health checks of the associated primary and secondary load balancer instances. If you plan to enable DNS failover for your load balancers, see Configure DNS Failover for Your Load Balancer (p. 180). This section describes how to associate your Elastic Load Balancing instance with a custom domain name using Option 1 or Option 2.
Prerequisite Before you start associating a load balancer DNS name with a custom domain name, you first need to create a load balancer. For information on creating a basic load balancer, see Get Started with Elastic Load Balancing (p. 21) For information on creating a load balancer with custom settings, see Create a HTTPS/SSL Load Balancer (p. 71).
Note The time-to-live (TTL) for an Elastic Load Balancing DNS entry is set to 60 seconds. This setting ensures that IP addresses can be re-mapped quickly to respond to events that cause Elastic Load Balancing to scale up or down.
Option 1: Create a CNAME Record for your subdomain and load balancer 1.
2.
3.
Register your custom domain name with your DNS provider. For a list of registrar websites you can use to register your domain name, go to ICANN. Wait for your registrar to notify you that your domain name is successfully registered. Create a subdomain name to associate with your load balancer DNS name. For example, if your custom domain name is example.com, you can create a subdomain name such as foo.mylb.example.com. Retrieve the public DNS name of your load balancer. You can use AWS Management Console, the Elastic Load Balancing Query API, or the Elastic Load Balancing command line interface (CLI) to retrieve your load balancer DNS name. To use the AWS Management Console to retrieve the public DNS name of your load balancer
API Version 2012-06-01 148
Elastic Load Balancing Developer Guide Associating Your Custom Domain Name with Your Load Balancer Name
a.
c.
Sign in to the AWS Management Console and open the Amazon EC2 console at https://console.aws.amazon.com/ec2/. On the Amazon EC2 console Resources page, in the EC2 Dashboard pane, under NETWORK & SECURITY, click Load Balancers. On the Load Balancers page, select your load balancer.
d. e.
The bottom pane displays the details of your load balancer. Make a note of the DNS name of your load balancer.
b.
4.
To use the Elastic Load Balancing Query API to retrieve the public DNS name of your load balancer a.
Call DescribeLoadBalancers with the following parameter: LoadBalancerName = your load balancer name
b.
5.
The operation returns the DNS name of your load balancer along with other details. Make a note of the DNS name.
To use the Elastic Load Balancing CLI to retrieve the public DNS name of your load balancer a.
b.
You'll need to install the Elastic Load Balancing CLI tool before you can use the following command. If you haven't yet installed the tool, go to Appendix A: Using the Elastic Load Balancing Command Line Interface (p. 251) for instructions on downloading and installing the CLI tool. Enter the command elb-describe-lbs, as in the following example. PROMPT> elb-describe-lbs your load balancer name
c.
6.
The command returns the DNS name of your load balancer along with other details. Make a note of the DNS name.
Create a CNAME record to associate your custom subdomain name with your load balancer DNS name, as in the following example:
Note Ask the company that provides your DNS name services (your domain name registrar) to create a CNAME record for your zone. Many domain name registrars provide self-service tools that you can use to create the CNAME record yourself. www.foo.mylb.example.com CNAME myLB-1234567890.us-east-1.elb.amazonaws.com
Option 2: Create an Amazon Route 53 hosted zone 1.
Register your custom domain name with your DNS provider. For a list of registrar websites you can use to register your domain name, go to ICANN. Wait for your registrar to notify you that your domain name is successfully registered.
2.
Create a hosted zone for your custom domain name using Amazon Route 53. For detailed instructions, go to Creating a Hosted Zone in Amazon Route 53 Developer Guide.
API Version 2012-06-01 149
Elastic Load Balancing Developer Guide Associating Your Custom Domain Name with Your Load Balancer Name
3.
As with other AWS products, there are no contracts or minimum commitments for using Amazon Route 53—you pay only for the hosted zones that you configure and the number of queries that Route 53 answers. For more information, see Route 53 Pricing. For each hosted zone you create, Route 53 automatically creates four name server (NS) records. These four name servers are called the delegation set. Before the Domain Name System will start to route queries for your domain to Route 53 name servers, you must update your registrar's or your DNS service's name server records, to point to the Route 53 name servers. Follow the instructions in Getting the Name Servers for a Hosted Zone to get the four name servers assigned to your hosted zone.
4.
Follow the instructions in Name Server (NS) Records to update your registrar's or your DNS service's name server records, to point to the Route 53 assigned name servers. Create an alias resource record set you will use to associate your zone apex with your Elastic Load Balancing instance DNS name. To create the alias resource record set you can use the Amazon Route 53 console, Amazon Route 53 API, or the Elastic Load Balancing command line interface (CLI). To use Amazon Route 53 console or Amazon Route 53 Query API For detailed instructions on using the Amazon Route 53 console or the Amazon Route 53 Query API to create an alias resource record set, go to Creating Alias Resource Record Sets in the Amazon Route 53 Developer Guide. To use the Elastic Load Balancing command line interface a.
b.
Before you get started, be sure you’ve installed the Elastic Load Balancing CLI tools. For more information, see Appendix A: Using the Elastic Load Balancing Command Line Interface (p. 251) for instructions on downloading and installing the CLI tools. For detailed descriptions of the Elastic Load Balancing commands, see the Elastic Load Balancing Quick Reference Card. Enter the elb-associate-route53-hosted-zone command, as in the following example, to associate a zone apex with an Elastic Load Balancing instance. This command creates an association between your zone apex and your Elastic Load Balancing instance by adding an alias resource record set to your hosted zone. The following example creates an association between example.com and a load balancer named myLoadBalancer. elb-associate-route53-hosted-zone myLoadBalancer --rr-name example.com --hosted-zone-id Z123456789 --weight 100
For the hosted-zone-id parameter, use the hosted zone ID of your custom domain name rather than the Elastic Load Balancing hosted zone ID. For instructions on getting the hosted zone ID of your custom domain name, go to Listing the Hosted Zones for an AWS Account. For more information about the weight parameter, go to Setting Up Weighted Resource Record Sets in the Amazon Route 53 API Reference Guide.
Note You might have to wait several minutes for your changes to propagate to all Amazon Route 53 DNS servers. For information on how to check the status of your change, go to Checking the Status of Your Change in the Amazon Route 53 Developer Guide. c.
You can also use elb-associate-route53-hosted-zone to create aliases for subdomains that are part of your hosted zone. The following example associates the subdomain foo.bar.example.com your Amazon Route 53 hosted zone with ID number Z123456789.
API Version 2012-06-01 150
Elastic Load Balancing Developer Guide Disassociating Your Custom Domain Name From Your Load Balancer Name elb-associate-route53-hosted-zone myLoadBalancer --rr-name foo.bar.ex ample.com --hosted-zone-id Z123456789 --weight 100
Note The elb-associate-route53-hosted-zone command works only with AWS secret key authentication. Unlike other Elastic Load Balancing CLI commands, this Elastic Load Balancing command does not work with X.509 certificate and RSA private key credentials.
Disassociating Your Custom Domain Name From Your Load Balancer Name You can disassociate your custom domain name from a load balancer instance by first deleting the resource record sets in your hosted zone and then deleting the hosted zone. 1.
Delete the alias resource record sets in your Amazon Route 53 hosted zone You can use Amazon Route 53 console, Amazon Route 53 API, or the Elastic Load Balancing command line interface (CLI) to delete alias resource record sets in your hosted zone.
Using the Amazon Route 53 Console • For information on using Amazon Route 53 console, go to Creating, Changing, and Deleting Resource Record Sets in the Amazon Route 53 Developer Guide.
Using the Amazon Route 53 Query API • For information on using Amazon Route 53 Query API, scroll down to the Creating, Changing, and Deleting Resource Record Sets Using the Route 53 API section in the Creating, Changing, and Deleting Resource Record Sets topic in the Amazon Route 53 Developer Guide.
Using the Elastic Load Balancing command line interface • Enter the elb-disassociate-route53-hosted-zone command. This command removes the association between your zone apex or subdomain and your Elastic Load Balancing instance by deleting an alias resource record set from your hosted zone. The following example removes an association between example.com and a load balancer named myLB. The hosted-zone-id parameter is your custom hosted zone ID. elb-disassociate-route53-hosted-zone myLB --rr-name example.com --hostedzone-id Z123456789 --weight 100
Note The weight parameter value must match the value you used to create the resource record set specified in the rr-name parameter. If you don't remember the original weight value, use the Amazon Route 53 ListResourceRecordSets action to retrieve the value. For more information, go to ListResourceRecordSets in the Amazon Route 53 API Reference
API Version 2012-06-01 151
Elastic Load Balancing Developer Guide Cross-Zone Load Balancing
Guide. For more information about the weight parameter, go to Setting Up Weighted Resource Record Sets in the Amazon Route 53 API Reference Guide.
Note The elb-disassociate-route53-hosted-zone command works only with AWS secret key authentication. Unlike other Elastic Load Balancing CLI commands, this new Elastic Load Balancing command does not work with X.509 certificate and RSA private key credentials. 2.
Delete the hosted zone associated with your load balancer DNS name You can use the Amazon Route 53 console or the Amazon Route 53 Query API to delete the hosted zone associated with your load balancer DNS name. For more information, go to Deleting a Hosted Zone in the Amazon Route 53 Developer Guide.
Enable or Disable Cross-Zone Load Balancing for Your Load Balancer Elastic Load Balancing provides you with an option to either enable or disable cross-zone load balancing for your load balancer. With cross-zone load balancing, your load balancer nodes route traffic to the back-end instances across all Availability Zones. For more information, see Availability Zones and Regions (p. 5). This section walks you through the process for enabling or disabling the cross-zone load balancing for your load balancer. Topics • Enable Cross-Zone Load Balancing (p. 152) • Disable Cross-Zone Load Balancing (p. 154)
Enable Cross-Zone Load Balancing You can enable cross-zone load balancing for your load balancer using the AWS Management Console, the Elastic Load Balancing command line interface (CLI) or the Elastic Load Balancing Query API.
To enable cross-zone load balancing using the AWS Management Console 1. 2.
Sign in to the AWS Management Console and open the Amazon EC2 console at https://console.aws.amazon.com/ec2/. On the Amazon EC2 console Resources page, in the navigation pane, under NETWORK & SECURITY, click Load Balancers to start the Elastic Load Balancing wizard.
3. 4.
If necessary, change the region. From the navigation bar, select the region that has your load balancer. On the Create Load Balancer page, select your load balancer.
5. 6. 7.
The bottom pane displays the details of your load balancer. Click (Edit) in the Cross-Zone Load Balancing: Disabled row. In the Configure Cross-Zone Load Balancing dialog box, select Enable.
8.
Click Save.
API Version 2012-06-01 152
Elastic Load Balancing Developer Guide Enable Cross-Zone Load Balancing
To enable cross-zone load balancing using the CLI You need to modify the crosszoneloadbalancing attribute of your load balancer by setting the attribute value to true. 1.
Enter the elb-modify-lb-attributes command using the following options: • Load balancer name = MyLoadBalancer • crosszoneloadbalancing • enabled=true Your command should look like the following example: elb-modify-lb-attributes MyLoadBalancer abled=true"
--crosszoneloadbalancing "en
Elastic Load Balancing responds as in the following example. OK-Modifying LoadBalancer Attributes
2.
Enter elb-describe-lb-attributes command as in the following example to verify that the cross-zone load balancing is enabled for your load balancer. Use the following option: • Load balancer name = MyLoadBalancer Your command should look like the following example. elb-describe-lb-attributes MyLoadBalancer
--headers
Elastic Load balancing responds as in the following example. CrossZoneLoadBalancing CrossZoneLoadBalancing
VALUE true
You have successfully enabled Cross-Zone Load Balancing.
To enable Cross-Zone load balancing using the Query API You need to modify the CrossZoneLoadBalancing attribute of your load balancer by setting the attribute value to true. 1.
Use the ModifyLoadBalancerAttributes action with the following parameters: • LoadBalancerName = MyLoadBalancer • CrossZoneLoadBalancingEnabled = true Your request should look like the following example: https://elasticloadbalancing.amazonaws.com/?LoadBalancerName=MyLoadBalancer &LoadBalancerAttributes.CrossZoneLoadBalancing.Enabled=true
API Version 2012-06-01 153
Elastic Load Balancing Developer Guide Disable Cross-Zone Load Balancing
&Version=2012-06-01 &Action=ModifyLoadBalancerAttributes &AUTHPARAMS
If your request was successful, you should get a response similar to the following example. true false my-test-loadbalancer true 300
API Version 2012-06-01 160
Elastic Load Balancing Developer Guide Disable Connection Draining
false false true 60 my-test-loadbalancer false 300 false false false 60 my-test-loadbalancer 30 30 false true
API Version 2012-06-01 167
Elastic Load Balancing Developer Guide Using the Query API
false 300 SSLNegotiationPolicyType < . . . .> BackendServerAuthenticationPolicyType < . . . .> PublicKeyPolicyType < . . . .> AppCookieStickinessPolicyType < . . . .> LBCookieStickinessPolicyType < . . . .> ProxyProtocolPolicyType < . . . .> 2013-01-24T20:51:35.710Z my-test-loadbalancer . . . . . . . . . . . . AWSConsole-SSLNegotiationPolicy-my-test-loadbalancer EnableProxyProtocol . . . . . . . . EnableProxyProtocol 80 2013-01-24T20:51:35.710Z my-test-loadbalancer . . . . . . . . . . . . AWSConsole-SSLNegotiationPolicy-my-test-loadbalancer EnableProxyProtocol
API Version 2012-06-01 178
Elastic Load Balancing Developer Guide Enable Proxy Protocol Using the Query API
. . . . . . . . lima project digital-media department my-test-loadbalancer digital-media department my-test-loadbalancer my-test-loadbalancer true my-test-loadbalancer-log myapp 60 true my-test-loadbalancer-log myapp 60
API Version 2012-06-01 218
Elastic Load Balancing Developer Guide Disable Access Logs
false my-test-loadbalancer false my-test-loadbalancer-log myapp 60 false my-test-loadbalancer-log
API Version 2012-06-01 221
Elastic Load Balancing Developer Guide Configure an Amazon S3 Bucket for Storing Access Logs myapp 60 false ami-60a54009 1 3
To secure the request, we add the BinarySecurityToken element. The secure version of the request begins with the following:
....many, many lines of base64 encoded X.509 certificate... 0pjZ1+TvgPf6uG7o+Yp3l2YdGZ4= HhRbxBBmc2OO348f8nLNZyo4AOM= bmVx24Qom4kd9QQtclxWIlgLk4QsQBPaKESi79x479xgbO9PEStXMi HZuBAi9luuKdNTcfQ8UE/d
API Version 2012-06-01 259
Elastic Load Balancing Developer Guide The Response Structure
jjHKZKEQRCOlLVy0Dn5ZL1RlMHsv+OzJzzvIJFTq3LQKNrzJzsNe 2006-06-09T10:57:35Z 2006-06-09T11:02:35Z
If you are matching this against requests generated by Elastic Load Balancing supplied libraries, or those of another vendor, the following are the most important elements.
Elements • BinarySecurityToken—Contains the X.509 certificate in base64 encoded PEM format • Signature—Contains an XML digital signature created using the canonicalization, signature algorithm, and digest method • Timestamp—Requests to Elastic Load Balancing are valid within 5 minutes of this value to help prevent replay attacks
The Response Structure In response to a request, the Elastic Load Balancing service returns an XML > r-47a5402e UYY3TLBUXIEON5NQVUUX6OMPWBZIQNFM default i-2ba64342 ami-60a54009
API Version 2012-06-01 260
Elastic Load Balancing Developer Guide Web Services References
0 pending i-2bc64242 ami-60a54009 0 pending ec2-67-202-51-176.compute-1.&api-domain; i-2be64332 ami-60a54009 0 pending ec2-67-202-51-122.compute-1.&api-domain; example-key-name m1.small 2007-08-07T11:54:42.000Z
Web Services References For more information about using web services, go to any of the following resources: • Web Service Description Language (WSDL) • WS-Security BinarySecurityToken Profile
API Version 2012-06-01 261
Elastic Load Balancing Developer Guide
AWS Glossary For the latest AWS terminology, see the AWS Glossary in the AWS General Reference.
API Version 2012-06-01 262


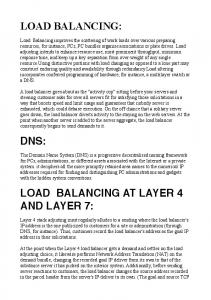


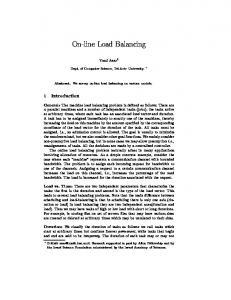


![Advanced Server Load-Balancing Deployment Guide - Cisco [PDF]](https://m.moam.info/img/260x300/advanced-server-load-balancing-deployment-guide-ci_647ef79c098a9e8b758b457e.jpg)
