EMBEDDED WEB SERVER CONFIGURATION TO ENABLE. AUTOSEND AND ...
This document provides a step-by-step guide to configure HP AutoSend on.
EMBEDDED WEB SERVER CONFIGURATION TO ENABLE AUTOSEND AND OUTGOING EMAIL FOR HP QUICKPAGE
INTRODUCTION To ensure accurate billing, the HP QuickPage program requires collection of the metered information from the printers and multifunction products (MFPs) under contract. HP AutoSend, a standard feature in the device firmware on many workgroup HP LaserJets, can be used to provide this capability. This document provides a step-by-step guide to configure HP AutoSend on HP printers and MFPs. IMPORTANT NOTE It is essential that you follow all steps in this document and that the proper email address for sending the AutoSend report is entered into the AutoSend “Email Destinations” box in the final step.
CONFIGURATION STEPS Prerequisites 1. Identify the IP address of the printer/MFP: Navigate through the menu in the display panel of the device and print the configuration page. The IP of the device can be found under the networking section or under the “Embedded JetDirect” section. 2. Gather SMTP server details (server name, port, user name, and password if authentication is required). This can be obtained from the IT admin of the client. This information is vital for AutoSend to function.
Section 1 Use the following steps to configure HP AutoSend on HP printers and MFPs. NOTE
Please refer to Section 2 for the following printers: • •
HP Color LaserJet CM4540 MFP HP Color LaserJet CP5520 series
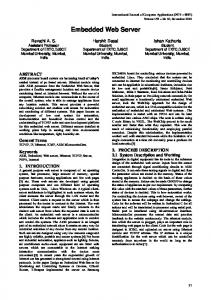
1. Launch a browser (Internet Explorer 6.0 or greater) and connect to the device home page— http://IPofTheDevice/ (for example, http://16.180.117.170/). a) Navigate to Settings > Email server and select Enable outgoing email to configure the email server. b) Provide the SMTP server IP and port (if asked) along with the domain name. Use “25” for the port if no other is evident. NOTE c)
On some models you will not see an input box for “Port”.
If the SMTP server requires authentication, provide the username and password.
d) The Return Email Address is required. The username must be the word “device” and the customer network domain name should be entered into the Domain Name field. Example: If the domain name is HP.com, Device email address would be “
[email protected]”. e) Click Apply.
1
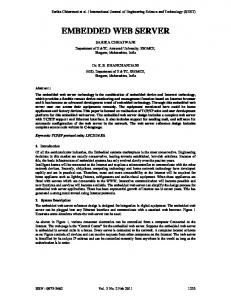
2. After setting the SMTP server details: a) Navigate to Settings > AutoSend. b) Select Enable AutoSend and configure to send every 1 day (as shown below). c)
Provide the destination email address:
[email protected]. Replace the “XX” (as shown here) with the 2-letter code for your country-specific email address. To find the country-specific code, please refer to the table of email addresses at the end of this document.
d) Click Test then Apply.
IMPORTANT NOTE To ensure the SMTP server passes the email to external destinations, please provide a test external email address (such as a Yahoo, Gmail, Hotmail, or other web-based email account other than the internal company account). Click Test and check for the receipt of an email message in the test address specified confirming the compatibility of the SMTP server. If an error message is shown at the AutoSend page or if the email does not reach your test email account, verify with your customer technical contact (IT) that the SMTP gateway is identified correctly in the email server section of the configuration. Send a test email again after any modification to the SMTP gateway information. After successful receipt of an email on the test account, be sure to replace the test email address with the email address stated in step 2.c. and click Test and then Apply. Sending another Test will immediately send the first AutoSend report to the QuickPage Clearing Office. If you are using the HP SMTP PROXY APPLICATION to act as your SMTP Email Server Gateway, the Test email to an external email account process will not work. Please just enter the “meterinfo” email address and click Test and then Apply.
2
Section 2 Use the following steps to configure HP AutoSend on these two printers: • •
HP Color LaserJet CM4540 MFP HP Color LaserJet CP5520 Series
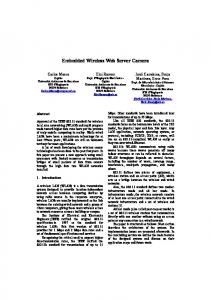
1. Launch a browser (Internet Explorer 6.0 or greater) and connect to the device home page— http://IPofTheDevice/ (for example, http://16.180.117.170/). a) Navigate to General > Autosend and select Send to E-mail to configure the email server. b) In the Outgoing E-mail Servers (SMTP) section, click Add.
c)
If the SMTP server is already known, choose the first option and click Next. If the SMTP server IP is not already known, choose the second option that looks for an SMTP server and click Next.
3
d) Provide the SMTP server and port (if asked). Use “25” for the port if no other is evident. If required, choose the option to split emails based on email size. NOTE
On some models you will not see an input box for “Port”.
e) Choose the required Server Authentication and click Next.
If the SMTP server requires authentication, provide the username and password and click Next.
4
f)
Click Finish.
2. After setting the SMTP server details: a) Navigate to General > AutoSend. b) Select Enable AutoSend and configure to send every 1 day (as shown below). c)
Select Send to Email.
d) Provide the destination email address:
[email protected]. Replace the “XX” (as shown here) with the 2-letter code for your country-specific email address. To find the country-specific code, please refer to the table of email addresses at the end of this document. e) Click Apply.
IMPORTANT NOTE To ensure the SMTP server passes the email to external destinations, please provide a test external email address (such as a Yahoo, Gmail, Hotmail, or other web-based email account other than the internal company account). Click on the Test button and check for the receipt of an email message in the test address specified confirming the compatibility of the SMTP server. If an error message is shown at the AutoSend page or if the email does not reach your test email account, verify with your customer technical contact (IT) that the SMTP gateway is identified correctly in the Email Server section of the configuration. Send a test email again after any modification to the SMTP gateway information. After successful receipt of an email on the test account, be sure to replace the test email address with the email address stated in step 2.d. above and click Test and then Apply. ADDITIONAL NOTE If you are using the HP SMTP PROXY APPLICATION to act as your SMTP Email Server Gateway, the TEST email to an external email account process will not work. Please just enter the “meterinfo” email address and click TEST and then APPLY. 5
Country
Designation
AutoSend meter email address
Australia
AU
[email protected]
Belgium
BE
[email protected]
Czech Republic
CZ
[email protected]
Denmark
DK
[email protected]
Finland
FI
[email protected]
France
FR
[email protected]
Germany
DE
[email protected]
Hong Kong
HK
[email protected]
Italy
IT
[email protected]
Luxembourg
LU
[email protected]
Mexico
MX
[email protected]
Netherlands
NL
[email protected]
Norway
NO
[email protected]
Portugal
PT
[email protected]
Republic of South Africa
ZA
[email protected]
Singapore
SG
[email protected]
Spain
ES
[email protected]
Sweden
SE
[email protected]
Switzerland
CH
[email protected]
United Kingdom
UK
[email protected]
© 2010 Hewlett-Packard Development Company, L.P. The information contained herein is subject to change without notice. The only warranties for HP products and services are set forth in the express warranty statements accompanying such products and services. Nothing herein should be construed as constituting an additional warranty. HP shall not be liable for technical or editorial errors or omissions contained herein. 20110707_ENWW


![Configuration guide to enable Shibboleth on EZproxy [PDF]](https://m.moam.info/img/260x300/configuration-guide-to-enable-shibboleth-on-ezprox_64816d25098a9ecb148b45a9.jpg)
