About the NetWorker Module for Microsoft Applications .............................. 18 .....
Microsoft Office SharePoint Server Backup and Recovery. Microsoft Office ...
EMC® NetWorker® Module for Microsoft Applications Release 2.0
Administration Guide P/N 300-006-314 REV A01
EMC Corporation Corporate Headquarters: Hopkinton, MA 01748-9103 1-508-435-1000 www.EMC.com
Copyright © 2007-2008 EMC Corporation. All rights reserved. Published March, 2008 EMC believes the information in this publication is accurate as of its publication date. The information is subject to change without notice. THE INFORMATION IN THIS PUBLICATION IS PROVIDED “AS IS.” EMC CORPORATION MAKES NO REPRESENTATIONS OR WARRANTIES OF ANY KIND WITH RESPECT TO THE INFORMATION IN THIS PUBLICATION, AND SPECIFICALLY DISCLAIMS IMPLIED WARRANTIES OF MERCHANTABILITY OR FITNESS FOR A PARTICULAR PURPOSE. Use, copying, and distribution of any EMC software described in this publication requires an applicable software license. For the most up-to-date listing of EMC product names, see EMC Corporation Trademarks on EMC.com. For the most up-to-date regulatory document for your product line, go to the Document/Whitepaper Library on EMC Powerlink All other trademarks used herein are the property of their respective owners.
2
EMC NetWorker Module for Microsoft Applications Release 2.0 Administration Guide
Contents
Figures Tables Preface Chapter 1
Overview About the NetWorker Module for Microsoft Applications .............................. NetWorker Module features ........................................................................... Privileged user level access ............................................................................. Supported configurations...................................................................................... Supported NetWorker Server hosts............................................................... Windows operating system support ............................................................. Simple LAN-based configuration .................................................................. LAN-based configuration with a proxy client ............................................. LAN-free configuration ................................................................................... Understanding the VSS snapshot creation process ........................................... About writers .................................................................................................... About providers................................................................................................ Dynamic volume support ............................................................................... Providers and backup performance .............................................................. NMM client snapshot backups ............................................................................. Nonpersistent rollover backup....................................................................... Instant backup with or without rollover....................................................... Serverless backup ............................................................................................. NMM client recoveries........................................................................................... Conventional recovery..................................................................................... Instant recovery ................................................................................................ Rollback recovery ............................................................................................. About the NMM client interface........................................................................... Recover view ..................................................................................................... Snapshot Management view........................................................................... Monitor view..................................................................................................... Using the NMM client graphical user interface ................................................. Opening the software and connecting to a NetWorker server .................. Selecting an item for recovery ........................................................................ Searching for an item ....................................................................................... Specifying a recovery browse time ................................................................ EMC NetWorker Module for Microsoft Applications Release 2.0 Administration Guide
18 18 19 20 20 20 21 22 23 25 26 28 28 28 30 30 30 30 32 32 32 32 34 34 36 37 38 38 39 39 40 3
Contents
Selecting a backup version for recovery ........................................................ 40 Viewing the volumes required for a recovery .............................................. 41
Chapter 2
Configuring a Scheduled Backup Backup configuration roadmap ............................................................................ 44 Privileged user level access ............................................................................. 45 Name resolution................................................................................................ 46 Best practices and considerations for backing up application data........... 46 Best practices for backing up system volumes ............................................. 47 Task 1: Configure a backup pool for snapshot operations ................................ 48 Configuring a device ........................................................................................ 48 Configuring a label template........................................................................... 49 Configuring a backup pool.............................................................................. 49 Labeling the device ........................................................................................... 50 Task 2: Configure snapshot policies ..................................................................... 51 Creating a snapshot policy .............................................................................. 51 Snapshot policy examples................................................................................ 53 Task 3: Configure a backup schedule ................................................................... 54 Task 4: Configure a backup group ........................................................................ 55 Task 5: Configure a Client resource ...................................................................... 57 Configuring a Client resource for applications ............................................ 57 Specifying save sets for application data....................................................... 59 Application information variable settings .................................................... 63 Task 6: Configure privileges .................................................................................. 64 Task 7: Configure a proxy client............................................................................ 65 Backing up a clustered NMM Client .................................................................... 67 Cluster failover and backups........................................................................... 67 Moving an NMM Client to another NetWorker server ..................................... 68
Chapter 3
Recovering Data Performing a recovery ............................................................................................ 70 NetWorker recovery options........................................................................... 72 Cluster recovery options.................................................................................. 73 Authoritative recovery of a Windows Server 2008 cluster database after NMM upgrade, from a NetWorker 7.4 SP2 save set.................................... 74 Non-authoritative recovery of a Windows Server 2008 cluster database, using a save set created with NetWorker 7.4 SP2....................... 75 ADAM recovery options.................................................................................. 75 DFS recovery options ....................................................................................... 76 FRS recovery options........................................................................................ 79 NTDS recovery options.................................................................................... 80 Security recovery options ................................................................................ 82 Recovering file system snapshots that have not been rolled over ................... 83 Performing a disaster recovery of a NMM Client .............................................. 84 Performing a disaster recovery of a clustered client .......................................... 86 Monitoring a recovery ...................................................................................... 91 Booting Windows in Directory Service Restore mode....................................... 92 Performing an authoritative recovery of NTDS or FRS data............................ 93 Recovering the Windows system configuration to an earlier state.................. 95
4
EMC NetWorker Module for Microsoft Applications Release 2.0 Administration Guide
Contents
Chapter 4
Microsoft SQL Server Backup and Recovery Microsoft SQL Server backup and recovery ....................................................... 98 SQL Server versions supported by NMM..................................................... 98 Types of Backup and Recovery Supported................................................... 98 Components used by NMM for SQL backup and recovery....................... 99 Specifying save sets for SQL data .................................................................. 99 Displaying valid SQL data save sets............................................................ 100 URL encoding for SQL save sets .................................................................. 101 SQL application information variable settings .......................................... 102 Serverless backup ........................................................................................... 102 Performing SQL Server backups ........................................................................ 103 Performing SQL Server recovery........................................................................ 105 Recovering SQL 2000 embedded databases ............................................... 105 Recovering SQL 2000 stand-alone databases ............................................. 106 Recovering SQL 2005 databases ................................................................... 106 Best practices for SQL backup and recovery .............................................. 107
Chapter 5
Microsoft Office SharePoint Server Backup and Recovery Microsoft Office SharePoint Server backup and recovery .............................. SharePoint Server versions supported by NMM client ............................ SharePoint backup and recovery types ....................................................... Requirements for installing SharePoint service pack................................ NMM installation requirements for a SharePoint system ........................ SharePoint 2007 data backed up by NMM ................................................. Keeping backups and recoveries in sync .................................................... Components used by NMM for SharePoint backup and recovery......... Specifying SharePoint 2007 save sets for application data ....................... Displaying valid SharePoint 2007 data save sets ....................................... URL encoding for SharePoint save sets....................................................... SharePoint 2007 Application information variable settings..................... Performing SharePoint Server backups............................................................. Configuring SharePoint 2007 backups ........................................................ Task 5: Configure a SharePoint Client resource ............................................... Performing a full backup for a distributed SharePoint farm ................... Performing SharePoint 2007 recovery ............................................................... Mandatory order for SharePoint recoveries ............................................... Selecting valid items for recovery ................................................................ Full recovery of a stand-alone SharePoint farm......................................... Full recovery of a distributed SharePoint farm.......................................... Recovery of individual SharePoint Content Databases ............................ Recovery of SharePoint Search/Content Indexes...................................... Rollback of SharePoint SQL databases........................................................ SharePoint disaster recovery............................................................................... NMM backup of SharePoint servers............................................................
Chapter 6
110 110 110 111 111 113 113 113 114 114 115 116 117 117 118 122 124 124 124 124 124 126 126 127 128 128
Microsoft Exchange Backup and Recovery Microsoft Exchange Server backup and recovery............................................ Exchange Server versions supported by NMM client .............................. Exchange backup and recovery types ......................................................... Updating and modifying Exchange credentials ........................................ Compatibility with previous Exchange backups....................................... Exchange data backed up by NMM............................................................. Components used by NMM for Exchange backup and recovery ........... EMC NetWorker Module for Microsoft Applications Release 2.0 Administration Guide
132 132 132 133 134 134 134 5
Contents
Specifying Exchange save sets for application data................................... 135 Exchange Application information variable settings ................................ 138 Serverless backup............................................................................................ 139 Snapshot process in an Exchange Server production and proxy client setup.................................................................................... 140 Best practices for Exchange backup and recovery ..................................... 141 Performing Exchange Server backups ............................................................... 143 Configuring Exchange Server backups........................................................ 143 Task 5: Configure an Exchange Client resource................................................ 144 Performing Exchange Server recovery............................................................... 146 Exchange recovery requirements and limitations...................................... 146 Exchange recovery options............................................................................ 147 Roll-forward recovery .................................................................................... 147 Point-in-time recovery.................................................................................... 148 Mounting the database after recovery ......................................................... 149 Rollback restore of Exchange data using NMM......................................... 150 Exchange rollback operation requirements ................................................ 150
Chapter 7
Microsoft Data Protection Manager Backup and Recovery Data Protection Manager backup and recovery ............................................... 154 DPM Server versions supported by NMM client....................................... 155 DPM backup and recovery types ................................................................. 155 DPM data backed up by NMM..................................................................... 155 Transportable backups of DPM Replicas not supported .......................... 155 Components used by NMM for DPM backup and recovery ................... 156 Specifying DPM save sets for application data .......................................... 157 DPM application information variable settings ......................................... 159 Performing DPM Server backups ....................................................................... 160 Configuring DPM backups............................................................................ 160 Task 5: Configure a DPM Client resource.......................................................... 161 Performing DPM Server recovery ...................................................................... 163 DPM configuration database recovery ........................................................ 163 DPM replica recovery..................................................................................... 163
Chapter 8
Microsoft Windows Cluster Backup and Recovery Windows Server Cluster backup and recovery ................................................ 166 Cluster support in NMM client..................................................................... 166 Compatibility with previous Windows Cluster backups ......................... 166 Components used by NMM for Windows Cluster backup and recovery .................................................................................................... 166 Specifying Windows Cluster save sets for application data..................... 167 Displaying valid Windows Cluster data save sets..................................... 167 Windows Cluster application information variable settings.................... 168 Performing Windows Server Cluster backups.................................................. 169 Cluster failover and backups......................................................................... 169 Windows Server Cluster recovery ...................................................................... 170 Cluster recovery options................................................................................ 170 Performing a disaster recovery of a clustered client in Windows Server 2003 ............................................................................................ 171 To perform a disaster recovery of a clustered client.................................. 171 To perform a disaster recovery of a clustered client from a legacy VSS backup .......................................................................................... 173 Disaster recovery of a clustered client from a legacy non-VSS backup .. 176
6
EMC NetWorker Module for Microsoft Applications Release 2.0 Administration Guide
Contents
Chapter 9
Active Directory and ADAM Backups Active Directory backup and recovery.............................................................. Types of Backup and Recovery Supported ....................................................... Performing an AD or ADAM backup................................................................ Performing a granular AD or ADAM backup.................................................. Set up local Windows SYSTEM account as an ADAM administrator.... Granular backup tasks ...................................................................................
Chapter 10
178 179 180 181 181 182
Active Directory Recover Recovering all Active Directory data................................................................. 184 Performing a granular recovery of AD objects and attributes ....................... 186 Recovery Restrictions for Active Directory ................................................ 187
Chapter 11
Snapshot Management Roll over a snapshot ............................................................................................. Roll back a snapshot............................................................................................. Rollback recovery requirements................................................................... Storage array descriptor file.......................................................................... Performing a rollback recovery .................................................................... Delete a snapshot ..................................................................................................
Chapter 12
190 191 191 191 193 194
NetWorker Client Management Specifying ranges for service and connection ports ........................................ 196 Specifying a password ......................................................................................... 197
Chapter 13
Troubleshooting The troubleshooting process ............................................................................... Setting up notifications .................................................................................. Finding errors.................................................................................................. NMM client error messages ................................................................................ E_VOLUME_NOT_SUPPORTED ................................................................ E_VETO_PROVIDER ..................................................................................... VSS_E_WRITERERROR_RETRYABLE error code 0x800423f3 ............... VSS CLIENT... Invalid Writer Selection... for APPLICATIONS .............. NMM client issues ................................................................................................ Savegroup failed in scheduled backup ....................................................... In progress backup fails................................................................................. NetWorker is blocked by Windows Firewall ............................................. Need to run utility to obtain Exchange Server information..................... Requesting a snapshot for a volume on hardware that is not transportable............................................................................................. PowerSnap service must be restarted after the NetWorker service is restarted ....................................................................................................... PowerSnap validation for recovery fails ..................................................... Snapshot backup may fail with writer errors............................................. Microsoft I/O write error when taking a replica in a CLARiiON array Creating a replica takes a long time in CLARiiON environment............ Cannot recover Exchange database due to overwrite prevention error Incremental backups within NetWorker Module for Exchange Client may be promoted to full backups...................................
EMC NetWorker Module for Microsoft Applications Release 2.0 Administration Guide
200 201 202 203 203 203 203 204 205 205 205 205 205 206 206 207 207 207 207 207 208
7
Contents
Incremental backups within NetWorker Module for SQL Server Client may be promoted to full backups ................................ 208 Diagnosing VSS Writer Issues....................................................................... 208 Modifying the Exchange 2007 COM+ component’s user account or password .............................................................................. 209 Save sets may not appear in the recover window...................................... 210 Recovery of AES-encrypted files fails without passphrase ...................... 210 Unable to restore files encrypted with both Microsoft Windows Encrypting File System and AES encryption.......... 210 Anti-virus programs block recovery ............................................................ 211 Checking log files .................................................................................................. 212 NMM client ...................................................................................................... 212 PowerSnap client............................................................................................. 212 Replication Manager....................................................................................... 213 Solutions Enabler ............................................................................................ 213 Active Directory .............................................................................................. 214 NetWorker server............................................................................................ 214 Manually stopping and starting services........................................................... 215 Other troubleshooting resources......................................................................... 216
Glossary Index
8
EMC NetWorker Module for Microsoft Applications Release 2.0 Administration Guide
Figures
Title 1 2 3 4 5 6 7 8 9 10 11 12 13 14 15
Page
Simple LAN-based configuration ....................................................................................... 22 LAN-based configuration with a proxy client .................................................................. 23 LAN-free configuration........................................................................................................ 24 VSS backup process .............................................................................................................. 26 NMM client main window .................................................................................................. 34 Exclusion representation of recover items ........................................................................ 35 Snapshot Management view ............................................................................................... 36 Monitor view ......................................................................................................................... 37 Selected and partially selected items.................................................................................. 39 SharePoint 2007 stand-alone farm configuration ........................................................... 112 SharePoint 2007 distributed farm configuration ............................................................ 112 Restore Remote Dependencies dialog box ...................................................................... 125 Snapshot process with Exchange production server and proxy client ....................... 141 NetWorker Module for Microsoft Applications protection of DPM ........................... 154 Troubleshooting process .................................................................................................... 201
EMC NetWorker Module for Microsoft Applications Release 2.0 Administration Guide
9
Figures
10
EMC NetWorker Module for Microsoft Applications Release 2.0 Administration Guide
Tables
Title 1 2 3 4 5 6 7 8 9 10 11 12 13 14 15 16 17 18 19 20 21 22 23 24 25 26 27 28 29 30 31 32
Page
Currently supported writers ............................................................................................... 27 Backup tasks .......................................................................................................................... 44 Best practices and considerations for application backups ............................................ 46 Conventional backup settings ............................................................................................. 53 Instant snapshot policy ........................................................................................................ 53 Instant snapshot with rollover policy ................................................................................ 53 Considerations for NMM Client backup schedules......................................................... 54 Save set syntax....................................................................................................................... 60 Special characters and their URL-encoded values ........................................................... 62 Application information variable settings......................................................................... 63 Configuration requirements for a proxy client................................................................. 65 Additional steps and considerations for backing up a clustered Client resource ....... 67 SQL save set syntax............................................................................................................... 99 Special characters and their URL-encoded values ......................................................... 101 SQL variable settings for Application information attribute........................................ 102 SQL Server backup and recovery best practices and considerations .......................... 107 SharePoint save set syntax ................................................................................................. 114 Special characters and their URL-encoded values ......................................................... 116 SharePoint application information variable settings ................................................... 116 Exchange save set syntax ................................................................................................... 135 Special characters and their URL-encoded values ......................................................... 137 Exchange application information variable settings...................................................... 138 NMM Data Protection Manager commands................................................................... 156 DPM save set syntax ........................................................................................................... 157 Special characters and their URL-encoded values ......................................................... 159 DPM application information variable settings ............................................................. 159 Windows Cluster save set syntax ..................................................................................... 167 Windows Cluster application information variable settings........................................ 168 Additional steps and considerations for backing up a clustered Client resource ..... 169 Setting up a granular AD or ADAM backup .................................................................. 182 Notifications and errors ..................................................................................................... 202 Services used in NMM client............................................................................................. 215
EMC NetWorker Module for Microsoft Applications Release 2.0 Administration Guide
11
Tables
12
EMC NetWorker Module for Microsoft Applications Release 2.0 Administration Guide
Preface
Audience
This guide is part of the NetWorker Module for Microsoft Applications documentation set, and is intended for use by system administrators during the setup and maintenance of the product. Readers should be familiar with the following technologies used in backup and recovery:
Related documentation
Conventions
◆
Storage subsystems, such as EMC CLARiiON or Symmetrix, if used
◆
EMC NetWorker software
◆
EMC NetWorker Snapshot management
◆
Microsoft Volume Shadow Copy Service (VSS) technology
Related documents include: ◆
EMC NetWorker Module for Microsoft Applications Release 2.0 Installation Guide
◆
EMC NetWorker NetWorker Module for Microsoft Applications Release 2.0 Release Notes
◆
EMC NetWorker Release 7.4 Service Pack 1 Multiplatform Version Administration Guide
◆
EMC Information Protection Software Compatibility Guide
◆
EMC Solutions Enabler Symmetrix CLI, Version 6.3 Quick Reference
EMC uses the following conventions: Note: A note presents information that is important, but not hazard-related.
CAUTION A caution note contains information that is essential to avoid data loss.
EMC NetWorker Module for Microsoft Applications Release 2.0 Administration Guide
13
Preface
Typographical conventions EMC uses the following type style conventions in this document: Normal
Used in running (nonprocedural) text for: • Names of interface elements (such as names of windows, dialog boxes, buttons, fields, and menus) • Names of resources, attributes, pools, Boolean expressions, buttons, DQL statements, keywords, clauses, environment variables, filenames, functions, utilities • URLs, pathnames, filenames, directory names, computer names, links, groups, service keys, file systems, notifications
Bold:
Used in running (nonprocedural) text for: • Names of commands, daemons, options, programs, processes, services, applications, utilities, kernels, notifications, system call, man pages Used in procedures for: • Names of interface elements (such as names of windows, dialog boxes, buttons, fields, and menus) • What user specifically selects, clicks, presses, or types
Where to get help
Italic:
Used in all text (including procedures) for: • Full titles of publications referenced in text • Emphasis (for example a new term) • Variables
Courier:
Used for: • System output, such as an error message or script • URLs, complete paths, filenames, prompts, and syntax when shown outside of running text.
Courier bold:
Used for: • Specific user input (such as commands)
Courier italic:
Used in procedures for: • Variables on command line • User input variables
Angle brackets enclose parameter or variable values supplied by the user
[]
Square brackets enclose optional values
|
Vertical bar indicates alternate selections - the bar means “or”
{}
Braces indicate content that you must specify (that is, x or y or z)
...
Ellipses indicate nonessential information omitted from the example
EMC support, product, and licensing information can be obtained as follows. Product information — For documentation, release notes, software updates, or for information about EMC products, licensing, and service, go to the EMC Powerlink website (registration required) at: http://Powerlink.EMC.com
Technical support — For technical support, go to EMC Customer Service on Powerlink. To open a service request through Powerlink, you must have a valid support agreement. Please contact your EMC sales representative for details about obtaining a valid support agreement or to answer any questions about your account.
14
EMC NetWorker Module for Microsoft Applications Release 2.0 Administration Guide
Preface
Your comments
Comments and suggestions about our product documentation are always welcome. To provide feedback: 1. Go to: http://Powerlink.EMC.com
2. Click the Feedback link.
EMC NetWorker Module for Microsoft Applications Release 2.0 Administration Guide
15
Preface
16
EMC NetWorker Module for Microsoft Applications Release 2.0 Administration Guide
1 Overview
This chapter includes the following topics: ◆ ◆ ◆ ◆ ◆ ◆
About the NetWorker Module for Microsoft Applications..................................... Understanding the VSS snapshot creation process.................................................. NMM client snapshot backups ................................................................................... NMM client recoveries ................................................................................................. About the NMM client interface ................................................................................. Using the NMM client graphical user interface........................................................
Overview
18 25 30 32 34 38
17
Overview
About the NetWorker Module for Microsoft Applications The EMC® NetWorker® Module for Microsoft Applications (NMM) works with Microsoft Volume Shadow Copy Service (VSS) technology to provide snapshot backup and recovery services for file systems, and application, and operating system data. The NMM client allows for the creation of point-in-time snapshot data. A snapshot can be retained on storage volumes for quick access. One can also perform a rollover of a snapshot to a traditional backup medium such as a tape, file type device, or advanced file type device. Data can be recovered either from a snapshot or from the backup.
NetWorker Module features
This NetWorker module provides the following features: ◆
This NetWorker Module can be set up in a LAN-based or LAN-free environment. NMM supports the following topologies: • “Simple LAN-based configuration” on page 21 • “LAN-based configuration with a proxy client” on page 22 • “LAN-free configuration” on page 23
◆
Support for several types of backup and recovery, depending on the types available for the given application or operating system: • “Instant backup with or without rollover” on page 30 • “Nonpersistent rollover backup” on page 30 • “Serverless backup” on page 30 • “Conventional recovery” on page 32 • “Instant recovery” on page 32 • “Rollback recovery” on page 32
◆
Application support: • Microsoft Exchange Server 2007 • Microsoft Exchange Server 2003 • Microsoft SQL Server 2005 • Microsoft SQL Server 2000 • Microsoft Office SharePoint Server 2007 • Microsoft System Center Data Protection Manager 2007 • Windows volumes and system components • Windows Cluster support • Active Directory Application Mode (ADAM) • Active Directory
Note: Application support often requires a minimum specific service pack level. The service pack levels frequently change. The EMC Information Protection Software Compatibility Guide provides the most up-to-date information about what service packs are required for each application.
18
EMC NetWorker Module for Microsoft Applications Release 2.0 Administration Guide
Overview
◆
Windows VSS Provider support: • Microsoft Software Shadow Copy provider for use with most leading hardware arrays • DMX/Symmetrix® Arrays with EMC VSS Provider v3.4.0.0 or later • CLARiiON® Arrays with EMC VSS Provider v3.4.0.0 or later • Celerra® Arrays with Celerra VSS Provider v1.7.15 • EqualLogic PS Series Arrays with EqualLogic Integration ToolKit v3.0 or later
The EMC Information Protection Software Compatibility Guide contains additional and the most up-to-date information about NMM compatibility.
Privileged user level access All NMM users who will be running or configuring NMM backups and recoveries must have administrator-level privileges for all resources they access: ◆
The NetWorker server
◆
Each NetWorker Module for Microsoft Applications (NMM) client machine
◆
All applications protected by NMM, such as Microsoft Windows Server, Microsoft Data Protection Manager (DPM), Microsoft Office SharePoint Server, Microsoft SQL Server, and Microsoft Exchange Server
◆
Network domains
◆
Storage servers
About the NetWorker Module for Microsoft Applications
19
Overview
Supported configurations This section describes the basic configurations in which the NMM client is supported.
Supported NetWorker Server hosts The NMM Client supports NetWorker Server 7.3.3 or later on the following hosts: ◆
AIX
◆
HP-UX (PA-RISC)
◆
Solaris (SPARC)
◆
Windows
Note: The NMM Client is not supported from NetWorker Server running on Linux.
The following NetWorker features are not supported: ◆
NetWorker Clone, Staging and Archive.
◆
Directed Recovery.
◆
Internationalization (I18N) or Localization (L10N).
◆
Installation of dedicated Storage Node on NMM client host. NMM does support proxy storage node, as described in “LAN-free configuration” on page 23.
◆
Adhoc/Manual Backups.
◆
De-duplication.
Windows operating system support NMM client supports the following versions of Windows and Windows-related features: ◆
Microsoft Windows Server 2008 (x86, x64)—Standard, Enterprise, DataCenter Editions
◆
Microsoft Windows Server 2003 R2 (x86, x64)—Standard, Enterprise, DataCenter Editions
◆
Microsoft Windows Server 2003 (x86, x64)—Standard, Enterprise, DataCenter Editions
◆
Microsoft Windows Storage Server 2003
◆
Microsoft Windows Storage Server 2003 R2
◆
System state recovery, file servers, and operating system roles including Active Directory, DHCP and Terminal Services
Note: The following Windows Server versions are not supported: Windows Server 2008 Core installation, and Windows IA64 editions.
In addition, the following Windows features are not supported:
20
◆
BitLocker encryption.
◆
GUID Partition Table (GPT) disks.
◆
LAN-based Proxy Client or LAN-free backups, if dynamic disks are used.
EMC NetWorker Module for Microsoft Applications Release 2.0 Administration Guide
Overview
◆
EMC VSS Hardware Provider with Windows Server 2008.
◆
EMC VSS Provider for Celerra with Windows Server 2008.
◆
VSS Hardware Providers with Windows dynamic disks.
◆
Microsoft Software Shadow Copy provider to perform persistent snapshots of clustered disks.
◆
Windows Automated System Recovery (ASR).
◆
Windows Storage Server Single Instance Storage (SIS) is supported, but recoveries will recover file data for all duplicate file—data will not be lost if there is sufficient disk space to hold the duplicate copies.
The EMC Information Protection Software Compatibility Guide contains additional and the most up-to-date information about NMM compatibility.
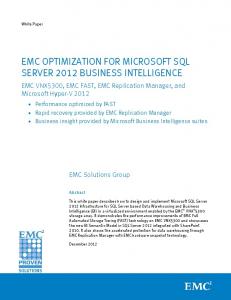
Simple LAN-based configuration Figure 1 on page 22 shows a simple LAN-based configuration with a storage area network. In a LAN-based configuration, the production data is stored on a storage area network (SAN) or direct attached storage. The data path to the NetWorker storage node devices is over a LAN. The application server that is being protected has the NMM client installed. The data moves as follows: 1. The NetWorker server, which must be release 7.3.3 or later, initiates the process by contacting the application server where the NMM client software is installed. 2. The application server with the NMM client software creates a snapshot of the data on the storage volume. Note: In the figure, snapshots are represented by S1 through S5.
3. The application server with the NMM client software uses a snapshot in primary storage to transfer the data over the LAN and into a conventional backup medium such as a file type disk, advanced file type disk, or tape.
Supported configurations
21
Overview
NetWorker Server 7.3.3 or later
LAN
Application server NetWorker Module for Microsoft Applications NetWorker Storage Node 7.3.x
SAN
Primary storage (For example CLARiiON or Symmetrix)
S5 S1
S4
Traditional storage
S3 S2 GEN-000747
Figure 1
Simple LAN-based configuration
LAN-based configuration with a proxy client Figure 2 on page 23 shows a LAN-based configuration with a storage area network and a proxy client. Both the application server and the proxy client have the NMM client installed. A proxy client is a host that acts as a remote data mover when snapshots are rolled over to a conventional backup medium. A proxy client frees resources on the application server. When a backup operation uses a proxy client, it is known as a serverless backup. The data moves as follows: 1. The NetWorker server initiates the process by contacting the application server where the NMM client software is installed. 2. The application server with the NMM client software creates a snapshot of the data on the storage volume. Note: In the figure, snapshots are represented by S1 through S5.
3. The snapshot is made visible to the proxy client. 4. The proxy client uses a snapshot in primary storage to transfer the data over the LAN and into a conventional backup medium such as a file type disk, advanced file type disk, or tape.
22
EMC NetWorker Module for Microsoft Applications Release 2.0 Administration Guide
Overview
NetWorker Server 7.3.3 or later
LAN
Application server NetWorker Module for Microsoft Applications
Proxy client NetWorker Module for Microsoft Applications
SAN
Primary storage (For example CLARiiON or Symmetrix)
S4 S5 S1
S3
NetWorker Storage Node 7.3.x
Traditional storage
S2 GEN-000748
Figure 2
LAN-based configuration with a proxy client
LAN-free configuration Figure 3 on page 24 shows a LAN-free configuration with a storage area network. The NMM client is installed on the application server. The proxy client is installed on the NetWorker storage node. You can set up a NetWorker storage node version 7.3.3 or later as a proxy client to avoid the network traffic that is generated when a snapshot is rolled over to a conventional backup medium. Network traffic is avoided because both the conventional backup device and the snapshot are directly attached to the storage node. Note: Install the proxy client software by using the NMM client software package.
The data moves as follows: 1. The NetWorker server initiates the process by contacting the application server where the NMM client software is installed. 2. The application server with the NMM client software creates a snapshot of the data on the storage volume. Note: In the figure, snapshots are represented by S1 through S5.
3. The snapshot is made visible to the proxy client. 4. The proxy client, in this case the storage node, uses a snapshot in primary storage to transfer the data into a conventional backup medium such as a file type disk, advanced file type disk, or tape. Supported configurations
23
Overview
The NetWorker server and the application server communicate through the LAN. However, the data itself is not transferred across the LAN because the conventional backup medium is attached directly to the NetWorker storage node. NetWorker Server 7.3.3 or later
LAN
Application server NetWorker Module for Microsoft Applications
Proxy client NetWorker Storage Node 7.3.x
SAN
Primary storage (For example CLARiiON or Symmetrix)
Traditional storage
S4 S5 S1
S3 S2 GEN-000750
Figure 3
24
LAN-free configuration
EMC NetWorker Module for Microsoft Applications Release 2.0 Administration Guide
Overview
Understanding the VSS snapshot creation process Microsoft Volume Shadow Copy Service (VSS) acts as a coordinator among the following three components that create, modify, back up, and recover data: ◆
Requestors Requestors include the NetWorker backup application.
◆
Writers Including writers for operating system data, application data such as Microsoft Exchange Server 2003 or Microsoft SQL Server data, and file system volumes such as a D:\ data drive.
◆
Providers Providers include the Microsoft VSS software provider or hardware-based providers such as the EMC VSS Provider.
In VSS, NetWorker software is a requestor—an application that performs the backup and recovery of applications or services. When a requestor performs a backup or recovery, the following occurs: 1. The requestor asks for information from VSS. 2. VSS reviews the request for validity. 3. VSS sends writer data from multiple application and system writers to the requestor. 4. The requester tells VSS which writers and volumes to include in the snapshot. Each application and service that supports VSS has its own writer, which understands how the application or service works. After the writer signals that it has prepared the data, the following occurs: 1. The VSS software does the following: a. Directs the writer to freeze input/output (I/O) to the selected volumes. b. Queues transactions for later processing. c. Calls a provider to capture the requested data. 2. The provider does the following: a. Captures the prepared data. b. Creates a snapshot that exists side-by-side with the live volume. 3. After the snapshot is created: a. The provider signals VSS, this signal tells the writer to resume activity. b. I/O is released to the selected volumes and any queued writes that arrived during the provider's work are processed. Figure 4 on page 26 illustrates the VSS backup process.
Understanding the VSS snapshot creation process
25
Overview
Requestor 1. NetWorker software (the requestor) asks VSS to enumerate writers and gether their metadata.
4. Requestor asks VSS to create snapshot.
2. Writers provide an XML description of backup components and define the recover method.
Writer
Writer
Writer
Writer
5. VSS tells the writers to freeze activity. Writer
7. VSS tells the writers to resume activity.
3. VSS asks which providers can support a snapshot for each of the required volumes. Microsoft VSS Software Provider
Disk 1
Disk 2
6. VSS tells the providers to create the snapshot of the current state on disk. EMC VSS Provider (CLARiiON or Symmetrix)
Disk 3
Disk 3 GEN-000188
Figure 4
VSS backup process
About writers Writers provide information about what data to back up, and specific methods for handling components and applications during backup and recovery. They also identify the type of application or service that is being backed up. If a service or application is present on a system but is not active, information from its writer will not be available. Consequently, a writer can appear or disappear from backup to backup.
26
EMC NetWorker Module for Microsoft Applications Release 2.0 Administration Guide
Overview
Table 1 on page 27 lists the writers that are supported for the NMM client. Table 1
Currently supported writers
Writer type
Writers supported by NMM
Volumes
A file system path such as D:\data Note: NMM only supports NTFS volumes. It does not support FAT16 and FAT32 volumes. Also, NMM does not support backup of raw volumes.
Applications
Microsoft ADAM (Active Directory Application Mode) Microsoft Exchange Server 2003 Microsoft Exchange Server 2007 Microsoft System Center Data Protection Manager 2007 Microsoft Distributed File Replication (Windows Server 2003) Microsoft Active Directory Lightweight Directory Services (AD LDS) Microsoft Office SharePoint Server 2007 Microsoft SQL Server 2000 Microsoft SQL Server 2005
Windows system components (Windows Server 2003 and Windows Server 2008 unless otherwise noted)
BITS (Background Intelligent Transfer Service) COM+ REGDB (Registration Database) Certificate Authority Cluster Database (Windows Server 2008) Cluster service DHCP (Dynamic Host Configuration Protocol) Jet Event log FRS (File Replication Server) FSRM (File Storage Resource Manager) Microsoft Distributed File Replication (Windows Server 2003) IIS Configuration Writer (Windows Server 2008) IIS Metabase MSDE (Microsoft SQL Server Desktop Engine for SQL 2000 embedded databases) MSSearch Service Writer (Windows Server 2008) NPS VSS Writer (Network Policy and Access Service, Windows Server 2008) NTDS (Active Directory Schema) Registry RSM (Removable Storage Manager) Remote Storage Manager Shadow Copy Optimization Writer (Windows Server 2008) SQL 2005 Embedded Terminal Services Gateway Writer (Windows Server 2008) Terminal Services Licensing WINS (Windows Internet Name Service) WMI (Windows Management Instrumentation) Note: GUID Partition Table (GPT) disks are not supported.
Note: Files located in an FTP directory are not included in a SYSTEM COMPONENTS snapshot. Typically, FTP files are stored by IIS in C:\inetpub. IIS Metabase files are configuration files, which are backed up as part of SYSTEM COMPONENTS. FTP files are content files, and must be backed up separately.
Understanding the VSS snapshot creation process
27
Overview
About providers A provider is used to capture snapshots. One of the following types of providers are available: ◆
EMC VSS Hardware Provider, which supports DMX/Symmetrix and CLARiiON arrays
◆
Celerra VSS Hardware Provider, which supports Celerra arrays
◆
EqualLogic VSS Hardware Provider, which supports EqualLogic PS Series arrays
◆
Microsoft Software Shadow Copy provider
The Microsoft Software Shadow Copy provider is a host-based provider that works with any type of storage hardware. The EMC VSS Hardware Provider works with an CLARiiON or a Symmetrix disk array. Some features of the NMM client, such as serverless backup and rollback recovery, are only available with hardware providers such as the EMC VSS Hardware Provider. Note: NMM does not support rollback restore for backups performed by EqualLogic or Celerra hardware. Only conventional restore and snapshot restore are supported for backups performed by EqualLogic or Celerra hardware.
Dynamic volume support NMM supports snapshots of dynamic volumes using the Microsoft Software Shadow Copy provider. This support applies to both Windows Server 2003 and Windows Server 2008. NMM does not support hardware-based VSS transportable snapshots of dynamic volumes. NMM will attempt to perform a hardware-based VSS transportable snapshot when a proxy backup host is specified using NSR_DATA_MOVER in the application information field of the Client resource. For example, hardware-based transportable snapshots are not supported when the dynamic volumes are on CLARiiON storage. NMM will attempt to perform the hardware-based snapshot, but the operation will fail during import of the hardware-based snapshot on the proxy backup host. This condition applies to both Windows Server 2003 and Windows Server 2008. Windows Server 2008 introduces support for local, hardware-based snapshots of dynamic volumes. NMM does not support local non-transportable hardware-based snapshots of dynamic volumes on Windows Server 2008. For customer environments where dynamic volumes are provisioned using a storage array, customers must not install the storage array vendor’s VSS provider on the production host. For example, if a dynamic volume was created on a CLARiiON LUN, customers must not install the EMC VSS Hardware Provider on the production host.
Providers and backup performance The Microsoft VSS software provider uses a copy-on-write snapshot technology. Some hardware providers such as the EMC VSS Hardware Provider, support split-mirror snapshot technology as well as copy-on-write technology. Although copy-on-write technology requires less hardware resources, split-mirror technology provides better performance. Large or fast-changing databases should not be saved with copy-on-write snapshot technology. The input/output requirements of these databases can cause the 28
EMC NetWorker Module for Microsoft Applications Release 2.0 Administration Guide
Overview
copy-on-write cache to overflow and invalidate the snapshot. Additionally, copy-on-write technology cannot match the performance of split-mirror technology. For large or fast-changing databases, use the EMC VSS Hardware Provider in conjunction with EMC hardware to provide a split-mirror storage solution such as a CLARiiON clone or a Symmetrix BCV.
Understanding the VSS snapshot creation process
29
Overview
NMM client snapshot backups Backups are configured as scheduled snapshot backups on a NetWorker server release 7.3.3 or later. Note: Ad hoc (manual) backups, from either the command line or from the NMM client, are not supported. However, one can manually start a scheduled backup at any time.
The NMM client supports three types of snapshot backups: ◆
“Nonpersistent rollover backup” on page 30
◆
“Instant backup with or without rollover” on page 30
◆
“Serverless backup” on page 30
Snapshot backups are specified through a snapshot policy and various settings for the Client resource. Snapshot policies and Client resources are set up on the NetWorker server. Chapter 2, “Configuring a Scheduled Backup,” provides more information about configuring backups and client resources.
Nonpersistent rollover backup A nonpersistent snapshot backup (also referred to as a live backup) creates a point-in-time snapshot of the data and then performs a rollover to a conventional backup medium such as tape, file, or advanced file type device. The original snapshot is automatically deleted from the NMM client.
Instant backup with or without rollover An instant backup creates and retains a snapshot on a mounted storage disk volume. Depending on how backups are configured, a snapshot that is created during an instant backup may be configured to roll over to a conventional backup. While the snapshot resides on a mounted storage disk volume, it is referred to as a persistent snapshot. Retaining persistent snapshots on a mounted storage disk volume enables one to perform an instant recovery. The number of persistent snapshots that can be retained on a volume depends on the amount of resources available. Other factors that constrain the number of persistent snapshots include: ◆
Snapshot technology that is used, either copy-on-write or split-mirror.
◆
Input/output patterns of the drive.
◆
Processing involved in running a snapshot backup group.
Serverless backup A proxy client is used in conjunction with instant snapshot backups to provide serverless backups. Serverless backups free the application server from much of the processing involved in a nonpersistent or instant snapshot backup. In a serverless backup, a snapshot is created on the application server and then immediately moved to the proxy client for further processing. Serverless backups are particularly useful when there is additional processing involved in a snapshot backup. For example, to help determine whether a snapshot of a Microsoft Exchange database is consistent, the Exchange utility, eseutil, should be 30
EMC NetWorker Module for Microsoft Applications Release 2.0 Administration Guide
Overview
run against the snapshot. Running eseutil can be disk intensive. Offloading the work from the Exchange server to a proxy client frees resources on the Exchange server. A serverless backup can be rolled over to a conventional backup. That backup can then remain on the mounted storage disk volume as a persistent snapshot. Note: Serverless backup is available only with VSS hardware providers and is subject to the capabilities of the vendor’s hardware. The EMC VSS Provider for CLARiiON and Symmetrix provides the capability to perform serverless backup operations for these storage platforms.
NMM client snapshot backups
31
Overview
NMM client recoveries There are three types of recoveries: ◆
“Conventional recovery” on page 32
◆
“Instant recovery” on page 32
◆
“Rollback recovery” on page 32
By default, recoveries are performed from a conventional backup. If a conventional backup is not available for the selected browse time, an instant recovery is performed. The default recovery method can be specified in the NetWorker recovery options dialog box. “NetWorker recovery options” on page 72 provides more information about these recovery methods.
Conventional recovery A conventional recovery consists of recovering data from a snapshot that has been rolled over to tape. Conventional recoveries support the same level of item selection as do instant recoveries.
Instant recovery Instant recoveries are performed on persistent snapshots. An instant recovery can take less time to complete than a conventional recovery because the snapshot is available on a mounted disk storage volume rather than on a conventional backup medium. Instant recoveries support the selection of individual files in a file system snapshot. Additionally, instant recoveries support the selection of individual components at whatever level of granularity is supported by the system or application writer. If the persistent snapshot is created by using a proxy client, the snapshot file system on the proxy client is read to restore the files. In this way, performance is improved even further because the job of processing the snapshot for recovery is offloaded from the NMM client production host to the proxy client. The procedure to perform an instant recovery of file system data differs if only a persistent snapshot is available. Chapter 3, “Recovering Data,” provides more information about performing recoveries. Note: When performing an instant recovery, the snapshot may become invalidated. This can occur if the snapshot is based on copy-on-write technology. If a large amount of data is recovered to the original volume, the cache may overflow. This is true for the Microsoft VSS software provider and for hardware providers that use copy-on-write technology, such as CLARiiON snapshots and Symmetrix virtual devices.
Rollback recovery A rollback recovery is the process of returning data volumes to an earlier point-in-time. The entire contents of a persistent snapshot is recovered during a rollback recovery. One cannot select individual components in a rollback recovery operation. A rollback recovery is the fastest way to recover the contents of a persistent snapshot.
32
EMC NetWorker Module for Microsoft Applications Release 2.0 Administration Guide
Overview
A rollback recovery is known as a "destructive" recovery because all changes that were made to the file systems after the selected snapshot was taken are overwritten. For example, suppose that a snapshot of a database is taken every hour. At 5:30 P.M., it is determined that the database is corrupt and that the last known consistent database snapshot was taken at 5:00 P.M. When the database host is rolled back to the 5:00 P.M. snapshot, all database transactions between the time of the 5:00 P.M. and 5:30 are overwritten. The following list describes additional requirements and conditions that apply to snapshots and rollback restore: ◆
The snapshot to be rolled back must reside on a CLARiiON or Symmetrix storage system that is supported with the EMC VSS Provider.
◆
The NMM client to which the snapshot is to be rolled back must be supported with a proxy client.
◆
NMM does not support rollback restore for backups performed with EqualLogic or Celerra hardware. Only conventional restore and snapshot restore are supported for those hardware.
“Roll back a snapshot” on page 191 provides more information about rollback recoveries.
NMM client recoveries
33
Overview
About the NMM client interface The NMM client interface has three views: ◆
“Recover view” on page 34
◆
“Snapshot Management view” on page 36
◆
“Monitor view” on page 37
Recover view With the exception of rollback recovery, all recoveries are performed from the Recover view. Rollback recoveries use the Snapshot Management view. Figure 5 on page 34 shows the Recover view. Main toolbar
Available views Figure 5
34
Summary of selected items
Navigation tree
Client selection (clustered client only)
View-Specific toolbar
NMM client main window
EMC NetWorker Module for Microsoft Applications Release 2.0 Administration Guide
Overview
The summary of selected items can also display exclusions, which shows only those items that are not selected for recovery. This view can be helpful when many items are selected for recovery. Figure 6 on page 35 shows an exclusion representation.
Items in red are excluded from recovery
Figure 6
Exclusion representation of recover items
To view an exclusion representation, right-click in the Summary pane at the bottom of the window and select Exclusion Representation.
About the NMM client interface
35
Overview
Snapshot Management view Various operations on snapshots are performed from the Snapshot Management view shown in Figure 7 on page 36.
Figure 7
Snapshot Management view
The following operations can be performed on snapshots: ◆
Rollover snapshot
◆
Rollback snapshot
◆
Delete snapshot
In most cases, snapshot rollover and delete operations are performed automatically based on snapshot policies, which are set up on the NetWorker server. However, if you need to manually delete or rollover a snapshot, you can do so in the Snapshot Management view. Chapter 2, “Configuring a Scheduled Backup,” provides more information about snapshot policies. Chapter 11, “Snapshot Management,” provides more information about performing manual snapshot operations from the Snapshot Management view.
36
EMC NetWorker Module for Microsoft Applications Release 2.0 Administration Guide
Overview
Monitor view Recovery and snapshot management operations can be monitored in the Monitor view shown in Figure 8 on page 37.
Figure 8
Monitor view
Most messages displayed in the Monitor view are also written to log files. Chapter 13, “Troubleshooting,” provides more information about log files. You can also copy and paste text from the Monitor view to another application.
About the NMM client interface
37
Overview
Using the NMM client graphical user interface This section describes how to perform the following basic tasks in the NMM client interface.
Opening the software and connecting to a NetWorker server To recover data, you must connect to the NetWorker server on which the backup was configured. To connect to a NetWorker server: 1. From the Start menu, open the NMM client software. If you have opened the NMM client before, proceed to step 2 on page 38. If this is the first time you have opened the NMM client, the Change NetWorker Server dialog box appears, and you can proceed to step 3 on page 38. 2. From the Main toolbar, click the NetWorker Server icon. The Change NetWorker Server dialog box appears. 3. Click Update Server List to browse for NetWorker 7.3.3 or later servers. The discovery process may take a few minutes. 4. When the list is updated, select a server. The selection appears in the Server field. You can also type a name in the Server field. 5. Click OK. Note: You can also select Configure Options from the Options menu to connect to a NetWorker server.
38
EMC NetWorker Module for Microsoft Applications Release 2.0 Administration Guide
Overview
Selecting an item for recovery To select items for recovery, click the checkbox beside a node in the navigation tree. A check mark indicates that the node is selected. By default, all items contained in the node, such as folders and files, will also be selected for recovery. To clear an item contained in a selected node, expand the node and click the checkbox beside the item to clear it. The check mark disappears. Figure 9 on page 39 depicts one selected item and several partially selected nodes in the navigation tree.
Check mark indicates that the item is selected. Solid box indicates that some items, not all, below this node are selected
Figure 9
Selected and partially selected items
Searching for an item To search for a recovery item: 1. Click Search above the navigation tree. 2. In the Path field, type a directory path. 3. Optionally, in the Name field, type the name of the search item. You can refine your search as follows: • Literal match (case-insensitive) Type abc to return abc, ABC, or AbC but not abcd or ABCD. • Literal match (case-sensitive) Type "abc" to return abc but not ABc or abcd. • Name contains (case-insensitive) Type %abc% to return abc, abcd, ABCD, or xyzABCde. • Name starts with (case-insensitive) Type abc% to return abcd or ABCde but not xyzABCde. • Name ends with (case-insensitive)
Using the NMM client graphical user interface
39
Overview
Type %abc to return xyzAbc but not ABCde. • Single-character match search using the ? wildcard Type ? to return single character entries and drive volumes, such as C or D. Type WMI?Writer to return WMI Writer. • Multiple-character match search by using the * wildcard Type *.txt to return all entries with a .txt extension. Type * to return all items within the selected container. Type *writer* to return all writers. • Search by using both the * and ? wildcard Type *??I*writer* to return WMI Writer. 4. Click Search. The Details pane displays the results of the search.
Specifying a recovery browse time To browse for items that were backed up on or before a particular time: 1. From the application toolbar, click the Browse calendar icon. 2. Select the arrows to select the date and time; click OK. The navigation tree displays backup items from the specified date and earlier.
Selecting a backup version for recovery This topic applies to system recovery or Active Directory recovery operations only. “Snapshot Management” on page 189 provides more information about rollback snapshot recoveries. To view the versions of an item that were backed up prior to the current browse time: 1. In the navigation tree, select a recover item. “Selecting an item for recovery” on page 39 provides more information about selecting an item. 2. Right-click the selected item and select Versions from the pop-up menu. 3. Select the backup version to recover. 4. Select Use selected item backup time as new browse time to change the browse time to the same date as the selected backup version. 5. Click OK. The recover items displayed in the navigation tree are from the selected browse time.
40
EMC NetWorker Module for Microsoft Applications Release 2.0 Administration Guide
Overview
Viewing the volumes required for a recovery There are no NetWorker volumes associated with a snapshot backup until the snapshot has been rolled over to a NetWorker server. If you select to view the required volumes for a system component or application data snapshot that has not been rolled over, no volumes will be displayed. To view the volumes that are required for a recovery operation: 1. In the navigation tree, select a recover item. “Selecting an item for recovery” on page 39 provides more information about selecting an item. 2. Right-click the selected item and select Required Volumes from the pop-up menu. The Required NetWorker Volumes dialog box appears with a list of the volumes that must be mounted: • If a volume is already mounted, the device name is shown after the volume name. • If a required volume is not mounted, the administrator is prompted to mount it after the recovery operation is started. 3. Click OK.
Using the NMM client graphical user interface
41
Overview
42
EMC NetWorker Module for Microsoft Applications Release 2.0 Administration Guide
2 Configuring a Scheduled Backup
This chapter includes the following topics: ◆ ◆ ◆ ◆ ◆ ◆ ◆ ◆ ◆ ◆
Backup configuration roadmap .................................................................................. Task 1: Configure a backup pool for snapshot operations ...................................... Task 2: Configure snapshot policies ........................................................................... Task 3: Configure a backup schedule ......................................................................... Task 4: Configure a backup group .............................................................................. Task 5: Configure a Client resource ............................................................................ Task 6: Configure privileges ........................................................................................ Task 7: Configure a proxy client.................................................................................. Backing up a clustered NMM Client .......................................................................... Moving an NMM Client to another NetWorker server ...........................................
Configuring a Scheduled Backup
44 48 51 54 55 57 64 65 67 68
43
Configuring a Scheduled Backup
Backup configuration roadmap This chapter describes the seven tasks required to configure most types of backups. Review Table 2 on page 44 to determine which tasks are required to configure your backups. Table 2
44
Backup tasks (page 1 of 2) Type of backup
Required action
Windows operating system: • Volume data such as a drive letter. • Windows system components, such as the registration database.
• Complete tasks 1 through 7: “Task 1: Configure a backup pool for snapshot operations” on page 48 “Task 2: Configure snapshot policies” on page 51 “Task 3: Configure a backup schedule” on page 54 “Task 4: Configure a backup group” on page 55 “Task 5: Configure a Client resource” on page 57 “Task 6: Configure privileges” on page 64 “Task 7: Configure a proxy client” on page 65
Application data, such as: • Microsoft SQL Server • Microsoft Office SharePoint Server • Microsoft Exchange Server • Microsoft System Center Data Protection Manager (DPM) • Microsoft Windows Server Cluster “NetWorker Module features” on page 18 lists the specific versions supported for each of these applications.
• Complete tasks 1 through 4: “Task 1: Configure a backup pool for snapshot operations” on page 48 “Task 2: Configure snapshot policies” on page 51 “Task 3: Configure a backup schedule” on page 54 “Task 4: Configure a backup group” on page 55 • Review the information in “Best practices and considerations for backing up application data” on page 46. • Continue configuration with the specific instructions for the application in: “Performing SQL Server backups” on page 103 “Performing SharePoint Server backups” on page 117 “Performing Exchange Server backups” on page 143 “Performing DPM Server backups” on page 160 “Performing Windows Server Cluster backups” on page 169
EMC NetWorker Module for Microsoft Applications Release 2.0 Administration Guide
Configuring a Scheduled Backup
Table 2
Backup tasks (page 2 of 2) Type of backup
Required action
For all other applications and systems supported by NMM
• Complete tasks 1 through 7: “Task 1: Configure a backup pool for snapshot operations” on page 48 “Task 2: Configure snapshot policies” on page 51 “Task 3: Configure a backup schedule” on page 54 “Task 4: Configure a backup group” on page 55 “Task 5: Configure a Client resource” on page 57 “Task 6: Configure privileges” on page 64 “Task 7: Configure a proxy client” on page 65
A NMM client that is part of a cluster
• Review the information in “Backing up a clustered NMM Client” on page 67 • Complete tasks 1 through 7. “Task 1: Configure a backup pool for snapshot operations” on page 48 “Task 2: Configure snapshot policies” on page 51 “Task 3: Configure a backup schedule” on page 54 “Task 4: Configure a backup group” on page 55 “Task 5: Configure a Client resource” on page 57 “Task 6: Configure privileges” on page 64 “Task 7: Configure a proxy client” on page 65
An Active Directory server
Complete Chapter 9, “Active Directory and ADAM Backups.”
Privileged user level access Because NMM requires access to protected data and system files, make sure all users who will be running or configuring NMM backups and recoveries have administrator-level privileges for all resources they must access: ◆
The NetWorker server
◆
Each NetWorker Module for Microsoft Applications (NMM) client machine
◆
All applications protected by NMM, such as Windows Server, DPM, Microsoft Office SharePoint Server, Microsoft SQL Server, and Microsoft Exchange Server
◆
Network domains
◆
Storage servers
Backup configuration roadmap
45
Configuring a Scheduled Backup
Name resolution NetWorker and the NMM client need proper name resolution to identify and back-translate computer names, such as from name-to-IP address or IP address-to-name. Also, NMM Client uses the host machine NETBIOS or “short” name when connecting to the NetWorker server to browse backups. If the NETBIOS name is not found, NMM will not be able to display backups. To ensure clear communication of computer names, make sure to perform the following: ◆
Add the NetWorker server name to either the local hosts file (located in %SystemRoot%\system32\drivers\etc) or the Domain Name Server that contains the names of all servers on your network.
◆
When configuring a Client resource, specify the NETBIOS name for the client in the Aliases attribute. “Configuring a Client resource for applications” on page 57 describes how to enter the NETBIOS name in the Aliases attribute.
Best practices and considerations for backing up application data Table 3 on page 46 lists the considerations for specifying values in the Save Set attribute for a particular Client resource. Table 3
46
Best practices and considerations for application backups Consideration
Best practice
Different policies for application server data
For application servers such as SQL or Exchange servers, back up the server application data under a schedule different than the host operating system data and volumes. Typically, application data is backed up several times a day while operating system data and volumes are backed up less frequently. To accomplish this, create a separate backup group, snapshot policy, and Client resource for: • Server application data • Volumes and operating system data Assign the appropriate snapshot policy and Client resource to each backup group.
Installation path for application server program
Do not install application server program files on the same volume as the application’s database files and log files.
Copy-on-write versus mirroring
Large or fast-changing databases should not be saved with Copy-on-write snapshot technology. Instead, use a split-mirror snapshot technology such as a CLARiiON clone or a Symmetrix BCV. Although copy-on-write technology requires less hardware resources, split-mirror technology can better handle the requirements of large or fast-changing databases. Split-mirror technology is supported only with the EMC VSS Provider.
NetWorker modules and the NMM Client
If you attempt to use both the NMM Client and a NetWorker module to backup application data, the module backups will be promoted to Full backups. “NMM client issues” on page 205 provides more information about issues that may be encountered with the NMM client.
Microsoft SQL data
If SQL 2005 backups were performed when the SQL Server VSS Writer service was disabled, and you subsequently enable the writer, perform a complete backup of SQL 2005 data. Performing a complete backup enables you to recover all SQL 2005 data from the same application folder, which is named SQLServerWriter.
EMC NetWorker Module for Microsoft Applications Release 2.0 Administration Guide
Configuring a Scheduled Backup
In addition to these best practices for all NetWorker Module for Microsoft Applications(NMM) backups, there are application-specific best practices: ◆
“Best practices for Exchange backup and recovery” on page 141
◆
“Best practices for SQL backup and recovery” on page 107
Best practices for backing up system volumes To protect against a disaster, ensure that all volumes and Windows system components are backed up. Also ensure that the associated snapshot policy includes at least one rollover to a conventional backup. The snapshot policy for volumes and Windows system components should specify in the Backup Snapshots field a value of first, last, or all. Do not specify none. Disaster recovery can only be performed from a conventional backup. “Creating a snapshot policy” on page 51 provides more information about snapshot policies and values.
Backup configuration roadmap
47
Configuring a Scheduled Backup
Task 1: Configure a backup pool for snapshot operations Snapshots create metadata that is used in the management of snapshot operations such as an instant recovery operation. Create a snapshot pool to store the save sets that contain snapshot metadata. Configuring a backup pool is a four-part process: 1. “Configuring a device” on page 48 2. “Configuring a label template” on page 49 3. “Configuring a backup pool” on page 49 4. “Labeling the device” on page 50 Note: All of the procedures in this section must be performed on a NetWorker server release 7.3.3 or later. Access the NetWorker server from the Administration window of the NetWorker Management Console.
The EMC NetWorker Release 7.4 Service Pack 1 Multiplatform Version Administration Guide provides more detailed information about performing the steps included here.
Configuring a device Configure a media device for snapshot metadata. Configure a tape, file, or advanced file type device. For best performance, configure a file or advanced file type device so that a snapshot can be recovered without the potential delay associated with retrieving a tape. To configure a device: 1. In the NetWorker Administration window of the NetWorker Management Console, click Devices on the taskbar. 2. In the expanded left pane, select Devices. 3. From the File menu, select New. 4. In the Name attribute, replace the default name with the path and name of the device: • If the device is configured on the NetWorker server’s storage node, the name is the simple device path, such as C:\tmp\d0 for a file type device. A tape device would have a format similar to \\.\Tape0. • If the device is configured on a remote storage node, the name must indicate that the storage node is remote, by including rd= and the name of the remote storage node in the device path. For example, if the remote storage node is neptune, then the device path might be rd=neptune:c:\tmp\d0. 5. In the Comment field, specify a comment for the device. 6. From the Media Type attribute, select the appropriate media type. 7. Select the Auto Media Management attribute. 8. Click Configuration. 9. In the Target Sessions attribute, type or select a value. Set this attribute to a value that will speed up the backup. 10. Click OK.
48
EMC NetWorker Module for Microsoft Applications Release 2.0 Administration Guide
Configuring a Scheduled Backup
Configuring a label template Labels identify the kind of data that is stored on the volumes in a backup pool. Label templates define a naming convention for labels. Create a label template for volumes that are used to contain snapshot metadata. To configure a label template: 1. In the Administration window of the NetWorker Management Console, click Media. 2. In the expanded left pane, select Label Templates. 3. From the File menu, select New. 4. In the Name attribute, type a name that identifies the series of labels as belonging to volumes for snapshot metadata. 5. In the Comment attribute, specify a comment for the label. 6. In the Fields attribute, specify a text name such as Snapshot_Metadata and on a separate line, specify a numeric range such as 001-999 or a text range such as aa-zz. These attributes are used to incrementally identify each label. 7. Click OK.
Configuring a backup pool To configure a backup pool to store snapshot metadata: 1. In the Administration window of the NetWorker Management Console, click Media. 2. In the expanded left pane, select Media Pools. 3. From the File menu, select New. 4. For the Name attribute, type a name that matches the label template. 5. In the Comment attribute, specify a comment for the pool. 6. Select the Enabled attribute. 7. For the Pool type attribute, select the backup pool type. 8. For the Label template attribute, select the matching label template. 9. Do not select a group in the Groups attribute. Do not associate the pool with a particular group. This pool may be associated with several backup groups, so a single group should not be specified here. 10. Click the Selection Criteria tab. 11. For the Clients attribute, specify a NMM Client. A value must be entered for this attribute because no group was specified. 12. In the Devices attribute, select each device that can accept snapshot rollovers for this pool. 13. Click OK.
Task 1: Configure a backup pool for snapshot operations
49
Configuring a Scheduled Backup
Labeling the device Before a device can be used for backup, it must be labeled. To label a device: 1. In the Administration window of the NetWorker Management Console, click Devices. 2. In the right pane, right-click on the name of the device and select Label. 3. In the Pool attribute, select the backup pool that was created. 4. Select the Mount after Labeling attribute. 5. Click OK.
50
EMC NetWorker Module for Microsoft Applications Release 2.0 Administration Guide
Configuring a Scheduled Backup
Task 2: Configure snapshot policies A snapshot policy determines the following: ◆
When and how often snapshots are created
◆
Number of snapshots, and if any are retained as persistent snapshots
◆
Which snapshots, if any, are rolled over to conventional storage
◆
When snapshots expire and become eligible for deletion
Note: Snapshots can also be manually rolled over or deleted. Chapter 11, “Snapshot Management,” describes these procedures in more detail.
You can specify a preconfigured policy or create a custom snapshot policy. The following preconfigured snapshot policies exist: ◆
Serverless A single snapshot is taken per day. The data is then rolled over to conventional storage and the snapshot is deleted.
◆
Daily Eight snapshots are taken per day. The data in the first snapshot is rolled over to conventional storage. Each snapshot has 24-hour expiration policy. CAUTION
!
To protect against a disaster, ensure that all volumes and Windows system components are backed up. Also ensure that the associated snapshot policy includes at least one rollover to a conventional backup. The snapshot policy for volumes and Windows system components should specify in the Backup Snapshots field a value of “first,” “last,” or “all.” Do not specify “none.” Disaster recovery can only be performed from a conventional backup.
Creating a snapshot policy To create a custom snapshot policy: 1. In the Administration window of the NetWorker Management Console, click Configuration. 2. In the expanded left pane, select Snapshot Policies. 3. From the File menu, select New. 4. In the Name attribute, type a name for the snapshot policy. 5. In the Comment attribute, type a comment for the snapshot policy.
Task 2: Configure snapshot policies
51
Configuring a Scheduled Backup
6. In the Number of Snapshots attribute, enter the number of snapshots to be created per day. The Number of Snapshots attribute works in conjunction with the Group resource Interval and Start Time attributes. The value for the Start Time and Interval attributes must allow the specified number of snapshots to be created in a 24-hour period. For example, to take four snapshots per day and the first snapshot must occur at 4:00 A.M. (Start Time attribute), the Interval attribute must be set to 5 hours or less. Number of Snapshots < (24:00 - Start Time) / Interval “Task 4: Configure a backup group” on page 55 provides additional information about Snapshots and policies. 7. In the Retain Snapshots attribute, enter the maximum number of snapshots that can be retained for a specified period of time before being expired. The period of time is specified in the Snapshot Expiration Policy attribute. Note: Use a minimum Retain Snapshot value of 2. This will insure that the most recent snapshot is retained while the new snapshot is created. A Retain Snapshot value of 1 will delete the only snapshot copy while creating the new snapshot.
8. In the Snapshots Expiration Policy attribute, select a preconfigured expiration policy to determine how long snapshots can be retained before being deleted. 9. In the Backup Snapshots attribute, specify which snapshots will be rolled over to a conventional storage medium. Valid values are All, None, First, Last, Every n.
!
CAUTION To protect against a disaster, ensure that all volumes and Windows system components are backed up. Also ensure that the associated snapshot policy includes at least one rollover to a conventional backup. The snapshot policy for volumes and Windows system components should specify in the Backup Snapshots field a value of “first,” “last,” or “all.” Do not specify “none.” Disaster recovery can only be performed from a conventional backup. If the Backup Snapshot attribute is set to None, you can still roll over the snapshot manually. Chapter 11, “Snapshot Management,” provides additional information about Snapshots. 10. Click OK. Note: For Data Protection Manager backups the Backup Snapshot policy must be set to All. Backup will fail if any other value is used.
52
EMC NetWorker Module for Microsoft Applications Release 2.0 Administration Guide
Configuring a Scheduled Backup
Snapshot policy examples Table 4 on page 53 depicts settings for a conventional backup. Four snapshots per day are taken. All snapshots are rolled over to a conventional storage medium. Each snapshot is deleted after it is rolled over. Table 4
Conventional backup settings Name
Conventional backup
Comment
Rollover and then delete.
Number of snapshots
4
Retain snapshots
0
Snapshot expiration policy
Day
Backup snapshots
All
Table 5 on page 53 depicts settings for an instant backup. Four snapshots per day are taken. Up to 28 snapshots are retained for a maximum period of one week. No snapshots are rolled over. Table 5
Instant snapshot policy Name
Instant backup
Comment
Persistent snapshots with no rollovers.
Number of snapshots
4
Retain snapshots
28
Snapshot expiration policy
Week
Backup snapshots
None
Table 6 on page 53 depicts settings for an instant backup with rollover to a conventional medium. Four snapshots per day are taken. Up to 28 snapshots are retained for a maximum period of one week. Every first and third snapshots are rolled over. Table 6
Instant snapshot with rollover policy Name
Instant and conventional backup
Comment
Persistent snapshots with rollover to tape.
Number of snapshots
4
Retain snapshots
28
Snapshot expiration policy
Week
Backup snapshots
Every 1 (press Enter) Every 3
Task 2: Configure snapshot policies
53
Configuring a Scheduled Backup
Task 3: Configure a backup schedule Backup schedules determine the days on which full or incremental backups are run. Full backups include all of the data specified in an NMM Client resource save set, while incremental backups include only the data that has changed since the last backup. Table 7 on page 54 contains the considerations for configuring a backup schedule for an NMM Client. The procedure for creating backup schedules for an NMM Client is the same as for creating a backup schedule for a regular NetWorker client. Table 7
Considerations for NMM Client backup schedules Backup levels
Consideration
Full level
These backups are supported for all types of data.
Incremental backups
These are supported only for backup of volume directories or paths such as E:\ or E:\business_files\.
Level 1 to 9 backups
These are supported only for backup of volume directories or paths such as E:\ or E:\business_files\.
Note: The information in Table 7 on page 54 applies only to rollover backup operations. Snapshots are always taken at full level.
54
EMC NetWorker Module for Microsoft Applications Release 2.0 Administration Guide
Configuring a Scheduled Backup
Task 4: Configure a backup group Backup groups enable you to balance backup loads to reduce the impact on your storage and network resources. Use a backup group to assign the following attributes to a set of Client resources: ◆
Snapshot policy
◆
Backup start times
◆
Schedules
◆
Backup pools
Note: A Client resource or backup group cannot specify volumes that use both CLARiiON and Symmetrix storage systems. For hosts that have both CLARiiON and Symmetrix volumes, create separate backup groups and Client resources. Each backup group and its Client resources can specify volumes from only one type of storage system.
To configure a backup group: 1. In the Administration window of the NetWorker Management Console, click Configuration. 2. In the expanded left pane, select Groups. 3. From the File menu, select New. 4. In the Name attribute, type a name for the backup group. 5. In the Comment attribute, type a description. 6. For the Start Time attribute, enter the time when the first snapshot is to be created. 7. For the Autostart attribute, select Enabled. 8. Click the Snapshot attribute so that a check mark appears beside it. 9. For the Snapshot Policy attribute, select a snapshot policy. “Task 2: Configure snapshot policies” on page 51 provides more information about snapshot policies. 10. For the Snapshot Pool attribute, select a pool that was created for the snapshot. “Task 1: Configure a backup pool for snapshot operations” on page 48 provides more information about pools. 11. Click the Advanced tab. 12. For the Interval attribute, specify how often a snapshot will be created. The Interval attribute works in conjunction with the backup group Start Time attribute and the snapshot policy Number of Snapshots attribute. For example, if you want to take four snapshots per day (Number of Snapshots attribute) and the first snapshot must occur at 4:00 A.M. (Start Time attribute), then the Interval attribute must be set to 5 hours or less. Number of Snapshots < (24:00 - Start Time) / Interval 13. Ensure that Restart Window attribute value is less than or equal to the Interval attribute value. 14. Set the Client Retries attribute to 0 (zero). 15. Click OK to create the backup group.
Task 4: Configure a backup group
55
Configuring a Scheduled Backup
!
CAUTION Once you have started a snapshot of a save group, do not interrupt or halt the snapshot process. For example, in Exchange backup, the nsrsnap_vss_save.exe process on the production server and the eseutil process on the proxy may continue to run after the snapshot is halted. Any attempt to stop a group in NetWorker Management Console will take a long time to complete.
56
EMC NetWorker Module for Microsoft Applications Release 2.0 Administration Guide
Configuring a Scheduled Backup
Task 5: Configure a Client resource A Client resource specifies what to include in a snapshot of an NMM Client. Client resources are associated with other backup resources such as groups and snapshot policies. You can create multiple Client resources for the same NMM Client host. In this way, you can apply different backup attributes to different types of information on the same host. For example, if the NMM Client host is an Exchange server, you can create one Client resource to back up the Exchange databases and create another Client resource to back up Windows system component data. This way, you can back up Exchange databases many times a day, and back up Windows system component data once a day. The general process for configuring a Client resource is the same for all applications or systems. Some applications backed up by NMM have settings and requirements specific to the application.
Configuring a Client resource for applications The Client resource configuration task is detailed in separate sections for the following applications: ◆
“Performing Exchange Server backups” on page 143
◆
“Performing DPM Server backups” on page 160
◆
“Performing SharePoint Server backups” on page 117
◆
“Performing SQL Server backups” on page 103
◆
“Performing Windows Server Cluster backups” on page 169
For all other applications and systems supported by NMM, “To create a Client resource:” on page 57 provides the Client resource configuration task steps. To create a Client resource: 1. In the Administration window of the NetWorker Management Console, click Configuration. 2. In the expanded left pane, select Clients. 3. From the File menu, select New. 4. In the Name attribute, type the hostname of the NetWorker client computer. 5. In the Comment attribute, type a description. If you are creating multiple Client resources for the same NetWorker client host computer, use this attribute to differentiate the purpose of each resource. 6. From the Browse Policy attribute, select a browse policy from the list. The browse policy determines how long rolled-over data is available for quick access. 7. From the Retention Policy attribute, select a retention policy from the list. The retention policy determines how long rolled-over data is available though not necessarily quickly. 8. Select the Scheduled Backups attribute.
Task 5: Configure a Client resource
57
Configuring a Scheduled Backup
9. In the Save Set attribute, specify the components to be backed up. Place multiple entries on separate lines: • To specify all volume data and all available Windows system components, type: All Application data such as Exchange data is not included in the save set All. • To back up specific volumes, type the volume name. For example, to specify the volume E and all of its subfolders and files, type: E:\ Entries are not case-sensitive. • To specify volume mount point data, place the name of the mount point on a separate line. For example, if you have a mount point named CAD_Drawings on volume E:\ and you want to back up all of the data on E:\ including the data under the mount point, type the following on separate lines: E:\ E:\CAD_Drawings The save set All will include mount point data only if no other path to the remote data is found during backup. • To specify all available Windows system components such as the registration database and Windows event log, type the save set All or type following: SYSTEM COMPONENTS:\ Ensure that the backslash (\) character is entered with the save set name SYSTEM COMPONENTS:\. Otherwise, backup fails and no concise error message is provided. To specify application data, type: APPLICATIONS:\Name of writer “Specifying save sets for application data” on page 59, provides more information about specifying save set syntax for applications, and links to corresponding save set sections for specific applications.
!
CAUTION To protect against a disaster, ensure that all volumes and Windows system components are backed up. Also ensure that the associated snapshot policy includes at least one rollover to a conventional backup. The snapshot policy for volumes and Windows system components should specify in the Backup Snapshots field a value of “first,” “last,” or “all.” Do not specify “none.” Disaster recovery can only be performed from a conventional backup. 10. For the Group attribute, select the backup group to which this Client resource will be added. If Client resources for the same NMM Client host are added to different backup groups, ensure that the Start Time attribute for each backup group is spaced far enough apart so that the backups for the host’s Client resources do not overlap. 11. For the Schedule attribute, select a backup schedule. 12. Click the Apps & Modules tab.
58
EMC NetWorker Module for Microsoft Applications Release 2.0 Administration Guide
Configuring a Scheduled Backup
13. In the Backup command attribute, type the backup command. For all types of backup data except for Active Directory conventional backups, type: nsrsnap_vss_save.exe “Active Directory backup and recovery” on page 178 provides additional information about Active Directory backups. 14. In the Application information attribute, type the following variable and value: NSR_SNAP_TYPE=vss Type any additional variables and their values on a separate line. Additional variables include specifications for a data mover (proxy client) and for Exchange setup attributes. “Application information variable settings” on page 63 provides more information about additional variables and their values. 15. If a proxy client is being set up for the NMM Client, type the hostname of the proxy client in the Remote Access attribute. If the NMM Client is part of a cluster, type the names of the physical nodes of the cluster in the Remote Access attribute. 16. Click the Globals (1 of 2) tab. 17. In the Aliases attribute, type the NETBIOS name for the client. Note: NMM Client uses the host machine NETBIOS or “short” name when connecting to the NetWorker server to browse backups. If the NETBIOS name is not found, NMM will not be able to display backups.
18. Click OK.
Specifying save sets for application data Table 8 on page 60 lists the save set syntax to specify for supported types of application data. Specify application data save sets in the Save Set attribute of a Client resource. “Displaying valid application data save sets” on page 61 describes how to find the exact name of a particular Exchange storage group or SQL Server instance and database combination.
Task 5: Configure a Client resource
59
Configuring a Scheduled Backup
Table 8
Save set syntax Type of backup data
Save set syntax
DFS data (Windows Server 2003 only)
APPLICATIONS:\DFS Replication service writer Also back up the SYSTEM COMPONENTS:\ save set on the namespace server (usually the domain controller) that is associated with the DFS configuration. Note: In Windows Server 2008, DFS Replication service writer is backed up as part of System Components:\
60
ADAM data
APPLICATIONS:\ADAM (instance_name) Writer For example, the ADAM instance named AddressBook would be typed as: APPLICATIONS:\ADAM (AddressBook) Writer Chapter 9, “Active Directory and ADAM Backups,” provides more information about Active Directory services. In Windows Server 2008, Active Directory Lightweight Directory Services, (AD LDS) includes the Active Directory Application Mode (ADAM) functionality provided in Windows Server 2003.
Active Directory
Chapter 9, “Active Directory and ADAM Backups,” provides more information about Active Directory services.
Microsoft Exchange Server
“Displaying valid Exchange data save sets” on page 136 provides more information about Exchange save sets and syntax.
Microsoft SQL Server
“Displaying valid SQL data save sets” on page 100 provides more information about Microsoft SQL Server save sets and syntax.
Microsoft System Center Data Protection Manager 2007
“Displaying valid DPM data save sets” on page 157 provides more information about DPM save sets and syntax.
Microsoft Office SharePoint Server
“Displaying valid SharePoint 2007 data save sets” on page 114 provides more information about Microsoft Office SharePoint Server.
Windows Server 2008 Cluster Writer
“Displaying valid Windows Cluster data save sets” on page 167 provides more information about Windows Server 2008 Cluster Writer save sets and syntax.
EMC NetWorker Module for Microsoft Applications Release 2.0 Administration Guide
Configuring a Scheduled Backup
Displaying valid application data save sets To display a list of the application data save sets that are available for backup: 1. Open a command prompt on the application server. 2. From the command prompt, type the following command to list the valid application data save set names. If the application server is not on a virtual host, type: nsrsnap_vss_save -? If the application server is on a virtual host, type: nsrsnap_vss_save -? -c virtual_server_name Where virtual_server_name is the name of the virtual host. nsrsnap_vss_save -? -c Note: If the application server is on a virtual host, run this command from the physical node that is currently hosting the application server.
3. Press Enter. The application data save sets that are available for backup are listed in a format similar to the following: "APPLICATIONS:\SqlServerWriter" "APPLICATIONS:\SqlServerWriter\CORPDBSERV1%5CYUKON" "APPLICATIONS:\SqlServerWriter\CORPDBSERV1%5CYUKON\master" "APPLICATIONS:\SqlServerWriter\CORPDBSERV1%5CYUKON\model" "APPLICATIONS:\SqlServerWriter\CORPDBSERV1%5CYUKON\msdb" "APPLICATIONS:\SqlServerWriter\CORPDBSERV1%5CYUKON\NADATA" Each line of output corresponds to a save set entry that you can add to the Save Set attribute of a Client resource. Each entry that you add to the Save Set attribute must be typed on a separate line. URL encoding for SQL and Exchange save sets When specifying save set names in the Save Set attribute of the Client resource, there are cases where special characters, such as the backslash (\), must be specified by their URL-encoded values. URL-encoded values are used to represent special characters in the following cases: ◆
SQL Server named instances
◆
SQL Server database names
◆
Exchange storage groups
Consider the following example of a SQL Server named instance. The name of a SQL Server named instance consists of two parts: the name of the host and a unique name. These two parts are always separated with a backslash (\) character. When specifying a SQL Server named instance in the Save Set attribute, replace the backslash with its URL-encoded value, which is %5C. In the following example, a SQL Server named instance that is identified as: CORPDBSERV1\YUKON would be represented in the Save Set attribute as: CORPDBSERV1%5CYUKON
Task 5: Configure a Client resource
61
Configuring a Scheduled Backup
To backup only the database named NADATA in the SQL Server named instance CORPDBSERV1\YUKON, the complete entry in the Save Set attribute would be: APPLICATIONS:\SqlServerWriter\CORPDBSERV1%5CYUKON\NADATA If the database name in the previous example was NA#DATA, the save set entry would be: APPLICATIONS:\SqlServerWriter\CORPDBSERV1%5CYUKON\NA%23DATA Table 9 on page 62 lists the most commonly used special characters and their URLvalues values values.
Table 9
62
Special characters and their URL-encoded values Special character
URL-encoded value
Special character
URL-encoded value
\
%5C
?
%3F
/
%2F
]
%5D
"
%22
[
%5B
%
%25
}
%7D
#
%23
{
%7B
&
%26
^
%5E
%3E
|
%7C
EMC NetWorker Module for Microsoft Applications Release 2.0 Administration Guide
Configuring a Scheduled Backup
Application information variable settings Table 10 on page 63 lists the variables that can be specified in the Application information attribute of the Client resource. Table 10
Application information variable settings Attribute name
Description
Values
NSR_SNAP_TYPE=value
Specifies the snapshot service provider name.
vss This vss value is required.
NSR_DATA_MOVER=value
Specifies the hostname of the NMM Client that moves snapshots from the NMM Client to primary and secondary (conventional) storage. The host can be either a local host or a proxy client host.
• The local host • The proxy client hostname If no value is entered, the local host is used as the data mover. If you are setting up a proxy client for a virtual cluster server, you must also type the proxy client hostname in the Remote Access attribute of the Client resource. For serverless backups, specify a proxy client. If setting up an Exchange Client resource, it is recommended that you use a proxy client. If a proxy client is specified, Exchange consistency checks are performed on the proxy client. Related messages are written to the Replication Manager log files (erm_clientxx.log) on the proxy client. If no proxy client is specified for an Exchange Client resource, consistency checks are performed on the Client resource host. Related messages are logged on the Client resource host in both the Replication Manager log files and the nmm.raw file.
In addition to the attributes listed in Table 10 on page 63, there are also application-specific attributes: • “Exchange Application information variable settings” on page 138 • “DPM application information variable settings” on page 159 • “SharePoint 2007 Application information variable settings” on page 116 • “SQL application information variable settings” on page 102 • “Windows Cluster application information variable settings” on page 168
Task 5: Configure a Client resource
63
Configuring a Scheduled Backup
Task 6: Configure privileges The NMM Client must be granted NetWorker Administrator privileges in order to perform media database operations during snapshot deletion. If you set up a proxy client for the NMM Client, grant the proxy client NetWorker Administrator privileges. If you are setting up a NMM Client in a cluster, grant NetWorker administrator privileges to each cluster node and virtual server. To add configure privileges: 1. In the Administration window of the NetWorker Management Console, click Configuration. 2. In the expanded left pane, click User Groups. 3. Right-click the Administrators group, then select Properties. The Properties dialog box appears. 4. In the Users attribute, add the following values for the NMM Client host. Place each value on a separate line: user=administrator,host=NMM_client_host user=system,host=NMM_client_host Where NMM_client_host is the DNS hostname of the NMM Client. If a proxy client is set up for the NMM Client, add the following values: user=administrator,host=NMM_clientproxy_host user=system,host=NMM_clientproxy_host If the NMM Client is installed in a cluster, grant NetWorker Administrator privileges to each cluster node and virtual server. 5. Click OK.
64
EMC NetWorker Module for Microsoft Applications Release 2.0 Administration Guide
Configuring a Scheduled Backup
Task 7: Configure a proxy client A proxy client is a separate host that acts as a data mover for a NMM Client. By default, the NMM Client acts as its own data mover. However, a proxy client is required for serverless backups. Serverless backups free the NMM Client from much of the processing involved in a snapshot backup. In a serverless backup, a snapshot is created on the NMM Client and then immediately moved to the proxy client for further processing. A proxy client can also be set up on a NetWorker storage node. In this way network traffic that is generated when a snapshot is rolled over to a conventional backup medium is avoided. Table 11 on page 65 lists the requirements for setting up a proxy client. Table 11
Configuration requirements for a proxy client (page 1 of 2) Requirement
Description
General requirements Installation
The proxy client must have the same version of the NMM Client software, and operating system version and patch level, as the host for which it is acting as the proxy client. The NetWorker Module for Microsoft Applications Release 2.0 Installation Guide provides more information about installation.
Configuration
Create a NMM Client resource for the proxy client host. “Task 5: Configure a Client resource” on page 57 provides more information about performing this task. Type the proxy client host name in the Application Information and the Remote Access attributes of the NMM Client resource that will use the services of the proxy client.
Connectivity
The proxy client must have connectivity between the NMM Client, the NetWorker server, and the storage subsystem on which snapshots reside.
Serverless backups
A proxy client is required for serverless backups. Additionally, serverless backups are supported only with VSS hardware providers and depend on the capabilities of the storage subsystem. For the EMC VSS Provider, serverless backups are supported for both CLARiiON and Symmetrix storage systems.
Rollback recovery
The NMM Client to which the snapshot is to be rolled back must be supported with a proxy client. “Roll back a snapshot” on page 191 provides more information rollback requirements.
CLARiiON
For proxy clients using CLARiiON storage and the EMC VSS Provider, at least one CLARiiON LUN must be permanently assigned to the proxy host.
Third-party hardware providers
Hardware providers may have additional configuration requirements for proxy clients. Refer to the vendor’s product documentation for details on these requirements.
Task 7: Configure a proxy client
65
Configuring a Scheduled Backup
Table 11
Configuration requirements for a proxy client (page 2 of 2) Requirement
Description
Additional requirements for an Exchange server
66
Exchange performance
Set up a proxy client for an Exchange server. A proxy client performs the processing associated with the Exchange consistency checker utility, eseutil.exe, thus reducing the load on the Exchange server.
Consistency checker utility
The Exchange consistency checker utility, eseutil.exe, must be installed on the proxy client. The version of eseutil.exe, must be of the same version (service pack level) as the Exchange server. For example, if Exchange Server 2003 Service Pack 2 is installed on the Exchange server, then the version of eseutil.exe that is installed on the proxy client must be from the Exchange Server 2003 SP2 Management utilities. Failure to do so will cause the consistency checker utility to report errors even when the databases are valid. Install the eseutil.exe utility from the Exchange Management Tools located on the Exchange Server CD.
Installation path to consistency checker utility
If the installation of the Exchange consistency checker utility, eseutil.exe, is not performed from the Exchange installation program, ensure that the path to the eseutil.exe program is in the $PATH environment variable.
Exchange mount paths
Use the NSR_ALT_PATH variable to specify a path to mount snapshots on the proxy client. “Application information variable settings” on page 63 provides more information about these settings.
EMC NetWorker Module for Microsoft Applications Release 2.0 Administration Guide
Configuring a Scheduled Backup
Backing up a clustered NMM Client To configure a virtual NMM Client for backup, complete all of the tasks required to back up a regular NMM Client. However, there are some considerations to be aware of when setting up a virtual NMM Client, which are outlined in Table 12 on page 67. Table 12
Additional steps and considerations for backing up a clustered Client resource Backup task
Consideration
“Task 5: Configure a Client resource” on page 57
Configure a Client resource for each virtual server that is being backed up and each physical node in the cluster on which the virtual server may execute. Type the names of the physical nodes of the cluster in the Remote Access attribute of each virtual Client resource.
“Task 6: Configure privileges” on page 64
Set up NetWorker administrator privileges for each physical node and proxy client in the cluster.
“Task 7: Configure a proxy client” on page 65
If a hardware provider such as the EMC VSS Provider is being used, a proxy client must be configured for a clustered NMM Client.
Cluster failover and backups If a node within a cluster undergoes failover during a backup operation, the operation will fail. The next scheduled backup operation will be the next valid backup. If you are using a hardware provider such as the EMC VSS Provider, use the disk management utilities provided with the associated hardware to delete any resources that may be left in an indeterminate state as a result of the failed backup. For example, a CLARiiON storage solution may have an InActive snapshot as the result of a failed backup. In this case, use the Navisphere® user interface or the NaviCLI command line interface to search for and delete the inactive snapshot.
Backing up a clustered NMM Client
67
Configuring a Scheduled Backup
Moving an NMM Client to another NetWorker server Do not set up scheduled backups for an NMM Client on multiple NetWorker servers. An NMM Client should be protected by only one NetWorker server. To move a NMM Client to a different NetWorker server: 1. On the NetWorker server that you are moving from, disable or delete the Client resources that are set up for the NMM Client. You can disable a Client resource for scheduled backup by clearing the Scheduled backup attribute in the Client resource. 2. On the NMM Client, open the NMM Client software and manually delete any snapshots for the client. “Delete a snapshot” on page 194 provides more information about deleting snapshots manually. Before deleting the snapshots, you can manually roll them over to a conventional backup. In this way, the data in the snapshot can be recovered. 3. On the NetWorker server that you are moving to, set up scheduled backups for the NMM Client. “Backup configuration roadmap” on page 44 provides more information about setting up scheduled backups.
68
EMC NetWorker Module for Microsoft Applications Release 2.0 Administration Guide
3 Recovering Data
This chapter includes the following topics: ◆ ◆ ◆ ◆ ◆ ◆ ◆
Performing a recovery .................................................................................................. Recovering file system snapshots that have not been rolled over ......................... Performing a disaster recovery of a NMM Client .................................................... Performing a disaster recovery of a clustered client ................................................ Booting Windows in Directory Service Restore mode............................................. Performing an authoritative recovery of NTDS or FRS data.................................. Recovering the Windows system configuration to an earlier state .......................
Recovering Data
70 83 84 86 92 93 95
69
Recovering Data
Performing a recovery Make sure all users who will be running or configuring NMM backups and recoveries have administrator-level privileges for all resources they must access: ◆
The NetWorker server
◆
Each NetWorker Module for Microsoft Applications (NMM) client machine
◆
All applications protected by NMM, such as Windows Server, Microsoft Data Protection Manager (DPM), Microsoft Office SharePoint Server, SQL Server, and Exchange Server
◆
Network domains
◆
Storage servers
Review the following options and considerations before performing the procedures in this chapter: ◆
Chapter 10, “Active Directory Recover,” provides more information about recovering Active Directory (AD) data.
◆
“Recovering file system snapshots that have not been rolled over” on page 83 provides more information about recovering data from a persistent snapshot that has not been rolled over to a conventional backup medium.
◆
To recover data, you must be a member of the following: • The NetWorker server Administrators group. The EMC NetWorker Multiplatform Version Administration Guide, release 7.3.2 or later, provides information about adding users to the NetWorker server Administrators group. • The Windows Administrators group.
70
◆
To recover backup data that was password-protected and encrypted with another VSS client program, and not NetWorker VSS Client for Microsoft Windows 1.0 or NetWorker Module for Microsoft Applications, use the recover.exe command from the CLI (command line interface). The EMC NetWorker Command Reference Guide, release 7.3.2 or later, provides more information about the recover.exe command.
◆
Data that was backed up from a mount point is available for browsing at the root of the navigation tree. For example, if the drive H:\ has a mount point named H:\CAD_Drawings, then a separate entry for the mount point H:\CAD_Drawings will be available at the root of the navigation tree instead of as a subfolder under H:\.
◆
To recover data to a mount point that has been deleted, manually re-create the mount point before recovering the data. Otherwise, the data will be recovered to a local directory whose name corresponds to the deleted mount point.
◆
If the disk that is referenced by the mount point has been replaced, manually re-create the mount point.
◆
If a file was not backed up due to a skip directive, you may still be able to select the file for a recovery operation. In this case, although you can select the file, it is not recoverable.
EMC NetWorker Module for Microsoft Applications Release 2.0 Administration Guide
Recovering Data
!
CAUTION If you are recovering File Replication Services (FRS) or NT Directory Services (NTDS) data, boot the NetWorker client in Directory Service Recovery mode before completing the recovery options in this section. “Booting Windows in Directory Service Restore mode” on page 92 provides more information about these recovery options. To recover system data
1. Open the NMM client software and select the NetWorker server on which the NMM client software was configured for backup. 2. If the NMM client is part of a cluster, select the virtual client to which you are recovering data. The virtual client can be selected from the Client list attribute in the application toolbar. 3. From the left pane, select Recover > System Recover Session. 4. In the navigation tree, select the items to be recovered. By default, items displayed in the navigation tree are from the most recent backup. For the System Recover Session view, both snapshot and rollovers can be displayed in the same view: • If the most recent backup for an item is a snapshot, the snapshot is displayed. • If the most recent backup for an item is a rollover, the rollover is displayed. To recover file system items from a previous backup: • From the application toolbar, click the Browse calendar icon and select an earlier browse time. • To view versions of a backup item prior to the browse time, right-click an item in the navigation tree and select Versions from the pop-up menu. 5. To determine whether any volumes need to be mounted for a selected item, right-click the item and select Required Volumes from the pop-up menu. 6. From the Options menu, select System Recover Session Options. 7. Enter application-specific recover options or settings, as described in: • “NetWorker recovery options” on page 72 • “Exchange recovery options” on page 147 • “Performing DPM Server recovery” on page 163 • “Performing SharePoint 2007 recovery” on page 124 • “ADAM recovery options” on page 75 • “DFS recovery options” on page 76 • “FRS recovery options” on page 79 • “NTDS recovery options” on page 80 • “Performing SQL Server recovery” on page 105 8. From the System Recover Session toolbar, click Start Restore. 9. From the left pane, select Monitor to view messages related to the progress of the recovery operation.
Performing a recovery
71
Recovering Data
Note: If you recovered items from a snapshot (instant recovery), the snapshot volume will be temporarily mounted during the recovery operation. The mounted volume is displayed in the Windows Explorer program. After the recovery is complete, you may have to refresh the Windows Explorer to update its view.
NetWorker recovery options To specify recovery options for file system data: 1. From the Options menu, select System Recover Session Options. 2.
Click the NetWorker tab.
3. In the Relocate recovered data to: field, type a location other than the location from which the data was originally backed up. The location must be a local path. URL syntax such as \\servername\share is not supported. 4. Use the Restore Type field to determine the default recovery method: • Select Conventional Restore to recover from a conventional backup medium. If a conventional backup is not available for the selected browse time, an instant recovery is performed. • Select Instant Restore to recover from a snapshot. If a snapshot is not available for the selected browse time, a conventional backup is performed. For instant restore, snapshot validation will occur prior to the restore. If the snapshot is invalid, the restore will fail. The invalid snapshot will be deleted automatically the next time the snapshot group runs. You can also delete a snapshot manually. “Delete a snapshot” on page 194 provides more information about manually deleting snapshots. 5. Select Use Microsoft best practices for selecting the system state to enforce Microsoft recommendations that determine which system state items must be selected as a group for recovery. Clear this attribute to select system state items individually.
!
CAUTION The "Microsoft Best Practices" box should not be cleared except where specifically noted in this document. There are some procedures, such as recovering Distributed File System (DFS) data, where you can clear this attribute. Microsoft does not support recovery of portions of the operating system. Attempted recovery of portions of the operating system, with this box cleared, may render the system unbootable. After each recovery operation, this option is automatically selected. 6. Click OK. “Performing a recovery” on page 70 provides more information about recovering data.
72
EMC NetWorker Module for Microsoft Applications Release 2.0 Administration Guide
Recovering Data
Cluster recovery options Use this tab to specify whether to perform an authoritative or nonauthoritative restore of the Cluster Writer. If the Cluster Writer was backed up in NetWorker 7.4 SP2 prior to upgrading to NMM 2.0, you must use a command line to perform an authoritative restore. “Authoritative recovery of a Windows Server 2008 cluster database after NMM upgrade, from a NetWorker 7.4 SP2 save set” on page 74 provides more information about the command line and when to use it. Nonauthoritative restore (default)
Use this mode if the cluster is completely lost—the cluster service does not run on either node, and the cluster database is missing or corrupted. Non-authoritative restores will restore the cluster but will not restore a particular version of the database. After the nonauthoritative restore is complete, you must follow up with an authoritative restore to recover a specific version of the database. NMM will perform an non-authoritative restore by default, but you must make sure that the SYSTEM COMPONENTS:\BootableSystemState saveset is also selected. To specify a non-authoritative restore for the Windows Server 2008 Cluster Writer: 1. From the Options menu, select System Recover Session Options. 2. Click the NetWorker tab, and then clear the Use Microsoft best practices for selecting system state check box. 3. Click OK to close the System Recover Session Options dialog box. 4. In the navigation tree, expand the SYSTEM COMPONENTS folder and select Cluster Database. 5. Select the SYSTEM COMPONENTS:\BootableSystemState saveset. 6. From the System Recover Session toolbar, click Start Restore. 7. Reboot the system when prompted. 8. Repeat from step 1 on page 73 on the other nodes, if needed. Authoritative restore
Use this mode when the cluster configuration is lost, but the cluster is running okay otherwise. For example, when a cluster resource was accidentally deleted or you want to revert to a previous cluster configuration. The cluster must be healthy in all nodes. Note: Authoritative restores of the Cluster Writer are only supported for Windows Server 2008.
To specify an authoritative restore for the Windows Server 2008 Cluster Writer: 1. Make sure the cluster service is running on the local system. 2. Make sure that the cluster service is running on all remote nodes. Microsoft Windows Server 2008 product documentation provides more information on running the cluster service. 3. From the Options menu, select System Recover Session Options. 4. Click the NetWorker tab, and clear the Use Microsoft best practices for selecting system state check box. 5. Click the Cluster tab. Performing a recovery
73
Recovering Data
6. Select the Authoritative Restore options. 7. Click OK to close the System Recover Session Options dialog box. 8. In the navigation tree, expand the SYSTEM COMPONENTS folder and select Cluster Database. 9. From the System Recover Session toolbar, click Start Restore. Note: EMC recommends performing an authoritative restore of the Windows 2008 cluster writer by selecting only the Windows 2008 cluster writer in that recover session. In particular, do not perform an authoritative restore of the Windows 2008 cluster writer at the same time as the restore of any other NMM application. Authoritative restores of the Windows 2008 cluster writer will restart the cluster service on all nodes in the cluster.
Authoritative recovery of a Windows Server 2008 cluster database after NMM upgrade, from a NetWorker 7.4 SP2 save set If the cluster database was backed up in NetWorker 7.4 SP2 prior to upgrading to NMM 2.0, you must use a command line to perform an authoritative restore. You cannot perform this authoritative recovery from the NMM user interface, System Recover Session Options > Cluster tab. The following example illustrates this installation, backup, and recovery sequence: 1. Install NetWorker 7.4 SP2 on a Windows Server 2008 cluster. 2. Back up VSS SYSTEM SERVICES. 3. Uninstall NetWorker 7.4 SP2. 4. Install NMM 2.0. If you attempt to use the NMM recovery user interface to recover a cluster database that was backed up in NetWorker 7.4 SP2 prior to upgrading to NMM 2.0, NMM will change it to a non-authoritative restore. You can only perform an authoritative restore of a Windows Server 2008 Cluster Writer backup created with NetWorker 7.4 SP2 by using the command line. To perform an authoritative restore of the Windows Server 2008 Cluster Writer: 1. Make sure that the cluster service is running in the local system. 2. Make sure that the cluster service is running on all remote nodes. 3. Type the following string on the command line: recover -s NWServer -U -N "VSS SYSTEM SERVICES:\Cluster Database" Note: EMC recommends performing an authoritative restore of the Windows 2008 cluster writer by selecting only the Windows 2008 cluster writer in that recover session. In particular, do not perform an authoritative restore of the Windows 2008 cluster writer at the same time as the restore of any other NMM application. Authoritative restores of the Windows 2008 cluster writer will restart the cluster service on all nodes in the cluster.
74
EMC NetWorker Module for Microsoft Applications Release 2.0 Administration Guide
Recovering Data
Non-authoritative recovery of a Windows Server 2008 cluster database, using a save set created with NetWorker 7.4 SP2 A non authoritative recovery of a Windows 2008 cluster database backup, using a save set created with NetWorker 7.4 SP2, can be performed through the NMM recovery user interface or through the recover command line. To specify a non-authoritative recovery through the user interface using a save set created with NetWorker 7.4 SP2: 1. From the Options menu, select System Recover Session Options. 2. Click the NetWorker tab, and clear the Use Microsoft best practices for selecting system state check box. 3. Click OK to close the System Recover Session Options dialog box. 4. In the navigation tree, expand the VSS SYSTEM SERVICES folder and select Cluster Database. 5. Select the entire VSS SYSTEM BOOT saveset. 6. From the System Recover Session toolbar, click Start Restore. 7. Reboot the system when prompted. Repeat these steps for each node on the cluster as needed. To specify a non-authoritative recovery through the command line using a save set created with NetWorker 7.4 SP2: 1. Type the following command: recover -s NWServer -N "VSS SYSTEM SERVICES:\Cluster Database"
2. Type the following command: recover -s NWServer -N "VSS SYSTEM BOOT:\"
3. Reboot the system when prompted. Repeat these steps for each node on the cluster as needed.
ADAM recovery options
You can specify whether to perform an authoritative or nonauthoritative restore of Active Directory Application Mode (ADAM) data on this host. Note: In Windows Server 2008, Active Directory Lightweight Directory Services (AD LDS) includes the ADAM functionality provided in Windows Server 2003. Unless otherwise noted, assume that all references to ADAM in this chapter also apply to AD LDS.
Nonauthoritative restore (default)
Authoritative restore
This type of restore is typically performed when the host is being recovered due to catastrophic loss of data such as a disk failure. The most recent ADAM data is restored from backups and then the recovered host is updated with the most recent ADAM data from another ADAM server in the domain. This restore relies on at least one other ADAM server in the domain to have accurate, up-to-date ADAM data. Perform an authoritative restore only when corrupted or deleted ADAM data has been propagated to other ADAM server. This type of recovery restores the most recent ADAM data from backups, and then updates other ADAM servers in the domain with the recovered data.
Performing a recovery
75
Recovering Data
Note: To recover ADAM data, the APPLICATIONS:\ADAM (instancename) Writer\ save set must have been backed up. Chapter 2, “Configuring a Scheduled Backup,” provides more information about specifying save sets when configuring a backup.
To specify recovery options for ADAM data: 1. From the Options menu, select System Recover Session Options and then click the ADAM tab. 2. Select one of the following options: • Non Authoritative Restore • Authoritative Restore 3. Click OK to close the System Recover Session Options dialog box. 4. In the navigation tree, expand the Applications folder and select ADAM (instancename) Writer. 5. From the System Recover Session toolbar, click Start Restore. 6. If an Authoritative Restore has been performed, restore for all selections has completed, and NMM reports success, complete the following steps: a. Exit the NMM Client, and open a command window. b. Run the dsdbutil.exe utility, and select Authoritative Restore option. This marks the objects that are to be restored in authoritative mode. c. When processing is complete, exit the dsdbutil.exe utility and start the ADAM instance service manually. If a Non Authoritative Restore was performed, the ADAM instance has already been started. “Performing a recovery” on page 70 provides more information about recovering system data.
DFS recovery options You can specify whether to perform an authoritative or nonauthoritative recovery of Distributed File System (DFS) data on this host. There are some differences between DFS recovery options on Windows Server 2003 and Windows Server 2008:
76
◆
Authoritative restore is available on Windows Server 2003 and on some Windows Server 2008 systems.
◆
In Windows Server 2003, the writer is recovered from Applications:\DFS Replication service writer.
◆
In Windows Server 2008, the writer is recovered from System Components:\Bootable System State.
◆
In Windows Server 2008, DFS can have DFS shares or it can also be part of Active Directory recovery.
EMC NetWorker Module for Microsoft Applications Release 2.0 Administration Guide
Recovering Data
◆
In Windows Server 2008, DFS is part of Active Directory recovery if it was promoted to a Domain Controller with the “2008 Functional level” setting selected.
◆
To restore DFS on a Windows 2008 system as part of Active Directory, the system must be booted into Directory Services Restore Mode.
The steps for performing a DFS recovery from Windows Server 2003 and Windows Server 2008 are described in separate procedures: ◆
“To specify whether to perform an authoritative or nonauthoritative recovery in Windows Server 2003” on page 77
◆
“To specify whether to perform an authoritative or nonauthoritative recovery in Windows Server 2008” on page 78
Nonauthoritative restore (default)
This type of recovery restores the most recent DFS data from backups and then updates the recovered host with the most recent DFS data from another DFS server in the domain. A nonauthoritative recovery relies on at least one other DFS server in the domain to have accurate up-to-date DFS data. Nonauthoritative recoveries are typically performed when the host is being recovered due to catastrophic loss of data such as a disk failure.
Authoritative restore
An authoritative recovery restores the most recent DFS data from backups, and then updates other DFS servers in the domain with the recovered data. Perform an authoritative recovery only when corrupted or deleted DFS data has been propagated to other DFS servers. Note: To recover DFS data, the APPLICATIONS:\DFS Replication service writer save set must have been backed up. The DFS Replication service writer is available with Windows Server 2003 R2 or later. Additionally, the SYSTEM COMPONENTS:\ save set on the namespace server (usually the domain controller) that is associated with the DFS configuration must have been backed up. Chapter 2, “Configuring a Scheduled Backup,” provides more information about specifying save sets when configuring a backup. To specify whether to perform an authoritative or nonauthoritative recovery in Windows Server 2003
1. From the Options menu, select System Recover Session Options and then click the DFS tab. 2. Select one of the following options: • Non Authoritative Restore to perform a nonauthoritative recovery. • Authoritative Restore to perform an authoritative recovery. 3. Click OK to close the System Recover Session Options dialog box. 4. From the navigation tree, expand the Applications folder and select DFS Replication service writer. 5. From the System Recover Session toolbar, click Start Restore. 6. After the DFS Replication service writer has been recovered, you must recover the Bootable System State components on the namespace server (usually the domain controller) that is associated with the DFS configuration: a. Boot the namespace server in directory service restore mode as described in “Booting Windows in Directory Service Restore mode” on page 92. b. Open the NMM client software on the namespace server (usually the domain controller) that is associated with the DFS configuration.
Performing a recovery
77
Recovering Data
c. From the Options menu, select System Recover Configuration Options and then click the NetWorker tab. d. Clear the Use Microsoft best practices for selecting the system state attribute and click Yes when asked to confirm your selection.
!
CAUTION The "Microsoft Best Practices" box should not be cleared except where specifically noted in this document. There are some procedures, such as recovering Distributed File System (DFS) data, where you can clear this attribute. Microsoft does not support recovery of portions of the operating system. Attempted recovery of portions of the operating system, with this box cleared, may render the system unbootable. After each recovery operation, this option is automatically selected. e. Click OK to close the dialog box. f. From the left pane, select Recover > System Recover Session. g. From the navigation tree, expand the SYSTEM COMPONENTS folder and select BootableSystemState. h. From the System Recover Session toolbar, click Start Restore. After the recovery has completed, the Use Microsoft best practices for selecting the system state attribute is automatically selected. “Performing a recovery” on page 70 provides more information about recovering system data. To specify whether to perform an authoritative or nonauthoritative recovery in Windows Server 2008
1. From the Options menu, select System Recover Session Options and then click the DFS tab. 2. Select one of the following options: • Non Authoritative Restore to perform a nonauthoritative recovery. • Authoritative Restore to perform an authoritative recovery. 3. Click OK to close the System Recover Session Options dialog box. 4. From the left pane, select Recover > System Recover Session 5. From the navigation tree, expand the SYSTEM COMPONENTS folder and select BootableSystemState. 6. From the System Recover Session toolbar, click Start Restore. After the recovery has completed, the Use Microsoft best practices for selecting the system state attribute is automatically selected.
78
EMC NetWorker Module for Microsoft Applications Release 2.0 Administration Guide
Recovering Data
!
CAUTION The "Microsoft Best Practices" box should not be cleared except where specifically noted in this document. There are some procedures, such as recovering Distributed File System (DFS) data, where you can clear this attribute. Microsoft does not support recovery of portions of the operating system. Attempted recovery of portions of the operating system, with this box cleared, may render the system unbootable. After each recovery operation, this option is automatically selected.
FRS recovery options You can specify whether to perform an authoritative or nonauthoritative recovery of File Replication Services (FRS) data on this host.
!
CAUTION Boot the NetWorker client in Directory Service Recovery mode before completing the recovery options in this section. Chapter 2, “Configuring a Scheduled Backup,” provides more information about specifying save sets when configuring a backup.
Nonauthoritative restore (default)
A nonauthoritative recovery restores the most recent FRS data from backups and then updates the recovered host with the most recent FRS data from another FRS server in the domain. A nonauthoritative recovery relies on at least one other FRS server to have accurate up-to-date FRS data. Nonauthoritative recoveries are typically performed when the host is being recovered due to catastrophic loss of data such as a disk failure.
Authoritative recovery
An authoritative recovery restores the most recent FRS data from backups, and then updates the other FRS servers in the domain with the recovered data. Perform an authoritative recovery only when corrupted or deleted FRS data has been propagated to other FRS servers. Note: To recover FRS data, the SYSTEM COMPONENTS save set must have been backed up. Chapter 2, “Configuring a Scheduled Backup,” provides more information about specifying save sets when configuring a backup.
To specify whether to perform an authoritative or nonauthoritative recovery: 1. From the Options menu, select System Recover Session Options and then click the FRS tab. 2. Select one of the following options: • Non Authoritative Restore to perform a nonauthoritative recovery. • Authoritative Restore to perform an authoritative recovery. 3. Click the NetWorker tab and then clear the attribute titled Use Microsoft best practices for selecting the system state. Click Yes when asked to confirm your selection.
Performing a recovery
79
Recovering Data
!
CAUTION The "Microsoft Best Practices" box should not be cleared except where specifically noted in this document. There are some procedures, such as recovering Distributed File System (DFS) data, where you can clear this attribute. Microsoft does not support recovery of portions of the operating system. Attempted recovery of portions of the operating system, with this box cleared, may render the system unbootable. After each recovery operation, this option is automatically selected. 4. Click OK to close the System Recover Session Options dialog box. 5. From the navigation tree, expand the System Components folder and click FRS. 6. From the System Recover Session toolbar, click Start Restore. If you are performing an authoritative recovery, complete the remaining steps in “Performing an authoritative recovery of NTDS or FRS data” on page 93. “Performing a recovery” on page 70 provides more information about recovering system data.
NTDS recovery options You can specify whether to perform an authoritative or nonauthoritative recovery of NT Directory Services (NTDS) data on this host.
!
CAUTION Boot the NetWorker client in Directory Service Recovery mode before completing the recovery options in this section. “Booting Windows in Directory Service Restore mode” on page 92 provides more information about these recovery options.
Nonauthoritative restore (default)
A nonauthoritative recovery restores the most recent NTDS data from backups and then updates the recovered host with the most recent NTDS data from another NTDS server in the domain. A nonauthoritative recovery relies on at least one other NTDS server to have accurate up-to-date NTDS data. Nonauthoritative recoveries are typically performed when the host is being recovered due to catastrophic loss of data such as a disk failure.
Authoritative restore
An authoritative recovery restores the most recent NTDS data from backups, and then updates other NTDS servers in the domain with the recovered data. Perform an authoritative recovery only when corrupted or deleted NTDS data has been propagated to other NTDS servers. Note: To recover NTDS data, the SYSTEM COMPONENTS save set must have been backed up. Chapter 2, “Configuring a Scheduled Backup,” provides more information about specifying save sets when configuring a backup.
80
EMC NetWorker Module for Microsoft Applications Release 2.0 Administration Guide
Recovering Data
To specify whether to perform an authoritative or nonauthoritative recovery: 1. From the Options menu, select System Recover Session Options and then click the NTDS tab. 2. Select one of the following options: • Non Authoritative restore to perform a nonauthoritative recovery. • Authoritative Restore to perform an authoritative recovery. 3. Click the NetWorker tab and then clear the attribute titled Use Microsoft best practices for selecting the system state. Click Yes when asked to confirm your selection.
!
CAUTION The "Microsoft Best Practices" box should not be cleared except where specifically noted in this document. There are some procedures, such as recovering Distributed File System (DFS) data, where you can clear this attribute. Microsoft does not support recovery of portions of the operating system. Attempted recovery of portions of the operating system, with this box cleared, may render the system unbootable. After each recovery operation, this option is automatically selected. 4. Click OK to close the System Recover Session Options dialog box. 5. From the navigation tree, expand the System Components folder and click NTDS. 6. From the System Recover Session toolbar, click Start Restore. If you are performing an authoritative recovery, complete the remaining steps in “Performing an authoritative recovery of NTDS or FRS data” on page 93. “Performing a recovery” on page 70 provides more information about recovering system data.
Performing a recovery
81
Recovering Data
Security recovery options Backup and archive data on Windows hosts can be encrypted with an AES Application Specific Module (ASM) pass phrase. If no pass phrase was specified when the backup data was encrypted, then the data is encrypted with a default pass phrase. During data recovery, you must specify the pass phrase used at the time of backup if it is not the default or current pass phrase. To specify pass phrases: 1. From the Options menu, select System Recover Session Options and then click the Security tab. 2. Type the pass phrases, and then click OK. The EMC NetWorker Multiplatform Version Administration Guide release 7.3.2 or later, provides more information about AES encryption, and setting the pass phrase.
!
CAUTION Do not use AES encryption when backing up files that are encrypted using EFS. When AES encryption is applied to a file that is also encrypted using the Microsoft Windows Encrypting File System (EFS), the backup will be reported as successful. However, recovery of the file will fail.
82
EMC NetWorker Module for Microsoft Applications Release 2.0 Administration Guide
Recovering Data
Recovering file system snapshots that have not been rolled over The procedure to recover items in a file system snapshot differs depending on whether the snapshot has been rolled over to a conventional storage medium. This section describes how to recover items from a file system snapshot that has not been rolled over. “Performing a recovery” on page 70 provides more information about recovering file system snapshots that have been rolled over. Note: If a snapshot volume has been mounted by using a client utility such as the EMC NaviCLI interface or the Windows Disk Management utility, remove the mount point before performing the next backup or recovery operation. If the mount point is not removed, it will be removed at the end of the next NetWorker backup or recovery operation.
To recover items in a file system backup that has not been rolled over: 1. Connect to the NetWorker server on which the NetWorker client was configured for backup. “Opening the software and connecting to a NetWorker server” on page 38 provides more information about connecting to the NetWorker server. 2. From the left pane, select Recover > System Recover Session. 3. In the navigation tree, right-click the snapshot and select Mount Snapshot. If the Mount Snapshot option is unavailable, then the snapshot has been rolled over. In this case, follow the steps described in “Performing a recovery” on page 70. If another snapshot is currently mounted, a message indicates that the currently mounted volume will be unmounted. Click OK to unmount the volume and to proceed with mounting the selected snapshot volume. 4. When the taskbar animation stops and a green mark appears, click on the mounted snapshot. The mounted snapshot item will expand in the navigation tree. 5. Under the expanded snapshot, select the items to be recovered. “Selecting an item for recovery” on page 39 provides more information about selecting items for recovery. 6. Select any additional file system options if applicable. “NetWorker recovery options” on page 72 provides more information about these options. 7. From the System Recover Session toolbar, click Start Restore. Once the recovery starts, the snapshot is automatically unmounted. 8. From the left pane, select Monitor to view the progress of the recovery.
Recovering file system snapshots that have not been rolled over
83
Recovering Data
Performing a disaster recovery of a NMM Client NMM provides recovery for the NMM Client itself, as well as the applications NMM protects, such as Microsoft Exchange Server, Microsoft SQL Server, Microsoft Office SharePoint Services, and Microsoft Data Protection Manager. Disaster recovery of the entire NMM Client machine requires completion of the following tasks: 1. Recovery of the NMM Client 2. Full recovery of the applications on that machine The following procedures complete both of those tasks:
!
◆
“To perform a disaster recovery if the NMM Client is not on a domain controller” on page 84
◆
“To perform a disaster recovery if the NMM Client resides on a domain controller” on page 85
CAUTION Ensure that your snapshot policies include at least one rollover to conventional backup. Disaster recovery can only be performed from a conventional backup. Chapter 11, “Snapshot Management,” describes how to roll over a snapshot to a conventional backup. To perform a disaster recovery if the NMM Client is not on a domain controller
1. Install the original operating system to the same specifications and configuration as originally on the client. Note: Be sure to apply all service packs and updates that had been applied to the operating system before the disaster, to bring it up to the exact same level as existed at the time it was lost.
2. Install the NMM Client software exactly as it was configured before the disaster. 3. Open the NMM Client software. 4. From the left pane, select Recover > System Recover Session. 5. Select all local drives except for the NMM client installation folder and the Replication Manager (RM) folder, (Typically C:\Program Files\EMC\rmagentps). 6. Select the SYSTEM COMPONENTS folder. If recovering a backup created with NetWorker VSS Client 1.0 SP1, perform this additional step — under SYSTEM COMPONENTS, clear ASR DISK. 7. From the System Recover Session toolbar, click Start Restore. 8. When prompted, restart the client. This restores the operating system to the state it was in when last backed up. Now applications, such as Microsoft Exchange Server, SQL Server, Office SharePoint Server, or Data Protection Manager can be restored from previous backups. 9. To restore APPLICATIONS, open NMM and select the APPLICATIONS for restore.
84
EMC NetWorker Module for Microsoft Applications Release 2.0 Administration Guide
Recovering Data
To perform a disaster recovery if the NMM Client resides on a domain controller
1. Install the original operating system to the same specifications and configuration as originally on the client. Note: Be sure to apply all service packs and updates that had been applied to the operating system before the disaster, to bring it up to the exact same level as existed at the time it was lost.
2. Install the NMM Client software exactly as it was configured before the disaster. Note: This is for an Active Directory client NMM installation, and is not for the Active Directory plugin within a client.
3. Boot the NMM client in directory service restore mode. “Booting Windows in Directory Service Restore mode” on page 92 provides more information about these recovery options. 4. Open the NMM Client software. 5. From the left pane, select Recover > System Recover Session. 6. Select all local drives except for the NMM client installation folder and the Replication Manager (RM) folder, (Typically C:\Program Files\EMC\rmagentps). 7. Select the SYSTEM COMPONENTS folder. If recovering a backup created with NetWorker VSS Client 1.0 SP1, perform this additional step — under SYSTEM COMPONENTS, clear ASR DISK. 8. From the System Recover Session toolbar, click Start Restore. 9. When prompted, restart the client. This restores the operating system to the state it was in when last backed up. Now applications, such as Microsoft Exchange Server, SQL Server, Office SharePoint Server, or Data Protection Manager, can be restored from previous backups. 10. To restore APPLICATIONS, open NMM and select the APPLICATIONS for restore.
Performing a disaster recovery of a NMM Client
85
Recovering Data
Performing a disaster recovery of a clustered client There are three different cluster recovery scenarios presented:
!
◆
“To perform a disaster recovery of a clustered client” on page 86 describes how to recover a cluster from a backup created by the NMM client.
◆
“To perform a disaster recovery of a clustered client from a legacy VSS backup” on page 88 describes how to recover a cluster from a VSS backup created before the NMM client was installed.
◆
“Disaster recovery of a clustered client from a legacy non-VSS backup” on page 91 provides recommendations for how to handle legacy non-VSS backup which does not work with the NMM client.
CAUTION Ensure that your snapshot policies include at least one rollover to conventional backup. Disaster recovery can only be performed from a conventional backup. Chapter 11, “Snapshot Management,” describes how to roll over a snapshot to a conventional backup. To perform a disaster recovery of a clustered client
The following procedure describes how to recover a single node in a two-node cluster. The procedure assumes that you are recovering Node_B and that Node_A is available: 1. Using the Cluster Administrator on Node_A, evict Node_B from the cluster. 2. At the command prompt, type the following to clean up MSCS: cluster node Node_B /forcecleanup
!
CAUTION After cleaning up the Cluster Server, you must reproduce the preexisting application environment on Node_B so MSCS can administer the applications as it did before the node failed. One way to reproduce the preexisting application environment is to perform a recovery for each application that was previously installed on the node. 3. Using the Cluster Administrator, select Join an existing Cluster and type the cluster name. 4. Using the Cluster Administrator on Node_A, ensure that Node_B appears available for failover operations. 5. Stop the cluster service in Node_A by using one of the following methods: • Using the control panel service tool, stop the Cluster service. • At the command prompt, type the following: net stop clussvc 6. Select the required items to be recovered for Node_B. The procedure differs depending on whether or not the cluster service resides on a domain controller. If the cluster service resides on a member server and is not a domain controller: a. Open the NMM client software on Node_B. b. From the left pane, select Recover > System Recover Session.
86
EMC NetWorker Module for Microsoft Applications Release 2.0 Administration Guide
Recovering Data
c. Select all local drives except for the NMM client installation folder and the Replication Manager (RM) installation folder. d. Select the SYSTEM COMPONENTS folder. If recovering a backup created with NetWorker VSS Client 1.0 SP1, perform this additional step — under SYSTEM COMPONENTS, clear ASR DISK. e. From the System Recover Session toolbar, click Start Restore. If the cluster service resides on a domain controller: a. Boot the NMM client in directory service restore mode. “Booting Windows in Directory Service Restore mode” on page 92 provides more information about these recovery options. b. Open the NMM client software. c. From the Options menu, select System Recover Configuration Options and click NetWorker. d. Clear the Use Microsoft best practices for selecting the system state attribute and click Yes when asked to confirm your selection.
!
CAUTION The "Microsoft Best Practices" box should not be cleared except where specifically noted in this document. There are some procedures, such as recovering Distributed File System (DFS) data, where you can clear this attribute. Microsoft does not support recovery of portions of the operating system. Attempted recovery of portions of the operating system, with this box cleared, may render the system unbootable. After each recovery operation, this option is automatically selected. e. Click OK to close the dialog box. f. From the left pane, select Recover > System Recover Session. g. Stop the cluster service in Node_B by using one of the following methods: – Using the control panel service tool, stop the Cluster service. – At the command prompt, type the following: net stop clussvc h. Select all local drives except for the NMM client installation folder and the Replication Manager (RM) installation folder. i. In the navigation tree, select BootableSystemState and Cluster Writer. j. Select the SYSTEM COMPONENTS folder. If recovering a backup created with NetWorker VSS Client 1.0 SP1, perform this additional step — under SYSTEM COMPONENTS, clear ASR DISK. k. From the System Recover Session toolbar, click Start Restore. When prompted, restart Node_B. 7. Start the Cluster service on Node_A by using one of the following methods: • Using the control panel service tool, start the Cluster service. • At the command prompt, type the following: net start clussvc
Performing a disaster recovery of a clustered client
87
Recovering Data
8. Using the Cluster Administrator on Node_A, confirm that the cluster resources were recovered to the point in time when the backup occurred. If you are performing regular scheduled backups, this will recover the cluster database to a point shortly before the loss of Node_B. 9. Using the Cluster Administrator on Node_A, monitor the cluster "joining" status of node_B. 10. Using the Cluster Administrator on Node_B, verify that the cluster group can be moved between the nodes by right-clicking the group and selecting Move group. To perform a disaster recovery of a clustered client from a legacy VSS backup
The procedure differs depending on whether or not the cluster service resides on a domain controller. For cluster service on a member server
This recovery is for a VSS backup created before the NMM Client was installed. This backup would include VSS SYSTEM SERVICES, VSS SYSTEM FILESET, and VSS SYSTEM BOOT. The following procedure describes how to recover a single node in a two-node cluster. The procedure assumes that you are recovering Node_B and that Node_A is available: 1. Using the Cluster Administrator on Node_A, evict Node_B from the cluster. 2. At the command prompt, type the following to clean up MSCS: cluster node Node_B /forcecleanup
!
CAUTION After cleaning up the Cluster Server, you must reproduce the preexisting application environment on Node_B so MSCS can administer the applications as it did before the node failed. One way to reproduce the preexisting application environment is to perform a recovery for each application that was previously installed on the node. 3. Using the Cluster Administrator, select Join an existing Cluster and type the cluster name. 4. Using the Cluster Administrator on Node_A, ensure that Node_B appears available for failover operations. 5. Stop the cluster service in Node_A by using one of the following methods: • Using the control panel service tool, stop the Cluster service. • At the command prompt, type the following: net stop clussvc 6. Select the required items to be recovered for Node_B: a. Open the NMM client software on Node_B. b. From the left pane, select Recover > System Recover Session. c. Select all local drives except for the NMM client installation directory.
88
EMC NetWorker Module for Microsoft Applications Release 2.0 Administration Guide
Recovering Data
d. Select VSS SYSTEM SERVICES, VSS SYSTEM FILESET, and VSS SYSTEM BOOT. e. From the System Recover Session toolbar, click Start Restore. f. When prompted, restart node_B. 7. Start the Cluster service on node_A by using one of the following methods: • Using the control panel service tool, start the Cluster service. • At the command prompt, type the following: net start clussvc 8. Using the Cluster Administrator on Node_A, confirm that the cluster resources were recovered to the point in time when the backup occurred. If you have been performing regular scheduled backups, this will recover the cluster database to a point in time shortly before the loss of Node_B. 9. Using the Cluster Administrator on Node_A, monitor the cluster "joining" status of Node_B. 10. Using the Cluster Administrator on Node_B, verify that the cluster group can be moved between the nodes by right-clicking the group and selecting Move group. For cluster service on a domain controller
This recovery is for a VSS backup created before the NetWorker VSS Client was installed. This backup would include VSS SYSTEM BOOT, VSS SYSTEM FILESET, and VSS SYSTEM SERVICE. The following procedure describes how to recover a single node in a two node cluster. The procedure assumes that you are recovering Node_B and that Node_A is available: 1. Using the Cluster Administrator on Node_A, evict Node_B from the cluster. 2. At the command prompt, type the following to clean up MSCS: cluster node Node_B /forcecleanup
!
CAUTION After cleaning up the Cluster Server, you must reproduce the preexisting application environment on Node_B so MSCS can administer the applications as it did before the node failed. One way to reproduce the preexisting application environment is to perform a recovery for each application that was previously installed on the node. 3. Using the Cluster Administrator, select Join an existing Cluster and type the cluster name. 4. Using the Cluster Administrator on Node_A, ensure that Node_B appears available for failover operations. 5. Stop the cluster service in Node_A by using one of the following methods: • Using the control panel service tool, stop the Cluster service. • At the command prompt, type the following: net stop clussvc
Performing a disaster recovery of a clustered client
89
Recovering Data
6. Select the required items to be recovered for Node_B. a. Boot the NMM client in directory service restore mode. “Booting Windows in Directory Service Restore mode” on page 92 provides more information about these recovery options. b. Open the NMM client software. c. From the Options menu, select System Recover Configuration Options and click the NetWorker tab. d. Clear the Use Microsoft best practices for selecting the system state attribute and click Yes when asked to confirm your selection.
!
CAUTION The "Microsoft Best Practices" box should not be cleared except where specifically noted in this document. There are some procedures, such as recovering Distributed File System (DFS) data, where you can clear this attribute. Microsoft does not support recovery of portions of the operating system. Attempted recovery of portions of the operating system, with this box cleared, may render the system unbootable. After each recovery operation, this option is automatically selected. e. Click OK to close the dialog box. f. From the left pane, select Recover > System Recover Session. g. Stop the cluster service in Node_B by using one of the following methods: – Using the control panel service tool, stop the Cluster service. – At the command prompt, type the following: net stop clussvc h. Select all local drives except for the NMM client installation directory. i. Select VSS SYSTEM SERVICES, VSS SYSTEM FILESET, and VSS SYSTEM BOOT. j. From the System Recover Session toolbar, click Start Restore. When prompted, restart node_B. 7. Start the Cluster service on node_A by using one of the following methods: • Using the control panel service tool, start the Cluster service. • At the command prompt, type the following: net start clussvc 8. Using the Cluster Administrator on Node_A, confirm that the cluster resources were recovered to the point in time when the backup occurred. If you have been performing regular scheduled backups, this will recover the cluster database to a point in time shortly before the loss of Node_B. 9. Using the Cluster Administrator on Node_A, monitor the cluster "joining" status of Node_B. 10. Using the Cluster Administrator on Node_B, verify that the cluster group can be moved between the nodes by right-clicking the group and selecting Move group.
90
EMC NetWorker Module for Microsoft Applications Release 2.0 Administration Guide
Recovering Data
Disaster recovery of a clustered client from a legacy non-VSS backup
This recover is for a non-VSS backup created before the NMM client was installed. This backup would include SYSTEM STATE, SYSTEM DB, and SYSTEM FILES. Recovery of non-VSS backups of the cluster database by using the NMM client does not work. To ensure that backups of the cluster database are available for recovery, perform a full backup of the system directly after updating the system to the NMM client. This creates a post-installation cluster backup that can be recovered by using the NMM Client.
Monitoring a recovery
The progress of all recovery operations can be viewed from the Monitor window. “About the NMM client interface” on page 34 provides more information about the Monitor window.
Performing a disaster recovery of a clustered client
91
Recovering Data
Booting Windows in Directory Service Restore mode Before you can complete the following recovery operations, boot the NMM client in Directory Service Restore mode: ◆
DFS recovery
◆
FRS recovery
◆
NTDS recovery
◆
Active Directory (AD) disaster recovery
To boot the NMM client in Directory Service Restore mode: 1. On the NetWorker client domain controller, close all programs and restart Windows. When the computer restarts, a list of startup choices appears. The startup choices and the duration of the startup display are based on the settings in the operating systems section and the boot loader section of the boot.ini file. 2. Choose the Windows boot option for the domain controller. 3. Press F8 to display a list of special boot options. 4. Select Directory Service Restore Mode (Windows Domain Controllers only) from the list of special boot options. When you boot in this mode, AD is taken offline. 5. Log in as administrator. Use the password that was specified when the domain controller was created. Windows starts in safe mode. 6. Open the NMM client application. 7. From the left pane, select Recover > System Recover Session. Continue with the recovery options. The following provide more specific information:
92
◆
“DFS recovery options” on page 76.
◆
“FRS recovery options” on page 79.
◆
“NTDS recovery options” on page 80.
◆
“Schema objects” on page 188.
◆
“Performing a recovery” on page 70 provides more information about SYSTEM STATE or VSS SYSTEM BOOT save sets, and save set recovery.
◆
“Performing a granular recovery of AD objects and attributes” on page 186 provides more information about save sets on a domain controller.
EMC NetWorker Module for Microsoft Applications Release 2.0 Administration Guide
Recovering Data
Performing an authoritative recovery of NTDS or FRS data Perform an authoritative recovery only when corrupted or deleted data has been propagated to other NT Directory Services (NTDS) or File Replication Services (FRS) servers. After the authoritative recovery, the domain administrator can delete any unnecessary newer objects. NTDS and FRS objects may have associated group policies, for example, organizational units, domains, and site objects. Group policies are stored in the SYSVOL directory. A recovery of the SYSVOL directory cannot be separated from an authoritative recovery of NTDS or FRS. To perform an authoritative recovery: 1. If you have not already done so, boot the NMM client in Directory Service Restore mode. “Booting Windows in Directory Service Restore mode” on page 92 provides more information about performing this procedure. 2. If you have not already done so, complete the NTDS or FRS recovery options. The following provide more specific information on the recovery options: • “FRS recovery options” on page 79. • “NTDS recovery options” on page 80. 3. From the command line, use the xcopy command to copy sysvol\domain to another location. This preserves group policy, and file and directory permissions. 4. Run the Windows ntdsutil utility. 5. At the ntdsutil prompt, type: NTDSUTIL: authoritative restore 6. To perform an authoritative recovery of the following: • Entire database, type: NTDSUTIL: restore database • Subtree or individual object, type: NTDSUTIL: restore subtree distinguished_name For example, NTDSUTIL: restore subtree OU=engineering,DC=Seattle,DC=jupiter,DC=com NTDSUTIL: restore subtree CN=mars,CN=users,DC=Seattle,DC=jupiter,DC=com The Microsoft Windows Server Resource Kit provides more information and Active Directory documentation. 7. Exit the ntdsutil utility by typing quit at each successive ntdsutil prompt until the command prompt appears. 8. Copy the entire recovered SYSVOL\domain directory and all of its subdirectories to a new location. 9. Restart the domain controller in normal mode. 10. Log in to the domain controller.
Performing an authoritative recovery of NTDS or FRS data
93
Recovering Data
11. Wait for the SYSVOL share to be published. This can take several minutes while the recovered domain controller synchronizes with its replication partners. 12. After the SYSVOL share has been published, perform one of the following: • For an authoritative recovery of the entire database, copy the entire SYSVOL\domain directory tree from the new location to the existing SYSVOL\domain directory as described in step 8 on page 93. When the copy operation prompts for confirmation, select Yes to All. • For an authoritative recovery of only a part of AD that includes Policy objects, copy the policy folders from the new location (see step 8) to the existing policy folders. Policy objects can be identified by their global universal ID (GUID). Policy folders are located in SYSVOL\domain\Policies.
94
EMC NetWorker Module for Microsoft Applications Release 2.0 Administration Guide
Recovering Data
Recovering the Windows system configuration to an earlier state Hosts that were upgraded from a regular NetWorker client to a NMM client can have their Windows operating system configuration recovered to a state prior to upgrading to the NMM client.
!
CAUTION If the Windows operating system was upgraded on the host, you cannot recover the Windows system configuration to the state it was in before the operating system software was upgraded. To recover the Windows system state to a point-in-time that precedes the installation of the NMM client: 1. If the NMM client is a Windows domain controller, boot the NMM client in Directory Services Restore mode. “Booting Windows in Directory Service Restore mode” on page 92 provides more information about booting in this mode. If the NMM client is not a Windows domain controller, start with step 2. 2. Recover the contents of the volume on which the Windows operating system was installed. 3. Recover the Windows configuration save sets: • If VSS was licensed and enabled, recover: – VSS SYSTEM BOOT – VSS SYSTEM FILESET – VSS SYSTEM SERVICES • If VSS was not licensed or enabled, recover: – SYSTEM STATE – SYSTEM FILES – SYSTEM DB 4. Update the recovered registry with NMM client entries. Because the registry was recovered to a client state prior to the NMM client installation, you must update the registry with entries for the NMM client. To update the registry, perform the following uninstall and install steps: a. Uninstall the NMM client software. b. Install the NMM client software. c. Uninstall the PowerSnap™ software. PowerSnap is installed with the NMM client software. d. Uninstall the NMM client software. e. Reinstall the NMM client software. The NetWorker Module for Microsoft Applications Release 2.0 Installation Guide provides more information about the uninstall and install steps. Reinstall, as necessary, any other applications that were installed after the point-in-time to which the Windows operating system configuration was recovered.
Recovering the Windows system configuration to an earlier state
95
Recovering Data
96
EMC NetWorker Module for Microsoft Applications Release 2.0 Administration Guide
4 Microsoft SQL Server Backup and Recovery
This chapter includes the following topics: ◆ ◆ ◆
Microsoft SQL Server backup and recovery.............................................................. 98 Performing SQL Server backups............................................................................... 103 Performing SQL Server recovery .............................................................................. 105
Microsoft SQL Server Backup and Recovery
97
Microsoft SQL Server Backup and Recovery
Microsoft SQL Server backup and recovery This chapter supplements the overall NetWorker Module for Microsoft Applications (NMM) backup procedures in Chapter 2, “Configuring a Scheduled Backup,” and recovery procedures in Chapter 3, “Recovering Data,” with the specific details needed to back up and recover Microsoft SQL Server. Microsoft SQL Server supports Volume Shadow Copy Service (VSS) through Microsoft-supplied application writers. NMM allows the creation of a point-in-time copy of data. The snapshot includes exact copies of data and open files. This allows the backup of the SQL server while the SQL database is online or in use.
SQL Server versions supported by NMM NMM client supports the following versions of Microsoft SQL Server: Microsoft SQL Server 2005 (x86, x64) ◆
Standard
◆
Enterprise
◆
Express Microsoft SQL Server 2000 (x86)
◆
Standard
◆
Enterprise
◆
Desktop (MSDE)
Note: NMM client does not support Microsoft SQL Server 2000 or 2005 running on IA64.
The EMC Information Protection Software Compatibility Guide provides the most up-to-date lists of hardware, operating system, service pack, and application versions supported by the NMM client. Note: To perform snapshot operations on an installation of Microsoft SQL Server 2000 service pack 4 32-bit running on Windows Server 2003 x64 based systems, you must download and install the Update for Windows Server 2003 (KB931312) package from the Microsoft Download Center. For more information, search for KB931312 on the Microsoft Support web site.
Types of Backup and Recovery Supported
Using point-in-time snapshot technology, NMM supports several types of backup and recovery for SQL 2000 embedded databases and Microsoft SQL Server. NMM supports database granularity for snapshot backup and restore. This allows you to back up a particular SQL database without having to shut down the database, and then select and restore that database from the backed-up databases. NMM provides the following types of backup:
98
◆
Backup Level supported — Full only
◆
All SQL Server 2005 named instances and databases including express and stand-alone databases
◆
Only the SQL 2005 host instance and database name combination
◆
All SQL 2000 embedded databases
EMC NetWorker Module for Microsoft Applications Release 2.0 Administration Guide
Microsoft SQL Server Backup and Recovery
◆
All SQL 2000 named instances and stand-alone databases
◆
Only the SQL 2000 host instance and database name combination
NMM supports the following types of recovery:
Components used by NMM for SQL backup and recovery
◆
Microsoft SQL Server 2005 stand-alone or express databases
◆
SQL 2000 embedded or stand-alone databases
NMM uses the following writers and commands to back up SQL data: ◆
Application writers NMM uses the application writers provided by Microsoft SQL Server: • MSDEWriter- SQL2000 — Writer for SQL 2000/MSDE • SqlServerWriter — Writer for SQL Server 2005 “Specifying save sets for SQL data” on page 99 describes how the writer name is used in the save set syntax.
◆
Nsrsnap_vss_save — The NMM command to initiate the VSS-based backup.
◆
Nsrsnap_vss_recover — The NMM command to initiate the VSS-based recovery.
Specifying save sets for SQL data Table 13 on page 99 lists the SQL save set syntax to specify for supported types of SQL data. Specify SQL data save sets in the Save Set attribute of a Client resource. Table 13
SQL save set syntax (page 1 of 2) Type of data to back up
Save set syntax
All SQL Server 2005 named instances and databases including express and stand-alone databases.
If the SQL Server VSS Writer service is enabled (it is disabled by default), type the following: APPLICATIONS:\SqlServerWriter If the SQL Server VSS Writer service is disabled, SQL 2005 named instances and databases including express and stand-alone databases, can be backed up with the following syntax: APPLICATIONS:\MSDEWriter-SQL2000
Only the SQL 2005 host instance and database name combination.
APPLICATIONS:\SqlServerWriter\host%5Ci nstance\master For example, to back up the database named trans07 on the SQL Server named instance MT11\BU, type the following: APPLICATIONS:\SqlServerWriter\MT11%5CB U\ trans07 Some special characters in a SQL Server named instance or database name must be replaced with their URL-encoded values. “URL encoding for SQL save sets” on page 101 provides more information about URL encoding.
Microsoft SQL Server backup and recovery
99
Microsoft SQL Server Backup and Recovery
Table 13
SQL save set syntax (page 2 of 2) Type of data to back up
Save set syntax
All SQL 2000 embedded databases
SYSTEM COMPONENTS:\
All SQL 2000 named instances and stand-alone databases.
APPLICATIONS:\MSDEWriter-SQL2000
Only the SQL 2000 host instance and database name combination.
APPLICATIONS:\MSDEWriter-SQL2000\host% 5C instance\master For example, to back up the database named accounts07 on the SQL Server named instance MT11\AP, type the following: APPLICATIONS:\MSDEWriter-SQL2000\ MT11%5CAP\accounts07 Some special characters in a SQL Server named instance or database name must be replaced with URL-encoded values. “URL encoding for SQL save sets” on page 101 provides more information about URL encoding.
Displaying valid SQL data save sets To display a list of the SQL save sets that are available for backup: 1. Open a command-prompt on the application server. 2. From the command-prompt, type the following command to list the valid application data save set names. If the application server is not on a virtual host, type: nsrsnap_vss_save -? If the application server is on a virtual host, type: nsrsnap_vss_save -? -c virtual_server_name Note: If the application server is on a virtual host, run this command from the physical node that is currently hosting the application server.
3. Press Enter. The save sets that are available for backup are listed in a format similar to the following: "APPLICATIONS:\SqlServerWriter" "APPLICATIONS:\SqlServerWriter\CORPDBSERV1%5CYUKON" "APPLICATIONS:\SqlServerWriter\CORPDBSERV1%5CYUKON\master" "APPLICATIONS:\SqlServerWriter\CORPDBSERV1%5CYUKON\model" "APPLICATIONS:\SqlServerWriter\CORPDBSERV1%5CYUKON\msdb" "APPLICATIONS:\SqlServerWriter\CORPDBSERV1%5CYUKON\NADATA" Each line of output corresponds to a save set entry that you can add to the Save Set attribute of a Client resource. Each entry that you add to the Save Set attribute must be typed on a separate line.
100
EMC NetWorker Module for Microsoft Applications Release 2.0 Administration Guide
Microsoft SQL Server Backup and Recovery
URL encoding for SQL save sets When specifying save set names in the Save Set attribute of the Client resource, there are cases where special characters, such as the backslash (\), must be specified by their URL-encoded values. URL-encoded values are used to represent special characters in the following cases: ◆
SQL Server named instances
◆
SQL Server database names
Consider the following example of a SQL Server named instance. The name of a SQL Server named instance consists of two parts: the name of the host and a unique name. These two parts are always separated with a backslash (\) character. When specifying a SQL Server named instance in the Save Set attribute, replace the backslash with its URL-encoded value, which is %5C. In the following example, a SQL Server named instance that is identified as: CORPDBSERV1\YUKON would be represented in the Save Set attribute as: CORPDBSERV1%5CYUKON To back up only the database named NADATA in the SQL Server named instance CORPDBSERV1\YUKON, the complete entry in the Save Set attribute would be: APPLICATIONS:\SqlServerWriter\CORPDBSERV1%5CYUKON\NADATA If the database name in the previous example was NA#DATA, the save set entry would be: APPLICATIONS:\SqlServerWriter\CORPDBSERV1%5CYUKON\NA%23DATA Table 14 on page 101 lists the most commonly used special characters and their URL values. Table 14
Special characters and their URL-encoded values Special character
URL-encoded value
Special character
URL-encoded value
\
%5C
?
%3F
/
%2F
]
%5D
"
%22
[
%5B
%
%25
}
%7D
#
%23
{
%7B
&
%26
^
%5E
%3E
|
%7C
Microsoft SQL Server backup and recovery
101
Microsoft SQL Server Backup and Recovery
SQL application information variable settings Table 15 on page 102 lists the variables that can be specified in the Application information attribute of the Client resource. Table 15
SQL variable settings for Application information attribute Attribute name
Description
Values
NSR_SNAP_TYPE=value
Specifies the snapshot service provider name.
vss This value is required.
NSR_DATA_MOVER=value
Specifies the hostname of the NMM client that moves snapshots from the NMM client to primary and secondary (conventional) storage. The host can be either a local host or a proxy client host.
• The local host • The proxy client hostname If no value is entered, the local host is used as the data mover. If you are setting up a proxy client for a virtual cluster server, you must also type the proxy client hostname in the Remote Access attribute of the Client resource. For serverless backups, specify a proxy client. If setting up an SQL Client resource, it is recommended that you use a proxy client. If a proxy client is specified, SQL consistency checks are performed on the proxy client. Related messages are written to the Replication Manager log files (erm_clientxx.log) on the proxy client. If no proxy client is specified for an SQL Client resource, consistency checks are performed on the Client resource host. Related messages are logged on the Client resource host in both the Replication Manager log files and the nmm.raw file.
Serverless backup A proxy client is used in conjunction with instant snapshot backups to provide serverless backups. A typical SQL setup with production hosts Serverless backups free the application server from much of the processing involved in a nonpersistent or instant snapshot backup. In a serverless backup, a snapshot is created on the application server and then immediately moved to the proxy client for further processing. A serverless backup can be rolled over to a conventional backup and the backup can remain on the mounted storage disk volume as a persistent snapshot. Note: Serverless backup is available only with VSS hardware providers and is subject to the capabilities of the vendor’s hardware. The EMC VSS Provider for CLARiiON and Symmetrix provides the capability to perform serverless backup operations for these storage platforms.
102
EMC NetWorker Module for Microsoft Applications Release 2.0 Administration Guide
Microsoft SQL Server Backup and Recovery
Performing SQL Server backups NMM supports several types and levels of backup: ◆
Point-in-time snapshots, which include exact copies of files and open files
◆
Full backup of SQL databases and logs
Full backup of an SQL Server
The first four tasks for scheduling a backup are the same for all VSS writers supported by NMM. Chapter 2, “Configuring a Scheduled Backup,” describes these tasks in detail: ◆
“Task 1: Configure a backup pool for snapshot operations” on page 48
◆
“Task 2: Configure snapshot policies” on page 51
◆
“Task 3: Configure a backup schedule” on page 54
◆
“Task 4: Configure a backup group” on page 55
The next task is specific to configuring a SQL Server Client Resource: 1. In the Administration window of the NetWorker Management Console, click Configuration. 2. In the expanded left pane, select Clients. 3. From the File menu, select New. 4. In the Name attribute, type the hostname of the NetWorker client computer. 5. In the Comment attribute, type a description. If you are creating multiple Client resources for the same NetWorker client host computer, use this attribute to differentiate the purpose of each resource. 6. From the Browse Policy attribute, select a browse policy from the list. The browse policy determines how long rolled-over data is available for quick access. 7. From the Retention Policy attribute, select a retention policy from the list. The retention policy determines how long rolled-over data is available though not necessarily quickly. 8. Select the Scheduled Backups attribute: • To back up all SQL 2000 embedded databases, specify the save set name: SYSTEM COMPONENTS:\ Note: The SYSTEM COMPONENTS:\ save set should be backed up as part the system disaster recovery strategy.
• To back up all SQL 2000 named instances and stand-alone databases, specify the save set name: APPLICATIONS:\MSDEWriter-SQL2000 • To back up only the SQL 2000 host instance and database name combination, specify the save set name: APPLICATIONS:\MSDEWriter-SQL2000\host%5Cinstance\master • To back up all SQL Server 2005 named instances and stand-alone databases, specify the save set name: APPLICATIONS:\SqlServerWriter
Performing SQL Server backups
103
Microsoft SQL Server Backup and Recovery
If the SQL Server 2005 VSS Writer service is running, then SQL 2005 Express databases are backed up under SYSTEM COMPONENTS: SYSTEM COMPONENTS:\ If the SQL Server 2005 VSS Writer service is not running, then SQL 2005 Express databases are backed up under MSDEWriter-SQL2000: APPLICATIONS:\MSDEWriter-SQL2000 The SQL Server save set syntax is described in “Specifying save sets for SQL data” on page 99. 9. If needed, use URL-encoded values when specifying save set names in the Save Set attribute of the Client resource. URL-encoded values are used to represent special characters such as the backslash (\), and a table of values is provided in “URL encoding for SQL save sets” on page 101. 10. Specify SQL application variable settings in the Application information attribute of the Client resource. These settings are described in Table 15 on page 102. 11. Click the Globals (1 of 2) tab. 12. In the Aliases attribute, type the NETBIOS name for the client. Note: NMM Client uses the host machine NETBIOS or “short” name when connecting to the NetWorker server to browse backups. If the NETBIOS name is not found, NMM will not be able to display backups.
104
EMC NetWorker Module for Microsoft Applications Release 2.0 Administration Guide
Microsoft SQL Server Backup and Recovery
Performing SQL Server recovery The following requirements must be met to recover SQL databases: ◆
To recover SQL 2000 embedded databases, the SYSTEM COMPONENTS:\ save set must have been backed up.
◆
To recover SQL2000 stand-alone databases, the APPLICATIONS:\ MSDEWriter-SQL2000 save set must have been backed up.
◆
To recover SQL 2005 Express databases, the following save sets must have been backed up: • SYSTEM COMPONENTS:\ save set if the SQL 2005 VSS Writer was started • APPLICATIONS:\ MSDEWriter-SQL2000 save set if the SQL 2005 VSS Writer was not started
Recovering SQL 2000 embedded databases To recover SQL 2000 embedded databases: 1. Stop the SQL Server services for the SQL 2000 embedded database instances. 2. From the Options menu, select System Recover Configuration Options and then click the NetWorker tab. 3. Clear the checkbox titled, Use Microsoft best practices for selecting the system state and click Yes when asked to confirm your selection.
!
CAUTION The "Microsoft Best Practices" box should not be cleared except where specifically noted in this document. There are some procedures, such as recovering Distributed File System (DFS) data, where you can clear this attribute. Microsoft does not support recovery of portions of the operating system. Attempted recovery of portions of the operating system, with this box cleared, may render the system unbootable. After each recovery operation, this option is automatically selected. 4. Click OK to close the dialog box. 5. From the left pane, select Recover > System Recover Session 6. From the navigation tree, expand the SYSTEM COMPONENTS folder and the MSDEWriter folder. 7. Select the databases to recover. 8. From the System Recover Session toolbar, click Start Restore. 9. After the recovery is complete, start the SQL Server services for the SQL 2000 embedded database instances.
Performing SQL Server recovery
105
Microsoft SQL Server Backup and Recovery
Recovering SQL 2000 stand-alone databases To recover SQL 2000 stand-alone databases: 1. Stop the SQL Server services for the SQL 2000 stand-alone database instances. 2. From the navigation tree, expand the Applications folder and the MSDEWriter-SQL2000 folder. 3. Select the databases to recover. 4. From the System Recover Session toolbar, click Start Restore. 5. After the recovery is complete, start the SQL Server services for the SQL 2000 stand-alone database instances.
Recovering SQL 2005 databases If the SQL Server VSS Writer service was enabled during backup, then SQL 2005 Express databases must be recovered from the SYSTEM COMPONENTS:\ save set. If the SQL Server VSS Writer service was disabled during backup, then SQL 2005 Express databases must be recovered from the APPLICATIONS:\MSDEWriter-SQL2000 save set. The SQL Server VSS Writer service is disabled by default when Microsoft SQL Server 2005 is installed. To recover SQL 2005 stand-alone databases that were backed up to the SQLServerWriter save set
1. If restoring the master database, stop the SQL Server services for the SQL 2005 database instances. 2. From the navigation tree, expand the Applications folder and the SQLServerWriter folder. 3. Select the databases to recover. 4. From the System Recover Session toolbar, click Start Restore. 5. After the recovery is complete, start the SQL Server services for the SQL 2005 database instances. To recover SQL 2005 express databases that were backed up to the SYSTEM COMPONENTS save set
If the SQL Server VSS Writer service was enabled during backup, then SQL 2005 Express databases must be recovered from the SYSTEM COMPONENTS:\ save set. In this case, follow these steps: 1. If restoring the master database, stop the SQL Server services for the SQL 2005 database instances. 2. From the navigation tree, expand the SYSTEM COMPONENTS:\ folder. 3. Select the databases to recover. 4. From the System Recover Session toolbar, click Start Restore. 5. After the recovery is complete, start the SQL Server services for the SQL 2005 database instances.
106
EMC NetWorker Module for Microsoft Applications Release 2.0 Administration Guide
Microsoft SQL Server Backup and Recovery
To recover SQL 2005 stand-alone or express databases that were backed up to the MSDE-Writer-SQL2000 save set
If the SQL Server VSS Writer service was disabled during backup, then SQL 2005 express and stand-alone databases must be recovered from the MSDEWriter-SQL2000 save set. In this case, follow these steps: 1. Stop the SQL Server services for the SQL 2005 database instances. 2. From the navigation tree, expand the Applications folder and the MSDEWriter-SQL2000 folder. 3. Select the databases to recover. 4. From the System Recover Session toolbar, click Start Restore. 5. After the recovery is complete, start the SQL Server services for the SQL 2005 database instances.
Best practices for SQL backup and recovery Table 16
Table 16 on page 107 lists the best practices and recommendations to follow when using NMM to back up and recover SQL Server. SQL Server backup and recovery best practices and considerations (page 1 of 2) Consideration
Best practice
Different policies for application server data
For application servers such as SQL servers, consider backing up the server application data under a schedule different than the host operating system data and volumes. Typically, application data is backed up several times a day while operating system data and volumes are backed up less frequently. To accomplish this, create a separate backup group, snapshot policy, and Client resource for: • Server application data • Volumes and operating system data Assign the appropriate snapshot policy and Client resource to each backup group.
Installation path for application server program
Do not install application server program files on the same volume as the application’s database files and log files.
Copy-on-write versus mirroring
Large or fast-changing databases should not be saved with copy-on-write snapshot technology. Instead, use a split-mirror snapshot technology such as a CLARiiON clone or a Symmetrix BCV. Although copy-on-write technology requires less hardware resources, split-mirror technology can better handle the requirements of large or fast-changing databases. Split-mirror technology is supported only with the EMC VSS Provider.
NetWorker modules and the NMM client
If you attempt to use both the NMM client and a NetWorker module such as NetWorker Module for Microsoft SQL Server to back up application data, the module backups will be promoted to full backups. “NMM client issues” on page 205 provides more information about client issues..
Microsoft SQL data
If SQL 2005 backups were performed when the SQL Server VSS Writer service was disabled, and you subsequently enable the writer, perform a complete backup of SQL 2005 data. Performing a complete backup enables you to recover all SQL 2005 data from the same application folder, which is named SQLServerWriter.
Performing SQL Server recovery
107
Microsoft SQL Server Backup and Recovery
Table 16
SQL Server backup and recovery best practices and considerations (page 2 of 2) Consideration
Best practice
CLARiiON limits for the CX500
If the number of snapshots exceeds the limit for number of snapshots supported per CLARiiON, a "VETO" failure will occur during snapshot creation. The CLARiiON limits for the CX500 are as follows: For a CX500, the limit is 150 snapshots or snapshot sessions system-wide. This includes reserved snapshots/sessions for SANCopy. There is also a limit of 8 snapshots or snapshot sessions per LUN. Limits for CLARiiON systems can be found in the EMC SnapView Integration Module for SQL Server (SIMS) Administrator’s Guide.
SQL instances in suspect mode
If any of the databases belonging to a SQL instance are in suspect mode, and a backup of the SQL instance is attempted with the Microsoft MSDE Writer, the snapshot backup will fail.
Verify VSS SQL Writer service is running
After installing the SQL Server, especially SQL 2005, a user needs to verify that the VSS SQL Writer service is up and running in order for the VSS SQL Writer snapshot to be successful. The SQL Writer is installed but is disabled by default. A user must enable it or set it to automatic to use its functionality.
Ignore tempdb database
Microsoft indicates that tempdb is a database that is rebuilt when the server is rebooted, and that VSS Requestors can ignore this database. The database is not reported by the writer and will not be backed up.
Special Character databases
Special Character databases are not backed up and the best practice is to have the list of databases without special character tables and columns.
Some SQL service may Administrators may have to manually shut down some SQL services to have to be manually shut restore SQL system databases. For SQL 2000, manually shut down the down to perform recovery SQL Server and the SQL Server Agent. For MSDE or SQL 2005, shut down the "master" and "msdb" database only if it is being recovered. Otherwise, do not shut down any MSDE or SQL 2005 database services. SQL restore does not automate this process, and requires VSS Requestors to take responsibility for controlling the SQL services during restore.
108
EMC NetWorker Module for Microsoft Applications Release 2.0 Administration Guide
5 Microsoft Office SharePoint Server Backup and Recovery
This chapter includes the following topics: ◆ ◆ ◆ ◆ ◆
Microsoft Office SharePoint Server backup and recovery .....................................110 Performing SharePoint Server backups .................................................................... 117 Task 5: Configure a SharePoint Client resource....................................................... 118 Performing SharePoint 2007 recovery...................................................................... 124 SharePoint disaster recovery ..................................................................................... 128
Microsoft Office SharePoint Server Backup and Recovery
109
Microsoft Office SharePoint Server Backup and Recovery
Microsoft Office SharePoint Server backup and recovery This chapter supplements the overall NetWorker Module for Microsoft Application (NMM) backup procedures in Chapter 2, “Configuring a Scheduled Backup,”, and recovery procedures in Chapter 3, “Recovering Data,”, with the specific details needed to back up and recover Microsoft Office SharePoint Server 2007.
SharePoint Server versions supported by NMM client NMM client supports Microsoft Office SharePoint Server 2007 Service Pack 1 (SP1 or later). The EMC Information Protection Software Compatibility Guide provides the most up-to-date lists of hardware, operating system, service pack, and application versions supported by the NMM client.
SharePoint backup and recovery types NMM client provides these backup features: ◆
Backup types: • Backup for stand-alone and distributed SharePoint farms • Utilizes Volume Shadow Copy framework to create snapshot of SharePoint data
◆
Backup level — Full: • Full backup of SQL Databases • Full backup of Search/Content Indexes
◆
Backup granularity: • Farm Backup — Backup of all SharePoint data in the farm, including: – Content/Configuration Databases – Search/Index Databases
NMM client provides these recovery features: ◆
Recovery types: • Conventional • Restore from snapshot • Content Recovery and Disaster Recovery • Recovery for stand-alone and distributed SharePoint farms Note: Rollback is unsupported.
◆
Recovery level — Full, Content/Configuration Database, Search/Content Indexes
◆
Recovery granularity: • Farm recovery: – Content Databases – Configuration Database – Search/Index Databases • Content Database recovery — Restore of SharePoint Content Databases
110
EMC NetWorker Module for Microsoft Applications Release 2.0 Administration Guide
Microsoft Office SharePoint Server Backup and Recovery
Note: Any major changes made to the SharePoint configuration or database structure requires a full backup. For example, if a full farm backup is performed on Monday, and then the user adds a new Content Database on Tuesday, a full backup needs to be performed to keep the backups up-to-date. The save set list also needs to be updated to include the new SharePoint objects.
Requirements for installing SharePoint service pack Microsoft Office SharePoint Service Pack 1 (SP1 or later) must be installed. Without this fix installed on SharePoint machines, NMM may incorrectly list the presence of the SharePoint Help Search Writer (SPSearch Writer) on a SharePoint machine that does not actually have the writer. This could lead to a user creating an invalid saveset, and backup or recovery failure. Go to the Microsoft web site and search for “Microsoft Office SharePoint Server 2007 Service Pack 1 (SP1).” Download and install this on all machines in the SharePoint server farm. Once it is installed, no further action is required for NMM. When installing SP1on a SharePoint farm, Microsoft recommends installing it in a specific order: 1. Start the SP1 installation on all machines at the same time. 2. When the Proceed message box is displayed, click OK on all remote clients, but do not click OK to proceed on the web front end yet. 3. After installation completes on all remote clients, click OK on all remote clients, and then click OK to proceed with installation on the web front end. 4. Start the SharePoint configuration wizard.
NMM installation requirements for a SharePoint system A Microsoft Office SharePoint 2007 farm can be deployed in a stand-alone system that runs all services on one machine as shown in Figure 10 on page 112, or in a configuration that includes several servers hosting separate services, as shown in Figure 11 on page 112. For NMM to backup a SharePoint farm, the NMM client must be installed on each machine in the farm. A SharePoint farm includes the following services: ◆
SharePoint 2007 servers: • Central Administration site and shared services: This is usually installed on an application server. • Front-end web servers: This is the web page-based user interface to manage the server. • Index server: Can be included on the query server if there is only one query server. • Query servers: If there is more than one query server, the index server cannot be included on a query server. • Application servers: For example, Excel Calculation Services. • Microsoft SQL Server: This server contains the SharePoint databases: – Configuration database (only one per farm) – Content databases (one or more per farm) – Search database (one or more per farm) Microsoft Office SharePoint Server backup and recovery
111
Microsoft Office SharePoint Server Backup and Recovery
!
IMPORTANT To back up the entire farm, the NMM client must be installed on each server hosting SharePoint data, and at least one front-end server.
Configuration Database Content Database
NetWorker Server 7.3.3 or later: Administers protection for NetWorker clients such as NMM
Web Front End Index Server Query Server Microsoft SQL Server NetWorker Module for Microsoft Applications GEN-000751
Figure 10
SharePoint 2007 stand-alone farm configuration
Query Server Index Server If there is more than Query Server, the Query Servers cannot be included on the Index Server NetWorker Module for Microsoft Applications
Configuration Database (1 per farm) NetWorker Server 7.3.3 or later: Administers protection for NetWorker clients such as NMM
Content Database 1 (1 or more per farm)
Web Front End On an application server NetWorker Module for Microsoft Applications
Content Database 2
Microsoft SQL Server Contains all SharePoint databases NetWorker Module for Microsoft Applications
GEN-000752
Figure 11 112
SharePoint 2007 distributed farm configuration
EMC NetWorker Module for Microsoft Applications Release 2.0 Administration Guide
Microsoft Office SharePoint Server Backup and Recovery
SharePoint 2007 data backed up by NMM NMM client backs up the following SharePoint components: ◆
Configuration database: SQL configuration database
◆
Content databases: SQL content databases
◆
SharePoint Search: SharePoint Search Index and associated SQL database
◆
Office Search: Office Search Index and associated SQL database
Note: The Search and Index databases cannot be backed up by themselves. Search/Index databases are backed up and recovered as part of Farm-level backup and recovery.
Keeping backups and recoveries in sync You should set up a consistent schedule of full farm-level backups. If backing up individual content databases, schedule these in between the full farm-level backups. However, whenever there are significant changes to the SharePoint farm, you should immediately update the NetWorker backup configuration with any new SharePoint objects, and perform a new full farm-level backup as soon as possible. Configuration or database structure changes
Any major changes made to the SharePoint configuration or database structure requires an update of the save set lists and a full backup. For example, if a full farm backup is performed on Monday, and then the user adds a new content database on Tuesday, a full backup needs to be performed to keep the backups up-to-date. For the full backup to be up-to-date, the NetWorker backup configuration must be manually updated to include the new database save sets. Out-of-sync expiration policies between clients
In a distributed farm, a snapshot policy is specified at the group level, to apply uniformly to all SharePoint clients in a group. The snapshot policy is then applied to each client independently. As long as the farm is working properly in a steady state, the snapshot expiration policy for the group and for each client stay in sync. But if one of the clients fails, and you do a manual rollover or a delete on one of the hosts, the rest of the hosts fall out-of-sync. When they get out-of-sync, some of the snapshots will expire and a full recovery is no longer possible from those snapshots. To bring the snapshots up-to-date, run a new full backup. A full backup of a distributed farm requires special steps in configuring the Client resources, as described in “To configure a SharePoint Client resource to perform a full back up of a distributed farm” on page 119, and in running the backup, as described in “Performing a full backup for a distributed SharePoint farm” on page 122.
Components used by NMM for SharePoint backup and recovery NMM uses the following files and commands to back up SharePoint data: ◆
VSS writers — NMM uses the VSS writers provided by Microsoft for SharePoint 2007, as well as a writer to back up the SQL database: • SqlServer Writer — Writer that backs up the SQL databases. • SharePoint Services Writer — Writer for SharePoint 2007, that runs on the Web front end. • SharePoint Search Writer — Writer for SharePoint 2007 search.
Microsoft Office SharePoint Server backup and recovery
113
Microsoft Office SharePoint Server Backup and Recovery
• Office Server Search Writer — Writer for Microsoft Office Server search.
Specifying SharePoint 2007 save sets for application data Table 17 on page 114 lists the SharePoint 2007 save set syntax to specify for supported types of SharePoint 2007 data. Specify SharePoint 2007 data save sets in the Save Set attribute of a Client resource. Table 17
SharePoint save set syntax Type of backup data
Save set syntax
SharePoint databases on SQL Server
APPLICATIONS:\SqlServerWriter
Full SharePoint backup The SharePoint Search Index and SharePoint Content Index are included when this save set is specified.
APPLICATIONS:\Microsoft Office SharePoint Services
SharePoint content database A specific content database. For example, on the host Mars1, a database named generic_database_1
APPLICATIONS:\Microsoft Office SharePoint Services\Mars1\generic_database_1
SharePoint Search Index and SharePoint Content Index
SYSTEM COMPONENTS:\Microsoft Office SharePoint Search or SYSTEM COMPONENTS:\Microsoft Office Search
Note: The Search and Index databases cannot be backed up by themselves. Search/Index databases are backed up as part of a Farm-level SharePoint backup.
Note: The Search and Index saveset names are provided for information only. These databases cannot be backed up by themselves. Search/Index databases are backed up as part of a Farm-level SharePoint backup.
Note: The Search and Index databases cannot be backed up by themselves. Search/Index databases are backed up as part of a Farm-level SharePoint backup.
Displaying valid SharePoint 2007 data save sets To display a list of the SharePoint 2007save sets that are available for backup: 1. Open a command-prompt on the application server. 2. From the command-prompt, type the following command to list the valid application data save set names. If the application server is not on a virtual host, type: nsrsnap_vss_save -? If the application server is on a virtual host, type: nsrsnap_vss_save -? -c virtual_server_name Note: If the application server is on a virtual host, run this command from the physical node that is currently hosting the application server.
114
EMC NetWorker Module for Microsoft Applications Release 2.0 Administration Guide
Microsoft Office SharePoint Server Backup and Recovery
3. Press Enter. The application data save sets that are available for backup are listed in a format similar to the following: APPLICATIONS:\Microsoft Office SharePoint Services Each line of output corresponds to a save set entry that you can add to the Save Set attribute of a Client resource. Each entry that you add to the Save Set attribute must be typed on a separate line.
URL encoding for SharePoint save sets When specifying save set names in the Save Set attribute of the Client resource, there are cases where special characters, such as the backslash (\), must be specified by their URL-encoded values. URL-encoded values are used to represent special characters when naming SQL or SharePoint 2007 save sets. Table 18 on page 116 lists the most commonly used special characters and their URL values. Note: Save sets displayed by the nsrsnap_vss_save - ? command will already include the URL encoding.
The name of a SQL Server named instance or SharePoint Server content database consists of two parts: the name of the host and a unique name. These two parts are always separated with a backslash (\) character. When specifying a SQL Server named instance in the Save Set attribute, replace the backslash with its URL-encoded value, which is %5C. In the following example, a SQL Server named instance that is identified as: CORPDBSERV1\YUKON would be represented in the Save Set attribute as: CORPDBSERV1%5CYUKON To back up only the database named NADATA in the SQL Server named instance CORPDBSERV1\YUKON, the complete entry in the Save Set attribute would be: APPLICATIONS:\SqlServerWriter\CORPDBSERV1%5CYUKON\NADATA If the database name in the previous example was NA#DATA, the “#” would be replaced with the URL-encoded value “%23”. The save set entry would be: APPLICATIONS:\SqlServerWriter\CORPDBSERV1%5CYUKON\NA%23DATA When specifying a SharePoint Server content database in the Save Set attribute, replace the backslash with its URL-encoded value, which is %5C. In the following example, a SharePoint Server content database that is identified as: Mars1\generic_database_1 would be represented in the Save Set attribute as: Mars1%5generic_database_1 To back up only the database named “generic_database_1” on the server “Mars1” the complete entry in the Save Set attribute would be: APPLICATIONS:\Microsoft Office SharePoint Services\Mars1%5generic_database_1
Microsoft Office SharePoint Server backup and recovery
115
Microsoft Office SharePoint Server Backup and Recovery
Table 18
Special characters and their URL-encoded values Special character
URL-encoded value
Special character
URL-encoded value
\
%5C
?
%3F
/
%2F
]
%5D
"
%22
[
%5B
%
%25
}
%7D
#
%23
{
%7B
&
%26
^
%5E
%3E
|
%7C
SharePoint 2007 Application information variable settings Table 19 on page 116 lists the variables that can be specified in the Application information attribute of the Client resource. Table 19
116
SharePoint application information variable settings Attribute name
Description
Values
NSR_SNAP_TYPE=value
Specifies the snapshot service provider name.
vss This value is required.
NSR_DATA_MOVER=value
Specifies the hostname of the NMM Client that moves snapshots from the NMM Client to primary and secondary (conventional) storage. The host can be either a local host or a proxy client host.
• The local host • The proxy client hostname If no value is entered, the local host is used as the data mover. If you are setting up a proxy client for a virtual cluster server, you must also type the proxy client hostname in the Remote Access attribute of the Client resource. For serverless backups, specify a proxy client.
EMC NetWorker Module for Microsoft Applications Release 2.0 Administration Guide
Microsoft Office SharePoint Server Backup and Recovery
Performing SharePoint Server backups NMM backup of SharePoint provides: ◆
Point-in-time snapshots, which include exact copies of files and open files.
◆
Full SharePoint Server backup.
◆
SharePoint Content and Configuration Database backup.
Configuring SharePoint 2007 backups The NMM client must be installed on each machine in the SharePoint farm. In addition, for distributed configurations, the SharePoint writer must be registered on on one and only one of the web front-end servers. This web front-end server will be included in the NetWorker backup schedule, and will be used to perform any recoveries. To register SharePoint writer, run the following command line: STSADM.EXE –o registerwsswriter The default location for STSADM.EXE is in the following folder: C:\Program Files\Common Files\Microsoft Shared\web server extensions\12\BIN Once the writer is registered, the first four tasks for scheduling a backup are the same for all VSS writers supported by NMM. “Configuring a Scheduled Backup” on page 43 describes these tasks in detail: ◆
“Task 1: Configure a backup pool for snapshot operations” on page 48
◆
“Task 2: Configure snapshot policies” on page 51
◆
“Task 3: Configure a backup schedule” on page 54
◆
“Task 4: Configure a backup group” on page 55
NMM provides full backup and backup of individual content databases, which allows you to protect your SharePoint farm with individual content database backups between full backups. Consider configuring separate backup schedules for full backups and individual content database backups. The next task is specific to configuring a SharePoint Client resource: “Task 5: Configure a SharePoint Client resource” on page 118
Performing SharePoint Server backups
117
Microsoft Office SharePoint Server Backup and Recovery
Task 5: Configure a SharePoint Client resource For each machine in the SharePoint farm, create a Client resource in NetWorker Management Console, and assign it to the same backup group. In a stand-alone SharePoint configuration, only one component is required in the save set to perform a full backup. The steps to back up a stand-alone farm are described in “To configure a SharePoint Client resource to back up a stand-alone farm” on page 118. In a distributed configuration, you must set up a Client resource for the web front-end server where the SharePoint 2007 VSS Writer was enabled using (STSADM). You do not need a Client resource on each web front-end unless you are implementing a system-level disaster recover backup schedule for these hosts. The Client resource can specify to perform a full farm backup, or to back up a content database. The components to specify in the save set for a particular machine are determined by performing the steps in “Displaying valid SharePoint 2007 data save sets” on page 114 on that machine. A full backup of a distributed farm requires special steps in configuring the Client resources, as described in “To configure a SharePoint Client resource to perform a full back up of a distributed farm” on page 119. There are also special steps when running the backup, as described in “Performing a full backup for a distributed SharePoint farm” on page 122. To configure a SharePoint Client resource to back up a stand-alone farm
1. In the Administration window of the NetWorker Management Console, click Configuration. 2. In the expanded left pane, select Clients. 3. From the File menu, select New. 4. In the Name attribute, type the hostname of the NetWorker client computer. 5. In the Comment attribute, type a description. If you are creating multiple Client resources for the same NetWorker client host computer, use this attribute to differentiate the purpose of each resource. 6. From the Browse Policy attribute, select a browse policy from the list. The browse policy determines how long rolled-over data is available for quick access. 7. From the Retention Policy attribute, select a retention policy from the list. The retention policy determines how long rolled-over data is available though not necessarily quickly. 8. Select the Scheduled Backups attribute. 9. In the Save Set attribute, specify the components to be backed up. Place multiple entries on separate lines. To back up all SharePoint Server data, where all server components are located on the same machine, specify the save set name: APPLICATIONS:\Microsoft Office SharePoint Services
The SharePoint Server save set syntax is described in “Specifying SharePoint 2007 save sets for application data” on page 114. 10. If needed, use URL-encoded values when specifying save set names in the Save Set attribute of the Client resource.
118
EMC NetWorker Module for Microsoft Applications Release 2.0 Administration Guide
Microsoft Office SharePoint Server Backup and Recovery
URL-encoded values are used to represent special characters such as the backslash (\), and a table of values is provided in “URL encoding for SharePoint save sets” on page 115. Note: If a save set is copied from the nsrsnap_vss_save - ? output, it will already include the URL encoding.
11. For the Group attribute, select the backup group to which this Client resource will be added. If Client resources for the same NMM Client host are added to different backup groups, ensure that the Start Time attribute for each backup group is spaced far enough apart so that the backups for the host’s Client resources do not overlap. 12. For the Schedule attribute, select a backup schedule. 13. Click the Apps & Modules tab. 14. In the Backup command attribute, type the backup command. For all types of backup data except for Active Directory conventional backups, type: nsrsnap_vss_save.exe 15. In the Application information attribute, type the following variable and value:
NSR_SNAP_TYPE=vss Type SharePoint application variable settings and their values on separate lines. These settings are described in Table 19 on page 116. 16. Click the Globals (1 of 2) tab. 17. In the Aliases attribute, type the NETBIOS name for the client. Note: NMM Client uses the host machine NETBIOS or “short” name when connecting to the NetWorker server to browse backups. If the NETBIOS name is not found, NMM will not be able to display backups.
18. Click OK. To configure a SharePoint Client resource to perform a full back up of a distributed farm
Repeat step 1 on page 119 - step 18 on page 121 for each machine in the farm, specifying the appropriate save set for the machine in step 9 on page 120 . For a distributed farm backup, add all client resources for the farm members to the same NetWorker backup group. After the Client resources have been configured on each machine, the backup process itself requires special steps as described in “Performing a full backup for a distributed SharePoint farm” on page 122: 1. In the Administration window of the NetWorker Management Console, click Configuration. 2. In the expanded left pane, select Clients. 3. From the File menu, select New. 4. In the Name attribute, type the hostname of the NetWorker client computer. 5. In the Comment attribute, type a description. If you are creating multiple Client resources for the same NetWorker client host computer, use this attribute to differentiate the purpose of each resource. 6. From the Browse Policy attribute, select a browse policy from the list. The browse policy determines how long rolled-over data is available for quick access. Task 5: Configure a SharePoint Client resource
119
Microsoft Office SharePoint Server Backup and Recovery
7. From the Retention Policy attribute, select a retention policy from the list. The retention policy determines how long rolled-over data is available. 8. Select the Scheduled Backups attribute. 9. In the Save Set attribute, specify the components to be backed up: Note: Each machine in a distributed farm requires a separate Client resource, and the Client resource for a given machine should only contain the SharePoint save sets on that machine.
• For the machine where the SharePoint VSS writer is registered, specify the save set name: APPLICATIONS:\Microsoft Office SharePoint Services Then proceed to step 10 on page 120 . • For the SQL Server machine, specify the save set name: APPLICATIONS:\SqlServerWriter Then proceed tostep 10 on page 120 . • For all other SharePoint machines, determine the save sets available on the specific machine by following the steps in “Displaying valid SharePoint 2007 data save sets” on page 114. Specify the available save set names for that machine. Then proceed to step 10 on page 120 . Note: The Search and Index databases cannot be backed up by themselves. Search/Index databases are backed up as part of a Farm-level SharePoint backup.
The SharePoint Server save set syntax is described in “Specifying SharePoint 2007 save sets for application data” on page 114. 10. If needed, use URL-encoded values when specifying save set names in the Save Set attribute of the Client resource. URL-encoded values are used to represent special characters such as the backslash (\), and a table of values is provided in “URL encoding for SharePoint save sets” on page 115. Note: If a save set is copied from the nsrsnap_vss_save - ? output, it will already include the URL encoding.
11. For the Group attribute, select the backup group to which this Client resource will be added. For a distributed farm backup, add all client resources for the farm members to the same NetWorker backup group. 12. For the Schedule attribute, select a backup schedule. 13. Click the Apps & Modules tab. 14. In the Backup command attribute, type the backup command. For all types of backup data except for Active Directory conventional backups, type: nsrsnap_vss_save.exe
120
EMC NetWorker Module for Microsoft Applications Release 2.0 Administration Guide
Microsoft Office SharePoint Server Backup and Recovery
15. In the Application information attribute, type the following variable and value: NSR_SNAP_TYPE=vss
Type SharePoint application variable settings and their values on separate lines. These settings are described in Table 19 on page 116. 16. Click the Globals (1 of 2) tab. 17. In the Aliases attribute, type the NETBIOS name for the client. Note: NMM Client uses the host machine NETBIOS or “short” name when connecting to the NetWorker server to browse backups. If the NETBIOS name is not found, NMM will not be able to display backups.
18. Click OK. To configure a SharePoint Client resource to back up a component on a machine in a distributed farm
1. In the Administration window of the NetWorker Management Console, click Configuration. 2. In the expanded left pane, select Clients. 3. From the File menu, select New. 4. In the Name attribute, type the hostname of the NetWorker client computer. 5. In the Comment attribute, type a description. If you are creating multiple Client resources for the same NetWorker client host computer, use this attribute to differentiate the purpose of each resource. 6. From the Browse Policy attribute, select a browse policy from the list. The browse policy determines how long rolled-over data is available for quick access. 7. From the Retention Policy attribute, select a retention policy from the list. The retention policy determines how long rolled-over data is available though not necessarily quickly. 8. Select the Scheduled Backups attribute. 9. In the Save Set attribute, specify the components to be backed up. Place multiple entries on separate lines: • To back up all SharePoint databases (Configuration database and Content databases), specify the save set name: APPLICATIONS:\SqlServerWriter Then proceed to step 10 on page 122 . • To back up a specific Content database (The Configuration database cannot be backed up by itself), specify the save set name: APPLICATIONS:\SqlServerWriter\ Then proceed to step 10 on page 122 . Note: The Search and Index databases cannot be backed up by themselves. Search/Index databases are backed up as part of a Farm-level SharePoint backup.
The SharePoint Server save set syntax is described in “Specifying SharePoint 2007 save sets for application data” on page 114.
Task 5: Configure a SharePoint Client resource
121
Microsoft Office SharePoint Server Backup and Recovery
10. If needed, use URL-encoded values when specifying save set names in the Save Set attribute of the Client resource. URL-encoded values are used to represent special characters such as the backslash (\), and a table of values is provided in “URL encoding for SharePoint save sets” on page 115. 11. For the Group attribute, select the backup group to which this Client resource will be added. If Client resources for the same NMM Client host are added to different backup groups, ensure that the Start Time attribute for each backup group is spaced far enough apart so that the backups for the host’s Client resources do not overlap. 12. For the Schedule attribute, select a backup schedule. 13. Click the Apps & Modules tab. 14. In the Backup command attribute, type the backup command. For all types of backup data except for Active Directory conventional backups, type: nsrsnap_vss_save.exe
15. In the Application information attribute, type the following variable and value: NSR_SNAP_TYPE=vss
Type SharePoint application variable settings and their values on separate lines. These settings are described in “SharePoint application information variable settings” on page 116. 16. Click the Globals (1 of 2) tab. 17. In the Aliases attribute, type the NETBIOS name for the client. Note: NMM Client uses the host machine NETBIOS or “short” name when connecting to the NetWorker server to browse backups. If the NETBIOS name is not found, NMM will not be able to display backups.
18. Click OK.
Performing a full backup for a distributed SharePoint farm In a distributed SharePoint farm, one or more SharePoint services may be located remotely on separate machines from the SharePoint web front-end. In order for NetWorker to successfully save all Client resources in the SharePoint farm, backups must be initiated through the Client resource on each remote machine, as well as the web front-end, and all client resources must be in the same NetWorker group. If the backup is only initiated through the web front-end, recovery will fail because even though NMM displays all of the SharePoint farm savesets on the web front-end, the remote client backups were never performed.
122
EMC NetWorker Module for Microsoft Applications Release 2.0 Administration Guide
Microsoft Office SharePoint Server Backup and Recovery
To perform a full backup for a distributed SharePoint farm: 1. Configure a Client resource for each machine, as described in “To configure a SharePoint Client resource to perform a full back up of a distributed farm” on page 119. Note: All clients in the farm must be part of the same backup group.
2. Run the NetWorker group to back up the data for all of the members of the farm. After the full backup, to perform a recovery it must be initiated from the web front end. In that process, NMM prompts you to recover each remote machine before recovering the web front-end machine. These steps are described in “Full recovery of a distributed SharePoint farm” on page 124.
Task 5: Configure a SharePoint Client resource
123
Microsoft Office SharePoint Server Backup and Recovery
Performing SharePoint 2007 recovery After the backup is complete, NMM truncates the files. When the files are backed up, administrators can perform: ◆
“Full recovery of a stand-alone SharePoint farm” on page 124
◆
“Full recovery of a distributed SharePoint farm” on page 124
◆
“Recovery of individual SharePoint Content Databases” on page 126
◆
“Recovery of SharePoint Search/Content Indexes” on page 126
◆
“SharePoint disaster recovery” on page 128
Mandatory order for SharePoint recoveries In all SharePoint recoveries, the recovery process must be performed in the following sequence: 1. Configuration database 2. Content databases Note: Data loss will occur if this sequence is not followed in order.
Selecting valid items for recovery All valid SharePoint items available for recovery are displayed in the APPLICATIONS folder in NMM. A SYSTEM COMPONENTS node may be listed in NMM after a SharePoint backup, but it does not contain valid savesets. Selecting SharePoint items from the SYSTEM COMPONENTS node will result in errors and failed recovery.
Full recovery of a stand-alone SharePoint farm To perform a full recovery of Microsoft Office SharePoint Portal Server 2007: 1. Open NetWorker Module for Microsoft Applications. 2. In the navigation tree, expand the APPLICATIONS folder and select SharePoint Services Writer. 3. From the System Recover Session toolbar, click Start Restore. Recovery proceeds to completion. Details about the recovery appear in the monitoring window.
Full recovery of a distributed SharePoint farm A full recovery of a distributed SharePoint farm requires that each machine in the farm is configured as a Client resource, and each remote machine was backed up before the web front end machine was backed up. These steps are described in “Performing a full backup for a distributed SharePoint farm” on page 122.
124
EMC NetWorker Module for Microsoft Applications Release 2.0 Administration Guide
Microsoft Office SharePoint Server Backup and Recovery
To perform a full recovery of Microsoft Office SharePoint Portal Server 2007: 1. Open NetWorker Module for Microsoft Applications on the web front-end that was used to perform the backups of the SharePoint 2007 Writer. 2. In the navigation tree, expand the APPLICATIONS folder and select SharePoint Services Writer. 3. From the System Recover Session toolbar, click Start Restore. The Restore Remote Dependencies dialog box appears, alerting you to go to the specified hosts and start the recovery processes. Figure 12 on page 125, shows an example of several remote hosts that must be recovered. In this example, though 13 service components are displayed, they are located on three remote hosts. You would need to go to each of those three hosts once to recover all 13 services.
Figure 12
Restore Remote Dependencies dialog box
4. At each remote host listed in the Restore Remote Dependencies dialog box: a. Open NetWorker Module for Microsoft Applications. b. In the navigation tree, locate and mark the items. c. Restore the items. 5. After all remote hosts have been recovered, return to NetWorker Module for Microsoft Applications on the web front-end and click Continue in the Restore Remote Dependencies dialog box. Recovery proceeds to completion. Details about the recovery are displayed in the monitoring window.
Performing SharePoint 2007 recovery
125
Microsoft Office SharePoint Server Backup and Recovery
Recovery of individual SharePoint Content Databases One or more content databases can be recovered after the configuration database has been restored. To perform a recovery of one or more individual Microsoft Office SharePoint Server 2007 Content Databases: 1. Open NetWorker Module for Microsoft Applications on the web front-end that was used to perform the backups of the SharePoint 2007 Writer. 2. In the navigation tree, expand the APPLICATIONS folder and select the SharePoint Services Writer. 3. Expand the SharePoint Services Writer folder until you find a database folder with an entry similar to the following example: APPLICATIONS:\Microsoft Office SharePoint Services\Mars1\db_1 where Mars1 is the name of the server and db_1 is the name of the database. 4. Select the databases you want to restore. 5. From the System Recover Session toolbar, click Start Restore. The Restore Remote Dependencies dialog box appears, alerting you to go to the specified hosts and start the recovery processes. 6. At the remote host: a. Open NetWorker Module for Microsoft Applications. b. In the navigation tree, locate and mark the items. c. Restore the items. 7. Return to NetWorker Module for Microsoft Applications on the web front-end, and click Continue in the Restore Remote Dependencies dialog box. Recovery proceeds to completion. Details about the recovery appear in the monitoring window.
Recovery of SharePoint Search/Content Indexes To perform a full recovery of Microsoft Office SharePoint Server 2007: 1. Open NetWorker Module for Microsoft Applications. 2. In the navigation tree, expand the SYSTEM COMPONENTS folder and select SPSearch VSS Writer and OSearch VSS Writer. 3. From the System Recover Session toolbar, click Start Restore. The Restore Remote Dependencies dialog box appears, alerting you to go to the specified hosts and start the recovery process. 4. Go to the remote host, and verify that the configuration database needs to be recovered. If it needs to be recovered, then recover it. 5. Return to NetWorker Module for Microsoft Applications and click Continue in the Restore Remote Dependencies dialog box. Recovery proceeds to completion. Details about the recovery appear in the monitoring window.
126
EMC NetWorker Module for Microsoft Applications Release 2.0 Administration Guide
Microsoft Office SharePoint Server Backup and Recovery
Rollback of SharePoint SQL databases NMM does not support a SharePoint SQL rollback. SharePoint content databases are backed up by NMM, but the master SQL database is not. The master database can be backed up separately and then used in a SharePoint SQL rollback. To back up SharePoint for rollback of SharePoint SQL databases, take a backup of the master database each time a NMM SharePoint backup is taken. To perform a full rollback, restore the backups created by the NMM SharePoint backup and then restore the SharePoint SQL master database.
Performing SharePoint 2007 recovery
127
Microsoft Office SharePoint Server Backup and Recovery
SharePoint disaster recovery One of the keys to successful disaster recovery is making sure you have a full and complete backup available before disaster strikes. Plan your backup schedule and strategy to ensure that you always have an up-to-date backup available in case of disaster. SharePoint Disaster Recovery is more than restoring a full backup. NMM backs up the SharePoint configuration and content databases, and the query and index servers. In a disaster recovery, you need to restore the Internet Information Service (IIS), SQL, and SharePoint Servers that make up the farm, including file systems and registries of each machine. Full disaster recovery requires that the following backups are performed ahead of time: ◆
“NMM backup of SharePoint servers” on page 128.
◆
NMM full backup of Microsoft Office SharePoint Server 2007 as described in “Configuring SharePoint 2007 backups” on page 117.
To perform a SharePoint Disaster Recovery: 1. Recover/restore the SharePoint servers that were backed up by NMM. “Performing a disaster recovery of a NMM Client” on page 84 provides more information about recovering the NMM Client. 2. Perform a recovery of the SharePoint farm as described in “Full recovery of a stand-alone SharePoint farm” on page 124.
NMM backup of SharePoint servers The Microsoft Office SharePoint Server 2007 installation directory, web parts, IIS virtual servers, :\Inetpub, and the Registry reside on all web front-end servers, application servers, and database server. To protect these critical components, ensure that you have a backup strategy that includes file system and system state backups of each SharePoint server. You should also back up the Global Assembly Cache (GAC). The GAC contains.NET assemblies installed by SharePoint. The following sections describe how to back up these items: ◆
“Backing up SharePoint critical components” on page 128
◆
“Backing up the Global Assembly Cache” on page 129
Backing up SharePoint critical components
Back up the following folders by using NMM: ◆
Microsoft Office SharePoint Server 2007 installation directory on all the servers in the farm
◆
SQL installation directory on database server
◆
Virtual directories of following IIS websites on all servers in the farm: • Default website • SharePoint Central Admin • Web application • SSP web application
128
EMC NetWorker Module for Microsoft Applications Release 2.0 Administration Guide
Microsoft Office SharePoint Server Backup and Recovery
◆
IIS, Microsoft Office SharePoint Server 2007, and SQL logs: • Internet Information Services logs (*.log) at C:\Winnt\System32\Logfiles\W3svc1\ • Usage analysis log at C:\Windows\System32\LogFiles\STS\ if usage analysis is enabled • Other Windows SharePoint Services logs, STSAdm.log and OWSTimer.log, from the C:\Documents and Settings\Windows_SharePoint_Services_Administrator_Account\Local Settings\Temp directory
◆
SharePoint configuration files. The directory at C:\Program Files\Common Files\Microsoft Shared\web server extensions
◆
IIS backup
◆
Registry backup on all servers
Backing up the Global Assembly Cache
The .NET assemblies installed in Global Assembly Cache (GAC) are not backed up by any of the SharePoint writers. To back up the GAC, back up the items as regular file system objects. The DLLs located in GAC are installed by applications and can be reinstalled during Disaster Recovery. The GAC includes SharePoint assemblies, and possibly your own custom assemblies. The GAC files are represented in Windows Explorer under C:\WINDOWS\assembly. The actual location can only be navigated to using the command line. For example, Microsoft.SharePoint.dll assembly is located in the following folder: C:\WINDOWS\assembly\GAC_MSIL\Microsoft.SharePoint\12.0.0.0__71 e9bce111e9429c
SharePoint disaster recovery
129
Microsoft Office SharePoint Server Backup and Recovery
130
EMC NetWorker Module for Microsoft Applications Release 2.0 Administration Guide
6 Microsoft Exchange Backup and Recovery
This chapter includes the following topics: ◆ ◆ ◆ ◆
Microsoft Exchange Server backup and recovery .................................................. 132 Performing Exchange Server backups ..................................................................... 143 Task 5: Configure an Exchange Client resource...................................................... 144 Performing Exchange Server recovery..................................................................... 146
Microsoft Exchange Backup and Recovery
131
Microsoft Exchange Backup and Recovery
Microsoft Exchange Server backup and recovery This chapter supplements the overall NetWorker Module for Microsoft Applications (NMM) backup procedures in Chapter 2, “Configuring a Scheduled Backup,” and recovery procedures in Chapter 3, “Recovering Data,” with the specific details needed to back up and recover Microsoft Exchange Server 2003 and 2007: ◆
NetWorker, Windows Server, and Exchange Server versions supported
◆
Types of Exchange data backed up
◆
Types of backup and recovery available
◆
Exchange application writers
◆
Exchange save set syntax
◆
Serverless backup
◆
Recovery options
◆
Best practices
Microsoft Exchange Server 2003 and Exchange Server 2007 support Volume Shadow Copy Service (VSS) through Microsoft-supplied application writers. Using the VSS writers, you can back up and restore Exchange databases and transaction log files. NMM can restore storage groups or email messages quickly, regardless of database size. Previous versions of NetWorker did not allow selection of storage groups for backup. The administrator had to restore the entire Exchange system in order to restore single deleted email messages. With NMM, the administrator can restore deleted email messages from a particular group by restoring just that group. NMM allows the creation of a point-in-time copy of data. The snapshot includes exact copies of data and open files. This allows the backup of the Exchange server while the Exchange database is online or in use.
Exchange Server versions supported by NMM client NMM client supports the following versions of Microsoft Exchange Server: ◆
Microsoft Exchange Server 2003 (x86)
◆
Microsoft Exchange Server 2007 (x64) SP1 or later
Note: NMM does not support Microsoft Exchange Server 2000 or earlier.
The EMC Information Protection Software Compatibility Guide provides the most up-to-date lists of hardware, operating system, service pack, and application versions supported by the NMM client.
Exchange backup and recovery types NMM supports several types of backup and recovery: ◆
Backup Level supported — Full only
◆
For Microsoft Exchange Server 2003: • Point-in-time snapshot — Backup of exact copies of files and open files. • Exchange Server backup — Backup of Exchange databases, logs, and storage groups.
132
EMC NetWorker Module for Microsoft Applications Release 2.0 Administration Guide
Microsoft Exchange Backup and Recovery
• Storage group backup — Backup of an individual storage group by creating a save set that specifies just that storage group. • Roll-forward recovery — Can be performed when the current log LUN is available. No data is lost when restoring from backup. Recovers the Exchange data from the last backup, and allows granular recovery selection down to the individual mailbox level. Deleted email is not recovered. • Point-in-time recovery — Use when log files have been lost. All new data after the last backup is lost - only the transaction files that were part of the backup set are restored. Deleted mail can be recovered. • Roll-back restore — Also known as a “destructive recovery,” because all changes that were made after the selected snapshot was taken are overwritten. The whole snapshot must be selected for recovery; storage groups within a snapshot cannot be selected for recovery. A single storage group can be recovered if the save set specified only that storage group for backup. ◆
For Microsoft Exchange Server 2007, NMM supports the backup and recovery options listed for Exchange Server 2003, and in addition supports: • Backup in a Cluster Continuous Replication (CCR) environment that is running on the active node or the passive node. • Backup in a Local Continuous Replication (LCR) environment of the production data, but not of the replicated data.
Updating and modifying Exchange credentials Exchange credentials are configured during NMM installation. Usually, you will have a specific account that you run your Exchange Services under. If Exchange Server is installed after NMM is installed, or if the Exchange credentials have changed, NMM must be updated with the new credential information. Modifying Exchange Server 2003 credentials
When installing NMM or when running the nwexinfo utility, enter the correct credentials. Otherwise backup of Client resource fails, even when the backup does not include Exchange data. To update Exchange Server 2003 credentials, run the nwexinfo.exe utility. The EMC NetWorker Module for Microsoft Applications Release 2.0 Installation Guide provides more information about initial setup of Exchange credentials during NMM installation. Modifying Exchange Server 2007 credentials
NMM installation configures your Exchange Server access with the username and account information you specify. If the credentials for the Exchange Server 2007 account change after the initial NMM installation, then NMM must be updated with the new credentials. You can use the following procedure to change the user account or password information for the COM+ component and the Replication Manager Exchange Interface Service. To update Exchange Server 2007 credentials: 1. Start component services. 2. Expand Computers > My Computer > DCOM Configuration. 3. Right-click Replication Manager Exchange Interface and select Properties from the context menu.
Microsoft Exchange Server backup and recovery
133
Microsoft Exchange Backup and Recovery
4. Click the Identity tab. 5. Modify the domain user account or password and click OK. This will also modify the account information for the Replication Manager Exchange Interface Service.
Compatibility with previous Exchange backups The Exchange database and logs that are backed up using previous versions of NetWorker may not be restored using NetWorker Module for Microsoft Applications. After upgrading to NMM, perform a full backup of Exchange in order to use NMM to perform point-in-time restores in the future: ◆
To restore Exchange backups created with NetWorker Module for Exchange 5.x, use NetWorker Module for Exchange. After the recovery, perform a full backup of the Exchange server with NMM.
◆
To restore backups created with NetWorker VSS Client for Microsoft Windows 1.0, including backups created before the upgrade to NetWorker Module for Microsoft Applications 2.0, use NMM.
Note: Upgrades to Microsoft Exchange Server, including Exchange Service Pack upgrades, do not allow recovery from a backup created before the upgrade. After an Exchange Server upgrade, perform a full backup to ensure that you have a new recoverable backup.
Exchange data backed up by NMM NetWorker Module for Microsoft Applications supports only full backups. It backs up the following Exchange data: ◆
Mounted Exchange databases
◆
Transaction log files
◆
Checkpoint files in a storage group
Components used by NMM for Exchange backup and recovery NMM uses the following commands and Exchange-specific attributes to back up Exchange data: ◆
Application writers NMM uses the application writers provided by Microsoft Exchange Server. There is one writer for Exchange 2003, and two for Exchange 2007: an Information Store writer and a Replication Service writer. The Replication Service writer is only used in a CCR environment.
◆
Nsrsnap_vss_save The NMM command to initiate the VSS-based backup. This command can be used with options for consistency checking and Jet error checking.
◆
NSR_CHECK_JET_ERRORS Option used with nsrsnap_vss_save to detect Jet errors in the Exchange backup. NSR_CHECK_JET_ERRORS is run before committing the shadow copy for Exchange.
134
EMC NetWorker Module for Microsoft Applications Release 2.0 Administration Guide
Microsoft Exchange Backup and Recovery
◆
eseutil A program provided by Microsoft Exchange server to check that the database and log files do not contain errors, and that the Exchange server is valid for restore.
◆
Nsrsnap_vss_recover The NMM command to initiate the VSS-based recovery.
◆
NSR_MOUNT_DB Specifies whether the database should be online or offline after restore.
◆
NSR_MOVE_TRANSLOGS Specifies the type of Exchange recovery - replay logs or replace logs for point-in-time recovery.
◆
NSR_VIRT_SERV Specifies the name of the Exchange Virtual Server Client resource in a CCR passive node backup.
◆
NSR_INDEX_CLIENT Specifies to index the backup under the client name of the Exchange Virtual Server, not the passive node client name in a CCR passive node backup.
Specifying Exchange save sets for application data Table 20 on page 135 lists the Exchange save set syntax to specify for supported types of Exchange data. Specify Exchange data save sets in the Save Set attribute of a Client resource. Table 20
Exchange save set syntax (page 1 of 2) Type of data to back up
Save set syntax
Exchange Server 2003, all Exchange storage groups.
APPLICATIONS:\Microsoft Exchange Writer
Exchange Server 2003, a specific Exchange storage group. For example, a storage group named first_group.
APPLICATIONS:\Microsoft Exchange Writer\first_group Some special characters in an Exchange storage group name must be replaced with URL-encoded values. “URL encoding for Exchange save sets” on page 137 provides more information about URL encoding.
Exchange Server 2007 (Information Store), all Exchange storage groups.
APPLICATIONS:\Microsoft Exchange 2007
Microsoft Exchange Server backup and recovery
135
Microsoft Exchange Backup and Recovery
Table 20
Exchange save set syntax (page 2 of 2) Type of data to back up
Save set syntax
Exchange Server 2007 (Information Store), a specific storage group. For example, a storage group named first_storage_group.
APPLICATIONS:\Microsoft Exchange 2007\first_storage_group Some special characters in an Exchange storage group name must be replaced with URL-encoded values. “URL encoding for Exchange save sets” on page 137 provides more information about URL encoding.
Exchange Server 2007 (Replication Service). all Exchange storage groups.
APPLICATIONS:\Microsoft Exchange 2007
Exchange Server 2007 (Replication Service), a specific storage group. For example, a storage group named second_storage_group.
APPLICATIONS:\Microsoft Exchange 2007\second_storage_group Some special characters in an Exchange storage group name must be replaced with URL-encoded values. “URL encoding for Exchange save sets” on page 137 provides more information about URL encoding.
Displaying valid Exchange data save sets
To display a list of the Exchange save sets that are available for backup: 1. Open a command-prompt on the application server. 2. From the command-prompt, type the following command to list the valid application data save set names. If the application server is not on a virtual host, type: nsrsnap_vss_save -? If the application server is on a virtual host, type: nsrsnap_vss_save -? -c virtual_server_name Note: If the application server is on a virtual host, run this command from the physical node that is currently hosting the application server.
In an Exchange 2007 CCR environment, type the following on both the active and passive nodes: nsrsnap_vss_save -c physical_server_name -A NSR_VIRT_SERV=virtual_server_name -? 3. Press Enter. The application data save sets that are available for backup are listed in a format similar to the following: "APPLICATIONS:\Microsoft "APPLICATIONS:\Microsoft "APPLICATIONS:\Microsoft "APPLICATIONS:\Microsoft
Exchange Exchange Exchange Exchange
Writer" Writer\first_group" 2007" 2007\second_group"
Each line of output corresponds to a save set entry that you can add to the Save Set attribute of a Client resource. Each entry that you add to the Save Set attribute must be typed on a separate line.
136
EMC NetWorker Module for Microsoft Applications Release 2.0 Administration Guide
Microsoft Exchange Backup and Recovery
URL encoding for Exchange save sets
When specifying save set names in the Save Set attribute of the Client resource, there are cases where special characters, such as the backslash (\), must be specified by their URL-encoded values. URL-encoded values are used to represent special characters when naming Exchange storage groups. For example, a storage group named: Accounting\Bellevue would be represented in the Save Set attribute as: APPLICATIONS:\Microsoft Exchange 2007\Accounting%5CBellevue Table 21 on page 137 lists the most commonly used special characters and their URL-encoded values. Table 21
Special characters and their URL-encoded values Special character
URL-encoded value
Special character
URL-encoded value
\
%5C
?
%3F
/
%2F
]
%5D
"
%22
[
%5B
%
%25
}
%7D
#
%23
{
%7B
&
%26
^
%5E
%3E
|
%7C
Microsoft Exchange Server backup and recovery
137
Microsoft Exchange Backup and Recovery
Exchange Application information variable settings Table 22 on page 138 lists the variables that can be specified in the Application information attribute of the Client resource. Table 22
138
Exchange application information variable settings (page 1 of 2) Attribute Name
Description
Values
NSR_SNAP_TYPE=value
Specifies the snapshot service provider name.
vss This value is required.
NSR_DATA_MOVER=value
Specifies the hostname of the NMM client that moves snapshots from the NMM client to primary and secondary (conventional) storage. The host can be either a local host or a proxy client host.
• The local host • The proxy client hostname If no value is entered, the local host is used as the data mover. If you are setting up a proxy client for a virtual cluster server, you must also type the proxy client hostname in the Remote Access attribute of the Client resource. For serverless backups, specify a proxy client. If setting up an Exchange Client resource, it is recommended that you use a proxy client. If a proxy client is specified, Exchange consistency checks are performed on the proxy client. Related messages are written to the Replication Manager log files (erm_clientxx.log) on the proxy client. If no proxy client is specified for an Exchange Client resource, consistency checks are performed on the Client resource host. Related messages are logged on the Client resource host in both the Replication Manager log files and the nmm.raw file.
NSR_DM_PORT=value
Specifies the control port number to use in communicating with the data mover client. This is the control port that the Replication Manager (RM) client service is running on. EMC NetWorker Module for Microsoft Applications Release 2.0 Installation Guide provides more information about RM ports.
The RM client control port number. For example: NSR_DM_PORT=6728 An RM client control port number must be specified.
NSR_ALT_PATH=value
Specifies the path on which to mount Exchange snapshots during the backup process. Exchange snapshots are mounted so that the database consistency check utility, eseutil.exe can be run.
A mount path.For example: NSR_ALT_PATH=G:\mount_replica\ If a proxy client is specified in the NSR_DATA_MOVER attribute, enter the mount path on the proxy client.
EMC NetWorker Module for Microsoft Applications Release 2.0 Administration Guide
Microsoft Exchange Backup and Recovery
Table 22
Exchange application information variable settings (page 2 of 2) Attribute Name
Description
Values
NSR_CHECK_JET_ERRORS =value
Specifies which JET database errors to check for in the event log before taking a snapshot.
• 447 (Exchange Server 2007 only) • 448 (Exchange Server 2007 only) • 1018 • 1019 • 1022 • all • none Values can be separated with a comma, for example: NSR_CHECK_JET_ERRORS=1018, 1019 The default is all.
Note: If errors are found, the snapshot will fail.
NSR_VIRT_SERV=value
Specifies the name of the Exchange Virtual Server Client resource in a CCR passive node backup. Note: Do not use this attribute for CCR active node backup.
NSR_INDEX_CLIENT=value
Specifies to index the backup under the client name of the Exchange Virtual Server, not the passive node client name in a CCR passive node backup. Note: Do not use this attribute for CCR active node backup.
The name of the Exchange Virtual Server. For example: NSR_VIRT_SERV=virtual_server_n
ame
This value is required in a CCR passive node backup.
The name of the Exchange Virtual Server. For example: NSR_INDEX_CLIENT=virtual_serve
r_name This value is required in a CCR passive node backup.
Serverless backup A proxy client is used in conjunction with instant snapshot backups to provide serverless backups. With typical Exchange setup with production hosts, serverless backups free the application server from much of the processing involved in a nonpersistent or instant snapshot backup. In a serverless backup, a snapshot is created on the application server and then immediately moved to the proxy client for further processing. Serverless backups are particularly useful when there is additional processing involved in a snapshot backup. For example, to help determine whether a snapshot of a Microsoft Exchange database is consistent, the Exchange utility, eseutil, should be run against the snapshot. Running eseutil can be disk intensive. Offloading the work from the Exchange server to a proxy client frees resources on the Exchange server. A serverless backup can be rolled over to a conventional backup and the backup can remain on the mounted storage disk volume as a persistent snapshot. Note: Serverless backup is available only with VSS hardware providers and is subject to the capabilities of the vendor’s hardware. The EMC VSS Provider for CLARiiON and Symmetrix provides the capability to perform serverless backup operations for these storage platforms.
Microsoft Exchange Server backup and recovery
139
Microsoft Exchange Backup and Recovery
Snapshot process in an Exchange Server production and proxy client setup Figure 13 on page 141 illustrates a LAN-based Exchange Server configuration with a storage area network and a proxy client. Both the Exchange server and the proxy client have the NetWorker Module for Microsoft Applications client installed. The proxy client frees resources on the Exchange server by offloading from the Exchange Server the work of processing and backing up snapshots. When a backup operation uses a proxy client, it is known as a serverless backup. The data moves as follows: 1. The NetWorker server initiates the process by contacting the Exchange server where the NMM client software is installed. 2. The Exchange server with the NMM client software creates a snapshot of the data on the storage volume. Note: In Figure 13 on page 141, snapshots are represented by S1 through S5.
3. The snapshot is made visible to the proxy client. 4. NMM runs the eseutil consistency check for Exchange on the proxy host. 5. If the consistency check is successful, NMM commits the shadow copy. 6. NMM instructs Exchange to truncate the log files. 7. The proxy client uses a snapshot in primary storage to transfer the data over the LAN and into a conventional backup medium such as a file type disk, advanced file type disk, or tape. The EMC VSS provider is used for the transportable snapshot. When the administrator moves the shadow copy to the traditional storage medium connected to the proxy host, NMM provides the option to move the transportable snapshot from the proxy host to the traditional storage medium. For this setup, the administrator must configure a SAN storage node as a proxy client.
140
EMC NetWorker Module for Microsoft Applications Release 2.0 Administration Guide
Microsoft Exchange Backup and Recovery
NetWorker Server 7.3.3 or later
LAN
Exchange Server NetWorker Module for Microsoft Applications
Proxy client NetWorker Module for Microsoft Applications
SAN
Primary storage (For example CLARiiON or Symmetrix)
S4 S5 S1
S3
NetWorker Storage Node 7.3.x
Traditional storage
S2 GEN-000749
Figure 13
Snapshot process with Exchange production server and proxy client
Best practices for Exchange backup and recovery In addition to “Best practices and considerations for backing up application data” on page 46, this section lists the best practices and recommendations to follow when using NetWorker Module for Microsoft Applications to back up and recover Exchange Server: ◆
Perform a full backup copy of Exchange server after every successful recovery.
◆
Ensure that all databases in a specified storage group are mounted before backing up the Exchange servers. Unmounted databases are not backed up.
◆
Perform a full backup copy after upgrading to NMM from previous releases of NetWorker clients.
◆
Ensure that database files and transaction log files reside on separate volumes for backup, otherwise the backup will fail.
◆
If Exchange objects like storage groups and databases are deleted using Exchange System Manager, these objects cannot be recovered until disaster recovery is performed. Objects from the Exchange server should not be deleted unless they no longer need to be recovered.
◆
After upgrading to the NMM client, you cannot recover Exchange backups that were performed with a previous version of the NetWorker client. To ensure that all Exchange data can be recovered to the point-in-time of the upgrade, perform a full backup of Exchange data immediately after upgrading to the NMM client.
Microsoft Exchange Server backup and recovery
141
Microsoft Exchange Backup and Recovery
142
◆
In Exchange Server 2003 backups, save sets and backup groups that include the Exchange writer cannot include other application writers or the SYSTEM COMPONENTS writer. The Exchange writer can however, be included in the same save set with volume components such as D:\.
◆
In Exchange Server 2007, save sets and backup groups that include the Exchange writer cannot include any other volumes, applications, or non-Exchange items in the save set.
◆
The Exchange consistency checker utility (eseutil.exe) must be installed on the proxy host. Ensure that the version of eseutil (Service Pack level) is the same as the Exchange server. For example, if Exchange Server 2003 SP1 is installed on the Exchange server, then the version of eseutil that is installed on the proxy client, the Data Mover host, must be from the Exchange Server 2003 SP1 management utilities. Failure to do so causes the consistency checker utility to report errors even when the database is valid.
◆
While performing a rollback restore of the Exchange server, all applications that are used by Exchange should be closed. Also, ensure that the volume that contains the Exchange data is not in use.
◆
If a rollback restore of a particular storage group is performed, ensure that this volume is not used by any other storage group that is not part of the recovery.
EMC NetWorker Module for Microsoft Applications Release 2.0 Administration Guide
Microsoft Exchange Backup and Recovery
Performing Exchange Server backups NMM supports several types and levels of backup: ◆
Point-in-time snapshots, which include exact copies of files and open files.
◆
Full backup of Exchange databases, logs, and storage groups, as well as administrator-selected storage groups.
◆
Backup in a Cluster Continuous Replication (CCR) environment on the active node and the passive node.
◆
Backup in an LCR environment of the production data, but not of the replicated data.
Configuring Exchange Server backups The first four tasks for scheduling a backup are the same for all VSS writers supported by NMM. “Configuring a Scheduled Backup” on page 43 describes these tasks in detail: ◆
“Task 1: Configure a backup pool for snapshot operations” on page 48
◆
“Task 2: Configure snapshot policies” on page 51
◆
“Task 3: Configure a backup schedule” on page 54
◆
“Task 4: Configure a backup group” on page 55
The next task is specific to configuring an Exchange Client resource: “Task 5: Configure an Exchange Client resource” on page 144
!
CAUTION Once you have started a snapshot of a save group, do not interrupt or halt the snapshot process. For example, in Exchange backup, the nsrsnap_vss_save.exe process on the production server and the eseutil process on the proxy may continue to run after the snapshot is halted. Any attempt to stop a save group in NetWorker Management Console will take a long time to complete.
Performing Exchange Server backups
143
Microsoft Exchange Backup and Recovery
Task 5: Configure an Exchange Client resource A Client resource specifies what to include in a snapshot of a NMM Client. Client resources are associated with other backup resources such as groups and snapshot policies. An Exchange Client resource can specify to perform a full backup, or back up a storage group. To create an Exchange Client resource: 1. In the Administration window of the NetWorker Management Console, click Configuration. 2. In the expanded left pane, select Clients. 3. From the File menu, select New. 4. In the Name attribute, type the hostname of the NetWorker client computer. 5. In the Comment attribute, type a description. If you are creating multiple Client resources for the same NetWorker client host computer, use this attribute to differentiate the purpose of each resource. 6. From the Browse Policy attribute, select a browse policy from the list. The browse policy determines how long rolled-over data is available for quick access. 7. From the Retention Policy attribute, select a retention policy from the list. The retention policy determines how long rolled-over data is available though not necessarily quickly. 8. Select the Scheduled Backups attribute. 9. In the Save Set attribute, specify the components to be backed up. Place multiple entries on separate lines: • To back up all Exchange Server 2003 data, specify the save set name: APPLICATIONS:\Microsoft Exchange Writer • To back up all Exchange Server 2007 data, specify the save set name: APPLICATIONS:\Microsoft Exchange 2007 • To back up a specific Exchange Server 2003 storage group, for example a storage group named Group_1, specify the save set name: APPLICATIONS:\Microsoft Exchange Writer\Group_1 • To back up a specific Exchange Server 2007 storage group, for example a group named Group_1, specify: APPLICATIONS:\Microsoft Exchange 2007\Group_1 • To back up all Exchange Server 2007 data in a CCR environment on the active or passive CCR node, specify: APPLICATIONS:\Microsoft Exchange 2007 • To back up a specific Exchange Server 2007 storage group in a CCR environment on the active or passive CCR node, for example a group named Group_1, specify: APPLICATIONS:\Microsoft Exchange 2007\Group_1 • To back up all Exchange Server 2007 data on a virtual server, on the active CCR node, specify: APPLICATIONS:\Microsoft Exchange 2007
144
EMC NetWorker Module for Microsoft Applications Release 2.0 Administration Guide
Microsoft Exchange Backup and Recovery
Note: When backing up an Exchange Server 2007 in a CCR environment on a passive CCR system, you must use the NSR_INDEX_CLIENT attribute.
• To back up all Exchange Server 2007 data in a LCR environment, specify: APPLICATIONS:\Microsoft Exchange 2007 • To back up a specific Exchange Server 2007 storage group in a LCR environment, for example a group named Group_1, specify: APPLICATIONS:\Microsoft Exchange 2007\Group_1 The Exchange Server save set syntax is described in “Specifying Exchange save sets for application data” on page 135. Note: When backing up data for a Microsoft Exchange application, ensure that all databases in a specified Storage Group are mounted. If at least one database in a selected Storage Group is not mounted, the entire backup of the Storage Group will fail.
10. If needed, use URL-encoded values when specifying save set names in the Save Set attribute of the Client resource. URL-encoded values are used to represent special characters such as the backslash (\), and a table of values is provided in “URL encoding for Exchange save sets” on page 137. 11. For the Group attribute, select the backup group to which this Client resource will be added. If Client resources for the same NMM client host are added to different backup groups, ensure that the Start Time attribute for each backup group is spaced far enough apart so that the backups for the host’s Client resources do not overlap. 12. For the Schedule attribute, select a backup schedule. 13. Click the Apps & Modules tab. 14. In the Backup command attribute, type the backup command. For all types of backup data except for Active Directory conventional backups, type: nsrsnap_vss_save.exe 15. In the Application information attribute, type the following variable and value:
NSR_SNAP_TYPE=vss Type Exchange application variable settings and their values on separate lines. These settings are described in Table 22 on page 138. 16. Click the Globals (1 of 2) tab. 17. In the Aliases attribute, type the NETBIOS name for the client. Note: NMM Client uses the host machine NETBIOS or “short” name when connecting to the NetWorker server to browse backups. If the NETBIOS name is not found, NMM will not be able to display backups.
18. Click OK.
Task 5: Configure an Exchange Client resource
145
Microsoft Exchange Backup and Recovery
Performing Exchange Server recovery After the backup is complete, NMM truncates the files. When the files are backed up, administrators can restore: ◆
Exchange storage groups
◆
Mailbox stores
◆
User email messages
Several types of recovery are available: ◆
Point-in-time
◆
Rollback
◆
Roll forward
Exchange recovery requirements and limitations The following requirements must be met before recovering Microsoft Exchange data: ◆
The APPLICATIONS:\Microsoft Exchange Writer save set (Exchange Server 2003) or APPLICATIONS:\Microsoft Exchange 2007 save set (Exchange Server 2007) must have been backed up. Chapter 2, “Configuring a Scheduled Backup,” provides more information about backups.
◆
For each Exchange database to be recovered, the Exchange checkbox titled “This database can be overwritten by a restore” must be selected in the Exchange SYSTEM Manager (Exchange Server 2003) or Exchange Management Console (Exchange Server 2007) application. This is a Microsoft requirement. For information about this checkbox, refer to the Microsoft Exchange documentation.
◆
When new Microsoft Service Packs for Exchange Server are installed, transactions (log files) created with previous Service Pack versions of Exchange Server generally cannot be recovered onto the updated Exchange server. Microsoft sometimes provides hotfix kits to address this Microsoft restriction.
◆
If you are recovering Exchange data that was backed up from a legacy NetWorker client by using the save set VSS USER DATA:\, then the Exchange databases to which data is being recovered must be unmounted before the recovery operation. After the recovery, the databases must be mounted.
There are several limitations when backing up and restoring Exchange objects with NMM:
146
◆
A single mailbox database cannot be restored by using point-in-time recovery of Exchange, because it requires both logs and databases to be selected for restore. VSS-marking semantics do not allow selecting logs for backup of restore. Logs are included only when the a storage group is selected for either backup or restore. Logs are not included when a database is selected.
◆
Roll-forward recovery is not possible after point-in-time restore. After you complete a successful point-in-time restore, perform a full backup of the Exchange server so that you can perform roll-forward recovers.
EMC NetWorker Module for Microsoft Applications Release 2.0 Administration Guide
Microsoft Exchange Backup and Recovery
Exchange recovery options To specify recovery options for Exchange data: 1. Review “Performing a recovery” on page 70. 2. Follow the procedure in “To recover system data” on page 71 until it directs you to enter application-specific options. 3. In System Recover Session Options, click the Exchange tab. 4. Select the type of recovery to perform: • To recover data for Exchange Server 2003 or 2007 and retain all existing Exchange transactions that occurred after the time of backup, select Include existing logs (Roll forward recovery). “Roll-forward recovery” on page 147 describes this type of recovery in detail. • To recover data for Exchange Server 2003 or 2007 up to the time of backup only and to not include subsequent transactions, select Include logs only from this restore (Point-in-time recovery). If you select point-in-time recovery, you cannot select an individual database for recovery. However, you can select to recover items at the Storage Group level or higher. “Point-in-time recovery” on page 148 describes this type of recovery in detail. 5. To make the Exchange database available after the recovery, select Put databases online after restore. 6. Click OK to close the System Recover Session Options dialog box. 7. From the navigation tree, expand the Applications folder and the appropriate Microsoft Exchange writer folder: • Microsoft Exchange Writer for Microsoft Exchange Server 2003 • Microsoft Exchange 2007 for Microsoft Exchange Server 2007 8. Select the Exchange storage groups and databases that are to be recovered. 9. From the System Recover Session toolbar, click Start Restore.
Roll-forward recovery This option recovers the Exchange data from the last backup, and retains all existing Exchange transactions that occurred after the time of the last backup. This recovery is carried out at the time of failure. A roll-forward recovery can be performed if the current log LUN is available. The administrator restores the database files and transaction logs from backup and uses the current logs on the server to roll the database forward. No data is lost by restoring from backup. A single mailbox database can be marked for this type of recovery in NetWorker Module for Microsoft Applications. While performing the roll-forward recover, all of the mailboxes pertaining to that storage group are dismounted and once the recovery is successful, all of the mailboxes are remounted. Note: If you perform a roll-forward recovery, perform a full backup after the recovery. Doing so enables you to recover data to a point-in-time that is after the point-in-time of the roll-forward recovery, if necessary. Also, a roll-forward recovery is not possible after performing a point-in-time recovery.
Performing Exchange Server recovery
147
Microsoft Exchange Backup and Recovery
To perform a roll-forward recovery of an Exchange Server 2007 in a CCR environment: 1. Perform the recovery from the active node, failing over the passive node to the active node if necessary. 2. In the Exchange Management Console application, select the Microsoft Exchange checkbox This database can be overwritten by a restore. 3. In the Exchange Management shell, stop replication to the passive node with the suspend-StorageGroupCopy command. For example: Suspend-StorageGroupCopy -Identity "bv-hood-cluse12\First Storage Group" 4. Open the NMM Client. 5. In the main toolbar, click the Client list, and then select the client that is the Exchange Virtual Server. 6. From the left pane, select System Recover Session. 7. From the Options menu, select System Recover Session Options, and then click the Exchange tab. 8. In Transaction Log File Replay, make sure Include existing logs (Roll-forward recovery) is selected. This is the default setting, but it may have been changed if the previous recovery was a point-in-time recovery. 9. From the navigation tree, expand the Applications folder and select the Microsoft Exchange 2007 folder. 10. Select the Exchange Server items you want to restore. 11. From the System Recover Session toolbar, click Start Restore. 12. Restore replication between the nodes with the 'resume-StorageGroupCopy' command. For example: resume-StorageGroupCopy -Identity "bv-hood-cluse12\First Storage Group”
Point-in-time recovery This recovery type is useful when log files have been lost. At this level, data can be selected at a Storage Group level, but not at an individual database level. Point-in-time recovers Exchange data only up to the time of the backup that is being recovered, and does not include subsequent transactions. All new data after that backup is lost. When point-in-time recovery is used, only the transaction log files that were part of the backup set are restored. Additional log files generated since the time of backup are not restored, and the databases are recovered only to the point of the backup. With this type of recovery the administrator gets back the deleted mail because the transaction logs are restored. In order to perform point-in-time restore, the administrator must first select the whole storage group and then perform the recover. The log files currently on disk are moved to another directory before the restore takes place. They can be manually deleted by the user if they are no longer needed after a successful restore.
148
EMC NetWorker Module for Microsoft Applications Release 2.0 Administration Guide
Microsoft Exchange Backup and Recovery
To perform a point-in-time recovery of an Exchange Server 2007 in a CCR environment: 1. Perform the recovery from the active node, failing over the passive node to the active node if necessary. 2. In the Exchange Management Console application, select the Microsoft Exchange checkbox This database can be overwritten by a restore. 3. In the Exchange command shell, stop replication to the passive node with the suspend-StorageGroupCopy command. For example: suspend-StorageGroupCopy -Identity "bv-hood-cluse12\First Storage Group" 4. Open the NMM Client. 5. In the main toolbar, click the Client list, and then select the client that is the Exchange Virtual Server. 6. From the left pane, select System Recover Session. 7. From the Options menu, select System Recover Session Options, and then click the Exchange tab. 8. In Transaction Log File Replay, select Include only logs from this restore (Point-in-time recovery). 9. From the navigation tree, expand the Applications folder and select the Microsoft Exchange 2007 folder. 10. Select the Exchange Server items you want to restore. 11. From the System Recover Session toolbar, click Start Restore. 12. After restore, on the passive node manually delete log files and database file. 13. On the passive node, in the Exchange command shell, re-seed the passive node with the Update-StorageGroupCopy command. For example: Update-StorageGroupCopy -Identity "bv-hood-cluse12\First Storage Group" 14. Restore replication between the nodes with the 'resume-StorageGroupCopy' command. For example: resume-StorageGroupCopy -Identity "bv-hood-cluse12\First Storage Group”
Mounting the database after recovery Certain pre- and post-restore operations provided for Exchange enable quick access to email after recovery. Until Exchange databases are remounted, email is not available for users to browse and verify. NMM provides options to automatically mount Exchange databases after restore. The Exchange administrator can decide if restore of a particular Exchange database is required and if automatic mounting of the database must be done after the restore is complete. If this option is specified, then the database is mounted after successful restore of the Exchange Server. If this
Performing Exchange Server recovery
149
Microsoft Exchange Backup and Recovery
option is disabled, then the administrator must manually mount the database. By default, this option is enabled in NMM. Select or disable this option with the Put databases online after restore checkbox as described in “Exchange recovery options” on page 147.
Rollback restore of Exchange data using NMM Rollback recovery returns data to an earlier point in time. This recovery is known as destructive recovery because all changes that were made after the selected snapshot was taken are overwritten. Note: NMM does not support rollback restore for backups performed with
EqualLogic or Celerra hardware. Only conventional restore and snapshot restore are supported for those hardware. Rollback recovery of Exchange does not allow granular selection of storage groups for recovery, the whole snapshot must be selected for recovery. To perform rollback restore of a particular storage group, the storage group must have previously been backed up by itself using a save set that specified that particular storage group. For example, to perform a rollback restore of the storage group SG1, the storage group would have had to been previously backed up with the save set "APPLICATIONS:\Microsoft Exchange Writer\SG1" (Exchange Server 2003) or "APPLICATIONS:\Microsoft Exchange 2007\SG1" (Exchange Server 2007).
Exchange rollback operation requirements To perform an Exchange rollback operation the following requirements apply: ◆
The snapshot should be a transportable snapshot.
◆
The rollback option is not available if the snapshot is taken by the software provider.
◆
A storage array descriptor file, sa.ini, must be configured with details of the type of storage used.
◆
The Microsoft Exchange checkbox titled “This database can be overwritten by a restore” must be selected for each Exchange database that is to be recovered. This checkbox can be found by using the Exchange SYSTEM Manager application in Exchange Server 2003 or Exchange Management Console in Exchange Server 2007.
◆
The snapshot must be taken with the proxy host.
◆
The administrator must manually mount the Exchange databases after recovery. Automatic mounting of database is not available for rollback restore.
◆
“Roll back a snapshot” on page 191 provides more information about rollback recovery, creating a storage array descriptor file, and the steps to perform a rollback recovery.
To perform a rollback recovery of Exchange Server 2003 or 2007, follow the steps in “Performing a rollback recovery” on page 193.
150
EMC NetWorker Module for Microsoft Applications Release 2.0 Administration Guide
Microsoft Exchange Backup and Recovery
To perform a rollback recovery of an Exchange Server 2007 in a CCR environment: 1. Make sure that the current Exchange active node is the node where the files existed at save time. Failover the virtual Exchange server to the passive node where the backup was taken, if necessary. 2. Follow the steps in “Performing a rollback recovery” on page 193 by using the following settings: • The Exchange Server 2007 recovery type is Point-in-time. • Browse and select the items for recovery from the client type Exchange Virtual Server.
Performing Exchange Server recovery
151
Microsoft Exchange Backup and Recovery
152
EMC NetWorker Module for Microsoft Applications Release 2.0 Administration Guide
7 Microsoft Data Protection Manager Backup and Recovery
This chapter includes the following topics: ◆ ◆ ◆ ◆
Data Protection Manager backup and recovery ..................................................... 154 Performing DPM Server backups ............................................................................. 160 Task 5: Configure a DPM Client resource................................................................ 161 Performing DPM Server recovery ............................................................................ 163
Microsoft Data Protection Manager Backup and Recovery
153
Microsoft Data Protection Manager Backup and Recovery
Data Protection Manager backup and recovery NetWorker Module for Microsoft Applications (NMM) provides full backup and recovery of Microsoft System Center Data Protection Manager (DPM) 2007. DPM is Microsoft’s solution for backing up and recovering Microsoft application and system data and files by using the VSS framework. DPM stores and manages this backup information in its own database. DPM can provide backup and recovery for: Windows file services, Microsoft Exchange Server, Microsoft SQL Server, Microsoft Office SharePoint Server, and Virtual Server 2005. Figure 14 on page 154 shows how NMM provides support for backup and recovery of DPM data. NetWorker Module for Microsoft Applications protects items within DPM Server 2007: DPM Configuration Database DPM Replicas
NetWorker Server 7.3.3 or later: Provides services for NetWorker clients such as NMM
DPM protects items within Microsoft Servers: Database files Storage groups Volumes Transaction logs LAN
Microsoft Servers: Backup and Recovery provided by DPM Server 2007
Figure 14
DPM Server 2007: Backup and Recovery provided by NetWorker Module for Microsoft Applications (NMM) client
NetWorker Module for Microsoft Applications protection of DPM
This chapter supplements the overall NetWorker Module for Microsoft Application backup procedures in Chapter 2, “Configuring a Scheduled Backup,” and recovery procedures in Chapter 3, “Recovering Data,” with the specific details needed to back up and recover DPM.
154
EMC NetWorker Module for Microsoft Applications Release 2.0 Administration Guide
Microsoft Data Protection Manager Backup and Recovery
DPM Server versions supported by NMM client NMM client supports Microsoft DPM 2007 running on x86 and x64 machines. The EMC Information Protection Software Compatibility Guide provides the most up-to-date lists of hardware, operating system, service pack, and application versions supported by the NMM client.
DPM backup and recovery types NMM supports several types of backup and recovery. For DPM, NMM supports: ◆
DPM Configuration Database Backup — Backup of the DPM configuration database
◆
DPM Replica Backup — Backup all or selected DPM replicas for DPM-protected servers
◆
Backup Level supported — Full only
◆
Recovery — Recovery of DPM Server can include recovery of the DPM configuration database or recovery of missing replicas in their entirety to their original locations
DPM data backed up by NMM NetWorker Module for Microsoft Applications supports only full backups for DPM 2007. It backs up the following DPM data: ◆
DPM configuration database: This is a SQL database. The DPM writer will describe the location of the database, and NMM will use VSS SQL writers to protect it. Note: This version of NMM requires a local instance of SQL. It does not support remote instances of SQL. The instance used by DPM Server must be on the same machine as DPM Server.
◆
DPM replicas: These are data containers that DPM uses to store its save sets. NMM will protect these as file system shares. Note: A DPM replica is not a VSS replica, and is not directly manipulated outside of the DPM environment.
Transportable backups of DPM Replicas not supported NMM 2.0 does not support transportable backup of DPM replicas. DPM Replica is in a dynamic volume. NMM does not support local non-transportable hardware-based snapshots of dynamic volumes on Windows Server 2008. “Dynamic volume support” on page 28 provides more information about dynamic volume and transportable support in NMM 2.0
Data Protection Manager backup and recovery
155
Microsoft Data Protection Manager Backup and Recovery
Components used by NMM for DPM backup and recovery Table 23 on page 156 describes commands NMM uses to back up and recover DPM data. Table 23
NMM Data Protection Manager commands Item
Description
Application writer
There is one writer for DPM 2007, “Microsoft DPM"
nsrsnap_vss_save
NMM command initiates the VSS-based backup.
nsrsnap_vss_recover
NMM command initiates the VSS-based recovery.
nsr_ps_single_save_per_sav eset
NMM command specifies that PowerSnap create a separate PowerSnap for each save set in the client entry. whether the database should be online or offline after restore. This attribute is required because of DPM writer restrictions requiring that the Configuration database and each of the DPM Replicas must be separated into separate VSS shadow copy sets.
nsr_ps_first_saveset_save
NMM command specifies to save the DPM Configuration Database before saving any of the DPM Replicas. This is not required by the DPM writer., but is recommended as a best practice by Microsoft.
dmpsync -restoredb -dbloc [path] \DBMDB2007.mdf
DPM command instructing DPM to use the database at the specified location.
dpmsync -sync
DPM command instructing DPM to synchronize itself with the new environment.
dpmsync -reallocatereplica
DPM command run on DPM Server before performing DPM Replica recover. This command instructs DPM server to verify its replicas and to create the appropriate number and size of partitions to receive the recovered replicas. Note: For replicas using Custom Volumes, you cannot use this command. You must manually create the necessary volumes before you can proceed with DPM replica recovery. The Microsoft DPM documentation provides more information about the use of Custom Volumes.
156
nsr_dpm_retry_wait
DPM command that specifies that if the DPM Replica is unavailable for backup because it is in use, wait the specified time (in minutes) before retrying to start the backup. The default value is 10.
nsr_dpm_retry_maximum
DPM command that specifies the total number of times - the first try plus retries - to attempt to start the backup. The default value is 3.
EMC NetWorker Module for Microsoft Applications Release 2.0 Administration Guide
Microsoft Data Protection Manager Backup and Recovery
Specifying DPM save sets for application data Table 24 on page 157 lists the DPM save set syntax to specify for supported types of DPM data. Specify DPM data save sets in the Save Set attribute of a Client resource. Table 24
DPM save set syntax Type of backup data
Save set syntax
DPM Server 2007, Configuration Database. There will always be exactly one DPM Configuration Database.
APPLICATIONS:\Microsoft DPM\DPM database.
DPM Server 2007, Protection group replica set, of a non-VSS datasource.There are usually multiple protection group replica sets. For example, a DPM replica resulting from DPM protection of a system state on a server named Mars.DPM.Server.
APPLICATIONS:\Microsoft DPM\Non VSS Datasource Writer component Computer%2FSystemState on server Mars DPM Server
DPM Server 2007, Protection Group replica set.There are usually multiple Protection Group replica sets. For example, a DPM replica resulting from DPM protection of a SQL database Luna\FAcmeBank on a server named Pluto SQL Server.
APPLICATIONS:\Microsoft DPM\SqlServerWriter component Luna%2FAcmeBank on server Pluto SQL Server
Some special characters in a DPM storage group name must be replaced with URL-encoded values. “URL encoding for DPM save sets” on page 158 provides more information about URL encoding.
Some special characters in a DPM storage group name must be replaced with URL-encoded values. “URL encoding for DPM save sets” on page 158 provides more information about URL encoding.
Some special characters in an DPM storage group name must be replaced with URL-encoded values. “URL encoding for DPM save sets” on page 158 provides more information about URL encoding.
Displaying valid DPM data save sets
To display a list of the DPM save sets that are available for backup: 1. Open a command-prompt on the application server. 2. List the valid application data save set names. If the application server is not on a virtual host, type: nsrsnap_vss_save -?
If the application server is on a virtual host, type: nsrsnap_vss_save -? -c virtual_server_name Note: If the application server is on a virtual host, run the command from the physical node that is currently hosting the application server.
3. Press Enter. The application data save sets that are available for backup are listed in a format similar to the following: APPLICATIONS:\Microsoft DPM\DPM database. APPLICATIONS:\Microsoft DPM\Volume C: on server mars.saturn.company.com Each line of output corresponds to a save set entry that you can add to the Save Set attribute of a Client resource. Each entry that you add to the Save Set attribute must be typed on a separate line. Data Protection Manager backup and recovery
157
Microsoft Data Protection Manager Backup and Recovery
Turning the MSDE writer on or off in the registry
Although DPM Server may be backed up with either the MSDE writer or the SQL writer, Microsoft recommends using the MSDE writer with DPM if it is available. Windows Server 2008 does not include the MSDE writer. To detect which writer is enabled, run nsrsnap_vss_save -? in a command window on the DPM server. Among the writers displayed, you should see either a list of MSDE writer components or a a list of SQL writer components. On a Windows Server 2003 machine, you can enable the MSDE writer through the following procedure: To turn the MSDE writer on or off: 1. Open Registry Editor. 2. Locate the registry key: HKEY_LOCAL_MACHINE\System\CurrentControlSet\Services\VSS\Settings\ MSDEVersionChecking
3. To enable the MSDE writer, set the value to 0. To disable the MSDE writer set the value to 1. 4. Exit Registry Editor. 5. Restart the VSS service. URL encoding for DPM save sets
When specifying save set names in the Save Set attribute of the Client resource, there are cases where special characters, such as the backslash (\), must be specified by their URL-encoded values. URL-encoded values are used to represent special characters when naming DPM components: The forward slash (/) in the component name Computer/SystemState is considered a special character: APPLICATIONS:\Microsoft DPM\Non VSS Datasource Writer component Computer/SystemState on server Mars DPM Server Replace it with its URL-encoded value, %2F: APPLICATIONS:\Microsoft DPM\Non VSS Datasource Writer component Computer%2FSystemState on server Mars DPM Server
158
EMC NetWorker Module for Microsoft Applications Release 2.0 Administration Guide
Microsoft Data Protection Manager Backup and Recovery
Table 25 on page 159 lists the most commonly used special characters and their URL values. Table 25
Special characters and their URL-encoded values Special character
URL-encoded value
Special character
URL-encoded value
\
%5C
?
%3F
/
%2F
]
%5D
"
%22
[
%5B
%
%25
}
%7D
#
%23
{
%7B
&
%26
^
%5E
%3E
|
%7C
DPM application information variable settings Table 26 on page 159 lists the variables that can be specified in the Application information attribute of the Client resource. Table 26
DPM application information variable settings Attribute name
Description
Values
NSR_SNAP_TYPE=value
Specifies the snapshot service provider name.
vss This value is required.
NSR_PS_SINGLE_SAVE_PE R_SAVESET=value
Tells PowerSnap to create a separate PowerSnap save set for each save set in the client entry.
yes NSR_PS_SINGLE_SAVE_PER_SAVES ET=yes
NSR_PS_FIRST_SAVESET_S Specifies the save set that AVE=value PowerSnap must operate upon first. This must be set to the DPM Configuration Database save set, as Microsoft recommends that it be saved first.
Configuration Database save set name For example: NSR_PS_FIRST_SAVESET_SAVE=MY _DPM_CONFIG_DB
NSR_DPM_RETRY_WAIT=val Specifies that if the DPM Replica is ue unavailable for backup because it is in use, wait the specified time (in minutes) before retrying to start the backup. The default setting is 1.
A positive integer For example to specify a wait time of two minutes: nsr_dpm_retry_wait=2
Specifies the total number of times the first try plus retries - to attempt to start the backup.
A positive integer For example to specify of three attempts: nsr_dpm_retry_maximum=3
NSR_DPM_RETRY_MAXIMU M=value
Data Protection Manager backup and recovery
159
Microsoft Data Protection Manager Backup and Recovery
Performing DPM Server backups NMM DPM backup provides: ◆
Point-in-time snapshots, which include exact copies of files and open files.
◆
Full backup of DPM databases, logs, and storage groups, as well as administrator-selected storage groups.
Configuring DPM backups The first four tasks for scheduling a backup are the same for all VSS writers supported by NMM. Chapter 2, “Configuring a Scheduled Backup,” describes these tasks in detail: ◆
“Task 1: Configure a backup pool for snapshot operations” on page 48
◆
“Task 2: Configure snapshot policies” on page 51 Note: For Data Protection Manager backups the Backup Snapshot policy must be set to All. Backup will fail if any other value is used.
◆
“Task 3: Configure a backup schedule” on page 54
◆
“Task 4: Configure a backup group” on page 55
The next task is specific to configuring a DPM Client resource: “Task 5: Configure a DPM Client resource” on page 161
160
EMC NetWorker Module for Microsoft Applications Release 2.0 Administration Guide
Microsoft Data Protection Manager Backup and Recovery
Task 5: Configure a DPM Client resource A Client resource specifies what to include in a snapshot of a NMM client. Client resources are associated with other backup resources such as groups and snapshot policies. You can create multiple Client resources for the same NMM host. In this way, you can apply different backup attributes to different types of information on the same host. For example, if the NMM host is an Exchange server, you can create one Client resource to back up the Exchange databases and create another Client resource to back up Windows system component data. This allows you to back up Exchange databases many times a day and back up Windows system component data only once a day. Note: This version of NMM requires a local instance of SQL. It does not support remote instances of SQL.The instance used by DPM Server must be on the same machine as DPM Server.
To create a DPM Client resource: 1. In the Administration window of the NetWorker Management Console, click Configuration. 2. In the expanded left pane, select Clients. 3. From the File menu, select New. 4. In the Name attribute, type the hostname of the NetWorker client computer. 5. In the Comment attribute, type a description. If you are creating multiple Client resources for the same NetWorker client host computer, use this attribute to differentiate the purpose of each resource. 6. From the Browse Policy attribute, select a browse policy from the list. The browse policy determines how long rolled-over data is available for quick access. 7. From the Retention Policy attribute, select a retention policy from the list. The retention policy determines how long rolled-over data is available though not necessarily quickly. 8. Select the Scheduled Backups attribute. 9. In the Save Set attribute, specify the components to be backed up. Place multiple entries on separate lines. To back up all DPM Server data, specify the save set name of every database and replica. For example: APPLICATIONS:\Microsoft DPM\DPM database. APPLICATIONS:\Microsoft DPM\Volume H: on server babaco.MARS.com APPLICATIONS:\Microsoft DPM\Volume I: on server babaco.MARS.com “Displaying valid DPM data save sets” on page 157 describes how to find the save sets available on the DPM Server. “Specifying DPM save sets for application data” on page 157 describes the DPM Server save set syntax. 10. For the Group attribute, select the backup group to which this Client resource will be added. Task 5: Configure a DPM Client resource
161
Microsoft Data Protection Manager Backup and Recovery
If Client resources for the same NMM host are added to different backup groups, ensure that the Start Time attribute for each backup group is spaced far enough apart so that the backups for the host’s Client resources do not overlap. 11. For the Schedule attribute, select a backup schedule. 12. Click the Apps & Modules tab. 13. In the Backup command attribute, type the backup command: nsrsnap_vss_save.exe
14. In the Application information attribute, type the following variables and values, each on a separate line: NSR_PS_SINGLE_SAVE_PER_SAVESET=yes NSR_PS_FIRST_SAVESET_SAVE=APPLICATIONS:\Microsoft DPM\DPM database NSR_SNAP_TYPE=vss
“DPM application information variable settings” on page 159 provides information about these variables and their values. 15. If a proxy client is being set up for the NMM, type the hostname of the proxy client in the Remote Access attribute. If the NMM is part of a cluster, type the names of the physical nodes of the cluster in the Remote Access attribute. 16. Click the Globals (1 of 2) tab. 17. In the Aliases attribute, type the NETBIOS name for the client. Note: NMM Client uses the host machine NETBIOS or “short” name when connecting to the NetWorker server to browse backups. If the NETBIOS name is not found, NMM will not be able to display backups.
18. Click OK.
162
EMC NetWorker Module for Microsoft Applications Release 2.0 Administration Guide
Microsoft Data Protection Manager Backup and Recovery
Performing DPM Server recovery After the backup is complete, NMM truncates the files. When the files are backed up, administrators can the following types of recovery: ◆
“DPM configuration database recovery” on page 163
◆
“DPM replica recovery” on page 163
DPM configuration database recovery To recover the DPM configuration database: 1. Open the NMM software and select the NetWorker server on which the NMM software was configured for backup. 2. If NMM is part of a cluster, select the virtual client to which you are recovering data. The virtual client can be selected from the Client list attribute in the application toolbar. 3. From the left pane, select Recover > System Recover Session. 4. From the navigation tree, expand the Applications folder and select the Microsoft Data Protection folder. 5. From the Options menu, select System Recover Session Options, and then click the DPM tab. 6. Select Restore database, and specify the folder path on a local drive where the recovered database is to be placed. At the successful conclusion of the database file recovery, NMM displays a message that DPM Server requires that commands be manually typed in order to make use of the newly-recovered file. 7. Open a command window on the DPM Server computer, and type the following commands on separate lines: dpmsync -restoredb -dbloc [path]\DatabaseFileName.mdf dpmsync -sync
In the first command, [path]\DatabaseFileName.mdf is the full path and file name of the recovered DPM database. The second command synchronizes DPM with the new environment. Note: If the path or file name contains any spaces, you must place the path and file name within quotes. For example: dpmsync -restoredb -dbloc “[path]\Database file name.mdf”
8. Click OK to close the System Recover Session Options dialog box. 9. From the System Recover Session toolbar, click Start Restore.
DPM replica recovery Microsoft Data Protection Manager only allows individual DPM replicas to be recovered when they are considered to be missing by the DPM Server. Before a DPM replica can be recovered, you must run a Microsoft tool that allows DPM to determine which DPM replicas are missing, and to create space for them. These missing replicas are in the “awaiting manual load” state. After running the tool, DPM is aware of the status of its DPM replicas. Then you can request a generic recovery of DPM Replicas, Performing DPM Server recovery
163
Microsoft Data Protection Manager Backup and Recovery
and NetWorker recovers any DPM replicas that the DPM Server reports as being in the “awaiting manual load” state. If you have a suspect DPM replica, or want to replace it for any reason, you should physically move it to a different location, or remove it from the DPM Server before running the recovery. This makes the replica appear to be missing. DPM Server will request that it be recovered during the DPM replica recovery operation. Note: For replicas using Custom Volumes, you cannot use the dpmsync -reallocatereplica command. You must manually create the necessary volumes before you can proceed with DPM replica recovery. The Microsoft DPM documentation provides more information about the use of Custom Volumes.
To recover DPM replicas: 1. On the DPM Server, enter the following command: dpmsync -reallocatereplica
DPM Server then performs the following actions: a. Checks the status of its replicas, and determines if it has enough disk space to accommodate any DPM replicas that need to recovered. b. Verifies its replicas, and then creates the appropriate number and size of partitions to receive the recovered replicas. 2. Open the NMM software and select the NetWorker server on which the NMM software was configured for backup. 3. If NMM is part of a cluster, select the virtual client to which you are recovering data. The virtual client can be selected from the Client list attribute in the application toolbar. 4. From the left pane, select Recover > System Recover Session. 5. From the navigation tree, expand the Applications folder and select the Microsoft Data Protection folder. 6. From the Options menu, select System Recover Session Options, and then click the DPM tab. 7. Select Restore lost replicas. 8. Click OK to close the System Recover Session Options dialog box. 9. From the System Recover Session toolbar, click Start Restore. As a result, the NMM recovery does the following: a. Accesses DPM’s backup XML document to cross-reference it with the replicas that were part of the save set, and removes from the recovery list all replicas which are not in the “awaiting manual load” state. b. Queries NetWorker for the appropriate save set, and recovers all remaining replicas to their original location. 10. After recovery is complete, use DPM Server or Windows Power Shell to run DPM consistency checks on all recovered replicas.
164
EMC NetWorker Module for Microsoft Applications Release 2.0 Administration Guide
8 Microsoft Windows Cluster Backup and Recovery
This chapter includes the following topics: ◆ ◆ ◆ ◆
Windows Server Cluster backup and recovery ...................................................... Performing Windows Server Cluster backups........................................................ Windows Server Cluster recovery ............................................................................ Performing a disaster recovery of a clustered client in Windows Server 2003 ..
Microsoft Windows Cluster Backup and Recovery
166 169 170 171
165
Microsoft Windows Cluster Backup and Recovery
Windows Server Cluster backup and recovery This chapter supplements the overall NetWorker Module for Microsoft Application (NMM) backup procedures in Chapter 2, “Configuring a Scheduled Backup,” and recovery procedures in Chapter 3, “Recovering Data,” with the specific details needed to back up and recover clusters in: ◆
Microsoft Windows Server 2008 — Windows Server Failover Clustering (WSFC)
◆
Microsoft Windows Server 2003 — Microsoft Cluster Service (MSCS)
Cluster support in NMM client NMM client supports Windows Server Clusters running on the following versions of Microsoft Windows Server: Microsoft Cluster Service (MSCS)
Microsoft Windows Server 2003 SP2 (x86, x64) and Microsoft Windows Server 2003 R2 with SP2 (x86, x64): • Standard Edition • Enterprise Edition • Datacenter Edition Windows Server Failover Clustering (WSFC)
Microsoft Windows Server 2008 (x86, x64): • Standard Edition • Enterprise Edition • Datacenter Edition
Compatibility with previous Windows Cluster backups Windows Server 2008 does not support recoveries of Windows Server 2003 backups of the Cluster Writer. Many Windows legacy APIs in Windows Server 2003 are not supported in Windows Server 2008. NMM Client does not prevent attempting to recover a Windows Server 2003 Cluster to a Windows Server 2008 Cluster, but recovery will fail.
Components used by NMM for Windows Cluster backup and recovery NetWorker Module for Microsoft Applications uses the following components and commands to back up Windows Cluster data:
166
◆
Application writers — NMM uses the application writers provided by Microsoft. The writer for Windows Server 2003 is “Cluster Service Writer.” The writer for Windows Server 2008 is “Cluster Database.”
◆
Nsrsnap_vss_save — The NMM command to initiate the VSS-based backup. This command can be used with options for consistency checking and Jet error checking.
◆
Nsrsnap_vss_recover — The NMM command to initiate the VSS-based recovery.
EMC NetWorker Module for Microsoft Applications Release 2.0 Administration Guide
Microsoft Windows Cluster Backup and Recovery
Specifying Windows Cluster save sets for application data Table 27 on page 167 lists the Windows Cluster save set syntax to specify for supported types of Windows Cluster data. Specify Windows Cluster data save sets in the Save Set attribute of a Client resource. Table 27
Windows Cluster save set syntax Type of data to back up
Save set syntax
Windows Server 2003 Cluster, Microsoft Cluster Service (MSCS)
SYSTEM COMPONENTS:\Cluster Service Writer
Windows Server 2008 Cluster, Windows Server Failover Clustering (WSFC)
SYSTEM COMPONENTS:\Cluster Database
Displaying valid Windows Cluster data save sets To display a list of the Windows Cluster save sets that are available for back up: 1. Open a command-prompt on the application server. 2. From the command-prompt, type the following command to list the valid application data save set names. If the application server is not on a virtual host, type: nsrsnap_vss_save -? If the application server is on a virtual host, type: nsrsnap_vss_save -? -c virtual_server_name Note: If the application server is on a virtual host, run this command from the physical node that is currently hosting the application server.
3. Press Enter. The application data save sets that are available for backup are listed in a format similar to the following: "SYSTEM COMPONENTS:\Cluster Writer"
Each line of output corresponds to a save set entry that you can add to the Save Set attribute of a Client resource. Each entry that you add to the Save Set attribute must be typed on a separate line.
Windows Server Cluster backup and recovery
167
Microsoft Windows Cluster Backup and Recovery
Windows Cluster application information variable settings Table 28 on page 168 lists the variables that can be specified in the Application information attribute of the Client resource. Table 28
168
Windows Cluster application information variable settings Attribute Name
Description
Values
NSR_SNAP_TYPE=value
Specifies the snapshot service provider name.
vss This value is required.
NSR_DATA_MOVER=value
Specifies the hostname of the NMM client that moves snapshots from the NMM client to primary and secondary (conventional) storage. The host can be either a local host or a proxy client host.
• The local host • The proxy client hostname If no value is entered, the local host is used as the data mover. If you are setting up a proxy client for a virtual cluster server, you must also type the proxy client hostname in the Remote Access attribute of the Client resource. For serverless backups, specify a proxy client. If setting up an Windows Cluster client resource, it is recommended that you use a proxy client. If a proxy client is specified, Windows Cluster consistency checks are performed on the proxy client. Related messages are written to the Replication Manager log files (erm_clientxx.log) on the proxy client. If no proxy client is specified for an Windows Cluster client resource, consistency checks are performed on the client resource host. Related messages are logged on the client resource host in both the Replication Manager log files and the nmm.raw file.
EMC NetWorker Module for Microsoft Applications Release 2.0 Administration Guide
Microsoft Windows Cluster Backup and Recovery
Performing Windows Server Cluster backups To configure a virtual NMM client for backup, complete all of the tasks required to back up a regular NMM client. There are additional considerations of when setting up a virtual NMM client, which are outlined in Table 29 on page 169. Table 29
Additional steps and considerations for backing up a clustered Client resource Backup task
Consideration
“Task 4: Configure a backup group”
Configure a Client resource for each virtual server that is being backed up and each physical node in the cluster on which the virtual server may execute. Type the names of the physical nodes of the cluster in the Remote Access attribute of each virtual Client resource.
“Task 6: Configure privileges”
Set up NetWorker administrator privileges for each physical node and proxy client in the cluster.
“Task 7: Configure a proxy client”
If a hardware provider such as the EMC VSS Provider is being used, a proxy client must be configured for a clustered NMM client
Cluster failover and backups If a node within a cluster undergoes failover during a backup operation, the operation will fail. The next scheduled backup operation will be the next valid backup. If you are using a hardware provider such as the EMC VSS Provider, use the disk management utilities provided with the associated hardware to delete any resources that may be left in an indeterminate state as a result of the failed backup. For example, a CLARiiON storage solution may have an InActive snapshot as the result of a failed backup. In this case, use the Navisphere user interface or the NaviCLI command line interface to search for and delete the inactive snapshot.
Performing Windows Server Cluster backups
169
Microsoft Windows Cluster Backup and Recovery
Windows Server Cluster recovery The Cluster recovery procedures are different for Windows Server 2003 and Windows Server 2008. The following sections provide more information: ◆
“Performing a disaster recovery of a clustered client in Windows Server 2003” on page 171 provides information about cluster recovery in Windows Server 2003.
◆
“Cluster recovery options” on page 73 describes the Cluster tab in NMM Recovery options. This tab provides options for authoritative or nonauthoritative restore. Authoritative restores of the Cluster Writer are only supported for Windows Server 2008.
Cluster recovery options This tab in the System Recover Session Options dialog box specifies the restore mode for authoritative restores of the Cluster Writer. This option is only available for the Cluster Writer in Windows Server 2008.
170
EMC NetWorker Module for Microsoft Applications Release 2.0 Administration Guide
Microsoft Windows Cluster Backup and Recovery
Performing a disaster recovery of a clustered client in Windows Server 2003 There are three different cluster recovery scenarios presented: ◆
“To perform a disaster recovery of a clustered client” on page 171 describes how to recover a cluster from a backup created by the NMM client.
◆
“To perform a disaster recovery of a clustered client from a legacy VSS backup” on page 173 describes how to recover a cluster from a VSS backup created before the NMM client was installed.
◆
“Disaster recovery of a clustered client from a legacy non-VSS backup” on page 176 provides recommendations for how to handle legacy non-VSS backup which does not work with the NMM client.
To perform a disaster recovery of a clustered client The following procedure describes how to recover a single node in a two-node cluster. The procedure assumes that you are recovering Node_B and that Node_A is available: 1. Using the Cluster Administrator on Node_A, evict Node_B from the cluster. 2. At the command prompt, type the following to clean up MSCS: cluster node Node_B /forcecleanup
!
CAUTION After cleaning up the Cluster Server, you must reproduce the preexisting application environment on Node_B so MSCS can administer the applications as it did before the node failed. One way to reproduce the preexisting application environment is to perform a recovery for each application that was previously installed on the node. 3. Using the Cluster Administrator, select Join an existing Cluster and type the cluster name. 4. Using the Cluster Administrator on Node_A, ensure that Node_B appears available for failover operations. 5. Stop the cluster service in Node_A by using one of the following methods: • Using the control panel service tool, stop the Cluster service. • At the command prompt, type the following: net stop clussvc 6. Select the required items to be recovered for Node_B. The procedure differs depending on whether or not the cluster service resides on a domain controller. If the cluster service resides on a member server and is not a domain controller: a. Open the NMM client software on Node_B. b. From the left pane, select Recover > System Recover Session. c. Select all local drives except for the NMM client installation directory.
Performing a disaster recovery of a clustered client in Windows Server 2003
171
Microsoft Windows Cluster Backup and Recovery
d. Select the SYSTEM COMPONENTS folder. If recovering a backup created with NetWorker VSS Client 1.0 SP1, perform this additional step: under SYSTEM COMPONENTS, clear ASR DISK. e. From the System Recover Session toolbar, click Start Restore. If the cluster service resides on a domain controller: a. Boot the NMM client in directory service restore mode. “Booting Windows in Directory Service Restore mode” on page 92 provides more information about these recovery options. b. Open the NMM client software. c. From the Options menu, select System Recover Configuration Options and click NetWorker. d. Clear the Use Microsoft best practices for selecting the system state attribute and click Yes when asked to confirm your selection.
!
CAUTION The "Microsoft Best Practices" box should not be cleared except where specifically noted in this document. There are some procedures, such as recovering Distributed File System (DFS) data, where you can clear this attribute. Microsoft does not support recovery of portions of the operating system. Attempted recovery of portions of the operating system, with this box cleared, may render the system unbootable. After each recovery operation, this option is automatically selected. e. Click OK to close the dialog box. f. From the left pane, select Recover > System Recover Session. g. Stop the cluster service in Node_B by using one of the following methods: – Using the control panel service tool, stop the Cluster service. – At the command prompt, type the following: net stop clussvc h. Select all local drives except for the NMM client installation folder. i. In the navigation tree, select BootableSystemState and Cluster Writer. j. Select the SYSTEM COMPONENTS folder. If recovering a backup created with NetWorker VSS Client 1.0 SP1, perform this additional step: under SYSTEM COMPONENTS, clear ASR DISK. k. From the System Recover Session toolbar, click Start Restore. When prompted, restart node_B. 7. Start the Cluster service on node_A by using one of the following methods: • Using the control panel service tool, start the Cluster service. • At the command prompt, type the following: net start clussvc
172
EMC NetWorker Module for Microsoft Applications Release 2.0 Administration Guide
Microsoft Windows Cluster Backup and Recovery
8. Using the Cluster Administrator on Node_A, confirm that the cluster resources were recovered to the point in time when the backup occurred. If you are performing regular scheduled backups, this will recover the cluster database to a point shortly before the loss of Node_B. 9. Using the Cluster Administrator on Node_A, monitor the cluster "joining" status of Node_B. 10. Using the Cluster Administrator on Node_B, verify that the cluster group can be moved between the nodes by right-clicking the group and selecting Move group.
To perform a disaster recovery of a clustered client from a legacy VSS backup The procedure differs depending on whether or not the cluster service resides on a domain controller. For cluster service on a member server
This recovery is for a VSS backup created before the NMM Client was installed. This backup would include VSS SYSTEM SERVICES, VSS SYSTEM FILESET, and VSS SYSTEM BOOT. The following procedure describes how to recover a single node in a two-node cluster. The procedure assumes that you are recovering Node_B and that Node_A is available: 1. Using the Cluster Administrator on Node_A, evict Node_B from the cluster. 2. At the command prompt, type the following to clean up MSCS: cluster node Node_B /forcecleanup
!
CAUTION After cleaning up the Cluster Server, you must reproduce the preexisting application environment on Node_B so MSCS can administer the applications as it did before the node failed. One way to reproduce the preexisting application environment is to perform a recovery for each application that was previously installed on the node. 3. Using the Cluster Administrator, select Join an existing Cluster and type the cluster name. 4. Using the Cluster Administrator on Node_A, ensure that Node_B appears available for failover operations. 5. Stop the cluster service in Node_A by using one of the following methods: • Using the control panel service tool, stop the Cluster service. • At the command prompt, type the following: net stop clussvc
Performing a disaster recovery of a clustered client in Windows Server 2003
173
Microsoft Windows Cluster Backup and Recovery
6. Select the required items to be recovered for Node_B: a. Open the NMM client software on Node_B. b. From the left pane, select Recover > System Recover Session. c. Select all local drives except for the NMM client installation directory. d. Select VSS SYSTEM SERVICES, VSS SYSTEM FILESET, and VSS SYSTEM BOOT. e. From the System Recover Session toolbar, click Start Restore. f. When prompted, restart Node_B. 7. Start the Cluster service on Node_A by using one of the following methods: • Using the control panel service tool, start the Cluster service. • At the command prompt, type the following: net start clussvc 8. Using the Cluster Administrator on Node_A, confirm that the cluster resources were recovered to the point in time when the backup occurred. If you have been performing regular scheduled backups, this will recover the cluster database to a point in time shortly before the loss of Node_B. 9. Using the Cluster Administrator on Node_A, monitor the cluster "joining" status of Node_B. 10. Using the Cluster Administrator on Node_B, verify that the cluster group can be moved between the nodes by right-clicking the group and selecting Move group. For cluster service on a domain controller
This recovery is for a VSS backup created before the NetWorker VSS Client was installed. This backup would include VSS SYSTEM BOOT, VSS SYSTEM FILESET, and VSS SYSTEM SERVICE. The following procedure describes how to recover a single node in a two node cluster. The procedure assumes that you are recovering Node_B and that Node_A is available: 1. Using the Cluster Administrator on Node_A, evict Node_B from the cluster. 2. At the command prompt, type the following to clean up MSCS: cluster node Node_B /forcecleanup
!
CAUTION After cleaning up the Cluster Server, you must reproduce the preexisting application environment on Node_B so MSCS can administer the applications as it did before the node failed. One way to reproduce the preexisting application environment is to perform a recovery for each application that was previously installed on the node. 3. Using the Cluster Administrator, select Join an existing Cluster and type the cluster name. 4. Using the Cluster Administrator on Node_A, ensure that Node_B appears available for failover operations.
174
EMC NetWorker Module for Microsoft Applications Release 2.0 Administration Guide
Microsoft Windows Cluster Backup and Recovery
5. Stop the cluster service in Node_A by using one of the following methods: • Using the control panel service tool, stop the Cluster service. • At the command prompt, type the following: net stop clussvc 6. Select the required items to be recovered for Node_B: a. Boot the NMM client in directory service restore mode. “Booting Windows in Directory Service Restore mode” on page 92 provides more information about these recovery options. b. Open the NMM client software. c. From the Options menu, select System Recover Configuration Options and click the NetWorker tab. d. Clear the Use Microsoft best practices for selecting the system state attribute and click Yes when asked to confirm your selection.
!
CAUTION The "Microsoft Best Practices" box should not be cleared except where specifically noted in this document. There are some procedures, such as recovering Distributed File System (DFS) data, where you can clear this attribute. Microsoft does not support recovery of portions of the operating system. Attempted recovery of portions of the operating system, with this box cleared, may render the system unbootable. After each recovery operation, this option is automatically selected. e. Click OK to close the dialog box. f. From the left pane, select Recover > System Recover Session. g. Stop the cluster service in Node_B by using one of the following methods: – Using the control panel service tool, stop the Cluster service. – At the command prompt, type the following: net stop clussvc h. Select all local drives except for the NMM client installation directory. i. Select VSS SYSTEM SERVICES, VSS SYSTEM FILESET, and VSS SYSTEM BOOT. j. From the System Recover Session toolbar, click Start Restore. When prompted, restart Node_B. 7. Start the Cluster service on Node_A by using one of the following methods: • Using the control panel service tool, start the Cluster service. • At the command prompt, type the following: net start clussvc 8. Using the Cluster Administrator on Node_A, confirm that the cluster resources were recovered to the point in time when the backup occurred. If you have been performing regular scheduled backups, this will recover the cluster database to a point in time shortly before the loss of Node_B.
Performing a disaster recovery of a clustered client in Windows Server 2003
175
Microsoft Windows Cluster Backup and Recovery
9. Using the Cluster Administrator on Node_A, monitor the cluster "joining" status of Node_B. 10. Using the Cluster Administrator on Node_B, verify that the cluster group can be moved between the nodes by right-clicking the group and selecting Move group.
Disaster recovery of a clustered client from a legacy non-VSS backup This recover is for a non-VSS backup created before the NMM client was installed. This backup would include SYSTEM STATE, SYSTEM DB, and SYSTEM FILES. Recovery of non-VSS backups of the cluster database by using the NMM client does not work. To ensure that backups of the cluster database are available for recovery, perform a full backup of the system directly after updating the system to the NMM client. This creates a postinstallation cluster backup that can be recovered by using the NMM Client.
176
EMC NetWorker Module for Microsoft Applications Release 2.0 Administration Guide
9 Active Directory and ADAM Backups
This chapter includes the following topics: ◆ ◆ ◆
Active Directory backup and recovery .................................................................... 178 Types of Backup and Recovery Supported.............................................................. 179 Performing a granular AD or ADAM backup ........................................................ 181
Active Directory and ADAM Backups
177
Active Directory and ADAM Backups
Active Directory backup and recovery This chapter and Chapter 10, “Active Directory Recover,” supplement the overall NetWorker Module for Microsoft Applications (NMM) backup procedures in Chapter 2, “Configuring a Scheduled Backup,” and recovery procedures in Chapter 3, “Recovering Data,” with the specific details needed to back up and recover Active Directory (AD), Active Directory Application Mode (ADAM), and Active Directory Lightweight Directory Services (AD LDS). Note: In Windows Server 2008, AD LDS includes the ADAM functionality provided in Windows Server 2003. Unless otherwise noted, assume that all references to ADAM in this chapter also apply to AD LDS.
178
EMC NetWorker Module for Microsoft Applications Release 2.0 Administration Guide
Active Directory and ADAM Backups
Types of Backup and Recovery Supported NMM supports the following types of backup: ◆
Active Directory Backup for Disaster Recovery • Backup of entire AD database • Utilizes Volume Shadow Copy (VSS) framework to create snapshot of AD data • Backup Level supported — Full only
◆
Active Directory Granular Backup • Conventional backup of individual AD objects and object attributes • Backup Levels supported — Full and Incremental
NMM supports the following types of recovery: ◆
Active Directory Recovery for Disaster Recovery • Recovery of entire AD database • Authoritative or Non-Authoritative Recovery Modes
◆
Active Directory Granular Recovery — Recovery of individual AD objects or attributes
Types of Backup and Recovery Supported
179
Active Directory and ADAM Backups
Performing an AD or ADAM backup Performing an AD backup for disaster recovery enables the recovery of the entire AD database in the event of a catastrophic loss such as a hardware failure. AD data that is protected for a disaster is recoverable on an “all or nothing” basis. You cannot choose individual objects for recovery, instead you must recover the entire AD database in one recovery operation. To enable the disaster recovery of AD or ADAM data, create a snapshot-based scheduled backup as described in Chapter 2, “Configuring a Scheduled Backup.” When specifying save sets for the scheduled backup, follow these guidelines: ◆
AD is backed up by normal system save operations. It is backed up as part of SYSTEM COMPONENTS, as part of standard Windows Server backups. Note: Microsoft best practices also recommends that a backup AD server be set up so that it can be promoted to the primary AD server, in the event of a disaster.
◆
For an ADAM Client resource, specify the save set as: APPLICATIONS:\ADAM (instance_name) Writer where (instance_name) is the name of the ADAM instance.
180
EMC NetWorker Module for Microsoft Applications Release 2.0 Administration Guide
Active Directory and ADAM Backups
Performing a granular AD or ADAM backup A granular, or conventional, Active Directory (AD) backup enables you to recover individual objects and object attributes. A granular Active Directory Application Mode (ADAM) backup enables you to recover individual application partitions.
!
CAUTION Granular recovery should only be performed as a supplement to the full AD database backup described in “Types of Backup and Recovery Supported” on page 179. A disaster recovery plan requires regular full AD database backups. Unlike other types of NMM client backups, a granular backup does not use snapshot technology. Instead, the backup is routed directly to a granular backup medium. For ADAM backup, complete the tasks in “Set up local Windows SYSTEM account as an ADAM administrator” on page 181 before performing a granular ADAM backup.
Set up local Windows SYSTEM account as an ADAM administrator The ADAM server, which is also a NetWorker client, relies on the NetWorker client’s nsrexecd service to spawn the required binaries to perform a backup. The nsrexecd service and other binaries run under the Windows SYSTEM account. To ensure that these binaries can access ADAM data, the Windows SYSTEM account must be given access rights to each instance on the ADAM server. Note: These steps are not required for AD backup.
To set up the Windows SYSTEM account with permissions on the local ADAM server: 1. Open the ADAM ADSI Edit utility. The ADAM ADSI Edit utility is available with ADAM SP1. 2. Connect to the ADAM instance. 3. In the Connection Settings dialog box, select Well-known naming context and select Configuration from the list box. 4. Type the port number (typically 50000) of the ADAM partition in the Port box and click OK. 5. In the left pane, Select CN=Roles. 6. In the right pane, right-click on CN=Administrators and then select Properties. 7. In the CN=Administrators Properties dialog box, select the Member Attribute from the attributes list, and then click Edit. 8. Click Add Windows Account and add the local ADAM Server name. 9. Save your changes. Repeat this procedure for each ADAM instance that you want to back up.
Performing a granular AD or ADAM backup
181
Active Directory and ADAM Backups
Granular backup tasks The tasks involved in setting up a granular AD or ADAM backup are similar to the tasks described in Chapter 2, “Configuring a Scheduled Backup.” The differences are outlined in Table 30 on page 182. Table 30
182
Setting up a granular AD or ADAM backup Backup task
Considerations
Configure a backup pool
Use backup pools for granular AD or ADAM backups that are different than the pools used for NMM client backups that include snapshots. In this way, you can sort granular AD and ADAM backups from other backups.
Configure snapshot policies
Do not use a snapshot policy for granular AD or ADAM backups.
Configure a backup schedule
Full and incremental level backups are supported for granular AD and ADAM backups. Level 1 to 9 backups are not supported.
Configure a backup group
Do not assign a snapshot policy or a snapshot pool to the backup group.
Configure a Client resource
Do not use the same Client resource for AD or ADAM granular backups and other NMM client backups including AD or ADAM backups for the purposes of disaster recovery.
Configure a Client resource, Save Set attribute
Specify domain objects in the following format: DC=corp, DC=domain,DC=com For example: DC=corp,DC=xyz,DC=com where the backup saves the entire domain named corp.xyz.com from its root level. CN=Users,DC=corp,DC=xyz,DC=com where the backup includes Active Directory User objects for the domain name, corp.xyz.com. CN=user123,CN=Users,DC=domain,DC=com where the backup includes Active Directory user123 objects for the domain name, users.domain.com.
Configure a Client resource, Backup Command attribute
• AD objects Type the following command in the Backup Command attribute: nsradsave.exe Active Directory domain objects and application partitions on the domain host cannot be backed up in the same Client resource. Each type of data must be specified on a separate Client resource. For example, to back up an Active Directory domain or part of a domain, type the following in one Client resource: nsradsave.exe • ADAM objects To back up ADAM application partitions, type the following command in the Backup Command attribute, specifying the port number 50000. For example, type the following: nsradsave.exe -p 50000
Configure privileges
In addition to the permission set up described in Chapter 2, “Configuring a Scheduled Backup,”, ensure that the steps described in “Set up local Windows SYSTEM account as an ADAM administrator” on page 181 are completed.
Configure a proxy client
Do not configure a proxy client for granular AD backups.
EMC NetWorker Module for Microsoft Applications Release 2.0 Administration Guide
10 Active Directory Recover
This chapter includes the following topics: ◆ ◆
Recovering all Active Directory data ....................................................................... 184 Performing a granular recovery of AD objects and attributes ............................. 186
Active Directory Recover
183
Active Directory Recover
Recovering all Active Directory data The steps in this procedure assume that any damaged hardware has been replaced and that all software has been reinstalled. To ensure the successful disaster recovery of the Active Directory (AD) server, the backup steps described in Chapter 9, “Active Directory and ADAM Backups,” must have been completed. Note: If you have followed Microsoft best practices, you will have a backup AD server that can be promoted to the primary AD server in the event of a disaster. This is the preferred method to recover an AD server from disaster. If you do not have a backup AD server that can be promoted to the primary AD server, complete the steps in this section to recover from a disaster of the AD server.
To recover AD server data from a disaster: 1. If you have not already done so, boot the NMM client in Directory Service Recovery mode. “Booting Windows in Directory Service Restore mode” on page 92 provides more information about booting in this mode. 2. Open the NMM software and select the NetWorker server on which the NMM client was configured for backup. 3. In the left pane, select Recover > System Recover Session. 4. From the navigation tree, open the System Components folder. By default, the objects displayed in the navigation tree are from the most recent backup. To recover from a previous backup: • From the application toolbar, click the Browse calendar icon and select an earlier browse time. • To view all versions of a backup object prior to the selected browse time, right-click an object in the navigation tree and select Versions. 5. Select items to recover: • If the AD server is not in a clustered environment, select all of the items under the System Components folder. • If the AD server is part of a cluster environment: a. From the Options menu, select System Recover Session Options and then click the NetWorker tab. b. clear the attribute titled Use Microsoft best practices for selecting the system state. Click Yes when asked to confirm your selection. c. Click OK to close the System Recover Session Options dialog box. d. Select all of the items under the System Components folder except for the Cluster Writer. 6. To determine whether any volumes need to be mounted, right-click the selected item and select Required Volumes. 7. From the System Recover Session toolbar, click Start Restore.
184
EMC NetWorker Module for Microsoft Applications Release 2.0 Administration Guide
Active Directory Recover
8. To perform an authoritative recovery of the AD server, complete the procedure for authoritative recovery of NTDS or FRS data. “Performing an authoritative recovery of NTDS or FRS data” on page 93 provide more information about these types of recovery. 9. After the AD recovery is complete, reboot the host to restart the AD server. 10. If the AD server is part of a cluster environment, select the Cluster Writer for recovery. 11. Recover any remaining volume or application data. Chapter 3, “Recovering Data,” provides more information about recoveries.
Recovering all Active Directory data
185
Active Directory Recover
Performing a granular recovery of AD objects and attributes You can individually select deleted AD objects and their attributes for recovery. Note: Due to AD limitations, there are some restrictions on the recovery of objects and attributes. “Recovery Restrictions for Active Directory” on page 187 provides more information about recovery restrictions.
To recover an AD object or object attribute: 1. Start the NMM Client program. 2. From the application toolbar, click the NetWorker server icon to select the NetWorker server on which the NetWorker client was configured for backup. 3. In the left pane, select Recover > Active Directory Recover Session. 4. In the navigation tree, select the AD objects to be recovered. By default, the objects displayed in the navigation tree are from the most recent backup. To recover objects from a previous backup: • From the application toolbar, click the Browse calendar icon and select an earlier browse time. • To view all versions of a backup object prior to the selected browse time, select an object in the navigation tree, right-click and select Versions. 5. To determine whether any volumes need to be mounted for a selected object, right-click an object and select Required Volumes. 6. Recover the entire object or selected object attributes: • To recover the entire object: a. Select the object. b. From the Active Directory Recover Session toolbar, click Start Recover to begin the recovery operation. • To recover just selected attributes of an object: a. Right-click an object and select Recover this Item. The Active Directory Recover Attributes dialog box appears. b. Select each attribute that is to be recovered. If all attributes or no attributes are selected, the entire object is recovered. 7. Click OK. 8. From the left pane, select Monitor to view the progress of the recovery.
186
EMC NetWorker Module for Microsoft Applications Release 2.0 Administration Guide
Active Directory Recover
Recovery Restrictions for Active Directory The following restrictions apply when recovering AD objects and attributes: ◆
“Tombstone lifetime restriction” on page 187
◆
“System-only attributes cannot be recovered” on page 187
◆
“Object password attributes” on page 188
◆
“Attributes with null values” on page 188
◆
“Schema objects” on page 188
Note: After starting an AD recovery, access the Monitor view to verify the status of the recovery.
For more information about Active Directory objects and attributes, refer to the Microsoft website. Tombstone lifetime restriction When an AD object is deleted, it is sent to a special container, named Deleted Objects. This object is now invisible to normal directory operations, and is called tombstone. It is better to recover a tombstone object instead of re-creating it because data such as the Security Identifier (SID) and the Global Unique Identifier (GUID) are stored with the tombstone object. This data is critical for additional data recoveries, such as assigned group permissions. For example, Access Control Lists (ACLs) use the SID of a security identifier object to store its permissions. A re-created group would get a new SID and GUID so that permissions assigned to the old group would be lost. Similarly, the SID and GUID are both used to recover a user profile. A user's profile would become unusable if a user with the same name is re-created. This is because the new profile would be given a new SID and GUID. Objects in tombstone are deleted when they reach the tombstone lifetime age for the domain, which is, by default, 180 days. After an object is deleted from the tombstone, it cannot be recovered. This is an AD restriction. The tombstone lifetime is a configurable attribute of a Windows domain. For more information, refer to the Microsoft Windows 2003 Server documentation on AD. System-only attributes cannot be recovered Object attributes that are system-only cannot be backed up nor recovered. This is an AD restriction. The following partial list of system-only attributes are not backed up: ◆
distinguishedName
◆
dSCorePropagationData
◆
instanceType
◆
objectCategory
◆
objectClass
◆
objectGUID
◆
uSNChanged
◆
uSNCreated
◆
whenChanged
◆
whenCreated
◆
badPasswordTime
Performing a granular recovery of AD objects and attributes
187
Active Directory Recover
◆
badPwdCount
◆
lastLogoff
◆
lastLogon
◆
logonCount
◆
sAMAccountType
◆
userAccountControl
Object password attributes An object’s password is not recovered. After recovering an object with a password attribute, the Windows administrator must reset the password. Attributes with null values Attributes with null values are not backed up and therefore, are not recovered. For example, if an attribute for a phone number was empty (null), then the null Phone Number attribute would not be backed up. This is an AD restriction and is intended to prevent the unintentional overwriting of valid attribute values. For example, if a Phone Number attribute was null when a snapshot was taken but later a valid phone number was added, subsequent recovery operations would not overwrite the valid phone number with a null value. Schema objects Schema objects cannot be recovered and therefore, should never be deleted.
188
EMC NetWorker Module for Microsoft Applications Release 2.0 Administration Guide
11 Snapshot Management
This chapter includes the following topics: ◆ ◆ ◆
Roll over a snapshot.................................................................................................... 190 Roll back a snapshot ................................................................................................... 191 Delete a snapshot ........................................................................................................ 194
Snapshot Management
189
Snapshot Management
Roll over a snapshot A rollover is the process of creating a conventional backup from a snapshot. Conventional backups include backup to tape, file type, or advanced file type devices. Rollover policies are typically controlled automatically through snapshot policy settings on the NetWorker server. Chapter 2, “Configuring a Scheduled Backup,” provides more information about scheduling backups. However, you can perform a rollover manually if necessary. For example, before recovering a database that currently exists only as a persistent snapshot, consider rolling over the snapshot to tape to protect the data in case the snapshot becomes corrupted during the recovery process. Another reason to perform a rollover manually, is to roll over only selected save sets from the snapshot. For example, if a snapshot contains two save sets: D:\ and E:\, you can select to roll over only the data in the E:\ save set. To roll over a snapshot: 1. Open the NMM client software and select the NetWorker server on which the NetWorker client was configured for backup. 2. In the left pane, select Snapshot Management. 3. In the navigation tree, select the snapshot and expand the snapshot to view the save sets. Select the snapshot or snapshot save sets to be rolled over. 4. From the Snapshot Management toolbar, click Rollover to begin the rollover operation. 5. In the left pane, select Monitor to view the progress of the rollover operation.
190
EMC NetWorker Module for Microsoft Applications Release 2.0 Administration Guide
Snapshot Management
Roll back a snapshot A rollback recovery is the process of returning data to an earlier point-in-time. The entire contents of a persistent snapshot is recovered during a rollback recovery. You cannot select individual components in a rollback recovery operation. A rollback recovery is the fastest way to recover the contents of a persistent snapshot. A rollback recovery is known as a "destructive" recovery because all changes that were made after the selected snapshot was taken are overwritten. For example, suppose that a snapshot of a database is taken every hour. At 5:30 P.M., it is determined that the database is corrupt and that the last known consistent database snapshot was taken at 5:00 P.M. When the database host is rolled back to the 5:00 P.M. snapshot, all database transactions between the time of the 5:00 P.M. snapshot and 5:30 P.M. are overwritten.
Rollback recovery requirements To perform a rollback operation, the following requirements must be met: ◆
The snapshot to be rolled back must reside on a CLARiiON or Symmetrix storage system that is supported with the EMC VSS Provider. EMC NetWorker Module for Microsoft Applications Release 2.0 Installation Guide provides more information.
◆
The NMM client to which the snapshot is to be rolled back must be supported with a proxy client and the snapshot must have been created using a proxy client. Chapter 2, “Configuring a Scheduled Backup,” provides more information about backup using a proxy client.
◆
The nested mount points on file systems are dismounted prior to performing the rollback restore.
◆
The Microsoft Exchange checkbox titled “This database can be overwritten by a restore” is selected for each Exchange database that is to be recovered. This checkbox can be found by using the Exchange SYSTEM Manager application.
◆
The databases are detached for each Microsoft SQL Server database that is to be recovered.
◆
NMM does not support rollback restore for backups performed with EqualLogic or Celerra hardware. Only conventional restore and snapshot restore are supported for those hardware.
Storage array descriptor file A storage array descriptor file, sa.ini, contains information about the storage arrays connected to the proxy client data mover. The sa.ini file is created with the nsr_sa_ini.exe utility, and placed in the nsr\res directory on the NMM client host. Nsr_sa_ini.exe prompts you for information about the storage arrays connected to the proxy client. The required inputs are different for CLARiiON and Symmetrix: ◆
For a CLARiiON storage array, you must provide an array user name and password. When you complete the entries for a CLARiiON sa.ini file, the password string is encrypted when you save the file. “Sample CLARiiON sa.ini file” on page 192 provides an example of the entries in this file.
Roll back a snapshot
191
Snapshot Management
◆
For a Symmetrix storage array, the sa.ini file has are fewer parameters - you do not need an account name, password, or IP address. “Sample Symmetrix sa.ini file” on page 192 provides an example of the entries in this file.
To create a storage array descriptor file: 1. At the command line, type: nsr_sa_ini.exe 2. Follow the prompts to provide the array information. Note: Even though the utility appears to allow you to enter credentials for more than one storage array, only the first one will be used by NMM. You must create a separate sa.ini for each storage array.
When you have completed entering the array information, the file is saved to the nsr\res directory on the NMM client host. WARNING Do not edit the sa.ini file with a text editor to make changes in the array parameters. Using a text editor can corrupt the file, or compromise the password entries. Use the nsr_sa_ini.exe tool to edit the sa.ini file if you need to make changes after you create it. Sample CLARiiON sa.ini file
A sample sa.ini file for a CLARiiON storage array would look similar to the following: [Storage_Array] Storage_Array_Count=2 Storage_Array_1=APM00052106710 [APM00052106710] Array_Type=CLARiiON Array_model=CX500 Array_user=sbarma Array_pass=**** Array_pass_confirm=**** Array_SPA=122.222.111.128 Array_SPB=122.222.111.129 Sample Symmetrix sa.ini file
A sample sa.ini file for a Symmetrix storage array would look similar to the following: [Storage_Array] Storage_Array_Count=1 Storage_Array_1=000187461273 [000187461273] Array_type=Symmetrix Array_sid=197 Array_Model=DMX-800
192
EMC NetWorker Module for Microsoft Applications Release 2.0 Administration Guide
Snapshot Management
Performing a rollback recovery Before performing a rollback recovery, ensure that the rollback requirements have been met. “Rollback recovery requirements” on page 191 provides more information about these requirements. To perform a rollback recovery: 1. Open the NMM client and select the NetWorker server on which the NetWorker client was configured for backup. 2. In the left pane, select Snapshot Management. 3. If you are performing a rollback for EMC Symmetrix configurations that use RAID5 Business Continuance Volumes (BCVs), perform the following steps: a. Delete all snapshots for the Standard EMC Disk (STD), except for the snapshot to be rolled back. For information about deleting snapshots, see “Delete a snapshot” on page 194. The deletion operation will put the snapshot BCVs in the established state. Once you have completed the deletions, there should be only one snapshot BCV in the split state, and that this is the snapshot BCV that is to be rolled back. Note: To prevent the loss of data from a snapshot that is to be deleted, perform a rollover of the snapshot before the deletion operation. “Roll over a snapshot” on page 190 provides more information about rolling over a snapshot.
b. Use the SYMCLI commands to disassociate the BCVs and Virtual Devices (VDEVs) that are in the established state. c. If the snapshot used multiple STDs, perform the previous steps for each STD. 4. In the navigation tree, select the snapshot to be rolled back. 5. Right-click the selected snapshot and select Rollback. 6. In the left pane, select Monitor to view the progress of the rollback operation. 7. When rollback processing has completed, reboot the host to complete the rollback operation. 8. If you performed a rollback on an Exchange or SQL database, remount the database. If you performed a rollback on a file system that had nested mount points, remount the nested mount points.
Roll back a snapshot
193
Snapshot Management
Delete a snapshot Snapshot deletion policies are typically controlled automatically through snapshot policy settings on the NetWorker server. Chapter 2, “Configuring a Scheduled Backup,” provides more information about policy settings. However, you can delete a snapshot manually. For instance, if space must be made available immediately on the storage system, you can manually roll over and then delete snapshots.
!
CAUTION If a snapshot is deleted without the use of the NMM client user interface, the snapshot may still appear to be recoverable in the NMM client user interface. If such a snapshot is selected for recovery, the recover operation will fail. A snapshot could by in used by a user in another application. A snapshot could also be deleted by VSS or the storage subsystem if resources are exhausted due to high input/output rates on the volumes. To delete a snapshot: 1. Open the NMM client software and select the NetWorker server on which the NetWorker client was configured for backup. “Opening the software and connecting to a NetWorker server” on page 38 provides more information about opening NMM and connecting to a NetWorker server. 2. In the left pane, select Snapshot Management. 3. In the navigation tree, select the snapshot to be deleted. 4. Right-click the selected snapshot and select Delete. 5. In the left pane, select Monitor to view the progress of the delete operation.
194
EMC NetWorker Module for Microsoft Applications Release 2.0 Administration Guide
12 NetWorker Client Management
This chapter includes the following topics: ◆ ◆
Specifying ranges for service and connection ports............................................... 196 Specifying a password................................................................................................ 197
NetWorker Client Management
195
NetWorker Client Management
Specifying ranges for service and connection ports A service port is a listener port that provides services to NMM client hosts. The default range for service ports is 7937 to 9936. A connection port is used to contact a service, whether it is on a NetWorker server, storage node, or client. The default range for connection ports is 10001-30000. To implement an enhanced security environment, it may be necessary to reduce the range of available ports. For more information about determining the size of the port range, refer to the EMC NetWorker Multiplatform Version Administration Guide, release 7.3.3 or later. To reduce the range of available ports: 1. From the Options menu, select Configure Options. The Configure Options dialog box appears. 2. In the Service Ports attribute, enter the range of available ports. 3. In the Connection Ports attribute, enter the range of available ports. 4. Click OK. Note: If a firewall exists between the NetWorker client and any NetWorker servers, ensure that the firewall is configured to accept the port ranges entered in the Configure Options dialog box.
196
EMC NetWorker Module for Microsoft Applications Release 2.0 Administration Guide
NetWorker Client Management
Specifying a password The password is used to protect items that will be backed up with either PW1 password-protection, or PW2 encryption and password-protection. PW1 and PW2 protection is enabled on the NetWorker server with a local or global directive. For more information about PW1 and PW2 protection, refer to the EMC NetWorker Multiplatform Version Administration Guide, release 7.3.3 or later.
!
CAUTION Changing the password does not change the password for files that have already been backed up. To recover PW1 or PW2 password-protected files, you must provide the password that was in effect at the time of the backup. To change the PW1 password: 1. From the Options menu, select Configure Options. The Configure Options dialog box is displayed. 2. In the Old password attribute, type the password that is currently in effect. 3. In the New password attribute, type the new password. 4. In the Confirm password attribute, retype the password. 5. Click OK. The new password will be applied to future scheduled backups for the NMM client where password-protection has been enabled with a global or local directive.
Specifying a password
197
NetWorker Client Management
198
EMC NetWorker Module for Microsoft Applications Release 2.0 Administration Guide
13
Invisible Body Tag
Troubleshooting
This chapter includes the following topics: ◆ ◆ ◆ ◆ ◆ ◆
The troubleshooting process...................................................................................... NMM client error messages....................................................................................... NMM client issues....................................................................................................... Checking log files ........................................................................................................ Manually stopping and starting services................................................................. Other troubleshooting resources...............................................................................
Troubleshooting
200 203 205 212 215 216
199
Troubleshooting
The troubleshooting process NetWorker and the NetWorker Module for Microsoft Applications (NMM) provide many resources to help discover and isolate problems. Setting up these resources before problems occur can help if and when troubleshooting problems occur later. If the problem is not with the NMM client, there are other NetWorker resources and documentation that may provide a solution. The following flowchart, Figure 15 on page 201 provides an overview of the process and sections of this chapter for troubleshooting a scheduled backup or recovery problem.
200
EMC NetWorker Module for Microsoft Applications Release 2.0 Administration Guide
Troubleshooting
Find error
NetWorker Server
NetWorker Client-side or Server-side?
NetWorker Client
No
Unique to NMM Client (volumes and writers)? Yes
Check other EMC documentation
Does the error appear in a log file or message window?
No
Yes Check NMM Client error messages section
Fixed?
Check NMM Client issues section
Yes
Finish
No Try a different solution?
No
Contact Technical Support
Yes GEN-000753
Figure 15
Troubleshooting process
Setting up notifications Set up NetWorker software and NMM client software to send notifications about events. These notifications can be sent to several locations, including log files, SNMP printers, SNMP management console, and email messages. The EMC NetWorker Multiplatform Version Administration Guide, release 7.3.2 or later, describes how to set up notifications.
The troubleshooting process
201
Troubleshooting
Finding errors When a problem occurs, a notification or message might be displayed, or appear in a log file. Table 31 on page 202 describes several ways that NetWorker server, NMM client, and other NetWorker features provide information about problems.
Table 31
202
Notifications and errors Type
Description
Email notification of a NetWorker event
NetWorker client can be set up to send an email notification about NetWorker events.
Error message windows
Appear on the NetWorker server when an error occurs during backup or recovery operations.
NetWorker Monitor window
Displays details of current NetWorker server activities, operations related to devices and libraries, and events that require user intervention.
Event viewer
Alerts users that user intervention is required on the NetWorker server.
Log files
Log files are created for each operation and process. Separate log files are available for NetWorker and various features, depending on what features are installed and in use: • NetWorker Module for Microsoft Applications • NetWorker • NetWorker PowerSnap • Replication Manager • Solutions Enabler • EMC VSS Provider The logging level of the log file is controlled by the debug level of the process.
EMC NetWorker Module for Microsoft Applications Release 2.0 Administration Guide
Troubleshooting
NMM client error messages Error messages help to identify which product is having a problem. The following sections describe error messages that are specific to the NMM client.
E_VOLUME_NOT_SUPPORTED This error occurs when CLARiiON is down, an array is unmanaged, or the CLARiiON disk is not visible. This error also occurs when Data Mover is used to take a local volume replica. The error message will appear in NMM client and Replication Manager logs. Solution
Check in the CLARiiON array for storage allocation.
E_VETO_PROVIDER There are several possible causes for this error: ◆
Storage resources such as Symmetrix clones or CLARiiON BCVs have been added but the Replication Manager service was not recycled to rebuild the storage resource cache. The provider finds the LUN as hosted by the storage array, but fails to find storage resources in the storage resource cache.
◆
There is a load on the CLARiiON array, and replica creation fails.
◆
A CLARiiON snapshot is performed when there are not enough LUNs in the reserved LUN pool. In this case, the rmsnap command fails.
◆
A CLARiiON snapshot is performed, but the number of established snapshot sessions to the LUN has already reached the limit.
Solution
Use the net stop and net start commands to stop and restart the EMC VSS provider, Microsoft VSS services, and Replication Manager services. For example, to stop and restart the Replication Manager service: 1. From the command line, stop the rmagentps service. net stop rmagentps 2. Start the rmagentps service. net start rmagentps
VSS_E_WRITERERROR_RETRYABLE error code 0x800423f3 This error occurs if a savegroup is rerun, and it was stopped previously while a replica was being taken and the replica did not complete. Solution
Stop EMC VSS provider, Microsoft VSS services, and Replication Manager services. Then start those services. Also restart Exchange Information store if it was running and was backed up.
NMM client error messages
203
Troubleshooting
VSS CLIENT... Invalid Writer Selection... for APPLICATIONS This error might occur if Microsoft Exchange services are not up or if SQL databases are offline. Another cause of this error is if there is a typographical error in writing APPLICATIONS:\Microsoft Exchange Writer. Solution
For Microsoft Exchange applications, start the Exchange services. If Exchange services were already up, dismount and mount the databases and then start the savegroup. For SQL Server applications, bring the databases online. Solution
Retype the words correctly or use the nsrsnap_vss_save -? command, as described in “Displaying valid application data save sets” on page 61, to display a listing of all valid application save sets on the NMM client.
204
EMC NetWorker Module for Microsoft Applications Release 2.0 Administration Guide
Troubleshooting
NMM client issues The following section describes some common problems and possible solutions for NMM client. Check this section first when there appears to be a problem but there is no specific error message in monitoring or event logs.
Savegroup failed in scheduled backup A notification appears in the NetWorker Monitor window that a savegroup failed. Solution
Check the savegroup details for the failed save set. This may provide an exact cause, or a general error, which should indicate whether it is a client-side or server-side issue. The EMC NetWorker Multiplatform Version Administration Guide, Release 7.3.2 or later, provides information about viewing group backup details. If there is not enough information in the savegroup details, check the NMM client log and other client-side logs. “Checking log files” on page 212 provides more information about the log names, locations, and details.
In progress backup fails If a node within a cluster undergoes failover during a backup operation, the operation will not be successful. The next scheduled backup operation will be the next valid backup. Solution
If you are using a hardware provider such as the EMC VSS Provider, use the disk management utilities provided with the associated hardware to delete any resources that may be left in an indeterminate state as a result of the failed backup. For example, a CLARiiON storage solution may have an inactive snapshot as the result of a failed backup. In this case, use the EMC NaviCLI interface to search for and delete the inactive snapshot.
NetWorker is blocked by Windows Firewall After installing Microsoft Windows Server 2003 (SP1), the Windows Firewall may be blocking NetWorker processes from sending information through the firewall. Solution
The EMC NetWorker Module for Microsoft Applications Release 2.0 Installation Guide provides information about how to extend the Security Configuration Wizard or manually configure Windows Firewall exceptions.
Need to run utility to obtain Exchange Server information The utility nwexinfo.exe runs when NMM client is installed on an Exchange Server. This utility gathers the Exchange username, password, and domain, and then inserts this information in the registry.
NMM client issues
205
Troubleshooting
Solution
Rerun the utility if any of the following conditions occurs: ◆
Exchange Server is installed after NMM client is installed.
◆
The Exchange username, password, or domain values change after the NMM client is installed.
To run the utility: 1. Navigate to the following folder: \nsr\bin 2. Run nwexinfo.exe. 3. Change the Exchange password, username, and domain as required.
Requesting a snapshot for a volume on hardware that is not transportable When volumes are added to the NMM client snapshot set, an error might appear if a transportable hardware snapshot is requested and the volume that is being replicated is not a volume that resides on special hardware that is transportable. The following error message might also appear: VSS_E_VOLUME_NOT_SUPPORTED_BY_PROVIDER. Solution
The Exchange server and proxy server (if one is set up for Exchange) must have matching volumes or alternate mount path in PowerSnap (PS) attribute. An Exchange backup that is mounted on a proxy server needs either matching volumes or an alternate location to mount Exchange databases and logs. An example of matching volumes would be D: to D: and E: to E:. An example of alternate location would be "G:\altpath" on the proxy server. In this example, the snapshot of "D:\" would be mounted on the proxy server as "G:\altpath\D\" and the snapshot of "E:\" would be mounted on the Proxy server as "G:\altpath\E\." To use the alternate mount path, set the PowerSnap attribute NSR_ALT_PATH in the Client resource. In the preceding example of an alternate location, the attribute would be set to "NSR_ALT_PATH=G:\altpath." “Task 5: Configure a Client resource” on page 57 provides more information about creating a Client resource.
PowerSnap service must be restarted after the NetWorker service is restarted After restarting the NetWorker service, if the PowerSnap service is not restarted, the first retention or rollover will fail. The following message appears: RPC send operation failed. A network connection could not be established with the host.
The PowerSnap service will re-establish the connection on the next operation, so this failure will only occur once. Solution
To fix this problem, restart the PowerSnap service after restarting the NetWorker service, before running a PowerSnap operation. 206
EMC NetWorker Module for Microsoft Applications Release 2.0 Administration Guide
Troubleshooting
PowerSnap validation for recovery fails When the service is not stopped, recovery fails while validating PowerSnap for recovery. Some VSS writers require that the service be stopped while recovering. For example, the SQL writer requires that the service be stopped while recovering the SQL database. Solution
To fix this problem, stop the service before recovering.
Snapshot backup may fail with writer errors A snapshot backup may fail with VSS writer errors that indicate the writer may be in an unstable state, such as the following: VSS_E_WRITERERROR_NONRETRYABLE VSS_E_BADSTATE VSS_E_UNEXPECTED_WRITER_ERROR Solution
Contact EMC Technical Support.
Microsoft I/O write error when taking a replica in a CLARiiON array This problem might occur when a replica is taken in a CLARiiON array LUN backup. Solution
To fix this problem, stop the EMC VSS provider, Volume Shadow Copy Service and Replication Manager services. Then start those services.
Creating a replica takes a long time in CLARiiON environment Older version of CLARiiON FLARE® OS that is running on CLARiiON may take a long time to create a replica. Solution
To fix this problem, update CLARiiON FLARE OS to the latest version.
Cannot recover Exchange database due to overwrite prevention error If an Exchange database has not been selected for recovery in the Exchange System Manager, recovery for that database will fail. When a recovery attempt fails, several entries are displayed in the NetWorker Monitor window. For example: "VSS CLIENT... Database "Mailbox Store 2 (SERVERX)" in Storage Group "Second Storage Group" does not have the "This database can be overwritten by a restore." checkbox marked." "VSS validatation and preprocessing failed for Microsoft Exchange Writer." "nsrsnap_vss_recover: Recovery operation failed. Refer to log file(s) for details."
NMM client issues
207
Troubleshooting
The following message may be displayed by Microsoft Exchange: The database files in this store were replaced with older versions by an offline restore. To use the restored files, open the database property page for this store, select "this database can be overwritten by a restore", wait for active directory replication, and try again. Error ID: C104173A Exchange System Manager Solution
Search for "KB293324"on the Microsoft Help and Support website, and go to the article "XADM: "C104173A" Error Message Occurs After You Restore the Database." Follow the instructions for changing the setting in Exchange System Manager.
Incremental backups within NetWorker Module for Exchange Client may be promoted to full backups If the NMM client is installed, requests for an incremental backup through the NetWorker Module for Exchange Client are automatically promoted to a full backup. This does not affect NMM client incremental backups of volumes. For example, suppose that NetWorker Module for Exchange Client requests an incremental backup for Exchange server "EXSRV1." If NetWorker NMM client is installed, then the NetWorker Module for Exchange Client promotes its own incremental backup to a full backup to maintain the integrity of the backup and prevent data loss. However, the NetWorker NMM client can still perform an incremental backup of a volume, such as "D:\" on "EXSRV1."
Incremental backups within NetWorker Module for SQL Server Client may be promoted to full backups If the NetWorker NMM client is active and configured to back up the SQL database, requests for an incremental backup through the NetWorker Module for SQL Client are automatically promoted to a full backup to maintain the integrity of the backup and prevent data loss. Installation of the NMM client itself does not automatically promote NetWorker Module for SQL Client incremental backups to full backups. This does not affect NMM client incremental backups of volumes. For example, suppose that the NetWorker Module for SQL Client requests an incremental backup for SQL server "SQLSRV1." If the NMM client is installed, and the NetWorker NMM client performs backups of the SQL database, then the NetWorker Module for SQL Client automatically promotes the incremental backup to a full backup. However, if the NMM client is installed but does not perform backups of the SQL database, then a request through the NetWorker Module for SQL Client for an incremental backup is allowed. In either case, the NMM client can still perform an incremental backup of a volume, such as "D:\" on "SQLSRV1."
Diagnosing VSS Writer Issues NMM provides a command to dump the Microsoft VSS Writer metadata to XML files. These XML files detail what each active writer on the system is doing, and may be useful to support personnel for investigating and analyzing writer issues.
208
EMC NetWorker Module for Microsoft Applications Release 2.0 Administration Guide
Troubleshooting
To dump the VSS Writer metadata to XML files, run the nsrsnap_vss_save command with the -G command switch, for example: D:\Legato\nsr\bin>nsrsnap_vss_save -G
When you run the command a message displays the directory the files were sent to. For example: NMM .. requesting of writer metadata completed successfully and deposited in C:\Users\ADMINI~1\AppData\Local\Temp\3\xmlfiles\
The directory contains an .XML for each writer on that system, for example: Exchange Writer.XML SQL Writer.XML etc.
The files will probably be hidden because the directory they are sent to are hidden by default. You can make the folder visible by using Start > Control Panel>Folder Options>View>Show Hidden Files and Folders. Double-click an XML file to view it in your browser, such as Internet Explorer or Firefox. You can also copy the files to another folder. For example: D:\>mkdir xmlfiles D:\>cd xmlfiles D:\xmlfiles>copy C:\Users\ADMINI~1\AppData\Local\Temp\3\xmlfiles\*.* c:\Users\ADMINI~1\AppData\Local\Temp\3\xmlfiles\ExchangeWriter.xml c:\Users\ADMINI~1\AppData\Local\Temp\3\xmlfiles\SQL Writer.xml 2 file(s) copied.
Modifying the Exchange 2007 COM+ component’s user account or password If your user account, your password information, or both change after the COM+ component is registered, you can use the following procedure to change the user account or password information for the COM+ component: 1. Start component services. 2. Expand Computers > My Computer > DCOM Configuration. 3. Right-click Replication Manager Exchange Interface and select Properties from the context menu. 4. Click the Identity tab. 5. Modify the domain user account or password and click OK. This will also modify the account information for the Replication Manager Exchange Interface Service.
NMM client issues
209
Troubleshooting
Save sets may not appear in the recover window NMM Client uses the host machine NETBIOS or "short" name when connecting to the NetWorker server to browse backups. If the NETBIOS name is not found, NMM will not be able to display backups. Solution
Add the NETBIOS name to the Aliases attribute of the Client resource. “Task 5: Configure a Client resource” on page 57 provides more information about creating a Client resource.
Recovery of AES-encrypted files fails without passphrase If an application such as SQL Server or Exchange Server is backed up with AES encryption, and then a recovery is attempted without the correct passphrase, recovery will fail. The application files will only be partially recovered, and will be empty or in a corrupted state. Solution
During data recovery, you must specify the pass phrase used at the time of backup if it is not the default or current pass phrase.Provide the passphrase when recovering AES encrypted files, using NMM Security recovery options. “Security recovery options” on page 82 provides more information about specifying pass phrases in NMM.
Unable to restore files encrypted with both Microsoft Windows Encrypting File System and AES encryption When AES encryption is applied to a file that is also encrypted using the Microsoft Windows Encrypting File System (EFS), the backup will be reported as successful. However, recovery of the file will fail and the following message will be written to the networker log file: recover: Error recovering . The RPC call completed before all pipes were processed. Solution
Do not use AES encryption when backing up files that are encrypted using EFS.
210
EMC NetWorker Module for Microsoft Applications Release 2.0 Administration Guide
Troubleshooting
Anti-virus programs block recovery When a recovery is attempted from a save set of “all” is attempted, anti-virus programs may block NMM recovery. Anti-virus programs are designed to protect their own program files and settings from external threats that may be attempting to disable the program. The anti-virus program cannot always distinguish the recovery from an attack. Solution
Prior to recovery, disable the anti-virus programs protection properties. The name and location of the settings varies, but look for a setting like “Prevent modification of command agent files and settings.” Clear or disable the setting. Check the anti-virus program’s documentation or online help for information about finding and disabling this setting. To recover files to a system protected by an anti-virus program: 1. Disable the anti-virus program’s setting for protecting its own files and settings. 2. Perform the recovery. 3. Reset the anti-virus program to protect its files and settings.
NMM client issues
211
Troubleshooting
Checking log files There are many log files generated by NMM client and associated features. These log files include errors that occur during the processes. Check the log files in the following order: 1. “NMM client” on page 212 2. “PowerSnap client” on page 212 3. “Replication Manager” on page 213 4. “Solutions Enabler” on page 213 5. “Active Directory” on page 214 6. “NetWorker server” on page 214 In addition, third party providers generate their own logs in place of the Solutions Enabler log (hwprov.log). For more information, check the third party documentation.
NMM client Log file
The NMM client log file is named: nmm.raw Location
Applogs folder. For example, C:\Program Files\Legato\nsr\applogs\. Description
Both save and recover CLIs write to this file. The log file is cumulative, so it is appended with each run. The logging level of the log file is controlled by the debug level of the process (-D).
PowerSnap client Log files
NetWorker VSS Client Interface Library: libvsspsclnt.XXXXX.log PowerSnap Client Core Processes. There are log files for each process that runs: ◆
nsrbragent.XXXXX.log
◆
nsrsnapagent.log
◆
nsrsnapbwragent.log
◆
nsrsnapck.log
Location
Logs folder. For example, C:\Program Files\Legato\nsr\logs\. Description
Usually the PowerSnap Client creates one set of log files for each backup or recover session, and a debug and trace log are created. These log files are tied together by using the Snapshot Session ID.
212
EMC NetWorker Module for Microsoft Applications Release 2.0 Administration Guide
Troubleshooting
The logging level of the log files is controlled by setting a variable in NSR_PS_DEBUG_LEVEL in NetWorker Server, in client configuration. Error messages in PowerSnap Client log files also appear in the standard user interface outputs for NMM client.
Replication Manager Log files
The Replication Manager log files are: ◆
erm_clientXXXXX_debug.log
◆
erm_clientXXXXX_detail.log
◆
erm_clientXXXXX_summary.log
Location
Replication Manager Agent Service log files are in the logs\client folder of the RM installation. For example, C:\Program Files\EMC\rmagentps\logs\client\ Description
The log files are cumulative, and will wrap once they reach a certain length. The debug level can be set through the registry key HKLM\SOFTWARE\RMSERVICE\RMAgentPS\Client\4.0.0\CC_DEBUG_LEVEL. The default value is 2, but can be changed to 3. To change the value, stop RM Services, change the value in the registry, and then restart RM Services. Error messages in Replication Manager log files also appear in the standard user interface outputs for NMM client.
Solutions Enabler Log files
The log files include a log file for the EMC VSS Provider and SYMAPI ◆
hwprov.log
◆
symapi-.log
Location
The Solutions Enabler product creates log files in the SYMAPI\logs folder of the Solutions Enabler installation. For example, C:\Program Files\EMC\SYMAPI\log\ Description
The log files are cumulative, or based on the date. The logging level of the EMC VSS Provider log file is controlled by a registry key. Error messages in Solutions Enabler log files do not appear in the standard user interface outputs for NMM client.
Checking log files
213
Troubleshooting
Active Directory Log files
The log files associated with Active Directory are: ◆
nsradsave.log
◆
nsradrecover.log
Location
Applogs folder. For example, C:\Program Files\Legato\nsr\applogs\
NetWorker server Log files
The NetWorker server creates several log files, which are documented in the EMC NetWorker Multiplatform Version Administration Guide, 7.3.2 or later.
214
EMC NetWorker Module for Microsoft Applications Release 2.0 Administration Guide
Troubleshooting
Manually stopping and starting services NMM client processes may need to be manually stopped and started in conjunction with configuration and troubleshooting activities. The NetWorker server creates several log files. These log files are documented in the EMC NetWorker Multiplatform Version Administration Guide, 7.3.2 or later, which provides more information about starting and stopping services on Windows and UNIX hosts, Console server, NetWorker Server, Client, or Storage Node. Table 32 on page 215 lists the services for NetWorker, PowerSnap, and Replication Manager that are active on the system.
Table 32
Services used in NMM client
Executable
Product
Category
Function
nsrexecd
NetWorker
Service
Authenticates and processes the NetWorker server’s remote execution requests and executes the save programs on the client.
nsrpsd
PowerSnap
Service
Provides PowerSnap Client services, including snapshot consistency check function, to apply retention policy and backup functions to rollover snapshots.
irccd.exe
Replication Manager
Service
Provides Replication Manager Client application and storage services for creating VSS-based snapshots and for rollback of VSS-based snapshots for EMC storage.
RMServer.exe
Replication Manager
Service
Provides Replication Manager Server services for executing workflow for creating VSS-based snapshots.
rm_api.dll
Replication Manager
Library
Library that provides Replication Manager Client interface library for NetWorker, used by NetWorker backup and recover processes.
nsrsnap
PowerSnap
Process
Temporary process active during snapshot groups that provides client-side workflow for snapshot groups, including applying retention policy, spawning process to create the snapshot, and spawning process to rollover the snapshot.
nsrsnap_vss_save
NetWorker
Process
Temporary process active during snapshot groups that is responsible for executing the client-side workflow to create the snapshot for the save sets specified in the Client resource. It is spawned by ‘nsrsnap’ and will communicate with irccd.exe to create the VSS-based snapshot, and then will communicate with PowerSnap services to register the snapshot.
Libpsvssclnt.dll
PowerSnap
Library
Library that provides PowerSnap Client Interface for NetWorker backup and recover processes.
nsrsnapagent
Temporary Service
Temporary service active during snapshot backup and restore operations that provides snapshot management functions to import and assign drive letters to a snapshot.
nsrsnapbwragent
Temporary Service
Temporary service active during snapshot backup and file system snapshot browse operations that provides the ability to read the file system on the snapshot.
Process
Provides graphical user interface for NetWorker software.
winworkr
NetWorker
Manually stopping and starting services
215
Troubleshooting
Other troubleshooting resources Does the problem appear to be on the NetWorker server or on a NetWorker client? If the problem appears on the NetWorker server, or otherwise seems to be on the server side, check to make sure that the NetWorker server is installed and configured correctly. Also, check the log files and error message documentation for the NetWorker server. If the problem appears to be with PowerSnap or Replication Manager, and is not unique to NMM client, check other documentation. The following documents provide specific error message, troubleshooting, or other documentation outside of NMM client:
216
◆
EMC NetWorker Multiplatform Version Installation Guide, release 7.3.2 or later
◆
EMC NetWorker Multiplatform Version Administration Guide, release 7.3.2 or later
◆
EMC NetWorker Multiplatform Version Error Message Guide, release 7.3.2 or later
◆
EMC NetWorker PowerSnap Module Installation and Administration Guide
◆
EMC Replication Manager Administrator’s Guide
EMC NetWorker Module for Microsoft Applications Release 2.0 Administration Guide
Glossary
This glossary contains terms related to disk storage subsystems. Many of these terms are used in this manual.
A ad hoc backup
A backup that a user requests from the client. The user specifies the files, file systems, and directories to backup. An ad hoc backup is also known as a manual backup.
Administrators group
A Microsoft Windows user group whose members have the rights and privileges of users in other groups, plus the ability to create and manage the users and groups in the domain.
Application Specific Module (ASM)
A program that is used in a directive to specify how a set of files or directories is to be backed up or recovered. For example, compressasm is a NetWorker directive used to compress files.
archive
Backing up directories or files to an archive volume to free disk space. Archived data is not recyclable.
archive volume
ASM auto media management autochanger autochanger sharing
A volume used to store archive data. You cannot store archive data on a backup volume or a clone volume. See Application Specific Module (ASM). A feature that enables the storage device to automatically label, mount, and overwrite an unlabeled or recyclable volume. See library. See library sharing.
B backup
An operation that saves data to a volume. See also conventional backup and snapshot.
backup components metadata document
See metadata document.
backup group
See group.
backup level
See level.
backup volume
A volume used to store backup data. You cannot store backup data on an archive volume or a clone volume.
EMC NetWorker Module for Microsoft Applications Release 2.0 Administration Guide
217
Glossary
bootstrap
browse policy
A save set that is essential for NetWorker disaster recovery. A bootstrap is composed of two components that reside on the NetWorker server: the media database, and the resource database. The bootstrap also provides information that is essential to recover a client file index. A policy that determines how long backed up data is available for quick access. See also retention policy.
C carousel
See autochanger.
client
A host, workstation, or fileserver whose data can be backed up or recovered. See also Client resource.
client file index
A database that tracks every database object, file, or file system that is backed up. The NetWorker server maintains a single client index file for each client.
client-initiated backup
See ad hoc backup.
Client resource
A NetWorker server resource that identifies the save sets to be backed up on a client. The Client resource also specifies information about the backup, such as the schedule, browse policy, and retention policy for the save sets. Multiple Client resources can be configured for one client host. For example, you could create one Client resource to back up business data and another to back up operating system files. See also client and resource.
clone
A reliable copy of backed up data. Unlike volumes created with a simple copy command, clone volumes can be used in exactly the same way as the original backup volume. Single save sets or entire volumes can be cloned.
clone volume
A volume used to store clone data. You cannot store clone data on an archive volume or a backup volume.
cluster
Two or more nodes that are connected and appear to network users as a single, highly available system.
command prompt component
A window in which you type commands. 1. A group of related data that must be treated as a single unit for backup and recovery. 2. In Microsoft VSS terminology, a component is a subordinate unit of a writer.
components metadata document consistency
Console server
conventional backup
218
See metadata document.
The application view of a set of data is in a state that is consistent with the application’s usage of the data at any point-in-time when the application is active. NetWorker servers and clients are managed from the NetWorker Console server. The Console server also provides reporting and monitoring capabilities for all NetWorker servers and clients. A NetWorker backup to a conventional backup device such as a tape library.
EMC NetWorker Module for Microsoft Applications Release 2.0 Administration Guide
Glossary
Compare to snapshot.
D data mover
data retention policy datawheel datazone DDS device
The NetWorker client that processes and backs up a snapshot. This may be the client whose data is the source of the snapshot, or it may be a different client, which is known as a proxy client. See also proxy client. See retention policy. See autochanger. A group of hosts administered by a NetWorker server. See Dynamic Drive Sharing (DDS). 1. A storage unit that reads from and writes to backup volumes. A storage unit can be a tape device, optical drive, autochanger, or file connected to the server or storage node. 2. When dynamic drive sharing (DDS) is enabled, refers to the access path to the physical drive.
DFS
See Distributed File System (DFS).
directed recovery
A recovery method used to recover data that originated on one NetWorker client host to another NetWorker client host.
directive
Instructions to take special actions on a given set of files for a specified client during a backup or recover operation.
disk subsystem
An integrated collection of storage controllers and/or HBAs, disks, and any required control software that provides storage services to one or more hosts, such as CLARiiON arrays.
Distributed File System (DFS) domain controller
Dynamic Drive Sharing (DDS)
A Microsoft Windows add-on that allows you to create a logical directory of shared directories that span multiple machines across a network. A host that manages user interactions with a domain, including logon, authentication, directory searches, and access to other shared resources. A feature that allows NetWorker software to recognize shared drives.
F file index file system
See client file index. 1. A file tree located on a specific disk partition or other mount point. 2. The entire set of all files. 3. A method of storing files.
full backup
See level.
EMC NetWorker Module for Microsoft Applications Release 2.0 Administration Guide
219
Glossary
G group
A NetWorker server resource that specifies the scheduled backup time for a client or group of clients.
H highly available system host ID
A system that allows cluster-aware services to continue despite a hardware or software failure. A serial number that uniquely identifies a host computer.
I inactivity timeout
incremental
The number of minutes to wait before a client is considered to be unavailable for backup. See level.
instant backup
The process of creating a persistent snapshot (point-in-time copy) of a group of files, volume, or filesystem from a single client to a storage disk volume that can be recovered (used as a backup copy). The instant backup may or may not be written to tape.
instant recovery
The process of copying back the saved group of files or a filesystem from a mounted storage disk volume of a single client, which was created using instant backup. General term for capabilities that enable near-instant access to production data in the event of data corruption to a production database. Includes both mounting replicas to an alternate host for recovery purposes and restoring the replicas to the production host.
J jukebox
See autochanger.
L label
legacy backup method
The use of special case Microsoft APIs that are required for backup and recovery of operating system components, services, and specific applications.
level
A measurement that determines how much data is saved during a scheduled or ad hoc backup.
library
library sharing local cluster client
220
A NetWorker assigned label that uniquely identifies a volume. Templates can be used to define label parameters.
A mechanism that uses a robotic arm to move media among various components in a device. The term library is synonymous with autochanger, autoloader, carousel, datawheel, jukebox, and near-line storage. Shared access of servers and storage nodes to the tape drives in a library. A NetWorker client that is not bound to a physical machine, but is instead managed by a cluster manager. It is also referred to as a logical or virtual client.
EMC NetWorker Module for Microsoft Applications Release 2.0 Administration Guide
Glossary
locale settings
LUN address
Settings that specify the input and output formats for date and time, based on local language conventions. The SCSI identifier of a logical unit number (LUN) within a device target. Each LUN address identifies a device on a SCSI bus that can perform input/output (I/O) operations.
M manual backup
See ad hoc backup.
media
The physical storage medium, such as magnetic tape, optical disk, or file system to which backup data is written.
media database
Indexed entries about the location and the life cycle status of all data and volumes that the NetWorker server manages. See also volume.
media index metadata document
mount mount point
See media database. VSS Information stored in an XML document that is passed from the writer to the requestor. Metadata includes the writer name, files and components to back up, a list of components to exclude from the backup, and the methods to use for recovery. See also shadow copy set. To make a volume physically available so that backup data can be written to it. See volume mount point.
N NDMP Network Data Management Protocol (NDMP) NetWorker administrator
NetWorker client
See Network Data Management Protocol (NDMP). A TCP/IP-based protocol that specifies how heterogeneous network components communicate for the purposes of backup and recovery. A user who can add to or change the configuration of the NetWorker server, media devices, and libraries. NetWorker administrators must have their usernames included in the NetWorker server Administrator list. See client.
NetWorker Console server
See Console server.
NetWorker Management Console
See Console server.
NetWorker server
NetWorker storage node nonclone pool
The host running the NetWorker server software, which contains the online indexes and provides backup and recovery services to the clients on the same network. See storage node. Pools that contain data that has not been cloned.
EMC NetWorker Module for Microsoft Applications Release 2.0 Administration Guide
221
Glossary
nonpersistent snapshot
A snapshot that is rolled over to tape and then deleted from disk is said to be nonpersistent.
O online indexes
operator
Databases on the NetWorker server that contain information about client backups (client file index) and backup volumes (media database). The person who monitors the server status, loads backup volumes into storage devices, and executes day-to-day NetWorker tasks.
P pathname
persistent snapshot
PIT
Instructions for accessing a file. An absolute pathname indicates how to find a file starting from the root directory. A relative pathname indicates how to find the file starting from the current directory. A snapshot that is retained on disk. A persistent snapshot may or may not be rolled over to tape. Point-in-time.
point-in-time copy
A fully usable copy of a defined collection of data, such as a consistent filesystem, database, or volume, which contains an image of the data as it appeared at a single point in time. A PIT copy is also called a shadow copy or a snapshot.
policy
A set of constraints that specify how long data is available for recovery. Each Client resource has a browse policy and a retention policy.
pool
A feature to sort backup data to selected volumes.
PowerSnap
EMC technology that provides point-in-time snapshots of data. NetWorker software backs up data from the snapshot. This allows applications to continue to write data during the backup operation, and ensures that open files are not omitted.
provider
A software component defined by Microsoft VSS, that plugs into the VSS environment. A provider, usually produced by a hardware vendor, enables a storage device to create and manage snapshots.
proxy client
A host that acts as a remote data mover during snapshot operations. A proxy client performs the NetWorker save operation for the NMM that requested the backup. A proxy client is required to perform a serverless backup.
Q quiescing
Stopping all writes to disk and flushing the filesystem cache. Quiescing the database prior to creating the snapshot provides a transactionally consistent image that can be remounted without filesystem checks or database consistency checks. Quiescing a database is the most common way of creating a database snapshot.
R
222
recover
To recover files from a backup volume to a client disk.
Registry
A Microsoft Windows database that centralizes all Windows settings and provides security and control over system, security, and user account settings.
EMC NetWorker Module for Microsoft Applications Release 2.0 Administration Guide
Glossary
requestor
replica resource
retention policy
retrieve rollback
Interfaces with the Microsoft VSS infrastructure to initiate the creation and destruction of shadow copy. NetWorker software is a requestor. See shadow copy. A component that describes the NetWorker server or its clients. Clients, devices, schedules, groups, and policies are all NetWorker resources. Each resource has attributes that define its properties. Determines how long backup data is available for recovery, though not necessarily immediate recovery. See also browse policy. To locate and recover archived files and directories. The process of returning data to an earlier snapshot in response to a recovery operation. A rollback is a complete recovery of a storage subsystem from a point-in-time copy to a standard volume without host involvement. Because no host process is involved in copying data and data does not get retrieved from tape to disk, this type of recovery is faster in comparison to traditional recovery operations from offline media. Rollbacks are destructive by nature, which means the entire contents of the file system are overwritten during a rollback operation.
rollover
root
The process of backing up a snapshot to a conventional backup medium such as tape. Whether or not the snapshot is retained on disk depends on the snapshot policy. The highest level of the system directory structure.
S save set save set ID
A group of files or a file system that is backed up on storage media. An internal identification number assigned to a save set.
save set recover
To recover data by specifying save sets rather than by browsing and selecting files or directories.
save set status
An attribute that indicates whether a save set is browsable, recoverable, or recyclable. The save set status also indicates whether the save set was successfully backed up.
server server index
See NetWorker server and Console server. See client file index.
serverless backup
A backup method that uses a proxy client to move the data from primary storage on the application server host to secondary storage on another host. Serverless backups free up resources on the application server by offloading the work of processing snapshots to a secondary host.
service port
A port used to listen for backup and recover requests from clients through a firewall.
shadow copy
A point-in-time copy of data created during an instant backup. A shadow copy is created by interaction between a requestor and the Shadow Copy infrastructure at a specific point in time. See also Volume Shadow Copy Service (VSS).
EMC NetWorker Module for Microsoft Applications Release 2.0 Administration Guide
223
Glossary
shadow copy set
shadow copy technology
skip
A complete roadmap of what was backed up at a single instant in time. The shadow copy set contains information about the writers, their components, metadata, and the volumes. A backup components metadata document containing that information is created and returned to the requestor after the snapshot is complete. Networker uses this document with the corresponding saveset at recover time. A defined and standard coordination between business application, file system, and backup application that allows a consistent copy of application and volume data to exist for replication purposes. A backup level in which designated files are not backed up.
snap clone
An exact copy of a snap set data backup. The clone operation is an archive operation without the deletion of the source data. A new snap ID is assigned to the cloned copy.
snap ID
Also known as a snapid, a unique 64-bit internal identification number for a snap set.
snap set
snapshot
snapshot expiration policy
The group of files, volumes, or filesystems from a single client, describing the collection of data for which a point-in-time copy is created on an external disk subsystem, such as a storage array. Also known as a shadow copy, a snapshot is a point-in-time copy of data created during an instant backup. The policy that determines how long snapshots are retained before their storage space is made available for the creation of a new snapshot.
snapshot policy
A set of rules that control the lifecycle of a snap set. The snapshot policy specifies the frequency of snapshots, and how long snapshots are retained before recycling.
snapshot retention policy
The policy that determines how many PIT copies are retained in the media database and thus are recoverable.
ssid staging
stand-alone device storage device
storage node
See save set ID. Moving data from one storage medium to a less-costly medium, and later removing the data from its original location. A storage device that contains a single drive for backing up data. The hardware that reads and writes data during backup, recovery, or other NetWorker operations. A host that has a storage device and the NetWorker storage node software installed. A storage node’s backup operations are controlled by the NetWorker server.
V volume
1. The physical storage medium, such as magnetic tape, optical disk, or file system to which backup data is written. 2. An identifiable unit of data storage that may reside on one or more host disks.
volume ID
224
An internal identification that NetWorker software assigns to a backup volume.
EMC NetWorker Module for Microsoft Applications Release 2.0 Administration Guide
Glossary
volume mount point
volume name volume pool Volume Shadow Copy Service (VSS)
VSS VSS component
A disk volume that is grafted into the namespace of a host disk volume. This allows multiple disk volumes to be linked into a single directory tree, and a single disk or partition to be linked to more than one directory tree. The name assigned to a backup volume when it is labeled. See also label. See pool. A Microsoft technology that creates a point-in-time shadow copy of a disk volume. NetWorker software backs up data from the shadow copy. This allows applications to continue to write data during the backup operation, and ensures that open files are not omitted. See Volume Shadow Copy Service (VSS). A subordinate unit of a writer.
W writer
A database, system service, or application code that provides metadata document information about what to back up and how to handle VSS components and applications during backup and recovery operations. A Writer provides information to requestors to ensure that application data is consistent, application files are closed and ready for a slight pause to make a Shadow Copy.
EMC NetWorker Module for Microsoft Applications Release 2.0 Administration Guide
225
Glossary
226
EMC NetWorker Module for Microsoft Applications Release 2.0 Administration Guide
Index
A Active Directory (AD) backups for disaster recovery 180 backups for object selection granularity 181 log files 214 Active Directory Lightweight Directory Services (AD LDS) 75, 178 active node 148 AD LDS backup and recovery 178 AD recovery all objects for a disaster recovery 184 individual objects and attributes 186 restrictions for 187 ADAM authoritative restore 76 nonauthoritative restore 76 recovery options 75 AES encryption conflict with EFS encryption 82 All save set considerations for 58 alternate mount path for proxy client 138, 159 application data save sets considerations for 46, 107 application information attribute commands 59, 63 commands for DPM 159, 162 commands for Exchange 138, 145 commands for SharePoint 116, 119, 121, 122 commands for SQL 102 commands for Windows Cluster 168 Application Specific Module (ASM) pass phrase 82
application writers DPM 156 Exchange 134 SharePoint 113 SQL 99 supported 27 authoritative restore ADAM 76 Cluster Writer 170 DFS 77, 78 FRS 79 NTDS 81
B backup client resource configuring 57 configuring DPM 161 configuring multiple 57, 161 backup command attribute commands 59 commands for DPM 162 commands for Exchange 145 commands for SharePoint 119, 120, 122 backup for active directory 181 backup for LCR 133 backup groups configuring 55 backup pool creating for snapshots 48
EMC NetWorker Module for Microsoft Applications Release 2.0 Administration Guide
227
Index
backup save sets considerations for 59 considerations for DPM 157 considerations for Exchange 135 considerations for SharePoint 114 considerations for SQL 99 considerations for Windows Cluster 167 specifying 58, 144, 161 backup schedule configuring 54 backup time selecting for recovery 40 best practices Exchange backup and recovery 141 SQL backup and recovery 107 browse time selecting for recovery 40
C CLARiiON E_VETO_PROVIDER error message 203 error message 203 provider overview 28 replica takes long time 207 client resource configuring for backup 57 configuring for DPM backup 161 configuring for Exchange backup 143 configuring for SharePoint backup 117 configuring for SQL backup 103 configuring multiple 57, 161 configuring when in a cluster 67, 169 Cluster Continuous Replication (CCR) Exchange backup 133 cluster server entering physical hostname of 59, 162 scheduling backups for 67, 169 Cluster tab 170 Cluster Writer recovery authoritative restore 170 for Windows Server 2008 73 nonauthoritative restore 170 options 73 common provider See EMC VSS Provider 25
228
component system writers supported 27 configuration database backup 113 SharePoint 110 SharePoint database backup 121 SharePoint recovery 124 connection port range specifying 196 connection to NetWorker server 38 consistency checker utility 66 conventional recovery overview 32 conventional snapshot policy example 53
D deleting snapshots 194 device configuring for rollover backup 48 DFS recovery options 76 directory services restore mode booting in for FRS recovery 92 booting in for NTDS recovery 92 disaster recovery planning for active directory 180 recovery for active directory 184 DPM configuring client resource for backup 161 syntax for save sets 157 URL encoding for save sets 158
E EFS encryption conflict with AES encryption 82 email notification NetWorker events 202 EMC VSS Provider overview 25 encryption recovering backup data 70 errors E_VETO_PROVIDER 203 E_VOLUME_NOT_SUPPORTED 203 error code 0x800423f3 203 Microsoft I/O write 207
EMC NetWorker Module for Microsoft Applications Release 2.0 Administration Guide
Index
NMM client 203 replica in a CLARiiON array 207 VSS CLIENT... Invalid Writer Selection 204 VSS_E_VOLUME_NOT_SUPPORTED_BY_P ROVIDER 206 VSS_E_WRITERERROR_RETRYABLE 203 with Exchange 204 Event viewer 202 events notification 205 exceptions Windows Firewall 205 Exchange client resource configuration 143 consistency checker utility 66 errors 204 point-in-time recovery 149 proxy client 139 roll-forward recovery 148 serverless backup 132 syntax for save sets 135 URL encoding for save sets 137 Exchange backup CCR environment 133 LCR environment 133 Exchange recovery database can be overwritten selection 146 options for 146 exclusion representation of save sets 35
F failover from the passive node 148 file system recovery options for 72, 73 FRS recovery booting in directory services restore mode 92 consideration for 71 options 79 full backup level consideration for 54
G groups configuring for backup 55
H hardware providers 28
I incremental backup level consideration for 54 instant backup overview 30 instant recovery overview 32 instant snapshot policy example 53 interface overview 34 issues NMM client 205 items searching for recovery 39
L label creating for pool 49 LCR 133 Exchange backup 133 LCR backup support 133 level 1 to 9 backups consideration for 54 level for backup considerations for 54 Local Continuous Replication (LCR) 133 log files 202 Active Directory 214 NetWorker Server 214, 215 NMM client 212 PowerSnap client 212 Replication Manager 213 Solutions Enabler 213 troubleshooting with 212
M marking items for recovery 39 Microsoft Cluster Service 166 Microsoft VSS software provider overview 25 Microsoft Windows Server 2008 21, 27, 28, 60, 155, 158, 178
EMC NetWorker Module for Microsoft Applications Release 2.0 Administration Guide
229
Index
Microsoft Windows Server 2008 support 21, 73, 75, 166 monitoring a recovery 91 mount path for proxy client 138, 159 MSCS 166 MSDE turning writer on or off in registry 158 multiple client resources for backup 57, 161
N NetWorker events email notification 202 NetWorker Monitor window 202 Networker recovery options 72, 73 NetWorker Server log files 214, 215 NetWorker server connecting to 38 NMM client error messages 203 issues 205 log files 212 nonauthoritative restore ADAM 76 Cluster Writer 170 DFS 77, 78 FRS 79 NTDS 81 nonpersistent backup overview 30 notification NetWorker events 205 savegroup failed 205 notifications 201 types 202 NSR_ALT_PATH command 138, 159 NSR_DATA_MOVER command 63, 102, 116, 138, 168 NSR_DM_PORT command 138, 159 nsr_sa_ini.exe 191 NSR_SNAP_TYPE=vss command 59, 63, 102, 116, 119, 121, 122, 138, 145, 159, 162, 168
230
NTDS recovery booting in directory services restore mode 92 consideration for 71 options 80 null value restriction for active directory recovery 188
O overview conventional recovery 32 Exchange proxy client 139 instant backup 30 instant recovery 32 interface 34 nonpersistent backup 30 persistent backup 30 provider 25 proxy client 30, 102 requestor 25 rollback recovery 32 rollover backup 30 serverless backup 30, 102, 139 software provider 25 VSS writers 26 overwrite prevention error Exchange database recovery 207
P pass phrase recovering AES encrypted data 82 passive node 148, 149 password changing 197 consideration for changing 197 restriction for active directory recovery 188 specifying for backup 197 password-protected recovering backup data 70 persistent backup overview 30 policies for snapshots 51 pool creating for snapshots 48 label for 49
EMC NetWorker Module for Microsoft Applications Release 2.0 Administration Guide
Index
ports Exchange proxy client communications 138 proxy client communications 159 service and connection port ranges 196 PowerSnap client log files 212 provider overview 25 proxy client configuring 65 Exchange serverless backup 132 mount path 138, 159 overview 30, 102 port number for communicating 138, 159 requirements for 65 SharePoint hostname 116 SharePoint serverless backup 116 specifying Cluster hostname 168 specifying Exchange hostname 138 specifying hostname of 63 SQL hostname 102 SQL serverless backup 102
R recover.exe 70 recovery active directory 183 ADAM options 75 browse time selection 40 Cluster options 73 Cluster Writer options 73 default method, choosing 72 DFS options 76 encrypted backup data 70 Exchange options 146 FRS options 79 marking items 39 NTDS options 80 password-protected backup data 70 performing for system data 71 searching for items 39 selecting a version 40 snapshots that have not been rolled over 83 viewing progress for 91 volumes required for 41
recovery error Exchange database 207 remote access attribute virtual cluster server specification 59, 162 replica error message 203 takes long time in CLARiiON environment 207 Replication Manager error message 203 log files 213 requestor overview 25 resource for backup configuring 57 configuring multiple 57, 161 rollback recovery limitations of 191 overview 32 performing 191, 193 requirements for 191 rollover backup device for 48 overview 30 performing 190
S sa.ini 191, 192 safe mode, booting in 92 save sets considerations for 59 DPM 157 Exchange 135, 144 exclusion representation 35 SharePoint 114 specifying for backup 58, 161 SQL 99 syntax for 59 syntax for DPM 157 syntax for Exchange 135 syntax for SharePoint 114 syntax for SQL 99 syntax for Windows Cluster 167 URL encoding 61 Windows Cluster 167 savegroup failed notification 205
EMC NetWorker Module for Microsoft Applications Release 2.0 Administration Guide
231
Index
schema object restriction for active directory recovery 188 Search Index 113 backup 114 searching for a recovery item 39 Security Configuration Wizard 205 selecting items for recovery 39 server connecting to NetWorker 38 serverless backup 28, 102 Exchange 132, 139 overview 30 proxy client requirement 65 SharePoint backup 116 SQL 102 service port range specifying 196 services 215 SharePoint Search Index 113 serverless backup 116 syntax for save sets 114 URL encoding for save sets 115 SharePoint configuration database 110 backup 113 recovery 124 SharePoint save sets specifying for backup 118, 120, 121 SharePoint URL encoding 115 snapshot policies configuring 51 examples of 53 snapshots deleting 194 pool for 48 recovering when not rolled over 83 rollback operation 191 rollover operation 190 software provider overview 25 Solutions Enabler log files 213 SQL serverless backup 102 syntax for save sets 99 URL encoding 101 SQL proxy client 102 232
SQL Server configure client resource 103 storage array creating descriptor 192 descriptor file 191 Exchange rollback requirements 150 Symmetrix provider overview 28 syntax for save sets 59 system component writers supported 27 system recovery performing 71 system-only attribute restriction for active directory recovery 187
T time of backup selecting for recovery 40 tombstone restriction for AD recovery 187 troubleshooting checking other documents 216
U URL encoding DPM save sets 158 Exchange save sets 137 save sets 61 SharePoint 115 SharePoint save sets 115 SQL save sets 101
V version selecting for recovery 40 virtual cluster server entering physical hostname of 59, 162 scheduling backups for 67, 169 Volume Shadow Copy Service (VSS) writers 26 volumes required for recovery 41 VSS CLIENT... Invalid Writer Selection 204 VSS_E_VOLUME_NOT_SUPPORTED_BY_PRO VIDER 206 VSS_E_WRITERERROR_RETRYABLE 203
EMC NetWorker Module for Microsoft Applications Release 2.0 Administration Guide
Index
W Windows Cluster syntax for save sets 167 Windows Encrypting File System (EFS) 82 Windows Firewall NetWorker blocked by 205
Windows Server 2008 21, 27, 28, 60, 73, 75, 155, 158, 178 Windows Server 2008 Cluster Writer nonauthoritative restore 73 Windows Server Failover Clustering (WSFC) 166 Windows system component writers supported 27
EMC NetWorker Module for Microsoft Applications Release 2.0 Administration Guide
233
Index
234
EMC NetWorker Module for Microsoft Applications Release 2.0 Administration Guide