http://ti.tuwien.ac.at/ecs/research/projects/scdl for further information. ... This
paper describes two concepts for remote teaching environments in embedded ...
Environments for Remote Teaching in Embedded Systems Courses Invited Paper
Christian Tr¨odhandl Thomas Handl Markus Proske Bettina Weiss Vienna University of Technology Embedded Computing Systems Group Treitlstr. 3/2, 1040 Vienna, Austria {troedhandl,handl,proske,bw}@ecs.tuwien.ac.at Abstract To cope with increasing numbers of students in embedded systems courses, providing means for distant learning from the student’s home is an appealing idea. This paper1 presents approaches for experimentation with real embedded hardware from the student’s home. In the labkit approach, students receive a media bag with hardware and software that can be used at their computer at home. In the remote workplace approach, the students connect to a target board via a server on the Internet. This paper gives an overview of these approaches and shows a case study on how the labkits approach has been deployed in our microcontroller programming course.
1 Introduction Embedded systems lab courses are a vital part of the computer engineering curriculum. Experiences in teaching embedded systems have shown that practical exercises are essential for effective learning [2, 3, 5]. With increasing numbers of students in these courses, providing means for distant learning from the student’s home is an appealing idea. However, such courses are typically characterized by a high demand on specific hardware equipment and development software compared to other more software-centered domains, like web programming or computer graphics applications, where the typical student is able to provide the necessary equipment. Besides the access to the hardware, making the development software available to the students confronts us with 1 This work is part of the “Seamless Campus: Distance Labs” project and received support from the Austrian “FITIT Embedded systems” initiative under grant 808210. See http://ti.tuwien.ac.at/ecs/research/projects/scdl for further information.
two additional problems: First, the development system must not have a restrictive or expensive software license, since the students expect the development system to install easily and not to come with license costs. Second, the software has to support the students’ systems at home, which means different operating systems and different computer performance. Since the development software often depends on specific drivers to access the attached hardware, these drivers must also be provided for different versions of operating systems. Therefore, to gain the students’ acceptance, the environment for experiments at home must be easy to install, economical, and run on the majority of the students’ computers. This paper describes two concepts for remote teaching environments in embedded systems courses: Remote workplaces and labkits. The first is used to provide a remote access interface to hardware that is located physically at the university. If the hardware is relatively cheap and small, however, it is more advantageous to produce embedded handout boards which can be taken home by the students for a deposit. This approach also has the advantage of preserving the possibility for hands-on exercises involving change of physical wiring among the target system components or adding further circuitry to the base target board. In this paper, we will provide a case study of our microcontroller programming course where we pursued a labkit approach. The remainder of the paper is structured as follows: The following Section 2 briefly describes the constraints and requirements for remote teaching environments. The concepts of our two different approaches for such environments are discussed in Section 3. Section 4 describes the “Microcontroller” course, where we introduced the labkit concept to provide remote learning for our students. The paper is concluded in Section 5.
2 Requirements Courses
for
Embedded
System
In contrast to other more software-centered domains, like web programming or computer graphics applications, where the typical student is able to provide the necessary equipment, i. e., a desktop PC, at home, the field of embedded systems comes with more specific requirements. In the area of software, it is important to realize that many embedded systems come with specific development tools, which have to be provided to the students. Making this software available to the students confronts us with two problems: First, there is the matter of installation and licensing. Naturally, license costs must be negligible, and the system should be easy to install. Even if students are more or less experts in the administration of their own computers, the more time it requires to set up the development system, the less time the student has left for the course itself. Similarly, the more hassle the installation is, the less favorable the student feels towards the course. Second, the hardware and software students have at home is highly heterogeneous, and any course software should support at least the most common architectures and operating systems. Some development tools for writing the Flash memory of a microcontroller connected to the computer via RS232, USB, or Printer Port even require an older operating system like Windows 95/98, since direct access to computer interfaces has been made more restrictive in newer operating systems. Additionally, hardware drivers, e. g. for USB devices, have to be provided for different versions of operating systems. Thus, the environment for experiments at home should be easy to install, economical, and run on the majority of the students’ computers.
3 Concepts Initially, we investigated three possible concepts for distance learning in our hardware-centric labs: • Using a simulator-only approach. • Distribution of labkits to our students. • Providing a remote access interface to the targets in our lab.
3.1
Simulation
Simulation can be a very cost-effective way to provide students with the possibility to carry out some of the embedded systems development at home. The downside with simulation is that it is based on a simple (idealized) model of the hardware and often behaves slightly different than the “real thing” [9], especially when it comes to details like timing
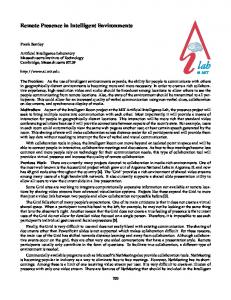
Figure 1. Labkit for Microcontroller course and side effects. Also the hands-on experience with simulations is not quite the same as with real hardware. Therefore we consider simulation rather as an additional tool in the provided software package for embedded systems courses than as a stand-alone replacement for real hardware.
3.2
Labkit
If the hardware is relatively cheap and small it is more advantageous to produce embedded handout boards which can be taken home by the students for a deposit. This approach also has the advantage of allowing students to actually interact with the hardware, to change the physical wiring among the target system components, and to add new hardware components to the provided ones. We use the labkit approach in our “Microcontroller” course, which is an undergraduate course designed to give computer engineering students an introduction to microcontroller programming in C and Assembler. The microcontroller labkit contains a controller board and an I/O board, a set of wires, a power supply, a programming interface, a CD, and a brief documentation (Figure 1). The labkit can be borrowed by students for a deposit of 70 Euro, interested students can also buy the kit for this price.
3.3
Remote Workplace
We envisioned two approaches to provide remote access to the hardware: In our “Digital Design” course we use the same workplace setup as in the local lab course. To access the workplace over the Internet, we use standard remotedesktop software that is included in Windows XP (similar to the solution provided in [4]). The client software needed to access the remote desktop is available for Linux and Windows.
The “Digital Design” course teaches undergraduate students the fundamentals of hardware design and VHDL. The development tools used in this course are proprietary Windows applications. As all the development software is bound to the workstations, there are no additional problems with licenses or distribution of software. Attached to the lab PC is the FPGA target board and a USB webcam. The webcam is used to capture the output of the target board that is displayed on a monitor; the task of the students is to implement a VGA controller on the FPGA. A logic analyzer is connected to the target board to measure its outputs. It, too, can be controlled via a window on the remote desktop. Other than the “Digital Design” course, the “Embedded Systems Engineering” course, which builds on the contents learned in the “Microcontroller” course, utilizes a clientserver architecture: Self-developed boards equipped with a measurement fieldbus network sending data to a server in combination with a self-developed visualization tool at the client’s side. In this architecture, only measurement values and debugging streams are transferred via the Internet – all necessary software runs on the client’s side. This reduces bandwidth usage by quite a large factor compared to the remote-controlled workstations. The target hardware consists of a board containing four microcontrollers, a programmer supporting subsequent programming of multiple controllers, a display, an electric fan with integrated rotation speed sensor, a light bulb, and sensors for luminance and temperature.
3.4
Preconfigured Knoppix
Environment
with
For the “Microcontroller” and the “Embedded Systems Engineering” course we use a customized Knoppix CD. The CD contains a bootable auto-configuring Linux system based on Knoppix [6] that supports various PC hardware (desktops as well as notebook types). The CD is selfcontained, the user does not need to have Linux or any other software pre-installed on his or her computer. As development software we use the GNU tool chain including the avrgcc cross-compiler, the uisp programmer software, and the GNU debugger frontend insight to debug programs running on the microcontroller nodes. Thus we have an environment that fulfills the previously mentioned requirements for experiments at home: Operating system independence: Since the course operating system is included with the labkit, the operating system installed on the user’s system has no influence on program compatibility. Zero installation effort: The standard Knoppix edition has been extended by the necessary compiler, programming and debugging tools for the target system,
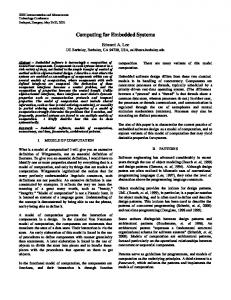
Figure 2. Development environment for Microcontroller course
no additional installations are required. No software license costs: We strictly used freeware or open source software on the CD, thus we do not have to cope with software license costs. This way we also avoid tedious software registration procedures. Thus, the enclosed CD enables students to start instantly working on their exercises and experiments. Since the software environment in the lab is identical to that on the CD, many sources of configuration errors and problems of interference between different programs are avoided. The Knoppix Linux system comes with a standard graphical desktop system which is familiar also to users that have not worked on Linux before (see Figure 2).
4 Case Study: Microcontroller Course In the following we describe how the labkit concept was deployed in the “Microcontroller” course held at the Vienna University of Technology.
4.1
Overview
The “Microcontroller” course is an undergraduate course designed to give second year computer engineering students their first impressions on microcontroller and hardwarenear programming. We require basic electrical engineering knowledge, some C programming skills and basic knowledge of computer architecture. For most of our students this course is their first contact with hardware and Assembler programming.
The original course was first held in 2003 when the new bachelor study “Computer Engineering” was introduced at the Vienna University of Technology. Faced with the challenge of 100-150 students in a lab with only 8 workstations, the first course consisted of free lab access combined with free exercises, support using email and newsgroup, and a programming exam at the end. The course was subsequently modified in the following years, experimenting with different mechanisms to balance the demands of the curriculum, the needs of our students, and the constraints of available resources.
4.2
Course Structure, Grading and Organization
The course consists of a theoretical part covering microcontroller architectures, I/O interfaces, and sensor/actuator peripherals and a practical part where students implement three sets of 3-4 short exercises. Motivated students are encouraged to improve their grade by submitting bonus exercises. Basically, our course is built on a mixture of programming and theory exams and both compulsory and voluntary exercises. The new course is divided into three parts. Part one is an introduction to microcontroller architecture, assembly programming and the programming environment. Part two teaches basic features like timers, analog module, interrupts, matrix keypad, and the numeric display. Finally, part three covers the advanced features like interfaces, motor control, and application programming. Both the second and the third part are done using C language. Each part has a couple of compulsory exercises. These exercises cover the microcontroller features in fairly simple tasks. The tasks are intentionally kept simple to make sure students work on getting their programs right, not just on getting them working. Students can additionally select voluntary tasks to deepen their knowledge. For those programs, additional points are rewarded depending on complexity of the task and quality of the solution. Since there is no guarantee that students complete these exercises on their own, each part of the course is concluded by a practical exam with two programming tasks and a theory exam. For a passing grade, we require students to have at least two out of the six programming exams correct. For students who attend all three exams, the worst result is dropped. The final grade consists of all the points out of the programming and theory exams and the compulsory homework. Students can use their points out of voluntary homework to compensate some missed points in their exams. The course uses a hierarchical system for student supervision to provide scalability and to minimize personnel costs. The course is managed by one assistant professor,
Figure 3. The wiring of the microcontroller board (here ATmega16) is specific for the exercise
one teaching assistant and one tutor per every 15 students2 . Basically, we organize the course as an open lab – in fact, the lab is the student’s home. Additionally, there is a supervised lab hour for every student once a week. Though attendance is not compulsory, it is highly recommended. Supervision is performed by tutors (senior students) who have 3-5 students per hour. Their task is to answer questions, help with debugging problems, have an open ear for students’ problems, and keep up students’ motivation. Tutors also do the preliminary grading of both compulsory and voluntary homework. The teaching assistant checks for plagiarism and does the final grading. Furthermore, he is the first instance for tutors having questions or problems. The assistant professor sets up the course, creates the electronic course material, prepares programming and theory exams, and is responsible for final grading. In fact, most of this work is preparation, so after the course starts, the professor’s workload is pretty low.
4.3
Microcontroller Hardware
As we expect our students to work at home (or anywhere else), we have to get the lab to our students. Simulators like in [1] would have been very cost effective, but their main drawback lies in the fact that simulators do not capture all problems that arise with real hardware [8]. Second, students gain a lot more confidence in using microcontrollers working “hands-on” instead of using simulators. Third, the microcontroller we use does not have enough I/O pins to 2 This number of students per tutors is fixed by the Computer Science Faculty of the Vienna University of Technology
Figure 4. The HCS12 microcontroller board permanently connect all hardware components to it, so our components are not pre-wired like those in [2] and our students have to do all the wiring themselves (see Figure 3). This is actually intentional on our part; we learned that particular lesson in our first lab course in 2003 using a commercial HCS12 evaluation board with fixed connections, where we had a couple of students who at the final exam did not understand the relationship between a microcontroller pin and the LED connected to it. They had only learned that “writing 0x02 to port A turns on LED2”, but could not handle a variation in which they were supposed to do the same to a LED connected to port B. For all these reasons, we decided to provide take-home hardware. The main idea here was to use cheap hardware that is easy to reproduce and suitable for mass production. Back in 2003, we did not find any suitable hardware on the market, so we developed our own. Main component is the interchangeable controller board that contains the microcontroller itself (an ATmega16), its supportive logic (power jack/regulator, reset button, programming connector, and oscillator), and I/O connectors as single pins. This approach enables the use of multiple controller boards together with the rest of our hardware. In fact we are currently working on three other boards using HCS12 (see Figure 4), ARM, and MSP430 processors to enable students to broaden their knowledge by working with more than just one processor during the course. A basic I/O board contains LEDs, switches, buttons, a matrix keypad, a numeric display, variable resistors, and a light sensor. Most exercises can be done using just one of the main controller boards and the I/O board, but for advanced projects, additional boards such as a motor board with dcand stepper-motors or an interface board with serial, parallel, and CAN interface are available (see Figure 5).
Figure 5. Additional boards with motors, chipcard reader and LCD display
4.4
The Labkit
The labkit is a media bag containing all the items needed during the “Microcontroller” course: Hardware, software, and documentation (see Figure 1). We offer those labkits for a deposit of 70 Euro, interested students can also buy the kit for this price. Each labkit contains one controller board and one I/O board, a set of wires, a power supply, a programming interface, a CD and a short documentation. The CD plays a key role here – it contains the bootable Linux environment (KNOPPIX) and all necessary software tools. Furthermore, a lot of documentation material is included. Other than the CD-ROM described in [10] that just contains learning material, the Knoppix CD enables students to start instantly with their exercises, without installing software or setting up their PC. All they have to do is insert the CD, reboot their computer, wire the boards, and load the demo program.
4.5
Exams and Grading
The labkit allows our students to freely plan their “lab time”. They only have to synchronize with us for exams and homework submission. Again, scalability and efficiency were main requirements. Our programming exams consist of two tasks to be solved in 1.5 hours. The tasks are kept very simple (about 20 lines of code, mainly register initializations). To allow complex settings while keeping the actual task simple, students are provided with a framework consisting of a C or Assembler skeleton, a makefile and object files. Students just have to add their code to complete the task.
Tutors are available to help students with hardware trouble. Tutors are also allowed to help with debugging problems if students can demonstrate that they understand the issues involved and just suffer from a blackout. When a student completes a task, the program is immediately checked by the tutors. The main advantage of our programming exams is that students can try out and debug their programs. They again work “hands-on”. Since our exam tasks are very simple, we use an “all-or-nothing” grading. Thus, the results are instantly available, so there is no need for a later grading session. The theory exams are set up as true/false-questions instead of the traditional exam questions. We took this approach for the benefit of a fair grading scheme and the possibility of automated grading. Before grading automatically, we run a statistical evaluation of all exams. Questions with a high percentage of wrong or no answers are carefully reevaluated for errors or complexity and possibly excluded from the test (and thus not graded). This method uncovers errors and problematic questions in the database at a moderate level of effort making our exams more convenient and fair for the students.
4.6
Anytime, Everywhere
The “Microcontroller” labkits perfectly fit into the anytime, everywhere paradigm. Students can freely decide when and where to do their homework (see Figure 6). In fact, we might even have students some thousand kilometers away. Homework and protocols can be submitted electronically, course materials including electronic slides are on the Knoppix CD. Two issues stand to be resolved: Human support, and trusted programming and theory exams. Students at our university have their weekly supervised lab hour and additional support via email and newsgroup. For students abroad we are currently preparing video tutors using software for voice/video communication over IP. Problems with theory exams can be solved accordingly. All we need is a trusted person supervising the test abroad. Students log into our framework and can do the test remotely. The trusted person must not necessarily have any microcontroller knowledge, as we once more can support the test using voice/video over IP. In programming exams the support can be handled the same way. However, our tutors must have a means to check the correctness of the programs, which simply cannot be done by trusted persons without microcontroller knowledge. Therefore we developed a system that can carry out black-box tests to verify whether the embedded software running on a target system meets predefined requirements. This system consists of a special test board which is connected to the target system and software running on a host
computer that assists in the generation of test-case descriptions and controls the test [7]. As long as this system does not generate false positives, a student can at least get immediate feedback if the solution is correct. Together with a final manual check carried out by the video tutor, we can again provide students with immediate feedback and debugging support.
5 Summary and Conclusion A fundamental part of today’s engineering education is the practical experience gained from working in laboratories. The growing number of students confronts us with the problem to supply the individual student with a sufficient amount of lab time. To overcome the limitations of an onsite lab, we investigated various kinds of remote-learning concepts and distance labs: Remote workplaces and labkits. We investigated two different types of remote workplace setups. In the “Digital Design” course we opted for a remote desktop solution that uses the standard configuration of our on-site workplaces and uses the built-in Remote Desktop Protocol to transmit the content of the desktop to the students. This approach was taken because of the expensive hardware and license issues with the proprietary development software. With the “Embedded Systems Engineering” course we used a client-server approach where a dedicated target server can handle multiple connections from different users. In this case, client-side visualization software is used to display the status of the target, and the software development is done locally with a pre-configured development environment.
Figure 6. With the Microcontroller labkit, students can do their programming examples everywhere they want
With the labkit approach used in the “Microcontroller” course, students receive a media bag with hardware and software that can be used with any PC, everywhere, so that each student can have his/her own laboratory at home. The reason for this approach is that in this course a major teaching goal is that the students get a “hands-on” impression for hardware by setting up the wiring of the target hardware, thus requiring physical access to the board. This approach is primarily suitable for courses where the hardware can be acquired for a low price. Additionally, we provided a software environment that can be used with all of our courses. One part of this framework is a customized Knoppix CD that features a preconfigured development environment and additional course material. Automatic evaluation of student programs was also implemented. The comparison between our different hardwarecentered lab courses show that there is no single “one method fits all” approach for deploying remote teaching concepts. For cases where the needed hardware is cheap, each student can be supplied with a labkit. In other cases a remote workplace approach is favorable – either in the form of a client-server or a remote desktop application. The choice of which particular environment is selected may depend on license issues (either the used development software can be freely distributed to the students or the license is bound to a single workstation) and the used hardware.
References [1] M. Amirijoo, A. Teˇsanovi´c, and S. Nadjm-Tehrani. Raising motivation in real-time laboratories: The soccer scenario. In 35th SIGCSE Technical Symposium on Computer Science Education, pages 265–269, Mar. 2004.
[2] R. Bachnak. Teaching microcontrollers with hands-on hardware experiments. Journal of Computing Sciences in Colleges, 20(4):207–213, Apr. 2005. [3] D. Beetner, H. Pottinger, and K. Mitchell. Laboratories teaching concepts in microcontrollers and hardwaresoftware co-design. In Proceedings of the 30th Annual Frontiers in Education Conference, volume 2, pages S1C/1– S1C/5, Kansas City, Missouri, USA, Oct. 2000. [4] M. J. Callaghan, J. Harkin, T. M. McGinnity, and L. Maguire. An internet-based methodology for remotely accesses embedded systems. In Proceedings of the IEEE International Conference on Systems, Man and Cybernetics, Oct. 2002. [5] M. J. Callaghan, J. Harkin, C. Peters, T. M. McGinnity, and L. Maguire. A collaborative environment for remote experimentation. In Proceedings of the 2003 IEEE International Conference on Microelectronic Systems Education (MSE’03), 2003. [6] K. Knopper. Building a self-contained auto-configuring Linux system on an iso9660 filesystem. In Proceedings of the 4th Annual Linux Showcase & Conference, Atlanta, Georgia, USA, Oct. 2000. USENIX Association. [7] V. Legourski, C. Tr¨odhandl, and B. Weiss. A system for automatic testing of embedded software in undergraduate study exercises. In Workshop on Embedded Systems Education (WESE’05), pages 44–51, Sept. 22nd, 2005. [8] J. W. McCormick. We’ve been working on the railroad: A laboratory for real-time embedded systems. In 36th SIGCSE Technical Symposium on Computer Science Education, pages 530–534, Feb. 23–27, 2005. [9] Z. Nedic, J. Machotka, and A. Nafalsk. Remote laboratories versus virtual and real laboratories. In 33th ASEE/IEEE Frontiers of Education Conference, pages T3E1–T3E6, Boulder, CO, USA, Nov. 5–9 2003. [10] J. M. Wilson and W. C. Jennings. Studio courses: How information technology is changing the way we teach, on campus and off. Proceedings of the IEEE, 88(1):72–80, Jan. 2000.