This edition applies to Version 1 Release 1 of the Oracle Database 10g on z/OS.
1.4. ...... dealing with specific products or solutions, while getting hands-on ...
Front cover
Experiences Installing g Oracle Database 10 10g on z/OS Using Oracle Universal Installer with Oracle on z/OS Tuning with Workload Manager
Using ESS with the Oracle Database
Kathryn Arrell Pat Blaney Denny Dutcavich Bruce Frank Michael Gorman Tom Russell
ibm.com/redbooks
International Technical Support Organization Experiences Installing Oracle Database 10g on z/OS June 2004
SG24-7055-00
Note: Before using this information and the product it supports, read the information in “Notices” on page ix.
First Edition (June 2004) This edition applies to Version 1 Release 1 of the Oracle Database 10g on z/OS.1.4.
© Copyright International Business Machines Corporation 2004. All rights reserved. Note to U.S. Government Users Restricted Rights -- Use, duplication or disclosure restricted by GSA ADP Schedule Contract with IBM Corp.
Contents Figures . . . . . . . . . . . . . . . . . . . . . . . . . . . . . . . . . . . . . . . . . . . . . . . . . . . . . . vii Notices . . . . . . . . . . . . . . . . . . . . . . . . . . . . . . . . . . . . . . . . . . . . . . . . . . . . . . . ix Trademarks . . . . . . . . . . . . . . . . . . . . . . . . . . . . . . . . . . . . . . . . . . . . . . . . . . . . x Preface . . . . . . . . . . . . . . . . . . . . . . . . . . . . . . . . . . . . . . . . . . . . . . . . . . . . . . . xi The team that wrote this redbook. . . . . . . . . . . . . . . . . . . . . . . . . . . . . . . . . . . . xi Become a published author . . . . . . . . . . . . . . . . . . . . . . . . . . . . . . . . . . . . . . . xii Comments welcome. . . . . . . . . . . . . . . . . . . . . . . . . . . . . . . . . . . . . . . . . . . . . xii Chapter 1. Overview of Oracle Database 10g . . . . . . . . . . . . . . . . . . . . . . . . 1 1.1 Overview of Oracle Database 10g . . . . . . . . . . . . . . . . . . . . . . . . . . . . . . . 2 1.1.1 New features of Oracle 10g . . . . . . . . . . . . . . . . . . . . . . . . . . . . . . . . 2 1.2 Oracle 8, 8i and 9i - former architecture . . . . . . . . . . . . . . . . . . . . . . . . . . . 3 1.3 Present architecture of Oracle 10g on z/OS . . . . . . . . . . . . . . . . . . . . . . . . 3 1.3.1 Multiple address spaces . . . . . . . . . . . . . . . . . . . . . . . . . . . . . . . . . . . 4 1.3.2 IBM Language Environment® and Oracle Database 10g . . . . . . . . . . 5 1.3.3 z/OS UNIX System Services (USS) and Oracle Database 10g . . . . . 5 1.3.4 Workload Manager and Oracle Database 10g . . . . . . . . . . . . . . . . . . 6 1.3.5 Oracle Enterprise Manager (OEM) and Oracle Database 10g . . . . . . 7 1.4 Summary . . . . . . . . . . . . . . . . . . . . . . . . . . . . . . . . . . . . . . . . . . . . . . . . . . . 7 Chapter 2. Preparing to install Oracle Database 10g . . . . . . . . . . . . . . . . . . 9 2.1 Preinstallation tasks . . . . . . . . . . . . . . . . . . . . . . . . . . . . . . . . . . . . . . . . . 10 2.2 Media and documentation . . . . . . . . . . . . . . . . . . . . . . . . . . . . . . . . . . . . . 10 2.3 Verify the TCP/IP and X Windows connection . . . . . . . . . . . . . . . . . . . . . 11 2.3.1 TN3270 connection . . . . . . . . . . . . . . . . . . . . . . . . . . . . . . . . . . . . . . 12 2.3.2 TCP/IP connection in line mode . . . . . . . . . . . . . . . . . . . . . . . . . . . . 13 2.3.3 X Windows connection . . . . . . . . . . . . . . . . . . . . . . . . . . . . . . . . . . . 14 2.4 Verifying that USS facilities are functional. . . . . . . . . . . . . . . . . . . . . . . . . 15 2.4.1 z/OS 1.4 . . . . . . . . . . . . . . . . . . . . . . . . . . . . . . . . . . . . . . . . . . . . . . 16 2.4.2 Java. . . . . . . . . . . . . . . . . . . . . . . . . . . . . . . . . . . . . . . . . . . . . . . . . . 16 2.4.3 Perl . . . . . . . . . . . . . . . . . . . . . . . . . . . . . . . . . . . . . . . . . . . . . . . . . . 17 2.4.4 Make command. . . . . . . . . . . . . . . . . . . . . . . . . . . . . . . . . . . . . . . . . 18 2.5 Choose the data set, user and group names . . . . . . . . . . . . . . . . . . . . . . 18 2.6 Add user IDs and groups. . . . . . . . . . . . . . . . . . . . . . . . . . . . . . . . . . . . . . 20 2.7 Verify file system size and permissions. . . . . . . . . . . . . . . . . . . . . . . . . . . 21 2.7.1 The /tmp file system . . . . . . . . . . . . . . . . . . . . . . . . . . . . . . . . . . . . . 21 2.7.2 The /oracle file system . . . . . . . . . . . . . . . . . . . . . . . . . . . . . . . . . . . 22
© Copyright IBM Corp. 2004. All rights reserved.
iii
2.8 Set program properties . . . . . . . . . . . . . . . . . . . . . . . . . . . . . . . . . . . . . . . 24 2.9 AFP-authorize the Oracle AUTHLOAD library . . . . . . . . . . . . . . . . . . . . . 24 2.10 Run the installer . . . . . . . . . . . . . . . . . . . . . . . . . . . . . . . . . . . . . . . . . . . 25 Chapter 3. Installing the Oracle Libraries . . . . . . . . . . . . . . . . . . . . . . . . . . 27 3.1 Obtaining the CD-ROMs . . . . . . . . . . . . . . . . . . . . . . . . . . . . . . . . . . . . . . 28 3.2 Using the Oracle documentation . . . . . . . . . . . . . . . . . . . . . . . . . . . . . . . . 30 3.3 Set up your system for X Windows . . . . . . . . . . . . . . . . . . . . . . . . . . . . . . 30 3.4 Checking to see if you are ready to install. . . . . . . . . . . . . . . . . . . . . . . . . 32 3.5 Connecting with the User ID to install Oracle . . . . . . . . . . . . . . . . . . . . . . 32 3.6 Running the Universal Installer . . . . . . . . . . . . . . . . . . . . . . . . . . . . . . . . . 32 3.6.1 Inventory directory panel. . . . . . . . . . . . . . . . . . . . . . . . . . . . . . . . . . 35 3.6.2 File locations . . . . . . . . . . . . . . . . . . . . . . . . . . . . . . . . . . . . . . . . . . . 36 3.6.3 Available products. . . . . . . . . . . . . . . . . . . . . . . . . . . . . . . . . . . . . . . 37 3.6.4 Select High Level Qualifier (HLQ) . . . . . . . . . . . . . . . . . . . . . . . . . . . 39 3.6.5 Allocate partitioned data sets . . . . . . . . . . . . . . . . . . . . . . . . . . . . . . 40 3.6.6 Exit . . . . . . . . . . . . . . . . . . . . . . . . . . . . . . . . . . . . . . . . . . . . . . . . . . 49 3.6.7 Some possible problem areas. . . . . . . . . . . . . . . . . . . . . . . . . . . . . . 50 Chapter 4. Customizing the subsystem for Oracle . . . . . . . . . . . . . . . . . . 51 4.1 Choosing our values . . . . . . . . . . . . . . . . . . . . . . . . . . . . . . . . . . . . . . . . . 52 4.2 Using the Oracle documentation . . . . . . . . . . . . . . . . . . . . . . . . . . . . . . . . 52 4.3 Creating PARMLIB and adding members to INSTLIB. . . . . . . . . . . . . . . . 53 4.4 Members in PARMLIB . . . . . . . . . . . . . . . . . . . . . . . . . . . . . . . . . . . . . . . . 64 Chapter 5. Creating the Oracle Database . . . . . . . . . . . . . . . . . . . . . . . . . . 69 5.1 Using the Oracle documentation . . . . . . . . . . . . . . . . . . . . . . . . . . . . . . . . 70 5.2 Running the jobs in INSTLIB . . . . . . . . . . . . . . . . . . . . . . . . . . . . . . . . . . . 70 5.3 Creating the database by running the jobs . . . . . . . . . . . . . . . . . . . . . . . . 77 5.4 Review of files and jobs. . . . . . . . . . . . . . . . . . . . . . . . . . . . . . . . . . . . . . . 78 5.4.1 Files at the completion of the database creation. . . . . . . . . . . . . . . . 78 5.4.2 Jobs to start and stop the database . . . . . . . . . . . . . . . . . . . . . . . . . 80 5.4.3 Commands to start and stop the database service. . . . . . . . . . . . . . 81 Chapter 6. Connecting to the Oracle Database with SQLPlus . . . . . . . . . 83 6.1 Connecting from USS (OMVS) or a telnet session . . . . . . . . . . . . . . . . . . 84 6.2 Connecting with a TSO client . . . . . . . . . . . . . . . . . . . . . . . . . . . . . . . . . . 84 6.3 Connecting a remote client to the database . . . . . . . . . . . . . . . . . . . . . . . 85 Chapter 7. Managing Oracle workload with z/OS Workload Manager . . . 87 7.1 Introduction to z/OS Workload Manager . . . . . . . . . . . . . . . . . . . . . . . . . . 89 7.2 WLM vocabulary . . . . . . . . . . . . . . . . . . . . . . . . . . . . . . . . . . . . . . . . . . . . 89 7.2.1 Service class . . . . . . . . . . . . . . . . . . . . . . . . . . . . . . . . . . . . . . . . . . . 89 7.2.2 Goals. . . . . . . . . . . . . . . . . . . . . . . . . . . . . . . . . . . . . . . . . . . . . . . . . 89
iv
Experiences Installing Oracle Database 10g on z/OS
7.2.3 Velocity goals . . . . . . . . . . . . . . . . . . . . . . . . . . . . . . . . . . . . . . . . . . 90 7.2.4 Response goals . . . . . . . . . . . . . . . . . . . . . . . . . . . . . . . . . . . . . . . . 90 7.2.5 CPU service unit . . . . . . . . . . . . . . . . . . . . . . . . . . . . . . . . . . . . . . . . 90 7.2.6 Service class period . . . . . . . . . . . . . . . . . . . . . . . . . . . . . . . . . . . . . 90 7.2.7 Resource group. . . . . . . . . . . . . . . . . . . . . . . . . . . . . . . . . . . . . . . . . 91 7.3 Classifying the Oracle server address spaces . . . . . . . . . . . . . . . . . . . . . 91 7.4 Classifying local clients . . . . . . . . . . . . . . . . . . . . . . . . . . . . . . . . . . . . . . . 91 7.4.1 TSO. . . . . . . . . . . . . . . . . . . . . . . . . . . . . . . . . . . . . . . . . . . . . . . . . . 91 7.4.2 CICS and IMS . . . . . . . . . . . . . . . . . . . . . . . . . . . . . . . . . . . . . . . . . . 92 7.4.3 Batch . . . . . . . . . . . . . . . . . . . . . . . . . . . . . . . . . . . . . . . . . . . . . . . . . 92 7.4.4 NET clients . . . . . . . . . . . . . . . . . . . . . . . . . . . . . . . . . . . . . . . . . . . . 92 7.5 Enclaves . . . . . . . . . . . . . . . . . . . . . . . . . . . . . . . . . . . . . . . . . . . . . . . . . . 93 7.6 Enclave resource accounting . . . . . . . . . . . . . . . . . . . . . . . . . . . . . . . . . . 94 7.7 Implementation of the WLM policy . . . . . . . . . . . . . . . . . . . . . . . . . . . . . . 96 7.7.1 The system under test. . . . . . . . . . . . . . . . . . . . . . . . . . . . . . . . . . . . 96 7.8 CPU accounting with Oracle 10g and enclaves . . . . . . . . . . . . . . . . . . . 107 Chapter 8. Installing the Intelligent Agent . . . . . . . . . . . . . . . . . . . . . . . . 109 8.1 Introduction to intelligent agents and OEM . . . . . . . . . . . . . . . . . . . . . . . 110 8.2 Configuring the intelligent agent . . . . . . . . . . . . . . . . . . . . . . . . . . . . . . . 110 Chapter 9. Using an IBM ESS with an Oracle database. . . . . . . . . . . . . . 117 9.1 Overview of ESS . . . . . . . . . . . . . . . . . . . . . . . . . . . . . . . . . . . . . . . . . . . 118 9.2 RAID arrays. . . . . . . . . . . . . . . . . . . . . . . . . . . . . . . . . . . . . . . . . . . . . . . 121 9.3 Disk and I/O. . . . . . . . . . . . . . . . . . . . . . . . . . . . . . . . . . . . . . . . . . . . . . . 125 9.3.1 Random reads. . . . . . . . . . . . . . . . . . . . . . . . . . . . . . . . . . . . . . . . . 128 9.3.2 Sequential reads . . . . . . . . . . . . . . . . . . . . . . . . . . . . . . . . . . . . . . . 129 9.3.3 Sequential writes. . . . . . . . . . . . . . . . . . . . . . . . . . . . . . . . . . . . . . . 130 9.3.4 Random writes . . . . . . . . . . . . . . . . . . . . . . . . . . . . . . . . . . . . . . . . 132 9.4 Conclusion. . . . . . . . . . . . . . . . . . . . . . . . . . . . . . . . . . . . . . . . . . . . . . . . 134 Appendix A. Options for setting up the X Windows environment . . . . . 135 Using a Linux Intel system as a client . . . . . . . . . . . . . . . . . . . . . . . . . . . . . . 136 Using the VNC client and server . . . . . . . . . . . . . . . . . . . . . . . . . . . . . . . . . . 136 Using VNC on a Linux guest on zSeries . . . . . . . . . . . . . . . . . . . . . . . . . . . . 137 Using Exceed with telnet . . . . . . . . . . . . . . . . . . . . . . . . . . . . . . . . . . . . . . . . 138 Using CYGWIN . . . . . . . . . . . . . . . . . . . . . . . . . . . . . . . . . . . . . . . . . . . . . . . 139 Preventing the OUI from waiting for OMVS input . . . . . . . . . . . . . . . . . . . 141 Appendix B. Creating a Hierarchical File System (HFS) . . . . . . . . . . . . . 143 Alternative way to create an HFS. . . . . . . . . . . . . . . . . . . . . . . . . . . . . . . . . . 146 Appendix C. Installing the Oracle Client . . . . . . . . . . . . . . . . . . . . . . . . . . 147 Installing Oracle Client code. . . . . . . . . . . . . . . . . . . . . . . . . . . . . . . . . . . . . . 147
Contents
v
Appendix D. Restarting the OUI using the deinstall option . . . . . . . . . . 159 Starting over . . . . . . . . . . . . . . . . . . . . . . . . . . . . . . . . . . . . . . . . . . . . . . . . . . 160 Testing the deinstall process . . . . . . . . . . . . . . . . . . . . . . . . . . . . . . . . . . . . . 160 Appendix E. Silent install example . . . . . . . . . . . . . . . . . . . . . . . . . . . . . . 165 Using the non-interactive install process . . . . . . . . . . . . . . . . . . . . . . . . . . . . 166 Performing a silent install . . . . . . . . . . . . . . . . . . . . . . . . . . . . . . . . . . . . . . . . 167 Related publications . . . . . . . . . . . . . . . . . . . . . . . . . . . . . . . . . . . . . . . . . . 187 IBM Redbooks . . . . . . . . . . . . . . . . . . . . . . . . . . . . . . . . . . . . . . . . . . . . . . . . 187 Other publications . . . . . . . . . . . . . . . . . . . . . . . . . . . . . . . . . . . . . . . . . . . . . 187 Online resources . . . . . . . . . . . . . . . . . . . . . . . . . . . . . . . . . . . . . . . . . . . . . . 188 How to get IBM Redbooks . . . . . . . . . . . . . . . . . . . . . . . . . . . . . . . . . . . . . . . 188 Help from IBM . . . . . . . . . . . . . . . . . . . . . . . . . . . . . . . . . . . . . . . . . . . . . . . . 188 Index . . . . . . . . . . . . . . . . . . . . . . . . . . . . . . . . . . . . . . . . . . . . . . . . . . . . . . . 189
vi
Experiences Installing Oracle Database 10g on z/OS
Figures 1-1 2-1 3-1 3-2 3-3 7-1 7-2 7-3 7-4 7-5 7-6 7-7 7-8 7-9 7-10 7-11 9-1 9-2 9-3 9-4 9-5 9-6 9-7 9-8 9-9 9-10 A-1 A-2 C-1 C-2 C-3 C-4 C-5 C-6 C-7 C-8 C-9 C-10
Overview of Oracle 10g architecture . . . . . . . . . . . . . . . . . . . . . . . . . . . . 4 3270 screen showing USS using the OMVS command. . . . . . . . . . . . . 13 VNC xTERM Window ready to run the Installer . . . . . . . . . . . . . . . . . . . 31 First window that appears for only a few seconds . . . . . . . . . . . . . . . . . 34 Request that you run the rootpre.sh script . . . . . . . . . . . . . . . . . . . . . . . 46 Managing network requests in Oracle 10g . . . . . . . . . . . . . . . . . . . . . . 95 System under test: Logical design . . . . . . . . . . . . . . . . . . . . . . . . . . . . . 96 WLM application service definition panel . . . . . . . . . . . . . . . . . . . . . . . . 98 Definition of workloads . . . . . . . . . . . . . . . . . . . . . . . . . . . . . . . . . . . . . . 99 Oracle service classes . . . . . . . . . . . . . . . . . . . . . . . . . . . . . . . . . . . . . 100 ORAMT1 service class . . . . . . . . . . . . . . . . . . . . . . . . . . . . . . . . . . . . 101 ORAMT2 service class . . . . . . . . . . . . . . . . . . . . . . . . . . . . . . . . . . . . 102 Classification rules panel . . . . . . . . . . . . . . . . . . . . . . . . . . . . . . . . . . . 103 Classification rules for subsystem OSDI . . . . . . . . . . . . . . . . . . . . . . . 104 Classification rules for subsystem STC . . . . . . . . . . . . . . . . . . . . . . . . 106 SDSF report of multiple address spaces . . . . . . . . . . . . . . . . . . . . . . . 108 Host adapters, clusters, and disks . . . . . . . . . . . . . . . . . . . . . . . . . . . . 118 DA pairs with SSA loops . . . . . . . . . . . . . . . . . . . . . . . . . . . . . . . . . . . 119 NVS/cluster relationship] . . . . . . . . . . . . . . . . . . . . . . . . . . . . . . . . . . . 120 Relationship of logical 3390 disk volumes to RAID arrays. . . . . . . . . . 122 RAID-5 and RAID-10 comparison . . . . . . . . . . . . . . . . . . . . . . . . . . . . 123 DA pair without arrays across loops . . . . . . . . . . . . . . . . . . . . . . . . . . 124 DA pair with arrays across loops . . . . . . . . . . . . . . . . . . . . . . . . . . . . . 125 Processing or read cache hits and read cache misses . . . . . . . . . . . . 128 Sequential prestage . . . . . . . . . . . . . . . . . . . . . . . . . . . . . . . . . . . . . . . 129 ESS write processing . . . . . . . . . . . . . . . . . . . . . . . . . . . . . . . . . . . . . . 131 Entering the Connection details . . . . . . . . . . . . . . . . . . . . . . . . . . . . . . 137 Initial screen . . . . . . . . . . . . . . . . . . . . . . . . . . . . . . . . . . . . . . . . . . . . . 139 The Welcome screen . . . . . . . . . . . . . . . . . . . . . . . . . . . . . . . . . . . . . . 148 Directory not found screen . . . . . . . . . . . . . . . . . . . . . . . . . . . . . . . . . . 149 Specifying file locations . . . . . . . . . . . . . . . . . . . . . . . . . . . . . . . . . . . . 150 Selecting a product for installation . . . . . . . . . . . . . . . . . . . . . . . . . . . . 150 Selecting the type of installation . . . . . . . . . . . . . . . . . . . . . . . . . . . . . 151 Entering the HLQ . . . . . . . . . . . . . . . . . . . . . . . . . . . . . . . . . . . . . . . . . 151 Allocating the data sets . . . . . . . . . . . . . . . . . . . . . . . . . . . . . . . . . . . . 152 Allocating the INSTLIB . . . . . . . . . . . . . . . . . . . . . . . . . . . . . . . . . . . . . 153 OUI Summary screen . . . . . . . . . . . . . . . . . . . . . . . . . . . . . . . . . . . . . 154 The OUI Installation screen . . . . . . . . . . . . . . . . . . . . . . . . . . . . . . . . . 155
© Copyright IBM Corp. 2004. All rights reserved.
vii
C-11 Setup Privilege screen . . . . . . . . . . . . . . . . . . . . . . . . . . . . . . . . . . . . . 155 C-12 The successful installation screen . . . . . . . . . . . . . . . . . . . . . . . . . . . . 156
viii
Experiences Installing Oracle Database 10g on z/OS
Notices This information was developed for products and services offered in the U.S.A. IBM may not offer the products, services, or features discussed in this document in other countries. Consult your local IBM representative for information on the products and services currently available in your area. Any reference to an IBM product, program, or service is not intended to state or imply that only that IBM product, program, or service may be used. Any functionally equivalent product, program, or service that does not infringe any IBM intellectual property right may be used instead. However, it is the user's responsibility to evaluate and verify the operation of any non-IBM product, program, or service. IBM may have patents or pending patent applications covering subject matter described in this document. The furnishing of this document does not give you any license to these patents. You can send license inquiries, in writing, to: IBM Director of Licensing, IBM Corporation, North Castle Drive Armonk, NY 10504-1785 U.S.A. The following paragraph does not apply to the United Kingdom or any other country where such provisions are inconsistent with local law: INTERNATIONAL BUSINESS MACHINES CORPORATION PROVIDES THIS PUBLICATION "AS IS" WITHOUT WARRANTY OF ANY KIND, EITHER EXPRESS OR IMPLIED, INCLUDING, BUT NOT LIMITED TO, THE IMPLIED WARRANTIES OF NON-INFRINGEMENT, MERCHANTABILITY OR FITNESS FOR A PARTICULAR PURPOSE. Some states do not allow disclaimer of express or implied warranties in certain transactions, therefore, this statement may not apply to you. This information could include technical inaccuracies or typographical errors. Changes are periodically made to the information herein; these changes will be incorporated in new editions of the publication. IBM may make improvements and/or changes in the product(s) and/or the program(s) described in this publication at any time without notice. Any references in this information to non-IBM Web sites are provided for convenience only and do not in any manner serve as an endorsement of those Web sites. The materials at those Web sites are not part of the materials for this IBM product and use of those Web sites is at your own risk. IBM may use or distribute any of the information you supply in any way it believes appropriate without incurring any obligation to you. Information concerning non-IBM products was obtained from the suppliers of those products, their published announcements or other publicly available sources. IBM has not tested those products and cannot confirm the accuracy of performance, compatibility or any other claims related to non-IBM products. Questions on the capabilities of non-IBM products should be addressed to the suppliers of those products. This information contains examples of data and reports used in daily business operations. To illustrate them as completely as possible, the examples include the names of individuals, companies, brands, and products. All of these names are fictitious and any similarity to the names and addresses used by an actual business enterprise is entirely coincidental. This publication is intended to help those who are installing Oracle Database 10g for the first time. The information in this publication is not intended as the specification of any programming interfaces that are provided by Oracle for Oracle8i on z/OS. See the PUBLICATIONS section of the IBM Programming Announcement for z/OS and Oracle publications for more information about what publications are considered to be product documentation. Information concerning Oracle's products was provided by Oracle. The material in this document has been produced by a joint effort between IBM and Oracle S/390 Specialists.The material herein is copyrighted by both IBM and Oracle.
© Copyright IBM Corp. 2004. All rights reserved.
ix
IBM makes no warranties regarding Oracle and other non-IBM products. IBM has not tested Oracle and other non-IBM products and cannot confirm the accuracy of perfromance, compatibility, or any other claims relative to non-IBM products. Questions on the capabilities of Oracle and non-IBM products should be addressed to the suppliers of those products. The information herein is provided as is. All warranties, express or implied, including the implied warranties of merchantability and fitness for a particular purpose and the warranty of noninfringement, are expressly excluded. COPYRIGHT LICENSE: This information contains sample application programs in source language, which illustrates programming techniques on various operating platforms. You may copy, modify, and distribute these sample programs in any form without payment to IBM, for the purposes of developing, using, marketing or distributing application programs conforming to the application programming interface for the operating platform for which the sample programs are written. These examples have not been thoroughly tested under all conditions. IBM, therefore, cannot guarantee or imply reliability, serviceability, or function of these programs. You may copy, modify, and distribute these sample programs in any form without payment to IBM for the purposes of developing, using, marketing, or distributing application programs conforming to IBM's application programming interfaces.
Trademarks The following terms are trademarks of the International Business Machines Corporation in the United States, other countries, or both: AFP™ AIX® CICS® Enterprise Storage Server® ECKD™ ESCON® FICON® IBM® IMS™
Language Environment® MVS™ MVS/ESA™ OS/390® RACF® Redbooks™ Redbooks (logo) ™ RMF™ S/390®
ThinkPad® TotalStorage® VSE/ESA™ VTAM® WebSphere® z/OS® z/VM® zSeries®
The following terms are trademarks of other companies Intel, Intel Inside (logos), MMX, and Pentium are trademarks of Intel Corporation in the United States, other countries, or both. Windows, Windows NT, and the Windows logo are trademarks of Microsoft Corporation in the United States, other countries, or both. Java and all Java-based trademarks and logos are trademarks or registered trademarks of Sun Microsystems, Inc. in the United States, other countries, or both. UNIX is a registered trademark of The Open Group in the United States and other countries. Other company, product, and service names may be trademarks or service marks of others.
x
Experiences Installing Oracle Database 10g on z/OS
Preface This IBM® Redbook will help you install, tailor and configure the new Oracle Database 10g on z/OS®. It describes experiences with the new installation process, and will be especially useful for anyone unfamiliar with the Oracle Universal Installer and IBM UNIX® System Services who is installing Oracle Database 10g for the first time. The book is based on experiences gained during installations at: The IBM/Oracle International Competency Center, San Mateo, California The IBM ITSO zSeries® Center in Poughkeepsie, New York Oracle Headquarters, Redwood Shores, California
The team that wrote this redbook This redbook was produced by a team of specialists from around the world working at the International Technical Support Organization, Poughkeepsie Center. Kathryn Arrell is an Oracle specialist at the IBM/Oracle International Competency Center at IBM San Mateo. Previously she worked as an ERP specialist at the ITSO in Poughkeepsie, New York. Pat Blaney is a Storage Specialist with IBM Advanced Technical Support located at IBM San Jose, supporting Oracle solutions. Dennis Dutcavich is a software engineer with the IBM zSeries division. He works in the ERP Business Segment and provides technical marketing support for Oracle Applications on z/OS. Bruce Frank is a zSeries Oracle Specialist in the IBM/Oracle International Competency Center at IBM San Mateo. Michael Gorman is a zSeries Oracle Specialist on the zOS support team for Oracle Corporation, USA. Tom Russell is a zSeries Specialist with IBM Canada. Presently, he is on a special assignment with Oracle in Redwood Shores, California. Thanks to the following people for their contributions to this project: Robert Haimowitz
© Copyright IBM Corp. 2004. All rights reserved.
xi
Mike Ebbers International Technical Support Organization, IBM Poughkeepsie Ana Cristina Rezende Penny Brisson Stephan Lange Andy Rogers Mike Morgan Oracle Corporation Thanks also to Terry Barthel, Alison Chandler and Alfred Schwab for their editorial assistance, and Ella Buslovich for her graphics assistance.
Become a published author Join us for a two- to six-week residency program! Help write an IBM Redbook dealing with specific products or solutions, while getting hands-on experience with leading-edge technologies. You'll team with IBM technical professionals, Business Partners and/or customers. Your efforts will help increase product acceptance and customer satisfaction. As a bonus, you'll develop a network of contacts in IBM development labs, and increase your productivity and marketability. Find out more about the residency program, browse the residency index, and apply online at: ibm.com/redbooks/residencies.html
Comments welcome Your comments are important to us! We want our Redbooks™ to be as helpful as possible. Send us your comments about this or other Redbooks in one of the following ways: Use the online Contact us review redbook form found at: ibm.com/redbooks
Send your comments in an Internet note to:
[email protected]
xii
Experiences Installing Oracle Database 10g on z/OS
Mail your comments to: IBM Corporation, International Technical Support Organization Dept. HYJ Mail Station P099 2455 South Road Poughkeepsie, NY 12601-5400
Preface
xiii
xiv
Experiences Installing Oracle Database 10g on z/OS
1
Chapter 1.
Overview of Oracle Database 10g This chapter provides an overview of the features of Oracle Database 10g and how it interfaces with z/OS.
© Copyright IBM Corp. 2004. All rights reserved.
1
1.1 Overview of Oracle Database 10g Oracle has long had a commitment to the IBM mainframe environment. Beginning in 1986, every major release of the Oracle database has been delivered on the mainframe, and Oracle’s most current release, Oracle 10g, is now available on z/OS 1.4. The Oracle database is implemented in a large kernel, written in C, that is identical on all platforms. This database kernel gets operating system function through a layer of code (called the “port-specific” layer) that is specific to the platform. In September 2000 the Oracle database on the mainframe was rearchitected to make a significant improvement in the z/OS port-specific layer. This chapter introduces the Oracle architecture on z/OS and how it exploits z/OS features.
1.1.1 New features of Oracle 10g Some of the key new features of the Oracle Database 10g are: 1. It is designed for grid computing. Grid computing reduces the cost of IT by clustering servers together to act as a single large computer, dynamically shifting server resources between applications on demand. 2. There are many areas that have performance improvements. – – – – – – – – –
PLSQL Table Scans SQL Profile Tuning huge Floating point math Bulk LOB Update Export/Import Incremental backup Parallel media recovery Backup compression
3. It is designed to be a self-managing database. – Built-in intelligent infrastructure • Code instrumentation • Workload repository – Automation of routine tasks • Automatic disk-based backup and recovery • Automatic optimizer statistics collection • Automatic memory management • Automatic storage management
2
Experiences Installing Oracle Database 10g on z/OS
– Tools to empower the DBA • Automatic Database Diagnostic Monitor • Automatic Tuning Optimizer For more information about the Oracle features, go to: http://www.oracle.com
1.2 Oracle 8, 8i and 9i - former architecture Oracle’s former architecture for OS/390® consisted of the Oracle kernel written in C and an assembler language interface to the operating system-specific functions. For the Oracle database, the OS/390-specific layer was referred to as the Multi Processing Monitor, MPM. The network was supported by a service called Net8, or the Transparent Network Substrate, TNS. All database processing was performed by tasks in the database server region. OS/390 cross-memory services were used to connect user programs to the database server region, but the processing was performed by tasks in the server address space, at the priority of the server address space. This architecture was established sometime before 1986, and over the years MPM and TNS were enhanced and stretched to keep pace with OS/390. Because it was no longer practical to continue to enhance this architecture, the present architecture was introduced as an option in 1999 with Oracle 8.1.7 Operating System Dependant Interface (OSDI).
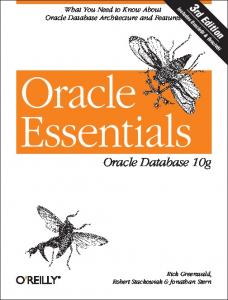
1.3 Present architecture of Oracle 10g on z/OS Beginning with Oracle8i Release 3 (8.1.7), a new architecture for running Oracle on z/OS called OSDI was made available. The use of this option in Oracle 8i or 9i did not affect the Oracle database kernel, which is the same on all Oracle platforms. The new architecture only changes how the kernel is supported on z/OS, that is, it is a change to the “Port Specific” layer. This support, which was an option in Oracle 8i and 9i, is now standard on Oracle Database 10g, and MPM is not available. Oracle Database 10g executes as a subsystem of z/OS. It exploits such features as Language Environment/370, Workload Manager, and UNIX Systems Services. There is a common management layer for all Oracle instances and address spaces. It is implemented as a formal z/OS subsystem and runs in z/OS common
Chapter 1. Overview of Oracle Database 10g
3
system storage, as shown in Figure 1-1. Management of the Oracle subsystem is via z/OS operator commands. Oracle 10g security is implemented using the z/OS System Authorization Facility (SAF).
z/OS Oracle Management Layer db instance 3 db instance 2 database instance 1
(Dynamic Subsystem)
NET NET Services Named Services Oracle Product
Oracle Architecture
AS1
ASn
Is a dynamic subsystem Manages many DB and NET services Services defined in parm file Starts/Stops services Manages Connections and Security
Multiple address spaces Figure 1-1 Overview of Oracle 10g architecture
1.3.1 Multiple address spaces Previously, with the MPM architecture, each Oracle address space contained a copy of the operating system-specific code. With Oracle 10g, only one copy of the Oracle operating system-specific code is required, and this copy controls all the Oracle and NET address spaces. z/OS supports 64-bit virtual addressing. However, this support is not available for C programs until z/OS 1.6. Since Oracle Database 10g is written in C, a 64-bit version of Oracle for z/OS is not possible before this release. Each database instance in Oracle 10g can consist of several address spaces. Because client programs, either batch, TSO, CICS® or remote NET connections, connect to the database instance, they connect to any of the address spaces. Each address space shares the storage in the Shared Global Area (SGA), but
4
Experiences Installing Oracle Database 10g on z/OS
other storage allocated by the client connection, such as the Program General Area (PGA), is allocated in the address space. This removes a memory constraint and allows more users to connect than MPM could support. The processing done on behalf of the client runs in the Oracle address space in cross-memory mode at the priority of the client. Remote clients coming through Oracle NET are run in an independent enclave created by Oracle NET, which is separately managed by z/OS and the Workload Manager (WLM). Enclaves are discussed in more detail in 7.5, “Enclaves” on page 93. When multiple address spaces are used, client sessions are distributed more or less uniformly across these address spaces. This process is transparent to the Oracle clients. Unlike MPM, each client request, whether from a remote terminal through Oracle NET, or a batch job running on the same z/OS system as the database service, is independently managed by WLM and z/OS. This allows all users of the Oracle database to be run at different priorities, depending on the installation policy and the business importance of the work. This new architecture’s ability to effectively exploit z/OS functions improves both the performance and manageability of Oracle on z/OS.
1.3.2 IBM Language Environment® and Oracle Database 10g Fifteen years ago, IBM did not provide a C compiler or library for S/390®. Oracle included a C compiler and library as part of their original distribution. Later Oracle converted to use an IBM-supplied C compiler, but continued to use Oracle-developed C libraries. The Oracle database is now completely converted to the IBM Language Environment (LE) and uses the IBM-supported compilers and libraries, enabling it to exploit new zSeries features and functions. LE provides a sophisticated test and development environment, and Oracle uses this environment to improve the quality, performance, scalability, and serviceability of Oracle code on z/OS. Oracle Database 10g is supported on z/OS 1.4 and subsequent releases.
1.3.3 z/OS UNIX System Services (USS) and Oracle Database 10g Over time, there has been some confusion about Oracle’s use of z/OS UNIX System Services. The Oracle Database runs on many UNIX systems, and Oracle is known as a UNIX database. However, Oracle Database 10g runs as a native z/OS subsystem, and does not directly use any z/OS UNIX facilities.
Chapter 1. Overview of Oracle Database 10g
5
Oracle tools such as the precompiler Pro*C/C++, SQL*Loader, SQLPlus, and Export and Import are available in USS. UNIX shell programs can be written (or ported from other platforms) that utilize these tools. Client programs running in z/OS UNIX System Services have full access to the Oracle Database. The Oracle Universal Installer in Oracle 10g runs in USS. Files used by the OUI and the tools are stored in HFS or zFS structures. This means that to install Oracle Database 10g you must have a fully functioning USS environment on your z/OS system. The OUI uses a number of UNIX tools that must be functional for the install to complete successfully. For example, the OUI uses Java™ and X Windows to provide the menus that are used to install the products. OUI keeps a record of the software inventory it installed in UNIX files, usually in the /var/opt/oracle directory. Other components of Oracle Database 10g, such as the Oracle tools and precompilers, are stored in other directories, usually under /oracle. See Chapter 2, “Preparing to install Oracle Database 10g” on page 9 for a discussion of the USS customization that must be done to install Oracle Database 10g.
1.3.4 Workload Manager and Oracle Database 10g Workload Manager (WLM) automatically manages a mainframe’s workload based on performance criteria assigned to each type of work. Oracle Database 10g fully exploits WLM. Oracle classifies remote client workloads based on data about the client. This means that different types of users can be identified and WLM can control the system resources assigned to these users. An important use of WLM is to manage the batch work. Heavy batch work can consume resources and degrade performance for online users. With Oracle’s WLM implementation, the resources available to batch work are controlled. Database requests made by an Oracle batch job are processed at the dispatching priority of the batch job, not the Oracle server address space. This ensures that online users get the cycles they need. Remote database requests entering the system through Oracle NET are classified by the WLM and given response time goals. Long requests can have their priority and importance lowered to ensure that short transactions get preferential access to the resources, and good response time. Future releases of Oracle will continue to enhance the use of WLM. Installations process different types of work with different completion and resource requirements. Every installation wants to make the best use of its resources, maintain the highest possible throughput, and achieve the best
6
Experiences Installing Oracle Database 10g on z/OS
possible system responsiveness. Workload management with the z/OS WLM makes this possible. With workload management, you can define performance goals and assign a business importance to each goal. You define the goals for work in business terms, and the system decides how much resource, such as CPU and storage, should be given to it to meet that goal. WLM will constantly monitor the system and adapt processing to meet the established goals. See Chapter 7, “Managing Oracle workload with z/OS Workload Manager” on page 87 for more discussion on WLM and Oracle Database 10g.
1.3.5 Oracle Enterprise Manager (OEM) and Oracle Database 10g Oracle Enterprise Manager (OEM) provides a comprehensive framework to manage the total Oracle environment. OEM is a Web-based architecture. The intelligent agents in USS provide an interface between tasks being performed by OEM and the database. The architecture consists of browser-based consoles, the Oracle Management Server (OMS), and the databases supported. The Intelligent Agent for z/OS (IA) is a product running in USS that performs scheduling, monitoring, and maintenance activities for Oracle instances on z/OS. It acts as an interface to the OEM toolset. The intelligent agents respond to requests and are controlled by OMS; refer to Chapter 8, “Installing the Intelligent Agent” on page 109 for more information about this topic. The OMS is the central control point for the total Oracle environment, and it can be used to manage all databases in the enterprise, regardless of the platform or location.
1.4 Summary Oracle Database 10g for z/OS is built using the Oracle OSDI architecture on z/OS. It provides an environment with much better scalability, better systems management, better performance, and improved availability over previous Oracle releases. Some of these advantages come from the features and functions delivered by Oracle. Some are the result of Oracle taking advantage of the capabilities provided by z/OS. Yet others are the result of designing a new architecture using the latest development tools and methodologies, instead of attempting to rework 15-year old code.
Chapter 1. Overview of Oracle Database 10g
7
The OSDI architecture for running Oracle on z/OS does not change the functionality of the Oracle Database on z/OS. The Oracle database engine on z/OS is still compiled from the same code base that runs on Intel and UNIX servers. Oracle functionally is the same product regardless of operating systems, and applications and data are easily moved among different platform architectures. Oracle allows you to build platform-independent applications. Applications can be developed and piloted on one platform, and deployed on another. As server technology changes, it is easy to move an Oracle application to take advantage of these changes. This architectural foundation provides for continuing development on the z/OS platform. It demonstrates Oracle’s commitment to supporting e-business on the mainframe. It allows greater scalability and exploits many of the new features and functions available on z/OS. The ability to support users of a single Oracle instance across multiple z/OS address spaces allows many more users on z/OS than was possible before with MPM.
8
Experiences Installing Oracle Database 10g on z/OS
2
Chapter 2.
Preparing to install Oracle Database 10g This chapter describes the steps we took to prepare our z/OS system for an installation of Oracle Database 10g Oracle Database 10g is no longer delivered on tape media. It is delivered on CD-ROMs or by download of the tar files from the Oracle Technology Network. It uses the Oracle Universal Installer (OUI), which is the same installer used to install Oracle on other platforms. This means that you must have a fully functional USS environment running on your z/OS 1.4 system to successfully run the OUI and install Oracle Database 10g. If this is not true, then the z/OS system programmer has some customization work to do. See z/OS UNIX Systems Services Planning, GA22-7800 for a detailed description of the customization to USS that may be required. Some of the preinstallation tasks must be done by the z/OS system programmer, some by the security administrator, and some by the DBA installing the database.
© Copyright IBM Corp. 2004. All rights reserved.
9
2.1 Preinstallation tasks The documentation for the install is in the manual Oracle Database Installation Guide 10g Release 1 (10.1) for IBM z/OS, B13525-01. To run the OUI, you must perform the following actions. 1. Obtain the documentation 2. Verify that you can connect to USS through TCP/IP and X Windows. 3. Verify that the required parts of the USS environment are functional. 4. Decide on the data set names and names of the cataloged procedures that will be used to run the system. 5. Add the user IDs and groups that are used to install and run Oracle Database 10g. 6. Ensure that the required file systems are of sufficient size, and that the file permissions are set correctly. 7. Set the program properties for Oracle. 8. APF authorize the Oracle AUTHLOAD library. 9. Run the installer. Each of these steps is described below in more detail. After successfully running the Oracle 10g Universal Installer you will have an Oracle subsystem that will start. A number of jobs are placed in an INSTLIB data set. These jobs must be run in order to communicate with the Oracle instance built by the OUI. Running the jobs will create a database.
2.2 Media and documentation The media for Oracle Database 10g can be downloaded from http://otn.oracle.com or it can be ordered as a CD-ROM pack from Oracle’s Internet store at http://store.oracle.com by selecting Database, CD Packs, Oracle Enterprise Server, Oracle Database 10g for Z/OS.
10
Experiences Installing Oracle Database 10g on z/OS
To obtain the Oracle 10g documentation, we logged on to Metalink, selected Technical library (left column), Product documentation, Oracle Enterprise Server, z/OS, then downloaded the following manuals: Oracle Database Installation Guide 10g Release 1 (10.1) for IBM z/OS, B13525-01 Oracle Database User’s Guide 10g Release 1 (10.1) for IBM z/OS, B13524-01 Oracle Database System Administration Guide 10g Release 1 (10.1) for IBM z/OS, B13526-01 Oracle Database Messages Guide 10g Release 1 (10.1) for IBM z/OS, B13527-01 Oracle Database Release Notes 10g Release 1 (10.1) for IBM z/OS, B13528-01 The documentation is also available on Metalink at: http:otn.oracle.com/documentation Table 2-1 lists the steps we followed and the documentation we used to install Oracle 10g and to create a database. Table 2-1 Book organization guide Step
Installation Activity
Chapter in Oracle Documentation
Chapter in Redbook
1
Prepare the z/OS system
2 in Installation Guide
2
2
Installing Oracle libraries
3 in Installation Guide
3
3
Customizing database instance and define the services
3 in Sysadmin Guide
4
4
Create the database instance
3 in Sysadmin Guide
5
5
Start and stop the database
5 in Sysadmin Guide
5
2.3 Verify the TCP/IP and X Windows connection For the OUI to operate correctly, you must have TCP/IP operational on the z/OS system. Although you can log onto TSO from a terminal such as an IBM 3270 that is not connected through TCP/IP to perform much of the setup, the OUI will not function without TCP/IP and X Windows.
Chapter 2. Preparing to install Oracle Database 10g
11
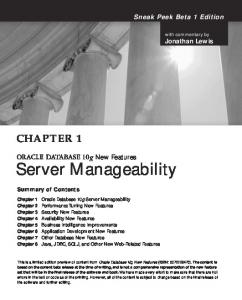
2.3.1 TN3270 connection We logged on to TSO userid IBMUSER using a TN3270 client called IBM Personal Communications (PCOMM) running on a Windows® workstation. The connection used TCP/IP. This userid had “superuser” authority. We also logged on successfully from a RedHat Linux Version 8 running on a Thinkpad using TN3270 and a TCP/IP connection. Once logged on to TSO, we used the OMVS command to enter the USS environment. Figure 2-1 on page 13 shows the screen running the OMVS command. Note that in this mode you can scroll backwards and forwards through the output, and the oedit command can be used to invoke the ISPF editor to edit the UNIX files. Note, though, at the bottom right corner of the screen there is a word which indicates the mode of the screen. If this word is INPUT, it means the screen is in input mode and any output to the screen will not display until the mode changes to RUNNING. We discovered that the screen mode will change to INPUT if the screen is idle for a time. When we were running the OUI installer, for example, the mode would change to INPUT after about 10 seconds, and we would not get any output messages until we hit the PA2 key to return the screen to RUNNING mode.
12
Experiences Installing Oracle Database 10g on z/OS
IBM Licensed Material - Property of IBM 5694-A01 (C) Copyright IBM Corp. 1993, 2001 (C) Copyright Mortice Kern Systems, Inc., 1985, 1996. (C) Copyright Software Development Group, University of Waterloo, 1989. All Rights Reserved. U.S. Government users - RESTRICTED RIGHTS - Use, Duplication, or Disclosure restricted by GSA-ADP schedule contract with IBM Corp. IBM is a registered trademark of the IBM Corp. IBMUSER:/u/ibmuser: >
===> INPUT ESC=¢ 1=Help 6=TSO 7=BackScr 12=Retrieve
2=SubCmd
3=HlpRetrn
4=Top
8=Scroll
9=NextSess 10=Refresh
5=Bottom 11=FwdRetr
Figure 2-1 3270 screen showing USS using the OMVS command
2.3.2 TCP/IP connection in line mode Users who are more familiar with using UNIX might prefer a line mode terminal to do the UNIX work. From the ThinkPad® running RedHat Linux we connected using the telnet command. This command names the host or IP address of the MVS™ system and also an optional port number on that host. The default port for telnet is 23, but on most MVS systems this port is reserved for 3270 connections, and so another port number is usually required. Each installation is different, but our MVS system used port 1023 for line mode terminal access, and so we logged on to MVS host MVS03 using the command in Example 2-1. Check with your Network administrator to find what port number you should use with telnet in your installation.
Chapter 2. Preparing to install Oracle Database 10g
13
Example 2-1 telnet command
telnet mvs03 1023 From the Windows workstation we used a telnet client called PuTTY, which we configured to use port 1023. After connecting to USS using either telnet or PuTTY to connect as a line mode terminal, you must verify that the keyboard mappings are appropriate. For example, we had to change the default backspace key in PuTTY to get a useful connection. Mapping the keyboard so that the keys on your keyboard can be used in a useful manner is different for all the various telnet clients, so it is beyond the scope of this Redbook to cover all the possibilities. Example 2-2 shows the logon sequence that we observed. Example 2-2 logon to USS from a line mode terminal
EZYTE27I login: ibmuser EZYTE28I ibmuser Password: IBM Licensed Material - Property of IBM 5694-A01 (C) Copyright IBM Corp. 1993, 2001 (C) Copyright Mortice Kern Systems, Inc., 1985, 1996. (C) Copyright Software Development Group, University of Waterloo, 1989. All Rights Reserved. U.S. Government users - RESTRICTED RIGHTS - Use, Duplication, or Disclosure restricted by GSA-ADP schedule contract with IBM Corp. IBM is a registered trademark of the IBM Corp. IBMUSER:/u/ibmuser: >
2.3.3 X Windows connection The Oracle installer requires X Windows to be functional. The OUI application is an X Windows client, and you must have an X-server running somewhere connected by TCP/IP to the client. The X-server displays the graphical output from the client. We used a ThinkPad running RedHat Linux for Intel release 8. X Windows is standard on this platform. By opening a terminal session on this machine we logged on and entered the xhost command as in Example 2-3.
14
Experiences Installing Oracle Database 10g on z/OS
Example 2-3 xhost command
flexes:/usr/flexes>xhost + access control disabled, clients can connect from any host flexes:/usr/flexes> This command allows the X-server to accept connections from any X Windows client that requests a connection. As a sample X Windows client, we used a program called xclock. This program is shipped in source code in the /usr/lpp/tcpip/X11R6/Xamples/clients/xclock directory. On our system, this directory is read-only, so we copied it to IBMUSER’s home directory as shown in Example 2-4. We then used the make command to compile and link the sample program. Obviously you cannot make the xclock program if you do not have the C/C++ Compiler installed. Executing the program xclock caused the graphic output of the clock program to be displayed on the ThinkPad screen. The ThinkPad was connected to the TCP/IP network at address 192.168.1.100. When we closed the clock window on the ThinkPad screen, the xclock program under USS ended. This verifies that X Windows programs can run under USS on z/OS and display their output on a TCP/IP-connected X Windows server. This is required to run the Oracle 10g Universal Installer. Example 2-4 Creating and executing the xclock sample program
IBMUSER:/u/ibmuser: >mkdir xclock IBMUSER:/u/ibmuser: >cp /usr/lpp/tcpip/X11R6/Xamples/clients/xclock/* xclock IBMUSER:/u/ibmuser: >cd xclock IBMUSER:/u/ibmuser/xclock: >make c89 -c -D_ALL_SOURCE -W c,dll xclock.c c89 -c -D_ALL_SOURCE -W c,dll Clock.c c89 -o xclock xclock.o Clock.o /usr/lib/Xaw.x /usr/lib/SM.x /usr/lib/ICE.x /usr/lib/X11.x IBMUSER:/u/ibmuser/xclock: >export DISPLAY=192.168.1.100:0.0 IBMUSER:/u/ibmuser/xclock: >xclock
2.4 Verifying that USS facilities are functional There are a number of software facilities in USS that must be available for the Oracle 10g Universal Installer to operate correctly.
Chapter 2. Preparing to install Oracle Database 10g
15
2.4.1 z/OS 1.4 Oracle Database 10g requires z/OS at the 1.4 level as a minimum. With USS you can use the UNIX command uname -a to determine the release. Example 2-5 shows the output from this command on our system. The 14.00 number indicates the system is z/OS 1.4. Example 2-5 uname -a command
IBMUSER:/u/ibmuser/xclock: >uname -a OS/390 P390 14.00 03 1245 IBMUSER:/u/ibmuser/xclock: >
2.4.2 Java The OUI is written in Java. You must have Java installed to successfully run the Oracle 10g Universal Installer. You can verify that Java is installed with the java -version command. See Example 2-6 for the output from this command on our system. The Oracle Database Installation Guide 10g Release 1 (10.1) for IBM z/OS, B13525-01 states that Java 1.4.1 is required. On our system we had Java 1.3.1, so we pointed a Web browser at http://www.ibm.com/servers/eserver/zseries/software/java and followed the links to download the IBM SDK for z/OS, Java 2 Technology Edition, Version 1.4. We followed the documented procedure to download and install this Java 1.4.1. Example 2-6 java -version command
IBMUSER:/u/ibmuser: >java -version java version "1.4.1" Java(TM) 2 Runtime Environment, Standard Edition (build 1.4.1) Classic VM (build 1.4.1, J2RE 1.4.1 IBM z/OS Persistent Reusable VM build cm1411-20030930 (JIT enabled: jitc)) IBMUSER:/u/ibmuser: > The pax command that creates the Java 1.4.1 directories failed on some members with the error message seen in Example 2-7. Example 2-7 Unable to restore extended attribute “l”
FSUMF073 J1.4/bin/libawt.so: user not authorized to restore extended attribute
16
Experiences Installing Oracle Database 10g on z/OS
As suggested in the support Web page, we created a generic RACF® profile BPX.FILEATTR.* in the RACF FACILITY class, and granted the userid access to this profile. After getting this authority, the pax command executed successfully.
2.4.3 Perl Note: This is now being shipped with the Oracle code so it is not necessary for you to install perl. This example is left here in case you need perl for another reason. The perl interpreter must be installed for the Oracle 10g Universal Installer to operate correctly. Example 2-8 shows the use of the perl -v command to verify that perl is functional. Example 2-8 Perl -v command
IBMUSER:/u/ibmuser: >perl -v This is perl, v5.6.1 built for os390 Copyright 1987-2001, Larry Wall MVS (OS390) port by Mortice Kern Systems, 1997-1999 Perl may be copied only under the terms of either the Artistic License or the GNU General Public License, which may be found in the Perl 5 source kit. Complete documentation for Perl, including FAQ lists, should be found on this system using `man perl' or `perldoc perl'. If you have access to the Internet, point your browser at http://www.perl.com/, the Perl Home Page. IBMUSER:/u/ibmuser: > In our system, which was a z/OS 1.4 system that had limited customization, perl was not installed. We went to the IBM z/OS UNIX System Services home page on the Web. This Web site is at: http://www.ibm.com/servers/eserver/zseries/zos/unix/
Chapter 2. Preparing to install Oracle Database 10g
17
On the left side of this Web page there is a pointer to Tools & Toys. Clicking on this takes you to: http://www.ibm.com/servers/eserver/zseries/zos/unix/bpxa1toy.html On this page there is a pointer to Ported Tools. Perl is one of these tools. We clicked on this pointer, and downloaded the binary versions of Perl. We followed the instructions to install these binaries. After that, we could verify the successful execution of perl as seen in Example 2-8 on page 17.
2.4.4 Make command The make command must be available for the Oracle 10g Universal Installer to operate. The make -V command (note the upper case V) will report the version of the command available, and thus ensures that it is functional. The first time we tried this on our system the USS environment was not set up, and we had to copy the file /samples/startup.mk to /etc/startup.mk before we could execute the make command successfully. Example 2-9 Make -V command
IBMUSER:/u/ibmuser: >make -V make - Version z/OS Shell and Utilities v1.4
2.5 Choose the data set, user and group names We decided that the Oracle configuration should be owned by a userid ORACLE1. The MVS data sets will begin with the high-level qualifier IBM1.V101G. The Oracle database service proc name is ORA1S10, and the network task will be started task ORA1N10. These names will be supplied to the OUI, but you need to set the RACF environment before the OUI runs. It is important to be prepared with the names of the resources that you will need in the installation process. We created Table 2-2 on page 19 to facilitate the process. You may not have all the values needed at this point, but we found that listing the values made the installation jobs easier by ensuring that the correct entries were made in the installation process. The installation process involves making updates to SYS1.LINKLIB and SYS1.PROCLIB. In our case, we did not have authority to write to these data sets and so we used SYS3.LINKLIB and SYS3.PROCLIB. The installation process allows you to point to another PROCLIB and LINKLIB. Our values for resources are shown in Table 2-2 on page 19.
18
Experiences Installing Oracle Database 10g on z/OS
Table 2-2 Values we used during installation Resource
Value we used
Comment
HFS
ZFS.MVS03.AGG016
The data set name we allocated for our ZFS for the USS directory. We found we needed 6 GB total to hold both the temporary and expanded files.
Mount point
/oracle
We had issued the command mkdir oracle in USS.
Oracle User ID
Oracle1
User ID that owns Oracle system.
Oracle Group Names
OINSTALL, ORADBA
RACF Group Names.
Proclib
SYS3.PROCLIB
We did not have access to SYS1.PROCLIB.
Linklib
SYS3.LINKLIB
We did not have access to SYS1.LINKLIB.
Database name
ORA1
SID for database instance.
Subsystem Name
ORSS
Oracle Subsystem Name.
Service Names
ORAS10, ORAN10
Service names for database and Net.
Proc names
ORA1S10, ORA1N10
Procedure names to start the database and net services.
HLQ for Oracle library files
IBM1.V10G
Names used for Oracle library data sets.
Oracle products to install
All but the Access Managers and gateways
Determine which of the Oracle products to install.
HLQ for DB files
IBM1.ORA1
We used the instance name to show they are VSAM files for this database instance.
USS directories
/oracle/o10g /oracle/o10gtest /oracle/o10gDisk
We had three subdirectories for our file system /oracle in USS.
Chapter 2. Preparing to install Oracle Database 10g
19
2.6 Add user IDs and groups We used the JCL in Example 2-10 to add the ORACLE1 userid and two groups to RACF. Note that our system uses the IBM SecureWay Security Server for z/OS, which is also known as RACF. If you have other security software, then your procedures will be different. In any case, this will probably be performed by the Security Administrator at your installation. Example 2-10 Add users to RACF
//IBMUSER JOB (), // CLASS=A, // MSGCLASS=X, // MSGLEVEL=(1,1), // NOTIFY=&SYSUID, // TIME=1440 //S0 EXEC PGM=IKJEFT01,DYNAMNBR=75,TIME=100,REGION=6M //SYSPRINT DD SYSOUT=* //SYSTSPRT DD SYSOUT=* //SYSTSIN DD * ADDGROUP OINSTALL SUPGROUP(SYS1) OMVS(GID(100)) ADDGROUP ORADBA SUPGROUP(OINSTALL) OMVS(GID(101)) ADDUSER ORACLE1 DFLTGRP(OINSTALL) AD ORACLE.* UACC(READ) ALU oracle1 OMVS(HOME('/u/oracle1') PROGRAM('/bin/sh') UID(100)) ALU oracle1 PASSWORD(ORACLE) PERMIT ACCT# CLASS(ACCTNUM) ACCESS(READ) ID(ORACLE1) PERMIT ISPFPROC CLASS(TSOPROC) ACCESS(READ) ID(ORACLE1) SETROPTS RACLIST(TSOPROC) REFRESH RDEFINE STARTED ORA1N10.** STDATA(USER(oracle1)) RDEFINE STARTED ORA1S10.** STDATA(USER(oracle1)) SETROPTS RACLIST(STARTED) REFRESH /* // Note the JCL in Example 2-10 not only adds the user IDs and groups to RACF, but also defines the ability of the ORACLE1 userid to use TSO and USS. Obviously the user ID that performs the install is arbitrary, that is, you can choose any value you wish. The only constraint is that this user ID cannot be a “superuser” to MVS USS, that is, cannot be uid(0). Each user of MVS that uses z/OS UNIX System Services (USS) must have a USS segment in the RACF user profile. You must assign a user number (uid) and a group identifier (gid) for each user of z/OS that uses USS. In our case we chose uid 100 for the userid ORACLE1and gid 100 and 101 for the groups OINSTALL and ORADBA. Your
20
Experiences Installing Oracle Database 10g on z/OS
installation will probably have other standards and your security administrator will assign the uid and gid values. This JCL also uses the rdefine command to cause the two started tasks ORA1N10 and ORA1S10 to be run using the security profile for userid ORACLE1. When you run the OUI, one of the panels will ask you to supply the names you wish to use for the NET and Oracle database service procedures. In our case we used the names ORAN10, ORAS10, ORA1N10, and ORA1S10 for the JCL procedures for the services. You must relate the names that you choose for these procedures to the userid ORACLE1. If you add additional NET or DB services after installation, you will have to use a similar rdefine command. See the Oracle Database System Administration Guide 10g Release 1 (10.1) for IBM z/OS, B13526-01 for information on how to add new services to the Oracle installation. The Oracle Database Installation Guide 10g Release 1 (10.1) for IBM z/OS, B13525-01 discusses adding two RACF resource classes to control the security of the Oracle instance. Adding these resource classes is disruptive, requiring an IPL of the z/OS system. The default in Oracle is to use the pre-existing FACILITY resource class for this purpose, and that is what we did. The only time that an installation would require adding unique resource classes to RACF would be if the security administration role is so large that the installation chooses to delegate the Oracle security to a unique area. In smaller installations, it is not a security exposure to have the same security administrator have authority to grant and revoke access to both Oracle resources and other non-related resources that also use the FACILITY class, such as DASD storage management.
2.7 Verify file system size and permissions There are a number of file systems that have to be verified.
2.7.1 The /tmp file system The install requires at least 400 MB of space in the /tmp directory. The df -k /tmp command will tell you how much space is currently available in the /tmp directory. If you do not have enough space, contact your systems programmer. An authorized userid could use JCL similar to that in the techniques used in the next section and define a new file system to be used at the /tmp mount point.
Chapter 2. Preparing to install Oracle Database 10g
21
2.7.2 The /oracle file system The Oracle installer needs 2.5 GB of space in the UNIX file system to receive the Oracle product. We chose to allocate a 2.5 GB file system and mount it as /oracle. As well, we allocated a small file system for the Oracle userid to use as a home directory when that userid uses z/OS UNIX System Services.
Allocating a file system The JCL in Example 2-11 was used to allocate 2.5 GB of space for use in the /oracle file system. It also allocates 10 MB of space for the use of the home directory for the ORACLE1 userid. This JCL allocates the space; the space must then be formatted and the file system mounted. Example 2-11 Allocating file systems
//IBMUSER JOB (72,FB3),DESCRIPTION,COND=(0,NE), // CLASS=A,MSGCLASS=H,NOTIFY=&SYSUID //S1 EXEC PGM=IDCAMS,REGION=0M //SYSPRINT DD SYSOUT=* DEFINE CLUSTER (NAME(ZFS.ORACLE) VOLUMES(ORA001) MEGABYTES(2500 500) LINEAR SHAREOPTIONS(2)) DEFINE CLUSTER (NAME(ZFS.U.ORACLE1) VOLUMES(ORA001) MEGABYTES(10 5) LINEAR SHAREOPTIONS(2))
Formatting a file system We used the JCL in Example 2-12 to format the two file systems. Example 2-12 Formatting file systems
//IBMUSER // //S1 // //SYSPRINT //STDOUT //STDERR //CEEDUMP
22
JOB (72,FB3),DESCRIPTION,COND=(0,NE), CLASS=A,MSGCLASS=H,NOTIFY=&SYSUID EXEC PGM=IOEAGFMT,REGION=0M, PARM='-aggregate ZFS.ORACLE -compat' DD SYSOUT=* DD SYSOUT=* DD SYSOUT=* DD SYSOUT=*
Experiences Installing Oracle Database 10g on z/OS
//S2 // //SYSPRINT //STDOUT //STDERR //CEEDUMP //
EXEC PGM=IOEAGFMT,REGION=0M, PARM='-aggregate ZFS.U.ORACLE1 -compat' DD SYSOUT=* DD SYSOUT=* DD SYSOUT=* DD SYSOUT=*
Mounting file systems To mount these file systems, the mount command could be used. An example of this is shown in Example 2-13. Example 2-13 Mounting file systems with the mount command
IBMUSER:/u/ibmuser: IBMUSER:/u/ibmuser: IBMUSER:/u/ibmuser: IBMUSER:/u/ibmuser:
>mount -f ZFS.ORACLE -t ZFS /oracle > >mount -f ZFS.U.ORACLE1 -t ZFS /u/oracle1 >
In our system we used these commands only for testing. To make these changes active every time your system is IPLed, we recommend that you change the USS startup member in the z/OS parameter library (PARMLIB). In our system the PARMLIB member BPXPRMCS was used to initialize USS. We inserted the lines in Example 2-14 into BPXPRMCS to cause the file systems to be mounted at IPL. Example 2-14 BPXPRMCS PARMLIB member changes
FILESYSTYPE TYPE(ZFS) ENTRYPOINT(IOEFSCM) ASNAME(ZFS) MOUNT
FILESYSTEM('ZFS.ORACLE') TYPE(ZFS) MODE(RDWR) MOUNTPOINT('/oracle')
MOUNT
FILESYSTEM('ZFS.U.ORACLE1') TYPE(ZFS) MODE(RDWR) MOUNTPOINT('/u/oracle1')
Once these file systems are mounted, you should be able to log on to the userid ORACLE1. On our system we got a permission failure, saying that the user ORACLE1did not have permission to access /u/oracle1as a home directory. We discovered that on our system the /u directory did not have the “x” permission bit
Chapter 2. Preparing to install Oracle Database 10g
23
set. This meant that a user that was not defined with uid(0), that is, a “superuser”, did not have write permission to the directories. On our system we had to use the chmod +x /u command executed by an authorized user to allow the /u/oracle1 file system to be used by the userid ORACLE1.
2.8 Set program properties The database and network service region programs must run non-swappable and non-cancellable and should not be subject to time limits. In addition, the database code runs in protect key 7. To enable this we added the entries shown in Example 2-15 to the SCHEDnn member in SYS1.PARMLIB. Example 2-15 SCHED00 member
EDIT ADCD.ZOSV14S.PARMLIB(SCHED00) - 01.01 Columns 00001 00072 Command ===> Scroll ===> HALF 011700 PPT PGMNAME(ORARASC) /* PROGRAM NAME */ 011800 NOCANCEL /* NOT CANCELABLE */ 011900 KEY(7) /* PROTECTION KEY 7 FOR DB */ 012000 NOSWAP /* PROGRAM IS NOT SWAPABLE */ 012100 SYST /* SYSTEM TASK, NOT TIMED */ 012200 PPT PGMNAME(MINMAIN) /* PROGRAM NAME */ 012300 NOCANCEL /* NOT CANCELABLE */ 012400 NOSWAP /* PROGRAM IS NOT SWAPABLE */ 012500 SYST /* SYSTEM TASK, NOT TIMED */
Adding these entries is not disruptive and can be activated with the command SET SCH=nn, where nn is the designation of your SCHEDnn member.
2.9 AFP-authorize the Oracle AUTHLOAD library The next preinstallation step is to AFP™-authorize the Oracle AUTHLOAD library. You first specify the data set name and volume of the library, and then activate this authorization with the command SET PROG=xx. The authload data set must be a PDSE data set. The library in our case was on volume ORA001. If you use Systems Managed Storage (DFSMS), then use the word SMS instead of VOLUME(ORA001). This change to the PROGxx member is activated with the command SET PROG=xx. Make sure that the IEASYS member
24
Experiences Installing Oracle Database 10g on z/OS
used in your system IPL has an entry PROG=xx, so that the next IPL will reestablish the authorization environment. Example 2-16 APF-authorizing the authload data set
EDIT ADCD.ZOSV14S.PARMLIB(PROG00) - 01.01 00001 00072 Command ===> ===> HALF 000001 APF FORMAT(DYNAMIC) 000002 APF ADD 000003 DSNAME(ORACLE.V10G.AUTHLOAD) VOLUME(ORA001)
Columns Scroll
2.10 Run the installer The next chapter discusses running the Oracle 10g Universal Installer. Assuming you have everything set up properly, the OUI is run by executing the commands shown in Example 2-17. This example shows you cannot run the OUI if your OMVS UID is 0, which is equivalent to root. You must use an ID that does not have root access. Example 2-17 Running the installer
IBMUSER:/oracle: >./runInstaller IBMUSER:/oracle: >Starting Oracle Universal Installer... Checking requirements... Checking operating system version: must be 14.00, 15.00 or 16.00. Actual 14.00 Passed Checking the version of Perl: must be 5.004,5.6.1 Perl is version 5.6.1 Passed All requirements met. The user is root. Oracle Universal Installer cannot continue installation if the user is root. IBMUSER:/oracle: >
Chapter 2. Preparing to install Oracle Database 10g
25
26
Experiences Installing Oracle Database 10g on z/OS
3
Chapter 3.
Installing the Oracle Libraries This chapter describes the steps we took using the Oracle Universal Installer to install the Oracle z/OS RDBMS server components. We used a zFS defined with 14 GB but 6 GB would have been sufficient. Large zFSs must be SMS-managed. It was mounted as /oracle. We created three directories: /oracle/o10g for the inventory /oracle/o10gtest for ORACLE_HOME /oracle/o10gDisk for the Disk1 and Disk2 files
© Copyright IBM Corp. 2004. All rights reserved.
27
3.1 Obtaining the CD-ROMs The code can be downloaded from the Oracle OTN site or you can use the CD-ROM media available at: store.oracle.com The steps to download the code are:
Go to otn.oracle.com. Choose Downloads on the right. Choose Oracle Database. Choose Oracle Database 10g. Choose Oracle database 10g for z/OS.
We then had two ZIP files on our workstation, which we unzipped. We had two large pax files that contained the Oracle code. We used the FTP command to place these in our USS directory, /oracle/o10gDisk. On the DOS command line, we issued the following commands: cd \zoscode\Disk1 dir Disk1.pax ftp mvs03 logon: oracle1 enter password: xxxxxx bin cd /oracle/o10gDisk put Disk1.pax quit. cd \zoscode\Disk2 dir Disk2.pax ftp mvs03 logon: oracle1 enter password: xxxxxx bin cd /oracle/o10gDisk put Disk2.pax quit
28
Experiences Installing Oracle Database 10g on z/OS
Once the code is FTP’ed, log on to USS, go to the directory where you put the pax files, and issue the following commands: cd /oracle/o10gDisk ls The two files we had were: -rw-r-----rw-r-----
1 ORACLE1 OINSTALL 1 ORACLE1 OINSTALL
517224960 Apr 22 11:10 Disk1.pax 391329792 Apr 22 11:13 Disk2.pax
The ls command was used to make sure that we had received the same number of bytes that we had downloaded. Uncompress the files in the directory using the pax commands: PAX -rvf Disk1.pax PAX -rvf Disk2.pax This could take a few minutes. After running the pax commands, the size for the April 2004 download files was 3.5 GB. The files were: drwxr-xr-x 3 ORACLE1 OINSTALL -rw-r----- 1 ORACLE1 OINSTALL
288 Apr 2 15:48 Disk1 517224960 Apr 19 14:45 Disk1.pax
drwxr-xr-x 3 ORACLE1 OINSTALL -rw-r----- 1 ORACLE1 OINSTALL
288 Apr 7 10:29 Disk2 391329792 Apr 19 14:48 Disk2.pax
drwxr-xr-x 3 ORACLE1 OINSTALL
288 Feb 18 07:50 Translations
drwxr-xr-x 3 ORACLE1 OINSTALL
416 Apr 19 07:51 install
-rwxr-xr-x 1 ORACLE1 OINSTALL
772 Feb 20 12:02 runInstaller
$ At this point, we were set up to run the Oracle Universal Installer. Notes: For the downloads you will need to register for OTN on otn.oracle.com If you experience problems with completing the download, try it with both Netscape and Internet Explorer. Oracle Database 10g for z/OS requires z/OS 1.4.
Chapter 3. Installing the Oracle Libraries
29
3.2 Using the Oracle documentation For this chapter we used the following documentation from Oracle: Oracle Database Installation Guide 10g Release 1 (10.1) for IBM z/OS, B13525-01 Oracle Database Release Notes 10g Release 1 (10.1) for IBM z/OS, B13528-01.
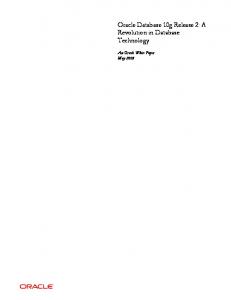
3.3 Set up your system for X Windows The OUI requires that you have the X Windows interface to execute. We used VNC. Examples of how to do this are shown in Appendix A, “Options for setting up the X Windows environment” on page 135. In our case, we installed a VNC server on a Linux guest on Linux on zSeries that is connected by a hipersocket to z/OS. We used a VNC client on the windows laptop connected to the VNC server, to connect to OMVS.
Enable the Linux guest system to handle X Windows To enable your USS system to export the X Windows display to your workstation, do the following: 1. On the USS session, set the DISPLAY variable by issuing the command export DISPLAY=hostname:0 where hostname is the name of your workstation or the IP address of your workstation. If you are using VNC, the hostname is the IP address of your VNC server. 2. On the VNC server session, execute the following command as user root xhost + 3. Usually, on the UNIX session you can test by running the following command. However, this command is not available on USS. xclock & If this displays a window with a clock, you are ready to start the OUI. To remove the clock that is displayed, we issued a command to kill the process. We found that the easiest setup to run the Oracle Universal Installer was to have a VNC Viewer session open with three xTERM windows. One was used to telnet into the Linux server on VM that was running the VNC server, and the other two were telnet sessions to OMVS(USS).
30
Experiences Installing Oracle Database 10g on z/OS
On the first VNC server xTERM window that was connected to VMLINUX9, we issued the xhost + command shown in Figure 3-1. On the second xTERM window, we created a telnet session on MVS03. As described in 3.5, “Connecting with the User ID to install Oracle” on page 32, we set the DISPLAY and JAVA_HOME variables and ran the OUI. On the third xTERM window we created a telnet session just to be available in case we had to check on any USS files. Also, we had a 3270 session connected to TSO so we could monitor the progress on that side.
Figure 3-1 VNC xTERM Window ready to run the Installer
Example 3-1 shows the files in the directory where we had unpacked the pax files. This is the location of the runInstaller script. Example 3-1 List of files on OMVS session
Disk1
install.platform
runInstaller
Chapter 3. Installing the Oracle Libraries
31
Disk2 Translations install
logs sessionContext.ser oraInstaller.properties oui
3.4 Checking to see if you are ready to install If your user ID or system has been used previously to install Oracle, you should remove some files or ENV variables to make the install process easier. We did the following: Removed the oraInst.loc file in /var/opt/oracle. Removed all settings of system variables that had anything to do with earlier versions of Oracle. For example, we did an unset of ORACLE_HOME, ORACLE_BASE, TWO_TASK, and ORANLS, and removed ORACLE_HOME from PATH and LIBPATH.
3.5 Connecting with the User ID to install Oracle We had a user ID name, oracle1, created for TSO and OMVS. It had a home directory of /u/oracle1 in USS. We used the VNC viewer to connect to VMLINUX9:5, and we used the telnet window to connect to USS. To set the Java directory correctly, you can do a find command for libjava.so. This user ID had to have access to the /oracle and /var/opt/oracle directories. We set the following entries in the .profile in /u/oracle1: export JAVA_HOME=/usr/lpp/java140/J1.4 export DISPLAY=vmlinux9:5 Check that the DISPLAY variable is set by issuing: echo $DISPLAY
3.6 Running the Universal Installer Go to the directory where the CD-ROM images were stored, then run the installer.
32
Experiences Installing Oracle Database 10g on z/OS
cd /oracle/o10gDisk/Disk1 ./runInstaller This will take a few minutes. Example 3-2 shows the messages on our telnet window. Example 3-2 Messages from runInstaller on the telnet window
./runInstaller ./runInstaller $ Starting Oracle Universal Installer... Checking installer requirements... Checking operating system version: must be 14.00, 15.00 or 16.00. Actual 14.00 Passed
All installer requirements met. /usr/lpp/java140/J1.4/bin/java Oracle Universal Installer, Version 10.1.0.2.0 Production Copyright (C) 1999, 2004, Oracle. All rights reserved. Then an X Windows screen appears with the name of the Oracle Universal Installer, followed by the Welcome panel shown in Figure 3-2 on page 34. Each panel has a Help screen if you need more information. We suggest you run this from a telnet session instead of an OMVS session. If you use OMVS, execute ./runInstaller > outmessages so the messages will go to the file. Otherwise, the OMVS screen goes into input mode and this will cause you to press Enter frequently for the next page. Note: If you wish to record your entries to the panels, issue the following command to start the OUI: ./runInstaller -record -destinationFile /oracle/script2 This creates the file script2, which can be used later to do a silent install. It also gives you a log of the entries you have made. See Appendix E, “Silent install example” on page 165, for our example on how we used the silent install process.
Chapter 3. Installing the Oracle Libraries
33
Figure 3-2 First window that appears for only a few seconds
After this window, the Welcome panel will appear and wait for your input.
34
Experiences Installing Oracle Database 10g on z/OS
Click Next to continue. Later we used the Deinstall Products button to test this process, as described in Appendix D, “Restarting the OUI using the deinstall option” on page 159.
3.6.1 Inventory directory panel At this point you are asked to indicate your inventory location directory. We put the inventory location in the /oracle/o10g directory. The default is the user ID home directory so this should be changed to be in the zFS you are using for Oracle files. It should not be in the ORACLE_HOME directory.
Our zFS was set up as /oracle. For this test, we created the subdirectories o10g for the inventory and 01ogtest for the ORACLE_HOME. You can use Browse to search for your directory. If the o10g directory is not created, the OUI will create it for you. OINSTALL is the group for our ID. You might use DBA. The OUI does check that this is a valid group. When ready to process, click Next.
Chapter 3. Installing the Oracle Libraries
35
This window only appears the first time you install because the data is then available from the /var/opt/oracle/oraInst.loc file.
3.6.2 File locations This is the screen that enables you to point to the location of the file representing the product you want to install and to specify your OUI_HOME. The default is the user home directory. You should change this to your zFS file system. In our case, it was /oracle/o10gtest. It should not be the same directory as your inventory location. This becomes your ORACLE_HOME. So we had three directories: /oracle/o10gtest for ORACLE_HOME /oracle/01og for the inventory /oracle/o10gDisk for the file images from the CD-ROMs
You can create a directory at this point. If you do not have write permission to the /oracle directory, you will get the following message, as we did in one installation where we were trying to write to /oracle1/dbserv. You must resolve the issue before proceeding.
36
Experiences Installing Oracle Database 10g on z/OS
3.6.3 Available products There are four choices at this point. As we were installing the Oracle Database 10g product, we chose the first option. If you only want to run the client code on z/OS, you would choose the second option. This is described in Appendix C, “Installing the Oracle Client” on page 147. If you want to install any of the gateway products, choose the third option. We did not execute this function. Later in the process, to complete the installation and to create a database, we customized the subsystem by taking the fourth option. This is described in Chapter 4, “Customizing the subsystem for Oracle” on page 51.
Chapter 3. Installing the Oracle Libraries
37
If you want to reduce the amount of space utilized, you can choose the custom install option and only choose the functions you need. If you choose the typical install, it will not include any of the demo programs, which results in taking less space than the complete option. We chose the complete option in our installation.
38
Experiences Installing Oracle Database 10g on z/OS
3.6.4 Select High Level Qualifier (HLQ) We had the HLQ of IBM1 set up for us to use for the PDS files on TSO. Selecting a new HLQ for the Oracle install is recommended so that only the HLQ entry goes into the system master catalog (SYS1.CATALOG). If you already have a previous release of Oracle installed, you may choose to use that HLQ and specify a different secondary qualifier.
Chapter 3. Installing the Oracle Libraries
39
In addition to using an HLQ, we used a secondary qualifier to denote the version of the database we were installing. This makes management of the data sets easier. If your HLQ does not exist, it will create it for you. IBM1.V10G was the HLQ we used for the Oracle libraries in the first phase of the installation. Later we used IBM1.ORA1 for all the files associated with the Oracle Database instance ORA1.
3.6.5 Allocate partitioned data sets There are now a series of panels that allow you to specify the volume serial number of the z/OS DASD volumes you want to use for the partitioned data sets. We used SUP014 for all the files. We chose to allocate the data sets immediately and not use SMS. The next eight windows show our entries.
40
Experiences Installing Oracle Database 10g on z/OS
If you choose No, then you must have preallocated all these data sets.
We wanted to allocate to specific volumes and did not use SMS.
Chapter 3. Installing the Oracle Libraries
41
This has to be a valid volume. If you have enough contiguous space, you may want to increase the primary extent.
42
Experiences Installing Oracle Database 10g on z/OS
You can change to 125 primaries if you have the contiguous space.
If you are satisfied with your selections, click Next.
Chapter 3. Installing the Oracle Libraries
43
You can page down to see the complete list of the 1169 products. The next step is the installation process. This moves the files from the USS file system to the z/OS partitioned data set.
44
Experiences Installing Oracle Database 10g on z/OS
If any of the lines are red, read the error message and solve the issue. This part of the installation is placing all the components of the database into the libraries. In our case, it tool about 40 minutes.
At the completion of the process, the end of installation screen appeared in the OUI window. You can monitor progress by watching the allocation of the PDS files. Note: The log name is displayed at the bottom of the window. The log will contain messages on the progress of the installer. Example 3-3 shows a sample from our log. Example 3-3 Extract from the installer log file Using paramFile: /oracle/o10gDisk/install/oraparam.ini Checking installer requirements... Checking operating system version: must be 14.00, 15.00 or 16.00. Actual 14.0 0 Passed All installer requirements met.
Chapter 3. Installing the Oracle Libraries
45
Environment Variables: ORACLE_HOME = PATH = /usr/local/bin:/usr/sbin:/bin:.:/bin:/usr/local/bin CLASSPATH = Username:ORACLE1 Setting variable 'PREREQ_CONFIG_LOCATION' to ''. Received the value from variabl e association. *** Welcome Page***
Figure 3-3 Request that you run the rootpre.sh script
At this point, we had our system administrator with UID 0 authority run the root.sh script. Example 3-4 on page 47 shows the messages our system administrator received.
46
Experiences Installing Oracle Database 10g on z/OS
Example 3-4 Output from root.sh script
mvs03:/oracle/o10g42004>./root.sh Running Oracle10 root.sh script... The following environment variables are set as: ORACLE_OWNER= ORACLE1 ORACLE_HOME= /oracle/o10gtest Enter the full pathname of the local bin directory: Ý/usr/local/bin¨: Copying dbhome to /usr/local/bin ... Copying oraenv to /usr/local/bin ...
Creating /var/opt/oracle/oratab file... Adding entry to /var/opt/oracle/oratab file... Finished running generic part of root.sh script. Now product-specific root actions will be performed. Then we clicked Next, which gave us the end of installation panel. Note: This script writes files in the /usr/local/bin directory.
Click Exit. You will get a window asking if you want to exit; click Yes. In early testing, if we did this too quickly, we got a message about a dump.
Chapter 3. Installing the Oracle Libraries
47
At this point we had completed the installation of the Oracle libraries. Example 3-5 shows the PDS files that were created (they could be seen using TSO). Example 3-5 List of PDS files that were created
Command - Enter "/" to select action Tracks %Used XT Device -------------------------------------------------------------------------IBM1.V10G.AUTHLOAD 4500 87 5 3390 IBM1.V10G.CMDLOAD 6750 94 6 3390 IBM1.V10G.H 90 85 5 3390 IBM1.V10G.INSTLIB 30 2 1 3390 IBM1.V10G.MACLIB 30 13 1 3390 IBM1.V10G.MESG 1950 96 5 3390 IBM1.V10G.OBJLIB 15 20 1 3390 IBM1.V10G.SQL 75 98 1 3390 IBM1.V10G.SQLLIB 15 93 1 3390 IBM1.V10G.SRCLIB 30 83 1 3390 Some of these files are using extents. If you have enough contiguous space, you may want to increase the default of the primary extent. Example 3-6 shows the files that were installed in /oracle as USS files. Example 3-6 Directories and files installed in the USS zFS file system
ORACLE HOME $ ls ls ENV sqlplus OPatch assistants
48
dbs
jdk14
network
perl
diagnostics dm
jlib ldap
nls olap
plsql precomp
Experiences Installing Oracle Database 10g on z/OS
srvm sysman
bin cdata client config css ctx $
has install inventory javavm jdbc jdk
lib md mesg mvscics mvsims mvsosdi
oraInst.loc oracore ord osp oui owm
rdbms relnotes root.sh server slax sqlj
uix wwg xdk
Example 3-7 shows the files in the Oracle inventory directory. Example 3-7 Files in the inventory directory
ORACLE INVENTORY $ ls ls Components oraInstaller.properties Contents ContentsXML
install.platform locks logs
oui sessionContext.ser
We suggest you review the entries in the log file to make sure everything was completed successfully. Our log file was in the /oracle/o10gtest/logs directory. The log is time stamped so you can identify the appropriate log to check.
3.6.6 Exit The Oracle binaries are installed, so you can exit from the Oracle Universal Installer by clicking Yes.
Now, the next steps are: Have the system administrator run the root.sh script. Customize the Oracle z/OS subsystem configuration. Create a database. These steps are covered in the following chapters.
Chapter 3. Installing the Oracle Libraries
49
3.6.7 Some possible problem areas These are some of the possible errors you may encounter: TCP/IP - If you cannot ping from the OMVS to the X Windows server, you cannot start the OUI. If you do not have enough space in your USS and PSD/E files, the OUI will fail. If your JDK 1.4 is not installed, you cannot run the OUI. If you have to restart, we found that it was easier when we removed oraInst.loc and oraInventory in /oracle/o10g and the files in /var/opt/oracle.
50
Experiences Installing Oracle Database 10g on z/OS
4
Chapter 4.
Customizing the subsystem for Oracle This chapter describes the choices we made when we configured the subsystem for Oracle. This includes setting up the PARMLIB for the Oracle Subsystem and creating the members in INSTLIB that will be used to create the database.
© Copyright IBM Corp. 2004. All rights reserved.
51
4.1 Choosing our values We had chosen the following names to use for the customization, as shown in Chapter 2, “Preparing to install Oracle Database 10g” on page 9.
The values for this stage of the installation were: Volume names
SUP014 and SUP015
HLQ/Oracle binaries
IBM1.V10G
HLQ/Oracle database IBM1.ORA1 Subsystem name
ORSS
DB Service Group
ORAS10
Started Proc name
ORA1S10
SID for Server
ORA1
No. of Add Spaces
1
Net Service group
ORAN10
Net Proc name
ORA1N10
SID for Net
ORAN
TCPIP port
1501 - default
Net enclave settings
used - default
Max no of sessions
500
Max Session memory 100m RACF authorization
none
SMR recording
0
Region buffer
10M
4.2 Using the Oracle documentation For this chapter we used the following documents: Oracle Database System Administration Guide 10g Release 1 (10.1) for IBM z/OS, B13526-01 Oracle Database Release Notes 10g Release 1 (10.1) for IBM z/OS, B13528-01
52
Experiences Installing Oracle Database 10g on z/OS
4.3 Creating PARMLIB and adding members to INSTLIB We started the OUI again, proceeded through the Welcome screen and the Specify File Location window, where we chose the source and target file directories. We then chose the fourth option to configure the subsystem and the database. This path creates the members of PARMLIB and INSTLIB that will be used to start the subsystem and to create the database instance.
We used the same HLQ of IBM1.V10G so that the PARMLIB file would be in the same directory chain as the other PDS Oracle binary files.
Chapter 4. Customizing the subsystem for Oracle
53
We had already used IBM1.V10G for the Authload, CMDLOAD libraries etc. so we entered it here.
54
Experiences Installing Oracle Database 10g on z/OS
We did not want to use SMS to allocate our data sets.
We used the same DASD volume that contained the other PDS files.
Chapter 4. Customizing the subsystem for Oracle
55
We chose the same HLQ that we had used to install the Oracle libraries, so the OUI will use the INSTLIB that was created at that time rather than creating a new PDS.
We had chosen all of the names we would use in the planning stage. We now used those names to customize our installation as shown in Chapter 2, “Preparing to install Oracle Database 10g” on page 9. The values from the next two panels will be used to create the Subsystem parameters.
56
Experiences Installing Oracle Database 10g on z/OS
The next two panels will be used to create the database parameters. We used the default values.
Chapter 4. Customizing the subsystem for Oracle
57
These panel entries are for the database VSAM files. We used the HLQ of IBM1.DBF.
58
Experiences Installing Oracle Database 10g on z/OS
The next four panels allow us to enter the information for the model files. These are the model DSNs for the files we would create later dynamically. We left these as defaults. You can modify the members in PARMLIB later on if you need to. These are used to create the ORA1FPS and ORA1FNA members.
After entering all these values we were asked to confirm our entries before we were able to proceed.
Chapter 4. Customizing the subsystem for Oracle
59
60
Experiences Installing Oracle Database 10g on z/OS
Chapter 4. Customizing the subsystem for Oracle
61
62
Experiences Installing Oracle Database 10g on z/OS
If there is no error message about available USS space, proceed by clicking Next. It does not check for the space available for PDS files. The installation process proceeded, and after a few minutes we received the end of installation panel.
Chapter 4. Customizing the subsystem for Oracle
63
This installation took about 5 minutes. Check for error messages in your telnet window and in the log file. We checked the members in PARMLIB to ensure that they were pointing to our IBM1.V10G and IBM1.DBF files. Our entries are shown in Members in PARMLIB. We checked the members in INSTLIB. The define job has a series of question marks (???????) for the volume information. We needed to add our 3390 name before it could be submitted. This is described in Chapter 5, “Creating the Oracle Database” on page 69. We were now ready to run the jobs in INSTLIB to create the database. We describe these steps in Chapter 5, “Creating the Oracle Database” on page 69.
4.4 Members in PARMLIB After receiving the window that we had successfully completed the installation, these were the members in IBM1.V10G.PARMLIB: create
64
Experiences Installing Oracle Database 10g on z/OS
initora oraenv1 fna fps orss orassparm sqlnet subsys tnsnames
Some of the key members are shown here in detail: Example 4-1 Create member of PARMLIB
STARTUP PFILE='IBM1.V10G.PARMLIB(INITORA)' NOMOUNT CREATE DATABASE ORA1 MAXDATAFILES 255 MAXLOGFILES 255 CONTROLFILE REUSE LOGFILE 'IBM1.LOG1' REUSE, 'IBM1.LOG2' REUSE DATAFILE 'IBM1.SYSTEM.DB1' REUSE, 'IBM1.SYSTEM.DB2' REUSE SYSAUX DATAFILE 'IBM1.SYSAUX.DB1' REUSE UNDO TABLESPACE "UNDOTBS" DATAFILE 'IBM1.SYSTEM.UNDO.DB1', 'IBM1.SYSTEM.UNDO.DB2' DEFAULT TABLESPACE USERS DATAFILE 'IBM1.USER.DB1', 'IBM1.USER.DB2' DEFAULT TEMPORARY TABLESPACE "TEMP" TEMPFILE 'IBM1.TEMP.DB1' CHARACTER SET "WE8EBCDIC1047"; Example 4-2 Initora member of PARMLIB
CONTROL_FILES = 'IBM1.DBF.CONTROL1' CONTROL_FILES = 'IBM1.DBF.CONTROL2' SHARED_POOL_SIZE = 150M JAVA_POOL_SIZE = 80M DB_FILES = 256 DB_NAME = ORA1 PROCESSES = 500 LOG_BUFFER = 65536 LOG_CHECKPOINT_INTERVAL = 3000 OPEN_CURSORS = 120
Chapter 4. Customizing the subsystem for Oracle
65
DML_LOCKS = 220 UNDO_MANAGEMENT=AUTO UNDO_TABLESPACE=UNDOTBS Example 4-3 ORA1ENV member of PARMLIB
* ORA1ENV - File. Tailor for your environment NLS_LANG='AMERICAN_AMERICA.WE8EBCDIC1047' NLS_DATE_FORMAT='YYYY-MM-DD' ORACLE_HOME='/oracle/o10gtest' Example 4-4 ORSS member of PARMLIB
INIT (ORASSI,ORSS) DEF SVG SSID(ORSS) DESC('OSDI Oracle 10G Subsystem - ORSS') DEF SRV ORAS10 PROC(ORA1S10) TYPE(ORA) MAXAS(1) DESC('Oracle V10G RDBMS Service') SID(ORA1) PARM('IBM1.V10G.PARMLIB(ORSSPARM)') DEF SRV ORAN10 PROC(ORA1N10) TYPE(NET) DESC('Oracle V10G Net Service') SID(ORAN) PARM('HPNS PORT(1501) ENCLAVE(SESS)') SHOW SERVICEGROUP LONG START ORAS10 START ORAN10 Example 4-5 SUBSYSTEM member of PARMLIB
000001 SETSSI ADD,S=ORSS,I=ORASSINI,P='IBM1.V10G.PARMLIB(ORSS)' Example 4-6 TNSNAMES member of PARMLIB
ORA1= (DESCRIPTION= (ADDRESS= (PROTOCOL=XM) (SID=ORA1) ) ) ORA1_TCP= (DESCRIPTION= (ADDRESS= (PROTOCOL = TCP)
66
Experiences Installing Oracle Database 10g on z/OS
(HOST = mvs03.us.oracle.com) (PORT = 1501) ) (CONNECT_DATA=(SID=ORA1)) )
Chapter 4. Customizing the subsystem for Oracle
67
68
Experiences Installing Oracle Database 10g on z/OS
5
Chapter 5.
Creating the Oracle Database This chapter describes the steps we took using JCL to create an Oracle Database on z/OS, as follows: Run the COPYPROC job. Have the system administrator run the CPLNKLIST job. Run the DEFINE job. Enter the volume name in place of the ?????? in the JCL. Run the ORASRVC job to start the services. Run the SQLORA11 to SQLORA19 jobs to create the database.
© Copyright IBM Corp. 2004. All rights reserved.
69
5.1 Using the Oracle documentation For this chapter we used the following documents – Oracle Database System Administration Guide 10g Release 1 (10.1) for IBM z/OS, B13526-01 – Oracle Database Release Notes 10g Release 1 (10.1) for IBM z/OS, B13528-01
5.2 Running the jobs in INSTLIB Example 5-1 shows the members we had in IBM1.V10G.INSTLIB after running the OUI to install the Oracle libraries. To prepare the system, we ran the first two members. Example 5-1 Members in IBM1.V10G.INSTLIB COPYPROC CPLINKLST RECEIVE Example 5-2 shows the members we had in IBM1.ORA1.INSTLIB after running the OUI for the subsystem. We ran the first members to prepare the system. Example 5-2 Members of IBM1.ORA1.INSTLIB
DEFINE ORAC ORACOB ORADBV ORAEXD ORAEXP ORAIMD ORAIMP ORALDR ORAPWD ORARMN ORASQL ORATKP ORA1N10 ORA1S10 RUN@REXX SQLORA11 SQLORA12
70
Experiences Installing Oracle Database 10g on z/OS
SQLORA13 SQLORA14 SQLORA15 SQLORA16 SQLORA17 SQLORA18 SQLORA19 SQLPSHUT SQLPSTRT STRTSRVC Before beginning the creation of the database, review each of the members you will be executing to make sure that the HLQ and volume information are complete and are what you intended.
COPYPROC job The COPYPROC job copies the jobs to start and stop the address space to the system PROCLIB. This may need to be executed by the system programmer if you cannot write into the PROCLIB data set. These job names have to be in the RACF started task list. Example 5-3 shows the job in our INSTLIB. Example 5-3 COPYPROC
//ORACOPY JOB (0000,OR),'COPY PROCS',CLASS=A, // MSGCLASS=X,PRTY=15,MSGLEVEL=(1,1),NOTIFY=&SYSUID,REGION=0M //*----------------------------------------------------------------* //* Copyright (c) 2004 Oracle. All rights reserved. * //*----------------------------------------------------------------* //* * //* JOB DESCRIPTION: Copy the oracle subsystem procs to a system * //* proclib. You need to tailor it first. * //* * //*----------------------------------------------------------------* //* //COPYPROC EXEC PGM=IEBCOPY //SYSPRINT DD SYSOUT=* ORACLE PROCEDURE LIBRARY COPY. //SYSUT3 DD UNIT=SYSDA, // SPACE=(CYL,(2,2)) //ORAINDD DD DISP=SHR,DSN=IBM1.V10G.INSTLIB //ORAOUTDD DD DISP=SHR,DSN=SYS3.PROCLIB //SYSIN DD * COPY INDD=((ORAINDD,R)),OUTDD=ORAOUTDD SELECT MEMBER=(ORA1S10) SELECT MEMBER=(ORA1N10)
Chapter 5. Creating the Oracle Database
71
DEFINE job The DEFINE job allocates the VSAM files for the database. You have to specify the volumes you want to use. The job is generated with ?????? for the volume name. We put all the files on one volume, but you should at least put LOG2, CONTROL2, and UNDO2 on separate volumes. Example 5-4 Define clusters
//ORADEFIN JOB (0000,OR),'DEFINE INSTALL',CLASS=A, // MSGCLASS=X,PRTY=15,MSGLEVEL=(1,1),NOTIFY=&SYSUID //*----------------------------------------------------------------* //* COPYRIGHT (C) 2004 ORACLE. ALL RIGHTS RESERVED. * //*----------------------------------------------------------------* //* JOB DESCRIPTION: DELETE AND ALLOCATE THE ORACLE/MVS DATABASE,* //* CONTROL, AND REDO LOG VSAM CLUSTERS. * //*----------------------------------------------------------------* //* //STEPAMS1 EXEC PGM=IDCAMS //SYSPRINT DD SYSOUT=* //SYSIN DD * /*----------------------------------------------------*/ /* */ /* DEFINE THE DB (ORACLE DATA BASE) CLUSTERS. */ /* */ /*----------------------------------------------------*/ DEFINE CLUSTER ( LINEAR NAME(IBM1.SYSTEM.DB1) VOLUMES(SUP014) SHR(3 3) RECORDS(50000 10000) ) DEFINE CLUSTER ( LINEAR NAME(IBM1.SYSTEM.DB2) VOLUMES(SUP014) SHR(3 3) RECORDS(50000 10000) ) DEFINE CLUSTER ( LINEAR NAME(IBM1.SYSAUX.DB1) VOLUMES(SUP014) SHR(3 3) RECORDS(50000 5000) )
72
Experiences Installing Oracle Database 10g on z/OS
/*-------------------------------------------------------*/ /* */ /* DEFINE CONTROL SEGMENT CLUSTERS */ /* */ /*-------------------------------------------------------*/ DEFINE CLUSTER ( LINEAR NAME(IBM1.CONTROL1) VOLUMES(SUP014) SHR(3 3) RECORDS(5000 500) ) DEFINE CLUSTER ( LINEAR NAME(IBM1.CONTROL2) VOLUMES(SUP014) SHR(3 3) RECORDS(5000 500) ) /*-------------------------------------------------------*/ /* */ /* DEFINE REDO LOG SEGMENT CLUSTERS */ /* */ /*-------------------------------------------------------*/ DEFINE CLUSTER ( LINEAR NAME(IBM1.LOG1) VOLUMES(SUP014) SHR(3 3) RECORDS(6000 0) ) DEFINE CLUSTER ( LINEAR NAME(IBM1.LOG2) VOLUMES(SUP014) SHR(3 3) RECORDS(6000 0) ) /*-------------------------------------------------------*/ /* */ /* DEFINE ROLLBACK SEGMENT CLUSTERS */ /* */ /*-------------------------------------------------------*/ DEFINE CLUSTER ( LINEAR -
Chapter 5. Creating the Oracle Database
73
NAME(IBM1.SYSTEM.UNDO.DB1) VOLUMES(SUP014) SHR(3 3) RECORDS(20000 5000) ) DEFINE CLUSTER ( LINEAR NAME(IBM1.SYSTEM.UNDO.DB2) VOLUMES(SUP014) SHR(3 3) RECORDS(20000 5000) ) /*----------------------------------------------------*/ /* */ /* DEFINE THE USER DATA FILE CLUSTERS. */ /* */ /*----------------------------------------------------*/ DEFINE CLUSTER ( LINEAR NAME(IBM1.USER.DB1) VOLUMES(SUP014) SHR(3 3) RECORDS(10000 10000) ) DEFINE CLUSTER ( LINEAR NAME(IBM1.USER.DB2) VOLUMES(SUP014) SHR(3 3) RECORDS(10000 10000) ) /*----------------------------------------------------*/ /* */ /* DEFINE THE TEMP DATA FILE CLUSTERS. */ /* */ /*----------------------------------------------------*/ DEFINE CLUSTER ( LINEAR NAME(IBM1.TEMP.DB1) VOLUMES(SUP014) SHR(3 3) RECORDS(10000 0) ) /*----------------------------------------------------*/ /* */
74
Experiences Installing Oracle Database 10g on z/OS
/* LIST THE CLUSTERS */ /* */ /*----------------------------------------------------*/ LISTC ENT(IBM1.SYSTEM.DB1) ALL LISTC ENT(IBM1.SYSTEM.DB2) ALL LISTC ENT(IBM1.SYSAUX.DB1) ALL LISTC ENT(IBM1.CONTROL1) ALL LISTC ENT(IBM1.CONTROL2) ALL LISTC ENT(IBM1.LOG1) ALL LISTC ENT(IBM1.LOG2) ALL LISTC ENT(IBM1.SYSTEM.UNDO.DB1) ALL LISTC ENT(IBM1.SYSTEM.UNDO.DB2) ALL LISTC ENT(IBM1.USER.DB1) ALL LISTC ENT(IBM1.USER.DB2) ALL LISTC ENT(IBM1.TEMP.DB1) ALL //*
CPLNKLST job You must put some of the members of AUTHLOAD in the system LINKLIST library. This job should be done by the system administrator. The JCL needs to be modified to the correct file names. The lowercase letters are there to prevent you from submitting the job without reviewing the JCL. Example 5-5 CPLNKLST member of INSTLIB
//ORACOPY JOB (0000,OR),'COPY PROCS',CLASS=A, // MSGCLASS=X,PRTY=15,MSGLEVEL=(1,1),NOTIFY=&SYSUID,REGION=0M //*----------------------------------------------------------------* //* Copyright (c) 2004 Oracle. All rights reserved. * //*----------------------------------------------------------------* //* * //* JOB DESCRIPTION: Copy the required modules to the system * //* linklist. You need to tailor it first. * //* * //*----------------------------------------------------------------* //* //CPLNK EXEC PGM=IEBCOPY //SYSPRINT DD SYSOUT=* //SYSUT3 DD UNIT=SYSDA, // SPACE=(TRK,(4,1)) //SYSUT4 DD UNIT=SYSDA, // SPACE=(TRK,(4,1)) //LINKLIST DD DISP=SHR,DSN=your.system.LINKLIST //AUTHLOAD DD DISP=SHR,DSN=oracle3.v10g.AUTHLOAD
Chapter 5. Creating the Oracle Database
75
//SYSIN DD * COPY INDD=((AUTHLOAD,R)),OUTDD=LINKLIST SELECT MEMBER=ORAASIN SELECT MEMBER=ORARSSRB SELECT MEMBER=ORASSI SELECT MEMBER=ORASSINI SELECT MEMBER=ORASSTRT /*
ORASRVC job Before running the create job as described in 5.3, “Creating the database by running the jobs” on page 77, you must make sure that the address space is started. Execute the job ORASRVC, as shown in Example 5-6. This runs the SETSSI command. If you make an error in this, you must IPL the system to execute it a second time. Example 5-6 Startsvc
//ORASRVC JOB 1,'AR10',CLASS=A,MSGCLASS=X,REGION=0M // SETSSI ADD,S=ORSS,I=ORASSINI,P='IBM1.V10G.PARMLIB(ORSS)' //*----------------------------------------------------------------* //* COPYRIGHT (C) 2004 ORACLE. ALL RIGHTS RESERVED. * //*----------------------------------------------------------------* //* * //* JOB DESCRIPTION: Define and start Oracle Subsystem * //* * //*----------------------------------------------------------------* //* //STRT EXEC PGM=IEFBR14 The STARTSVC job uses the PARMLIB entry that describes the services for the database instance, as shown in Example 5-7. Example 5-7 Parameter file of ORSS to start the services
INIT (ORASSI,ORSS) DEF SVG SSID(ORSS) DESC('OSDI Oracle 10G Subsystem - ORSS') DEF SRV ORAS10 PROC(ORA1S10) TYPE(ORA) MAXAS(1) DESC('Oracle V10G RDBMS Service') SID(ORA1) PARM('IBM1.V10G.PARMLIB(ORSSPARM)') DEF SRV ORAN10 PROC(ORA1N10) TYPE(NET) DESC('Oracle V10G Net Service') SID(ORAN) PARM('HPNS PORT(1501) ENCLAVE(SESS)')
76
Experiences Installing Oracle Database 10g on z/OS
SHOW SERVICEGROUP LONG START START
ORAS10 ORAN10
SQLORA11 job Once the services are started, you are ready to run the job to create the database. It is SQLsid1 in INSTLIB. Ours is shown in Example 5-8. This creates a database instance of ORA1. Example 5-8 SQLORA11 - Create database
//ORACREAT JOB (0000,OR),'ORACLE INSTALL 1',CLASS=A, // MSGCLASS=X,PRTY=15,MSGLEVEL=(1,1),NOTIFY=&SYSUID //*----------------------------------------------------------------* //* COPYRIGHT (C) 2004 ORACLE. ALL RIGHTS RESERVED. * //*----------------------------------------------------------------* //* * //* JOB DESCRIPTION: Create Oracle database * //* * //*----------------------------------------------------------------* //* //SQLPLUS EXEC PGM=SQLPLUS,PARM='/NOLOG',REGION=0M //STEPLIB DD DISP=SHR,DSN=IBM1.V10G.CMDLOAD //ORA$LIB DD DISP=SHR,DSN=IBM1.V10G.MESG //* REQUIRES //ORA@SID DD DUMMY STATEMENT (ORACLE INSTANCE). //ORA@ORA1 DD DUMMY //SQLBSQ DD DISP=SHR,DSN=IBM1.V10G.SQL(SQLBSQ) //ORA$ENV DD DISP=SHR,DSN=IBM1.V10G.PARMLIB(ORA1ENV) //SQLLOGIN DD DUMMY //SYSIN DD * SET ECHO ON CONNECT / as SYSDBA @'//IBM1.V10G.PARMLIB(INITORA)' /*
5.3 Creating the database by running the jobs Now that the system preparation was completed, we were ready to create the database and complete the installation by running the following jobs: SLQORA11 - Creates a new database.
Chapter 5. Creating the Oracle Database
77
Do not submit until you have initialized your subsystem by issuing the SETSSI command as shown in Example 5-6. The output of the job goes to the ORA1.ALERT or SYSOUT file. Note: All the jobnames are the same for each of these jobs. You may want to edit the members to change the jobname before submitting for execution. We changed them to ORACREA1, ORACREA2, and so on. SQLORA12 - Runs catalog and catproc. This job takes some time to complete. SQLORA13 - Initializes Java VM. SQLORA14 - Loads SQL*Plus help data. SQLORA15 - Creates a sample table under Scott schema. SQLORA16 - Installs the interMedia text feature. This job did not complete successfully. We had to manually allocate the tablespace. SQLORA17 - Installs the Spatial data feature. SQLORA18 - Turns on database archiving. SQLORA19 - Changes the database passwords. Note: Be sure to check the output of these jobs. They will end with a condition code of zero, but that is the code from the Oracle commands. You must check the log listings to see the results of the Oracle statements. Since the listings are long, you could search for the strings rror and arning, which will find all instances of error, Error, warning and Warning and avoid having to search with lowercase and uppercase.
5.4 Review of files and jobs We listed the files we had at the completion of the database creation job and listed several of the jobs that will be helpful in managing the database.
5.4.1 Files at the completion of the database creation Example 5-9 PDS files after the installation and creation of our database.
IBM1 IBM1.ORA1.CONTROL1 IBM1.ORA1.CONTROL1.DATA IBM1.ORA1.CONTROL2 IBM1.ORA1.CONTROL2.DATA
78
Experiences Installing Oracle Database 10g on z/OS
IBM1.ORA1.LOG1 IBM1.ORA1.LOG1.DATA IBM1.ORA1.LOG2 IBM1.ORA1.LOG2.DATA IBM1.ORA1.ORACLE.CONTROL1 IBM1.ORA1.ORACLE.CONTROL1.DATA IBM1.ORA1.ORACLE.CONTROL2 IBM1.ORA1.ORACLE.CONTROL2.DATA IBM1.ORA1.SYSAUX.DB1 IBM1.ORA1.SYSAUX.DB1.DATA IBM1.ORA1.SYSTEM.DB1 IBM1.ORA1.SYSTEM.DB1.DATA IBM1.ORA1.SYSTEM.DB2 IBM1.ORA1.SYSTEM.DB2.DATA IBM1.ORA1.SYSTEM.UNDO.DB1 IBM1.ORA1.SYSTEM.UNDO.DB1.DATA IBM1.ORA1.SYSTEM.UNDO.DB2 IBM1.ORA1.SYSTEM.UNDO.DB2.DATA IBM1.ORA1.TEMP.DB1 IBM1.ORA1.TEMP.DB1.DATA IBM1.ORA1.USER.DB1 IBM1.ORA1.USER.DB1.DATA IBM1.ORA1.USER.DB2 IBM1.ORA1.USER.DB2.DATA IBM1.V10G.AUTHLOAD IBM1.V10G.CMDLOAD IBM1.V10G.H IBM1.V10G.INSTLIB IBM1.V10G.MACLIB IBM1.V10G.MESG IBM1.V10G.OBJLIB IBM1.V10G.PARMLIB IBM1.V10G.SQL IBM1.V10G.SQLLIB IBM1.V10G.SRCLIB IBM1.ORA1.INSTLIB IBM1.ORA1.PARMLIB Your database creation is complete. To connect to the database using SQLPlus on OMVS, run the ENV command to set up your variables. This is described in Chapter 6, “Connecting to the Oracle Database with SQLPlus” on page 83.
Chapter 5. Creating the Oracle Database
79
5.4.2 Jobs to start and stop the database The sample jobs to help us manage our database were in IBM1.ORA1.INSTLIB. Example 5-10 To start the database
//ORASTRT JOB (0000,OR),'START DATABASE',CLASS=A, // MSGCLASS=X,PRTY=15,MSGLEVEL=(1,1),NOTIFY=&SYSUID,REGION=0M //*----------------------------------------------------------------* //* COPYRIGHT (C) 2004 ORACLE. ALL RIGHTS RESERVED. * //*----------------------------------------------------------------* //* * //* JOB DESCRIPTION: Start Oracle Database * //* * //*----------------------------------------------------------------* //* //SQLPLUS EXEC PGM=SQLPLUS,PARM='/NOLOG',REGION=0M //STEPLIB DD DISP=SHR,DSN=IBM1.V10G.CMDLOAD //ORA$LIB DD DISP=SHR,DSN=IBM1.V10G.MESG //SQL DD DISP=SHR,DSN=IBM1.V10G.SQL //* REQUIRES //ORA@SID DD DUMMY STATEMENT (ORACLE INSTANCE). //ORA@ORA1 DD DUMMY //ORA$FNA DD DISP=SHR,DSN=IBM1.V10G.PARMLIB(ORA1FNA) //ORA$ENV DD DISP=SHR,DSN=IBM1.V10G.PARMLIB(ORA1ENV) //SQLLOGIN DD DUMMY //SYSIN DD * SET ECHO ON CONNECT / as SYSDBA STARTUP PFILE='IBM1.V10G.PARMLIB(INITORA)' NOMOUNT alter database mount; alter database open; col parameter format a30 col value format a30 col description format a30 col num format 09999 col name format a35 col type format 9999 col update_comment format a30 col file_name format a30 col tablespace_name format a15 select * from v$version; select * from v$option; select * from v$parameter; /*
80
Experiences Installing Oracle Database 10g on z/OS
Example 5-11 To shut down the database
//ORASHUT JOB (0000,OR),'SHUTDOWN DATABASE',CLASS=A, // MSGCLASS=X,PRTY=15,MSGLEVEL=(1,1),NOTIFY=&SYSUID //*----------------------------------------------------------------* //* COPYRIGHT (C) 2004 ORACLE. ALL RIGHTS RESERVED. * //*----------------------------------------------------------------* //* * //* JOB DESCRIPTION: Shutdown Oracle database * //* * //*----------------------------------------------------------------* //* //SQLPLUS EXEC PGM=SQLPLUS,PARM='/NOLOG',REGION=0M //STEPLIB DD DISP=SHR,DSN=IBM1.V10G.CMDLOAD //ORA$LIB DD DISP=SHR,DSN=IBM1.V10G.MESG //SQL DD DISP=SHR,DSN=IBM1.V10G.SQL //* REQUIRES //ORA@SID DD DUMMY STATEMENT (ORACLE INSTANCE). //ORA@ORA1 DD DUMMY //ORA$FNA DD DISP=SHR,DSN=IBM1.V10G.PARMLIB(ORA1FNA) //ORA$ENV DD DISP=SHR,DSN=IBM1.V10G.PARMLIB(ORA1ENV) //SQLLOGIN DD DUMMY //SYSIN DD * SET ECHO ON CONNECT / as SYSDBA shutdown immediate; /* //*
5.4.3 Commands to start and stop the database service After we verified that the SETSSI had been successful, we then used the commands shown in Example 5-12 to start and stop the database and net services. Example 5-12 Commands to start services
/ORSS start ORAN10 /ORSS start ORAS10
/ORSS stop ORAS10 /ORSS stop ORAN10
Chapter 5. Creating the Oracle Database
81
The slash (/) is shown because we issued the command under SDSF. ORSS is the service group name. The jobs to start the address spaces are ORA1N10 and ORA1S10. These names must be RACF started tasks. To verify that the address spaces are running, you can go to SDSF, then enter: ===> PRE ORSS* ===> DA This will list the address spaces that are active.
82
Experiences Installing Oracle Database 10g on z/OS
6
Chapter 6.
Connecting to the Oracle Database with SQLPlus This chapter describes how we customized the files needed to give access to the database using SQLPlus from USS, TSO, and a remote system.
© Copyright IBM Corp. 2004. All rights reserved.
83
6.1 Connecting from USS (OMVS) or a telnet session On our telnet session to OMVS, we executed the following to connect to the database: Logged on to OMVS. Executed the ENV script in ORACLE_HOME (. ENV). This set our ORACLE_HOME and PATH variables. Set ORACLE_SID with the command: export ORACLE_SID=ORA1 Connected using the sqlplus command. Logged on to the database with System/ manager. We received the following message: Connected to: Oracle Database 10g Enterprise Edition Release 10.1.0.2.21 Production With the Partitioning, Oracle Label Security and Data Mining options If we did not set ORACLE_SID, we received the message: ERROR: ORA-06413: Connection not open.
6.2 Connecting with a TSO client We set up our system to access the database using SQL*Plus from the TSO command line by following these steps: We issued two ALLOC commands on the TSO command line: ALLOC F(ORA$LIB) DA('IBM1.V10G.MESG') SHR ALLOC F(ORA@ORA1) DUMMY To connect to the database, we issued this command: call 'ibm1.v10g.cmdload(sqlplus)' Copyright (c) 1982, 2004, Oracle. All rights reserved. Enter user-name: scott Enter password:
84
Experiences Installing Oracle Database 10g on z/OS
Connected to: Oracle Database 10g Enterprise Edition Release 10.1.0.2.21 Production With the Partitioning, Oracle Label Security and Data Mining options SQL> When we logged off, we had to issue the FREE commands: FREE F(ORA$LIB) FREE F(ORA@ORA1) We checked the TNSNAMES member in IBM1.V10G PARMLIB that was created by the Oracle Universal Installer, as shown in Example 6-1. Example 6-1 Checking the TNSNAMES member
ORA1= (DESCRIPTION= (ADDRESS= (PROTOCOL=XM) (SID=ORA1) ) ) ORA1_TCP= (DESCRIPTION= (ADDRESS= (PROTOCOL = TCP) (HOST = wtsc04.itso.ibm.com) (PORT = 1501) ) (CONNECT_DATA=(SID=ORA1)) )
6.3 Connecting a remote client to the database To connect to a database on z/OS from a remote machine, do the following: Update tnsnames.ora on your remote machine. Insure that Net Service is running on the database server on z/OS. Connect to the database. We used SQL*Plus. Also, make sure that you have TCP/IP connectivity between the machines.
Chapter 6. Connecting to the Oracle Database with SQLPlus
85
From a laptop that had Oracle client code installed, we executed the following. On the remote client we updated the tnsnames.ora file in ORACLE_HOME/network/admin: ITSO_10G = (DESCRIPTION = (ADDRESS_LIST = (ADDRESS = (PROTOCOL = TCP)(HOST = MVS03)(PORT = 1501)) ) (CONNECT_DATA = (SID = ORA1)(SERVER = DEDICATED)) ) On the database system, we made sure that Net Service was running through SDSF. Then we connected to the database by clicking the SQL*Plus ICON on the remote client and entering the user ID, password and host string (ITSO_10G) in the SQL*Plus dialogue box. To run SQL*Plus from the command line on another system such as Linux or AIX® tp Oracle Database 10g on z/OS, the steps would be similar: – Insure that the client code is installed on the machine. – Add the entry to tnsnames.ora to identify the location of the database. – Enter the following command: sqlplus userid/password@host string
86
Experiences Installing Oracle Database 10g on z/OS
7
Chapter 7.
Managing Oracle workload with z/OS Workload Manager The Workload Manager (WLM) is a z/OS facility that allows installations to effectively manage their Oracle (as well as non-Oracle) workloads based on business priorities. Goals can be defined that reflect business priorities. The system automatically manages the amount of resources, such as CPU and storage, that is required for a given workload to achieve its goal. Like other WLM-managed workloads, Oracle workloads should be assigned to appropriate service classes based on attributes such as subsystem name, service name, user name, and transaction name. Service class structure and importance are determined by the business needs of an installation. Workloads should also be classified into report classes to facilitate monitoring and validation of an installation's workload management policies. This chapter contains the following: A short introduction to the z/OS WLM, including a definition of the various terms used. A discussion of the use of WLM to manage various Oracle address spaces, with examples of the WLM definitions used to define the WLM constructs. The address spaces are: – The Oracle Server address spaces
© Copyright IBM Corp. 2004. All rights reserved.
87
– The NET address space and the enclaves created for each client request – Batch jobs using an Oracle Database – CICS or IMS™ regions connecting to an Oracle Database – TSO users connected to an Oracle Database A discussion of the MVS enclave, which is used to manage the work for clients connecting through.
88
Experiences Installing Oracle Database 10g on z/OS
7.1 Introduction to z/OS Workload Manager This section gives a brief description of the z/OS Workload Manager (WLM), and how to use the WLM to manage Oracle Database 10g workloads.
7.2 WLM vocabulary Here we introduce some of the terms used by WLM that you will need to understand in the discussion of Oracle workloads. For a more detailed description of these terms, see MVS Planning: Workload Management, SA22-7602.
7.2.1 Service class Each item of work in a z/OS 1.4 or later system is classified into a service class. A “Work Manager” calls WLM to classify a work request using various attributes of the work item. Examples of Work Managers are JES2, which classifies all the batch jobs and started tasks in the system; CICS Transaction Server (CICS/TS), which classifies CICS transactions; WebSphere®, which classifies Web requests; and Oracle 10g, which classifies any transaction coming in through Oracle NET. The classification rules are specified in the WLM policy. The workload definition is built by the z/OS systems programmer, and contains the WLM policy. See 7.7, “Implementation of the WLM policy” on page 96 for examples of using the WLM dialogs to build a workload definition.
7.2.2 Goals The service class that the work is assigned to is broken into a number of periods, based on the resources that the transaction consumes. Short transactions end in the first period, while longer work may migrate to a second or subsequent period. Each service class period has two major attributes: the goal and the importance. The importance ranges from Importance 1 (high importance) to 5 (low importance) as well as discretionary, which has no importance, and can only get resource that is not needed elsewhere. The performance goal of the service class period can be a response time, or a percentile response goal, or a velocity goal.
Chapter 7. Managing Oracle workload with z/OS Workload Manager
89
7.2.3 Velocity goals These are goals for long-running, non-response oriented work. The velocity is calculated by sampling the work at regular intervals, and performing the calculation shown in Example 7-1. Example 7-1 Velocity calculation
Velocity = Using samples ÷ ( Using + Delay samples ) × 100 The velocity includes storage delay for both paging and waiting for work to be swapped in. Delay time also includes CPU delay, which is time waiting to be dispatched because higher priority work has access to the CPU. Delay time in this calculation can also include I/O delay, waiting for disk or tape operations to complete.
7.2.4 Response goals These are goals for interactive, response oriented work. The goal can be average response time, such as “all transactions should complete with an average response of .2 seconds”. An example of a percentile goal is “95% of transactions should complete with a response of less than .5 seconds”.
7.2.5 CPU service unit WLM defines a measure of computer usage called a service unit to make the WLM policy independent of processor speed. The service unit includes a measure of both CPU and I/O resource consumed. The CPU service unit is specified as a number of service units per CPU second and is a constant associated with the speed of the CPU model. For example, a 9672-R56 delivers 5158 SU per CPU second, a 2066-002 delivers 8588.3, while a 2084-301 delivers 21858. Faster machines deliver more service units per CPU second. The duration of each performance period is specified in service units, so that work running on a faster CPU automatically moves to the next period sooner than the same work on a slow CPU.
7.2.6 Service class period After consuming a number of service units, the service class migrates to another period, with a different goal and importance. This allows longer work to be treated at lower importance than new work. Only short transactions are treated at a high importance—if they consume enough CPU resource, they migrate to the next period of the service class and are controlled with a new lower importance.
90
Experiences Installing Oracle Database 10g on z/OS
7.2.7 Resource group A resource group is a WLM construct that allows an installation to define a maximum or minimum service rate for a set of service classes. The resource group minimum or maximum is specified in CPU service units. A maximum service rate can be used as a “cap” on resource usage for certain kinds of work. Work will be delayed if it attempts to consume CPU resources at a rate higher than the cap. A resource group can also be very effective as a minimum rate. An example of this could be defining a service class with a discretionary goal, but putting the service class in a resource group guaranteed a minimum number of service units corresponding to 5% of system capacity. Using this example, the work in this service class is run at a very low priority, but it is guaranteed not to be shut out completely.
7.3 Classifying the Oracle server address spaces The address spaces for Oracle NET and for the database service are started tasks and are classified under the STC subsystem. You must have a classification rule under subsys STC that assigns these address spaces a service class. See Figure 7-10 on page 106 for an example of the classification of the Oracle started tasks.
7.4 Classifying local clients The Oracle Database can be called from many different programs. Each of these requestors must be classified by WLM, so that the work they do will be managed according to the policy specified by the installation.
7.4.1 TSO Work done in Oracle requested by a TSO user is performed at the priority of the TSO user. Having a TSO service class that treats short transactions at high importance and lowers the importance as the transaction proves to require more resource is probably all that you require for TSO users that use Oracle. If you have a set of TSO users that use a lot of very long Oracle transactions, then perhaps you should consider classifying the users in a unique service class with an additional last period with a discretionary goal.
Chapter 7. Managing Oracle workload with z/OS Workload Manager
91
7.4.2 CICS and IMS Work done in Oracle by a CICS or IMS transaction is performed at the priority of the Database Thread in CICS or IMS, that is, at the priority of the CICS or IMS transaction. CICS and IMS workloads can be managed using service classes and can be classified using attributes such as user ID, transaction name, luname, and subsystem instance name. We recommend that you use a response time goal for CICS and IMS transactions.
7.4.3 Batch Work done in Oracle by a batch job is performed at the priority of the batch job. Oracle batch jobs do not normally need to be classified differently than other batch jobs. However, if required, Oracle batch jobs can be distinguished from other batch jobs by establishing separate service classes, as described for the TSO environment. When Oracle batch jobs are run under a certain service class, consider their priority relative to other Oracle and non-Oracle workloads. In a normal to heavily loaded system, if Oracle batch jobs run at a lower priority than others, the Oracle jobs might be swapped out for lengthy periods. If an Oracle job is swapped out while holding a critical latch, it may adversely impact the performance of other Oracle users. Specifying a resource group with a minimum service rate can be used to protect the Oracle Database from this phenomenon.
7.4.4 NET clients Key to Oracle Database 10g for NET clients is the concept of the enclave. With the old MPM release of Oracle, all Oracle work, from whatever source, was performed at the priority of the Oracle server address space. In OSDI releases, before the ENCLAVE(CALL) option was available, work from batch, TSO, or CICS was managed by the MVS WLM in a service class associated with the batch job, TSO user, or CICS address space but all client server work coming through Oracle NET was run at the priority of Oracle NET. With the OSDI implementation that is standard with Oracle Database 10g, Oracle NET supports the use of MVS enclaves, so that work items from different sources can be distinguished from each other, and run according to the business value of the work. The next section discusses MVS enclaves, and shows the panels used to build a WLM policy for an Oracle Database 10g.
92
Experiences Installing Oracle Database 10g on z/OS
Note that Language Environment/370 (LE) also uses the word “enclave” to describe the runtime environment of a running program. In this book we only use the word enclave in the WLM context, and do not refer to LE enclaves.
7.5 Enclaves An enclave is a transaction that can span multiple dispatchable units (SRBs and tasks) in one or more address spaces, and that is reported on and managed as a unit. The enclave is managed separately from the address spaces it runs in. CPU and I/O resources associated with processing the transaction are managed by the transaction's performance goal, accounted to the transaction, and reported to the transaction. Before MVS/ESA™ 5.2.0, the only recipient of resource consumption and priorities was at the address space level. The address space can be swapped in or swapped out, it can be given more or less processor storage, and its priority can be adjusted to control the CPU resources given to the associated dispatchable units (that is, SRBs and TCBs). This approach is effective for traditional workloads such as TSO and batch. The performance management difficulties that the Oracle client/server workloads posed to z/OS were that z/OS MVS did not provide an anchor for a transaction other than an address space. All client requests came through the TNS address space and were managed under the priority for that address space. To handle this problem, a new kind of dispatchable unit was introduced in MVS/ESA 5.2.0: the preemptible-class SRB. Together with the new SRB, a new z/OS construct called an enclave was introduced. Prior to the Oracle 8i OSDI option, which used these new MVS facilities, Oracle provided no ability to prioritize among requests according to their business value, since the requests are not reported as transactions to MVS. All requests are managed as part of the Oracle NET address space. This means that the WLM controls for Oracle NET must be set so that the processing requirements of the requests most valuable to the business are satisfied. Any other requests that flow through the Oracle NET address space also get this favorable treatment, even if they are not as important to the business. The OSDI option in Oracle 8i and 9i is now a standard feature of Oracle Database 10g. Oracle has improved the ability of the MVS system to manage Oracle client/server workloads by enabling WLM to manage the individual users’ transactions within the DB server address space. WLM differentiates among dispatchable units associated with different business units of work, providing an
Chapter 7. Managing Oracle workload with z/OS Workload Manager
93
additional level of manageability and control by using the existing WLM view of goals for work.
7.6 Enclave resource accounting A dependent enclave is a logical continuation of the transaction already active in a client's address space. Therefore, CPU and MSO service for a dependent enclave is included in the SMF 30 record of the owning address space, and in the SMF 72 record for the address space's transaction. MSO service for the enclave is calculated based on the frame count of the owning address space, not on frame usage in the address space (or spaces) where the enclave is executing. For an independent enclave, CPU service is included in the SMF 30 record of the owning address space, and in the SMF 72 record for the enclave's service class or performance group period. MSO service is not calculated for an independent enclave. For both dependent and independent enclaves, IOC service is included in the SMF 30 and 72 records associated with the address space where the enclave work is executing. SRB service for enclaves is always zero. In Oracle Database 10g, Oracle NET will allocate an independent enclave for each user logging in to the database. Figure 7-1 on page 95 shows how TNS (Oracle NET) transactions are now managed. A logon request arrives from the network into the TNS address space. Then: 1. Oracle NET creates an independent enclave. 2. Oracle NET calls the WLM classify service. If there is an active policy with classification rules for Oracle 10g, WLM associates the enclave with a service class. 3. Oracle NET schedules the SRB into the enclave. 4. When the MVS dispatcher finds the enclave SRB, it is dispatched at the priority associated with the enclave, independent of the priority of the Oracle NET address space. 5. The SQL code in the application uses a Program Call (PC) instruction to execute the required code in the server address space, while still getting all the CPU accounting charged to the enclave.
94
Experiences Installing Oracle Database 10g on z/OS
NET A/S
Oracle Server A/S
Oracle Database
Network Task Enclave 1 SRB PC to run query Rows returned Enclave 2 Ind. SRB Enc 2
NET SMF 30 CPU
Ind. Enc 1
Enclave SMF 72 CPU time
NET SMF 72 CPU time
Figure 7-1 Managing network requests in Oracle 10g
For Oracle 10g, the NET startup option ENCLAVE(SESS | CALL) determines when the enclave is classified. The NET startup option ENCLAVE (CALL | SESS) controls how the database request from the client is handled. With ENCLAVE(SESS) specified in the PARM value used at NET startup, classification of the work is done once when a new remote connection is made. Oracle NET presents WLM with attributes for workload classification. Some of the network-specific attributes that can be used for classification include protocol, host name, or IP address. These attributes are summarized in Table 7-1 on page 97. The enclave will be deleted at session termination (logoff) time. Because the classification happens only once per session, only velocity goals are appropriate for the enclave’s service class. If ENCLAVE(CALL) is specified in the PARM value used at NET startup, then the enclave is deleted when the request from the client is finished (when NET needs more data from the client). Deleting the enclave reports the transaction completion to WLM, providing response time and transaction counts to any workload monitors such as RMF. The next request arriving from the client will be classified into a new enclave. Because the classification is done for each network request, response time goals should be used for the enclave’s service class.
Chapter 7. Managing Oracle workload with z/OS Workload Manager
95
7.7 Implementation of the WLM policy See MVS Planning: Workload Management, SA22-7602 for information on the rules for defining a WLM policy. This section discusses the creation of a policy to control the workload in an Oracle Oracle 10g system.
7.7.1 The system under test
Oracle Applications Suite E-Business Internet Architecture Oracle Application Server z/Series Database Server
Communications TCPIP Oracle Net
Oracle Developer Server
Business Logic Stored Procedures Triggers
Support Server Concurrent Managers Reports Engine
Figure 7-2 System under test: Logical design
In this exercise we tested the Oracle Applications Suite. In this environment the users at the PC workstations use a Web browser, such as Netscape or Internet Explorer, to access applications running on an Oracle application server. This server provides a Web interface to the browser on each user’s client workstation, and accesses the database through the database server running on z/OS. Much of the Oracle Application Suite is implemented as Oracle stored procedures, which execute in the database server. When parts of this application want to perform some operations that are not required instantly, they insert requests into a table that acts as a queue of off-line requests. This queue is processed by a server that runs the Oracle Concurrent
96
Experiences Installing Oracle Database 10g on z/OS
Manager. This server retrieves queued requests from the database and processes them by executing the proper application logic, calling the database server for any database requests. One of the major advantages of this release of Oracle is that it provides a way to distinguish database requests from the users running their database requests on the application server from the lower priority requests from the concurrent manager.
Classification Oracle NET connects to WLM at initialization as a new subsystem identified as OSDI. The user logon requests are classified under this subsystem. Table 7-1 lists the information passed to WLM that can be used to classify the work request and assign a service class. Table 7-1 Classification attributes for subsystem OSDI Attribute
Value
SI
Oracle 10g subsystem name
UI
User ID from the client. For Oracle Applications this is the UID of the user running the application server on the middle-tier processor.
NET
First eight characters of dotted IP address (example, 100.024).
LU
Last eight characters of dotted IP address. Note that the IP address requires that leading zeros be specified.
CT
Protocol from connect, TCP.
SPM
Position 1 to 8. Oracle Service Name for this connection. The service name is defined in the parameters used to initialize the OSDI subsystem. A database service name identifies the specific Oracle Database.
SPM
Position 9 to 89. TCP/IP hostname (left justified).
A Workload Manger policy is defined using an ISPF dialog. Although each installation is different, the default method of invoking the dialog is to execute the TSO command: EXEC 'SYS1.SBLSCLI0(IWMARIN0)' See MVS Planning: Workload Management, SA22-7602, for further details. The following examples show some of the screen dialogs presented by the WLM application as we defined the policy used in this benchmark.
Chapter 7. Managing Oracle workload with z/OS Workload Manager
97
Figure 7-3 shows the main selection panel for the dialog.
File Utilities Notes Options Help -----------------------------------------------------------------------Functionality LEVEL003 Definition Menu WLM Appl LEVEL013 Command ===> ____________________________________________________________ Definition data set . . : 'RUSSELL.OLYMPIA.OSDI.POLICY' Definition name . . . . . WLMOSDI (Required) Description . . . . . . . WLM Policy for Oracle 10g Select one of the following options. . . . . _2_ 1. Policies 2. Workloads 3. Resource Groups 4. Service Classes 5. Classification Groups 6. Classification Rules 7. Report Classes 8. Service Coefficients/Options 9. Application Environments 10. Scheduling Environments Figure 7-3 WLM application service definition panel
To the WLM, a workload is a construct used only for reporting. Resources used by various service classes can be grouped together into workloads through the WLM application. Entering a 2 on the main menu takes you to the workload definition panel. We defined a workload called ORACLE, which contains all the service classes used to run the application. You can assign these service classes to workloads in any way you like.
98
Experiences Installing Oracle Database 10g on z/OS
Workload View Notes Options Help ----------------------------------------------------------------------Workload Selection List Row 1 to 5 of 5 Command ===> ___________________________________________________________ Action Codes: 1=Create, 2=Copy, 3=Modify, 4=Browse, 5=Print, 6=Delete, /=Menu Bar ----Last Change----Action Name Description User Date __ JES Batch Jobs RUSSELL 2000/06/16 __ OMVS USS Workload RUSSELL 2000/06/16 __ ORACLE ORACLE 10g Workload RUSSELL 2004/03/17 __ STC STC workload RUSSELL 2000/06/16 __ TSO TSO workload RUSSELL 2000/06/16 ****************************** Bottom of data ************************** Figure 7-4 Definition of workloads
Typing a 4 on the main WLM panel takes you to the Service Class definition panel. On this panel we defined four service classes for Oracle work, and assigned them all to the same workload. The service class ORACLE will be assigned by a classification rule to the address spaces that run any Oracle functions. The service classes ORAMT1, ORAMT2, and ORAMT3 will be assigned to the work running in the enclaves built by Oracle NET.
Chapter 7. Managing Oracle workload with z/OS Workload Manager
99
Service-Class View Notes Options Help --------------------------------------------------------------------------Service Class Selection List Row 1 to 15 of 15 Command ===> ___________________________________________________________________ Action Codes: 1=Create, 2=Copy, 3=Modify, 4=Browse, 5=Print, 6=Delete, /=Menu Bar
Action __ __ __ __ 3_ __ __
Class BATHI BATLO BATMED ORACLE ORAMT1 ORAMT2 ORAMT3
Description Batch High Priority Batch Low Priority Batch Medium Default Oracle Oracle Mid Tier #1 Oracle Mid Tier #2 Oracle Mid Tier #3
Figure 7-5 Oracle service classes
100
Experiences Installing Oracle Database 10g on z/OS
Workload JES JES JES ORACLE ORACLE ORACLE ORACLE
Service-Class Notes Options Help ------------------------------------------------------------------------Create a Service Class Row 1 to 4 of 4 Command ===> ______________________________________________________________ Service Class Name . . . . . . ORAMT1 (Required) Description . . . . . . . . . Oracle Mid Tier #1 Workload Name . . . . . . . . ORACLE (name or ?) Base Resource Group . . . . . ________ (name or ?) Cpu Critical . . . . . . . . . NO (YES or NO) Specify BASE GOAL information. Action Codes: I=Insert new period, E=Edit period, D=Delete period. ---Period--- ---------------------Goal--------------------Action # Duration Imp. Description __ __ 1 100 1 Average response time of 00:00:00.015 __ 2 1000 3 Average response time of 00:00:01.000 __ 3 5 Execution velocity of 10 ***************************** Bottom of data ******************************* Figure 7-6 ORAMT1 service class
We used the ENCLAVE(CALL) option, so each terminal interaction is run in a separate enclave. The service class must have a goal that is appropriate for a short terminal interaction, and so we assign a multiple-period, response time goal. General interactive traffic on our benchmark came from two different application servers. For this interactive traffic, arriving from Mid-tier number one and Mid-tier number 3, we assigned an Importance 1 (the highest level) and a very small response time goal for the first period. This ensures that WLM will treat short transactions from these application servers with as high a priority as possible. If the transaction is still running after 100 service units have been consumed, WLM moves the transaction to the second period and lowers its importance to 3. Really long transactions are dropped to Importance 5, and run with a low velocity goal. This service class setup ensures that short transactions are treated at high priority and longer-running transactions are run with an appropriate priority. This goal is given to the service classes ORAMT1 and ORAMT3.
Chapter 7. Managing Oracle workload with z/OS Workload Manager
101
Service-Class Xref Notes Options Help ------------------------------------------------------------------------Modify a Service Class Row 1 to 2 of 2 Command ===> ______________________________________________________________ Service Class Name . . . . . : ORAMT2 Description . . . . . . . . . Oracle Mid Tier #2 Workload Name . . . . . . . . ORACLE (name or ?) Base Resource Group . . . . . ________ (name or ?) Specify BASE GOAL information. Action Codes: I=Insert new period, E=Edit period, D=Delete period. ---Period-----------------------Goal--------------------Action # Duration Imp. Description __ __ 1 Discretionary **************************** Bottom of data ******************************* Figure 7-7 ORAMT2 service class
For our benchmark, we configured the driver software so that the concurrent manager requests for data were isolated to a specific mid-tier processor. Within the Oracle Application Suite, this function is lower priority than the interactive work. Interactive users place batch requests, such as requesting that a report be printed, in a concurrent manager queue database. The concurrent manager periodically queries this queue and processes the requests that have been queued there. This is a non-critical, batch function, so we assigned the service class ORAMT2, which was assigned to all work from Mid-tier processor number 2, a discretionary goal. This ensures that this workload is the lowest priority workload in the MVS system, and never competes for resources with the interactive workload.
102
Experiences Installing Oracle Database 10g on z/OS
Subsystem-Type View Notes Options Help ------------------------------------------------------------------------Subsystem Type Selection List for Rules Row 1 to 5 of 5 Command ===> ______________________________________________________________ Action Codes: 1=Create, 2=Copy, 3=Modify, 4=Browse, 5=Print, 6=Delete, /=Menu Bar
------Class------Action Type Description Report __ JES Classify BATCH workload __ OMVS OMVS - USS 3_ OSDI ORACLE Subsytem __ STC Started Tasks __ TSO Classify TSO workload *************************** Bottom of data ********************************
Service BATMED USSMED ORACLE STCMED TSO
Figure 7-8 Classification rules panel
Typing a 6 on the main menu takes us to panels associated with the classification rules, which are organized under the various subsystems that own work and call WLM to classify this work. The JES subsystem rules define the rules for classifying batch jobs. Here we select the OSDI subsystem to add classification rules that will be used when Oracle NET classifies work arriving from the Oracle NET client.
Chapter 7. Managing Oracle workload with z/OS Workload Manager
103
Subsystem-Type Xref Notes Options Help ------------------------------------------------------------------------Modify Rules for the Subsystem Type Row 1 to 5 of 5 Command ===> ____________________________________________ SCROLL ===> PAGE Subsystem Type . : OSDI (Y or N) Description . . . ORACLE Subsytem
Fold qualifier names?
Action codes: A=After C=Copy M=Move I=Insert rule B=Before D=Delete row R=Repeat IS=Insert Sub-rule More ===> -------Qualifier-------------------Class-------Action Type Name Start Report DEFAULTS: ________ ____ 1 SI ORAC ___ ________ ____ 2 NET 010.100. ___ ________ ____ 3 LU 001.080 ___ ________ ____ 3 LU 002.082 ___ ________ ____ 3 LU 003.081 ___ ________ ****************************** BOTTOM OF DATA ******************************
Service ORACLE ________ ________ ORAMT1 ORAMT2 ORAMT3
Figure 7-9 Classification rules for subsystem OSDI
For our test configuration for Oracle applications, we had three mid-tier processors running the Oracle applications server.
104
Experiences Installing Oracle Database 10g on z/OS
Y
These three servers were connected through distinct TCP/IP addresses. We had configured these application servers so that the Concurrent Manager (batch) requests all came from TCP/IP address 10.100.1.82. The other two application servers, on 10.100.1.80 and 10.100.3.81, delivered standard application interactive traffic. The rules in the above classification rule panel assign three different service classes to the work arriving from the three mid-tier processors. Note the nesting of the rules. The first-level rule applies to all OSDI workload running under the Oracle subsystem ORAC. Using the Insert Sub-rule (IS) command allows you to enter a level two rule for NET. Referring to Table 7-1 on page 97, you can see that the value passed by Oracle NET in the NET attribute is the first eight characters of the TCP/IP address. Note the requirement for leading zeros on the numeric portion of the address. Similarly, third-level rules for the LU attribute check the last eight characters of the TCP/IP address. This set of nested rules will assign the service class ORAMT1 to work arriving in Oracle NET from the client at IP address 10.100.1.80, ORAMT2 to work from 10.100.2.82, and ORAMT3 for work from 10.100.3.81. The service class ORACLE is assigned as the default service class to work classified by Oracle NET that doesn’t get assigned a service class by the above classification rules. In our case, there was no work assigned this service class. As an example, if you were running a test Oracle Oracle 10g instance on this MVS system, you should use additional rules to classify the test work differently from the production work. If the test instance had its own Oracle subsystem, you could add a level one rule to check for SI. If the test instance was an additional service of an existing subsystem, the level one check would be for SPM position 1 to 8, which is the service name assigned by the Oracle subsystem. (See Oracle Database System Administration Guide 10g Release 1 (10.1) for IBM z/OS, B13526-01, for a description of the parameters supplied to the initialization of the Oracle subsystem.) By classifying on the test instance, you can assign a different service class that has a goal with lower importance than the production rules. The above rules classify work from Oracle NET, that is, work that is classified under subsystem OSDI. The Oracle NET address space itself, and the Oracle Database server address spaces, must also have a service class assigned. These address spaces are classified by MVS under subsystem STC.
Chapter 7. Managing Oracle workload with z/OS Workload Manager
105
Subsystem-Type Xref Notes Options Help ------------------------------------------------------------------------Modify Rules for the Subsystem Type Row 1 to 11 of 11 Command ===> ____________________________________________ SCROLL ===> PAGE Subsystem Type . : STC Fold qualifier names? Description . . . Started Tasks Action codes:
Y (Y or N)
A=After C=Copy M=Move I=Insert rule B=Before D=Delete row R=Repeat IS=Insert
Sub-rule More ===> --------Qualifier--------------Class-------Action Type Name Start Report DEFAULTS: ____ 1 TN GRS ___ ____ 1 TN CATALOG ___ RCATALOG ____ 1 SPM SYSSTC ___ ____ 1 SPM SYSTEM ___ ____ 1 TN ORAC* ___ RORACLE ____ 1 TNG STCHI ___ ____ 1 TNG STCMD ___ ____ 1 TNG SERVERS ___ RONLINE ____ 1 TNG MONITORS ___ RMONITOR ____ 1 TNG ONLPRD ___ RONLINE ____ 1 TNG ONLTST ___ RONLINE ****************************** BOTTOM OF DATA ****************************** Figure 7-10 Classification rules for subsystem STC
106
Experiences Installing Oracle Database 10g on z/OS
Service STCLO RSTC SYSTEM RGRS SYSTEM SYSSTC RSTC SYSTEM RSTC STCMD SYSSTC RSTC STCMD RSTC SERVERS SYSSTC ONLPRD ONLTST
The above classification rule for the STC subsystem assigns a default service class of STCLO to any started tasks that do not match a rule, or do not have a system-delivered default. The started tasks required for MVS operation are classified into service class SYSTEM and SYSSTC by the two SPM rules. The Oracle Server address spaces have little workload of their own—all the application work is managed under a service class assigned by TSO, JES, OMVS, or OSDI (Oracle NET). The processing done in the DB server address spaces that is not managed by the user’s service class consists of such things as database logging and other data base instance-related functions. We recommend you assign a service class with a lower importance goal than the short requests through Oracle NET. In this case, we assigned STCMD. For Oracle 10g you should be aware that there is currently an exception to the rule that all Oracle work is run in the priority of the requestor. When using Oracle, any parallel processing done by specifying a degree of parallelism (DOP) greater than one for tables that occupy more than one extent on the disk is done by server tasks in the server address space, and run at the priority of the Oracle database address space, not the client. If you run the Oracle Server address space at a high priority, then a clever user who turns on parallel processing for his or her query can significantly affect other users of the Oracle instance. See Oracle Database User’s Guide 10g Release 1 (10.1) for IBM z/OS, B13524-01 for a discussion of Oracle parallel processing (formally known as the Parallel Query Option).
7.8 CPU accounting with Oracle 10g and enclaves The implementation of Oracle 10g will change the way the CPU time is recorded for applications using Oracle NET. Customers converting from an MPM version of Oracle may require changes in their resource accounting, capacity planning, and operations departments. These changes are also seen by users of the OSDI versions of Oracle 8i and Oracle 9i One of these changes is the result of the use of multiple address spaces for the Oracle 10g database server. In previous versions of Oracle that did not have the OSDI option, there was a single address space for the Oracle Database server. CPU time consumed by work arriving from the Network was charged to Oracle NET, and the time used by server functions was charged to the server address space. With Oracle 10g, you can have multiple address spaces for the Database server. Some CPU time is charged to each of these server address spaces, although all
Chapter 7. Managing Oracle workload with z/OS Workload Manager
107
work that cannot be done in cross-memory mode will be performed in the primary server address space, and will be charged to that address space. The display of the SDSF monitor in Figure 7-11 shows there were 25 server address spaces in the configuration being tested. Note that the CPU time for the ORAxxxx address spaces is much higher in ORA0001 than in the others. All processing that cannot be done in cross-memory mode is done in the primary address space ORA0001. CPU time consumed by the independent enclaves created for the Oracle NET work is reported in the ECPU column of the SDSF display. This column is normally far to the right in the default SDSF screen format, but we used the Arrange option under the View Command pull-down to move the ECPU and ECPU% columns onto the default display. Note that in this display the processing time for address space ORANET has a large amount of ECPU time, which is the CPU time charged to the enclaves created for the Oracle NET work. This CPU time is recorded as enclave time in the SMF type 30 record for Oracle NET, and in the type 72 SMF records for the service classes that the enclaves were assigned. By separately managing the work through Oracle NET in an enclave, the transactions will show up in the WLM RMF™ reports.
Display Filter View Print Options Help ------ ---------------------------------------------------------------SDSF DA OU02 OU02 PAG 0 SIO 2 CPU 1 LINE 1-26 (26) NP JOBNAME STEPNAME SRVCLASS DP CPU% ECPU% CPU-TIME ECPU-TIME REAL ORACNET ORACNET SYSSTC FE 0.00 0.00 2001.54 45261.24 7218 ORAC015 ORAC015 SYSSTC FE 0.00 0.00 3.06 3.06 4381 ORAC025 ORAC025 SYSSTC FE 0.00 0.00 3.33 3.33 4402 ORAC024 ORAC024 SYSSTC FE 0.00 0.00 3.83 3.83 4246 ORAC019 ORAC019 SYSSTC FE 0.00 0.00 5.26 5.26 4022 .... ORAC007 ORAC007 SYSSTC FE 0.00 0.00 3.34 3.34 3978 ORAC006 ORAC006 SYSSTC FE 0.00 0.00 3.09 3.09 3984 ORAC005 ORAC005 SYSSTC FE 0.00 0.00 3.76 3.76 3888 ORAC004 ORAC004 SYSSTC FE 0.00 0.00 11.07 11.07 4058 ORAC003 ORAC003 SYSSTC FE 0.00 0.00 3.09 3.09 4072 ORAC002 ORAC002 SYSSTC FE 0.00 0.00 3.46 3.46 4048 ORAC001 ORAC001 SYSSTC FE 0.00 0.00 547.68 547.68 3802
Figure 7-11 SDSF report of multiple address spaces
108
Experiences Installing Oracle Database 10g on z/OS
8
Chapter 8.
Installing the Intelligent Agent This chapter describes how we set up the Intelligent Agent. The document we used was Oracle Database System Administration Guide 10g Release 1 (10.1) for IBM z/OS, B13526-01.
© Copyright IBM Corp. 2004. All rights reserved.
109
8.1 Introduction to intelligent agents and OEM Intelligent agents are autonomous because they function without requiring that the Oracle Enterprise Manager console or Management Server be running. The primary communications path from the Oracle Management Server to the database instance is through the intelligent agent, the agent that services and Oracle instances can run when the database is down. This allows the intelligent agent to start and shut down instances. It can also perform administrative tasks and run applications without direct intervention from the DBA. It can detect errors and issue predetermined corrective actions to resolve the problem. All job and event messages are queued, enabling the work to take place when the OMS is not active.
8.2 Configuring the intelligent agent The intelligent agent that ran in UNIX Systems Services is now known as the Management Agent and has undergone significant changes. Among these are the fact that the only parameter file that remains from the old setup is ORATAB. There are two new configuration files that need to be modified, emd.properties and target.xml. As in the past the Management Agent is set to run independent of the network connections to the Oracle Management Server (OMS) and the database it is managing. What this means is that it continues to run and monitor the database and environment even when not connected to OMS or the database. It needs to function in this manner to allow it to know what is happening to the database environment should the network go down, as well as working independent of the database because it is used to manage the database. Note: The configuration files contained in this document are only samples to be used after modification for your environment. Here is the environment we set up and the steps we completed to configure the Oracle Management Agent on MVS03: The base Management Agent install is done by the Oracle Universal Installer (OUI). Our .profile file contains the following: export export export export export export
110
ORACLE_HOME=/oracle/v10gPB/OHome1 ORA_NLS32=/oracle/v10gPB/OHome1/ocommon/nls/admin/data ORA_NLS33=$ORA_NLS32 ORA_NLS=$ORA_NLS32 TNS_ADMIN=$ORACLE_HOME ORATAB=$ORACLE_HOME/network/admin/oratab
Experiences Installing Oracle Database 10g on z/OS
export TWO_TASK="(ADDRESS=(PROTOCOL=XM)(SUBSYS=MGSS)(SERVICE=MG10))" export LIBPATH=$ORACLE_HOME/lib:$LIBPATH export PATH=$ORACLE_HOME/bin:$PATH
Note: $ORACLE_HOME is /oracle/v10gPB/OHome1. ORATAB file will be in $ORACLE_HOME/network/admin/oratab There are three files that undergo configuration during the install process, but will need more configuration: – emd.properties in $ORACLE_HOME/sysman/config – targets.xml will be entered with a very basic start in $ORACLE_HOME/sysman/emd – oratab in $ORACLE_HOME/network/admin/oratab ORATAB remains the same as before: MG10:/oracle/v10gPB/OHome1/:N Where: MG10 is the database instance to be monitored. /oracle/v10gPB/Ohome1 is the Oracle Home directory. N means the database is not to be started when the agent is started. TARGETS.XML Example 8-1 shows a sample of the TARGETS.XML file Example 8-1 The TARGETS.XML file
Chapter 8. Installing the Intelligent Agent
111
EMD.PROPERTIES: Example 8-2 shows the entries in the file EMD.PROPERTIES. Example 8-2 Sample EMD.PROPERTIES file
perlBin=/oracle/v10gPB/OHome1/perl/bin scriptsDir=/oracle/v10gPB/OHome1/sysman/admin/scripts emdRoot=/oracle/v10gPB/OHome1 agentStateDir=/oracle/v10gPB/OHome1 chronosRoot=/oracle/v10gPB/OHome1/sysman/emd/chronos # This was one of the parmeters that needed configuration, it points # to the Oracle Management Server. This must be valid or the OMS does # not know about the agent REPOSITORY_URL=http://OEM:7777/em/upload/ #proxyHost=www-proxy.us.oracle.com #proxyPort=80 #dontProxyFor=.us.oracle.com #REPOSITORY_PROXYHOST= #REPOSITORY_PROXYPORT= # This seed number must match the number in the target.xml # This was also a field that was modified agentSeed=229596192 agentVersion=10.1.0.2.0 UploadInterval=15 UploadFailBackoffPct= 20 UploadTimeout=1800 #UploadMaxTime=15 UploadFileSize=2048 UploadMaxBytesXML=50 UploadMaxNumberXML=5000 UploadMaxDiskUsedPct=98 UploadMaxDiskUsedPctFloor=95 #DbHangTimeout=200 #emdFailureScript=emdfail.command emdRootCertLoc=/oracle/v10gPB/OHome1/sysman/config/b64LocalCertifica te.txt internetCertLoc=/oracle/v10gPB/OHome1/sysman/config/b64InternetCerti ficate.txt emdWalletSrcUrl=http://mvs03.us.oracle.com:4889/em/wallets/emd emdWalletDest=/oracle/v10gPB/OHome1/sysman/config/server emd_email_address= emd_email_gateway= emd_from_email_address=
112
Experiences Installing Oracle Database 10g on z/OS
# This was configured for this managment agent you need a port # EMD_URL=http://mvs03.us.oracle.com:1571/emd/main/ AgentListenOnAllNICs=TRUE # ThreadPoolModel = SMALL # ThreadPoolModel = MEDIUM # ThreadPoolModel = LARGE NormalThreadStackSize=0 #IgnoreSignals= ouiLoc=/oracle/v10gPB/OHome1/oui hostConfigClasspath=/oracle/v10gPB/OHome1/oui/jlib/xmlparserv2.jar:/ oracle/v10gPB/OHome1/oui/jlib/OraInstaller.jar:/oracle/v10gPB/OHome1 /oui/jlib/srvm.jar:/oracle/v10gPB/OHome1/oui/jlib/share.jar:/oracle/ v10gPB/OHome1/sysman/jlib/emd_java.jar:/oracle/v10gPB/OHome1/sysman/ jlib/log4j-core.jar JAVA_HOME=/oracle/v10gPB/OHome1/jdk CLASSPATH=/oracle/v10gPB/OHome1/sysman/jlib/emd_java.jar:/oracle/v10 gPB/OHome1/opmn/lib/ons.jar:/oracle/v10gPB/OHome1/lib/xmlparserv2.ja r:/oracle/v10gPB/OHome1/sysman/jlib/log4j-core.jar:/oracle/v10gPB/OH ome1/j2ee/home/lib/http_client.jar:/oracle/v10gPB/OHome1/lib/dms.jar :/oracle/v10gPB/OHome1/lib/dmsEmd.jar:/oracle/v10gPB/OHome1/jlib/sha re.jar:/oracle/v10gPB/OHome1/jdbc/lib/ojdbc14dms.jar:/oracle/v10gPB/ OHome1/jlib/jssl-1_1.jar:/oracle/v10gPB/OHome1/jlib/javax-ssl-1_1.ja r:/oracle/v10gPB/OHome1/jlib/ojmisc.jar:/oracle/v10gPB/OHome1/lib/em _test.jar:/oracle/v10gPB/OHome1/jlib/ojmisc.jar:/oracle/v10gPB/OHome 1/jlib/repository.jar:/oracle/v10gPB/OHome1/opmn/lib/optic.jar #JAVA_OPTIONS=-Xmx128m agentJavaDefines=-Doracle.dms.refresh.wait.time=1000 -DUrlTiming.UseJSSE=true #LogFileWithPID=true LogFileMaxSize=4096 LogFileMaxRolls=4 TrcFileMaxSize=4096 TrcFileMaxRolls=4 #enableMetricBrowser=true #disableRemoteOperations=true #altAdminPath= #MaxHealthMonitorThreads=5 # EMAGENT_PERL_TRACE_LEVEL=ERROR #EMAGENT_PERL_TRACE_DIR= #EMAGENT_PERL_TRACE_FILESIZE=5 tracelevel.main=WARN tracelevel.emSDK.xml=WARN
Chapter 8. Installing the Intelligent Agent
113
tracelevel.emSDK.utl=WARN tracelevel.ResMonitor=WARN tracelevel.Dispatcher=WARN tracelevel.ThreadPool=WARN tracelevel.pingManager=WARN tracelevel.collector=WARN tracelevel.http=WARN tracelevel.blackouts=WARN tracelevel.upload=WARN tracelevel.command=WARN tracelevel.reload=WARN tracelevel.scheduler=WARN tracelevel.Authentication=WARN tracelevel.metadata=WARN tracelevel.targets=WARN tracelevel.TargetManager=WARN tracelevel.engine=WARN tracelevel.javaproc=WARN tracelevel.vpxoci=WARN tracelevel.javavm=WARN tracelevel.fetchlets=WARN tracelevel.fetchlets.os=WARN tracelevel.fetchlets.osline=WARN tracelevel.fetchlets.oslinetok=WARN tracelevel.fetchlets.UDM=WARN tracelevel.fetchlets.sql=WARN tracelevel.fetchlets.url=WARN tracelevel.fetchlets.urllines=WARN tracelevel.fetchlets.urllinetoken=WARN tracelevel.fetchlets.URLTiming=WARN tracelevel.fetchlets.propEcho=WARN tracelevel.fetchlets.readFromFile=WARN tracelevel.fetchlets.readMultFromFile=WARN tracelevel.fetchlets.throwable=WARN tracelevel.fetchlets.resourceGrab=WARN tracelevel.fetchlets.emSDK=WARN agentTZRegion=PST Note: There are several comments in the sample for this file. They have been removed for this example to increase readablility. The comments remaining are related to modifications made to the file.
114
Experiences Installing Oracle Database 10g on z/OS
Starting the Oracle Management Agent Once these files are in place, you can start the Oracle Management Agent. The commands to do this changed in Oracle 9.2 and again for Oracle 10g. The commands now are: – emctl status agent If the agent is up and running, this will return: $ emctl status agent Oracle Enterprise Manager 10g Release 10.1.0.2.0. Copyright (c) 1996, 2003 Oracle Corporation. All rights reserved. --------------------------------------------------------------Agent Version : 10.1.0.2.0 OMS Version : 10.1.0.2.0 Protocol Version : 10.1.0.2.0 Agent Home : /oracle/v10gPB/OHome1 Agent binaries : /oracle/v10gPB/OHome1 Agent Process ID : 227 Parent Process ID : 33554658 Agent URL : http://mvs03.us.oracle.com:1571/emd/main/ Started at : 2004-05-11 13:35:19 Started by user : MGORMAN Last Reload : 2004-05-11 13:35:19 Last successful upload : 2004-05-11 15:51:24 Total Megabytes of XML files uploaded so far : 0.01 Number of XML files pending upload : 0 Size of XML files pending upload(MB) : 0.00 Available disk space on upload filesystem : 56.71% -----------------------------------------------------------Agent is Running and Ready If the agent is not up and running, it will return: $ emctl status agent Oracle Enterprise Manager 10g Release 10.1.0.2.0. Copyright (c) 1996, 2003 Oracle Corporation. All rights reserved. --------------------------------------------------------------Agent is Not Running $
– emctl start agent will return: $ emctl start agent Oracle Enterprise Manager 10g Release 10.1.0.2.0. Copyright (c) 1996, 2003 Oracle Corporation. All rights reserved. Starting agent .... started. $
Chapter 8. Installing the Intelligent Agent
115
– emctl stop agent will return: $ emctl stop agent Oracle Enterprise Manager 10g Release 10.1.0.2.0. Copyright (c) 1996, 2003 Oracle Corporation. All rights reserved. Stopping agent ... stopped.
6. At this point you will be able to connect from the OMS that is defined in the REPOSITORY_URL in the emd.propeties file. If this is not defined as a valid address, OMS will not see the agent.
116
Experiences Installing Oracle Database 10g on z/OS
9
Chapter 9.
Using an IBM ESS with an Oracle database This chapter offers an overview of the IBM TotalStorage Enterprise SubSystem (ESS) and how it can be effectively used with the Oracle Database.
© Copyright IBM Corp. 2004. All rights reserved.
117
9.1 Overview of ESS The IBM Enterprise Storage Server, or ESS, is a high performance fault-tolerant storage subsystem for attachment to a variety of server platforms, including zSeries z/OS, z/VM, VSE/ESA, and zSeries Linux. Servers are attached to the ESS through host adapter ports, which can be FICON, fiber channel, ESCON, or SCSI; see Figure 9-1. There can be as many as 16 host adapters, but 8 for the server attachment are adequate for performance in almost all cases.
Figure 9-1 Host adapters, clusters, and disks
The disks in the ESS are Serial Storage Architecture (SSA) disks, organized in loops shared between device adapters in the two clusters. There are four device adapter pairs, each with two loops; see Figure 9-2 on page 119.
118
Experiences Installing Oracle Database 10g on z/OS
8Pack 1
8Pack17
8Pack33
8Pack 2
8Pack18
8Pack34
DA
8Pack 9
8Pack25
8Pack41
8Pack10
8Pack26
8Pack42
8Pack 3
8Pack19
8Pack35
8Pack 4
8Pack20
8Pack36
DA
8Pack11
8Pack27
8Pack43
8Pack12
8Pack28
8Pack44
8Pack 5
8Pack21
8Pack37
8Pack 6
8Pack22
8Pack38
DA
8Pack13
8Pack29
8Pack14
DA
8Pack45
8Pack30
DA
DA
8Pack46
8Pack 7
8Pack23
8Pack39
8Pack 8
8Pack24
8Pack40
8Pack15
8Pack31
8Pack47
8Pack16
8Pack32
8Pack48
2105-800
DA
DA
Expansion Frame
Figure 9-2 DA pairs with SSA loops
In normal operation, half the disks are accessed by Cluster 1 and half by Cluster 2 (see Figure 9-3 on page 120). If one cluster fails, all disks are accessed by the surviving cluster. Disk groups consist of eight disks. A single frame ESS can contain up to 16 disk groups. A two-frame ESS can contain up to 48 disk groups. The ESS is a dual cluster storage subsystem with two active clusters. Each cluster is a 4-way (or optionally 6-way) SMP with its own independently managed cache memory. In addition, each cluster contains battery-backed nonvolatile storage (NVS) used to ensure data integrity for fast write data. The NVS in Cluster 1 is used to hold write data for Cluster 2, and vice versa. There are four PCI busses on each cluster motherboard. Two are used to communicate with host adapters and two are used to communicate with device adapters. Host adapter Bays 1 and 3 are accessed using one PCI bus in each cluster, and host adapter Bays 2 and 4 are accessed using a second host adapter PCI bus in each cluster. Device Adapters 1 and 2 in each cluster use one PCI bus and Device Adapters 3 and 4 use a second device adapter PCI bus.
Chapter 9. Using an IBM ESS with an Oracle database
119
HA Bay 2
HA Bay 1
DA
DA
DA
PCI Bus
8Pack 1 8Pack 2
8Pack 1 8Pack 2 8Pack 9 8Pack10
8Pack 3 8Pack 4
8Pack 9 8Pack10 8Pack 3 8Pack 4
8Pack11 8Pack12 8Pack 5 8Pack 6
8Pack11 8Pack12 8Pack 5 8Pack 6
8Pack13 8Pack14 8Pack 7 8Pack 8
8Pack13 8Pack14 8Pack 7 8Pack 8
8Pack15 8Pack16
8Pack15 8Pack16
DA
DA
DA
DA
PCI Bus
Cluster 2
PCI Bus
PCI Bus
DA
HA Bay 4
PCI Bus
Cluster 1
PCI Bus
PCI Bus
PCI Bus
HA Bay 3
Figure 9-3 NVS/cluster relationship]
To maximize I/O throughput in an ESS, it is best to balance the I/O workload across the components in the ESS:
Host adapters Clusters PCI busses Device adapters Disk groups
Unbalanced utilization can lead to bottlenecks. For instance, if a single disk group is nearly 100% busy, the performance of a database system will be bottlenecked even if other disk groups in the ESS are only 10% busy. An ESS can be configured with disk groups of several capacities and, for some capacities, there is also a choice of rotational speeds. The following 15K RPM capacities are offered: 18.2 GB 36.4 GB 72.8 GB The following 10K RPM capacities are offered: 18.2 GB 36.4 GB
120
Experiences Installing Oracle Database 10g on z/OS
72.8 GB 145.6 GB When both rotational speeds are offered for the same capacity, 15K RPM disks give higher performance but are also more expensive than the corresponding 10K RPM disks.
9.2 RAID arrays Disk groups can be formatted into RAID-5 or RAID-10 arrays. RAID-10 provides less effective capacity with the same number of disks, but gives higher performance than RAID-5. As an example, consider a device adapter pair with four disk groups of 10 K RPM 36.4 GB disks. (A device adapter pair is a device adapter in Cluster 1 and the partner device adapter in Cluster 2.) The ESS will reserve 4 disks per device adapter pair for spares (2 per loop). If disk groups with different capacities are mixed on an SSA loop, the ESS will reserve 2 spares of each capacity. If the 4 disk groups were configured as RAID-5, we would get four 6+P RAID-5 arrays plus 4 spare drives. The effective capacity of each RAID-5 array is about 210 GB with 36.4 GB disks, so the effective capacity of the 4 disk groups is about 840 GB. Note: All disk and RAID array capacities are specified in gigabytes, where 1 GB = 109 bytes. If the four disk groups were configured as RAID-10 arrays, we would get two 3+3 RAID-10 arrays, two 4+4 RAID-10 arrays, and 4 spare disks. The effective capacity of a 3+3 RAID-10 array with 36.4 GB disks is about 105 GB and the effective capacity of a 4+4 RAID-10 array with 36.4 GB disks is about 140 GB, so the effective capacity of the four disk groups is about 490 GB. An array can be configured into one or more logical disks (3380 or 3390). Each logical disk is striped across all the disks in the array.
Chapter 9. Using an IBM ESS with an Oracle database
121
Figure 9-4 Relationship of logical 3390 disk volumes to RAID arrays
The most important performance difference between RAID-5 and RAID-10 is for random writes. An ESS RAID-5 stripe for a 6+P array consists of one 3380 or 3390 track image on each of the 7 disks in the array. Six of the stripes are used to store data and the seventh stores the exclusive OR parity that can be used to reconstruct data in case of a disk failure. A RAID-5 random update write of a 4 KB block will generate up to four I/Os to the ESS disks as the ESS destages the write. This involves: Reading the original data in disk blocks containing the 4 KB CKD block to be updated Reading the corresponding parity disk blocks Writing disk blocks containing the updated 4 KB CKD block Calculating new parity and writing the updated parity disk blocks A RAID-5 random update write of a 4 KB block will generate up to four I/Os to the ESS disks as the ESS destages the write. This involves: Reading the original data in disk blocks containing the 4 KB CKD block to be updated Reading the corresponding parity disk blocks Writing disk blocks containing the updated 4 KB CKD block
122
Experiences Installing Oracle Database 10g on z/OS
Calculating new parity and writing the updated parity disk blocks RAID-10 doesn't use exclusive OR parity. Data is striped across a number of disks, and the same data is also striped across a second set of disks. There are two copies of all data. An ESS 4+4 RAID-10 stripe consists of a 3380 or 3390 track image on each of 4 disks, and then the same data repeated on another set of 4 disks. A RAID-10 random update write of a 4 KB block will generate up to 2 I/Os to the ESS disks as the ESS destages the write.
Figure 9-5 RAID-5 and RAID-10 comparison
If a database system is generating a lot of random writes to an ESS subsystem, the ESS will typically generate twice as many back-end disk writes for RAID-5 arrays as it would for RAID-10 arrays. As long as the disk busy percent for the disk in an ESS disk group remains at 50% or less, performance generally does not suffer. If RAID-5 arrays of a certain disk capacity would cause the disks to be 80% busy for a certain workload, then the additional expense of RAID-10 would be justified (less effective capacity with the same hardware, or more hardware to get the same effective capacity). If the disks in the RAID-5 arrays were typically 35% busy, then it's unlikely that RAID-10 would have any significant effect on disk I/O performance.
Chapter 9. Using an IBM ESS with an Oracle database
123
For many applications, RAID-5 with 10K RPM 72.8 GB disks provides more than adequate performance. For workloads that generate more I/Os per GB than typical, especially a lot more random writes, all of the following should be considered:
10K RPM 72.8 GB disks with RAID-10 15K RPM 72.8 GB disks with RAID-5 15K RPM 72.8 GB disks with RAID-10 15K RPM 36.4 GB disks with RAID-5 15K RPM 36.4 GB disks with RAID-10
For a given ESS configuration, data placement can play a key role in ESS subsystem and database performance. As an example, consider an ESS with 16 disk groups of 72.8 GB disks (either 10K RPM or 15K RPM) configured as RAID-5. Traditionally, the disk groups would be configured as shown in Figure 9-6. CLUSTER 1
CLUSTER 2
Loop A
Loop A DA
DA Loop B
Loop B
Denotes 8-Pack
Denotes RAID Array
Figure 9-6 DA pair without arrays across loops
The ESS 2105-800 now offers a feature code for new ESSs that provides a different configuration called Arrays Across Loops (AAL). With AAL, the arrays would be configured as shown in Figure 9-7 on page 125.
124
Experiences Installing Oracle Database 10g on z/OS
CLUSTER 1
CLUSTER 2
Loop A
Loop A DA
DA Loop B
Loop B
Denotes 8-Pack
Denotes RAID Array
Figure 9-7 DA pair with arrays across loops
While AAL does not improve the overall performance capabilities of an ESS subsystem, it does improve the sequential performance—both read and write—of a single stream to a single array. With AAL, disk groups must be added in groups of 4 rather than in groups of 2. If the capacity granularity is not an issue, AAL is a good idea for new ESSs that have 16 or more disk groups. In some cases, there may be no performance improvement, while in some cases there may be significant performance improvement. In no case should performance be worse with AAL if there are 16 or more disk groups. If there are 12 or fewer disk groups in an ESS, AAL will concentrate the arrays on three or fewer device adapter pairs. Performance for some workloads may suffer in this case. Whether there are arrays across loops or not, a 16-disk group ESS configured for RAID-5 will have 16 6+P RAID-5 arrays. With 36.4 GB disks, each array will be about 210 GB.
9.3 Disk and I/O For zSeries servers, the ESS emulates 3380 and 3390 count-key-data (CKD) disks. The ESS supports both standard capacity emulated disks (for example, 3390-3 and 3390-9) or you can create custom volumes with any number of cylinders up to 65,536. The CKD cccchhhhrr addressing limits CKD devices to 64K cylinders.
Chapter 9. Using an IBM ESS with an Oracle database
125
For zSeries server operating systems that support it, the ESS also supports Parallel Access Volumes (PAVs), which are alternate addresses for the same disk volume, which can be used to support multiple I/Os in parallel to the same device, which can increase throughput. Let's assume that all 16 disk groups are divided into 3390-9 volumes and that there are three PAV aliases associated with each volume. On the zSeries server side, there will be a device number associated with the cuu address of each logical volume. Let's assume we need 16 3390-9 volumes for a database system. We could select 16 logical disks in one array (for example, devices 000, 001, 002, ..., 00f) or we could select 16 logical disks, one on each of 16 arrays (for example, devices 000, 100, 200, ..., f00). Assume we have a FICON channel group with 8 paths to the ESS, so there are 8 paths to each logical disk in the ESS. The best way to cable this is to use 2 host adapters in each of the four ESS host adapter bays. (If there are only 8 fiber host adapters installed in the ESS, this is how they will be installed.) Where 16 logical disks in one disk group are in use, some components in the ESS will be busy where others are not used. The zSeries channel subsystem will balance the workload across the (up to) 8 available paths to a device, which will, in turn, balance the workload across the ESS host adapters, ESS host adapter bays, and ESS cluster host adapter PCI busses on each cluster. (Utilization may not be perfectly balanced if activity is low, since the zSeries channel subsystem will use any available path. Since this is when activity is low, this is not a problem for the ESS.) All I/Os to a single logical disk will be processed by the same cluster, however. Actually, all writes are sent to both clusters—one for processing and one to store a second copy of the data in NVS. The second cluster provides NVS management on behalf of its partner. But a logical disk is owned by a cluster unless a failure causes failover of control to the other cluster. All logical disks in a disk group are owned by the same cluster. So if we used only 16 disks in one disk group, all the I/O would be processed by one cluster and only one of the two NVSs would be used. In addition, the ESS will limit the amount of NVS that can be used by a single array to no more than 25% of the NVS available to that cluster. Note: An exception to this is when there are only 4 arrays in the ESS.
126
Experiences Installing Oracle Database 10g on z/OS
And if all the logical disks in use reside in a single array, the 7 disks in that array may be very busy while the other 105 disks that are not spares in our example ESS are idle. Only one device adapter out of 8 in 2 clusters is active, and only one device adapter PCI bus out of 4 in 2 clusters is active. By comparison, if the 16 logical disks are selected one in each of the 16 disk groups and the I/O load is reasonably balanced across the 16 logical disks, then: The clusters each handle about half the I/Os. All cache is available to be used. Both independently managed NVSs are used. All four host adapter PCI busses in two clusters are active. All eight device adapters in two clusters are active. All four device adapter PCI busses in two clusters are active. All 105 disks that are not spares are active. Clearly, a benchmark performed with the second configuration is much less likely to be I/O bound than one with the first configuration. But if the database doesn't require 3 TB of disk space all by itself, the ESS in our example is going to be shared with other applications. It is still a good idea to use one logical disk on each of the disk groups, even if this means sharing disk groups with other applications. Experience has shown that this is the case almost all the time. ESS users are much more likely to experience I/O performance problems because of “hot spots” within the ESS than because of the interaction of workloads on shared components. Now in its third generation, the ESS has been widely used as a shared subsystem for different workloads and as part of server consolidation efforts. The sophisticated caching algorithms of the ESS typically provide excellent performance to a variety of workloads all at the same time. While performance will of course suffer if all the disk groups in the ESS are very busy, disk storage performance bottlenecks are more likely to occur if only some components in the ESS are busy while others are idle or lightly used. It is helpful to understand a little bit about how I/Os are processed by the ESS. For simplicity, the description of read and write processing here does not include PAV extent conflict considerations, nor does it include considerations for Flash Copy, Peer-to-Peer Remote Copy (PPRC), or Extended Remote Copy (XRC).
Chapter 9. Using an IBM ESS with an Oracle database
127
The ESS is a cached subsystem. Data can be stored in cache both as a result of read operations and as a result of write operations.
9.3.1 Random reads
Figure 9-8 Processing or read cache hits and read cache misses
When a program reads a block from a CKD disk track, the ESS looks to see if the block is already in cache. If it is, the block is sent to the server and the cache segments containing the block and any other blocks on the same track are moved to the top of the queue used for least recently used (LRU) cache segment management. If it is not in cache, the ESS stages the required record and the rest of the records to the end of the CKD track into cache. This can be done with a single I/O to the disks. When the required record is in cache, the ESS completes the I/O. The ESS maintains an LRU list of cache segments. Room for new blocks in cache is made by freeing up cache segments at the bottom of the least recently used queue. At the time that cache segments are removed, the ESS notes whether the extra blocks read into cache as part of the staging operation were ever referenced. If the ESS notes that such staging is resulting in cache hits when subsequent records on the track are read by the server, it continues this staging algorithm. If the ESS notes that such staging is rarely resulting in cache hits, then the ESS changes its bias towards a different staging algorithm in which only the record requested by the server is staged into cache.
128
Experiences Installing Oracle Database 10g on z/OS
It's also possible that after staging a record and the balance of the CKD track, there may be a read operation for a record at the beginning of the track. With normal track balance staging, this would result in a second staging operation for the same track, staging the record required and the balance of the track not already in cache. At the time that cache segments are removed at the bottom of the LRU list, the ESS also notes whether such a “front end miss” occurred for the CKD track. If the ESS notes that this is common, the ESS changes its bias towards a third staging algorithm in which reading a record results in staging the entire CKD track into cache. Over time, this adaptive caching will cause the ESS to choose the most appropriate staging algorithm for the way the data is accessed. The ESS maintains caching statistics for bands of cylinders on a single CKD disk volume, so it is possible for different staging algorithms to be in use for different volume serials and for different ranges of cylinders within the same volume serial. There is no external control over which staging algorithm is used by the ESS.
9.3.2 Sequential reads
Figure 9-9 Sequential prestage
With sequential reads, it is relatively easy for the ESS to predict what I/O will follow from the server. The only thing the ESS doesn't know is when the sequential processing stream will stop. As a result, the ESS attempts to prestage data into cache in anticipation of sequential reads, but not so aggressively that data is unnecessarily staged into cache.
Chapter 9. Using an IBM ESS with an Oracle database
129
The ECKD command architecture allows the zSeries server to explicitly tell the ESS that it is performing sequential I/O by setting a bit in the Define Extent CCW. In addition, the ESS can also detect a sequential access pattern even when the Define Extent bit is not set. When the ESS stages tracks into cache, it checks whether the preceding track is already in cache. When the ESS recognizes a pattern of sequential processing, it begins sequential prestage whether the channel program identified sequential processing or not. With sequential prestage, the ESS uses anticipatory staging to read tracks in the current and next cylinder into cache. Since each track in turn is stored on a different disk in the RAID array, the ESS can stage tracks from multiple member disks of the array in parallel. Data staged into cache as part of a sequential prestage operation is less likely to be re-referenced than data staged as part of a random read. The ESS will more rapidly age cache segments used for sequential prestage to the bottom of the LRU chain. This allows sequential read operations to be processed efficiently without flooding cache and forcing the destage of other data.
9.3.3 Sequential writes Data sent to the ESS as part of a write operation is sent by the host adapter to both clusters. One stores the data in cache and later destages the data to disk. The other stores the data in NVS and keeps it there until it is notified that the data has been destaged to disk. Destage to disk is not immediate. For much the same reason that database management systems do not initiate a disk write every time a block is updated, the ESS will attempt to accumulate writes into fewer larger I/Os when destaging modified data from cache to disk.
130
Experiences Installing Oracle Database 10g on z/OS
Host interface 1 3 Controller
2 Controller Asynchronous destage
Disks Database writes and log writes are fast writes Figure 9-10 ESS write processing
A special case exists for sequential writes to RAID-5 arrays. Where all six track images in a 6+P RAID-5 stripe can be destaged together, the ESS device adapter can calculate the parity strip without first reading any data from disk. It's unlikely that a server application would write six properly aligned CKD track images in a single write operation, so the ESS will allow data to accumulate and then destage the data to disk with a properly aligned write of six CKD track images. Full-stride writes significantly improve the efficiency of writing sequential data to RAID-5 arrays. While the ESS will also destage sequential data to RAID-10 arrays as efficiently as possible, the effect is not as dramatic with RAID-10. Sequential write data is removed from nonvolatile storage after it is destaged to disk, but it remains in cache since it may provide read cache hits. Cache segments containing sequential write data are destaged according to the same accelerated aging algorithm used for cache segments containing data staged as part of a sequential prefetch operation. As part of the processing of format writes (ECKD writes that write over whatever previously had been stored on a CKD track image), the ESS notes whether each track has what is known as a “regular track format.” A track has a regular track format if all records on the track are of the same length. The ESS uses this knowledge to provide more efficient processing of later update writes.
Chapter 9. Using an IBM ESS with an Oracle database
131
Since all tracks on a volume must be written the first time they are used, the ESS has knowledge of the regular track format status of every track on every logical disk in the subsystem. This information is maintained in a bitmap and persists across power cycles of the ESS.
9.3.4 Random writes Whenever possible, the ESS handles writes as fast writes. This significantly improves I/O performance for database systems. However, once the device end and channel end have been sent to signal the end of the channel program, it's too late for the ESS to find out that there's a problem destaging the new data to disk. For example, if the 5th record on a CKD track is 2 KB and a 4 KB update write for that record is received, the write should fail. In order to make sure this doesn't happen, the ESS must be careful with update writes. The ESS will process an update write as a fast write if and only if: The block being written is currently in cache (known as a “write hit”). The CKD track in question is known to the ESS to have a regular track format. Most database management systems store fixed-length records on disk, with the database management system providing space management with the disk blocks. As a result, the ESS can process virtually all database writes as fast writes even if the block being written is not currently in cache. As with sequential writes, random writes are not immediately destaged to disk. Adjacent blocks that could be destaged in a single I/O may be sent to the ESS in a separate write operation. Frequently updated blocks may be written again and again. It may only be necessary to destage such a frequently written block a fraction of the number of times it is written. There is no data integrity exposure in delaying the destage of write data to disk. There are two copies of all such data, one in cache and one managed by the other cluster in nonvolatile storage. Any read requests for recently updated data will retrieve the updated data from cache whether or not it has yet been destaged to disk. Modified data written to disk will continue to stay in cache (now as unmodified data) and cache segments containing such data will be removed from cache as they age in the same LRU queue as segments containing data read into cache as part of a random read.
132
Experiences Installing Oracle Database 10g on z/OS
The least recently updated modified data is written to disk when the ESS reaches a threshold. In addition, there are two other cases that can trigger destage to disk: Frequently modified data that continually moves to the top of the LRU chain is periodically destaged to disk even if it never makes it to the bottom of the queue. During longer periods of system inactivity, modified data is drained from cache to disk. As server memory sizes increase, database systems are more and more likely to subject disk subsystems to large floods of writes. Many database management systems write redo logs either as buffers are filled or as required by checkpoints. Database writes are usually deferred until either a given percent of the buffer pool contains “dirty pages” or as required by checkpoints. With a larger buffer pool, it's less likely to have, say, 34% dirty pages, so floods of writes often occur at thresholds or system checkpoints. If a flood of writes is sent to the ESS, but it's not so large as to fill the NVS, the writes can all be processed as fast writes. But if the NVS fills because the writes are arriving in a burst faster than the ESS can destage data to disk, then the write stream will slow because the ESS must hold off writes until it has freed enough NVS space to hold the data. This can impact database system performance because—if the write flood was issued as part of a system checkpoint—the database system must wait for all the writes to complete before the system checkpoint can complete. The IBM TotalStorage Expert for ESS reports NVS full conditions (as a percent of total I/O, not as a percent of writes). Even a small percentage of NVS full conditions (0.1%) can have a negative impact on write performance. While database writes will always occur in bursts because of the way database management systems manage buffer pools, care should be taken to ensure that the bursts are not so large as to cause NVS full conditions Even if NVS full conditions do not occur, large bursts of writes can interfere with other read processing since it makes the FICON connections very busy. Oracle allows control over the size of bursts of writes by controlling the checkpoint frequency. The FAST_START_MTTR_TARGET init.ora parameter can be used to increase the frequency of checkpoints. Statspack gives an indication of what the MTTR would be for an existing workload, and this can be used as a starting point for tuning the parameter. Taking checkpoints too frequently causes additional overhead, but checkpoints taken too infrequently will take a long time and, if restart is needed, require processing of more log records at restart time.
Chapter 9. Using an IBM ESS with an Oracle database
133
FAST_START_MTTR_TARGET is overridden by FAST_START_IO_TARGET or LOG_CHECKPOINT_INTERVAL if either is specified.
9.4 Conclusion The ESS is a high performance, fault-tolerant storage subsystem able to concurrently manage different workloads. To maximize I/O throughput in an ESS, it is best to balance the I/O workload across the components in the ESS:
Host adapters Clusters PCI busses Device adapters Disk groups
and ensure that bursts of writes, which will always occur, are not too large.
134
Experiences Installing Oracle Database 10g on z/OS
A
Appendix A.
Options for setting up the X Windows environment This appendix shows examples of how we set up connectivity to run the Oracle Universal Installer (OUI) with the X Windows Interface using the following:
A Linux Intel system VNC software Exceed software Cygwin software
To run the OUI, you need to have an X Windows interface running on your desktop. You can use a Windows desktop or a Linux desktop. Note: A key factor in deciding which method to use is the distance between the installing workstation desktop and the z/OS host; we found that using VNC is the best alternative if you are not on the same local area network.
© Copyright IBM Corp. 2004. All rights reserved.
135
Using a Linux Intel system as a client Follow these steps to use a Linux Intel system: 1. Log on to Linux Client as root. 2. Issue the command: xhost + (the plus sign (+) gives everyone access to the system. 3. Issue the command: startx (this is only needed if X Windows is not initialized). 4. Open another window for the telnet session. 5. Telnet to the zSeries Linux system, log on as oracle, then issue the command: export DISPLAY=hostname:0.0 where hostname is the hostname or IP address of the Linux Intel Client, and 0 is the default console. 6. Test by issuing the command: xclock & Now you are ready to start the Oracle Universal Installer.
Using the VNC client and server In our case, we had the VNC server code installed on a Linux Intel system that was located on the same LAN as the zSeries. We used the following IP addresses: VNC server - 9.38.159.12 – Port 3 was enabled for our workstation. Workstation Client with VNC viewer - 9.38.159.141 zSeries USS system - 9.38.159.11 You can also install the VNC server on the Linux guest on the zSeries machine directly, if you have one available. The rpm package is included in the SLES7 distribution for zSeries. You can install the VNC server with YaST, or manually install the package that is located in the directory /suse/xap2 of the SUSE distribution. After the installation, simply run the command vncserver as the oracle user. Enter a password to connect to your vncserver, and start the vncviewer from your workstation as described here. From the workstation: 1. Invoke the VNC viewer. 2. Enter the IP address and the port number of the VNC server; see Figure A-1 on page 137.
136
Experiences Installing Oracle Database 10g on z/OS
Figure A-1 Entering the Connection details
3. 4. 5. 6. 7. 8.
Enter the password. Left-mouse click and select the option: xTerm. In the xTerm window, telnet to the USS port on the z/OS zSeries system. Use telnet 9.38.159.11. Enter the user ID and password. Issue the command: EXPORT DISPLAY=9.38.159.12:3.
You are now ready to follow the remaining setup steps, which are described in Chapter 3, “Installing the Oracle Libraries” on page 27.
Using VNC on a Linux guest on zSeries Another way to use VNC is by installing on a Linux guest machine running under VM. VNC is included in the packages with SLES8. The package name is vnc-3.3.3r2-172. You can use the rpm command to install it: # rpm -i vnc-3.3.3r2-172 After VNC is installed on a Linux guest machine running under VM, you can log on to the Linux guest machine and start a vncserver, as shown here. Welcome to SuSE SLES 8 (s390) - Kernel 2.4.19-3suse-SMP (22). vmlinux9 login: oracle Password: Last login: Mon Nov 10 15:30:25 from dhcp… This is an IBM test server for SLES 8 31-bit RAC vmlinux9:~> vncserver :2 New 'X' desktop is vmlinux9:2 Starting applications specified in /local/oracle/.vnc/xstartup Log file is /local/oracle/.vnc/vmlinux9:2.log vmlinux9:~>
Appendix A. Options for setting up the X Windows environment
137
This server will handle your X output from the zOS machine, and you will be able to install Oracle using the OUI installer. This method is a useful way to avoid network traffic, because the communication will be internal to the zSeries. Telnet to the z/OS machine and log on. Change directory to where you have your Oracle distribution. In your telnet session, set up your display: MVS03 $ export DISPLAY=vmlinux9:2 When you start the installer, the display will go to the vncserver identified by vmlinux9:2.
Using Exceed with telnet Follow these steps to enable your Linux guest to export the X Windows display to your workstation using Exceed. 1. Go to Exceed -> host access -> telnet. 2. Connect to the zSeries Linux system: telnet 9.12.159.11. 3. Enter the userid and password. 4. Go to Exceed -> xConfig. a. b. c. d.
Click Configuration. Verify that it is in passive mode. Click screen definition. Verify that window mode is multiple.
5. Go to Exceed and start it, to have it running as a background process. 6. Return to the telnet session and enter the command ioczm10s:~ # su oracle. 7. Enter oracle@ioczm10s:~ > export DISPLAY=9.38.157.215:0 where hostname is the name of your workstation or the IP address of your workstation. 8. Enter oracle@ioczm10s:~ > xhost + You will receive the following message: access control disabled, clients can connect from any host xhost: must be on local machine to enable or disable access control. 9. Change directories to where you have staged the install CDs: cd /ora92. 10.Change directory to the first disk: cd Disk1. 11.Run the Oracle Universal Installer:
138
Experiences Installing Oracle Database 10g on z/OS
./runInstaller oracle@ioczm10s:/ora92/Disk1 > Initializing Java Virtual Machine from ../../stage 12.The screen in Figure A-2 will be shown briefly, then the Welcome screen will appear.
Figure A-2 Initial screen
Using CYGWIN Cygwin/X is a port of XFree86 to the Microsoft® Windows family of operating systems. Cygwin/X runs on all recent consumer and business versions of Windows; as of 2002-05-12, those versions are specifically Windows 95, Windows 98, Windows Me, Windows NT® 4.0, Windows 2000, and Windows XP. Cygwin/X consists of an X Server, Xlib, and nearly all of the standard X clients, such as xterm, xhost, xdpyinfo, xclock, and xeyes. Cygwin/X, as the name implies, uses the Cygwin project which provides a UNIX-like API to Xlib and X clients, thereby minimizing the amount of porting required. Cygwin/X is licensed under an X-style license; Cygwin is licensed under a modified GNU General Public License that specifically allows libcygwin1.a to be linked to programs that are licensed under an Open Source compliant-license without such linking requiring that those Open Source programs be licensed
Appendix A. Options for setting up the X Windows environment
139
under the GNU General Public License (see the Cygwin licensing page for more information). Source code and binaries for both projects are freely available. For more detailed information about Cygwin, refer to the following site: http://www.cygwin.com/xfree/ To use Cygwin, after installing Cygwin Version 4 (Version 5 does not require these changes), make the following changes to be able to use the xserver. 1. Create a shortcut on your desktop: Go to Properties by pressing the right mouse button and select the ShortCut tab. In the target field, enter the following line: E:\cygwin\bin\rxvt.exe -ls -rv -sl 5000 -fn "Lucida Console-Bold-12" (This replaces the line E:\CYGWIN.) 2. Open a Cygwin window and edit /etc/X11/xinit/xintrc at the end of the file; comment out the last 5 lines and insert a line: wmaker, as shown here: /etc/X11/xinit/xintrc #!/bin/sh # $Xorg: xinitrc.cpp,v 1.3 2000/08/17 19:54:30 cpqbld Exp $ userresources=$HOME/.Xresources usermodmap=$HOME/.Xmodmap sysresources=/usr/X11R6/lib/X11/xinit/.Xresources sysmodmap=/usr/X11R6/lib/X11/xinit/.Xmodmap # merge in defaults and keymaps if [ -f $sysresources ]; then xrdb -merge $sysresources fi if [ -f $sysmodmap ]; then xmodmap $sysmodmap fi if [ -f $userresources ]; then xrdb -merge $userresources fi if [ -f $usermodmap ]; then xmodmap $usermodmap fi
140
Experiences Installing Oracle Database 10g on z/OS
# start some nice programs wmaker #twm & #xclock -geometry 50x50-1+1 & #xterm -geometry 80x50+494+51 & #xterm -geometry 80x20+494-0 & #exec xterm -geometry 80x66+0+0 -name login At this point you should be able to enter the command startx in the cygwindow, and get an xserver running on your PC. Next, telnet to the z/OS machine and log on. Change directory to where you have your Oracle distribution. In your telnet session, set up your display: MVS03 $ export DISPLAY=ipaddress of your pc:0 When you start the installer, the display will go to the cygwin xserver running on your PC.
Preventing the OUI from waiting for OMVS input When you run the OUI from OMVS, after a few minutes the process will appear to be hung; it is waiting in input mode on the OMVS screen, but the OUI is waiting for send messages to the screen.
Explanation After you type a command and press Enter, the status of your session is displayed in the lower right-hand corner of the screen as RUNNING. After a short time, the status indicator automatically changes to INPUT; this means the shell session is ready for input and will not send any more output or messages to the display screen. At times you may find that the status indicator changes to INPUT before you have received any or all of your output. This is not a cause for concern because the shell is producing output and storing it in a buffer. This behavior occurs because TSO/VTAM® does not provide a way to wait for keyboard input and TTY output at the same time under TSO.
Solution Simply press the Refresh function key and the shell will display more output on your screen. (If you do not have a Refresh function key, press key, , or .)
Appendix A. Options for setting up the X Windows environment
141
Additionally, the z/OS UNIX System Services Web site offers code (poll.c) that allows an OMVS user to remain in RUNNING mode indefinitely. This improves usability, but can have a significant performance impact if many people use it. The program is available from: http://www.ibm.com/servers/eserver/zseries/zos/unix/pollc.html The other solution is to run OUI from a telnet session.
142
Experiences Installing Oracle Database 10g on z/OS
B
Appendix B.
Creating a Hierarchical File System (HFS) In our case, we chose to use the z/OS Distributed File Service zSeries File System (zFS) to install Oracle Database 10g. However, using the USS Hierarchical File System (HFS) is still a viable option. In this appendix, we describe how you can allocate an HFS.
Allocating an HFS for the UNIX System Services (USS) files In this section, we discuss two methods for creating a directory in USS. Note that these are general procedures; the numbers and size of resources are provided for illustrative purposes only.
Using TSO to create an HFS Create the HFS using TSO by executing the following steps: 1. Choose ISPF option 6, then issue the ish command (this command gets you to the ishell so you can access USS files). 2. Press F10 to put the cursor on the action bar (top of screen). 3. Tab to File_systems, then press Enter. 4. Enter 2 for new on the pull-down menu. Enter the information shown in Example B-1 on page 144 to create one HFS file.
© Copyright IBM Corp. 2004. All rights reserved.
143
Example: B-1 Allocation of the HFS file
Production Library File system name omvs.user.orauss Primary cylinders 700 Secondary cylinders 50 Storage class H70SC Management class H70MC Data class H70DC Note: The storage class, management class, and data class shown here are examples only. Check with your z/OS systems programmer for the correct values to use in your environment.
Creating the directory for the mount point Mount points are directories over which an HFS is mounted. An HFS cannot be accessed through z/OS USS unless it has been mounted. The member BPXPRM00 in SYS1.PARMLIB can be used to automatically mount the HFS files at IPL time. To put this session into z/OS USS, log on as IBMU03, select ISPF option 6, and type: omvs. Then create a directory for the mount point, using the following commands: cd / mkdir orauss
Mounting the HFS file to the mount point An HFS file cannot be accessed through z/OS USS unless it has been associated with the mount point. To do so, the HFS files must have been allocated and the directory for the mount point created. As previously mentioned, member BPXPRM00 in SYS1.PARMLIB can be used to automatically mount at IPL time. You can also manually mount the HFS files via TSO. To mount HFS files manually: 1. 2. 3. 4.
Choose ISPF option 6, then issue the ish command. Press F10 to go to the action bar. Tab to File_systems, press Enter. Choose 3 for mount on the pull-down menu.
We entered the information shown in Example B-2 on page 145 to mount our HFS file.
144
Experiences Installing Oracle Database 10g on z/OS
Example: B-2 Mounting our HFS
Mount Point /orauss File system name OMVS.USER.ORAUSS File system type HFS New owner IBMU03
Changing the permissions of the HFS After you have mounted the HFS, you must change the attribute so that others will have read/write access to it, as follows: 1. 2. 3. 4. 5.
Choose ISPF option 6, then issue the ish command. Press F10 to go to the action bar. Tab to directory and press Enter. Choose 3 for Attributes on the pull-down menu. Change the permissions to 755 to allow write access; see Example B-3.
Example: B-3 File attributes
Display File Attributes Pathname : /orauss More: File type . . . . : Directory Permissions . . . : 755 File size . . . . : 8192 File owner . . . . : SHWUNG(1001) Group owner . . . : OEDFLTG(996) Last modified . . : 12/06/2000 10:30 GMT Last changed . . . : 12/06/2000 10:30 GMT Last accessed . . : 12/16/2000 04:22 GMT Created . . . . . : 08/24/2000 15:13 GMT Link count....: 24 Set UID bit . . . : 0
+
6. Use PF3 to save and exit.
Using a naming convention for HFS As we learned after setting up several subsystems on the same LPAR, it is easier to manage multiple HFS systems if a naming convention is used that relates the HFS to the subsystem (for example, in our case we should have used HFSOSD1 instead of ORAUSS).
Appendix B. Creating a Hierarchical File System (HFS)
145
Alternative way to create an HFS Alternatively, you can use IEFBR14 to create the temp and HFS and mount them, as shown in Example B-4. Example: B-4 Using IEFBR14
//jobcard //CRFS EXEC PGM=IEFBR14 //ORAUSS DD DSN=OMVS.USER.ORAUSS, // DISP=(NEW,KEEP,DELETE), // STORCLAS=H70SC, // DSNTYPE=HFS, // SPACE=(CYL,(700,50,1)) //* The HFS will need to be made permanent by listing it in SYS1.PARMLIB(BPXPRM00). Example: B-5 Listing the HFS in SYS1.PARMLIB(BPXPRM00)
MOUNT FILESYSTEM('OMVS.USER.ORAUSS') MOUNTPOINT('/orauss') TYPE(HFS) MODE(RDWR)
146
Experiences Installing Oracle Database 10g on z/OS
C
Appendix C.
Installing the Oracle Client In this appendix, we describe the steps we followed using the Oracle Universal Installer (OUI) to install the Oracle 10g Client on z/OS. This method would primarily be used if you want to set up a gateway product, or you if want to access an Oracle database on another platform from zOS.
Installing Oracle Client code First we restarted the OUI, as we had done in “Running the Universal Installer” on page 32, by issuing the ./runInstaller command. This brought us to the Welcome screen; see Figure C-1 on page 148.
© Copyright IBM Corp. 2004. All rights reserved.
147
Figure C-1 The Welcome screen
After pressing Next, we were asked to specify our file locations for the source and target. We used the same paths in our zFS as we did for the Oracle libraries. Because this was a first-time installation, we were asked where to put the inventory file. The default is /u/userid, but it is recommended that you change this and put it somewhere in your directory for Oracle (such as /oracle/inventory).
148
Experiences Installing Oracle Database 10g on z/OS
Figure C-2 Directory not found screen
You can use the browse button to search for the location. If a directory does not already exist, the program will create it for you; refer to Figure C-2. On the next window, shown in Figure C-3 on page 150, we had to verify that the program had found the source files. We also had to enter the directories where it would install the USS files.
Appendix C. Installing the Oracle Client
149
Figure C-3 Specifying file locations
Pressing Next brought us to the window shown in Figure C-4, where we chose to install the Oracle Client code (the second item in the option list).
Figure C-4 Selecting a product for installation
150
Experiences Installing Oracle Database 10g on z/OS
Figure C-5 Selecting the type of installation
As shown in Figure C-5, we chose to install the complete version of the client code. Next we entered the HLQ and Secondary qualifiers for our z/OS files (IBM1.V10GCL), as shown in Figure C-6.
Figure C-6 Entering the HLQ
Appendix C. Installing the Oracle Client
151
We installed the Client code in a separate directory and with a new OUIHOME, so we needed to create all the PDS files for this client install. In our case, we chose to have the OUI allocate these PDS datasets for us; refer to Figure C-7.
Figure C-7 Allocating the data sets
Note: If you happen to have an oraInst or oraInventory file, the OUI will use the PDSs you have used previously and you will not get the following windows.
152
Experiences Installing Oracle Database 10g on z/OS
Figure C-8 Allocating the INSTLIB
As shown in Figure C-8, for the INSTLIB allocation we entered SUP014 (our 3390 volume ID). Four other panels will have to be completed for AUTHLOAD, CMDLOAD and the rest of the libraries. (We do not show these windows here as they are covered in “Running the Universal Installer” on page 32.)
Appendix C. Installing the Oracle Client
153
Figure C-9 OUI Summary screen
We were presented with a summary of our choices, as shown in Figure C-9. (If you do not have sufficient space, you will get a message at this point.) This screen confirms that we had enough space for the USS files. You must ensure you have enough space for the PDS files. Next, we pressed Install and proceeded with the installation; refer to Figure C-10 on page 155.
154
Experiences Installing Oracle Database 10g on z/OS
Figure C-10 The OUI Installation screen
Just before the installation completed, a window appeared as shown in Figure C-11 which indicated that the next step has to be run by the userid with UID 0 (usually the system administrator). This is run to create or update the oratab file.
Figure C-11 Setup Privilege screen
After clicking OK, the screen shown in Figure C-12 on page 156 was displayed, indicating that the installation was successful.
Appendix C. Installing the Oracle Client
155
Figure C-12 The successful installation screen
The following files had been installed: IBM1.V10GCL.AUTHLOAD IBM1.V10GCL.CMDLOAD IBM1.V10GCL.H IBM1.V10GCL.INSTLIB IBM1.V10GCL.MACLIB IBM1.V10GCL.MESG IBM1.V10GCL.OBJLIB IBM1.V10GCL.SQL IBM1.V10GCL.SQLLIB IBM1.V10GCL.SRCLIB
156
Experiences Installing Oracle Database 10g on z/OS
The files in the USS directory were: $ ls ENV OPatch assistants bin client config ctx demo diagnostics dm install install.platform
inventory javavm jdbc jdk jdk14 jlib ldap lib md mesg mvscics mvsims
mvsosdi network nls oraInst.loc oracore osp oui owm perl plsql precomp rdbms
relnotes root.sh root.sh.old slax sqlj sqlplus sysman uix xdk
The Oracle client code was now installed. It was ready to be configured to connect to remote databases, as described in Chapter 6, “Connecting to the Oracle Database with SQLPlus” on page 83.
Appendix C. Installing the Oracle Client
157
158
Experiences Installing Oracle Database 10g on z/OS
D
Appendix D.
Restarting the OUI using the deinstall option There are two major scenarios that would require restarting the OUI: Leaving the installation before it completes (for example, if the person installing Oracle must handle a more critical issue and does not want to leave the install run unattended) Deciding to stop the current installation, remove all the files, and start over again Note: After successfully installing the database, do not remove the OUI home and the files installed under it, because the OUI may be used for other functions such as installing patches to Oracle in USS or z/OS. In this appendix, we describe the deinstall process.
© Copyright IBM Corp. 2004. All rights reserved.
159
Starting over If you want to start over from the very beginning, we recommend the following process. First, remove the following file: rm /var/opt/oracle/oraInst.loc This file contains the Oracle install gid and the location of the install or OUI home (this was created when you ran the OUI). Next, remove all the files under the OUIHOME. rm -rf $OUIHOME Note: The variable OUIHOME is the default for the installer. You may have chosen a different name for this. You may also want to remove the directory of the OUIHOME if you are going to use a different directory. Depending on how far along you were in the OUI process, you may need to remove files from USS or TSO. In our case, we found that many of the Oracle binaries were still present. So to start a complete reinstall, we went to the ORACLE_HOME directory and issued the command rm -r * to remove all files in the directory. On the TSO side, we removed all the PDS and VSAM files under our HLQ of IBM1. After this has been completed, start the process from the beginning. Although Oracle provides a deinstall process to remove database instances, it does not perform as complete a cleanup as the steps described here.
Testing the deinstall process We decided to start over from the beginning, so we used the deinstall option to remove a database that had a SID of ORA1 (the database must be shut down before starting this process). We started the installer by issuing the command ./runInstaller. Then, on the Welcome panel, we clicked the deinstall button and the following screen appeared. We then clicked OUIHOME1 to expand the list of products.
160
Experiences Installing Oracle Database 10g on z/OS
Appendix D. Restarting the OUI using the deinstall option
161
OUIHOME was the Oracle Home that we wanted to delete, so we checked this entry. The next screen asked that we confirm the components we wanted to delete; we clicked Yes.
After the deinstaller removed these products and components, the database instance could no longer be started. After the deinstall process was completed, we tried a second time to start the deinstaller. The following screen showed that we had nothing installed to remove.
162
Experiences Installing Oracle Database 10g on z/OS
However, as previously mentioned, we found that many of the Oracle binaries were still present. So to start a complete reinstall, we went to the ORACLE_HOME directory and issued the rm -r * command to remove all files in the directory. We also removed the files in /var/opt/oracle as noted in “Starting over” on page 160. On the TSO side, we removed all the PDS and VSAM files under our HLQ of IBM1. At this point, we were ready to restart the installation process.
Appendix D. Restarting the OUI using the deinstall option
163
164
Experiences Installing Oracle Database 10g on z/OS
E
Appendix E.
Silent install example In this appendix, we show an example of the silent installation process that we tested.
© Copyright IBM Corp. 2004. All rights reserved.
165
Using the non-interactive install process We installed the database and configured the subsystem using the -silent switch of the ./runInstaller command. This is accomplished by placing all entries required for the installation panels during the OUI installation process in a response file. The advantage of doing this is that once the response file is set up, it will run without intervention until the end, when the root.sh script must be run by a user with root authority. The same idea applies to the configuration script, except that it will complete without needing other scripts to be run. Of course, all the data must be typed in 100% correctly or the install will fail, install with options you did not really want, or put data sets in wrong places. The response file is located in the directory structure where Disk1 resides; in our case: /oracle/v1010/Disk1/stage/Response We took the response file oracle.mvsosdi.server.Complete.install.rsp and copied it to denny.complete.install.rsp. We entered the install data in the response file and initiated a silent install with the following command; ./runInstaller -silent -responseFile /oracle/v1010/Disk1/stage/Response/denny.complete.install.rsp It is important to insure that the userid used for the install does not have root authority in USS. You can check this by executing a id command to insure the uid is not 0. For the oracle3 userid, the id command gave the following: uid=6676(ORACLE3) gid=0(SYS1) The uid is not 0, thus indicating no root authority. An example of root authority is: uid=0(DUTCH) gid=0(SYS1) The uid is 0 in this example, thus indicating root authority. Note: The full path name must be given for the response file.
166
Experiences Installing Oracle Database 10g on z/OS
Performing a silent install 1. Perform the same preinstallation steps as for an interactive install. 2. Verify that you have the directory set up correctly for Disk1 and Disk2; in our case: /oracle/v1010/Disk1 and Disk2 This is most easily accomplished from USS. 3. Make the changes to the response file that are correct for your installation. The easiest way to do this is to use oedit in USS. 4. Log on to USS from an X Windows client. We used VNC. We reached USS by logging into a Linux guest and then performing a telnet to USS, using the id for the Oracle install. We did a telnet to USS from VNC in order to avoid having to constantly press Enter in USS. As the installer runs, there is console output (even if it is redirected to a file). USS will drop to “input” mode frequently and you will need to press Enter to go back to “running” mode, which defeats the purpose of doing a silent install. 5. Run the installer as described. During the silent install, the installer will write several files, including the inventory files. These files will be written in the home directory of the installer id. In our case: /u/oracle3/oraInventory Do not put the inventory files in ORACLE_HOME, as this will create problems later. We allowed the installer to use the default location under the user home directory. This may be different from where these files may be put in other UNIX systems. Other files that are written are: /var/opt/oracle/oraInst.loc and oratab /usr/local/bin/dbhome and oraenv 6. At the end of the silent install, you will be asked to run root.sh. We did this by going into USS from TSO with an id that has root authority and entering ./root.sh. A log of the install will be kept in the inventory location; for example: /u/oracle3/oraInventory/logs/silentInstall2004-5-14_12-04-29PM.log 7. After completing the silent install, we went to TSO and checked the ORACLE3 PDSs to verify that the install had executed correctly and placed the data sets where we wanted; see Example E-1 on page 168.
Appendix E. Silent install example
167
Example: E-1 List of PDS files after completion
ORACLE3.V10G.AUTHLOAD ORACLE3.V10G.CMDLOAD ORACLE3.V10G.H ORACLE3.V10G.INSTLIB ORACLE3.V10G.LINKLIB ORACLE3.V10G.MACLIB ORACLE3.V10G.MESG ORACLE3.V10G.OBJLIB ORACLE3.V10G.SQL ORACLE3.V10G.SQLLIB ORACLE3.V10G.SRCLIB 8. We used the same process to do the subsystem configuration. For the configuration run we made a copy of the response file: oracle.mvsosdi.server.config.Typical.rsp Note: At the time of writing, the silent install for the configuration did not work. A second INSTLIB and a PARMLIB were created with the wrong hlq. The fix is provided here and should appear in the first patch set.
After making the copy of the response file, we made the appropriate changes to the variables for our installation. However, there was a bug in the response for the typical configuration, shown here: /oracle/v1010/Disk1/stage/Response/oracle.mvsosdi..config.Typical.rsp
Because of this, we made the following changes per Oracle support: a. We added the variable ORACLE_DB_HLQ and set it to ORACLE3.V10G. b. We changed DB_HLQ to ORACLE3.V10G and the script then created the PDS with the correct HLQ. Example E-2 shows the part of the response file we had to change. Example: E-2 Changes to silent install - config response file
000683 #---------------------------------------------------------------------000684 #Name : DB_HLQ 000685 #Datatype : String 000686 #Description: High level qualifier for database and parameter files.
168
Experiences Installing Oracle Database 10g on z/OS
000687 #Component : oracle.mvsosdi.config 000688 #---------------------------------------------------------------------000689 000690 oracle.mvsosdi.config:DB_HLQ="ORACLE3.V10G" 000691 #---------------------------------------------------------------------000692 #Name : ORACLE_DB_HLQ 000693 #Datatype : String 000694 #Description: High level qualifier for database and parameter files. 000695 #Per Oracle Support to fix problem of creating PDS with wrong HLQ 000696 #Component : oracle.mvsosdi.config 000697 #---------------------------------------------------------------------000698 000699 oracle.mvsosdi.config:ORACLE_DB_HLQ="ORACLE3.V10G"
Our response file Example 9-1 The script we used for installing the DB Server code
#################################################################### ## Copyright(c) Oracle Corporation 1998,2002. All rights reserved.## ## ## ## Specify values for the variables listed below to customize ## ## your installation. ## ## ## ## Each variable is associated with a comment. The comment ## ## identifies the variable type. ## ## ## ## Please specify the values in the following format ## ## Type Example ## ## String "Sample Value" ## ## Boolean True or False ## ## Number 1000 ## ## StringList {"String value 1","String Value 2"} ## ## ## ## The values that are given as need to be ## ## specified for a silent installation to be successful. ##
Appendix E. Silent install example
169
## ## ## ## ## This response file is generated by Oracle Software ## ## Packager. ## #################################################################### RESPONSEFILE_VERSION=2.2.1.0.0 #----------------------------------------------------------------------------#Name : UNIX_GROUP_NAME #Datatype : String #Description: Unix group to be set for the inventory directory. Valid only in Unix platforms. #Example: UNIX_GROUP_NAME = "install" #----------------------------------------------------------------------------UNIX_GROUP_NAME="SYS1" #----------------------------------------------------------------------------#Name : FROM_LOCATION #Datatype : String #Description: Complete path to the products.xml. #Example: FROM_LOCATION = "../stage/products.xml" #-----------------------------------------------------------------------------FROM_LOCATION="/SC04/oracle/v1010/Disk1/stage/products.xml" #----------------------------------------------------------------------------#Name : FROM_LOCATION_CD_LABEL #Datatype : String #Description: This variable should only be used in multi-CD installations. It includes the label of the compact disk where the file "products.xml" exists. The label can be found in the file "disk.label" in the same directory as products.xml. #Example: FROM_LOCATION_CD_LABEL = "CD Label" #----------------------------------------------------------------------------FROM_LOCATION_CD_LABEL="10.1.0.2" #----------------------------------------------------------------------------#Name : NEXT_SESSION_RESPONSE #Datatype : String #Description: Optionally specifies the full path of the next session's response file. If only a file name is specified, the response file is retrieved from the /oraInstall directory. This variable is only active if NEXT_SESSION is set to true. #Example: NEXT_SESSION_RESPONSE = "nextinstall.rsp"
170
Experiences Installing Oracle Database 10g on z/OS
#----------------------------------------------------------------------------#NEXT_SESSION_RESPONSE= #----------------------------------------------------------------------------#Name : LOCATION_FOR_DISK2 #Datatype : String #Description: Complete path to the other disks. #Example: LOCATION_FOR_DISK2 = "../../Disk2" #----------------------------------------------------------------------------LOCATION_FOR_DISK2="/oracle/v1010/Disk2" #----------------------------------------------------------------------------#Name : ORACLE_HOME #Datatype : String #Description: Complete path of the Oracle Home. #Example: ORACLE_HOME = "C:\OHOME1" #----------------------------------------------------------------------------ORACLE_HOME="/oracle/v1010_DB" #----------------------------------------------------------------------------#Name : ORACLE_HOME_NAME #Datatype : String #Description: Oracle Home Name. Used in creating folders and services. #Example: ORACLE_HOME_NAME = "OHOME1" #----------------------------------------------------------------------------ORACLE_HOME_NAME="ORA1_HOME" #----------------------------------------------------------------------------#Name : TOPLEVEL_COMPONENT #Datatype : StringList #Description: The top level component to be installed in the current session. #The following choices are available. The value should contain only one of these choices. #The choices are of the form Internal Name, Version : External name. Please use the internal name and version while specifying the value. # oracle.mvsosdi.server, 10.1.0.2.0 : Oracle z/OS Database 10g 10.1.0.2.0 # oracle.mvsosdi.client, 10.1.0.2.0 : Oracle z/OS Client 10.1.0.2.0 # oracle.mvsosdi.tg, 10.1.0.2.0 : Oracle Transparent Gateways 10.1.0.2.0
Appendix E. Silent install example
171
# oracle.mvsosdi.config, 10.1.0.2.0 : Oracle z/OS Database and Subsystem Configuration 10.1.0.2.0 #Example: TOPLEVEL_COMPONENT = {"oracle.mvsosdi.server","10.1.0.2.0"} #----------------------------------------------------------------------------TOPLEVEL_COMPONENT={"oracle.mvsosdi.server","10.1.0.2.0"} #----------------------------------------------------------------------------#Name : DEINSTALL_LIST #Datatype : StringList #Description: List of components to be deinstalled during a deinstall session. #The following choices are available. The value should contain only one of these choices. #The choices are of the form Internal Name, Version : External name. Please use the internal name and version while specifying the value. # oracle.mvsosdi.server, 10.1.0.2.0 : Oracle z/OS Database 10g 10.1.0.2.0 # oracle.mvsosdi.client, 10.1.0.2.0 : Oracle z/OS Client 10.1.0.2.0 # oracle.mvsosdi.tg, 10.1.0.2.0 : Oracle Transparent Gateways 10.1.0.2.0 # oracle.mvsosdi.config, 10.1.0.2.0 : Oracle z/OS Database and Subsystem Configuration 10.1.0.2.0 #Example: DEINSTALL_LIST = {"oracle.mvsosdi.server","10.1.0.2.0"} #----------------------------------------------------------------------------DEINSTALL_LIST={"oracle.mvsosdi.server","10.1.0.2.0"} #----------------------------------------------------------------------------#Name : SHOW_SPLASH_SCREEN #Datatype : Boolean #Description: Set to true if the initial splash screen in OUI needs to be shown. #Example: SHOW_SPLASH_SCREEN = true #----------------------------------------------------------------------------SHOW_SPLASH_SCREEN=true #----------------------------------------------------------------------------#Name : SHOW_WELCOME_PAGE #Datatype : Boolean #Description: Set to true if the Welcome page in OUI needs to be shown. #Example: SHOW_WELCOME_PAGE = false #-----------------------------------------------------------------------------
172
Experiences Installing Oracle Database 10g on z/OS
SHOW_WELCOME_PAGE=false #----------------------------------------------------------------------------#Name : SHOW_COMPONENT_LOCATIONS_PAGE #Datatype : Boolean #Description: Set to true if the component locations page in OUI needs to be shown. #This page only appears if there are products whose installed directory can be changed. #If you set this to false you will prevent the user from being able to specify alternate directories. #Example: SHOW_COMPONENT_LOCATIONS_PAGE = false #----------------------------------------------------------------------------SHOW_COMPONENT_LOCATIONS_PAGE=true #----------------------------------------------------------------------------#Name : SHOW_CUSTOM_TREE_PAGE #Datatype : Boolean #Description: Set to true if the custom tree page in OUI needs to be shown. #Use this page to select or de-select dependencies. This page appears only in a custom install type. #Example: SHOW_CUSTOM_TREE_PAGE = false #----------------------------------------------------------------------------SHOW_CUSTOM_TREE_PAGE=false #----------------------------------------------------------------------------#Name : SHOW_SUMMARY_PAGE #Datatype : Boolean #Description: Set to true if the summary page in OUI needs to be shown. #The summary page shows the list of components that will be installed in this session. #Example: SHOW_SUMMARY_PAGE = true #----------------------------------------------------------------------------SHOW_SUMMARY_PAGE=true #----------------------------------------------------------------------------#Name : SHOW_INSTALL_PROGRESS_PAGE #Datatype : Boolean #Description: Set to true if the install progress page in OUI needs to be shown.
Appendix E. Silent install example
173
#This page shows the current status in the installation. The current status includes the product being installed and the file being copied. #Example: SHOW_INSTALL_PROGRESS_PAGE = true #----------------------------------------------------------------------------SHOW_INSTALL_PROGRESS_PAGE=true #----------------------------------------------------------------------------#Name : SHOW_REQUIRED_CONFIG_TOOL_PAGE #Datatype : Boolean #Description: Set to true if the required config assistants page in OUI needs to be shown. #This page shows the list of required configuration assistants that are part of this installation. #It shows the status of each assistant, including any failures with detailed information on why it failed. #Example: SHOW_REQUIRED_CONFIG_TOOL_PAGE = true #----------------------------------------------------------------------------SHOW_REQUIRED_CONFIG_TOOL_PAGE=true #----------------------------------------------------------------------------#Name : SHOW_CONFIG_TOOL_PAGE #Datatype : Boolean #Description: Set to true if the config assistants page in OUI needs to be shown. #This page shows the list of configuration assistants that are part of this installation and are configured to launch automatically. #It shows the status of each assistant, including any failures with detailed information on why it failed. #Example: SHOW_CONFIG_TOOL_PAGE = true #----------------------------------------------------------------------------SHOW_CONFIG_TOOL_PAGE=true #----------------------------------------------------------------------------#Name : SHOW_XML_PREREQ_PAGE #Datatype : Boolean #Description: This variable determines whether or not to show the prereq page. #Example: SHOW_XML_PREREQ_PAGE = true #----------------------------------------------------------------------------SHOW_XML_PREREQ_PAGE=true
174
Experiences Installing Oracle Database 10g on z/OS
#----------------------------------------------------------------------------#Name : SHOW_RELEASE_NOTES #Datatype : Boolean #Description: Set to true if the release notes of this installation need to be shown at the end of installation. #This dialog is launchable from the End of Installation page and shows the list of release notes available for the products just installed. # This also requires the variable SHOW_END_SESSION_PAGE variable to be set to true. #Example: SHOW_RELEASE_NOTES = true #----------------------------------------------------------------------------SHOW_RELEASE_NOTES=false #----------------------------------------------------------------------------#Name : SHOW_ROOTSH_CONFIRMATION #Datatype : Boolean #Description: Set to true if the Confirmation dialog asking to run the root.sh script in OUI needs to be shown. #Valid only for Unix platforms. #Example: SHOW_ROOTSH_CONFIRMATION = true #----------------------------------------------------------------------------SHOW_ROOTSH_CONFIRMATION=true #----------------------------------------------------------------------------#Name : SHOW_END_SESSION_PAGE #Datatype : Boolean #Description: Set to true if the end of session page in OUI needs to be shown. #This page shows if the installation is successful or not. #Example: SHOW_END_SESSION_PAGE = true #----------------------------------------------------------------------------SHOW_END_SESSION_PAGE=true #----------------------------------------------------------------------------#Name : SHOW_EXIT_CONFIRMATION #Datatype : Boolean #Description: Set to true if the confirmation when exiting OUI needs to be shown. #Example: SHOW_EXIT_CONFIRMATION = true #-----------------------------------------------------------------------------
Appendix E. Silent install example
175
SHOW_EXIT_CONFIRMATION=true #----------------------------------------------------------------------------#Name : NEXT_SESSION #Datatype : Boolean #Description: Set to true to allow users to go back to the File Locations page for another installation. This flag also needs to be set to true in order to process another response file (see NEXT_SESSION_RESPONSE). #Example: NEXT_SESSION = true #----------------------------------------------------------------------------NEXT_SESSION=false #----------------------------------------------------------------------------#Name : NEXT_SESSION_ON_FAIL #Datatype : Boolean #Description: Set to true to allow users to invoke another session even if current install session has failed. This flag is only relevant if NEXT_SESSION is set to true. #Example: NEXT_SESSION_ON_FAIL = true #----------------------------------------------------------------------------NEXT_SESSION_ON_FAIL=false #----------------------------------------------------------------------------#Name : SHOW_DEINSTALL_CONFIRMATION #Datatype : Boolean #Description: Set to true if deinstall confimation is needed during a deinstall session. #Example: SHOW_DEINSTALL_CONFIRMATION = true #----------------------------------------------------------------------------SHOW_DEINSTALL_CONFIRMATION=false #----------------------------------------------------------------------------#Name : SHOW_DEINSTALL_PROGRESS #Datatype : Boolean #Description: Set to true if deinstall progress is needed during a deinstall session. #Example: SHOW_DEINSTALL_PROGRESS = true #-----------------------------------------------------------------------------SHOW_DEINSTALL_PROGRESS=false #-----------------------------------------------------------------------------
176
Experiences Installing Oracle Database 10g on z/OS
#Name : ACCEPT_LICENSE_AGREEMENT #Datatype : Boolean #Description: By setting this variable to true, you are accepting the license agreement. This variable is used only for silent installations. #Example: ACCEPT_LICENSE_AGREEMENT = true #----------------------------------------------------------------------------ACCEPT_LICENSE_AGREEMENT=false #----------------------------------------------------------------------------#Name : RESTART_SYSTEM #Datatype : Boolean #Description: Set to true to allow automatic restart of the system, if set to false then installer will exit without restarting, no exit confirmation dialog is shown #Example: RESTART_SYSTEM = false #----------------------------------------------------------------------------RESTART_SYSTEM=true #-----------------------------------------------------------------------------#Name : CLUSTER_NODES #Datatype : StringList #Description: This variable represents the cluster node names selected by the user for installation. #Example: CLUSTER_NODES = {"node1"} #----------------------------------------------------------------------------#CLUSTER_NODES= #----------------------------------------------------------------------------#Name : OUI_HOSTNAME #Datatype : String #Description: This variable holds the hostname of the system as set by the user. #Example: OUI_HOSTNAME = #-----------------------------------------------------------------------------OUI_HOSTNAME="wtsc04oe.itso.ibm.com" #----------------------------------------------------------------------------#Name : REMOVE_HOMES #Datatype : StringList #Description: List of the homes to be removed during a deinstall session. Each home is represented by its full path. #Example: REMOVE_HOMES = {,, ...}
Appendix E. Silent install example
177
#----------------------------------------------------------------------------#REMOVE_HOMES= #----------------------------------------------------------------------------#Name : COMPONENT_LANGUAGES #Datatype : StringList #Description: Languages in which the components will be installed. #The following choices are available. The value should contain only one of these choices. #The choices are of the form Internal Name : External name. Please use the internal name while specifying the value. # en, : English # fr, : French # ar, : Arabic # bn, : Bengali # pt_BR, : Brazilian Portuguese #Example: COMPONENT_LANGUAGES = {"en"} #Component : oracle.mvsosdi.server #----------------------------------------------------------------------------oracle.mvsosdi.server:COMPONENT_LANGUAGES={"en"}# ----------------------------------------------------------------------------#Name : INSTALL_TYPE #Datatype : String #Description: Installation type of the component. #The following choices are available. The value should contain only one of these choices. #The choices are of the form Internal Name : External name. Please use the internal name while specifying the value. # Typical, : Typical # Complete, : Complete # Custom, : Custom #Example: INSTALL_TYPE = "Typical" #Component : oracle.mvsosdi.server #----------------------------------------------------------------------------oracle.mvsosdi.server:INSTALL_TYPE="Typical" #----------------------------------------------------------------------------#Name : ORACLE_HLQ_PDS #Datatype : String #Description: HLQ_desc #Component : oracle.mvsosdi.server
178
Experiences Installing Oracle Database 10g on z/OS
#----------------------------------------------------------------------------oracle.mvsosdi.server:ORACLE_HLQ_PDS="ORACLE3.V10G" #----------------------------------------------------------------------------#Name : s_nameForOPERGrp #Datatype : String #Description: oper group #Component : oracle.rdbms #----------------------------------------------------------------------------oracle.rdbms:s_nameForOPERGrp="SYS1" #----------------------------------------------------------------------------#Name : s_nameForDBAGrp #Datatype : String #Description: dba group #Component : oracle.rdbms #----------------------------------------------------------------------------oracle.rdbms:s_nameForDBAGrp="SYS1" #----------------------------------------------------------------------------#Name : Use_SMS #Datatype : Boolean #Description: SMS_desc #Component : oracle.mvsosdi.mvsalloc #----------------------------------------------------------------------------oracle.mvsosdi.mvsalloc:Use_SMS=false #----------------------------------------------------------------------------#Name : ORACLE_SRCLIB_VOLUME #Datatype : String #Description: The volume name for the SRCLIB data set #Component : oracle.mvsosdi.mvsalloc #----------------------------------------------------------------------------oracle.mvsosdi.mvsalloc:ORACLE_SRCLIB_VOLUME="ORACL9" #----------------------------------------------------------------------------#Name : ORACLE_SRCLIB_UNIT #Datatype : String #Description: The Unit type for the volume for the SRCLIB #Component : oracle.mvsosdi.mvsalloc
Appendix E. Silent install example
179
#----------------------------------------------------------------------------oracle.mvsosdi.mvsalloc:ORACLE_SRCLIB_UNIT="SYSDA" #----------------------------------------------------------------------------#Name : ORACLE_SQL_VOLUME #Datatype : String #Description: The volume name for the SQL data set #Component : oracle.mvsosdi.mvsalloc #----------------------------------------------------------------------------oracle.mvsosdi.mvsalloc:ORACLE_SQL_VOLUME="ORACL9" #----------------------------------------------------------------------------#Name : ORACLE_SQL_UNIT #Datatype : String #Description: The Unit type for the volume for the SQL #Component : oracle.mvsosdi.mvsalloc #----------------------------------------------------------------------------oracle.mvsosdi.mvsalloc:ORACLE_SQL_UNIT="SYSDA" #----------------------------------------------------------------------------#Name : ORACLE_SQLLIB_VOLUME #Datatype : String #Description: The volume name for the SQLLIB data set #Component : oracle.mvsosdi.mvsalloc #----------------------------------------------------------------------------oracle.mvsosdi.mvsalloc:ORACLE_SQLLIB_VOLUME="ORACL9" #----------------------------------------------------------------------------#Name : ORACLE_SQLLIB_UNIT #Datatype : String #Description: The Unit type for the volume for the SQLLIB #Component : oracle.mvsosdi.mvsalloc #----------------------------------------------------------------------------oracle.mvsosdi.mvsalloc:ORACLE_SQLLIB_UNIT="SYSDA" #----------------------------------------------------------------------------#Name : ORACLE_OBJLIB_VOLUME #Datatype : String #Description: The volume name for the OBJLIB data set #Component : oracle.mvsosdi.mvsalloc
180
Experiences Installing Oracle Database 10g on z/OS
#----------------------------------------------------------------------------oracle.mvsosdi.mvsalloc:ORACLE_OBJLIB_VOLUME="ORACL9" #----------------------------------------------------------------------------#Name : ORACLE_OBJLIB_UNIT #Datatype : String #Description: The Unit type for the volume for the OBJLIB #Component : oracle.mvsosdi.mvsalloc #----------------------------------------------------------------------------oracle.mvsosdi.mvsalloc:ORACLE_OBJLIB_UNIT="SYSDA" #----------------------------------------------------------------------------#Name : ORACLE_MESG_VOLUME #Datatype : String #Description: MESG_volume_desc #Component : oracle.mvsosdi.mvsalloc #----------------------------------------------------------------------------oracle.mvsosdi.mvsalloc:ORACLE_MESG_VOLUME="ORACL9" #----------------------------------------------------------------------------#Name : ORACLE_MESG_UNIT #Datatype : String #Description: MESG_unit_desc #Component : oracle.mvsosdi.mvsalloc #----------------------------------------------------------------------------oracle.mvsosdi.mvsalloc:ORACLE_MESG_UNIT="SYSDA" #----------------------------------------------------------------------------#Name : ORACLE_MESG_SECONDARY #Datatype : String #Description: The secondary extents of the MESG data set in cylinders #Component : oracle.mvsosdi.mvsalloc #----------------------------------------------------------------------------oracle.mvsosdi.mvsalloc:ORACLE_MESG_SECONDARY=100 #----------------------------------------------------------------------------#Name : ORACLE_MESG_PRIMARY #Datatype : String #Description: The primary extent of the MESG data set in cylinders #Component : oracle.mvsosdi.mvsalloc
Appendix E. Silent install example
181
#----------------------------------------------------------------------------oracle.mvsosdi.mvsalloc:ORACLE_MESG_PRIMARY=200 #----------------------------------------------------------------------------#Name : ORACLE_MACLIB_VOLUME #Datatype : String #Description: The volume name for the MACLIB data set #Component : oracle.mvsosdi.mvsalloc #----------------------------------------------------------------------------oracle.mvsosdi.mvsalloc:ORACLE_MACLIB_VOLUME="ORACL9" #----------------------------------------------------------------------------#Name : ORACLE_MACLIB_UNIT #Datatype : String #Description: The Unit type for the volume for the MACLIB #Component : oracle.mvsosdi.mvsalloc #----------------------------------------------------------------------------oracle.mvsosdi.mvsalloc:ORACLE_MACLIB_UNIT="SYSDA" #----------------------------------------------------------------------------#Name : ORACLE_H_VOLUME #Datatype : String #Description: The volume name for the H data set #Component : oracle.mvsosdi.mvsalloc #----------------------------------------------------------------------------oracle.mvsosdi.mvsalloc:ORACLE_H_VOLUME="ORACL9" #----------------------------------------------------------------------------#Name : ORACLE_H_UNIT #Datatype : String #Description: The Unit type for the volume for the Header file #Component : oracle.mvsosdi.mvsalloc #----------------------------------------------------------------------------oracle.mvsosdi.mvsalloc:ORACLE_H_UNIT="SYSDA" #----------------------------------------------------------------------------#Name : ORACLE_CMDLOAD_VOLUME #Datatype : String #Description: CMDLOAD_volume_desc #Component : oracle.mvsosdi.mvsalloc
182
Experiences Installing Oracle Database 10g on z/OS
#----------------------------------------------------------------------------oracle.mvsosdi.mvsalloc:ORACLE_CMDLOAD_VOLUME="ORACL9" #----------------------------------------------------------------------------#Name : ORACLE_CMDLOAD_UNIT #Datatype : String #Description: CMDLOAD_unit_desc #Component : oracle.mvsosdi.mvsalloc #----------------------------------------------------------------------------oracle.mvsosdi.mvsalloc:ORACLE_CMDLOAD_UNIT="SYSDA" #----------------------------------------------------------------------------#Name : ORACLE_CMDLOAD_SECONDARY #Datatype : String #Description: The secondary extent of the CMDLOAD data set in cylinders #Component : oracle.mvsosdi.mvsalloc #----------------------------------------------------------------------------oracle.mvsosdi.mvsalloc:ORACLE_CMDLOAD_SECONDARY=100 #----------------------------------------------------------------------------#Name : ORACLE_CMDLOAD_PRIMARY #Datatype : String #Description: The Primary extent of the CMDLOAD data set in cylinders #Component : oracle.mvsosdi.mvsalloc #----------------------------------------------------------------------------oracle.mvsosdi.mvsalloc:ORACLE_CMDLOAD_PRIMARY=225 #----------------------------------------------------------------------------#Name : ORACLE_AUTHLOAD_VOLUME #Datatype : String #Description: AUTHLOAD_volume_desc #Component : oracle.mvsosdi.mvsalloc #----------------------------------------------------------------------------oracle.mvsosdi.mvsalloc:ORACLE_AUTHLOAD_VOLUME="ORACL9" #----------------------------------------------------------------------------#Name : ORACLE_AUTHLOAD_UNIT #Datatype : String #Description: AUTHLOAD_unit_desc #Component : oracle
Appendix E. Silent install example
183
#----------------------------------------------------------------------------oracle.mvsosdi.mvsalloc:ORACLE_AUTHLOAD_UNIT="SYSDA" #----------------------------------------------------------------------------#Name : ORACLE_AUTHLOAD_SECONDARY #Datatype : String #Description: The secondary extents of the AUTHLOAD data set in cylinders #Component : oracle.mvsosdi.mvsalloc #----------------------------------------------------------------------------oracle.mvsosdi.mvsalloc:ORACLE_AUTHLOAD_SECONDARY=100 #----------------------------------------------------------------------------#Name : ORACLE_AUTHLOAD_PRIMARY #Datatype : String #Description: The primary extent of the authload data set in cylinders #Component : oracle.mvsosdi.mvsalloc #----------------------------------------------------------------------------oracle.mvsosdi.mvsalloc:ORACLE_AUTHLOAD_PRIMARY=200 #----------------------------------------------------------------------------#Name : Allocate_pds #Datatype : Boolean #Description: Alloc_desc #Component : oracle.mvsosdi.mvsalloc #----------------------------------------------------------------------------oracle.mvsosdi.mvsalloc:Allocate_pds=true #----------------------------------------------------------------------------#Name : SMS_sel #Datatype : StringList #Description: SMS selection - String list in the format { Mgmt Class, Stor Class, Data Class } #Component : oracle.mvsosdi.mvsalloc #----------------------------------------------------------------------------#SMS_sel= #----------------------------------------------------------------------------#Name : OPTIONAL_CONFIG_TOOLS #Datatype : StringList
184
Experiences Installing Oracle Database 10g on z/OS
#Description: List of optional config assistants that need to be launched. #The following choices are available. The value should contain only one of these choices. #The choices are of the form Internal Name : External name. Please use the internal name while specifying the value. # netca, : Oracle Net Configuration Assistant #Example: OPTIONAL_CONFIG_TOOLS = {"netca"} #Component : oracle.networking.netca #----------------------------------------------------------------------------oracle.networking.netca:OPTIONAL_CONFIG_TOOLS={"netca"}
Appendix E. Silent install example
185
186
Experiences Installing Oracle Database 10g on z/OS
Related publications The publications listed in this section are considered particularly suitable for a more detailed discussion of the topics covered in this redbook.
IBM Redbooks For information on ordering these publications, see “How to get IBM Redbooks” on page 188. Note that some of the documents referenced here may be available in softcopy only. Experiences with Migrating Oracle to OS/390, SG24-4981 Managing Oracle 8.1.7 on OS/390, SG24-5972 Experiences Installing Oracle Release 3 (8.1.7) for OS/390, SG24-5973 Experiences with Oracle for Linux on zSeries, SG24-6552
Other publications These publications are also relevant as further information sources: Oracle Database User’s Guide 10g Release 1 (10.1) for IBM z/OS, B13524-01 Oracle Database Installation Guide 10g Release 1 (10.1) for IBM z/OS, B13525-01 Oracle Database System Administration Guide 10g Release 1 (10.1) for IBM z/OS, B13526-01 Oracle Database Messages Guide 10g Release 1 (10.1) for IBM z/OS, B13527-01 Oracle Database Release Notes 10g Release 1 (10.1) for IBM z/OS, B13528-01 z/OS UNIX Systems Services Planning, GA22-7800 MVS Planning: Workload Management, SA22-7602
© Copyright IBM Corp. 2004. All rights reserved.
187
Online resources These Web sites and URLs are also relevant as further information sources: Oracle Technical Network http://otn.oracle.com/ Oracle Store http://store.oracle.com/ Oracle Metalink Network http://metalink.oracle.com
How to get IBM Redbooks You can search for, view, or download Redbooks, Redpapers, Hints and Tips, draft publications and Additional materials, as well as order hardcopy Redbooks or CD-ROMs, at this Web site: ibm.com/redbooks
Help from IBM IBM Support and downloads ibm.com/support IBM Global Services ibm.com/services
188
Experiences Installing Oracle Database 10g on z/OS
Index Symbols ./runInstaller 33 /u/userid. 148 /var/opt/oracle 50, 160
Numerics 10K RPM 120 15K RPM 120
CPLNKLST job 75 create a new database 77 custom install 38 Cygwin 135, 140 Cygwin/X 139
D
AAL 124 address spaces 82 AFP-authorize 24 ALLOC command 84 allocate 78 anchor 93 Arrays Across Loops 124 AUTHLOAD 153 AUTHLOAD library 24 Automatic Storage Management 2
data class 144 database archiving 78 passwords 78 service 81 DB_HLQ 168 DEFINE job 72 deinstall option 159 deinstall process 159–160 Deinstall Products 35 device adapter 119 device adapters 134 disk groups 134 DISPLAY variable 141
B
E
back-end disk writes 123 bottlenecks 120 BPXPRM00 144 bursts of writes 134
effective capacity 121 emctl command 116 emd.properties 110 enclave 92–93, 101 ENV 84 ESCON 118 Exceed 138 Exceed software 135 EXPORT DISPLAY command 137, 141 export/import 2 Extended 127 Extended Remote Copy 127
A
C cached subsystem 128 catalog 78 catproc 78 CKD 132 classification rule 107 Classification. see WLM client code 37 client requests 93 clusters 134 CMDLOAD 153 contiguous space 43 COPYPROC job 71 count-key-data 125
© Copyright IBM Corp. 2004. All rights reserved.
F FAST_START_MTTR_TARGET 133 FICON 118 Flash Copy 127 FREE command 85 full path name 166
189
G
N
gateway product 147 gateway products 37 gid 160 goal. see WLM grid computing 2
NET 4 NET Service 81 NET Service group 52 non-interactive install process 166 nonvolatile storage 119 Note 78 NVS 126, 133
H HFS 6, 143 HLQ 39, 168 host adapter 119 host adapters 134
I IA 7 IBM ESS 117 IBM Personal Communications (PCOMM) 12 IBM TotalStorage Enterprise SubSystem 117 importance. see WLM incremental backup 2 initialized subsystem 78 input mode 167 Intelligent Agent 7, 109 interactive install 167 interMedia text 78 ipaddress 141 ISPF 145
J Java VM 78 JDK 1.4 50
L Language Environment/370, 3 LE (Language Environment) 5 LIBPATH 111 Linux Intel system 135 log listings 78 LPAR 145 LRU 129
M management class 144 mount point 144 MPM 3
190
O oedit 167 OEM 7, 110 OMS 7 OMVS 84, 141 Operating System Dependant Interface. see OSDI ORA_NLS 110 ORA_NLS32 110 ORA_NLS33 110 ORA1.ALERT 78 Oracle client code 147 Oracle Concurrent Manager 96 Oracle Database allocate 78 Oracle Database 10g 1, 9 Oracle Enterprise Manager 110 Oracle Enterprise Manager. see OEM Oracle inventory directory 49 Oracle Management Agent 115 Oracle tools 6 Oracle Universal Installer 29 ORACLE_DB_HLQ 169 ORACLE_HOME 35–36, 84, 110, 171 ORACLE_SID 84 oraInst.loc 50, 160 oraInventory 50 ORATAB 110 OSD1JDOO 78 OSDI 3 OTN 29 OUI 135 OUI home 160 OUI_HOME 36
P Parallel Access Volumes 126 parity disk 122 PARMLIB 65 patch set 168
Experiences Installing Oracle Database 10g on z/OS
PATH 111 PATH variable 84 PAV 126 pax files 28 PCI bus 119 PCI busses 134 PDS 160 Peer-to-Peer Remote Copy 127 permissions of the HFS 145 PGA 5 PLSQL 2 pollc.html 142 port specific layer 3 PPRC 127 preemptible-class SRB 93 primary extent 48 Pro*C/C++ 6 Program General Area. see PGA program properties 24
R RACF started tasks 82 RAID arrays 121 RAID-10 121, 123 RAID-5 121–122 Random 132 random reads 128 random writes 132 Redbooks Web site 188 Contact us xii remote client 85 remote database 157 REPOSITORY_URL 116 resource consumption 93 response file 166 restarting the OUI 159, 165 root authority 166 root.sh 167 root.sh script 49 rotational speed 121 rpm package 136
sequential reads 129 sequential writes 130 Serial Storage Architecture 118 service class 92 service class. see WLM service group name 82 SETSS 81 SGA 4 Shared Global Area. see SGA shut down the database 81 SID 52, 160 silent install 165 SLES8 137 SLQORA11 77 SMS 24 spatial data 78 SQL*Loader 6 SQL*Plus 78 SQLORA12 78 SQLORA14 78 SQLORA15 78 SQLORA16 78 SQLORA17 78 SQLORA18 78 SQLORA19 78 SQLORA3 78 SQLPlus 6, 79, 83 SSA 118 start the database 80 Started Proc name 52 STARTSVC job 76 startx command 141 storage class 144 subsystem 37 name 52 SYS1.CATALOG 39 SYS1.PARMLIB 24, 144 SYSOUT file 78 system LINKLIST library 75 Systems Managed Storage. See SMS
T S SAF 4 sample table 78 Scott schema 78 SCSI 118 self managing database 2
target.xml. 110 TCP/IP 105 TCP/IP connectivity 85 telnet 138 telnet session 84 TNS 3
Index
191
TNS_ADMIN 110 TNSNAMES 85 tnsnames.ora 85 TSO 83 TWO_TASK 111 typical instal 38
U UNIX Systems Services 3 UNIX Systems Services. see USS USS 5, 83 USS directory 157
V VNC server 30, 136 VNC software 135 VNC viewer 136 vncserver command 136 VSAM files 72, 160
W WLM 5–6, 87, 92 classification 89 service class 89 goal 89 importance 89 WLM policy 92 Workload Manager 3 Workload Manager. see WLM
X X Windows 30, 135 X Windows Interface 135 xclock & 136 xhost + 136, 138 XRC 127 xserver 141 xTerm 137
Y YaST 136
Z z/OS 144 z/OS 1.4 2 zFS 6, 35, 143, 148
192
Experiences Installing Oracle Database 10g on z/OS
Experiences Installing Oracle Database 10g on z/OS
(0.2”spine) 0.17”0.473” 90249 pages
Back cover
®
Experiences Installing Oracle Database 10g on z/OS Using Oracle Universal Installer with Oracle on z/OS Tuning with Workload Manager Using ESS with the Oracle Database
This IBM Redbook will help you install, tailor and configure the new Oracle Database 10g on z/OS. It describes experiences with the new installation process, and will be especially useful for anyone unfamiliar with the Oracle Universal Installer and IBM UNIX System Services who is installing Oracle Database 10g for the first time. The book is based on experiences gained during installations at: -The IBM/Oracle International Competency Center, San Mateo, California -The IBM ITSO zSeries Center in Poughkeepsie, New York -Oracle Headquarters, Redwood Shores, California
INTERNATIONAL TECHNICAL SUPPORT ORGANIZATION
BUILDING TECHNICAL INFORMATION BASED ON PRACTICAL EXPERIENCE IBM Redbooks are developed by the IBM International Technical Support Organization. Experts from IBM, Customers and Partners from around the world create timely technical information based on realistic scenarios. Specific recommendations are provided to help you implement IT solutions more effectively in your environment.
For more information: ibm.com/redbooks SG24-7055-00
ISBN 0738497940