The Replacement Parts Similar? Compare ... Applications: Honda CR125 (1990-
1996) CR250 (1989-1992) ... in the factory service manual will most likely be.
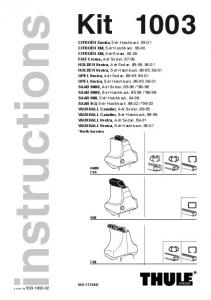
OPEL Vectra, 5-dr Hatchback, 89-95, 96-01. SAAB 9000 ... instructions. Kit XXXX
... 503-1003-02. 3. 1. 2. A. B. C. 750. 480. 480R /754. 480R /754. 480. 750 ....
www.thule.com [email protected][email protected] i i i. B. A. A. B. A. B.
B.
(please read combine harvester manufacturer instruction book). 2 - There is no ...
Example of fitting of the belt on to a New Holland TX Combine. Belt list in ...
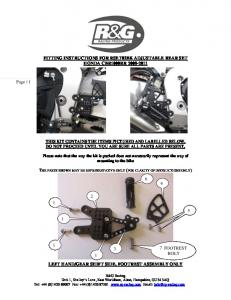
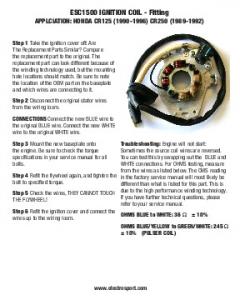
HONDA CBR1000RR 2008-2011. THIS KIT CONTAINS THE ITEMS PICTURED
AND LABELLED BELOW. DO NOT PROCEED UNTIL YOU ARE SURE ALL ...
It is essential that you read these instructions before use. .... It is the user´s
responsibility to comply with the standards applying in each country .... C CLASS.
85 -> 95. X. URBAN CRUISER. 09 -> 10. X. C8. 02 -> 11. X. VITO ... PEUGEOT.
The Replacement Parts Similar? Compare ... Honda CR125 1986-89, CR250
1986-88 and CR500 1986 ... service manual will most likely be different than.
Compare replacement parts to originals. The new ... Kaw KX80/100 81-88,
KX125 87-88, KX250 81-88, KX500 86-98, YAM YZ125 1990-91 www.
electrosport. ... service manual will most likely be different than ... Kawasaki KX80
/100. Ground.
We take the question of customer service seriously. ... aided by Daryl Showering and for the shower system (including th
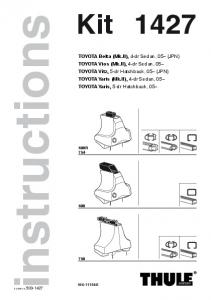
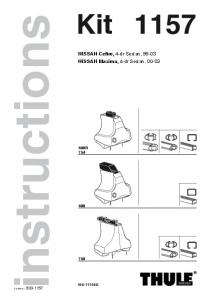
instructions. 1596. Kit. 480 ... VOLVO S70, 4-dr Sedan, 97-00 / *98-00. VOLVO ....
S. Dra åt växelvis. FIN. Kierrä vuorotellen. EST. Pinguldage vaheldumisi. LAT.
TOYOTA Prius, 5-dr Estate, 12– (with glass roof). TOYOTA Prius V, 5-dr Wagon, *
12–. TOYOTA Prius V, 5-dr Wagon, *12– (with glass roof). *North America. 1668.
The Replacement Parts Similar? Compare ... Applications: Honda CR250 (1993-
1996) ... in the factory service manual will most likely be different than what is ...
The Replacement Parts Similar? ... specifications in your service manual for all
bolts. ... APPLCIATION: HONDA CR125 (1990-1996) CR250 (1989-1992).
50-8153. Panhard Rod Fitting Instructions. Removing Original Panhard Rod: 1.
Raise rear of vehicle and support axle housing on safety stands. 2. Undo the nut
...
Fitting. Instructions. TOWBAR. For Honda FR-V. 2004 -. HN58Q. MATERIALS. A.
1. Cross Bar. C. 1. Left Sidearm. D. 1. Right Sidearm. F. 2. Bush 31 O.D, 22mm ...
75 kg. 40. 0. 130 km/h. 80. 812•4DF/8. /501-3025-06. GB. Fitting instructions. D ...
Instructions de montage. NL. Montage- ... RU. Инструкции по установке. CZ. Nแ
vod na montแž. SK. Nแvod na montแž ... OPEL Astra GTC, 3-dr Hatchback, 05–.
The Replacement Parts Similar? Compare the replacement part to ... Applications
: Honda CR250 1997-98 ... The OMS reading in the factory service manual will ...
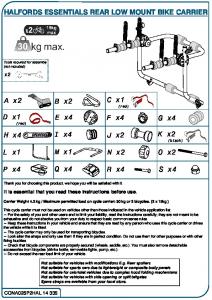
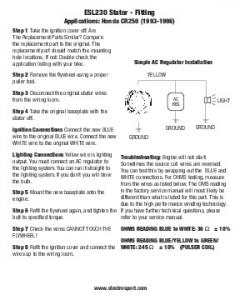
ESL970 Stator - Fitting
Applications: Honda CR250 1997-98 Step 1 Take the ignition cover off. Are The Replacement Parts Similar? Compare the replacement part to the original. The replacement part should match, including the mounting hole locations. If not: Double check the application listing with your bike. Note These machines use a separate output, next to the ignition output to provide power for the power valve. The part provides extra power from this coil to be able to run lights. Step 2 Remove the flywheel. Remove the original base plate with stator. Then cut the wires close to the original stator, and take the original stator from the base plate. Step 3 Mount the new stator in place. Use new screws and use locking compound on the threads. TIGHTEN THE SCREWS SECURELY! CONNECTIONS: The stator lead colors are: WHITE, BLUE, YELLOW/WHITE and YELLOW. Some 1998/99 models need interchanging the BLUE and WHITE wires. (WHITE to BLUE CDI input, BLUE to WHITE CDI input) Also, the YELLOW/WHITE and YELLOW wires are interchangeable. Step 4 Connect the wires from the new stator to the original wires. Use high quality crimp connections, or solder the connections. Use heat shrinking sleeve to isolate them. The best place to put the connections is at the back of the pulser coil (the black cube at the side) Use a tie-rap to secure the wires in place. Follow the wiring instructions in the diagram.
Step 5 Refit flywheel, tighten bolt to specified torque and fit ignition cover.
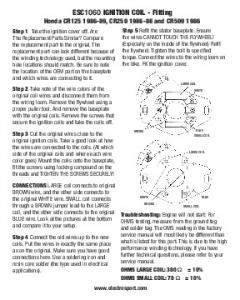
Heat Shrink Wire
Resin Core Solder
Soldering Tip: After you trim away the plastic cover on the wire, add a dab of solder to each wire first. Then, solder the two pieces together be aware that solder doesn’t work that well on older wires. Use heat shrinking sleeves to insulate each wire connection. Headlight Connection BLUE
YELLOW AC REG.
WHITE
YELLOW GROUND
GROUND
LIGHT
GROUND
Troubleshooting: Engine will not start: For OHMS testing, measure from the BLUE to WHITE. The OMS reading in the factory service manual will most likely be different than what is listed for this part. This is due to the high performance winding technology. If you have further technical questions, please refer to your service manual.
OHMS READING BLUE to WHITE WIRE: LIGHTING: Lighting When fitting this part you 12Ω ± 10% can tap a wire off the original BLACK/RED wire to connect to the lights. www.electrosport.com