Please check with your customer support team if you are in any ... of this Getting
Started Guide for more information. Set up the .... Samsung E250. USB settings ...
Vodafone Mobile Broadband via the phone
Getting started guide: PC internet via the phone software install
Make the most of now
Contents Vodafone Mobile Broadband via the phone System requirements What can I do with it?
3 3 4
Browse the web
4
Pick up emails
4
Make and receive calls
4
Charge your phone
4
Getting started
4
Connecting your phone to your computer
4
Set up the software
4
Making a connection the first time
5
Connecting to the network
5
Disconnecting from the network
5
Making a connection on subsequent occasions
5
Other settings
6
Troubleshooting
6
Phone mode settings
7
2
Vodafone Mobile Broadband via the phone This software enables you to use your existing phone to connect your laptop or desktop computer to the internet over the Vodafone high-speed mobile phone network, so you can browse the web or collect your emails. Simply plug and go! We’ll now take you through the simple process of setting up your phone as a modem, and help you to get started – so you can make the most of now.
System requirements
• Vodafone Mobile Broadband via the phone software • A compatible handset plus the USB cable • A computer running Microsoft Windows® Vista® (32 bit or 64 bit) or Windows XP® SP2 • At least 20MB free disk space, 256 MB RAM, and a recommended Pentium® 300MHz processor performance • A USB or USB 2.0 socket on the PC
Please ensure you have a suitable tariff before using your phone as a modem, as downloading large volumes of data, such as music albums or video streaming, without a suitable tariff may incur high charges. Please check with your customer support team if you are in any doubt.
3
What can I do with it?
Getting started
Browse the web
Before you can use your Vodafone Mobile Broadband via the phone software you will need to have downloaded the install file from a Vodafone website. Ensure the SIM is inserted in your phone, the phone is charged, and both the phone and computer are switched on.
You can now access the web from your PC wherever you are, as long as there is a data signal – at 3G or 3G Broadband speeds (depending on your handset capability and location). This means you only need your phone to have all the information and services on the Internet in front of you, on any computer, wherever you are. You can use your handset with either a laptop or desktop computer.
Pick up emails Keep up to date with your emails, wherever you are.
Make and receive voice calls You can still make and receive voice calls whilst your phone is connected to your computer. Just use your phone in the usual way.
Connecting your phone to your computer
• Connect your phone to the USB cable which was supplied with your phone • Plug the other end into your computer’s USB port – make sure it is fully inserted • On some phones you may need to select the correct mode first. Please see the table at the end of this Getting Started Guide for more information.
Charge your phone Don’t worry about your phone’s battery life. Many phones will charge from your computer whilst they are connected via the USB charger cable. Please check your phone manual for details.
Set up the software
• Locate the install file you have downloaded and double click on the icon to begin installation • Select your preferred language and follow the instructions on the screen • When the via the phone install manager screen appears, click Start, and then follow the simple instructions to complete the once-only installation of the software
4
Making a connection the first time
Disconnecting from the network To close the connection, click Disconnect.
Once the software setup process is complete, the Vodafone Mobile Broadband via the phone window will appear. On the first running of the software only, you may be asked to select your type of data tariff (either contract or pre-pay). All the correct settings for your local network and contract type will now be automatically stored in the software ready to connect you again at any time in the future. If you change your type of contract, you can modify it in the settings screen in the software. A new icon will appear in the bottom right of your computer screen. This indicates Vodafone Mobile Broadband is ready to connect to the Vodafone network.
Making a connection on subsequent occasions Next time you want to connect to the internet, just follow these simple steps: • Switch on your computer and then plug your phone into it using the USB cable • When the Vodafone Mobile Broadband via the phone software appears, click on the Connect button in the main window.
Connecting to the network Simply click on the Connect button to connect to the internet via the Vodafone network.
On some phones you may need to select the correct mode first. Please see the table on page 7 for more information.
The main window will now show your connection status and other information. You will now be able to use your usual web browser and email programs as normal.
5
Other settings
Troubleshooting
If you are an advanced user, you may wish to customise your settings using the Managed Devices, Managed Connections and Settings screens.
First check you that you are using a compatible phone. We are constantly supporting new phones, so check vodafone.co.uk/vtp for the latest handsets.
Note: Most users will not need to change these settings, but some businesses may require specific security settings to access their internal computer networks.
If nothing happens when you plug your phone, make sure both the phone and the computer are switched on, and try using another USB port. If you can’t make a data connection, make sure that your SIM is enabled for data connections. Contact Customer Support if you’re not sure. If you get an error message: “Error: you must be on the Vodafone network to make a connection”, please check that you are using a Vodafone SIM card. You can only use Vodafone Mobile Broadband via the phone software with Vodafone operators. If the software fails to load onto your computer at the first attempt, please make sure that you are logged in as an administrator when you first connect your phone to your computer. For any other problems, first try the Help menu in the Vodafone Mobile Broadband via the phone software main screen. For further help, please visit vodafone.co.uk/vtp or call your local Vodafone Customer Support Team.
6
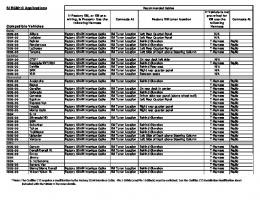
Phone mode settings On some phones you may need to select the correct mode before you can use your phone as a modem. Please consult the table below for details on how to do this. Supported phone
Automatic selection
How to find it
Nokia 5300
USB data cable Nokia mode
Go to: Settings_Connectivity_USB data cable_Nokia mode
Nokia 5610
USB data cable PC suite
Go to: Settings>Connectivity>USB data cable>PC Suite (or Ask on connection mode then press shortcut key when prompted by the phone)
Nokia 6020
Automatic selection
N/A
Nokia 6120 Classic
USB PC suite
Go to: Settings >Connectivity >USB > PC Suite (or set Ask on connection mode to Yes then press shortcut key when prompted by the phone)
USB mode PC suite
Go to: Settings_Connectivity_USB_USB mode_PC Suite or Settings_Phone settings_Connection_USB_USB mode_PC Suite altering in one location alters the setting in both (or Ask on connection mode in either location then press shortcut key when prompted by the phone)
Nokia 6210-s
USB connection mode PC Suite
Go to: Settings_Connectivity_USB_USB connection mode_PC Suite or Phone settings_Connection_USB_USB connection mode_PC Suite altering in one location alters the setting in both (or Ask on connection mode in either location then press shortcut key when prompted by the phone)
Nokia 6230i
Automatic selection
N/A
Nokia 6234
USB data cable default mode
Go to: Settings >Connectivity >USB data cable> default mode (or press shortcut key when prompted by the phone)
Nokia 6280
USB data cable default mode
Go to: Settings >Connectivity >USB data cable> default mode (or press shortcut key when prompted by the phone)
Nokia 6288
USB data cable default mode
Go to: Settings >Connectivity >USB data cable> default mode (or press shortcut key when prompted by the phone)
Nokia 6300
USB data cable Nokia mode
Go to: Settings >Connectivity > USB data cable> Nokia mode (or press shortcut key when prompted by the phone)
Nokia 6124
7
Nokia 6630
Automatic selection
N/A
Nokia 6680
Automatic selection
N/A
Nokia E51
USB Mode PC suite
Go to: Connectivity>USB>USB mode>PC Suite or Tools>Settings>Connection>USB>USB mode>PC Suite altering in one location alters the setting in both (or Ask on connection mode in either location then press shortcut key when prompted by the phone)
Nokia E65
Data cable PC suite
Go to: Connectivity > Data cable> PC Suite (or Ask on connection mode then press shortcut key when prompted by the phone)
Nokia N70
Automatic selection
N/A
Nokia N72
Automatic selection
N/A
Nokia N73
Data cable PC suite
Go to: Connectivity > Data cable> PC Suite (or Ask on connection mode then press shortcut key when prompted by the phone)
USB Mode PC suite
Go to: Tools>Settings>Connection>USB>USB mode>PC Suite or Tools>Connectivity>USB>USB mode>PC Suite altering in one location changes the setting in both (or set Ask on connection to Yes then in either location press shortcut key when prompted by the phone)
Nokia N78
USB connection mode PC suite
Go to: Tools>Settings>Connection>USB>USB connection mode>PC Suite or Tools>Connectivity>USB>USB connection mode> PC Suite altering in one location alters the setting in both (or Ask on connection mode in either location then press shortcut key when prompted by the phone)
Nokia N80
Data cable PC suite
Go to: Connectivity > Data cable> PC Suite (or Ask on connection then press shortcut key when prompted by the phone)
Mobile Network On
Go to: Tools>Settings>Connection>USB>USB mode>PC Suite (or set Ask on connection to Yes then press shortcut key when prompted by the phone)
Nokia N76
Nokia N81
8
Nokia N85
Nokia N95 / N95 8GB
Nokia N96
Sony Ericsson C902
Sony Ericsson C905
Sony Ericsson K770i
Sony Ericsson K800i
Sony Ericsson V630i
USB connection mode PC Suite
Go to: Tools>Settings>Connection>USB>USB connection mode>PC Suite or Tools>Connectivity>USB>USB connection mode> PC Suite altering in one location alters the setting in both (or Ask on connection mode in either location then press shortcut key when prom
USB mode PC suite
Go to: Tools>Settings>Connection>USB>USB mode>PC Suite or Tools>Connectivity>USB>USB mode>PC Suite altering in one location changes the setting in both (or set Ask on connection to Yes then in either location press shortcut key when prompted by the phone)
USB connection mode PC suite
Go to: Tools>Connectivity>USB>USB connection mode>PC Suite or Tools>Settings>Connection>USB>USB connection mode>PC Suite altering in one location changes the setting in both (or set Ask on connection to Yes then in either location press shortcut key when prompted by the phone)
USB default mode Phone mode
Go to:Settings>Connectivity>USB>USB default mode>Phone mode (or Show menu then press shortcut key when prompted by phone)
USB default mode Phone mode
Go to:Settings>Connectivity>USB>USB default mode>Phone mode (or Show menu then press shortcut key when prompted by phone)
USB connection Phone mode
Go to:Settings>Connectivity>USB>USB connection>Phone mode USB connection can only be selected when there is a USB connection present
USB connection Phone mode
Go to:Settings>Connectivity>USB>USB connection>Phone mode USB connection can only be selected when there is a USB connection present
USB connection Phone mode
Go to:Settings>Connectivity>USB>USB connection>Phone mode USB connection can only be selected when there is a USB connection present
9
USB default mode Phone mode
Go to:Settings>Connectivity>USB>USB default mode>Phone mode (or Show menu then press shortcut key when prompted by phone)
USB connection Phone mode
Go to:Settings>Connectivity>USB>USB connection>Phone mode USB connection can only be selected when there is a USB connection present
USB default mode Phone mode
Go to:Settings>Connectivity>USB>USB default mode>Phone mode (or Show menu then press shortcut key when prompted by phone)
USB default mode Phone mode
Go to:Settings>Connectivity>USB>USB default mode>Phone mode (or Show menu then press shortcut key when prompted by phone)
USB default mode Phone mode
Go to:Settings>Connectivity>USB>USB default mode>Phone mode (or Show menu then press shortcut key when prompted by phone)
Sony Ericsson C905
USB default mode Phone mode
Go to:Settings>Connectivity>USB>USB default mode>Phone mode (or Show menu then press shortcut key when prompted by phone)
Samsung L760
USB settings Samsung PC Studio
Go to: Settings>Phone settings>USB settings> Samsung PC Studio (or Ask on connection then press shortcut key when prompted by the phone)
Samsung L770s
USB connections Samsung PC studio
Go to: Settings_Phone settings_PC connections_Samsung PC Studio (or Ask on connection then press shortcut key when prompted by the phone)
Samsung U700
USB settings Samsung PC studio
Go to: Settings_Phone settings_USB settings_Samsung PC Studio (or Ask on connection then press shortcut key when prompted by the phone)
Samsung U900
USB connections Samsung PC studio
Go to: Settings>Phone settings>PC connections>Samsung PC Studio (or Ask on connection then press shortcut key when prompted by the phone)
Samsung ZV10
Automatic selection
N/A
Sony Ericsson V640i
Sony Ericsson W880i
Sony Ericsson W890i
Sony Ericsson W910i
Sony Ericsson W980
10
Samsung ZV60
USB Samsung PC suite
Go to: Settings>Phone Settings>USB>Samsung PC studio (or Ask on connection then press shortcut key when prompted by the phone)
Samsung E250
USB settings mode
Go to: Settings>Phone settings>USB settings> Modem
Blackberry® Bold 9000
Mobile network on
Go to: Manage Connections>Mobile Network>On
Blackberry® Storm 9500
Mobile network on
Go to: Manage Connections>Mobile Network>On
© March 2009. Vodafone Limited. Vodafone and the Vodafone logos are trademarks of the Vodafone Group. Other product and company names mentioned herein may be the trademarks of their respective owners. The information contained in this publication is correct at the time of going to print. Such information may be subject to change, and services may be modified, supplemented or withdrawn by Vodafone without prior notice. All services are subject to Terms and Conditions, copies of which may be obtained upon request. Microsoft and Windows are either registered trademarks or trademarks of Microsoft Corporation in the United States and/or other countries. The RIM and BlackBerry families of related marks, images and symbols are the exclusive properties of and trademarks of Research In Motion – used by permission Vodafone Limited, Vodafone House, The Connection, Newbury, Berkshire RG14 2FN www.vodafone.co.uk Registered in England No. 1471587 Via_the_phone_getting_started_guide_2.4.15_EN
11