How to Add A Network Printer On a Mac. 1. Go to the apple in the top left corner
of the screen. 2. After selecting the apple select system preferences. 3.
these best practices to build your email list and put your program in a position for
success now and in the future. Tips, Insights & Tactics. Best practices to build.
To enlarge photos, hold down the Ctrl and + buttons on your keyboard. Hold down the Ctrl and 0 (zero) buttons to return
How to add a Parent User to your BARC Account. The BARC Account belongs to
the student and they are the only ones who can add Parent. User(s) to their ...
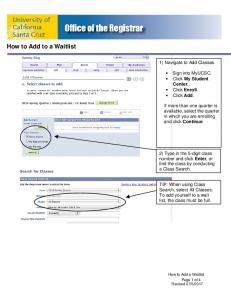
How to Add a Wait List. Page 1 of 4. Last updated 10/29/2011. How to Add to a
Wait List. 1) Navigate to Add Classes. • Sign into my.ucsc.edu. • Click Main Menu.
price paid by the consumers? ! Solution. First, we need to add the two demand
curves to obtain market demand. This market demand (Dsum) has two segments:
.
Your Blackboard Class. This manual will show you how to do the following: Log
into Blackboard. Access Your Blackboard Class. Add Documents to Your.
You can design custom titles and images with Adobe Premiere Elements. Titles
are a valuable .... Figure 10 Select the object to save as a style. Figure 11 Save ...
Finally, Han Feizi (Han Fei Tzu) is a brilliant theorist of power. - how it is
accumulated, how it is lost, how to maintain it. I hesitate to recommend him only
because ...
Xerox 4590/4110 Copier/Printer System Administration Guide i. Table of ...... User
Guide: This guide describes all the necessary steps for copy/print/scan jobs, ...
Xerox 4590/4110 Copier/Printer Getting Started i. Table of contents. 1. ..... User
Guide: This guide describes all the necessary steps for copy/print/scan jobs, ...
will need to download the PaperCut client here. Page 1 of 1. how to add a printer.pdf. how to add a printer.pdf. Open. E
How to Add a Printer Using a Windows 7 Laptop. Overview: HMS provides
wireless pay-for-printing for matriculated, registered HMS, HSDM, DMS, and HST
pre- ...
Xerox ® Color 560/570 Printer Productivity plus outstanding color for all environments. Xerox® Color 560/570 Printer Brochure
Guide to Finding Your Serial Number. SERGD-01UB. Product. Location. Phaser
8200. Inside front cover; on left side. Phaser 740, 740L, 750. Inside front door.
Please keep in mind when setting up your account on an Android device that
your device may look slightly different than the pictures that are provided and the
...
Click on Add a Printer or open the printer box and click on Printer Tasks on the
left. 3. Select “A network printer, or a printer attached to another computer” (2nd ...
4) It should detect your home printer, if so select the printer & click next. If you're ...
5) Windows will automatically search for the best driver. 6) Name the printer (I ...
procedure passed to call/cc's argument and the actual meta-level. continuation is ... is always called before the program enters the application of thunk,. and that ...
for Non-Residents (Off Campus Housing). **Note: You must be on campus in
order to register your computer system onto the network**. Connect your
computer ...
etch Stainless Steel, Brass, Bronze,. Aluminum and more. Diversify into more profitable markets by offering ... carryove
Creating a Windows XP VM - Picture Tutorial . .... virtual machines. Each step-by-step section is followed by numbered s
In Canvas, create an Assignment as normal. Give your assignment a name, then under Submission Type, select External Tool
Make a wooden frame to fit over your shed roof. It needs to be. 20-30cm deep to take liners, soil and plants. Ensure the
Add a Xerox Printer to your Computer on Windows 7. 1. Click on START Button
on the lower left hand corner of computer screen. 2. Select DEVICES AND ...
Add a Xerox Printer to your Computer on Windows 7
1. Click on START Button screen.
on the lower left hand corner of computer
2. Select DEVICES AND PRINTERS 3. At top of DEVICE AND PRINTER window, Select Add a printer
4. The Add printer Wizard should appear. Select Add a network, wireless or Bluetooth printer.
5. Next, select the printer to which you would like to print. If the printer that you want to print to is not listed, select the bottom option: The printer that I want isn’t listed
6. On the next window you can stay with the default option, which is; Find a printer in the directory, based on location or feature. Select NEXT button.
7. Once the printer of your choice is located, double-‐click on the printer and it will be connected and set up on your local computer. FOR ALL TECHNICAL/SUPER USERS You can simply connect to printers via UNC path: \\apinfpsv1 This will allow you to select the printer of choice. Simply right-‐click printer and select CONNECT