viewpoint of the lens as you look around the image. ... carbon-fiber tripod for my
panoramas. The next .... This indexing strip was created in Adobe Illustrator, then.
QuickTime Virtual Reality – how to make panoramic images by Brian P. Lawler
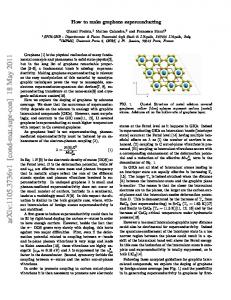
I have long been a fan of panoramic photography, and in the last 20 years have collected a few antique panoramic images and even taken a few with specially-built rolling-film slit-scan cameras. Apple Computer has now satisfied my thirst for making panoramic images with its QTVR software. QTVR stands for Quick Time Virtual Reality. The software has several functions: to “stitch”
this paper to include a discussion of objects.
Software for QTVR When making QTVR panoramics, you need special software. The leader of the pack is Apple Computer’s QuickTime VR Authoring Studio. Though it is woefully out-of-date, the software still works wonderfully (it runs well in Classic mode under Mac OS X), and I continue to use it to make
A snippet from a panoramic image of my city. This was taken as 20 images on a point-and-shoot Nikon camera (with focus locked at infinity). The focal length of the lens is 28mm., and the field of view as calculated by Apple QTVR software is about 70°.
a series of panoramic still photos together and build both a panoramic still image and a complete interactive and navigable panoramic image from the results. The wonderful thing about the final QTVR images is the viewer software. When you use it, it’s as if you were inside a photographic cylinder at the viewpoint of the lens as you look around the image. There are two big classes of QTVR images: panoramic images and object images. A panoramic is made by rotating the camera through a series of steps to take a complete (or incomplete) panoramic image. An object image is taken of an object rotated in front of a stationary camera. The result is an image which is viewed on the computer screen as if you were moving around the object or the object were turning on a turntable in front of you. This essay concentrates on the panoramic image, but much of the information here applies to object images as well. At some point I’ll expand © 1997-2005 Brian P. Lawler. All rights reserved.
my panoramic images – years after the most recent update. In researching this paper, I found and purchased several additional Macintosh products for making panoramas, and investigated a few for the Microsoft Windows operating system. I am still convinced that QTVR is the best on the market, but have been successful with other software.
Cameras, tripods and accessories To make a QTVR panoramic image, you need a camera – and almost any camera will work. Moderately wide angle lenses are best, and good sharp lenses are reasonably important. Apple’s manual recommends very wide angle lenses (a 15mm Nikkor is shown in their manual). It’s my experience also that panoramic images taken close to the subject with moderately wide angle lenses are much better than long (or even normal) focal length lenses. So far, my most pleasing panoramic prints have v.13•4/16/05
1
������������������� ����������������������������������������
come from images made with a 20mm lens. The aspect ratio of a 360° print from this lens is 6:1; the aspect ratio of a 15mm lens is much shorter, about 3.1:1. There is a huge – and visible – amount of distortion in such an image that I don’t like. You’ll also need a tripod. A sturdy one with a rotating head is required. I now use a high-quality carbon-fiber tripod for my panoramas. The next part can be tricky: an indexing camera/tripod mount. For my panoramas I have used a wooden bracket that I made in my workshop (see the drawing on page 5 for details). For my first experiments, I attached this to my tripod and then held my camera to the mount with a sturdy elastic band! It worked fine. Recent advances include a nylon machine screw to attach the camera to the mount. The important point is that the rotation of the camera should be around the lens’ nodal point. It’s much easier with full-size lenses to find the nodal point, but on the small camera I was using, I just guessed the nodal point to be approximately half way into the camera, and it has worked beautifully. I have now made numerous wooden panoramic bases, and find them to be excellent alternatives to the nice, but more expensive aluminum variety on the market. I bought a spirit level at the hardware
001
002
003
With the tripod and its rotating index head, the camera is panned through a series of frames to take the entire panorama. In this illustration the arrow indicates a clockwise rotation, but the direction is unimportant.
store for $3.50 (in the hand tools section), and I put that on the wooden base to set level when making my set-ups. A ball mount would be much easier.
Finding the nodal point To find the nodal point for any camera and lens you set the camera on its panoramic mount on a tripod, and focus the lens to infinity. Place a photo light stand in front of the camera at a distance of roughly one meter. Turn the camera on the tripod head left and right. If the light stand shifts left-to-right relative to the background as you rotate, the nodal point is not correct.
004
005
006
The successive images (six of 12 total) taken for the panoramic image are shot in a clockwise direction. Notice that there is considerable overlap of images, and slight variation in lighting. This is one of my Panoramic Portraits, showing Charlie Thorne, a craftsman window-maker in his San Luis Obispo workshop. When shooting panoramas in tight quarters like this, the camera’s point-of-rotation moves slightly forward, and thus the camera might need to be positioned differently.
2
© 1997-2005 Brian P. Lawler. All rights reserved.
v.13•4/16/05
Slide the camera on its mount forward or backward and repeat the process until the broomstick stands still relative to the background while the camera turns left and right. Tiny forward or backward movements are necessary to get it perfect (but perfect isn’t absolutely necessary – close counts here!).
Panoramic step-and-repeat When taking a series of panoramic images for QTVR, you must step the rotation so that the resulting images overlap by a considerable amount. Apple’s documentation recommends an overlap of between 20 and 40 percent. With this overlap, the stitching software can
This is a 140° section of my Taj Mahal panoramic. This image was made with a Nikon 35mm point-and-shoot camera and 16 individual images. The quality of photos from this camera is good; the image was made on 35mm film (as opposed to a digital camera). Scanning was done on a Scitex SmartScan by the Apple Publishing Technology Centre in New Delhi.
Rotational indexing On some commercial panoramic indexing heads there are click-stops for each photo. On Kaidan’s heads, for example, metal discs can be inserted into the mount for ball-detent positioning. My tripod mount features a paper indexing marker which is positioned visually for each frame. I make these indices with Adobe Illustrator and a caliper. Measure the diameter of the rotational element of your tripod with the caliper, then calculate the circumference (πD) and draw an indexing strip for your tripod (see illustration below). Print the illustration on any printer, then attach it to the tripod with very high-tech doublesided Scotch tape (accuracy counts!).
find enough common points in the images that it makes the process of combining the images into a single panoramic frame simpler. Calculating the overlap and the number of steps with the digital camera is an interesting process. I succeeded by trial-and-error since I didn’t know the focal length of my first camera’s lens. After gathering more information from lens manufacturers, I developed the table below. With this table you can look up the focal length of your lens, see the angles of Field-Of-View (FOV), and the number of steps necessary for a panoramic image. Each of these assumes a 35mm camera, mounted in a vertical position on the tripod. Since the image must be shot in an even Focal Length FOV Horiz.
1
16
15
14
13
12
11
10
9
8
7
6
5
4
3
2
1
This indexing strip was created in Adobe Illustrator, then printed on a color printer. I use double-sided tape to affix it to the rotational base of my tripod. This strip has 16 indices, yours may require more or less (see the table at right to determine the correct number). On one I made, I put both 18 and 16 indices so I could shoot with both 28 and 35mm lenses. When you buy a commercial mount you avoid all this measurement and construction, but I think it’s fun. © 1997-2005 Brian P. Lawler. All rights reserved.
FOV Vert.
Pan Steps
15mm
110
72
10
18mm
100
66
12
20mm
94
62
12
24mm
84
55
16
28mm
74
49
16
35mm
62
41
18
50mm
46
30
24
v.13•4/16/05
3
number of steps, whatever the field of view, it must be evenly divisible into the 360° rotation of the camera. Once you have determined the number of steps to make your panoramas, you can take the photos and make a test panoramic image.
Which film to use for panoramas My best experiences have been with color negative film because of its great exposure latitude. Kodak’s ISO 200 Gold color negative is my favorite film because it allows for good depth-of-
This is a part of a panoramic image taken on the surface of Mars in 1997. The rover Sojourner can be seen in the foreground, and the rock called Yogi is in the upper-right. NASA and JPL have used Apple’s QTVR extensively in the Mars exploration photo imagery.
field and is good for most early morning and full sunlight shots. It is also virtually grain-free at the sizes at which I use it. All negative films allow for greater exposure variations without overexposure, and as a result are superior to transparency films for panoramas. In bright sunlight, the range of exposure from the side to the sun can be greater than 4 stops, and most negative films can tolerate this. Shots made directly into the sun will be overexposed or nearly overexposed, but this is acceptable. Transparency films, by contrast, cannot handle this exposure variation without overexposure.
Exposure considerations One of the more challenging issues when making full 360° panoramic images is that of setting exposure. When you have control over exposure it’s important to give all the frames exactly the same exposure. Most point-and-shoot and digital cameras take over exposure control and won’t give it back. When shooting with these cameras, there are a number of techniques for “controlling” exposure. One is to shield the camera from direct sunlight with an object in the panorama (I have often used a tree for this purpose). Another technique is to shoot just before the sun comes up, or just after it goes down.
4
© 1997-2005 Brian P. Lawler. All rights reserved.
Midday shots are also successful when the sun is so high that it does not appear directly in the scene, but this is hard to control. When you can, set your exposure with the camera set at a 90-degree angle relative to the sun (see diagram on the next page). Set the exposure at this setting for the entire panorama, and take all your shots with this same exposure.
Which resolution to use when stitching When your images come back from the lab on Photo CD disc, you have five choices of resolution. I find that the Base and Base✳4 resolutions are most appropriate for QTVR panoramas. Since I print most of my panoramas in addition to making the interactive version, I am interested in obtaining significant resolution in the finished files. Using Base x 16 images results in a file just over 75MB when I shoot 12 frames with my 20mm lens. This size is excellent for printing on my Epson 9500 ink-jet printer all the way up to 44 inches in width. It will reproduce at about 30 inches in length on an offset press with a screen frequency of 150 lpi. If your intentions are less grand, you can use the Base x 4-size files which will stitch into a finished panorama of just over 16 megabytes. These are useful for printing at smaller sizes and still result in excellent image quality. I have printed them at 44 inches on the Epson, but I can see a visible quality loss compared to the higherresolution Base x 16 images.
Stitching with QuickTime VR software QuickTime VR Authoring Studio comes as a collection of panoramic and object movie making tools. You can produce panoramic images, object images (photos of objects that can be viewed from any direction on the computer screen) or “scenes” which are a combination of panoramas, object movies, still images, and other graphic information to be navigated by the viewer onscreen. The stitching step is the most impressive part of the QuickTime VR process. The software takes the images in the order you have designated, and looks for commonalities and points that can be stitched together to make a complete image. The stitch will cause the images to be stretched and blended together into a single seamless image. The software can also sharpen the result before saving it, though I prefer to do this in Photoshop. After stitching, the image is saved as a vertical panorama in a single PICT file. This is handy (except for the vertical part) because you can open it in Adobe Photoshop and retouch it if necessary, then save it again before continuing the process.
v.13•4/16/05
� ��������������
� ����������� ����������������
�
������������ �������� �
�
�
�
�
���������������� ��������������
Build-your-own QTVR panoramic mount. My wooden panoramic mounts consist of two pieces of wood screwed together at a 90° angle. The measurements marked A are the distance from the edge and the front of the camera for the tripod screw in the camera base. B is the center point of the lens which will indicate the horizontal line of the nodal point position. C indicates the vertical dimension of the nodal point. It is determined by a process described on the next page (see More on finding the nodal point). The camera is held to the base by a 1⁄4 -20 machine screw with an extra nut for tightening. The rotational indicator is made by measuring the circumference of the tripod base and splitting that distance into 12, 16, 18, or 20 increments (see the chart on page 3 for details). The pointer is a piece of white drafting tape cut to a point. If your tripod has no rotational base, you can make one by cutting two additional base parts and allowing one to rotate on the other; this can be a bit more complicated, but it’s not too difficult. © 1997-2005 Brian P. Lawler. All rights reserved.
v.13•4/16/05
5
1
16
15
14
13
12
11
10
9
8
7
6
5
4
3
2
1
Making and affixing a rotational index is fairly easy. Measure the diameter of the rotational base of your tripod; multiply that diameter by pi, then build a strip to that length in an illustration program. Subdivide the strip into the correct number of steps needed for a 360° panorama with the lens you have chosen (see FOV chart on Page 3). Print it out and affix it to the tripod with double-sided tape. The pointer is a piece of drafting tape, cut with scissors to a point. This is low tech, high-quality technology!
Finishing When you are ready for the next step, the image is “diced” by the QTVR software into a number of tiles that work together to make the QTVR panorama. After dicing, the finished panorama is saved in a format that can be read by the player software on Mac or Windows computers (QuickTime is the preeminent time-based image format for both Windows and Mac). Each of the panoramas I have produced is a single node image consisting of 12-20 frames taken on one level plane.
Hot Spots QTVR panoramic images can also have what are called Hot Spots, these being image areas that can be used as buttons to activate other panoramic movies, still photos, sounds, and other actions. The process of creating Hot Spots is pretty simple. When the vertical stitched PICT file is complete, a new bit-mapped single-channel image is created that has solids painted in for the Hot Spots. Then, using the QTVR authoring tools, these
6
© 1997-2005 Brian P. Lawler. All rights reserved.
hot spots are assigned actions. It’s possible then to use the hot spot in one panoramic image to activate another node or another movie to “walk” though a scene comprised of numerous QTVR panoramic images. This is amazing technology, and it has opened my eyes to the potential for interactive panoramic images and scenes. It requires a leap of imagination to put yourself inside the cylinder of an interactive panoramic image, but once you have experienced it, you’ll begin to see opportunities for this kind of image everywhere. You’ll begin to see things panoramically!
Sources of images I have made panoramas now on three continents and in several hundred locations. The results have been exciting (with a few notable exceptions). I have used a number of digital cameras. I started with consumer cameras, and worked my way up to the Nikon professional D1 and D1X, both of which are very nice and served me well. I now shoot with the Canon EOS 1DS Mark II. This v.13•4/16/05
���������������������� ��������������������������� ������������������������
���������������� ������������������ ������������������� ��������������� �����������������������
is a very high-resolution camera used by many professional photographers. The output from this camera gives me panoramic photos that are several hundred megabytes in size. My film-based panoramas have been made with both my point-and-shoot Nikon camera and a fantastic Nikon N70 camera on a wooden panoramic mount (see next page). After shooting the images on film, I have them processed and scanned to Kodak Photo CD disc by my favorite supplier – Color 2000 in San Francisco, California. I like Photo CD scans because they are consistent, and the positional accuracy of the frame in each scan is almost absolute. I never have to worry about the accuracy or squareness of the scans I get on Photo CD discs.
Many happy panoramas to you!
■ This is one of a series of free essays I have written on graphic arts and computer subjects. Subjects range from dot gain and halftone screens, to preparing files for the World Wide Web. For access to the others, please direct your browser to my site on the World Wide Web: www.thelawlers.com Brian P. Lawler Graphic Arts Consultant 6045 Madbury Court San Luis Obispo, California 93401 USA Phone: (805) 544-8814 Fax: (805) 544-8445 Email:
[email protected] Web: www.thelawlers.com For more information on QTVR, also visit the Apple Computer QTVR web site: http://www.apple.com/ quicktime/qtvr/
Good luck, and have fun with this fascinating technology!
© 1997-2005 Brian P. Lawler. All rights reserved.
v.13•4/16/05
7