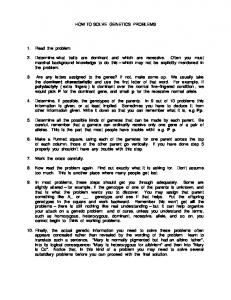
Subnet Masks: Start at the Gateway Machine (the machine at the top in these
diagrams). Find the ... Project X1: TCP/IP Subnetting Exercises. CST 232 / Riley.
Project 2: TCP/IP Addressing Exercises
Name: ________________________ .
In the diagrams I am using here, there are three numbers given for each NIC, in this order: • IP Address • Subnet Mask • Default Gateway The default gateway on the Gateway Machine (the machine at the top in these diagrams) is for a 2nd NIC, not shown, that connects to the Internet.
How to Solve Subnetting Problems 1. Subnet Masks: Start at the Gateway Machine (the machine at the top in these diagrams). Find the subnet mask. Make sure every machine has the same subnet mask. In the example below, the subnet mask is 255.255.255.0 2. Label the Subnet: Find the network portion of the IP address of the Gateway Machine. Fill in the host portion with 0s. Write that label above the network (in the upper left, in these diagrams). In the example below, the Gateway Machine has an IP address of 192.168.1.101 and since the subnet mask is 255.255.255.0, the network portion includes only the first 3 bytes. To find the subnet label, replace the last byte with zero: 192.168.1.0. 3. Check the IP Addresses • Network Portion: Make sure that each NIC on a subnet has the same network address as the label you wrote at the top of the subnet. In the example below, on the left subnet, that means every IP address must start with 192.168.1 • Host Portion: Make sure that each NIC on a subnet has a different host address, including the default gateway. In the example below, the Gateway Machine has a host address of 1, and the others are 101, 102, and 103, so there are no duplicates. 4. Default Gateway: On each subnet, the default gateway is the Gateway Machine’s IP address. It is the same for each NIC on the subnet, except the Gateway Machine itself, which has a default gateway of the network above it, usually an ISP. In the example below, the Gateway Machine has an IP address of 192.168.1.1, so the default gateway must be 192.168.1.1 for all three workstations at the bottom of the chart.
To the Internet
Subnet: 192.168.1.0
Hub
192.168.1.101 255.255.255.0 192.168.1.1
CST 232 / Riley
192.168.1.1 255.255.255.0 147.144.51.1
192.168.1.102 255.255.255.0 192.168.1.1
Page 1 of 6
192.168.1.103 255.255.255.0 192.168.1.1
Project X1: TCP/IP Subnetting Exercises 1. Fill in the missing numbers so this network will operate correctly.
Subnet: ____________
Hub
To the Internet
192.168.0.1 255.255.255.0 147.144.51.1
_____________________
_____________________
_____________________
_____________________
_____________________
_____________________
_____________________
_____________________
_____________________
2. Fill in the missing numbers so this network will operate correctly.
Subnet: ____________
Hub
To the Internet
10.1.1.1 255.0.0.0 147.144.51.1
_____________________
_____________________
_____________________
_____________________
_____________________
_____________________
_____________________
_____________________
_____________________
CST 232 / Riley
Page 2 of 6
Project X1: TCP/IP Subnetting Exercises 3. Fill in the missing numbers so this network will operate correctly.
Subnet: ____________
Hub
To the Internet
_______________ _______________ 147.144.51.1
10.0.0.101
_____________________
_____________________
255.255.0.0
_____________________
_____________________
10.0.0.1
_____________________
_____________________
4. Fill in the missing numbers so this network will operate correctly.
Subnet: 172.31.0.0
Hub
To the Internet
_______________ _______________ 147.144.51.1
_____________________
_____________________
_____________________
_____________________
_____________________
_____________________
_____________________
_____________________
_____________________
CST 232 / Riley
Page 3 of 6
Project X1: TCP/IP Subnetting Exercises 5. Change one number so this network will operate correctly.
Subnet: 192.168.1.0
Hub
6.
To the Internet
192.168.1.1 255.255.255.0 147.144.51.1
192.168.1.2
192.168.1.3
192.168.1.4
255.255.255.0
255.255.255.0
255.255.0.0
192.168.1.1
192.168.1.1
192.168.1.1
Change one number so this network will operate correctly.
Subnet: 192.168.1.0
Hub
To the Internet
192.168.1.1 255.255.255.0 147.144.51.1
192.168.1.13
192.168.1.3
192.168.1.2
255.255.255.0
255.255.255.0
255.255.255.0
192.168.11.1
192.168.1.1
192.168.1.1
CST 232 / Riley
Page 4 of 6
Project X1: TCP/IP Subnetting Exercises 7. Change one number so this network will operate correctly.
Subnet: 192.168.1.0
Hub
8.
To the Internet
192.168.1.1 255.255.255.0 147.144.51.1
192.168.1.2
192.168.1.3
193.168.1.102
255.255.255.0
255.255.255.0
255.255.255.0
192.168.1.1
192.168.1.1
192.168.1.1
Change one number so this network will operate correctly.
Subnet: 10.0.0.0
To the Internet
Hub
10.1.1.1 255.0.0.0 147.144.51.1
10.1.1.101
10.2.1.101
10.1.1.101
255.0.0.0
255.0.0.0
255.0.0.0
10.1.1.1
10.1.1.1
10.1.1.1
CST 232 / Riley
Page 5 of 6
Project X1: TCP/IP Subnetting Exercises 9. Change one number so this network will operate correctly.
Subnet: 172.16.0.0
Hub
To the Internet
172.16.1.1 255.255.0.0 147.144.51.1
172.16.19.2
172.16.1.19
172.19.1.2
255.255.0.0
255.255.0.0
255.255.0.0
172.16.1.1
172.16.1.1
172.16.1.1
10. Change one number so this network will operate correctly.
Subnet: 172.16.0.0
To the Internet
Hub
172.16.1.1 255.0.0.0 147.144.51.1
172.16.1.13
172.16.1.14
172.16.1.15
255.255.0.0
255.255.0.0
255.255.0.0
172.16.1.1
172.16.1.1
172.16.1.1
CST 232 / Riley
Page 6 of 6


![[PDF] How To Solve Word Problems In Algebra - Google Sites](https://m.moam.info/img/260x300/pdf-how-to-solve-word-problems-in-algebra-google-s_64786858097c474e708cc71f.jpg)


