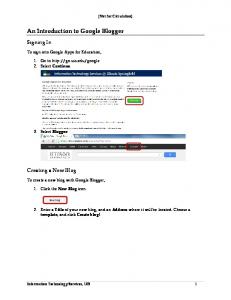
So let’s center our text. The modified HTML looks like this (the new code is in blue):
I want to be centered!
In your blog post, the text inside the div will be centered. (Keep in mind you will not see the effect of any of your formatting in the “edit html” window. To preview your changes you can click the “preview” button below the post editing window.)
Introducing CSS (Cascading Style Sheets) HTML can do a lot, but in all the fun stuff comes from CSS. CSS is a sister language to HTML, and you can use it to apply color changes, spacing and all sorts of other features to different HTML tags.
Background Color Say let's say you want a certain part of your post to be displayed in a box, centered, and you want the background to be a light blue. First write you text and place a div around it:
I want to be centered inside a box with a blue background.
As before, we can add the align tag to the div to center the text:
I want to be centered inside a box with a blue background.
Now, we want to take it to the next level. You add what’s called a style tag to the div, (this can be in addition to the existing alignment tag). The style tag will contain the CSS that will tell the div how it should look. CSS always contain two elements. The first is the special CSS name for the type of style you are applying, the second is the specific formatting you want to add. There is also some special punctuation that needs to be put in place. The CSS name is followed by a colon and the specific style is followed by a semi-colon. A CSS designation will always look like this: CSSname: specific-style; For example, if I want the text inside the div to be all uppercase, I can use the following designation: text-transform: uppercase; When adding CSS to a div tag, the CSS has to be contained within a style tag as part of the div. So if we want our box to have a light blue background, we add the following code to div: (the new code is highlighted)
I want to be centered inside a box with a blue background.
In your blog post, your box will now looks like this:
When getting into this more complicated realm, it is extremely important to be vigilant about punctuation. If you forget a semi-colon or colon, the HTML will not work. Also pay attention to the quotation marks that contain the style. These must always be in place for the style to take.
HTML and Color HTML understands color by use of hex codes. Every color on the spectrum has its own six-digit series of numbers and letters, starting first with the # sign. You can find the hex code for the color you want to use simply by using a hex code chart of generator like this one. The hex code for white is #FFFFFF. For black, it is #000000.
Padding A box is no good if it is crowding right up against the edge of your text, so we need to add some breathing room. HTML understands space in terms of pixels. A pixel is very small, so generally 10 or 20 pixels is enough to give a nice margin. So back with our box, let’s say we want to add 20 pixels worth of space between the edge of the box and the text. We do this by applying padding to the style tag. To do this we have to add another CSS designation after the first, inside the quotation marks that contain the style tag attributes.
I want to be centered inside a box with a blue background.
Our box now looks like this:
Borders What good is a box without a border? Let’s say we want to add a thin border to the box we’ve been creating. We can do this by adding more CSS to the style tag. A border tag consists of three parts. First is the pixel width of the border, second is the border style (you will almost always want to use “solid” and finally the hex code for the color you want the border to be.) The CSS for a dark blue border would look like this: border: 1px solid #000033; To add this to our box, we simply insert this new CSS into the style tag, after the semi-colon ending the previous designation but before the end quote around the style tag:
I want to be centered inside a box with a blue background.
Our box now looks like this:
Width Sometimes you don't want your width to go the full width of the page. You can set a width either by percentage, or a particular pixel amount. The CSS for a box that is 300 pixels wide would look like this: width: 300px; The CSS for a box that is 80% of the available space wide would look like this: width: 80%; To add this to our box, we simply insert this new CSS into the style tag, after the semi-colon ending the previous designation but before the end quote around the style tag:
I want to be centered inside a box with a blue background.
Our box now looks like this:
Conclusion Editors like the one provided in the Blogger interface can only do so much, but if you spend a little time playing, you'll be surprised at how quickly you can make an impact on the look of your posts with just the
tag and some basic CSS.
happy blogging! PLEASE CONTACT US FOR MORE INFORMATION
www.brownwingstudio.com • (319) 438-2493 •
[email protected]