May 1, 2013 - one by Timoshenko and Goodier), e.g., if the x and y axes lie in the cross- ... using the two-dimensional discretization is an approximation ... the user can use three-dimensional elements to model the entire ...... FEM analysis will be done perfectly with quadratic shape funtions ..... Lower plane height (3.0) thk.
HyFem A Matlab-based finite element package for linear elastostatics and linear elastodynamics May 1, 2013 by Raghvendra Pratap Singh Arup Kumar Nandy under the guidance of Prof. C. S. Jog
Department of Mechanical Engineering Indian Institute of Science, Bangalore
Contents 1 Introduction 1.1 Overview of The Package . . . . . . . . . . . . . . . . . . . . . . . . . . . .
4 4
2 Solved Demo Problems 2.1 Static and Modal Analysis of a Cantilever Beam . . . . . . . . . . . . . . . 2.1.1 Problem Description . . . . . . . . . . . . . . . . . . . . . . . . . . 2.1.2 User Inputs . . . . . . . . . . . . . . . . . . . . . . . . . . . . . . . 2.1.3 Results and Discussion . . . . . . . . . . . . . . . . . . . . . . . . . 2.2 Transient Analysis of a Circular Thin Clamped Plate under Ring Pressure Load (Using HyFem Mesh Generator) . . . . . . . . . . . . . . . . . . . . . 2.2.1 Problem Description . . . . . . . . . . . . . . . . . . . . . . . . . . 2.2.2 User Inputs . . . . . . . . . . . . . . . . . . . . . . . . . . . . . . . 2.2.3 Results and Discussion . . . . . . . . . . . . . . . . . . . . . . . . . 2.3 Transient Analysis of a Circular Thin Clamped Plate under Ring Pressure Load (Importing Gambit Files) . . . . . . . . . . . . . . . . . . . . . . . . 2.4 Static Analysis of a Pinched Hemispherical Shell Problem . . . . . . . . . . 2.4.1 Problem Description . . . . . . . . . . . . . . . . . . . . . . . . . . 2.4.2 User Inputs . . . . . . . . . . . . . . . . . . . . . . . . . . . . . . . 2.4.3 Results and Discussion . . . . . . . . . . . . . . . . . . . . . . . . . 2.5 Static Analysis of Thick and Thin Beam under Self-Weight . . . . . . . . . 2.5.1 Problem Description . . . . . . . . . . . . . . . . . . . . . . . . . . 2.5.2 User Inputs . . . . . . . . . . . . . . . . . . . . . . . . . . . . . . . 2.5.3 Results and Discussion . . . . . . . . . . . . . . . . . . . . . . . . . 2.6 Bending of Prismatic Bar for Semicircular Section . . . . . . . . . . . . . . 2.6.1 Problem Description . . . . . . . . . . . . . . . . . . . . . . . . . . 2.6.2 User Inputs . . . . . . . . . . . . . . . . . . . . . . . . . . . . . . . 2.6.3 Results and Discussion . . . . . . . . . . . . . . . . . . . . . . . . . 2.7 Torsion of prismatic bar for equilateral triangle . . . . . . . . . . . . . . . 2.7.1 Problem Description . . . . . . . . . . . . . . . . . . . . . . . . . . 2.7.2 User Inputs . . . . . . . . . . . . . . . . . . . . . . . . . . . . . . . 2.7.3 Result and Discussion . . . . . . . . . . . . . . . . . . . . . . . . .
9 9 9 9 10
15 15 15 15 16 17 17 17 20 20 20 21 21 22 22 23 23
A Different Mesh Options A.1 Two-Dimensional Geometries . . . . . . . . . . . . A.1.1 Cartesian mesh . . . . . . . . . . . . . . . . A.1.2 Quarter rectangular plate with quarter hole A.1.3 Half rectangular plate with semicircular hole A.1.4 Arch . . . . . . . . . . . . . . . . . . . . . .
24 24 24 24 25 26
1
. . . . .
. . . . .
. . . . .
. . . . .
. . . . .
. . . . .
. . . . .
. . . . .
. . . . .
. . . . .
. . . . .
. . . . .
. . . . .
12 12 12 12
A.1.5 Full circular plate with central hole . . . A.1.6 Part of circular plate with central hole . A.1.7 Full circular plate . . . . . . . . . . . . . A.1.8 Part of circular plate . . . . . . . . . . . A.1.9 Cook’s Membrane problem . . . . . . . . A.2 Axisymmetric Geometries . . . . . . . . . . . . A.2.1 Cylindrical Mesh . . . . . . . . . . . . . A.2.2 Hollow sphere . . . . . . . . . . . . . . . A.2.3 Full sphere . . . . . . . . . . . . . . . . . A.2.4 Cylinder with hemispherical cavity . . . A.2.5 Cylinder with spherical cavity . . . . . . A.2.6 Cylinder with hemispherical ends . . . . A.3 Three-Dimensional Geometries . . . . . . . . . . A.3.1 Cartesian mesh . . . . . . . . . . . . . . A.3.2 Part of a cylinder with hole . . . . . . . A.3.3 Full cylinder with hole . . . . . . . . . . A.3.4 Part of solid cylinder . . . . . . . . . . . A.3.5 Full solid cylinder . . . . . . . . . . . . . A.3.6 Part of a Hemisphere with hole . . . . . A.3.7 Full hemisphere with hole . . . . . . . . A.3.8 Part of hemisphere . . . . . . . . . . . . A.3.9 Full hemisphere . . . . . . . . . . . . . . A.3.10 Quarter plate with quarter inclusion . . A.3.11 Rectangular plate with circular inclusion A.3.12 Half plate with semicircular inclusion . . A.3.13 Cooks membrane problem . . . . . . . . A.3.14 Part of cylinder with hemispherical ends
. . . . . . . . . . . . . . . . . . . . . . . . . . .
. . . . . . . . . . . . . . . . . . . . . . . . . . .
. . . . . . . . . . . . . . . . . . . . . . . . . . .
. . . . . . . . . . . . . . . . . . . . . . . . . . .
. . . . . . . . . . . . . . . . . . . . . . . . . . .
. . . . . . . . . . . . . . . . . . . . . . . . . . .
. . . . . . . . . . . . . . . . . . . . . . . . . . .
. . . . . . . . . . . . . . . . . . . . . . . . . . .
. . . . . . . . . . . . . . . . . . . . . . . . . . .
. . . . . . . . . . . . . . . . . . . . . . . . . . .
. . . . . . . . . . . . . . . . . . . . . . . . . . .
. . . . . . . . . . . . . . . . . . . . . . . . . . .
. . . . . . . . . . . . . . . . . . . . . . . . . . .
. . . . . . . . . . . . . . . . . . . . . . . . . . .
. . . . . . . . . . . . . . . . . . . . . . . . . . .
26 26 27 27 27 28 28 29 29 29 30 30 31 31 31 31 32 32 32 33 34 34 35 36 37 38 38
B Use of Gambit B.1 One Structural Example . . . . . . . . . . . . . B.1.1 Problem Description . . . . . . . . . . . B.1.2 Problem Modeling in Gambit - Steps . . B.1.3 Gambit output file used in main package B.1.4 Gambit Errors and Measures . . . . . . .
. . . . .
. . . . .
. . . . .
. . . . .
. . . . .
. . . . .
. . . . .
. . . . .
. . . . .
. . . . .
. . . . .
. . . . .
. . . . .
. . . . .
. . . . .
39 39 39 39 41 45
C Structure of Bcd ld file C.1 Static Problem: . . . . . . . . . . . . . C.1.1 Analysis Type . . . . . . . . . . C.1.2 Geometry Class . . . . . . . . . C.1.3 Formulation Strategy . . . . . . C.1.4 Variables per Node . . . . . . . C.1.5 Prescribed Displacement . . . . C.1.6 Applying Load . . . . . . . . . C.1.7 Material Specification . . . . . . C.1.8 2D Plane Geometry . . . . . . . C.2 Modal Problem: . . . . . . . . . . . . . C.3 Transient Problem: . . . . . . . . . . . C.3.1 Transient Analysis Specification
. . . . . . . . . . . .
. . . . . . . . . . . .
. . . . . . . . . . . .
. . . . . . . . . . . .
. . . . . . . . . . . .
. . . . . . . . . . . .
. . . . . . . . . . . .
. . . . . . . . . . . .
. . . . . . . . . . . .
. . . . . . . . . . . .
. . . . . . . . . . . .
. . . . . . . . . . . .
. . . . . . . . . . . .
. . . . . . . . . . . .
. . . . . . . . . . . .
46 46 46 46 46 46 47 48 50 50 50 51 51
2
. . . . . . . . . . . .
. . . . . . . . . . . .
. . . . . . . . . . . .
. . . . . . . . . . . .
. . . . . . . . . . . .
C.4 St. Venant Torsion Problem: . . C.4.1 Geometry Class . . . . . C.4.2 Formulation Strategy . . C.4.3 Variables per Node . . . C.4.4 Prescribed Displacement C.4.5 Torsion Data . . . . . . C.4.6 Material Specification . . C.5 Bending of Prismatic Bar: . . . C.5.1 Bending Data . . . . . .
. . . . . . . . .
. . . . . . . . .
. . . . . . . . .
. . . . . . . . .
. . . . . . . . .
. . . . . . . . .
. . . . . . . . .
. . . . . . . . .
. . . . . . . . .
. . . . . . . . .
. . . . . . . . .
. . . . . . . . .
. . . . . . . . .
. . . . . . . . .
. . . . . . . . .
. . . . . . . . .
. . . . . . . . .
. . . . . . . . .
. . . . . . . . .
. . . . . . . . .
. . . . . . . . .
. . . . . . . . .
. . . . . . . . .
. . . . . . . . .
D Geometry Input Data File (‘geometry’) E Installation Instruction of HyFem E.1 Linux Systems . . . . . . . . . . . E.1.1 Installation of Installer . . E.1.2 Running the Executable . E.2 Windows Systems . . . . . . . . . E.2.1 Installation of Installer . . E.2.2 Running the Executable .
. . . . . .
3
. . . . . .
. . . . . .
52 52 52 52 52 52 53 53 53 54
. . . . . .
. . . . . .
. . . . . .
. . . . . .
. . . . . .
. . . . . .
. . . . . .
. . . . . .
. . . . . .
. . . . . .
. . . . . .
. . . . . .
. . . . . .
. . . . . .
. . . . . .
. . . . . .
. . . . . .
. . . . . .
. . . . . .
. . . . . .
56 56 56 56 56 56 56
Chapter 1 Introduction It is well-known that standard displacement-based elements (especially lower-order ones) are highly susceptible to membrane, shear and volumetric locking. Hybrid stress-based finite elements, which are based on a two-field variational formulation involving displacements and stresses are much less susceptible to locking than standard displacement-based formulations, and thus, yield very good coarse-mesh accuracy. The package HyFem is a MATLAB-based implementation of two- and three-dimensional conventional and hybrid elements for linear elastostatics and linear elastodynamics. Conventional shell formulations suffer from several shortcomings such as the need to develop reduced constitutive relations based on ‘plane stress’ assumptions, the need for transition elements while interfacing with brick elements, significant reformulation for thick shells etc. Since no kinematic assumption is being made in the development of hybrid elements, since the treatment is fully three-dimensional with no plane stress or similar assumption being made, since there are no stabilization parameters that need to be adjusted, since they converge very rapidly to the actual solution with mesh refinement, and since they are relatively much more immune to shear and other types of locking, hybrid elements can be used very effectively (with no reformulation) to model problems as diverse as beam/plates/shells on the one hand, and problems involving ‘chunky’ geometries on the other. Thus, just one type of element, namely, three-dimensional hybrid elements, can be used to model all types of structures, with no need for specialized beam, plate or shell elements. The choice of stress shape functions for the hybrid elements, which is of course critical in ensuring their accuracy, is based on “Improved Hybrid Elements for Structural Analysis”, C. S. Jog, Journal of Mechanics of Material and Structure, Vol. 5, No 3, 2010. For transient problems, the trapezoidal method (which is a special case of the Newmark-Beta algorithm), which obeys several conservation properties for linear time-dependent problems, has been used as the time-stepping strategy.
1.1
Overview of The Package
An attempt has been made to make HyFem as self-contained as possible, and, thus, it comes equipped with pre- and post-processing options. Some sample problems are discussed in the following sections. All required files for these sample problems are kept in the ‘sample’ folder. Installation instructions are given in Appendix E. Followings are brief descriptions about options available in the package.
4
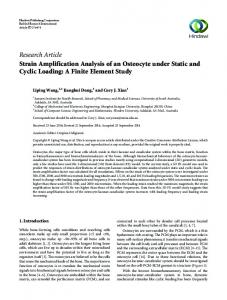
1. Problem Domain For conducting a new analysis, the user has to select ‘Problem Domain’ from the menu options. The current version of HyFem can solve only linear elastic problems; the options available are Static, Transient, Modal analysis, St. Venant Torsion Problem and Bending of Prismatic bars. Static, transient and modal analysis can be conducted for two-dimensional (plane stress/plane strain) and three-dimensional problems, using either hybrid elements, or conventional displacement-based elements. As discussed earlier, hybrid elements are relatively more immune to locking, and hence can be used to model beam/plate/shell structures. Thus, there are no separate beam/plate/shell elements within HyFem, and analysis for both ‘thin’ and ‘chunky’ structures can be conducted effectively using just three-dimensional hybrid elements. In the St. Venant torsion problem, a torque is applied on the end-faces of a prismatic bar, and the lateral surfaces are assumed to be traction-free. Certain assumptions are made regarding the displacement field (see any book on linear elasticity such as the one by Timoshenko and Goodier), e.g., if the x and y axes lie in the cross-sectional plane of a prismatic beam, then the warping/uz displacement is assumed to be just a function of (x, y). As a result of these assumptions, only the cross-section of the prismatic beam needs to be modeled using two-dimensional elements. The user is required to specify the overall torque T that acts on the end-faces. The actual distribution of tractions on these end-faces that generates the torque is determined as part of the solution. If the torque is applied using a different distribution of tractions, then the solution obtained using the two-dimensional discretization is an approximation of the actual stress distribution (St. Venant’s principle); alternatively, in such a case, the user can use three-dimensional elements to model the entire prismatic beam. The formulation is general enough to tackle multiply-connected or multi-material composite cross-sections provided the cross-section is uniform along the z-direction (i.e, the beam is prismatic). The axis of torsion (defined as the point (xT , yT ) in the cross-section about which the torque is applied, so that ux = uy = 0 along the axis of torsion) can be arbitrary (it can even lie outside the cross-section), and is specified by the user. The origin lies on the plane that lies between the planes of the end faces (i.e., if L is the length of the bar, the end faces on which the torques are being applied are given by z = ±L/2), but on this central plane, its placement can be arbitrary. The orientation of the x and y axes can also be arbitrary (i.e., the axes need not be principal axes). The user needs to select at least one node in the two-dimensional cross-section where uz can be set to zero. In case the cross-section is singly or doubly symmetric, then the user can model only a half or quarter of the domain, respectively, with uz specified to be zero at all nodes on the symmetry axes. The ‘bending of prismatic bar’ menu option solves the problem of a prismatic beam whose one end is of cantilever support type, and the other end is subjected to bending moments/torque (Mx , My , T ), and terminal loads (Wx , Wy ) passing through (x0 , y0 ) (which are specified by the user; similar to (xT , yT ) in the previous menu option, the point (x0 , y0 ) can lie outside the cross-section); see Figure 1.1. The origin is assumed to lie on the left face, although on this face its placement can be arbitrary (i.e., need not be at the centroid). The orientation of the x and y-axes can also be arbitrary, i.e., the axes need not be principal axes. Similar to the St. Venant torsion problem, certain 5
My y
Wy
L
T
z
y
My Wy x0 y0
Wx x M x
Figure 1.1: Bending of a cantilever beam by terminal loads and moments.
assumptions are made regarding the displacement and stress fields, which allows one to solve the problem by modeling only the cross-section (once again, see any book on linear elasticity for the assumptions that are made). At the end z = 0, the fields ux , uy , ∂ux /∂z, ∂uy /∂z, ∂ux /∂y, ∂uy /∂x are all automatically set to zero at the centroid (xc , yc ) of the z = 0 plane. The user needs to select one node in the two-dimensional cross-section where uz can be set to zero on the left end-face (to suppress rigid motion along the z-direction). Even if the cross-section is symmetric, the user is required to model the entire cross-section under this menu option (this is unlike the St. Venant torsion menu option, where symmetry can be used to model part of the domain). The formulation is general enough to tackle multiply-connected cross-sections, but not general enough to tackle multi-material composites (thus, the whole beam needs to be made of a single material). If the cross-section is made of multiple-materials, then the entire beam needs to be modeled using three-dimensional elements. In case a torque T is being applied in this menu option, the axis of torsion needs to be coincident with the line of centroids i.e., xT = xc and yT = yc (if the axis of torsion is different than the centroidal axis, then one should obtain the results for torsional loading using the ‘St.Venant torsion problem’ menu option discussed above). The exact distribution of tractions on the right face that generates (Mx , My , T ) and (Wx , Wy ) is determined as part of the solution. If the actual traction distribution is different than this one, then one either treats the obtained solution as an approximation (St. Venant’s principle), or, one uses three-dimensional elements to model the entire prismatic beam. Under the ‘bending of prismatic bar’ menu option, there is a sub-option to compute the shear center and other geometric properties of the cross-section (such as the location of the centroid, and values of the moment of inertia tensor). Since the location of the shear center depends only on the cross-section and the Poisson ratio, the user need not specify (Mx , My , T ) and (Wx , Wy ), while using this menu option. Note that uz still needs to be suppressed at one nodal point. The formulation is general enough to tackle multiply-connected cross-sections, but not general enough to tackle multi-material composites. Note that a finite element method based on an elasticity formulation is being used to compute the shear center, and thus, there is no assumption about the cross-section being thin-walled. 2. Preprocess • Standard Geometry HyFem has its inbuilt preprocessor. The user can create some standard geome6
tries using Preprocess→Standard Geometry. For using the inbuilt mesh generator, the user has to specify Element Type and Geometric Model. The various types of geometries that can be meshed using this mesh generator are described in Appendix-A. • Clear Bcd ld Bcd ld is the main user input file, where boundary conditions, formulation strategies, different loading data, material properties, transient analysis data etc. can be specified. The user can use Preprocess→Clear Bcd ld to clear all the data in this file before starting a new problem. • Create Bcd ld The Bcd ld file can be created using Preprocess→Create Bcd ld as described in Appendix-C. • Apply Manual Change (Bcd ld) The Bcd ld file can be changed manually. After carrying out the manual changes in Bcd ld file in accordance with Appendix-C, the file should be saved. Then the user should click Preprocess→Apply Manual Change (Bcd ld) in order to make the changes effective. 3. Import Files In case the user wants to use an existing geometry file, user can import this file using Import Files/Old Geometry. The user has the option to import existing Bcd ld file also. For meshing more complicated geometries, the user can use GAMBIT, which is a preprocessing package, whose output files containing information about the nodal coordinates, connectivity etc, can be directly read by our analysis program. In this case, the user has to import two files using Import Files/Gambit. These two files can be created as described in Appendix-B . The various Element Types those are supported by our package are discussed in Appendix-D. 4. Solution After preprocessing, the user can use the menu button Solution→RUN to solve. Our package will tell to specify the directory where user wants to save the files and it will ask for ‘Problem Name’. After analysis our package will automatically save the geometry, Bcd ld, and result files (additionally gambit.neu and guser when user is using gambit) in that directory with extention as the specified ‘Problem Name’. In case user specifies the current directory (the directory where the package exe exist) then it will not ask for ‘Problem Name’. Then user can see geometry, Bcd ld, result files in the current directory itself. For transient analysis the user has to specify the time-dependent function (e.g.‘10*sin(2*pi*t)’) that multiplies the load vector. The initial values of the displacements and velocities are assumed to be zero. For modal analysis, the user has to specify the number of frequencies (starting from the first frequency) that are of interest. For all the four types of analysis, static, modal, transient and St. Venant torsion, the results are stored in the file ‘result’. For static problems, this file contains nodal displacement and stresses, for modal analysis it contains natural frequencies and corresponding mode shape, for transient analysis, it contains displacement, velocities and stresses at user-specified nodes, while for the St. Venant Torsion Problem it contains section coordinate (z), applied torque T , and twist per unit length α, along with nodal displacements and stresses. 7
5. Post-processing Post processing of the current or existing result file can be done using Postprocess. Existing old result files can be imported. For static problems, the displacements or stresses can be plotted, or the result file can be seen using a text editor. For transient problems, the results are accessible only through the ‘result’ file (the animation option has not yet been implemented). For modal problems, however, the animation of different mode shapes can be seen. Two sliders are provided for controlling animation. The first slider is for controlling scaling of the mode-shape, and the second slider is for controlling speed of the animation. For the St. Venant Torsion Problem, warping of the surface or stresses can be plotted. 6. Axis Using menu item Axis some operations can be done on the resulting plots obtained through post-processing. Axis can be turned on/off using Axis On/Off. It is advisable to model only part of the domain if symmetry exists, e.g. in Appendix B only a quarter of the domain is modeled and analyzed. In case of axisymmetric problems, we model only the section that lies in the r-z plane. In these cases, during post-processing, the results are plotted on the ‘reduced’ domain. If the user is interested in plotting the results for the actual 3D domain, then the user should use Axis→Augmentation. The option Mirror should be used before post-processing. For axisymmetric problems, the user has to first set the revolution angle through Revolve Asym, and then post-processing should be done. Note that Revolve Asym can only be used for axisymmetric problems.
8
Chapter 2 Solved Demo Problems In this chapter, we demonstrate the solution procedure for four different examples. Appropriate SI units may be assumed wherever they are not specified. 1. Static and modal analysis of a cantilever beam. 2. Transient analysis of a circular thin clamped plate under ring pressure load (using ‘HyFem’ mesh generator). 3. Transient analysis of a circular thin clamped plate under ring pressure load (importing gambit files). 4. Static analysis of a pinched hemispherical shell problem. 5. Static analysis of thick and thin beam under self weight. 6. Bending of a prismatic beam of semi-circular cross-section. 7. Torsion of a prismatic beam whose cross-section is an equilateral triangle.
2.1 2.1.1
Static and Modal Analysis of a Cantilever Beam Problem Description
A thin cantilever beam of .3 m length, .003 m thickness, and .03 m width, is subjected to a uniform traction (force/area) of 105 N/m2 on the free end along the thickness direction. The Young modulus, Poisson ratio and density of the material are taken as 210×109 N/m2 , 0.3 and 7800 kg/m3 respectively. The displacement in the load direction at the central node of the free end, and the maximum stress at the fixed section are sought, while from the modal analysis routine, the first four natural frequencies are sought.
2.1.2
User Inputs
For this three dimensional problem, we either use b27 or b8 brick elements for mesh generation. Four levels of mesh refinements are used, as indicated in the result figures. • The domain mesh can be created using Appendix-A.3.1. • At the fixed end of the mesh all displacements are prescribed as zero. These displacement BCs can be specified as ‘Displacement at Surface’ (see Appendix C.1.5). 9
• Traction load is given as component traction on the surface (see Appendix C.1.6). • Material properties are specified as discussed in Appendix C.1.7. Displacement with b27
Stress with b27
1
1.05
0.995
1
0.99
0.95
0.985
0.9
0.98 0.85 0.975 0.8 5X1X1
10X1X1
20X1X1
60X1X1
5X1X1
10X1X1
20X1X1
60X1X1
Con Hyb Displacement with b8
Stress with b8
1
1
0.9
0.9
0.8
0.8
0.7
0.7
0.6
0.6
0.5
0.5
0.4
0.4
0.3
0.3
0.2
0.2 0.1
0.1 10X2X2
20X2X2
40X2X2 120X2X2
10X2X2
20X2X2
40X2X2 120X2X2
Figure 2.1: Comparison between hybrid and conventional b27/b8 elements for displacements and stresses.
2.1.3
Results and Discussion
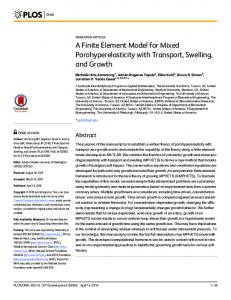
The conventional and hybrid element results are compared by taking the result obtained using a very fine mesh as a benchmark solution for the stresses and displacement. Benchmark values for displacement and stress (σxx ) are 5.653 × 10⁻³ m and 78.22e6 Pa respectively. The first four analytical natural frequencies based on a beam model are 27.940, 175.095, 279.397 and 490.271 Hz. The normalized results are plotted in Figures 2.1 and 2.2. The superior performance of hybrid elements over conventional elements can be readily seen at all mesh sizes for displacements, stresses and natural frequencies, especially in the case of lower order elements. For the 60×1×1 mesh of 27 node elements, the geometry, Bcd ld and result files can be found in the folder ‘Sample/Problem1’.
10
b8−20X2X2
b8−10X2X2 6 3
5.5 5 4.5
2.5
4 3.5
2
3 2.5 1.5
2 1.5 1
1
2
3
1
4
1
2
3
4
Con Hyb b8−50X2X2
b8−100X2X2
1.6 1.2 1.5
1.15
1.4
1.3 1.1 1.2 1.05 1.1 1
1 1
2
3
4
1
2
3
4
(a) b8 element
b27−5X1X1
b27−10X1X1
1.14
1.04
1.12
1.035 1.03
1.1
1.025 1.08 1.02 1.06 1.015 1.04
1.01
1.02 1
1.005 1 1
2
3
4
1
2
3
4
Con Hyb
b27−25X1X1
b27−50X1X1 1.008
1.01 1.006 1.008 1.004 1.006 1.002
1.004 1.002
1
1
0.998
0.998
0.996
0.996 1
2
3
4
1
2
3
4
(b) b27 element
Figure 2.2: Comparison between hybrid and conventional elements for natural frequency calculation.
11
2.2
2.2.1
Transient Analysis of a Circular Thin Clamped Plate under Ring Pressure Load (Using HyFem Mesh Generator) Problem Description
A circular plate of radius 1 and thickness 0.01 is clamped at its boundary. A ring pressure load of 2 N/m2 is applied from r = 0.2 to r = 0.4 on top of the plate. Two types of transient loading cases are used: (i) The load is impulsive i.e. it is applied at time t=0, and kept constant; (ii) The load is varied as ‘2 sin(500t)’. The initial velocity and displacement of all plate points are taken to be zero. The structural damping is assumed to be of Rayleigh type (C = αM +βK) with α = 5.517 and β = 8.62e-6. The Young Modulus, Poisson ratio and density of plate material are taken as 210e9 N/m2 , 0.3 and 7800 kg/m3 respectively. The total time of analysis is specified to be 2 sec.
2.2.2
User Inputs
Since the problem is axisymmetric, we use axisymmetric 4-node and 9-node meshes. Three level of meshes, 10×1, 20×1 and 40×1, are used for the 9-node meshes. Equivalent meshes for the axisymmetric 4-node elements are 20×2, 40×2 and 80×2. The time steps for the three meshes are taken as 2 × 10⁻⁴ sec, 10−4 sec and 5 × 10⁻⁵ seconds. • The problem domain mesh can be created using Appendix A.2.1. • At the clamped end of the mesh all displacements are prescribed as zero. At r = 0, the ur displacement is prescribed to zero. These displacements BCs can be specified as ‘Displacement at Surface’ (see Appendix C.1.5). • Ring pressure load (sign should be +ve as it is applied towards the surface) can be given as pressure on the surface (see Appendix C.1.6). • Material properties can be specified as in Appendix C.1.7. • Time parameters and output point (center of the plate) can be specified as in Appendix C.3.1. • Time variation of the load (without magnitude) is specified during running of HyFem; it should be given in single quotes. For example, for an impulsive load, it should be specified as ‘1’, for a sinusoidal loading of the type 2 sin 500t, it should be specified as ‘sin(500×t)’ (the magnitude 2 is specified through the file Bcd ld).
2.2.3
Results and Discussion
Conventional and hybrid element results are compared against the analytical result (which has been derived using a modal method). The normalized errors for the center-point deflection of the plate are shown in Figures 2.3 and 2.4; the normalizing factor used is the maximum analytical center deflection for the time-span 0 to 5 sec (1.0006e-6 m for impulsive and 1.5087e-7 m for sine load). In the legend, ‘a9’ corresponds to hybrid and ‘b9’ corresponds to conventional results. 12
Center deflection with time (Error with analytical) 0.1 10ele b9 10ele a9 20ele b9 20ele a9 40ele b9 40ele a9
0.08
Normalized Difference with Analytical
0.06
0.04
0.02
0
−0.02
−0.04
−0.06
−0.08
−0.1 0
0.2
0.4
0.6
0.8
1
1.2
1.4
1.6
1.8
2
Time (Sec)
(a) Axi-symmetric 9 node
Center deflection with time (Error with analytical) 1 20ele b4 20ele a4 40ele b4 40ele a4 80ele b4 80ele a4
Normalized Difference with Analytical
0.8
0.6
0.4
0.2
0
−0.2
−0.4
0.2
0.4
0.6
0.8
1
1.2
1.4
1.6
1.8
2
Time (Sec)
(b) Axi-symmetric 4 node
Figure 2.3: Normalized error for center-point deflection of the plate for the case of impulsive loading.
13
Center deflection with time (Error with analytical) 0.3 10ele b9 10ele a9 20ele b9 20ele a9 40ele b9 40ele a9
0.25
Normalized Difference with Analytical
0.2 0.15 0.1 0.05 0 −0.05 −0.1 −0.15 −0.2
0.2
0.4
0.6
0.8
1 Time (Sec)
1.2
1.4
1.6
1.8
2
(a) Axisymmetric 9 node
Center deflection with time (Error with analytical)
Normalized Difference with Analytical
1
0.5
0
−0.5
20ele b4 20ele a4 40ele b4 40ele a4
−1
80ele b4 80ele a4
−1.5 0.2
0.4
0.6
0.8
1
1.2
1.4
1.6
1.8
2
Time (Sec)
(b) Axisymmetric 4 node
Figure 2.4: Normalized error for center-point deflection of the plate for the case of sinusoidal loading. Once again, the superior performance of the hybrid elements can be readily seen for 14
all mesh sizes, especially in capturing the initial transients. For 40×1 a9 mesh with time step 0.00005 second, the geometry, Bcd ld and result files (impulsive loading case) for conventional and hybrid elements can be found in folder ‘Sample/Problem2’. In the result file displacement and velocity are listed for the center point of the plate (0.0,0.01) with display start time as 0.001 sec and display time step as 0.001 sec.
2.3
Transient Analysis of a Circular Thin Clamped Plate under Ring Pressure Load (Importing Gambit Files)
The same analysis in the previous Section is repeated with 3D model, now using GAMBIT for generating the input files. Appendix B explains how to generate the gambit files corresponding to this problem. In this case, the user has to import two files (.neu and guser) using Import Files/Gambit. Some portion of Bcd ld is automatically generated. The user has to specify ‘Transient Analysis Specification’ in Bcd ld following Appendix C.3.1. Sample .neu, guser, geometry, Bcd ld and result files for hybrid 27-node element can be found in folder ‘Sample/Gambit Example’
2.4 2.4.1
Static Analysis of a Pinched Hemispherical Shell Problem Problem Description
A hemispherical shell is subjected to pinching loads; only a quadrant is modeled due to symmetry as shown in Figure 2.5 with F = 1. The properties are E = 6.825 × 10⁷ , ν = 0.3,
Figure 2.5: Quarter domain of symmetric Pinched Hemisphere mean radius R = 10, and thickness h = 0.04.
2.4.2
User Inputs
• The problem domain mesh can be created using Appendix A.3.8. 15
• Symmetry condition (perpendicular displacement is zero) can be put on symmetry faces using ‘Displacement at Surface’ (see Appendix C.1.5). The node can be fixed as shown in the figure using ’Displacement at Node’ (see Appendix C.1.5). • Point loads can be given at suitable node as mentioned in Appendix C.1.6. • Material properties can be specified as in Appendix C.1.7.
2.4.3
Results and Discussion
Meshes of 4 × 4 × 2, 8 × 8 × 2 and 16 × 16 × 2 8-node brick elements, and 2 × 2 × 1, 4 × 4 × 1 and 8 × 8 × 1 27-node brick elements are used with the layer near to the center of the hemisphere being modeled by wedge elements. For the linear case, the results for the displacement at the point of application of the forces, normalized against the solution of 0.0924, are presented in Table 2.1.
Nodes/side 5 9 17
B6/B8 0.00053 0.00218 0.00847
Hemispherical Shell B18/B27 W6/S8 0.00109 0.0186 0.01157 0.4120 0.19478 0.9561
W18/S27 0.0437 0.7846 0.9849
Table 2.1: Normalized displacements for the pinched hemisphere problem A graphical comparison of the results is shown in Figure 2.6. For a 8×8×1 mesh of 27node elements the sample finpt, Bcd ld and result files for conventional and hybrid elements can be found in folder ‘Sample/Problem3’.
16
wedge6cube8
wedge18cube27
1
1
0.9
0.9
0.8
0.8
0.7
0.7
0.6
con hyb
0.6
0.5
0.5
0.4
0.4
0.3
0.3
0.2
0.2
0.1
0.1
4X4X2
8X8X2
16 X 16 X 2
2X2X1
4X4X1
8X8X1
Figure 2.6: Comparison between conventional and hybrid elements
2.5 2.5.1
Static Analysis of Thick and Thin Beam under Self-Weight Problem Description
Simply-supported 2D beams of length 0.2m and width of .05m are loaded under self-weight under plane strain conditions. Using symmetry, only half of the beam is modeled. The displacement in the y-direction at the mid-node of the mid-section, and the stresses at the top and bottom of the mid-section are sought. The body force is specified to be 9.81 N/kg, along the -ve y-direction. The Young Modulus, Poisson ratio and density of the material are taken as 210E9 N/m2 , 0.499 and 7800 kg/m3 respectively. The Poisson ratio is chosen close to 0.5 in order to see the effect of volumetric locking.
2.5.2
User Inputs
Since the problem is two dimensional, q9 or q4 elements are used for mesh generation. Four level of mesh refinements are used as indicated in the result figures. • Problem domain mesh can be created using Appendix-A.1.1. • uy is specified to zero at right end, and ux is specified to zero at left end. These displacement BCs can be specified as ‘Displacement at Surface’ (see Appendix C.1.5). • The body force is given in the negative y-direction as by (see Appendix C.1.6). bx and ωz should be specified as zero. 17
• Material properties are specified as shown in Appendix C.1.7. • Either plane strain (thick beam) or plane stress (thin beam) type is set as shown in Appendix C.1.8.
Displacement with q9
Stress with q9
1 1.01 0.9998
1.009 1.008
0.9996
1.007 1.006
0.9994
1.005 0.9992
1.004 1.003
0.999
1.002 1.001
0.9988 5X2
10X2
20X4
1
40X8
5X2
10X2
20X4
40X8
Con Hyb Displacement with q4
Stress with q4
1 1.03
0.995
1.025 0.99
1.02 1.015
0.985
1.01 0.98 1.005 0.975
1 0.995
0.97 10X4
20X4
40X8
80X16
10X4
20X4
40X8
80X16
Figure 2.7: Normalized thick plate results for Poisson ratio 0.3
18
Displacement with q9
Stress with q9
1 1.05
0.995 0.99
1.04
0.985 1.03 0.98 1.02 0.975 1.01
0.97 0.965 5X2
10X2
20X2
1
40X2
5X2
10X2
20X2
40X2
Con Hyb Displacement with q4
Stress with q4
1 3.5 0.9 0.8
3
0.7 2.5
0.6 0.5
2
0.4 0.3
1.5 0.2 0.1 10X4
20X4
40X4
1
80X4
10X4
20X4
40X4
80X4
(a) Thin Plate
Displacement with q9
Stress with q9
1
2
0.998
1.8
0.996
1.6
0.994
1.4
0.992
1.2
0.99 5X2
10X2
20X4
1
40X8
5X2
10X2
20X4
40X8
Con Hyb Displacement with q4
Stress with q4
1 6 0.9 5
0.8 0.7
4
0.6 3
0.5 0.4
2
0.3 10X4
20X4
40X8
1
80X16
10X4
20X4
40X8
(b) Thick Plate
Figure 2.8: Normalized results for Poisson ratio 0.499
19
80X16
2.5.3
Results and Discussion
Conventional and hybrid results are compared against the analytical solution. Normalizations are carried out with respect to the analytical (for Poisson ratio 0.499) displacement and stress solutions of 3.4036E-8 m and 4.6676e4 N/m 2 . The normalized results are shown in Figures 2.7 and 2.8). For a Poisson ratio of 0.3, the hybrid element results are somewhat better than the conventional elements, while for a Poisson ratio of 0.499, the hybrid elements display a vastly superior performance due to volumetric locking that occurs in the conventional elements (see Figures 2.8). Another important observation made using Jump in Stress (Sxx) Conventional/Hybrid Formulation 3 2.5
Normalised Stress
2 1.5
1 0.5 0
−0.5 −1
1
1.5
2
2.5
3
3.5
Nodes
Figure 2.9: Variation in stresses across elements in the conventional and hybrid strategies. Figure 2.8 is that the nodal stress computed with the conventional q4 element does not converge monotonically with mesh refinement for both the thick and thin plate problems. The nodal stresses are computed by averaging the nodal stress values in the different elements sharing that node. Since the stresses vary sharply in the case of conventional elements as shown in Figure 2.9, the nodal stresses turn out to be inaccurate. In contrast, the variation of the stress for a node across an element is quite small in the case of the hybrid element, resulting in accurate nodal stresses. For a 80 ×80 q4 mesh, the geometry, Bcd ld and result files for conventional and hybrid elements (plane strain case with poisson’s ratio 0.499) can be found in folder ‘Sample/Problem4’.
2.6 2.6.1
Bending of Prismatic Bar for Semicircular Section Problem Description
A prismatic cantilever beam of length 5 m and of semicircular cross-section of radius 1 m (see Figure 2.10) is subjected to bending moments of 30 Nm and 40 Nm about the x- and y20
Figure 2.10: Semicircle section for bending problem axes, respectively, and a terminal load of 50 N in the negative y-direction through the shear center (which results in bending of the beam without twisting of the cross-section). The Young modulus and Poisson ratio are 210e9 N/m2 and 0, respectively. We first determine the shear center using the appropriate menu option, and find it to be located at (0.5093, 0). Since we want to apply the load through the shear center, we take (x0 , y0 ) = (0.5093, 0), and (Mx , My ) = (30, 40) and (Wx , Wy ) = (0, −50). The displacements and stresses are required to be found at the section z = 2 m.
2.6.2
User Inputs
• The problem domain mesh can be created using Appendix A.1.8. Results are given for mesh 20(r) × 16(theta). • A particular node can be selected to suppress the rigid motion along z using Appendix C.5. • Material properties can be specified as in Appendix C.1.7. • Other data required for bending analysis can be specified as described in Appendix C.5.1.
2.6.3
Results and Discussion
As mentioned in Appendix C.5, for the bending analysis of prismatic beams, only conventional elements exist. The FEM solutions for ux , uy , uz , τxz , τyz and τzz for different points located at r = 0.4 are compared against the analytical solution. The analytical values of 21
Result at section z = 2.0 Uz
−9
4
x 10
Sxz 3 Analytical
3
2 Fem
2
1
1
0
0
−1
−1
−2
−2 0
0.5
1
1.5 Theta
2
2.5
−3 0
3
0.5
1
Syz
1.5 Theta
2
2.5
3
2
2.5
3
Szz
−40
400
−41
300
−42 200 −43 100 −44 0
−45 −46 0
0.5
1
1.5 Theta
2
2.5
−100 0
3
0.5
1
1.5 Theta
Figure 2.11: Plot along points with varying θ at r = 0.4. ux and uy for all the points are given by 3.471e-9 and -5.982e-9 respectively. The FEM solution for ux matches almost exactly with the analytical solution, whereas that for uy varies slightly (between -5.96e-9 to -6.04e-9) from point to point. The average value of uy is found to be -6.0133e-9. Figure 2.11 shows the variation of the z-displacement and stress components with θ for points at r = 0.4. The almost exact match with the analytical solution can be seen from this figure. Again, if the beam is only under the action of same terminal load (both moments are zero) then load section (z = 5 m) displacement is obtained as 2.526285e-8 m which is very close to the well known tip deflection value of a Pl3 cantilever under tip point load, 3EI = 2.5262823e − 8m. The geometry, Bcd ld and result xx files for the problem (under both bending and terminal load) can be found in the folder ‘Sample/Problem5’.
2.7 2.7.1
Torsion of prismatic bar for equilateral triangle Problem Description
√ The equilateral triangular cross-section (see Figure 2.12) of side 2/ 3 is subjected to a uniform torque T = 1 about the origin ((xT , yT ) = (0, 0)). The Young modulus is chosen 2, and the Poisson ratio is chosen 0, so that the modulus of rigidity G=1. Meshes of different refinements for q4 and q9 elements (see Table 2.2), are used to solve this problem. In order to ensure a fair comparison between the q4 and q9 elements, an ‘equivalent’ mesh of q9 elements with the same number and positioning of nodes as in the q4 mesh is used.
22
Figure 2.12: Equilateral triangle section for torsion problem
2.7.2
User Inputs
• The problem domain mesh can be created using Gambit. • A node can be selected to suppress rigid body mode as discussed in Appendix C.4.4. • Material properties can be specified through guser file as described in Appendix B.1.3. • Other data required for torsion analysis can be specified as described in Appendix C.4.5.
2.7.3
Result and Discussion
As we can be seen from Table 2.2, reasonably accurate answers are obtained using both the Q4 and Q9 elements. Q4 Number of Elements 12 48 108
elements Maximum uz (FEM) 0.9417462101 0.9416071829 0.9391725760
Q9 Elements Equivalent Maximum uz No.of Ele(FEM) ments 3 0.9519230769 12 0.9404855739 27 0.9371124511
Analytical
0.9375 0.9375 0.9375
√ Table 2.2: Data for Equilateral triangular cross-section with 2/ 3 The gambit.neu, guser, geometry, Bcd ld and result file for the 27 element Q9 mesh can be found in the folder ‘Sample/Problem6’.
23
Appendix A Different Mesh Options This Appendix explains the various mesh options available in the ‘HyFem’ mesh generator. This is available in the path Preprocess→Standard Geometry. In each case, user has to first specify ‘Element type’ and thereafter user has to specify some parameters after selecting suitable ‘Geometric Model’. The meaning of these parameters is explained below. All angles should be given in radian. The resulting meshes in the ‘HyFem’ window for specific values of these parameters (written in bracket) are also attached. With zoomed view, one can see the volume element numbers and co-ordinates. Although user select quadratic element, our package will do linear interpolation between nodes during plotting of geometry, but FEM analysis will be done perfectly with quadratic shape funtions and postprocessing is also based on results obtained through quadratic elements. So, for quadratic element only geometry visualization is not as smooth as it should be.
A.1 A.1.1
Two-Dimensional Geometries Cartesian mesh nelx nely x1, y1 x2, y2
Number of elements in x-direction (5) Number of elements in y-direction (10) Coordinates of left bottom corner (-1,-2) Coordinates of diagonally opposite corner (3,5)
See Figure A.1a.
A.1.2
Quarter rectangular plate with quarter hole nr ntheta radin x2, y2
Number of elements in r-direction (5) Number of elements in θ-direction (10) Radius of the hole (1) Coordinates of corner of the plate (2,2)
ntheta should be even. Since the center of the hole is at the origin, we have x2>0 and y2>0; see Figure A.1b. 24
2
5 46
47
48
49
50
50
45
40
35
30
1.8 4
41
42
43
44
49
45
44
39
25
34
29
1.6 36
37
38
39
40
31
32
33
34
35
48
3
43
38
24
33
1.4
28 47
20
42
37
23
32
1.2
27
2 26
27
28
29
30
21
22
23
24
25
46
19
41
Y
Y
36
1
22
31
18
15
26
1 0.8 16
17
18
19
20
11
12
13
14
15
14
17
21
13 16
0.6
0
12
10 9
11
8
0.4 7 6
−1
7
8
9
10
6
0.2 1
2
−2 −1
3
0
4
1 X
5
2
3
(a) Cartesian mesh
0
0.2
0.4
0.6
0.8
1 X
1.2
1.4
5
4
3
2
1
0
1.6
1.8
2
(b) Quarter rectangular plate with quarter hole
Figure A.1
A.1.3 nr ntheta radin x2, y2
Half rectangular plate with semicircular hole Number of elements in r-direction(5) Number of elements in θ-direction(12) Radius of the hole (1) If it is entered as (3,2) then co-ordinates of the 4 corners will be (3,2), (3,-2), (0,2) and (0,-2)
ntheta should be a multiple of 4, and again x2>0 and y2>0; see Figure A.2a.
25
2 60
55
59
5 4
49
53
57 56
48
44
16
33
32
19
20
35
Y
26
27
26 27 28 29 30
10
28
29
30 31 32 33 34 35
21 22 23
16
36 37 38 39 40
24 11
−1
41 42 43 44 45
18
12
19
13
8
3
46 47 48 49 50 20
1
1.5 X
51 52 53 54 55
15
10
5
0.5
0
14
9
4
0
5
25
7
2
−1.5
17
6
1
−2
18
24 25 21 22 23
15 34
0
−0.5
17
38 37 36
31
Y
12 11
39 41
0.5
13
6
40
42
46
15 14
7
1
20 43
51
1
8
2
52 47
10 9
3
45
58
1.5
50
54
2
2.5
3
0
(a) Half rectangular plate with semicircular hole
Figure A.2
25
5 X
10
(b) Arch
A.1.4
Arch
nr ntheta1 ntheta2 rad radhemi lcyl
Number of elements in thickness direction (5) Number of elements in curve part (5) Number of elements in straight part (along cylinder length) (6) Outer radius of the cylinder (10) Inner radius of the cylinder (5) Length of straight part (15.0)
See Figure A.2b.
A.1.5
Full circular plate with central hole nr ntheta rad radin
Number of elements in r-direction (5) Number of elements in θ-direction (10) Outer radius (10) Inner radius (5)
See Figure A.3a. 2
10
5
50
8
44
10
1
43
4
3
9 8
42 6
2
2
1.2 39
38
37
11
12
13
14
15
1
35
19
24
40
29 8
13
7
18
12 17
1 6 11 16
36
Y
Y
40
30 14
1.4
7
41
0
9
1.6
2
46
20 25
4
3
47
45
15
1.8
4
48
6
10
5
49
45
34 23
39 28 33 38
22
27
49 43
32
48
37 21
26
50 44
42 31
−2
47
36 41
0.8
31 16
32
−4
46
17
33 34
18 26
35
21
27
−6
20
23
29
−8
0.6
19
22
28
0.4
24
30
25
0.2 −10 −10
−8
−6
−4
−2
0 X
2
4
6
8
10
0
(a) Full circular plate with central hole
0
0.5
1 X
1.5
2
(b) Part of circular plate with central hole
Figure A.3
A.1.6
Part of circular plate with central hole nr ntheta rad radin theta
Number of elements in r-direction (5) Number of elements in θ-direction (10) Outer radius (2.0) Inner radius (1.0) Angle subtended by the plate edge (pi/4)
See Figure A.3b. 26
A.1.7
Full circular plate nr ntheta rad
Number of elements in r-direction (5) Number of elements in θ-direction (10) Outer radius (2)
See Figure A.4a.
2
2 50
41
1.8
1.5 40
11
31
12
1.6
49
13
1
30
42
21
39 29
20
0.5
11
14
1.4
32 22
19
15
1.2
12 10 1
Y
48
38
0
28
18
2
8
3 7
13
23
33
43
16
8 9 10
15
24
0.6
34
26
47
7
0.8
37
−1
6
5 14
27
1
4 6
17
−0.5
Y
9
25 44
1 2
0.4
36
35
3
4 5
−1.5 46
−2 −2
−1.5
−1
−0.5
0.2
45
0 X
0.5
1
1.5
0
2
0
0.2
0.4
0.6
0.8
1
1.2
1.4
X
(a) Full circular plate
(b) Part of circular plate
Figure A.4
A.1.8
Part of circular plate nr ntheta rad theta
Number of elements in r-direction (3) Number of elements in θ-direction (5) Outer radius (2.0) Angle subtended by the plate edge (pi/4)
See Figure A.4b.
A.1.9
Cook’s Membrane problem nelx nely
Number of elements in x-direction (4) Number of elements in y-direction (6)
See Figure A.5.
27
60 24 20 23 16
50 19
22
12 8
15
21
18 4
40
11 14
17
Y
7 10
30
3
13
6 9
20
2 5
10
0
1
0
5
10
15
20
25 X
30
35
40
45
Figure A.5: Cook’s Membrane Problem (2D mesh)
A.2 A.2.1
Axisymmetric Geometries Cylindrical Mesh nelr nelz r1, z1 r2, z2
Number of elements in r-direction (5) Number of elements in z-direction (10) Coordinates of left bottom corner (1,1) Coordinates of diagonally opposite corner (3,5)
Note that r1>0 and r2>0. See Figure A.6a.
5
2 46
47
48
49
5
50
10
4
4.5
1.5 41
42
43
44
9
3
45
8
2
4
36
37
38
39
40
31
32
33
34
35
15 14
7
1
1
13
6
12 20
11 17
0.5 26
27
28
29
30
21
22
23
24
25
16
17
18
19
20
3
Z
Z
19 18
3.5
2.5
16
23
25
22
24
21
26
27
28
29
30
0
−0.5
31 32 33 36
2
11
12
13
14
34 35
37
41
−1
15
38
46 42 47
6
7
8
9
43
10
1.5
48
−1.5 1
1
2
1.5
3
2 R
4
2.5
5
40 44
49
1
39
45
50
−2
3
(a) Circular cylinder
0
0.5
1 R
1.5
2
(b) Hollow sphere
Figure A.6
28
A.2.2
Hollow sphere nr ntheta rad radin
Number of elements in r-direction (5) Number of elements in θ-direction (10) Outer radius (2.0) Inner radius (1.0)
See Figure A.6b.
A.2.3
Full sphere nr ntheta rad
Number of elements in r-direction (5) Number of elements in θ-direction (10) Outer radius (2.0)
See Figure A.7a.
2
6 41
50
45
40
35
30
42
1.5 31
5
1
25
43
32
49
21
44
39
34
33
29
22 44 23 34
11
24
13
8
48
14 4 5 6 7
35
25
15 16
36
17
−0.5
47
42
37
32
18
27
14 22
47
30
17 46 41 36
38
31
39
48
1
8
16 11
49
7
6
50
1
0.5
1 R
1.5
0
2
(a) Full sphere
0
0.5
10 9
12
21
40
13
26
−1.5
0
19
23
2
29
−2
28
3
46
37
28
−1
33
27
19
20
38
15
26
18
43
45
Z
Z
3
0 109
20
12
0.5 1 2
24
4
1
1.5
2
2 R
2.5
5
4
3
3
3.5
4
(b) Cylinder with hemispherical cavity
Figure A.7
A.2.4
Cylinder with hemispherical cavity nr ntheta radin r2, z2
Number of elements in r-direction (5) Number of elements in θ-direction (10) Radius of the hole (1) Coordinates of corner of the plate (4,6)
ntheta should be even. Center of the cavity is at origin. Hence, r2>0 and z2>0. See Figure A.7b. 29
A.2.5
Cylinder with spherical cavity
nr ntheta radin r2, z2
Number of elements in r-direction (5) Number of elements in θ-direction (12) Radius of the hole (0.5) If it is entered as (3,2) then co-ordinates of four corners will be (3,2), (3,-2), (0,2) and (0,-2)
ntheta should be a multiple of 4. Here, always r2>0 and z2>0. See Figure A.8a.
2
45 60
55
50 5
59
1.5
54
58
1
53
57
44
48
51
41
33
27
28
29
17
−1.5
23
24
25
10 25
13
8
20
1.5 R
2
27
28
29
30
31
32
33
34
35
38
39
40
0 36
15
10
1
26
5
19 14
9
0.5
22
21
18
4
0
24
12
5
−2
15 23
7
3
16
20
30
22
11
2
20 19 18
11 17
21 16
13 12
6
35
34
Z 26
1
7 1
25
32
31
−1
15 14
2
30
39
0
6
3 8
37
36
Z
35
38
46
−0.5
9
40
47 42
56
10 4
43
52
0.5
40
45
49
2.5
−5
3
(a) Cylinder with spherical cavity
0
5
10
37
15 R
20
25
30
(b) Cylinder with hemispherical ends
Figure A.8
A.2.6
Cylinder with hemispherical ends
nr ntheta1 ntheta2 rad radhemi lcyl
Number of elements in thickness direction (5) Number of elements in curved part (5) Number of elements in straight part (along cylinder length) (3) Outer radius of the cylinder (30) Inner radius of the cylinder (10) Length of straight part (15.0)
See Figure A.8b.
30
A.3
Three-Dimensional Geometries
A.3.1
Cartesian mesh
nelx, nely, nelz x1, y1, z1 x2, y2, z2
Number of elements in respective directions (3, 2, 4) Coordinates of one corner of the parallelepiped (0.5, 0.5, 0.5) Coordinates of the diagonally opposite corner (1.5, 1.0, 2.0)
See Figure A.9a.
(a) Cartesian mesh
(b) Part of a cylinder with hole
Figure A.9
A.3.2
Part of a cylinder with hole nr, nthet, naxis theta radmid thick lcyl
Number of elements in respective directions (5, 4, 3) Angle subtended by the cylinder part (pi/2) Radius of mid-section of the cylinder (3.0) Thickness of the cylinder (1.0) Length of the cylinder (2.0)
See Figure A.9b.
A.3.3
Full cylinder with hole
nr, nthet, naxis radmid thick lcyl
Number of elements in respective directions (5, 12, 3) Radius of the mid-section of the cylinder (3.0) Thickness of the cylinder (1.0) Length of the cylinder (2.0)
See Figure A.10a. 31
(a) Full cylinder with hole
(b) Part of solid cylinder
Figure A.10
A.3.4
Part of solid cylinder nr, nthet, naxis theta radout lcyl
Number of elements in respective directions (5, 4, 3) Angle subtended by the cylinder part (pi/2) Outer Radius of the cylinder (3.0) Length of the cylinder (2.0)
See Figure A.10b.
A.3.5
Full solid cylinder
nr, nthet, naxis radout lcyl
Number of elements in respective directions (2, 12, 3) Outer Radius of the cylinder (3.0) Length of the cylinder (2.0)
See Figure A.11a.
A.3.6
Part of a Hemisphere with hole
nphi, nthet, nthick theta phiin, phiout radmid thick
Number of elements in respective directions (3, 4, 2) Angle subtended in circumferential direction (pi/2) The inner and outer angle subtended by the sphere part with the z-axis (pi/6, pi/4) Radius of mid-surface of sphere part (2.0) Thickness of the sphere part (0.5)
See Figure A.11b. 32
(a) Full solid cylinder
(b) Part of a Hemisphere with hole
Figure A.11
A.3.7
Full hemisphere with hole
nphi, nthet, nthick phiin, phiout radmid thick
Number of elements in respective directions (3, 12, 2) The inner and outer angle subtended by the sphere part with the z-axis (pi/6, pi/4) Radius of mid-surface of sphere part (4.0) Thickness of the sphere part (0.5)
See Figure A.12a.
(a) Full hemisphere with hole
(b) Part of a Hemisphere
Figure A.12
33
A.3.8
Part of hemisphere
nphi, nthet, nthick theta phiout radmid thick
Number of elements in respective directions (3, 4, 2) Angle subtended in circumferential direction (pi/2) Outer angle subtended by the hemisphere part with the z-axis (pi/6) Radius of mid-surface of the sphere part (4.0) Thickness of the sphere part (0.5)
See Figure A.12b.
A.3.9
Full hemisphere
nphi, nthet, nthick phiout radmid thick
Number of elements in respective directions (3, 12, 2) Outer angle subtended by the hemisphere part with the z-axis (pi/6) Radius of mid-surface of the sphere part (4.0) Thickness of the sphere part (0.5)
See Figure A.13a.
(a) Full hemisphere
(b) Quarter plate with quarter inclusion
Figure A.13
34
A.3.10
Quarter plate with quarter inclusion
nr
Number of elements in the r-direction for inclusion (2). If nr = 0 then it is a hole. nrinbox Number of elements in the r-direction for the inner box (4) nroutbox Number of elements along the horizontal direction to the right of the bounding box (5) ntinbox Number of elements in the θ-direction for the inner box (6). It has to be even. ntoutbox Number of elements along the vertical direction above the bounding box (7) nelz Number of elements in the thickness direction (1) radhole Radius of the inclusion (3.0) offset Offset of center of the inclusion (0.5). If offset is 0.0 then the center is at origin. If it is positive then the center is offset along the negative y axis. x2b, y2b Planar position of the opposite corner of the inner box (5.0, 6.0) z1 Lower plane height of the plate w.r.t. lower plane (z=0) of the inclusion (0.0) x2, y2 Planar position of the opposite corner of the outer box (8.0, 9.0) z2 Thickness of both the inclusion and plate (1.0) See Figure A.13b.
35
A.3.11
Rectangular plate with circular inclusion
nr Number of elements in r-direction for inclusion (2). If nr = 0 then it is a hole. nrinbox Number of elements in r direction for inner box (3) nroutbox1 Number of elements along the horizontal direction to the right of the bounding box (4) nroutbox2 Number of elements along the horizontal direction to the left of the bounding box (2) ntinbox Number of elements in the θ-direction for inner box (16). It has to be a multiple of 8. ntoutbox1 Number of elements along the vertical direction above the bounding box (5) ntoutbox2 Number of elements along the vertical direction below the bounding box (3) nelz Number of elements in thickness direction (1) radhole Radius of the inclusion (0.5) offset Offset of the center of inclusion (-0.2). If offset is 0.0, then the center is at the origin. If it is positive, then the center of the top semicircle is offset along the negative y-axis, and the center of the bottom semicircle is offset along the positive y-axis. x1b, y1b Planar position of the bottom left corner of the inner box (-1.5, -1.5) x2b, y2b Planar position of the top right corner of the inner box (3.0, 3.0) x1, y1, z1 Co-ordinates of bottom, left, back corner of the plate (-2.0, -2.0, 0.0) x2, y2, z2 Co-ordinates of top, right, front corner of the plate (4.0, 4.0, 0.2) Center of the circle is at the origin. So, x1, y1, x1b, y1b have to be negative and x1 y2b. See Figure A.14a.
36
(a) Rectangular plate with circular inclusion
(b) Half plate with semicircular inclusion
Figure A.14
A.3.12
Half plate with semicircular inclusion
nr nrinbox nroutbox1 nroutbox2 ntinbox ntoutbox nelz radhole offset
x1b x2b, y2b x1, z1 x2, y2, z2
Number of elements in the r-direction for inclusion(2). If nr = 0 then it is a hole. Number of elements in the r-direction for inner box (2) Number of elements in the horizontal direction in the right part of the outer box (2) Number of elements in the horizontal direction in the left part of the outer box (3) Number of elements in the θ-direction for the inner box (4). It has to be a multiple of 4. Number of elements in the vertical direction in the outer box (4) Number of elements in the thickness direction (1) Radius of the inclusion (1.0) Offset of center of inclusion (0.6). If offset is 0.0 then the center is at the origin. It it is positive, then the center is offset along the negative y-axis. Planar position of the bottom, left corner of the inner box (-2.0). y co-ordinate is automatically chosen as 0.0. Planar position of the top, right corner of the inner box (2.0, 2.0) Co-ordinate of the bottom, left, back corner of the plate (-5.0, 0.0). y co-ordinate is automatically chosen as 0.0. Co-ordinate of the top, right, front corner of the plate (4.0, 4.0, 1.0)
See Figure A.14b. 37
A.3.13
Cooks membrane problem
nelx, nely, nelz z1 thk
Number of elements in respective directions (4, 5, 1) Lower plane height (3.0) Thickness (2)
See Figure A.15a.
(a) Cooks membrane problem
(b) Part of cylinder with hemispherical ends
Figure A.15
A.3.14
Part of cylinder with hemispherical ends
nthet nphi1 nphi2 nthk thick theta radhemi radout lcyl
Number of elements along the circumferential direction (4) Number of elements along the hemisphere (3) Number of elements along the cylinder length (2) Number of elements along the thickness direction (2) Thickness (2.0) Angle subtended in the circumferential direction (pi/2) Radius of hemisphere (10) Outer radius (30) Length of the cylinder (15)
See Figure A.15b.
38
Appendix B Use of Gambit This documentation is based on Gambit 2.4.6.
B.1 B.1.1
One Structural Example Problem Description
A clamped circular plate of radius 1 and thickness 0.01 is vibrating under a ring pressure load of 2 N/m2 , applied over r = [0.2, 0.4]. The plate is made of two materials, the first material being used in r = [0, 0.2], and the second material in r = [0.2, 1.0].
B.1.2
Problem Modeling in Gambit - Steps
We will model only a quarter domain as the problem is symmetric. • Modeling the Geometry 1. Working Directory - Browse the path of the folder. Session id - new session. 2. Select Solver (See top left corner) as POLYFLOW. It is required to get the gambit file in .neu format. 3. Go to TOOLPAD SELECTOR BAR. Select Operation→Geometry→Volume. 4. Select Cylinder (right click 2nd sub-button under Volume). Specify Height = 0.01, Radius 1 = 1, Axis Location = Positive Z. Then Apply. One cylinder will be developed. You can rotate the figure using the left mouse. You can get zoomed view by using the right mouse button. One can pan the model by pressing mouse wheel. 5. To get quarter of the plate, select Brick. Specify Width = 1, Depth = 1, Height = 0.01, Direction = +X +Y +Z. Then Apply. Select Intersect (right click 3rd sub-button under Volume). Select both created cube and cylinder. Then Apply. 6. To get the quarter circular plate divided into an inner cylinder of radius 0.2, and an annular cylinder of inner radius 0.2 and outer radius 1 connected by a common surface, first create the common surface at radius 0.2. Select Geometry→Vertex. Select From Coordinates (right click First sub-button under Vertex ). Create two vertices at (0.2,0,0) and (0.2,0,0.01). Select Geometry→Edge. Select Straight Edge (right click first sub-button under Edge). Select the just created vertices
(Any selection from the model can be done in GAMBIT by Shift + Left Click ). Select Type→Real. Then Apply. Select Geometry→Face. Select Revolve Edges (right click first sub-button under Face). Select the created edge. Specify Angle = 90, Axis→Z Positive. Then Apply. 7. Select Geometry→Volume. Then select split volume (7th sub-button under Volume). Select the quarter plate as the volume. Specify Split With→Faces (Real). Select the created face. You can toggle between nearby faces pressing middle mouse button if selection is not desired. Keep only the Connected button on. Then Apply. 8. To split the top face of the plate into loading and non-loading parts, we first create one arc of radius 0.4 on the top face of the plate. Create two vertices at (0.4,0,0.01) and (0,0.4,0.01). Select Geometry→Edge. Select Arcs (right click first sub-button under Edge). Select the Method as one center point and two end points of the arc. Select the vertex (0.0,0.0,0.01) as center and last two created vertices as two end points. Then Apply. Select Geometry→Face→Split Face. Specify Split With→Edges. Select the created arc as the edge. Then Apply. The geometry modeling is now complete. If you want to check whether the volume parts are well connected or not, and also whether any extra surfaces, volumes are present, you can match the desired total number of volumes and faces with the existing geometry. Select Geometry→ Volume→Total (9th sub-button). Select Show total number of →Geometry Entities. You can see the result in Transcript Window. For this example, the total number of volumes and faces are 2 and 11, respectively. • Specify Domains
If two parts of structural domain have different material properties, then each part should be meshed as a separate volume. Furthermore, if you want to use the conventional strategy in one part, and the hybrid strategy in another part of the structural domain made of the same material, then each part should be meshed as a separate volume. All volumes should be properly connected with each other by common surfaces. In the present example, since there are two different materials in the domain, two domains have to be specified as discussed above. Select Operation→Zones→Specify Continuum Types. Then choose Action→Add. Select two structural domains separately.
• Specify Boundary Types
In this section we discuss how to assign boundary conditions, e.g., clamped boundary or symmetry boundary etc. We have to name the boundaries in such a way that the name itself signifies the boundary type. For structural problems, the three primary dependent variables (which are directly solved for in the code), are the three components of the displacement vector. Let u, v, w denote the displacements along the x, y, z directions, respectively. The boundary name should contain only that variable (among u, v, w) which is being specified along that boundary. For example, for a clamped boundary (along which all u, v, w are specified) uvw or vwu or wvu etc. are suitable names (the order does not matter). Similarly, for a x-symmetry boundary (i.e. symmetry boundary perpendicular to the x-axis, along which we have u = 0), the name to be assigned is u. For both 2D or axi-symmetric u, v denote 40
the displacements along x and y directions (for 2D) or along r and z directions (for axi-symmetric) respectively. 1. Select Operation→Zones→Specify Boundary Types. Then choose Action→Add. 2. Let us first select the clamped boundary of plate. As discussed above, the name of the boundary can be taken as uvw. select Type→ELEMENT SIDE. Then Apply. 3. Now we specify the x- and y-symmetry faces. There are 2 ‘x’ symmetry faces and 2 ‘y’ symmetry faces (because of splitting). For ‘x’ and ‘y’ symmetry faces, the boundary names should be u and v respectively. • Specify Pressure/Component Traction Loading Face
Pressure is force/area always applied normal to the surface. With component traction option force/area can be applied as components along different coordinate directions. To specify the portion of the surface where pressure/component traction loading is applied, first Select Operation→Zones →Specify Boundary Types. Then choose Action→Add. Select the face portion. Name the loading face as tn if you want to apply pressure on that face. If you want to apply traction as components (tx , ty , tz ), then you have to name it as tc. For the case being considered, since pressure is applied to the face, we assign the Name as tn. Select Type→ELEMENT SIDE. Then Apply.
• Meshing
Mesh the domains according to domain numbers, i.e., after complete meshing of domain1 (which is selected first in ‘Specify Domains’ section), mesh domain2, and so on. We want to mesh all structural domains by 27node elements. 1. Select Operation→Mesh→Volume. Then choose Set Volume Element Type (5th sub-button)→Hexahedron→27 node. Then Apply. 2. Select Mesh Volume (1st sub-button). Select the inner plate as Volumes. Select Elements→Hex/Wedge, Spacing→Interval Size→0.025. Then Apply. The annular plate is also meshed with the same specifications.
• Getting Output File
Select Files→Export→Mesh. Specify name of the file (extension should be .neu), and then choose Accept.
B.1.3
Gambit output file used in main package
If GAMBIT is being used to generate the input files, then in the main package, the user has to specify the path of two files. Gambit File The .neu file (it is created in the folder where you created GAMBIT model) is the first file among them.
41
User Specified File User has to specify material, domain and loading data in the second file guser (which user has to create). The guser file will be different for different analysis. • guser file for static and transient analysis 1. Analysis Type It should be either ‘Structural Linear Static’ or ‘Structural Linear Transient’. 2. Material Properties First row is total number of materials used. If there are m number of materials, then the next m rows are used for specifying material properties. Material id of the material in the ith row is automatically assigned as i. In each of these m rows, there are 6 columns. coln1 → number of material properties (5 for static and transient analysis). coln2 → Young modulus of the structure. coln3 → Poisson Ratio of the structure. coln4 → Density of the structure. coln5 → First parameter of the Rayleigh damping model. coln6 → Second parameter of the Rayleigh damping model. Last two properties should be assigned to zero if there is no damping. 3. Domain Properties If there are d number of domains, then the following d rows are for the domain data. The j th row among these d rows is for j th domain. In each of these d rows there are only one columns where user has to specify flag for material id. 4. Formulation Strategy It will be either Conventional or Hybrid for structural domain. 5. 2d Plane Geometry Data This part is for 2D planar problems. If the problem is 3D or axi-symmetric, then the starting flag in this section should be specified as 0, while for 2D planar problems, it should be 1. On the next line, the user specifies whether the problem is plane stress (1) or plane strain (0). This flag is to be specified only if the previous flag is 1 (2D planar problem). 6. Prescribed Boundary Condition The next part specifies displacement boundary conditions. The user has to first write the number of face sets (say l) where boundary conditions are applied. It should be consistent with the data generated by Gambit and it should be 0 if there is no face set with prescribed BC. In each face set, there can be more than one faces. However, each set should have the same boundary type for all faces of that set. For this model problem there are l=3 face sets. The next l rows should consist of prescribed displacement values (3 columns for u, v and w in 3D, 2 columns for u, v in 2D plane and 2 columns for ur and uz in axi-symmetric) for each of the l face sets. If for some face sets, there is no condition in one direction, then the corresponding value should be 0.0 (it will be taken care of by the name of the face as mentioned before).
42
7. Prescribed Pressure The next part specifies the pressure boundary conditions. Pressure is nothing but force/area applied always in normal to the surface. The user first specifies the number of face sets (say p), where the pressure is applied (unit N/m2 ). Again, this data should be consistent with the Gambit data. In each set, there can be more than one face. However, all faces in a particular set should be subjected to the same pressure. For this model problem there are (p = 1) face sets. The next p rows specify the prescribed pressure values (toward the surface positive) for each of the p face sets. If there is no face set where pressure is being applied, then only a 0 value is written in this section. 8. Prescribed Component Traction The next part deals with the specification of component-wise traction boundary conditions. Traction is nothing but force/area. The user first specifies the number of face sets (say s), where component tractions are applied (unit N/m2 ). This data should be consistent with the Gambit data. In each set, there can be more than one face. However, all faces in a particular set should be subjected to the same component traction. The next s rows specify the prescribed component traction values (3 components in 3D, 2 components in 2D and axi-symmetric) for each of the p face sets. If there is no face set where a component-wise traction is being applied, then only a 0 value is input. 9. Prescribed Body Force Next comes the specification of body forces. In this part, the first line specifies the flag for body force (0 if body force is absent, 1 if body force is present). The following line of input have 4(for 3D)/3(for 2D) columns in case the body force flag is 1; if the body force flag is 0, then no further input needs to be given in this part. For 3D problems, the user inputs values for body force per unit mass in the x, y and z directions in the first three columns and the angular velocity (rad/sec) about the z-axis in the fourth column, while for 2D problems, the user specifies the values for body force per unit mass in the x and y directions in the first two columns, and the angular velocity (rad/sec) about the z-axis in the third column and for 3D axi-symmetric problems, the user specifies the values for body force per unit mass in the r and z directions in the first two columns and the angular velocity about z-axis in the third column. Point load data (described in Appendix C.1.6) and Time analysis data for transient problem (described in Appendix C.3.1) can be given using HyFem preprocessor. One standard starting guser file for static/transient analysis is present in ‘Sample/Gambit Example’ as ‘guser start1’. • guser file for modal analysis 1. Analysis Type It should be ‘Structural Linear Modal’. 2. Material Properties First row is total number of materials used. If there are m number of materials, then the next m rows are used for specifying material properties. Material id of the material in the ith row is automatically assigned as i. In each of these m 43
rows, coln1 coln2 coln3 coln4
there are 4 columns. → number of material properties (3 for modal analysis). → Young modulus of the structure. → Poisson Ratio of the structure. → Density of the structure.
Following sections will be same as ‘guser file for static/transient problem’. 3. Domain Properties 4. Formulation Strategy 5. 2D Plane Geometry Data 6. Prescribed Boundary Condition There will be no loading informations in guser file for modal analysis. One standard starting guser file for modal analysis is present in ‘Sample/Gambit Example’ as ‘guser start2’. • guser file for torsion/bending analysis 1. Analysis Type It should be ‘Structural Linear Torsion/Bending’. 2. Material Properties First row is total number of materials used. If there are m number of materials, then the next m rows are used for specifying material properties. Material id of the material in the ith row is automatically assigned as i. In each of these m rows, there are 3 columns. coln1 → number of material properties (2 for torsion/bending analysis). coln2 → Young modulus of the structure. coln3 → Poisson Ratio of the structure. 3. Domain Properties This section will be same as ‘guser file for static/transient problem’. For torsion problem selection of symmetry edges (if exist) or fixing node for non symmetry section (see Appendix C.4.4) and specifying torsion analysis data (Appendix C.4.5) can be done using HyFem preprocessor. For bending problem selection of the node to suppress rigid body mode and specification of bending data (see Appendix C.5) can be done using HyFem preprocessor. One standard starting guser file for torsion/bending analysis is present in ‘Sample/Gambit Example’ as ‘guser start3’. For the present example guser is constructed for transient analysis. Although, earlier, we have discussed the case of ‘domain splitting’ where we have two different materials in two domains, we now specify the same material properties (for steel) for both domains, in order that the results can be matched with analytical results. The Rayleigh damping parameters are considered as 5.517(α) and 8.62e-6(β). For this problem, guser can be found as ‘guser1’ in folder ‘Sample/Gambit Example’. 44
B.1.4
Gambit Errors and Measures
1. If gambit gives following error message in transcript window as ‘Boundary type Wall is incompatible for solver POLYFLOW’ then user has to follow this path in GAMBIT - Edit/Defaults/FILE IO/MESH. Then he has to select ‘UNSPECIFIED’ as Unspecified boundary entity.
45
Appendix C Structure of Bcd ld file This is main user input file. This file can be created using Preprocess→Create Bcd ld. The user can use ‘Plot Box Rotate’ for easy rotation of the model and ‘Stretch-to-Fill Axes’ for a magnified view. Both options are available under ‘Rotate Options’ of ‘Rotate 3d’ tool in ‘HyFem’ window. Different portions of this file for different problems are explained below.
C.1 C.1.1
Static Problem: Analysis Type
This section will be automatically written by our package.
C.1.2
Geometry Class
This section specifies underlying geometry (D2/D3/Asym) of the mesh. D2 D3 Asym
2 dimensional plane 3 dimensional 2 dimensional axi-symmetric
Geometry class is automatically specified based on existing geometry, while user is specifying ‘Formulation Strategy’.
C.1.3
Formulation Strategy
Formulation strategy can be specified using Preprocess→Create Bcd ld→Apply Formulation Strategy. Note that a hybrid formulation does not exist for 3- and 6-node triangular elements, and the 10-node tetrahedral element; hence, only the conventional formulation can be specified for these elements.
C.1.4
Variables per Node
Variables per node are specified automatically based on geometry and analysis type, while user is specifying ‘Formulation Strategy’. For 2D or Axisymmetric elasticity problems, it is specified as 2, while for 3D problems, it is specified as 3.
46
C.1.5
Prescribed Displacement
The displacement boundary conditions (BCs) can be prescribed using Preprocess→Create Bcd ld→Apply BCs. There are provisions to choose either node groups or surface element groups on the surface. If all the nodes on a surface (for 3D) or on an edge (for 2D) have the same type of BCs, it can be prescribed easily using Displacement at Surface; The user can use both options in a specific problem simultaneously. For axi-symmetry problems if axi-symmetry edge (z axis) is part of the geometry then our package will automatically impose axi-symmetry condition (ur = 0) on the nodes of that edge. Displacement at Surface If the first entity of this part of input is ‘1’, it signifies that some surfaces displacements are prescribed. Displacements at a surface in 3D are given as : 1 elefirst ... ... ... 0
eleend
incr
0
0
faceid
udof1id
udof2id
udof3id
udof1
udof2
udof3
If the first and end element numbers are the same, then the increment should be 0. If user want to specify BC in one direction then corresponding dofid should be 1, otherwise it should be 0. For example if user want to specify BC in x and z direction in 3D then udof1id, udof3id should be 1 and udof2id should be 0.The user specifies the prescribed values (zero or nonzero) of displacement in the respective directions as udof. In some direction if dofid is given zero then corresponding udof automatically will be put 0.0 by the package just for completion, it will not be used. The zeros on the last line act as a delimiter. If the first entry in this part of the input is ‘0’, it signifies that displacements are not prescribed on any surface. Then this section is written as: 0 Similar to the 3D data, the data for 2d or axisymmetric problems is to be given as 1 elefirst ... ... ... 0
eleend
incr
0
0
faceid
udof1id
udof2id
udof1
udof2
Displacement at Nodes If the first entry of this part is ‘1’, it signifies that at some nodes, the displacements are prescribed. For the 3D case, the prescribed displacements at some node group are specified
47
as : 1 nodefirst ... ... ... 0
nodeend
incr
0
0
udof1id
udof2id
udof3id
udof1
udof2
udof3
If the first and end nodes are the same, then increment should be 0. For 2D problems, the input is specified as 1 nodefirst ... ... ... 0
nodeend
incr
0
0
udof1id
udof2id
udof1
udof2
If the first entry of this part of the input data is ‘0’, it signifies that displacements are not prescribed on any node separately. It is written as: 0
C.1.6
Applying Load
Body Force If the first entry of this part of the data is ‘1’, it signifies presence of a body force. It is specified using Preprocess→Create Bcd ld→Apply Load→Body Force. They can be as below 1 bx bx br
by by bz
bz ωz ωz
ωz
← for 3D ← for 2D ← for Axisym
If the first entry of this part of the data is ‘0’, it signifies absence of body force. Pressure If the first entry of this part of the data is ‘1’, it signifies presence of pressure. By pressure it is meant that force per unit area applied normal to the surface. If it is applied towards the surface then sign should be considered positive. It is specified using Preprocess→Create
48
Bcd ld→Apply Load→Pressure. It can be as below 1 elefirst ... ... ... 0
eleend
incr
0
0
faceid
p or tn value
If the first entry of this part of the data is ‘0’, it signifies absence of pressure loading. Component Traction If the first entry of this part of the data is ‘1’, it signifies presence of general traction loading. Traction loading is nothing but force/area. This can be applied in components along different global co-ordinate directions. It is specified using Preprocess→Create Bcd ld→Apply Load→Component Traction. It can be as below 1 elefirst elefirst elefirst ... ... ... 0
eleend eleend eleend
incr incr incr
0
0
faceid faceid faceid
tx tx tr
ty ty tz
tz
← for 3D ← for 2D ← for Axisym
If the first entry of this part of the data is ‘0’, it signifies absence of general traction loading. Point Loading If the first entry of this part is ‘1’, it signifies presence of point loading on a particular node. It is specified using Preprocess→Create Bcd ld→Apply Load→Point Load. It can be as below 1 node node node ... ... ... 0
Px Px Pr
Py Py Pz
0
0
Pz
← for 3D ← for 2D ← for Axisym
Note that in the 2D case (for both plane stress and plane strain), the (Px , Py ) entries denote load per unit width (units of force per length). In the axisymmetric case, Pr and Pz denote the total ring load being applied (units of force). If the first entry of this part of the data is ‘0’, it signifies absence of point loading. 49
C.1.7
Material Specification
This section is specified using Preprocess→Create Bcd ld→Apply Material. It can be as below Material Properties The first entry of this part of the data stands for the number of materials used (nmat) in the formulation. Material properties are listed as: nmat matid ... ... ...
E
nu
rho
alpha
beta
For static problem density is relevant only when there is body force and alpha, beta are relevant only when there is damping. Material id of Elements If more than one type of material is used in the formulation, elements can be listed as per material id, while it is asked. For one material it will be automatically taken care. This data section will be as below elefirst ... ... 0
C.1.8
eleend
incr
0
0
matid
2D Plane Geometry
If the first entry of this part of the data is ‘1’, it signifies that additional information pertaining to planar analysis is there. This information is to be given as 1 1/0
← if problem is 2D Plane type ← 1 for plane stress 0 for plain strain
If first entry of this part of the data is ‘0’, it signifies it is not 2D plane problem.
C.2
Modal Problem:
For modal problems Bcd ld file will be same as that for static problem, but loading part (Appendix C.1.6) will be absent as it is not required in modal analysis.
50
C.3
Transient Problem:
Bcd ld file for transient problem will be same as that for static problem. In addition there will be transient analysis specifications as below.
C.3.1
Transient Analysis Specification
If the first entry of this part of the data is ‘1’, it signifies transient analysis, otherwise it is not. The starting time of the analysis is assumed to be t = 0. The following data can be specified using Preprocess→Create Bcd ld→Transient Analysis Data. Time data dt
Tend
dspstart
dspend
dspstep
where dt Tend dspstart dspend dspstep
Analysis time step Analysis end time Display start time Display end time Display time step
Nodes for displaying Displacements Following node set is for displaying displacements and velocities for each display time step. nodefirst ... ... 0
nodeend
incr
0
0
Nodes for displaying Stresses Following node set is for displaying stresses for each display time step. nodefirst ... ... ... 0
nodeend
incr
0
0
51
C.4 C.4.1
St. Venant Torsion Problem: Geometry Class
This section specifies the underlying geometry of the mesh. For the option ‘St. Venant’s Torsion Problem’, the geometry class is automatically specified as ‘D2’ (2 dimensional plane) when the user specifies the ‘Formulation Strategy’.
C.4.2
Formulation Strategy
Formulation strategy can be specified using Preprocess→Create Bcd ld→Apply Formulation Strategy. Note that a hybrid formulation does not exist for the St. Venant torsion problem; hence, the conventional displacement-based formulation will be automatically chosen by the package.
C.4.3
Variables per Node
Variables per node is automatically chosen as 1 for St. Venant Torsion Problem.
C.4.4
Prescribed Displacement
If the section is singly or double symmetric, then the user can model only half or quarter of the entire section, as shown in Figure C.1. At the nodes located on the symmetry edges, uz = 0.
(a) Full Triangle
(b) Fem Domain
Figure C.1 The user only has to select symmetry edges using Preprocess→Create Bcd ld→Apply BC’s→On Surface Elements; the HyFem package will automatically set uz =0 at nodes along these edges. If the full section is being modeled by the user, then the user has to select one and only one node using Preprocess→Create Bcd ld→Apply BC’s→On Surface Node to suppress rigid-body displacements.
C.4.5
Torsion Data
The torsion data is specified using Preprocess→Create Bcd ld→Torsion Analysis Data. In the Bcd ld file 4 pieces of data need to be specified. The first one is the torque T . The next two are the in-plane co-ordinates of the axis of torsion (xT , yT ). The last piece of data is 52
(a) Full Circle
(b) Fem Domain
Figure C.2 the distance z of the section from the origin at which the results are desired. We assume that the origin is located on the central plane of the bar, i.e., the end faces on which the torque is applied are located at z = ±L/2, where L is the total length of the bar. The location of the origin on the central plane, and the orientation of the x and y-axes can be arbitrary. For the St. Venant torsion problem, the length of the bar L does not enter the formulation, and hence does not need to be specified by the user.
C.4.6
Material Specification
Material can be specified using Preprocess→Create Bcd ld→Apply Material. The user has to specify the Young modulus and the Poisson ratio.
C.5
Bending of Prismatic Bar:
See Figure 1.1 for a sketch of the problem being attempted. As in the St. Venant torsion problem, here too, only conventional elements exist. The Bcd ld file for this problem is the same as St. Venant torsion problem except that the ‘Torsion Data’ section is now replace by the ‘Bending Data’ section. Even if the section is symmetric, the full section needs to be discretized by the user. The user is required to select one and only one node of the section using Apply BC’s→On Surface Node to suppress the rigid-body mode.
C.5.1
Bending Data
This section is specified using Preprocess→Create Bcd ld→Bending Analysis Data. In this section, the pieces of data that need to be specified are the beam length L, followed by the moments about the x, y and z axis, namely, (Mx , My , T ). The axis of torsion for the torque T is assumed to coincide with the centroidal axis, i.e., xT = xc and yT = yc . In the terminal load data section 4 values need to be specified, namely, the loads in the x and y directions, (Wx , Wy ), and the in-plane co-ordinates of the point of application of these loads (x0 , y0 ). Lastly, the user specifies the distance z of the section from the origin at which the results are desired. The origin is assumed to lie on the left face as shown in Figure 1.1, although in that plane, its placement can be arbitrary. The orientation of the x and y-axes is also arbitrary.
53
Appendix D Geometry Input Data File (‘geometry’) This is the Geometry input file. It is generated automatically by the package. The user need not require to make any change in this file. When user selects ‘old file’ as ‘Geometry Input Mode’, then the user has to specify the path of the previously saved ‘geometry’ file. Again, when the user imports a previous result file only for the purpose of post-processing, user has to specify the path of the corresponding ‘geometry’ file. Description of the file is given below: The first line in ‘geometry’ is the header. The next part of the data file consists of nodal co-ordinate data. The first line in this part of the data specifies the total number of nodes and geometric dimension of the problem. The following lines are coordinates of nodes as specified below in increasing order of node number. NodeNo NodeNo NodeNo
X-coord X-coord R-coord
Y-coord Y-coord Z-coord
Z-coord
← for 3D ← for 2D ← for Axisym
The following part of the data contains information about the elements used. The first line represents the number of element classes (say n). Two elements fall in different classes if they have different element types (wedge, brick (hexahedral), tetrahedral, etc.). This is followed by n groups of information corresponding to the n element classes. In each group, the first line signifies the name of the element type for that element class. On the following line, the first number represents the total number of elements (say m) in that class, while the second number represents the number of nodes (say p) for each element of that class. The following m lines (one line for each element), arranged according to ascending element numbers, provide the following information. The first number is the element number, while the next p numbers provide the element connectivity. This is followed by two flags which are there for some internal purpose. The symbol for different element types are as follows:
54
1. 3D Elements: b8 b27 w6 w18 t10
8-node brick element 27-node brick element 6-node wedge element 18-node wedge element 10-node tetrahedral element
2. Axi-symmetry Elements: aq4 aq9 at3 at6
4-node 9-node 3-node 6-node
quadrilateral element quadrilateral element triangular element triangular element
q4 q9 t3 t6
4-node 9-node 3-node 6-node
quadrilateral element quadrilateral element triangular element triangular element
3. 2D Elements:
There is no Hybrid formulation for t3, t6 (axisymmetry/2D) and t10 (3D) elements.
55
Appendix E Installation Instruction of HyFem E.1 E.1.1
Linux Systems Installation of Installer
At first user has to download suitable MCRInstaller(64bit/32bit). User can get the MCRInstaller in respective Matlab version. User has to go to the folder ‘Matlab’ created during installation of Matlab. Then user can get MCRInstaller following the path - ‘toolbox/compiler/deploy/glnxa64’. Then user has to install ‘MCRInstaller.bin’. Path of installation will be required later. Let, the path is ‘PATH1’. If MCRinstaller window does not show up in some ubuntu version, user has to set ‘Visual Effects’ as ‘Normal’ following the path ‘System/Preferences/Appearance/Visual Effects’.
E.1.2
Running the Executable
User has to keep suitable executable (compatible with installed installer) and the files in ‘Other Rqd Files’ in one folder. Then after going to that folder, user has to first access ‘execute’ mode to all files using ‘sudo chmod a+wx *’ command in terminal. Then user has to enter following command to run the executable - ./run HyFem.sh PATH1/v715/. ‘PATH1’ is the path mentioned in previous section. The number 715 may change from one installer to the other.
E.2 E.2.1
Windows Systems Installation of Installer
At first user has to download suitable MCRInstaller(64bit/32bit). User can get the installer in respective Matlab version. At first user has to go to the folder ‘Matlab’ (generally in Programme files) which is created during installation of Matlab. Then user can get MCRInstaller following the path - ‘R2011b/toolbox/compiler/deploy/win64’. Then user has to install ‘MCRInstaller’.
E.2.2
Running the Executable
User has to keep suitable executable (compatible with installed installer) and the files in ‘Other Rqd Files’ in one folder. Now the executable can be directly run. 56
For both windows and linux the MCRinstaller can be installed independently without matlab. Even if in a system only suitable MCRInstaller can be installed and the executable will work.
57