These instructions are for all 1999 1/2 through mid-2005 Jetta, all 1999 1/2
through ... 10mm open end wrench (the 10mm/13mm combo wrench from the VW
tire change tool kit in your ... On turbocharged cars and especially the TDI, it may
be easier to
Sep 28, 2009 ... MK5 & MK6 Sigma 5 Speed Shifter Install .... your ratchet but do not go crazy with
it (The Bentley service manual says tighten to 18 foot pounds but this accuracy is
... On Golf and Jetta, while working inside of the car, put both
Diss. ETH No 10655. Metaprogramming in Oberon. A dissertation submitted to
the. SWISS FEDERAL INSTITUTE OF TECHNOLOGY ZURICH for the degree of.
the release of his international bestseller The Last Templar and completing work
on the BBC hit show Spooks, and the Emmy-award winning BBC series Waking ...
These instructions are for the following vehicles, regardless of engine type or
transmission type: 2005.5-2010 Jetta Sedan. 2009-2013 Jetta Sportwagen.
See car specific diagrams for further information. 4. Install into the ... NOTE: Car
manufacturers can change wiring specifications without notice. Ensure that.
Oct 10, 2010 ... Jailbreak, to get Cydia in IPT. • jailbreakme.com (via wifi) or. • spirit.exe only for
iOS 3.1.3 or below (via usb cable). 2. Add sources in Cydia.
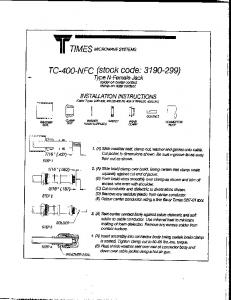
(A) Slide braid clamp over Being certain that clamp seats ... 6 K 3. (A) Seatcenter
contact firmly againstcabiedielectricandsoft solder to cable conductor.
the focus quickly turned to client-side attacks and classic social engi- neering. Most client-side ... Pay-Per-Install: The New Malware Distribution Network. Page 2. Security ... The kingpin then recruits affiliates to sign up on the Web site where t
Nov 4, 2013 ... Outdoor Lifestyles by Hearth & Home Technologies • Dakota 42-B/Dakota 42H-B
...... Figure 7.1 Intellefire Pilot Ignition (IPI) Wiring Diagram ...
[um raw. INSTALLATION INSTRUCTIONS. FOR 16618. 2005- CHEW COBALT -
4cyl. 2.2L. Mufflers, Converters,. Systems and Tlps EXHAU ST. RESONATOR.
vehicle is moving, for example the MP3 menu for DVD upgrades. Changes/
updates of the ... years 2006, Caddy Live, Skoda Octavia 2 and other vehicles
with.
Page 1. Install Guide. En. Page 2. Table of Contents. Introduction: About This Manual ..................................
with different models of camera and different versions of Windows. .... 7. Installing Nikon Capture 3 Under Windows. Eas
Remove and retain two small rubber guides on tabs at front of each muffler for re-
install ... (2006 & later bike with audio amplifier removed is shown below) ... 15
Unbolt brake caliper from final drive (two (2) bolts) and support it out of .... ba
Requirements. Please ensure your web host meets the application requirements.
• Linux, UNIX or variants preferred. Windows 2000 or higher (which support IIS ...
INSTALLATION INSTRUCTIONS. FOR 15805. 2002-2003 MITSUBISHI LANCER
- 4CYI. 2.0L. DIAGRAM T. RESONATOR. ASSEMBLY. 2.25" CLAMP —>Q.
Heat & Glo • Bravo • 704-902 Rev. ... barrier is not present or help is needed to
properly install one. ..... ment, all venting instructions, all parts lists for venting.
Illustrations. The illustrations in this guide are from Windows XP and Mac OS X. Depending on the operating system ....
Read the manual prior to installation. Technical ... manual for support purposes!
... ML-Class (W164) from approx 04/08, C-Class (W204) from approx. 08/08 ...
CONNECTING TO MAP SENSOR (2006 - 2007 5.9L ONLY) 30. CONNECTING
TO DATA .... the Dodge Cummins Diesel®. The Juice/Attitude .... of the engine in
the wiring harness near the power steering pump. • 2000 - 2002: The ... steering
pump. 2. Replace the
MW. Mufflers, Converters,. Systems and Tips EXHAU ST. |NSTALLATION |
NSTRUCTIONS. FOR 1 6601. '02- AUDI A4 1.8T AWD. 2.50" CLAMP. INLET
PIPE.
FUEL SYSTEM BLEEDING INSTRUCTIONS . ... CONNECTING TO FUEL
PRESSURE SENSOR . ..... it needs to plug into the “HOT” side of the fuse
location.
Please go to WWW.MULTITOUCH-APPSTORE.COMand hit the DOWNLOAD BUTTON 1 . In order to download AppSuite, you need to LOGIN
Download ArcHydro Data Model Template from ESRI Resource Center. 2.
Download the ... Download the ArcHydro Tools Tutorial (Latest Version). 4.
Determine ...
Steps to Install ArcHydro Data Model Template: 1. Download ArcHydro Data Model Template from ESRI Resource Center. 2. Download the ArcHydro Tools Overview (Latest Version) 3. Download the ArcHydro Tools Tutorial (Latest Version) 4. Determine where project files and data will be stored. ArcHydro works significantly faster when processing all data from your harddrive. I created a C:\geodata\ArcHydro folder for the data. My MIS staff then wrote a backup routine to get this folder to be backed up each Friday onto our tape drive. 5. Unzip the install files. 6. Ran the “Create Spatial Reference XML” script set to NAD 83. 7. Ran the “Set Spatial Reference” script. Chose NAD 1983 UTM 16N so that I had a regional coordinate system for watersheds that extend out of the county and data that comes from NRCS or State. 8. Created a file geodatabase at C:\geodata\archydro data model\maps and gdbs\OC_ArcHydro.gdb. 9. Imported XML into step 8 that was created in Step 6. 10. Changed XML to 4.0 as default. 11. Install ApFramework 12. Run ArcHydro install. 13. Open Blank Map 14. Add ArcHydro Toolbar and NSS Regression Toolbar 15. Edit XML on disk to “1” to read *.gdb 16. Add OC_ArcHydro.gdb to map. 17. Verify Spatial Reference of Map 18. Save map and exit. 19. Created a TerrainSetupInfo.gdb in C:\geodata\archydro\data model\maps and gdbs\layers (Terrain Setupinfo.gdb contains my editable feature classes, i.e. burn lines, culvert points, etc.) 20. Copy and pasted DNR grids and gaging stations to same folder as step 19. 21. Renamed ArcHydro Template map w/ original because ArcHydro writes all data back to the central gdb. Need to keep this in mind when doing multiple small projects and a big project as the data may be on top of each other potentially. 22. Add DNR data from step 20 into the map.


![Pay-Per-Install - Symantec [PDF]](https://m.moam.info/img/260x300/pay-per-install-symantec-pdf_648c6fd1098a9e974a8b4620.jpg)