Microsoft Office PowerPoint. 1. Microsoft Office PowerPoint. "PowerPoint" refers
to Microsoft PowerPoint, a program that allows the user to design a presentation
...
Introduction to PowerPoint 2007. 2. Contents ... 3.2 THE QUICK ACCESS
TOOLBAR . ..... from the sub-menu, select Microsoft Office, then select Microsoft
Office.
Course Syllabus: Microsoft PowerPoint 2007 Introduction. The Fundamentals.
Starting PowerPoint 2007. What's New in PowerPoint 2007. Understanding the ...
PowerPoint 101: Introduction. PowerPoint 2007 Series. The University of Akron.
Table of Contents. COURSE OVERVIEW .
Oct 12, 2009 ... Institute for Advanced Stud y. Information Technology Group. 609-734-8044 *
[email protected]. Introduction to. Microsoft PowerPoint 2007 ...
Note: This tutorial was created using PowerPoint 2003 on a Windows XP platform
. ... presentations as Adobe Acrobat documents with the file extension .pdf. ...
View: Microsoft PowerPoint has three main views: normal view, slide sorter view,
...
Files produced in Access 2007 have the file extension ".mdbx", and the files ...
sub-menu, select Microsoft Office, then select Microsoft Office Access 2007.
Microsoft PowerPoint 2007 yang untuk selanjutnya disingkat Power-. Point 2007
adalah ... Pengganti menu dan toolbars pada PowerPoint 2007 biasa disebut
Ribbon ... seluruh fasilitas dan fungsi yang disediakan oleh PowerPoint. 2007.
PENGEMBANGAN BAHAN AJAR BERBASIS TIK. DI SMA NEGERI 2
BENGKALIS. MODUL. MICROSOFT POWERPOINT. INSTRUKTUR :
NOVRIYANTO, ST.
Etkili Sunum Hazırlama. Dinleyici kitlenizi belirleyin. ◦ Dinleyiciler uzman kişiler
mi? ◦ Sıradan dinleyiciler mi? Sunumun ana mesajını belirleyin.
Pertandingan Pidato. ○. Mulakan satu persembahan baru. ○. Masukkan teks
dalam .... ffl Kegemaran ffl Prinsip. BIODATA. Nama: Umur: No. KP: Keturunan:.
PowerPoint is a presentation program that is part of Microsoft Office. ➢ It allows ...
Click on Click to add title and type in PowerPoint 2007 Basics. In the Click to ...
Access 2010, Microsoft Access 2013, Microsoft PowerPoint 2003, Microsoft
PowerPoint 2007, Microsoft. PowerPoint 2010, Microsoft PowerPoint 2013,
Microsoft ...
C. Melakukan Editing pada Microsoft Office PowerPoint 2007 . ... yang dapat
membuat file presentasi dengan efek animasi dan audiovisual. Software
presentasi yang ... Gambar 1.5 Contoh membuat file presentasi baru b.
Menyimpan File ...
MEMBUAT MEDIA PRESENTASI BAHAN AJAR. MENGGUNAKAN ... Klik Star →
All Programs → Microsoft Office Power Point 2007. 2. Muncul tampilan seperti ...
On a given slide, the text of a hyperlink will appear underlined. During the ....
There are two ways to add narration to PowerPoint presentations. The first way is
to ...
Aug 15, 2012 ... PowerPoint 2007. - Introduction. This is the first of six PowerPoint handouts. It is
intended to introduce you to the PowerPoint environment and ...
1. Introduction to Microsoft 2007 Office. The Microsoft Office Button. We'll use
Microsoft Word 2007 for our initial illustrations of Ribbon, Tab and Group
examples.
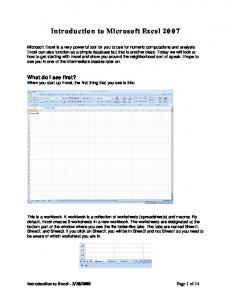
Mar 20, 2008 ... In Excel 2007, the new Office Fluent user interface replaces the traditional ... After
you have done this, click on a different cell and note the cell ...
Microsoft Powerpoint 2007 Keyboard Shortcuts CTRL+F10 Maximize or restore a selected window. PRINT SCREEN Copy a picture of the screen to the Clipboard.
Jun 19, 2015 - the culture sector about how arts and culture can deliver positive social ... safeguard delivery network.
Putting Content in the Presentation. 26. 4.1. Entering Text. 26. 4.1.1. Text Boxes. 27. 4.2. Add a Slide. 27. 4.3. Slide
A . Menjalankan Powerpoint. ▫ Klik Start > All program > Microsoft Offce > Ms
Office Powerpoint. ▫ Membuat Materi Bahan Ajar sesuai bidang study ( urutannya
...
11/27/07 Rev3. 1. Introduction to PowerPoint 2007. Viewing a Presentation.
When you start PowerPoint, the workspace opens in Normal view. Normal view.
Introduction to PowerPoint 2007 Viewing a Presentation When you start PowerPoint, the workspace opens in Normal view. Normal view is divided into 3 areas: 1. Slide Pane - shows the full layout of a slide 2. Slides Tab and Outline Tab – shows slide thumbnails and text-only hierarchical versions of the slides 3. Notes Pane – used to input text relevant to a specific slide Other views include Slide Sorter view which shows thumbnails of the entire presentation and Slide Show view where you preview your presentation as your audience will see it.
Slides Tab
Outline Tab
Slide Pane
Thumbnails
Notes Pane
Normal View
11/27/07 Rev3
Slide Show View
Slide Sorter View
1
Creating a New Presentation To Create a New Presentation: 1) Click on the Office button 2) Click on New 3) Select either a Blank Presentation or one of the Installed Templates 4) Click Create
Entering Text on a Slide When you create a new presentation the first slide to appear is a Title slide. It contains two placeholders: a title placeholder and a subtitle placeholder. To add text, click within the placeholder and type.
Placeholders
2
Formatting PowerPoint provides a wide variety of themes that apply a distinctive look to the text, bullets, background colors, and graphics in a presentation. Using a theme is a big time-saver and immediately adds a professional touch to your presentation. You can apply a theme when you create a new presentation and you can change the theme as many times as you want. To Apply a Theme: 1) Click on the Design tab 2) Select one of the themes in the Themes group To see more themes click on the dialog box launcher.
To Format Text: 1) Click within the placeholder to select it 2) Using the click-and-drag method, select the text to format
3) Click on the Home tab 4) Click on the formatting buttons in either the Font or Paragraph groups You can also use the Mini Tool Bar that appears when the text is selected.
3
To Add New Slides: 1) Click on the Home tab 2) Click on New Slide in the Slides Group
A new slide with title and content layout appears in the Slide pane. This layout has a title placeholder and a content placeholder that supports either bulleted text or graphic elements. To Add Text: 1) Click on the Title placeholder and type the title of the slide 2) Click on Click to add text and type your first bulleted item, hitting ENTER to move to the next line To Add Content: Click on the type of content you want to create and PowerPoint will provide the tools needed to create it. There are 6 types of Content: 1. Tables 2. Charts 3. Smartart Graphics 4. Pictures 5. Clipart 6. Media 4
Applying Slide Transitions A transition is a special effect that determines how a slide appears as it enters or leaves the screen. To Apply Transitions: 1) Click on the Animations tab 2) Click on the drop down arrow in the Transition to This Slide group to see a listing of all available transitions 3) Click on the transition you want to apply 4) Click on Apply to All to apply the transition effect to the entire presentation
Printing To Print: 1) Click on the Microsoft Office Button 2) Click on Print
Under Print what: click on the drop down arrow and select one of the options to print • Slides - prints each slide separately • Handouts - prints multiple slides per page. Change the number of slides to print per page under Handouts. • Notes Pages - prints the slide and the notes that pertain to that slide • Outline View - prints the text of the presentation. However your presentation appears under the Outline tab is how it will print. 5