Internet, Web applications, and Web services, the majority of today's programs and applications require ... basic concep
Java™ Network Programming and Distributed Computing By David Reilly, Michael Reilly
Publisher : Addison Wesley Pub Date : March 25, 2002 ISBN : 0-201-71037-4
Table of Contents
Pages : 496
Java(TM) Network Programming and Distributed Computing is an accessible introduction to the changing face of networking theory, Java(TM) technology, and the fundamental elements of the Java networking API. With the explosive growth of the Internet, Web applications, and Web services, the majority of today's programs and applications require some form of networking. Because it was created with extensive networking features, the Java programming language is uniquely suited for network programming and distributed computing. Whether you are a Java devotee who needs a solid working knowledge of network programming or a network programmer needing to apply your existing skills to Java, this how-to guide is the one book you will want to keep close at hand. You will learn the basic concepts involved with networking and the practical application of the skills necessary to be an effective Java network programmer. An accelerated guide to networking API, Java(TM) Network Programming and Distributed Computing also serves as a comprehensive, example-rich reference. You will learn to maximize the API structure through in-depth coverage of: • • • • • • •
The architecture of the Internet and TCP/IP Java's input/output system How to write to clients and servers using the User ; else hostname=&"; }
216
// Construct the full GET request String finalURL = baseURL + arguments; System.out.println ("Sending GET request - " + finalURL); // Send the GET request, and display output try { // Construct the url object URL url = new URL(finalURL); // Open a connection InputStream input = url.openStream(); // Buffer the stream, for better performance BufferedInputStream bufIn = new BufferedInputStream(input); // Repeat until end of file for (;;) { int Sending POST request - " + query); // Send the POST request, and display output try { // Construct the url object representing cgi // script URL url = new URL( baseURL ); // Get a URLConnection object, to write to POST // method URLConnection connect = url.openConnection(); // Specify connection settings connect.setDoInput(true); connect.setDoOutput(true);
219
// Get an output stream for writing OutputStream output = connect.getOutputStream(); // Create a print stream, for easy writing PrintStream pout = new PrintStream (output); pout.print ( query ); pout.close(); // Open a connection InputStream input = connect.getInputStream(); // Buffer the stream, for better performance BufferedInputStream bufIn = new BufferedInputStream(input); // Repeat until end of file for (;;) { int req.getRequestURI()="+req.getRequestURI()); pw.println("req.getProtocol()="+req.getProtocol()); pw.println("req.getHeader(\"User-Agent\")=" +req.getHeader("User-Agent")); pw.close(); } }
Running RequestDisplay After compiling and installing RequestDisplay in the preferred servlet engine or servletrunner, for testing purposes, you'll notice that whenever a request for this servlet is made, diagnostic information about the request will be displayed, such as the type of browser. If you view it in another browser, you will notice a different version number.
10.8 ServletResponse and HttpResponse For servlets, the ServletResponse and its subclass HttpResponse are two of the most vital classes. These classes perform the function of sending the MIME-encoded value="+cookies[i].getValue()); pw.println("version="+cookies[i].getVersion()); if(cookies[i].getName().equals("cookie")) { current=cookies[i]; } pw.println(); } } int count=0; if(current != null) { count = Integer.parseInt(current.getValue()); // Add new cookie, so we have more than one cookie // stored in browser res.addCookie(new Cookie("previouscookie",new Integer(count).toString())); } // Increment count pw.println("Count of value stored in cookie = count++;
241
"+count);
// Add cookie to save state value="+cookies[i].getValue()); pw.println("version="+cookies[i]. getVersion()); if(cookies[i].getName().equals("cookie")) { current=cookies[i]; } pw.println(); }
Running CookieTest After compiling and installing CookieTest in your preferred servlet engine, or servletrunner for testing purposes, you'll notice that a cookie will be added to your browser. If you have security settings on your browser to reject cookies, or to manually accept/deny cookies, this will be easier to observe. Cookie session.getCreationTime()="+ new java.util.Date( session.getCreationTime())); pw.println("session.getID()="+session.getId()); pw.println("session.getLastAccessedTime()=" + new java.util.Date(session.getLastAccessedTime())); // Modify a session variable, so state // information is changed from one invocation to // another of this servlet String strCount = (String) session.getValue("VisitCount"); pw.println("No. of times visited = " + strCount); // Increment counter int count = Integer.parseInt(strCount);
count++;
// Place new session data back for next servlet invocation session.putValue("VisitCount", Integer.toString(count)); pw.println (""); pw.flush(); } }
Running SessionServlet After compiling and installing SessionServlet in your preferred servlet engine, or the JSDK for testing purposes, you'll notice that on the first time through, a brand-new session is created. Subsequent executions, however, will contain previous state data, with a counter being incremented along with the last accessed time. Please note that to see the output change, you will need to "refresh" your browser so that a new HTTP request is sent to the servlet.
10.14 Summary Java servlets provides a comprehensive and well-thought-out API that offers a powerful and flexible alternative to the CGI API. This technology gives far superior performance and built-in support for cookies and session management. The ability to extend servlets to other transport mechanisms is another plus for this API.
Chapter Highlights In this chapter, you have learned: • • • • •
How to install and set up the Java Servlet Development Kit (JSDK) How to run the JSDK reference servlet engine How to write a simple servlet How to use the HTTPServletRequest and HTTPServletResponse objects to retrieve and send data How to use cookies to store simple data
244
•
How to create a new session, and to add data to it, for more advanced servlets
245
Chapter 11. Remote Method Invocation (RMI) Section 11.1. Overview Section 11.2. How Does Remote Method Invocation Work? Section 11.3. Defining an RMI Service Interface Section 11.4. Implementing an RMI Service Interface Section 11.5. Creating Stub and Skeleton Classes Section 11.6. Creating an RMI Server Section 11.7. Creating an RMI Client Section 11.8. Running the RMI System Section 11.9. Remote Method Invocation Packages and Classes Section 11.10. Remote Method Invocation Deployment Issues Section 11.11. Using Remote Method Invocation to Implement Callbacks Section 11.12. Remote Object Activation Section 11.13. Summary
11.1 Overview Remote Method Invocation (RMI) is a distributed systems technology that allows one Java Virtual Machine (JVM) to invoke object methods that will be run on another JVM located elsewhere on a network. This technology is extremely important for the development of large-scale systems, as it makes it possible to distribute resources and processing load across more than one machine.
11.1.1 What Is Remote Method Invocation? RMI is a Java technology that allows one JVM to communicate with another JVM and have it execute an object method. Objects can invoke methods on other objects located remotely as easily as if they were on the local host machine (once a few initialization tasks have been performed). Figure 11-1 provides an example of this process, whereby an object running on one JVM invokes a method of an object hosted by another. Communication like this does not have to be a one-way process, either—a remote object method can return data as well as accept it as a parameter. Figure 11-1. Invocation of a method on a remote object, executing on a remote machine
246
Each RMI service is defined by an interface, which describes object methods that can be executed remotely. This interface must be shared by all developers who will write software for that service—it acts as a blueprint for applications that will use and provide implementations of the service. More than one implementation of the interface can be created, and developers do not need to be aware of which implementation is being used or where it is located.
11.1.2 Comparison of Remote Method Invocation with Remote Procedure Calls Object method invocation is not a new concept. Even before object-oriented programming, technologies existed that allowed software to call functions and procedures remotely. Systems such as remote procedure calls (RPCs) have been in use for years and continue to be used today. A popular implementation of RPC was developed by Sun Microsystems and published as RFC 1057 (making obsolete an earlier version, published as RFC 1050). Remote procedure calls were designed as a platform-neutral way of communicating between applications, regardless of any operating system or language differences. The difference between RPC and Java RMI is subtle. Java is, after all, a platform-neutral language, and conceivably would allow Java applications to communicate with Java applications running on any hardware and operating system environment that supported a JVM. The principal difference between the two goals is that RPC supports multiple languages, whereas RMI only supports applications written in Java. NOTE With the introduction of the Java 2 Platform, Enterprise Edition, a new technology known as RMI over IIOP helps bridge the gap between RMI and CORBA systems. This technology allows for translation between RMI services and CORBA services, via the Internet Inter-ORB Protocol (more detailed information on IIOP is provided in Chapter 12). In general practice, however, RMI is used primarily with Java-only systems.
247
Beyond the language that either system supports, there are some fundamental differences in the way that RPC and RMI work. Remote method invocation deals with objects, and allows methods to accept and return Java objects as well as primitive datatypes. Remote procedure calls, on the other hand, do not support the notion of objects. RPC services offer procedures, which are not associated with a particular object. Messages to an RPC service are represented by the External Data Representation (XDR) language, which abstracts the differences between byte ordering and structure of datatypes. Only datatypes that are definable by XDR can be passed, and while this amounts to a large variety of primitive datatypes and structures composed of primitive datatypes, it does not allow objects to be passed. Neither system is perfect. Many RPC services already exist, and RMI is not compatible with these legacy applications. However, it is easier for Java developers to use RMI, rather than using a library that implements RPC, as services can exchange entire objects, rather than just individual data fields. By writing distributed systems in RMI, however, the ability to develop systems in other languages is lost. There are, however, distributed systems technologies that do support other languages. The most popular choice for this is the Common Object Request Broker Architecture (CORBA), which the Java 2 platform supports. CORBA has many advantages, as well as some limitations, and is discussed further in Chapter 12.
11.2 How Does Remote Method Invocation Work? Systems that use RMI for communication typically are divided into two categories: clients and servers. A server provides an RMI service, and a client invokes object methods of this service. RMI servers must register with a lookup service, to allow clients to find them, or they can make available a reference to the service in some other fashion. Included as part of the Java platform is an application called rmiregistry, which runs as a separate process and allows applications to register RMI services or obtain a reference to a named service. Once a server has registered, it will then wait for incoming RMI requests from clients. Figure 11-2 illustrates services registering with a single RMI registry. Associated with each service registration is a name (represented as a string), to allow clients to select the appropriate service. If a service moves from one server to another, the client need only look up the registry again to find the new location. This makes for a more faulttolerant system—if the service is unavailable because a machine is down, a system administrator could launch a new instance of the service on another system and have it register with the RMI registry. Providing the registry remains active, you can have your servers go online and offline or move from host to host. The registry doesn't care which host a service is offered from, and clients get the service location directly from the registry. Figure 11-2. Multiple services can register with the same registry.
248
RMI clients will send RMI messages to invoke an object method remotely. Before any remote method invocation can occur, however, the client must have a remote object reference. This is normally obtained by looking up a service in the RMI registry. The client application requests a particular service name, and receives a URL to the remote resource. Remember, URLs are not just for HTTP—most protocols can be represented using URL syntax. The following format is used by RMI for representing a remote object reference: rmi://hostname:port/servicename
where hostname represents the name of a server (or IP address), port the location of the service on that machine, and servicename a string description of the service. Once an object reference is obtained (either through the rmiregistry, a custom lookup service, or by reading an object reference URL from a file), the client can then interact with the remote service. The networking details of requests are completely transparent to the application developer—working with remote objects becomes as simple as working with local ones. This is achieved through a clever division of the RMI system into two components, the stub and the skeleton. The stub object acts as a proxy object, conveying object requests to the remote RMI server. Remember that every RMI service is defined as an interface, not as an implementation. The stub object implements a particular RMI interface, which the client application can use just like any other object implementation. Rather than performing the work itself, however, the stub passes a message to a remote RMI service, waits for a response, and returns this response to the calling method. The application developer doesn't need to be concerned about where the RMI resource is located, on which platform it is running, or how it will fulfill the request. The RMI client simply invokes a method of the proxy object, which handles all the implementation details. Figure 11-3 illustrates how this is achieved; shown is an RMI client invoking an object method on the stub proxy, which conveys this request to the remote server. Figure 11-3. The RMI client stub calls the RMI server skeleton.
249
At the RMI server end, the skeleton object is responsible for listening for incoming RMI requests and passing these on to the RMI service. The skeleton object does not provide an implementation of an RMI service, however. It only acts as a receiver for requests, and passes these requests on further. After a developer creates an RMI interface, he or she must still provide a concrete implementation of the interface. This implementation object will be called by the skeleton object, which invokes the appropriate method and passes the results back to the stub object in the RMI client. This model makes for much simpler programming, as the skeleton is separated from the actual implementation of the service. All the developer of the server needs to be concerned about is some brief initialization code (to register a service and accept requests), and providing an implementation of the RMI service interface. With respect to the question of how messages are sent, the answer is fairly straightforward. Communication occurs between stub and skeleton using TCP sockets. The skeleton, once it is created, listens for incoming socket requests issued by stubs. Parameters in an RMI system are not limited to primitive datatypes—any object that is serializable can be passed as a parameter or returned from a remote method. When a stub passes a request to a remote skeleton, it must package the parameters (either primitive datatypes, objects, or both) for transmission, which is known as data marshalling. At the skeleton end the parameters are reconstituted to form primitive datatypes and objects, which is known as unmarshalling. For this task, specialized subclasses of the ObjectOutputStream and ObjectInputStream classes are used, to read and write the contents of objects. Parameters are normally passed by value in this case, unless the parameter is itself a reference to a remote object.
11.3 Defining an RMI Service Interface Any system that uses RMI will use a service interface. The service interface defines the object methods that can be invoked remotely, and specifies parameters, return types, and exceptions that may be thrown. Stub and skeleton objects, as well as the RMI service, will implement this interface. For this reason, developers are urged to define all methods in advance, and to freeze changes to the interface once development begins. NOTE It is possible to make changes to an interface, but all clients and servers must have a new copy of the service interface, and code for the stubs and skeletons must be rebuilt.
All RMI service interfaces extend the java.rmi.Remote interface, which assists in identifying methods that may be executed remotely. To define a new interface for an RMI system, you must
250
declare a new interface extending the Remote interface. Only methods defined in a java.rmi.Remote interface (or its subclasses) may be executed remotely—other methods of an object are hidden from RMI clients. For example, to define an interface for a remote lightbulb system (a high-tech version of the traditional on-off switch for a networked world), we could define an interface such as the following: //Chapter 11, Listing 1 public interface RMILightBulb extends java.rmi.Remote { public void on () throws java.rmi.RemoteException; public void off() throws java.rmi.RemoteException; public boolean isOn() throws java.rmi.RemoteException; }
The interface is identified as remotely accessible, by extending from the Remote interface. Each method is marked as public, and may throw a java. rmi.RemoteException. This is important, as network errors might occur that will prevent the request from being issued or responded to. In an RMI client, a stub object that implements this interface will act as a proxy to the remote system—if the system is down, the stub will throw a RemoteException error that must be caught. If a method is defined as part of an RMI interface, it must be marked as able to throw a RemoteException—if it is not, stub and skeleton classes cannot be generated by the "rmic" tool (a tool that ships with the Java SDK which automates the generation of these classes). Methods are not limited to throwing only a RemoteException, however. They may throw additional exceptions that are already defined as part of the Java API (such as an IllegalArgumentException to indicate bad method parameters), or custom exceptions created for a system. For example, the on() method could be modified to throw a BrokenBulb exception, if it could not be successfully activated.
11.4 Implementing an RMI Service Interface Once a service interface is defined, the next step is to implement it. This implementation will provide the functionality for each of the methods, and may also define additional methods. However, only those methods defined by the RMI service interface will be accessible remotely, even if they are marked public in scope or as being able to throw a RemoteException. For our lightbulb system, the following implementation could be created.
Code for RMILightBulbImpl // Chapter 11, Listing 2 public class RMILightBulbImpl // Extends for remote object functionality extends java.rmi.server.UnicastRemoteObject // Implements a light bulb RMI interface implements RMILightBulb { // A constructor must be provided for the remote object public RMILightBulbImpl() throws java.rmi.RemoteException { // Default value of off
251
setBulb(false); } // Boolean flag to maintain light bulb state information private boolean lightOn; // Remotely accessible "on" method - turns on the light public void on() throws java.rmi.RemoteException { // Turn bulb on setBulb (true); } // Remotely accessible "off" method - turns off the light public void off() throws java.rmi.RemoteException { // Turn bulb off setBulb (false); } // Remotely accessible "isOn" method, returns state of bulb public boolean isOn() throws java.rmi.RemoteException { return getBulb(); } // Locally accessible "setBulb" method, changes state of // bulb public void setBulb (boolean value) { lightOn = value; } // Locally accessible "getBulb" method, returns state of // bulb public boolean getBulb () { return lightOn; } }
How RMILightBulbImpl Works An object that can be accessed remotely must—at a minimum—extend the java.server.RemoteObject class. However, a support class exists that provides all the necessary functionality for exporting an object remotely. When implementing an interface, the class should extend the java.server.UnicastRemoteOb ject class—this saves significant time and effort and provides for simpler code. Extending from UnicastRemoteObject is the only RMI-specific code that needs to be written for a service implementation. As can be seen from the code, there is very little work that needs to be done to create RMI service implementations. Methods defined in the service interface must be implemented (or the class would fail to compile until implemented or marked abstract), but beyond that there is no actual networking code required. This means that even developers not experienced with networking could contribute to RMI systems, although writing code for a server and client requires somewhat more effort.
252
11.5 Creating Stub and Skeleton Classes The stub and skeleton classes are responsible for dispatching and processing RMI requests. Developers should not write these classes, however. Once a service implementation exists, the rmic tool, which ships with the JDK, should be used to create them. The implementation and interface should be compiled, and then the following typed at the command line: rmic implementation
where implementation is the name of the service implementation class. For example, if the class files for the RMILightBulb system are in the current directory, the following would be typed to produce stub and skeleton classes: rmic RMILightBulbImpl
Two files would then be produced in this case: • •
RMILightBulbImpl_Stub.class RMILightBulbImpl_Skeleton.class
RMI clients, and the RMI registry, will require these classes as well as the service interface class. They can be copied to a local file system, or distributed remotely via a Web server using dynamic class loading (discussed in Section 11.10.1).
11.6 Creating an RMI Server The RMI server is responsible for creating an instance of a service implementation and then registering it with the remote method invocation registry (rmiregistry). This actually amounts to only a few lines of code, and is extremely easy to do. In small systems, the server could even be combined with the service implementation by adding a main() method for this purpose, though a separation of classes is a cleaner design.
Code for LightBulbServer import java.rmi.*; import java.rmi.server.*; // Chapter 11, Listing 3 public class LightBulbServer { public static void main(String args[]) { System.out.println ("Loading RMI service"); try { // Load the service RMILightBulbImpl bulbService = new RMILightBulbImpl(); // Examine the service, to see where it is stored
253
RemoteRef location = bulbService.getRef(); System.out.println (location.remoteToString()); // Check to see String registry if (args.length { registry = }
if a registry was specified = "localhost"; >=1) args[0];
// Registration format //registry_hostname :port /service // Note the :port field is optional String registration = "rmi://" + registry + "/RMILightBulb"; // Register with service so that clients can find us Naming.rebind( registration, bulbService ); } catch (RemoteException re) { System.err.println ("Remote Error - " + re); } catch (Exception e) { System.err.println ("Error - " + e); } } }
How LightBulbServer Works The lightbulb server defines a single method, main, which allows it to be run as an application. The application encloses almost all of the code in a try { .. } catch block, since networking errors that occur at runtime must be caught. The most likely error to occur is for a RemoteException to be thrown, if the service could not be started or if the server is unable to register with the rmiregistry. public static void main(String args[]) { System.out.println ("Loading RMI service"); try { .... } catch (RemoteException re) { System.err.println ("Remote Error - " + re); } catch (Exception e) { System.err.println ("Error - " + e); } }
The next step is to create an instance of the RMI lightbulb service defined by the RMILightBulbImpl class. The constructor for this class takes no parameters and is simple to
254
invoke. Once the service has been created, the application obtains a remote reference to the newly created lightbulb service and displays its contents so that it is possible to see exactly where the service is located. Each service binds to a local TCP port through which it is located, and the reference is composed of the hostname and port of the service. // Load the service RMILightBulbImpl bulbService = new RMILightBulbImpl(); // Examine the service, to see where it is stored RemoteRef location = bulbService.getRef(); System.out.println (location.remoteToString());
The final step is to register the service with the rmiregistry, so that other clients can access it. This registry could be located on any computer on the local network, or on the Internet, or it could be found on the current host. By default, the server will attempt a registration on the local machine, but if the hostname of a registry is specified on the command line, this setting will be overridden. // Check to see String registry if (args.length { registry = }
if a registry was specified = "localhost"; >=1) args[0];
// Registration format //registry_hostname:port /service // Note the :port field is optional String registration = "rmi://" + registry + "/RMILightBulb"; // Register with service so that clients can find us Naming.rebind( registration, bulbService );
The registration details include the location of the registry, followed by an optional port and then the name of the service. Using static methods of the class java.rmi.Naming, which is responsible for retrieving and placing remote object references in the registry, we register the service so that clients can access it. The details, represented by our registration string, are passed to the Naming. rebind(..) method, which accepts as a parameter a registration name and an instance of the java.rmi.Remote interface. We pass the service created earlier, and the service becomes bound to the registry. The binding process creates an entry in the registry for clients to locate a particular service, so that if the service is shut down, it should of course unbind itself. If no errors occur, the service is then available for remote method invocation.
11.7 Creating an RMI Client Writing a client that uses an RMI service is easy compared with writing the service itself. The client needs only to obtain an object reference to the remote interface, and doesn't need to be concerned with how messages are sent or received or the location of the service. To find the service initially, a lookup in the RMI registry is made, and after that, the client can invoke methods of the service interface just as if it were a local object. The next example demonstrates how to turn a remote lightbulb on and off.
Code for LightBulbClient import java.rmi.*;
255
// Chapter 11, Listing 4 public class LightBulbClient { public static void main(String args[]) { System.out.println ("Looking for light bulb service"); try { // Check to see String registry if (args.length { registry = }
if a registry was specified = "localhost"; >=1) args[0];
// Registration format //registry_hostname (optional):port /service String registration = "rmi://" + registry + "/RMILightBulb"; // Lookup the service in the registry, and obtain // a remote service Remote remoteService = Naming.lookup ( registration ); // Cast to a RMILightBulb interface RMILightBulb bulbService = (RMILightBulb) remoteService; // Turn it on System.out.println ("Invoking bulbservice.on()"); bulbService.on(); // See if bulb has changed System.out.println ("Bulb state : " + bulbService.isOn() ); // Conserve power System.out.println ("Invoking bulbservice.off()"); bulbService.off(); // See if bulb has changed System.out.println ("Bulb state : " + bulbService.isOn() ); } catch (NotBoundException nbe) { System.out.println ( "No light bulb service available in registry!"); } catch (RemoteException re) { System.out.println ("RMI Error - " + re); } catch (Exception e) { System.out.println ("Error - " + e); } } }
How LightBulbClient Works 256
As in the lightbulb server, the client application must be careful to catch any exceptions thrown at runtime, if the server or rmiregistry is unavailable. It also needs to create a URL to the registry and service name, which by default will point to the local machine, but can be overridden by a command-line parameter. The code for this is similar to that in the server, and for this reason is not repeated here. Once a URL to the registry entry has been created, the application attempts to look up the location of the service and obtain an object reference to it, by using the Naming.lookup(String) method. An explicit cast is made to the RMILightBulb interface; if no such interface is found, a NotBoundException will be thrown and caught. // Lookup the service in the registry, and obtain a remote // service Remote remoteService = Naming.lookup ( registration ); // Cast to a RMILightBulb interface RMILightBulb bulbService = (RMILightBulb) remoteService;
Here the networking code ends and the service code begins. Three methods were defined in the service interface: • • •
public void RMILightBulb.on() public void RMILightBulb.off() public boolean RMILightBulb.isOn()
Each of the three methods is tested, and the changes in bulb state displayed to the user. Once this is done, the application will terminate, its task complete.
11.8 Running the RMI System Running any RMI system takes a little care, as there is a precise order to the running of applications. Before the client can invoke methods, the registry must be running. Nor can the service be started before the registry, as an exception will be thrown when registration fails. Furthermore, the client, server, and registry need access to the interface, stub, and skeleton classes, which means they must be available in the class path, unless dynamic loading is used (discussed in Section 11.10). This means compiling these classes, and copying them to a directory on the local file system of both client and server (as well as the registry, if it is located elsewhere), before running them. NOTE Remember to run the rmic tool over the RMILightBulbImpl class, to generate stub and skeleton classes before copying the class files.
The following steps show how to run the lightbulb system, but apply to other RMI systems as well. 1. Copy all necessary files to a directory on the local file system of all clients and the server. 2. Check that the current directory is included in the classpath, or an alternate directory where the classes are located.
257
3. Change to the directory where the files are located, and run the rmiregistry application (no parameters are required), by invoking the following command: rmiregistry 4. In a separate console window, run the server (specifying if necessary the hostname of the machine where the rmiregistry application was run): java LightBulbServer hostname. 5. In a separate console window, and preferably a different machine, run the client (specifying the hostname of the machine where the rmiregistry application was run): java LightBulbClient hostname. You will then see a message indicating that the bulb was activated and then switched off using RMI.
11.9 Remote Method Invocation Packages and Classes Now that you're familiar with the basics of RMI and how to write an RMI service, server, and client, let's look at the packages and classes that comprise the RMI subset of the Java API.
11.9.1 Packages Relating to Remote Method Invocation Five packages deal with RMI. The two most commonly used are java.rmi and java.rmi.server, but it's important to be aware of the functionality provided by the remaining three. 1. java.rmi— defines the Remote interface, classes used in RMI, and a number of exceptions that can occur at runtime. 2. java.rmi.activation— introduced in the Java 2 platform, this package supports "activation" of remote services. Activation allows a service to be started on demand, rather than running continually and consuming system resources. 3. java.rmi.dgc— provides an interface and two classes to support distributed garbage collection. Just as objects can be garbage-collected by the JVM, distributed objects may be collected when clients no longer maintain a reference to them. 4. java.rmi.registry— provides an interface to represent an RMI registry and a class to locate an existing registry or launch a new one. 5. java.rmi.server— provides interfaces and classes related to RMI servers, as well as a number of server-specific exceptions that may be thrown at runtime. 11.9.1.1 Package java.rmi There are one interface, three classes, and a large number of exception classes defined by this package. Each is discussed separately. Remote Interface The java.rmi.Remote interface is unusual, in that it does not define any methods for implementing classes. It is, instead, used as a means of identifying a remote service. Every RMI service interface will extend the Remote interface. Being an interface, it cannot be instantiated (only a class that implements an interface may be instantiated). However, an implementing class may be cast to a Remote instance at runtime. When creating a service that extends the java.rmi.Remote interface, you should be aware that methods must declare a throws clause, listing at least java.rmi.RemoteException, and (optionally) any application-specific exceptions. This is not declared in the API documentation for the Remote interface, but is a condition imposed by the rmic tool. Failure to adhere to this
258
condition will cause an error when stub and skeleton classes are generated. This condition is needed, as a client that invokes a remote method may not be able to connect to the RMI service (due to firewall/network issues, or if the server is inactive). By declaring a throws clause, clients that use the service are forced to catch and deal with the RemoteException, rather than having it surprise users at runtime. MarshalledObject This class represents a serialized object, using the same mechanism for serialization as used in marshalling and unmarshalling parameters and return values. Objects serialized in this way have the codebase of their class definition files annotated, so that they can be dynamically loaded by RMI clients or servers. Naming Class The Naming class offers static methods to assign or retrieve object references of the RMI object registry (rmiregistry). Each method takes as a parameter a Java string, representing a URL to a registry entry. The format of these entries is as follows: rmi://registry_hostname:registry_port/servicename
where registry_hostname is the hostname or IP address of a rmiregistry, registry_port is an optional port field for nonstandard registry locations, and servicename is the name of an RMI service. The default port for an rmiregistry 1099. Methods All methods provided by the Naming class have public access modifiers. The Naming class defines the following methods: •
•
•
•
static void bind ( String url, Remote obj) throws java.rmi. AlreadyBoundException java.rmi.AccessRestriction, java.net. MalformedURLException, java.rmi.RemoteException— inserts a registry
entry (specified by the URL string) for the remote service into the registry, and "binds" the entry to that object. If the remote service is already bound, the operation is not permitted, an invalid URL is specified, or the registry is not available, an exception will be thrown. static String[] list( String url ) throws java.net.Malformed URLException java.rmi.RemoteException— returns a list of services available from the specified rmiregistry (denoted by the URL string). If an invalid URL is specified, or the registry was not contactable, then an exception will be thrown. static Remote lookup( String url ) throws java.rmi.AccessExcep tion java.rmi.NotBoundException, java.net.MalformedURLException, java.rmi.RemoteException— returns a reference for the remote object represented by the specified registry entry (denoted by the URL string). This reference may then be cast to a particular RMI service interface (for example, an RMILightBulb, as used earlier in the chapter). If the operation is not permitted, the registry entry does not exist, or the registry is not contactable, then an exception will be thrown. static void rebind( String url, Remote obj) throws java.rmi. AccessException java.net.MalformedURLException, java.rmi. RemoteException— modifies an existing registry entry, or creates a registry entry if
•
one does not exist, for the specified remote object. If the operation is not permitted, an invalid URL is specified, or the registry is not available, an exception will be thrown. static void unbind( String url) throws java.rmi.AccessException java.rmi.NotBoundException, java.net.MalformedURLException,
259
java.rmi.RemoteException— removes a registry entry (specified by URL string) for a remote service and "unbinds" the remote service associated with that entry. If removal of the entry is not permitted, an entry for that service does not exist, an invalid URL is specified, or the registry is not available, an exception will be thrown.
RMISecurityManager Class All RMI servers and clients that support dynamic class loading (discussed in Section 11.10) will require a security manager to be registered with the JVM. For convenience, an RMI-specific manager is provided that protects rogue code from initiating network connections, masquerading as servers, or gaining file access. This is a more restrictive form of security than that imposed on applets, but may be modified to grant additional privileges by using a security policy file. The RMISecurityManager class extends the java.lang.SecurityManager class. The default action of each method is to throw a SecurityException, unless additional privileges have been granted by a security policy. The number of methods of any security manager is extremely large and not particularly relevant to a networking text. However, more information about these methods may be found in the Java API documentation. AccessException Class An AccessException may be thrown by the Naming class to indicate that a bind, rebind, lookup, or unbind operation cannot be performed. This class extends the java.rmi.RemoteException class. AlreadyBoundException Class If a remote object is already bound to a registry entry, or if another object has already bound that service name, then AlreadyBoundException class is used to indicate that the bind operation could not proceed. The RMI service could unbind and attempt the bind operation again, or it could use the rebind method of the Naming class. This class extends the generic java.lang.Exception class. ConnectException Class This exception class represents an inability to connect to a remote service, such as a registry. This class extends the java.rmi.RemoteException class. ConnectIOException Class Similar to the ConnectException class, this represents an inability to connect to a service to execute a remote method call. This class extends the java.rmi. RemoteException class. MarshalException Class This class represents an error that has occurred during the marshalling of parameters for a remote method call, or when sending a return value. For example, if the server connection is disconnected while writing arguments, this may be thrown. If it occurs at the client end, it is impossible to tell whether the method was invoked by the remote system—a subsequent method invocation may actually cause the method to be invoked twice. While not always significant, it is something that developers should be mindful of, if the method causes state information to change. This class extends the java.rmi.RemoteException class. NoSuchObjectException Class
260
If an attempt to invoke a remote method is made, and the object to which the reference points no longer exists, a NoSuchObjectException may be thrown. This indicates that the method call never reached the object, and may be transmitted at a later date (or to another machine), without a duplicate of the method call being sent. This class extends the java.rmi.RemoteException class. NotBoundException Class When attempts are made to look up or unbind a registry entry that does not exist, the NotBoundException class is thrown by the Naming class. This class extends the generic java.lang.Exception class.
RemoteException Class The RemoteException class represents an error that occurs performing a RMI operation. It is the superclass of many exceptions defined in the java.rmi and java.rmi.server packages. It extends the java.io.IOException class. ServerError Class Representing an error that occurs in an RMI server, this class indicates that the method invocation caused a java.lang.Error to be thrown. This error extends the java.rmi.RemoteException class. ServerException Class When a method call to an RMI server causes a RemoteException to be thrown by the object implementing the service interface, a ServerException is thrown. StubNotFoundException Class If a stub for an RMI service interface cannot be located on the local file system (or externally, if dynamic class loading is enabled), this exception is used to indicate failure to locate the necessary class definition. For a remote object to be passed as a reference and unmarshalled, or a remote object method to be invoked, stub class definitions are required. This class extends the java.rmi. RemoteException class. UnexpectedException Class The UnexpectedException class is used by clients to represent an exception thrown by a remote method that was not declared in the throws clause of the RMI interface. This class extends the java.rmi.RemoteException class. UnknownHostException Class If a client making a remote method request can't resolve a hostname, the java. rmi.UnknownHostException will be thrown. This should not be confused with the similarly named java.net.UnknownHostException, which is not RMI specific. This class extends the java.rmi.RemoteException class. UnmarshalException Class The UnmarshalException class represents an error during the unmarshalling process, either of arguments or of return values. If, for example, the class definition for a remote interface could not
261
be located due to a java.lang. ClassNotFoundException being thrown, it would be represented by an UnmarshalException. This class extends the java.rmi.RemoteException class. 11.9.1.2 Package java.rmi.activation The java.rmi.activation package supports remote object activation, an advanced topic discussed later in the chapter (see Section 11.12). As the reader is unlikely to use every class and interface from this package, only the most important classes and exceptions are covered. Readers are advised that activation is an advanced topic of RMI, and is not essential for the development of RMI systems. Nonetheless, some readers may be interested in learning more about the java.rmi.activation package, or may wish to come back to it at a later time. Furthermore, only the most important of classes, interfaces, and methods used to create activation RMI systems are discussed. For further coverage of this package, see the Java API documentation for java.rmi.activation. Activatable Class This class provides a base from which remote objects that support activation can be built. Just as the UnicastRemoteObject class provides all of the necessary code to create remote objects, so too does the Activatable class. Developers creating activatable services must extend the Activatable class, implement a remote service interface, and provide their own implementing methods for that service interface. All of the constructors for the Activatable class are marked protected, and not used by developers, but there are several useful methods that the reader may want to be aware of. Methods Unless noted otherwise, all methods of the Activatable class are public. •
static Remote exportObject ( Remote obj, ActivationID id, int port ) throws java.rmi.RemoteException— makes the specified remote service available at the specific port. Activatable objects should not invoke this static method;
only nonactivatable objects use this method.
•
static Remote exportObject ( Remote obj, ActivationID id, int port, RMIClientSocketFactory csf, RMIServerSocketFactory ssf) throws java.rmi.RemoteException— makes the specified remote service available
at the specific port, using the specified client and server socket factories for obtaining sockets. Activatable objects should not invoke this static method; only nonactivatable objects use this method.
•
static ActivationID exportObject ( Remote obj, String location, MarshalledObject data, boolean restart, int port) throws java. rmi.RemoteException— used to register an Activatable object's activation
descriptor, which provides essential information to the activation daemon process. An ActivationID object is returned, which uniquely identifies the remote object and contains a reference to the object's activator. Again, this should only be used by objects that do not extend the Activatable class.
•
static ActivationID exportObject ( Remote obj, String location, MarshalledObject data, boolean restart, int port, RMIClient SocketFactory csf, RMIServerSocketFactory ssf) throws java.rmi. RemoteException— this method is used to register an Activatable object's
activation descriptor, which provides essential information to the activation daemon process. An ActivationID object is returned, which uniquely identifies the remote object and contains a reference to the object's activator. Connections to and from the
262
•
•
remote object will use the specified socket factories for communication. Again, this should only be used by objects that do not extend the Activatable class. protected ActivationID getID()— returns the object's ActivationID, which serves to uniquely identify the object and contains a reference to the object's activator. As a protected field, only subclasses of the Activatable class may access this method, which means that any remote object that extends the Activatable class may access its ID but other objects may not. static boolean inactive(ActivationID id) throws java.rmi. activation.UnknownObjectException java.rmi.activation. ActivationException, java.rmi.RemoteException— notifies the activation system that a previously active object, associated with the specified ActivationID, is
•
no longer active. If a client issues an RMI request at a later date, the object may be reactivated again. If the specified activation ID, or the activation group associated with that ID, is already inactive, an exception may be thrown. If the operation was successful, a value of "true" is returned; otherwise a value of "false" is returned. static Remote register(ActivationDesc descriptor) throws java. rmi.activation.UnknownGroupException java.rmi.activation. ActivationException java.rmi.remoteException— registers an activation
•
•
descriptor object with the activation system, and returns a stub for the activatable object. If the activation group associated with the specified descriptor is not known to the activation system, or if the activation system is not running, an exception will be thrown. static boolean unexportObject(Remote obj, boolean force) throws java.rmi.NoSuchObjectException— deactivates the specified remote object so that it will no longer respond to object requests. This method takes a single boolean flag as a parameter. If the value of the flag is "true," the object is terminated even if it is still responding to client requests. If "false" and there are pending requests from clients, the object will not be deactivated. A boolean flag is also returned by this method—if the operation was successful, a value of "true" is returned, otherwise a value of "false" is returned. static void unregister(ActivationID id ) throws java.rmi. activation.UnknownObjectException java.rmi.activation. ActivationException, java.rmi.remoteException— removes registration of the object associated with the specified ActivationID from the RMI activation
daemon.
ActivationDesc Class An activation descriptor contains information that identifies an activatable object, such as the codebase of the object, class name, and the activation group associated with the object.
Descriptors are registered with an activation system, which uses this information to activate the object in response to a remote method call from a client. Constructors Constructors of the ActivationDesc class are as follows. •
public ActivationDesc( ActivationGroupID group, String classname, String codebase, MarshalledObject data) throws java.lang. IllegalArgumentException— creates an activation descriptor associated with the specified activation group. The classname parameter specifies the name of the class, and the codebase parameter specifies a URL to the resource (though
this can also be a local file:// URL). If the activation group is null, an
•
IllegalArgumentException will be thrown. public ActivationDesc( ActivationGroupID group, String class name, String codebase, MarshalledObject data, boolean restart
263
Flag) throws java.lang.IllegalArgumentException— creates an activation descriptor associated with the specified activation group. The classname parameter specifies the name of the class, and the code base parameter specifies a URL to the resource (though this can also be a local file:// URL). The restartFlag parameter
specifies whether the object will be restarted when the activator is restarted—if set to a value of "false," it will be started on demand. If the activation group is null, an IllegalArgumentException will be thrown.
•
public ActivationDesc( String classname, String codebase, MarshalledObject data) throws java.rmi.activation.ActivationException— creates an activation descriptor associated with the default activation group for the JVM. The classname parameter specifies the name of the class, and the codebase parameter specifies a URL to the
•
public ActivationDesc( String classname, String codebase, MarshalledObject data, boolean restart ) throws java.rmi. activation.ActivationException— creates an activation descriptor associated with the default activation group for the JVM. The class name parameter specifies the name of the class, and the codebase parameter specifies a URL to the resource (though this can also be a local file:// URL). The restartFlag parameter specifies whether the
resource (though this can also be a local file:// URL).
object will be restarted when the activator is restarted. If set to a value of "false," it will be started on demand.
Methods Methods of the ActivationDesc class are listed below; all are public. •
boolean equals(Object obj)— tests two objects for equality. If the specified
•
String getClassName()— returns the name of the class represented by this
•
MarshalledObject getData()— returns a marshalled object containing
•
ActivationGroupID getGroupID()— returns the activation group ID for this
object is an activation descriptor, and holds identical contents, this method returns "true."
activation descriptor.
initialization data for the remote object.
descriptor. •
String getLocation()— returns the codebase of the class represented by this
activation descriptor.
•
•
boolean getRestartMode()— returns a boolean flag, indicating whether the
object represented by the activation descriptor should be restarted when the activation daemon restarts, or whether it should only be activated on demand. int hashCode()— returns an int value, representing a hashcode of the activation descriptor.
ActivationGroup Class The ActivationGroup class is responsible for creating new instances of activatable objects, and notifying the activation system when objects (and the group itself) becomes active or inactive. The only constructor for the Activation Group class is protected and thus inaccessible—to create an activation group the createGroup(..) method is instead used, which returns an ActivationGroup instance. Several methods are provided by this class, but are unlikely to be used by developers. Instead, the group will be registered with an activation system, which will return an ActivationGroupID. This will be passed to activation descriptor constructors. ActivationGroupDesc Class
264
Just as the activator needs a descriptor, so too do groups require some form of descriptor. The ActivationGroupDesc class contains information about the group's classname and location. The developer, however, does not normally control these—the RMI library provides a default implementation. The ActivationGroupDesc class also makes it possible to specify commandline arguments and system properties for activation groups. In normal practice, this will not be required, and only experienced activation developers are advised to modify the default settings. ActivationGroupID Class This class serves as a unique identifier for an activation group, and provides a reference to the group's activation system. Constructors The class's single constructor takes as a parameter an ActivationSystem instance with which the group will be associated. •
public ActivationGroupID ( ActivationSystem )— creates a unique
activation group ID.
Methods Methods of the ActivationGroupID class include: • •
boolean equals(Object o)— compares two activation group IDs for equality. ActivationSystem getSystem()— returns the activation system associated with
•
int hashCode()— returns an int, representing a hashcode for this activation group ID.
this group ID.
ActivationID Class To uniquely identify activatable remote objects, an ActivationID class is used. Each remote object has a single ActivationID, which contains a reference to the remote object's activator and a unique ID code. To create an ActivationID, an object must be registered with an activation system; applications should not create new instances of the ID themselves. ActivationSystem The ActivationSystem interface is used to register activation groups, as well as activatable objects. The ActivationSystem is used to handle tasks related to both the ActivationID and ActivationGroupID objects. Further usage of this class is described in the section on activatable objects later in Section 11.12.4. Activation Exceptions The exceptions defined by this package are as follows: •
ActivationException— a generic exception used by the classes of the activation
•
ActivateFailedException— represents the error condition that activation of a remote object has failed. This class extends the java.rmi. RemoteException class. UnknownGroupException— thrown when an activation group ID is unknown to the
package. It is the superclass of several activation-specific exceptions.
•
activation system, and therefore invalid. For example, an invalid or expired activation group ID might be stored in an ActivationDesc, and then found to be invalid by the
265
•
activation system. This class extends the java.rmi.activation. ActivationException class. UnknownObjectException— similar to the UnknownGroupException class, this is thrown when an activation ID is not recognized by the activation system. For an activation ID to be valid, the object associated with that ID must be registered with the activation system; otherwise an UnknownObjectException could be thrown when it is used.
11.9.1.3 Package java.rmi.dgc This package provides support classes for distributed garbage collection. VMID Class The Virtual Machine Identifier (VMID) is used to uniquely identify a client JVM. As there can be more than one JVM interacting with an RMI service, it is necessary to distinguish between one JVM and another. An IP address alone isn't always sufficient, either, as one machine can host multiple clients. Instead, the VMID should be used, which guarantees to offer a unique identifier on the proviso that an IP address for the client machine is available. Constructors There is only one constructor for the VMID class, which accepts no parameters. •
public VMID()— creates a unique virtual machine identifier for the host machine.
Methods The following methods (all of which are public) are defined by the VMID class. •
boolean equals (Object o )— compares two virtual machine identifiers for
• •
int hashCode()— creates a hash code for the virtual machine identifier. static boolean isUnique()— returns a boolean value, indicating whether a
equality.
•
virtual machine identifier can be generated that is truly unique. A VMID is guaranteed unique, if and only if an IP address can be determined for the host machine on which it was generated; if not, there is the slight possibility of an overlap between one VMID and another. String toString()— returns a string representation of the virtual machine identifier.
Lease Class When an RMI server creates an object for use by a client, it offers it for a short duration of time (called a lease). If the client makes further calls, the lease is renewed, but if the lease expires, the object is safe to garbage collect to conserve memory. The Lease class represents a lease between a server and a client JVM, and stores the lease duration and the virtual machine identifier of the client. Constructors There is only one constructor for the Lease class.
266
•
public Lease (VMID vmid, long duration)— creates a lease, storing the
duration of the lease and the virtual machine identifier of the client machine to which the lease is offered.
Methods Methods of this class are public. •
long getDuration()— returns the duration of a lease between an RMI server and an
•
VMID getVMID()— returns the virtual machine identifier for this lease.
RMI client.
11.9.1.4 Package java.rmi.registry The registry package defines an interface (Registry) for accessing a registry service, and the LocateRegistry class, which can create a new RMI registry (if the rmiregistry application has
not been run), as well as locating an existing registry. Registry Interface
This interface defines methods for accessing, creating, or modifying registry entries of an RMI object registry. Similar method signatures are used for the java.rmi.Naming class, but there are some small changes. The java.rmi. Naming class is designed to support registry entries on any remote registry, whereas the Registry interface deals with a specific registry. This means that some methods don't require as many parameters, and others don't require a hostname and port to be specified in the URL for the registry entry. Methods All methods provided by the Registry class have public access modifiers. •
•
•
static void bind ( String name, Remote obj) throws java.rmi. AlreadyBoundException java.rmi.AccessRestriction, java.net. MalformedURLException, java.rmi.RemoteException— adds a registry entry
matching the specified name. Note that a service name should be specified, not the URL as used in the Naming class. For example, to insert the remote lightbulb service created earlier in the chapter, the name parameter would be RMILightBulb. If the service is already bound, the operation is not permitted, an invalid URL is specified, or the registry is not available, then an exception will be thrown. static String[] list() throws java.net.MalformedURLException java.rmi.RemoteException— returns a list of services available from the registry. If the registry is not contactable, an exception will be thrown. static Remote lookup( String name ) throws java.rmi.Access Exception java.rmi.NotBoundException, java.net.MalformedURL Exception, java.rmi.RemoteException— returns a reference for the remote
•
object bound to the specified name, if one is available. This reference may then be cast to a particular RMI service interface (for example, an RMILightBulb as used earlier in the chapter). If the operation is not permitted, the registry entry does not exist, or the registry is not contactable, an exception will be thrown. static void rebind( String name Remote obj) throws java.rmi. AccessException, java.net.MalformedURLException, java.rmi. RemoteException— replaces an existing registry entry, or creates a new one, and "binds" the specified remote object to the registry entry. If the operation is not permitted, an invalid URL is specified, or the registry is not available, an exception will be thrown.
267
•
static void unbind( String name) throws java.rmi.Access Exception, java.rmi.NotBoundException, java.net.Malformed URLException, java.rmi.RemoteException— removes a registry entry for a remote service, and
"unbinds" the remote service associated with that entry. If removal of the entry is not permitted, an entry for that service does not exist, an invalid URL is specified, or the registry is not available, an exception will be thrown. LocateRegistry Class
This class can be used to locate a remote object registry or to create a new one. Sometimes it is more convenient for a registry to be launched by a server, rather than separately in a new window. Methods The LocateRegistry class defines several public methods, all of which return a Registry instance. •
static Registry createRegistry(int port) throws java.rmi.RemoteException— attempts to install a registry at the specified port
location, on the local machine. •
static Registry createRegistry(int port, RMIClientSocket Factory csf, RMIServerSocketFactory ssf) throws java.rmi.Remote Exception— attempts to install a registry at the specified port location, and to use the
•
static Registry getRegistry() throws java.rmi.RemoteException—
specified client and server socket factories for making and receiving registry connections.
•
•
•
•
returns a reference to the registry located at the default port of 1099 on the local machine. An exception will not be thrown if no such registry exists—this is only an object reference, and the application will only encounter an error if and when the Registry instance is used. static Registry getRegistry(int port) throws java.rmi.RemoteException— returns a reference to the registry located at the specified TCP port on the local machine. An exception will not be thrown if no such registry exists; this is only an object reference, and the application will encounter an error if and only if it uses the Registry instance. static Registry getRegistry(String host) throws java.rmi.RemoteException— returns a reference to the registry located at the default port of 1099, on the specified host. Even if the hostname is invalid, or there exists no registry at that location, no exception will be thrown, as this is only an object reference. static Registry getRegistry(String host, int port) throws java. rmi.RemoteException— returns a reference to the registry located at the specified TCP port, on the specified host. Even if the hostname/port is invalid, or there exists no registry at that location, no exception will be thrown, as this is only an object reference. static Registry getRegistry(String host, int port, RMIClient SocketFactory csf) throws java.rmi.RemoteException— returns a reference
to the registry located at the specified TCP port, on the specified host, and using the specified client socket factory to create network connections. Even if the hostname is invalid, or there exists no registry at that location, no exception will be thrown, as this is only an object reference.
11.9.1.5 Package java.rmi.server The java.rmi.server package defines a number of interfaces, objects, and exceptions relating to RMI servers and remote objects. While a number of useful classes are defined, developers do not normally use most of the classes in this package in the production of RMI services. For this reason, only the most important classes are discussed herein.
268
RemoteRef Interface The remote reference interface is a handle to the remote object. Stubs can use a remote reference to issue method requests and to compare two remote objects for equality. RMIClientSocketFactory Interface Classes that provide alternate types of socket communication for sending RMI requests should implement this interface, which acts as a factory for producing client sockets. For example, in a special network environment where TCP communication is restricted by a firewall, or where for security reasons encrypted sockets must be used, a custom socket factory could be produced, so that normal TCP sockets are replaced. Under normal circumstances, developers will not create custom sockets and socket factories. Methods The RMIClientSocketFactory defines a single method: •
public Socket createSocket ( String host, int port ) throws java. io.IOException— returns a Socket instance, connected to the specified host and port. If a connection can't be established, an IOException will be thrown.
RMIServerSocketFactory Interface Classes that provide alternate types of socket communication for listening for RMI requests should implement this interface, which acts as a factory for producing server sockets. For example, in a high-security network system, or a system that uses an insecure network connection such as a public communications network, encryption of sockets may be required. A custom server socket might automatically decrypt communications transparently to the developer, to allow encrypted RMI requests to be sent. Methods The RMIClientSocketFactory defines a single method: •
public Socket createServerSocket ( int port ) throws java.io. IOException— returns a custom ServerSocket instance, bound to the specified port. If the service can't bind to that port, an IOException will be thrown.
RemoteObject Class The RemoteObject class implements the java.rmi.Remote interface, and provides a base template for all remote object implementations. It overrides several important methods defined in the java.lang.Object class, making them "remote" aware. Methods The RemoteObject class provides implementations for the equals, hashCode(), and toString() methods, as well as the following new methods (both of which are public): • •
RemoteRef getRef()— returns a remote reference for this object. static Remote toStub( Remote obj ) throws java.rmi.NoSuchObjectException— returns a stub for the specified remote
269
object. If invoked before the object has been exported, a NoSuchObjectException will be thrown. RemoteServer The RemoteServer class extends the RemoteObject class, and adds additional functionality. It is also the superclass of the abstract Activatable class, and the UnicastRemoteObject class from which most RMI servers will be extended. Methods The RemoteServer class provides several methods of use during development (all of which are public): •
•
•
static String getClientHost() throws java.rmi.server.Server NotActiveException— returns the location of the RMI client. If not called from a thread handling a RMI client, a ServerNotActive Exception will be thrown. This
method assists in adding some degree of security to RMI calls, as servers can handle requests differently, based on the IP address of the client. However, due to IP spoofing, this may not guarantee the authenticity of a client. Nonetheless, it may be useful in less secure systems, as well as in logging the origin of RMI requests. static PrintStream getLog()— returns the RMI logging stream, which can be used to store information for debugging purposes, or to maintain a history of requests. This logging stream is extremely useful—anything written to it includes the time and date automatically, making logging easier on developers. static void setLog(OutputStream out)— logs RMI calls, as well as additional information written to a PrintStream instance returned by RemoteServer.getLog(), to the specified output stream. Additional information such as time, date, hostname/IP address, and the method being called is also sent to this stream.
RMISocketFactory The RMISocketFactory class implements both the RMIClientSocketFactory interface and the RMIServerSocketFactory interface (both of which are part of the java.rmi.server package). This class creates the socket used in remote method invocation. By extending the RMISocketFactory class, and overriding the factory methods defined in the RMIClientSocketFactory and RMIServerSocketFactory interfaces, customized sockets can be used for RMI communication. For example, encrypted sockets, or sockets that use an alternate transport mechanism for communication (such as piggybacking requests on another network protocol), can be used as an alternative to TCP sockets by registering a new RMISocketFactory. By default, three mechanisms are used for communication. In the event that the first method fails, the second method is attempted, followed if necessary by the third. These mechanisms are: 1. A direct TCP socket used to create client sockets 2. An HTTP connection to the server, using the port number of the service (e.g., http://server:1095/) 3. A modified HTTP connection to the server, using the default HTTP port number and invoking a CGI script that is sometimes used for accepting requests over HTTP (e.g., http://server:80/cgi-bin/java-rmi.cgi) When a firewall restricts direct TCP access, HTTP is often used. If an HTTP server is specified as a Java system property, this will sometimes allow a client to break through the firewall. However, this is not guaranteed to work in all circumstances, and will result in a slower response time.
270
Constructors With respect to constructors, as two methods of this class are abstract (requiring a subclass to implement them), it is impossible to instantiate the RMISocketFactory class. Instead, a subclass should be implemented and instantiated, then registered as the default RMISocketFactory, by invoking the setSocketFactory(RMISocketFactory) method. Methods It is advised that only experienced developers create customized sockets and a custom RMISocketFactory. This class defines the following methods (all of which are public): •
•
•
Socket createSocket ( String host, int port ) throws java.io. IOException— returns a Socket instance connected to the specified host and port. If a connection cannot be established, an IOException will be thrown. Socket createServerSocket ( int port ) throws java.io.IOException— returns a custom ServerSocket instance bound to the specified port. If the service cannot bind to that port, an IOException will be thrown. static RMISocketFactory getDefaultSocketFactory()— returns the
default socket factory used for creating client and server sockets for RMI.
• •
static RMIFailureHandler getFailureHandler()— returns a handler object, which is called when an attempt to create a ServerSocket fails. static RMISocketFactory getSocketFactory()— returns the socket factory that has been assigned by the setSocketFactory(RMISocketFactory) method. If
no such handler has been assigned, this method returns null.
•
static void setFailureHandler (RMIFailureHandler failureHandler)— assigns an RMIFailureHandler to the socket factory. This failure handler will be invoked whenever an attempt to create a ServerSocket is made
but fails. The failure handler controls whether a subsequent attempt to create a ServerSocket should be made.
•
static void setSocketFactory (RMISocketFactory factory)— assigns
a new socket factory, which will be used by the RMI library whenever a client or server socket needs to be constructed. By registering a custom socket factory, it is possible to create custom sockets (such as encrypted sockets, compressed sockets, or sockets that use an alternate transport mechanism).
UnicastRemoteObject Class The UnicastRemoteObject provides a base from which remote services can be constructed. It provides methods to "export" a remote object and make it available for receiving incoming method requests, as well as to "unexport" a remote object and remove it from service. Generally, the easiest way to develop a remote service is to extend the UnicastRemoteObject class, and to implement the interface associated with the remote service. All of the required functionality to export objects is provided by the UnicastRemoteObject, which saves considerable time and effort. Constructors The UnicastRemoteObject class provides the following constructors (which may also be called from the constructors of subclasses): •
protected UnicastRemoteObject() throws java.rmi.Remote Exception— creates and exports a remote object, using any available server port. If the object could not be exported, a RemoteException will be thrown.
271
•
protected UnicastRemoteObject(int port) throws java.rmi.Remote Exception— creates and exports a remote object using the specified server port. If the
object could not be exported (for example, if the port is already taken by another service), a RemoteException will be thrown.
•
protected UnicastRemoteObject(int port, RMIClientSocket Factory csf, RMIServerSocketFactory ssf) throws java.rmi.RemoteException— creates and exports a remote object using the
specified server port and the specified client/server socket factories. This allows custom sockets to be used for receiving RMI requests and issuing requests to clients. Methods The UnicastRemoteObject class provides the following methods (all of which are public): •
•
•
•
•
Object clone() throws java.lang.CloneNotSupportedException— creates
a "clone" of the remote object. Not every remote object will support cloning—subclasses may choose to override this method and throw a CloneNotSupportedException. static RemoteStub exportObject(Remote obj) throws java.rmi. RemoteException— exports the remote object using any available server port. If the object could not be exported, a RemoteException will be thrown. static Remote exportObject(Remote obj, int port) throws java.rmi. RemoteException— exports the remote object using the specified server port. If the object could not be exported (for example, if the port was already taken by another service), a RemoteException will be thrown. static Remote exportObject(Remote obj, int port, RMIClientSocket Factory csf, RMIServerSocketFactory ssf) throws java.rmi.RemoteException— exports the remote object using the specified server
port and the specified client/server socket factory. If the object could not be exported (for example, if the port was already taken by another service), a RemoteException will be thrown. static boolean unexportObject(Remote obj, boolean force) throws java.rmi.NoSuchObjectException— attempts to "unexport" the specified remote object and remove it from active duty. The second parameter, a boolean flag, indicates whether or not the object should be forcefully removed. If set to a value of "true," the object will be deactivated even if there are pending client requests. If set to a value of "false," the object will only be deactivated if there are no requests pending. The success or failure of the operation will be returned as a boolean value.
Exceptions Several server-specific exceptions are also defined by the java.rmi.server package. •
•
•
•
ExportException Class— represents a failure to export an object. Objects are exported via the constructors of the UnicastRemoteObject and Activatable classes, as well as their exportObject(..) methods. This class is a subclass of the java.rmi.RemoteException class. ServerCloneException Class— thrown when an attempt to clone a UnicastRemoteObject (or one of its subclasses) fails. It extends the java.lang.CloneNotSupportedException class. ServerNotActiveException Class— thrown when the RemoteServer. getClientHost() method is invoked by a thread not associated with fulfilling an RMI client request. This class extends the java.lang. ExceptionException class. SkeletonMistmatchException Class— occurs when a call is made to a skeleton but the method signatures have changed (for example, if an out-of-date skeleton class
272
•
•
generated by the rmic tool is being used). This class extends the java.rmi.RemoteException class. SkeletonNotFoundException Class— represents the error condition that a skeleton for a remote object could not be located. Though skeletons are no longer used in the Java 2 platform, they are still required for backward compatibility in JDK1.1. This class extends the java. rmi.RemoteException class. SocketSecurityException Class— thrown in cases in which an object is unable to be exported due to security restrictions (for example, if a port lower than 1024 on a Unix system was chosen, or if an RMISecurityManager is installed but no security policy file was specified). This is a subclass of the ExportException class.
11.10 Remote Method Invocation Deployment Issues Remote method invocation, during development and testing, runs very smoothly and with very few problems (other than perhaps out-of-date stub files if a service interface or implementation is changed). However, when it comes to deploying RMI services and clients on a network, some additional complexities may be encountered. Class definitions for services and clients must be distributed, and there are issues with different JVM implementations (such as a Microsoft JVM versus one from Sun Microsystems) and even between JDK versions. Finally, applet communication with RMI services is an issue that must be considered during deployment.
11.10.1 Dynamic Class Loading The effort required to distribute stub and skeleton classes to every client may be trivial in some situations (such as in a small organization in which only a few clients are going to be using a service). However, what if a large number of clients are going to be using the service? If a central RMI registry is to be used for all services, and a new service is introduced to the system, stub files for the service must be copied to the classpath of the registry before the server can register. Is this the most efficient way of organizing services? Or in a more complex system, where object parameters or return values are marshalled and unmarshalled using serialization, what happens if an object subclass is passed that a client or server hasn't encountered before? For example, a remote thread execution system might accept as a parameter tasks that implement the Runnable interface—but the exact class being passed at runtime may not be known. Clients might submit new tasks, and the remote JVM needs to be able to load the classes. Restricting a system to defined types only limits its usefulness. This problem is overcome by employing a technique known as dynamic class loading. When objects are serialized by stub and skeleton objects, only the contents of the object are sent, not the actual bytecode representing all of the object's methods and member variables. To do otherwise would slow down the speed of each request and cause unnecessary waste of bandwidth. A specialized version of the object serialization classes (ObjectOutputStream, and ObjectInputStream) is used by stub and skeleton objects. In the case of the ObjectOutput Stream subclass, the annotateClass(...) method is overridden to include the location from which the class definition can be located. A corresponding method (resolveClass) exists for ObjectInputStream that will read the class location. This means that class definitions can be kept at different locations, and an RMI system isn't limited to storing files in a central location. During the unmarshalling process, an attempt is made to locate the appropriate class definition locally (see Figure 11-4). If not available, then an attempt is made to fetch the class definition from the specified location by the RMIClassLoader object. This allows new behavior to be introduced into a system, but at a penalty. As a security safeguard, the RMIClassLoader will not fetch class definitions unless a security manager has been registered with the JVM.
273
Figure 11-4. RMI class loader decision process
Without the presence of a security manager, new class definitions might be sent that could damage the host system or the data contained within it, such as deleting essential files or accessing/modifying sensitive information. Imagine the damage that could be caused by the introduction of a rogue subclass that overrides methods to introduce dangerous functionality. Whether it be reading password data from /etc/passwd on a Unix system or executing the "format c:" command on a Wintel host, such effects could be devastating. For this reason, a security manager must be installed for an RMI system to use dynamic class loading. The most common security manager used in an RMI system is the java.rmi.RMISecurityManager. This creates some additional deployment issues with the Java 2 platform that were not present in previous JVMs, however. For additional information about changes to RMI security under Java 2, see Section 11.10.2.3. Before fetching a class definition, however, the location must be identified. The way that this location is specified to a client, or the server, is by setting the system property java.rmi.server.codebase. This should be set to a URL, which points to a codebase directory (just like the codebase of an applet). From there, the RMIClassLoader may download classes used in the RMI system. The easiest way to set the codebase would be to use a JVM command-line parameter specifying the property. For example, to assign a remote codebase to a service called RMIServer, the following syntax would be used: java –Djava.rmi.server.codebase=http://hostname:port/path RMIServer
where hostname is an IP address or hostname of a machine, port is an optional number specifying the port of the HTTP service, and path is the directory of the codebase.
274
NOTE If the rmiregistry can find class definitions locally, it will override the codebase setting and confuse clients. If the client is not on the same file system, it will then be unable to locate the classes, and a ClassNotFoundException will be thrown at runtime. Unsetting the classpath, and running the rmiregistry from a location different from the directory where the server is located will guarantee that this does not occur. If dynamic class loading is not being utilized, however, the rmiregistry must be able to find the class definitions in the classpath.
While servers can specify a codebase, so too can a client. If a client sends an object as a parameter that the server is not aware of, the server will be instructed to retrieve the class definition from the client's codebase, which may or may not be the same location as that specified to the server. For example, to assign a remote codebase to a client called RMIClient, the following syntax would be used: java –Djava.rmi.server.codebase=http://hostname:port/path RMIClient
11.10.2 Differences between Java Virtual Machines There are many differences in the support of RMI between the various editions of the Java platform. These deployment issues can affect clients that use the software, as well as RMI servers that may be located across a wide variety of JVMs running on machines throughout a network. 11.10.2.1 Lack of Remote Method Invocation Support in Microsoft JVMs Despite the fact that the RMI packages are part of the "core" Java API, RMI is not generally supported by Microsoft JVMs. This means that RMI clients or servers cannot be easily run on these JVMs, making the use of RMI in applets difficult, as Microsoft Internet Explorer is widely used by a large number of Internet users. An additional download is available from Microsoft to patch the Microsoft JVM to support RMI; however, it is used infrequently and thus installation on client machines can't be guaranteed. 11.10.2.2 Changes in Remote Method Invocation from JDK1.02 to JDK1.1 Under JDK1.02, implementations of an RMI service would extend the java. rmi.server.UnicastRemoteServer class. This class is not available under JDK1.1, and should be replaced with java.rmi.server.UnicastRemoteObject. Support for RMI in JDK1.02 was an interim release only, and should be avoided in production systems. The availability of JDK1.1 or higher JVMs on most operating system platforms makes it a better choice for RMI. 11.10.2.3 Changes in RMI from JDK1.1 to Java 2 Applications that use dynamic class loading, and thus install as their default security manager the RMISecurityManager, will not run without a few changes under the Java 2 platform. Security precautions have been increased, and the security manager will restrict network access entirely, unless modified by a security policy file. This means that RMI clients can't connect to RMI servers, and that RMI servers can't bind to a TCP port to accept incoming requests or to register with the rmiregistry. There are several options available to developers under the Java 2 platform:
275
• • •
Remove the RMISecurityManager entirely, and disable dynamic class loading Replace the RMISecurityManager with a custom security manager, which requires extra code to write such a manager. Specify a security policy file, which allows network access and (optionally) file access for systems that need it.
Of the three options, the first is the simplest, but requires classpath access to class definitions. In small systems, this might be fine, but the advantages of dynamic class loading in more complex systems make it an attractive feature to keep. The second option requires much more work, and demands that you override the appropriate security manager methods to allow access to the network, file system, and other resources. The best choice, if dynamic class loading is required, is to specify a security policy file when running a client or server. Security policy files are simple text files that specify what access to resources is permitted. Once a security manager such as RMISecurityManager is loaded, access to most resources is disabled. To add a security manager, the following code can be added to the application (but must take place before any actions that could cause dynamic class loading to occur). System.setSecurityManager ( new RMISecurityManager() );
Basically, it excludes access to resources unless specific permission is given to grant access. By specifying a security policy, you can override these settings and assign new permissions for networking security. The idea of a policy file makes sense—it gives fine-grained control over security settings and forces system administrators and users to consider carefully what types of access are being given (as opposed to granting universal access and then excluding or restricting certain types of access). It's easy to forget to exclude some feature, and forcing a system to specify only the permissions it needs will help to prevent a backdoor to the system being left open. The format of the security policy file is specified in the Java 2 security documents, but for most RMI applications, a policy file like the following will suffice. It grants permission to bind to a TCP port above 1024, but leaves privileged ports for well-known protocols (such as HTTP/FTP) unavailable, to prevent rogue code from masquerading as a legitimate server. It also grants limited file read access to the c:\rmi directory, and grants write access to the c:\rmi\data directory. By convention, double slash characters ("\") are used as a path separator on Windows systems. For other operating systems such as Unix, an alternate file separator will be used, such as "/." Code for rmi.policy Grant { permission java.net.SocketPermission "*:1024-65535", "accept, connect, listen, resolve"; permission java.net.SocketPermission "*:1-1023", "connect, resolve"; permission java.io.FilePermission "c:\\rmi\\", "read"; permission java.io.FilePermission "c:\\rmi\\data\\", "write"; }
NOTE Further information on the format of policy files can be found in the Java 2 Security Guide, http://java.sun.com/products/jdk/1.2/docs/guide/security/index.html.
276
To specify a security policy when running RMI software, the system policy java.security.policy is set; this points to the file location of the policy. For example, to specify the rmi.policy file discussed earlier for an RMI client, the following command would be used: java –Djava.security.policy=c:\rmi\rmi.policy RMIClient
11.10.3 Remote Method Invocation and Applets RMI presents some unique difficulties for applets. Aside from issues of RMI support in Internet Explorer (discussed earlier), there is also the problem of applet network restrictions. These restrictions can be very serious, and prevent RMI-based applets from communicating with RMI services. 11.10.3.1 Inability to Bind to TCP Ports Since an applet can't bind to a TCP port, it cannot be an RMI server. While not every applet will need this functionality, it does mean that RMI services cannot be run from inside a Web browser. This means that callbacks cannot be easily implemented using RMI—a client applet can invoke methods on a server, but cannot export a remote object and have it invoked during the callback by another service. 11.10.3.2 Restrictions on Network Connections An applet can only connect to the host machine from which its codebase was loaded. When an applet is loaded from a machine, such as www.davidreilly.com, for example, it can only make TCP and UDP connections to that server (see Figure 11-5). This is a restriction placed on applets by browsers; while the restriction is in the best interest of users, it limits developers. Figure 11-5. Applets are restricted in their ability to make network connections.
This means that applets don't make good RMI clients, unless of course the same machine is used for the rmiregistry, every service that the applet may need to use, and the Web server. Digitally signed applets can lift this restriction, but this adds an extra level of complexity. 11.10.3.3 Firewall Restrictions
277
A considerable number of Web users are protected by a firewall, which usually prohibits direct socket connections. Many companies, organizations, and other institutions use firewalls to protect themselves against security breaches from outside and to restrict the types of applications being run from the inside. This means that some users will be able to use an applet that used RMI, and others will not. Even a digitally signed applet won't get through, unless RMI requests are tunneled through the firewall using a trusted protocol such as HTTP. Tunneling allows one protocol to be piggybacked on top of another more innocuous protocol, to overcome the limitations of firewalls and network security. NOTE The RMI specification does support firewall tunneling using HTTP, and an example CGI script that supports this is available from the Sun Microsystems Java RMI page, http://java.sun.com/products/jdk/rmi/. However, the specification states that such tunneling is at least one order of magnitude slower than direct socket requests. While RMI is an excellent technology for distributed computing, it is not normally feasible for Java applets.
11.11 Using Remote Method Invocation to Implement Callbacks A common technique used in event-driven programming is the callback. The simplest way of understanding a callback is to think of a phone call. Suppose you want to know if a stock price hits a certain level, and you ask your broker to call back when it does. When the broker (the source of the event) notices that the stock price reflects your parameters, he or she calls you back, to notify you of the new price. That's a callback.
11.11.1 Object-Oriented Callbacks Of course, in an object-oriented system, we're talking about software components or entire systems, not people. When one object needs to be notified of events as they occur (as opposed to continually polling to see if an event has happened), a callback is used. This is often a more efficient way of implementing a system, as the object doesn't need to periodically check the state of another object—it is instead notified if an event is triggered. Multiple listeners can register with the same event source, as shown in Figure 11-6. Figure 11-6. Multiple listeners can register with one or more event sources.
278
When an event is triggered (either as a result of an interaction with external objects or systems, or an internal process such as completing a work unit or interacting with a user), the event source will notify each and every registered listener (see Figure 11-7). This means that the event source must maintain a list of active listeners, and then pass a message back to them that an event has occurred, and optionally give some details. Figure 11-7. Callback notification of event, for every registered listener
The next issue to understand about callbacks is how the notification is achieved. Some systems are designed to send and receive messages, but how can one object pass information to another (and hence inform the object that an event has occurred)? While you may not realize it, objects do this all the time, by invoking methods. In object-oriented systems, callbacks are achieved by passing an object reference (the listener) to the object that is
279
the event source. The event source, at the appropriate time, will then invoke one of the listener's methods to notify it of an action and allow it to respond, as illustrated in Figure 11-8. A listener interface is defined for each major event type, and interested objects then register implementations of that interface with the listener. Figure 11-8. Callback implemented by invoking a method on a listening object
This type of system is widely used in object-oriented programming, and in the context of Java, the Abstract Windowing Toolkit. The AWT event-handling model requires application developers to implement a listener interface and have that listener register with each component that needs to be monitored. Multiple listeners can register with the same component, and listeners can also register with multiple components (although due care must be taken to check which component was the source in this case). When building a system, you can create your own listener interfaces, and add for each type of event relevant methods to register and deregister listeners. While implementing callbacks in local objects is one thing, what about callbacks using RMI?
11.11.2 RMI Callbacks Callbacks can be easily implemented using RMI. The chief difference between a local callback and a remote callback is that some extra initialization must occur, and that both the listener interface and the event source must be implemented as an RMI service. For the listener to register itself with the remote event source, it must invoke a remote method and pass an object reference to
280
the remote listener interface it defines. This sounds complex in theory, but is reasonably straightforward in practice, requiring only a small amount of additional code. This next example works through implementing a callback using RMI, and shows how a listener can be a client and a server. For the purpose of this example, the server supplies information about changes in temperature, which can be accessed remotely. However, it would be inefficient to check the monitor continually, polling for changes, as the time at which a change will occur is not known. A temperature monitor registers with a temperature sensor service, and passes a reference to a remote temperature listener object. When the temperature does change, a callback is made, notifying registered listeners. 11.11.2.1 Defining the Listener Interface The listener interface defines a remote object with a single method. This method should be invoked by an event source whenever an event occurs, so as to act as notification that the event occurred. The method signifies a change in temperature, and allows the new temperature to be passed as a parameter. Chapter 11, Listing 5 interface TemperatureListener extends java.rmi.Remote { public void temperatureChanged(double temperature) throws java.rmi.RemoteException; }
11.11.2.2 Defining the Event Source Interface The event source must allow a listener to be registered and unregistered, and may optionally provide additional methods. In this case, a method to request the temperature on demand is offered. Chapter 11, Listing 6 interface TemperatureSensor extends java.rmi.Remote { public double getTemperature() throws java.rmi.RemoteException; public void addTemperatureListener (TemperatureListener listener ) throws java.rmi.RemoteException; public void removeTemperatureListener (TemperatureListener listener ) throws java.rmi.RemoteException; }
11.11.2.3 Implementing the Event Source Interface Once interfaces have been defined, the next step is to implement them. A TemperatureSensorServer class is defined, which acts as an RMI server. This server will also notify registered listeners as a client. The server must extend UnicastRemoteObject, to offer a service, and implement the Temperature Sensor interface defined earlier. After creating an instance of the service and registering it with the rmiregistry, the server launches a new thread, responsible for updating the value of the temperature, based on randomly generated numbers. Both the amount (plus or minus 0.5 degrees) and the time delay between changes are generated randomly. As each change occurs, registered listeners are notified, by reading from a list of listeners stored in a java.util.Vector object. This list is modified by the remote addTemperatureListener(TemperatureListener) and removeTemperatureListener(Tempera tureListener) methods. Additionally, if a
281
remote exception occurs while notifying a listener (indicating the temperature client is inaccessible or has terminated), it will be dropped. import java.util.*; import java.rmi.*; import java.rmi.server.*; // Chapter 11, Listing 7 public class TemperatureSensorServer extends UnicastRemoteObject implements TemperatureSensor, Runnable { private volatile double temp; private Vector list = new Vector(); public TemperatureSensorServer() throws java.rmi.RemoteException { // Assign a default setting for the temperature temp = 98.0; } public double getTemperature() throws java.rmi.RemoteException { return temp; } public void addTemperatureListener ( TemperatureListener listener ) throws java.rmi.RemoteException { System.out.println ("adding listener -" + listener); list.add (listener); } public void removeTemperatureListener ( TemperatureListener listener ) throws java.rmi.RemoteException { System.out.println ("removing listener -" + listener); list.remove (listener); } public void run() { Random r = new Random(); for (;;) { try { // Sleep for a random amount of time int duration = r.nextInt() % 10000 + 2000; // Check to see if negative, if so, reverse if (duration < 0) duration = duration * -1; Thread.sleep(duration); } catch (InterruptedException ie) {
}
// Get a number, to see if temp goes up or down int num = r.nextInt();
282
if (num < 0) { temp += 0.5; } else { temp -= 0.5; } // Notify registered listeners notifyListeners(); } } private void notifyListeners() { // Notify every listener in the registered list for (Enumeration e = list.elements(); e.hasMoreElements(); ) { TemperatureListener listener = (TemperatureListener) e.nextElement(); // Notify, if possible a listener try { listener.temperatureChanged (temp); } catch (RemoteException re) { System.out.println ("removing listener -" + listener); // Remove the listener list.remove( listener ); } } } public static void main(String args[]) { System.out.println ("Loading temperature service"); // Only required for dynamic class loading //System.setSecurityManager ( new RMISecurityManager() ); try { // Load the service TemperatureSensorServer sensor = new TemperatureSensorServer(); // Check to see String registry if (args.length { registry = }
if a registry was specified = "localhost"; >=1) args[0];
// Registration format //registry_hostname:port /service // Note the :port field is optional
283
String registration = "rmi://" + registry + "/TemperatureSensor"; // Register with service so that clients can // find us Naming.rebind( registration, sensor ); // Create a thread, and pass the sensor server. // This will activate the run() method, and // trigger regular temperature changes. Thread thread = new Thread (sensor); thread.start(); } catch (RemoteException re) { System.err.println ("Remote Error - " + re); } catch (Exception e) { System.err.println ("Error - " + e); } } }
11.11.2.4 Implementing the Listener Interface The temperature monitor client must implement the TemperatureListener interface, and register itself with the remote temperature sensor service, by invoking the TemperatureSensor.addTemperatureListener (Temperature Listener) method. By registering as a listener, the monitor client will be notified of changes as they occur, using a remote callback. The client waits patiently for any changes, and though it does not ever remove itself as a listener, functionality to achieve this is supplied by the TemperatureSensor.removeTemper atureListener(TemperatureListener)
method.
import java.rmi.*; import java.rmi.server.*; // Chapter 11, Listing 5 public class TemperatureMonitor extends UnicastRemoteObject implements TemperatureListener { // Default constructor throws a RemoteException public TemperatureMonitor() throws RemoteException { // no code req'd } public static void main(String args[]) { System.out.println ("Looking for temperature sensor"); // Only required for dynamic class loading //System.setSecurityManager(new RMISecurityManager()); try { // Check to see if a registry was specified String registry = "localhost"; if (args.length >=1)
284
{ registry = args[0]; } // Registration format //registry_hostname :port/service // Note the :port field is optional String registration = "rmi://" + registry + "/TemperatureSensor"; // Lookup the service in the registry, and obtain // a remote service Remote remoteService = Naming.lookup ( registration ); // Cast to a TemperatureSensor interface TemperatureSensor sensor = (TemperatureSensor) remoteService; // Get and display current temperature double reading = sensor.getTemperature(); System.out.println ("Original temp : " + reading); // Create a new monitor and register it as a // listener with remote sensor TemperatureMonitor monitor = new TemperatureMonitor(); sensor.addTemperatureListener(monitor); } catch (NotBoundException nbe) { System.out.println ("No sensors available"); } catch (RemoteException re) { System.out.println ("RMI Error - " + re); } catch (Exception e) { System.out.println ("Error - " + e); } } public void temperatureChanged(double temperature) throws java.rmi.RemoteException { System.out.println ("Temperature change event : " + temperature); } }
11.11.2.5 Running the Callback Example When developing an RMI callback system, both parties (listener and event source) will act as servers and as clients. This means that both parties need to have a copy of the class definitions, or access to a Web server if dynamic class loading is needed. NOTE
285
To use dynamic class loading, class files must be copied to a Web server, which must be specified as a command-line parameter (see Section 11.10.1), and a security manager must be installed by uncommenting the line //System.setSecurityManager ( new RMISecurityManager() );.
The following steps should be performed, in order, to run the example. 1. Compile the applications and generate stub/skeleton files for both TemperatureSensorServer and TemperatureSensorMonitor. 2. Run the rmiregistry application. 3. Run the TemperatureSensorServer. 4. Run the TemperatureSensorMonitor. When first connected, the monitor will display the current temperature. It registers itself with the server and is notified of changes by a callback. Terminating the client will cause it to be unregistered in the TemperatureSensorServer, when the sensor is unable to notify the client. In addition, the callback will be unregistered if the server is unable to notify the client due to a network error.
11.12 Remote Object Activation One of the chief disadvantages of using RMI for large and complex systems is the amount of overhead generated by RMI server software. Suppose you are constructing a massive system, with many different RMI service interfaces and server implementations. In such a system, each server would have to be running continually, even if it was seldom used by client software. Servers must create and export remote objects that implement RMI service interfaces, which consumes memory and CPU time. If each implementation is created as a separate server, this means that there will be as many JVM instances as there are services (unless all servers are combined into one, which is a messy solution and still wastes memory, as an instance of each service must still be created even if not used). So a system with a dozen separate RMI servers would need at least a dozen JVMs, and possibly one more if the rmiregistry application is being used. Of course, this is only a moderately sized distributed system—imagine large ones that run indefinitely but are infrequently used. This translates into wasted CPU cycles and more memory than is needed (particularly if each service allocates memory for state information and loads many objects into memory). Prior to JDK1.2 and the Java 2 platform, there was no way to solve this problem (other than to distribute RMI services across the network and not on a single server). As this is a serious issue for medium-to-large-scale software development projects that employ RMI, Sun Microsystems took it seriously, and introduced a solution in the Java 2 platform release—remote object activation. Readers may find both the concept and the implementation of remote object activation to be quite complex. Designing and implementing an activatable RMI service will not be appropriate in every circumstance—for example, if you have only a few services and they are running almost constantly, the performance gains from an activatable version may be small in comparison with the headaches involved. Nonetheless, for large-scale systems, this is an important technology to be aware of, and extremely useful.
11.12.1 What Is Remote Object Activation?
286
Remote object activation is a technique that solves the problem of running a large number of idle RMI services. It allows services to be registered with the rmiregistry, but not instantiated. Instead, they remain inactive, until called upon by a client, when they will awaken and perform their operation. A special daemon process called the remote method invocation activation system daemon (rmid) listens for these requests and instantiates RMI services on demand. Using some special trickery behind the scenes, a request is forwarded onto the activation daemon process, which creates the service. Requests are then forwarded onto the newly created service, transparently to the client, just as if it were a normal RMI service that had been running indefinitely. This means that services will lie dormant until invoked, and activated just in time (JIT) for use by a RMI client.
11.12.2 How Does Remote Object Activation Work? Remote object activation works a little differently from normal RMI servers. To be locatable, a service must be available through an RMI registry, but to do that normally requires an object to be instantiated. Since the whole point is to avoid instantiating RMI servers and instead to activate them as required, a faulting remote reference is registered in its place. A faulting remote reference is a remote reference that acts as a proxy between the remote client and the as-yet-unactivated server. Unlike a UnicastRemoteObject server, which runs indefinitely, a server installation program runs for a short duration. Its purpose is to notify the activation system of an activatable remote object, and to register the faulting remote reference with the rmiregistry (see Figure 11-9). Once the registration is complete, the server installation program can terminate; creating the remote object is now the responsibility of the faulting reference and the remote method activation system daemon. Figure 11-9. Server installation program registers activatable object with rmid, and faulting reference with rmiregistry.
At some point in time in the future, an RMI client will look up the rmiregistry and select the service provided by the faulting remote reference. When the faulting reference is activated, it checks to see if it already has a reference to the server. The first time the faulting reference receives a call, the reference will be null, indicating that the server must be activated before being used. It enlists the aid of the rmid application, to create a new instance of the server, and then
287
passes the call to the newly activated object (see Figure 11-10). Method requests to the faulting reference are forwarded onward to the activated object, and then returned back to the client. Though there is a slight delay on wakeup, this is not repeated for subsequent requests, as the service is ready for action. Figure 11-10. Faulting reference, with the aid of activation system, passes information from activated object back to client.
The elegance of this solution resides in the fact that the client is, at all times, completely unaware of the details of server implementation. Although there may be some slight delay in creating the remote object initially, subsequent calls are faster, and the client does not know whether the server has always been running or was only recently activated. This means no extra code to compile, and no extra work for client developers.
11.12.3 Creating an Activatable Remote Object Creation of an activatable remote object is a little different from that of a UnicastRemoteObject, but the code is fairly similar. Let's start with an extremely simple remote interface, and see how it would be implemented as an activatable remote object. public interface MyRemoteInterface extends java.rmi.Remote { public void doSomething () throws java.rmi.RemoteException; }
The RMI service interface contains a single method, doSomething(), which takes no parameters and may throw a RemoteException. There's no difference between a normal remote interface and one that will be implemented by an activatable remote object. In fact, an interface can be implemented by both an activatable object and a UnicastRemoteObject. The next step is to create an implementation that extends the java.rmi. activation.Activatable class. It must implement our RMI interface and provide both a
288
constructor and a doSomething() method. Unlike classes that extend the UnicastRemoteObject class, a different constructor signature is used. This constructor calls the parent constructor and exports the object on any available port. The service is then available for use by clients. public class MyRemoteInterfaceImpl extends java.rmi.activation.Activatable implements MyRemoteInterface { public MyRemoteInterfaceImpl (java.rmi.activation.ActivationID activationID, java.rmi.MarshalledObject data) throws java.rmi.RemoteException { // call the Activatable(ActivationID activationID, // int port) parent constructor super (activationID, 0); } public void doSomething() { System.out.println ("Doing something...."); } }
Comparing this class to one extended from the UnicastRemoteObject class reveals relatively few differences. However, there's a little more work to do, as the object must still be registered with the activation system and the rmiregistry.
11.12.4 Registering an Activatable Remote Object Registering an activatable object with the RMI activation daemon is a more complex task than just creating one, and requires a fair bit of extra code. This code can be included in a separate application class, or added in a main(..) method of the activatable remote object. To demonstrate how this is achieved, we'll create an activatable version of the RMILightBulb service discussed earlier in the chapter, and create a main(..) method to register the object with the rmid and rmiregistry applications. Code for ActivatableLightBulbServer import import import import import
java.rmi.*; java.rmi.server.*; java.rmi.activation.*; java.net.URLEncoder; java.util.Properties;
// Chapter 11, Listing 9 public class ActivatableLightBulbServer // Extends the Activatable class extends Activatable // Implements a light bulb RMI interface implements RMILightBulb { public ActivatableLightBulbServer(ActivationID activationID, MarshalledObject data) throws RemoteException { // Call the constructor of the parent class (Activatable)
289
// to export the object on any available port super( activationID, 0); // Default to value of off setBulb(false); } /* // Normally defined for UnicastRemoteObject subclasses... // not for an Activatable class public ActivatableLightBulbServer() throws RemoteException { // no code req'd } */ public static void main(String args[]) { System.out.println ("Loading Activatable RMI service"); System.out.println (); // Set a RMI security manager System.setSecurityManager(new RMISecurityManager()); try { // Step one : create an ActivationGroupDesc // instance ActivationGroupDesc groupDescriptor = new ActivationGroupDesc (new Properties(), null); // Step two : register that activation group descriptor // with the activation system, and get // groupID ActivationSystem system = ActivationGroup.getSystem(); // Register the group descriptor // without registering the group, no execution ActivationGroupID groupID = system.registerGroup(groupDescriptor); // Output the group ID to screen System.out.println ("Group ID : " + groupID); // Step three: create an activation group, // passing the group ID and // descriptor as parameters ActivationGroup.createGroup(groupID, groupDescriptor, 0); // Specify a location for the codebase of // the activated object. By default, the current // directory will be used. // However, if dynamic class loading is used, // a HTTP URL may be specified instead java.io.File location = new java.io.File ("."); // Encode URL, for Win32 systems. This may // be required on other operating systems that don't // support spaces and punctuation in filenames
290
String strLoc = "file://" + URLEncoder.encode(location.getAbsolutePath()); System.out.println ("Activation codebase : " + strLoc); // Step four : Create an activation descriptor, // whose constructor requires the class // name, codebase, and an optional // marshalled object ActivationDesc desc = new ActivationDesc ("ActivatableLightBulbServer", strLoc, null); // Step five : Register the object with the // activation system // Returns a stub, which may be registered // with rmiregistry Remote stub = Activatable.register(desc); // Check to see String registry if (args.length { registry = }
if a registry was specified = "localhost"; >=1) args[0];
// Registration format // registry_hostname ( optional):port /service String registration = "rmi://" + registry + "/RMILightBulb"; // Step six : Register the stub with the rmiregistry Naming.rebind(registration, stub); System.out.println( "Service registered with rmid.Now terminating..."); System.exit(0); } catch (RemoteException re) { System.err.println ("Remote Error - " + re); } catch (Exception e) { System.err.println ("Error - " + e); } } /* Remainder of code implements RMILightBulb interface, and is not RMI specific */ // Boolean flag to maintain light bulb state information private boolean lightOn; // Remotely accessible "on" method - turns on the light public void on() throws java.rmi.RemoteException { // Turn bulb on setBulb (true); }
291
// Remotely accessible "off" method - turns off the light public void off() throws java.rmi.RemoteException { // Turn bulb off setBulb (false); } // Remotely accessible "isOn" method, returns state of bulb public boolean isOn() throws java.rmi.RemoteException { return getBulb(); } // Locally accessible "setBulb" method, changes state of bulb public void setBulb (boolean value) { lightOn = value; } // Locally accessible "getBulb" method, returns state of bulb public boolean getBulb () { return lightOn; } }
How ActivatableLightBulbServer Works Other than the main method, there really isn't a great deal of difference between the ActivatableLightBulbServer and the LightBulbServer class used earlier in the chapter. The real source of complexity is in the registration of the object with the activation daemon in the main(..) method, as there is a fair amount of initialization that must take place before an object may be activated. The first thing you should notice is that a security manager is installed by the application. Activation requires some form of security manager to be installed, so this means that a security policy must be specified as a command-line parameter when running the server. Also, registration code is wrapped in an exception handler, as errors could occur when contacting the rmid or rmiregistry applications. // Set a RMI security manager System.setSecurityManager(new RMISecurityManager()); try { // registration code goes here ..... } catch (RemoteException re) { System.err.println ("Remote Error - " + re); }
The procedure for registering an activatable remote object can be broken down into a series of steps. Each of these steps is difficult to understand initially, but varies very little from service to service. When developing activatable services of your own, you can use these steps as guidelines for registering other classes. Step One
292
The first step is to create an activation group descriptor. This descriptor is associated with an activation group, and allows you to specify system properties. In this example, no system properties are required and a new instance of the Properties class is created. // Step one : create an ActivationGroupDesc instance ActivationGroupDesc groupDescriptor = new ActivationGroupDesc (new Properties(), null);
Step Two The second step is to register the activation group descriptor with the RMI activation daemon process. This process is represented by the Activation System interface. Applications do not create or extend this interface. Instead, a reference to the activation daemon process is obtained by invoking the static ActivationGroup.getSystem() method. // Step two : register that activation group descriptor // with the activation system, and get groupID ActivationSystem system = ActivationGroup.getSystem();
Once a reference to the ActivationSystem class is obtained, the group descriptor is registered using the ActivationSystem.registerGroup method, which returns an ActivationGroupID instance. // Register the group descriptor - without registering the // group, no execution ActivationGroupID groupID = system.registerGroup(groupDescriptor);
Step Three Once a group descriptor has been registered with the activation system and a valid ActivationGroupID obtained, the next step is to actually create the activation group. The act of registering it is not sufficient—one must be created, by calling the static ActivationGroup.createGroup(ActivationGroupID id, ActivationGroupDesc descriptor) method. This creates and assigns an activation group for the JVM, and notifies the activation system that the group is active. // Step three: create an activation group, passing the // group ID and descriptor as parameters ActivationGroup.createGroup(groupID, groupDescriptor, 0);
Step Four The fourth step is to create an activation descriptor, which describes an activatable remote object. It stores three key pieces of information: the class name of the remote object, the URL location of the remote object, and (optionally) a MarshalledObject that contains a serialized version of the remote object. Determining the codebase location of a remote object can be a little tricky. If class definitions are stored on a Web server for the purpose of dynamic class loading, this is made simple—but what if the class files are stored locally? In this example, the current directory is used as the codebase and converted to a file:// URL. However, if dynamic class loading is to be used by client and server, it may be more convenient to copy class files to a Web server and specify an HTTP URL instead. Once a location has been determined, it is then passed to the ActivationDesc constructor.
293
java.io.File location = new java.io.File ("."); // Encode URL, for Win32 systems. This may not be required // on other operating systems that don't support spaces and // punctuation in filenames String strLoc = "file://" + URLEncoder.encode(location.getAbsolutePath()); System.out.println ("Activation codebase : " + strLoc); // Step four : Create an activation descriptor, whose // constructor requires the class name, // codebase, and an optional marshalled object ActivationDesc desc = new ActivationDesc ("ActivatableLightBulbServer", strLoc, null);
Step Five The fifth step is to register the activation descriptor with the activation system. This instructs the activation system of the class name and the location of the class definition file. A remote stub will be returned, which can then be registered as an RMI service. // Step five : Register the object with the activation system // Returns a stub, which may be registered with // rmiregistry Remote stub = Activatable.register(desc);
Step Six The sixth and final step is to add a registry entry for the RMI service, so that clients may locate the service. The code for this is similar to that of the previous RMI lightbulb server, except that a remote stub is registered, not an instance of a remote object. // Check to see String registry if (args.length { registry = }
if a registry was specified = "localhost"; >=1) args[0];
// Registration format //registry_hostname:port/service // Note the :port field is optional String registration = "rmi://" + registry + "/RMILightBulb"; // Step six : Register the stub with the rmiregistry Naming.rebind(registration, stub); System.out.println("Service registered with rmid. Now terminating..."); System.exit(0);
Running ActivatableLightBulbServer Before running the ActivatableLightBulbServer, you will need to compile it and produce stub/skeleton files. Launch the rmiregistry and rmid applications (either in the same directory as the server, if classes are being loaded locally, or in a different directory if dynamic class loading is being used).
294
Now you can run the ActivatableLightBulbServer. However, a security policy file must be specified for the server. The security policy file must grant many additional privileges, beyond the standard socket and file permissions. Since no actual objects are being passed (and hence no dynamic code is being loaded from the client), it is safe to grant access to all permissions; on a more complex and secure system, individual permissions could be assigned. The format for the security policy is as follows (the policy should be saved as active.policy): grant { permission java.security.AllPermission; } ;
To specify the security policy file when running the server, use the following syntax: java –Djava.security.policy=active.policy ActivatableLightBulbServer
Now, run the client application from earlier in the chapter against the server. No code needs to be changed in the client—it will treat the activatable lightbulb server just as if it were a normal RMI server. java LightBulbClient localhost
11.13 Summary Remote method invocation (RMI) is a distributed systems technology that allows object methods located in remote Java Virtual Machines (JVMs) to be invoked remotely. This is often a simpler way of communicating between one application and another than direct TCP socket communication, which requires both parties to adhere to a network protocol. Instead of writing protocol implementations, developers interact with object methods defined by an RMI service interface. Once a reference to a remote object has been obtained, it can be treated just like a local object, which is a more intuitive way of developing network applications.
Chapter Highlights In this chapter, you have learned: • • • •
How to define a remote method invocation service How to create a server implementation of an RMI service How to create a client that locates and uses an RMI service implementation How to create an activatable RMI server
295
Chapter 12. Java IDL and CORBA This chapter introduces readers to the Common Object Request Broker Architecture and to writing CORBA clients and services in Java. At the conclusion of this chapter, readers should be able to design and implement systems in Java that make use of CORBA for communication.
12.1 Overview Remote Method Invocation (RMI) was covered in Chapter 11, and as with many things in life, there is more than one way to achieve the same goal. CORBA is a standard for making object method invocation requests over a network. The Object Management Group (OMG), a large consortium of companies devoted to improving remote object method invocation, developed the CORBA specification. NOTE Information on the work of the Object Management Group can be found at http://www.omg.org/.
CORBA has been designed from the ground up to support a wide range of network, operating system, and language configurations. This makes it, for some purposes, a more attractive solution than RMI, which is limited primarily to the Java platform. While not hardware or operating system specific, it is still fairly language specific unless you use a bridge from Java to another language, which requires considerable effort. CORBA, on the other hand, is not limited to invoking objects running within a JVM. It is not a language per se, but a specification for how objects will interact. Thus, it is not limited to a single language—CORBA services and clients can be written in a variety of languages. Suppose you wanted to write a business object that would fulfill requests for a range of machine types, and that would integrate with almost any major programming language such as C++ and Java. CORBA would be an ideal solution, as it does not lock the developer into a single language for development and use of the business object. That's the purpose behind the CORBA vision—to make objects accessible from any language and platform. Older legacy systems can be integrated with Java software and revitalized (for example, adding on a Web interface to an old inventory management system). The ability to interconnect with existing legacy systems isn't the only factor in CORBA's favor though. CORBA makes a good choice for Java developers, not just now but also in the future. Languages of the future that supercede Java will still be able to communicate with "legacy" systems that we are now writing and will write in the future. Consider it a way to make your systems "future-proof." While CORBA itself is not a language, it introduces a new language. CORBA services are described by a schema, which is a template for the methods an object makes available. Such schemas are expressed using the Interface Definition Language (IDL). Languages like Java that support CORBA can implement an IDL schema, thus allowing other software to invoke methods.
296
IDL is language neutral, so any programming language for which an IDL mapping has been written can use it. Currently, the following specifications for IDL language mappings are available from the OMG: • • • • • •
C C++ Smalltalk COBOL Ada Java
While this discussion covers CORBA only from a Java perspective, it is important for the reader to be aware that CORBA can be used from other languages. This makes it more interoperable than Java's RMI, and ideal as a middle layer between Java and legacy systems. Let's examine the Common Object Request Broker Architecture in detail.
12.2 Architectural View of CORBA CORBA is made up of a collection of objects and software applications that work together cooperatively. A schema specification, written in IDL, describes the objects that are exported for remote usage. An object request broker (ORB) implements the interface between remote object and software client. The ORB handles requests for an object's services, as well as sending a response. Figure 12-1 provides an overview of how clients and servants (the end implementation of the service) interact using an ORB. Figure 12-1. Objects accessed locally act as a proxy for remote objects.
Even though objects are treated as local objects, and you can invoke methods on them as if they were normal objects, there's an extra step involved. Acting as an intermediary between client and servant is the ORB. Communication between client and servant occurs over the network via the Internet Inter-ORB Protocol (IIOP), shown in Figure 12-2. Figure 12-2. Communication takes places using IIOP.
297
IIOP is not something that you, as a developer, would write software for. Nonetheless, it's important to be aware of, as communication takes place over sockets. Therefore, you should remember that software using IIOP as a transport mechanism will have all the strengths and weaknesses of TCP/IP. Your CORBA software will be limited by network restrictions on applets, as well as firewalls. Generally, however, CORBA services are used within an intranet, as the extra overhead of transmission over the Internet is slower, and users may have a firewall in between. In addition to object method invocation, the CORBA standard defines a host of other features, such as transaction handling, messaging, and object persistence. Such topics, however, are beyond the scope of this book, and are worthy of book-length discussions in their own right.
12.2.1 CORBA Services Within the CORBA architecture, software services are described by a schema and implemented by a servant. The servant is a special piece of software that registers itself with a lookup service, so that other CORBA software can locate and access its services. Typically a CORBA server will create a CORBA servant, and is then responsible for creating an ORB for the servant and registering the service for access by other clients. Figure 12-3 shows this process in action. Figure 12-3. Clients register with a name service.
12.2.2 CORBA Clients Clients, on the other hand, don't need to register with a name service. They do, however, want to use the name service to look up services (as shown in Figure 12-4). Such services might always be
298
located on the same machine, but in the event that they move, the name server helps locate them. CORBA has been designed for robustness, so the movement of a service to a new machine won't confuse clients that rely on a name server—the next time they look up the location of a particular service they will be referred to the new machine. This is, in fact, very similar to what occurs with RMI. Such a system is much more fault tolerant and versatile than relying on hard-coded locations in your source code or configuration files, and allows network administrators to distribute services across the network for the purposes of load balancing. Figure 12-4. Client uses name server to locate CORBA servant.
12.3 Interface Definition Language (IDL) The Interface Definition Language (IDL) is a crucial language to learn and attain, as all CORBA services are described by it. It is not, however, a complex language to learn. If you've managed to acquire a reasonably difficult language like Java, then picking up IDL will be a breeze.
12.3.1 Overview of the Language The IDL defines many language constructs, allowing a rich schema of objects to be described. We'll cover each of the basic ones, but readers are advised to read the "Java Language Mapping to OMG IDL Specification," published by the Object Management Group. NOTE The IDL documentation is available from the OMG Web site, at http://www.omg.org/technology/documents/formal/java_language_mapping_to_omg_idl.htm. If the page has moved from this location, you can access it from the main OMG site at http://www.omg.org/, by searching for "Java Language Mapping to OMG IDL."
299
12.3.2 IDL Datatypes IDL defines a set of primitive datatypes, such as numbers and text, as well as the ability to create more powerful constructs like arrays, sequences, and data structures. Readers interested in the more complex constructs are advised to consult the "Java Language Mapping to OMG IDL Specification" document, on which Table 12-1, showing the basic IDL datatypes, is based.
12.3.3 IDL Interfaces Interface definitions describe a remote object, the methods that the object exposes, as well as member variables, such as constants. The interface keyword is used to describe an interface. The following is an example of an interface: interface UserAccount { float getBalance(); void setBalance(in float amount); };
12.3.4 IDL Modules Modules are a convenient way of grouping logically related interfaces together for convenience. Consider modules similar to a package in Java; related classes are grouped together into categories. Table 12-1. Java Datatypes and Their Mapping to IDL Datatypes Java Datatype IDL Datatype void Void boolean Boolean wchar Char octet Byte short Short long Int long long Long float Float double Double string / wstring java.lang.String module AccountTypes { interface UserAccount { // code for account would go here }; interface UserID { // code for userid would go here }; interface Subscriptions { // code for subscriptions would go here } }
300
12.3.5 IDL Attributes Interfaces can have variables, as well as providing member variables. While you can write accessor functions to obtain the value of a variable and/or modify it, an easier alternative is to define an attribute. Attributes may be mutable or immutable to the remote client through the readonly keyword. Remember, however, that if you make an attribute mutable instead of hiding it through a set of accessor functions, you lose control over how modifications are made. The following is an example of an attribute, in contrast to our first interface example, which defined accessor functions: interface UserAccount { // balance is not protected, and can be easily changed attribute float balance; // account id may be read but not remotely modified readonly attribute long long accountid; };
12.3.6 IDL Operations While attributes have their uses, the most important part of an IDL schema will be the operations that are defined. These operations may be invoked remotely, and can perform both simple and complex tasks, limited only by the imagination. Operations are functions that can return a value upon completion and can accept parameters. There are three types of parameters that may be specified for an IDL operation: 1. in— parameter used for input only, and is immutable 2. out— parameter whose contents may be modified, and is not immutable 3. inout— parameter that combines the properties of in and out. Such parameters may be used as input and may also be modified. A cleaner implementation will result when you use input parameters only, and a single return value. However, sometimes it may be necessary to use the other modifiers; readers are advised to use discretion. The following interface shows three simple operations, two of which accept an input parameter. Each operation also specified a return value (in this case, of type float). interface UserBalance { float getBalance(); float addBalance(in float amount); float subtractBalance(in float amount); };
Note that if a method does not have a return value, just as in Java you should specify this by using the void keyword.
12.3.7 IDL Exception Handling Exception handling in CORBA is a good way to indicate abnormal situations. Rather than returning a simple error code as a return value, you can throw an exception. Exception handling in CORBA varies slightly from that of Java, in that exceptions may not be subclasses. This is in
301
contrast to Java, where generic exceptions are commonly identified as being throwable, but more concrete implementations are thrown. For example, java.net.Socket Exception may be thrown when using the Socket class, but actually a subclass is being thrown (such as java.net.ConnectException or java.net.NoRouteToHostException). You can, however, define several exceptions within an IDL schema, and have an operation throw more than one type of exception. This is an easy workaround to the subclass limitation. The following is an example of two IDL exceptions thrown by an operation. The raises keyword is used to identify a method that throws an exception. module BankingSystem { // Account inactive exception exception AccountInactive { string reason; }; // Account overdrawn exception exception AccountOverdrawn { string reason; }; interface BankAccount { double withdrawMoney(in double amount) raises (AccountInactive, AccountOverdrawn); // Further bank account methods might go here ... }; };
12.4 From IDL to Java So far, we've covered the basic syntax of the Interface Definition Language. The next step is to write a CORBA service described by an IDL schema and implemented in Java. We'll also need to write a CORBA client that will access our service. So you can compare between CORBA and RMI, we'll carry on the example of a distributed lightbulb service, first introduced in Chapter 11. For efficiency's sake, we will use the CORBA reference implementation that is included in the Java 2 platform. While this is not a full production implementation, it is perfectly adequate for the purposes of learning CORBA, and it comes free as part of Java.
12.4.1 A Sample Schema The following schema describes our distributed lightbulb service, which will be saved as a text file called LightBulb.idl. exception BulbBrokenException { }; interface LightBulb
302
{ void on () raises (BulbBrokenException); void off(); boolean isOn() raises (BulbBrokenException); };
The next step involves mapping this IDL schema to Java.
12.4.2 Mapping an IDL Schema to Java Rather than manually converting an IDL schema to Java source code, we'll use a simple tool to automate the process. This tool, idlj.exe, ships as standard with the Java 2 SDK v1.3 or higher for Windows. Previous versions of the Java 2 SDK did not include the tool, and required you to download a program called idl2java.exe. The reader is advised, if this hasn't been done already, to install the latest version of the Java 2 SDK for Windows—further instructions presume that readers are able to run the idlj.exe program. If you've already saved the lightbulb schema as LightBulb.idl (preferably in a directory of its own), the next step is to generate the Java mapping, using idlj.exe. Type the following command: idlj –fall LightBulb.idl
You'll notice that we specify an extra parameter, –fall. You can specify that you want to generate only the client mapping by using –fclient, and only the server mapping by using – fserver. For convenience, you'll usually do all mappings at once. If you do a directory listing, you'll notice that there are quite a few new files. These are stub and skeleton files, created automatically as part of the mapping process. You should not modify these files directly; if you run the idlj program in the future your changes will be overwritten. Instead, we'll use these classes as the scaffolding for a CORBA servant and a CORBA client.
12.4.3 Writing the Servant Code Writing code to implement a CORBA service is fairly straightforward. Most of the hard work has already been done, remember, by the IDL mapping tool. When you define an interface, you'll get a variety of files. The two most important ones for writing a servant are the following: • •
InterfaceOperations.java _InterfaceImplBase.java
So, when we compiled the LightBulb schema, it produced (among other files), LightBulbOperations.java and _LightBulbImplBase.java. The Operations source file provides the Java mapping of operations a CORBA servant must implement. You can copy and paste these method signatures into your servant, and then provide an implementation. The second file, ImplBase, should be extended using class inheritance by your servant, and should then implement the methods of the Operations file. The following example shows an implementation of a CORBA servant, for our distributed lightbulb service. Code for LightBulbServant import import import import
java.util.Random; org.omg.CORBA.*; org.omg.CosNaming.*; org.omg.CosNaming.NamingContextPackage.*;
303
// Chapter 12, Listing 1 public class LightBulbServant extends _LightBulbImplBase { // Boolean flag representing light bulb state private boolean bulbOn; // Boolean flag representing light bulb working private boolean bulbOk = true; public LightBulbServant() { // Off by default bulbOn = false; } // // // //
Implementing operations defined by the LightBulb interface Remember, the Operations class of any interface contains the Java method signatures you must implement.
// Turn on the bulb public void on () throws BulbBrokenException { // Check to see if bulb already on if (bulbOn) return; // Check to see if bulb broken if (!bulbOk) throw new BulbBrokenException(); // Check to see if bulb will break Random r = new Random(); // Make it a one in four chance, since it is an // old bulb and we want to test the throwing of // an exception int chance = r.nextInt() % 4; if ( chance == 0) { bulbOk = false; bulbOn = false; throw new BulbBrokenException(); } else { bulbOn = true; } } // Turn off the bulb public void off () { bulbOn = false; } // Is the bulb on and working? public boolean isOn () throws BulbBrokenException {
304
// Check to see if broken if ( !bulbOk ) throw new BulbBrokenException(); // Return bulb state return bulbOn; } public static void main(String args[]) { System.out.println ("Loading ORB"); try { // Create the ORB ORB orb = ORB.init(args, null); // Create a new light bulb servant... LightBulbServant servant = new LightBulbServant(); // ... and connect it to our orb orb.connect(servant); // Object Request Broker ready System.out.println ("Light bulb service loaded"); // Next step : export the orb to our name service // Get a name service reference org.omg.CORBA.Object object = orb.resolve_initial_references("NameService"); // Narrow to a NamingContext object NamingContext namingContext = NamingContextHelper.narrow(object); // Creating a naming component for our servant NameComponent component = new NameComponent ("LightBulb", ""); // NamingContext requires an array, not a single // NameComponent NameComponent componentList[] = { component } ; // Now notify naming service of our new interface namingContext.rebind(componentList, servant); System.out.println ("Servant registered"); // Wait indefinitely for clients to use the // servant for (;;) { Thread.sleep(1000); } } catch (Exception e) { System.err.println ("Error - " + e); } }
305
}
How LightBulbServant Works As you can see from the source code, we've implemented the on(), off(), and isOn() methods of the remote interface. The code for these is fairly simple, and consists of modifying boolean flags that control whether the light is on, off, or broken. As such, they are not networking or CORBA specific. What is important to understand from this example is how to export a CORBA servant and list it in the CORBA naming service. You could, if you wanted a clean separation between application and network code, create a separate class to handle the CORBA-specific code. However, it is often easier to combine the two, by adding a main(String[]) method to your servant, to allow it to be run as a stand-alone application. The first step is to obtain a reference to the object request broker and register the servant with it. You don't create an ORB, as there is only one ORB per JVM instance. Instead, you obtain a reference to it by calling the ORB.init(..) method. Then, we connect the servant to the ORB. // Create the ORB ORB orb = ORB.init(args, null); // Create a new light bulb servant ... LightBulbServant servant = new LightBulbServant(); // ... and connect it to our orb orb.connect(servant);
The second step for writing a servant is to register it with a name service. The name service allows the servant to be located by clients. This part gets a little tricky, and involves a few extra lines of code. The first part of the procedure is to obtain a reference to the name service. We do this by asking our ORB to locate the NameService, and we then narrow the service from a generic CORBA object to a NamingContext object, which represents the NameService. This is, effectively, a cast from a generic type to a more specific one. // Get a name service reference org.omg.CORBA.Object object = orb.resolve_initial_references("NameService"); // Narrow to a NamingContext object NamingContext namingContext = NamingContextHelper.narrow(object);
The next step is to create a descriptor for our servant, using the Name Component class. This descriptor will then be passed to the NamingContext object. It accepts an array of descriptors, not individual ones, so we'll wrap it in a single element array. Finally, we notify the naming service by calling the rebind(..) method of NamingContext. // Creating a naming component for our servant NameComponent component = new NameComponent ("LightBulb", ""); // NamingContext requires an array, not a single // NameComponent NameComponent componentList[] = { component } ; // Now notify naming service of our new interface namingContext.rebind(componentList, servant);
306
Now our server will wait patiently for incoming client requests. The next step, of course, is to write the client!
12.4.4 Writing the Client Code The code required for a CORBA client differs only slightly from that of a server, in that instead of locating and registering a servant with a name service, the client instead looks up a servant. Both client and server still need to initialize an object request broker and locate the name service, so much of the code is identical. Let's look at the source code of the CORBA lightbulb client. Code for LightBulbClient import org.omg.CORBA.*; import org.omg.CosNaming.*; // Chapter 12, Listing 2 public class LightBulbClient { public static void main(String args[]) { try { // First step : initialize our client ORB // Create the ORB ORB orb = ORB.init(args, null); // // // //
Second step: lookup the light bulb using name service We use the same code from our servant to create the nameservice reference and namecomponent.
System.out.println ("Looking for lightbulb"); // Get a name service reference org.omg.CORBA.Object object = orb.resolve_initial_references("NameService"); // Narrow to a NamingContext object NamingContext namingContext = NamingContextHelper.narrow(object); // Creating a naming component for our light bulb // servant NameComponent component = new NameComponent ("LightBulb", ""); // NamingContext requires an array, not a single // NameComponent NameComponent componentList[] = { component } ; // Now, here the client differs. We want to // resolve (look up) the name component // representing the light bulb. org.omg.CORBA.Object remoteRef = namingContext.resolve(componentList); // Next, we narrow it to get an address book LightBulb lb = LightBulbHelper.narrow remoteRef);
307
// Finally, we have a remote reference to our // light bulb. System.out.println ("Found light bulb"); // Turn bulb on and off till it fails, // demonstrating exceptions for (;;) { try { lb.on(); System.out.print ("Light on.... "); lb.off(); System.out.print ("Light off.... "); }F catch (BulbBrokenException bbe) { System.err.println (); System.err.println ("Bulb broken exception encountered"); break; } } } catch (Exception e) { System.err.println ("Error - " + e); } } }
How LightBulbClient Works To conserve space and avoid repetition, we'll use the same code as in Light BulbServant to initialize the object request broker, and to locate the name service that will provide a remote reference to the CORBA servant. The code required for a CORBA client to perform this operation is no different from that of a CORBA servant. Once the client has obtained a reference to the NameService, it will ask for a servant matching a specified NamingComponent. The code, to prepare the component, is identical to that of the servant and should match, otherwise the servant will not be locatable. Where the client differs from the servant is that it obtains a remote reference, by asking the name service to locate a matching service. // Creating a naming component for our light bulb servant NameComponent component = new NameComponent ("LightBulb", ""); // NamingContext requires an array, not a single // NameComponent NameComponent componentList[] = { component } ; // Now, here the client differs. We want to resolve (look up) // the name component representing the light bulb. org.omg.CORBA.Object remoteRef = namingContext.resolve(componentList);
The service, if able to find a match, will return a reference, which is initially a generic CORBA object and not a more specific object instance. It must therefore be narrowed to a specific LightBulb instance through the use of a "helper" class, created by the idlj compiler. We as programmers do not need to concern ourselves with how the helper class works—it is instead
308
created automatically by the idlj tool. The helper class is custom written by the compiler to create a mapping from each element of the IDL schema to the appropriate Java code and therefore must not be tampered with by the developer. // Next, we narrow it to get an address book LightBulb lb = LightBulbHelper.narrow (remoteRef);
Once you have an instance of the servant, it will act just like a local object. It is, in fact, acting as a proxy, carrying the remote request to the servant and returning the response. In this way, a CORBA service differs little from that of one written using remote method invocation—both are just as easy to use once a reference is obtained. The remainder of the client code deals with the matter of turning on and off the lightbulb. To demonstrate exception handling, our bulb will expire after a random number of switches on and off, so a repeated call to turn it on and off will eventually generate a BulbBrokenException, as defined in our CORBA schema. The client loops indefinitely, waiting for the bulb to break, and then catches the thrown exception. It should be noted, too, that other exceptions may be thrown at runtime, such as if a CORBA nameservice or a remote Light Bulb servant cannot be located.
12.4.5 Putting It All Together With the servant and client complete, the final process is to run both software applications to demonstrate remote communication between objects using CORBA. Follow the steps as delineated below. Step One Compile the client and the server code, as well as any other associated files generated by the idjl.exe application. By placing all of your source files in the same directory, you can use a single command to perform this operation: javac *.java
Step Two Start the CORBA name service. Included as part of the Java 2 Standard Edition, the application tnameserv.exe will be used as our name service. It can be found in either the \bin\or \jre\bin of your Java 2 installation. You'll want to run this in a separate console window, as the program runs continually. Step Three Run the CORBA servant. In a separate console window, type: java LightBulbServant
If you get an exception reading org.omg.CORBA.COMM_FAILURE, it means CORBA couldn't find the name server. You should double-check that tnameserv is still running. Step Four Run the CORBA client. In a separate console window, type: java LightBulbClient
309
Your client will attempt to look up the appropriate lightbulb service from the CORBA name service application. Your console should display the message "Looking for lightbulb" followed by "Found lightbulb," unless either the name service or server is not yet running. Now your client will enter a loop turning the bulb on and off until it breaks, thus demonstrating exception handling under CORBA. Congratulations, you have now run your first CORBA client-server application!
12.5 Summary CORBA provides a language-independent means of invoking object methods remotely to create a distributed system. While many developers prefer the technique of remote method invocation (RMI) covered in the previous chapter, CORBA does have its advantages as well. Chiefly, it is supported by a wide range of languages, and supports additional features such as transaction handling, messaging, and persistence. However, such topics are of less importance to most Java developers, and most will be concerned about language independence and the long-term interoperability of their Java software with legacy and future systems. The pros and cons of CORBA over RMI have been outlined in this chapter, and only you as a developer can decide which technology is the most appropriate, on a case-by-case (or project-by-project) basis.
Chapter Highlights In this chapter, you have learned: • • • • • •
The differences between remote method invocation and CORBA How to understand, and to write your own, IDL schemas How to compile an IDL schema using the Java 2 platform About running a name service under Java 2, so that clients can locate servants How to write, compile, and run both a CORBA client and servant About exception handling under CORBA and Java
310
Chapter 13. JavaMail The ability to send messages electronically across the Internet has changed the face of communication. E-mail, and to a lesser extent other forms of messaging such as newsgroups, have become an essential part of modern life. Recognizing the need to support such communication within Java, Sun Microsystems released the JavaMail API. The JavaMail API provides a common framework for managing electronic mail, by defining a set of abstract classes that represent the components of a mail system. The JavaMail API provides access to electronic mail systems, as well as the ability to create and transmit new mail messages. It has been designed to make it easy for developers to incorporate mail functionality into software, and to be interoperable with current and future mail/ messaging services. Rather than prescribing a particular set of protocols and supplying an implementation for these, the JavaMail API leaves the choice of implementation open to service providers. Though the API ships with minimal implementations for SMTP, IMAP, and POP as of JavaMail 1.2, these alone are not sufficient for every program or situation, due to the wide variety of mail and messaging protocols used today on the Internet. The API allows third-party developers to plug in their own providers and support other protocols. For example, implementations are already available for the popular POP3 and NNTP message stores. This makes JavaMail far more powerful than just an implementation of a few mail protocols—JavaMail is a flexible framework providing a common interface to mail systems, regardless of the details of their implementation.
13.1 Overview The JavaMail API is targeted toward several types of audiences, as identified in the JavaMail API specification: • • •
Developers writing mail applications (such as an e-mail client or a newsreader) Developers whose applications must be "mail-aware" or able to use mail as a transport mechanism Third-party mail implementation providers developing an implementation of a mail store or mail-delivery mechanism
The first two audiences rely on implementations supplied by messaging service providers. Figure 13-1 shows an architectural overview of JavaMail. The API designers have chosen a layered approach, separating the implementation details from the API interface. Figure 13-1. Relationship between the JavaMail API and other services
311
When an application must access a mail service or send a message to a mail service, it uses the JavaMail API to request an implementation. The API returns an instance of that implementation (if one is available), and the application can then use it to retrieve or send mail. The actual details of the implementation are transparent to the application developer. While the application can request an implementation of a particular protocol, the interface to a mail service remains the same. NOTE Few protocol implementations ship with the JavaMail API. Many third-party implementations of protocols are available, however. A list of these can be found at the JavaMail API Web site, at http://java.sun.com/products/javamail/.
13.2 Installing the JavaMail API The JavaMail API is not part of the standard Java API, and must be installed before it can be used. The JavaMail API is a Java extension; it is approved by Sun Microsystems but not part of the core Java API provided by Java Virtual Machine implementers. Before you can use JavaMail, you must install it, along with the JavaBeans Activation Framework (JAF), which is a package required by JavaMail to determine the datatype of mail messages (for example, to determine the MIME type of a message body or attachment). When applications are deployed to third parties, the latter will also require installation of JavaMail and JAF. NOTE The code and instructions in this chapter apply to JavaMail 1.1.3. Readers who prefer to use later versions of JavaMail should consult the installation instructions for any changes, and should be mindful that any additions to the API may not be backward compatible with older JavaMail installations.
312
Installing the JavaMail API is a relatively straightforward process. First you'll need to download the API from Sun Microsystems, along with the JavaBeans Activation Framework. Then you'll need to unzip the archives in which they are stored and add JavaMail and JAF to your classpath. The following steps should be taken: 1. Download the most recent JavaMail API implementation from http://java.sun.com/products/javamail. 2. Download the JavaBeans Activation Framework (JAF) from http://java.sun.com/beans/glasgow/jaf.html. 3. Extract the files from both archives into separate directories underneath your JDK installation directory; for example, c:\jdk1.2\javamail and c:\jdk1.2\jaf. 4. Add the JavaMail API to your classpath environmental variable. On a Windows machine, add the following to your autoexec.bat file (substituting for your installation directory): 5.
set CLASSPATH=%CLASSPATH%;c:\jdk1.2\javamail\mail.jar
7.
set CLASSPATH=%CLASSPATH%;c:\jdk1.2\jaf\activation.jar.
6. Add the JavaBeans Activation Framework to your classpath environmental variable. On a Windows machine, add the following to your autoexec.bat file: This will install the basic JavaMail implementation, but if you'd like to support Post Office Protocol (POP3) e-mail accounts under JavaMail 1.1.3, you need to do one more thing (JavaMail 1.2 already includes a POP3 provider, so no additional steps are necessary). Sun provides a POP3 implementation that can be downloaded from the JavaMail Web site at http://java.sun.com/products/javamail/pop3.html. You'll then need to add the POP3.jar file from this implementation to your classpath, to support POP3 accounts (e.g., set CLASSPATH=%CLASSPATH%;c:\jdk1.2\javamail\POP3.jar). Once this is complete, JavaMail has been installed, and you're ready to start writing applications or to run existing ones. The JavaMail API ships with some demonstration applications. If you're eager to see its capabilities, check out the demonstration applications in the javamail\demo directory, or read on.
13.3 Testing the JavaMail Installation JavaMail ships with a small number of protocol providers (code plug-ins for the JavaMail API that implement specific Internet protocols). Currently, the Simple Mail Transfer Protocol (SMTP) and the Internet Message Applications Protocol (IMAP) are included. Third-party implementations are also available, and a separate download from Sun Microsystems is offered for POP3 support. Our first example lists the available mail protocol implementations and their properties. NOTE Again, developers using JavaMail 1.2 will not require the additional download of a POP3 provider.
Code for ProviderList
313
import javax.mail.*; import javax.mail.internet.*; // Chapter 13, Listing 1 public class ProviderList { public static void main (String args[]) throws Exception { // Get a session, with default system properties Session mySession = Session.getDefaultInstance (System.getProperties(), null); // Get a list of available providers Provider[] providerList = mySession.getProviders(); // Look at each provider for (int i = 0; i< providerList.length; i++) { // Print out protocol name System.out.println ("Protocol : " + providerList[i].getProtocol()); // Print type (store or transport) if (providerList[i].getType() == Provider.Type.STORE) System.out.println ("Provider type : STORE"); else System.out.println ( "Provider type : TRANSPORT"); // Print out vendor name System.out.println ("Vendor : " + providerList[i].getVendor()); System.out.println ("--"); } } }
Running ProviderList The ProviderList application requires no parameters, and is simple to run: java ProviderList
When run, it will display the name of each protocol, the type of protocol, and the vendor name. As protocols are added, the output will change. If you've installed JavaMail and the POP3 provider, you should see output similar to the following: Protocol : pop3 Provider type : STORE Vendor : Sun Microsystems, Inc … Protocol : imap
314
Provider type : STORE Vendor : Sun Microsystems, Inc -Protocol : smtp Provider type : TRANSPORT Vendor : Sun Microsystems, Inc -As shown in this sample output, the Post Office Protocol version 3, the Internet Message Application Protocol, and the Simple Mail Transfer Protocol are supported by this machine.
13.4 Working with the JavaMail API JavaMail provides a set of interfaces to mail protocol implementations. Once you've mastered the basic concepts and interfaces, you'll be able to write applications that work with any protocol for which an implementation is available. Below are some of the important classes that form the core of the JavaMail API, as well as the methods offered by these classes. The JavaMail API is extensive, and a first review of it can be overwhelming. Readers should not be concerned with the details of every method; a preliminary examination will provide a sufficient idea of how they work. The methods can be referred back to as necessary.
13.4.1 Address Class The Address class represents an Internet messaging address, as distinct from another type of Internet address such as the Uniform Resource Locator (java. net.URL). This is an abstract class; it may not be instantiated. Instead, developers create a subclass of this class, or use one of two subclasses provided with the JavaMail API: the InternetAddress and NewsAddress classes.
13.4.2 Message Class The Message class is an abstract class that represents a mail message. It is responsible for storing the contents of a mail message and any associated properties (such as the subject, date, and "To" and "From" addresses). Messages may be sent using a message transport object, or retrieved from a mail folder. This is also an abstract class; it may not be instantiated. Methods The following methods of the Message class are public unless otherwise noted. •
void addFrom(Address[] addressArray) throws javax.mail.IllegalWriteException, java.lang.IllegalStateException, javax.mail. MessagingException— adds the specified mail addresses to the "From" field of the
315
message. If the message is read only, or does not allow modification, an exception will be thrown. •
void addRecipient (Message.RecipientType type, Address address)
throws javax.mail.IllegalWriteException, javax.mail.MessagingException— adds the address to the message as a recipient. There are three types of recipients (to, carbon copy, and blind carbon copy) that may be specified, either as Message.RecipientType.TO, Message.RecipientType.CC, or Message.RecipientType.BCC. •
void addRecipients (Message.RecipientType type, Address[]address) throws javax.mail.IllegalWriteException, javax.mail. MessagingException— modified form of the addRecipient method that allows multiple addresses to be added by specifying an array of Address
•
Flags getFlags() throws javax.mail.MessagingException— returns flag
•
Folder getFolder()— returns the folder of the message. If a message has been
objects.
settings for the message, such as whether it has been sent or seen.
•
•
• • •
•
• • • •
•
•
•
created, and not retrieved from a folder, a null value will be returned. Address[] getFrom() throws javax.mail.MessagingException— returns the senders of a message, as identified by the "From" field. A null value may be returned if no sender could be identified. int getMessageNumber()— returns the number of the message within a folder. This number is usually greater than or equal to one (a value of zero indicates a message that was created and not retrieved from a folder). Date getReceivedDate throws javax.mail.MessagingException— returns the date when the message was retrieved, if available. Address[] getAllRecipients() throws javax.mail.MessagingException— returns all recipients of the message. Address[] getRecipients(Message.RecipientType) throws javax. mail.MessagingException throws javax.mail.MessagingException— returns message recipients of the specified type (to, cc, bcc). To access all recipients, use the Message.getAllRecipients() method. Address[] getReplyTo() throws javax.mail.MessagingException— returns addresses specified by the "Reply To" field. This field indicates that messages should be directed to a different address than the sender. Date getSentDate()— returns the date when a message was sent, if available. String getSubject()— returns the message subject, as identified by the "Subject" field. boolean isExpunged()— returns a boolean value, indicating whether a message has been deleted. boolean isSet ( Flags.Flag flag_type ) throws javax.mail. MessagingException— checks to see whether a particular flag is set for this message. Returns a boolean value, to indicate flag state. boolean match (SearchTerm term) throws javax.mail.MessagingException— checks to see if a message matches a specific search condition. Message reply (boolean all) throws javax.mail.Messaging Exception— returns a new message, with the appropriate header fields set to deliver the message to the sender of the message. If the specified boolean flag is set to "true," all recipients of the message will be sent the reply. void saveChanges() throws javax.mail.IllegalWriteException, java.lang.IllegalStateException, javax.mail.MessagingException— saves any changes made to the message to
the folder from which it was accessed. For example, if a flag was modified, this method would update the message's flag settings.
316
• •
protected void setExpunged(boolean flag)— modifies the expunged field, which controls the return value of the Message.getExpunged() method. void >setFlag(Flags.flag, boolean value) throws java.lang. IllegalStateException, javax.mail.IllegalWriteException, javax.mail.MessagingException— modifies the specified flag to the specified
state, for the message. •
•
•
• •
void setFlags(Flags, boolean value) throws java.lang.IllegalStateException, javax.mail.IllegalWriteException, javax.mail. MessagingException— modifies the specified flags to the specified state. void setFrom() throws javax.mail.IllegalWriteException, java. lang.IllegalStateException, javax.mail.MessagingException— sets
the value of the "From" field to that defined by the system property mail.user, or if it does not exist, user.name. void setFrom(Address sender) throws javax.mail.IllegalWrite Exception java.lang.IllegalStateException, javax.mail. MessagingException— sets the value of the "From" field to the specified address. protected void setMessageNumber(int num)— specifies a message number for the message. void setRecipient(Message.RecipientType type, Address recipient)
throws
javax.mail.IllegalWriteException,java.lang.IllegalStateExceptio n, javax.mail.MessagingException— sets a recipient of the specified type for
the message, overwriting all previous values for that type.
•
• •
void setRecipients(Message.RecipientType type, Address[] recipients) throws javax.mail.IllegalWriteException, java.lang. IllegalStateException, javax.mail.MessagingException— sets multiple
recipients of the specified type for the message, overwriting all previous values for that type. void setSentDate(Date >date)— specifies a date at which the message was sent. void setSubject(String subject)— specifies a subject for the message.
In addition, the Message class implements the javax.mail.Part interface, which provides a set of methods for modifying the contents of a message. You'll learn how to specify the contents of a mail message in an example later in the chapter.
13.4.3 Service Class The Service class is an abstract class, representing a messaging-related networking service. It may not be instantiated by application developers, and usually is not extended directly, as there are already subclasses to represent mail stores and transports. Methods The following methods of the Service class are public unless otherwise noted. •
void addConnectionListener(ConnectionListener listener)— registers
•
void close() throws javax.mail.MessagingException— closes the network
•
void connect() throws javax.mail.AuthenticationFailedException, java.lang.IllegalStateException, javax.mail.MessagingException— attempts a connection to the network service
a listener for any network connection events. connection for this store.
represented by the mail store object, using details provided by system properties. If a
317
connection could not be established, or was already established, an exception will be thrown. •
void connect(String host, String username, String password) throws javax.mail.AuthenticationFailedException, java.lang. IllegalStateException, javax.mail.MessagingException— attempts a
connection to the network service represented by the mail store object, using the specified connection details. If a connection could not be established, or was already established, an exception will be thrown. •
•
•
• •
void connect(String host, int port, String username, String pass word) throws javax.mail.AuthenticationFailedException java. lang.IllegalStateException, javax.mail.MessagingException—
attempts a connection to the network service represented by the mail store object, using the specified connection details. This method takes an extra argument, allowing a mail port to be specified. If a connection could not be established, or was already established, an exception will be thrown. protected void finalize()— cleans up mail store state before being garbage collected, and terminates event dispatching thread. This method should not normally be overridden, and if it is, should be called from any subclasses. URLName getURLName()— returns a URL address for the mail store. The URLName class differs little from a java.net.URL class, and only in as much as it does not support connections to the service represented by the URL. boolean isConnected()— returns "true" if the service is connected, "false" if not. protected void notifyConnectionListeners (int type)— notifies all registered connection listeners of the specified event type.
•
protected protocolConnect(String host, int port, String user, String password) throws javax.mail.MessagingException— is overridden
•
protected queueEvent(MailEvent evt, Vector listenerVector)—
by service implementations to provide protocol-specific connection routines.
adds the event to a queue of message events, which will be delivered to the specified listeners. •
void removeConnectionListener( ConnectionListener listener )—
•
void setConnected(boolean state)— modifies the connection flag for this
• •
void setURLName(URLName url)— modifies the address representing the service. String toString()— returns a string representation of the service, by invoking getURLName.toString().
deregisters the specified connection listener. object.
13.4.4 Store Class A mail store represents an external Internet mail service (such as a news server or mail server). Like Message, Store is an abstract class, whose implementation is supplied by mail service providers—it is not instantiated by applications. A Store provides access to individual folders (collections of messages), through which messages may then be read. In some simple systems there will only be a single folder available, the INBOX, and in others a wider variety of folders will be provided. It is extended from the javax.mail.Service class, which provides methods to name a service and to have it connect to the network service it represents. The Store class also provides methods to register and deregister event listeners (discussed later in the chapter). Methods All methods of the Store class are public unless otherwise noted.
318
•
void addFolderListener (FolderListener listener)— registers a listener
•
void addStoreListener (StoreListener listener)— registers a listener
for any folder events.
for any mailstore events. •
•
•
•
Folder getDefaultFolder() throws java.lang.IllegalStateException, javax.mail.MessagingException— returns the default folder for the mail store. If
not connected, an exception may be thrown. Folder getFolder (String name) throws java.lang.IllegalState Exception javax.mail.MessagingException— returns a folder for the specified name, if available. Folder getFolder (URLName name) throws java.lang.IllegalState Exeption, javax.mail.MessagingException— returns a folder for the specified URL. Note that the URLName is a new class introduced as part of the javax.mail class, and differs only from a URL object in that it does not support methods to open a connection to the resource.
protected void notifyFolderListeners (int type, Folder folder)— notifies all registered folder listeners of the specified event type, and the
folder that is the focus of the event. •
protected void notifyFolderRenamedListeners (Folder original Folder, Folder newFolder)— notifies all registered folder listeners that a folder
•
protected void notifyStoreListeners (int type, String message)— notifies all registered store listeners of the specified event type and the
has been renamed.
event details. •
void removeFolderListener( FolderListener listener )— deregisters
the specified folder listener. •
void removeStoreListener( StoreListener listener )— deregisters the
specified store listener.
13.4.5 Folder Class A folder represents a collection of messages, such as a mailbox or a newsgroup. Individual messages can be selected from a folder, searched, and deleted. Messages stored in a folder also have an additional property—a set of flags that indicate whether the message has been read, should be deleted, and so on. Folders are accessed through a mail store—each folder is named, and the name associated with the default folder is INBOX. Fields The following member variables are publicly declared, and are used for identifier folder access permissions. • • • •
Folder.HOLDS_FOLDERS— indicates that a folder can contain subfolders. Folder.HOLDS_MESSAGES— indicates that a folder may contain messages. Folder.READ_ONLY— indicates that a folder may be read but not modified. Folder.READ_WRITE— indicates that a folder may be both read and modified.
Methods •
void addConnectionListener (ConnectionListener listener)—
•
void addFolderListener (FolderListener listener)— registers a listener
registers a listener for any connection events. for any folder events.
319
• •
void addMessageChangedListener (MessageChangedListener listener)— registers a listener for any change in messages events. void addMessageCountListener (MessageCountListener listener)—
registers a listener for any change in the number of messages within a folder.
•
•
•
void appendMessages(Message[] messages) throws javax.mail. FolderNotFoundException javax.mail.MessagingException— appends
the specified messages to the folder. However, this should not be used to send new messages. void close(boolean expungeFlag) throws IllegalStateException javax.mail.MessagingException— closes an open folder, and if the expungeFlag is set to "true," any messages marked as deleted will be removed from the folder. void copyMessages(Message[] messages, Folder targetFolder) throws java.lang.IllegalStateException, javax.mail.FolderNotFoundException, javax.mail.MessagingException— copies (not moves) the specified messages
•
•
into the target folder. If the messages are not part of the current folder, or the current folder is not open, an exception will be thrown. boolean create(int folderType) throws javax.mail.MessagingException— creates this folder on the mail store, and if necessary, any parent folders. Returns "true" if folder was created successfully, "false" if not. boolean delete(boolean recurseFlag) throws java.lang.IllegalStateException, javax.mail.FolderNotFoundException, javax. mail.MessagingException— deletes the folder, and any subfolders if the specified recurseFlag parameter is set to "true." If the folder is not already closed, or does not
exist, an exception will be thrown. •
boolean exists() throws javax.mail.MessagingException— returns "true"
•
Message[] expunge() throws IllegalStateException, javax. mail.FolderNotFoundException, javax.mail.MessagingException—
if the folder exists in the mail store, and "false" if it does not.
•
• •
• •
expunges any messages marked as deleted, without closing the folder. A folder must be opened, and exist on the server, or an exception will be thrown. Once messages are expunged, they are gone, and new message numbers will be assigned. This method returns an array of deleted messages. void fetch(Message[] messages, FetchProfile profile) throws java.lang.IllegalStateException javax.mail.MessagingException— prefetches a group of messages at once, to allow more responsive access at a later point in time. protected void finalize()— called by the garbage collector, to allow folder operations to be cleaned up before being disposed of. Folder getFolder(String name) throws javax.mail.MessagingException— returns a folder object associated with the specified pathname. If an absolute path is not specified, the folder name will be interpreted as a subfolder of the current folder. String getFullName()— returns the full pathname of a folder. Message getMessage(int number) throws java.lang.IndexOutOfBoundsException java.lang.IllegalStateException, javax. mail.FolderNotFoundException, javax.mail.MessagingException— retrieves the numbered message, and returns a Message object. If an invalid number is
specified, the folder is closed or does not exist, or a network error occurs, an exception will be thrown.
320
•
int getMessageCount() throws javax.mail.FolderNotFoundException, javax.mail.MessagingException— returns the number of messages stored within
a folder. •
•
Message[] getMessages() throws java.lang.IllegalStateException javax.mail.FolderNotFoundException, javax.mail.MessagingException— returns an array, composed of all messages
stored in the folder. If no messages exist, a blank array will be returned. Message[] getMessages(int[] specificNumbers) throws java.lang.
IllegalStateException javax.mail.FolderNotFoundException javax.mail.MessagingException— returns an array composed of the specified
messages. •
•
• •
• • •
• •
•
Message[] getMessages(int startRange, int endRange) throws java. lang.IllegalStateException javax.mail.FolderNotFoundException javax.mail.MessagingException— returns an array composed of the messages in the specified range (startRange .. endRange). int getMode() throws IllegalStateException— returns the access permissions for the folder. A value of Folder.READ_ONLY, Folder.READ_ WRITE will be returned, or –1 if no permissions could be determined. String getName()— returns the folder name. An absolute name is not returned; for this, use the getAbsoluteName() method. int getNewMessageCount() throws javax.mail.FolderNotFoundException, javax.mail.MessagingException— returns the number of new messages in this
folder. A new message is a message whose "recent" flag is set to true. Some store providers may not support this functionality, in which case a value of –1 is returned. Folder getParent() throws javax.mail.MessagingException— returns the parent folder, if one exists. If not, a value of null is returned. Flags getPermanentFlags()— returns a Flags object, containing all the flags supported by the folder, or null if unknown. char getSeparator() throws javax.mail.FolderNotFoundException, javax.mail.MessagingException— returns the separator character used to separate one folder from another in a pathname. For example, on Wintel systems the file separator is "\," whereas on Unix systems the separator is "/." Mail systems can also have different separators, and this information is often needed at runtime to compose pathnames. Store getStore()— returns the store that is associated with the folder object. int getType() throws javax.mail.FolderNotFoundException, javax. mail.MessagingException— returns a folder type int, which is either Folder.HOLDS_FOLDERS or Folder.HOLDS_MESSAGES. int getUnreadMessageCount() throws javax.mail.FolderNotFoundException, javax.mail.MessagingException— returns the number of unread messages,
• •
determined by the state of the message "seen" flag. If the store provider doesn't support this functionality, a value of –1 will be returned. String getURLName() throws javax.mail.MessagingException— returns a URLName for the folder. boolean hasNewMessages() throws javax.mail.FolderNotFoundException javax.mail.MessagingException— returns "true" if new messages are available,
"false" if not. • • •
boolean isOpen()— returns "true" if the folder is open, "false" if the folder is closed. boolean isSubscribed()— returns "true" if the folder is a subscribed folder. Folder[] list() throws javax.mail.FolderNotFoundException, javax.mail.MessagingException— lists subfolders underneath the current folder.
321
•
•
•
• • • •
Folder[] list(String pattern) throws javax.mail.FolderNotFoundException, javax.mail.MessagingException— returns a list of folders matching the
specified pattern (for example "*box" to find "inbox," "outbox," and "personalbox"). Folder[] listSubscribed() throws javax.mail.FolderNotFound Exception, javax.mail.MessagingException— returns a list of subscribed folders beneath the current folder. Folder[] listSubscribed(String pattern) throws javax.mail. FolderNotFoundException, javax.mail.MessagingException— returns a list of subscribed folders beneath the current folder, matching the specified pattern. For example, "*java*" might return the newsgroups "comp.lang.java.help" and "comp.lang.java.programmer." protected void notifyConnectionListeners(int type)— notifies all registered connection listeners of a connection event. protected void notifyFolderListeners(int type)— notifies all registered folder listeners of a folder event. protected void notifyFolderRenamedListeners(Folder targetFolder)— notifies all registered folder listeners that a folder has been renamed. protected void notifyMessageAddedListeners(Message[] messages)— notifies all registered MessageCountListeners that the specified
messages have been added to the folder.
•
protected void notifyMessageChangedListeners(int Message message)— notifies all registered MessageChangedListeners that the specified
•
protected void notifyMessageRemovedListeners(boolean removalFlag, Message[] messages)— notifies all registered MessageCountListeners that the specified messages have been removed from the
•
void open (int accessMode) throws IllegalStateException javax. mail.FolderNotFoundException, javax.mail.MessagingException— opens a folder in the specified access mode, either Folder.READ_ONLY or Folder.READ_WRITE. protected void removeConnectionListener(ConnectionListener listener)— deregisters the specified listener. protected void removeFolderListener(FolderListener listener)—
message has been modified within the folder.
folder.
• •
deregisters the specified folder listener.
• • •
•
protected void removeMessageChangedListener(MessageChanged Listener listener)— deregisters the specified message changed listener. protected void removeMessageCountListener(MessageCountListener listener)— deregisters the specified message count listener. boolean renameTo(Folder folder) throws java.lang.IllegalStateException, javax.mail.FolderNotFoundException, javax.mail. MessagingException— renames the current folder to the specified folder. Not every
folder may be renamed; the success of the operation is returned as a boolean value. Message[] search( javax.mail.search.SearchTerm term) throws
java.lang.IllegalStateException javax.mail.search.SeachException, javax.mail.FolderNotFoundException, javax.mail.Messaging Exception— searches through all of a folder's messages for the mail matching the
specified search term.
•
Message[] search( javax.mail.search.SearchTerm term, Message[]) throws java.lang.IllegalStateException, javax.mail.search. SeachException, javax.mail.FolderNotFoundException javax. mail.MessagingException— searches through a subset of a folder's messages for
322
the mail matching the specified search term. Only the messages specified as a parameter will be searched for a match. •
void setFlags(int[] numbers, Flags flagSettings, boolean value)
throws java.lang.IndexOutOfBoundsException java.lang. IllegalStateException, javax.mail.MessagingException— modifies the flag settings of the specified message numbers to the specified value. •
void setFlags(int startRange, int endRange, Flags flagSettings, boolean value) throws java.lang.IndexOutOfBoundsException java.lang.IllegalStateException, javax.mail.MessagingException—
•
void setFlags(Message[] messages, Flags flagSettings, boolean value) throws java.lang.IndexOutOfBoundsException, java.lang. IllegalStateException, javax.mail.MessagingException— modifies the
modifies the flag settings of messages in the specified range to the specified value.
•
flag settings of the specified messages (which must be part of this folder), to the specified value. void setSubscribed(boolean subscribe) throws javax.mail.FolderNotFoundException javax.mail.MethodNotSupportedException, javax.mail.MessagingException— subscribes this folder, if subscriptions are
•
supported by the current mail store. For example, a newsgroup may be subscribed to, and a list of subscribed newsgroups could then be listed by invoking the listSubscribed() method. String toString()— returns a string representation of a folder.
13.4.6 Transport Class A Transport represents an Internet mail service that allows messages to be sent (as opposed to a store, which is designed for retrieving messages). Transport is an abstract class, and may not be instantiated by applications. Static methods are provided, which use the default transport system for each type of recipient address (for example, a newsgroup address type gets sent to a newsgroup, while a mail address gets sent to a mail account). This class extends the javax. mail.Service class, and provides several additional methods. Methods The following methods of the Transport class are public unless otherwise noted. •
void addTransportListener (TransportListener listener)— adds the
specified listener to a list, which will be notified whenever a transport-related event occurs.
•
protected void notifyTransportListeners ( int type, Address[] validSent, Address[] validUnsent, Address[] invalid, Message msg)— notifies all registered transport listeners of an event, and to which recipients the
•
void removeTransportListener (TransportListener listener)—
specified message has been sent, and which recipients were not sent the message.
•
•
removes the specified listener from a list, which is notified of transport events. static void send(Message message) throws
javax.mail.SendFailedException, javax.mail.MessagingException— sends a message using the default transport system for the message's recipient address. If a message could not be sent to one or more recipients, a SendFailedException will be thrown, and valid recipients may not receive the message. static void send(Message message, Address[] addresses) throws javax.mail.SendFailedException, javax.mail.MessagingException— sends a message, using the default transport system for each recipient address, to all of
323
the specified recipients. This is an overloaded version of the Transport.send() method. An easier alternative is to specify the recipients of a message during its construction. •
static void sendMessage(Message message, Address[] addresses) throws javax.mail.SendFailedException, javax.mail.Messaging Exception— sends a message using the default transport system for each recipient. Unlike the Transport.send(..) method, valid recipients are guaranteed to receive the message if there are some invalid recipients and a SendFailedException is
thrown.
13.4.7 Session Class The Session class represents the interface between a mail client and a mail server. This class acts as a factory for Store and Transport objects. Using a Session instance, an application can request a particular type of store or transport, and if an implementation for that protocol is available, it will be returned. Methods Methods of the Session class include: •
boolean getDebug()— returns the state of the debug flag, which controls whether
debugging messages are displayed.
•
•
•
static Session getDefaultInstance( Properties properties, Authenticator authenticator)— returns an instance of the default session
object. As each session can contain sensitive information (such as usernames and passwords), granting access to the default session may be risky if multiple applications are running within the JVM. For this reason, an Authenticator object may be passed. In most situations, however, it is safe to pass a null value for the authenticator parameter. Mail session properties may also be specified, to control the actions of the session object. Folder getFolder(URLName location) throws javax.mail.NoSuch ProviderException, javax.mail.MessagingException— returns a folder object for the specified URLName. If a folder could not be found, a null value will be returned, and an exception may be thrown. static Session getInstance(Properties properties, Authenticator authenticator)— returns a new session object, which will use the specified mail
properties and authentication mechanism. The authenticator parameter may be null.
• • •
PasswordAuthentication getPasswordAuthentication (URLName location)— returns a PasswordAuthentication object for the session. Properties getProperties()— returns mail properties used by a session. String getProperty(String key)— returns the value of the specified mail
property. •
Provider getProvider(String protocol) throws javax.mail.NoSuchProviderException— returns the default implementation
•
Provider[] getProviders()— returns an array of protocol implementation
•
Store getStore() throws javax.mail.NoSuchProviderException— returns the default mail store, determined by the mail.store. protocol property setting, if
•
Store getStore(Provider provider) throws javax.mail.NoSuch ProviderException— returns the mail store offered by the specified implementation
provider for the specified protocol. providers.
one is available.
provider, if one is available.
324
•
Store getStore(String name) throws javax.mail.NoSuchProviderException— returns the mail store representing the
specified protocol, if one is available.
•
Store getStore(URLName location) throws javax.mail.NoSuch ProviderException— returns the mail store associated with the specified URLName
•
Transport getTransport() throws javax.mail.NoSuchProvider Exception— returns the default mail transport, determined by the mail.store.transport property setting, if one is available. Transport getTransport(Address address) throws javax.mail. NoSuchProviderException— returns the mail transport associated with the
object, if one is available.
•
specified address's type, if one is available.
•
Transport getTransport(Provider provider) throws javax.mail. NoSuchProviderException— returns the mail transport offered by the specified
provider, if one is available.
•
Transport getTransport(String protocol) throws javax.mail. NoSuchProviderException— returns the mail transport for the specified transport
•
Transport getTransport(URLName location) throws javax.mail. NoSuchProviderException— returns the mail transport associated with the specified URLName object, if one is available. PasswordAuthentication requestPasswordAuthentication(Inet Address address, int port, String protocol, String prompt, String username)— prompts the user for a password and returns a PasswordAuthentication object when called. This method is invoked when
protocol, if one is available.
•
password details have not been provided.
•
void setDebug (boolean debug)— sets the state of the debug flag, to activate debugging information, and modifies the value of the mail.debug system property.
•
void setPasswordAuthentication (URLName location, Password Authentication authenticator)— assigns a PasswordAuthentication
This information is irrelevant to users, but can be helpful during debugging.
•
object for the session, which will be associated with the specified URL location. A null value may also be specified, removing any password authentication. void setProvider(Provider provider) throws javax.mail.NoSuchProviderException— registers the specified provider as the default provider for its protocol.
13.4.8 Using JavaMail to Send Messages Armed with a basic knowledge of the essential classes in the JavaMail API, we will now take a look at a practical application. Sending messages with the JavaMail API is extremely simple, and a good demonstration of the capabilities of the API. A default implementation of the Simple Mail Transfer Protocol (SMTP) is available, which is used to send e-mail messages to SMTP mail servers. We'll use this implementation to send an electronic message using SMTP and JavaMail. Code for SendMailDemo import javax.mail.*; import javax.mail.internet.*; import java.util.Properties; // Chapter 13, Listing 2 public class SendMailDemo { public static void main(String args[]) {
325
int argc = args.length; // Check for valid number of parameters if (argc != 2) { System.out.println ("Syntax :"); System.out.println ("java SendMailDemo smtphost to_address"); return; } String host = args[0]; String to = args[1]; // Create a properties file, specifying mail // settings Properties prop = new Properties(); prop.put ("mail.transport.default", "smtp"); prop.put ("mail.smtp.host", host); try { // Get a session, with the specified properties Session mySession = Session.getInstance (prop, null); // Create a message to send, specifying our // session Message message = new MimeMessage (mySession); message.setSubject ("Test message"); message.setContent ("This is a test message....", "text/plain"); // Create an InternetAddress, for specifying // recipient InternetAddress toAddr = new InternetAddress ( to ); message.setRecipient (Message.RecipientType.TO, toAddr); // Create an InternetAddress, for specifying sender // address InternetAddress fromAddr= new InternetAddress ( "nobody@nowhere. com", "SendMailDemo" ); message.setFrom (fromAddr); System.out.println ("Sending message"); // Send the message Transport.send(message); System.out.println ("Message sent"); } catch (AddressException ae) { System.err.println ("Invalid address " + ae); } catch (MessagingException me) { System.err.println ("Messaging failure : " + me); }
326
catch (Exception ex) { System.err.println ("Failure : " + ex); } } }
How SendMailDemo Works The first thing our application must do is to import the necessary classes from the JavaMail package, as well as the Properties class from the java.util package. import javax.mail.*; import javax.mail.internet.*; import java.util.Properties;
The application then checks for the correct number of command-line parameters. To send even the simplest of mail messages, we need to know several pieces of information—including the hostname of the SMTP server, the recipient of the message, and other message details such as the subject and body of the message. Our mail application is fairly simple, and we can provide a default subject and body for the purposes of a demonstration. The application must, however, be informed of the recipient of the message (your e-mail address) and the SMTP server name. public static void main(String args[]) { int argc = args.length; // Check for valid number of parameters if (argc != 2) { System.out.println ("Syntax :"); System.out.println ("java SendMailDemo smtphost to_ address"); return; } String host = args[0]; String to = args[1]; // ..... }
Next, we must prepare the settings for sending mail. We start by creating a new Properties object, and specifying the mail transport protocol we wish to use, as well as the hostname of the SMTP server. // Create a properties file, specifying mail settings Properties prop = new Properties(); prop.put ("mail.transport.default", "smtp"); prop.put ("mail.smtp.host", host);
NOTE
327
If you'd like to see what is going on behind the scenes, or need further information for debugging purposes, simply set the mail.debug property to a String value of "true." In this example, you could add the following line here: prop.put ("mail.debug", "true");
We pass this information on to JavaMail, when we request an instance of the Session class, by using the static method Session.getInstance(). It takes as a parameter a Properties object and an Authenticator object (which can be set to null). // Get a session, with the specified properties Session mySession = Session.getInstance (prop, null);
Once you have a Session object, you can then begin to create a mail message. Remember that the Message class is an abstract class, so we need to use a concrete implementation. We create a new instance of a MimeMessage (which is used to handle a variety of message types, including plain text), and pass to its constructor our Session object (needed later when we want to transmit the messsage). Then we can begin to populate our message with data, such as the subject and message contents. // Create a message to send, specifying our session Message message = new MimeMessage (mySession); message.setSubject ("Test message"); message.setContent ("This is a test message....", "text/plain");
Addressing the message is slightly more complicated. We can't specify a "To:" or "From:" address simply by passing a String. Instead, an Address instance must be passed. For news messages, we would pass a NewsAddress instance, but for mail messages we pass an InternetAddress instance. You'll notice too that for the "From:" address, two parameters are used. An InternetAddress can take a raw e-mail address, or an e-mail address and a personal name. In this case, we use "
[email protected]" as the e-mail address, and "SendMailDemo" as the person. NOTE An InternetAddress is not the same as a java.net.InetAddress. There are also different types of recipient addresses (TO, CC, and BCC). A TO address is sent to the named recipient, while a CC address is sent as a carbon copy. A BCC address is sent as a blind carbon copy; that is, other recipients of the message won't know that it was sent to the address listed as BCC. The address types are represented by constants defined in Message.RecipientType: // Create an InternetAddress, for specifying recipient InternetAddress toAddr = new InternetAddress ( to ); message.setRecipient (Message.RecipientType.TO, toAddr); // Create an InternetAddress, for specifying sender address InternetAddress fromAddr= new InternetAddress ( "
[email protected]", "SendMailDemo" ); message.setFrom (fromAddr);
328
Finally, we are able to send the message. Sending the message is the easiest part of all. Simply call the static method Transport.send( Message ), and the message will be sent. Transport knows the correct mail settings, because our message knows the correct Session instance, which was created earlier. If you want finer control over message sending, you can request a Transport instance and open connections yourself. For a single message, however, this is the easiest way of delivery. // Send the message Transport.send(message);
We also need to wrap most of this code in exception handlers, as there are plenty of errors that can occur at runtime. For example, the address specified by the user might not be an actual address (if the user mixed up the order of parameters). The SMTP server might be incorrect, or might be down. These are a few of the many errors that can occur at runtime. For this reason, applications must at least catch a MessagingException. Running SendMailDemo You'll need to specify the hostname for an SMTP server on your local network, or the SMTP server of your Internet service provider. You'll also need to specify your e-mail address, so that you can check whether the message was delivered correctly. The syntax for the SendMailDemo is as follows: java SendMailDemo mysmtpserver myemail@mydomain
13.4.9 Using JavaMail to Retrieve Messages While sending messages is useful, it is only part of the functionality of the JavaMail API. Reading messages from an Internet mail server (such as an IMAP/POP3 account or a newsgroup), is also possible, as the next example demonstrates. Code for ReadMailDemo import javax.mail.*; import javax.mail.internet.*; // Chapter 13, Listing 3 public class ReadMailDemo { public static void main (String args[]) { int argc = args.length; // Check for valid number of parameters if (argc != 4) { System.out.println ("Syntax :"); System.out.println ( "java ReadMailDemo protocol host username password"); return; }
329
String String String String
protocol host username password
= = = =
args[0]; args[1]; args[2]; args[3];
try { // Get a session, with default system properties Session mySession = Session.getDefaultInstance (System.getProperties(), null); // Get a specific mail store, such as // imap/pop3/news Store myStore = mySession.getStore(protocol); myStore.connect (host, username, password); // Request the INBOX folder for this mail store Folder myFolder = myStore.getFolder("INBOX"); if (myFolder == null) { System.err.println ("No default folder available"); return; } System.out.println ("Accessing " + myFolder.getFullName() + " folder"); // Open in READ_ONLY mode myFolder.open(Folder.READ_ONLY); int messagecount = myFolder.getMessageCount(); System.out.println (myFolder.getFullName() + " has " + messagecount + " messages."); Message[] message = myFolder.getMessages (); for (int i = 0; i < message.length; i++) { Address[] fromAddr = message[i].getFrom(); System.out.println (fromAddr[0] + ":" + message[i].getSubject()); } myFolder.close(false); } catch (MessagingException me) { System.err.println ("Messaging failure : " + me); } catch (Exception ex) { System.err.println ("Failure : " + ex); } } }
How ReadMailDemo Works
330
As in the previous example, it is necessary here to import the basic JavaMail packages. We won't be specifying any properties, however, and the import statement for java.util.Properties can be omitted. import javax.mail.*; import javax.mail.internet.*;
The next thing that must be done is to check command-line parameters. There are four parameters to this example, which control the protocol used (either IMAP or POP3), the hostname of the mail service, the username, and finally the password. If there are missing or extra parameters, a message showing the correct syntax will be displayed. int argc = args.length; // Check for valid number of parameters if (argc != 4) { System.out.println ("Syntax :"); System.out.println ("java ReadMailDemo protocol host username password"); return; } String String String String
protocol host username password
= = = =
args[0]; args[1]; args[2]; args[3];
Next, we need to get an instance of the Session class, by using the static method System.getInstance(). We don't need to specify any properties, but the method still requires a Properties object. We could create a new Properties instance that is blank, but it is better to select the default system properties, as any existing property settings will be preserved. // Get a session, with default system properties Session mySession = Session.getDefaultInstance (System.getProperties(), null);
The application can now connect to a mail store. Since the user of the application will specify a protocol as a command-line parameter, we don't need to choose the protocol ourselves. This shows the power of JavaMail—whether you're working with a POP3 server, an IMAP server, or some other type of mail server, the code will remain the same. Before using a mail store, though, it is important that it is actually connected. Here we specify the hostname, username, and password, by using the Store.connect() method. // Get a specific mail store, such as imap/pop3/news Store myStore = mySession.getStore(protocol); myStore.connect (host, username, password);
Mail systems store messages in folders. Some mail systems may have many folders, whereas others may support just one folder. Generally, the INBOX folder will be the default folder for incoming messages. The application requests the INBOX folder, and opens it in READ_ONLY mode. Before a folder can be used, it must be opened. // Request the INBOX folder for this mail store Folder myFolder = myStore.getFolder("INBOX"); System.out.println ("Accessing mail account now");
331
// Open in READ_ONLY mode myFolder.open(Folder.READ_ONLY);
The folder, now open, can be used to retrieve messages. First, the application requests a count of the total number of messages available. Next, it uses this information to select a batch of messages, from the first message to the last. This will be returned as an array of messages. NOTE Messages are numbered from 1 (1 is the first message). Arrays in Java are zero-indexed, meaning that the first element is element 0.
int messagecount = myFolder.getMessageCount(); System.out.println (myFolder.getFullName() + " has " + message count + " messages."); Message[] message = myFolder.getMessages ();
The application then traverses through each element of the array (starting with the first message, at element 0). The application displays the sender of the message as well as the message subject. Message has a getFrom() method that returns an array of Address objects. There isn't a simple way to get the sender of the message, so to display the sender, you can usually simply access the first element of this array. The JavaMail API allows for multiple senders, so if the mailing system your application is using supports this facility, then for completeness you may want to have your applications check the length of the "From" array. Getting the subject of the message is far easier—simply call the getSubject() method. for (int i = 0; i < message.length; i++) { Address[] fromAddr = message[i].getFrom(); System.out.println (fromAddr[0] + ":" + message[i].getSubject()); }
Finally, we can clean up open folders and connections to mail services by calling the close method on any open folders or stores. The Folder.close() method takes a boolean flag parameter, indicating whether any messages marked "deleted" should be removed. As we're opening the folder in read-only mode anyway, this is unnecessary, so a value of "false" is passed. // Close messages, don't expunge myFolder.close(false); // Close connection to store myStore.close();
Running ReadMailDemo You'll need to specify four parameters for this demonstration. These are the name of the mail protocol to use, the hostname of the mail service, the username of the account, and finally the password. If you have an IMAP account, use the protocol name of "imap," and for a POP3
332
account, use the protocol name of "pop3." Remember, too, if you haven't done so already, to install any additional protocol implementations that you require. NOTE Case sensitivity applies to protocol names. "POP3" is not treated the same way as "pop3."
The syntax for the ReadMailDemo is as follows: java ReadMailDemo protocol myserver myusername mypassword
For example: java ReadMailDemo pop3 ficticiousemailserver.com johndoe xxm312ras
13.5 Advanced Messaging with JavaMail The examples up until now have been pretty straightforward. They only scratch the surface of JavaMail, however. Simple tasks are easy to perform in JavaMail, but more advanced functionality is available. Let's take a further look at what JavaMail has to offer.
13.5.1 JavaMail Event-Handling Model The JavaMail API uses the JDK1.1 event-handling model, which readers may already be familiar with from using the Abstract Windowing Toolkit (AWT) and Swing. For those without prior experience with this model, a brief over view is offered. Readers acquainted with this material may choose to skip to Section 13.5.1.2. 13.5.1.1 Overview AWT event handling in JDK1.02 used a clumsy callback mechanism that required developers to extend a Component and provide event-handling methods, or to provide these methods in a parent container such as an applet. As of JDK1.1, this model has been replaced with a far superior mechanism. The new event-handling model requires objects that are interested in observing events to register with the event source as a listener (see Figure 13-2). Each type of listener defines a set of methods that define event handlers. When an event is generated by the event source, one of these handler methods will be called, for every registered listener. This model allows multiple listeners for a given event source, as well as multiple types of event listeners. Other listeners will be notified independently of each other; one listener cannot block the notification of another. Figure 13-2. Event-handling overview
333
Let's look at a brief example of this event-handling mechanism in action. For example, suppose an application wanted to terminate when a button was pressed. Rather than subclassing the button to provide event methods, the application can implement the appropriate listener interface and register with the button. public class myapp implements ActionListener { public myapp() { Button b = new Button("Exit"); b.addActionListener(this) ..... } public void actionPerformed(ActionEvent e) { System.exit(0); } }
In this example, which uses ActionListener, only one event callback method was required. However, more complex event listeners require many methods. If you only want to implement one or a few of the methods of an event listener, there is usually a listener adapter class provided. An adapter class implements every method you need for a listener interface, and by overriding individual methods you can save yourself a considerable amount of time and effort. Inner classes are another way of working with short event handlers. An inner class is a class within a class. If you frequently write event listeners that use adapters, you'll find that you often need to create new Java source files, which can become difficult to manage. Inner classes are a language feature of JDK1.1 and higher. A thorough discussion of Java language features is beyond the scope of this book. However, examples using inner classes for event handling can be found later in the chapter. 13.5.1.2 JavaMail Events Several JavaMail events are defined in the javax.mail.event package. The event classname, its corresponding description, and the usual sources of the event are shown in Table 13-1. Each event can be responded to by implementing the appropriate event listener classes. There are six listener classes, and some support adapters that are useful when a single event action, or a few event actions, must be monitored.
334
1. ConnectionListener— listener interface for ConnectionEvent o ConnectionAdapter— adapter for ConnectionListener 2. FolderListener— listener interface for FolderEvent o FolderAdapter— adapter for FolderListener 3. MessageChangedListener— listener interface for MessageChangedEvent o MessageChangedAdapter— adapter for MessageChangedListener 4. MessageCountListener— listener interface for MessageCountEvent 5. StoreListener— listener interface for StoreEvent 6. TransportListener— listener interface for TransportEvent o TransportAdapter— adapter for TransportListener
13.5.2 Writing JavaMail Event Handlers Let's look at a practical example of JavaMail event handlers. Earlier in this chapter, we looked at how to send a simple message using the Transport class. However, other than catching exceptions thrown at runtime, there wasn't any strong error-handling code. For example, the message might not have been delivered if the SMTP server rejected the recipient or IP address of the sender. The earlier example has been rewritten to illustrate the JavaMail event-handling mechanism. It registers a ConnectionListener and a TransportListener, to detect connection and transport events. While some of the code is the same, changed portions are described below. Code for SendEventDemo import import import import
javax.mail.*; javax.mail.event.*; javax.mail.internet.*; java.util.Properties;
// Chapter 13, Listing 4 public class SendEventDemo {
Table 13-1. Events Defined by the javax.mail Package Event Class Event Description Source MailEvent Represents general mail events Any ConnectionEvent Connection and disconnection events Store/Transport FolderEvent Represents a folder-related event Folder MessageChanged Represents change to messages Folder MessageCountEvent Represents a change in the number of messages Folder StoreEvent Represents an event pertaining to a mail service Store TransportEvent Represents a message transport event Transport public static void main(String args[]) { int argc = args.length; // Check for valid number of parameters if (argc != 2) { System.out.println ("Syntax :"); System.out.println ("java SendEventMailDemo smtphost to_address"); return; } String host = args[0]; String to = args[1];
335
// Create a properties file, specifying mail settings Properties prop = new Properties(); prop.put ("mail.transport.default", "smtp"); prop.put ("mail.smtp.host", host); try { // Get a session, with the specified properties Session mySession = Session.getInstance (prop, null); // Create a message to send, specifying our session Message message = new MimeMessage (mySession); message.setSubject ("Test message"); message.setContent ("This is a test message....", "text/plain"); // Create an InternetAddress, for specifying recipient InternetAddress toAddr = new InternetAddress ( to ); message.setRecipient (Message.RecipientType.TO, toAddr); // Create an InternetAddress, for specifying sender address InternetAddress fromAddr= new InternetAddress ( "
[email protected]", "SendEventMailDemo" ); message.setFrom (fromAddr); // Get a transport instance Transport transport = mySession.getTransport(toAddr); // Create an anonymous inner class for connection listener transport.addConnectionListener( new ConnectionListener() { public void opened(ConnectionEvent e) { System.out.println ("connection opened"); } public void disconnected(ConnectionEvent e) { System.out.println ("connection disconnected"); } public void closed(ConnectionEvent e) { System.out.println ("connection closed"); } }); // Create an anonymous inner class for transport listener transport.addTransportListener( new TransportAdapter() { public void messageDelivered(TransportEvent e) { System.out.println ("Message delivered");
336
} public void messageNotDelivered(TransportEvent e) { System.out.println ("Message not delivered"); } }); // Open the connection transport.connect(); System.out.println ("Attempting to send message"); // Send the message Address[] msgAddr = { toAddr } ; transport.sendMessage(message, msgAddr); // Close the connection transport.close(); } catch (AddressException ae) { System.err.println ("Invalid address " + ae); } catch (MessagingException me) { System.err.println ("Messaging failure : " + me); } catch (Exception ex) { System.err.println ("Failure : " + ex); } } }
How SendEventDemo Works The first major difference is that we need to get an instance of a Transport object. While Transport has a static method that allows messages to be sent, you will need an instance of Transport to register a ConnectionListener or TransportListener. // Get a transport instance Transport transport = mySession.getTransport(toAddr);
Next, we have to create a listener and register it with our transport object. In this example, anonymous inner classes are used, though it is also possible to create separate classes for this purpose. An application could implement a Listener interface, or extend an Adapter class if not every listener method was required. To illustrate the difference, both approaches have been used. // Create an anonymous inner class for connection listener transport.addConnectionListener( new ConnectionListener() { public void opened(ConnectionEvent e) { System.out.println ("connection opened"); }
337
public void disconnected(ConnectionEvent e) { System.out.println ("connection disconnected"); } public void closed(ConnectionEvent e) { System.out.println ("connection closed"); } }); // Create an anonymous inner class for transport listener transport.addTransportListener( new TransportAdapter() { public void messageDelivered(TransportEvent e) { System.out.println ("Message delivered"); } public void messageNotDelivered(TransportEvent e) { System.out.println ("Message not delivered"); } });
When the listeners are registered, you can then work with the Trans port object. The first step is to open a connection to the remote transport, by calling the Transport.connect() method. This will trigger the registered ConnectionListener, as a connection will be established. // Open the connection transport.connect();
Once connected, the message can be sent. The static Transport.send() method can't be used, as our listeners are registered with another Transport object instance. Instead, the sendMessage() method must be used, which takes as a parameter an array of Address objects. This will trigger a TransportEvent, which will be passed to the registered listener. // Send the message Address[] msgAddr = { toAddr } ; transport.sendMessage(message, msgAddr);
Finally, the transport must be closed down. When closed, a Connection Event will be passed to our listener. // Close the connection transport.close();
Running SendEventDemo As in the earlier SendMailDemo, the hostname of an SMTP server must be specified as a parameter, as well as a valid e-mail address. The syntax for the SendEventDemo is as follows: java SendEventDemo mysmtpserver myemail@mydomain
338
Not only will a message be sent, but you'll also see the application progress, when a connection opens and closes and when a message is delivered to the SMTP server.
13.5.3 Sending a File as an Attachment Previous examples in this chapter have dealt with purely text documents. However, one of the most useful features of e-mail is the ability to send files as an attachment. E-mail makes it easy to get files across to other people on the Internet, such as documents and compressed files archives. JavaMail supports MIME attachments, and makes it easy to compose and transmit a multipart message with a file attachment. This next example is based on a demonstration provided in the JavaMail SDK. Code for SendAttachment import import import import import
java.util.Properties; javax.activation.*; javax.mail.*; javax.mail.internet.*; java.io.File;
// Chapter 13, Listing 5 public class SendAttachment { public static void main(String args[]) { int argc = args.length; // Check for valid number of parameters if (argc != 3) { System.out.println ("Syntax :"); System.out.println ( "java SendAttachment smtphost to_address filepath"); return; } String host = args[0]; String to = args[1]; String file = args[2]; // Create a properties file, specifying mail settings Properties prop = new Properties(); prop.put ("mail.transport.default", "smtp"); prop.put ("mail.smtp.host", host); try { // Get a session, with the specified properties Session mySession = Session.getInstance (prop, null); System.out.println ("Composing message"); // Create a message to send, specifying our session Message message = new MimeMessage (mySession); message.setSubject ("File attachment file"); // Create an InternetAddress, for specifying recipient InternetAddress toAddr = new InternetAddress ( to );
339
message.setRecipient (Message.RecipientType.TO, toAddr); // Use the same sender address as recipient message.setFrom (toAddr); // Construct a multipart message Multipart part = new MimeMultipart(); // Create the message body BodyPart msgBody = new MimeBodyPart (); msgBody.setText ("There is a file attached to this message...."); // Create the message attachment BodyPart attachment = new MimeBodyPart(); // Use a file data source for reading the file FileDataSource fileDataSource = new FileDataSource(file); // Set the appropriate data handler attachment.setDataHandler ( new DataHandler ( fileDataSource ) ); // Set the filename of the file (don't include path info) if (file.indexOf( File.separator ) != -1) { String fileName = file.substring (file.lastIndexOf( File.separator)+1, file.length()); attachment.setFileName(fileName); } else { attachment.setFileName(file); } System.out.println ("Adding attachments"); // Add msg body and attachment to multipart message part.addBodyPart(msgBody); part.addBodyPart(attachment); // Set our multipart message as the msg contents message.setContent (part); System.out.println ("Sending message"); // Send the message Transport.send(message); System.out.println ("Message sent"); } catch (AddressException ae) { System.err.println ("Invalid address " + ae); } catch (MessagingException me) { System.err.println ("Messaging failure : " + me);
340
} catch (Exception ex) { System.err.println ("Failure : " + ex); } } }
How SendAttachment Works Sending a plain text message is relatively straightforward—simply create a new instance of a MimeMessage and pass the text contents of the message to the MimeMessage.setContent() method. When a multipart message (one composed of multiple parts) is needed, further work needs to be done. The first step will be to create a new Multipart object. // Construct a multipart message Multipart part = new MimeMultipart();
The Multipart object acts as a container for the various components that will make up our message. The first component will be our text body. This is where the normal text of the message goes. // Create the message body BodyPart msgBody = new MimeBodyPart (); msgBody.setText ("There is a file attached to this message....");
Next, we need to create a second BodyPart, to hold our attachment. We will also need to specify a data source for the part's contents, using a FileDataSource object from the JavaBeans Activation Framework (JAF). We must also specify a DataHandler, which will use our FileDataSource to get the contents of a file. // Create the message attachment BodyPart attachment = new MimeBodyPart(); // Use a file data source for reading the file FileDataSource fileDataSource = new FileDataSource(file); // Set the appropriate data handler attachment.setDataHandler ( new DataHandler ( fileDataSource ) );
We also need to assign a name to the file that will be stored as an attachment. If an absolute filename (a filename that includes path information) is specified as a command-line parameter, we need to strip this information away using some simple string processing. // Set the filename of the file (don't include path info) if (file.indexOf( File.separator ) != -1) { String fileName = file.substring (file.lastIndexOf( File.separator)+1, file.length()); attachment.setFileName(fileName); } else { attachment.setFileName(file); }
341
Finally, we add each individual part to our Multipart object, and assign this object as the content of our message. // Add msg body and attachment to multipart message part.addBodyPart(msgBody); part.addBodyPart(attachment); // Set our multipart message as the msg contents message.setContent (part);
Running SendAttachment The syntax for SendAttachment is as follows: java SendAttachment mysmtpserver myemail@mydomain filename
This message will send the specified file as an e-mail attachment. Your mail client must support attachments in order for the file to be read.
13.6 Summary The JavaMail API is a comprehensive framework for sending and retrieving mail messages. Creating your own implementation of a mail protocol is feasible, but involves additional effort and replication of code. The JavaMail API has many benefits as well, including an interface that makes the choice of mail protocol transparent during coding. Whether using IMAP or POP3, the code to access mail folders remains the same, and future mail protocols can be included with little or no changes.
Chapter Highlights In this chapter, you have learned: • • • • • •
How to install the JavaMail API implementation and POP3 provider How to determine the available Store and Transport providers How to compose and send a mail message using a Transport How to retrieve mail messages from a Folder, using a Store How to write JavaMail event handlers How to send a file as an attachment
Brought to you by ownSky!
342


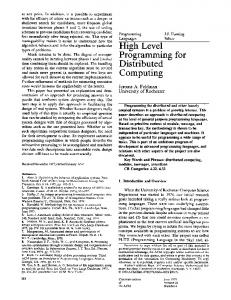


![[PDF] Java Programming - Google Sites](https://m.moam.info/img/260x300/pdf-java-programming-google-sites_64787e33097c4786708ce28f.jpg)


![[PDF] Distributed Computing - Google Sites](https://m.moam.info/img/260x300/pdf-distributed-computing-google-sites_6478391a097c4744708c96c6.jpg)


