Ertmer, P.A., & Johnson, J. (2002). One pixel short of a frame: Lessons learned from a large-scale (underfunded) multimedia development project. Educational Technology Review, [Online serial], 10(2), 3-27.
One Pixel Short of a Frame: Lessons Learned from a Large-Scale (Underfunded) Multimedia Development Project
PEGGY A. ERTMER Purdue University, USA
[email protected] TRISTAN JOHNSON Florida State University, USA
Multimedia development in an academic environment poses both benefits and challenges to project directors and team members due to increased levels of flexibility and changing project roles. Based on our experiences designing and developing a CD-ROM/ Internet-based teacher development tool, intended to help teachers envision and achieve technology integration, we present nine lessons learned during a two-year development process. Lessons relate to multiple project stages including analysis, design, development, and evaluation and include suggestions for planning, cost-cutting, production, managing resources, and capitalizing on flexibility.
Have you ever found yourself in a situation where you were expected to lead others through some complex procedure, one that was only vaguely defined and with which you had no previous experience? We imagine we’re not the only ones who have encountered this. We know how faculty are: we write grants where we make vague promises, we teach courses marginally related to our areas of expertise, or we agree to write a book chapter about some barely familiar content. For me, the first author, this particular adventure started innocently enough. I didn’t intend to become a software developer— I only wanted to fill a need that many of my teacher colleagues were experiencing. Thus, the rationale for initiating the development effort went something like this: 3
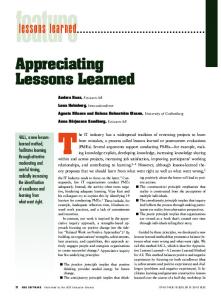
Point #1: Teachers today are having a hard time integrating technology into their classrooms because they don’t really know what this looks like. Point #2: Perhaps if we provided teachers with some examples of exemplary technology-using teachers, they’d be in a better position to tackle this formidable task. However #1: There really aren’t a lot of examples of exemplary technologyusing teachers in our local schools and even if there were, arranging for classroom observations would be incredibly difficult. However #2: Even if we could arrange these visits, would novice users know what to look for or how to interpret what they see? Proposed Solution: If we captured (on videotape, CD-ROM, or the Web) the good things teachers are doing with technology, we could save classroom teachers a lot of trouble trying to arrange classroom visits. We could also help users “see” both the critical beliefs and relevant classroom practices that facilitate exemplary use. Sounds logical, right? In fact, the idea sounded so logical that the Multimedia Instructional Development Center (MIDC) on campus decided to award a small, $20,000, grant to the project. Yikes! Now, I was actually going to have to do what I had described! And so, without further ado, this ambitious development journey began. Now, I consider myself a decent instructional designer and I’ve created a wide range of instructional materials, but I’d never developed software before. I had a (very) general idea of what I wanted to create, but the specifics were mainly, well, unspecified (Figure 1). Still, I didn’t feel overwhelmed by the task, at least not at first (ignorance is bliss, I suppose). I knew that I had a lot to learn, but I thought that was a good thing—I expected that this experience would increase my understanding of the development process (and the tools used to support it), and thus, in the long run, help me become a better designer. In addition, as a qualitative researcher, I was fairly comfortable with the “emergent” nature of a research and development project. I figured that if I were going to work with real teachers in real classrooms, I wasn’t going to try to script exactly what I would capture. Rather, I prepared myself to be flexible.
4
Teachers: • Description of supporting pedagogy • Explanation of lesson evolution • Reflection on lesson effectiveness
Classroom Practice 3-6 electronic cases of technology-using teachers
Students: • Projects
Classroom: • Layout • Technology Resources
Figure 1. Early conceptualization of the software content Fortunately, grant proposals require you to specify the tasks that you will accomplish as well as a timeline for their completion. Unfortunately, in my case, these were not nearly as specific as they could have been. Nevertheless, this was my starting point. I quickly learned, after hiring a halftime graduate assistant for the project (total cost = $15,000), that funds were going to be tight. Thus, I tackled this as any faculty member might tackle an underfunded project—I brainstormed ways to get free help! My overall approach to the development process was guided, at least in theory, by a rapid prototyping model (without the rapid component, of course). According to Tripp and Bichelmeyer (1990), rapid prototyping allows for greater flexibility in the formation of instruction at the early stages of development. Given my expectation that the product would “emerge” over time as ideas and content became more concrete, this seemed to offer the
5
most practical approach. In addition, I intended to solicit feedback from multiple users at numerous steps along the way. Thus, what started as only a rough idea became more and more defined during each step of the development process, as well as after each period of evaluation. Beginning with the selection of teachers; moving through the videotaping, storyboarding, and digitizing phases; and concluding with decisions regarding the “final” (and I use that word loosely) interface and navigation, I was required to be more and more specific about both the content and the approach. How did I want teachers to be able to use this software? What did I want them to be able to see and hear? What did I hope they would learn? In the description that follows, I illustrate my “qualitative” approach to multimedia development. Given the amount of flexibility afforded design efforts that occur within an academic environment (e.g., open-ended deadlines, changing team members, multiple try-out and revision cycles), I share ideas about how to harness that flexibility to achieve meaningful results. Furthermore, I offer a number of lessons learned that, hopefully, will illuminate your path, should you find yourself embarking down a similar road. As more and more designers and teacher educators take on the roles of multimedia developers, the greater the need, as well as the potential, for learning from each other. This article is designed to meet this growing need and to maximize that potential. STAGES OF ANALYSIS AND DESIGN Identifying Exemplary Technology-Using Teachers When funding was awarded in late spring, 1998, I made an immediate decision to involve my graduate students in the teacher selection process. As luck would have it, I was scheduled to teach an advanced research course during the upcoming fall semester. This would provide me with some much needed help and would allow me to complete some initial preparations during the summer term. Thus, after receiving human subjects approval, I sent letters to 358 principals of public and private schools within an hour’s driving distance of the university. Principals were asked to nominate teachers in their schools who they thought were exemplary technology users. Teachers were then given an application form, along with an informed consent letter, that they were required to complete in order to be considered for participation. By the time the fall semester began I had received applications from approximately 25 teachers.
6
Lesson #1: The Importance of Timing. Sending principals and teachers anything that requires their attention during the first few weeks of school is not good timing. I probably would have received a lot more applications had I timed this differently. However, on the plus side, I might not have been able to review many more applications. Twenty-five applicants provided a reasonable number from which to select a subset of exemplary technology-using teachers.
Designing a teacher application form required me to clarify what I was looking for in terms of teachers’ technology use. What did I mean by “successful” use? How would I know if teachers’ practices were in line with their beliefs? In the initial grant proposal, I had stated: “teachers will be interviewed to provide more detail regarding beliefs and practices about: teacher/student/technology roles, classroom organization/activities, curricular and social characteristics, and assessment practices.” On the application form, then, this became part of question #4, asking teachers to describe a successful lesson using technology (This form, as well as a description of the criteria used to select teachers, is included in Appendix A.). Following review of the application forms, each student in the research class contacted one or two teachers to arrange both observation and interview times. Each teacher was observed at least twice and interviewed at least once. As a class we created our interview questions and determined which types of technology use qualified as exemplary. This forced my students to read the literature and provided me with multiple perspectives regarding the exemplary status of our candidates. At the end of this process we identified five teachers (or sets of teachers) to feature in the software. We were now ready to begin videotaping teachers in their classrooms. Well, almost ready.
Videotaping Classroom Practice I hired a technical crew from our university’s production center to help with the videotaping. Prior to conducting videotaping sessions with our selected teachers, however, I scheduled preproduction sessions with the crew, a couple of graduate students (working for course credit), and each set of teachers. I provided the teachers with a list of the types of information I wanted to gather, as well as some of the interview questions I would be asking (Table 1). We clarified procedures for obtaining informed consent from their students as well as the students’ parents.
7
Table 1 Early Videotaping Guide (September, 1998)
Teacher Bio
School
Teacher Student
Resources Pictures
Past
Present Goals
Beliefs
Quick Facts • How long have you been teaching? • How long have you been in your current position? • What kind of technology training have you had? • What degrees have you earned? • List any honors, awards you have received • Provide relevant Web site addresses • Size • Location • Student body make-up • Picture of outside, inside (students changing classes), inside classroom Supporting Materials • Lesson plans • Assessment tools • Student products • Sample technology products (tutorials, Web pages, presentations) • Room layout • Technology resources • Teachers, students, school, classroom Teacher Interview What experiences in your past enabled you to reach the level of integration you have achieved today? • What were the “critical factors?” • What kinds of barriers have you had to overcome? • What was your motivation for persisting? • What kind of support have you received? 1) What is your goal for students in your classroom? • How does the way you organize your classroom help you achieve this goal? • How/Where does technology fit in this picture? • How/Where do you and your team instructors fit into this picture? 2) Specifically, what was your goal for today’s lesson? • How did/does technology help you reach this goal (what value does it add)? • How do you manage the variety of skills, interests, goals of the individual students? 3) What is different about what you did today and what you used to do? 1) How have your beliefs or practices evolved to support current technology uses? 2) How do you define “technology integration?” (continued on next page)
8
Table 1 (continued) Early Videotaping Guide (September, 1998) Assessment Of lesson
1) How would you categorize the lesson today, in terms of successful? • What made this “good” or “exemplary”? • What would have made it better? • How typical is this lesson that we viewed?
Of students 2) How will/did you assess students’ learning during today’s activity? • How does technology facilitate or limit the student assessment process? • How are students involved in the assessment process? Of self 3) How does technology influence your own teaching behaviors and attitudes? Future
What do you envision your classroom being like in the future? • What is your goal for technology use? • What will you do (what will it take) to make this vision a reality? • What are the challenges to using technology?
Lesson #2: Planning for Surprises. It more or less goes without saying that when you work in schools, you should expect the unexpected. Our very first videotaping was scheduled for a day that turned out to be a snow day. It would have been easier to reschedule this if we had put two dates on the calendar from the very start. We learned to be prepared for fire drills (check with the principal ahead of time), absent teachers, tired or boisterous students, equipment break downs, scheduled exam times, and so on. Also, getting students’ permissions posed some minor difficulties. Assuming that you will not get permission from everyone, make it easy to determine who can be videotaped and who cannot (students wore big red dots on their name tags if they could not be videotaped).
9
I purposefully scheduled our first videotaping session to occur in a local school. If I were going to make mistakes, I deemed it better to make them close to home. Local mistakes could be fixed more easily; a return visit would not be as difficult to arrange. For example, I quickly learned what kind of lighting and sound quality we needed, how to arrange student and teacher interviews for maximum use, as well as the types of “scenes” I needed in order to illustrate critical concepts. Of course, this became more and more clear as I visited more classrooms and particularly as I started to storyboard our content.
Lesson #3: Creative Cost-Cutting. After I received my first bill from the videotaping crew, I made a point of mentioning that I was on a shoestring budget and that I would be working hard to keep expenses low. Fortunately, they cooperated. For example, the crew allowed me to transport them in my personal vehicle as opposed to driving a university van to the videotaping site (total savings = $14/day plus .33/mile). Then, after noting the kinds of things that were handled during the pre-production meetings, they allowed me to conduct the rest of these myself (total savings = $72/hour). Depending on the particular school we were planning to tape, we were sometimes able to work with only one crew member instead of their standard two (total savings = $32-$40/ hour). As we became better at outlining what it was we wanted to capture on tape, our school visits also became more efficient.
Typically, we videotaped twice in each classroom. During our first visits we captured general footage that illustrated how the teacher and students were using technology. However, for our subsequent visits, we typically arrived with a detailed list of the kinds of shots we needed. By this point, we had storyboarded the majority of our content so it was easier to see where the holes were.
Formulating/Storyboarding Software Content Most videographers work from a script when they shoot video footage (in fact, our video consultant couldn’t fathom not having all the content written prior to videotaping). Yet, in this project, our scripts and storyboards were actually developed after our first shoots. Since much of our content was developed from teacher and student interviews, our scripts were based
10
partially on what we wanted to say and partially on what we could say, given the information we had. At best, our crew had an outline and a list of the kinds of things we wanted to capture in each classroom (Table 1). Additionally, I had visited each teacher’s classroom at least twice before videotaping, so I had a fairly good sense of what might occur on any given day. However, each school day has a rhythm and flow of its own (and visitors are known to disrupt these normal flows)—I knew that I could not control everything that would occur. So, during each shoot, I paid close attention to what was occurring in the classrooms and then directed our videographer to capture relevant scenes that would help illustrate each teacher’s technology practices.
Lesson #4: Shooting Classroom Video. I still can’t decide if this was the best way to approach videotaping or not. Given the “newness” of this project, as well as the context in which we were working, I can’t imagine having all of the scripts figured out beforehand. Perhaps, this just illustrates my lack of experience with videotaping and storyboarding. If I were to begin creating new cases today, I’d still use an outline, as opposed to a script, to guide videotaping. Yet, the outline would probably be much more detailed than the one I started with in September of 1998.
After each videotaping session, we made a log of each tape and we also transcribed all of the student and teacher interviews. We noted times at which certain activities or comments started and ended so that we could more easily locate these sections when it came time to digitize our clips (Table 2). After logging our video footage, we began the process of outlining our content and, as this became more detailed, matching specific clips to the concepts we wanted to illustrate.
11
Table 2 Sample Video Log Time 1:00 1:19 1:24
Activity Barbara taking roll (General Music 8th grade) A far view—Barbara behind the piano; taking roll Barb explaining the class objectives and handing out worksheets 1:29 Students sitting; Barbara giving directions 3:00 Barb asking students “what do you want to do?” 3:04 Lots of students around the computers 3:20 Three girls 3:36 2 girls working on HS—lots of noise in background 3:58 2 girls—spelling Baroque 4:15 4 girls at computers 4:35 Title screen—Baroque 5:01 Netscape NetCenter screen—Web search—Midi files 5:25 Two girls on net 5:33 3 students (including Cory) on HS (2 boys and 1 girl) 6:00 Cory’s screen—Fun, fun, fun 6:10 Cory’s screen—my theme song 6:29 Same 3 students—reading Barb’s feedback “original and creative” “met all requirements" 6:35-6:55 One student reading Barb’s feedback 7:03 Cory’s Theme Song 7:22 Theme Song Screen 7:45 Barb with 2 students (boys) 8:00 2 boys playing music 8:24 2 boys—improv—screen shot of Music Shop 8:43 One boy plucking out sound; we can hear music 9:14 Checkered-shirt kid—working on music 9:25 2 boys interact (one is checkered-shirt) 9:37 Barb comes over and helps 9:40 Barb helps; checkered boy smiles 10:14 Screen shot of Music shop 10:44 Close up of checkered shirt 11:00 2 girls—HS—Baroque project 11:24 2 boys interview (orange shirt); what’s unique; your job Explains what Music shop is Describes requirements for HS project 15:50 Cory, other guy, and girl—interview Cory explains what they’re doing with the keyboards 19:33 Cory demos his HS project 20:00 Theme song project 20:58 2 students (checkered shirt) 21:12 Other 2 boys in background jamming 21:18 2 boys improvising; jamming 21:40 1 boy improvising
12
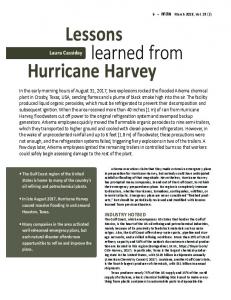
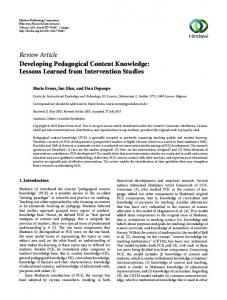
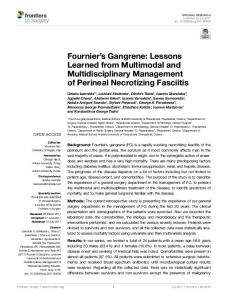
We began with a simple content outline (Figure 2), indicating the main topics we planned to address on the CD-ROM. Following this, we built a very simple prototype, using HyperStudio, to help us think about navigational features (Figure 3). To create our first storyboards, we identified relevant interview clips and then classified them by topic, according to our outline (e.g., Guiding vision, Classroom organization). Once we had identified the primary audio content, we then looked for the appropriate kinds and amount of video to illustrate the specific audio segments (Figure 4). On average, each storyboard (one per major topic) went through 8-10 iterations. About this same time, we also wrote and recorded narration that would tie all of the sections together and that would describe the underlying metaphor we planned to use (i.e., VisionQuest: Teachers’ Journeys toward Technology Integration). OUTLINE - CASE: Westlane, Draft 1 June 3, 1999 1. General Music - Welcome screen Quick facts Teachers School Students Class 2. Teachers story A. Teachers Journey 1) Guiding vision * Pedagogical vision * Technology vision 2) Getting started 3) Road blocks(barriers) * Resources * Support * Time 4) Rewards * Personal * Professional B. Implementation 1) Roles * Teacher * Student * Technology 2) Classroom organization * Activity structure * Grouping strategies * Sample lesson plans 3) Curricular emphasis * Lesson goals * Depth vs. Breadth * Thematic vs. Content C. Assessment * Teacher check points * Student check points * Assessment tools/Sample student products
Figure 2. Early content outline of the Westlane Middle School case 13
Figure 3. Simple prototype depicting how to navigate through VisionQuest
14
VISUAL PART
AUDIO PART
Need some visuals here for the Intro
Intro to grouping strategies: Classroom organization is reflected in the way students work, individually or in groups, to complete the various tasks. Allowing students to work in pairs, or on teams, impacts the learning process as well as learning outcomes. (needs to be recorded)
TEXT: In Barbara’s classroom students typically choose to work in pairs or in small groups, although some activities are completed individually. Students move easily between activities and among groups. Talking head st-choiceCCC
17:48 S4: We picked our groups, we had a choice, our group chose classical.
Talking head 26:20 One girl working on two computers st-working2C
36:46 – 37:04 cl-unique4 S7: Also its more than independent -like you can work with groups and you don’t really have to sit together in your classroom, just go at your own place and do what you feel is what you should be doing. And it’s a lot easier that way, because you don’t feel as much stress in the classroom and assignments.
Movie 1 TEXT: Most students feel a responsibility to their other group members to do a good job on their part of a shared project.
37:39 st-groups S6: If you are working in a group, you all have to give all that you can, or the project will just not work out, you have to give everything you have to get the assignment right.
Talking head 2 girls on HS—3:53-5:34 st-working3C
(continued on next page)
15
TEXT: Barbara looks for ways to group students so that everyone benefits. Talking head
55:00 – 55:14 t-st-ability B: The management of the range of skills – I tried to put the ones who have been in music classes with the ones who haven’t, when I pair them up. I always like to do things in pairs and groups. To put them together like that really helps, they help each other that way.
21:00-21:15 Two boys on keyboardS st-working4C
TEXT: Having a loosely structured classroom organization can lead to some important management issues. 55:45 – 56:20 t-improvement B: I think the improvement of the lessons, I think has to do with my management skills, specially the communications skills class. They are – I feel like I’m herding sheep sometimes, to get them together to even show them anything and they don’t listen. I think just my whole management of that class – nobody ever gave me a guide or a curriculum guide to teach this, so I’m just – this is my first year doing this – I’m just planning it as I go. I think I will be better next year. I have learned a lot.
Talking head
st-herdingC
st-inquiryC
Talking head
53:42 – 54:00 t-challenge B: (Headaches, eye strain, also) There is a lot of chaos in my classroom at times and that’s just acceptance of the chaos, that sometimes it has to be chaotic and that’s difficult at times, especially when I’m going “eeee,” you know, Middle school kids can be very loud as you have heard today.
1:30 kids coming incl-chaos (?)
Figure 4. Early storyboard from the classroom organization component of the Westlane Middle School case
16
STAGES OF DEVELOPMENT Creating Video Case Examples—Digitizing, Composing, Exporting, and Compressing Video We digitized video clips identified on our storyboards and then created a timeline for each storyboard, using Adobe Premier. Timelining is part of the composition process and involves matching digitized audio clips with appropriate video clips, still images, and digital pictures, and then adding transitions so that each segment is structured as a relatively self-contained “movie,” illustrating a specific concept. Within each timeline there were multiple movies that were exported and then compressed. Each movie eventually appeared as a single QuickTime movie on one of our CD-ROM pages. All told, we exported a total of 145 movies. For example, from the storyboards in Figure 4, we exported 4 movies (not counting the introduction), one for each “chunk” of content in the figure.
Lesson #5: Creating and Managing Digital Files. We made a number of mistakes during our initial digitizing efforts. For example, on our first case, we didn’t pay much attention to the elapsed time of our audio clips. Thus, when we started digitizing video, we captured much more than we needed. This was not very efficient—on later cases, we had a much better idea of how much video we needed, so we didn’t digitize a whole lot of extra footage “just in case.” Furthermore, we used a single project timeline for the entire first case, rather than starting new timelines for each major component of the outline. This led to a huge project file that became unwieldy every time we needed to make a simple change. For other cases, we started a new project timeline for each storyboard (Guiding vision, incentives, and barriers, etc.).
Other difficulties related to file management—as the number of files grew, we encountered issues related to file naming conventions. Since we had not formalized naming conventions ahead of time, each digitizer developed his/ her own approach. Whereas one person created names based on the location in the timeline, another person developed an elaborate coding system that no one else could understand. Needless to say, this caused problems later, especially when personnel changed. Prior to exporting movies, however, we standardized our naming conventions, using our content outline as the basis. In addition, we continued to streamline our naming conventions as the project grew and the number of files increased.
17
With today’s new digital video cameras, the steps involved in digitizing may now be unnecessary. However, digitizing video is not difficult and it has one distinct advantage: it necessitates determining which segments of your videotape are worthwhile and which are not. If everything comes in digitized, the hard work still remains—deciding which segments you are going to combine with which other segments to illustrate your ideas. In addition, digitized video requires hard drive storage space—something that quickly gets eaten up. Digitized media are real memory hogs. A single, uncompressed video clip can use 200-300 megabytes of space, or more. We quickly used up all of the memory space (approximately 25 GB) allocated by the multimedia center. Yet, we didn’t want to throw clips away, or store them in ways that were not readily accessible, since we were still making changes as our storyboards improved and our cases became more streamlined. Although we found some ways to make smaller movies—using digital pictures and video stills as opposed to live action—this was really a small gain compared to our overall needs.
Lesson # 6: Leaving Room to Grow. I had not adequately understood, or planned for, the huge amounts of storage space I would need. About a year and a half into the project, I finally bought 2 hard drives, each capable of holding 37 gigabytes of data. And although this helped, it was still not enough! Not only did I need to store the raw digitized clips, but also the exported movies, and the compressed movies. Plus, I wanted to be sure I had a backup of each. I borrowed a couple of other hard drives that could hold an additional 34 gigs of data. Eventually, as the project neared completion, we moved the exported and compressed movies to CD-ROM, requiring a total of 45 CD-ROMs! Some exported movies were so big that only 2-3 clips could fit on a single CDROM. The biggest lesson learned from all of this was to estimate (and budget for) space needs appropriately (and then—triple your estimate)!
Designing the Interface Two of the biggest challenges we faced in this project related to designing our interface and structuring our navigation to achieve a user-friendly design. From the very beginning, we decided to use a web interface so that the CD-ROM materials could be migrated to the Web after video capabilities
18
improved. Initially, we considered creating our materials in Macromedia Director but decided it was too difficult, given our current skill levels (novice-beginner levels). In consultation with the MIDC production staff, we considered other authoring tools including PowerPoint, Flash, Dreamweaver, and Adobe GoLive. Knowing that my expertise did not lie in the production area, the MIDC staff offered to create a shell, using Flash 4.0, for our first case, which would then allow us to plug in the appropriate media for the case and subsequently apply the same shell to the other two cases. This seemed to offer an efficient option for jump-starting our faltering development process. Unfortunately, software constraints within Flash 4.0 prevented us from loading all the video that we wanted to use in it. At this point, then, we switched to another web authoring tool (GoLive) that allowed us to effectively combine text, audio, and video components within a single page. Small animated segments, primarily introductory sequences, were created with Flash and then embedded within the web pages. With a seminar presentation rapidly approaching, we purchased a background image from a commercial web site and thus, based on the selected graphic, managed to finalize our underlying metaphor and adopt a color scheme. Following this first small, but successful, demonstration of our product, the development center indicated that it could no longer continue to provide such a high level of support (even though the case “shell” was still far from complete). Knowing that my resources were limited, I posted a message on the listserv of the university’s technical graphics program area, soliciting help from interested undergraduates. Fortunately, I was able to hire an advanced undergraduate student, with work-study status, to help with some immediate development needs. Thus, for a very small cost, I gained some much needed technical expertise. In addition, this student continued to work on the project until he graduated two years later. In a winwin fashion, both parties gained from this collaborative effort. We created a number of early versions of the interface using GoLive. However, when the second author came on board, about six months after the development of the first prototype, he successfully argued for switching to Dreamweaver. At this point, it was fairly clear that Macromedia Dreamweaver was becoming the industry standard. It was also clear that our navigation was still very primitive and required major adjustments. Since we were faced with making numerous changes anyway, we decided to begin
19
(anew) with the authoring tool that we believed could best see us through to the end.
Lesson # 7: Capitalizing on Design and Development Flexibility. Development in an academic setting provides unique opportunities for being flexible. If managed appropriately, this flexibility can enable a strong focus on product improvement based on multiple stages of formative evaluation. Flexibility in this project enabled us to author more than one prototype and to consider the strengths and limitations of the different development tools. Flexibility also allowed us to work with multiple development teams, both professional (MIDC) and amateur (students). Given our need to include more student designers after MIDC decreased their level of support, flexibility allowed us to switch tools based on the specific skills students were learning in our courses. However, as described later, conference deadlines and other strategies were used to prevent this flexibility from getting out of hand.
Developing the Navigation We made navigation decisions throughout all of the design stages. As we outlined our content, we considered how users might access the different cases, as well how they would navigate through the various themes. We created simple prototypes, first on 6 x 9 index cards, then in HyperStudio (Figure 3), in order to conceptualize how users would access our materials. Early prototypes were built to demonstrate the functionality of one complete theme (e.g., classroom organization) across all three cases, as opposed to demonstrating a single case across all themes. This allowed us to illustrate the potential of the product to stimulate users’ reflections on the similarities and differences across cases. It also allowed us to show “something” without having everything (or much at all, as was true in the early stages) completed. This allowed us to pilot the product at conferences and to use it with different groups of target learners to gain valuable feedback throughout the development process. Developing a navigational interface that is easy to use depends on providing clues to users about (a) where they are in the program, (b) how to return to previous locations, and (c) how to move to new locations (Nielsen, 1999).
20
We tried to avoid burying the user in lots of unnecessary layers or requiring extra mouse clicks in order to move around (e.g., going back to main menus in order to jump across cases). This led to the development of both top and bottom navigational bars as illustrated in Figure 5. The top bar indicated where learners were through the use of bread crumbs, and provided easy access to an index (!) and a help section (?). In addition, users could exit at any time, using a quit option (⌧) and if using a live browser could e-mail comments to the designers ("). The bottom bar allowed users to choose a different case or subtheme within a theme, as well as to move ahead to different pages within a subtheme. Finally, based on suggestions by Evans and Edwards (1999), the middle frame was reserved for instructional content—typically comprised of a QuickTime movie on the right side and text on the left.
Figure 5. Screen shot of sample page, illustrating top and bottom navigation bars In an effort to maximize the screen real estate, we decided to program the navigation interface in Flash. A programmer from the multimedia development center expressed interest in working with us and so we contracted with him to create the navigation. Unfortunately, he was just learning Flash (still, he knew more than most of us) and had little experience with interface
21
design. Furthermore, he was developing the navigation interface as others were determining the functionality needed in the interface. Therefore, he would create a prototype, and then we would all meet to discuss what we liked and didn’t. Simple issues such as button activation (e.g., a single click or roll-over) were easy to program, yet design decisions such as these were not trivial. The programmer did not embrace the flexible approach that we had become accustomed to. After delivering what he considered to be his final product, he left the development team, leaving revisions to be made by other team members. However, the programming logic was hard to follow and we received no programmer comments, thus making revisions extremely hard to complete. Changes were finally made and the code cleaned up through great effort by remaining team members. As might be expected, we determined that there were easier ways to code the navigation features that we needed. As they say, hindsight is always 20/20!
STAGES OF EVALUATION One of the characteristics of rapid prototyping is the involvement of the end-user, or costumer, at multiple stages throughout the design and development process (Jones & Richey, 2000). True to this concept, we continually gathered input during the development process from both preand inservice teachers, as well as teacher educators and K-12 personnel, including principals and technology coordinators. We first gathered feedback about our proposed idea: we asked colleagues, as well as our teacher applicants, about the worthiness of the idea of creating cases of exemplary technology using teachers. No one tried to discourage us! As soon as we had a working prototype, we conducted one-on-one evaluations with both preservice and inservice teachers to gather feedback on both the design of the CD, as well as on proposed learning activities. We took our prototype on the road and conducted small group evaluations by gathering input from multiple sets of conference participants who attended our demonstration sessions. The most frequently asked question was “how soon will it be done?” although some participants asked us to create more cases and to consider including a wider audience (e.g., administrators, higher education faculty, etc.).
22
Lesson # 8: Finalizing Flexibility. Impending deadlines posed by conference presentations can provide a tremendous motivator for continuing to work (and make progress) on long-term projects such as these. Using a scheduled conference presentation as our most immediate deadline, we would identify the specific components of the project that we wished to have completed by that time. Then, working backwards, we’d map out the needed tasks and determine if our goals were realistic. Typically, we experienced a great burst of energy a month or so before every conference. And although we were exhausted by the time we actually demonstrated our product, we returned home feeling exhilarated due to the positive responses received from so many conference attendees. This translated into additional satisfaction as well as motivation to continue. Although the deadlines always seemed to make us crazy beforehand, without them, this project surely would have floundered and died.
Finally, as completion of the software neared, but before we were “married” to our interface and navigational design, we conducted two classroom field trials—one with a multi-section class of undergraduate education students (n = 125) and one with a group of inservice teachers (n = 13). We collected information about usability and examined learning outcomes as evidenced by students’ written responses to guiding questions. In both cases, the software was used as it was intended; that is, students explored the cases individually and reflected on similarities and differences across cases. Based on feedback received, we made changes to our design: we added additional navigational cues to help learners know where they were; added index, help, and quit buttons; and cleaned up some video problems. In general, we have been pleased with students’ responses to the cases, both in the number and quality of ideas that appear to be prompted by their exploration of the video examples. Users have indicated that the video examples are both relevant and realistic, giving users a sense of being in real classrooms.
Soliciting and Building on Student Help Given the limited amount of funds available to support the completion of this project, we identified multiple ways to “hire” both undergraduate and graduate students for course credit. We believed that this provided a winwin solution to our problem: students gained real-world experiences working
23
on a complex multimedia development project while we benefited from their growing technical expertise and the increased number of hours they were able to devote to the project. We began by modifying two existing courses to take advantage of this opportunity. Both courses (e.g., Production of Web-based Instructional Materials, Research in Educational Technology) already included a hands-on component; we merely focused on this project instead of other possible projects. For example, students in the advanced research course typically design and conduct an actual research study. One semester, then, students in this course applied research-based criteria to select the participating teachers. Two years later, students in the same course conducted the formative field trial with a group of preservice teachers. In the introductory production course students typically create projects using Dreamweaver, Flash, and Fireworks. Students were invited (but not required) to identify small pieces of the CD-ROM (e.g., the navigational help section, the introduction) that they wished to develop for their course requirements. In the advanced production course, students took on the role of project managers, directing and guiding a group of introductory students working on the small development projects. In addition to these existing courses, we also offered practicum and intern opportunities to our own students, as well as students in the technical graphics area. As the project became better known, students signed up for independent study credit in order to gain real-world design experiences. It was not unusual to have three to four independent studies in progress each semester. Lesson #9: Addressing Both Project and Student Goals. Bringing new students on-board each semester has both advantages and disadvantages. While you’re always bringing someone up to speed, the enthusiasm that students shared with each other was very contagious and as a result, a lot of student-to-student mentoring occurred. We made a point of hosting an orientation session at the start of each semester, usually with lots of food, to provide a warm welcome and put new team members at ease. Students divided themselves into design and development teams, depending on their particular interests and goals, and then team leaders were selected to lead each specific effort. Team leaders met weekly with the project directors and project manager to provide updates and to brainstorm solutions to current problems. While it took time to acclimate new students to the project, it also forced us to develop more effective communication tools (outlines, flowcharts, image maps) to accurately depict the project content. These tools, then, became useful aids during professional meetings and conferences, and eventually may become part of a well-designed marketing plan. But then, that’s another story that will have to wait to be told! 24
CONCLUSION As teachers continue to struggle to integrate technology within their classrooms, educators are noting the strong potential of multimedia cases to help teachers gain competence and confidence for using technology in their classrooms (Albion & Gibson, 2000). Within the last several years, alone, a number of video and CD-ROM cases have made their way onto the Web and into inservice teacher development programs (North Central Regional Educational Laboratory, 1997-1998; University of Northern Iowa, 2000). As these types of programs continue to increase, many designers and teacher educators may find themselves facing a myriad of development issues, not previously experienced. Software development is not a path that should be embarked upon lightly, at least not without some idea of the types of pitfalls you are likely to encounter. Furthermore, when development is undertaken within an academic environment, the flexibility afforded to the development effort can be both empowering and debilitating. It is our hope that the design and development process described here will inform others who find themselves heading down similar paths, and with luck, maybe even prevent one or two problems from occurring at all.
References Albion, P.R., & Gibson, I.W. (2000). Problem-based learning as a multimedia design framework in teacher education. Journal of Technology and Teacher Education, 8(4), 315-326. Evans, C., & Edwards, M. (1999). Navigational interface design for multimedia courses. Journal of Computers in Mathematics and Science Teaching, 8(2), 151-174. Jones, T.S., & Richey, R.C. (2000). Rapid prototyping methodology in action: A developmental study. Educational Technology Research and Development, 48(2), 63-80. Nielsen, J. (1999). Designing Web usability. Indianapolis, IN: New Riders. North Central Regional Educational Laboratory (1997-1998). Learning with technology: Captured wisdom CD-ROM library. Retrieved from the World Wide Web January 30, 2001 from: http://www.nrel.org/cw/ Tripp, S., & Bichelmeyer, B. (1990). Rapid prototyping: An alternative instructional design strategy. Educational Technology Research and Development, 38(1), 31-44. University of Northern Iowa. (2000). InTime: Integrating new technologies into the methods of education: A PT3 catalyst grant. Retrieved from the World Wide Web January 30, 2001 from: http://www.intime.uni.edu
25
Appendix A Application Form for Identifying Exemplary Technology-Using Teachers (including criteria for selection in italics) Name:
School:
City: School Phone:
Fax:
Home Phone: Grade Level:
E-mail:
Content Area (if applicable):
Please answer the following questions as accurately and honestly as possible. You may use extra paper if you wish to elaborate on any response. 1. Describe your available technology resources. (e.g., number/type of computers and peripherals; where located; support personnel) This item will help us identify teachers with high, medium, and low levels of resources. Our final pool will include teachers representing each of these levels. 2.
Describe your professional uses of technology.
We will look for teachers who go beyond using technology for basic tasks (preparing materials for student use, communicating with parents), to include more of the following: exchanging ideas, experiences, and curricular materials with peers; consulting with experts; accessing remote databases and acquiring software over the Internet; furthering their own knowledge and professional capabilities. 3. Describe your instructional uses of technology (include names of relevant software). We will look for teachers whose students are using application (e.g., word processors, databases) authoring (HyperStudio, PageMill), and/or communication software (e-mail, web browsers) in the context of substantial authentic tasks, as opposed to “isolated” uses of instructional games, tutorials, or integrated learning systems. 4. Describe an example of a “successful” use of technology in your classroom. Include information about the roles you, your students, and the technology played, how students were grouped, the goal of the activity, its relevance to the curriculum, and the manner in which you assessed outcomes.
26
First of all, this item allows us to view “successful use” from the teacher’s point of view and can provide valuable insights into teachers’ technology goals. Second, the specific information that teachers include will help us determine the extent to which their practice incorporates the characteristics of an integrated classroom environment described in the literature. We will look for teachers whose descriptions include characteristics that are primarily representative of constructivist classroom practices. 5. Assuming no constraints, describe your vision of a wholly integrated classroom. Teachers should go beyond a description of equipment to describe how technology will be used to facilitate student-initiated projects, inquiries, explorations, and problem-solving activities. We will look for teachers who acknowledge the power of technology to expand and extend the curriculum to create more and different ways for students to represent knowledge and to communicate their representations to others.
27