5 Dec 2003 ... Moodle Course Management System 2. Abstract. Online education is on the
horizon for many public school districts. The Winfield.
In the Create Part dialog box (shown above) name the part and select a. Axisymmetric b. Deformable c. Shell d. Approximate size = 0.2. 4. Create the geometry ...
MATLAB. Tutorial Course. 1 ... Fuzzy Logic Toolbox. ▫ Control Toolbox ... Any
MATLAB expression can be entered as a matrix element. • Matrices must be ...
Moodle: Discover Open Source. Course Management Software for. Medical
Education. Serkan Toy, Ph.D. Children's Mercy Hospital. University of Missouri ...
Nov 27, 2018 - last semester, has its contents fully structured in Moodle, but carried out in the classroom, with the .... Congresso de Graduação da USP (pp.
Dept. of Business and Agricultural Informatics, University of Debrecen, Centre of Agricultural Sciences and .... available for importing Moodle quiz questions.
The way files are handled in Moodle 2 has changed from earlier versions. In
Moodle 1.9 ... two links to add files: Upload a file and Recent files. Upload a file ...
Introducing Lagrange multipliers Ïab to enforce the orthogonality con- straints [Burges, 2004], in order to minimize the reconstruction error we must maximize.
ey, an ESOL instructor from the Columbus Preparatory & Fitness Academy and Tolles Career & Tech- ... (CALL), sociolinguistics, and discourse analysis. ... In general, our schools do a good job of teaching students the Five Big Ideas of Beginning ....
Portal elearning kini banyak dikembangkan dengan menggunakan LMS ...
bagian 2 ini akan dijelaskan cara membuat Quiz, tugas (assignment), forum
diskusi dan .... website Moodle dan sumber-sumber lainnya agar dapat
memanfaatkan ...
Learning Management System (LMS). BUILDING YOUR COURSE WITH
MOODLE. TRAINING MANUAL LEVEL I. Louisiana Tech University. Wyly Tower
1014.
May 1, 2005 ... PSCAD/EMTDC Transients Simulation Workshop ... 2) Simple hands on tutorial
to develop a simulation case in PSCAD/EMTDC. 3) Discussion ...
Note Both authors are English teachers, one of whom has a certificate in nursing.
Title. Oxford English for Careers: Nursing. Oxford English for Careers: Nursing.
AbstractâThis work describes the impact of different teachers' approaches in using Moodle, for supporting their courses, at the Polytechnic of Porto - School of ...
This guide will prepare you to use Moodle, MCNY's Course Management System
. Professors may ask you to visit this system in order to access lecture notes, ...
22 Mar 2007 ... Moodle Course Management. Systems (CMS). Presentation to M.Ed. Program.
Helen Mongan-Rallis & Shelly McCauley. Jugovich. March 22 ...
Pengembangan Course Elearning berbasis Moodle (Part 1). BAB IV. .....
menaruh file-file dan aplikasi e-learning sehingga dapat diakses melalui Internet.
Moodle is provided freely as Open Source software ... exported into a Moodle XML file, which can ... slides into Open Office to create the final Flash movie.
Apr 6, 2003 - Management System (CMS), Moodle. It helps the students at undergraduate level in learning introductory DSP and experimenting with its basic ...
My Email S. My Email Settings. Email Address: Email Provider: Incoming Mail Se.
Incoming Mail Server Settings. Account type: POP [ ] IMAP [ ]. Incoming server:.
last few years LMS Moodle imposed itself as the best solution, and is becoming one of ..... management module, helpdesk module, online grading tools, students ...
LMS SECURITY VULNERABILITIES. Learning management systems are client/server web applications that, among rest, manage user requests coming.
a. Name the step, set the procedure to âGeneralâ, select âDynamic,. Explicitâ, and click âContinueâ¦â b. On the âEdit Stepâ page under the âBasicâ tab, set the time.
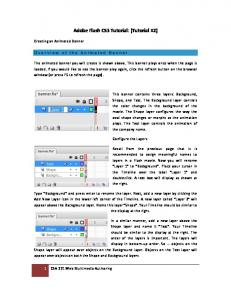
1 CSA 221 Web Multimedia Authoring. Adobe Flash CS3 Tutorial: (Tutorial #2).
Creating an Animated Banner. Overview of the Animated Banner. The animated ...
Page 1 of 4. LATTC Faculty Technology Training Tutorial. Moodle 2 Course
Settings. This tutorial begins with the instructor already logged into Moodle.
LATTC Faculty Technology Training Tutorial
Moodle 2 Course Settings This tutorial begins with the instructor already logged into Moodle. http://moodle.lattc.edu Faculty login = same as email login.
The navigation menu is shown to the left with options to click on Site Pages, My Profile and My courses. When you click on My Courses, the courses to which you are enrolled as student, non-editing teacher or teacher will be displayed. Clicking on the links will display items lower in the structure and clicking on it a second time collapses the list.
a)
b)
The upper right corner of the navigation menu has a central bar that divides the hide/show option on the left and the command to dock the menu on the right. Notice the difference between image a) and b) to the left. Image a) has a minus sign and matches the Navigation menu image above it. That indicates the Navigation menu displays items. Clicking on the minus sign hides the list of items and the right corner turns to a + sign. See image c) for two collapsed menus.
1.
Page 1 of 4
Each of the menus that appear on the left and right of the center primary Moodle window operate in the same fashion.
Locate the My Courses in the Navigation box after you log into Moodle and click on it to reveal your courses. Go to the courses with list your class and name but no section number. These are the courses that were transferred from Moodle 1. If you change those settings, you won’t have to do it later when you import the content for the new term. Scroll below the navigation menu or collapse it so you can see the Settings menu. Click on EDIT SETTINGS link.
The top three options are the course full name, short name and ID number. Faculty should verify the Full name is correct for that section. The short course name and the ID number CANNOT be changed. Doing so will cause problems with uploading students into your class. The course summary is information which will appear to the students without being enrolled in the course. There are three icons that appear next to the course listing in Moodle: The first icon indicates guests are allowed. The second indicates an enrollment key is required. The third is a link to the course summary which is part of the course settings menu options. Faculty can link to files such as a course syllabus or the online textbook purchase. Sample course showing all three icons: The next three options are course organization format, number of weeks/topics, and start date. Faculty use the Format drop down window to change from Weekly format where the dates automatically appear at the top of each segment or to Topics format and dates can be manually put in place. There are advantages to each format. An Page 2 of 4
instructor needs to decide which best fits their style and if the class is taught in varying lengths of time for fall/winter/summer sessions. The course start date should be correctly set when the term shell is made, but if a change is made after that, the instructor can manually change the date here. The area where the master course content is stored doesn’t need to have correct dates. The hidden sections drop down menu allows the instructor to make hidden sections completely invisible or to show them as unavailable. The number of news items to show relates to the news forum and to RSS feeds that you might bring into your Moodle classroom and show along the side. If you set it to “0” the news forum won’t even show. Most faculty leave the next two setting options as they appear in their default set. It is good for the students to see their grade book. Students can also be allowed to see their own activity reports if you wish. Maximum upload file size for the course is set here. Each activity can also set a maximum file size upload. Allowing larger files than needed increases the download time of the instructor and increases the chance of getting a virus. Be realistic if you change this. The default is to not allow guest access. If you change this to YES and do not set a key, anyone, including the search robots on the web can get in and index your content. This password is ONLY for guest access. To set a password for your class first click the UNMASK box and then add the password. You can’t enter the password unless the UNMASK box is checked. The groups option is turned on or off here. Groups will be discussed in a later tutorial.
Page 3 of 4
The availability drop down menu makes the course available to students or makes it unavailable. When the instructor makes the course unavailable, it does not appear under the “My Courses” list when a student logs in. Some students believe this means they were dropped. When possible, faculty should close sections but leave the course available to students and the top unit should contain basic information files such as course syllabus.
Note: all new course shell are NOT AVAILABLE to students when created. Teachers must change this at the start of the term. NEW TO MOODLE 2 – SET STUDENT PROGRESS
1. Select Enabled, control via completion and activity settings from the pulldown menu. 2. No Check in the box next to Completion tracking begins on enrollment. The rest of the setting options are normally left unchanged and the changes are saved using the Save Changes button. This concludes the Moodle Course Settings tutorial.