Multisim Tutorial on Principles of Electrical Engineering II Lab ... - ECE
Recommend Documents
Digital Logic Design. CSE-241. Muhammad Usman Arif. ZERO LAB (MULTISIM
TUTORIAL). Figure 1. 1. Open/Create Schematic. A blank schematic Circuit 1 is ...
1. 14:332:223 Principles of Electrical Engineering II. Instructions for using NI
Circuit Design. Lei Lin. January 21, 2009. Overview. This tutorial leads you
through ...
Introduction to Multisim: Learn to Capture and Simulate in Less Than 30 ... This
tutorial takes less than 30 minutes to complete and consists of 50 short steps.
Jan 11, 2010 ... a companion laboratory for ECE 262, Electric Circuits II. January ... This
laboratory manual is based on a compilation of laboratory experiments originally
devised ..... AC power (real and reactive, instantaneous and average).
Irwin and Nelms, Basic Engineering Circuit Analysis, 9th or 10th Edition. General
Learning Objectives (CEAB Graduate Attributes). Knowledge Base 3/1 ...
ECE 559 Lab Tutorial 2 ..... Upon completion of this tutorial, you should be able to
: ...... Its integration with PrimeTime (that is a gate-level critical path finder and ...
Wearing a ring or watch can be hazardous in an electrical lab since such items ...
Never operate the black circuit breakers on the main and branch circuit panels.
Tutorial. Multisim Electronics Workbench is available in several different versions
including a professional version, a demo version, a student version, and a ...
1. School of Engineering. Department of Electrical and Computer Engineering.
332:223 Principles of Electrical Engineering I Laboratory. Experiment # 5.
Total ECE Graduate Enrollment by Degree for Fall 2016 .... North Carolina State University researchers in ECE and Comput
Lab 3: Multisim & Ultiboard. INTRODUCTION. Multisim is a schematic capture
and simulation application that assists you in carrying out the major steps in the ...
Mar 6, 2006 ... Electronics Workbench's MultiSim is a circuit simulation platform, similar to other
... In this tutorial we focus on MultiSim9, the circuit simulation.
Department of Electrical and Computer Engineering ... Tutorial on SystemC
modeling using CoCentric Studio. 1. ... You will see Window as shown in Figure 1
.
Altera Quartus II Tutorial. ECE 552. Quartus II by Altera is a PLD Design Software
which is suitable for high-density Field-Programmable. Gate Array (FPGA) ...
Each question is followed by 4 answer choices. 01' these. you have ... Paper
Code. Moi-k Paper .... frequencies of e RLC eerice circuit and to ie the frequency
at ...
SPICE / MultiSim Tutorial. 1. Introduction. Cellular phones and computers are just
two examples of some of today's extremely complex electronic systems.
Department of Electrical Engineering. EE281. Introduction to MATLAB on the
Region IV Computing Facilities. 1 What is Matlab? Matlab is a high-performance
...
May 29, 2009 ... Al Hero –IEEE Board of Directors for Signals and Systems, awarded ... Research:
power systems and analysis of nonlinear (hybrid) systems, in.
ECE 340 - Electrical Engineering Fundamentals ... Home Page: http://www.csun.
edu/~jaf35230. Prerequisite: ECE 240 (with C- or better). Textbook: Sedra, A.
Content: This course is meant to accompany ECE 3551 as an introduction to
control ... compensation, proportional-integral-derivative (PID) and state-space
feedback control. ... Groups: Each lab group will be made up of two students. ...
Disability
experience in analog and digital communication systems. For the first part of ...
The manual for the lab exercises will be available in pdf format on. Blackboard.
Multisim Tutorial on Principles of Electrical Engineering II Lab ... - ECE
on Principles of Electrical Engineering II Lab Experiment 2: Frequency Response
of Filters. By Gang Liu. 4.1 Low Pass Filter. Schematic is below: Schematic ...
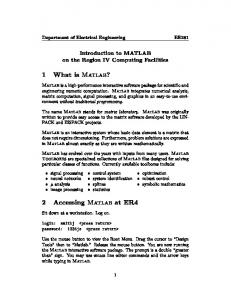
Multisim Tutorial on Principles of Electrical Engineering II Lab Experiment 2: Frequency Response of Filters By Gang Liu
4.1 Low Pass Filter Schematic is below:
Schematic Capture _____________________________________ Complete the following step to launch Multisim: 1. Select Start»All Programs»National Instruments»Circuit Design Suite 10.1»Multisim 10.1. A blank file opens on the workspace called Circuit1. Complete the following steps to save the file with a new name: 1. Select File»Save As to display a standard Windows Save dialog. 2. Navigate to the location where you wish the file to reside, enter ‘PEEII_2_LPF’ as the filename, and click the Save button. Complete the following steps to start placing components: 1. Open PEEII_2_LPF.ms10 as described above. 2. Select Place»Component to display the Select a Component browser, navigate to the 741 OP AMP display as shown below and click OK. The component appears as a “ghost” on the cursor.
3. Move the cursor to the middle-right of the workspace and left-click to place the component. Note that the Reference Designator for this component is “U1.” 4. Place the remaining components in the LPF area as shown below. Note: since there is no ‘-VCC’ available in Multisim, battery is used instead. Complete the following steps to wire the circuit: 1. Click on a pin on a component to start the connection (your pointer turns into a crosshair) and move the mouse. A wire appears, attached to your cursor. 2. Click on a pin on the second component to finish the connection. Multisim automatically places the wire, which conveniently snaps to an appropriate configuration, as shown below. This feature saves a great deal of time when wiring large circuits. 3. You can also control the flow of the wire by clicking on points as you move the mouse. Each click “fixes” the wire to that point.
C2 100nF VCC 15V 7
V1 1 Vpk 1kHz 0°
R1
R2
2.2kΩ 5%
2.2kΩ 5%
1
5
U1
3 6 2
C1 51nF
741
4
V2 -15 V
Simulation _____________________________________ 1. Select Simulate»Instruments»Oscilloscope to place the oscilloscope on the workspace. Wire the instrument as shown in step 4. XSC1 Ext T rig + _ B
A +
_
+
_
C2 100nF VCC 15V 7
V1 1 Vpk 1kHz 0°
R1
R2
2.2kΩ 5%
2.2kΩ 5%
1
5
U1
3 6 2
C1 51nF
741
4
V2 -15 V
3. Double-click on the scope’s icon to show the instrument face. Select Simulate»Run. The output of the OP_AMP appears on the scope. 4. Adjust the Timebase to 1mS/Div and Channel A and B’s Scale to 1V/Div, Y position to -1. You will see the following displayed on the scope.
Analysis _____________________________________ In this section, you will use AC Analysis to verify the frequency response of the amplifier. Complete the following steps to perform an AC Analysis at the output of the OP_AMP: 1. Double-click on the wire that is attached to pin 6 of the opamp, and change the net name to OUTPUT in the Net dialog box. 2. Select Simulate»Analyses»AC Analysis and click on the Output tab.
3. Highlight V(analog_out) in the left column and click Add. V(output) moves to the right column.
4. Click Simulate. The results of the analysis appear in the Grapher.
The Grapher _____________________________________ The Grapher is a multi-purpose display tool that lets you view, adjust, save and export graphs and charts. It is used to display the results of all Multisim analyses in graphs and charts and a graph of traces for some instruments (for example, the results of the oscilloscope). Complete the following steps to view results of a simulation on the Grapher: 1. Run the simulation as described earlier. 2. Select View»Grapher.