OCR Unit 21 – AO5 – Creating Web Banners in Adobe Flash CS3
Recommend Documents
de compresión y descompresión de voz tiene licencia de Nellymoser, Inc. (www.
nellymoser.com) Flash CS3 utiliza tecnología de vídeo de On2 TrueMotion.
Adobe Flash CS3 Classroom in a Book ..... For video tutorials about ActionScript
3.0, the Flash workflow ... Tutorial videos are also included on the Adobe Flash.
This tutorial is an introduction to Adobe Flash CS3 and will demonstrate the basic
Flash tools and concepts with a step by step guide to creating an animated ...
ADOBE FLASH CS3. Creating a looping background. Backgrounds are vital to
most scenes in flash animations. They quickly help locate the viewer in a ...
OCR 2010. 1. Unit Title: Adobe visual communication using Photoshop. OCR unit
number. A220. Sector unit number. 9.3. Level: 2. Credit value: 3.
KEGIATAN 6 : Membuat Animasi dengan Masking dan Path . .... pengajar/guru
modul Pembuatan Animasi dengan Adobe Flash CS3 Professional ini ditulis.
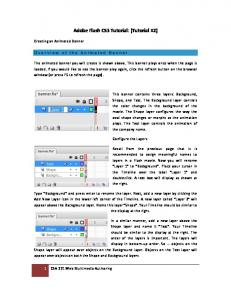
1 CSA 221 Web Multimedia Authoring. Adobe Flash CS3 Tutorial: (Tutorial #2).
Creating an Animated Banner. Overview of the Animated Banner. The animated ...
Steven Collins, Rebecca Palomba, Tiffany Vrcic. Creating a Banner with Adobe
Photoshop CS3. Upon the completion of the following instructions, the reader ...
23 Sep 2007 ... This tutorial will provide a basic introduction to creating a graphic left side ...
September 2007: Updated for Photoshop CS3 with all new CS3 ...
Applications using. Dreamweaver CS3 and Flash CS3. Matt May. Andrew
Kirkpatrick. Adobe. 13 March 2008 ... Provide Equivalents and Names –
ActionScript 2.
3 Last updated 3/7/2016 Chapter 2: Flash Player environment Player files and locations Adobe Flash Player is normally deployed as a browser plug-in or ActiveX control.
2. Adobe Flash CS3 Classroom in a Book. The lessons in this book require
assets, including Flash ..... Learning ActionScript 2.0 in Adobe Flash, Developing.
Adobe Flash CS3 Classroom in a Book ... Though Flash CS3 Professional
requires a minimum ..... Tutorial videos are also included on the Adobe Flash.
CS3 ...
Adobe Web Communication using Dreamweaver CS3 objectives ... 1.5 Make
website development decisions based on your analysis and interpretation of
design ... 4.7 Insert rich media, such as video, sound, and animation in Flash
format.
DREAMWEAVER CS3: CREATING BASIC WEB PAGES. AN INTRODUCTION
TO WEB PAGES AND BEST PRACTICES ... Movies, Flash, Audio, etc. • How to ...
Adobe Rich Media Communication using Flash CS3 objectives. Domain 1.0
Setting Project Requirements. 1.1 Identify the purpose, audience, and audience ...
Using Adobe® Flash® CS3 Professional for Windows® and Mac OS .... Version
Cue PDF reviews . ..... nities, seminars, tutorials, RSS feeds, and much more.
Adobe Rich Media Communication using Flash CS3 objectives. Domain 1.0
Setting Project Requirements. 1.1 Identify the purpose, audience, and audience ...
modul-pelatihan-adobe-flash-cs3-professional.pdf. modul-pelatihan-adobe-flash-cs3-professional.pdf. Open. Extract. Open
Membuat animasi dengan Adobe Flash CS3 Bagian 1. Dasar/Teori/Konsep/
Kerangka ... Quick Time : Menghasilkan file *.mov untuk Quick time player.
METODE ...
implementasi media pembelajaran berbasis animasi Adobe Flash CS3 pada
mata ..... khusus, salah satunya flash player yang sudah .... Teknik Membuat.
Кафедра компьютерных образовательных технологий. Д.Г. Штенников.
Эффективная работа в Adobe Flash CS3. Учебно-методическое пособие.
Санкт- ...
Sep 2, 2017 - ... PRO user manual online FLASH CS3 at www adobe com go learn fl tutorials For video FLASH ... Comment go
Guide de l'utilisateur Adobe® Photoshop® CS3 pour Windows® et Mac OS. ...... 1
Fermez toute autre application Adobe en cours d'exécution sur votre ordinateur.
... Enregistrez votre produit afin de bénéficier, gratuitement, d'une aide à
OCR Unit 21 – AO5 – Creating Web Banners in Adobe Flash CS3


![[PDF] Download Adobe Flash CS3 Professional Video ... - Google Sites](https://m.moam.info/img/260x300/pdf-download-adobe-flash-cs3-professional-video-go_64771ebc097c4796708b59c6.jpg)
