IMPORTANT: If your loader is equipped with Optional Hydraulic Self Leveling
refer to ... instructions in Optional Hydraulic Self Leveling section in this manual.
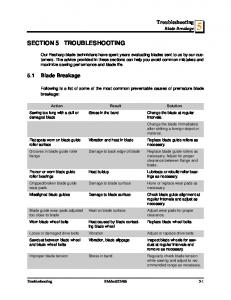
blade. Frozen or worn blade guide roller bearings. Heat buidup. Lubricate or
rebuild roller bear- ings as necessary. Chipped/broken blade guide wear pads.
blade. Frozen or worn blade guide roller bearings. Heat buidup. Lubricate or
rebuild roller bear- ings as necessary. Chipped/broken blade guide wear pads.
PRECISION TIG 375. OPERATORʼS MANUAL. IM936. February, 2012. Safety
Depends on You. Lincoln arc welding and cutting equipment is designed and ...
Previous Printings 2008, 2003, 2002, 2000, 1999 ... If any damage is found,
immediately refer to the section of this manual .... serVIce aNd MaINteNaNce. ....
most of the energy, then transfer that energy readily to neon atoms, which have ...
tion can be found in the Operation and Service Manual for your unit. This manual
can be .... controller will lock out the run relay and flash “SP” on the left hand.
MARINE DIESEL ENGINE. “HEELS: “III-IE; IIDIS-d; fill-363; ... MANUAL. AND
PARTS. IDENTIFICATION. Lehman Power Cnrpuialiiun. 2213 Was: Far-c Place ...
Lincoln equipment is designed and built with .... switch at the fuse box before
working on the equipment. ... iii. Refer to http://www.lincolnelectric.com/safety for
additional safety information. VRTEX® 360 ...... 6562 Feet (2000 Meters).
RELATIV
ing on contact with hot engine parts and .... switch at the fuse box before working
on ... Refer to http://www.lincolnelectric.com/safety for additional safety
information. .... 2004 on the approximation of the laws of the Member States
relating t
TOSHIBA TEC or parties authorized by TOSHIBA TEC, could void the user's ... in
accordance with the instruction manual, may cause harmful interference to ...
This engine is a product of Kubota's quality engineering and manufacturing. The
engine is made .... T. Expenses incurred investigating performance complaints
unless defective Power ..... Kubota Models D905-B and D1105-B. Service Parts.
away from V-belts, gears, fans and all other moving parts .... switch at the fuse
box before working on .... talons sans revers, et chaussures montantes. 5.
Toujours ..... 95/55/50. 109/63/58. 80/46/42. 85/49/45. 70/41/37. 65/38/35. 10/6/5.
400W.
Retain this manual with your machine for future reference. ..... The drive belt is
under constant even tension by a spring loaded jockey, this requires no attention.
WARN® et le logo WARN sont des marques déposées .... the Instructions and/or
Operations Guide, and/or ... Always complete the winch installation and hook.
troubleshooting of electric and electronic control systems. Electrical power to ... If
the truck is factory pre-wired and the power source is from a breaker panel, ....
semi-automatic system used with Caterpillar, Cummins and. Mack engines, the ...
Jun 28, 2005 ... Marine AccuTroll & CruiseMaster Gasoline. Inboard & I/O to .... Always cover
connectors and wire ends with heat shrink tubing. V. System Start-Up: .... Most
Closed Loop EFI Gasoline Inboard, and I/O Engines. • Sensors are ...
Aktiengesellschaft BMW AG. E BMW AG, Munich, Germany. VS-2, Printed in
Germany. Gb ... Digital diesel electronics. (DDE 2.1, 6–cylinder M51). ББББ.
ББББ.
Control logic, which manages typical timing for the plasma .... blocks 40 (hf
generator), 41(solenoid valve 1) and 42 (solenoid valve 2) . ..... supplied by
Telwin.
2. RS3200 PLUS 4. Remote Kevless Entrv (RKE). - Avalon - Tundra. - Camry -
Tacoma. - Solara - MR2-Spyder. - Highlander. - Sienna 5. RS3200 PLUS for RKE
...
Permission is granted to copy, distribute and/or modify this document under the
.... 3.8 Alternative methods of mixing text and music . ..... do ldd $i | sed 's/.*=> \/\(.
For more information, see AMS 2440. (Inspection of Ground, Chromium Plated
Steel. Parts). Slow Plating Rates. Typical chromium deposition rates are 0.50 to.
Windows® XP Home Edition operating system, English version ..... When you
have trouble installing the software successfully or the ScanSnap does not
operate.
Troubleshooting & Servicing Spa and Electrical Equipment . .... On Every System,
a Wiring Diagram Is Placed Inside the Door . . . . . . . . . . . . . . . . . . . . . . . . . . . . . .7 .....
all of the pumps and the blower to circulate water and wa
350 - 500 hp . ... The unit is also compatible with both the GM, Ford and .... and a
permanent marker, mark all the vacuum hoses, vacuum sources and ports ...
This Trouble Shooting Chart is provided for reference to possible loader
operational problems. ... Lift and Tilt Cylinders inoperative Low hydraulic fluid
level.
OPERATORS MANUAL TROUBLESHOOTING SECTION
KMW Ltd. 198 N. Hwy 281 Great Bend, Kansas 67530 800 445-7388 Fax 620 793-6737 ïïïKâãïäç~ÇÉêëKÅçã
1. TROUBLE SHOOTING PROCEDURES This Trouble Shooting Chart is provided for reference to possible loader operational problems. Determine the problem that best describes the operational problem being experienced and eliminate the possible causes as listed by following the correction procedures. For further assistance contact your dealer.
1.1. TROUBLE SHOOTING FOR ALL LOADERS PROBLEM
POSSIBLE CAUSE
CORRECTION
Lift and Tilt Cylinders inoperative
Low hydraulic fluid level.
Check and replenish hydraulic fluid.
Hydraulic hoses connected improperly.
Check and correct hydraulic hose connections
Hydraulic Hoses to/from loader valve blocked.
Check for damaged (kinked) hoses, etc.
Loader valve or tractor main relief valve stuck open.
Check system pressure. Repair or replace relief valve.
Low system pressure supplied from hydraulic pump.
Check system pressure. Repair or replace pump.
Loader valve linkage broken.
Inspect. Repair as required.
Quick disconnect coupler(s) are not fully connected.
Check coupler connections. Replace coupler(s) if necessary.
Hydraulic hose or tubeline blockage.
Check all hoses and tubes for leaks, damage, or restrictions. Replace damaged or restricted hoses or tube lines.
Cylinder piston assembly defective (not sealing).
Check cylinders for internal leakage as described in service section under cylinder leakage tests.
Loader valve blockage.
Inspect for blockage. Disassemble valve if necessary.
Lift and/or tilt cylinders operate in wrong direction relative to valve handle position
Hydraulic hoses connected incorrectly.
Correct hydraulic hose connections.
Attachment will dump but will not rollback (Only if your loader valve is equipped with regen)
Hydraulic circuit connected incorrectly.
Refer to plumbing diagram and correct hose connections.
Slow or erratic lift
Low hydraulic fluid level.
Check and replenish hydraulic fluid.
Cold hydraulic fluid.
Allow hydraulic system to warm up to operating temperature.
Engine R.P.M. too slow (hydraulic pump R.P.M. too slow).
Increase engine speed to obtain satisfactory loader operation.
Excessive weight in bucket. Material weight exceeds maximum specified loader capacity.
Reduce material load.
Loader valve linkage binding/defective.
Check loader valve linkage and repair if worn/defective.
Aeration of hydraulic fluid
Refer to "Aeration of Hydraulic Fluid".
2
PROBLEM
Inadequate lifting capacity
Aeration of Hydraulic Fluid (generally indicated by foamy appearance of fluid).
System relief valve squeals.
Loader drops with loader valve spool in "Centered" position (no external oil leakage evident.)
POSSIBLE CAUSE
CORRECTION
Quick disconnect coupler restriction or coupler.
Check coupler connections. Repair or replace.
Hydraulic hose or tubeline restriction (hoses/tubeline kinked or pinched).
Check hoses and tubelines for evidence of restriction.
Lift cylinder piston assembly leakage.
Check cylinders for leakage. Repair as needed.
Relief valve erratic or set below specifications.
Check and reset relief valve setting as needed.
Loader valve leaking internally. (Bypassing fluid within valve.)
Replace loader valve and recheck operation.
Inadequate hydraulic pump capacity.
Refer to "Hydraulic Pump Capacity Inadequate".
Engine R.P.M. too slow.
Increase engine R.P.M.
Excessive load – material weight exceeds specified loader capacity.
Reduce Load.
Relief valve setting below specifications.
Check and reset relief valve setting as needed.
Lift cylinder piston assembly leakage.
Check cylinders for leakage. Repair as needed.
Loader valve leaking internally.
Replace loader valve and recheck operation.
Hydraulic pump defective.
Refer to "Hydraulic Pump Capacity Inadequate".
Low hydraulic fluid level.
Check and refill hydraulic system to proper level.
Air leaking into suction side of hydraulic pump.
Check for loose or defective connections between reservoir and hydraulic pump.
Hydraulic fluid foaming due to improper hydraulic oil usage.
Refer to Tractor Operator’s Manual and replace hydraulic oil using recommended hydraulic oil.
Cold Hydraulic Fluid.
Allow hydraulic fluid to warm up to operating temperature.
Excessive load in bucket. Weight exceeds specified loader capacity.
Reduce load.
Relief valve setting below specifications.
Check and reset valve setting as needed.
Hydraulic hose, tubeline, or quick disconnect coupler restriction.
Check for evidence of restriction in hydraulic oil flow. Repair or replace defective components.
Cylinder Piston assembly leakage.
Check cylinders for leakage.
Loader valve internal leakage.
Replace loader valve and recheck.
3
PROBLEM
Loader valve spool(s) will not return to centered position.
Loader bucket moves freely after dumping load
POSSIBLE CAUSE
CORRECTION
Note: A gradual drop over an extended period of time is a normal condition.
Run Leakage Test to see if hydraulic components meet specification.
Valve handle linkage binding.
Determine origin of binding and repair.
Loader valve spool centering is broken.
Replace centering spring.
Loader valve spool binding in valve body spool bore.
Disassemble valve for inspection and repair.
Tilt cylinder cavitation has occurred.
Use of regen function (if equipped) while dumping load will eliminate problem. Contact Factory for optional orifice sizes.
Loose hydraulic connection.
Tighten loose connections.
Defective hydraulic hose, tubeline, adapter fitting or adapter fitting oring.
Check for origin of oil leak and replace defective part.
Loader valve o-rings defective.
Replace defective o-rings.
Loader valve spool or body damaged or worn.
Replace loader valve.
Cylinder rod packing set leakage.
Check cylinders for leakage. Repair as needed.
Cold hydraulic fluid.
Allow hydraulic fluid to warm up to operating temperature.
Engine R.P.M. too slow.
Increase engine R.P.M.
Low hydraulic fluid supply.
Refer to Tractor Operator’s Manual for service recommendations.
Hydraulic hose restriction.
Check for evidence of restriction in hydraulic hoses.
Hydraulic pump defective.
Refer to Tractor Operator’s manual for recommended service procedures. Replace hydraulic pump if determined to be defective.
Lift cylinder rods bend when lift cylinders extended.
Excessive shock load on lift cylinders during transport.
Replace defective parts. Review and observe proper and safe operational practices.
Bucket cutting edge wear is uneven side to side
Bucket is not level to ground.
Check rear tire inflation and adjust to level bucket to ground.
Bucket cutting edge wear rate is excessive. (Wear rate is even across full width of bucket).
Incorrect operational practices. Excessive down pressure placed on bucket when used on hard abrasive surfaces.
Refer to operation – scraping section for correct operating procedures. Utilize float position.
Bucket wear pads worn.
Replace wear pads.
External hydraulic fluid leakage.
Hydraulic pump capacity inadequate.
Note: Extensive use of bucket on concrete or asphalt surfaces will accelerate wear rate of bucket cutting edge. 4
PROBLEM
POSSIBLE CAUSE
CORRECTION
Loader is slow and/or will not dump.
Hydraulic oil too heavy.
Change to proper oil.
Oil filter plugged.
Clean or replace filter.
Hydraulic pump worn.
Repair or replace pump.
Oil line restricted or leaking.
Check all hoses and tubes for leaks, damage, or restrictions. Replace damaged or restricted hoses or tube lines.
Loader valve does not shift properly.
Inspect clean, repair, or replace valve.
Cylinder leaks internally.
Replace seals.
Faulty valve.
Repair or replace valve.
Air in hydraulic system.
Cycle lift cylinders and tilt cylinders.
Oil level too low.
Add oil as required.
Worn loader valve.
Have authorized KMW dealer replace valve.
Worn cylinder piston seals.
Have authorized KMW dealer replace seals.
Hydraulic circuit connected incorrectly.
Check that loader valve is connected to tilt cylinder correctly if valve is equipped with regen funtion.
Loader chatters or vibrates when raising or lowering.
Slow leakdown.
Attachment will dump but will not rollback
1.2. TROUBLE SHOOTING OPTIONAL LOADER VALVE If your loader/tractor combination is equipped with an optional KMW Cable Controlled Loader valve and unit reacts in the following manner. PROBLEM
POSSIBLE CAUSE
CORRECTION
Nothing happens when handle switch is activated
Tractor switch is not on.
Turn tractor switch on.
Power circuit is not connected.
Connect to tractor power supply that is only activated when tractor switch is on.
Switch does not have 12 volts.
Trace circuit and find cause.
Solenoid valve does not have 12 volts when switch is activated.
If not, check switch by jumping terminal wires on switch in handle. If 12 volts are at solenoid valve, replace switch
Spool is sticking.
Push in on each side of valve spool to free up spool as shown in installation instructions included with your valve kit.
If you have 12 volts at solenoid valve but valve does not function
Contamination in hydraulic oil causes spool to stick. Replace oil and filter. Solenoid valve section is damaged. Replace solenoid valve section. 5
1.3. TROUBLE SHOOTING OPTIONAL COMFORT DRIVE PROBLEM
POSSIBLE CAUSE
CORRECTION
Comfort drive does not activate.
Turn on comfort drive and check to see if 12 volts are at solenoid.
If 12 volts are not available, inspect and repair as follows.
Solenoid not properly grounded
If not properly grounded, repair.
Fuse
replace if required
Wire damaged or cut.
If damaged repair or replace
Switch does not have 12 volts.
Trace circuit and find cause.
Tractor switch is not on.
Turn tractor switch on.
Power circuit not connected.
Connect to tractor power supply that is only activated when tractor switch is on.
Pre-charge pressure is not correct
Check pre-charge pressure of each end of accumulator and correct as required.
Leak in fluid or gas side of accumulator
Repair and replace accumulator seals
Circuits not connected correctly
Trace circuits and make sure large end of accumulator is connected to base end of lift cylinder.
Comfort drive does not work properly
1.4. TROUBLE SHOOTING OPTIONAL SELF LEVELING PROBLEM
POSSIBLE CAUSE
CORRECTION
Bucket does not maintain level while raising at high idle.
Flow divider spool stuck.
*Check flow divider spool for free operation. (Check for contamination.)
Raise counterbalance valve stuck.
*Remove and check for contamination.
Flow divider spool stuck.
*Check flow divider cartridge for free operation.
(Open Center system only) Load drop modulator valve stuck.
*Remove and check for contamination. (Spool should move freely in bore.)
Bad bucket cylinder seal.
Repack cylinder.
Raise counterbalance valve stuck.
*Remove and check for contamination.
Anti-Cavitation relief malfunction.
*Check Anti-Cavitation valve cartridge. Remove and check for contamination or replace. Contact factory for adjustment information.
Excessive loader control valve bucket spool port leakage.
Check with Factory on acceptable valve spool leakage rate. Replace if required.
Pilot operated check is not closing (cartridge plus pilot piston).
*Remove and check for contamination. Replace if required.
Bucket does not maintain level while lowering at high idle.
Excessive bucket drift in the dump direction.
Bucket moves freely when putting down pressure on cutting edge.
6
PROBLEM
POSSIBLE CAUSE
CORRECTION
Loader bounces with lowering load.
Low hydraulic flow.
Increase tractor RPM to increase hydraulic flow.
Bucket does not maintain Level while raising
Bucket self leveling is designed to work optimally at high RPM.
Run engine at med. To high RPM.
Bucket does not maintain Level while lowering on Open Center system.
Loader valve lift spool not fully stroked.
Fully stroke the valve spool.
Bucket does not maintain Level while lowering on Load Sense and Closed Center systems.
Loader valve lift spool is fully stroked.
Feather the loader lift spool.
Self leveling function is delayed after lowering loader.
Loader being lowered with attachment against the rollback stops.
Lowering loader with bucket rolled slightly forward will reduce delay.
Self-Leveling does not operate after initial hook-up.