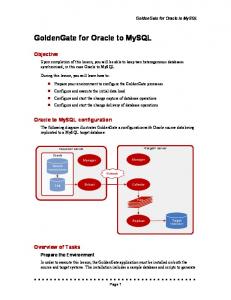
Aug 1, 2012 ... Oracle GoldenGate for Oracle Installation and Setup Guide, Release 11.2.1 .....
Preparing to install Oracle GoldenGate within a cluster.
Oracle® GoldenGate Oracle Installation and Setup Guide Release 11.2.1 E35957-03
February 2015
Oracle GoldenGate for Oracle Installation and Setup Guide, Release 11.2.1 E35957-03 Copyright © 2010, 2015, Oracle and/or its affiliates. All rights reserved. This software and related documentation are provided under a license agreement containing restrictions on use and disclosure and are protected by intellectual property laws. Except as expressly permitted in your license agreement or allowed by law, you may not use, copy, reproduce, translate, broadcast, modify, license, transmit, distribute, exhibit, perform, publish, or display any part, in any form, or by any means. Reverse engineering, disassembly, or decompilation of this software, unless required by law for interoperability, is prohibited. The information contained herein is subject to change without notice and is not warranted to be error-free. If you find any errors, please report them to us in writing. If this software or related documentation is delivered to the U.S. Government or anyone licensing it on behalf of the U.S. Government, the following notice is applicable: U.S. GOVERNMENT RIGHTS Programs, software, databases, and related documentation and technical data delivered to U.S. Government customers are "commercial computer software" or "commercial technical data" pursuant to the applicable Federal Acquisition Regulation and agency-specific supplemental regulations. As such, the use, duplication, disclosure, modification, and adaptation shall be subject to the restrictions and license terms set forth in the applicable Government contract, and, to the extent applicable by the terms of the Government contract, the additional rights set forth in FAR 52.227-19, Commercial Computer Software License (December 2007). Oracle USA, Inc., 500 Oracle Parkway, Redwood City, CA 94065. This software is developed for general use in a variety of information management applications. It is not developed or intended for use in any inherently dangerous applications, including applications which may create a risk of personal injury. If you use this software in dangerous applications, then you shall be responsible to take all appropriate fail-safe, backup, redundancy, and other measures to ensure the safe use of this software. Oracle Corporation and its affiliates disclaim any liability for any damages caused by use of this software in dangerous applications. Oracle is a registered trademark of Oracle Corporation and/or its affiliates. Other names may be trademarks of their respective owners. This software and documentation may provide access to or information on content, products, and services from third parties. Oracle Corporation and its affiliates are not responsible for and expressly disclaim all warranties of any kind with respect to third-party content, products, and services. Oracle Corporation and its affiliates will not be responsible for any loss, costs, or damages incurred due to your access to or use of third-party content, products, or services.
Contents Preface ................................................................................................................................................................. xi Audience....................................................................................................................................................... xi Documentation Accessibility ..................................................................................................................... xi Related Documents .................................................................................................................................... xii Conventions ................................................................................................................................................ xii
1 System requirements and preinstallation instructions Supported Platforms................................................................................................................................ 1-1 Operating system requirements ............................................................................................................ 1-1 Memory requirements....................................................................................................................... 1-1 Disk requirements .............................................................................................................................. 1-2 Temporary disk requirements.......................................................................................................... 1-2 Network............................................................................................................................................... 1-2 Operating system privileges............................................................................................................. 1-3 Itanium requirements ........................................................................................................................ 1-3 Console ................................................................................................................................................ 1-3 Other programs .................................................................................................................................. 1-4 Database configuration ........................................................................................................................... 1-4 Summary of supported Oracle data types and objects per capture mode..................................... 1-5 Details of support for Oracle data types.............................................................................................. 1-7 Numeric data types............................................................................................................................ 1-7 Character data types .......................................................................................................................... 1-7 Multi-byte character types ................................................................................................................ 1-7 Binary data types................................................................................................................................ 1-8 Date and timestamp data types ....................................................................................................... 1-8 Large object data types...................................................................................................................... 1-8 XML data types .................................................................................................................................. 1-9 User defined or abstract types....................................................................................................... 1-11 Non-supported Oracle data types ................................................................................................ 1-12 Details of support for Oracle objects and operations in DML..................................................... 1-12 Tables, views, and materialized views......................................................................................... 1-12 Sequences ......................................................................................................................................... 1-15 Non-supported objects and operations in Oracle DML ............................................................ 1-15 Details of support for objects and operations in Oracle DDL ..................................................... 1-16 Supported objects and operations in Oracle DDL...................................................................... 1-16
iii
Non-supported objects and operations in Oracle DDL ............................................................. 1-17 Supported and non-supported object names................................................................................... 1-18
2 Installing Oracle GoldenGate Installation overview ............................................................................................................................... 2-1 Downloading Oracle GoldenGate ........................................................................................................ 2-1 Setting ORACLE_HOME and ORACLE_SID .................................................................................... 2-2 Specifying Oracle variables on UNIX and Linux systems ........................................................... 2-2 Specifying Oracle variables on Windows systems........................................................................ 2-3 Setting library paths for dynamic builds on UNIX ........................................................................... 2-3 Preparing to install Oracle GoldenGate within a cluster ................................................................. 2-5 Installing as the Oracle user.............................................................................................................. 2-5 Supported Oracle cluster storage..................................................................................................... 2-5 Deciding where to install Oracle GoldenGate binaries and files in the cluster ........................ 2-6 Installing Oracle GoldenGate on Linux and UNIX........................................................................... 2-6 Installing Oracle GoldenGate on Windows........................................................................................ 2-7 Installing Oracle GoldenGate into a Windows Cluster ................................................................ 2-7 Installing the Oracle GoldenGate files ............................................................................................ 2-7 Specifying a custom Manager name................................................................................................ 2-7 Installing Manager as a Windows service ...................................................................................... 2-8 Integrating Oracle GoldenGate into a cluster .................................................................................... 2-9 General requirements in a cluster.................................................................................................... 2-9 Adding Oracle GoldenGate as a Windows cluster resource .................................................... 2-10 Installing support for Oracle sequences........................................................................................... 2-10
3 Installing Oracle GoldenGate DDL support for an Oracle database Overview of the DDL objects ................................................................................................................ 3-1 Installing the DDL objects ..................................................................................................................... 3-2
4 Configuring Oracle GoldenGate on Oracle source and target databases What to expect from this procedure...................................................................................................... 4-1 Creating and editing parameter files.................................................................................................... 4-1 Overview of basic steps to configure Oracle GoldenGate............................................................... 4-2 Choosing names for processes and files .............................................................................................. 4-2 Choosing group names ..................................................................................................................... 4-2 Choosing file names........................................................................................................................... 4-3 Deciding which capture method to use ............................................................................................... 4-3 About classic capture......................................................................................................................... 4-3 About integrated capture.................................................................................................................. 4-4 Combining capture modes................................................................................................................ 4-5 Assigning a database user for Oracle GoldenGate............................................................................ 4-6 Creating the Oracle GoldenGate instance........................................................................................... 4-9 Configuring Extract for change capture ............................................................................................ 4-10 Configuring the primary Extract (classic or integrated mode) ................................................ 4-10 Configuring the data pump........................................................................................................... 4-12 Configuring Replicat for change delivery........................................................................................ 4-14
iv
Creating a checkpoint table ........................................................................................................... Configuring Replicat ..................................................................................................................... Tuning recommendations for integrated capture............................................................................ Configuring additional process groups for best performance ..................................................... Next steps in the deployment ............................................................................................................. When to start replicating transactional changes ............................................................................. Testing your configuration ..................................................................................................................
4-14 4-15 4-16 4-17 4-18 4-18 4-19
5 Preparing the database for Oracle GoldenGate Preparing integrity constraints in source and target tables ............................................................. 5-1 Disabling triggers and referential cascade constraints on target tables..................................... 5-1 Deferring constraint checking on target tables .............................................................................. 5-2 Ensuring row uniqueness in source and target tables.................................................................. 5-3 Configuring logging properties............................................................................................................. 5-4 Enabling database-level supplemental logging............................................................................. 5-4 Enabling schema-level supplemental logging ............................................................................... 5-5 Enabling table-level supplemental logging.................................................................................... 5-6 Limiting row changes in tables that do not have a unique row identifier ................................... 5-7 Supporting the conversion of character sets ....................................................................................... 5-7 Setting NLS_LANG with SETENV.................................................................................................. 5-7 Viewing globalization settings ......................................................................................................... 5-8 Getting more information about globalization support............................................................... 5-8 Setting fetch options ................................................................................................................................ 5-8 Handling special data types ................................................................................................................... 5-9 Multibyte character types .............................................................................................................. 5-10 Oracle Spatial objects ...................................................................................................................... 5-10 TIMESTAMP.................................................................................................................................... 5-11 Large Objects (LOB)........................................................................................................................ 5-11 XML................................................................................................................................................... 5-12 User defined types .......................................................................................................................... 5-12 Handling other database properties .................................................................................................. 5-12 Using Oracle GoldenGate with Oracle Exadata .............................................................................. 5-13 Migrating to Oracle Exadata.......................................................................................................... 5-14 Replicating to Exadata with EHCC enabled ............................................................................... 5-14
6 Additional configuration steps when using classic capture Configuring Oracle TDE data in classic capture mode..................................................................... Overview of TDE support in classic capture ................................................................................. Requirements for capturing TDE in classic capture mode .......................................................... Required database patches ............................................................................................................... Configuring TDE support ................................................................................................................. Recommendations for maintaining data security after decryption............................................ Performing DDL while TDE capture is active ............................................................................... Updating the Oracle shared secret in the parameter file.............................................................. Using Oracle GoldenGate in an Oracle RAC environment............................................................. Capturing from an Oracle ASM instance when in classic capture mode......................................
6-1 6-1 6-2 6-2 6-2 6-5 6-5 6-5 6-6 6-7
v
Accessing the transaction logs in ASM ........................................................................................... 6-7 Ensuring ASM connectivity.............................................................................................................. 6-8 Ensuring data availability....................................................................................................................... 6-9 Log retention requirements per Extract recovery mode .............................................................. 6-9 Log retention options......................................................................................................................... 6-9 Determining how much data to retain......................................................................................... 6-11 Purging log archives ....................................................................................................................... 6-11 Specifying the archive location ..................................................................................................... 6-11 Mounting logs that are stored on other platforms ..................................................................... 6-11 Configuring Oracle GoldenGate to read only the archived logs................................................. 6-12 Limitations and requirements of ALO mode.............................................................................. 6-12 Configuring Extract for ALO mode.............................................................................................. 6-12 Avoiding log-read bottlenecks............................................................................................................ 6-13
7 Configuring DDL synchronization for an Oracle database Overview of DDL synchronization ...................................................................................................... 7-1 Limitations of Oracle GoldenGate DDL support .............................................................................. 7-1 DDL statement length ....................................................................................................................... 7-1 Supported topologies......................................................................................................................... 7-2 Filtering, mapping, and transformation ......................................................................................... 7-2 Renames............................................................................................................................................... 7-2 Interactions between fetches from a table and DDL ..................................................................... 7-2 Comments in SQL .............................................................................................................................. 7-3 Compilation errors............................................................................................................................. 7-3 Interval partitioning........................................................................................................................... 7-3 Configuration guidelines for DDL support........................................................................................ 7-4 Database privileges ............................................................................................................................ 7-4 Parallel processing ............................................................................................................................. 7-4 DDL and DML in data pumps ......................................................................................................... 7-4 Object names ....................................................................................................................................... 7-4 Data definitions .................................................................................................................................. 7-5 Truncates ............................................................................................................................................. 7-5 Initial synchronization....................................................................................................................... 7-5 Data continuity after CREATE or RENAME ................................................................................. 7-5 Understanding DDL scopes ................................................................................................................... 7-6 Mapped scope..................................................................................................................................... 7-6 Unmapped scope................................................................................................................................ 7-8 Other scope ......................................................................................................................................... 7-8 Correctly identifying unqualified object names in DDL................................................................. 7-9 Enabling DDL support............................................................................................................................ 7-9 Filtering DDL replication .................................................................................................................... 7-10 Filtering with PL/SQL code .......................................................................................................... 7-10 Adding and dropping filter rules ................................................................................................. 7-12 Filtering with the DDL parameter ................................................................................................ 7-14 Combining DDL parameter options............................................................................................. 7-20 Special filter cases ................................................................................................................................. 7-20 DDL EXCLUDE ALL ...................................................................................................................... 7-20
vi
Implicit DDL .................................................................................................................................... How Oracle GoldenGate handles derived object names .............................................................. MAP exists for base object, but not derived object .................................................................... MAP exists for base and derived objects ..................................................................................... MAP exists for derived object, but not base object .................................................................... New tables as derived objects ....................................................................................................... Disabling the mapping of derived objects................................................................................... Using DDL string substitution ........................................................................................................... Controlling the propagation of DDL that is executed by Replicat.............................................. Propagating DDL in an active-active (bi-directional) configurations ..................................... Propagating DDL in a cascading configuration ......................................................................... Adding supplemental log groups automatically ............................................................................ Removing comments from replicated DDL ..................................................................................... Replicating an IDENTIFIED BY password ...................................................................................... How DDL is evaluated for processing .............................................................................................. Handling DDL processing errors ....................................................................................................... Handling DDL trigger errors .............................................................................................................. Viewing DDL report information ...................................................................................................... Extract DDL reporting .................................................................................................................... Statistics in the process reports ..................................................................................................... Viewing metadata in the DDL history table .................................................................................... Tracing DDL processing....................................................................................................................... Tracing the DDL trigger .......................................................................................................................
7-21 7-22 7-22 7-22 7-23 7-23 7-24 7-25 7-26 7-26 7-28 7-28 7-29 7-29 7-29 7-31 7-31 7-32 7-32 7-33 7-33 7-33 7-33
8 Instantiating and starting Oracle GoldenGate replication Overview of basic Oracle GoldenGate instantiation steps.............................................................. 8-1 Satisfying prerequisites for instantiation............................................................................................ 8-1 Configure change capture and delivery ......................................................................................... 8-1 Add collision handling...................................................................................................................... 8-1 Disable DDL processing.................................................................................................................... 8-2 Prepare the target tables.................................................................................................................... 8-2 Making the instantiation procedure more efficient .......................................................................... 8-2 Share parameters between process groups .................................................................................... 8-2 Use parallel processes........................................................................................................................ 8-3 Configuring the initial load ................................................................................................................... 8-3 To load with a database utility......................................................................................................... 8-3 To direct bulk load to SQL*Loader.................................................................................................. 8-3 To load from an input file to SQL*Loader...................................................................................... 8-6 Registering Extract with the mining database.................................................................................... 8-8 Adding change-capture and change-delivery processes................................................................... 8-9 Set the RMAN archive log deletion policy ..................................................................................... 8-9 Add the primary Extract ................................................................................................................... 8-9 Add the local trail............................................................................................................................ 8-10 Add the data pump Extract group ............................................................................................... 8-10 Add the remote trail ....................................................................................................................... 8-11 Add the Replicat group .................................................................................................................. 8-11 Performing the target instantiation ................................................................................................... 8-11
vii
To perform instantiation with a database utility........................................................................ To perform instantiation with direct bulk load to SQL*Loader............................................... To perform instantiation from an input file to SQL*Loader ........................................................ Monitoring processing after the instantiation................................................................................. Backing up the Oracle GoldenGate environment ..........................................................................
8-11 8-13 8-14 8-15 8-15
9 Controlling processes When to start processes ........................................................................................................................... 9-1 Starting processes after instantiation is complete ............................................................................. 9-1
10 Managing the Oracle DDL replication environment Enabling and disabling the DDL trigger.......................................................................................... Maintaining the DDL marker table ................................................................................................... Deleting the DDL marker table.......................................................................................................... Maintaining the DDL history table ................................................................................................... Deleting the DDL history table .......................................................................................................... Purging the DDL trace file .................................................................................................................. Applying database patches and upgrades when DDL support is enabled ............................... Applying Oracle GoldenGate patches and upgrades when DDL support is enabled ............ Restoring an existing DDL environment to a clean state .............................................................. Removing the DDL objects from the system ...................................................................................
10-1 10-1 10-2 10-2 10-2 10-3 10-3 10-3 10-4 10-6
11 Uninstalling Oracle GoldenGate Stopping processes ............................................................................................................................... Removing the DDL environment....................................................................................................... Removing database objects ................................................................................................................. (Windows) Removing Oracle GoldenGate Windows components............................................. Removing the Oracle GoldenGate files............................................................................................
11-1 11-1 11-2 11-3 11-3
A Configuring a downstream mining database for integrated capture Evaluating capture options for a downstream deployment............................................................ Preparing the Source Database for Downstream Deployment ...................................................... Creating the source user account.................................................................................................... Configuring redo transport from a source to the downstream mining database.................... Preparing the downstream mining database ..................................................................................... Creating the downstream mining user account ........................................................................... Configuring the mining database to archive local redo log files .............................................. Preparing a downstream mining database for real-time capture ..............................................
A-1 A-1 A-2 A-2 A-3 A-4 A-4 A-5
B Example configuration of downstream mining database for integrated capture Example 1: Capturing from one source database in real-time mode............................................. B-1 Prepare the mining database to archive its local redo ................................................................. B-1 Prepare the mining database to archive redo received in standby redo logs from the source database B-2
viii
Prepare the source database to send redo to the mining database............................................ Set up integrated capture (ext1) on DBMSCAP............................................................................ Example 2: Capturing from multiple sources in archive-log-only mode .................................... Prepare the mining database to archive its local redo ................................................................. Prepare the mining database to archive redo from the source database .................................. Prepare the first source database to send redo to the mining database.................................... Prepare the second source database to send redo to the mining database .............................. Set up Extracts at the downstream mining database.................................................................. Example 3: Capturing from multiple sources with mixed real-time and archive-log-only mode.................................................................................................................... Prepare the mining database to archive its local redo ................................................................. Prepare the mining database to accept redo from the source databases .................................. Prepare the first source database to send redo to the mining database.................................... Prepare the second source database to send redo to the mining database .............................. Prepare the third source database to send redo to the mining database .................................. Set up Extracts at downstream mining database .........................................................................
B-2 B-2 B-3 B-3 B-4 B-4 B-4 B-5 B-6 B-6 B-7 B-7 B-8 B-8 B-9
C Supporting changes to XML schemas Supporting RegisterSchema.................................................................................................................. C-1 Supporting DeleteSchema:.................................................................................................................... C-1 Supporting CopyEvolve......................................................................................................................... C-1
D Preparing DBFS for active-active propagation with Oracle GoldenGate Supported operations and prerequisites ............................................................................................ Applying the required patch................................................................................................................. Examples used in these procedures ..................................................................................................... Partitioning the DBFS sequence numbers ......................................................................................... Configuring the DBFS file system....................................................................................................... Mapping local and remote peers correctly .........................................................................................
D-1 D-1 D-2 D-2 D-3 D-4
E Oracle GoldenGate installed components Oracle Goldengate Programs And Utilities ....................................................................................... Oracle Goldengate Subdirectories ....................................................................................................... Other Oracle GoldenGate files............................................................................................................. Oracle GoldenGate checkpoint table ..................................................................................................
E-1 E-2 E-4 E-8
ix
x
Preface With Oracle GoldenGate for Oracle, you can: ■
■
■
Map, filter, and transform transactional data changes between similar or dissimilar supported Oracle versions, and between supported Oracle versions and other supported types of databases. Replicate and filter Oracle DDL operations between heterogeneous Oracle databases. Perform initial loads to target tables in Oracle or other databases to instantiate a synchronized replication environment.
This guide helps you get started with installing, configuring, and running Oracle GoldenGate on an Oracle database system. It helps you produce a basic Oracle GoldenGate configuration, from source to target, that is tailored to the Oracle environment. Where needed, it points you to other documentation where you can find additional information to expand the configuration to suit your needs.
Audience This guide is intended for installers, database administrators, and system administrators who are installing, configuring and running Oracle GoldenGate.
Documentation Accessibility For information about Oracle's commitment to accessibility, visit the Oracle Accessibility Program website at http://www.oracle.com/pls/topic/lookup?ctx=acc&id=docacc.
ORACLE CONFIDENTIAL. For authorized use only. Do not distribute to third parties.
Access to Oracle Support Oracle customers have access to electronic support through My Oracle Support. For information, visit http://www.oracle.com/pls/topic/lookup?ctx=acc&id=info or visit http://www.oracle.com/pls/topic/lookup?ctx=acc&id=trs if you are hearing impaired.
Related Documents The complete Oracle GoldenGate documentation set includes the following components: HP NonStop Platform ■ Oracle GoldenGate for NonStop Reference Guide ■
Oracle GoldenGate for NonStop Administrator's Guide
Windows, UNIX, and Linux Platforms Oracle GoldenGate Installation and Setup Guides per supported database
■ ■
Oracle GoldenGate Windows and UNIX Administrator’s Guide
■
Oracle GoldenGate Windows and UNIX Reference Guide
■
Oracle GoldenGate Windows and UNIX Troubleshooting and Tuning Guide
■
Oracle GoldenGate Upgrade Guide
Other Oracle GoldenGate Products Oracle GoldenGate Adapter for Flat Files Administrator’s Guide
■ ■
Oracle GoldenGate Adapter for Java Administrator’s Guide
■
Oracle GoldenGate Director Administrator’s Guide
■
Oracle GoldenGate Monitor Administrator’s Guide
■
Oracle GoldenGate Veridata Administrator’s Guide
Conventions The following text conventions are used in this document: Convention
Meaning
boldface
Boldface type indicates graphical user interface elements associated with an action, such as "From the File menu, select Save." Boldface also is used for terms defined in text or in the glossary.
italic
Italic type indicates placeholder variables for which you supply particular values, such as in the parameter statement: TABLE table_ name. Italic type also is used for book titles and emphasis.
italic monospace MONOSPACE
Monospace type indicates code components such as user exits and scripts; the names of files and database objects; URL paths; and input and output text that appears on the screen. Uppercase monospace type is generally used to represent the names of Oracle GoldenGate parameters, commands, and user-configurable functions, as well as SQL commands and keywords.
Convention
Meaning
UPPERCASE
Uppercase in the regular text font indicates the name of a utility unless the name is intended to be a specific case.
{}
Braces within syntax enclose a set of options that are separated by pipe symbols, one of which must be selected, for example: {option1 | option2 | option3}.
[]
Brackets within syntax indicate an optional element. For example in this syntax, the SAVE clause is optional: CLEANUP REPLICAT group_ name [, SAVE count]. Multiple options within an optional element are separated by a pipe symbol, for example: [option1 | option2].
1 System requirements and preinstallation instructions
1
This chapter contains the requirements for the system and database resources that support Oracle GoldenGate. Oracle GoldenGate supports two capture modes for an Oracle source database. Some system requirements may vary depending on the capture mode that is selected. To learn about the capture modes, see "Deciding which capture method to use" on page 4-3.
Note:
1.1 Supported Platforms To find out which Oracle GoldenGate builds are available for a specific combination of database version and operating system, log onto http://support.oracle.com and select the Certifications tab. For assistance, click Tips for Finding Certifications. An e-mail and password are required to enter this site.
1.2 Operating system requirements This section outlines the operating system resources that are necessary to support Oracle GoldenGate.
1.2.1 Memory requirements The amount of memory that is required for Oracle GoldenGate depends on the number of concurrent processes that will be running. At minimum on the source system, there is a primary Extract process that captures source data and a secondary Extract data-pump process that transfers data across the network. At minimum on the target system is at least one Replicat process that applies the replicated data to the target database. In some cases, these processes might all operate on the same system, depending on the required configuration. It is possible that you will need to use additional, parallel processes to improve throughput if your environment generates a large volume of transactional data that must be replicated. Oracle GoldenGate supports up to 5,000 concurrent Extract and Replicat processes per instance of Oracle GoldenGate. Each Extract and Replicat process needs approximately 25-55 MB of memory, or more depending on the size of the transactions and the number of concurrent transactions. The actual amount of physical memory that is used by any Oracle GoldenGate process is controlled by the operating system, not the Oracle GoldenGate program. The Oracle
System requirements and preinstallation instructions
1-1
Operating system requirements
GoldenGate cache manager takes advantage of the memory management functions of the operating system to ensure that Oracle GoldenGate processes work in a sustained and efficient manner. For more information about evaluating Oracle GoldenGate memory requirements, see the CACHEMGR parameter in the Oracle GoldenGate Windows and UNIX Reference Guide.
1.2.2 Disk requirements Assign the following free disk space: ■
■
■
■
50-150 MB, depending on the database and platform. This includes space for the compressed download file and space for the uncompressed files. You can delete the download file after the installation is complete. 40 MB for the working directories and binaries for each instance of Oracle GoldenGate that you are installing on the system. For example, to install two builds of Oracle GoldenGate into two separate directories, allocate 80 MB of space. To install Oracle GoldenGate into a cluster environment, install the Oracle GoldenGate binaries and files as the Oracle user on a shared file system that is available to all cluster nodes. See "Preparing to install Oracle GoldenGate within a cluster" on page 2-5 for more information. An additional 1 GB of disk space on any system that hosts Oracle GoldenGate trails, which are files that contain the working data. You may need more or less than this amount, because the space that is consumed by the trails depends on the volume of data that will be processed. See the guidelines for sizing trails in the Oracle GoldenGate Administrator's Guide.
1.2.3 Temporary disk requirements By default, Oracle GoldenGate maintains data that it swaps to disk in the dirtmp sub-directory of the Oracle GoldenGate installation directory. The cache manager assumes that all of the free space on the file system is available. This directory can fill up quickly if there is a large transaction volume with large transaction sizes. To prevent I/O contention and possible disk-related Extract failures, dedicate a disk to this directory. You can assign a name to this directory with the CACHEDIRECTORY option of the CACHEMGR parameter.
1.2.4 Network The following network resources must be available to support Oracle GoldenGate. ■
■
■
■
For optimal performance and reliability, especially in maintaining low latency on the target, use the fastest network possible and install redundancies at all points of failure. Configure the system to use TCP/IP services, including DNS. Oracle GoldenGate supports IPv4 and IPv6 and can operate in a system that supports one or both of these protocols. Configure the network with the host names or IP addresses of all systems that will be hosting Oracle GoldenGate processes and to which Oracle GoldenGate will be connecting. Host names are easier to use. Oracle GoldenGate requires some unreserved and unrestricted TCP/IP ports, the number of which depends on the number and types of processes in your configuration. See the Oracle GoldenGate Windows and UNIX Administrator's Guide for details on how to configure the Manager process to handle the required ports.
1-2 Oracle GoldenGate for Oracle Installation and Setup Guide
Operating system requirements
■
■
Keep a record of the ports that you assigned to Oracle GoldenGate. You will specify them with parameters when configuring the Manager process. Configure your firewalls to accept connections through the Oracle GoldenGate ports.
1.2.5 Operating system privileges The following are the privileges in the operating system that are required to install Oracle GoldenGate and to run the processes. ■
■
■
■
■
To install on Windows, the person who installs Oracle GoldenGate must log in as Administrator. To install on UNIX, the person who installs Oracle GoldenGate must have read and write privileges on the Oracle GoldenGate installation directory. The Oracle GoldenGate Extract, Replicat, and Manager processes must operate as an operating system user that has privileges to read, write, and delete files and subdirectories in the Oracle GoldenGate directory. In addition, the Manager process requires privileges to control the other Oracle GoldenGate processes. (Classic capture mode) In classic capture mode, the Extract process reads the redo logs directly and must operate as an operating system user that has read access to the log files, both online and archived. On UNIX systems, that user must be a member of the group that owns the Oracle instance. If you install the Manager process as a Windows service during the installation steps in this documentation, you must install as Administrator for the correct permissions to be assigned. If you cannot install Manager as a service, assign read access to the Extract process manually, and then always run Manager and Extract as Administrator. Dedicate the Extract, Replicat, and Manager operating system users to Oracle GoldenGate. Sensitive information might be available to anyone who runs an Oracle GoldenGate process, depending on how database authentication is configured.
1.2.6 Itanium requirements To install Oracle GoldenGate on a Microsoft Itanium system, the vcredist_IA64.exe runtime library package must be installed. You can download this package from the Microsoft website. This package includes Visual Studio DLLs necessary for Oracle GoldenGate to operate on the Itanium platform. If these libraries are not installed, Oracle GoldenGate generates the following error. The application failed to initialize properly (0xc0150002). Click on Ok to terminate the application.
1.2.7 Console The operating system and the command console must have the same character sets. Mismatches occur on Microsoft Windows systems, where the operating system is set to one character set, but the DOS command prompt uses a different, older DOS character set. Oracle GoldenGate uses the character set of the operating system to send information to GGSCI command output; therefore a non-matching console character set causes characters not to display correctly. You can set the character set of the console before opening a GGSCI session by using the following DOS command: chcp OS character set
System requirements and preinstallation instructions
1-3
Database configuration
If the characters do not display correctly after setting the code page, try changing the console font to Lucida Console, which has an extended character set.
1.2.8 Other programs The following are additional considerations in support of Oracle GoldenGate. ■
■
Before installing Oracle GoldenGate on a Windows system, install and configure the Microsoft Visual C ++ 2005 SP1 Redistributable Package. Make certain it is the SP1 version of this package, and make certain to get the correct bit version for your server. This package installs runtime components of Visual C++ Libraries. For more information, and to download this package, go to http://www.microsoft.com. Oracle GoldenGate fully supports virtual machine environments created with any virtualization software on any platform. When installing Oracle GoldenGate into a virtual machine environment, select a build that matches the database and the operating system of the virtual machine, not the host system. For example, on a Windows system with a RHAS 4.0 virtual machine running Oracle11g, you would install the RHAS 4.0 build for Oracle 11g, just as you would on an actual Linux machine.
1.3 Database configuration This section contains Oracle GoldenGate requirements that are specific to the Oracle database. ■
■
■
■
■
■
■
To run Oracle GoldenGate for multiple Oracle instances on a Windows system, you must install an instance of Oracle GoldenGate for each one On 64-bit Sun Solaris, HP Tru64 (OSF/1), and LINUX machines with 32-bit Oracle databases, Oracle GoldenGate requires LD_LIBRARY_PATH to include the 32-bit Oracle libraries. You will be instructed to set LD_LIBRARY_PATH in "Setting library paths for dynamic builds on UNIX" on page 2-3. If the database is configured to use a bequeath connection, the sqlnet.ora file must contain the bequeath_detach=true setting. (Integrated capture mode) Oracle GoldenGate 11.2.1 introduced integrated capture support for Oracle 11.2.0.3 with the 11.2.0.3 Database specific bundle patch for Integrated Extract 11.2.x (Doc ID 1411356.1). This mode makes use of a logmining server on the source system or in a downstream Oracle database. For more information, see "Deciding which capture method to use" on page 4-3. The full Oracle client must be used with Oracle GoldenGate so that the Oracle GoldenGate programs have access to the Oracle XDK libraries. Do not use Oracle Instant Client, which lacks those libraries. You can download the full client from the Oracle website. To install Oracle GoldenGate in an Oracle Real Application Cluster (RAC) environment, install Oracle GoldenGate on the shared drive(s) that are accessed by the RAC nodes. For more information, see "Preparing to install Oracle GoldenGate within a cluster" on page 2-5. Additional database user privileges and configuration requirements are explained elsewhere in this manual.
1-4 Oracle GoldenGate for Oracle Installation and Setup Guide
Summary of supported Oracle data types and objects per capture mode
1.4 Summary of supported Oracle data types and objects per capture mode This section contains summary and detail information about the way that Oracle GoldenGate supports the Oracle data types according to the capture mode that you choose. For more information about capture modes, see "Deciding which capture method to use" on page 4-3. Detailed support information for Oracle data types, objects, and operations starts with "Details of support for Oracle data types" on page 1-7. Table 1–1
Supported data types per capture mode
Data type
Classic capture
Integrated capture
Scalar columns including DATE and DATETIME columns
Captured from redo.
Captured from redo.
BASICFILE LOB columns
LOB modifications done via DML (INSERT/UPDATE/DELETE) are captured from redo.
All LOB modifications (done via DML and those done via DBMS_LOB package) are captured from redo.
LOB modifications done via DBMS_LOB package are captured by fetching values from the base table. SECUREFILE LOB
SECUREFILE LOBs are only captured from SECUREFILE LOBs are captured from redo redo if LOBs are not transformed (such as except for the following cases: not compressed or encrypted) and stored ■ LOB is deduplicated out of row, and if the modification is done via DML statements. ■ LOB is modified via fragment operations LOBs are fetched from the base table for ■ NOLOGGING LOBs the following cases: ■
LOB is encrypted
■
LOB is compressed
■
LOB is stored in-line
■
■ ■
■
Index Organized Tables (IOT)
■
LOB is modified via DBMS_LOB package
■
■
■
■
■
LOB is deduplicated LOB is modified via fragment operations
LOB is deduplicated LOB is modified via fragment operations NOLOGGING LOBs
Requires source database COMPATIBLE setting to be 11.2.0.0.0 or higher.
NOLOGGING LOBs
Captured from redo with the following restrictions: ■
XML stored as CLOB
LOBs are fetched from the base table for the following cases:
Captured from redo.
IOT with mapping table not supported. Direct load inserts to IOT tables cannot have the SORTED clause. IOT with prefix compression as specified with COMPRESS clause is not supported. Captured from redo.
Captured from redo. Requires source database compatibility to be set to 11.0.0.0.0 or higher.
System requirements and preinstallation instructions
1-5
Summary of supported Oracle data types and objects per capture mode
Table 1–1 (Cont.) Supported data types per capture mode Data type
Classic capture
Integrated capture
XML stored as Binary
Fetched from base table.
Captured from redo. Requires source database compatibility to be set to 11.2.0.3.0 or higher.
XML stored as Object-Relational
Not supported.
XMLType Table
Not supported.
ADT (Abstract Data Type)
Fetched from source table.
Captured from redo. Requires source database compatibility to be set to 11.2.0.3.0 or higher. Captured from redo. Fetched from source table. Requires source database compatibility to be set to 11.2.0.3.0 or higher.
Collections (VARRAYs)
Fetched from source table.
Fetched from source table. Requires source database compatibility to be set to 11.2.0.0.0 or higher.
Collections (Nested Tables) Fetched from source table with limitations.
Fetched from source table with limitations.
See "Details of support for Oracle objects and operations in DML" on page 1-12.
See "Details of support for Oracle objects and operations in DML" on page 1-12.
Object Table
Fetched from source table.
Fetched from source table.
Transparent Data Encryption (Column Encryption & Tablespace Encryption)
Captured from redo.
Captured from redo.
Requires additional setup: See "Configuring Oracle TDE data in classic capture mode" on page 6-1.
No additional setup is required.
Basic Compression
Not supported.
Captured from redo.
Requires source database compatibility to be set to 11.0.0.0.0 or higher.
Requires source database compatibility to be set to 11.2.0.0.0 or higher. OLTP-Compression
Not supported.
Captured from redo. Requires source database compatibility to be set to 11.2.0.0.0 or higher.
Exadata Hybrid Columnar Not supported. Compression
Captured from redo. Requires source database compatibility to be set to 11.2.0.0.0 or higher.
XA on non-RAC database
Captured from redo.
Captured from redo.
XA on RAC database
Not supported.
Captured from redo.
To get support, must make sure all Requires source database compatibility to branches of XA goes to the same instance. be set to 11.2.0.0.0 or higher. PDML on non-RAC database
Captured from redo.
Captured from redo.
PDML on RAC database
Not supported.
Captured from redo.
To get support, must make sure child transactions spawned from a PDML transaction does not span multiple instances.
1-6 Oracle GoldenGate for Oracle Installation and Setup Guide
Details of support for Oracle data types
1.5 Details of support for Oracle data types The following outlines details of Oracle data type support by Oracle GoldenGate. Unless otherwise noted, the support applies to both classic and integrated capture mode. For more information about these modes, see "Configuring Oracle GoldenGate on Oracle source and target databases" on page 4-1.
1.5.1 Numeric data types The following numeric data types are supported: ■
NUMBER up to the maximum size permitted by Oracle
■
BINARY FLOAT
■
BINARY DOUBLE
1.5.1.1 Limitations of support The support of range and precision for floating-point numbers depends on the host machine. In general, the precision is accurate to 16 significant digits, but you should review the database documentation to determine the expected approximations. Oracle GoldenGate rounds or truncates values that exceed the supported precision.
1.5.2 Character data types The following character data types are supported: ■
CHAR
■
VARCHAR2
■
LONG
■
NCHAR
■
NVARCHAR2
1.5.3 Multi-byte character types The following multi-byte character types are supported: ■
NCHAR and NVARCHAR2 multi-byte character data types
■
Multi-byte data stored in CHAR and VARCHAR2 columns
1.5.3.1 Limitations of support ■
For Oracle GoldenGate to support multi-byte character data, the source and target databases must be logically identical in terms of schema definition for the tables and sequences being replicated. Transformation, filtering, and other manipulation are not supported. The character sets between the two databases must be one of the following: –
Identical, for example SHIFT-JIS on the source and on the target.
–
Equivalent, which is not the same character set but containing the same set of characters, for example SHIFT-JIS and EUC-JP.
–
Target is superset of the source: For example, UNICODE is a superset of all character types, and therefore of any other character set.
System requirements and preinstallation instructions
1-7
Details of support for Oracle data types
■
Multi-byte data is supported whether the length semantics are in bytes or characters.
For additional configuration requirements, see "Handling special data types" on page 5-9.
1.5.4 Binary data types The following binary data types are supported: ■
RAW
■
LONG RAW
1.5.5 Date and timestamp data types The following date and time data types are supported: ■
DATE
■
TIMESTAMP (see Limitations of support)
1.5.5.1 Limitations of support ■ ■
■
■
Oracle GoldenGate does not support negative dates. INTERVAL DAY and INTERVAL YEAR are supported only if the size of the target column is equal to, or greater than, that of the source. Oracle GoldenGate supports the capture and replication of TIMESTAMP WITH TIME ZONE as a UTC offset (TIMESTAMP '2011-01-01 8:00:00 -8:00'). TIMESTAMP WITH TIME ZONE as TZR (Region ID) is supported for the replication of data changes, but not for initial loads, for SQLEXEC, or for operations where the column must be fetched from the database. In these cases, the region ID is converted to a time offset by the database when the column is selected. Replicat replicates the timestamp as date and time data with a time offset value.
To support TIMESTAMP WITH TIME ZONE specified as TZR properly, and also to handle TIMESTAMP WITH LOCAL TIMEZONE properly, see the "Handling special data types" on page 5-9.
1.5.6 Large object data types The following large object types are supported: ■
CLOB
■
NCLOB
■
BLOB
■
SECUREFILE and BASICFILE are both supported.
1.5.6.1 General limitations of support - integrated and classic capture modes When the size of a large object exceeds 4K, Oracle GoldenGate stores the data in segments within the Oracle GoldenGate trail. The first 4K is stored in the base segment, and the rest is stored in a series of 2K segments. Oracle GoldenGate does not support the filtering, column mapping, or manipulation of large objects of this size. Full Oracle GoldenGate functionality can be used for objects that are 4K or smaller.
1-8 Oracle GoldenGate for Oracle Installation and Setup Guide
Details of support for Oracle data types
1.5.6.2 Limitations of support - classic capture mode ■
■
■
BASICFILE LOBs are captured from the redo log regardless of storage, but are fetched from the database in the following circumstances: –
Extract determines the LOB is invalid.
–
The LOB data is not in the redo log, which occurs when the BASICFILE LOB is created with the no_logging option.
–
The LOB is created with the CACHE attribute.
–
The LOB is only partially updated. Oracle GoldenGate does not support partial column data. Extract assumes LOB data to be incomplete if the LOB does not start with a LOB reset record, or if the LOB does not start at the first byte and does not end at the last byte, according to the new LOB length. Partial updates can be generated by the following OCI calls: OCILOBWrite(), OCILobAppend(), OCiLobCopy(), OCILobLoadFromFile(), OCILobTrim(), and by updates made through procedures in the dbms_lob package.
–
Extract detects an anomaly in the LOB data, such as a missing page number, missing END MARKER, or a mismatch between the size that was captured and the expected size.
SECUREFILE LOBs are captured from the redo logs only when the update is complete and the LOB is not transformed (the column is not compressed or encrypted or deduplicated) and stored out-of-row. SECUREFILE LOBs are fetched from the database in the following circumstances: –
The LOB is stored in-row.
–
The LOB is transformed either with compression or encryption.
–
The LOB is created with the CACHE attribute.
–
Extract determines that a LOB instance is invalid.
–
LOB data is missing from the redo log. This can occur if the LOB is created with any of following options: deduplicate, no_logging, filesystem_like_ logging.
–
The LOB is updated using OCILOBWrite(), OCILobAppend(), OCiLobCopy(), OCILobLoadFromFile(), OCILobTrim(), or through procedures in the dbms_lob package.
–
Any other anomalies as detected by Extract in terms of a missing page number, a missing END MARKER, or a mismatch between the size that was captured and the expected size.
When changing a SECUREFILE LOB from one storage to another (such as from ENCRYPT to DECRYPT), Oracle updates the whole table, and Extract captures those updates from the log. Therefore, it will appear as though Oracle updated all of the data blocks that are associated with the table. This also can happen when an ALTER TABLE command sets a DEFAULT value to a column that has null values.
For additional setup requirements, see "Handling special data types" on page 5-9.
1.5.7 XML data types The following XML types are supported: ■
In integrated capture mode, Oracle GoldenGate supports XMLType columns and XMLType tables stored as XML CLOB, XML Object Relational, and XML Binary.
System requirements and preinstallation instructions
1-9
Details of support for Oracle data types
■
In classic capture mode, Oracle GoldenGate supports XMLType columns and XMLType tables stored as XML CLOB and XML Binary.
1.5.7.1 Limitations of support - integrated and classic capture modes ■ ■
■
■
■
Oracle GoldenGate treats XMLType data as a LOB. The source and target objects that contain the XML must be identical. Filtering and manipulation are not supported. You can map the XML representation of an object to a character column by means of a COLMAP clause in a TABLE or MAP statement. The following are not supported: –
Hierarchy-enabled tables (these are managed by the Oracle XML database repository.)
–
XMLType tables created from a CTAS (CREATE TABLE AS SELECT) statement that populates the table. Assuming DDL support is enabled, Oracle GoldenGate replicates the CTAS statement and allows it to select the data from the underlying target table(s). The original inserts are not replicated. For XMLType tables, the row object IDs must match between source and target, which cannot be maintained when Replicat uses logical SQL statements. XMLType tables created by an empty CTAS statement (that does not insert data in the new table) can be maintained correctly.
–
XMLType tables with primary key-based object identifiers (OID)
–
Non-XMLType tables with a single XML column
–
SQL*Loader direct-path insert for XML Binary and XML Object Relational
XML Schema-based XMLType tables and columns are supported, but changes made to XML Schemas are not replicated and must be registered on both source and target databases with the dbms_xml package. Supported tables must have at least one unique key constraint that is made up of scalar columns, or the combination of all scalar columns must guarantee uniqueness. Extract or Replicat cannot use unique or primary key constraints made up of XML attributes for row identification purposes.
1.5.7.2 Limitations of support - integrated capture mode ■
■
The Oracle database must be release 11.2.0.3 or higher, and Extract must be configured in integrated capture mode. The maximum length for the entire SET value of an update to an XMLType is 32K, including the new content plus other operators and XQuery bind values.
1.5.7.3 Limitations of support - classic capture mode ■
■
For XML Binary, Oracle GoldenGate fetches additional row data from the source database because the redo log does not contain enough information. Because the fetched data is not part of the original transaction, it may lead to inconsistency. A table that contains XMLType columns must have one of the following: a primary key, column(s) with a unique constraint, or a unique index.
See "Handling special data types" on page 5-9 for additional information about replicating XML.
1-10 Oracle GoldenGate for Oracle Installation and Setup Guide
Details of support for Oracle data types
1.5.8 User defined or abstract types Oracle GoldenGate supports user defined types (UDT) or abstract data types (ADT) when the source and target objects have the same structure. The schema names can be different.
1.5.8.1 General limitations of support - integrated and classic capture modes ■
■
■
■ ■
■
■
Because a UDT must be fetched, a table that contains one must have one of the following: a primary key, column(s) with a unique constraint, or a unique index. Oracle GoldenGate does not support UDTs with the following embedded scalar types: CLOB, CFILE, BFILE, or INTERVAL_YM, INTERVAL_DS, and OPAQUE (with the exception of XMLType, which is supported). Object or relational tables where the key contains a UDT, or where a UDT is the only column, are not supported. The RMTTASK parameter does not support user-defined types (UDT). CHAR and VARCHAR attributes that contain binary or unprintable characters are not supported. UDTs, including values inside object columns or rows, cannot be used within filtering criteria in TABLE or MAP statements, or as input or output for the Oracle GoldenGate column-conversion functions, SQLEXEC, or other built-in data-manipulation tools. Support is only provided for like-to-like Oracle source and targets. Oracle GoldenGate does not support REF types.
For additional setup requirements, see "Handling special data types" in Chapter 5.
1.5.8.2 Limitations for collection types - integrated and classic capture modes ■
■
When data in a nested table is updated, the row that contains the nested table must be updated at the same time. When VARRAYS and nested tables are fetched, the entire contents of the column are fetched each time, not just the changes.
1.5.8.3 Limitations for object tables- - integrated and classic capture modes ■
■
■
■
■
Oracle GoldenGate supports object tables in uni-directional and active-active configurations. Object tables are captured from the redo log, but certain data types that are fetched from the database when in regular relational tables, such as LOBs and collection types, are also fetched when in object tables. Similarly, current limitations that apply to collection types when in regular tables also apply to these types when in object tables. An Oracle object table can be mapped to a non-Oracle object table in a supported target database. A primary key must be defined on the root-level object attributes of the object table, and cannot include leaf-level attributes. If no key is defined, Oracle GoldenGate will use all viable columns as a pseudo-key. Oracle GoldenGate does not support the replication of DDL operations for an object table. This limitation includes the database object versioning that is associated with ALTERs of object tables. Synonyms are not supported for object tables or relational tables that contain object tables.
System requirements and preinstallation instructions 1-11
Details of support for Oracle objects and operations in DML
1.5.8.4 Limitations for spatial types - integrated and classic capture modes Oracle GoldenGate supports SDO_GEOMETRY, SDO_TOPO_GEOMETRY, and SDO_GEORASTER (raster tables). See additional configuration information in "Handling special data types" on page 5-9.
1.5.9 Non-supported Oracle data types Oracle GoldenGate does not support the following data types. ■
Abstract data types (ADT) with scalar, LOBs, VARRAYS, nested tables, and/or REFs
■
ANYDATA
■
ANYDATASET
■
ANYTYPE
■
BFILE
■
ORDDICOM
■
TIMEZONE_ABBR
■
URITYPE
■
UROWID
See additional exclusions in the Limitations of support sections in "Summary of supported Oracle data types and objects per capture mode" on page 1-5.
1.6 Details of support for Oracle objects and operations in DML This section outlines the Oracle objects and operations that Oracle GoldenGate supports for the capture and replication of DML operations.
1.6.1 Tables, views, and materialized views Oracle GoldenGate supports the following DML operations made to regular tables, index-organized tables, clustered tables, and materialized views. ■
INSERT
■
UPDATE
■
DELETE
■
Associated transaction control operations
1.6.1.1 Limitations of support for regular tables These limitations apply to integrated and classic capture modes. ■
Oracle GoldenGate supports tables that contain any number of rows up to 2 MB in length. Each character LOB/LONG column contributes up to 4 KB to this limit, and each binary LOB column contributes up to 8 KB. This row-size limitation mostly affects update operations on columns that are being used as a row identifier. This identifier can be a primary or unique key, a key defined within the Oracle GoldenGate parameter file, or all of the columns if no key is defined. If a row identifier is updated, the 2 MB length must include not only the after image, but also the full before image, which is required to find the correct key on the target for the update.
1-12 Oracle GoldenGate for Oracle Installation and Setup Guide
Details of support for Oracle objects and operations in DML
■
■
■
■
■
Oracle GoldenGate supports the maximum number of columns per table that is supported by the database. Oracle GoldenGate supports the maximum column size that is supported by the database. Oracle GoldenGate supports tables that contain only one column, except when the column contains one of the following data types: –
LOB
–
LONG
–
Nested table
–
User defined data type
–
VARRAY
–
XML
Oracle GoldenGate supports tables with unused columns, but the support is disabled by default, and Extract abends on them. See "Handling other database properties" on page 5-12. Oracle GoldenGate supports tables with these partitioning attributes: –
Range partitioning
–
Hash Partitioning
–
Interval Partitioning
–
System Partitioning
–
Composite Partitioning
–
Virtual Column-Based Partitioning
–
Reference Partitioning
–
List Partitioning
See "Handling other database properties" on page 5-12. ■
■
■
■
Oracle GoldenGate supports tables with virtual columns, but does not capture change data for these columns or apply change data to them: The database does not write virtual columns to the transaction log, and the Oracle database does permit DML on virtual columns. For the same reason, initial load data cannot be applied to a virtual column. You can map the data from virtual columns to non-virtual target columns. See "Handling other database properties" on page 5-12. Oracle GoldenGate ignores any virtual column that is part of a unique key or index. If a virtual column is the only unique identifier for a table, Oracle GoldenGate uses all of the remaining columns for row identification, so it is possible that the wrong target rows could be deleted or updated if the remaining columns do not enforce uniqueness. Oracle GoldenGate supports replication to and from Oracle Exadata. See "Using Oracle GoldenGate with Oracle Exadata" on page 5-13. Oracle GoldenGate supports Transparent Data Encryption (TDE). For integrated capture, the source database must be Oracle version 11.1.0 with compatibility setting of 11.0.0.0 or higher. Column-level encryption is supported for all versions of Oracle 10.2.0.5, 11.1, and 11.2. Tablespace-level encryption is supported for all versions of Oracle 10.2.0.5 and 11.2.0.1. TDE is supported without setup System requirements and preinstallation instructions 1-13
Details of support for Oracle objects and operations in DML
requirements in integrated capture mode. TDE in classic capture mode requires some setup. See "Configuring Oracle TDE data in classic capture mode" on page 6-1. ■
■
■
■
Oracle GoldenGate supports TRUNCATE statements as part of its DDL replication support, or as standalone functionality that is independent of the DDL support. See "Handling other database properties" on page 5-12. Oracle GoldenGate supports the capture of direct-load INSERTs. Supplemental logging must be enabled, and the database must be in archive log mode. The following direct-load methods are supported. –
/*+ APPEND */ hint
–
/*+ PARALLEL */ hint (Non-RAC only in classic capture mode)
–
SQLLDR with DIRECT=TRUE
Oracle GoldenGate fully supports basic, advanced, and EHCC compressed tables in integrated capture mode. In classic capture mode, Oracle GoldenGate can deliver to, but not capture from, regular and EHCC compressed tables on Oracle Exadata. See "Handling other database properties" on page 5-12. Oracle GoldenGate supports XA and PDML distributed transactions in integrated capture mode.
1.6.1.2 Limitations of support for index-organized tables These limitations apply to classic capture mode. ■
■
IOT with a mapping table is not supported in classic capture mode. The DDL for an IOT with mapping table will be replicated correctly, but subsequent DML on it will fail. This limitation applies to integrated and classic capture modes. IOT with key compression enabled (indicated by the COMPRESS keyword in the key_compression clause) is not supported in classic capture mode, but is supported in integrated capture mode.
1.6.1.3 Limitations of support for views These limitations apply to integrated and classic capture modes. ■
■
■
Oracle GoldenGate supports capture from a view when Extract is in initial-load mode (capturing directly from the source view, not the redo log). Oracle GoldenGate does not capture change data from a view, but it supports capture from the underlying tables of a view. Oracle GoldenGate can replicate to a view as long as the view is inherently updatable. The structures of the source tables and a target view must be identical.
See configuration requirements for views in "Handling other database properties" on page 5-12.
1.6.1.4 Limitations of support for materialized views These limitations apply to integrated and classic capture modes. ■
Materialized views created WITH ROWID are not supported.
■
The materialized view log can be created WITH ROWID.
■
The source table must have a primary key.
1-14 Oracle GoldenGate for Oracle Installation and Setup Guide
Details of support for Oracle objects and operations in DML
■
■
■ ■
Truncates of materialized views are not supported. You can use a DELETE FROM statement. Some Oracle GoldenGate initial-load methods do not support LOBs in a materialized view. For Replicat, the materialized view must be updateable. DML (but not DDL) from a full refresh of a materialized view is supported. If DDL support for this feature is required, open an Oracle GoldenGate support case.
1.6.1.5 Limitations of support for clustered tables Indexed and hash clusters are both supported in both integrated and classic capture modes, but in classic capture mode the following limitations apply: ■ ■
Encrypted and compressed clustered tables are not supported in classic capture. Extract in classic capture mode captures DML changes made to index clustered tables if the cluster size remains the same. Any DDL that causes the cluster size to increase or decrease may cause Extract to capture subsequent DML on that table incorrectly.
1.6.2 Sequences ■
■
Oracle GoldenGate supports the replication of sequence values in a uni-directional and active-passive high-availability configuration. Oracle GoldenGate ensures that the target sequence values will always be higher than those of the source (or equal to them, if the cache is 0).
1.6.2.1 Limitations of support for sequences These limitations apply to integrated and classic capture modes. ■
■
■
Oracle GoldenGate does not support the replication of sequence values in an active-active bi-directional configuration. The cache size and the increment interval of the source and target sequences must be identical. The cache can be any size, including 0 (NOCACHE). The sequence can be set to cycle or not cycle, but the source and target databases must be set the same way.
See configuration requirements in "Handling other database properties" on page 5-12.
1.6.3 Non-supported objects and operations in Oracle DML The following are not supported in either classic or integrated capture mode: ■
REF
■
Sequence values in an active-active bi-directional configuration
■
Database Replay
■
Tables created as EXTERNAL
The following are not supported in classic capture mode only: ■
Exadata Hybrid Columnar Compression
■
Capture from tables with OLTP table compression
■
Capture from tablespaces and tables created or altered with COMPRESS
System requirements and preinstallation instructions 1-15
Details of support for objects and operations in Oracle DDL
■
Capture from encrypted and compressed clustered tables
■
Synonyms
■
Distributed transactions. In Oracle versions 11.1.0.6 and higher, you can capture these transactions if you make them non-distributed by using the following command, which requires the database to be restarted. alter system set _CLUSTERWIDE_GLOBAL_TRANSACTIONS=FALSE;
■
XA and PDML distributed transactions
■
Materialized views created WITH ROWID
■
Truncates of materialized views
1.7 Details of support for objects and operations in Oracle DDL This section outlines the Oracle objects and operation types that Oracle GoldenGate supports for the capture and replication of DDL operations.
1.7.1 Supported objects and operations in Oracle DDL These statements apply to integrated and classic capture modes. ■
■
■
All Oracle GoldenGate topology configurations are supported for Oracle DDL replication. Active-active (bi-directional) replication of Oracle DDL is supported between two (and only two) databases that contain identical metadata. Oracle GoldenGate supports DDL operations of up to 2 MB in size on the following objects: –
clusters
–
functions
–
indexes
–
packages
–
procedure
–
tables
–
tablespaces
–
roles
–
sequences
–
synonyms
–
triggers
–
types
–
views
–
materialized views
–
users
The 2 MB size limitation includes packages, procedures, and functions.
1-16 Oracle GoldenGate for Oracle Installation and Setup Guide
Details of support for objects and operations in Oracle DDL
The actual size limit of the DDL support is approximate, because the size will not only include the statement text but also Oracle GoldenGate maintenance overhead that depends on the length of the object name, the DDL type, and other characteristics of keeping a DDL record internally.
Note:
See the Oracle GoldenGate Windows and UNIX Administrator's Guide for specific support guidelines, support limitations, and configuration instructions.
1.7.2 Non-supported objects and operations in Oracle DDL These statements apply to integrated and classic capture modes.
1.7.2.1 Oracle-reserved schemas The following schema names are considered Oracle-reserved and must be excluded from the Oracle GoldenGate DDL configuration. Oracle GoldenGate will ignore these schemas. ANONYMOUS AURORA $JIS $UTILITY $AURORA $ORB $UNAUTHENTICATED CTXSYS DBSNMP DMSYS DSSYS EXFSYS MDSYS ODM ODM_MTR OLAPSYS ORDPLUGINS ORDSYS OSE$HTTP$ADMIN OUTLN PERFSTAT PUBLIC REPADMIN SYS SYSMAN SYSTEM TRACESVR WKPROXY WKSYS WMSYS XDB
1.7.2.2 Other non-supported DDL Oracle GoldenGate does not support the following: ■
ALTER TABLE ... MOVE TABLESPACE System requirements and preinstallation instructions 1-17
Supported and non-supported object names
■
DDL on nested tables
■
ALTER DATABASE and ALTER SYSTEM (these are not considered to be DDL)
■
DDL on a standby database
In addition, classic capture mode does not support DDL that involves password-based column encryption, such as: ■
CREATE TABLE t1 ( a number, b varchar2(32) ENCRYPT IDENTIFIED BY my_ password);
■
ALTER TABLE t1 ADD COLUMN c varchar2(64) ENCRYPT IDENTIFIED BY my_ password;
1.8 Supported and non-supported object names For information about Oracle GoldenGate support for object names and case, see the Oracle GoldenGate Windows and UNIX Administrator's Guide.
1-18 Oracle GoldenGate for Oracle Installation and Setup Guide
2 Installing Oracle GoldenGate
2
These instructions are for installing Oracle GoldenGate for the first time. To upgrade Oracle GoldenGate from one version to another, follow the instructions on: http://www.oracle.com/technology/software/products/goldengate/in dex.html Installing Oracle GoldenGate installs all of the components that are required to run and manage the processing (excluding any components required from other vendors, such as drivers or libraries) and it installs the Oracle GoldenGate utilities. The installation process takes a short amount of time.
2.1 Installation overview To install Oracle GoldenGate, the following steps are required: ■
Downloading Oracle GoldenGate
■
Setting ORACLE_HOME and ORACLE_SID
■
Setting library paths for dynamic builds on UNIX
■
Preparing to install Oracle GoldenGate within a cluster
■
Installing Oracle GoldenGate on Linux and UNIX
■
Installing Oracle GoldenGate on Windows
■
Integrating Oracle GoldenGate into a cluster
■
Installing support for Oracle sequences
2.2 Downloading Oracle GoldenGate Download the appropriate Oracle GoldenGate build to each system that will be part of the Oracle GoldenGate configuration. 1.
Navigate to http://edelivery.oracle.com
2.
On the Welcome page:
3.
■
Select your language.
■
Click Continue.
On the Export Validation page: ■
Enter your identification information.
■
Accept the Trial License Agreement (even if you have a permanent license). Installing Oracle GoldenGate
2-1
Setting ORACLE_HOME and ORACLE_SID
4.
5.
6.
■
Accept the Export Restrictions.
■
Click Continue.
On the Media Pack Search page: ■
Select the Oracle Fusion Middleware Product Pack.
■
Select the platform on which you will be installing the software.
■
Click Go.
In the Results List: ■
Select the Media Pack that you want to download.
■
Click Continue.
On the Download page: ■
Click Download for each component that you want. Follow the automatic download process to transfer the mediapack.zip file to your system. Before installing the software, review the release notes for any new features, new requirements, or bug fixes that affect your current configuration. Review the readme file for known issues.
Note:
2.3 Setting ORACLE_HOME and ORACLE_SID Make certain that the ORACLE_HOME and ORACLE_SID system environment variables are set to the correct Oracle instance. The Oracle GoldenGate processes refer to them when connecting to the database.
2.3.1 Specifying Oracle variables on UNIX and Linux systems If there is one instance of Oracle on the system, set ORACLE_HOME and ORACLE_SID at the system level. If you cannot set them that way, use the following SETENV statements in the parameter file of every Extract and Replicat group that will be connecting to the instance. The SETENV parameters override the system settings and allow the Oracle GoldenGate process to set the variables at the session level when it connects to the database. SETENV (ORACLE_HOME = “path to Oracle home location”) SETENV (ORACLE_SID = “SID”) If there are multiple Oracle instances on the system with Extract and Replicat processes connecting to them, you will need to use a SETENV statement in the parameter file of each process group and point it to the correct instance. For example, the following shows parameter files for two Extract groups, each capturing from a different Oracle instance. Group 1: EXTRACT ora9a SETENV (ORACLE_HOME = “/home/oracle/ora/product”) SETENV (ORACLE_SID = “oraa”) USERID ggsa, PASSWORD ggsa RMTHOST sysb RMTTRAIL /home/ggs/dirdat/rt TABLE hr.emp; TABLE hr.salary;
2-2 Oracle GoldenGate for Oracle Installation and Setup Guide
Setting library paths for dynamic builds on UNIX
Group 2: EXTRACT orab SETENV (ORACLE_HOME = “/home/oracle/ora/product”) SETENV (ORACLE_SID = “orab”) USERID ggsb, PASSWORD ggsb RMTHOST sysb RMTTRAIL /home/ggs/dirdat/st TABLE fin.sales; TABLE fin.cust;
2.3.2 Specifying Oracle variables on Windows systems If there is one instance of Oracle on the system, the Registry settings for ORACLE_HOME and ORACLE_SID should be sufficient for Oracle GoldenGate. If those settings are incorrect in the Registry and cannot be changed, you can set an override as follows. 1.
On the Desktop or Start menu (depending on the Windows version), right-click My Computer, and then select Properties.
2.
In Properties, click the Advanced tab.
3.
Click Environment Variables.
4.
Under System Variables, click New.
5.
For Variable Name, type ORACLE_HOME.
6.
For Variable Value, type the path to the Oracle binaries.
7.
Click OK.
8.
Click New again.
9.
For Variable Name, type ORACLE_SID.
10. For Variable Value, type the instance name. 11. Click OK.
If there are multiple Oracle instances on the system with Extract and Replicat processes connecting to them, do the following. 1.
Use the preceding procedure (single Oracle instance on system) to set the ORACLE_ HOME and ORACLE_SID system variables to the first Oracle instance.
2.
Start all of the Oracle GoldenGate processes that will connect to that instance.
3.
Repeat the procedure for the next Oracle instance, but first edit the existing ORACLE_HOME and ORACLE_SID variables to specify the new information.
4.
Start the Oracle GoldenGate processes that will connect to that instance.
5.
Repeat the edit and startup procedure for the rest of the Oracle instances.
2.4 Setting library paths for dynamic builds on UNIX Oracle GoldenGate uses shared libraries. When you install Oracle GoldenGate on a UNIX system, the following must be true before you run GGSCI or any other Oracle GoldenGate process. 1.
Make certain that the database libraries are added to the shared-library environment variables of the system. This procedure is usually performed at
Installing Oracle GoldenGate
2-3
Setting library paths for dynamic builds on UNIX
database installation time. Consult your Database Administrator if you have any questions. When Oracle GoldenGate is running on the same server as the database, all of the following must have the same bit type, either all 32-bit, all 64-bit, or all IA64: ■
Oracle library versions
■
Oracle GoldenGate version
■
Database versions
When Oracle GoldenGate connects remotely to the database server through SQL*Net, the following are required: ■
■
2.
Replicat: The Oracle client library and the Oracle GoldenGate build must have the same Oracle version, bit type (32-bit, 64-bit, IA64), and operating system version. Extract: The Oracle client library and the Oracle GoldenGate build must have the same Oracle version, bit type (32-bit, 64-bit, IA64), and operating system version. In addition, both operating systems must be the same endian.
If you will be running an Oracle GoldenGate program from outside the Oracle GoldenGate installation directory on a UNIX system: ■
■
(Optional) Add the Oracle GoldenGate installation directory to the PATH environment variable. (Required) Add the Oracle GoldenGate installation directory to the shared-libraries environment variable.
For example, given an Oracle GoldenGate installation directory of /users/ogg, the second command in the following example requires these variables to be set: Command
Requires GG libraries in environment variable?
$ users/ogg > ./ggsci
No
$ users > ./ogg/ggsci
Yes
To set the variables in Korn shell PATH=installation_directory:$PATH export PATH shared_libraries_variable=absolute_path_of_installation_directory:$shared_ libraries_variable export shared_libraries_variable
To set the variables in Bourne shell export PATH=installation_directory:$PATH export shared_libraries_variable=absolute_path_of_installation_directory:$shared_ libraries_variable
To set the variables in C shell setenv PATH installation_directory:$PATH setenv shared_libraries_variable absolute_path_of_installation_directory:$shared_ libraries_variable
Where: shared libraries variable is one of the variables shown in Table 2–1:
2-4 Oracle GoldenGate for Oracle Installation and Setup Guide
Preparing to install Oracle GoldenGate within a cluster
Table 2–1
UNIX/Linux library path variables per platform
Platform
Environment variable
IBM AIX
LIBPATH
HP-UX
SHLIB_PATH
Sun Solaris
LD_LIBRARY_PATH1
HP Tru64 (OSF/1) LINUX 1
In 64-bit environments with 32-bit Oracle databases, Oracle GoldenGate requires the LD_LIBRARY_PATH to include the 32-bit Oracle libraries.
Example export LD_LIBRARY_PATH=/ggs/11.0:$LD_LIBRARY_PATH
To view the libraries that are required by an Oracle GoldenGate process, use the ldd goldengate_process shell command before starting the process. This command also shows an error message for any that are missing.
Note:
2.5 Preparing to install Oracle GoldenGate within a cluster This topic covers the installation requirements that apply when Oracle GoldenGate will be installed in a cluster environment. Oracle GoldenGate can be used with any cluster-management solution that is Oracle-certified. The Oracle Clusterware solution provides the advantage of being able to be used with or without an Oracle RAC database, which enables you to include any non-database servers that are running Oracle GoldenGate.
2.5.1 Installing as the Oracle user To install into an Oracle cluster, install as the Oracle operating system user.
2.5.2 Supported Oracle cluster storage You will need to install at least some Oracle GoldenGate objects on shared storage. Select cluster-aware shared storage that is independent of, but available to, all nodes of the cluster. You can use any of the following: ■
■
■
Oracle Cluster File System (OCFS). Instead of installing Oracle GoldenGate in a local directory, install it in a directory that is mounted to an OCFS volume. See the OCFS2 documentation for configuration information. Oracle Automatic Storage Management System (AFS). If using classic capture, see setup requirements in "Capturing from an Oracle ASM instance when in classic capture mode" on page 6-7. Oracle Database File system (DBFS). Do not install Oracle GoldenGate on DBFS, but you can store the subdirectories (that are created with CREATE SUBDIRS during installation) in a DBFS cluster that is only mounted to one server at a time. For requirements in high-availability, see "Preparing DBFS for active-active propagation with Oracle GoldenGate" on page D-1.
Installing Oracle GoldenGate
2-5
Installing Oracle GoldenGate on Linux and UNIX
2.5.3 Deciding where to install Oracle GoldenGate binaries and files in the cluster The best practice is to install Oracle GoldenGate entirely on shared storage. This allows you to start the Oracle GoldenGate processes from any of the nodes without having to make changes to the parameter files. If the active node fails, the processes can be started quickly on another node, using the processing checkpoints that are preserved in the installation directory. If you decide to install the Oracle GoldenGate binaries and files on each node, rather than on shared storage, the following must be true: ■
■
The Oracle GoldenGate installation must have the same location path on every node. At minimum, install the following directories on the shared storage to support Oracle GoldenGate recovery requirements. On UNIX or Linux, you can create symbolic links to them from the installation directory on each node. –
br
–
dirchk
–
dirdat
–
dirtmp
These directories are among those created when you issue CREATE SUBDIRS during installation. ■
The parameter files in the dirprm directory, if not placed on the shared drive, must be identical on all nodes. To resolve environment settings that must be different from one node to the other, you can set environment settings so they are inherited from the local Manager process or reference a node-specific Oracle GoldenGate macro file. Because this scenario can be difficult to enforce, the inherent concerns can be avoided by storing the parameter files on the shared drive.
See also "Integrating Oracle GoldenGate into a cluster" on page 2-9 after you install Oracle GoldenGate.
2.6 Installing Oracle GoldenGate on Linux and UNIX Follow these steps to install Oracle GoldenGate for Oracle on a Linux or UNIX system or in the appropriate location in a cluster. See Section 2.5, "Preparing to install Oracle GoldenGate within a cluster" for more information. 1.
Extract the Oracle GoldenGate mediapack.zip file to the system and directory where you want Oracle GoldenGate to be installed.
2.
Run the command shell.
3.
Change directories to the new Oracle GoldenGate directory.
4.
From the Oracle GoldenGate directory, run the GGSCI program. GGSCI
5.
In GGSCI, issue the following command to create the Oracle GoldenGate working directories. CREATE SUBDIRS
6.
Issue the following command to exit GGSCI. EXIT
2-6 Oracle GoldenGate for Oracle Installation and Setup Guide
Installing Oracle GoldenGate on Windows
2.7 Installing Oracle GoldenGate on Windows Follow these steps to install Oracle GoldenGate for Oracle on a Windows system or in the appropriate location in a cluster. See Section 2.5, "Preparing to install Oracle GoldenGate within a cluster" for more information.
2.7.1 Installing Oracle GoldenGate into a Windows Cluster 1.
Log into one of the nodes in the cluster.
2.
Choose a drive for the Oracle GoldenGate installation location. This drive must be a resource within the same cluster group that contains the database instance.
3.
Ensure that this cluster group is owned by the cluster node that you are logging into.
4.
Install Oracle GoldenGate according to "Installing the Oracle GoldenGate files".
2.7.2 Installing the Oracle GoldenGate files 1.
Unzip the downloaded file(s) by using WinZip or an equivalent compression product.
2.
Move the files in binary mode to a folder on the drive where you want to install Oracle GoldenGate. Do not install Oracle GoldenGate into a folder that contains spaces in its name, even if the path is in quotes. For example: C:\“Oracle GoldenGate” is not valid. C:\Oracle_GoldenGate is valid.
3.
From the Oracle GoldenGate folder, run the GGSCI program.
4.
In GGSCI, issue the following command to create the Oracle GoldenGate working directories. CREATE SUBDIRS
5.
Issue the following command to exit GGSCI. EXIT
6.
Copy the following files from the Oracle GoldenGate installation directory to the SYSTEM32 directory. category.dll ggsmsg.dll
2.7.3 Specifying a custom Manager name You must specify a custom name for the Manager process if either of the following is true: ■ ■
You want to use a name for Manager other than the default of GGSMGR. There will be multiple Manager processes running as Windows services on this system. Each Manager on a system must have a unique name. Before proceeding further, note the names of any local Manager services.
To specify a custom Manager name 1. From the directory that contains the Manager program, run GGSCI. 2.
Issue the following command.
Installing Oracle GoldenGate
2-7
Installing Oracle GoldenGate on Windows
EDIT PARAMS ./GLOBALS The ./ portion of this command must be used, because the GLOBALS file must reside at the root of the Oracle GoldenGate installation file. Note:
3.
In the file, add the following line, where name is a one-word name for the Manager service. MGRSERVNAME name
4.
Save the file. The file is saved automatically with the name GLOBALS, but without a file extension. Do not move this file. It is used during installation of the Windows service and during data processing.
2.7.4 Installing Manager as a Windows service By default, Manager is not installed as a service and can be run by a local or domain account. However, when run this way, Manager will stop when the user logs out. When you install Manager as a service, you can operate it independently of user connections, and you can configure it to start manually or at system start-up. Installing Manager as a service is required on a Windows Cluster, but optional otherwise. To install Manager as a Windows service 1. (Recommended) Log on as the system administrator. 2.
Click Start, then Run, and then type cmd in the Run dialog box.
3.
From the directory that contains the Manager program that you are installing as a service, run the INSTALL utility with the following syntax: install option [...]
Where: option is one of the following: Table 2–2
INSTALL utility options
Option
Description
ADDEVENTS
Adds Oracle GoldenGate events to the Windows Event Manager.
ADDSERVICE
Adds Manager as a service with the name that is specified with the MGRSERVNAME parameter in the GLOBALS file, if one exists, or by the default of GGSMGR. ADDSERVICE configures the service to run as the Local System account, the standard for most Windows applications because the service can be run independently of user logins and password changes. To run Manager as a specific account, use the USER and PASSWORD options.1 The service is installed to start at system boot time (see AUTOSTART ). To start it after installation, either reboot the system or start the service manually from the Services applet of the Control Panel.
AUTOSTART
Sets the service that is created with ADDSERVICE to start at system boot time. This is the default unless MANUALSTART is used.
MANUALSTART
Sets the service that is created with ADDSERVICE to start manually through GGSCI, a script, or the Services applet of the Control Panel. The default is AUTOSTART .
2-8 Oracle GoldenGate for Oracle Installation and Setup Guide
Integrating Oracle GoldenGate into a cluster
Table 2–2 (Cont.) INSTALL utility options Option
Description
USER name
Specifies a domain user account that executes Manager. For the name, include the domain name, a backward slash, and the user name, for example HEADQT\GGSMGR . By default, the Manager service is installed to use the Local System account.
PASSWORD password 1
4.
Specifies the password for the user that is specified with USER .
A user account can be changed by selecting the Properties action from the Services applet of the Windows Control Panel.
(Windows Server 2008) If Windows User Account Control (UAC) is enabled, you are prompted to allow or deny the program access to the computer. Select Allow to enable the INSTALL utility to run. The INSTALL utility installs the Manager service with a local system account running with administrator privileges. No further UAC prompts will be encountered when running Manager if installed as a service. If Manager is not installed as a service, Oracle GoldenGate users will receive a UAC prompt to confirm the elevation of privileges for Manager when it is started from the GGSCI command prompt. Running other Oracle GoldenGate programs also triggers a prompt.
Note:
2.8 Integrating Oracle GoldenGate into a cluster If you installed Oracle GoldenGate in a cluster, take the following steps to integrate Oracle GoldenGate within the cluster solution.
2.8.1 General requirements in a cluster 1.
Register the Oracle GoldenGate Manager process (and only Manager) as a cluster-managed resource as you would any other application. Manager must be the only Oracle GoldenGate process that the cluster-management software starts and stops, because it is the parent process that manages all other processes.
2.
If the cluster uses a virtual IP address (such as Oracle Clusterware), you may need to obtain an available fixed IP address for the Manager process. The VIP must be an available IP address on the public subnet and cannot be determined through DHCP. In the parameter files of the Extract data pumps, specify the VIP of the remote Manager as the input value of the RMTHOST parameter. Other Oracle GoldenGate products that access Manager also should use the VIP.
3.
(Oracle databases earlier than version 10.2) Make certain that all nodes in the cluster have synchronized system clocks. The clocks must be synchronized with the clock on the system where Extract is executed. Oracle GoldenGate compares the time of the local system to the commit timestamps to make critical decisions. For information about synchronizing system clocks, consult www.ntp.org or your systems administrator. See also the IOLATENCY option of the THREADOPTIONS parameter in the Oracle GoldenGate Windows and UNIX Reference Guide. This is not a requirement for integrated capture.
4.
Make certain that all nodes in the cluster have the same COMPATIBLE parameter setting.
Installing Oracle GoldenGate
2-9
Installing support for Oracle sequences
5.
When you configure Manager, add the AUTOSTART and AUTORESTART parameters so that Manager starts the replication processes automatically (see "Creating the Oracle GoldenGate instance" on page 4-9). You can, when needed, control Extract, Replicat, and other Oracle GoldenGate processes from within the Oracle GoldenGate user interfaces.
6.
Mount the shared drive on one node only. This prevents processes from being started on another node. Use the same mount point on all nodes.
7.
Configure Oracle GoldenGate as directed in this documentation.
2.8.2 Adding Oracle GoldenGate as a Windows cluster resource When installing Oracle GoldenGate in a Windows cluster, follow these instructions to establish Oracle GoldenGate as a cluster resource and configure the Manager service correctly on all nodes. ■
■
■
In the cluster administrator, add the Manager process to the group that contains the database instance to which Oracle GoldenGate will connect. Make sure all nodes on which Oracle GoldenGate will run are selected as possible owners of the resource. Make certain the Manager Windows service has the following dependencies (configurable from the Services control panel): –
The database resource
–
The disk resource that contains the Oracle GoldenGate directory
–
The disk resource that contains the database transaction log files
–
The disk resource that contains the database transaction log backup files
2.9 Installing support for Oracle sequences To support Oracle sequences, you must install some database procedures. These procedures support the Oracle GoldenGate FLUSH SEQUENCE command, which you issue immediately after you start the Oracle GoldenGate processes for the first time (typically when you perform the initial data synchronization procedure). To install Oracle sequence objects You will perform steps on the source and target systems. 1.
In SQL*Plus, connect to the source and target Oracle systems as SYSDBA.
2.
If you already assigned a database user to support the Oracle GoldenGate DDL replication feature, you can skip this step. Otherwise, in SQL*Plus on both systems create a database user that can also be the DDL user. CREATE USER DDLuser IDENTIFIED BY password; GRANT CONNECT, RESOURCE, DBA TO DDLuser;
3.
From the Oracle GoldenGate installation directory on each system, run GGSCI.
4.
In GGSCI, issue the following command on each system. EDIT PARAMS ./GLOBALS
5.
In each GLOBALS file, enter the GGSCHEMA parameter and specify the schema of the DDL user that you created earlier in this procedure. GGSCHEMA schema
2-10 Oracle GoldenGate for Oracle Installation and Setup Guide
Installing support for Oracle sequences
6.
Save and close the files.
7.
In SQL*Plus on both systems, run the sequence.sql script from the root of the Oracle GoldenGate installation directory. This script creates some procedures for use by Oracle GoldenGate processes. (Do not run them yourself.) You are prompted for the user information that you created in the first step. @sequence.sql
8.
In SQL*Plus on the source system, grant EXECUTE privilege on the updateSequence procedure to a database user that can be used to issue the DBLOGIN command. Remember or record this user. You use DBLOGIN to log into the database prior to issuing the FLUSH SEQUENCE command, which calls the procedure. GRANT EXECUTE on DDLuser.updateSequence TO DBLOGINuser;
9.
In SQL*Plus on the target system, grant EXECUTE privilege on the replicateSequence procedure to the Replicat database user. GRANT EXECUTE on DDLuser.replicateSequence TO Replicatuser;
10. In SQL*Plus on the source system, issue the following statement in SQL*Plus.
ALTER TABLE sys.seq$ ADD SUPPLEMENTAL LOG DATA (PRIMARY KEY) COLUMNS;
Installing Oracle GoldenGate 2-11
Installing support for Oracle sequences
2-12 Oracle GoldenGate for Oracle Installation and Setup Guide
3 Installing Oracle GoldenGate DDL support for an Oracle database
3
This chapter contains instructions for installing the objects that support DDL replication. To configure Oracle GoldenGate to capture and replicate DDL, see Chapter 7. Note: DDL support for sequences (CREATE, ALTER, DROP, RENAME) is compatible with, but not required for, replicating the sequence values themselves. To replicate just sequence values, you do not need to install the Oracle GoldenGate DDL support environment. You can just use the SEQUENCE parameter in the Extract configuration.
3.1 Overview of the DDL objects To install the Oracle GoldenGate DDL environment, you will be installing the database objects shown in Table 3–1. Table 3–1
DDL synchronization objects
Object
Purpose
Default name
DDL marker table
Stores DDL information. This table only receives inserts.
GGS_MARKER
Sequence on marker table
Used for a column in the marker table.
GGS_DDL_SEQ
DDL history table
Stores object metadata history. This table receives inserts, updates, deletes.
GGS_DDL_HIST
Object ID history table
Contains object IDs of configured GGS_DDL_HIST_ALT objects.
DDL trigger
Fires on DDL operations. Writes information about the operation to the marker and history tables. Installed with the trigger are some packages.
GGS_DDL_TRIGGER_BEFORE
DDL schema
Contains the DDL synchronization objects.
None; must be specified during installation and in the GLOBALS file.
User role
Establishes the role needed to execute DDL operations.
GGS_GGSUSER_ROLE
Installing Oracle GoldenGate DDL support for an Oracle database
3-1
Installing the DDL objects
Table 3–1 (Cont.) DDL synchronization objects Object
Purpose
Default name
Internal setup table
Database table for internal use only.
GGS_SETUP
ddl_pin
Pins DDL tracing, the DDL ddl_pin package, and the DDL trigger for performance improvements.
ddl_cleartrace.sql
Removes the DDL trace file.
ddl_cleartrace.sql
ddl_status.sql
Verifies that the Oracle GoldenGate DDL objects are installed
ddl_status.sql
marker_status.sql
Verifies that the marker table is installed.
marker_status.sql
ddl_tracelevel.sql
Sets the level for DDL tracing.
ddl_tracelevel.sql
3.2 Installing the DDL objects Follow these steps to install the database objects that support Oracle GoldenGate DDL capture. 1.
Choose a schema that can contain the Oracle GoldenGate DDL objects. This schema cannot be case-sensitive.
2.
Grant the following permission to the Oracle GoldenGate schema. GRANT EXECUTE ON utl_file TO schema;
3.
Create a default tablespace for the Oracle GoldenGate DDL schema. This tablespace must be dedicated to the DDL schema; do not allow any other schema to share it.
4.
Set AUTOEXTEND to ON for the DDL tablespace, and size it to accommodate the growth of the GGS_DDL_HIST and GGS_MARKER tables. The GGS_DDL_HIST table, in particular, will grow in proportion to overall DDL activity.
5.
(Optional) To cause user DDL activity to fail when the DDL tablespace fills up, edit the params.sql script and set the ddl_fire_error_in_trigger parameter to TRUE. Extract cannot capture DDL if the tablespace fills up, so stopping the DDL gives you time to extend the tablespace size and prevent the loss of DDL capture. Managing tablespace sizing this way, however, requires frequent monitoring of the business applications and Extract to avoid business disruptions. As a best practice, make certain to size the tablespace appropriately in the first place, and set AUTOEXTEND to ON so that the tablespace does not fill up. Make a backup of the params.sql script before you edit it to preserve its original state.
WARNING:
6.
Create a GLOBALS file (or edit it, if one exists). EDIT PARAMS ./GLOBALS
3-2 Oracle GoldenGate for Oracle Installation and Setup Guide
Installing the DDL objects
EDIT PARAMS creates a simple text file. When you save the file after EDIT PARAMS, it is saved with the name GLOBALS in upper case, without a file extension, at the root of the Oracle GoldenGate directory. Do not alter the file name or location. Note:
7.
In the GLOBALS file, specify the name of the DDL schema by adding the following parameter to the GLOBALS file. GGSCHEMA schema_name
8.
(Optional) To change the names of other objects listed in Table 3–1, the changes must be made now, before proceeding with the rest of the installation. Otherwise, you will need to stop Oracle GoldenGate DDL processing and reinstall the DDL objects. It is recommended that you accept the default names of the database objects. To change any name in Table 3–1 (except the schema), do one or both of the following: ■
■
Record all name changes in the params.sql script. Edit this script and change the appropriate parameters. Do not run this script. List the names shown in Table 3–2 in the GLOBALS file. The correct parameters to use are listed in the Parameter column of the table.
Table 3–2
GLOBALS parameters for changing DDL object names
Object
Parameter
Marker table
MARKERTABLE new_table_name1
History table
DDLTABLE new_table_name
1
9.
Do not qualify the name of any of these tables. The schema name for these table must be either the one that is specified with GGSCHEMA or the schema of the current user, if GGSCHEMA is not specified in GLOBALS.
(Optional) To improve the performance of capture from tables that have hundreds of partitions, add the no_unnest hint to the SQL in the params.sql script as shown in the following example. The hint is shown in bold face font. SELECT KEY.KEY_NAME INDEX_NAME, KEY.COLUMN_NAME, KEY.DESCEND FROM (SELECT /*+ NO_UNNEST */ C.CONSTRAINT_NAME KEY_NAME, C.COLUMN_NAME COLUMN_NAME, C.POSITION POSITION, 'ASC' DESCEND FROM DBA_CONS_COLUMNS C WHERE C.OWNER = :B2 AND C.TABLE_NAME = :B1 AND C.CONSTRAINT_NAME IN ( SELECT /*+ NO_UNNEST */ CON1.NAME FROM SYS.USER$ USER1, SYS.USER$ USER2, SYS.CDEF$ CDEF, SYS.CON$ CON1, SYS.CON$ CON2, SYS.OBJ$ OBJ1, SYS.OBJ$ OBJ2 WHERE USER1.NAME = :B2 AND OBJ1.NAME = :B1 AND CDEF.TYPE# = 3 AND BITAND(CDEF.DEFER, 36) = 4 AND (CDEF.TYPE# = 5 OR CDEF.ENABLED IS NOT NULL) AND CON2.OWNER# = USER2.USER#(+) AND CDEF.ROBJ# = OBJ2.OBJ#(+) AND CDEF.RCON# = CON2.CON#(+) AND OBJ1.OWNER# = USER1.USER# AND CDEF.CON# = CON1.CON# AND CDEF.OBJ# = OBJ1.OBJ#) UNION SELECT /*+ NO_UNNEST */ I.INDEX_NAME KEY_NAME, C.COLUMN_NAME COLUMN_NAME, C.COLUMN_POSITION POSITION, C.DESCEND DESCEND FROM DBA_INDEXES I, DBA_IND_COLUMNS C WHERE I.TABLE_OWNER = :B2 AND I.TABLE_NAME = :B1 AND I.UNIQUENESS = 'UNIQUE' AND I.OWNER = C.INDEX_OWNER AND I.INDEX_NAME = C.INDEX_NAME AND :B1 = C.TABLE_NAME AND :B2 = C.TABLE_OWNER AND I.INDEX_NAME IN ( SELECT /*+ NO_UNNEST */INDEX_NAME FROM DBA_INDEXES WHERE TABLE_OWNER = :B2 AND TABLE_NAME = :B1 AND UNIQUENESS = 'UNIQUE') AND I.INDEX_NAME NOT IN ( SELECT /*+ NO_UNNEST */C.CONSTRAINT_NAME FROM DBA_CONS_COLUMNS C WHERE C.OWNER = :B2 AND
Installing Oracle GoldenGate DDL support for an Oracle database
3-3
Installing the DDL objects
C.TABLE_NAME = :B1 AND C.CONSTRAINT_NAME IN ( SELECT /*+ NO_UNNEST */ C1.NAME FROM SYS.USER$ U1, SYS.USER$ U2, SYS.CDEF$ D, SYS.CON$ C1, SYS.CON$ C2, SYS.OBJ$ O1, SYS.OBJ$ O2 WHERE U1.NAME = :B2 AND O1.NAME = :B1 AND D.TYPE# IN (2, 3) AND (D.DEFER IS NULL OR D.DEFER = 0 OR BITAND(D.DEFER, 36) = 4) AND (D.TYPE# = 5 OR D.ENABLED IS NOT NULL) AND C2.OWNER# = U2.USER#(+) AND D.ROBJ# = O2.OBJ#(+) AND D.RCON# = C2.CON#(+) AND O1.OWNER# = U1.USER# AND D.CON# = C1.CON# AND D.OBJ# = O1.OBJ#) AND EXISTS ( SELECT /*+ NO_UNNEST */ 'X' FROM DBA_TAB_COLUMNS T WHERE T.OWNER = C.OWNER AND T.TABLE_NAME = C.TABLE_NAME AND T.COLUMN_NAME = C.COLUMN_NAME)) ) KEY ORDER BY KEY.KEY_NAME, KEY.POSITION
WARNING: Do not edit any other parameters in params.sql except if you need to follow documented instructions to change certain object names. 10. Save and close the GLOBALS file and the params.sql file. 11. Change directories to the Oracle GoldenGate installation directory. 12. Exit all Oracle sessions, including those of SQL*Plus, those of business
applications, those of the Oracle GoldenGate processes, and those of any other software that uses Oracle. Prevent the start of any new sessions. 13. Run SQL*Plus and log in as a user that has SYSDBA privilege. This privilege is
required to install the DDL trigger in the SYS schema, which is required by Oracle. All other DDL objects are installed in the schema that you created in step 1. 14. Run the marker_setup.sql script. Supply the name of the Oracle GoldenGate
schema when prompted, and then press Enter to execute the script. The script installs support for the Oracle GoldenGate DDL marker system. @marker_setup.sql 15. Run the ddl_setup.sql script. You are prompted to specify the name of the DDL
schema that you configured in step 1. The ddl_setup.sql will fail if the tablespace for this schema is shared by any other users. It will not fail, however, if the default tablespace does not have AUTOEXTEND set to ON, the recommended setting. You must disable the Oracle recycle bin if your database is Oracle 10g.
Note:
@ddl_setup.sql 16. Run the role_setup.sql script. At the prompt, supply the DDL schema name. The
script drops and creates the role that is needed for DDL synchronization, and it grants DML permissions on the Oracle GoldenGate DDL objects. @role_setup.sql 17. Grant the role that was created (default name is GGS_GGSUSER_ROLE) to all Oracle
GoldenGate Extract users. You may need to make multiple grants if the processes have different user names. GRANT role TO user; 18. Run the ddl_enable.sql script to enable the DDL trigger. 3-4 Oracle GoldenGate for Oracle Installation and Setup Guide
Installing the DDL objects
@ddl_enable.sql
To install and use the optional performance tool To improve the performance of the DDL trigger, make the ddl_pin script part of the database startup. It must be invoked with the Oracle GoldenGate DDL user name, as in: @ddl_pin DDL_user This script pins the PL/SQL package that is used by the trigger into memory. If executing this script from SQL*Plus, connect as SYSDBA from the Oracle GoldenGate installation directory. This script relies on the Oracle dmbs_shared_pool system package, so install that package before using ddl_pin.
Installing Oracle GoldenGate DDL support for an Oracle database
3-5
Installing the DDL objects
3-6 Oracle GoldenGate for Oracle Installation and Setup Guide
4 Configuring Oracle GoldenGate on Oracle source and target databases
4
This chapter contains instructions for configuring Oracle GoldenGate to capture source Oracle data and apply it to a target Oracle database.
4.1 What to expect from this procedure These instructions show you how to configure a basic set of Oracle GoldenGate parameter (configuration) files, one for each process that replicates transactional data changes from an Oracle source to an identical Oracle target. Your business requirements probably will require a more complex topology, but this procedure forms a basis for the rest of your configuration steps. Figure 4–1 The basic configuration
By performing these steps, you can: ■ ■
■
get the basic configuration files established. build upon them later by adding more parameters as you make decisions about features or requirements that apply to your environment. use copies of them to make the creation of additional parameter files faster than starting from scratch.
4.2 Creating and editing parameter files You will be working with Oracle GoldenGate parameter files throughout the deployment process. To create and edit a parameter file, use the EDIT PARAMS command in GGSCI at any time after you start Manager. EDIT PARAMS name of parameter file Configuring Oracle GoldenGate on Oracle source and target databases
4-1
Overview of basic steps to configure Oracle GoldenGate
For more information about ways to work with Oracle GoldenGate parameter files, see the Oracle GoldenGate Windows and UNIX Administrator's Guide.
4.3 Overview of basic steps to configure Oracle GoldenGate You will make the following decisions: ■
Choosing names for processes and files
■
Deciding which capture method to use
■
Assigning a database user for Oracle GoldenGate
You will create the following basic set of objects. On both systems: ■ Creating the Oracle GoldenGate instance On the source system: ■ Configuring Extract for change capture On the target system: ■ Configuring Replicat for change delivery
This chapter also includes recommendations for: ■
Tuning recommendations for integrated capture
■
Configuring additional process groups for best performance
■
Next steps in the deployment
■
When to start replicating transactional changes
■
Testing your configuration
4.4 Choosing names for processes and files It is helpful to develop some naming conventions for the Oracle GoldenGate processes and files before you start configuration steps. Choosing meaningful names helps you differentiate among multiple processes and files in displays, error logs, and external monitoring programs. In addition, it accommodates the naming of additional processes and files later, as your environment changes or expands. This section contains instructions for: ■
Choosing group names
■
Choosing file names
4.4.1 Choosing group names You specify the names of Oracle GoldenGate processes in the parameter files and when you create them during the instantiation of the Oracle GoldenGate environment (Chapter 8). At minimum, you must choose names for the following processing components:
4-2 Oracle GoldenGate for Oracle Installation and Setup Guide
Deciding which capture method to use
■
■
■
Primary Extract: The primary Extract process captures data and DDL from the database source. Data pump: The data pump is a secondary Extract process that reads captured data from a local trail on the source system and sends it over the network to the target. The data pump adds storage flexibility and isolates the primary Extract process from TCP/IP activity. For an illustration of how a data pump fits into the capture configuration, see Figure 4–1. Replicat: The Replicat process reads a remote trail and applies the transactional changes to the target database.
You may need to create more than one Replicat group and possibly more than one primary Extract group and data pump, depending on such decisions as capture method, performance tuning, or load balancing. For process naming conventions, see the ADD EXTRACT and ADD REPLICAT commands in the Oracle GoldenGate Windows and UNIX Reference Guide.
4.4.2 Choosing file names Captured data must be processed into a series of files called a trail, where it is stored for processing by the next Oracle GoldenGate process downstream. The basic configuration is: ■
a local trail on the source system
■
a remote trail on the target system.
The name can be a relative or fully qualified path name. The actual trail name can contain only two characters, such as ./dirdat/tr. Oracle GoldenGate appends this name with a six-digit sequence number whenever a new file is created, such as ./dirdat/aa000002. For more information about trail files, how they are stored, and how they are managed, see the Oracle GoldenGate Windows and UNIX Administrator's Guide.
4.5 Deciding which capture method to use For an Oracle source database, you can use either classic capture or integrated capture mode. The following explains these modes and the database versions that each mode supports.
4.5.1 About classic capture In classic capture mode, the Oracle GoldenGate Extract process captures data changes from the Oracle redo or archive log files on the source system or from shipped archive logs on a standby system. Figure 4–2 Classic capture
Configuring Oracle GoldenGate on Oracle source and target databases
4-3
Deciding which capture method to use
Classic capture supports most Oracle data types fully, with restricted support for the complex data types. Classic capture is the original, fast, and time-proven Oracle GoldenGate capture method that supports a broad array of the most commonly used Oracle data types and features. You can use classic capture for any source Oracle RDBMS that is supported by Oracle GoldenGate. You can use classic capture to support the following: ■
■
ADTs, VARRAYs, NOLOGGING LOBs with source database compatibility set below 11.2.0.0.0. Transparent Data Encryption support with source database compatibility set below 11.0.0.0.0.
■
SECUREFILE LOB support with source database compatibility set below 11.2.0.0.0.
■
NOLOGGING LOB support with source database compatibility set below 11.2.0.0.0.
For more information, see "Summary of supported Oracle data types and objects per capture mode" on page 1-5. If using classic capture, some additional setup is required after you complete the configuration steps to produce a basic set of Oracle GoldenGate parameter files. See "Additional configuration steps when using classic capture" on page 6-1.
4.5.2 About integrated capture In integrated capture mode, the Oracle GoldenGate Extract process interacts directly with a database logmining server to receive data changes in the form of logical change records (LCR). Integrated capture supports more data and storage types as compared to classic capture, and the support is more transparent. For more information, see "Summary of supported Oracle data types and objects per capture mode" on page 1-5. Figure 4–3 Integrated capture
The following are some additional benefits of integrated capture: ■
■
■ ■
Because integrated capture is fully integrated with the database, no additional setup is required to work with Oracle RAC, ASM, and TDE. Integrated capture uses the database logmining server to access the Oracle redo stream, with the benefit of being able to automatically switch between different copies of archive logs or different mirrored versions of the online logs. Thus integrated capture can transparently handle the unavailability of a log file caused by disk corruption, hardware failure, or operator error, assuming that additional copies of the archived and online logs are available Integrated capture enables faster filtering of tables. Integrated capture handles point-in-time recovery and RAC integration more efficiently.
4-4 Oracle GoldenGate for Oracle Installation and Setup Guide
Deciding which capture method to use
■
Integrated capture features integrated log management. The Oracle Recovery Manager (RMAN) automatically retains the archive logs that are needed by Extract.
4.5.2.1 Integrated capture supported database versions The database version determines the data type support available through integrated capture: ■
Full support: To support all Oracle data and storage types, the compatibility setting of the source database must be at least 11.2.0.3.0 with the 11.2.0.3 Database specific bundle patch for Integrated Extract 11.2.x (Doc ID 1411356.1). To get this patch from Oracle support, go to: https://support.oracle.com/oip/faces/secure/km/DocumentDispla y.jspx?id=1411356.1
■
Limited support: You can use integrated capture on an 11.2.0.3.0 downstream mining database for a source database with a compatibility less than 11.2.0.3, but in this mode, SECUREFILE LOBs, XML columns, Transparent Data Encryption, and UDTs are not supported. The downstream mining database must have the 11.2.0.3 Database specific bundle patch for Integrated Extract 11.2.x (Doc ID1411356.1) applied. See "Integrated capture deployment options" on page 4-5.
To understand the differences in data type support among different RDBMS versions, see "Summary of supported Oracle data types and objects per capture mode" on page 1-5.
4.5.2.2 Integrated capture deployment options There are two deployment options for integrated capture, depending on where the mining database is deployed. The mining database is the one where the logmining server is deployed. ■
■
Local deployment: For local deployment, the source database and the mining database are the same. The source database is the database for which you want to mine the redo stream to capture changes, and also where you deploy the logmining server. Because integrated capture is fully integrated with the database, this mode does not require any special database setup. Downstream deployment: In downstream deployment, the source and mining databases are different databases. You create the logmining server at the downstream database. You configure redo transport at the source database to ship the redo logs to the downstream mining database for capture at that location. Using a downstream mining server for capture may be desirable to offload the capture overhead and any other overhead from transformation or other processing from the production server, but requires log shipping and other configuration.
When using a downstream mining configuration, the source database and mining database must be of the same platform. For example, if the source database is running on Windows 64-bit, the downstream database must also be on a Windows 64-bit platform. To configure a downstream mining database, see "Configuring a downstream mining database for integrated capture" on page A-1.
4.5.3 Combining capture modes For Oracle 11.2.0.3 with the 11.2.0.3 Database specific bundle patch for Integrated Extract 11.2.x (Doc ID 1411356.1), you can use either integrated capture, classic capture, or a combination of the two modes. You can divide your tables between two or more Extracts in different capture modes depending on the attributes and data types of the Configuring Oracle GoldenGate on Oracle source and target databases
4-5
Assigning a database user for Oracle GoldenGate
tables. The Oracle GoldenGate parameter files, trails, conversion capabilities, mapping options, and replication mechanisms are fundamentally the same in both modes.
4.6 Assigning a database user for Oracle GoldenGate This procedure creates a database user for each Oracle GoldenGate process and assigns the correct database privileges. 1.
Create a source database user and a target database user, each one dedicated to Oracle GoldenGate on the source and target systems. It can be the same user for all of the Oracle GoldenGate processes that must connect to a source or target Oracle database: ■
■
■
■
2.
Extract (source database): This user performs metadata queries on the source database, and to fetch data from the source tables for data types that are not directly supported from the redo stream. For a list of these data types, see "Summary of supported Oracle data types and objects per capture mode" on page 1-5. In a local mining deployment of integrated capture, this user also creates, alters, and connects to the logmining server and receives logical change records (LCR) from it. Replicat (target database): This user is used to create the Replicat checkpoint table and to apply DML, DDL, and initial load operations. Manager (source database, if using DDL support): This user performs maintenance on the Oracle GoldenGate database objects if DDL support is being used. DEFGEN (source or target database): This user performs local metadata queries to build a data-definitions file that supplies the metadata to remote Oracle GoldenGate instances.
If you are using Extract in integrated capture mode and you will be using a downstream mining database, create a mining user in the downstream database. This user creates, alters, and connects to the logmining server on the mining database, and it receives logical change records (LCR) from it. This user can be the same as the source Extract user or different. Choose the name of the mining user carefully. Once created by this user, the database logmining server cannot be altered or used by another user.
Note:
3.
To assign the correct privileges to the Oracle GoldenGate users, see Table 4–1
4-6 Oracle GoldenGate for Oracle Installation and Setup Guide
Assigning a database user for Oracle GoldenGate
Table 4–1
Database privileges by Oracle GoldenGate process Extract (Classic Capture)
Extract (Integrated Capture)
Replicat
CREATE SESSION, ALTER SESSION
X
X
X
ALTER SYSTEM
X
X
RESOURCE
X
X
User privilege
X
Manager
Purpose
If RESOURCE cannot be granted to Replicat, use the following statement, where tablespace represents all tablespaces that contain target objects: ALTER USER user QUOTA {size | UNLIMITED} ON tablespace;
CONNECT
X
X
X
SELECT ANY DICTIONARY
X
X
X
FLASHBACK ANY TABLE
X
X
X
X
X
X
Required only if Replicat owns target objects or any PL/SQL procedures. If Replicat cannot have CONNECT, grant CREATE object for any object that Replicat needs to create.
or FLASHBACK ON owner.table SELECT ANY TABLE
X
or SELECT ON owner.table SELECT on dba_ clusters INSERT, UPDATE, DELETE ON target tables
X
CREATE TABLE
X
Privileges required to issue DDL operations to target tables (DDL support only).
X
EXECUTE on DBMS_FLASHBACK package
X
X
Required to use ADD CHECKPOINTTABLE to enable the database checkpoint feature.
Oracle GoldenGate makes a call to DBMS_FLASHBACK.GET_ SYSTEM_CHANGE_NUMBER.
Configuring Oracle GoldenGate on Oracle source and target databases
4-7
Assigning a database user for Oracle GoldenGate
Table 4–1 (Cont.) Database privileges by Oracle GoldenGate process
User privilege GGS_GGSUSER_ ROLE
Extract (Classic Capture)
Extract (Integrated Capture)
X
X
Replicat
Manager
Role for DML privileges on Oracle GoldenGate-owned DDL objects, if DDL support is used. Role is created during installation of DDL objects. User that installs this role must have SYSDBA privileges. X
DELETE ON Oracle GoldenGate DDL objects X
LOCK ANY TABLE
Purpose
Required only if using parameters that maintain the Oracle GoldenGate DDL database objects. Required only to use the Oracle GoldenGate initial load method that inserts data by means of a direct bulk load to SQL*Loader.
sys.dbms_ internal_clkm
X
Required to replicate Oracle Transparent Data Encryption (TDE) in classic capture mode.
SELECT ANY TRANSACTION
X
Required for Extract to use a newer Oracle ASM API. For more information, see the DBLOGREADER option of TRANLOGOPTIONS in the Oracle GoldenGate reference documentation.
Oracle 11.2.0.3 and above: Privileges granted through dbms_ goldengate_ auth.grant_ admin_ privilege
X
Required to interact with a database logmining server in integrated capture mode. See "Deciding which capture method to use" on page 4-3.
SELECT on the V_ $DATABASE view
X
Only required for a downstream Extract mining user in a downstream capture configuration.
EXECUTE ON dbms_logmrn_d package
X
Required for the source Extract user to issue the REGISTER EXTRACT command if the Oracle source database is version >= 11.1.0.5 and ALTER DATABASE ADD SUPPLEMENTAL LOG DATA; SQL> ALTER DATABASE FORCE LOGGING;
4.
Issue the following command to verify that these properties are now enabled. SELECT supplemental_log_data_min, force_logging FROM v$database;
The output of the query must be YES for both properties. 5.
Switch the log files. SQL> ALTER SYSTEM SWITCH LOGFILE;
5.2.2 Enabling schema-level supplemental logging Oracle GoldenGate supports schema-level supplemental logging. Schema-level logging is required for an Oracle source database when using the Oracle GoldenGate DDL replication feature, and optional otherwise. Schema-level logging automatically logs the values of the primary key and all valid unique indexes for each existing table in the schema, and also for every new table that is added through subsequent DDL changes. See the ADD SCHEMATRANDATA command in the Oracle GoldenGate Windows and UNIX Reference Guide for the additional logging effects of schema-level logging and for other usage considerations. Perform the following steps to enable schema-level supplemental logging. 1.
(Solaris systems) Apply Oracle Patch 10423000 to the source Oracle database if the version is earlier than 11.2.0.2.
2.
Run GGSCI on the source system.
3.
Issue the DBLOGIN command as a user that has privilege to enable schema-level supplemental logging. DBLOGIN USERID user, PASSWORD password [encryption options]
Preparing the database for Oracle GoldenGate
5-5
Configuring logging properties
See the Oracle GoldenGate Windows and UNIX Reference Guide for password encryption options for DBLOGIN. 4.
Issue the ADD SCHEMATRANDATA command for each schema for which you want to capture data changes with Oracle GoldenGate. ADD SCHEMATRANDATA schema
As an example, the following commands enable supplemental logging for the finance and hr schemas. ADD SCHEMATRANDATA finance ADD SCHEMATRANDATA hr
5.2.3 Enabling table-level supplemental logging Table-level logging of primary keys or unique index values is required by Oracle GoldenGate unless you use schema-level logging. Before choosing schema-level logging over table-level logging when schema-level logging is not required for DDL support, see the ADD SCHEMATRANDATA documentation in the Windows and UNIX Reference Guide for its affect on log volume. Note:
Even if you use schema-level logging, you can use table-level logging options to prevent the logging of the primary key and, instead, specify an alternate key for Oracle GoldenGate to use. Additionally, you may be required to log non-key column values at the table level to support specific Oracle GoldenGate features. Use the ADD TRANDATA command to enable table-level supplemental logging options. 1.
Run GGSCI on the source system.
2.
Issue the DBLOGIN command as a user that has privilege to enable table-level supplemental logging. DBLOGIN USERID user, PASSWORD password [encryption options]
See the Oracle GoldenGate Windows and UNIX Reference Guide for password encryption options for DBLOGIN. 3.
Issue the ADD TRANDATA command. ADD TRANDATA table [, COLS (columns)] [, NOKEY]
Where: ■
■
■
table is the owner and name of the table. You can use a wildcard for the table name, but not the owner name. ADD TRANDATA without options issues an ALTER TABLE command with an ADD SUPPLEMENTAL LOG DATA ALWAYS clause that is appropriate for the type of unique constraint that is defined for the table, or all columns in the absence of a unique constraint. This command satisfies the basic table-level logging requirements of Oracle GoldenGate when schema-level logging will not be used. COLS columns logs non-key columns that are required for a KEYCOLS clause or for filtering and manipulation. The parentheses are required. These columns
5-6 Oracle GoldenGate for Oracle Installation and Setup Guide
Supporting the conversion of character sets
will be logged in addition to the primary key unless the NOKEY option is also present. ■
4.
NOKEY prevents the logging of the primary key or unique key. Requires a KEYCOLS clause in the TABLE and MAP parameters and a COLS clause in the ADD TRANDATA command to log the alternate KEYCOLS columns.
If using ADD TRANDATA with the COLS option, create a unique index for those columns on the target to optimize row retrieval. If you are logging those columns as a substitute key for a KEYCOLS clause, make a note to add the KEYCOLS clause to the TABLE and MAP statements when you configure the Oracle GoldenGate processes.
See the ADD TRANDATA command in the Oracle GoldenGate Windows and UNIX Reference Guide for additional usage considerations.
5.3 Limiting row changes in tables that do not have a unique row identifier If a target Oracle table does not have a primary key or a unique key, duplicate rows can exist. In this case, Oracle GoldenGate could update or delete too many target rows, causing the source and target data to go out of synchronization without error messages to alert you. To limit the number of rows that are updated, use the DBOPTIONS parameter with the LIMITROWS option in the Replicat parameter file. LIMITROWS can increase the performance of Oracle GoldenGate on the target system because only one row is processed.
5.4 Supporting the conversion of character sets When replicating from a source Windows-based or UNIX-based database to a target Oracle database that has another character set, Replicat allows Oracle to perform the character-set conversion. When replicating from a z/OS system, Replicat performs the conversion. To support the conversion of character sets by an Oracle target database, the NLS_LANG environment variable must be set to the character set of the source database on the target system. You can use the Replicat parameter SETENV to set NLS_LANG for the Replicat client session, instead of setting it at the system level. When set from the parameter file, it is less likely to be changed than at the system level. (Note: Oracle GoldenGate programmatically sets NLS_LANG to the source database character set on the source.)
5.4.1 Setting NLS_LANG with SETENV These instructions set NLS_LANG from the Replicat parameter file. 1.
Use the following syntax to set NLS_LANG with the SETENV parameter. SETENV (NLS_LANG = NLS_LANGUAGE_NLS_TERRITORY.NLS_CHARACTERSET)
The following is an example from the UNIX platform: SETENV (NLS_LANG = “AMERICAN_AMERICA.AL32UTF8”) 2.
Stop and then start the Oracle GoldenGate Manager process so that the processes recognize the new variable.
Preparing the database for Oracle GoldenGate
5-7
Setting fetch options
5.4.2 Viewing globalization settings To determine the globalization settings of the database and whether it is using byte or character semantics, use the following commands in SQL*Plus: SHOW PARAMETER NLS_LANGUAGE SHOW PARAMETER NLS_TERRITORY SELECT name, value$ from SYS.PROPS$ WHERE name = 'NLS_CHARACTERSET'; SHOW PARAMETER NLS_LENGTH_SEMANTICS
The VIEW REPORT command in GGSCI shows the current database language and character settings and indicates whether or not NLS_LANG is set.
5.4.3 Getting more information about globalization support For more information about support for character sets by Oracle GoldenGate, see the Oracle GoldenGate Windows and UNIX Administrator's Guide.
5.5 Setting fetch options To process certain update records, Extract fetches additional row data from the source database. Oracle GoldenGate fetches data for the following: ■
User-defined types
■
Nested tables
■
XMLType objects
By default, Oracle GoldenGate uses Flashback Query to fetch the values from the undo (rollback) tablespaces. That way, Oracle GoldenGate can reconstruct a read-consistent row image as of a specific time or SCN to match the redo record. For best fetch results, configure the source database as follows: 1.
Set a sufficient amount of redo retention by setting the Oracle initialization parameters UNDO_MANAGEMENT and UNDO_RETENTION as follows (in seconds). UNDO_MANAGEMENT=AUTO UNDO_RETENTION=86400 UNDO_RETENTION can be adjusted upward in high-volume environments.
2.
Calculate the space that is required in the undo tablespace by using the following formula. undo space = UNDO_RETENTION * UPS + overhead
Where: ■
undo space is the number of undo blocks.
■
UNDO_RETENTION is the value of the UNDO_RETENTION parameter (in seconds).
■
UPS is the number of undo blocks for each second.
■
overhead is the minimal overhead for metadata (transaction tables, etc.).
Use the system view V$UNDOSTAT to estimate UPS and overhead. 3.
For tables that contain LOBs, do one of the following: ■
Set the LOB storage clause to RETENTION. This is the default for tables that are created when UNDO_MANAGEMENT is set to AUTO.
5-8 Oracle GoldenGate for Oracle Installation and Setup Guide
Handling special data types
■
4.
If using PCTVERSION instead of RETENTION, set PCTVERSION to an initial value of 25. You can adjust it based on the fetch statistics that are reported with the STATS EXTRACT command (see Table 5–1). If the value of the STAT_OPER_ ROWFETCH CURRENTBYROWID or STAT_OPER_ROWFETCH_CURRENTBYKEY field in these statistics is high, increase PCTVERSION in increments of 10 until the statistics show low values.
Grant the following privileges to the Oracle GoldenGate Extract user: GRANT FLASHBACK ANY TABLE TO db_user
Or ... GRANT FLASHBACK ON owner.table TO db_user
Oracle GoldenGate provides the following parameters to manage fetching. Table 5–1
Oracle GoldenGate parameters and commands to manage fetching
Parameter or Command
Description
STATS EXTRACT command with REPORTFETCH option
Shows Extract fetch statistics on demand.
STATOPTIONS parameter with REPORTFETCH option
Sets the STATS EXTRACT command so that it always shows fetch statistics.
MAXFETCHSTATEMENTS parameter
Controls the number of open cursors for prepared queries that Extract maintains in the source database, and also for SQLEXEC operations.
MAXFETCHSTATEMENTS parameter
Controls the default fetch behavior of Extract: whether Extract performs a flashback query or fetches the current image from the table.
FETCHOPTIONS parameter with the USELATESTVERSION or NOUSELATESTVERSION option
Handles the failure of an Extract flashback query, such as if the undo retention expired or the structure of a table changed. Extract can fetch the current image from the table or ignore the failure.
REPFETCHEDCOLOPTIONS parameter
Controls the response by Replicat when it processes trail records that include fetched data or column-missing conditions.
5.6 Handling special data types This section applies whether Extract operates in classic or integrated capture mode, unless otherwise noted. It addresses special configuration requirements for the following Oracle data types: ■
Multibyte character types
■
Oracle Spatial objects
■
TIMESTAMP
■
Large Objects (LOB)
■
XML
■
User defined types
Preparing the database for Oracle GoldenGate
5-9
Handling special data types
5.6.1 Multibyte character types Multi-byte characters are supported as part of a supported character set. If the semantics setting of an Oracle source database is BYTE and the setting of an Oracle target is CHAR, use the Replicat parameter SOURCEDEFS in your configuration, and place a definitions file that is generated by the DEFGEN utility on the target. These steps are required to support the difference in semantics, whether or not the source and target data definitions are identical. Replicat refers to the definitions file to determine the upper size limit for fixed-size character columns. For more information about character-set support, see the Oracle GoldenGate Windows and UNIX Administrator's Guide. For information about SOURCEDEFS and the DEFGEN utility, see the Oracle GoldenGate Windows and UNIX Administrator's Guide.
5.6.2 Oracle Spatial objects To replicate tables that contain one or more columns of SDO_GEORASTER object type from an Oracle source to an Oracle target, follow these instructions to configure Oracle GoldenGate to process them correctly. 1.
Create a TABLE statement and a MAP statement for the georaster tables and also for the related raster data tables.
2.
If the METADATA attribute of the SDO_GEORASTER data type in any of the values exceeds 1 MB, use the DBOPTIONS parameter with the XMLBUFSIZE option to increase the size of the memory buffer that stores the embedded SYS.XMLTYPE attribute of the SDO_GEORASTER data type. If the buffer is too small, Extract abends. For more information about XMLBUFSIZE, see DBOPTIONS in the Oracle GoldenGate Windows and UNIX Reference Guide.
3.
To ensure the integrity of the target georaster tables and the spatial data, keep the trigger enabled on both source and target.
4.
Use the REPERROR option of the MAP parameter to handle the “ORA-01403 No data found” error that occurs as a result of keeping the trigger enabled on the target. It occurs when a row in the source georaster table is deleted, and the trigger cascades the delete to the raster data table. Both deletes are replicated. The replicated parent delete triggers the cascaded (child) delete on the target. When the replicated child delete arrives, it is redundant and generates the error. To use REPERROR, do the following: ■
Use a REPERROR statement in each MAP statement that contains a raster data table.
■
Use Oracle error 1403 as the SQL error.
■
Use any of the response options as the error handling.
A sufficient way to handle the errors on raster tables caused by active triggers on target georaster tables is to use REPERROR with DISCARD to discard the cascaded delete that triggers them. The trigger on the target georaster table performs the delete to the raster data table, so the replicated one is not needed. MAP geo.st_rdt, TARGET geo.st_rdt, REPERROR (-1403, DISCARD) ;
If you need to keep an audit trail of the error handling, use REPERROR with EXCEPTION to invoke exceptions handling. For this, you create an exceptions table and map the source raster data table twice: ■
once to the actual target raster data table (with REPERROR handling the 1403 errors).
5-10 Oracle GoldenGate for Oracle Installation and Setup Guide
Handling special data types
■
again to the exceptions table, which captures the 1403 error and other relevant information by means of a COLMAP clause.
For more information about using an exceptions table, see the Oracle GoldenGate Windows and UNIX Administrator's Guide. For more information about REPERROR options, see the Oracle GoldenGate Windows and UNIX Reference Guide.
5.6.3 TIMESTAMP To replicate timestamp data, follow these guidelines. 1.
To prevent Oracle GoldenGate from abending on TIMESTAMP WITH TIME ZONE as TZR, use the Extract parameter TRANLOGOPTIONS with one of the following: ■
■
INCLUDEREGIONID to replicate TIMESTAMP WITH TIME ZONE as TZR from an Oracle source to an Oracle target of the same version or later. INCLUDEREGIONIDWITHOFFSET to replicate TIMESTAMP WITH TIMEZONE as TZR from an Oracle source that is at least v10g to an earlier Oracle target, or from an Oracle source to a non-Oracle target.
These options allow replication to Oracle versions that do not support TIMESTAMP WITH TIME ZONE as TZR and to database systems that only support time zone as a UTC offset. For more information, see TRANLOGOPTIONS in the Windows and UNIX Reference Guide. 2.
Because the Oracle database normalizes TIMESTAMP WITH LOCAL TIME ZONE data to the local time zone of the database that receives it, the timestamps do not transfer correctly between databases that are in different time zones. For example, data that reflects 5:00 a.m. EST on a source server in New York City becomes 5:00 a.m. PST on a target server in San Francisco, when it should be 2:00 a.m. in San Francisco time to reflect the three-hour difference in time zones. To adjust the timestamp to the target time zone for all of the records that are applied by Replicat, place the following parameter statement after the USERID parameter, but before the first MAP statement, in the Replicat parameter file: SQLEXEC "ALTER SESSION SET TIME_ZONE = ‘value of source_timezone’"
Where: value of source_timezone is the offset from the source time zone. For example, using the previous example, the value would be ‘-03:00.’ Use a plus (+) or minus (-) sign, depending on whether the target is ahead of, or behind, the source time.
5.6.4 Large Objects (LOB) The following are some configuration guidelines for LOBs in both classic capture and integrated capture mode. 1.
Store large objects out of row if possible.
2.
Replicat writes LOB data to a target database in fragments. To minimize the effect of this I/O on the system, Replicat enables Oracle’s LOB caching mechanism, caches the fragments in a buffer, and performs a write only when the buffer is full. For example, if the buffer is 25,000 bytes in size, Replicat only performs I/O four times given a LOB of 100,000 bytes.
Preparing the database for Oracle GoldenGate 5-11
Handling other database properties
■
■
To optimize the buffer size to the size of your LOB data, use the DBOPTIONS parameter with the LOBWRITESIZE option. The higher the value, the fewer the I/O calls made by Replicat to write one LOB. To disable Oracle’s LOB caching, use the DBOPTIONS parameter with the DISABLELOBCACHING option. When LOB caching is disabled, whatever is sent by Replicat to Oracle in one I/O call is written directly to the database media.
3.
If CLOB columns can store binary data, set the NLS_LANG system environment variable and the NLS_LANGUAGE database parameter to the same value.
4.
(Applies only to integrated capture) Integrated capture captures LOBs from the redo log. For UPDATE operations on a LOB document, only the changed portion of the LOB is logged. To force whole LOB documents to be written to the trail when only the changed portion is logged, use the TRANLOGOPTIONS parameter with the FETCHPARTIALLOB option in the Extract parameter file. When Extract receives partial LOB content from the logmining server, it fetches the full LOB image instead of processing the partial LOB. Use this option when replicating to a non-Oracle target or in other conditions where the full LOB image is required. For more information about TRANLOGOPTIONS, see the Oracle GoldenGate Windows and UNIX Reference Guide.
5.6.5 XML The following are tools for working with XML within Oracle GoldenGate constraints. ■
■
Although both classic and integrated capture modes do not support the capture of changes made to an XML schema, you may be able to evolve the schemas and then resume replication of them without the need for a resynchronization. See "Supporting changes to XML schemas" on page C-1. (Applies only to integrated capture) Integrated capture captures XML from the redo log. For UPDATE operations on an XML document, only the changed portion of the XML is logged if it is stored as OBJECT RELATIONAL or BINARY. To force whole XML documents to be written to the trail when only the changed portion is logged, use the TRANLOGOPTIONS parameter with the FETCHPARTIALXML option in the Extract parameter file. When Extract receives partial XML content from the logmining server, it fetches the full XML document instead of processing the partial XML. Use this option when replicating to a non-Oracle target or in other conditions where the full XML image is required. For more information about TRANLOGOPTIONS, see the Oracle GoldenGate Windows and UNIX Reference Guide.
5.6.6 User defined types Extract fetches UDTs (except for object tables) from the database. For more information, see "Setting fetch options" on page 5-8.
5.7 Handling other database properties The following table shows database properties that may affect Oracle GoldenGate and the parameters that you can use to resolve or work around the condition.
5-12 Oracle GoldenGate for Oracle Installation and Setup Guide
Using Oracle GoldenGate with Oracle Exadata
Table 5–2
Handling other database properties
Database Property
Concern/Resolution
Table with unused columns
By default, unused columns are not supported. To support them, use the DBOPTIONS parameter with the ALLOWUNUSEDCOLUMN option to force Extract to generate a warning and continue processing. The same unused column must exist in the target table, or a source definitions file must be created for Replicat with the DEFGEN utility. You can include the appropriate ALTER TABLE...SET UNUSED statements in a DDL replication configuration.
Table with interval partitioning
To support tables with interval partitioning, make certain that the WILDCARDRESOLVE parameter remains at its default of DYNAMIC.
Table with virtual columns Virtual columns are not logged, and Oracle does not permit DML on virtual columns. You can, however, capture this data and map it to a target column that is not a virtual column by doing the following: Include the table in the Extract TABLE statement and use the FETCHCOLS option of TABLE to fetch the value from the virtual column in the database. In the Replicat MAP statement, map the source virtual column to the non-virtual target column. Table with inherently updateable view
To replicate to an inherently updateable view, define a key on the unique columns in the updateable view by using a KEYCOLS clause in the same MAP statement in which the associated source and target tables are mapped.
Redo logs or archives in different locations
The TRANLOGOPTIONS parameter contains options to handle environments where the redo logs or archives are stored in a different location than the database default or on a different platform from that on which Extract is running.
TRUNCATE operations
To replicate TRUNCATE operations, choose one of two options: Standalone TRUNCATE support by means of the GETTRUNCATES parameter replicates TRUNCATE TABLE, but no other TRUNCATE options. The full DDL support replicates TRUNCATE TABLE, ALTER TABLE TRUNCATE PARTITION, and other DDL. To install this support, see "Installing Oracle GoldenGate DDL support for an Oracle database" on page 3-1.
Sequences
To replicate DDL for sequences (CREATE, ALTER, DROP, RENAME), use Oracle GoldenGate DDL support. To replicate just sequence values, use the SEQUENCE parameter in the Extract parameter file. This does not require the Oracle GoldenGate DDL support environment. See SEQUENCE in the Oracle GoldenGate Windows and UNIX Reference Guide for additional requirements.
5.8 Using Oracle GoldenGate with Oracle Exadata Oracle GoldenGate supports Oracle Exadata Database Machine as follows: ■
■
Oracle GoldenGate can capture from Exadata in either classic capture or integrated capture mode, but to capture from Exadata with EHCC compression enabled, Extract must be in integrated capture mode. Oracle GoldenGate can replicate data from any supported database to Exadata.
In general, the configuration of Oracle GoldenGate to operate with Exadata is the same as any other Oracle GoldenGate configuration. These instructions highlight configuration requirements that are different from the standard Oracle GoldenGate installation.
Preparing the database for Oracle GoldenGate 5-13
Using Oracle GoldenGate with Oracle Exadata
5.8.1 Migrating to Oracle Exadata Oracle GoldenGate supports the logical migration of data to Exadata with unload and reload performed through SQL. To migrate from other databases to Exadata Database Machine, you can do one of the following: ■
Migrate to Exadata by using an initial load
■
Migrate to Exadata by using an active-passive configuration
5.8.1.1 Migrate to Exadata by using an initial load One way to migrate from your original database to Exadata is to perform a simple initial load from one system to the other. This is a uni-directional initial synchronization of the source and target tables, while Oracle GoldenGate captures any ongoing transactions that must remain active. Install Oracle GoldenGate on both systems, and follow the configuration, database setup, and initial load instructions in this guide. For additional initial load options, see the Oracle GoldenGate Windows and UNIX Administrator's Guide.
5.8.1.2 Migrate to Exadata by using an active-passive configuration You can use an active-passive bi-directional configuration to migrate to Exadata. The active database is the primary database from which the data is being migrated, and the passive database is the Exadata machine. In this configuration, the Exadata machine can work in tandem with the original system until testing is completed and you switch operations over to the Exadata machine. No special setup is needed if using integrated capture to deploy this configuration. However, to use classic capture mode, include the following TRANLOGOPTIONS statements in the Extract parameter file on the Exadata machine: ■
■
TRANLOGOPTIONS with DBLOGREADER: Uses the Oracle database server to access the log files, instead of connecting to the Oracle ASM instance, for improved read performance. This option is supported for Oracle 10.2.0.5, and for Oracle 11.1.0.7 and later 11g R2 versions (but not Oracle 11g R1 versions). TRANLOGOPTIONS with ASMUSER: Logs into ASM to access the log files. This option provides a backup in the event that the source database becomes unavailable, so that Extract can continue to read the log files directly in ASM.
Each of these should be a separate TRANLOGOPTIONS parameter statement: comment out the ASMUSER one until it is needed in a database server failure. For syntax for these parameters and other options for tuning ASM interactivity, see TRANLOGOPTIONS in the Oracle GoldenGate Windows and UNIX Reference Guide. To deploy a migration to Exadata using an active-passive configuration: ■
■
Install Oracle GoldenGate on both systems, and follow the configuration, database setup, and initial load instructions in this guide. For the specifics of configuring the active-passive topology, see the Oracle GoldenGate Windows and UNIX Administrator's Guide.
5.8.2 Replicating to Exadata with EHCC enabled To ensure successful delivery of insert operations to Oracle Exadata with Hybrid Columnar Compression (EHCC), use the INSERTAPPEND parameter in the Replicat parameter file. INSERTAPPEND causes Replicat to use an APPEND hint for inserts so they remain compressed. Without this hint, the record will be inserted uncompressed. For
5-14 Oracle GoldenGate for Oracle Installation and Setup Guide
Using Oracle GoldenGate with Oracle Exadata
more information about INSERTAPPEND, see the Oracle GoldenGate Windows and UNIX Reference Guide.
Preparing the database for Oracle GoldenGate 5-15
Using Oracle GoldenGate with Oracle Exadata
5-16 Oracle GoldenGate for Oracle Installation and Setup Guide
6 Additional configuration steps when using classic capture
6
This chapter contains additional configuration and preparation requirements that are specific only to Extract when operating in classic capture mode. Other preparation steps are also required. See the following topics: "System requirements and preinstallation instructions" on page 1-1 "Installing Oracle GoldenGate" on page 2-1 "Installing Oracle GoldenGate DDL support for an Oracle database" on page 3-1 "Preparing the database for Oracle GoldenGate" on page 5-1 "Configuring Oracle GoldenGate on Oracle source and target databases" on page 4-1 "Configuring DDL synchronization for an Oracle database" on page 7-1 To instantiate Oracle GoldenGate processing, see the following topics: "Instantiating and starting Oracle GoldenGate replication" on page 8-1 "Controlling processes" on page 9-1 Additional topics may apply: "Supporting changes to XML schemas" on page C-1 "Preparing DBFS for active-active propagation with Oracle GoldenGate" on page D-1 For more information about classic capture, see "Deciding which capture method to use" on page 4-3.
6.1 Configuring Oracle TDE data in classic capture mode The following special configuration steps are required to support TDE when Extract is in classic capture mode.
6.1.1 Overview of TDE support in classic capture TDE support when Extract is in classic capture mode requires the exchange of two kinds of keys: ■
■
The encrypted key can be a table key (column-level encryption), an encrypted redo log key (tablespace-level encryption), or both. This key is shared between the Oracle database and Extract. The decryption key is named ORACLEGG and its password is known as the shared secret. This key is stored securely in the Oracle and Oracle GoldenGate domains.
Additional configuration steps when using classic capture 6-1
Configuring Oracle TDE data in classic capture mode
Only a party that has possession of the shared secret can decrypt the table and redo log keys. The encrypted keys are delivered to the Extract process by means of built-in PL/SQL code. Extract uses the shared secret to decrypt the data. Extract never handles the wallet master key itself, nor is it aware of the master key password. Those remain within the Oracle database security framework. Extract never writes the decrypted data to any file other than a trail file, not even a discard file (specified with the DISCARDFILE parameter). The word “ENCRYPTED” will be written to any discard file that is in use. The impact of this feature on Oracle GoldenGate performance should mirror that of the impact of decryption on database performance. Other than a slight increase in Extract startup time, there should be a minimal affect on performance from replicating TDE data.
6.1.2 Requirements for capturing TDE in classic capture mode The following are requirements for Extract to support TDE capture: ■
■ ■
To maintain high security standards, the Oracle GoldenGate Extract process should run as part of the oracle user (the user that runs the Oracle database). That way, the keys are protected in memory by the same privileges as the oracle user. The Extract process must run on the same machine as the database installation. If using TDE with a Hardware Security Module, you must use a software wallet. Instructions are provided in Section 6.1.4.3 in the configuration steps for moving from an HSM-only to an HSM-plus-wallet configuration and configuring the sqlnet.ora file correctly.
6.1.3 Required database patches To support TDE on Oracle 10.2.0.5 or 11.2.0.2, download and apply Oracle Patch 10395645 to the source database. Oracle 11.2.0.3 patch set includes this patch. If you cannot find this patch on the My Oracle Support website (https://support.oracle.com), submit a service request (SR) and request a backport.
6.1.4 Configuring TDE support The following outlines the steps that the Oracle Security Officer and the Oracle GoldenGate Administrator take to establish communication between the Oracle server and the Extract process.
6.1.4.1 Agree on a shared secret that meets Oracle standards Agree on a shared secret password that meets or exceeds Oracle password standards. This password must not be known by anyone else. For guidelines on creating secure passwords, see Oracle Database Security Guide.
6.1.4.2 Oracle DBA tasks 1.
Log in to SQL*Plus as a user with the SYSDBA system privilege. For example: sqlplus sys/as sysdba Connected. Enter password: password
6-2 Oracle GoldenGate for Oracle Installation and Setup Guide
Configuring Oracle TDE data in classic capture mode
2.
Run the prvtclkm.plb file that is installed in the Oracle admin directory. The prvtclkm.plb file creates the DBMS_INTERNAL_CLKM PL/SQL package, which enables Oracle GoldenGate to extract encrypted data from an Oracle database. @?/app/oracle/product/orcl111/rdbms/admin/prvtclkm.plb
3.
Grant EXEC privilege on DBMS_INTERNAL_CLKM PL/SQL package to the Extract database user. GRANT EXECUTE ON DBMS_INTERNAL_CLKM TO psmith;
4.
Exit SQL*Plus.
6.1.4.3 Oracle Security Officer tasks 1.
Oracle GoldenGate requires the use of a software wallet. If you are currently using HSM-only mode, move to HSM-plus-wallet mode by taking the following steps: a.
Change the sqlnet.ora file configuration as shown in the following example, where the wallet directory can be any location on disk that is accessible (rwx) by the owner of the Oracle database. This example shows a best-practice location, where my_db is the $ORACLE_SID. ENCRYPTION_WALLET_LOCATION= (SOURCE=(METHOD=HSM)(METHOD_DATA= (DIRECTORY=/etc/oracle/wallets/my_db)))
b.
Log in to orapki (or Wallet Manager) as the owner of the Oracle database, and create a wallet in the location that you specified in the sqlnet.ora file. When prompted for the wallet password, specify the same password as the HSM password (or HSM Connect String). These two passwords must be identical. cd /etc/oracle/wallets/my_db orapki wallet create -wallet /etc/oracle/wallets/my_db
The Oracle database owner must have full operating system privileges on the wallet.
Note:
2.
Create an entry named ORACLEGG in the wallet. ORACLEGG must be the name of this key. The password for this key must be the agreed-upon shared secret, but do not enter this password on the command line. Instead, wait to be prompted. mkstore -wrl ./ -createEntry ORACLE.SECURITY.CL.ENCRYPTION.ORACLEGG Oracle Secret Store Tool : Version 11.2.0.3.0 - Production Copyright (c) 2004, 2011, Oracle and/or its affiliates. All rights reserved. Your secret/Password is missing in the command line Enter your secret/Password: sharedsecret Re-enter your secret/Password: sharedsecret Enter wallet password: hsm/wallet_password
3.
Verify the ORACLEGG entry. mkstore -wrl . -list Oracle Secret Store Tool : Version 11.2.0.3.0 - Production Copyright (c) 2004, 2011, Oracle and/or its affiliates. All rights reserved. Enter wallet password: hsm/wallet_password Oracle Secret Store entries: ORACLE.SECURITY.CL.ENCRYPTION.ORACLEGG
4.
Log in to SQL*Plus as a user with the SYSDBA system privilege.
Additional configuration steps when using classic capture 6-3
Configuring Oracle TDE data in classic capture mode
5.
Close and then re-open the wallet. SQL> alter system set encryption wallet close identified by "hsm/wallet_ password"; System altered. SQL> alter system set encryption wallet open identified by "hsm/wallet_ password"; System altered.
6.
Switch log files. alter system switch logfile; System altered.
7.
If this is an Oracle RAC environment and you are using copies of the wallet on each node, make the copies now and then reopen each wallet. Oracle recommends using one wallet in a shared location, with synchronized access among all Oracle RAC nodes.
Note:
6.1.4.4 Oracle GoldenGate Administrator tasks 1.
Run GGSCI.
2.
Issue the ENCRYPT PASSWORD command to encrypt the shared secret so that it is obfuscated within the Extract parameter file. This is a security requirement. ENCRYPT PASSWORD sharedsecret {AES128 | AES192 | AES256} ENCRYPTKEY keyname
Where: ■ ■
■
sharedsecret is the clear-text shared secret. This value is case-sensitive. {AES128 | AES192 | AES256} specifies Advanced Encryption Standard (AES) encryption. Specify one of the values, which represents the desired key length. keyname is the logical name of the encryption key in the ENCKEYS lookup file. Oracle GoldenGate uses this key to look up the actual key in the ENCKEYS file. To create a key and ENCKEYS file, see the Oracle GoldenGate Windows and UNIX Administrator's Guide. Example: ENCRYPT PASSWORD sharedsecret AES256 ENCRYPTKEY mykey1
3.
In the Extract parameter file, use the DBOPTIONS parameter with the DECRYPTPASSWORD option. As input, supply the encrypted shared secret and the decryption key. DBOPTIONS DECRYPTPASSWORD sharedsecret {AES128 | AES192 | AES256} ENCRYPTKEY keyname
Where: ■ ■
■
sharedsecret is the encrypted shared secret. {AES128 | AES192 | AES256} must be same value that was used for ENCRYPT PASSWORD. keyname is the logical name of the encryption key in the ENCKEYS lookup file. Example: DBOPTIONS DECRYPTPASSWORD AACAAAAAAAAAAAIALCKDZIRHOJBHOJUH AES256
6-4 Oracle GoldenGate for Oracle Installation and Setup Guide
Configuring Oracle TDE data in classic capture mode
ENCRYPTKEY mykey1 4.
Log in to SQL*Plus as a user with the SYSDBA system privilege.
5.
Close and then re-open the wallet. SQL> alter system set encryption wallet close identified by "hsm/wallet_ password"; System altered. SQL> alter system set encryption wallet open identified by "hsm/wallet_ password"; System altered.
6.1.5 Recommendations for maintaining data security after decryption Extract decrypts the TDE data and writes it to the trail as clear text. To maintain data security throughout the path to the target database, it is recommended that you also deploy Oracle GoldenGate security features to: ■
encrypt the data in the trails
■
encrypt the data in transit across TCP/IP
For more information, see the security chapter in the Windows and UNIX Administrator's Guide.
6.1.6 Performing DDL while TDE capture is active If DDL will ever be performed on a table that has column-level encryption, or if table keys will ever be re-keyed, you must either quiesce the table while the DDL is performed or enable Oracle GoldenGate DDL support. It is more practical to have the DDL environment active so that it is ready, because a re-key usually is a response to a security violation and must be performed immediately. To install the Oracle GoldenGate DDL environment, see the instructions in this guide. To configure Oracle GoldenGate DDL support, see the Windows and UNIX Administrator's Guide. For tablespace-level encryption, the Oracle GoldenGate DDL support is not required.
6.1.7 Updating the Oracle shared secret in the parameter file Use this procedure to update and encrypt the TDE shared secret within the Extract parameter file. 1.
Run GGSCI.
2.
Stop the Extract process. STOP EXTRACT group
3.
Modify the ORACLEGG entry in the Oracle wallet. ORACLEGG must remain the name of the key. For instructions, see the Oracle Database Advanced Security Administrator’s Guide.
4.
Issue the ENCRYPT PASSWORD command to encrypt the new shared secret. ENCRYPT PASSWORD sharedsecret {AES128 | AES192 | AES256} ENCRYPTKEY keyname
Where: ■ ■
sharedsecret is the clear-text shared secret. This value is case-sensitive. {AES128 | AES192 | AES256} specifies Advanced Encryption Standard (AES) encryption. Specify one of the values, which represents the desired key length.
Additional configuration steps when using classic capture 6-5
Using Oracle GoldenGate in an Oracle RAC environment
■
keyname is the logical name of the encryption key in the ENCKEYS lookup file. Example: ENCRYPT PASSWORD sharedsecret AES256 ENCRYPTKEY mykey1
5.
In the Extract parameter file, use the DBOPTIONS parameter with the DECRYPTPASSWORD option. As input, supply the encrypted shared secret and the Oracle GoldenGate-generated or user-defined decryption key. DBOPTIONS DECRYPTPASSWORD sharedsecret {AES128 | AES192 | AES256} ENCRYPTKEY keyname
Where: ■ ■
■
sharedsecret is the encrypted shared secret. {AES128 | AES192 | AES256} must be same value that was used for ENCRYPT PASSWORD. keyname is the logical name of the encryption key in the ENCKEYS lookup file. Example: DBOPTIONS DECRYPTPASSWORD AACAAAAAAAAAAAIALCKDZIRHOJBHOJUH AES256 ENCRYPTKEY mykey1
6.
Log in to SQL*Plus as a user with the SYSDBA system privilege.
7.
Close and then re-open the wallet. SQL> alter system set encryption wallet close identified by "hsm/wallet_ password"; System altered. SQL> alter system set encryption wallet open identified by "hsm/wallet_ password"; System altered.
8.
Start Extract. START EXTRACT group
6.2 Using Oracle GoldenGate in an Oracle RAC environment The following general guidelines apply to Oracle RAC when Extract is operating in classic capture mode. ■
■
■
During operations, if the primary database instance against which Oracle GoldenGate is running stops or fails for any reason, Extract abends. To resume processing, you can restart the instance or mount the Oracle GoldenGate binaries to another node where the database is running and then restart the Oracle GoldenGate processes. Stop the Manager process on the original node before starting Oracle GoldenGate processes from another node. Whenever the number of redo threads changes, the Extract group must be dropped and re-created. For the recommended procedure, see the Oracle GoldenGate Windows and UNIX Administrator's Guide. Extract ensures that transactions are written to the trail file in commit order, regardless of the RAC instance where the transaction originated. When Extract is capturing in archived-log-only (ALO) mode, where one or more RAC instances may be idle, you may need to perform archive log switching on the idle nodes to ensure that operations from the active instances are recorded in the trail file in a
6-6 Oracle GoldenGate for Oracle Installation and Setup Guide
Capturing from an Oracle ASM instance when in classic capture mode
timely manner. You can instruct the Oracle RDBMS to do this log archiving automatically at a preset interval by setting the archive_lag_target parameter. For example, to ensure that logs are archived every fifteen minutes, regardless of activity, you can issue the following command in all instances of the RAC system: SQL> alter system set archive_lag_target 900 ■
To process the last transaction in a RAC cluster before shutting down Extract, insert a dummy record into a source table that Oracle GoldenGate is replicating, and then switch log files on all nodes. This updates the Extract checkpoint and confirms that all available archive logs can be read. It also confirms that all transactions in those archive logs are captured and written to the trail in the correct order.
The following table shows some Oracle GoldenGate parameters that are of specific benefit in Oracle RAC. Table 6–1
Oracle GoldenGate parameters for Oracle RAC
Parameter
Description
THREADOPTIONS parameter with the INQUEUESIZE and OUTQUEUESIZE options
Sets the amount of data that Extract queues in memory before sending it to the target system. Tuning these parameters might increase Extract performance on Oracle RAC.
TRANLOGOPTIONS parameter with the PURGEORPHANEDTRANSACTIONS | NOPURGEORPHANEDTRANSACTIONS and TRANSCLEANUPFREQUENCY options
Controls how Extract handles orphaned transactions, which can occur when a node fails during a transaction and Extract cannot capture the rollback. Although the database performs the rollback on the failover node, the transaction would otherwise remain in the Extract transaction list indefinitely and prevent further checkpointing for the Extract thread that was processing the transaction. By default, Oracle GoldenGate purges these transactions from its list after they are confirmed as orphaned. This functionality can also be controlled on demand with the SEND EXTRACT command in GGSCI.
6.3 Capturing from an Oracle ASM instance when in classic capture mode This topic covers additional configuration requirements that apply when Oracle GoldenGate operates against transaction logs that are stored in Oracle Automatic Storage Management (ASM). Oracle GoldenGate requires a connection to the ASM instance to be able to read the logs.
6.3.1 Accessing the transaction logs in ASM Extract must be configured to read logs that are stored in ASM. Depending on the ASM version, the following options are available:
6.3.1.1 Optimal ASM connection from the database server Use the TRANLOGOPTIONS parameter with the DBLOGREADER option in the Extract parameter file if the ASM instance is one of the following versions: ■
Oracle 10.2.0.5 or later 10g R2 versions
■
Oracle 11.2.0.2 or later 11g R2 versions
A newer ASM API is available in those releases (but not in Oracle 11g R1 versions) that uses the database server to access the redo and archive logs. When used, this API
Additional configuration steps when using classic capture 6-7
Capturing from an Oracle ASM instance when in classic capture mode
enables Extract to use a read buffer size of up to 4 MB in size. A larger buffer may improve the performance of Extract when redo rate is high. You can use the DBLOGREADERBUFSIZE option of TRANLOGOPTIONS to specify a buffer size.
6.3.1.2 ASM direct connection If the ASM version is not one of those listed in Section 6.3.1.1, do the following: 1.
Create a user for the Extract process to access the ASM instance directly. Assign this user SYS or SYSDBA privileges in the ASM instance. Oracle GoldenGate does not support using operating-system authentication for the ASM user. See Table 6–2 for additional details.
Table 6–2
Extract database privileges — ASM instance
ASM password configuration1
Permitted user
ASM instance and the database share a password file
You can use the Oracle GoldenGate source database user if you grant that user SYSDBA, or you can use any other database user that has SYSDBA privileges.
ASM instance and the source database have separate password files
You can overwrite the ASM password file with the source database password file, understanding that this procedure changes the SYS password in the ASM instance to the value that is contained in the database password file, and it also grants ASM access to the other users in the database password file. Save a copy of the ASM file before overwriting it.
1
2.
To view how the current ASM password file is configured, log on to the ASM instance and issue the following command in SQL*Plus: SQL> SELECT name, value FROM v$parameter WHERE name = 'remote_login_passwordfile';
Specify the ASM user with the TRANLOGOPTIONS parameter with the ASMUSER option.
For syntax, additional information, and related parameters, see TRANLOGOPTIONS in the Oracle GoldenGate Windows and UNIX Reference Guide.
6.3.2 Ensuring ASM connectivity To ensure that the Oracle GoldenGate Extract process can connect to an ASM instance, list the ASM instance in the tnsnames.ora file. The recommended method for connecting to an ASM instance when Oracle GoldenGate is running on the database host machine is to use a bequeath (BEQ) protocol. The BEQ protocol does not require a listener. If you prefer to use the TCP/IP protocol, verify that the Oracle listener is listening for new connections to the ASM instance. The listener.ora file must contain an entry similar to the following. SID_LIST_LISTENER_ASM = (SID_LIST = (SID_DESC = (GLOBAL_DBNAME = ASM) (ORACLE_HOME = /u01/app/grid) (SID_NAME = +ASM1) ) )
6-8 Oracle GoldenGate for Oracle Installation and Setup Guide
Ensuring data availability
A BEQ connection does not work when using a remote Extract configuration. Use TNSNAMES with the TCP/IP protocol.
Note:
6.4 Ensuring data availability To ensure the continuity and integrity of capture processing when Extract operates in classic capture mode, enable archive logging. The archive logs provide a secondary data source should the online logs recycle before Extract is finished with them. The archive logs for open transactions must be retained on the system in case Extract needs to recapture data from them to perform a recovery. If you cannot enable archive logging, there is a high risk that you will need to completely resynchronize the source and target objects and reinstantiate replication should there be a failure that causes an Extract outage while transactions are still active. If you must operate this way, configure the online logs according to the following guidelines to retain enough data for Extract to capture what it needs before the online logs recycle. Allow for Extract backlogs caused by network outages and other external factors, as well as long-running transactions.
WARNING:
In a RAC configuration, Extract must have access to the online and archived logs for all nodes in the cluster, including the one where Oracle GoldenGate is installed.
6.4.1 Log retention requirements per Extract recovery mode The following summarizes the different recovery modes that Extract might use and their log-retention requirements: ■
■
By default, the Bounded Recovery mode is in effect, and Extract requires access to the logs only as far back as twice the Bounded Recovery interval that is set with the BR parameter. This interval is an integral multiple of the standard Extract checkpoint interval, as controlled by the CHECKPOINTSECS parameter. These two parameters control the Oracle GoldenGate Bounded Recovery feature, which ensures that Extract can recover in-memory captured data after a failure, no matter how old the oldest open transaction was at the time of failure. For more information about this requirement, see the BR parameter documentation in the Oracle GoldenGate Windows and UNIX Reference Guide. In the unlikely event that the Bounded Recovery mechanism fails when Extract attempts a recovery, Extract reverts to normal recovery mode and must have access to the archived log that contains the beginning of the oldest open transaction in memory at the time of failure and all logs thereafter.
6.4.2 Log retention options Depending on the version of Oracle, there are different options for ensuring that the required logs are retained on the system.
6.4.2.1 Oracle Enterprise Edition 10.2 and later For these versions, Extract can be configured to work with Oracle Recovery Manager (RMAN) to retain the logs that Extract needs for recovery. You enable this feature
Additional configuration steps when using classic capture 6-9
Ensuring data availability
when you issue the REGISTER EXTRACT command before creating your Extract processes (see "Configuring Extract for change capture" on page 4-10). To use this feature, the Extract database user must have the following privileges, in addition to the basic privileges listed in "Assigning a database user for Oracle GoldenGate" on page 4-6. Table 6–3
Extract database privileges —Log retention in Oracle EE 10.2 and later
Oracle EE version
Privileges
10.2
1.
Run package to grant Oracle Streams admin privilege. exec dbms_streams_auth.grant_admin_privilege('user')
2.
Grant INSERT into logmnr_restart_ckpt$. grant insert on system.logmnr_restart_ckpt$ to user;
3.
Grant UPDATE on streams$_capture_process. grant update on sys.streams$_capture_process to user;
4.
Grant the 'become user' privilege. grant become user to user;
11.1 and 11.2.0.1
1.
Run package to grant Oracle Streams admin privilege. exec dbms_streams_auth.grant_admin_privilege('user')
2.
Grant the 'become user' privilege. grant become user to user;
11.2.0.3 and later
Run package to grant Oracle Streams admin privilege. exec dbms_goldengate_auth.grant_admin_privilege('user')
When log retention is enabled, Extract retains enough logs to perform a Bounded Recovery, but you can configure Extract to retain enough logs through RMAN for a normal recovery by using the TRANLOGOPTIONS parameter with the LOGRETENTION option set to SR. There also is an option to disable the use of RMAN log retention. Review the options of LOGRETENTION in the Oracle GoldenGate Windows and UNIX Reference Guide before you configure Extract. If you set LOGRETENTION to DISABLED, see "Determining how much data to retain" on page 6-11. To support RMAN log retention on Oracle RAC, you must download and install the database patch that is provided in BUGFIX 11879974 before you add the Extract groups.
Note:
The RMAN log retention feature creates an underlying (but non-functioning) Oracle Streams Capture process for each Extract group. The name of the Capture is based on the name of the associated Extract group. The log retention feature can operate concurrently with other local Oracle Streams installations. When you create an Extract group, the logs are retained from the current database SCN. Note: If the Oracle Flashback storage area is full, RMAN purges the archive logs even when needed by Extract. This limitation exists so that the requirements of Extract (and other Oracle replication components) do not interfere with the availability of redo to the database.
6-10 Oracle GoldenGate for Oracle Installation and Setup Guide
Ensuring data availability
To have even more integration of Oracle GoldenGate capture with the Oracle database engine, you can use integrated capture if the source database is Oracle 11.2.0.3 or later. In integrated capture mode, log retention is enabled automatically, and Extract receives data changes directly from a database logmining server instead of reading the redo logs directly. See "About integrated capture" on page 4-4.
6.4.2.2 All other Oracle versions For versions of Oracle other than Enterprise Edition 10.2 and later, you must manage the log retention process with your preferred administrative tools. Follow the directions in "Determining how much data to retain" on page 6-11.
6.4.3 Determining how much data to retain When managing log retention, try to ensure rapid access to the logs that Extract would require to perform a normal recovery (not a Bounded Recovery). See "Log retention requirements per Extract recovery mode" on page 6-9. If you must move the archives off the database system, the TRANLOGOPTIONS parameter provides a way to specify an alternate location. See "Specifying the archive location" on page 6-11. The recommended retention period is at least 24 hours worth of transaction data, including both online and archived logs. To determine the oldest log that Extract might need at any given point, issue the SEND EXTRACT command with the SHOWTRANS option. You might need to do some testing to determine the best retention time given your data volume and business requirements. If data that Extract needs during processing was not retained, either in online or archived logs, one of the following corrective actions might be required: ■
■
Alter Extract to capture from a later point in time for which log data is available (and accept possible data loss on the target). Resynchronize the source and target data, and then start the Oracle GoldenGate environment over again.
6.4.4 Purging log archives Make certain not to use backup or archive options that cause old archive files to be overwritten by new backups. Ideally, new backups should be separate files with different names from older ones. This ensures that if Extract looks for a particular log, it will still exist, and it also ensures that the data is available in case it is needed for a support case.
6.4.5 Specifying the archive location If the archived logs reside somewhere other than the Oracle default directory, specify that directory with the ALTARCHIVELOGDEST option of the TRANLOGOPTIONS parameter in the Extract parameter file. You might also need to use the ALTARCHIVEDLOGFORMAT option of TRANLOGOPTIONS if the format that is specified with the Oracle parameter LOG_ARCHIVE_FORMAT contains sub-directories. ALTARCHIVEDLOGFORMAT specifies an alternate format that removes the sub-directory from the path. For example, %T/log_%t_%s_%r.arc would be changed to log_%t_%s_%r.arc. As an alternative to using ALTARCHIVEDLOGFORMAT, you can create the sub-directory manually, and then move the log files to it.
Additional configuration steps when using classic capture
6-11
Configuring Oracle GoldenGate to read only the archived logs
6.4.6 Mounting logs that are stored on other platforms If the online and archived redo logs are stored on a different platform from the one that Extract is built for, do the following: ■ ■
NFS-mount the archive files. Map the file structure to the structure of the source system by using the LOGSOURCE and PATHMAP options of the Extract parameter TRANLOGOPTIONS. For more information, see the Oracle GoldenGate Windows and UNIX Reference Guide.
6.5 Configuring Oracle GoldenGate to read only the archived logs You can configure Extract to read exclusively from the archived logs. This is known as Archived Log Only (ALO) mode. In this mode, Extract reads exclusively from archived logs that are stored in a specified location. ALO mode enables Extract to use production logs that are shipped to a secondary database (such as a standby) as the data source. The online logs are not used at all. Oracle GoldenGate connects to the secondary database to get metadata and other required data as needed. As an alternative, ALO mode is supported on the production system. ALO mode is not compatible with Extract operating in integrated capture mode.
Note:
6.5.1 Limitations and requirements of ALO mode Observe the following guidelines when using Extract in ALO mode. ■
■
■
■
■
■
Log resets (RESETLOG) cannot be done on the source database after the standby database is created. ALO cannot be used on a standby database if the production system is Oracle RAC and the standby database is non-RAC. In addition to both systems being Oracle RAC, the number of nodes on each system must be identical. ALO on Oracle RAC requires a dedicated connection to the source server. If that connection is lost, Oracle GoldenGate processing will stop. On Oracle RAC, the directories that contain the archive logs must have unique names across all nodes; otherwise, Extract may return “out of order SCN” errors. ALO mode does not support archive log files in ASM mode. The archive log files must be outside the ASM environment for Extract to read them. The LOGRETENTION parameter defaults to DISABLED when Extract is in ALO mode. You can override this with a specific LOGRETENTION setting, if needed.
6.5.2 Configuring Extract for ALO mode To configure Extract for ALO mode, follow these steps as part of the overall process for configuring Oracle GoldenGate, as documented in "Configuring Oracle GoldenGate on Oracle source and target databases" on page 4-1. 1.
Enable supplemental logging at the table level and the database level for the tables in the source database. (See "Configuring logging properties" on page 5-4.)
2.
When Oracle GoldenGate is running on a different server from the source database, make certain that SQL*Net is configured properly to connect to a remote server, such as providing the correct entries in a TNSNAMES file. Extract must have permission to maintain a SQL*Net connection to the source database.
6-12 Oracle GoldenGate for Oracle Installation and Setup Guide
Avoiding log-read bottlenecks
3.
Use a SQL*Net connect string in the following: ■
■
The USERID parameter in the parameter file of every Oracle GoldenGate process that connects to that database. The DBLOGIN command in GGSCI.
Example USERID statement: USERID ggext@ora01, PASSWORD ggs123 If you have a standby server that is local to the server that Oracle GoldenGate is running on, you do not need to use a connect string in USERID. You can just supply the user login name.
Note:
4.
Use the Extract parameter TRANLOGOPTIONS with the ARCHIVEDLOGONLY option. This option forces Extract to operate in ALO mode against a primary or logical standby database, as determined by a value of PRIMARY or LOGICAL STANDBY in the db_role column of the v$database view. The default is to read the online logs. TRANLOGOPTIONS with ARCHIVEDLOGONLY is not needed if using ALO mode against a physical standby database, as determined by a value of PHYSICAL STANDBY in the db_role column of v$database. Extract automatically operates in ALO mode if it detects that the database is a physical standby.
5.
Other TRANLOGOPTIONS options might be required for your environment. For example, depending on the copy program that you use, you might need to use the COMPLETEARCHIVEDLOGONLY option to prevent Extract errors.
6.
Use the MAP parameter for Extract to map the table names to the source object IDs. For more information, see the Oracle GoldenGate Windows and UNIX Reference Guide.
7.
Add the Extract group by issuing the ADD EXTRACT command with a timestamp as the BEGIN option, or by using ADD EXTRACT with the SEQNO and RBA options. It is best to give Extract a known start point at which to begin extracting data, rather than by using the NOW argument. The start time of NOW corresponds to the time of the current online redo log, but an ALO Extract cannot read the online logs, so it must wait for that log to be archived when Oracle switches logs. The timing of the switch depends on the size of the redo logs and the volume of database activity, so there might be a lag between when you start Extract and when data starts being captured. This can happen in both regular and RAC database configurations.
6.6 Avoiding log-read bottlenecks When Oracle GoldenGate captures data from the redo logs, I/O bottlenecks can occur because Extract is reading the same files that are being written by the database logging mechanism. Performance degradation increases with the number of Extract processes that read the same logs. You can: ■
■
Try using faster drives and a faster controller. Both Extract and the database logging mechanism will be faster on a faster I/O system. Store the logs on RAID 0+1. Avoid RAID 5, which performs checksums on every block written and is not a good choice for high levels of continuous I/O. For more information, see the Oracle documentation or search related web sites.
Additional configuration steps when using classic capture
6-13
Avoiding log-read bottlenecks
6-14 Oracle GoldenGate for Oracle Installation and Setup Guide
7 Configuring DDL synchronization for an Oracle database
7
This chapter contains information to help you understand and configure DDL support in Oracle GoldenGate.
7.1 Overview of DDL synchronization Oracle GoldenGate supports the synchronization of DDL operations from one database to another. DDL synchronization can be active when: ■
■
business applications are actively accessing and updating the source and target objects. Oracle GoldenGate transactional data synchronization is active.
The components that support the replication of DDL and the replication of transactional data changes (DML) are independent of each other. Therefore, you can synchronize: ■
just DDL changes
■
just DML changes
■
both DDL and DML
For a list of supported objects and operations for DDL support for Oracle, see the Oracle GoldenGate Oracle Installation and Setup Guide.
7.2 Limitations of Oracle GoldenGate DDL support This topic contains some limitations of the DDL feature. For any additional limitations that were found after this documentation was published, see the Oracle GoldenGate release notes or the readme file that comes with the software.
7.2.1 DDL statement length Oracle GoldenGate measures the length of a DDL statement in bytes, not in characters. The supported length is approximately 2 MB, allowing for some internal overhead that can vary in size depending on the name of the affected object and its DDL type, among other characteristics. If the DDL is longer than the supported size, Extract will issue a warning and ignore the DDL operation. The ignored DDL is saved in the marker table. You can capture Oracle DDL statements that are ignored, as well as any other Oracle DDL statement, by using the ddl_
Configuring DDL synchronization for an Oracle database 7-1
Limitations of Oracle GoldenGate DDL support
ddl2file.sql script, which saves the DDL operation to a text file in the USER_DUMP_ DEST directory of Oracle. The script prompts for the following input: ■
■
■
The name of the schema that contains the Oracle GoldenGate DDL objects, which is specified in the GLOBALS file. The Oracle GoldenGate marker sequence number, which is recorded in the Extract report file when DDLOPTIONS with the REPORT option is used in the Extract parameter file. A name for the output file.
7.2.2 Supported topologies Oracle GoldenGate supports DDL synchronization only in a like-to-like configuration. The source and target object definitions must be identical. Oracle GoldenGate does not support DDL on a standby database. Oracle GoldenGate supports DDL replication in all supported uni-directional configurations, and in bi-directional configurations between two, and only two, systems. For special considerations in an Oracle active-active configuration, see "Propagating DDL in an active-active (bi-directional) configurations" on page 7-26.
7.2.3 Filtering, mapping, and transformation DDL operations cannot be transformed by any Oracle GoldenGate process. However, source DDL can be mapped and filtered to a different target object by a primary Extract or a Replicat process. Mapping or filtering of DDL by a data-pump Extract is not permitted, and the DDL is passed as it was received from the primary Extract. This is known as PASSTHRU mode. For example, ALTER TABLE TableA is processed by a data pump as ALTER TABLE TableA. It cannot be mapped by that process as ALTER TABLE TableB, regardless of any TABLE statements that specify otherwise.
7.2.4 Renames RENAME operations on tables are converted to the equivalent ALTER TABLE RENAME. For example RENAME tab1 TO tab2 would be changed to ALTER TABLE tab1 RENAME TO tab2. The reason for this conversion is that RENAME does not support the use of a schema name, but ALTER TABLE RENAME does. Oracle GoldenGate makes the conversion so that a schema name can be included in the target DDL statement. The conversion is reported in the Replicat process report file. RENAME operations on sequences and views cannot be converted to an ALTER statement, because there is no such statement in Oracle for sequences and views. Consequently, sequence renames are always replicated on the target with the same owner and object name as in the source DDL and cannot be mapped to something different.
7.2.5 Interactions between fetches from a table and DDL Oracle GoldenGate supports some data types by identifying the modified row from the redo stream and then querying the underlying table to fetch the changed columns. For instance, in classic capture, partial updates on LOBs (modifications done via dbms_ lob package) are supported by identifying the modified row and the LOB column from the redo log, and then querying for the LOB column value for the row from the base table. A similar technique is employed to support User Defined Types (both in classic and integrated capture). 7-2 Oracle GoldenGate for Oracle Installation and Setup Guide
Limitations of Oracle GoldenGate DDL support
Such fetch-based support is implemented by issuing a flashback query to the database based on the SCN (System Change Number) at which the transaction committed. The flashback query feature has certain limitations. Certain DDL operations act as barriers such that flashback queries to get data prior to these DDLs do not succeed. Examples of such DDL are "ALTER TABLE MODIFY COLUMN" and "ALTER TABLE DROP COLUMN". Thus, in cases where there is Extract capture lag, an intervening DDL may cause fetch requests for data prior to the DDL to fail. In such cases, Extract falls back and fetches the current snapshot of the data for the modified column. There are two limitations to this approach: First, the DDL could have modified the column that Extract needs to fetch (for example, suppose the intervening DDL added a new attribute to the UDT that is being captured). Second, the DDL could have modified one of the columns that Extract uses as a logical row identifier. To prevent fetch-related inconsistencies such as these, take the following precautions while modifying columns. 1.
Pause all DML to the table.
2.
Wait for Extract to finish capturing all remaining redo, and wait for Replicat to finish processing the captured data from trail. To determine whether Replicat is finished, issue the following command in GGSCI until you see a message that there is no more data to process. INFO REPLICAT group
3.
Execute the DDL on the source.
4.
Resume source DML operations.
7.2.6 Comments in SQL If a source DDL statement contains a comment in the middle of an object name, that comment will appear at the end of the object name in the target DDL statement. For example: Source: CREATE TABLE hr./*comment*/emp ...
Target: CREATE TABLE hr.emp /*comment*/ ...
This does not affect the integrity of DDL synchronization. Comments in any other area of a DDL statement remain in place when replicated.
7.2.7 Compilation errors If a CREATE operation on a trigger, procedure, function, or package results in compilation errors, Oracle GoldenGate executes the DDL operation on the target anyway. Technically, the DDL operations themselves completed successfully and should be propagated to allow dependencies to be executed on the target, for example in recursive procedures.
7.2.8 Interval partitioning DDL replication is unaffected by interval partitioning, because the DDL is implicit.
Configuring DDL synchronization for an Oracle database 7-3
Configuration guidelines for DDL support
7.3 Configuration guidelines for DDL support The following are guidelines to take into account when configuring Oracle GoldenGate processes to support DDL replication.
7.3.1 Database privileges See "Assigning a database user for Oracle GoldenGate" on page 4-6 for database privileges that are required for Oracle GoldenGate to support DDL capture and replication.
7.3.2 Parallel processing If using parallel Extract and/or Replicat processes, keep related DDL and DML together in the same process stream to ensure data integrity. Configure the processes so that: ■
■
all DDL and DML for any given object are processed by the same Extract group and by the same Replicat group. all objects that are relational to one another are processed by the same process group.
For example, if ReplicatA processes DML for Table1, then it should also process the DDL for Table1. If Table2 has a foreign key to Table1, then its DML and DDL operations also should be processed by ReplicatA. If an Extract group writes to multiple trails that are read by different Replicat groups, Extract sends all of the DDL to all of the trails. Use each Replicat group to filter the DDL by using the filter options of the DDL parameter in the Replicat parameter file.
7.3.3 DDL and DML in data pumps If using a data pump, configure DML for PASSTHRU mode if the objects are using DDL support. DDL is passed through a data pump in PASSTHRU mode, so the same must be true of the DML. Any filtering, mapping, or transformation of the DML must be done by the primary Extract or by Replicat. However, tables that do not use DDL support can be configured in NOPASSTHRU mode to allow data filtering, and manipulation by a data pump. To configure tables for PASSTHRU, NOPASSTHRU, or both, do the following: 1.
In the parameter file of the data pump, place the PASSTHRU parameter before all of the TABLE statements that contain tables that use DDL support.
2.
In the same parameter file, you can place the NOPASSTHRU parameter before any TABLE statements that contain tables that do not use DDL support, if you want data filtering, mapping, or transformation to be performed for them.
3.
Do not use any of the DDL configuration parameters for a data pump: DDL, DDLOPTIONS, DDLSUBST, PURGEDDLHISTORY, PURGEMARKERHISTORY, DDLERROR, or any of the Oracle GoldenGate tracing parameters with DDL-related options.
For more information about PASSTHRU and NOPASSTHRU, see the Oracle GoldenGate Windows and UNIX Reference Guide.
7.3.4 Object names Oracle GoldenGate preserves the database-defined object name, case, and character set. This support preserves single-byte and multibyte names, symbols, and accent
7-4 Oracle GoldenGate for Oracle Installation and Setup Guide
Configuration guidelines for DDL support
characters at all levels of the database hierarchy. For more information about support for object names, see the Oracle GoldenGate Windows and UNIX Administrator's Guide. You can use the question mark (?) and asterisk (*) wildcards to specify object names in configuration parameters that support DDL synchronization. For more information about support for wildcards, see the Oracle GoldenGate Windows and UNIX Administrator's Guide. To process wildcards correctly, the WILDCARDRESOLVE parameter is set to DYNAMIC by default. If WILDCARDRESOLVE is set to anything else, the Oracle GoldenGate process that is processing DDL operations will abend and write the error to the process report.
7.3.5 Data definitions Because DDL support requires a like-to-like configuration, the ASSUMETARGETDEFS parameter must be used in the Replicat parameter file. Replicat will abend if objects are configured for DDL support and the SOURCEDEFS parameter is being used. For more information about ASSUMETARGETDEFS, see the Oracle GoldenGate Windows and UNIX Reference Guide.
7.3.6 Truncates TRUNCATE statements can be supported as follows: ■
■
As part of the Oracle GoldenGate full DDL support, which supports TRUNCATE TABLE, ALTER TABLE TRUNCATE PARTITION, and other DDL. This is controlled by the DDL parameter (see "Enabling DDL support" on page 7-9.) As standalone TRUNCATE support. This support enables you to replicate TRUNCATE TABLE, but no other DDL. The GETTRUNCATES parameter controls the standalone TRUNCATE feature. For more information, see the Oracle GoldenGate Windows and UNIX Reference Guide.
To avoid errors from duplicate operations, only one of these features can be active at the same time.
7.3.7 Initial synchronization To configure DDL replication, start with a target database that is synchronized with the source database. DDL support is compatible with the Replicat initial load method. Before executing an initial load, disable DDL extraction and replication. DDL processing is controlled by the DDL parameter in the Extract and Replicat parameter files. After initial synchronization of the source and target data, use all of the source sequence values at least once with NEXTVAL before you run the source applications. You can use a script that selects NEXTVAL from every sequence in the system. This must be done while Extract is running.
7.3.8 Data continuity after CREATE or RENAME To replicate DML operations on new Oracle tables resulting from a CREATE or RENAME operation, the names of the new tables must be specified in TABLE and MAP statements in the parameter files. You can use wildcards to make certain that they are included. To create a new user with CREATE USER and then move new or renamed tables into that schema, the new user name must be specified in TABLE and MAP statements. To create a new user fin2 and move new or renamed tables into that schema, the parameter
Configuring DDL synchronization for an Oracle database 7-5
Understanding DDL scopes
statements could look as follows, depending on whether you want the fin2 objects mapped to the same, or different, schema on the target: Extract: TABLE fin2.*;
Replicat: MAP fin2*, TARGET different_schema.*;
7.4 Understanding DDL scopes Database objects are classified into scopes. A scope is a category that defines how DDL operations on an object are handled by Oracle GoldenGate. The scopes are: ■
MAPPED
■
UNMAPPED
■
OTHER
The use of scopes enables granular control over the filtering of DDL operations, string substitutions, and error handling.
7.4.1 Mapped scope Objects that are specified in TABLE and MAP statements are of MAPPED scope. Extraction and replication instructions in those statements apply to both data (DML) and DDL on the specified objects, unless override rules are applied. For objects in TABLE and MAP statements, the DDL operations listed in the following table are supported. Table 7–1
Objects that can be mapped in MAP and TABLE statements
Operations
On any of these Objects1
CREATE
TABLE3
ALTER
INDEX
DROP
TRIGGER
RENAME
SEQUENCE 2
COMMENT ON
MATERIALIZED VIEW VIEW FUNCTION PACKAGE PROCEDURE SYNONYM PUBLIC SYNONYM4
GRANT
TABLE
REVOKE
SEQUENCE MATERIALIZED VIEW
ANALYZE
TABLE INDEX CLUSTER
7-6 Oracle GoldenGate for Oracle Installation and Setup Guide
Understanding DDL scopes
1
2 3 4
TABLE and MAP do not support some special characters that could be used in an object name affected by these operations. Objects with non-supported special characters are supported by the scopes of UNMAPPED and OTHER. Applies to COMMENT ON TABLE, COMMENT ON COLUMN Includes AS SELECT Table name must be qualified with schema name.
For Extract, MAPPED scope marks an object for DDL capture according to the instructions in the TABLE statement. For Replicat, MAPPED scope marks DDL for replication and maps it to the object specified by the schema and name in the TARGET clause of the MAP statement. To perform this mapping, Replicat issues ALTER SESSION to set the schema of the Replicat session to the schema that is specified in the TARGET clause. If the DDL contains unqualified objects, the schema that is assigned on the target depends on circumstances described in "Correctly identifying unqualified object names in DDL" on page 7-9. Assume the following TABLE and MAP statements: Extract (source) TABLE fin.expen; TABLE hr.tab*;
Replicat (target) MAP fin.expen, TARGET fin2.expen2; MAP hr.tab*, TARGET hrBackup.bak_*;
Also assume a source DDL statement of: ALTER TABLE fin.expen ADD notes varchar2(100);
In this example, because the source table fin.expen is in a MAP statement with a TARGET clause that maps to a different owner and table name, the target DDL statement becomes: ALTER TABLE fin2.expen2 ADD notes varchar2(100);
Likewise, the following source and target DDL statements are possible for the second set of TABLE and MAP statements in the example: Source: CREATE TABLE hr.tabPayables ... ;
Target: CREATE TABLE hrBackup.bak_tabPayables ...;
When objects are of MAPPED scope, you can omit their names from the DDL configuration parameters, unless you want to refine their DDL support further. If you ever need to change the object names in TABLE and MAP statements, the changes will apply automatically to the DDL on those objects. If you include an object in a TABLE statement, but not in a MAP statement, the DDL for that object is MAPPED in scope on the source but UNMAPPED in scope on the target.
7.4.1.1 Mapping Oracle cluster tables and UDTs An Oracle clustered table or Oracle user defined type (UDT) cannot be mapped to a different target name, but it can be mapped to a different target owner. Because these
Configuring DDL synchronization for an Oracle database 7-7
Understanding DDL scopes
special kinds of objects can consist of underlying tables that, themselves, could be a mix of both MAPPED and UNMAPPED scope, name mapping cannot be used.
7.4.1.2 Mapping ALTER INDEX An ALTER INDEX...RENAME command cannot be mapped to a different target index name, but it can be mapped to a different target owner. Valid example: ALTER INDEX src.ind RENAME TO indnew;
This DDL can be mapped with wildcards as: MAP src.* TARGET tgt.*;
Alternatively, it can be mapped explicitly as the following, making sure to use the original index name in the source and target specifications: MAP src.ind TARGET tgt.ind;
In either of the preceding cases, the target DDL will be: ALTER INDEX tgt.ind RENAME TO indnew;
Invalid example: A MAP statement such as the following is not valid: MAP src.ind TARGET tgt.indnew;
That statement maps the old name to the new name, and the target DDL will become: ALTER INDEX tgt.indnew RENAME TO indnew;
7.4.2 Unmapped scope If a DDL operation is supported for use in a TABLE or MAP statement, but its base object name is not included in one of those parameters, it is of UNMAPPED scope. An object name can be of UNMAPPED scope on the source (not in an Extract TABLE statement), but of MAPPED scope on the target (in a Replicat MAP statement), or the other way around. When Oracle DDL is of UNMAPPED scope in the Replicat configuration, Replicat will by default do the following: 1.
Set the current owner of the Replicat session to the owner of the source DDL object.
2.
Execute the DDL as that owner.
3.
Restore Replicat as the current owner of the Replicat session.
See also "Correctly identifying unqualified object names in DDL" on page 7-9.
7.4.3 Other scope DDL operations that cannot be mapped are of OTHER scope. When DDL is of OTHER scope in the Replicat configuration, it is applied to the target with the same owner and object name as in the source DDL. An example of OTHER scope is a DDL operation that makes a system-specific reference, such as DDL that operates on data file names. Some other examples of OTHER scope:
7-8 Oracle GoldenGate for Oracle Installation and Setup Guide
Enabling DDL support
CREATE USER joe IDENTIFIED by joe; CREATE ROLE ggs_gguser_role IDENTIFIED GLOBALLY; ALTER TABLESPACE gg_user TABLESPACE GROUP gg_grp_user;
See also “Correctly identifying unqualified object names in DDL” on page 9.
7.5 Correctly identifying unqualified object names in DDL Extract captures the current schema (also called session schema) that is in effect when a DDL operation is executed. This schema is used to resolve unqualified object names in the DDL. Consider the following example: CONNECT SCOTT/TIGER CREATE TABLE TAB1 (X NUMBER); CREATE TABLE SRC1.TAB2(X NUMBER) AS SELECT * FROM TAB1;
In both of those DDL statements, the unqualified table TAB1 is resolved as SCOTT.TAB1 based on the current schema SCOTT that is in effect during the DDL execution. There is another way of setting the current schema, which is to set the current_schema for the session, as in the following example: CONNECT SCOTT/TIGER ALTER SESSION SET CURRENT_SCHEMA=SRC; CREATE TABLE TAB1 (X NUMBER); CREATE TABLE SRC1.TAB2(X NUMBER) AS SELECT * FROM TAB1;
In both of those DDL statements, the unqualified table TAB1 is resolved as SRC.TAB1 based on the current schema SRC that is in effect during the DDL execution. In both classic and integrated capture modes, Extract captures the current schema that is in effect during DDL execution, and it resolves the unqualified object names (if any) by using the current schema. As a result, MAP statements specified for Replicat work correctly for DDL with unqualified object names. You can also map a source session schema to a different target session schema. Session schema mapping is required for some DDL to succeed on the target in the presence of mapping, such as CREATE TABLE AS SELECT and in CREATE TABLE operations with the REFERENCES clause. This mapping is global and overrides any other mappings that involve the same schema names. To map session schemas, use the DDLOPTIONS parameter with the MAPSESSIONSCHEMA option. For more information, see the Oracle GoldenGate Windows and UNIX Reference Guide. You can prevent explicit schema mapping with the NOEXPLICITSCHEMAMAPPING option of the DDLOPTIONS parameter. See the DDLOPTIONS parameter documentation in the Windows and UNIX Reference Guide.
7.6 Enabling DDL support By default, the status of DDL replication support is as follows: ■
■
On the source, Oracle GoldenGate DDL support is disabled by default. You must configure Extract to capture DDL by using the DDL parameter. On the target, DDL support is enabled by default, to maintain the integrity of transactional data that is replicated. By default, Replicat will process all DDL operations that the trail contains. If needed, you can use the DDL parameter to configure Replicat to ignore or filter DDL operations.
Configuring DDL synchronization for an Oracle database 7-9
Filtering DDL replication
7.7 Filtering DDL replication For Oracle databases, you can use the following methods to filter DDL operations so that specific (or all) DDL is applied to the target database according to your requirements. By default, all DDL is passed to Extract by the DDL trigger. ■
■
■
■
Filter with PL/SQL code. This method makes use of an Oracle function that is called by the DDL trigger when a DDL operation occurs, to compute whether or not to send the DDL to Extract. Filter with built-in filter rules: This method makes use of some procedures that you run to build filter rules into the Oracle GoldenGate trigger logic. This method allows discreet control over the types of objects that are sent to Extract, and it allows the ordering of rule evaluation. Filter with the DDL parameter on the source, the target, or both. This method is performed within Oracle GoldenGate, and both Extract and Replicat can execute filter criteria. Extract can perform filtering, or it can send all of the DDL to a trail, and then Replicat can perform the filtering. Alternatively, you can filter in a combination of different locations. The DDL parameter gives you control over where the filtering is performed, and it also offers more filtering options than the trigger method, including the ability to filter collectively based on the DDL scope (for example, include all MAPPED scope). Combine PL/SQL, built-in rules, and DDL parameter filtering. Any DDL that is passed to Extract after it is filtered by the DDL trigger or filter rules can be filtered further with the DDL parameter to meet specific needs.
7.7.1 Filtering with PL/SQL code You can write PL/SQL code to pass information about the DDL to a function that computes whether or not the DDL is passed to Extract. By sending fewer DDL operations to Extract, you can improve capture performance. 1.
Copy the ddl_filter.sql file that is in the Oracle GoldenGate installation directory to a test machine where you can test the code that you will be writing.
2.
Open the file for editing. It contains a PL/SQL function named filterDDL, which you can modify to specify if/then filter criteria. The information that is passed to this function includes: ■
ora_owner: the owner of the DDL object
■
ora_name: the defined name of the object
■
ora_objtype: the type of object, such as TABLE or INDEX
■
ora_optype: the operation type, such as CREATE or ALTER
■
ora_login_user: The user that executed the DDL
■
retVal: can be either INCLUDE to include the DDL, or EXCLUDE to exclude the DDL from Extract processing.
In the location after the 'compute retVal here' comment, write filter code for each type of DDL that you want to be filtered. The following is an example: if ora_owner='SYS' then retVal:='EXCLUDE'; end if; if ora_objtype='USER' and ora_optype ='DROP' then retVal:='EXCLUDE'; end if;
7-10 Oracle GoldenGate for Oracle Installation and Setup Guide
Filtering DDL replication
if ora_owner='JOE' and ora_name like 'TEMP%' then retVal:='EXCLUDE'; end if;
In this example, the following DDL is excluded from being processed by the DDL trigger:
3.
■
DDL for objects owned by SYS
■
any DROP USER
■
any DDL on JOE.TEMP%
(Optional) To trace the filtering, you can add the following syntax to each if/then statement in the PL/SQL: if ora_owner='JOE' and ora_name like 'TEMP%' then retVal:='EXCLUDE'; if "&gg_user" .DDLReplication.trace_level >= 1 then "&gg_user" .trace_put_line ('DDLFILTER', 'excluded JOE.TEMP%'); end if;
Where: ■ ■
■
&gg_user is the schema of the Oracle GoldenGate DDL support objects. .DDLReplication.trace_level is the level of DDL tracing. To use trigger tracing, the TRACE or TRACE2 parameter must be used with the DDL or DDLONLY option in the Extract parameter file. .DDLReplication.trace_level must be set to >=1. trace_put_line is a user-defined text string that Extract writes to the trace file that represents the type of DDL that was filtered.
4.
Save the code.
5.
Stop DDL activity on the test system.
6.
In SQL*Plus, compile the ddl_filter.sql file as follows, where schema_name is the schema where the Oracle GoldenGate DDL objects are installed. @ddl_filter schema_name
Note: See the Oracle GoldenGate Oracle Installation and Setup Guide for information on these objects. 7.
Test in the test environment to make certain that the filtering works. It is important to perform this testing, because any errors in the code could cause source and target DDL to become out of synchronization.
8.
After a successful test, copy the file to the Oracle GoldenGate installation directory on the source production system.
9.
Stop DDL activity on the source system.
10. Compile the ddl_filter.sql file as you did before. @ddl_filter schema_name 11. Resume DDL activity on the source system.
Configuring DDL synchronization for an Oracle database
7-11
Filtering DDL replication
7.7.2 Adding and dropping filter rules You can add inclusion and exclusion rules to control the DDL operations that are sent to Extract by the DDL trigger. By storing rules and sending fewer DDL operations to Extract, you can improve capture performance. 1.
Use the DDLAUX.addRule() function to define your rules according to the following instructions. This function is installed in the Oracle GoldenGate DDL schema after the DDL objects are installed with the ddl_setup.sql script.
2.
To activate the rules, execute the function in SQL*Plus or enter a collection of rules in a SQL file and execute that file in SQL*Plus.
7.7.2.1 DDLAUX.addRule() function definition FUNCTION addRule( obj_name IN VARCHAR2 DEFAULT NULL, base_obj_name IN VARCHAR2 DEFAULT NULL, owner_name IN VARCHAR2 DEFAULT NULL, base_owner_name IN VARCHAR2 DEFAULT NULL, base_obj_property IN NUMBER DEFAULT NULL, obj_type IN NUMBER DEFAULT NULL, command IN VARCHAR2 DEFAULT NULL, inclusion IN boolean DEFAULT NULL , sno IN NUMBER DEFAULT NULL) RETURN NUMBER;
7.7.2.2 Parameters for DDLAUX.addRule() The information passed to this function are the following parameters, which correlate to the attributes of an object. All parameters are optional, and more than one parameter can be specified. ■
sno: Specifies a serial number that identifies the rule. The order of evaluation of rules is from the lowest serial number to the highest serial number, until a match is found. The sno can be used to place inclusion rules ahead of an exclusion rule, so as to make an exception to the exclusion rule. Because this is a function and not a procedure, it returns the serial number of the rule, which should be used for the drop rule specified with DDLAUX.dropRule(). The serial number is generated automatically unless you specify one with this statement at the beginning of your code: DECLARE sno NUMBER; BEGIN sno := For example: DECLARE sno NUMBER; BEGIN sno := tkggadmin..DDLAUX.ADDRULE(obj_name => 'GGS%' , obj_type => TYPE_TABLE); END
■
obj_name: Specifies the object name
■
owner_name: Specifies the name of the object owner
■
■ ■
■
■
base_obj_name: Specifies the base object name of the DDL object (such as the base table if the object is an index) base_owner_name: Specifies the base object owner name base_obj_property: Specifies the base object property. See "Valid DDL components for DDLAUX.addRule()" on page 7-13 obj_type: Specifies the object type. See "Valid DDL components for DDLAUX.addRule()" on page 7-13 command: Specifies the command. See "Valid DDL components for DDLAUX.addRule()" on page 7-13
7-12 Oracle GoldenGate for Oracle Installation and Setup Guide
Filtering DDL replication
■
inclusion = TRUE: Indicates that the specified objects are to be captured by the DDL trigger. If this parameter is not specified, the rule becomes an exclusion rule, and the specified objects are not captured. You can specify both an exclusion rule and an inclusion rule. If a DDL does not match any of the rules, it is included (passed to Extract) by default. Calling DDLAUX.addRule() without any parameters generates an empty rule that excludes all DDL on all the objects.
7.7.2.3 Valid DDL components for DDLAUX.addRule() The following are the defined DDL object types, base object properties, and DDL commands that can be specified in the function code. Valid object types are: TYPE_INDEX TYPE_TABLE TYPE_VIEW TYPE_SYNONYM TYPE_SEQUENCE TYPE_PROCEDURE TYPE_FUNCTION TYPE_PACKAGE TYPE_TRIGGER Valid base object properties are: TB_IOT TB_CLUSTER TB_NESTED TB_TEMP TB_EXTERNAL Valid commands are: CMD_CREATE CMD_DROP CMD_TRUNCATE CMD_ALTER
7.7.2.4 Examples of rule-based trigger filtering The following example excludes all temporary tables, except tables with names that start with IMPTEMP. 1. DDLAUX.ADDRULE(obj_name => 'IMPTEMP%', base_obj_property => TB_TEMP, obj_type => TYPE_TABLE, INCLUSION => TRUE); 2. DDLAUX.ADDRULE(base_obj_property => TB_TEMP, obj_type => TYPE_TABLE);
Since the IMPTEMP% tables must be included, that rule should come first.
Note:
The following example excludes all tables with name 'GGS%' DECLARE sno NUMBER; BEGIN sno := DDLAUX.ADDRULE(obj_name => 'GGS%' , obj_type => TYPE_TABLE); END
The following example excludes all temporary tables. DDLAUX.ADDRULE(base_obj_property => TB_TEMP, obj_type => TYPE_TABLE);
Configuring DDL synchronization for an Oracle database
7-13
Filtering DDL replication
The following example excludes all indexes on TEMP tables. DDLAUX.ADDRULE(base_obj_property => TB_TEMP, obj_type => TYPE_INDEX);
The following example excludes all objects in schema TKGGADMIN. DDLAUX.ADDRULE(obj_owner => 'TKGGADMIN');
The following example excludes all objects in TRUNCATE operations made to TEMP tables. DDLAUX.ADDRULE(base_obj_property => TB_TEMP, obj_type => TYPE_TABLE, command => CMD_TRUNCATE)
7.7.2.5 Dropping filter rules Use the DDLAUX.dropRule() function with the drop rule. This function is installed in the Oracle GoldenGate DDL schema after the DDL objects are installed with the ddl_ setup.sql script. As input, specify the serial number of the rule that you want to drop. FUNCTION dropRule(sno IN NUMBER) RETURN BOOLEAN;
7.7.3 Filtering with the DDL parameter The DDL parameter is the main Oracle GoldenGate parameter for filtering DDL within the Extract and Replicat processes. When used without options, the DDL parameter performs no filtering, and it causes all DDL operations to be propagated as follows: ■
■
As an Extract parameter, it captures all supported DDL operations that are generated on all supported database objects and sends them to the trail. As a Replicat parameter, it replicates all DDL operations from the Oracle GoldenGate trail and applies them to the target. This is the same as the default behavior without this parameter.
When used with options, the DDL parameter acts as a filtering agent to include or exclude DDL operations based on: ■
scope
■
object type
■
operation type
■
object name
■
strings in the DDL command syntax or comments, or both
Only one DDL parameter can be used in a parameter file, but you can combine multiple inclusion and exclusion options to filter the DDL to the required level. ■
■
■
■
DDL filtering options are valid for a primary Extract that captures from the transaction source, but not for a data-pump Extract. When combined, multiple filter option specifications are linked logically as AND statements. All filter criteria specified with multiple options must be satisfied for a DDL statement to be replicated. When using complex DDL filtering criteria, it is recommended that you test your configuration in a test environment before using it in production.
7-14 Oracle GoldenGate for Oracle Installation and Setup Guide
Filtering DDL replication
WARNING: Do not include any Oracle GoldenGate-installed DDL objects in a DDL parameter, in a TABLE parameter, or in a MAP parameter, nor in a TABLEEXCLUDE or MAPEXCLUDE parameter. Make certain that wildcard specifications in those parameters do not include Oracle GoldenGate-installed DDL objects. These objects must not be part of the Oracle GoldenGate configuration, but the Extract process must be aware of operations on them, and that is why you must not explicitly exclude them from the configuration with an EXCLUDE, TABLEEXCLUDE, or MAPEXCLUDE parameter statement.
Before you create a DDL parameter statement, it might help to review "How DDL is evaluated for processing" on page 7-29.
Note:
Syntax: DDL [ {INCLUDE | EXCLUDE} [, MAPPED | UNMAPPED | OTHER | ALL] [, OPTYPE type] [, OBJTYPE ‘type’] [, OBJNAME name] [, INSTR ‘string’] [, INSTRCOMMENTS ‘comment_string’] [, STAYMETADATA] [, EVENTACTIONS (action specification) ] [...]
Configuring DDL synchronization for an Oracle database
7-15
Filtering DDL replication
Table 7–2
DDL inclusion and exclusion options
Option
Description
INCLUDE | EXCLUDE
Use INCLUDE and EXCLUDE to identify the beginning of an inclusion or exclusion clause. ■
■
An inclusion clause contains filtering criteria that identifies the DDL that this parameter will affect. An exclusion clause contains filtering criteria that excludes specific DDL from this parameter.
The inclusion or exclusion clause must consist of the INCLUDE or EXCLUDE keyword followed by any valid combination of other options of the parameter that is being applied. If you use EXCLUDE, you must create a corresponding INCLUDE clause. For example, the following is invalid: DDL EXCLUDE OBJNAME hr.* However, you can use either of the following: DDL INCLUDE ALL, EXCLUDE OBJNAME hr.* DDL INCLUDE OBJNAME fin.* EXCLUDE OBJNAME fin.ss An EXCLUDE takes priority over any INCLUDEs that contain the same criteria. You can use multiple inclusion and exclusion clauses. MAPPED | UNMAPPED | OTHER | ALL
Use MAPPED, UNMAPPED, OTHER, and ALL to apply INCLUDE or EXCLUDE based on the DDL operation scope. ■
■
OPTYPE type
MAPPED applies INCLUDE or EXCLUDE to DDL operations that are of MAPPED scope. MAPPED filtering is performed before filtering that is specified with other DDL parameter options. UNMAPPED applies INCLUDE or EXCLUDE to DDL operations that are of UNMAPPED scope.
■
OTHER applies INCLUDE or EXCLUDE to DDL operations that are of OTHER scope.
■
ALL applies INCLUDE or EXCLUDE to DDL operations of all scopes.
Use OPTYPE to apply INCLUDE or EXCLUDE to a specific type of DDL operation, such as CREATE, ALTER, and RENAME. For type, use any DDL command that is valid for the database. For example, to include ALTER operations, the correct syntax is: DDL INCLUDE OPTYPE ALTER
OBJTYPE ‘type’
Use OBJTYPE to apply INCLUDE or EXCLUDE to a specific type of database object. For type, use any object type that is valid for the database, such as TABLE, INDEX, and TRIGGER. For an Oracle materialized view and materialized views log, the correct types are snapshot and snapshot log, respectively. Enclose the name of the object type within single quotes. For example: DDL INCLUDE OBJTYPE ‘INDEX’ DDL INCLUDE OBJTYPE ‘SNAPSHOT’ For Oracle object type USER, do not use the OBJNAME option, because OBJNAME expects owner.object whereas USER only has a schema.
7-16 Oracle GoldenGate for Oracle Installation and Setup Guide
Filtering DDL replication
Table 7–2 (Cont.) DDL inclusion and exclusion options Option
Description
OBJNAME name
Use OBJNAME to apply INCLUDE or EXCLUDE to the fully qualified name of an object, for example owner.table_name. You can use a wildcard only for the object name. Example: DDL INCLUDE OBJNAME accounts.* Do not use OBJNAME for the Oracle USER object, because OBJNAME expects owner.object, whereas USER only has a schema. When using OBJNAME with MAPPED in a Replicat parameter file, the value for OBJNAME must refer to the name specified with the TARGET clause of the MAP statement. For example, given the following MAP statement, the correct value is OBJNAME fin2.*. MAP fin.exp_*, TARGET fin2.*; In the following example, a CREATE TABLE statement executes as follows on the source: CREATE TABLE fin.exp_phone; That same statement executes as follows on the target: CREATE TABLE fin2.exp_phone; If a target owner is not specified in the MAP statement, Replicat maps it to the database user that is specified with the USERID parameter. For DDL that creates derived objects, such as a trigger, the value for OBJNAME must be the name of the base object, not the name of the derived object. For example, to include the following DDL statement, the correct value is hr.accounts, not hr.insert_trig. CREATE TRIGGER hr.insert_trig ON hr.accounts; For RENAME operations, the value for OBJNAME must be the new table name. For example, to include the following DDL statement, the correct value is hr.acct. ALTER TABLE hr.accounts RENAME TO acct;
INSTR ‘string’
Use INSTR to apply INCLUDE or EXCLUDE to DDL statements that contain a specific character string within the command syntax itself, but not within comments. For example, the following excludes DDL that creates an index. DDL INCLUDE ALL EXCLUDE INSTR ‘CREATE INDEX’ Enclose the string within single quotes. The string search is not case sensitive. INSTR does not support single quotation marks (‘ ’) that are within the string, nor does it support NULL values.
INSTRCOMMENTS ‘comment_ Use INSTRCOMMENTS to apply INCLUDE or EXCLUDE to DDL statements that contain a specific character string within a comment, but not within the DDL command itself. string’ By using INSTRCOMMENTS, you can use comments as a filtering agent. For example, the following excludes DDL statements that include “source” in the comments. DDL INCLUDE ALL EXCLUDE INSTRCOMMENTS ‘SOURCE ONLY’ In this example, DDL statements such as the following are not replicated. CREATE USER john IDENTIFIED BY john /*source only*/; Enclose the string within single quotes. The string search is not case sensitive. You can combine INSTR and INSTRCOMMENTS to filter on a string in the command syntax of a DDL statement, and also on the comments in that statement. INSTRCOMMENTS does not support single quotation marks (‘ ’) that are within the string, nor does it support NULL values.
Configuring DDL synchronization for an Oracle database
7-17
Filtering DDL replication
Table 7–2 (Cont.) DDL inclusion and exclusion options Option
Description
INSTRWORDS ‘word list’
Use INSTRWORDS to apply INCLUDE or EXCLUDE to DDL statements that contain the specified words. For word list, supply the words in any order, within single quotes. To include spaces, put the space (and the word, if applicable) in double quotes. Double quotes also can be used to enclose sentences. All specified words must be present in the DDL for INSTRWORDS to take effect. Example: ALTER TABLE INCLUDE INSTRWORDS ‘ALTER CONSTRAINT “ xyz” This example will match both of the following statements: ALTER TABLE ADD CONSTRAINT xyz CHECK ALTER TABLE DROP CONSTRAINT xyz INSTRWORDS does not support single quotation marks (‘ ’) that are within the string, nor does it support NULL values.
7-18 Oracle GoldenGate for Oracle Installation and Setup Guide
Filtering DDL replication
Table 7–2 (Cont.) DDL inclusion and exclusion options Option
Description
INSTRCOMMENTSWORDS ‘word list’
Works the same way as INSTRWORDS, but only applies to comments within a DDL statement, not the DDL syntax itself. By using INSTRCOMMENTS, you can use comments as a filtering agent. INSTRCOMMENTSWORDS does not support single quotation marks (‘ ’) that are within the string, nor does it support NULL values. You can combine INSTRWORDS and INSTRCOMMENTSWORDS to filter on a string in the command syntax and in the comments of the same DDL statement.
STAYMETADATA
Valid for Extract and Replicat. Prevents metadata from being replicated. When Extract first encounters DML on a table, it retrieves the metadata for that table. When DDL is encountered on that table, the old metadata is invalidated. The next DML on that table is matched to the new metadata so that the target table structure always is up-to-date with that of the source. However, if you know that a particular DDL operation will not affect the table’s metadata, you can use STAYMETADATA so that the current metadata is not retrieved or replicated. This is a performance improvement that has benefit for such operations as imports and exports, where such DDL as truncates and the disabling of constraints are often performed. These operations do not affect table structure, as it relates to the integrity of subsequent data replication, so they can be ignored in such cases. For example ALTER TABLE ADD FOREIGN KEY does not affect table metadata. An example of how this can be applied selectively is as follows: DDL INCLUDE ALL INCLUDE STAYMETADATA OBJNAME xyz This example states that all DDL is to be included for replication, but only DDL that operates on object xyz will be subject to STAYMETADATA. STAYMETADATA also can be used the same way in an EXCLUDE clause. STAYMETADATA must be used the same way on the source and target to ensure metadata integrity. When STAYMETADATA is in use, a message is added to the report file. DDL reporting is controlled by the DDLOPTIONS parameter with the REPORT option. This same functionality can be applied globally to all DDL that occurs on the source by using the @ddl_staymetadata scripts: ■
@ddl_staymetadata_on globally turns off metadata versioning.
■
@ddl_staymetadata_off globally enables metadata versioning again.
This option should be used with the assistance of Oracle GoldenGate technical support staff, because it might not always be apparent which DDL affects object metadata. If improperly used, it can break the integrity of the replication environment.
Configuring DDL synchronization for an Oracle database
7-19
Special filter cases
Table 7–2 (Cont.) DDL inclusion and exclusion options Option
Description
EVENTACTIONS (action specification)
Causes the Extract or Replicat process take a defined action based on a DDL record in the transaction log or trail, which is known as the event record. The DDL event is triggered if the DDL record is eligible to be written to the trail by Extract or a data pump, or to be executed by Replicat, as determined by the other filtering options of the DDL parameter. You can use this system to customize processing based on database events. For action specification see EVENTACTIONS under the MAP and TABLE parameters. Guidelines for using EVENTACTIONS on DDL records: ■
■
CHECKPOINTBEFORE: Since each DDL record is autonomous, the DDL record is guaranteed to be the start of a transaction; therefore, the CHECKPOINT BEFORE event action is implied for a DDL record. IGNORE: This option is not valid for DDL records. Because DDL operations are autonomous, ignoring a record is equivalent to ignoring the entire transaction.
EVENTACTIONS does not support the following DDL objects because they are derived objects: ■
indexes
■
triggers
■
synonyms
■
RENAME on a table and ALTER TABLE RENAME
7.7.4 Combining DDL parameter options The following is an example of how to combine the options of the DDL parameter. DDL & INCLUDE UNMAPPED & OPTYPE alter & OBJTYPE ‘table’ & OBJNAME users.tab* & INCLUDE MAPPED OBJNAME * & EXCLUDE MAPPED OBJNAME temporary.tab"
The combined filter criteria in this statement specify the following: ■
■
■
INCLUDE all ALTER TABLE statements for tables that are not mapped with a TABLE or MAP statement (UNMAPPED scope), but only if those tables are owned by “users” and their names start with “tab,” and INCLUDE all DDL operation types for all tables that are mapped with a TABLE or MAP statement (MAPPED scope), and EXCLUDE all DDL operation types for all tables that are MAPPED in scope, but only if those tables are owned by “temporary” and only if their names begin with “tab.”
7.8 Special filter cases The following are special cases that you should be aware of when creating your filter conditions.
7.8.1 DDL EXCLUDE ALL DDL EXCLUDE ALL is a special processing option that maintains up-to-date object metadata for Oracle GoldenGate, while blocking the replication of the DDL operations 7-20 Oracle GoldenGate for Oracle Installation and Setup Guide
How Oracle GoldenGate handles derived object names
themselves. You can use DDL EXCLUDE ALL when using a method other than Oracle GoldenGate to apply DDL to the target, but you want Oracle GoldenGate to replicate data changes to the target objects. It provides the current metadata to Oracle GoldenGate as objects change, thus preventing the need to stop and start the Oracle GoldenGate processes. The following special conditions apply to DDL EXCLUDE ALL: ■ ■
DDL EXCLUDE ALL does not require the use of an INCLUDE clause. When using DDL EXCLUDE ALL, you can set the WILDCARDRESOLVE parameter to IMMEDIATE to allow immediate DML resolution if required.
To prevent all DDL metadata and operations from being replicated, omit the DDL parameter entirely. The DDL trigger will continue to record the DDL operations to the history table, unless disabled manually.
7.8.2 Implicit DDL User-generated DDL operations can generate implicit DDL operations. For example, the following statement causes the Oracle DDL trigger to process two distinct DDL operations. CREATE TABLE customers (custID number, name varchar2(50), address varchar2(75), address2 varchar2(75), city varchar2(50), state (varchar2(2), zip number, contact varchar2(50), areacode number(3), phone number(7), primary key (custID));
The first (explicit) DDL operation is the CREATE TABLE statement itself. The second DDL operation is an implicit CREATE UNIQUE INDEX statement that creates the index for the primary key. This operation is generated by the database engine, not a user application. Guidelines for filtering implicit DDL When the DDL parameter is used to filter DDL operations, Oracle GoldenGate filters out any implicit DDL by default, because the explicit DDL will generate the implicit DDL on the target. For example, the target database will create the appropriate index when the CREATE TABLE statement in the preceding example is applied by Replicat. However, when the DDL trigger is used to filter DDL operations, you must handle the implicit DDL in your filter rules based on the following: ■
If your filtering rules exclude the explicit DDL from being propagated, you must also create a rule to exclude the implicit DDL. For example, if you exclude the CREATE TABLE statement in the following example, but do not exclude the implicit CREATE UNIQUE INDEX statement, the target database will try to create the index on a non-existent table. CREATE TABLE customers (custID number, name varchar2(50), address varchar2(75), address2 varchar2(75), city varchar2(50), state (varchar2(2), zip number, contact varchar2(50), areacode number(3), phone number(7), primary key (custID));
■
If your filtering rules permit the propagation of the explicit DDL, you do not need to exclude the implicit DDL. It will be handled correctly by Oracle GoldenGate and the target database.
7.9 How Oracle GoldenGate handles derived object names DDL operations can contain a base object name and also a derived object name. A base object is an object that contains data. A derived object is an object that inherits some
Configuring DDL synchronization for an Oracle database
7-21
How Oracle GoldenGate handles derived object names
attributes of the base object to perform a function related to that object. DDL statements that have both base and derived objects are: ■
RENAME and ALTER RENAME
■
CREATE and DROP on an index, synonym, or trigger
Consider the following DDL statement: CREATE INDEX hr.indexPayrollDate ON TABLE hr.tabPayroll (payDate);
In this case, the table is the base object. Its name (hr.tabPayroll) is the base name and is subject to mapping with TABLE or MAP under the MAPPED scope. The derived object is the index, and its name (hr.indexPayrollDate) is the derived name. You can map a derived name in its own TABLE or MAP statement, separately from that of the base object. Or, you can use one MAP statement to handle both. In the case of MAP, the conversion of derived object names on the target works as follows.
7.9.1 MAP exists for base object, but not derived object If there is a MAP statement for the base object, but not for the derived object, the result is an implicit mapping of the derived object. Assuming the DDL statement includes MAPPED, Replicat gives the derived object the same target owner as that of the base object. The name of the derived object stays the same as in the source statement. For example, assume the following: Extract (source) Table hr.tab*;
Replicant (target) MAP hr.tab*, TARGET hrBackup.*;
Assume the following source DDL statement: CREATE INDEX hr.indexPayrollDate ON TABLE hr.tabPayroll (payDate);
The CREATE INDEX statement is executed by Replicat on the target as follows: CREATE INDEX hrBackup.indexPayrollDate ON TABLE hrBackup.tabPayroll (payDate);
The rule for the implicit mapping is based the typical practice of giving derived objects the same owner as the base object. It ensures the correct name conversion even if the name of the derived object is not fully qualified in the source statement. Also, when indexes are owned by the same target owner as the base object, an implicit mapping eliminates the need to map derived object names explicitly.
7.9.2 MAP exists for base and derived objects If there is a MAP statement for the base object and also one for the derived object, the result is an explicit mapping. Assuming the DDL statement includes MAPPED, Replicat converts the owner and name of each object according to its own TARGET clause. For example, assume the following: Extract (source) TABLE hr.tab*; TABLE hr.index*;
Replicat (target)
7-22 Oracle GoldenGate for Oracle Installation and Setup Guide
How Oracle GoldenGate handles derived object names
MAP hr.tab*, TARGET hrBackup.*; MAP hr.index*, TARGET hrIndex.*;
Assume the following source DDL statement: CREATE INDEX hr.indexPayrollDate ON TABLE hr.tabPayroll (payDate); The CREATE INDEX statement is executed by Replicat on the target as follows: CREATE INDEX hrIndex.indexPayrollDate ON TABLE hrBackup.tabPayroll (payDate); Use an explicit mapping when the index on the target must be owned by a different owner from that of the base object, or when the name on the target must be different from that of the source.
7.9.3 MAP exists for derived object, but not base object If there is a MAP statement for the derived object, but not for the base object, Replicat does not perform any name conversion for either object. The target DDL statement is the same as that of the source. To map a derived object, the choices are: ■ ■
■
Use an explicit MAP statement for the base object. If names permit, map both base and derived objects in the same MAP statement by means of a wildcard. Create a MAP statement for each object, depending on how you want the names converted.
7.9.4 New tables as derived objects The following explains how Oracle GoldenGate handles new tables that are created from: ■
RENAME and ALTER RENAME
■
CREATE TABLE AS SELECT
7.9.4.1 RENAME and ALTER TABLE RENAME In RENAME and ALTER TABLE RENAME operations, the base object is always the new table name. In the following example, the base object name is considered to be “index_ paydate.” ALTER TABLE hr.indexPayrollDate RENAME TO index_paydate; or... RENAME hr.indexPayrollDate TO index_paydate; The derived object name is “hr.indexPayrollDate.”
7.9.4.2 CREATE TABLE AS SELECT CREATE TABLE AS SELECT statements include SELECT statements and INSERT statements that affect any number of underlying objects. On the target, Oracle GoldenGate obtains the data for the AS SELECT clause from the target database.
Configuring DDL synchronization for an Oracle database
7-23
How Oracle GoldenGate handles derived object names
For this reason, Oracle XMLType tables created from a CTAS (CREATE TABLE AS SELECT) statement cannot be supported. For XMLType tables, the row object IDs must match between source and target, which cannot be maintained in this scenario. XMLType tables created by an empty CTAS statement (that does not insert data in the new table) can be maintained correctly. Note:
The objects in the AS SELECT clause must exist in the target database, and their names must be identical to the ones on the source. In a MAP statement, Oracle GoldenGate only maps the name of the new table (CREATE TABLE name) to the TARGET specification, but does not map the names of the underlying objects from the AS SELECT clause. There could be dependencies on those objects that could cause data inconsistencies if the names were converted to the TARGET specification. The following shows an example of a CREATE TABLE AS SELECT statement on the source and how it would be replicated to the target by Oracle GoldenGate. CREATE TABLE a.tab1 AS SELECT * FROM a.tab2; The MAP statement for Replicat is as follows: MAP a.tab*, TARGET a.x*; The target DDL statement that is applied by Replicat is the following: CREATE TABLE a.xtab1 AS SELECT * FROM a.tab2; The name of the table in the AS SELECT * FROM clause remains as it was on the source: tab2 (rather than xtab2). To keep the data in the underlying objects consistent on source and target, you can configure them for data replication by Oracle GoldenGate. In the preceding example, you could use the following statements to accommodate this requirement: Source TABLE a.tab*;
Target MAPEXCLUDE a.tab2 MAP a.tab*, TARGET a.x*; MAP a.tab2, TARGET a.tab2;
See also "Correctly identifying unqualified object names in DDL" on page 7-9.
7.9.5 Disabling the mapping of derived objects Use the DDLOPTIONS parameter with the NOMAPDERIVED option to prevent the conversion of the name of a derived object according to a TARGET clause of a MAP statement that includes it. NOMAPDERIVED overrides any explicit MAP statements that contain the name of the base or derived object. Source DDL that contains derived objects is replicated to the target with the same owner and object names as on the source. The following table shows the results of MAPDERIVED compared to NOMAPDERIVED, based on whether there is a MAP statement just for the base object, just for the derived object, or for both.
7-24 Oracle GoldenGate for Oracle Installation and Setup Guide
Using DDL string substitution
Table 7–3
[NO]MAPDERIVED results on target based on mapping configuration Derived object converted per a MAP?
Derived object gets owner of base object?
Base Object
Derived Object
MAP/NOMAP DERIVED?
mapped1
mapped
MAPDERIVED
yes
no
mapped
not mapped
MAPDERIVED
no
yes
not mapped
mapped
MAPDERIVED
no
no
not mapped
not mapped
MAPDERIVED
no
no
mapped
mapped
NOMAPDERIVED
no
no
mapped
not mapped
NOMAPDERIVED
no
no
not mapped
mapped
NOMAPDERIVED
no
no
not mapped
not mapped
NOMAPDERIVED
no
no
1
Mapped means included in a MAP statement.
The following examples illustrate the results of MAPDERIVED as compared to NOMAPDERIVED. In Table 7–4, both trigger and table are owned by rpt on the target because both base and derived names are converted by means of MAPDERIVED. Table 7–4
Default mapping of derived object names (MAPDERIVED)
MAP statement MAP fin.*, TARGET rpt.*;
Source DDL statement captured by Extract
Target DDL statement applied by Replicant
CREATE TRIGGER fin.act_trig ON fin.acct;
CREATE TRIGGER rpt.act_trig ON rpt.acct;
In Table 7–5, the trigger is owned by fin, because conversion is prevented by means of NOMAPDERIVED. Table 7–5
Mapping of derived object names when using NOMAPDERIVED
MAP statement MAP fin.*, TARGET rpt.*;
Source DDL statement captured by Extract
Target DDL statement applied by Replicant
CREATE TRIGGER fin.act_trig ON fin.acct;
CREATE TRIGGER fin.act_trig ON rpt.acct;
In the case of a RENAME statement, the new table name is considered to be the base table name, and the old table name is considered to be the derived table name.
Note:
7.10 Using DDL string substitution You can substitute strings within a DDL operation while it is being processed by Oracle GoldenGate. This feature provides a convenience for changing and mapping directory names, comments, and other things that are not directly related to data structures. For example, you could substitute one tablespace name for another, or substitute a string within comments. String substitution is controlled by the DDLSUBST parameter. For more information, see the Oracle GoldenGate Windows and UNIX Reference Guide. Configuring DDL synchronization for an Oracle database
7-25
Controlling the propagation of DDL that is executed by Replicat
Note: Before you create a DDLSUBST parameter statement, it might help to review "How DDL is evaluated for processing" on page 7-29 in this chapter.
7.11 Controlling the propagation of DDL that is executed by Replicat Extract and Replicat both issue DDL operations. ■
Extract issues ALTER TABLE statements to create log groups,
■
Replicat applies replicated DDL statements to the target.
To identify Oracle GoldenGate DDL operations, the following comment is part of each Extract and Replicat DDL statement: /* GOLDENGATE_DDL_REPLICATION */ The DDLOPTIONS parameter controls whether or not Replicat’s DDL is propagated. ■
■
The GETREPLICATES and IGNOREREPLICATES options control whether Replicat’s DDL operations are captured by Extract or ignored. The default is IGNOREREPLICATES. The GETAPPLOPS and IGNOREAPPLOPS options control whether DDL from applications other than Replicat (the business applications) are captured or ignored.
By default, Extract ignores DDL that is applied to the local database by a local Replicat, so that the DDL is not sent back to its source, but Extract captures all other DDL that is configured for replication. The following is the default DDLOPTIONS configuration. DDLOPTIONS GETAPPLOPS, IGNOREREPLICATES This behavior can be modified. See the following topics: ■
"Propagating DDL in an active-active (bi-directional) configurations" on page 7-26
■
"Propagating DDL in a cascading configuration" on page 7-28
7.11.1 Propagating DDL in an active-active (bi-directional) configurations Oracle GoldenGate supports active-active DDL replication between two systems. For an active-active bi-directional replication, the following must be configured in the Oracle GoldenGate processes: 1.
DDL that is performed by a business application on one system must be replicated to the other system to maintain synchronization. To satisfy this requirement, include the GETAPPLOPS option in the DDLOPTIONS statement in the Extract parameter files on both systems.
2.
DDL that is applied by Replicat on one system must be captured by the local Extract and sent back to the other system. To satisfy this requirement, use the GETREPLICATES option in the DDLOPTIONS statement in the Extract parameter files on both systems.
7-26 Oracle GoldenGate for Oracle Installation and Setup Guide
Controlling the propagation of DDL that is executed by Replicat
An internal Oracle GoldenGate token will cause the actual Replicat DDL statement itself to be ignored to prevent loopback. The purpose of propagating Replicat DDL back to the original system is so that the Replicat on that system can update its object metadata cache, in preparation to receive incoming DML, which will have the new metadata. See Figure 7–1.
Note:
3.
Each Replicat must be configured to update its object metadata cache whenever the remote Extract sends over a captured Replicat DDL statement. To satisfy this requirement, use the UPDATEMETADATA option in the DDLOPTIONS statement in the Replicat parameter files on both systems.
The resultant DDLOPTIONS statements should look as follows: Extract (primary and secondary) DDLOPTIONS GETREREPLICATES, GETAPPLOPS Replicat (primary and secondary) DDLOPTIONS UPDATEMETADATA WARNING: Before you allow new DDL or DML to be issued for the same object(s) as the original DDL, allow time for the original DDL to be replicated to the remote system and then captured again by the Extract on that system. This will ensure that the operations arrive in correct order to the Replicat on the original system, to prevent DML errors caused by metadata inconsistencies. See Figure 7–1 for more information.
Configuring DDL synchronization for an Oracle database
7-27
Adding supplemental log groups automatically
Figure 7–1 Path of DDL in round trip to update Replicat object metadata cache
7.11.2 Propagating DDL in a cascading configuration In a cascading configuration, use the following setting for DDLOPTIONS in the Extract parameter file on each intermediary system. This configuration forces Extract to capture the DDL from Replicat on an intermediary system and cascade it to the next system downstream. DDLOPTIONS GETREPLICATES, IGNOREAPPLOPS
7.12 Adding supplemental log groups automatically You can use the DDLOPTIONS parameter with the ADDTRANDATA option to: ■
■
■ ■
enable Oracle’s supplemental logging automatically for new tables created with a CREATE TABLE. update Oracle’s supplemental logging for tables affected by an ALTER TABLE to add or drop columns. update Oracle’s supplemental logging for tables that are renamed. update Oracle’s supplemental logging for tables where unique or primary keys are added or dropped.
By default, the ALTER TABLE that adds the supplemental logging is not replicated to the target unless the GETREPLICATES parameter is in use. For more information about this option, see the Oracle GoldenGate Windows and UNIX Reference Guide.
7-28 Oracle GoldenGate for Oracle Installation and Setup Guide
How DDL is evaluated for processing
7.13 Removing comments from replicated DDL You can use the DDLOPTIONS parameter with the REMOVECOMMENTS BEFORE and REMOVECOMMENTS AFTER options to prevent comments that were used in the source DDL from being included in the target DDL. By default, comments are not removed, so that they can be used for string substitution. For more information about this option, see the Oracle GoldenGate Windows and UNIX Reference Guide.
7.14 Replicating an IDENTIFIED BY password Use the DDLOPTIONS parameter with the DEFAULTUSERPASSWORD and REPLICATEPASSWORD | NOREPLICATEPASSWORD options to control how the password of a replicated {CREATE | ALTER} USER name IDENTIFIED BY password statement is handled. These options must be used together. For more information about these options, see the Oracle GoldenGate Windows and UNIX Reference Guide.
7.15 How DDL is evaluated for processing The following explains how Oracle GoldenGate processes DDL statements on the source and target systems. It shows the order in which different criteria in the Oracle GoldenGate parameters are processed, and it explains the differences between how Extract and Replicat each process the DDL. Extract 1.
Extract captures a DDL statement.
2.
Extract separates comments, if any, from the main statement.
3.
Extract searches for the DDL parameter. (This example assumes it exists.)
4.
Extract searches for the IGNOREREPLICATES parameter. If it is present, and if Replicat produced this DDL on this system, Extract ignores the DDL statement. (This example assumes no Replicat operations on this system.)
5.
Extract determines whether the DDL statement is a RENAME. If so, the rename is flagged internally.
6.
Extract gets the base object name and, if present, the derived object name.
7.
If the statement is a RENAME, Extract changes it to ALTER TABLE RENAME.
8.
Extract searches for the DDLOPTIONS REMOVECOMMENTS BEFORE parameter. If it is present, Extract removes the comments from the DDL statement, but stores them in case there is a DDL INCLUDE or DDL EXCLUDE clause that uses INSTR or INSTRCOMMENTS.
9.
Extract determines the DDL scope: MAPPED, UNMAPPED or OTHER: ■
■
■
It is MAPPED if the operation and object types are supported for mapping, and the base object name and/or derived object name (if RENAME) is in a TABLE parameter. It is UNMAPPED if the operation and object types are not supported for mapping, and the base object name and/or derived object name (if RENAME) is not in a TABLE parameter. Otherwise the operation is identified as OTHER.
Configuring DDL synchronization for an Oracle database
7-29
How DDL is evaluated for processing
10. Extract checks the DDL parameter for INCLUDE and EXCLUDE clauses, and it evaluates
the DDL parameter criteria in those clauses. All options must evaluate to TRUE in order for the INCLUDE or EXCLUDE to evaluate to TRUE. The following occurs: ■
■
If an EXCLUDE clause evaluates to TRUE, Extract discards the DDL statement and evaluates another DDL statement. In this case, the processing steps start over. If an INCLUDE clause evaluates to TRUE, or if the DDL parameter does not have any INCLUDE or EXCLUDE clauses, Extract includes the DDL statement, and the processing logic continues.
11. Extract searches for a DDLSUBST parameter and evaluates the INCLUDE and EXCLUDE
clauses. If the criteria in those clauses add up to TRUE, Extract performs string substitution. Extract evaluates the DDL statement against each DDLSUBST parameter in the parameter file. For all true DDLSUBST specifications, Extract performs string substitution in the order that the DDLSUBST parameters are listed in the file. 12. Now that DDLSUBT has been processed, Extract searches for the REMOVECOMMENTS
AFTER parameter. If it is present, Extract removes the comments from the DDL statement. 13. Extract searches for DDLOPTIONS ADDTRANDATA. If it is present, and if the operation
is CREATE TABLE, Extract issues the ALTER TABLE name ADD SUPPLEMENTAL LOG GROUP command on the table. 14. Extract writes the DDL statement to the trail.
Replicat 1.
Replicat reads the DDL statement from the trail.
2.
Replicat separates comments, if any, from the main statement.
3.
Replicat searches for DDLOPTIONS REMOVECOMMENTS BEFORE. If it is present, Replicat removes the comments from the DDL statement.
4.
Replicat evaluates the DDL synchronization scope to determine if the DDL qualifies for name mapping. Anything else is of OTHER scope.
5.
Replicat evaluates the MAP statements in the parameter file. If the source base object name for this DDL (as read from the trail) appears in any of the MAP statements, the operation is marked as MAPPED in scope. Otherwise it is marked as UNMAPPED in scope.
6.
Replicat replaces the source base object name with the base object name that is specified in the TARGET clause of the MAP statement.
7.
If there is a derived object, Replicat searches for DDLOPTIONS MAPDERIVED. If it is present, Replicat replaces the source derived name with the target derived name from the MAP statement.
8.
Replicat checks the DDL parameter for INCLUDE and EXCLUDE clauses, and it evaluates the DDL parameter criteria contained in them. All options must evaluate to TRUE in order for the INCLUDE or EXCLUDE to evaluate to TRUE. The following occurs: ■
■
If any EXCLUDE clause evaluates to TRUE, Replicat discards the DDL statement and starts evaluating another DDL statement. In this case, the processing steps start over. If any INCLUDE clause evaluates to TRUE, or if the DDL parameter does not have any INCLUDE or EXCLUDE clauses, Replicat includes the DDL statement, and the processing logic continues.
7-30 Oracle GoldenGate for Oracle Installation and Setup Guide
Handling DDL trigger errors
9.
Replicat searches for the DDLSUBST parameter and evaluates the INCLUDE and EXCLUDE clauses. If the options in those clauses add up to TRUE, Replicat performs string substitution. Replicat evaluates the DDL statement against each DDLSUBST parameter in the parameter file. For all true DDLSUBST specifications, Replicat performs string substitution in the order that the DDLSUBST parameters are listed in the file.
10. Now that DDLSUBT has been processed, Replicat searches for the REMOVECOMMENTS
AFTER parameter. If it is present, Replicat removes the comments from the DDL statement. 11. Replicat executes the DDL statement on the target database. 12. If there are no errors, Replicat processes the next DDL statement. If there are
errors, Replicat performs the following steps. 13. Replicat analyzes the INCLUDE and EXCLUDE rules in the Replicat DDLERROR
parameters in the order that they appear in the parameter file. If Replicat finds a rule for the error code, it applies the specified error handling; otherwise, it applies DEFAULT handling. 14. If the error handling does not enable the DDL statement to succeed, Replicat does
one of the following: abends, ignores the operation, or discards it as specified in the rules. Note: If there are multiple targets for the same source in a MAP statement, the processing logic executes for each one.
7.16 Handling DDL processing errors Use the DDLERROR parameter to handle errors on objects found by Extract for which metadata cannot be found, and for Replicat errors that occur when DDL is applied to the target database. With DDLERROR options, you can handle most errors in a default manner, for example to stop processing, and also handle other errors in a specific manner. You can use multiple instances of DDLERROR in the same parameter file to handle all errors that are anticipated. For options and usage, see the Oracle GoldenGate Windows and UNIX Reference Guide.
7.17 Handling DDL trigger errors Use the params.sql non-executable script to handle failures of the Oracle GoldenGate DDL trigger in relation to whether the source DDL fails or succeeds. The params.sql script is in the root Oracle GoldenGate directory. The parameters to use are the following: ■
ddl_fire_error_in_trigger: If set to TRUE, failures of the Oracle GoldenGate DDL trigger are raised with a Oracle GoldenGate error message and a database error message to the source end-user application. The source operations fails. If set to FALSE, no errors are raised, and a message is written to the trigger trace file in the Oracle GoldenGate directory. The source operation succeeds, but no DDL is replicated. The target application will eventually fail if subsequent data changes do not match the old target object structure. The default is FALSE.
■
_ddl_cause_error: If set to TRUE, tests the error response of the trigger by deliberately causing an error. To generate the error, Oracle GoldenGate attempts to
Configuring DDL synchronization for an Oracle database
7-31
Viewing DDL report information
SELECT zero rows without exception handling. Revert this flag to the default of FALSE after testing is done.
7.18 Viewing DDL report information By default, Oracle GoldenGate shows basic statistics about DDL at the end of the Extract and Replicat reports. To enable expanded DDL reporting, use the DDLOPTIONS parameter with the REPORT option. Expanded reporting includes the following information about DDL processing: ■
■
A step-by-step history of the DDL operations that were processed by Oracle GoldenGate. The DDL filtering and processing parameters that are being used.
Expanded DDL report information increases the size of the report file, but it might be useful in certain situations, such as for troubleshooting or to determine when an ADDTRANDATA to add supplemental logging was applied. To view a report, use the VIEW REPORT command in GGSCI. VIEW REPORT group
7.18.1 Extract DDL reporting The Extract report lists the following: ■
■
■
The entire syntax of each captured DDL operation, the start and end SCN, the Oracle instance, the DDL sequence number (from the SEQNO column of the history table), and the size of the operation in bytes. A subsequent entry that shows how processing criteria was applied to the operation, for example string substitution or INCLUDE and EXCLUDE filtering. Another entry showing whether the operation was written to the trail or excluded.
The following, taken from an Extract report, shows an included operation and an excluded operation. There is a report message for the included operation, but not for the excluded one. 2011-01-20 15:11:41 GGS INFO 2100 DDL found, operation [create table myTable ( myId number (10) not null, myNumber number, myString varchar2(100), myDate date, primary key (myId) ) ], start SCN [1186754], commit SCN [1186772] instance [test11g (1)], DDL seqno [4134]. 2011-01-20 15:11:41 GGS INFO 2100 DDL operation included [INCLUDE OBJNAME myTable*], optype [CREATE], objtype [TABLE], objname [QATEST1.MYTABLE]. 2011-01-20 15:11:41 file.
GGS INFO
2100
DDL operation written to extract trail
2011-01-20 15:11:42 GGS INFO 2100 Successfully added TRAN DATA for table with the key, table [QATEST1.MYTABLE], operation [ALTER TABLE "QATEST1"."MYTABLE" ADD SUPPLEMENTAL LOG GROUP "GGS_MYTABLE_53475" (MYID) ALWAYS /* GOLDENGATE_DDL_ REPLICATION */ ]. 2011-01-20 15:11:43
GGS INFO
2100
7-32 Oracle GoldenGate for Oracle Installation and Setup Guide
DDL found, operation [create table
Tracing the DDL trigger
myTableTemp ( vid varchar2(100), someDate date, primary key (vid) ) ], start SCN [1186777], commit SCN [1186795] instance [test11g (1)], DDL seqno [4137]. 2011-01-20 15:11:43 GGS INFO 2100 DDL operation excluded [EXCLUDE OBJNAME myTableTemp OPTYPE CREATE], optype [CREATE], objtype [TABLE], objname [QATEST1.MYTABLETEMP].
7.18.2 Statistics in the process reports You can send current statistics for DDL processing to the Extract and Replicat reports by using the SEND command in GGSCI. SEND {EXTRACT | REPLICAT} group REPORT
The statistics show totals for: ■
All DDL operations
■
Operations that are MAPPED in scope
■
Operations that are UNMAPPED in scope
■
Operations that are OTHER in scope
■
Operations that were excluded (number of operations minus included ones)
■
Errors (Replicat only)
■
Retried errors (Replicat only)
■
Discarded errors (Replicat only)
■
Ignored operations (Replicat only)
7.19 Viewing metadata in the DDL history table Use the DUMPDDL command in GGSCI to view the information that is contained in the DDL history table. This information is stored in proprietary format, but you can export it in human-readable form to the screen or to a series of SQL tables that you can query. The information in the DDL history table is the same as that used by the Extract process. For more information, see the Oracle GoldenGate Windows and UNIX Reference Guide.
7.20 Tracing DDL processing If you open a support case with Oracle GoldenGate Technical Support, you might be asked to turn on tracing. The following parameters control DDL tracing. ■
TLTRACE controls Extract tracing
■
TRACE and TRACE2 control Replicat tracing.
These parameters have options to isolate the tracing of DDL from the tracing of DML. For more information, see the Oracle GoldenGateWindows and UNIX Reference Guide.
7.21 Tracing the DDL trigger To trace the activity of the Oracle GoldenGate DDL trigger, use the following tools. Configuring DDL synchronization for an Oracle database
7-33
Tracing the DDL trigger
■
ggs_ddl_trace.log trace file: Oracle GoldenGate creates a trace file in the USER_ DUMP_DEST directory of Oracle. On RAC, each node has its own trace file that captures DDL tracing for that node. You can query the trace file as follows: select value from sys.v_$parameter where name = 'user_dump_dest';
■
■
ddl_tracelevel script: Edit and run this script to set the trace level. A value of None generates no DDL tracing, except for fatal errors and installation logging. The default value of 0 generates minimal tracing information. A value of 1 or 2 generates a much larger amount of information in the trace file. Do not use 1 or 2 unless requested to do so by a Oracle GoldenGate Technical Support analyst as part of a support case. ddl_cleartrace script: Run this script on a regular schedule to prevent the trace file from consuming excessive disk space as it expands. It deletes the file, but Oracle GoldenGate will create another one. The DDL trigger stops writing to the trace file when the Oracle directory gets low on space, and then resumes writing when space is available again. This script is in the Oracle GoldenGate directory. Back up the trace file before running the script.
7-34 Oracle GoldenGate for Oracle Installation and Setup Guide
8 Instantiating and starting Oracle GoldenGate replication
8
This chapter contains instructions for configuring an initial load of target data, adding the required processes to instantiate replication, and perform the instantiation. The expected outcome of these steps is that source-target data is made consistent (known as the initial synchronization), and that Oracle GoldenGate captures and delivers ongoing transactional changes so that consistency is maintained going forward.
8.1 Overview of basic Oracle GoldenGate instantiation steps These instructions show you how to instantiate the basic replication environment that you configured in Chapter 4. These steps are: ■
Satisfying prerequisites for instantiation
■
Making the instantiation procedure more efficient
■
Configuring the initial load
■
Registering Extract with the mining database
■
Adding change-capture and change-delivery processes
■
Performing the target instantiation
■
Monitoring processing after the instantiation
■
Backing up the Oracle GoldenGate environment
8.2 Satisfying prerequisites for instantiation These steps must be taken before starting any Oracle GoldenGate processes or native database load processes.
8.2.1 Configure change capture and delivery By the time you are ready to instantiate the replication environment, all of your Extract and Replicat process groups must be configured with completed parameter files as directed in Chapter 4. In addition, all of the other setup requirements in this manual must be satisfied.
8.2.2 Add collision handling If the source database will remain active during the initial load, collision-handling logic must be added to the Replicat parameter file. This logic handles conflicts that Instantiating and starting Oracle GoldenGate replication 8-1
Making the instantiation procedure more efficient
occur because static data is being loaded to the target tables while Oracle GoldenGate replicates transactional changes to those tables. To handle collisions, add the HANDLECOLLISIONS parameter to the Replicat parameter file to resolve: ■
INSERT operations for which the row already exists
■
UPDATE and DELETE operations for which the row does not exist
For more information about HANDLECOLLISIONS, see the Oracle GoldenGate Windows and UNIX Reference Guide.
8.2.3 Disable DDL processing Before executing an initial load, disable DDL extraction and replication. DDL processing is controlled by the DDL parameter in the Extract and Replicat parameter files. See Chapter 7 for more information about DDL support.
8.2.4 Prepare the target tables The following are suggestions that can make the load go faster and help you to avoid errors. ■
■
■
■
Data: Make certain that the target tables are empty. Otherwise, there may be duplicate-row errors or conflicts between existing rows and rows that are being loaded. Constraints: If you have not done so already, disable foreign-key constraints and check constraints. Foreign-key constraints can cause errors, and check constraints can slow down the loading process. See also "Preparing integrity constraints in source and target tables" on page 5-1 for additional requirements. Indexes: Remove indexes from the target tables. Indexes are not necessary for the inserts performed by the initial load process and will slow it down significantly. You can add back the indexes after the load is finished. Keys: To use the HANDLECOLLISIONS function to reconcile incremental data changes with the load, each target table must have a primary or unique key. If you cannot create a key through your application, use the KEYCOLS option of the TABLE and MAP parameters to specify columns as a substitute key for Oracle GoldenGate’s purposes. If you cannot create keys, the affected source table must be quiesced for the load.
8.3 Making the instantiation procedure more efficient The following are some suggestions for making the instantiation process move more efficiently.
8.3.1 Share parameters between process groups Some of the parameters that you use in a change-synchronization parameter file also are required in an initial-load Extract and initial-load Replicat parameter file. To take advantage of the commonalities, you can use any of the following methods: ■ ■
Copy common parameters from one parameter file to another. Store the common parameters in a central file and use the OBEY parameter in each parameter file to retrieve them.
8-2 Oracle GoldenGate for Oracle Installation and Setup Guide
Configuring the initial load
■
Create an Oracle GoldenGate macro for the common parameters and then call the macro from each parameter file with the MACRO parameter.
8.3.2 Use parallel processes You can configure parallel initial-load processes to perform the initial load more quickly. It is important to keep tables with foreign-key relationships within the same set of processes. You can isolate large tables from smaller ones by using different sets of processes, or simply apportion the load across any number of process sets. To configure parallel processes correctly, see the Windows and UNIX Troubleshooting and Tuning Guide.
8.4 Configuring the initial load Oracle GoldenGate supports the following load methods specifically for Oracle: ■
To load with a database utility
■
To load from an input file to SQL*Loader
■
To load with a database utility
Select a method and follow its configuration steps to create the load processes and parameter files.
8.4.1 To load with a database utility Figure 8–1
This method uses a database copy utility to establish the target data. You start a change-synchronization Extract group to extract ongoing data changes while the database utility makes and applies a static copy of the data. When the copy is finished, you start the change-synchronization Replicat group to re-synchronize rows that were changed while the copy was being applied. From that point forward, both Extract and Replicat continue running to maintain data synchronization. No special configuration of any initial-load processes is needed for this method. You just use the change-synchronization process groups that you configured in Chapter 4.
8.4.2 To direct bulk load to SQL*Loader
Instantiating and starting Oracle GoldenGate replication 8-3
Configuring the initial load
With this method, you configure and run an Oracle GoldenGate initial-load Extract to extract complete source records and send them directly to an initial-load Replicat task. The initial-load Replicat task communicates with SQL*Loader to load data as a direct-path bulk load. Data mapping and transformation can be done by either the initial-load Extract or initial-load Replicat, or both. During the load, the change-synchronization groups that you configured in Chapter 4 replicated incremental changes, which are then reconciled with the results of the load. Limitations: ■ This method does not support extraction of LOB or LONG data. As an alternative, see “To load from an input file to SQL*Loader” on page 126. ■
This method does not support materialized views that contain LOBs, regardless of their size. It also does not support data encryption.
To configure a direct bulk load to SQL*Loader 1. Grant LOCK ANY TABLE to the Replicat database user on the target Oracle database. 2.
On the source and target systems, run GGSCI.
3.
Start Manager on both systems. START MANAGER
4.
On the source system, create the initial-load Extract. ADD EXTRACT initial-load Extract name, SOURCEISTABLE Where: ■
■
5.
initial-load Extract name is the name of the initial-load Extract, up to eight characters. SOURCEISTABLE directs Extract to read complete records directly from the source tables.
On the source system, create the initial-load Extract parameter file. EDIT PARAMS initial-load Extract name
6.
Enter the initial-load Extract parameters in the order shown, starting a new line for each parameter statement. Your input will be different. Refer to Table 8–1 for descriptions. EXTRACT initext USERID ogg, PASSWORD AACAAAAAAAAAAAJAUEUGODSCVGJEEIUGKJDJTFNDKEJFFFTC & AES128, ENCRYPTKEY securekey1 RMTHOST fin1, MGRPORT 7809 ENCRYPT AES192, KEYNAME securekey2 RMTTASK replicat, GROUP initrep TABLE hr.*;
Table 8–1
Initial-load Extract parameters to direct bulk load to SQL*Loader
Parameter
Description
EXTRACT initial-load Extract name
Specifies the name of the initial-load Extract, as stated with ADD EXTRACT.
USERID user id, PASSWORD pw [encryption options]
Specifies database credentials and encryption information, if required. You can use the same user that you created for the change-synchronization processes.
RMTHOST hostname, MGRPORT portnumber[, ENCRYPT algorithm KEYNAME keyname]
Specifies the target system, the port where Manager is running, and optional encryption of data across TCP/IP.
8-4 Oracle GoldenGate for Oracle Installation and Setup Guide
Configuring the initial load
Table 8–1 (Cont.) Initial-load Extract parameters to direct bulk load to SQL*Loader Parameter
Description
RMTTASK replicat, GROUP initial-load Replicat name
Specifies the process type (must be Replicat) and the name of the initial-load Replicat. Directs Manager on the target system to dynamically start the initial-load Replicat as a one-time task.
TABLE owner.table;
Specifies the owner and a table or multiple tables specified with a wildcard for initial data extraction. To exclude any objects from a wildcard specification, use the TABLEEXCLUDE parameter.
7.
Save and close the file.
8.
On the target system, create the initial-load Replicat. ADD REPLICAT initial-load Replicat name, SPECIALRUN Where: ■ ■
9.
initial-load Replicat name is the name of the initial-load Replicat task. SPECIALRUN identifies the initial-load Replicat as a one-time task, not a continuous process.
On the target system, create the initial-load Replicat parameter file. EDIT PARAMS initial-load Replicat name
10. Enter the initial-load Replicat parameters in the order shown, starting a new line
for each parameter statement. See Table 8–2 for descriptions. REPLICAT initrep USERID ogg, PASSWORD AACAAAAAAAAAAAJAUEUGODSCVGJEEIUGKJDJTFNDKEJFFFTC & AES128, ENCRYPTKEY securekey1 BULKLOAD ASSUMETARGETDEFS MAP hr.*, TARGET hr2.*;
Table 8–2
Initial-load Replicat parameters to direct bulk load to SQL*Loader
Parameter
Description
REPLICAT initial-load Replicat name
Specifies the name of the initial-load Replicat task, as stated with ADD REPLICAT.
USERID user id, PASSWORD pw [encryption options]
Specifies database credentials and encryption information, if required. You can use the same user that you created for the change-synchronization processes.
BULKLOAD
Directs Replicat to interface directly with the Oracle SQL*Loader interface.
ASSUMETARGETDEFS
Assumes the source and target tables are identical, including semantics. If source and target definitions are different, you must create and specify a source-definitions file that both the change-synchronization and initial-load processes will use. For more information, see the Windows and UNIX Administrator's Guide.
Instantiating and starting Oracle GoldenGate replication 8-5
Configuring the initial load
Table 8–2 (Cont.) Initial-load Replicat parameters to direct bulk load to SQL*Loader Parameter
Description
MAP owner.table, TARGET owner.table;
Specifies a relationship between a source and target table or tables. ■ ■
owner is the schema name. table is the name of a table or a wildcard definition for multiple tables. To exclude any objects from a wildcard specification, use the MAPEXCLUDE parameter.
11. Save and close the parameter file. 12. Proceed to "Registering Extract with the mining database" on page 8-8.
8.4.3 To load from an input file to SQL*Loader Figure 8–2
With this method, an initial-load Extract extracts source records from the source tables and writes them to an extract file in external ASCII format. The files are read by SQL*Loader. During the load, the change-synchronization groups that you configured in Chapter 4 replicate incremental changes, which are then reconciled with the results of the load. As part of the load procedure, Oracle GoldenGate uses the initial-load Replicat to create run and control files required by the database utility. Any data transformation must be performed by the initial-load Extract on the source system because the control files are generated dynamically and cannot be pre-configured with transformation rules. To configure a load from file to SQL*Loader 1.
On the source and target systems, run GGSCI.
2.
Start Manager on both systems. START MANAGER
3.
On the source system, create the initial-load Extract parameter file. EDIT PARAMS initial-load Extract name
4.
Enter the initial-load Extract parameters in the order shown, starting a new line for each parameter statement. Your input will be different. Refer to Table 8–3 for descriptions. SOURCEISTABLE USERID ogg, PASSWORD AACAAAAAAAAAAAJAUEUGODSCVGJEEIUGKJDJTFNDKEJFFFTC & AES128, ENCRYPTKEY securekey1 RMTHOST fin1, MGRPORT 7809 ENCRYPT AES192, KEYNAME securekey2 ENCRYPTTRAIL AES192, KEYNAME mykey1 RMTFILE /ggs/dirdat/ie
8-6 Oracle GoldenGate for Oracle Installation and Setup Guide
Configuring the initial load
FORMATASCII, SQLLOADER TABLE hr.*;
Table 8–3
Initial-load Extract parameters to load from file to SQL*Loader
Parameter
Description
SOURCEISTABLE
Designates Extract as an initial load process that extracts records directly from the source tables.
USERID user id, PASSWORD pw [encryption options]
Specifies database credentials and encryption information, if required. You can use the same user that you created for the change-synchronization processes.
RMTHOST MGRPORT ENCRYPT KEYNAME
Specifies the target system, the port where Manager is running, and optional encryption of data across TCP/IP.
hostname, portnumber[, algorithm keyname]
ENCRYPTTRAIL encryption options
Encrypts the data in the remote file. For encryption options, see the Oracle GoldenGate Windows and UNIX Reference Guide.
RMTFILE path name
Specifies the absolute or full path name of an extract file that Extract creates and to which it writes the load data.
FORMATASCII, SQLLOADER
Produces a fixed-length, ASCII-formatted remote file that is compatible with SQL*Loader. For information about limitations and options of FORMATASCII, see the Oracle GoldenGate Windows and UNIX Reference Guide.
TABLE owner.table;
Specifies the owner and a table or multiple tables specified with a wildcard for initial data extraction. To exclude any objects from a wildcard specification, use the TABLEEXCLUDE parameter.
5.
Save and close the parameter file.
6.
On the target system, create the initial-load Replicat parameter file. EDIT PARAMS
7.
Enter the initial-load Replicat parameters in the order shown, starting a new line for each parameter statement. See Table 8–4 for descriptions. GENLOADFILES sqlldr.tpl USERID ogg, PASSWORD AACAAAAAAAAAAAJAUEUGODSCVGJEEIUGKJDJTFNDKEJFFFTC & AES128, ENCRYPTKEY securekey1 DECRYPTTRAIL AES192, KEYNAME mykey1 EXTFILE /ggs/dirdat/ie ASSUMETARGETDEFS MAP hr.*, TARGET hr2.*;
Table 8–4
Initial-load Replicat parameters to load from file to SQL*Loader
Parameter
Description
GENLOADFILES template file
Generates run and control files for the database utility. For instructions on using this parameter, see the Oracle GoldenGate Windows and UNIX Reference Guide
USERID user id, PASSWORD pw [encryption options]
USERID specifies database credentials and encryption information, if required. You can use the same user that you created for the change-synchronization processes.
DECRYPTTRAIL encryption options
Decrypts the data in the input extract file. For encryption options, see the Oracle GoldenGate Windows and UNIX Reference Guide
Instantiating and starting Oracle GoldenGate replication 8-7
Registering Extract with the mining database
Table 8–4 (Cont.) Initial-load Replicat parameters to load from file to SQL*Loader Parameter
Description
EXTFILE path name |
Specifies the extract file that you specified with the Extract parameter RMTFILE.
EXTTRAIL path name ASSUMETARGETDEFS
Assumes the source and target tables are identical, including semantics. If source and target definitions are different, you must create and specify a source-definitions file that both the change-synchronization and initial-load processes will use. For more information, see the Oracle GoldenGate Windows and UNIX Administrator's Guide.
MAP owner.table, TARGET owner.table;
Specifies a relationship between a source and target table or tables. ■ ■
owner is the schema name. table is the name of a table or a wildcard definition for multiple tables. To exclude objects from a wildcard specification, use the MAPEXCLUDE parameter.
8.
Save and close the parameter file.
9.
Proceed to "Registering Extract with the mining database".
8.5 Registering Extract with the mining database To create the database logmining server, you register each Extract process with the mining database. The creation of the logmining server extracts a snapshot of the source database in the redo stream of the source database. To avoid unnecessary logmining activity on the source, perform this procedure close in time to when you instantiate replication. 1.
Log into the mining database. The command to use differs, depending on whether the database logmining server is to be created at a source mining database or a downstream mining database. Command for source deployment: DBLOGIN USERID user, PASSWORD password [encryption options] Command for downstream deployment: MININGDBLOGIN USERID user, PASSWORD password [encryption options] Where: encryption options specifies optional encryption options for the password. For more information, see DBLOGIN in the Oracle GoldenGate Windows and UNIX Reference Guide.
2.
Register the Extract process with the mining database. To register multiple Extracts with a downstream database, issue the command for each one. REGISTER EXTRACT group DATABASE
The register process may take a few to several minutes to complete, even though the REGISTER command returns immediately.
8-8 Oracle GoldenGate for Oracle Installation and Setup Guide
Adding change-capture and change-delivery processes
8.6 Adding change-capture and change-delivery processes Perform these steps at or close to the time that you are ready to start the initial load and change capture. You will start these processes during the initial load steps.
Note:
These steps establish the Oracle GoldenGate Extract, data pump, and Replicat processes that you configured in Chapter 4. Collectively known as the “change-synchronization” processes, these are the processes that: ■
■
capture and apply ongoing source changes while the load is being performed on the target reconcile any collisions that occur
8.6.1 Set the RMAN archive log deletion policy Set the RMAN archive log deletion policy to the following value: CONFIGURE ARCHIVELOG DELETION POLICY TO APPLIED ON ALL STANDBY This must be done before you add the primary Extract.
8.6.2 Add the primary Extract These steps add the primary Extract that captures change data. 1.
Run GGSCI.
2.
Issue the ADD EXTRACT command to add the primary Extract group. ADD EXTRACT group name {, TRANLOG | , INTEGRATED TRANLOG} {, BEGIN {NOW | yyyy-mm-dd [:hh:mi:[ss[.cccccc]]]} | {, EXTSEQNO seqno, EXTRBA relative byte address} [, THREADS n]
Where: ■
group name is the name of the Extract group.
■
TRANLOG specifies the transaction log as the data source; for classic capture only.
■
■
■
■
INTEGRATED TRANLOG specifies that Extract receives logical change records through a database logmining server; for integrated capture only. BEGIN specifies to begin capturing data as of a specific time: –
NOW starts at the first record that is timestamped at the same time that 3 is issued.
–
yyyy-mm-dd [:hh:mi:[ss[.cccccc]]] starts at an explicit timestamp. Logs from this timestamp must be available.
EXTSEQNO seqno, EXTRBA relative byte address specifies to begin capturing data at a specific location (log sequence number and RBA) in the redo stream. THREADS n is required in classic capture mode for Oracle Real Application Cluster (RAC), to specify the number of redo log threads being used by the cluster. Extract reads and coordinates each thread to maintain transactional consistency. Not required for integrated capture. Instantiating and starting Oracle GoldenGate replication 8-9
Adding change-capture and change-delivery processes
This is the minimum required syntax. Additional options are available. See the Oracle GoldenGate Windows and UNIX Reference Guide.
Note:
Example 8–1 Classic capture with timestamp start point ADD EXTRACT finance, TRANLOG, BEGIN 2011-01-01 12:00:00.000000 Example 8–2 Integrated capture with ADD EXTRACT timestamp start point ADD EXTRACT finance, INTEGRATED TRANLOG, BEGIN NOW Example 8–3 Integrated capture with log sequence/RBA start point ADD EXTRACT finance, INTEGRATED TRANLOG, EXTSEQNO 2952, EXTRBA 7598080
8.6.3 Add the local trail These steps add the local trail to which the primary Extract writes captured data. In GGSCI on the source system, issue the ADD EXTTRAIL command: ADD EXTTRAIL pathname, EXTRACT group name Where: ■ ■
■
EXTTRAIL specifies that the trail is to be created on the local system. pathname is the relative or fully qualified name of the trail, including the two-character name. EXTRACT group name is the name of the primary Extract group.
Example 8–4 ADD EXTTRAIL /ggs/dirdat/lt, EXTRACT finance
8.6.4 Add the data pump Extract group These steps add the data pump that reads the local trail and sends the data to the target. In GGSCI on the source system, issue the ADD EXTRACT command. ADD EXTRACT group name, EXTTRAILSOURCE trail name Where: ■ ■
group name is the name of the Extract group. EXTTRAILSOURCE trail name is the relative or fully qualified name of the local trail.
Example 8–5 ADD EXTRACT financep, EXTTRAILSOURCE c:\ggs\dirdat\lt
8-10 Oracle GoldenGate for Oracle Installation and Setup Guide
Performing the target instantiation
8.6.5 Add the remote trail These steps add the remote trail. Although it is read by Replicat, this trail must be associated with the data pump, so it must be added on the source system, not the target. In GGSCI on the source system, issue the following command: ADD RMTTRAIL pathname, EXTRACT group name Where: ■ ■
■
RMTTRAIL specifies that the trail is to be created on the target system. pathname is the relative or fully qualified name of the trail, including the two-character name. EXTRACT group name is the name of the data-pump Extract group.
Example 8–6 ADD RMTTRAIL /ggs/dirdat/rt, EXTRACT financep
8.6.6 Add the Replicat group These steps add the Replicat group that reads the remote trail (which gets created automatically on the target) and applies the data changes to the target Oracle database. 1.
Run GGSCI on the target system.
2.
Issue the ADD REPLICAT command. ADD REPLICAT group name, EXTTRAIL pathname Where: ■ ■
group name is the name of the Replicat group. EXTTRAIL pathname is the relative or fully qualified name of the remote trail, including the two-character name.
Example 8–7 ADD REPLICAT financer, EXTTRAIL c:\ggs\dirdat\rt
8.7 Performing the target instantiation This procedure instantiates the target tables while Oracle GoldenGate captures ongoing transactional changes on the source and stores them until they can be applied on the target. By the time you perform the instantiation of the target tables, the entire Oracle GoldenGate environment should be configured for change capture and delivery, as should the initial-load processes if using Oracle GoldenGate as an initial-load utility.
8.7.1 To perform instantiation with a database utility 1.
On the source and target systems, run GGSCI and start the Manager process. START MANAGER
Instantiating and starting Oracle GoldenGate replication 8-11
Performing the target instantiation
In a Windows cluster, start the Manager resource from the Cluster Administrator.
Note:
2.
Start the primary change-capture Extract group. START EXTRACT Extract group name
3.
Start the data-pump Extract group. START EXTRACT data pump name The first time that Extract starts in a new Oracle GoldenGate configuration, any open transactions will be skipped. Only transactions that begin after Extract starts are captured.
Note:
4.
If replicating sequence values: ■
Issue the DBLOGIN command as a user who has EXECUTE privilege on update.Sequence. DBLOGIN USERID DBLOGINuser, PASSWORD password [encryption options]
■
Issue the following command to update each source sequence and generate redo. From the redo, Replicat performs initial synchronization of the sequences on the target. You can use an asterisk wildcard for any or all characters for the sequence name but not owner. FLUSH SEQUENCE owner.sequence
5.
Start making the copy with the database utility.
6.
Wait until the copy is finished and record the time of completion.
7.
On the target system, view the Replicat parameter file to make certain that the HANDLECOLLISIONS parameter is listed. If not, add the parameter with the EDIT PARAMS command. VIEW PARAMS group name EDIT PARAMS group name
8.
Start Replicat. START REPLICAT group name
9.
Issue the INFO REPLICAT command, and continue to issue it until it shows that Replicat posted all of the change data that was generated during the initial load. For example, if the initial-load Extract stopped at 12:05, make sure Replicat posted data up to that time. INFO REPLICAT group name
10. Turn off HANDLECOLLISIONS for the change-delivery Replicat to disable initial-load
error handling. SEND REPLICAT group name, NOHANDLECOLLISIONS 11. Edit the change-delivery Replicat parameter file to remove the HANDLECOLLISIONS
parameter. EDIT PARAMS group name 12. Save and close the parameter file.
8-12 Oracle GoldenGate for Oracle Installation and Setup Guide
Performing the target instantiation
From this point forward, Oracle GoldenGate continues to synchronize data changes.
8.7.2 To perform instantiation with direct bulk load to SQL*Loader 1.
On the source system, run GGSCI.
2.
Start the primary change-capture Extract group. START EXTRACT group name
3.
Start the data-pump Extract group. START EXTRACT data pump name
4.
If replicating sequence values: ■
Issue the DBLOGIN command as a user who has EXECUTE privilege on update.Sequence. DBLOGIN USERID DBLOGINuser, PASSWORD password [encryption options]
■
Issue the following command to update each source sequence and generate redo. From the redo, Replicat performs initial synchronization of the sequences on the target. You can use an asterisk wildcard for any or all characters for the sequence name but not owner. FLUSH SEQUENCE owner.sequence
5.
Start the initial-load Extract. START EXTRACT initial-load Extract name WARNING: Do not start the initial-load Replicat. The Manager process starts it automatically and terminates it when the load is finished.
6.
On the target system, run GGSCI.
7.
Issue the VIEW REPORT command to determine when the initial load to SQL*Loader is finished. VIEW REPORT initial-load Extract name
8.
When the load is finished, start the change-data Replicat group. START REPLICAT group name
9.
Issue the INFO REPLICAT command, and continue to issue it until it shows that Replicat posted all of the change data that was generated during the initial load. For example, if the initial-load Extract stopped at 12:05, make sure Replicat posted data up to that time. INFO REPLICAT group name
10. Turn off HANDLECOLLISIONS for the change-delivery Replicat to disable initial-load
error handling. SEND REPLICAT group name, NOHANDLECOLLISIONS 11. Edit the change-delivery Replicat parameter file to remove the HANDLECOLLISIONS
parameter. EDIT PARAMS group name
Instantiating and starting Oracle GoldenGate replication 8-13
To perform instantiation from an input file to SQL*Loader
12. Save and close the parameter file.
From this point forward, Oracle GoldenGate continues to synchronize data changes.
8.8 To perform instantiation from an input file to SQL*Loader 1.
On the source system, run GGSCI.
2.
Start the primary change-capture Extract group. START EXTRACT group name
3.
Start the data-pump Extract group. START EXTRACT data pump name
4.
If replicating sequence values: ■
Issue the DBLOGIN command as a user who has EXECUTE privilege on update.Sequence. DBLOGIN USERID DBLOGINuser, PASSWORD password [encryption options]
■
Issue the following command to update each source sequence and generate redo. From the redo, Replicat performs initial synchronization of the sequences on the target. You can use an asterisk wildcard for any or all characters for the sequence name but not owner. FLUSH SEQUENCE owner.sequence
5.
From the Oracle GoldenGate installation directory on the source system, start the initial-load Extract from the command line of the operating system (not GGSCI). UNIX and Linux: $ /OGG directory/extract paramfile dirprm/initial-load Extract name.prm reportfile path name Windows: C:\> OGG directory\extract paramfile dirprm\initial-load Extract name.prm reportfile path name Where: initial-load Extract name is the name of the initial-load Extract and path name is the relative or fully qualified path where you want the Extract report file to be created.
6.
Wait until the initial extraction from the source is finished. Verify its progress and results by viewing the Extract report file from the command line.
7.
On the target system, start the initial-load Replicat. UNIX and Linux: $ /OGG directory/replicat paramfile dirprm/initial-load Replicat name.prm reportfile path name Windows: C:\> OGG directory\replicat paramfile dirprm\initial-load Replicat name.prm reportfile path name Where: initial-load Extract name is the name of the initial-load Replicat and path name is the relative or fully qualified path where you want the Replicat report file to be created.
8-14 Oracle GoldenGate for Oracle Installation and Setup Guide
Backing up the Oracle GoldenGate environment
8.
When the initial-load Replicat stops, verify its results by viewing the Replicat report file from the command line.
9.
Using the ASCII-formatted file and the run and control files that the initial-load Replicat created, load the data with SQL*Loader.
10. When the load is finished, start the change-delivery Replicat group.
START REPLICAT group name 11. Issue the INFO REPLICAT command, and continue to issue it until it shows that
Replicat posted all of the change data that was generated during the initial load. For example, if the initial-load Extract stopped at 12:05, make sure Replicat posted data up to that time. INFO REPLICAT group name 12. Turn off HANDLECOLLISIONS for the change-delivery Replicat to disable initial-load
error handling. SEND REPLICAT group name, NOHANDLECOLLISIONS 13. Edit the change-delivery Replicat parameter file to remove the HANDLECOLLISIONS
parameter. EDIT PARAMS group name 14. Save and close the parameter file.
From this point forward, Oracle GoldenGate continues to synchronize data changes.
8.9 Monitoring processing after the instantiation After the target is instantiated and replication is in effect, you can, and should, view the status, lag, and overall health of the replication environment to ensure that processes are running properly, that there are no warnings in the Oracle GoldenGate error log, and that lag is at an acceptable level. You can view Oracle GoldenGate processes from: ■ ■
GGSCI: See the Oracle GoldenGate Windows and UNIX Administrator's Guide. Oracle GoldenGate Monitor: See the administration documentation and online help for that product.
You also should verify that capture and delivery is being performed for all of the appropriate tables, and that the data remains synchronized. You can use the Oracle GoldenGate Veridata product for this purpose.
8.10 Backing up the Oracle GoldenGate environment After you start Oracle GoldenGate processing, an effective backup routine is critical to preserving the state of processing in the event of a failure. Unless the Oracle GoldenGate working files can be restored, the entire replication environment must be re-instantiated, complete with new initial loads. As a best practice, include the entire Oracle GoldenGate home installation in your backup routines. There are too many critical sub-directories, as well as files and programs at the root of the directory, to keep track of separately. In any event, the most critical files are those that consume the vast majority of backup space, and therefore it makes sense just to back up the entire installation directory for fast, simple recovery.
Instantiating and starting Oracle GoldenGate replication 8-15
Backing up the Oracle GoldenGate environment
8-16 Oracle GoldenGate for Oracle Installation and Setup Guide
9 Controlling processes
9
The standard way to control online processes is through GGSCI. For alternate methods, see the Oracle GoldenGate Windows and UNIX Administrator's Guide.
9.1 When to start processes Typically, the first time that Oracle GoldenGate processes are started in a production setting is during the initial synchronization process, assuming source user applications must remain active. While the target is loaded with the source data, Oracle GoldenGate captures ongoing user changes and then reconciles them with the results of the load. The first time that Extract starts in a new Oracle GoldenGate configuration, any open transactions will be skipped. Only transactions that begin after Extract starts are captured.
Note:
9.2 Starting processes after instantiation is complete These instructions are for starting the processes on a daily basis, as needed. They show basic syntax. Additional syntax may be available and is documented in the Oracle GoldenGate Windows and UNIX Reference Guide. To start Manager 1.
From the Oracle GoldenGate directory, run GGSCI.
2.
In GGSCI, issue the following command. START MANAGER When starting Manager from the command line or GGSCI on Windows Server 2008 with User Account Control enabled, you will receive a UAC prompt requesting you to allow or deny the program to run.
Note:
To start Extract or Replicat START {EXTRACT | REPLICAT} group_name Where group_name is the name of the Extract or Replicat group or a wildcard set of groups (for example, * or fin*).
Controlling processes
9-1
Starting processes after instantiation is complete
To stop Extract or Replicat gracefully STOP {EXTRACT | REPLICAT} group_name Where group_name is the name of the Extract or Replicat group or a wildcard set of groups (for example, * or fin*). To stop Replicat forcefully STOP REPLICAT group_name ! The current transaction is aborted and the process stops immediately. You cannot stop Extract forcefully. To kill a process that STOP cannot stop KILL {EXTRACT | REPLICAT} group_name Killing a process does not shut it down gracefully, and checkpoint information can be lost. To control multiple processes at once command ER wildcard specification Where: ■ ■
command is: KILL, START, or STOP wildcard specification is a wildcard specification for the names of the process groups that you want to affect with the command. The command affects every Extract and Replicat group that satisfies the wildcard. Oracle GoldenGate supports up to 100,000 wildcard entries.
To delete an Extract group Run GGSCI.
1. 2.
Stop the process. STOP EXTRACT group_name
3.
Issue the following command. DELETE EXTRACT group_name ! The ! argument deletes all Extract groups that satisfy a wildcard without prompting.
To delete a Replicat group 1. Stop the process. STOP REPLICAT group_name 2.
If using a checkpoint table for this group, issue the following command from GGSCI to log into the database. DBLOGIN USERID user, PASSWORD password [encryption options] Where:
3.
■
USERID user, PASSWORD password, specifies database login credentials.
■
encryption options is one of the options that encrypt the password.
Issue the following command to delete the group. DELETE REPLICAT group_name
9-2 Oracle GoldenGate for Oracle Installation and Setup Guide
Starting processes after instantiation is complete
For additional commands and options, see the Oracle GoldenGate Windows and UNIX Reference Guide.
Note:
Deleting a process group preserves the parameter file. You can create the same group again, using the same parameter file, or you can delete the parameter file to remove the group’s configuration permanently.
Controlling processes
9-3
Starting processes after instantiation is complete
9-4 Oracle GoldenGate for Oracle Installation and Setup Guide
10 Managing the Oracle DDL replication environment
10
This chapter contains instructions for making changes to the database environment or the Oracle GoldenGate environment when the Oracle GoldenGate DDL objects still exist on the system. For instructions on configuring Oracle GoldenGate DDL support, see the Oracle GoldenGate Windows and UNIX Administrator's Guide.
10.1 Enabling and disabling the DDL trigger You can enable and disable the trigger that captures DDL operations without making any configuration changes within Oracle GoldenGate. The following scripts control the DDL trigger. ■
■
ddl_disable: Disables the trigger. No further DDL operations are captured or replicated after you disable the trigger. ddl_enable: Enables the trigger. When you enable the trigger, Oracle GoldenGate starts capturing current DDL changes, but does not capture DDL that was generated while the trigger was disabled.
Before running these scripts, disable all sessions that ever issued DDL, including those of the Oracle GoldenGate processes, SQL*Plus, business applications, and any other software that uses Oracle. Otherwise the database might generate an ORA-04021 error. Do not use these scripts if you intend to maintain consistent DDL on the source and target systems.
10.2 Maintaining the DDL marker table You can purge rows from the marker table at any time. It does not keep DDL history. To purge the marker table, use the Manager parameter PURGEMARKERHISTORY. Manager gets the name of the marker table from one of the following: 1.
The name given with the MARKERTABLE parameter in the GLOBALS file, if specified.
2.
The default name of GGS_MARKER.
PURGEMARKERHISTORY provides options to specify maximum and minimum lengths of time to keep a row, based on the last modification date. For more information, see the Oracle GoldenGate Windows and UNIX Reference Guide.
Managing the Oracle DDL replication environment 10-1
Deleting the DDL marker table
10.3 Deleting the DDL marker table Do not delete the DDL marker table unless you want to discontinue synchronizing DDL. The marker table and the DDL trigger are interdependent. An attempt to drop the marker table fails if the DDL trigger is enabled. This is a safety measure to prevent the trigger from becoming invalid and missing DDL operations. If you remove the marker table, the following error is generated: "ORA-04098: trigger 'SYS.GGS_DDL_TRIGGER_BEFORE' is invalid and failed re-validation" The proper way to remove an Oracle GoldenGate DDL object depends on your plans for the rest of the DDL environment. To choose the correct procedure, see one of the following: ■
"Restoring an existing DDL environment to a clean state" on page 10-4
■
"Removing the DDL objects from the system" on page 10-6
10.4 Maintaining the DDL history table You can purge the DDL history table to control its size, but do so carefully. The DDL history table maintains the integrity of the DDL synchronization environment. Purges to this table cannot be recovered through the Oracle GoldenGate interface. 1.
To prevent any possibility of DDL history loss, make regular full backups of the history table.
2.
To ensure the recoverability of purged DDL, enable Oracle Flashback for the history table. Set the flashback retention time well past the point where it could be needed. For example, if your full backups are at most one week old, retain two weeks of flashback. Oracle GoldenGate can be positioned backward into the flashback for reprocessing.
3.
If possible, purge the DDL history table manually to ensure that essential rows are not purged accidentally. If you require an automated purging mechanism, use the PURGEDDLHISTORY parameter in the Manager parameter file. You can specify maximum and minimum lengths of time to keep a row. For more information, see the Oracle GoldenGate Windows and UNIX Reference Guide. Temporary tables created by Oracle GoldenGate to increase performance might be purged at the same time as the DDL history table, according to the same rules. The names of these tables are derived from the name of the history table, and their purging is reported in the Manager report file. This is normal behavior.
Note:
10.5 Deleting the DDL history table Do not delete the DDL history table unless you want to discontinue synchronizing DDL. The history table contains a record of DDL operations that were issued. The history table and the DDL trigger are interdependent. An attempt to drop the history table fails if the DDL trigger is enabled. This is a safety measure to prevent the trigger from becoming invalid and missing DDL operations. If you remove the history table, the following error is generated: "ORA-04098: trigger 'SYS.GGS_DDL_TRIGGER_BEFORE' is invalid and failed re-validation"
10-2 Oracle GoldenGate for Oracle Installation and Setup Guide
Applying Oracle GoldenGate patches and upgrades when DDL support is enabled
The proper way to remove an Oracle GoldenGate DDL object depends on your plans for the rest of the DDL environment. To choose the correct procedure, see one of the following: ■
"Restoring an existing DDL environment to a clean state" on page 10-4
■
"Removing the DDL objects from the system" on page 10-6
10.6 Purging the DDL trace file To prevent the DDL trace file from consuming excessive disk space, run the ddl_ cleartrace script on a regular basis. This script deletes the trace file, but Oracle GoldenGate will create it again. The default name of the DDL trace file is ggs_ddl_trace.log. It is in the USER_DUMP_ DEST directory of Oracle. The ddl_cleartrace script is in the Oracle GoldenGate directory.
10.7 Applying database patches and upgrades when DDL support is enabled Database patches and upgrades usually invalidate the Oracle GoldenGate DDL trigger and other Oracle GoldenGate DDL objects. Before applying a database patch, do the following. 1.
Log in to SQL*Plus as a user that has SYSDBA privileges.
2.
Disable the Oracle GoldenGate DDL trigger by running the ddl_disable script in SQL*Plus.
3.
Apply the patch.
4.
Enable the DDL trigger by running the ddl_enable script in SQL*Plus. Database upgrades and patches generally operate on Oracle objects. Because Oracle GoldenGate filters out those objects automatically, DDL from those procedures is not replicated when replication starts again.
Note:
To avoid recompile errors after the patch or upgrade, which are caused if the trigger is not disabled before the procedure, consider adding calls to @ddl_disable and @ddl_ enable at the appropriate locations within your scripts.
10.8 Applying Oracle GoldenGate patches and upgrades when DDL support is enabled If there are instructions like these in the release notes or upgrade instructions that accompany a release, follow those instead of these. Do not use this procedure for an upgrade from an Oracle GoldenGate version that does not support DDL statements that are larger than 30K (pre-version 10.4). To upgrade in that case, follow the instructions in "Restoring an existing DDL environment to a clean state" on page 10-4.
Note:
Managing the Oracle DDL replication environment 10-3
Restoring an existing DDL environment to a clean state
Follow these steps to apply a patch or upgrade to the DDL objects. This procedure may or may not preserve the current DDL synchronization configuration, depending on whether the new build requires a clean installation. 1.
Run GGSCI. Keep the session open for the duration of this procedure.
2.
Stop Extract to stop DDL capture. STOP EXTRACT group
3.
Stop Replicat to stop DDL replication. STOP REPLICAT group
4.
Download or extract the patch or upgrade files according to the instructions provided by Oracle GoldenGate.
5.
Change directories to the Oracle GoldenGate installation directory.
6.
Log in to SQL*Plus as a user that has SYSDBA privileges.
7.
Disconnect all sessions that ever issued DDL, including those of Oracle GoldenGate processes, SQL*Plus, business applications, and any other software that uses Oracle. Otherwise the database might generate an ORA-04021 error.
8.
Run the ddl_disable script to disable the DDL trigger.
9.
Run the ddl_setup script. You are prompted for the name of the Oracle GoldenGate DDL schema. If you changed the schema name, use the new one.
10. Run the ddl_enable.sql script to enable the DDL trigger. 11. In GGSCI, start Extract to resume DDL capture.
START EXTRACT group 12. Start Replicat to start DDL replication.
START REPLICAT group
10.9 Restoring an existing DDL environment to a clean state Follow these steps to completely remove, and then reinstall, the Oracle GoldenGate DDL objects. This procedure creates a new DDL environment and removes any current DDL history. Due to object interdependencies, all objects must be removed and reinstalled in this procedure.
Note:
1.
If you are performing this procedure in conjunction with the installation of a new Oracle GoldenGate version, download and install the Oracle GoldenGate files, and create or update process groups and parameter files as necessary.
2.
(Optional) To preserve the continuity of source and target structures, stop DDL activities and then make certain that Replicat finished processing all of the DDL and DML data in the trail. To determine when Replicat is finished, issue the following command until you see a message that there is no more data to process. INFO REPLICAT group
10-4 Oracle GoldenGate for Oracle Installation and Setup Guide
Restoring an existing DDL environment to a clean state
Instead of using INFO REPLICAT, you can use the EVENTACTIONS option of TABLE and MAP to stop the Extract and Replicat processes after the DDL and DML has been processed. Note:
3.
Run GGSCI.
4.
Stop Extract to stop DDL capture. STOP EXTRACT group
5.
Stop Replicat to stop DDL replication. STOP REPLICAT group
6.
Change directories to the Oracle GoldenGate installation directory.
7.
Log in to SQL*Plus as a user that has SYSDBA privileges.
8.
Disconnect all sessions that ever issued DDL, including those of Oracle GoldenGate processes, SQL*Plus, business applications, and any other software that uses Oracle. Otherwise the database might generate an ORA-04021 error.
9.
Run the ddl_disable script to disable the DDL trigger.
10. Run the ddl_remove script to remove the Oracle GoldenGate DDL trigger, the DDL
history and marker tables, and other associated objects. This script produces a ddl_remove_spool.txt file that logs the script output and a ddl_remove_set.txt file that logs environment settings in case they are needed for debugging. 11. Run the marker_remove script to remove the Oracle GoldenGate marker support
system. This script produces a marker_remove_spool.txt file that logs the script output and a marker_remove_set.txt file that logs environment settings in case they are needed for debugging. 12. If you are changing the DDL schema for this installation, grant the following
permission to the Oracle GoldenGate schema. GRANT EXECUTE ON utl_file TO schema; 13. If you are changing the DDL schema for this installation, the schema’s default
tablespace must be dedicated to that schema; do not allow any other schema to share it. AUTOEXTEND must be set to ON for this tablespace, and the tablespace must be sized to accommodate the growth of the GGS_DDL_HIST and GGS_MARKER tables. The GGS_DDL_HIST table, in particular, will grow in proportion to overall DDL activity. If the DDL tablespace fills up, Extract stops capturing DDL. To cause user DDL activity to fail when that happens, edit the params.sql script and set the ddl_fire_error_in_trigger parameter to TRUE. Stopping user DDL gives you time to extend the tablespace size and prevent the loss of DDL capture. Managing tablespace sizing this way, however, requires frequent monitoring of the business applications and Extract to avoid business disruptions. Instead, Oracle recommends that you size the tablespace appropriately and set AUTOEXTEND to ON so that the tablespace does not fill up. Note:
Managing the Oracle DDL replication environment 10-5
Removing the DDL objects from the system
WARNING: Do not edit any other parameters in params.sql except if you need to follow documented instructions to change certain object names. 14. If you are changing the DDL schema for this installation, edit the GLOBALS file and
specify the new schema name with the following parameter. GGSCHEMA schema_name 15. Run the marker_setup script to reinstall the Oracle GoldenGate marker support
system. You are prompted for the name of the Oracle GoldenGate schema. 16. Run the ddl_setup script. You are prompted for the name of the Oracle
GoldenGate DDL schema. 17. Run the role_setup script to recreate the Oracle GoldenGate DDL role. 18. Grant the role to all Oracle GoldenGate users under which the following Oracle
GoldenGate processes run: Extract, Replicat, GGSCI, and Manager. You might need to make multiple grants if the processes have different user names. 19. Run the ddl_enable.sql script to enable the DDL trigger.
10.10 Removing the DDL objects from the system This procedure removes the DDL environment and removes the history that maintains continuity between source and target DDL operations. Note:
Due to object interdependencies, all objects must be removed.
1.
Run GGSCI.
2.
Stop Extract to stop DDL capture. STOP EXTRACT group
3.
Stop Replicat to stop DDL replication. STOP REPLICAT group
4.
Change directories to the Oracle GoldenGate installation directory.
5.
Run SQL*Plus and log in as a user that has SYSDBA privileges.
6.
Disconnect all sessions that ever issued DDL, including those of Oracle GoldenGate processes, SQL*Plus, business applications, and any other software that uses Oracle. Otherwise the database might generate an ORA-04021 error.
7.
Run the ddl_disable script to disable the DDL trigger.
8.
Run the ddl_remove script to remove the Oracle GoldenGate DDL trigger, the DDL history and marker tables, and the associated objects. This script produces a ddl_ remove_spool.txt file that logs the script output and a ddl_remove_set.txt file that logs current user environment settings in case they are needed for debugging.
9.
Run the marker_remove script to remove the Oracle GoldenGate marker support system. This script produces a marker_remove_spool.txt file that logs the script output and a marker_remove_set.txt file that logs environment settings in case they are needed for debugging.
10-6 Oracle GoldenGate for Oracle Installation and Setup Guide
Removing the DDL objects from the system
Managing the Oracle DDL replication environment 10-7
Removing the DDL objects from the system
10-8 Oracle GoldenGate for Oracle Installation and Setup Guide
11 Uninstalling Oracle GoldenGate
11
This procedure assumes that you no longer need the data in the Oracle GoldenGate trails, and that you no longer need to preserve the current Oracle GoldenGate environment. To preserve your current environment and data, make a backup of the Oracle GoldenGate directory and all subdirectories before starting this procedure. Note:
Follow these sections in the order they are presented.
11.1 Stopping processes This procedure stops the Extract and Replication processes. Leave Manager running until directed to stop it. On all systems: 1. Run the command shell. 2.
Log on as the system administrator or as a user with permission to issue Oracle GoldenGate commands and delete files and directories from the operating system.
3.
Change directories to the Oracle GoldenGate installation directory.
4.
Run GGSCI.
5.
Stop all Oracle GoldenGate processes. STOP ER *
6.
Stop the Manager process. STOP MANAGER
11.2 Removing the DDL environment This procedure removes all of the Oracle GoldenGate DDL objects from the DDL schema on a source system. 1.
Log in to SQL*Plus as a user that has SYSDBA privileges.
2.
Disconnect all sessions that ever issued DDL, including those of Oracle GoldenGate processes, SQL*Plus, business applications, and any other software that uses Oracle. Otherwise the database might generate an ORA-04021 error.
3.
Run the ddl_disable script to disable the DDL trigger.
4.
Run the ddl_remove script to remove the Oracle GoldenGate DDL trigger, the DDL history and marker tables, and other associated objects. This script produces a
Uninstalling Oracle GoldenGate 11-1
Removing database objects
ddl_remove_spool.txt file that logs the script output and a ddl_remove_set.txt file that logs environment settings in case they are needed for debugging. 5.
Run the marker_remove script to remove the Oracle GoldenGate marker support system. This script produces a marker_remove_spool.txt file that logs the script output and a marker_remove_set.txt file that logs environment settings in case they are needed for debugging.
11.3 Removing database objects Follow these instructions to remove Oracle GoldenGate objects that are configured within an Oracle database. Specific steps and commands may not apply to your configuration. On a source system: Review the GGSCI commands in this procedure before logging in with DBLOGIN. Special privileges may be required. 1.
Make certain all Extract and Replicat processes are stopped.
2.
Log into the database with the DBLOGIN (or the MININGDBLOGIN command if you need to remove a database logmining server from a downstream mining database). [MINING]DBLOGIN USERID user, PASSWORD password [encryption options]
3.
Run GGSCI.
4.
In GGSCI, run any or all of the following commands, depending on your configuration: ■
Disable schema-level supplemental logging (wildcards not allowed): DELETE SCHEMATRANDATA schema
■
Disable table-level supplemental logging. DELETE TRANDATA schema.*
■
(Bi-directional configuration) Remove the Oracle trace table. DELETE TRACETABLE schema.table
■
(Classic capture configuration) Disable log retention and remove the underlying Oracle Streams capture process. DBLOGIN requires privileges shown in Table 6–3 on on page 6-10. UNREGISTER EXTRACT group LOGRETENTION
■
(Integrated capture configuration) Remove the database logmining server from an Oracle mining database. [MINING]DBLOGIN requires privileges granted in the dbms_goldengate_auth.grant_admin_privilege procedure. DELETE EXTRACT group UNREGISTER EXTRACT group DATABASE
On any system where a Replicat checkpoint exists: Make certain Replicat is stopped.
1. 2.
Log into the database with the DBLOGIN command. DBLOGIN USERID user, PASSWORD password [encryption options]
11-2 Oracle GoldenGate for Oracle Installation and Setup Guide
Removing the Oracle GoldenGate files
3.
Remove the Replicat checkpoint table by running the DELETE CHECKPOINTTABLE command. DELETE CHECKPOINTTABLE schema.table
11.4 (Windows) Removing Oracle GoldenGate Windows components This procedure removes Oracle GoldenGate as a Windows cluster resource from a source or target Windows system, stops Oracle GoldenGate events from being reported to the Windows Event Manager, and removes the Manager service. Perform these steps on source and target systems. 1.
Log on as the system administrator or as a user with permission to issue Oracle GoldenGate commands and to delete files and directories from the operating system.
2.
(Cluster) Working from the node in the cluster that owns the cluster group that contains the Manager resource, run GGSCI and make certain that all Extract and Replicat processes are stopped. Stop any that are running. STATUS ER * STOP ER *
3.
(Cluster) Use the Cluster Administrator tool to take the Manager resource offline.
4.
(Cluster) Right click the resource and select Delete to remove it.
5.
Click Start then Run, and then type cmd in the Run dialog box to open the command console.
6.
Change directories to the Oracle GoldenGate installation directory.
7.
Run the INSTALL utility with the following syntax. install deleteevents deleteservice
8.
Delete the CATEGORY.DLL and GGSMSG.DLL files from the Windows SYSTEM32 folder.
9.
(Cluster) Move the cluster group to the next node in the cluster, and repeat from step 5.
11.5 Removing the Oracle GoldenGate files Perform these steps on all systems to remove the Oracle GoldenGate installation directory. 1.
In GGSCI, verify that all processes are stopped. Stop any that are running. STATUS MANAGER STATUS ER * STOP MANAGER STOP ER *
2.
Exit GGSCI. EXIT
3.
Remove the Oracle GoldenGate installation directory.
Uninstalling Oracle GoldenGate 11-3
Removing the Oracle GoldenGate files
11-4 Oracle GoldenGate for Oracle Installation and Setup Guide
A Configuring a downstream mining database for integrated capture
A
This chapter contains instructions for preparing a downstream Oracle mining database to support Extract in integrated capture mode. ■
Evaluating capture options for a downstream deployment
■
Preparing the Source Database for Downstream Deployment
■
Preparing the downstream mining database
For more information about parameters used in these procedures, see Oracle® Database Reference 11g Release 2 (11.2) and Oracle Data Guard Concepts and Administration 11g Release 2 (11.2). For more information about integrated capture, see "Deciding which capture method to use" on page 4-3. For examples of the downstream mining configuration, see "Example configuration of downstream mining database for integrated capture" on page B-1.
11.6 Evaluating capture options for a downstream deployment Downstream deployment allows you to offload the source database. The source database ships its redo logs to a downstream database, and Extract uses the logmining server at the downstream database to mine the redo logs. A downstream mining database can accept both archived logs and online redo logs from a source database. Multiple source databases can send their redo data to a single downstream database; however the downstream mining database can accept online redo logs from only one of those source databases. The rest of the source databases must ship archived logs. When online logs are shipped to the downstream database, real-time capture by Extract is possible. Changes are captured as though Extract is reading from the source logs. In order to accept online redo logs from a source database, the downstream mining database must have standby redo logs configured. When using a downstream mining configuration, the source database and mining database must be of the same platform. For example, if the source database is running on Linux 64-bit, the downstream database must also be on the Linux 64-bit platform.
11.7 Preparing the Source Database for Downstream Deployment This section guides you in the process of: ■
Creating the source user account
Configuring a downstream mining database for integrated capture
A-1
Preparing the Source Database for Downstream Deployment
■
Configuring redo transport from a source to the downstream mining database
11.7.1 Creating the source user account There must be an Extract user on the source database. Extract uses the credentials of this user to do metadata queries and to fetch column values as needed from the source database. The source user is specified by the USERID parameter. You may have created this user already and assigned the required privileges if you followed the procedure in "Assigning a database user for Oracle GoldenGate" on page 4-6. If you did not create this user, create it now and assign the following privileges: 1.
Grant the appropriate privileges for Extract to operate in integrated capture mode. ■
■
2.
For Oracle 11.2.0.3 and above, use the dbms_goldengate_auth.grant_admin_ privilege procedure. For earlier Oracle releases that do not have the dbms_goldengate_auth.grant_ admin_privilege procedure, use the dbms_streams_auth.grant_admin_ privilege procedure.
Grant SELECT privilege on the V_$DATABASE view to the downstream mining user. GRANT SELECT ON V_$DATABASE TO user;
3.
Assign the appropriate basic user privileges that are listed in "Assigning a database user for Oracle GoldenGate" on page 4-6.
11.7.2 Configuring redo transport from a source to the downstream mining database Complete the following steps to set up the transfer of redo log files from a source database to the downstream mining database, and to prepare the downstream mining database to accept these redo log files. The archived logs shipped from the source databases are called foreign archived logs. You must not use the recovery area at the downstream mining database to store foreign archived logs. Such a configuration is not supported by Integrated Capture.
Note:
These instructions take into account the requirements to ship redo from multiple sources, if required. You configure an Extract process for each of those sources. The following summarizes the rules for supporting multiple sources sending redo to a single downstream mining database: ■
■
■
Only one source database can be configured to send online redo to the standby redo logs at the downstream mining database. The log_archive_dest_n setting for this source database should not have a TEMPLATE clause. Source databases that are not sending online redo to the standby redo logs of the downstream mining database must have a TEMPLATE clause specified in the log_ archive_dest_n parameter. Each of the source databases that sends redo to the downstream mining database must have a unique DBID. You can select the DBID column from the v$database view of these source databases to ensure that the DBIDs are unique.
A-2 Oracle GoldenGate for Oracle Installation and Setup Guide
Preparing the downstream mining database
To configure redo transport 1. Configure Oracle Net so that each source database can communicate with the mining database. For instructions, see Oracle® Database Net Services Administrator's Guide 11g Release 2 (11.2). 2.
Configure authentication at each source database and at the downstream mining database to support the transfer of redo data. Redo transport sessions are authenticated using either the Secure Sockets Layer (SSL) protocol or a remote login password file. If a source database has a remote login password file, copy it to the appropriate directory of the mining database system. The password file must be the same at all source databases, and at the mining database. For more information about authentication requirements for redo transport, see Preparing the Primary Database for Standby Database Creation in Oracle® Data Guard Concepts and Administration 11g Release 2 (11.2).
3.
At each source database, configure one LOG_ARCHIVE_DEST_n initialization parameter to transmit redo data to the downstream mining database. Set the attributes of this parameter as shown in one of the following examples, depending on whether real-time or archived-log-only capture mode is to be used. ■
Example for real-time capture at the downstream logmining server, where the source database sends its online redo logs to the downstream database: ALTER SYSTEM SET LOG_ARCHIVE_DEST_2='SERVICE=DBMSCAP.EXAMPLE.COM ASYNC NOREGISTER VALID_FOR=(ONLINE_LOGFILES,PRIMARY_ROLE)DB_UNIQUE_NAME=dbmscap'
■
Example for archived-log-only capture at the downstream logmining server: ALTER SYSTEM SET LOG_ARCHIVE_DEST_2='SERVICE=DMBSCAP.EXAMPLE.COM ASYNC NOREGISTER VALID_FOR=(ONLINE_LOGFILES,PRIMARY_ROLE) TEMPLATE=/usr/oracle/log_for_dbms1/dbms1_arch_%t_%s_%r.log DB_UNIQUE_NAME=dbmscap'
When using an archived-log-only downstream mining database, you must specify a value for the TEMPLATE attribute. Oracle also recommends that you use the TEMPLATE clause in the source databases so that the log files from all remote source databases are kept separated from the local database log files, and from each other. Note:
4.
At the source database, set a value of ENABLE for the LOG_ARCHIVE_DEST_STATE_n initialization parameter that corresponds with the LOG_ARCHIVE_DEST_n parameter that corresponds to the destination for the downstream mining database, as shown in the following example. ALTER SYSTEM SET LOG_ARCHIVE_DEST_STATE_2=ENABLE
5.
At the source database, and at the downstream mining database, set the DG_CONFIG attribute of the LOG_ARCHIVE_CONFIG initialization parameter to include the DB_ UNIQUE_NAME of the source database and the downstream database, as shown in the following example. ALTER SYSTEM SET LOG_ARCHIVE_CONFIG='DG_CONFIG=(dbms1,dbmscap)'
11.8 Preparing the downstream mining database
Configuring a downstream mining database for integrated capture
A-3
Preparing the downstream mining database
■
Creating the downstream mining user account
■
Configuring the mining database to archive local redo log files
■
Preparing a downstream mining database for real-time capture
11.8.1 Creating the downstream mining user account When using a downstream mining configuration, there must be an Extract mining user on the downstream database. The mining Extract process uses the credentials of this user to interact with the downstream logmining server. The downstream mining user is specified by the TRANLOGOPTIONS parameter with the MININGUSER option. Create this user at the downstream mining database and assign the following privileges: 1.
Grant the appropriate privileges for the downstream mining user to operate in integrated capture mode by executing the dbms_goldengate_auth.grant_admin_ privilege procedure.
2.
Grant SELECT privilege on the V_$DATABASE view to the downstream mining user. GRANT SELECT ON V_$DATABASE TO user;
3.
Assign the downstream mining user the basic privileges that are listed in "Assigning a database user for Oracle GoldenGate" on page 4-6.
11.8.2 Configuring the mining database to archive local redo log files This procedure configures the downstream mining database to archive redo data in its online redo logs. These are redo logs that are generated at the downstream mining database. Archiving must be enabled at the downstream mining database if you want to run Extract in real-time integrated capture mode, but it is also recommended for archive-log-only capture. Extract in integrated capture mode writes state information in the database. Archiving and regular backups will enable you to recover this state information in case there are disk failures or corruption at the downstream mining database. To archive local redo log files 1. Alter the downstream mining database to be in archive log mode. You can do this by issuing the following DDL. STARTUP MOUNT; ALTER DATABASE ARCHIVELOG; ALTER DATABASE OPEN; 2.
At the downstream mining database, set the first archive log destination in the LOG_ARCHIVE_DEST_n initialization parameter as shown in the following example: ALTER SYSTEM SET LOG_ARCHIVE_DEST_1='LOCATION=/home/arc_dest/local VALID_FOR=(ONLINE_LOGFILE,PRIMARY_ROLE)'
Alternatively, you can use a command like this example: ALTER SYSTEM SET LOG_ARCHIVE_DEST_1='LOCATION="USE_DB_RECOVERY_FILE_DEST" valid_for=(ONLINE_ LOGFILE,PRIMARY_ROLE)'
A-4 Oracle GoldenGate for Oracle Installation and Setup Guide
Preparing the downstream mining database
The online redo logs generated by the downstream mining database can be archived to a recovery area. However, you must not use the recovery area of the downstream mining database to stage foreign archived logs or to archive standby redo logs. For information about configuring a fast recovery area, see Oracle® Database Backup and Recovery User's Guide 11g Release 2 (11.2).
Note:
3.
Enable the local archive destination. ALTER SYSTEM SET LOG_ARCHIVE_DEST_STATE_1=ENABLE
For more information about these initialization parameters, see Oracle Data Guard Concepts and Administration 11g Release 2 (11.2).
11.8.3 Preparing a downstream mining database for real-time capture This procedure is only required if you want to use real-time capture at a downstream mining database. It is not required to use archived-log-only capture mode. To use real-time capture, it is assumed that the downstream database has already been configured to archive its local redo data as shown in "Configuring the mining database to archive local redo log files" on page A-4.
11.8.3.1 Create the standby redo log files The following steps outline the procedure for adding standby redo log files to the downstream mining database. The following summarizes the rules for creating the standby redo logs: ■
■
Each standby redo log file must be at least as large as the largest redo log file of the redo source database. For administrative ease, Oracle recommends that all redo log files at source database and the standby redo log files at the downstream mining database be of the same size. The standby redo log must have at least one more redo log group than the redo log at the source database, for each redo thread at the source database.
The specific steps and SQL statements that are required to add standby redo log files depend on your environment. See Oracle Data Guard Concepts and Administration 11g Release 2 (11.2) for detailed instructions about adding standby redo log files to a database. If there will be multiple source databases sending redo to a single downstream mining database, only one of those sources can send redo to the standby redo logs of the mining database. An Extract process that mines the redo from this source database can run in real-time mode. All other source databases must send only their archived logs to the downstream mining database, and the Extracts that read this data must be configured to run in archived-log-only mode.
Note:
To create the standby redo log files 1. In SQL*Plus, connect to the source database as an administrative user. 2.
Determine the size of the source log file. Make note of the results. SELECT BYTES FROM V$LOG;
Configuring a downstream mining database for integrated capture
A-5
Preparing the downstream mining database
3.
Determine the number of online log file groups that are configured on the source database. Make note of the results. SELECT COUNT(GROUP#) FROM V$LOG;
4.
Connect to the downstream mining database as an administrative user.
5.
Add the standby log file groups to the mining database. The standby log file size must be at least the size of the source log file size. The number of standby log file groups must be at least one more than the number of source online log file groups. This applies to each instance (thread) in a RAC installation. So if you have "n" threads at the source database, each having "m" redo log groups, you should configure n*(m+1) redo log groups at the downstream mining database. The following example shows three standby log groups. ALTER DATABASE ADD STANDBY LOGFILE GROUP 3 ('/oracle/dbs/slog3a.rdo', '/oracle/dbs/slog3b.rdo') SIZE 500M; ALTER DATABASE ADD STANDBY LOGFILE GROUP 4 ('/oracle/dbs/slog4.rdo', '/oracle/dbs/slog4b.rdo') SIZE 500M; ALTER DATABASE ADD STANDBY LOGFILE GROUP 5 ('/oracle/dbs/slog5.rdo', '/oracle/dbs/slog5b.rdo') SIZE 500M;
6.
Confirm that the standby log file groups were added successfully. SELECT GROUP#, THREAD#, SEQUENCE#, ARCHIVED, STATUS FROM V$STANDBY_LOG;
The output should be similar to the following: GROUP# THREAD# SEQUENCE# ---------- ---------- ---------3 0 0 4 0 0 5 0 0 7.
ARC --YES YES YES
STATUS ---------UNASSIGNED UNASSIGNED UNASSIGNED
Ensure that log files from the source database are appearing in the location that is specified in the LOCATION attribute of the local LOG_ARCHIVE_DEST_n that you set. You might need to switch the log file at the source database to see files in the directory.
11.8.3.2 Configure the database to archive standby redo log files locally This procedure configures the downstream mining database to archive the standby redo logs that receive redo data from the online redo logs of the source database. Keep in mind that foreign archived logs should not be archived in the recovery area of the downstream mining database. To archive standby redo logs locally 1. At the downstream mining database, set the second archive log destination in the LOG_ARCHIVE_DEST_n initialization parameter as shown in the following example. ALTER SYSTEM SET LOG_ARCHIVE_DEST_2='LOCATION=/home/arc_dest/srl_dbms1 VALID_FOR=(STANDBY_LOGFILE,PRIMARY_ROLE)'
Oracle recommends that foreign archived logs (logs from remote source databases) be kept separate from local mining database log files, and from each other. You must not use the recovery area of the downstream mining database to stage foreign archived logs. For information about configuring a fast recovery area, see Oracle® Database Backup and Recovery User's Guide 11g Release 2 (11.2).
A-6 Oracle GoldenGate for Oracle Installation and Setup Guide
Preparing the downstream mining database
If you are accepting redo generated by another database in the standby redo logs of a downstream mining database, you must configure log_archive_dest_2 for your standby redo logs as described above. Note:
2.
Enable the LOG_ARCHIVE_DEST_2 parameter you set in the previous step as shown in the following example. ALTER SYSTEM SET LOG_ARCHIVE_DEST_STATE_2=ENABLE For more information about these initialization parameters, see Oracle Data Guard Concepts and Administration 11g Release 2 (11.2).
Configuring a downstream mining database for integrated capture
A-7
Preparing the downstream mining database
A-8 Oracle GoldenGate for Oracle Installation and Setup Guide
B Example configuration of downstream mining database for integrated capture B
This appendix contains examples for preparing a downstream Oracle mining database to support Extract in integrated capture mode. For more information about configuring a downstream mining database, see "Configuring a downstream mining database for integrated capture" on page A-1.
11.9 Example 1: Capturing from one source database in real-time mode This example assumes that you created the necessary standby redo log files as shown in "Configuring a downstream mining database for integrated capture" on page A-1.
Note:
This example captures changes from source database DBMS1 by deploying an integrated capture session at a downstream mining database DBMSCAP. This assumes that the following users exist: ■
■
User GGADM1 in DBMS1 whose credentials Extract will use to fetch data and metadata from DBMS1. User GGADM1 has select privileges on V_$DATABASE view at the source database. It is assumed that the DBMS_GOLDENGATE_AUTH.GRANT_ ADMIN_PRIVILEGE() procedure was called to grant appropriate privileges to this user at the source database. User GGADMCAP in DBMSCAP whose credentials Extract will use to retrieve logical change records from the logmining server at the downstream mining database DBMSCAP. It is assumed that the DBMS_GOLDENGATE_AUTH.GRANT_ADMIN_ PRIVILEGE() procedure was called to grant appropriate privileges to this user at the mining database. User GGADMCAP has select privileges on V_$DATABASE view at the downstream mining database.
11.9.1 Prepare the mining database to archive its local redo 1.
The downstream mining database must be in archive log mode. You can do this by issuing the following DDL. STARTUP MOUNT; ALTER DATABASE ARCHIVELOG; ALTER DATABASE OPEN;
2.
At the downstream mining database, set log_archive_dest_1 to archive local redo.
Example configuration of downstream mining database for integrated capture
B-1
Example 1: Capturing from one source database in real-time mode
ALTER SYSTEM SET LOG_ARCHIVE_DEST_1='LOCATION=/home/arc_dest/local VALID_FOR=(ONLINE_LOGFILE, PRIMARY_ROLE)' 3.
Enable log_archive_dest_1. ALTER SYSTEM SET LOG_ARCHIVE_DEST_STATE_1=ENABLE
11.9.2 Prepare the mining database to archive redo received in standby redo logs from the source database 1.
At the downstream mining database, set log_archive_dest_2 as shown in the following example. ALTER SYSTEM SET LOG_ARCHIVE_DEST_2='LOCATION=/home/arc_dest/srl_dbms1 VALID_FOR=(STANDBY_LOGFILE,PRIMARY_ROLE)'
2.
Enable log_archive_dest_2 as shown in the following example. ALTER SYSTEM SET LOG_ARCHIVE_DEST_STATE_2=ENABLE
3.
Set DG_CONFIG at the downstream mining database. ALTER SYSTEM SET LOG_ARCHIVE_CONFIG='DG_CONFIG=(dbms1,dbmscap)'
11.9.3 Prepare the source database to send redo to the mining database 1.
Make sure that the source database is running with the required compatibility. select name, value from v$parameter where name = 'compatible'; NAME --------compatible
VALUE --------------------11.1.0.7.0
The minimum compatibility setting required from integrated capture is 10.2.0.0.0. 2.
Set DG_CONFIG at the source database. ALTER SYSTEM SET LOG_ARCHIVE_CONFIG='DG_CONFIG=(dbms1,dbmscap)';
3.
Set up redo transport at the source database. ALTER SYSTEM SET LOG_ARCHIVE_DEST_2='SERVICE=DBMSCAP.EXAMPLE.COM ASYNC OPTIONAL NOREGISTER VALID_FOR=(ONLINE_LOGFILES,PRIMARY_ROLE)DB_UNIQUE_NAME=dbmscap';
4.
Enable the downstream destination. ALTER SYSTEM SET LOG_ARCHIVE_DEST_STATE_2=ENABLE;
11.9.4 Set up integrated capture (ext1) on DBMSCAP 1.
Register Extract with the downstream mining database. GGSCI> DBLOGIN USERID ggadm1@dbms1 PASSWORD ggadm1pw GGSCI> MININGDBLOGIN USERID ggadmcap@dbmscap PASSWORD ggadmcappw GGSCI> REGISTER EXTRACT ext1 DATABASE
2.
Create Extract at the downstream mining database. GGSCI> ADD EXTRACT ext1 INTEGRATED TRANLOG BEGIN NOW
B-2 Oracle GoldenGate for Oracle Installation and Setup Guide
Example 2: Capturing from multiple sources in archive-log-only mode
3.
Edit Extract parameter file ext1.prm. The following lines must be present to take advantage of real-time capture. USERID ggadm1@dbms1 PASSWORD ggadm1pw TRANLOGOPTIONS MININGUSER ggadmcap@dbmscap MININGPASSWORD ggadmcappw TRANLOGOPTIONS INTEGRATEDPARAMS (downstream_real_time_mine Y)
4.
Start Extract. GGSCI> START EXTRACT ext1 You can create multiple Extracts running in real-time integrated capture mode in the downstream mining database, as long as they all are capturing data from the same source database, such as capturing changes for database DBMS1 in the preceding example.
Note:
11.10 Example 2: Capturing from multiple sources in archive-log-only mode The following example captures changes from database DBMS1 and DBMS2 by deploying an integrated capture session at a downstream mining database DBMSCAP. It assumes the following users: ■
■
■
User GGADM1 in DBMS1 whose credentials Extract will use to fetch data and metadata from DBMS1. User GGADM1 has select privileges on v_$database at DBMS1. It is assumed that the DBMS_GOLDENGATE_AUTH.GRANT_ADMIN_PRIVILEGE() procedure was called to grant appropriate privileges to this user at DBMS1. User GGADM2 in DBMS2 whose credentials Extract will use to fetch data and metadata from DBMS2. User GGADM2 has select privileges on v_$database in DBMS2. It is assumed that the DBMS_GOLDENGATE_AUTH.GRANT_ADMIN_PRIVILEGE() procedure was called to grant appropriate privileges to this user at DBMS2. User GGADMCAP in DBMSCAP whose credentials Extract will use to retrieve logical change records from the logmining server at the downstream mining database. It is assumed that the DBMS_GOLDENGATE_AUTH.GRANT_ADMIN_ PRIVILEGE() procedure was called to grant appropriate privileges to this user at the downstream mining database DBMSCAP. User GGADMCAP has select privileges on v_$database at DBMSCAP.
This procedure also assumes that the downstream mining database is configured in archive log mode.
11.10.1 Prepare the mining database to archive its local redo 1.
The downstream mining database must be in archive log mode. You can do this by issuing the following DDL. STARTUP MOUNT; ALTER DATABASE ARCHIVELOG; ALTER DATABASE OPEN;
2.
At the downstream mining database, set log_archive_dest_1 to archive local redo. ALTER SYSTEM SET LOG_ARCHIVE_DEST_1='LOCATION=/home/arc_dest/local VALID_FOR=(ONLINE_LOGFILE, PRIMARY_ROLE)'
Example configuration of downstream mining database for integrated capture
B-3
Example 2: Capturing from multiple sources in archive-log-only mode
3.
Enable log_archive_dest_1. ALTER SYSTEM SET LOG_ARCHIVE_DEST_STATE_1=ENABLE
11.10.2 Prepare the mining database to archive redo from the source database Set DG_CONFIG at the downstream mining database. ALTER SYSTEM SET LOG_ARCHIVE_CONFIG='DG_CONFIG=(dbms1,dbms2, dbmscap)'
11.10.3 Prepare the first source database to send redo to the mining database 1.
Make certain that DBMS1 source database is running with the required compatibility. select name, value from v$parameter where name = 'compatible'; NAME --------compatible
VALUE --------------------11.1.0.7.0
The minimum compatibility setting required from integrated capture is 10.2.0.0.0. 2.
Set DG_CONFIG at DBMS1 source database. ALTER SYSTEM SET LOG_ARCHIVE_CONFIG='DG_CONFIG=(dbms1, dbmscap)';
3.
Set up redo transport at DBMS1 source database. The TEMPLATE clause is mandatory if you want to send redo data directly to foreign archived logs at the downstream mining database. ALTER SYSTEM SET LOG_ARCHIVE_DEST_2='SERVICE=DBMSCAP.EXAMPLE.COM ASYNC OPTIONAL NOREGISTER TEMPLATE='/usr/orcl/arc_dest/dbms1/dbms1_arch_%t_%s_%r.log VALID_FOR=(ONLINE_ LOGFILES,PRIMARY_ROLE)DB_UNIQUE_NAME=dbmscap';
4.
Enable the downstream destination. ALTER SYSTEM SET LOG_ARCHIVE_DEST_STATE_2=ENABLE;
11.10.4 Prepare the second source database to send redo to the mining database 1.
Make sure that DBMS2 source database is running with the required compatibility. select name, value from v$parameter where name = 'compatible'; NAME --------compatible
VALUE --------------------10.2.0.3.0
The minimum compatibility setting required from integrated capture is 10.2.0.0.0. 2.
Set DG_CONFIG at DBMS2 source database. ALTER SYSTEM SET LOG_ARCHIVE_CONFIG='DG_CONFIG=( dbms2, dbmscap)';
3.
Set up redo transport at DBMS2 source database. The TEMPLATE clause is mandatory if you want to send redo data directly to foreign archived logs at the downstream mining database. ALTER SYSTEM SET LOG_ARCHIVE_DEST_2='SERVICE=DBMSCAP.EXAMPLE.COM ASYNC OPTIONAL NOREGISTER TEMPLATE='/usr/orcl/arc_dest/dbms2/dbms2_arch_%t_%s_%r.log VALID_FOR=(ONLINE_
B-4 Oracle GoldenGate for Oracle Installation and Setup Guide
Example 2: Capturing from multiple sources in archive-log-only mode
LOGFILES,PRIMARY_ROLE)DB_UNIQUE_NAME=dbmscap'; 4.
Enable the downstream destination. ALTER SYSTEM SET LOG_ARCHIVE_DEST_STATE_2=ENABLE;
11.10.5 Set up Extracts at the downstream mining database These steps set up Extract at the downstream database to capture from the archived logs sent by DBMS1 and DBMS2.
11.10.5.1 Set up Extract (ext1) to capture changes from archived logs sent by DBMS1 Perform the following steps on the DBMSCAP downstream mining database. 1.
Register Extract with DBMSCAP for the DBMS1 source database. GGSCI> DBLOGIN USERID ggadm1@dbms1 PASSWORD ggadm1pw GGSCI> MININGDBLOGIN USERID ggadmcap@dbmscap PASSWORD ggadmcappw GGSCI> REGISTER EXTRACT ext1 DATABASE
2.
Add Extract at the mining database DBMSCAP. GGSCI> ADD EXTRACT ext1 INTEGRATED TRANLOG BEGIN NOW
3.
Edit the Extract parameter file ext1.prm. USERID ggadm1@dbms1 PASSWORD ggadm1pw TRANLOGOPTIONS MININGUSER ggadmcap@dbmscap, MININGPASSWORD ggadmcappw TRANLOGOPTIONS INTEGRATEDPARAMS (downstream_real_time_mine N)
4.
Start Extract. GGSCI> START EXTRACT ext1
11.10.5.2 Set up Extract (ext2) to capture changes from archived logs sent by DBMS2 Perform the following steps on the downstream DBMSCAP mining database. 1.
Register Extract with the mining database for source database DBMS2. GGSCI> DBLOGIN USERID ggadm2@dbms2, PASSWORD ggadm2pw GGSCI> MININGDBLOGIN USERID ggadmcap@dbmscap, PASSWORD ggadmcappw GGSCI> REGISTER EXTRACT ext2 DATABASE
2.
Create Extract at the mining database. GGSCI> ADD EXTRACT ext2 INTEGRATED TRANLOG, BEGIN NOW
3.
Edit the Extract parameter file ext2.prm. USERID ggadm2@dbms2, PASSWORD ggadm2pwd TRANLOGOPTIONS MININGUSER ggadmcap@dbmscap, MININGPASSWORD ggadmcappw TRANLOGOPTIONS INTEGRATEDPARAMS (downstream_real_time_mine N)
4.
Start Extract. GGSCI> START EXTRACT ext2
Example configuration of downstream mining database for integrated capture
B-5
Example 3: Capturing from multiple sources with mixed real-time and archive-log-only mode
You can create multiple Extracts capturing data from the same source database while running in archive-log-only mode in the downstream mining database. In the case of these examples, you can create other Extracts capturing changes for database DBMS1 and DBMS2 at the downstream mining database.
Note:
11.11 Example 3: Capturing from multiple sources with mixed real-time and archive-log-only mode This example assumes that you created the necessary standby redo log files as shown in "Configuring a downstream mining database for integrated capture" on page A-1.
Note:
The following example captures changes from database DBMS1, DBMS2 and DBMS3 by deploying an integrated capture session at a downstream mining database DBMSCAP. It assumes the following users: ■
■
■
■
User GGADM1 in DBMS1 whose credentials Extract will use to fetch data and metadata from DBMS1. User GGADM1 has select privileges on v_$database at DBMS1. It is assumed that the DBMS_GOLDENGATE_AUTH.GRANT_ADMIN_PRIVILEGE() procedure was called to grant appropriate privileges to this user at DBMS1. User GGADM2 in DBMS2 whose credentials Extract will use to fetch data and metadata from DBMS2. User GGADM2 has select privileges on v_$database at DBMS2. It is assumed that the DBMS_GOLDENGATE_AUTH.GRANT_ADMIN_PRIVILEGE() procedure was called to grant appropriate privileges to this user at DBMS2. User GGADM3 in DBMS3 whose credentials Extract will use to fetch data and metadata from DBMS3. User GGADM3 has select privileges on v_$database at DBMS3. It is assumed that the DBMS_GOLDENGATE_AUTH.GRANT_ADMIN_PRIVILEGE() procedure was called to grant appropriate privileges to this user at DBMS3. User GGADMCAP in DBMSCAP whose credentials Extract will use to retrieve logical change records from the logmining server at the downstream mining database. It is assumed that the DBMS_GOLDENGATE_AUTH.GRANT_ADMIN_ PRIVILEGE() procedure was called to grant appropriate privileges to this user at the downstream mining database DBMSCAP. User GGADMCAP has select privileges on v_$database at DBMSCAP.
This procedure also assumes that the downstream mining database is configured in archive log mode. In this example, the redo sent by DBMS3 will be mined in real time mode, whereas the redo data sent from DBMS1 and DBMS2 will be mined in archive-log-only mode.
11.11.1 Prepare the mining database to archive its local redo 1.
The downstream mining database must be in archive log mode. You can do this by issuing the following DDL. STARTUP MOUNT; ALTER DATABASE ARCHIVELOG; ALTER DATABASE OPEN;
B-6 Oracle GoldenGate for Oracle Installation and Setup Guide
Example 3: Capturing from multiple sources with mixed real-time and archive-log-only mode
2.
At the downstream mining database, set log_archive_dest_1 to archive local redo. ALTER SYSTEM SET LOG_ARCHIVE_DEST_1='LOCATION=/home/arc_dest/local VALID_FOR=(ONLINE_LOGFILE, PRIMARY_ROLE)'
3.
Enable log_archive_dest_1. ALTER SYSTEM SET LOG_ARCHIVE_DEST_STATE_1=ENABLE
11.11.2 Prepare the mining database to accept redo from the source databases Because redo data is being accepted in the standby redo logs of the downstream mining database, the appropriate number of correctly sized standby redo logs must exist. If you did not configure the standby logs, see "Configuring a downstream mining database for integrated capture" on page A-1. 1.
At the downstream mining database, set the second archive log destination in the LOG_ARCHIVE_DEST_n initialization parameter as shown in the following example. This is needed to handle archive standby redo logs. ALTER SYSTEM SET LOG_ARCHIVE_DEST_2='LOCATION=/home/arc_dest/srl_dbms3 VALID_FOR=(STANDBY_LOGFILE,PRIMARY_ROLE)'
2.
Enable the LOG_ARCHIVE_DEST_STATE_2 initialization parameter that corresponds with the LOG_ARCHIVE_DEST_2 parameter as shown in the following example. ALTER SYSTEM SET LOG_ARCHIVE_DEST_STATE_2=ENABLE
3.
Set DG_CONFIG at the downstream mining database to accept redo data from all of the source databases. ALTER SYSTEM SET LOG_ARCHIVE_CONFIG='DG_CONFIG=(dbms1, dbms2, dbms3, dbmscap)'
11.11.3 Prepare the first source database to send redo to the mining database 1.
Make certain that DBMS1 source database is running with the required compatibility. select name, value from v$parameter where name = 'compatible'; NAME --------compatible
VALUE --------------------11.1.0.7.0
The minimum compatibility setting required from integrated capture is 10.2.0.0.0. 2.
Set DG_CONFIG at DBMS1 source database. ALTER SYSTEM SET LOG_ARCHIVE_CONFIG='DG_CONFIG=(dbms1, dbmscap)';
3.
Set up redo transport at DBMS1 source database. The TEMPLATE clause is mandatory if you want to send redo data directly to foreign archived logs at the downstream mining database. ALTER SYSTEM SET LOG_ARCHIVE_DEST_2='SERVICE=DBMSCAP.EXAMPLE.COM ASYNC OPTIONAL NOREGISTER TEMPLATE='/usr/orcl/arc_dest/dbms1/dbms1_arch_%t_%s_%r.log VALID_FOR=(ONLINE_ LOGFILES,PRIMARY_ROLE)DB_UNIQUE_NAME=dbmscap';
Example configuration of downstream mining database for integrated capture
B-7
Example 3: Capturing from multiple sources with mixed real-time and archive-log-only mode
4.
Enable the downstream destination. ALTER SYSTEM SET LOG_ARCHIVE_DEST_STATE_2=ENABLE;
11.11.4 Prepare the second source database to send redo to the mining database 1.
Make sure that DBMS2 source database is running with the required compatibility. select name, value from v$parameter where name = 'compatible'; NAME --------compatible
VALUE --------------------10.2.0.3.0
The minimum compatibility setting required from integrated capture is 10.2.0.0.0. 2.
Set DG_CONFIG at DBMS2 source database. ALTER SYSTEM SET LOG_ARCHIVE_CONFIG='DG_CONFIG=(dbms2, dbmscap)';
3.
Set up redo transport at DBMS2 source database. The TEMPLATE clause is mandatory if you want to send redo data directly to foreign archived logs at the downstream mining database. ALTER SYSTEM SET LOG_ARCHIVE_DEST_2='SERVICE=DBMSCAP.EXAMPLE.COM ASYNC OPTIONAL NOREGISTER TEMPLATE='/usr/orcl/arc_dest/dbms2/dbms2_arch_%t_%s_%r.log VALID_FOR=(ONLINE_ LOGFILES,PRIMARY_ROLE)DB_UNIQUE_NAME=dbmscap';
4.
Enable the downstream destination. ALTER SYSTEM SET LOG_ARCHIVE_DEST_STATE_2=ENABLE;
11.11.5 Prepare the third source database to send redo to the mining database 1.
Make sure that DBMS3 source database is running with the required compatibility. select name, value from v$parameter where name = 'compatible'; NAME --------compatible
VALUE --------------------11.2.0.3.0
The minimum compatibility setting required from integrated capture is 10.2.0.0.0. 2.
Set DG_CONFIG at DBMS3 source database. ALTER SYSTEM SET LOG_ARCHIVE_CONFIG='DG_CONFIG=(dbms3, dbmscap)';
3.
Set up redo transport at DBMS3 source database. Because DBMS3 is the source that will send its online redo logs to the standby redo logs at the downstream mining database, do not specify a TEMPLATE clause. ALTER SYSTEM SET LOG_ARCHIVE_DEST_2='SERVICE=DBMSCAP.EXAMPLE.COM ASYNC OPTIONAL NOREGISTER VALID_FOR=(ONLINE_LOGFILES,PRIMARY_ROLE)DB_UNIQUE_NAME=dbmscap';
4.
Enable the downstream destination. ALTER SYSTEM SET LOG_ARCHIVE_DEST_STATE_2=ENABLE;
B-8 Oracle GoldenGate for Oracle Installation and Setup Guide
Example 3: Capturing from multiple sources with mixed real-time and archive-log-only mode
11.11.6 Set up Extracts at downstream mining database These steps set up Extract at the downstream database to capture from the archived logs sent by DBMS1 and DBMS2.
11.11.6.1 Set up Extract (ext1) to capture changes from archived logs sent by DBMS1 Perform the following steps on the DBMSCAP downstream mining database. 1.
Register Extract with DBMSCAP for the DBMS1 source database. GGSCI> DBLOGIN USERID ggadm1@dbms1 PASSWORD ggadm1pw GGSCI> MININGDBLOGIN USERID ggadmcap@dbmscap PASSWORD ggadmcappw GGSCI> REGISTER EXTRACT ext1 DATABASE
2.
Add Extract at the mining database DBMSCAP. GGSCI> ADD EXTRACT ext1 INTEGRATED TRANLOG BEGIN NOW
3.
Edit the Extract parameter file ext1.prm. USERID ggadm1@dbms1 PASSWORD ggadm1pw TRANLOGOPTIONS MININGUSER ggadmcap@dbmscap, MININGPASSWORD ggadmcappw TRANLOGOPTIONS INTEGRATEDPARAMS (downstream_real_time_mine N)
4.
Start Extract. GGSCI> START EXTRACT ext1
11.11.6.2 Set up Extract (ext2) to capture changes from archived logs sent by DBMS2 Perform the following steps on the DBMSCAP downstream mining database. 1.
Register Extract with the mining database for source database DBMS2. GGSCI> DBLOGIN USERID ggadm2@dbms2, PASSWORD ggadm2pw GGSCI> MININGDBLOGIN USERID ggadmcap@dbmscap, PASSWORD ggadmcappw GGSCI> REGISTER EXTRACT ext2 DATABASE
2.
Create Extract at the mining database. GGSCI> ADD EXTRACT ext2 INTEGRATED TRANLOG, BEGIN NOW
3.
Edit the Extract parameter file ext2.prm. USERID ggadm2@dbms2, PASSWORD ggadm2pwd TRANLOGOPTIONS MININGUSER ggadmcap@dbmscap, MININGPASSWORD ggadmcappw TRANLOGOPTIONS INTEGRATEDPARAMS (downstream_real_time_mine N)
4.
Start Extract. GGSCI> START EXTRACT ext2
11.11.6.3 Set up Extract (ext3) to capture changes in real-time mode from online logs sent by DBMS3 Perform the following steps on the DBMSCAP downstream mining database. 1.
Register Extract with the mining database for source database DBMS3. GGSCI> DBLOGIN USERID ggadm3@dbms3, PASSWORD ggadm3pw GGSCI> MININGDBLOGIN USERID ggadmcap@dbmscap, PASSWORD ggadmcappw GGSCI> REGISTER EXTRACT ext3 DATABASE
Example configuration of downstream mining database for integrated capture
B-9
Example 3: Capturing from multiple sources with mixed real-time and archive-log-only mode
2.
Create Extract at the mining database. GGSCI> ADD EXTRACT ext3 INTEGRATED TRANLOG, BEGIN NOW
3.
Edit the Extract parameter file ext3.prm. To enable real-time mining, you must specify downstream_real_time_mine. USERID ggadm3@dbms3, PASSWORD ggadm3pwd TRANLOGOPTIONS MININGUSER ggadmcap@dbmscap, MININGPASSWORD ggadmcappw TRANLOGOPTIONS INTEGRATEDPARAMS (downstream_real_time_mine Y)
4.
Start Extract. GGSCI> START EXTRACT ext3 You can create multiple Extracts running in real-time integrated capture mode in the downstream mining database, as long as they all are capturing data from the same source database, such as all capturing for database DBMS3 in the preceding example.
Note:
B-10 Oracle GoldenGate for Oracle Installation and Setup Guide
C Supporting changes to XML schemas
C
This topic contains instructions for supporting changes to an XML schema. Both classic and integrated capture modes do not support the capture of changes made to an XML schema.
11.12 Supporting RegisterSchema RegisterSchema can be handled by registering the schema definition on both source and target databases before any table is created that references the XML schema.
11.13 Supporting DeleteSchema: Issue DeleteSchema on the source database first. Once Replicat is caught up with the changes made to the source database, issue the DeleteSchema call on the target database.
11.14 Supporting CopyEvolve The CopyEvolve procedure evolves, or changes, a schema and can modify tables by adding or removing columns. It can also be used to change whether or not XML documents are valid. Handling CopyEvolve requires more coordination. Use the following procedure if you are issuing CopyEvolve on the source database. 1.
Quiesce changes to dependent tables on the source database.
2.
Execute the CopyEvolve on the primary or source database.
3.
Wait for Replicat to finish applying all of the data from those tables to the target database.
4.
Stop Replicat.
5.
Apply the CopyEvolve on the target database.
6.
Restart Replicat.
Supporting changes to XML schemas
C-1
Supporting CopyEvolve
C-2 Oracle GoldenGate for Oracle Installation and Setup Guide
D Preparing DBFS for active-active propagation with Oracle GoldenGate D
This chapter contains steps to configure Oracle GoldenGate to function within an active-active bi-directional or multi-directional environment where Oracle Database File System (DBFS) is in use on both (or all) systems.
11.15 Supported operations and prerequisites Oracle GoldenGate for DBFS supports the following: ■
■
Supported DDL (like TRUNCATE or ALTER) on DBFS objects except for CREATE statements on the DBFS objects. CREATE on DBFS must be excluded from the configuration, as must any schemas that will hold the created DBFS objects. The reason to exclude CREATES is that the metadata for DBFS must be properly populated in the SYS dictionary tables (which itself is excluded from Oracle GoldenGate capture by default). Capture and replication of DML on the tables that underlie the DBFS file system.
The procedures that follow assume that Oracle GoldenGate is configured properly to support active-active configuration. This means that it must be: ■ ■
Installed according to the instructions in this guide. Configured according to the instructions in the Oracle GoldenGate Windows and UNIX Administrator's Guide.
11.16 Applying the required patch Apply the Oracle DBFS patch for bug-9651229 on both databases. To determine if the patch is installed, run the following query: connect / as sysdba select procedure_name from dba_procedures where object_name = 'DBMS_DBFS_SFS_ADMIN' and procedure_name = 'PARTITION_SEQUENCE';
The query should return a single row. Anything else indicates that the proper patched version of DBFS is not available on your database.
Preparing DBFS for active-active propagation with Oracle GoldenGate
D-1
Examples used in these procedures
11.17 Examples used in these procedures The following procedures assume two systems and configure the environment so that DBFS users on both systems see the same DBFS files, directories, and contents that are kept in synchronization with Oracle GoldenGate. It is possible to extend these concepts to support three or more peer systems.
11.18 Partitioning the DBFS sequence numbers DBFS uses an internal sequence-number generator to construct unique names and unique IDs. These steps partition the sequences into distinct ranges to ensure that there are no conflicts across the databases. After this is done, further DBFS operations (both creation of new felicitates and subsequent file system operations) can be performed without conflicts of names, primary keys, or IDs during DML propagation. 1.
Connect to each database as sysdba. Issue the following query on each database. select last_number from dba_sequences where sequence_owner = 'SYS' and sequence_name = 'DBFS_SFS_$FSSEQ'
2.
From this query, choose the maximum value of LAST_NUMBER across both systems, or pick a high value that is significantly larger than the current value of the sequence on either system.
3.
Substitute this value (“maxval” is used here as a placeholder) in both of the following procedures. These procedures logically index each system as myid=0 and myid=1.
Node1 declare begin dbms_dbfs_sfs_admin.partition_sequence(nodes => 2, myid => 0, newstart => :maxval); commit; end; /
Node 2 declare begin dbms_dbfs_sfs_admin.partition_sequence( nodes => 2, myid => 1, newstart => :maxval); commit; end; /
Note: Notice the difference in the value specified for the myid parameter. These are the different index values.
For a multi-way configuration among three or more databases, you could make the following alterations: ■
Adjust the maximum value that is set for maxval upward appropriately, and use that value on all nodes.
D-2 Oracle GoldenGate for Oracle Installation and Setup Guide
Configuring the DBFS file system
■
4.
Vary the value of myid in the procedure from 0 for the first node, 1 for the second node, 2 for the third one, and so on.
(Recommended) After (and only after) the DBFS sequence generator is partitioned, create a new DBFS file system on each system, and use only these file systems for DML propagation with Oracle GoldenGate. See "Configuring the DBFS file system" on page D-3. DBFS file systems that were created before the patch for bug-9651229 was applied or before the DBFS sequence number was adjusted can be configured for propagation, but that requires additional steps not described in this document. If you must retain old file systems, open a service request with Oracle Support.
Note:
11.19 Configuring the DBFS file system To replicate DBFS file system operations, use a configuration that is similar to the standard bi-directional configuration for DML. ■ ■
Use matched pairs of identically structured tables. Allow each database to have write privileges to opposite tables in a set, and set the other one in the set to read-only. For example: ■
■
■
Node1 writes to local table t1 and these changes are replicated to t1 on Node2. Node2 writes to local table t2 and these changes are replicated to t2 on Node1. On Node1, t2 is read-only. On Node2, t1 is read-only.
DBFS file systems make this kind of table pairing simple because: ■ ■
■
The tables that underlie the DBFS file systems have the same structure. These tables are modified by simple, conventional DML during higher-level file system operations. The DBFS Content API provides a way of unifying the namespace of the individual DBFS stores by means of mount points that can be qualified as read-write or read-only.
The following steps create two DBFS file systems (in this case named FS1 and FS2) and set them to be read-write or read, as appropriate. 1.
Run the following procedure to create the two file systems. (Substitute your store names for FS1 and FS2.)
Example 11–1 declare dbms_dbfs_sfs.createFilesystem('FS1'); dbms_dbfs_sfs.createFilesystem('FS2'); dbms_dbfs_content.registerStore('FS1', 'posix', 'DBMS_DBFS_SFS'); dbms_dbfs_content.registerStore('FS2', 'posix', 'DBMS_DBFS_SFS'); commit; end;
Preparing DBFS for active-active propagation with Oracle GoldenGate
D-3
Mapping local and remote peers correctly
/ 2.
Run the following procedure to give each file system the appropriate access rights. (Substitute your store names for FS1 and FS2.)
Example 11–2
Node 1
declare dbms_dbfs_content.mountStore('FS1', 'local'); dbms_dbfs_content.mountStore('FS2', 'remote', read_only => true); commit; end; / Example 11–3
Node 2
declare dbms_dbfs_content.mountStore('FS1', 'remote', read_only => true); dbms_dbfs_content.mountStore('FS2', 'local'); commit; end; /
In this example, note that on Node 1, store FS1 is read-write and store FS2 is read-only, while on Node 2 the converse is true: store FS1 is read-only and store FS2 is read-write. Note also that the read-write store is mounted as local and the read-only store is mounted as remote. This provides users on each system with an identical namespace and identical semantics for read and write operations. Local path names can be modified, but remote path names cannot.
11.20 Mapping local and remote peers correctly The names of the tables that underlie the DBFS file systems are generated internally and dynamically. Continuing with the preceding example, there are: ■
Two nodes (Node 1 and Node 2 in the example).
■
Four stores: two on each node (FS1 and FS2 in the example).
■
1.
Eight underlying tables: two for each store (a table and a ptable). These tables must be identified, specified in Extract TABLE statements, and mapped in Replicat MAP statements. To identify the table names that back each file system, issue the following query. (Substitute your store names for FS1 and FS2.)
Example 11–4 select fs.store_name, tb.table_name, tb.ptable_name from table(dbms_dbfs_sfs.listTables) tb, table(dbms_dbfs_sfs.listFilesystems) fs where fs.schema_name = tb.schema_name and fs.table_name = tb.table_name and fs.store_name in ('FS1', 'FS2') ;
The output looks like the following examples. D-4 Oracle GoldenGate for Oracle Installation and Setup Guide
Mapping local and remote peers correctly
Example 11–5
Example output: Node 1 (Your table names will be different.)
STORE NAME ------------FS1 FS2
TABLE_NAME ------------SFS$_FST_100 SFS$_FST_118
Example 11–6
Example output: Node 2 (Your table names will be different.)
STORE NAME ------------FS1 FS2
TABLE_NAME ------------SFS$_FST_101 SFS$_FST_119
2.
PTABLE_NAME ------------SFS$_FSTP_100 SFS$_FSTP_118
PTABLE_NAME ------------SFS$_FSTP_101 SFS$_FSTP_119
Identify the tables that are locally read-write to Extract by creating the following TABLE statements in the Extract parameter files. (Substitute your owner and table names.)
Example 11–7
Node1
TABLE owner.SFS$_FST_100 TABLE owner.SFS$_FSTP_100; Example 11–8
Node2
TABLE owner.SFS$_FST_119 TABLE owner.SFS$_FSTP_119; 3.
Link changes on each remote file system to the corresponding local file system by creating the following MAP statements in the Replicat parameter files. (Substitute your owner and table names.)
Example 11–9
Node1
MAP owner.SFS$_FST_119, TARGET owner.SFS$_FST_118; MAP owner.SFS$_FSTP_119, TARGET owner.SFS$_FSTP_118 Example 11–10 Node2 MAP owner.SFS$_FST_100, TARGET owner.SFS$_FST_101; MAP owner.SFS$_FSTP_100, TARGET owner.SFS$_FSTP_101;
This mapping captures and replicates local read-write source tables to remote read-only peer tables: ■
File system changes made to FS1 on Node 1 propagate to FS1 on Node 2.
■
File system changes made to FS2 on Node 2 propagate to FS2 on Node1.
Changes to the file systems can be made through the DBFS Content API (package DBMS_DBFS_CONTENT) of the database or through dbfs_client mounts and conventional file systems tools. All changes are propagated in both directions. ■
■ ■
A user at the virtual root of the DBFS namespace on each system sees identical content. For mutable operations, users use the /local sub-directory on each system. For read operations, users can use either of the /local or /remote sub-directories, depending on whether they want to see local or remote content. Preparing DBFS for active-active propagation with Oracle GoldenGate
D-5
Mapping local and remote peers correctly
D-6 Oracle GoldenGate for Oracle Installation and Setup Guide
E Oracle GoldenGate installed components
E
This appendix describes the programs, directories, and other components created or used by the Oracle GoldenGate software in the Oracle GoldenGate installation directory. Additional files not listed here might be installed on certain platforms. Files listed here might not be installed on every platform.
11.21 Oracle Goldengate Programs And Utilities This section describes programs installed in the root Oracle Goldengate installation directory. Some programs may not exist in all installations. For example, if only capture or delivery is supported by Oracle GoldenGate for your platform, the extract or replicat program will not be installed, respectively. Likewise, special files might be installed to support a specific database.
Note:
Table 11–1
Oracle GoldenGate installed programs and utilities
Program
Description
convchk
Converts checkpoint files to a newer version.
ddlgen
Generates target database table definitions based on source database DDL. Used primarily on the NonStop platform.
defgen
Generates data definitions and is referenced by Oracle GoldenGate processes when source and target tables have dissimilar definitions.
emsclnt
Sends event messages created by Collector and Replicat on Windows or UNIX systems to EMS on NonStop systems.
extract
Performs capture from database tables or transaction logs or receives transaction data from a vendor access module.
ggmxinstall
Oracle GoldenGate installation script for the SQL/MX database.
ggsci
User interface to Oracle GoldenGate for issuing commands and managing parameter files.
ggsmgr.jcl
Start the Oracle GoldenGate Manager process from a batch job or the operator console on a z/OS system. Installed to support DB2 z/OS databases.
ggsmgr.proc ggsmgrst.jcl ggsmgrst.proc
Oracle GoldenGate installed components
E-1
Oracle Goldengate Subdirectories
Table 11–1 (Cont.) Oracle GoldenGate installed programs and utilities Program
Description
install
Installs Oracle GoldenGate as a Windows service and provides other Windows-based service options.
keygen
Generates data-encryption keys.
logdump
A utility for viewing and saving information stored in extract trails or files.
mgr
(Manager) Control process for resource management, control and monitoring of Oracle GoldenGate processes, reporting, and routing of requests through the GGSCI interface.
replicat
Applies data to target database tables.
reverse
A utility that reverses the order of transactional operations, so that Replicat can be used to back out changes from target tables, restoring them to a previous state.
server
The Collector process, an Extract TCP/IP server collector that writes data to remote trails.
triggen
Generates scripts that create the Oracle GoldenGate log table and logging triggers to support the trigger-based extraction method.
vamserv
Started by Extract to read the TMF audit trails generated by TMF-enabled applications. Installed to support the NonStop SQL/MX database.
11.22 Oracle Goldengate Subdirectories This Section describes the subdirectories of the Oracle Goldengate installation directory and their contents. Note:
Table 11–2
Some directories may not exist in all installations.
Oracle GoldenGate installed subdirectories
Directory
Description
br
Contains the checkpoint files for the bounded recover feature.
cfg
Contains the property and XML files that are used to configure Oracle GoldenGate Monitor.
dirdb
Contains the data store that is used to persist information that is gathered from an Oracle GoldenGate instance for use by the Oracle GoldenGate Monitor application or within Oracle Enterprise Manager.
E-2 Oracle GoldenGate for Oracle Installation and Setup Guide
Oracle Goldengate Subdirectories
Table 11–2 (Cont.) Oracle GoldenGate installed subdirectories Directory
Description
dirchk
Contains the checkpoint files created by Extract and Replicat processes, which store current read and write positions to support data accuracy and fault tolerance. Written in internal Oracle GoldenGate format. File name format is group_name+sequence_number.ext where sequence_number is a sequential number appended to aged files and ext is either cpe for Extract checkpoint files or cpr for Replicat checkpoint files. Do not edit these files. Examples: ext1.cpe rep1.cpr
dirdat
The default location for Oracle GoldenGate trail files and extract files that are created by Extract processes to store extracted data for further processing by the Replicat process or another application or utility. Written in internal Oracle GoldenGate format. File name format is a user-defined two-character prefix followed by either a six-digit sequence number (trail files) or the user-defined name of the associated Extract process group (extract files). Do not edit these files. Examples: rt000001 finance
dirdef
The default location for data definitions files created by the DEFGEN utility to contain source or target data definitions used in a heterogeneous synchronization environment. Written in external ASCII. File name format is a user-defined name specified in the DEFGEN parameter file. These files may be edited to add definitions for newly created tables. If you are unsure of how to edit a definitions file, contact Oracle GoldenGate technical support. Example: defs.dat
dirjar
Contains the Java executable files that support Oracle GoldenGate Monitor.
dirout
This directory is not used any more.
dirpcs
Default location for status files. File name format is group.extension where group is the name of the group and extension is either pce (Extract), pcr (Replicat), or pcm (Manager). These files are only created while a process is running. The file shows the program name, the process name, the port number, and the process ID. Do not edit these files. Examples: mgr.pcm ext.pce
Oracle GoldenGate installed components
E-3
Other Oracle GoldenGate files
Table 11–2 (Cont.) Oracle GoldenGate installed subdirectories Directory
Description
dirprm
The default location for Oracle GoldenGate parameter files created by Oracle GoldenGate users to store run-time parameters for Oracle GoldenGate process groups or utilities. Written in external ASCII format. File name format is group name/user-defined name.prm or mgr.prm . These files may be edited to change Oracle GoldenGate parameter values after stopping the process. They can be edited directly from a text editor or by using the EDIT PARAMS command in GGSCI. Examples: defgen.prm finance.prm
dirrec
Not used by Oracle GoldenGate.
dirrpt
The default location for process report files created by Extract, Replicat, and Manager processes to report statistical information relating to a processing run. Written in external ASCII format. File name format is group name+sequence number.rpt where sequence number is a sequential number appended to aged files. Do not edit these files. Examples: fin2.rpt mgr4.rpt
dirsql
Used by the triggen utility to store SQL scripts before triggen was deprecated. Currently used to store training scripts and any user-created SQL scripts that support Oracle GoldenGate.
dirtmp
The default location for storing transaction data when the size exceeds the memory size that is allocated for the cache manager. Do not edit these files.
dirwlt
Contains the Oracle Wallet that supports Oracle GoldenGate Monitor. This directory is not installed until you run the utility that creates the wallet.
UserExitExamples
Contains sample files to help with the creation of user exits.
11.23 Other Oracle GoldenGate files This section describes other files, templates, and objects created or installed in the root Oracle GoldenGate installation directory. Some files may not be installed in your environment, depending on the database and OS platform.
Note:
Table 11–3
Other Oracle GoldenGate installed files
Component
Description
bcpfmt.tpl
Template for use with Replicat when creating a run file for the Microsoft BCP/DTS bulk-load utility.
bcrypt.txt
Blowfish encryption software license agreement.
E-4 Oracle GoldenGate for Oracle Installation and Setup Guide
Other Oracle GoldenGate files
Table 11–3 (Cont.) Other Oracle GoldenGate installed files Component
Description
cagent.dll
Contains the Windows dynamic link library for the Oracle GoldenGate Monitor C sub-agent.
category.dll
Windows dynamic link library used by the INSTALL utility.
chkpt_db_create.sql
Script that creates a checkpoint table in the local database. A different script is installed for each database type.
db2cntl.tpl
Template for use with Replicat when creating a control file for the IBM LOADUTIL bulk-load utility.
ddl_access.tpl
Template used by the DDLGEN utility to convert source DDL to Microsoft Access DDL.
ddl_cleartrace.sql
Script that removes the DDL trace file. (Oracle installations)
ddl_db2.tpl
Template used by the DDLGEN utility to convert source DDL to DB2 DDL (Linux, UNIX, Windows).
ddl_db2_os390.tpl
Template used by the DDLGEN utility to convert source DDL to DB2 DDL (z/OS systems).
ddl_ddl2file.sql
Script that saves DDL from the marker table to a file.
ddl_disable.sql
Script that disables the Oracle GoldenGate DDL trigger. (Oracle installations)
ddl_enable.sql
Script that enables the Oracle GoldenGate DDL trigger. (Oracle installations)
ddl_filter.sql
Script that supports filtering of DDL by Oracle GoldenGate. This script runs programmatically; do not run it manually.
ddl_informix.tpl
Template used by the DDLGEN utility to convert source DDL to Informix DDL.
ddl_mss.tpl
Template used by the DDLGEN utility to convert source DDL to SQL Server DDL.
ddl_mysql.tpl
Template used by the DDLGEN utility to convert source DDL to MySQL DDL.
ddl_ nopurgeRecyclebin.sql
Empty script file for use by Oracle GoldenGate support staff.
ddl_nssql.tpl
Template used by the DDLGEN utility to convert source DDL to NonStop SQL DDL.
ddl_ora9.sql
Scripts that run programmatically as part of Oracle GoldenGate DDL support; do not run these scripts.
ddl_ora10.sql ddl_ora11.sql ddl_ora10upCommon.sql ddl_oracle.tpl
Template used by the DDLGEN utility to convert source DDL to Oracle DDL.
ddl_pin.sql
Script that pins DDL tracing, the DDL package, and the DDL trigger for performance improvements. (Oracle installations)
ddl_purgeRecyclebin.sql
Script that purges the Oracle recyclebin in support of the DDL replication feature.
ddl_remove.sql
Script that removes the DDL extraction trigger and package. (Oracle installations)
ddl_session.sql
Supports the installation of the Oracle DDL objects. This script runs programmatically; do not run it manually.
ddl_session1.sql
Oracle GoldenGate installed components
E-5
Other Oracle GoldenGate files
Table 11–3 (Cont.) Other Oracle GoldenGate installed files Component
Description
ddl_setup.sql
Script that installs the Oracle GoldenGate DDL extraction and replication objects. (Oracle installations)
ddl_sqlmx.tpl
Template used by the DDLGEN utility to convert Tandem Enscribe DDL to NonStop SQL/MX DDL.
ddl_status.sql
Script that verifies whether or not each object created by the Oracle GoldenGate DDL support feature exists and is functioning properly. (Oracle installations)
ddl_staymetadata_off.sql Scripts that control whether the Oracle DDL trigger collects metadata. This script runs programmatically; do not run it ddl_staymetadata_on.sql manually. ddl_sybase.tpl
Template used by the DDLGEN utility to convert source DDL to Sybase DDL.
ddl_tandem.tpl
Template used by the DDLGEN utility to convert source DDL to NonStop SQL DDL.
ddl_trace_off.sql
Scripts that control whether DDL tracing is on or off.
ddl_trace_on.sql ddl_tracelevel.sql
Script that sets the level of tracing for the DDL support feature. (Oracle installations)
debug files
Debug text files that may be present if tracing was turned on.
demo_db_scriptname.sql demo_more_db_ scriptname.sql
Scripts that create and populate demonstration tables for use with tutorials and basic testing.
.dmp files
Dump files created by Oracle GoldenGate processes for tracing purposes.
ENCKEYS
User-created file that stores encryption keys. Written in external ASCII format.
exitdemo.c
User exit example.
exitdemo_utf16.c
User exit example that demonstrates how to use UTF16 encoded data in the callback structures for information exchanged between the user exit and the process.
freeBSD.txt
License agreement for FreeBSD.
ggmessage.dat
Data file that contains error, informational, and warning messages that are returned by the Oracle GoldenGate processes. The version of this file is checked upon process startup and must be identical to that of the process in order for the process to operate.
ggserr.log
File that logs processing events, messages, errors, and warnings generated by Oracle GoldenGate.
ggsmsg.dll
Windows dynamic link library used by the install program.
GLOBALS
User-created file that stores parameters applying to the Oracle GoldenGate instance as a whole.
help.txt
Help file for the GGSCI command interface.
icudt38.dll
Windows shared libraries for International Components for Unicode.
icuin38.dll icuuc38.dll
E-6 Oracle GoldenGate for Oracle Installation and Setup Guide
Other Oracle GoldenGate files
Table 11–3 (Cont.) Other Oracle GoldenGate installed files Component
Description
jagent.bat
Windows batch file for the Java Agent for Oracle GoldenGate Monitor.
jagent.log
Log files for the Oracle GoldenGate Monitor Agent.
jagentjni.log jagent.sh
UNIX shell script for the Java Agent for Oracle GoldenGate Monitor
LGPL.txt
Lesser General Public License statement. Applies to free libraries from the Free Software Foundation.
libodbc.so
ODBC file for Ingres 2.6 on Unix.
libodbc.txt
License agreement for libodbc.so.
libxml2.dll
Windows dynamic link library containing the XML library for the Oracle GoldenGate XML procedures.
libxml2.txt
License agreement for libxml2.dll .
marker.hist
File created by Replicat if markers were passed from a NonStop source system.
marker_remove.sql
Script that removes the DDL marker table. (Oracle installations)
marker_setup.sql
Script that installs the Oracle GoldenGate DDL marker table. (Oracle installations)
marker_status.sql
Script that confirms successful installation of the DDL marker table. (Oracle installations)
notices.txt
Third-party software license file.
odbcinst.ini
Ingres 2.6 on Unix ODBC configuration file.
params.sql
Script that contains configurable parameters for DDL support. (Oracle installations)
pthread-win32.txt
License agreement for pthread-VC.dll .
pthread-VC.dll
POSIX threads library for Microsoft Windows.
prvtclkm.plb
Supports the replication of Oracle encrypted data.
pw_agent_util.bat
Script files that support the Oracle GoldenGate Monitor Agent.
pw_agent_util.sh role_setup.sql
Script that creates the database role necessary for Oracle GoldenGate DDL support. (Oracle installations)
sampleodbc.ini
Sample ODBC file for Ingres 2.6 on UNIX.
sqlldr.tpl
Template for use with Replicat when creating a control file for the Oracle SQL*Loader bulk-load utility.
start.prm
z/OS paramlib members to start and stop the Manager process.
stop.prm
stopmgr
z/OS Unix System Services scripts to start the Manager process from GGSCI.
startmgrcom
z/OS system input command for the Manager process.
startmgr
stopmgrcom tcperrs
File containing user-defined instructions for responding to TCP/IP errors.
Oracle GoldenGate installed components
E-7
Oracle GoldenGate checkpoint table
Table 11–3 (Cont.) Other Oracle GoldenGate installed files Component
Description
usrdecs.h
Include file for user exit API.
xerces-c_2_8.dll
Apache XML parser library.
zlib.txt
License agreement for zlib compression library.
11.24 Oracle GoldenGate checkpoint table When database checkpoints are being used, Oracle GoldenGate creates a checkpoint table with a user-defined name in the database upon execution of the ADD CHECKPOINTTABLE command, or a user can create the table by using the chkpt_db_ create.sql script (where db is an abbreviation of the type of database that the script supports). Do not change the names or attributes of the columns in this table. You can change table storage attributes as needed. Table 11–4
Checkpoint table definition
Column
Description
GROUP_NAME (primary key) The name of a Replicat group using this table for checkpoints. There can be multiple Replicat groups using the same table. GROUP_KEY (primary key)
A unique identifier that, together with GROUPNAME, uniquely identifies a checkpoint regardless of how many Replicat groups are writing to the same table.
SEQNO
The sequence number of the checkpoint file.
RBA
The relative byte address of the checkpoint in the file.
AUDIT_TS
The timestamp of the checkpoint position in the checkpoint file.
CREATE_TS
The date and time when the checkpoint table was created.
LAST_UPDATE_TS
The date and time when the checkpoint table was last updated.
CURRENT_DIR
The current Oracle GoldenGate home directory or folder.
E-8 Oracle GoldenGate for Oracle Installation and Setup Guide


![[1 ] Oracle® GoldenGate](https://m.moam.info/img/260x300/1-oracle-goldengate_59c040b21723dd70109560e9.jpg)