Oracle Technology Network is the world's largest community ... Trouble Ticket
Tracking System is a web-based application that manages and maintains lists of
...
OTN Developer Day Enterprise Java
Hands on Lab Manual JPA 2.0 and Object Relational Mapping Basics
I want to improve the performance of my application...
Can I copy Java code to an HTML Extension?
I coded it this way...
Here’s where you can find the latest release.
Is the app customizable?
How does restricted task reassignment work?
The best way to migrate Oracle E-Business Application Suite Tier servers to Linux is...
Just watch the live webcast on virtualization.
Where can I find technical articles on logging in Java ME?
Oracle Technology Network. It‘s code for sharing expertise. Come to the best place to collaborate with other IT professionals. Oracle Technology Network is the world’s largest community of developers, administrators, and architects using industrystandard technologies with Oracle products. Sign up for a free membership and you‘ll have access to: • • • •
Discussion forums and hands-on labs Free downloadable software and sample code Product documentation Member-contributed content
Take advantage of our global network of knowledge.
JOIN TODAY
Go to: oracle.com/technetwork
Copyright © 2010, Oracle and/or its affiliates. All rights reserved. Oracle and Java are registered trademarks of Oracle and/or its affiliates. Other names may be trademarks of their respective owners. 10039688
Step 1. Setup Workspace and Create Java EE Projects Time to complete this step: 15 minutes
Trouble Ticket System Overview During this tutorial series, you will develop a version of an IT ticketing system called Trouble Ticket Tracking System (which can be enhanced to be a full-blown application). Trouble Ticket Tracking System is a web-based application that manages and maintains lists of tickets submitted for the products of an organization. Customers can submit tickets for a specific product and can view the status of a ticket at any time. The submitted ticket can be picked by a technician from the pool of submitted tickets. Once assigned, the technician is the owner of that ticket and is responsible for resolving it. A submitted ticket can have different life-cycle states such as: NEW, for a newly submitted ticket; ASSIGNED, for when the ticket is assigned to a technician; FIXED, when the problem has been fixed; or CAN_NOT_FIX, if the issue cannot be fixed now. A ticket can have a history for different life-cycle states for tracking purposes. In this step, you will configure your workspace for Java EE project development and create a new web project for web service development. A Web Project is an Eclipse Java project that contains the source code, web pages, images, resources, and configuration files for building a web application. The extracted /home/oracle/labs/JPA_Lab_Resources folder contains the file TroubleTicketSystem.sql which contains the DDL for creating the database. It also has dao and tests folders that contain the Java DAO classes and test cases respectively. During the later steps, you are required to import and use them. Note: The software used in this tutorial is as follows: Derby (JPA Tutorial Database) Oracle TopLink 12c Oracle Enterprise Pack for Eclipse 12c Lab Resources in /home/oracle/labs/JPA_Lab_Resources
Launch Oracle Enterprise Pack for Eclipse On the desktop, double click OEPE 12c to launch OEPE. Choose the /home/oracle/labs/Dev_labs_2012/JPA_Tutorial workspace.
Open the Java EE perspective, if not already open by going to Window > Open Perspective > Other > Java EE.
Create the TroubleTicketSystemEAR project
Create the TroubleTicketSystemServer project
Browse the Database Structure using the DataSource Explorer
Create the TroubleTicketSystemEAR project 1.
Right click in the Project Explorer and choose New > Enterprise Application Project
2.
Enter the project name TroubleTicketSystemEAR in the New EAR Application Project wizard. The tutorial code expects this name.
3.
Keep the default configuration and click Finish.
Create the TroubleTicketSystemServer project In this step, you will create the Dynamic Web Project TroubleTicketSystemServer and add it to the TroubleTicketSystemEAR project as a web module. 1.
Right click in the Project Explorer and choose New > Dynamic Web Project
2.
Enter the project name TroubleTicketSystemServer in the New Dynamic Web Project wizard.
3.
Select the Add project to an EAR option for adding this dynamic web project to TroubleTicketSystemEAR project.
4.
For the Configuration option, click Modify... which opens the Project Facets dialog for selecting the facet(s) for the project. Select the Java Persistence and the Java Annotation Processing Support facets.
5.
Click OK.
6.
In the New Dynamic Web Project wizard, choose the option Add project to an EAR and select the TroubleTicketSystemEAR project. Click Next.
7.
Click Next again in Java wizard page.
8.
Click Next in Web Module wizard page.
9.
Now we will configure the JPA Facet. Ensure that EclipseLink 2.0.x is chosen as the platform.
10. For the JPA implementation, choose User Library… and then check the box for TopLink1211. The user library is comprised of eclipselink.jar and javax.persistence_2.0.jar. 11. Now add a new database connection. Click Add Connection.... 12. Choose the Derby from the list. Enter the database connection name TroubleTicketSystemDBConnection and click Next.
13. Select the Derby Client JDBC driver from the Drivers dropdown menu, if necessary. Note that if you click on the button for editing the driver definition, you will see its referencing the JAR for Derby located in /labs/derby/dbderby/lib/derbyclient.jar. Then, configure the connection parameters to connect to the schema where the tables for the troubleticket database are located as shown below. The user / password is app / app.
14. Make sure to check “Save password” as shown above. Then click Test Connection and verify that the ping succeeds. If it does not, you can use Derby’s ij utility to ensure the database is started, or simply launch a terminal window from the GNOME desktop. 15. Click Finish once the ping has completed successfully. 16. Back in the JPA Facet page, select the option “Add the driver library to build path” and choose Derby Client JDBC Driver option. Then click Finish.
17. The New Dynamic Web Project wizard creates a new TroubleTicketSystemServer web project and adds it to the TroubleTicketSystemEAR as a web module. 18. Double-click the TroubleTicketSystemServer > Java Resources > src > META-INF > persistence.xml file. This opens the persistence.xml file in the Persistence XML Editor. 19. Review the properties in the General tab. The persistence unit name has been set to TroubleTicketSystemServer and the persistence provider has been set to org.eclipse.persistence.jpa.PersistenceProvider .
20. Switch to the Connection tab and review the persistence unit connection properties.
Step 2. Generate O/R mappings Time to complete this step: 15 minutes The Oracle Enterprise Pack for Eclipse (OEPE) provides a powerful and flexible object relational mapping interface to popular persistence services like OpenJPA. Depending on the development scenario, OR Mappings can be generated through two different mechanisms.
Reverse Engineering the Schema to create object relational mappings
Generating Mappings from an Object Model You will perform the following tasks in this step:
Generate JPA entities from database Schema using the Generate Custom JPA Entities Wizard
o
Define new association between TECHNICIAN and TECHNICIANPRIVATEDATA
Review the generated classes with JPA annotations
Generate JPA entities from database Schema using the Generate Custom JPA Entities wizard In this step, we will use OEPE to automatically generate JPA entity beans from an existing database schema by reverse engineering the schema. OEPE will generate Java classes with the appropriate accessors and JPA annotations. 1.
If the current perspective is not JPA perspective then switch to JPA perspective.
2.
In the Project Explorer, right-click the TroubleTicketSystemServer project and select JPA Tools > Generate Entities from Tables.
3.
Select the database tables from the Generate Custom Entities wizard as shown below. Do not select the DEPARTMENT database table. In the coming step, you will use the DEPARTMENT database table to manually create a POJO class, Department, and annotate this class for JPA in order to better understand the topdown development approach.
4.
Click Next.
5.
The Table Associations dialog displays entity relationships as observed in the database schema from the foreign key definitions. Select each association to review the association definitions among different entities. The dialog allows you to edit a table association by selecting each association and modifying its options in the editing panel.
6.
First, select the auto-detected relationship between TECHNICIAN PRIVATEDATA and TECHNICIAN. Uncheck the "generate this association" check mark, as you will define it yourself in a later step.
7.
Then, select the association between TICKETHISTORY and TECHNICIAN. A technician can have references to tickets but not ticket history. Hence to avoid bi-direction association between technician and ticket history, un-check the option Generate a reference to a collection of TICKETHISTORY in TECHNICIAN.
8.
Select the association between TICKETHISTORY and TICKET. Change the value of the second property name from tickethistories to ticketHistory
Define new association between TECHNICIAN and TECHNICIANPRIVATEDATA OEPE also supports the creation of new entity associations in case your database lacks foreign key definitions (such as for performance reasons). It can create Simple Associations (one to one, one to many, many to one) between two tables and Many to Many Associations through an intermediate table. a.
In the Table Associations wizard page, click the New Associations button.
b.
We want to define a simple one-to-one association between the TECHNICIAN and TECHNICIANPRIVATEDATA tables. In the Create New Association dialog, for the Simple association option, select the TECHNICIANPRIVATEDATA table for Table 1 and the TECHNICIAN table for Table 2 (as shown below) and click Next .
c.
In the Join Columns dialog, specify the join columns between tables. Click the Add button. Select the ID column for the TECHNICIANPRIVATEDATA table and the ID column for the TECHNICIAN table. Click Next . You may need to resize the window to see the add/remove buttons.
d.
Select One-to-One to specify one TECHNICIAN per TECHNICIANPRIVATEDATA.
e.
Click Finish. This adds a new association in the Table Associations wizard page.
Click Next in the Table Associations wizard page. In the Customize Default Entity Generation wizard page, confirm that none is selected for the Key Generator field. A Java Package is required for generating the entity beans. Enter com.oracle.ticketsystem.beans as the Package name under Domain Java Class section and the package will be created automatically upon completion of the dialog.
Click Next. The Customize Individual Entities wizard page allows you to customize the tables and columns mapping generation. We will not customize the tables in this tutorial, but you can get a feel for how tables and columns can generate flexible, maintainable java source.
Click Finish. The Generate Custom Entities wizard generates JPA entity beans under the com.oracle.ticketsystem.beans package.
Open the persistence.xml file using the Persistence XML Editor. Expand the Managed Classes group to see the list of classes to be managed in the persistence unit. OEPE identifies the persistent entity - based on the class names of entities specified in persistence.xml file.
Review the generated classes with JPA annotations
When we create entity mappings, we define each property as having one of six property types: basic, id, many-to-one, one-toone, one-to-many, and many-to-many. When you generate entities from a database, OEPE annotates the generated source code with JPA annotations that designate which type a given property is. In this section, we will review some basic JPA annotations. Review the following annotations in the Technician class. 1.
Double-click the file TroubleTicketSystemServer > Java Resources: src > com.oracle.ticketsystem.beans > Technician.java to view its source.
2.
Basic Properties: A basic property handles a standard value that is persisted as-is to the database. Every non-static non-transient property (field or method) of an entity bean is considered persistent. Not having an annotation for property is equivalent to the appropriate @Basic annotation. The @Basic annotation allows to declare the fetching strategy for a property. The @Basic annotation is followed by the @Column annotation defining an attribute name which is the name of the column to which the property is bound; the attribute nullable is false to specify that the column cannot store null values; the column length attribute specifies the maximum length. private String name; public String getName() { return this.name; }
3.
public void setName(String name) { this.name = name; } ID properties: An Id property designates an identifier, such as a primary key. All entity beans must declare one or more fields which together form the persistent identity of an instance. An @Id annotation is followed by a @Column annotation defining the attribute unique which is true to specify that the column is UNIQUE in the SQL sense (can have only unique values). @Id private String id; public String getId() { return this.id; }
4.
public void setId(String id) { this.id = id; } One-to-One properties: There are three cases for one-to-one associations: either the associated entities share the same primary keys values, a foreign key is held by one of the entities (note that this FK column in the database should be constrained unique to simulate one-to-one multiplicity), or an association table is used to store the link between the 2 entities (a unique constraint has to be defined on each FK to ensure the one to one multiplicity). The following shows the one-to-one mapping association between Technician and Technicianprivatedata in the Technicianprivatedata class. The following @JoinColumn annotation declares the column in the targeted entity that will be used for the join. //bi-directional one-to-one association to Technician @OneToOne @JoinColumn(name="ID") private Technician technician; public Technician getTechnician() { return this.technician; } public void setTechnician(Technician technician) {
this.technician = technician; } 5.
The following shows the one-to-one mapping association between Technicianprivatedata and Technician in the Technician class. The mappedBy attribute refers to the property name of the association on the owner side. //bi-directional one-to-one association to Technicianprivatedata @OneToOne(mappedBy="technician") private Technicianprivatedata technicianprivatedata; public Technicianprivatedata getTechnicianprivatedata() { return this.technicianprivatedata; } public void setTechnicianprivatedata(Technicianprivatedata technicianprivatedata) { this.technicianprivatedata = technicianprivatedata; }
6.
One-to-Many Properties: A one-to-many property designates a relationship in which one A entity references multiple B entities, and no two A entities reference the same B entity. Here the Technician entity references multiple Ticket entities, but a Ticket entity can have only one Technician entity reference. The one-to-many annotation defines an attribute mappedBy which is the name of the many-to-one field in the Ticket entity that maps this bidirectional relation. //bi-directional many-to-one association to Ticket @OneToMany(mappedBy="technician") private Set tickets;
7.
public Set getTickets() { return this.tickets; } public void setTickets(Set tickets) { this.tickets = tickets; } Many-to-one Properties: A many-to-one property designates a relationship in which an entity A references a single entity B, and other A's might also reference the same B; there is a many-to-one relation from A to B. The many-to-one annotation defines an attribute fetch which is a enum that specifies whether to load the field's persisted data before the entity object is returned by the persistence provider (FetchType.EAGER) or later, when the property is accessed (FetchType.LAZY). The many-to-one are defaulted to FetchType.EAGER. The many-to-one annotation is followed by a @JoinColumn annotation defining the column name which is the name of the column to which the property is bound and a referencedColumnName attribute which is the name of the primary key column being joined to. Open the Ticket class. //bi-directional many-to-one association to Technician @ManyToOne @JoinColumn(name="TECHNICIANID") private Technician technician; public Technician getTechnician() { return this.technician; } public void setTechnician(Technician technician) { this.technician = technician; }
Step 3. Generate O/R mappings
Time to complete this step: 15 minutes The Oracle Enterprise Pack for Eclipse (OEPE) allows you to generate JPA entities (by providing annotations) from existing POJO classes i.e. a Top-Down development scenario. You will perform the following tasks in this step:
Create a POJO to represent persistent data
Generate a JPA entity from a Java class and define associations among entities
Create a POJO to represent persistent data In this step, you will create a persistent java class Department and use OEPE to generate JPA mappings for the Department object. 1.
Under the package com.oracle.ticketsystem.beans, create a new Java class Department that implements the java.io.Serializable interface. Click Finish when done.
2.
Open the generated Department.java class, and add the following property: private static final long serialVersionUID = 1L;
3.
4.
Add the following set of private variables to the Department class. Note: we are defining properties that map to columns in the DEPARTMENT database table. private long id; private String name; Add getter and setter methods for each property. Hint: Right-click in the editor and select Source > Generate getters and setters.... In the Generate Getters and Setters dialog, select all properties and click OK . public long getId() { return id; } public void setId(long id) { this.id = id; } public String getName() { return name; } public void setName(String name) { this.name = name; }
5.
Override the equals() and hashCode() methods in case we use Department instances in a Set – you can simply copy and paste this code into the class definition to do so. public boolean equals(Object obj) { if ((this == obj)) return true; if (!(obj instanceof Department)) return false; Department castOther = (Department) obj; if (this.getId() == castOther.getId()) { return true; } else { return false; }} public int hashCode() { return (new Long(this.getId())).hashCode(); }
6.
Save the Department class. Now, we have the object representation for DEPARTMENT persistence data. Next, we will annotate the Department object.
Generate the JPA entity from the Java class and define associations In this step, you will annotate the Department java class using the OEPE Generate Entity from the Java Class wizard and define associations among the Department and Technician entities.
1.
In the Project Explorer, right-click the TroubleTicketSystemServer project and select JPA Tools > Generate Entity from Java Class.
2.
Click Browse to select a Java Class. Type Department to view and select the com.oracle.ticketsystem.beans.Department object to be mapped. Click OK.
3.
If Property has chosen as the Entity access type then OEPE annotates your class's accessors; if you choose field, OEPE annotate your class's fields. Leave the Entity Access to Field and click Next.
4.
In the Class Mapping Properties dialog, choose DEPARTMENT for the Table field and the id as the Primary Key property field. Click Next.
5.
In the Property Mapping dialog, you can verify the mappings between fields and database columns that are being annotated in the Department java class. Note that you can select a property mapping and click Edit to modify a selected property mapping. In this tutorial, we do not need to change any mapping information. Click Finish.
6.
Open the Department class and verify that the JPA annotations have been added for the class and its fields.
7.
Edit the annotated class Technician for adding bi-directional many-to-one associations with Department.
a.
Remove the deptid property and corresponding accessor methods. (private int deptid;)
b.
Add a new property department and annotate it with the @ManytoOne annotation to define a many-to-one association with the Department. The @JoinColumn annotation defines the attribute column name which is the name of the column to which the property is bound and the referenced column which is the name of the primary key column being joined to. @ManyToOne() @JoinColumn(name="DEPTID", referencedColumnName="ID") private Department department;
c.
Add getter/setter accessor methods for the department property. public Department getDepartment() { return department; } public void setDepartment(Department department) { this.department = department; }
d. 8.
Save the Technician class.
Edit the annotated class Department for adding bi-directional many-to-one association with Technician. a.
Import the following javax.persistence classes for adding a new many-to-one column join, and the java.util.set. import javax.persistence.OneToMany; import java.util.Set;
b.
Add a property technicians of type java.util.Set. Specify the @ OneToMany annotation to the Department entity for adding a one-to-many association with Technician. The @OnetoMany annotation defines the attribute MappedBy which is the name of the many-to-one field in the Technician entity that maps this bidirectional relation. @OneToMany(mappedBy="department") private Set technicians;
c.
Add getter/setter accessor methods for the technicians property. public Set getTechnicians() { return technicians; } public void setTechnicians(Set technicians) { this.technicians = technicians; }
d.
Save the Department class.
Step 4. Managing Persistent Entities using the JPA Entities Editor Time to complete this step: 10 minutes OEPE allows you to view, create, and manage JPA entity relationships. The Entities Editor provides a centralized view of all entity relationships, allows you to modify entity properties, and navigate between the object model, mapping associations, and database schema layers. You will perform the following tasks in this step:
View an Entity Relationship Diagram using the Entities Editor
Viewing and Editing JPA Persistent Entities using the JPA Details View
Manage JPA entity mappings
View an Entity Relationship Diagram using the Entities Editor OEPE provides an Entities Editor that displays relationship diagram for entities defined in the persistence.xml file.
1.
In the Project Explorer view, right-click the project TroubleTicketSystemServer and select JPA > Show in Entity Editor.
2.
The JPA Persistence Entities Editor displays all entity relationships defined in the Persistence configurations file. Each box displays a specific entity, its properties, and an icon denoting the nature of the relationship. The JPA Persistence Entities Editor displays and selects property types for an entity with tool tip popups. You can work with the entity relationship diagram by selecting operations such as Zoom In, Zoom Out, Export to Image, and Print. To view a tool tip, hover your cursor over the respective entity. To view and edit the details, use the JPA Details View.
3.
The JPA Persistence Entities Editor also allows you to filter relationships between entities. This feature helps you simplify your view of the diagram when it is large and complex. Click on the Toggle relations actions like One-to-Many and Many-to-One to filter entity relationships in the diagram.
4.
Reset both the filters.
Viewing and Editing JPA Persistent Entities using the JPA Details View Using the JPA Details View, you can easily edit entity properties. 1.
Select the Ticket entity in the JPA Entities Editor.
2.
The JPA Details View displays the properties for the Ticket entity.
3.
With the JPA Details View, you can edit the associated Java Bean class, strategy for persistence, and the database access information for the selected entity. To edit, either enter text in the text box or click on the drop down lists for the schema binding, Primary Key Generation, Sequence Generators, Queries, etc.
4.
To edit a property, in the JPA Entities Editor view, select the customeremail property of the Ticket entity. Observe the customeremail property in JPA Details View.
5.
Use the JPA Details View to modify the Length of the customeremail property. Update the Length value from 255 to 200. This creates a @Column(length = 200) annotation in Ticket.java.
1.
Press CTRL+S to save the changes.
Within the JPA Entities Editor, right-click the entity Technician to view its source code OR to see the associated configuration in persistence.xml.
Manage JPA entity mappings The following describes how the annotations are translated into what the JPA Details View displays. When the JPA Details View displays an underlined label, you can click the label to view the corresponding Java source code or item in the Data Source Explorer. 1.
In the JPA Entities Editor, review the many-to-one association between Ticket and Product. Select the product property in the Ticket entity to view its properties in the JPA Details View.
2.
Within the JPA Details View, examine Join Columns. Select the association and click Edit to edit the mapping association. Click Cancel
3.
. Next, locate the one-to-many association between Ticket and Tickethistory. Click on the ticketHistory property in the Ticket entity and view the Target Entity and Mapped By properties in the JPA Details View.
4.
Clicking Target Entity in the JPA Details View will take you to the class for the related entity type Tickethistory.
5.
Close the Tickethistory.java file.
6.
Clicking Mapped By under the Join Properties will allow you to change the field by which the many-to-one association of Ticket to Tickethistory is mapped by. Do not make any changes at this time.
Step 5. Explore the Persistence Settings of the project Time to complete this step: 10 minutes The persistence.xml file defines the context for JPA persistence. In this step, you will use the JPA Persistence Configuration Editor to explore the persistence.xml file for your JPA web project. You will perform the following tasks in this step:
Use the JPA Persistence Configuration Editor to view the Persistence Configuration File
View the Connection Properties
Use the JPA Persistence Configuration Editor to view the Persistence Configuration File The JPA Persistence Configuration Editor provides a graphical interface that allows you to modify connection information, mapped classes, and JPA properties that are defined by your persistence.xml file. Optionally, you can also use the editor to edit the persistence.xml source file.
1.
From the Project Explorer, open the JPA Persistence XML Editor by right-clicking the persistence.xml file and selecting Open. This will open the persistence.xml configuration file in the JPA Persistence Configuration Editor.
2.
You can also open the persistence.xml file by double-clicking it in Project Explorer. The persistence.xml file is located at this path in your project hierarchy: TroubleTicketSystemServer/src/META-INF
3.
The JPA Persistence Configuration Editor is organized in different category tabs. The General tab allows to edit information about managed classes and the persistence provider unit.
4.
To edit the JPA entity beans, select a mapped class from the Managed Classes and click Open to view the source code for the selected mapped class. The editor also allows you to add a new mapped class by clicking Add... and browsing to the class.
5.
Switch to the Logging tab, which shows the EclipseLink logging properties. Set the logging level to Default (Info). Save the persistence.xml file.
View the Connection Properties 1.
The Connection tab of the persistence.xml editor displays the current connection properties and allows you to modify the existing connection if you use a JDBC Datasource.
2.
If you choose to instead embed the connection properties directly in persistence.xml, you can use the Properties tab to edit them. This tutorial embeds the properties directly.
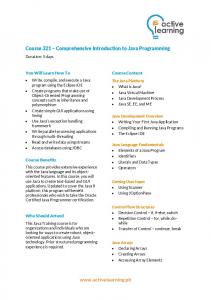
Step 6. Create and implement JPA DAO classes Time to complete this step: 15 minutes Data Access Objects (DAO) can be used to perform the required work with the data source. For this tutorial, the data source is the Oracle database. In this step, you will define DAO interfaces and implement them to create/find/update/remove entities that we have defined in previous steps. Figure 1. shows DAO interfaces and implementation classes and interaction with entities.
Figure 1. DAO abstraction for managing entities
You will perform the following tasks in this step:
Define/import DAO interfaces
Implement DAO interfaces using JPA API
Define (and import) DAO interfaces In this step, you will define (and import) DAO interfaces that define methods for doing various CRUD operations for entities. 1.
Create a new Java package com.oracle.ticketsystem.dao in TroubleTicketSystemServer project under the /src node.
2.
Right-click the com.oracle.ticketsystem.dao package and select New > Interface.
3.
Enter the interface name ILoginDao and click Finish.
4.
In ILoginDao interface, define a login method for validating the technician credentials as shown below inside the ILoginDao interface. For valid credentials, it will return reference of the Technician entity. Enter Cntrl + Shift + O to Organize Imports and save the file to resolve any build errors. public interface ILoginDao { /** * Validates the given technician ID and password. * If the ID and password are valid then return * the
Technician reference, * otherwise returns null. * * @param id * string ID of Technician * @param pwd * string password of Technician * @return TechnicianType * if the ID and password are valid */ public Technician login(String id, String pwd); }
5.
Copy the additional DAO interfaces ( IProductDao and ITicketDao ) from the extracted JPA_Lab_Resources/dao folder to the com.oracle.ticketsystem.dao package. You may need to use the import function by right clicking on the com.oracle.ticketsystem.dao package and choosing Import -> File System. IProductDao: A DAO interface for the Product entity provides a product based on a specific ID or a complete list of products. /** * A DAO for providing product information. */
public interface IProductDao { /** * Returns all the available products. * * @return set of
Products */ public List getAllProducts(); /** * Returns reference of a Product for the given product ID. * * @param id * product ID * @return reference of
Product if found for the given ID, * otherwise null. */ public Product getProduct(int id); } 1. 2.
ITicketDao: A DAO interface for the Ticket entity which performs create, find, update and delete operation on tickets. /** * A DAO that handles the ticket related requests, * for example, adding a new ticket, updating an * existing ticket, getting a specific ticket, and * getting list of tickets by specific state. * */ public interface ITicketDao { /** * Adds the given ticket. * * @param ticket to add * @return
Ticket reference to ticket being added */ public Ticket add(int productId, String customerName, String customerEmail, String title, String description); /** * Updates the ticket specified with the given ID. *
* Ignores the update request (and returns null), if could not find * Ticket for the given ID. *
* It updates the current state of the ticket and also adds an entry * for the ticket history. * * @param ticketId * ID of the ticket to update * @param technicianId * ID of technician who is updating the ticket * @param comment * string comment about the update
* @param state * state to update for the ticket * @return the updated TicketType */ public Ticket update(int ticketId, String technicianId, String comment, String state); /** * Returns Ticket reference for the given ticket ID, * or null if does not found. * * @param ticketId * ID of ticket to retrieve * @return Ticket reference for the given ticket ID if found, * otherwise null. */ public Ticket get(int ticketId); /** * Returns List of tickets assigned to technician with the given ID. * * @param technicianId get tickets assigned to technician with the given ID * @return List of tickets. */ public List getTicketsOwnedByTechnician(String technicianId); /** * Returns List of open tickets i.e. either NEW or OPEN * * @return a list of open tickets i.e. either NEW or OPEN */ public List getOpenTickets(); /** * Removes the ticket with the given ticket ID. * * @param ticketId * the ID of the ticket to be removed */ public void remove(int ticketId); }
Implement the DAO interfaces using the JPA API In this step, you will use the JPA API for implementing the DAO interfaces defined in the previous step. 1.
Create a new Java package com.oracle.ticketsystem.dao.impl in the TroubleTicketSystemServer project.
2.
Import the JPADaoFactory class from the extracted JPA_Lab_Resources/dao folder to the com.oracle.ticketsystem.dao.impl package. This class creates singleton instances of EntityManagerFactory and EntityManager using the persistence unit name as defined in the persistence.xml. Also, it has a method to close the EntityManagerFactory for necessary clean-up during the application shutdown. /** * A JPA DAO factory for providing reference to EntityManager. * */
public class JPADaoFactory { private static final String PERSISTENCE_UNIT_NAME = "TroubleTicketSystemServer"; private static EntityManagerFactory entityManagerFactory; private static EntityManager entityManager; /** * Returns reference to EntityManager instance. If null then create it * using the persistence unit name as defined in the persistence.xml * * @return EntityManager */ public static EntityManager createEntityManager() { if(entityManager == null) { entityManagerFactory = Persistence.createEntityManagerFactory(PERSISTENCE_UNIT_NAME); entityManager = entityManagerFactory.createEntityManager(); } return entityManager; } public static void close() { entityManager.close(); entityManagerFactory.close(); } }
3.
Now, we will create a base class for JPA DAO implementation classes. The BaseJPADao class provides an accessor method for the EntityManager. Right-click the com.oracle.ticketsystem.dao.impl package and select New > Class.
4.
Enter the class name BaseJPADao and click Finish.
5.
Edit the BaseJPADao class. Add the getEntityManager() method that returns reference of type EntityManager using the JPADaoFactory. Organize imports for the EntityManager. /** * Returns JPA EntityManager reference. * @return */ public EntityManager getEntityManager() { return JPADaoFactory.createEntityManager(); }
6.
Now, we will implement the ILoginDao interface. Right-click the com.oracle.ticketsystem.dao.impl package and select New > Class.
7.
Enter the class name LoginJPADao. Click Browse.. and choose the superclass BaseJPADao. Click Add... and choose the interface ILoginDao. Click Finish.
8.
The LoginJPADao class uses the JPA API to retrieve Technician entity based on the given technician ID and validate the password. It returns reference to Technician entity if match found, otherwise null. Implement the login() method as shown below: @Override public Technician login(String id, String pwd) { Technician technician = getEntityManager().find(Technician.class, id); if(technician == null) { return null; } if(technician.getPassword().equals(pwd)) { return technician; } return null; }
9.
Import additional DAO implementations ( ProductJPADao and TicketJPADao ) classes from the extracted JPA_Lab_resources/dao folder to the com.oracle.ticketsystem.dao.impl package.
10. Open and review the ProductJPADao class. The ProductJPADao performs find operations on JPA EntityManager to retrieve a specific product based on the given ID and executes a SELECT query to find all the products. 11. Open and review the TicketJPADao class. The TicketJPADao performs various CRUD operations on TicketJPADao using the JPA EntityManager. public class TicketJPADao extends BaseJPADao implements ITicketDao {
/** * Date pattern used across the application. */ public static final String DATE_PATTERN = "MM/dd/yyyy hh:mm:ss aa"; //$NON-NLS-1$
/** * Default no-arg constructor */ public TicketJPADao() { }
@Override public Ticket add(int productId, String customerName, String customerEmail, String title, String description) {
Product product = getEntityManager().find(Product.class, productId);
if(product == null) { throw new RuntimeException("While adding a new ticket, " + "could not find reference to the given product Id: " + productId); }
Ticket ticket = new Ticket(); ticket.setProduct(product); ticket.setCustomername(customerName); ticket.setCustomeremail(customerEmail); ticket.setTitle(title); ticket.setDescription(description);
ticket.setState("NEW"); // always NEW state SimpleDateFormat dtFormat = new SimpleDateFormat(DATE_PATTERN); ticket.setSubmissiondate(dtFormat.format(new Date()));
Integer maxId = getMaxId("SELECT max(t.id) FROM Ticket t");
// setting the ticket Id ticket.setId( (int) ((maxId == null) ? 0 : maxId + 1));
EntityTransaction t = getEntityManager().getTransaction(); t.begin(); getEntityManager().persist(ticket); t.commit();
return ticket; }
@Override public Ticket get(int ticketId) { return getEntityManager().find(Ticket.class, ticketId); }
@SuppressWarnings("unchecked") @Override public List getTicketsOwnedByTechnician(String technicianId) {
Query query = getEntityManager().createQuery("SELECT t from Ticket t WHERE t.technician.id = :technicianId"); query.setParameter("technicianId", technicianId);
return query.getResultList(); }
@Override public Ticket update(int ticketId, String technicianId, String comment, String state) {
EntityTransaction t = getEntityManager().getTransaction(); t.begin();
Ticket ticket = get(ticketId);
if(ticket == null) { return null; }
ticket.setState(state); Technician technician = null;
if(technicianId != null) {
technician = getEntityManager().find(Technician.class, technicianId);
if(technician == null) { throw new RuntimeException("No technician found for the ID '" + technicianId + "'"); }
} ticket.setTechnician(technician);
Tickethistory ticketHistory = new Tickethistory(); Integer maxTicketHistoryId = getMaxId("SELECT max(h.id) FROM Tickethistory h");
// setting the ticketHistory Id ticketHistory.setId( (int) ((maxTicketHistoryId == null) ? 0 : maxTicketHistoryId + 1));
if(technician != null) { ticketHistory.setTechnician(technician); }
ticketHistory.setState(state); ticketHistory.setComments(comment); ticketHistory.setTicket(ticket);
SimpleDateFormat dtFormat = new SimpleDateFormat(DATE_PATTERN); ticketHistory.setUpdatedate(dtFormat.format(new Date()));
getEntityManager().persist(ticketHistory);
ticket.getTicketHistory().add(ticketHistory);
t.commit(); return ticket; }
@SuppressWarnings("unchecked") @Override public List getOpenTickets() {
Query openTicketsQuery = getEntityManager().createQuery( "SELECT t FROM Ticket t " + "WHERE t.state = :newState " + "OR t.state = :openState"); openTicketsQuery.setParameter("newState", "NEW"); openTicketsQuery.setParameter("openState", "OPEN");
return openTicketsQuery.getResultList(); }
@Override public void remove(int ticketId) {
Ticket ticket = get(ticketId); if(ticket != null) { EntityTransaction trx = getEntityManager().getTransaction();
trx.begin();
for(Tickethistory ticketHistory : ticket.getTicketHistory()) { getEntityManager().remove(ticketHistory); }
ticket.getTicketHistory().clear();
getEntityManager().remove(ticket);
trx.commit(); }
}
private int getMaxId(String maxQuery) {
Query maxIdQuery = getEntityManager().createQuery(maxQuery);
int maxId = (int) 1L;
if( (maxIdQuery.getResultList() != null) && (maxIdQuery.getResultList().size() > 0) ) { maxId = (Integer)maxIdQuery.getResultList().get(0); } return maxId; }
}
Step 7. Test the JPA Entities Time to complete this step: 10 minutes You will perform the following tasks in this step:
Configure the TroubleTicketSystemServer project for JUnit
Import and Run JUnit Tests
Configure the TroubleTicketSystemServer project for JUnit Before importing the JUnit TestCases, it is required to configure the project build path for JUnit libraries. 1.
Right-click the TroubleTicketSystemServer project and select Properties from the context menu.
2.
In the Properties dialog for TroubleTicketSystemServer project, select Java Build Path in left pane, and the Libraries tab in the right pane. Click the Add Library... button.
3.
In the Add Library dialog, select JUnit and click Next.
4.
Select JUnit 4 as the JUnit library version and click Finish.
5.
This adds the JUnit 4 libraries to the project build path. Click OK.
Import and Run JUnit tests In this step, you will import the JUnit TestCases for performing various CRUD operations on JPA Entities developed during previous steps. 1.
Create a new com.oracle.ticketsystem.dao.tests package in TroubleTicketSystemServer project.
2.
Import all the test classes from the JPA_Lab_Resources/tests folder to the com.oracle.ticketsystem.dao.tests package.
3.
Open and review the test classes.
1.
LoginDaoTest:
1.
Tests the login() operation with valid and invalid Technician credentials.
2.
ProductDaoTest:
0.
Tests the finder methods for Product entity.
3.
TicketDaoTest:
0.
Tests the various CRUD operations for the Ticket entity. Right-click the LoginDaoTest class and select Run As > JUnit Test .
This launches the LoginDaoTest unit test and shows the result in the JUnit UI.
Similarly, execute the ProductDaoTest and TicketDaoTest JUnit tests. Verify the test results.