Jun 28, 2006 ... DRAFT! DO NOT DISTRIBUTE WITHOUT PRIOR PERMISSION. Printed on
August 8, 2008 cс2007 Thomas P. Murtagh. Comments, corrections ...
Programming with Java, Swing and Squint
Thomas P. Murtagh Williams College
DRAFT! DO NOT DISTRIBUTE WITHOUT PRIOR PERMISSION Printed on August 8, 2008 c �2007 Thomas P. Murtagh Comments, corrections, and other feedback appreciated
[email protected]
Contents 1 What is Programming Anyway? 1.1 Without Understanding . . . . . . . . . . . . . . 1.2 The Java Programming Language . . . . . . . . . 1.3 Your First Sip of Java . . . . . . . . . . . . . . . 1.3.1 Simple Responsive Programs . . . . . . . 1.3.2 “Class” and other Magic Words . . . . . . 1.3.3 Under Construction . . . . . . . . . . . . 1.3.4 Discourse on the Method . . . . . . . . . 1.3.5 The Name Game . . . . . . . . . . . . . . 1.4 Programming Tools . . . . . . . . . . . . . . . . . 1.5 Graphical User Interface Components . . . . . . 1.5.1 Constructing GUI Components . . . . . . 1.5.2 Additional GUI Event-handling Methods 1.5.3 GUI Component Layout . . . . . . . . . . 1.6 To Err is Human . . . . . . . . . . . . . . . . . . 1.7 Summary . . . . . . . . . . . . . . . . . . . . . .
. . . . . . . . . . . . . . .
. . . . . . . . . . . . . . .
. . . . . . . . . . . . . . .
. . . . . . . . . . . . . . .
. . . . . . . . . . . . . . .
. . . . . . . . . . . . . . .
. . . . . . . . . . . . . . .
. . . . . . . . . . . . . . .
. . . . . . . . . . . . . . .
. . . . . . . . . . . . . . .
. . . . . . . . . . . . . . .
. . . . . . . . . . . . . . .
. . . . . . . . . . . . . . .
. . . . . . . . . . . . . . .
. . . . . . . . . . . . . . .
. . . . . . . . . . . . . . .
. . . . . . . . . . . . . . .
. . . . . . . . . . . . . . .
. . . . . . . . . . . . . . .
. . . . . . . . . . . . . . .
1 2 6 7 7 10 12 13 14 15 18 19 23 25 27 30
2 What’s in a name? 2.1 Modifying Objects . . . . . . . . . . . . . . . . 2.2 Instance Variable Declarations . . . . . . . . . 2.3 Assigning Meanings to Variable Names . . . . . 2.4 Local Variables . . . . . . . . . . . . . . . . . . 2.5 GUI Layout with Panels . . . . . . . . . . . . . 2.6 More on Declarations . . . . . . . . . . . . . . . 2.6.1 Initializers . . . . . . . . . . . . . . . . . 2.6.2 Making it final . . . . . . . . . . . . . 2.6.3 Declaring Collections of Similar Names 2.7 ints and Strings . . . . . . . . . . . . . . . . . 2.8 Comments . . . . . . . . . . . . . . . . . . . . . 2.9 Summary . . . . . . . . . . . . . . . . . . . . .
. . . . . . . . . . . .
. . . . . . . . . . . .
. . . . . . . . . . . .
. . . . . . . . . . . .
. . . . . . . . . . . .
. . . . . . . . . . . .
. . . . . . . . . . . .
. . . . . . . . . . . .
. . . . . . . . . . . .
. . . . . . . . . . . .
. . . . . . . . . . . .
. . . . . . . . . . . .
. . . . . . . . . . . .
. . . . . . . . . . . .
. . . . . . . . . . . .
. . . . . . . . . . . .
. . . . . . . . . . . .
. . . . . . . . . . . .
. . . . . . . . . . . .
. . . . . . . . . . . .
31 31 33 34 37 39 41 43 43 45 45 47 49
3 Probing Questions 3.1 Accessor Methods . . . . . . . . . . . . . . . . . . . . . . . . . . . . . . . . . . . . . 3.2 Statements and Expressions . . . . . . . . . . . . . . . . . . . . . . . . . . . . . . . . 3.3 Working with GUI Components . . . . . . . . . . . . . . . . . . . . . . . . . . . . . .
51 51 53 56
iii
. . . . . . . . . . . .
. . . . . . .
. . . . . . .
. . . . . . .
. . . . . . .
. . . . . . .
. . . . . . .
. . . . . . .
. . . . . . .
. . . . . . .
. . . . . . .
. . . . . . .
. . . . . . .
. . . . . . .
57 57 60 68 72 76 78
4 Let’s Talk 4.1 Protocols . . . . . . . . . . . . . . . . . . . . . . . . . . . . . . 4.1.1 The Client/Server Paradigm . . . . . . . . . . . . . . . 4.1.2 Mail Servers and Clients . . . . . . . . . . . . . . . . . . 4.1.3 The Transmission Control Protocol . . . . . . . . . . . . 4.1.4 Talking SMTP . . . . . . . . . . . . . . . . . . . . . . . 4.2 Using NetConnections . . . . . . . . . . . . . . . . . . . . . . . 4.2.1 An Interface for an SMTP Client . . . . . . . . . . . . . 4.2.2 Making Connections . . . . . . . . . . . . . . . . . . . . 4.2.3 The Ins and Outs of NetConnections . . . . . . . . . . 4.2.4 A Closing Note . . . . . . . . . . . . . . . . . . . . . . . 4.2.5 What’s Next . . . . . . . . . . . . . . . . . . . . . . . . 4.2.6 Network Event Notification . . . . . . . . . . . . . . . . 4.2.7 Summary of NetConnection constructions and methods 4.3 Summary . . . . . . . . . . . . . . . . . . . . . . . . . . . . . .
. . . . . . . . . . . . . .
. . . . . . . . . . . . . .
. . . . . . . . . . . . . .
. . . . . . . . . . . . . .
. . . . . . . . . . . . . .
. . . . . . . . . . . . . .
. . . . . . . . . . . . . .
. . . . . . . . . . . . . .
. . . . . . . . . . . . . .
. . . . . . . . . . . . . .
. . . . . . . . . . . . . .
. . . . . . . . . . . . . .
81 81 83 84 86 89 92 93 96 97 100 100 103 106 107
. . . . . . . . .
109 . 109 . 113 . 116 . 117 . 120 . 122 . 123 . 126 . 132
. . . . . . . . . .
135 . 136 . 139 . 142 . 144 . 145 . 149 . 151 . 156 . 158 . 163
3.4 3.5 3.6
3.3.1 Common Features . . . . . . . . . . . . . . 3.3.2 Menu Methods . . . . . . . . . . . . . . . . 3.3.3 Components that Display Text . . . . . . . 3.3.4 Summary of Methods for GUI Components Identifying Event Sources . . . . . . . . . . . . . . Using Variables to Remember . . . . . . . . . . . . Summary . . . . . . . . . . . . . . . . . . . . . . .
5 Pro-Choice 5.1 Either/or Questions . . . . . . . . . 5.1.1 Numbers and Strings . . . . 5.1.2 A Simple if Statement . . . 5.2 if Statements are Statements . . . . 5.3 The Truth about Curly Braces . . . 5.3.1 Multi-way Choices . . . . . . 5.4 Something for Nothing . . . . . . . . 5.5 Synonyms, Homographs, and Scopes 5.6 Summary . . . . . . . . . . . . . . . 6 Class Action 6.1 Second Class . . . . . . . . . . . . 6.2 Constructor Parameters . . . . . . 6.2.1 Parameter Correspondence 6.2.2 Choosing Colors . . . . . . 6.3 Method Madness . . . . . . . . . . 6.4 Analyze This . . . . . . . . . . . . 6.5 Talking Back . . . . . . . . . . . . 6.6 Defining Accessor Methods . . . . 6.7 Invisible Objects . . . . . . . . . . 6.8 Private Parts . . . . . . . . . . . .
. . . . . . . . . .
. . . . . . . . . . . . . . . . . . .
. . . . . . . . . . . . . . . . . . . iv
. . . . . . . . . . . . . . . . . . .
. . . . . . . . . . . . . . . . . . .
. . . . . . . . . . . . . . . . . . .
. . . . . . . . . . . . . . . . . . .
. . . . . . . . . . . . . . . . . . .
. . . . . . . . . . . . . . . . . . .
. . . . . . .
. . . . . . . . . . . . . . . . . . .
. . . . . . .
. . . . . . . . . . . . . . . . . . .
. . . . . . .
. . . . . . . . . . . . . . . . . . .
. . . . . . .
. . . . . . . . . . . . . . . . . . .
. . . . . . .
. . . . . . . . . . . . . . . . . . .
. . . . . . .
. . . . . . . . . . . . . . . . . . .
. . . . . . . . . . . . . . . . . . .
. . . . . . . . . . . . . . . . . . .
. . . . . . . . . . . . . . . . . . .
. . . . . . . . . . . . . . . . . . .
. . . . . . . . . . . . . . . . . . .
. . . . . . . . . . . . . . . . . . .
. . . . . . . . . . . . . . . . . . .
. . . . . . . . . . . . . . . . . . .
. . . . . . . . . . . . . . . . . . .
. . . . . . . . . . . . . . . . . . .
. . . . . . . . . . . . . . . . . . .
6.9
Summary . . . . . . . . . . . . . . . . . . . . . . . . . . . . . . . . . . . . . . . . . . 168
7 Primitive Technology 7.1 Planning a Calculator . . . . . . . . . . . . . . . . 7.2 Smooth Operators . . . . . . . . . . . . . . . . . . 7.2.1 Relational Operators and boolean Values . 7.2.2 Primitive Ways . . . . . . . . . . . . . . . . 7.2.3 Logical Arguments . . . . . . . . . . . . . . 7.3 double Time . . . . . . . . . . . . . . . . . . . . . 7.3.1 Seeing double . . . . . . . . . . . . . . . . 7.3.2 Choosing a Numeric Type . . . . . . . . . . 7.3.3 Arithmetic with doubles and ints . . . . . 7.3.4 Why are Rational Numbers Called double? 7.4 boolean Variables . . . . . . . . . . . . . . . . . . 7.5 Summary . . . . . . . . . . . . . . . . . . . . . . .
. . . . . . . . . . . .
. . . . . . . . . . . .
. . . . . . . . . . . .
. . . . . . . . . . . .
. . . . . . . . . . . .
. . . . . . . . . . . .
. . . . . . . . . . . .
. . . . . . . . . . . .
. . . . . . . . . . . .
. . . . . . . . . . . .
. . . . . . . . . . . .
. . . . . . . . . . . .
. . . . . . . . . . . .
. . . . . . . . . . . .
. . . . . . . . . . . .
. . . . . . . . . . . .
. . . . . . . . . . . .
. . . . . . . . . . . .
169 . 169 . 173 . 177 . 179 . 182 . 185 . 186 . 187 . 189 . 191 . 192 . 196
8 String Theory 8.1 Cut and Paste . . . . . . . . . . . . 8.2 Search Options . . . . . . . . . . . . 8.3 Separate but .equals() . . . . . . . 8.4 Methods and More Methods . . . . . 8.5 Online Method Documentation . . . 8.6 What a character! . . . . . . . . . . 8.7 Summary . . . . . . . . . . . . . . . 8.7.1 Summary of String Methods
. . . . . . . .
. . . . . . . .
. . . . . . . .
. . . . . . . .
. . . . . . . .
. . . . . . . .
. . . . . . . .
. . . . . . . .
. . . . . . . .
. . . . . . . .
. . . . . . . .
. . . . . . . .
. . . . . . . .
. . . . . . . .
. . . . . . . .
. . . . . . . .
. . . . . . . .
. . . . . . . .
. . . . . . . .
. . . . . . . .
. . . . . . . .
. . . . . . . .
. . . . . . . .
. . . . . . . .
. . . . . . . .
. . . . . . . .
. . . . . . . .
197 197 201 204 208 209 214 216 217
9 Doomed to Repeat 9.1 Repetition without Loops 9.2 Worth Your While . . . . 9.3 Count to Ten . . . . . . . 9.4 Nesting Instinct . . . . . . 9.5 Line by Line . . . . . . . . 9.5.1 Sentinels . . . . . . 9.6 Accumulating Loops . . . 9.7 String Processing Loops . 9.8 Summary . . . . . . . . .
. . . . . . . . .
. . . . . . . . .
. . . . . . . . .
. . . . . . . . .
. . . . . . . . .
. . . . . . . . .
. . . . . . . . .
. . . . . . . . .
. . . . . . . . .
. . . . . . . . .
. . . . . . . . .
. . . . . . . . .
. . . . . . . . .
. . . . . . . . .
. . . . . . . . .
. . . . . . . . .
. . . . . . . . .
. . . . . . . . .
. . . . . . . . .
. . . . . . . . .
. . . . . . . . .
. . . . . . . . .
. . . . . . . . .
. . . . . . . . .
. . . . . . . . .
. . . . . . . . .
. . . . . . . . .
221 221 224 228 233 236 240 245 248 257
. . . . . . . .
259 . 260 . 268 . 271 . 275 . 275 . 278 . 279 . 284
. . . . . . . . .
. . . . . . . . .
. . . . . . . . .
. . . . . . . . .
. . . . . . . . .
. . . . . . . . .
10 Recurring Themes 10.1 Long Day’s Journey . . . . . . . . . . . . 10.2 Journeys End . . . . . . . . . . . . . . . . 10.3 Overload . . . . . . . . . . . . . . . . . . . 10.4 Recurring Methodically . . . . . . . . . . 10.4.1 Case by Case . . . . . . . . . . . . 10.4.2 Understanding Recursive Methods 10.4.3 Blow by Blow . . . . . . . . . . . . 10.4.4 Summing Up . . . . . . . . . . . . v
. . . . . . . .
. . . . . . . .
. . . . . . . .
. . . . . . . .
. . . . . . . .
. . . . . . . .
. . . . . . . .
. . . . . . . .
. . . . . . . .
. . . . . . . .
. . . . . . . .
. . . . . . . .
. . . . . . . .
. . . . . . . .
. . . . . . . .
. . . . . . . .
. . . . . . . .
. . . . . . . .
. . . . . . . .
. . . . . . . .
. . . . . . . .
. . . . . . . .
10.5 10.6 10.7 10.8 10.9
Lovely spam! Wonderful Nothing Really Matters Recursive Removal . . . Wrapping Up . . . . . . Summary . . . . . . . .
spam! . . . . . . . . . . . . . . . .
. . . . .
. . . . .
. . . . .
. . . . .
. . . . .
. . . . .
. . . . .
. . . . .
. . . . .
. . . . .
. . . . .
. . . . .
. . . . .
. . . . .
. . . . .
. . . . .
. . . . .
. . . . .
. . . . .
. . . . .
. . . . .
. . . . .
. . . . .
. . . . .
. . . . .
. . . . .
. . . . .
. . . . .
. . . . .
. . . . .
284 286 290 294 297
11 Tables of Content 11.1 A Picture is Worth 754 Words 11.2 Matrices, Vectors, and Arrays . 11.3 Array Declarations . . . . . . . 11.4 Array Constructions . . . . . . 11.5 SImages and JLabels . . . . . . 11.6 Image Files . . . . . . . . . . . 11.7 Think Negative . . . . . . . . . 11.8 for by for . . . . . . . . . . . 11.9 Moving Experiences . . . . . . 11.10Arrays of Arrays . . . . . . . . 11.11Summing Up . . . . . . . . . . 11.12Purple Cows? . . . . . . . . . . 11.13Summary . . . . . . . . . . . .
. . . . . . . . . . . . .
. . . . . . . . . . . . .
. . . . . . . . . . . . .
. . . . . . . . . . . . .
. . . . . . . . . . . . .
. . . . . . . . . . . . .
. . . . . . . . . . . . .
. . . . . . . . . . . . .
. . . . . . . . . . . . .
. . . . . . . . . . . . .
. . . . . . . . . . . . .
. . . . . . . . . . . . .
. . . . . . . . . . . . .
. . . . . . . . . . . . .
. . . . . . . . . . . . .
. . . . . . . . . . . . .
. . . . . . . . . . . . .
. . . . . . . . . . . . .
. . . . . . . . . . . . .
. . . . . . . . . . . . .
. . . . . . . . . . . . .
. . . . . . . . . . . . .
. . . . . . . . . . . . .
. . . . . . . . . . . . .
. . . . . . . . . . . . .
. . . . . . . . . . . . .
. . . . . . . . . . . . .
. . . . . . . . . . . . .
. . . . . . . . . . . . .
. . . . . . . . . . . . .
299 299 301 303 304 307 308 312 316 317 325 329 333 337
Index
338
vi
Chapter 1
What is Programming Anyway? Most of the machines that have been developed to improve our lives serve a single purpose. Just try to drive to the store in your washing machine or vacuum the living room with your car and this becomes quite clear. Your computer, by contrast, serves many functions. In the office or library, you may find it invaluable as a word processor. Once you get home, slip in a DVD and your computer takes on the role of a television. Start up a flight simulator and it assumes the properties of anything from a hang glider to a Learjet. Launch an mp3 player and you suddenly have a music system. This, of course, is just a short sample of the functions a typical personal computer can perform. Clearly, the computer is a very flexible device. While the computer’s ability to switch from one role to another is itself amazing, it is even more startling that these transformations occur without making major physical changes to the machine. Every computer system includes both hardware, the physical circuitry of which the machine is constructed, and software, the programs that determine how the machine will behave. Everything described above can be accomplished by changing the software used without changing the machine’s actual circuitry in any way. In fact, the changes that occur when you switch to a new program are often greater than those you achieve by changing a computer’s hardware. If you install more memory or a faster network card, the computer will still do pretty much the same things it did before but a bit faster (hopefully!). On the other hand, by downloading a new application program through your web browser, you can make it possible for your computer to perform completely new functions. Software clearly plays a central role in the amazing success of computer technology. Very few computer users, however, have a clear understanding of what software really is. This book provides an introduction to the design and construction of computer software in the programming language Java. By learning to program in Java, you will acquire a useful skill that will enable you to construct software of your own or participate in the implementation or maintenance of commercial software. More importantly, you will gain a clear understanding of what a program really is and how it is possible to radically change the behavior of a computer by constructing a new program. A program is a set of instructions that a computer follows. We can therefore learn a good bit about computer programs by examining the ways in which instructions written for humans resemble and differ from computer programs. In this chapter we will consider several examples of instructions for humans in order to provide you with a rudimentary understanding of the nature of a computer program. We will then build on this understanding by presenting a very simple but complete example of a computer program written in Java. Like instructions for humans, the instructions 1
that make up a computer program must be communicated to the computer in a language that it comprehends. Java is such a language. We will discuss the mechanics of actually communicating the text of a Java program to a computer so that it can follow the instructions contained in the program. Finally, you have undoubtedly already discovered that programs don’t always do what you expect them to do. When someone else’s program misbehaves, you can complain. When this happens with a program you wrote yourself, you will have to figure out how to change the instructions to eliminate the problem. To prepare you for this task, we will conclude this chapter by identifying several categories of errors that can be made when writing a program.
1.1
Without Understanding
You have certainly had the experience of following instructions of one sort or another. Electronic devices from computers to cameras come with thick manuals of instructions. Forms, whether they be tax forms or the answer sheet for an SAT exam, come with instructions explaining how they should be completed. You can undoubtedly easily think of many other examples of instructions you have had to follow. If you have had to follow instructions, it is likely that you have also complained about the quality of the instructions. The most common complaint is probably that the instructions take too long to read. This, however, may have more to do with our impatience than the quality of the instructions. A more serious complaint is that instructions are often unclear and hard to understand. It seems obvious that instructions are more likely to be followed correctly if they are easy to understand. This “obvious” fact, however, does not generalize to the types of instructions that make up computer programs. A computer is just a machine. Understanding is something humans do, but not something machines do. How can a computer understand the instructions in a computer program? The simple answer is that it cannot. As a result, the instructions that make up a computer program have to satisfy a very challenging requirement. It must be possible to follow them correctly without actually understanding them. This may seem like a preposterous idea. How can you follow instructions if you don’t understand them? Fortunately, there are a few examples of instructions for humans that are deliberately designed so that they can be followed without understanding. Examining such instructions will give you a bit of insight into how a computer must follow the instructions in a computer program. First, consider the “mathematical puzzle” described below. To appreciate this example, don’t just read the instructions. Follow them as you read them. 1. Pick a number between 1 and 40. 2. Subtract 20 from the number you picked. 3. Multiply by 3. 4. Square the result. 5. Add up the individual digits of the result. 6. If the sum of the digits is even, divide by 2. 7. If the result is less than 5 add 5, otherwise subtract 4. 2
8. Multiply by 2. 9. Subtract 6. 10. Find the letter whose position in the alphabet is equal to the number you have obtained (a=1, b=2, c=3, etc.) 11. Think of a country whose name begins with this letter. 12. Think of a large mammal whose name begins with the second letter of the country’s name. You have probably seen puzzles like this before. The whole point of such puzzles is that you are supposed to be surprised that it is possible to predict the final result produced even though you are allowed to make random choices at some points in the process. In particular, this puzzle is designed to leave you thinking about elephants. Were you thinking about an elephant when you finished? Are you surprised we could predict this? The underlying reason for such surprise is that the instructions are designed to be followed without being understood. The person following the instructions thinks that the choices they get to make in the process (choosing a number or choosing any country whose name begins with “D”), could lead to many different results. A person who understands the instructions realizes this is an illusion. To understand why almost everyone who follows the instructions above will end up thinking about elephants, you have to identify a number of properties of the operations performed. The steps that tell you to multiply by 3 and square the result ensure that after these steps the number you are working with will be a multiple of nine. When you add up the digits of any number that is a multiple of nine, the sum will also be a multiple of nine. Furthermore, the fact that your initial number was relatively small (less than 40), implies that the multiple of nine you end up with is also relatively small. In fact, the only possible values you can get when you sum the digits are 0, 9 and 18. The next three steps are designed to turn any of these three values into a 4 leading you to the letter “D”. The last step is the only point in these instructions where something could go wrong. The person following them actually has a choice at this point. There are several countries whose names begin with “D” including Denmark, Djibouti, Dominica and the Dominican Republic. Luckily, for most readers of this text, Denmark is more likely to come to mind than any of the other countries (even though the Dominican Republic is actually larger in both land mass and population). This example should make it clear that it is possible to follow instructions without understanding how they work. It is equally clear that it is not possible to write instructions like those above without understanding how they work. This contrast provides an important insight into the relationship between a computer, a computer program and the author of the program. A computer follows the instructions in a program the way you followed the instructions above. It can comprehend and complete each step individually but has no understanding of the overall purpose of the program, the relationships between the steps, or the ways in which these relationships ensure that the program will accomplish its overall purpose. The author of a program, on the other hand, must understand its overall purpose and ensure that the steps specified will accomplish this purpose. Instructions like this are important enough to deserve a name. We call a set of instructions designed to accomplish some specific purpose even when followed by a human or computer that has no understanding of their purpose an algorithm. 3
There are situations where specifying an algorithm that accomplishes some purpose can actually be useful rather than merely amusing. To illustrate this, consider the standard procedure called long division. A sample of the application of the long division procedure to compute the quotient 13042144/32 is shown below: 407567 32 )13042144 128 242 224 181 160 214 192 224 224 0 Although you may be rusty at it by now, you were taught the algorithm for long division sometime in elementary school. The person teaching you might have tried to help you understand why the procedure works, but ultimately you were probably simply taught to perform the process by rote. After doing enough practice problems, most people reach a point where they can perform long division but can’t even precisely describe the rules they are following, let alone explain why they work. Again, this process was designed so that a human can perform the steps without understanding exactly why they work. Here, the motivation is not to surprise anyone. The value of the division algorithm is that it enables people to perform division without having to devote their mental energies to thinking about why the process works. Finally, to demonstrate that algorithms don’t always have to involve arithmetic, let’s consider another example where the motivation for designing the instructions is to provide a pleasant surprise. Well before you learned the long division algorithm, you were probably occasionally entertained by the process of completing a connect-the-dots drawing like the one shown in Figure 1.1. Go ahead! It’s your book. Connect the dots and complete the picture. A connect-the-dots drawing is basically a set of instructions that enable you to draw a picture without understanding what it is you are actually drawing. Just as it wasn’t clear that the arithmetic you were told to perform in our first example would lead you to think of elephants, it is not obvious looking at Figure 1.1 that you are looking at instructions for drawing an elephant. Nevertheless, by following the instructions “Connect the dots” you will do just that (even if you never saw an elephant before). This example illustrates a truth of which all potential programmers should be aware. It is harder to devise an algorithm to accomplish a given goal than it is to simply accomplish the goal. The goal of the connect-the-dots puzzle shown in Figure 1.1 is to draw an elephant. In order to construct this puzzle, you first have to learn to draw an elephant without the help of the dots. Only after you have figured out how to draw an elephant in the first place will you be able to figure out where to place the dots and how to number them. Worse yet, figuring out how to place and number the dots so the desired picture can be drawn without ever having to lift your pencil from the paper can be tricky. If all you really wanted in the first place was a picture of an elephant, it 4
c Figure 1.1: Connect dots 1 through 82 (�2000 Monkeying Around) 5
would be easier to draw one yourself. Similarly, if you have a division problem to solve (and you don’t have a calculator handy) it is easier to do the division yourself than to try to teach the long division algorithm to someone who doesn’t already know it so that they can solve the problem for you. As you learn to program, you will see this pattern repeated frequently. Learning to convert your own knowledge of how to perform a task into a set of instructions so precise that they can be followed by a computer can be quite challenging. Developing this ability, however, is the key to learning how to program. Fortunately, you will find that as you acquire the ability to turn an informal understanding of how to solve a class of problems into a precise algorithm, you will be developing mental skills you will find valuable in many other areas.
1.2
The Java Programming Language
An algorithm starts as an idea in one person’s mind. To become effective, it must be communicated to other people or to a computer. Communicating an algorithm requires the use of a language. A program is just an algorithm expressed in a language that a computer can comprehend. The choice of the language in which an algorithm is expressed is important. The numeric calculation puzzle that led you to think of Danish elephants was expressed in English. If our instructions had been written in Danish, most readers of this text would not understand them. The use of language in a connect-the-dots puzzle may not be quite as obvious. Note, however, that we could easily replace the numbers shown with numbers expressed using the roman numerals I, II, III, IV, ... LXXXII. Most of you probably understand Roman numerals, so you would still be able to complete the puzzle. You would probably have difficulty, however, if we switched to something more ancient like the numeric system used by the Babylonians or to something more modern like the binary system that most computers use internally, in which the first few dots would be labeled 1, 10, 11, 100, 101, and 110. The use of language in the connect-the-dots example is interesting from our point of view because the language used is quite simple. Human languages like English and Japanese are very complex. It would be very difficult to build a computer that could understand a complete human language. Instead, computers can only interpret instructions written in simpler languages designed specifically for computers. Computer languages are much more expressive than a system for writing numbers like the Roman numerals, but much simpler in structure than human languages. One consequence of the relative simplicity of computer languages is that it is possible to write a program to translate instructions written in one computer language into another computer language. These programs are called compilers. The internal circuitry of a computer usually can only interpret commands written in a single language. The existence of compilers, however, makes it possible to write programs for a single machine using many different languages. Suppose that you have to work with a computer that can understand instructions written in language A but you want to write a program for the machine in language B. All you have to do is find (or write) a program written in language A that can translate instructions written in language B into equivalent instructions in language A. This program would be called a compiler for B. You can then write your programs in language B and use the compiler for B to translate the programs you write into language A so the computer can comprehend the instructions. Each computer language has its own advantages and disadvantages. Some are simpler than others. This makes it easier to construct compilers that process programs written in these languages. 6
At the same time, a language that is simple can limit the ways you can express yourself, making it more difficult to describe an algorithm. Think again about the process of constructing the elephant connect-the-dot puzzle. It is easier to draw an elephant if you let yourself use curved lines than if you restrict yourself to straight lines. To describe an elephant in the language of connect-the-dot puzzles, however, you have to find a way to use only straight lines. On the other hand, a language that is too complex can be difficult to learn and use. In this text, we will teach you how to use a language named Java to write programs. Java provides some sophisticated features that support an approach to programming called object-oriented programming that we emphasize in our presentation. While it is not a simple language, it is one of the simpler languages that support object-oriented programming. Java is a relatively young computer language. It was designed in the early 90’s by a group at Sun Microsystems. Despite its youth, Java is widely used. Compilers for Java are readily available for almost all computer systems. We will talk more about Java compilers and how you will use them once we have explained enough about Java itself to let you write simple programs. Our approach to programming includes an emphasis on what is known as event-driven programming. In this approach, programs are designed to react to events generated by the user or system. The programs that you are used to using on computers use the event-driven approach. You do something – press a button, select an item from a menu, etc. – and the computer reacts to the “event” generated by that action. In the early days of computing, programs were started with a collection of data all provided at once and then run to completion. Many text books still teach that approach to programming. In this text we take the more intuitive event-driven approach to programming. Java is one of the first languages to make this easy to do as a standard part of the language.
1.3
Your First Sip of Java
The task of learning any new language can be broken down into at least two parts: studying the language’s rules of grammar and learning its vocabulary. This is true whether the language is a foreign language, such as French or Japanese, or a computer programming language, such as Java. In the case of a programming language, the vocabulary you must learn consists primarily of verbs that can be used to command the computer to do things like “show the number 47.2 on the screen” or “send the next email message to the server.” The grammatical structures of a computer language enable you to form phrases that instruct the computer to perform several primitive commands in sequence or to choose among several primitive commands based on a user’s input. When learning a new human language, one undertakes the tasks of learning vocabulary and grammar simultaneously. One must know at least a little vocabulary before one can understand examples of grammatical structure. On the other hand, developing an extensive vocabulary without any knowledge of the grammar used to combine words would just be silly. The same applies to learning a programming language. Accordingly, we will begin your introduction to Java by presenting a few sample programs that illustrate fundamentals of the grammatical structure of Java programs, using only enough vocabulary to enable us to produce somewhat interesting examples.
1.3.1
Simple Responsive Programs
The typical program run on a personal computer reacts to a large collection of actions the user can perform using the mouse and keyboard. Selecting menu items, typing in file names, pressing 7
Figure 1.2: Window displayed by a very simple program buttons, and dragging items across the screen all produce appropriate reactions from such programs. The details of how a computer responds to a particular user action are determined by the instructions that make up the program running on the computer. The examples presented in this section are intended to illustrate how this is done in a Java program. To start things off simply, we will restrict our attention to programs that involve only one form of user input mechanism: buttons. The programs we consider in this section will only specify how the computer should respond when the user clicks on a button in the program’s window. As a very simple first example, consider the structure of a program which simply displays some text on the screen each time a button is clicked. When this program is started, all that will appear in its window is a single button as shown in Figure 1.2. The window remains this way until the user positions the mouse cursor within the button and presses the mouse button. Once this happens, the program displays the phrase I’m Touched in the window as shown in Figure 1.3. If the user clicks the mouse again, the program displays a second copy of the phrase “I’m Touched” in the window. Eventually, if the user clicks often enough, the whole window will be filled with copies of this phrase. That is all it does! Not exactly Microsoft Word, but it is sufficient to illustrate the basic structure of many of the programs we will discuss. The text of such a Java program is shown in Figure 1.4. A brief examination of the text of the program reveals features that are certainly consistent with our description of this program’s behavior. There is the line contentPane.add( new JLabel( "I’m Touched" ) ); which includes the word “add” and the message to be displayed. This line comes shortly after a line containing the words “button clicked” (all forced together to form the single word buttonClicked) 8
Figure 1.3: Window displayed by a very simple program
import squint.*; import javax.swing.*; public class TouchyButton extends GUIManager { private final int WINDOW_WIDTH = 150; private final int WINDOW_HEIGHT = 300; public TouchyButton() { this.createWindow( WINDOW_WIDTH, WINDOW_HEIGHT ); contentPane.add( new JButton( "Click Here" ) ); } public void buttonClicked() { contentPane.add( new JLabel( "I’m Touched" ) ); } } Figure 1.4: Our first Java program
9
which suggest when the new message will appear. Similarly, a few lines earlier, a line containing the word createWindow is followed by a line containing the words new JButton. These two lines, describe actions that should happen when the program initially begins to run. These suggestive tidbits are unfortunately obscured by a considerable amount of text that is probably indecipherable to the novice. Our goal is to guide you through the details of this program in a way that will enable you to understand its basic structure.
1.3.2
“Class” and other Magic Words
Our brief example program contains many words that have special meaning to Java. Unfortunately, it is relatively hard to give a precise explanation of many of the terms used in Java to someone who is just beginning to program. For example, to fully appreciate the roles of the terms import, public and extends one needs to appreciate the issues that arise when constructing programs that are orders of magnitude larger than we will discuss in the early chapters of this text. We will attempt here to give you some intuition regarding the purpose of these words. However, you may not be able to understand them completely until you learn more about Java. Until then, we can assure you that you will do fine if you are willing to regard just a few of these words and phrases as magical incantations that must be recited appropriately at certain points in your program. For example, the first two lines of nearly every program you read or write while studying this book will be identical to the first two lines in this example: import squint.*; import javax.swing.*; In fact, these two lines are so standard that we won’t even show them in the examples beyond the first two chapters of this text. The Head of the Class Most of your programs will also contain a line very similar to the third line shown in our example: public class TouchyButton extends GUIManager {
This line is called a class header. The programs you write will all contain a line that looks just like this except that you will replace the word TouchyButton with a word of your own choosing. TouchyButton is just the name we have chosen to give to our program. It is appropriate to give a program a name that reflects its behavior. This line is called a class header because it informs the computer that the text that follows describes a new class. Why does Java call the specification that describes a program a “class”? Java uses the word class to refer to: “A set, collection, group, or configuration containing members regarded as having certain attributes or traits in common.” (From the American Heritage Dictionary) If several people were to run the program shown above at the same time but on different computers, each would have an independent copy of the program described by this class. If one person clicked on the button, the message “I’m Touched” would only appear on that person’s computer. The other computers running the same program would be unaffected. Thus, the running copies of the program are independent but they form a collection very similar objects. Java refers to such a collection of objects as a class. 10
Using Software Libraries The class header of TouchyButton indicates that it extends something called GUIManager. This means that our program depends on previously written Java instructions. Programs are rarely built from scratch. The physical circuits of which a computer is constructed are only capable of performing very simple operations like changing the color of a single dot on the screen. If every program was built from scratch, every program would have to explicitly describe every one of the primitive operations required to accomplish its purpose. Instead, libraries have been written containing collections of instructions describing useful common operations like drawing a button on the screen. Programs can then be constructed using the operations described by the library in addition to the operations that can be performed by the basic hardware. This notion of using collections of previously written Java instructions to simplify the construction of new programs explains the mysterious phrases found in the first two lines of our program. Lines that start with the words import inform Java which libraries of previously written instructions our program uses. In our example, we list two libraries, javax.swing and squint. The library named javax.swing is a collection of instructions describing common operations for building programs that use interface mechanisms like buttons and menus. The prefix “javax” reveals that this library is a standard component of the Java language environment used by many Java programs. The second library mentioned in our import specifications is Squint. This is a library designed just for this text to make the Java language more appropriate as an environment for teaching programming. Recall that the class header of our example program mentions that TouchyButton extends GUIManager. GUIManager refers to a collection of Java instructions that form part of this Squint library. A GUIManager is an object that coordinates user and program activities that involve Graphical User Interface (GUI) components like buttons, menus, and scrollbars. If a program was nothing but a GUIManager, then all that would happen when it was run would be that a window would appear on the screen. Nothing would ever appear within the window. Our GUIManager class specification extends the functionality of the GUIManager by telling it exactly what GUI components to display (a button and “labels” that display the message “I’m Touched”) and when they should be displayed. Getting Braces The single open brace (“{”) that appears at the end of the class header for TouchyButton introduces an important and widely used feature in Java’s grammatical structure. Placing a pair consisting of an open and closing brace around a portion of the text of a program is Java’s way of letting the programmer indicate that the enclosed text describes a single, logical unit. If you scan quickly over the complete example, you will see that braces are used in this way in several parts of this program even though it is quite short. The open brace after the class header public class TouchyButton... is matched by the closing brace on the last line of the program. This indicates that everything between these two braces (i.e., everything left in the example) should be considered part of the description of the class named TouchyButton. The text between these braces is called the body of the class. 11
Within the body of this class, there are two other examples of structures composed of a header line followed by a body that is enclosed in curly braces. The first begins with the header line public TouchyButton() { and the second begins with the header public void buttonClicked() { Like the class header, both of these lines start with the word public. Unlike the class header, these lines don’t include the word class or the phrase extends GUIManager. Finally, both of these headers end with a name followed by a pair of empty parentheses. The names included before the parentheses reveal that these lines are the headers of similar but distinct grammatical structures in Java. The first is the header of a structure called a constructor. It specifies the actions to be performed when this program is first started. We can tell this because the name included in this header is the same as the name of the class we are defining, TouchyButton. The second is the header of a construct called a method definition. We discuss these two constructs in the following sections.
1.3.3
Under Construction
In order to appreciate the role of a constructor, one has to appreciate Java’s notion that a class doesn’t describe a single object, but instead describes a whole collection of similar objects. Given a blueprint for a house, you can build multiple copies of the house. Similarly, given a class definition, you “build” a new copy of the program defined each time you run the program. Just as you have to build a house to live in it, you must construct a copy or instance of a class definition before you can interact with it. This is what happens when you actually run a program described by a class definition. The role of the constructor within a class definition is to specify the details of the steps that should be performed to construct an instance of a class definition. With this background, let us take a close look at the constructor included in the definition of the TouchyButton class: public Touchybutton() { this.createWindow( WINDOW_WIDTH, WINDOW_HEIGHT ); contentPane.add( new JButton( "Click Here" ) ); } The header of this constructor is quite simple. The key elements are the word public, the name of the class in which the constructor appears, and a set of empty parentheses. Eventually, we will learn that it is possible to provide additional information between the parentheses, but for at least a few chapters, all of our constructor headers will take this simple form. The interesting part of the constructor is its body. The body of a constructor contains a list of instructions telling the computer what operations to perform when it is told to create a new instance of the object described by its class definition. In our constructor for the TouchyWindow class we include the two instructions: this.createWindow( WINDOW_WIDTH, WINDOW_HEIGHT ); contentPane.add( new JButton( "Click Here" ) ); 12
These two instructions tell the computer that when this program begins to execute it should create a new window on the screen for this program’s use and then display a button in that window. Both of the instructions included in this constructor use a notation we will be seeing quite frequently. Both instructions have the general form name.action( ... ); This form of instruction is used to tell some component of the program, identified by the name that appears before the period, to perform the action described after the period. It is called a method invocation. In the first method invocation the name is this and the action is createWindow. The name this refers to the program itself. It may seem odd, but in this command, the program is telling itself to create a new window. In the second instruction, the name is contentPane and the action is add The name contentPane refers to the interior of the program window — the part that holds the window’s contents. This second command tells the content pane that it should add a new button to the items it displays. In each of the method invocations used in this constructor, extra information that is needed to specify how to perform the desired action is provided between the parentheses that appear after the action name. These extra pieces of information are called the arguments or actual parameters of the method invocation. For example, in the first line of the constructor the arguments included determine the size of the window we are instructing the program to create. Obviously, by changing the contents of these instructions, we can change the way in which this program behaves. For example, if we replaced the second instruction in the constructor’s body with the line: contentPane.add( new JButton( "Click Me" ) ); the button displayed in the window would contain the words “Click Me” instead of “Click Here”. Accordingly, you cannot simply view the instructions placed within a constructor as magical incantations. Instead, you must carefully consider each component so that you understand its purpose.
1.3.4
Discourse on the Method
The last few lines in the body of the class TouchyButton look like: public void buttonClicked() { contentPane.add( new JLabel( "I’m Touched" ) ); } This text is an example of another important grammatical form in Java, the method definition. A method is a named sequence of program instructions. A method definition consists of a method header, which includes the name to be associated with the instructions, followed by a method body (which is bracketed by braces just like the body of the constructor). In this case, the method being defined is named buttonClicked, and its body contains the single instruction: contentPane.add( new JLabel( "I’m Touched" ) ); In the method header, the method’s name is preceded by the words public void and followed by an empty pair of parentheses. Unfortunately, for now, you must just trust that these words and parentheses are necessary. They will appear in all of the methods we examine in this chapter. On 13
the other hand, a programmer is free to choose any appropriate name for a method. The method name can then be used in other parts of the program to cause the computer to obey the instructions within the method’s body. Within a class that extends GUIManager, certain method names have special significance. In particular, if such a class contains a method which is named buttonClicked then the instructions in that method’s body will be followed by the computer whenever any button displayed in the program’s window is pressed using the mouse. That is why this particular program reacts to a button click as it does. The single line that forms the body of our buttonClicked method: contentPane.add( new JLabel( "I’m Touched" ) ); is another example of a method invocation. It specifies that a new “label” displaying the phrase I’m Touched should be added to the contentPane associated with the program. In addition to buttonClicked, other special method names (menuItemSelected, for example) can be used to specify how to react to other actions the user may perform when interacting with a program. All such methods are called event-handling methods. We will provide a complete list of such methods later.
1.3.5
The Name Game
The constructor definition in this program is preceded by the lines private final int WINDOW_WIDTH = 150; private final int WINDOW_HEIGHT = 300; These two lines are not instructions that the computer will follow when it needs to react to some event. They are definitions that tell the computer what meanings should be associated with the names WINDOW WIDTH and WINDOW HEIGHT throughout this program’s execution. We could have written this program without defining these names. If we replaced the first line in the constructor with the line this.createWindow( 150, 300 ); we could remove the two definitions that precede the constructor and the program would still behave in the same way. We used the names WINDOW WIDTH and WINDOW HEIGHT for two reasons. First, their use illustrates good programming style. When writing a program it is not only important to give the computer the correct instructions, it is also important to write the instructions in a way that will make it as easy as possible for someone else to read and understand them. Even as a beginner, it is pretty easy to guess that the command this.createWindow( WINDOW_WIDTH, WINDOW_HEIGHT ); has something to do with setting the program’s window size. This isn’t as obvious with the command this.createWindow( 150, 300 ); 14
As one learns to write large, complicated programs, taking care to write them in a style that will be as easy to understand as possible becomes very important. Our other reason for using these names is just to give you a hint about how important names are in computer programs. We have already seen that names like this and contentPane are used to refer to elements of your program. The meanings associated with these names are built into Java and the libraries we are using. Names like WINDOW WIDTH and WINDOW HEIGHT are interesting because they show that it is also possible for you as a programmer to associate meanings with names. This important ability is the main topic of the next chapter.
1.4
Programming Tools
Writing a program isn’t enough. You also have to get the program into your computer and convince your computer to follow the instructions it contains. A computer program like the one shown in the preceding section is just a fragment of text. You already know ways to get other forms of textual information into a computer. You use a word processor to write papers. When entering the body of an email message you use an email application like Eudora or Outlook. Just as there are computer applications designed to allow you to enter these forms of text, there are applications designed to enable you to enter the text of a program. Entering the text of your program is only the first step. As explained earlier, unless you write your program in the language that the machine’s circuits were designed to interpret, you need to use a compiler to translate your instructions into a language the machine can comprehend. Finally, after this translation is complete you still need to somehow tell the computer to treat the file(s) created by the translation process as instructions and to follow them. Typically, the support needed to accomplish all three of these steps is incorporated into a single application called an integrated development environment or IDE. It is also possible to provide separate applications to support each step. Which approach you use will likely depend on the facilities available to you and the inclination of the instructor teaching you to program. There are too many possibilities for us to attempt to cover them all in this text. To provide you with a sense of what to expect, however, we will sketch how two common integrated development environments, BlueJ and Eclipse, could be used to enter and run the TouchyButton program. These sketches are not intended to provide you with the detailed knowledge required to actually use either of these IDEs effectively. We will merely outline the main steps that are involved. The IDEs we will describe share several important properties: • Implementations of both IDEs are available for a wide range of computer systems including Windows systems, MacOS, and Unix and its variants. • Both IDEs are available for free and can be downloaded from the web.
They also differ in major ways. BlueJ was designed by computer science faculty members with the primary goal of providing a Java development system for use when teaching students to program. Eclipse was developed to meet the needs of professional programmers. Just as it is helpful to divide a book into chapters, it is helpful to divide large programs into separate text files describing individual components of the program. Within a Java IDE, the collection of text files that constitute a program is called a project. In fact, most Java IDEs expect all programs, even programs that are quite small, to be organized as projects. As a result, even 15
Figure 1.5: An Eclipse project window though our TouchyButton program is only 13 lines long and will definitely only require one text file, the first step performed to enter and run this program using either Eclipse or BlueJ will be to use an entry in the application’s “File” menu to create a new project. The IDE will then display a number of dialog boxes asking for information about the project we wish to create. Among other things, we will be asked to specify a name for the project and to select a location in our computer’s file system to store the file(s) that will hold the text of our program. Once a project has been created, the IDE will display a window representing the state of the project. The window Eclipse would present is shown in Figure 1.5 and the window BlueJ would present is shown in Figure 1.6. The next step is to tell the IDE that we wish to create a new file and enter the text of our program. With BlueJ, we do this by pressing the “New Class...” button seen in the upper left of the window shown in Figure 1.6. With Eclipse, we select a “New Class” menu item. In either case, the IDE will then ask us to enter information about the class, including its name, in a dialog box. Then the IDE will present us with a window in which we can type the text of our program much as we would type within a word processor. Such program text is often called code. In Figures 1.7 and 1.8 we show how the windows provided by Eclipse and BlueJ would look after we ask the IDE to create a new class and enter the code for the class. Eclipse incorporates the text entry window as a subwindow of the project window. BlueJ displays a separate text window. In both the BlueJ project window and the BlueJ window holding the text of the TouchyButton class there is a button labeled “Compile”. Pressing this button instructs BlueJ that we have completed entering our code and would like to have it translated into a form the machine can more easily interpret. Under most Java IDEs, compiling a class definition will produce a file storing a translation of the definition into a language called Java virtual machine code or byte code. After 16
Figure 1.6: A BlueJ project window
Figure 1.7: Entering the text of TouchyButton under Eclipse
17
Figure 1.8: Entering the text of TouchyButton under BlueJ this is done, we can ask Java to run the program by depressing the mouse on the icon that represents the TouchyButton class within the BlueJ project window and selecting the “new TouchyButton” item from the pop-up menu that appears. BlueJ will then display a new window controlled by the instructions included in our program. When the mouse is clicked on the button in this window, the words “I’m touched” will appear as shown in Figure 1.9. With Eclipse, compiling a program and running it can be combined into a single step. We first create what Eclipse calls a run configuration. This involves specifying things like the size of the window created when the program starts running. We will not discuss the details of this process here. Once we have created a run configuration, we can compile and run our program by pressing an icon displayed at the top of the Eclipse window. Like BlueJ, Eclipse then displays a new window in which we can interact with our program. In this discussion of how to enter and run a program we have overlooked one important fact. It is quite likely that you will make a mistake at some point in the process, leaving the IDE confused about how to proceed. As a result, in order to work effectively with an IDE you need some sense of what kinds of errors you are most likely to make and how the IDE will react to them. We will return to this issue after we teach you a bit more about how to actually write Java programs.
1.5
Graphical User Interface Components
Most current computer programs interact with their users through mechanisms like buttons, menus, and scroll bars. These mechanisms are called Graphical User Interface Components, or GUI com18
Figure 1.9: Running a program under BlueJ ponents for short. The Java program we have considered thus far has involved one obvious example of a GUI component, a button. In fact, this program uses two forms of GUI components. The phrase displayed by the program, “I’m touched”, is clearly part of the means through which the program interacts with its users. As such, even though clicking on this phrase doesn’t have any effect, it is still part of the program’s graphical user interface. Such phrases are called labels. In this section we will discuss the use of buttons and labels in more detail and we will introduce several additional types of GUI components that we will use in the Java programs we write. In particular, we will show you how to include fields where users can type text into your programs and how to create simple menus. Your knowledge of Java is still so limited at this point that we won’t be able to do much with these GUI components. For example, although you will learn how to add a text field to a program’s interface, you won’t have any way to determine what the user has typed into that field. Introducing these components now, however, will enable us to explore several aspects of how GUI components are used in programs. In particular, we will learn more about how a program can be written to respond when users modify the settings of GUI components and we will learn a little about how to control how the GUI components that make up a program’s interface are arranged relative to one another in the program’s window.
1.5.1
Constructing GUI Components
Let’s begin by taking a closer look at some of the details of the TouchyButton program shown in Figure 1.4. If you examine the line in the constructor of TouchyButton that instructs the computer 19
Figure 1.10: An interface for entering postal addresses to display a button: contentPane.add( new JButton( "Click Here" ) ); you should notice that it is very similar to the line from the buttonClicked method that tells the computer to display the phrase “I’m Touched”: contentPane.add( new JLabel( "I’m Touched" ) ); Both lines are invocations instructing the contentPane to add additional components to the display. In addition, the phrases used to describe the arguments to these two method invocations have very similar structures. Both phrases have the form new TypeOfObject( . . . ) In Java, a phrase of this form is called a construction. Each construction tells the computer to create a new object of the kind described by the “TypeOfObject” specified. We can use constructions like these to create all kinds of GUI components, and, as we will see later, many other objects within our programs. The actual details of how GUI components should behave in a Java program are described as part of the Swing library that is imported for use by this program. The designers of Swing decided to name the class of objects that implement buttons JButton and to name pieces of text displayed alone on the screen JLabels Therefore, we have to include these names to describe the types of objects we would like created by the two constructions in the TouchyButton program. As in a method invocation, extra information required to construct the desired object can be provided in the parentheses after the specification of the type of the object to be constructed. Again, such pieces of information are called arguments or actual parameters. When creating a JButton, we provide the words we would like displayed in the button as an actual parameter. These words must be enclosed in quotes as shown. Once you understand the basic form of a construction, it is easy to learn how to construct GUI components of other types. All you need to know is the name assigned by Swing to the type of component you want to create and the actual parameters to use to specify the details of the components. This information is provided in the documentation for the Swing libraries that is available online. For example, suppose you were working on a program in which the user needed to enter a postal address and you therefore wanted to provide components in your program’s interface like those shown in Figure 1.10. First, you should recognize that there are only two types of GUI components used in this interface. The phrases “Street Addr:”, “City:”, “State:”, and “Zip:” are 20
public AddressWindow() { this.createWindow( WINDOW_WIDTH, WINDOW_HEIGHT ); contentPane.add( new JLabel( "Street Addr:" ) ); contentPane.add( new JTextField( 29 ) ); contentPane.add( new JLabel( "City:" ) ); contentPane.add( new JTextField( 18 ) ); contentPane.add( new JLabel( "State:" ) ); contentPane.add( new JTextField( 2 ) ); contentPane.add( new JLabel( "Zip:" ) ); contentPane.add( new JTextField( 5 ) ); } Figure 1.11: Code to construct the interface shown in Figure 1.10 just examples of JLabels. The fields where the user would type the required information are examples of what Swing calls JTextFields. Given that you know that the fields are called JTextFields, you now know that the constructions that instruct the computer to create them will all take the form new JTextField( . . . ) All we have to figure out is what, if any, actual parameters should take the place of the “ . . . ”s. If you look at Figure 1.10 again, you can see that the only difference between one of the JTextFields used in this example and another is how large each field is. The actual parameter in the construction is used to control the size of a JTextField in a fairly simple way. Each time you create a JTextField, you specify the number of characters you expect the user to type as an argument in the construction. For example, the construction for the zip code field would look like new JTextField( 5 ) while the state field would be created by the construction new JTextField( 2 ) This is all you need to understand the code used to construct the desired components shown in Figure 1.11. There are other options available to you when you want to create a JTextField. Sometimes it is useful to be able to place some text in a JTextField when it is first created. Suppose that you first used a window like that shown in Figure 1.10 to have a user enter a home address and then wanted to display a similar window in which they could enter a work address. You might want the JTextField for the state information to appear already filled in with the state that was entered for the home address in the hope of saving the user a bit of time in the common case that they lived and worked in the same state. In a situation like this, you can provide two arguments in the 21
JTextField constructor. For example, you could create a JTextField that would initially contain the abbreviation for California by using the construction new JTextField( "CA", 2 ); The user of the program could still change the contents of the JTextField when the window appeared if California was not the correct state for the work address. We mention this to highlight a few important facts about constructions. First, while all of our preceding examples of constructions involved a single actual parameter, there are also examples of constructions that involve two or more parameters. There are also occasions when you will write constructions that involve no parameters. For example, the construction new JButton() would create an unlabeled button. Note that even if there are no arguments included in a construction, the parentheses are still required. This is also true for method invocations. Second, we wanted you to see that in some cases Java provides you with several options to choose from when you want to construct a new object. Depending on the requirements of your program you will find some situations where you want JTextFields that are initially empty and others where you want to fill them in. It is nice to have the option to do it either way. Finally, we don’t want you to think Java is more flexible than it really is. Having learned that you can write new JTextField( "CA", 2 ); to create a JTextField, it might be tempting to assume that writing new JTextField( 2, "CA"); would have the same effect. This is not the case at all. If you included the second construction in a program, Java would reject the program as erroneous. Java is very particular about the order in which actual parameter values are included in constructions and method invocations. You have to make sure you place the parameters in the required order whenever you write a construction involving multiple actual parameters. We will tell you the correct parameter order for each method we introduce. Later, we will explain how to access the online documentation for the Swing library, which provides this information for all methods provided in the library. There is one other GUI component we will find useful in many of our programming examples. In Swing, this component is called a JComboBox although it is more common to call it a menu or pop-up menu. Figure 1.12 includes two examples of JComboBoxes showing how they might look when they are idle and in use. Obviously, the construction for one of these menus will look something like new JComboBox( . . . ) The tricky part is specifying the argument for the construction. The argument can be used to specify what items should be included in the menu. Typically, we want several items in the menu, but Java expects us to provide this list of items wrapped up together as a single object. To do this, we have to use a special form of construction that packages up several pieces of text as a single entity. For example, to create the yes-no-maybe menus shown in Figure 1.12 we used constructions of the form 22
Figure 1.12: Examples of Java pop-up menus new JComboBox( new String[] { "Yes", "No", "Maybe so" } ) The first new in this phrase tells the computer we want it to construct a new JComboBox. The second new tells it we want it to package up the list of words “Yes”, “No”, and “Maybe so” as a single object so that this object can be used as the argument that specifies the items that will be included in the menu. You may be wondering why the square brackets (“[]”) are included in this construction. Unfortunately, we won’t be able to give a satisfying explanation of the interpretation of this notation for a while. You will just have to accept it as another magic incantation until then. Fortunately, it is easy to imitate this example without fully understanding the notation. As an example, the construction new JComboBox( new String[] { "AM", "PM" } ) could be used to create an AM/PM menu that might be helpful when entering the time of day.
1.5.2
Additional GUI Event-handling Methods
In the TouchyButton program, we defined a method with a special name, buttonClicked, as a way of telling the computer how we wanted our program to react when a user clicked on the button in our program. There are similar event-handling methods that can be defined to associate actions with other GUI components. In particular, instructions placed in a method named textEntered will be executed whenever a user presses the return or enter key while typing text in a JTextField, and instructions placed in a method named menuItemSelected will be executed when a user selects an item from a JComboBox menu. As we mentioned above, at this point, you don’t know enough about Java to actually use the information a user types into a JTextField or to find out which item has been selected from a JComboBox. This makes it a bit hard to construct a realistic example to illustrate the use of these additional event-handling methods. We can, however, show you a somewhat silly example program to make things a bit more concrete. The program we have in mind will display menus like those shown in Figure 1.12. Whenever a person using this program selects an item from either of the menus shown, the program will encourage the user by enthusiastically displaying the message “What a good choice!” as shown in Figure 1.13. Just as our TouchyButton program would fill the window with copies of the message “I’m Touched” if its button was pressed several times, this program will display multiple copies of its message if the user selects menu items repeatedly. Note that at this point, when the menuItemSelected method is executed, not only doesn’t it know which menu item was selected, it can’t even tell whether the item was selected from the menu on the left or the menu on the right. This is an issue we will address in the next chapter. The complete code for the program is shown in Figure 1.14. 23
Figure 1.13: Reacting to JComboBox events
import squint.*; import javax.swing.*; public class TwoComboBoxes extends GUIManager { private final int WINDOW_WIDTH = 300; private final int WINDOW_HEIGHT = 200; public TwoComboBoxes() { this.createWindow( WINDOW_WIDTH, WINDOW_HEIGHT ); contentPane.add( new JComboBox( new String[] {"Yes", "No", "Maybe so" } ) ); contentPane.add( new JComboBox( new String[] {"Yes", "No", "Maybe so" } ) ); }
}
public void menuItemSelected() { contentPane.add( new JLabel( "What a good choice!" ) ); }
Figure 1.14: Handling JComboBox selection events
24
The code shown in Figure 1.14 illustrates one simple but useful fact about the process of entering your Java code. You don’t have to type each command you write on a single line. Note that in typing in the command contentPane.add( new JComboBox( new String[] {"Yes", "No", "Maybe so" } ) ); we split it up over three lines so that the construction of the JComboBox would stand out on a line by itself. Java allows you to start a new line anywhere other than in the middle of a word or in the middle of a text surrounded by quotes. That is, while the example above is fine, Java would not be happy if you typed contentPane.add( new JCombo Box( new String[] {"Yes", "No", "Maybe so" } ) ); because the word JComboBox has been split into two words. Java would also complain if you entered the code contentPane.add( new JComboBox( new String[] {"Yes", "No", "Maybe so" } ) ); because the quoted text "Maybe so" has been split over two lines. Basically, outside of quoted text, wherever you can type a single space in a Java program, you can type as many spaces, tabs, and/or new lines as you like. You can (and should!) use this feature to ensure that your code is formatted in a way that will make it as easy to read and understand as possible.
1.5.3
GUI Component Layout
When a program’s interface involves a complex collection of buttons, menus, and other GUI components, the physical layout of these components on the screen can become an important concern. You may have noticed, however, that in all the example code we have shown you there have never been any instructions to the computer that explicitly say anything about how to arrange the components on the screen. The truth is that we are cheating a bit. Java provides extensive mechanisms to enable a programmer to tell it how the components of a program’s interface should be arranged. Unfortunately, learning how to use these mechanisms takes time, and there are many other things that are more important to learn as a beginning programmer. Accordingly, in our examples we have been using a very simple (but limited) approach to the layout of our GUI interfaces that we will expect you to use in many of your programs as well. In the Java mechanisms for GUI layout, an object called a layout managers is associated with the content pane in which GUI components are displayed. The program can control the positioning of components by giving instructions to the layout manager. By default, a very simple layout manager is associated with the content pane of every program that is written by extending GUIManager. This layout manager is called a FlowLayout. With this layout manager, there are really only two factors that determine the arrangement of components in a program’s window — the order in which the components are added to the window and the size of the window. 25
Figure 1.15: A component layout illustrating FlowLayout centering
Figure 1.16: A component layout where FlowLayout falls short The operation of a FlowLayout manager can be understood by thinking about how a word processor places words on a page as you type. Basically, as you type words into a word processor, it places as many words as it can on the first line. Then, when it reaches the point that it can’t fit your next word on the first line, it starts a second line of words. Again, it keeps putting the words you enter on this second line until the line fills up, then it starts a third line and so on. A FlowLayout manager does the same thing with GUI components. It puts as many GUI components as it can fit on the first line of your screen, then it fills up a second line, and so on until you stop adding components. Take a quick look at the layout of the components shown in Figure 1.10. You can see that it was only possible to fit two components, the JLabel “Street Addr:” and one JTextField, on the first line. The remaining six components all fit on the second line. Importantly, notice that all eight components appear in the order in which they were added to the content pane. The big difference between the way a FlowLayout positions components and a word processor positions words is that once a line is filled, the FlowLayout will center all the components on that line within the window rather than always starting at the left edge of the window. To see this, suppose that we increased the value associated with WINDOW WIDTH in the program that creates the components shown in Figure 1.10 so that the program window becomes wider. The resulting layout might look like that shown in Figure 1.15. In this wider window, the first four GUI components added to the content pane now fit across the first line of the window. This leaves only four components remaining. These components don’t fill the second line of the window, so the FlowLayout manager centers them in the window. The display of the components in Figure 1.15 isn’t quite as nice as that in Figure 1.10, but it is still reasonable. That is where we are cheating. The simple process followed by a FlowLayout manager does not always result in reasonable positioning of the components. For example, if we change the window size again to make it narrower but taller, we can get a layout like that shown in Figure 1.16. It would be much nicer to move the JLabel “Zip:” to the next line so that it would still be attached to the JTextField it is supposed to label, but the FlowLayout manager does not know enough to do this. 26
Despite such limitations, we believe that for our purposes, the simplicity of the FlowLayout manager outweighs its weaknesses. We will introduce one mechanism in the next chapter that can be used to fix problems like the misplaced “Zip” shown in Figure 1.16, but beyond that we will postpone exploring the more advanced features Java provides to control component layout. There are many more interesting aspects of programming in Java that we would rather explore first.
1.6
To Err is Human
We all make mistakes. Worse yet, we often make the same mistakes over and over again. If we make a mistake while giving instructions to another person, the other person can frequently figure out what we really meant. For example, if you give someone driving directions and say “turn left” somewhere you should have said “turn right” chances are that they will realize after driving in the wrong direction for a while that they are not seeing any of the landmarks the remaining instructions mention, go back to the last turn before things stopped making sense, and try turning in the other direction. Our ability to deal with such incorrect instructions, however, depends on our ability to understand the intent of the instructions we follow. Computers, unfortunately, never really understand the instructions they are given so they are far less capable of dealing with errors. There are several distinct types of errors you can make while writing or entering a program. The computer will respond differently depending on the type of mistake you make. The first type of mistake is called a syntax error. The defining feature of a syntax error is that the IDE can detect that there is a problem before you try to run your program. As we have explained, a computer program must be written in a specially designed language that the computer can interpret or at least translate into a language which it can interpret. Computer languages have rules of grammar just like human languages. If you violate these rules, either because you misunderstand them or simply because you make a typing mistake, the computer will recognize that something is wrong and tell you that it needs to be corrected. The mechanisms used to inform the programmer of syntactic errors vary from one IDE to another. Eclipse constantly examines the text you have entered and indicates fragments of your program that it has identified as errors by underlining them and/or displaying an error icon on the offending line at the left margin. If you point the mouse at the underlined text or the error icon, Eclipse will display a message explaining the nature of the problem. For example, if we accidentally left out the curly brace that terminates the body of the TouchyButton constructor while entering the program shown in Figure 1.4, Eclipse would underline the semicolon at the end of the last line of the constructor. Pointing the mouse at the underlined semicolon would cause Eclipse to display the message “Syntax error, insert ‘}’ to complete MethodBody” as shown in Figure 1.17. The bad news is that your IDE will not always provide you with a message that pinpoints your mistake so clearly. When you make a mistake, your IDE is forced to try to guess what you meant to type. As we have emphasized earlier, your computer really cannot be expected to understand what your program is intended to do or say. Given its limited understanding, it will often mistake your intention and display error messages that reveal its confusion. For example, if you type public void buttonClicked
{
instead of public void buttonClicked() { 27
Figure 1.17: Eclipse displaying a syntax error message as the header of the buttonClicked method of our example program, Eclipse will underline the word “buttonClicked” and display the message “void is an invalid type for the variable buttonClicked.” In such cases, the error message is more likely to be a hindrance than a help. You will just have to examine what you typed before and after the position where the IDE identified the error and use your knowledge of the Java language to identify your mistake. BlueJ is more patient about syntax errors. It ignores them until you press the Compile button. Then, before attempting to compile your code it checks it for syntactic errors. If an error is found, BlueJ highlights the line containing the error and displays a message explaining the problem at the bottom of the window containing the program’s text. Figure 1.18 shows how BlueJ would react to the mistake of leaving out the closing brace at the end of the TouchyButton constructor. Note that different IDEs may display different messages and, particularly in the case where the error is an omission, associate different points in the code with the error. In this case, Eclipse flags the line before the missing brace while BlueJ highlights the line after the error. A program that is free from syntax errors is not necessarily a correct program. Think back to the instructions for performing calculations that were designed to leave you thinking about Danish elephants that we presented in Section 1.1. If while typing these instructions we completely omitted a line, the instructions would still be grammatically correct. Following them, however, would no longer lead you to think of Danish elephants. The same is true for the example of saying “left” when you meant to say “right” while giving driving directions. Mistakes like these are not syntactic errors; they are instead called logic errors or simply bugs. They result in an algorithm that doesn’t achieve the result that its author intended. Unfortunately, to realize such a mistake has been made, you often have to understand the intended purpose of the algorithm. This is exactly what 28
Figure 1.18: BlueJ displaying a syntax error message computers don’t understand. As a result, your IDE will give you relatively little help correcting logic errors. As a simple example of a logical error, suppose that while typing the buttonClicked method for the TouchyButton program you got confused and typed menuItemSelected instead of buttonClicked. The result would still be a perfectly legitimate program. It just wouldn’t be the program you meant to write. Your IDE would not identify your mistake as a syntax error. Instead, when you ran the program it just would not do what you expected. When you clicked the button, nothing would happen at all. Since there is no JComboBox in which you could select an item, the code in the menuItemSelected method would never be executed. This may appear to be an unlikely error, but there is a very common error which is quite similar to it. Suppose instead of typing the name buttonClicked you typed the name buttonlicked. Look carefully. These names are not the same. buttonlicked is not the name of one of the special event handling methods discussed in the preceding sections. In more advanced programs, however, we will learn that it is sometimes useful to define additional methods that do things other than handle events. The programmer is free to choose any name for such a method. buttonlicked would be a legitimate (if strange) name for such a method. That is, a program containing a method with this name has to be treated as a syntactically valid program by any Java IDE. As a result, your IDE would not recognize this as a typing mistake, but when you ran the program Java would think you had decided not to associate any instructions with button clicking events. As before, the text “I’m Touched” would never appear in the window. There is an even more subtle way this error can occur. Suppose that instead of typing buttonClicked you typed buttonclicked. That is, you didn’t capitalize the “c” in “clicked”. Java considers upper and lower case letters used in names completely distinct. Therefore, buttonclicked is considered just as different from buttonClicked as the name buttonlicked. Changing the capi29
tal “C” to a lower case “c” would therefore confuse Java enough that the code in the method would not be executed when a button was clicked. There are many other examples of logical errors a programmer can make. In larger programs the possibilities for making such errors just increase. You will find that careful, patient, thoughtful examination of your code as you write it and after errors are detected is essential.
1.7
Summary
Programming a computer to say “I’m Touched.” is obviously a rather modest achievement. In the process of discussing this simple program, however, we have explored many of the principles and practices that will be developed throughout this book. We have learned that computer programs are just collections of instructions. These instructions, however, are special in that they can be followed mechanically, without understanding their actual purpose. This is the notion of an algorithm, a set of instructions that can be followed to accomplish a task without understanding the task itself. We have seen that programs are produced by devising algorithms and then expressing them in a language which a computer can interpret. We have learned the rudiments of the language we will explore further throughout this text, Java. We have also explored some of the tools used to enter computer programs, translate them into a form the machine can follow, and run them. Despite our best efforts to explain how these tools interact, there is nothing that can take the place of actually writing, entering and running a program. We strongly urge you to do so before proceeding to read the next chapter. Throughout the process of learning to program you will discover that it is a skill that is best learned by practice. Now is a good time to start.
30
Chapter 2
What’s in a name? An important feature of programming languages is that the vocabulary used can be expanded by the programmer. Suppose you were given the task of writing a web browser and one of the desired features was a menu which would list the user’s favorite web pages. How would you write the commands to create such a menu? You could not actually type in the desired menu items because they would not be known until later when the program was actually being used. In fact, the contents of the menu might change based on user input while the program was running. What you must do instead is introduce a name that will function as a place holder for the information that belongs in the menu. You can use such a name to describe the contents of the menu as long as elsewhere in the program you include instructions that tell the computer what information should be associated with the name. Such names are somewhat like proper names used to refer to the characters in a story. You cannot determine their meanings by simply looking them up in a standard dictionary. Instead, the information that enables you to interpret them is part of the story itself. In this chapter, we will continue your introduction to programming in Java by discussing how to introduce and use such names in Java programs. In addition, we will introduce several details of the primitives used to manipulate GUI components.
2.1
Modifying Objects
Instructions like: contentPane.add( new JButton( "Continue" ) ); provide the means to place a variety of GUI components on a computer screen. Many programs that use GUI components, however, do more than just place them on the screen and respond when users interact with the GUI components. They also modify the GUI components in various ways to reflect changes in the state of the program. For example, when you try to save a new file in an application, the program is likely to display a dialog box containing a text field in which you can type a name for the file, and a “Save” button to click once you finish typing the name. Typically, the “Save” button is initially disabled, but as soon as you type in a potential name for the file, the program somehow changes the state of the button by enabling it. Similarly, many word processing programs contain menus of styles you can apply to text. These programs usually also allow you to add new styles. When you add a new style, the program has to somehow modify the menu it created earlier by adding new items. 31
At some level, adding a new item to a menu is actually quite similar to adding a new GUI component to the display. Therefore, it should not come as a surprise that just as we use a method invocation to add components to the window, we can also use method invocations to add items to menus and to modify GUI components in many other ways. Recall that, in general, a method invocation has the form: name.action( . . .
arguments . . .
)
where action is the name of a method that describes the action we want performed, name is a name associated with the object that we want to perform this action, and arguments are 0 or more pieces of extra information that more precisely describe the action to be performed. In order to write a method invocation that will modify a GUI component in a particular way, we need to know exactly what to use in place of the name, action, and arguments components that comprise a complete invocation. The action, and arguments are actually fairly simple. Associated with each type of GUI component there is a collection of methods that can be used to perform actions that affect GUI components of that type. We can look up the names of these methods in the documentation that comes with the Java language. In this documentation, we will also find descriptions of each method’s behavior and of the arguments that each method expects. For example, with a JLabel, a method named setText can be used to change the text displayed on the screen by the label. When this method is used, a single argument giving the new text to be displayed must be included. Thus, if statusMessage is a name that refers to a JLabel, then the method invocation statusMessage.setText( "Host www.yhoo.com not responding" ); could be used to replace whatever message had been previously displayed by the label with the warning message “Host www.yhoo.com not responding”. Similarly, a method named setEnabled can be used to tell a JButton to become enabled (or disabled). This method also expects a single argument. If the argument provided is true, the button will become enabled. If the argument is false, the button will become disabled. Thus, if saveButton is a name that refers to a button, the instruction saveButton.setEnabled( false ); can be used to disable that button. In fact, the setEnabled action can be performed by any GUI component. So, if you wanted to disable a menu you could type something like historyMenu.setEnabled( false ); This example illustrates why we have to provide the name of the object that should perform the desired action in a method invocation. If we just typed setEnabled( false ); 32
Figure 2.1: Behavior of proposed NotSoTouchy program in a program that included both a button and a menu in its interface, Java would have no way to decide which one we wanted to disable. In general, to apply a method to a particular object, Java expects us to provide a name or some other means of identifying the object followed by a period and the name of the method to be used. So, in order to learn to use method invocations effectively, we need to learn how to associate names with GUI components and other entities in our programs.
2.2
Instance Variable Declarations
To introduce the process of associating a name with an object in Java we will construct another version of the TouchyButton program that we used as an example in the preceding chapter. In the original version, each time someone clicked the button, a new copy of the message “I’m touched” appeared on the screen. Our new version will be less repetitive. Rather than filling the screen with multiple copies of its message, the new version will only display its message once no matter how many times the button is pressed. We will name the new program NotSoTouchy To accomplish this, we will make the program take a different approach to displaying its message. Instead of constructing a new JLabel each time the button is pressed, we will change the program so that the JLabel is created and displayed in the constructor before the button is pressed. Initially, instead of displaying “I’m touched” we will make the label display instructions telling the user to click the button. Then, when the button is pressed, we will use setText to make the label display the message “I’m touched”. Figure 2.1 illustrates the behavior we have in mind. If the button is pressed again, the program will use setText to make the label display the message “I’m touched” again, but since it already is displaying this message nothing will change on the screen. Before we can use setText to change the appearance of a JLabel, we have to choose a name to associate with the label. Java puts a few restrictions on the names we can pick. Names that satisfy these restrictions are called identifiers. An identifier must start with a letter. After the first letter, you can use either letters, digits or underscores. So we could name our label something like message, status or message2user. Case is significant. Java would treat userStatus and userstatus as two completely distinct names. An identifier can be as long (or short) as you like, but it must be just one word (i.e., no blanks or punctuation marks are allowed in the middle of an identifier). A common convention used to make up for the inability to separate parts of a name using spaces is to start each part of a name with a capital letter. For example, we might use a name like importantMessage. It is also a convention to use identifiers starting with lower case letters to name objects to help distinguish them from the names of classes like TouchyButton and constants like WINDOW WIDTH. Finally, words like class and public that are used as part of the Java language itself cannot be used as identifiers. These are called reserved words or keywords. 33
We can use a sequence of letters, numbers and underscores as an identifier in a Java program even if it has no meaning in English. Java would be perfectly happy if we named our label e2d iw0. It is much better, however, to choose a name that suggests the role of an object. Such names make it much easier for you and others reading your code to understand its meaning. With this in mind, we will use the name message for the label as we complete this example. There are two steps involved in associating a name with an object. Java requires that we first introduce each name we plan to use by including what is called a declaration of the name. Then, we associate a particular meaning with the name using an assignment statement. We discuss declarations in this section and introduce assignments in the following section. The syntax of a declaration is very simple. For each name you plan to use, you enter the word private followed by the name of the type of object to which the name will refer and finally the name you wish to introduce. In addition, like commands, each declaration is terminated by a semi-colon. So, to declare the name message, which we intend to use to refer to a JLabel, we type the declaration: private JLabel message; The form and placement of a declaration within a program determines where in the program the name can be used. This region is called the scope of the name. In particular, we will eventually want to refer to the name message in both the constructor for the NotSoTouchy class and in the buttonClicked method. The declaration of a name that will be shared between a constructor and a method or between several methods should be placed within the braces that surround the body of our class, but outside of the constructor and method bodies. Names declared in this way are called instance variables. We recommend that instance variable declarations be placed before the constructor and method definitions. The inclusion of the word private in an instance variable declaration indicates that only code within the class we are defining should be allowed to refer to this name. The public qualifier that we include in method declarations, by way of contrast, indicates that the method is accessible outside of the class. The declaration of an instance variable does not determine to which object the name will refer. Instead, it merely informs Java that the name will be used at some point in the program and tells Java the type of object that will eventually be associated with the name. The purpose of such a declaration is to enable Java to give you helpful feedback if you make a mistake. Suppose that after deciding to use the name “message” in a program we made a typing mistake and typed “massage” in one line where we meant to type “message”. It would be nice if when Java tried to run this program it could notice such a mistake and provide advice on how to fix the error similar to that provided by a spelling checker. To do this, however, Java needs the equivalent of a dictionary against which it can check the names used in the program. The declarations included in a program provide this dictionary. If Java encounters a name that was not declared it reports it as the equivalent of a spelling mistake. Based on this discussion, the contents of the program we want to write might begin with the code shown in Figure 2.2.
2.3
Assigning Meanings to Variable Names
Before a name can be used in a command like: message.setText( "I’m touched" ); 34
import squint.*; import javax.swing.*; public class NotSoTouchy extends GUIManager { private final int WINDOW_WIDTH = 170; private final int WINDOW_HEIGHT = 100; private JLabel message; public NotSoTouchy() { this.createWindow( WINDOW_WIDTH, WINDOW_HEIGHT ); contentPane.add( new JButton( "Click Here" ) ); . . . } . . . } Figure 2.2: Declaring message in the NotSoTouchy program we must associate the name with a particular object using a command Java calls an assignment statement. An assignment statement consists of a name followed by an equal sign and a phrase that describes the object we would like to associate with that name. As an example, an assignment statement to associate the name message with a JLabel that initially displayed instructions for the user of our program might look like: message = new JLabel( "Click the button above" ); In this assignment statement, we use the construction that creates the JLabel as a sub-phrase to describe the object we want associated with the name message. Ordering is critical in an assignment. The name being defined must be placed on the left side of the equal sign while the phrase that describes the object to which the name should refer belongs on the right side. Java will reject the command as nonsense if we interchange the order of the name and the construction. It may be easier to remember this rule if you recognize that the correct ordering of the parts of an assignment statement is similar to the way definitions are presented in a dictionary. The name being defined comes before its definition. Java will also reject an assignment statement that attempts to associate a name with an object that is not of the type included in the name’s declaration. The declaration included in Figure 2.2 states that message will be used to refer to a JLabel. If we included the assignment message = new JButton( "Click Here" ); in our program, it would be identified as an error because it attempts to associate the name with an object that is a JButton rather than with a JLabel. When we use a construction of a GUI component as an argument in a method invocation of the form 35
import squint.*; import javax.swing.*; public class NotSoTouchy extends GUIManager { private final int WINDOW_WIDTH = 170; private final int WINDOW_HEIGHT = 100; private JLabel message; public NotSoTouchy() { this.createWindow( WINDOW_WIDTH, WINDOW_HEIGHT ); contentPane.add( new JButton( "Click Here" ) ); message = new JLabel( "Click the button above" ); contentPane.add( message ); }
}
public void buttonClicked() { message.setText( "I’m touched" ); }
Figure 2.3: Complete program illustrating use of an instance variable contentPane.add( new JLabel( "I’m Touched" ) ); as we have in all our earlier examples, the command both creates the specified GUI component and adds it to the program’s display. When a GUI component construction is instead used as a subphrase of an assignment, execution of the assignment instruction creates the object and associates a name with it but does not add it to the display. So, if all we do is execute the assignment statement message = new JLabel( "Click the button above" ); nothing new will appear in the program’s window. This gives us a chance to immediately show how we can make use of the name message. We want the label to appear on the screen. To make something appear on the screen we have to provide it as an argument to the contentPane’s add method. The name message now refers to the label we want to add. So, using this name as an argument to the add method as in contentPane.add( message ); will now make the label appear in the display. Basically, once we have used an assignment to associate a name with an object, we can use that name whenever we want to tell the computer to do something with that object. Given this introduction to associating names with objects, we can now show the complete code for our NotSoTouchy program. The code is shown in Figure 2.3. Even though it is very short and simple, this program includes examples of all three of the basic steps involved in using variable names: declarations, assignments, and references. 36
• The declaration: private JLabel message; appears at the beginning of the class body. • An assignment of a meaning to the name appears on the third line of the constructor: message = new JLabel( "Click the button above" ); • References to the label through its name appear in both the last line of the constructor : contentPane.add( message ); and the only instruction in the buttonClicked method: message.setText( "I’m touched" ); We emphasize these three aspects of using variable names because they apply not just to this example but to almost any use of a variable name in Java. To illustrate this, suppose someone pointed out that it seemed silly to be able to click the button in our program over and over when it really only did something on the first click. We could address this complaint by disabling the button after it was clicked using the setEnabled method. To do this, we would follow the same three steps identified above. Assuming that we decided to call the button theButton, we would first add a declaration of the form: private JButton theButton; just before or after the declaration of message. Then, we would associate the name with an actual JButton by replacing the line contentPane.add( new JButton( "Click Here" ) ); with the pair of lines theButton = new JButton( "Click Here" ); contentPane.add( theButton ); Finally, we would add the instruction theButton.setEnabled( false ); to the buttonClicked method.
2.4
Local Variables
In the examples considered in the last section, the variables we used were essential to the instructions we wanted to write in two distinct sections of the program’s code, the constructor and the buttonClicked method. The GUI components associated with these names were constructed and added to the content pane in the constructor, but modified later in buttonClicked. Whenever a 37
variable is associated with an object that is shared between a constructor and a method or between several methods in this way, the variable should be declared as what we call an instance variable. This is done by placing its declaration outside of the bodies of the constructor and the methods (and typically before the constructor and method definitions). There are other situations, however, where all the operations we wish to perform with some object occur within the constructor or within a single method. In such situations, Java allows us to define names in such a way that their meanings only apply within the section of code in which they are needed. Such names are called local variables. Using local variables rather than instance variables when possible is considered good programming style. As your knowledge of programming increases and you write larger and larger programs, you will quickly discover that the overall structure of a program can become very complex. One way to minimize this overall complexity is to specify any details of the program that don’t need to be known globally in such a way that they are local to the part of the program for which they are relevant. Using local variables is a good example of this practice. To illustrate the use of a local variable, let’s make a simple, cosmetic change to the NotSoTouchy program shown in Figure 2.3. In particular, let’s make the text “Click Here” appear in red instead of the default black. When GUI components are drawn on the screen, the computer uses one color, the foreground color, for the text shown, and another color, the background color, to fill the remainder of the component. By default, the foreground color is black and the background color is white. The methods setForeground and setBackground can be invoked to change the colors used. Both methods expect a single argument specifying the color to use. The names Color.RED, Color.BLUE, Color.GREEN, and a few other similar names can be used to describe common colors.1 So, if the name theButton were associated with our program’s button, the invocation theButton.setForeground( Color.RED ); could be used to make the words “Click Here” appear in red. If this is all we want to do with the button (in particular, if we don’t want to try to disable it in the buttonClicked method), then all the operations that involve the button will occur in the constructor. We will construct the button in the constructor, we will set its foreground color, and we will add it to the content pane. In such a situation, it is best to declare theButton as a local variable within the constructor rather than as an instance variable. Declaring a local variable is quite simple. The main difference between local variable declarations and instance variable declarations is that the line that declares a local variable is placed inside the body of the constructor or method where the name will be used rather than outside of the definitions of the constructors and methods. Doing this tells Java that the name will be private, not just to its class, but to the constructor or method in which it is declared. Therefore, the word private is not included in a local variable declaration. The revised definition of the NotSoTouchy constructor would contain the code shown in Figure 2.4.
1
These names are actually defined in a library known as the Abstract Windowing Toolkit (or AWT) rather than in Squint or Swing. Therefore, to use these names we have to add an import for the library “java.awt.*” to our program. Java also provides a complete mechanism to describe custom colors which we will discuss later.
38
public NotSoTouchy() { this.createWindow( WINDOW_WIDTH, WINDOW_HEIGHT ); JButton theButton; theButton = new JButton( "Click Here" ); theButton.setForeground( Color.RED ); contentPane.add( theButton ); message = new JLabel( "Click the button above" ); contentPane.add( message ); } Figure 2.4: A method definition including a local variable
2.5
GUI Layout with Panels
In Section 1.5.3 we explained that the simple approach we are taking to the layout of GUI components sometimes produces undesirable results. The program discussed in that section created four JTextFields intended to be used to enter an individual’s address. Each JTextField was paired with an identifying JLabel. In Figure 1.16, we showed how the layout manager might under some circumstances unnecessarily separate a JLabel from the component it was intended to label. At that time, we promised that we would introduce a mechanism to address this issue. This is a good time to keep that promise since the mechanism used will give us a chance to show you a few more examples of the use of local variables. You should be familiar with the fact that when we want to add a component to the display, we write an invocation of the form contentPane.add( . . . ); When we first introduced this mechanism, we explained that contentPane was a name for the interior of the program’s window. By now, we know that when we want to associate an object with a name, we first have to tell Java the type of the object to which the name will refer. Will it identify a JButton, a JLabel, or something else? So it seems fair to ask for the same sort of information about the name contentPane. What type of object does the name contentPane refer to? contentPane refers to an object that belongs to the class JPanel. A JPanel is essentially a box into which one can insert GUI components that you want displayed as a group. In a program, we can construct a JPanel and then add a collection of related components to the panel’s contents in much the same manner that we would add them to the contentPane. More importantly, a JPanel is also a GUI component itself. That means that after we have constructed a JPanel and placed some other components inside of it, we can add the JPanel to the contentPane and thereby add all of the components it contains to our program’s display as a group. For example, suppose that we place a JLabel that displays the label “Street Addr:” and a JTextField together in a new JPanel. We can then add these two components to our display by adding the JPanel to the contentPane instead of adding the two components to the contentPane separately. This will ensure that these two components will be displayed together if at all possible. 39
JPanel streetPanel; streetPanel = new JPanel(); streetPanel.add( new JLabel( "Street Addr:" ) ); streetPanel.add( new JTextField( 29 ) ); contentPane.add( streetPanel ); Figure 2.5: Instructions to add a JPanel holding two components to the display
Figure 2.6: JPanels can be used to group components in the display The actual code to accomplish this is fairly simple. The JPanel does not expect any arguments in its construction. Therefore, the code shown in Figure 2.5 can be used to create the two desired components and add them to the display as part of a single sub-panel. The first line of this code declares the name streetPanel that we will use to refer to our JPanel. We will only need to perform operations on the panel within the constructor, so we declare streetPanel as a local variable. The following line constructs an empty panel and associates it with the name streetPanel. The next two lines are identical to lines from the original program (as shown in Figure 1.11) except the name of the program’s main JPanel, the contentPane, has been replaced by the name streetPanel. The last line adds the sub-panel we have formed to the content pane. Following this pattern, we can create three additional JPanels to hold the labels and text fields for the remaining components of the address: the city, state and zip code. For now, let us assume these JPanels are named cityPanel, statePanel, and zipPanel. Figure 2.6 shows how the display of this program might look if its window was narrowed just a bit, just as we did to the earlier version of the program to produce the display shown in Figure 1.16. When we narrowed the window of the earlier version of the program, the label “Zip:” became separated from its text field because while there was enough room for the label on the second line of the display, there wasn’t enough room for the text field. If you look at Figure 2.6 carefully, you can see that there is still enough room for the label “Zip:” on the second line of the display. The layout manager for the window, however, doesn’t see the label and the text field as separate components. Instead, it sees a single JPanel that contains both of them. Since the entire panel cannot fit on the second line, it puts the label 40
Figure 2.7: Coloring makes JPanels visible in the display and the text field together on the third line as desired. We can make the effect of the JPanels visible by using the setBackground method to change the colors of the JPanels. In particular, if we add the instructions zipPanel.setBackground( Color.YELLOW ); statePanel.setBackground( Color.GRAY ); cityPanel.setBackground( Color.YELLOW ); streetPanel.setBackground( Color.GRAY ); to our program and run it again in a narrow window, it produces the display shown in Figure 2.7. Now it should be clear how the JPanels are grouping the components in the display. There is one last interesting change we can make to this program. Consider how the name streetPanel is used in the program. It is clearly very important during the five lines shown in figure 2.5, but it isn’t used at all after that. The names cityPanel, statePanel, and zipPanel have similarly short spans during which they are actually of use in the program. As a result, we can instead use just one name to refer to all four of these JPanels. Obviously, this name can only refer to one panel at a time. It will refer to the panel that we named streetPanel for the five instructions that work with that panel, then we will change its meaning to make it refer to the panel that was originally named cityPanel and so on. The key to doing this is that Java allows us to use an assignment statement to change the meaning of a name at any point in a program where that is useful. This should not strike you as too surprising. We frequently use names in this way outside the world of programming. The name “president of the class” often changes its meaning once a year. Of course, it would be bad to use streetPanel or any of the other three names we suggested earlier for this new name. Instead, we will use the identifier currentPanel. The complete code to construct the address entry display using this approach is shown in Figure 2.8. Note that the name is only declared once in the first line of this code, but then is associated with four different JPanels at different points in the program.
2.6
More on Declarations
There are three additional features of variable declarations that we want to introduce at this point. They are not essential features, but they can help you write programs that are more concise and clear. 41
JPanel currentPanel; currentPanel = new JPanel(); currentPanel.add( new JLabel( "Street Addr:" ) ); currentPanel.add( new JTextField( 29 ) ); contentPane.add( currentPanel ); currentPanel = new JPanel(); currentPanel.add( new JLabel( "City:" ) ); currentPanel.add( new JTextField( 18 ) ); contentPane.add( currentPanel ); currentPanel = new JPanel(); currentPanel.add( new JLabel( "State:" ) ); currentPane.add( new JTextField( 2 ) ); contentPane.add( currentPanel ); currentPanel = new JPanel(); currentPanel.add( new JLabel( "Zip:" ) ); currentPanel.add( new JTextField( 5 ) ); contentPane.add( currentPanel ); Figure 2.8: Changing the meaning associated with a variable
42
2.6.1
Initializers
We have emphasized that in Java, the act of introducing a name is logically distinct from the act of associating a meaning with a name. One is accomplished using a declaration. The other is accomplished using an assignment statement. It is frequently the case, however, that a programmer knows that a certain value should be associated with a name when it is first introduced. In this situation, Java allows the programmer to write a declaration that looks somewhat like a hybrid between a declaration and an assignment statement. As an example, consider the first two statements of the code we wrote to illustrate the use of JPanels shown in Figure 2.8: JPanel currentPanel; currentPanel = new JPanel(); Java allows you to combine these two lines into a single declaration of the form JPanel currentPanel = new JPanel(); Note that while this looks like an assignment statement with a type name added to the beginning it is considered a declaration with an initializer rather than an assignment statement. Initializers can be used in the declarations of instance variables as well as in local variables. Figure 2.9 shows yet another version of the “touchy button” program that incorporates the use of such initializers. Note that the constructions to create the JButton and the JLabel have been moved out of the constructor and into the instance variable declarations for message and theButton. The use of initializers in declarations often provides the clearest way to specify the initial value associated with a name. In the next few chapters, however, we will deliberately make sparing use of this feature. We do this primarily to emphasize the distinction between declaring a name and assigning a value to a name. Novice Java programmer frequently confuse these two steps in the use of variable names. In a few chapters, after you become comfortable with this distinction we will use initializers more frequently.
2.6.2
Making it final
By now, you might have noticed that the two lines we put at the beginning of the body of all our class definitions: private final int WINDOW_WIDTH = 170; private final int WINDOW_HEIGHT = 100; look a lot like declarations with initializers. If you ignore the second word on each line, you are left with the words private, followed by the word int (which refers to the collection of values usually called the integer numbers), an identifier, then an equal sign, and a value to associate with the identifier as its initial value. The only thing that is odd about these lines is that they include the word final after the word private. The word final tells Java that the values associated with these names by their initializers will be the only values ever associated with these names. In fact, if you include the word final in such a declaration and later try to use an assignment statement to change the meaning of the name, Java will identify this as an error in your program. 43
import squint.*; import java.awt.*; import javax.swing.*; public class NotSoTouchy extends GUIManager { private final int WINDOW_WIDTH = 170; private final int WINDOW_HEIGHT = 100; private JLabel message = new JLabel( "Click the button above" ); private JButton theButton = new JButton( "Click Here" ); public NotSoTouchy() { this.createWindow( WINDOW_WIDTH, WINDOW_HEIGHT ); theButton.setForeground( Color.RED ); contentPane.add( theButton ); contentPane.add( message ); }
}
public void buttonClicked() { message.setText( "I’m touched" ); }
Figure 2.9: A program illustrating initializers in instance variable declarations
44
Variables declared to be final are called constant names. As the names we have used for these two variables suggest, it is a convention that identifiers used as constant names are composed of all upper case letters. The primary purpose for using constant names is to make your program more readable. As we mentioned earlier, the role of the arguments to createWindow would be fairly clear in the line this.createWindow( WINDOW_WIDTH, WINDOW_HEIGHT ); even to someone who didn’t fully understand what the createWindow method did. On the other hand, the purpose of the numbers 170 and 100 in this.createWindow( 170, 100 ); is not so obvious.
2.6.3
Declaring Collections of Similar Names
One final feature of Java name declarations is the fact that you can declare several names that will refer to values of the same type in a single declaration. For example, we could either declare the names streetPanel, cityPanel, statePanel, and zipPanel used in our discussion of JPanels using four separate declarations of the form: JPanel JPanel JPanel JPanel
streetPanel; cityPanel; statePanel; zipPanel;
or within a single declaration of the form JPanel streetPanel, cityPanel, statePanel, zipPanel; When multiple variables are declared together in this way, it is possible to include initializers for each of the names as in: private final int WINDOW_WIDTH = 600, WINDOW_HEIGHT = 200; While including multiple names in a single declaration is sometimes helpful, this feature should be used with caution. For the sake of readability, you should only declare names together if they are used in nearly identical ways.
2.7
ints and Strings
One other interesting aspect of the declarations of WINDOW WIDTH and WINDOW HEIGHT is that they show that it is possible to associate names with things other than GUI components. There are two interesting collections of values that will be used often in our programs and with which we will want to associate names. As mentioned above, the name int refers to the collection of integer values. If we want to do any kind of calculation or counting in a program, we will clearly want to refer to ints using variable names. The other important class of values is the collection of sequences of letters strung together to form words and sentences. We have used such values when creating JButtons and JLabels. The information "Click Here" used in the construction 45
new JButton( "Click Here" ) is an example of such a sequence of letters. In Java, the name String is used to refer to the collection of such sequences.2 Just as we have seen that we can declare variable names to refer to GUI components, we can declare variables that refer to ints and Strings. The variables WINDOW WIDTH and WINDOW HEIGHT are examples of int variables. We could easily use a String variable in a similar way. If we included the declaration private final String BUTTON_LABEL = "Click Here"; right after the declaration of WINDOW HEIGHT in Figure 2.9, we could then rewrite the declaration of theButton as private JButton theButton = new JButton( BUTTON_LABEL ); As a much more interesting use of a variable that refers to something that is not a GUI component, let’s see how to make a program count. In particular, we will change TouchyButton once more to produce a version that displays a message of the form “I’ve been touched 4 time(s)” each time its button is clicked, where the value 4 will be replaced by the actual number of times the button has been clicked. First, we need to associate a name with the number that describes how many times the button has been clicked. Initially the value associated with this name should be 0, so we can declare the name using the declaration private int numberOfClicks; Then, in the constructor for our class we will include the assignment numberOfClicks = 0; to associate the correct initial value with this variable. Obviously, the meaning associated with this variable will have to change as the program runs. We have seen that we can associate a new value with a name by executing an assignment statement. To change the value of numberOfClicks, we will say numberOfClicks = numberOfClicks + 1; In all our previous examples of assignments, the right hand side has been a construction. When we introduced the assignment statement, we did not say this was required. Instead, we simply said that the right hand side should describe the value with which the name on the left should be associated. When working with numbers, Java interprets the plus sign in the usual way. Accordingly, if numberOfClicks is associated with 0, then numberOfClicks + 1 describes the value 1. Therefore, after the assignment is executed once, numberOfClicks will be associated with 1. The right hand 2
It is actually not quite precise to limit ourselves to sequences of letters. We might want to create a button by saying new JButton( "Choice 1." ) In this example, "Choice 1." is definitely a String even though it contains the symbols “1” and “.” which are considered digits and punctuation marks rather than letters. To be accurate we should describe Strings as sequences of symbols.
46
side of the assignment now describes the value 2. Therefore, if the assignment is executed a second time, the value associated with numberOfClicks will become 2. In fact, the value associated with numberOfClicks will always be equal to the number of times the assignment has been executed. The last detail required to complete the program we have in mind is that Java interprets the plus sign a bit differently when it is used to combine a String value with a number or another String. Instead of trying to perform the arithmetic addition operation, it sticks the sequence of symbols that make up the String and the sequence of digits that describe the number together to form a longer sequence. This operation is called concatenation. For example, when numberOfClicks is associated with the number 4, the phrase "I’ve been touched " + numberOfClicks + " time(s)" describes the String "I’ve been touched 4 time(s)" The spaces within the quoted strings "I’ve been touched " and " time(s)" are required or no spaces will be left around the digits placed between them. The complete code for the simple counting program is shown in Figure 2.10. We have included lines of text in this program that are intended to help explain the program to a human reader rather than the computer. The details of the mechanisms Java provides for such explanatory notes, which are known as comments are discussed in the next section.
2.8
Comments
In the program shown in Figure 2.10, we introduce one additional and very important feature of Java, the comment. As programs become complex, it can be difficult to understand their operation by just reading the Java code. It is often useful to annotate this code with English text that explains more about its purpose and organization. In Java, you can include such comments in the program text itself as long as you follow conventions designed to enable the computer to distinguish the actual instructions it is to follow from the comments. For short comments, this is done by preceding such comments with a pair of slashes (“//”). Any text that appears on a line after a pair of slashes is treated as a comment by Java. The class declaration in Figure 2.10 is preceded by three lines of comments. If we have multiple lines of comments, we can write them a bit more simply by starting the comments with a “/*” and ending them with “*/” as follows: /* A program that responds when its user clicks on a button by displaying a count of the total number of times the button has been clicked. */ Many programmers prefer to format multi-line comments as shown in the figure: /* * A program that responds when its user clicks on a button * by displaying a count of the total number of times the * button has been clicked. */ 47
import squint.*; import javax.swing.*; /* * A program that responds when its user clicks on a button * by displaying a count of the total number of times the * button has been clicked. */ public class TouchCounter extends GUIManager { // The desired dimensions of the program window private final int WINDOW_WIDTH = 170, WINDOW_HEIGHT = 100; // Used to display instructions and counter messages private JLabel message; // Keeps track of the number of times the button has been clicked private int numberOfClicks; /* * Place a button and the instructions in a window */ public TouchCounter() { this.createWindow( WINDOW_WIDTH, WINDOW_HEIGHT ); numberOfClicks = 0; contentPane.add( new JButton( "Click Here" ) ); message = new JLabel( "Click the button above" ); contentPane.add( message ); }
}
/* * Display a counter of the number of clicks */ public void buttonClicked() { numberOfClicks = numberOfClicks + 1; message.setText( "I’ve been touched " + numberOfClicks + " time(s)" ); }
Figure 2.10: Using an int variable to count 48
While Java only considers the initial “/*” and final “*/”, the “*”s at the beginning of new lines make it easier for the reader to see that they are part of a comment.
2.9
Summary
In this chapter we explored the importance of using names to refer to the objects our programs manipulate. Instance variable names are used to share information between constructors and methods and local variables provide the means to associate a name with an object for use within a single constructor or method. We saw that both types of variables have to be declared before they can be used in a program, and that the actual meaning associated with a name can be specified either in an assignment statement that is separate from the declaration or by an initializer included in its declaration. We also presented several additional aspects of working with GUI components. We learned about methods like setText, setForeground, and setEnabled that can be used to change the properties of GUI components. We also discussed how to use JPanels to gain a little more control over the positioning of GUI components in a program’s window.
49
50
Chapter 3
Probing Questions In the preceding chapter, we learned how to give commands in Java. Using method invocations, you can now write programs that create GUI components and then command them to change in various ways. In this chapter, we show that method invocations can also be used to ask questions. For example, at some point in a program you might need to determine what a user has typed into a text field. We will learn that you can ask a text field to tell you what it currently contains by invoking a method named getText. A similar method can be used to ask a menu which of its items is currently selected. Such methods are called accessor methods. They are used to access information about the state of an object. In contrast, all the methods we introduced in the last chapter are used to change object states. Such methods are called mutator methods. There is one important kind of question that cannot be asked using an accessor method. Imagine a program that displays two buttons in its interface. One button might be labeled “Print” while the other is labeled “Quit”. If a user clicks one of these buttons, the code in the program’s buttonClicked method will be executed. Somehow, this method will have to ask which button was clicked. We will see that rather than depending on method invocations to determine this information, Java instead provides a way to directly associate a name with the GUI component that causes an event-handling method to be invoked. Finally, after discussing the basics of using both mutator and accessor methods, we will explore the collection of methods that can be used to manipulate GUI components. In addition, we will introduce one additional type of GUI component, the JTextArea which is used to display multiple lines of text.
3.1
Accessor Methods
To introduce the use of accessor methods, we will construct a program that implements aspects of a feature found in many web browsers, the bookmarks or favorites menu. Obviously, we are not going to try to present the code for a complete web browser in this chapter. Instead, we will focus on exploring the type of code that might be included in a web browser to allow a user to add the addresses of interesting web sites to a menu. The interface for the program we want to examine will be quite simple. There will be a JTextField in which a user can type items that should be added to the favorites menus. We will assume that the user types addresses of web sites into this text field, but our program will actually work the same way no matter what form of text the user chooses to enter. There will also be a 51
Figure 3.1: Interface for program implementing a “favorites” menu JComboBox that will display the list of items the user has identified as “favorite” web site addresses. Finally, there will be a button labeled “Add”. When this button is pressed, the address currently in the text field will be added to the menu as a new item. An image of what the program’s interface might look like while the user is actually selecting an item from the favorites menu is shown in Figure 3.1. Of course, selecting an item from the menu will have no real effect. The only reason we show the program in this state is so that you can see that items have been added to the menu, including the latest item, www.williams.edu, which still appears in the JTextField. The only detail of implementing this program that will be new is the use of the accessor method named getText to determine what the user has typed into the text field. In some respects even this will seem fairly familiar, because using an accessor method is very much like using a mutator method. To invoke either a mutator method or an accessor method we must write a phrase of the form name.action( . . .
arguments . . .
)
Accordingly, before we can use getText to find out what is in a JTextField we will have to associate a name with the JTextField, much as we had to associate names with buttons and labels in the last chapter in order to use mutator methods. Assume that we include the following declarations in our program: // A place where the user can type in a web site address private JTextField address; // Size of field used to enter addresses private final int ADDR_LENGTH = 20; // Menu that will hold all the addresses identified as favorite sites private JComboBox favorites; and that we include code in our constructor to create a text field and a menu and to associate them with these names: address = new JTextField( ADDR_LENGTH ); favorites = new JComboBox(); Finally, assume that we include code in the constructor to add these two components and a JButton to the contentPane Note that in the assignment statement for favorites we use a JComboBox 52
construction that includes no arguments. This type of construction produces a menu that initially contains no items. The only detail we have left to consider is what code to put in the buttonClicked method to actually add the contents of the text field as a new item in the menu. There is a mutator method named addItem that is used to add entries to a menu. If the invocation favorites.addItem( "http://www.weather.com" ); is executed, the computer will add the address http://www.weather.com as a new item in the menu. Of course, while we will want to use this method, we cannot use it in this way. We cannot just type in the item we want to add in quotes as an argument because we won’t know what needs to be added until the program is running. We have to provide something in the invocation of the addItem method that will tell the computer to ask the text field what it currently contains and use that as the argument to addItem. Java lets us do this by using an invocation of the getText accessor method as an argument to the addItem method. The complete command we need to place in the buttonClicked method will therefore look like favorites.addItem( address.getText() ); The complete program is shown in Figure 3.2.
3.2
Statements and Expressions
It is important to remember that accessor methods like getText serve a very different function than mutator methods. A mutator method instructs an object to change in some way. An accessor method requests some information about the object’s current state. As a result, we will use accessor methods in very different contexts than mutator methods. With this in mind, it is a good time for us to take a close look at some aspects of the grammatical structure of Java programs and clearly distinguish between two types of phrases that are critical to understanding this structure. The body of a method definition consists of a sequence of commands. These commands are called statements or instructions. We have seen two types of phrases that are classified as statements so far: assignment statements such as message = new JLabel( "Click the button above" ); and method invocations such as contentPane.add( new JButton( "Click Here") ); Simply asking an object for information is rarely a meaningful command by itself. We would never write a statement of the form: address.getText(); One might mistakenly think of such a method invocation as a command because it does tell the computer to do something — to ask the JTextField for its contents. It would be a useless command, however, because it does not tell the computer what to do with the information requested. For this reason, invocations that involve mutator methods are used as statements, but invocations that involve accessor methods are not. 53
import squint.*; import javax.swing.*; /* * A program to demonstrate the techniques that would be used * to enable a user to add addresses to a favorites menu in a * web browser. */ public class FavoritesMenu extends GUIManager { // Change these to adjust the size of the program’s window private final int WINDOW_WIDTH = 600, WINDOW_HEIGHT = 100; // A place where the user can type in a web site address private JTextField address; // Size of field used to enter addresses private final int ADDR_LENGTH = 20; // Menu that will hold all the addresses identified as favorite sites private JComboBox favorites; /* * Create the program window and place a button, text field and * a menu inside. */ public FavoritesMenu() { this.createWindow( WINDOW_WIDTH, WINDOW_HEIGHT ); address = new JTextField( ADDR_LENGTH ); favorites = new JComboBox(); contentPane.add( new JButton( "Add to favorites" ) ); contentPane.add( address ); contentPane.add( favorites ); }
}
/* * Add contents of JTextField to JComboBox */ public void buttonClicked( ) { favorites.addItem( address.getText() ); }
Figure 3.2: Code for program to simulate a favorites menu 54
Invocations that involve accessor methods are instead used in contexts where Java expects us to describe an object or value. There are many contexts in which such phrases are used. We have already noted that this is the type of phrase expected to appear on the right side of an assignment statement. The function of the assignment is then to associate the name on the left side of the equal sign with the object or value described by this phrase. We also use such phrases when we describe the arguments provided in method invocations and constructions. Phrases of this type are called expressions. At this point, we have seen five types of phrases that can be used as expressions: 1) accessor method invocations The use of accessor method invocations to describe values was first encountered in the preceding section. A phrase like address.getText() is an expression that describes a value by telling some object (the text field address in this case) to provide the desired information. 2) literals Expressions that directly and explicitly identify particular values are called literals. For example, in the statements contentPane.add( new JButton( "Click here" ) ); contentPane.add( new JTextField( 20 ) ); the number 20 and the string "Click here" are examples of literals. 3) constructions Recall that a construction is a phrase of the form new Type-of-object( ... arguments ... ) that tells Java to create a new object. In addition to creating an object, a construction serves as a description of the object that is created. As such, constructions are expressions. In the two examples included in our discussion of literals, the constructions of a JButton and a JTextField are used to describe the arguments to the content pane add method. 4) variable names Almost as soon as we introduced instance variable names, we showed that we could replace a command like contentPane.add( new JTextField( 20 ) ); with the pair of commands message = new JTextField( 20 ); contentPane.add( message ); In the second of these two lines, the variable name message has taken on the role of describing the argument to the add method. Thus, variable names can also be used as expressions. 5) formulas In the buttonClicked method of the TouchCounter program shown in Figure 2.10, we saw the statement numberOfClicks = numberOfClicks + 1; 55
In this instruction, we describe a value by telling Java how to compute it using the addition operation. The phrase numberOfClicks + 1 is an example of an expression that is formed by combining simpler expressions (the variable numberOfClicks and the literal 1) using the addition operator. An expression like this is called a formula. We will see that Java supports many operators, including operators for the usual arithmetic operations addition (+), subtraction (-), division (/), and multiplication (*). Java allows us to use whatever form of expression we want to describe a value on the right hand side of an assignment statement or as an argument in an invocation or a construction. It doesn’t care whether we use a literal, variable, invocation, construction or a formula. It is very picky, however, about the type of information the expression we use describes. For example, the parameter provided to the content pane’s add method must be a GUI component. As a result, we can say contentPane.add( new JLabel( "Click here" ) ); but we cannot say contentPane.add( "Click here" ); The literal "Click here" describes a String. While a string can be used as a parameter in a construction that creates a GUI component, the string itself is not a GUI component and therefore the literal "Click here" will not be accepted as a valid argument for the add method.
3.3
Working with GUI Components
In the preceding sections, we have used examples involving GUI components to introduce the ways in which method invocations can be used within Java programs. Now that we have explored the basics of using method invocations both as statements and expressions, we want to explore the collection of methods that can be used to manipulate GUI components more thoroughly. In addition, we will introduce a new type of GUI component, the JTextArea which is similar to the JTextField but allows us to display multiple lines of text. The complete collection of methods associated with the GUI components we have been using is quite extensive. We will not cover all of these methods. We will limit our attention to a relatively small selection of methods that provides access to the essential functions of these GUI components. The curious reader can consult the online documentation for the GUI components provided by the Swing library at http://java.sun.com/j2se/1.5.0/docs/api/javax/swing/package-summary.html
56
3.3.1
Common Features
There are some methods that can be applied to any GUI component. We have already introduced several such methods. When we first introduced setEnabled, we mentioned that this method could be applied to any GUI component. setEnabled can be used to enable or disable any type of GUI component. In our examples, we only used the setForeground method to set the color of text displayed in a JButton. In fact, this method and its close relative, setBackground, can be applied to any GUI component. Thus, we can use these methods to change the colors used to display buttons, labels and menus. In addition to these mutator methods that are shared by all types of GUI components, there are also accessor methods that can be applied to components of any type. One example is a counterpart to setEnabled. It is an accessor method named isEnabled. We saw that setEnabled expects us to specify either true or false as its argument depending on whether we want the component involved to be enabled or disabled. If oneButton and anotherButton are variable names associated with JButtons, then oneButton.isEnabled() is an expression that either describes the value true or false depending on whether oneButton is currently enabled or disabled. Therefore, the statement anotherButton.setEnabled( oneButton.isEnabled() ); could be used to make sure that anotherButton’s state is the same as oneButton’s state as far as being enabled or disabled.
3.3.2
Menu Methods
We have already introduced one method used withthe JComboBox class, the addItem method that inserts a new entry into a menu. In addition, the JComboBox class provides an extensive collection of methods for removing items, determining which items are currently displayed in a menu, and changing the item that is selected in a menu. We will present several of these methods in this section. We will start with what we consider the most important method in the collection, getSelectedItem, a method used to determine which menu item is currently selected. Using the getSelectedItem Method getSelectedItem is an accessor method. To illustrate its use, we will add a bit of functionality to the FavoritesMenu program we presented in Figure 3.2. Our earlier version of this program allowed us to add items to a menu, but it didn’t react in any significant way if we selected an item from the menu. If the menu were part of an actual web browser, we would expect it to load the associated web page when we selected an item from the favorites menu. We will set a simpler goal. We will modify the program so that when a menu item is selected, the web address associated with the menu item is placed in the JTextField included in the program’s display. A program can tell a text field to change its contents by applying the setText method to the text field. For example, executing the invocation address.setText( "http://www.aol.com" ); 57
would place the address of the web site for America Online in the JTextField. This use of setText should seem familiar. In an earlier example, we applied setText in a similar way to change the words displayed by a JLabel. In fact, we can use setText to change the text displayed by either a JLabel, a JTextField, or a JButton. Recall that whenever an item is selected from a menu, any instruction placed in the method named menuItemSelected will be executed. This suggests that we can make our program display the contents of an item when it is selected by adding a method definition of the form public void menuItemSelected( ) { address.setText( ... ); } to the FavoritesMenu program. All we have to do is figure out what argument to provide where we typed “...” above. Given that we just explained that the getSelectedItem method can be used to determine which item is selected, an invocation of the form favorites.getSelectedItem() might seem to be an obvious candidate to specify the parameter to setText. Unfortunately, this will NOT work. Your IDE will reject your program as erroneous if you use this parameter. The problem arises because setText expects a String as its argument but getSelectedItem doesn’t always return a String. You can probably imagine that it is sometimes useful to create a menu whose items are more complex than strings — a menu of images for example. The JComboBox provides the flexibility to construct such menus (though we have not exploited it yet). When working with such menus, the result produced by invoking getSelectedItem will not be a String. Java’s rules for determining when an expression is a valid parameter are quite conservative in accounting for this possibility. Even though it is obvious that the result of using getSelectedItem in this particular program has to be a String, Java will not allow us to use an invocation of getSelectedItem to specify the parameter to setText because such an invocation will not always produce a String as its result in every program. There is another accessor method that we can use to get around this problem. It is named toString and it can be applied to any object in a Java program. It tells the object to provide a String that describes itself. The descriptions provided by invoking toString can be quite cryptic in some cases. If the object that toString is applied to is actually a String, however, then the result produced by the invocation is just the String itself. So, by applying the toString method to the result produced by applying getSelectedItem we can provide the argument we want to the setText method. There is one last subtlety remaining. Up until this point we have stated that the form of an invocation in Java was name.action( . . . arguments . . . ) If this were true, then we would first have to associate a name with the result produced by the invocation of getSelectedItem before we could apply the toString method to that result. Fortunately, we haven’t told you the whole truth about this. The actual description for the form of an invocation in Java is expression.action( . . . arguments . . . ) 58
That is, just as you can use any of the five forms of expression — names, literals, constructions, invocations, and formulas — to specify the arguments in an invocation, you can use any form of expression to describe the object to which the action should be applied. So, to apply the toString method to the result of applying the getSelectedItem method we can write favorites.getSelectedItem().toString() This is an expression that is acceptable as a specification for the argument to setText. As a result, we can extend the program as we desire by adding the following method declaration: public void menuItemSelected( ) { address.setText( favorites.getSelectedItem().toString() ); } Examining Menu Items There are two methods that can be applied to a JComboBox to find out what items are currently in the menu. While these methods are not very important in programs that display menus that contain fixed sets of items, they can be helpful in programs where the user can add and delete menu items. The first of these methods is named getItemCount. It is an accessor method that returns the number of items currently in a menu. The value returned will always be an int. The other method is named getItemAt. It returns the item found at a specific position in the menu. The items in a JComboBox are numbered starting at 0. Thus, the invocation favorites.getItemAt( 0 ) would return the first item in the menu and favorites.getItemAt( 3 ) would produce what one might normally consider the fourth item in the menu. Because one can create menus that contain items that are not Strings, Java will not allow you to use an invocation of getItemAt in a context where a String is required. As we explained in the preceding section, if you need to use getItemAt in such a context, you can do so by combining its invocation with an invocation of toString. There is also a method named getSelectedIndex which returns the position of the currently selected item counting from position 0. Changing the Selected Menu Item Java provides two methods to change the item that is selected within a menu. The first, setSelectedIndex, expects you to specify the position of the item you would like to select numerically. Again, items are numbered starting at 0 so favorites.setSelectedIndex( 0 ); would select the first item in the favorites menu while favorites.setSelectedIndex( favorites.getItemCount() - 1 ); 59
would select the last item in the menu. The setSelectedItem method allows you to select a new item by providing its contents as an argument. For example, If a menu named indecision contained the items “Yes”, “No”, and “Maybe so” like the menus shown in Figure 1.12, then the statement indecision.setSelectedItem( "No" ); could be used to select the middle item. Removing Items from a Menu The simplest way to remove items from a menu is to remove all of them. This can be done using a method named removeAllItems as in the statement favorites.removeAllItems(); It is also possible to remove one item at a time either by specifying the position of the item to be removed or its contents. When removing by position, the method to use is removeItemAt. For example, the invocation favorites.removeItemAt( 0 ); would remove the first item from the menu. The method removeItem can be used to remove an item based on its contents as in indecision.removeItem( "Maybe so" );
3.3.3
Components that Display Text
We have already encountered two types of GUI components that can be used to display text, JTextFields and JLabels. JTextFields and JLabels are obviously different in many ways. A program’s user can type new text into a text field, while the information displayed in a JLabel can only be changed by invoking the setText method from within the program. At the same time, however, these two types of GUI components share many similarities. For example, we have seen that the setText method can be applied to either a JLabel or a JTextField. Similarly, the getText accessor method can be applied to either a JTextField or a JLabel to access its current contents. JTextAreas and JScrollPanes There is a third type of GUI component used to display text that shares even more methods with JTextField. This type of component is called a JTextArea. A JTextArea provides a convenient way to display multiple lines of text in a program’s window. When we construct a JTextField, we include a number in the construction that indicates how many characters wide the field should be. When we construct a JTextArea, we specify how many lines tall the field should be in addition to specifying how many characters wide. The construction involves two arguments with the first specifying the number of lines. Thus, a construction of the form new JTextArea( 20, 40 ) 60
/* * Class HardlyAWord - A program that presents a text area in * which a user can enter and edit text. * */ public class HardlyAWord extends GUIManager { // Change these values to adjust the size of the program’s window private final int WINDOW_WIDTH = 300, WINDOW_HEIGHT = 150; /* * Place a JTextArea in the window */ public HardlyAWord() { // Create window to hold all the components this.createWindow( WINDOW_WIDTH, WINDOW_HEIGHT ); contentPane.add( new JTextArea( 6, 20 ) ); }
}
Figure 3.3: The world’s smallest word processing program would create a text area tall enough for 20 lines and wide enough for 40 characters in any single line. A program that uses a JTextArea is shown in Figure 3.3. It is a very simple program. In fact it is about the simplest program you could imagine writing that actually does something that is at least somewhat useful. When the program runs it displays a window containing an empty text area as shown in Figure 3.4. While the empty text area in this window may not look very impressive, it actually provides a fair amount of functionality. You can click the mouse in the text area and start typing. It won’t automatically start a new line for you if you type in too much to fit within its width, but you can start new lines by pressing the return key. If you make a mistake, you can reposition the cursor by clicking with the mouse. You can even cut and paste text within the window. Figure 3.5 shows how the program window might look after we had used these features to enter the opening words of an exciting little story. There is, however, a difficulty. If we keep typing but press the return key less frequently so that the complete text entered would look like Once upon a time, in a small text area sitting on a computer’s screen a funny thing happened. As the computer’s user typed and typed and typed, the small text area got bigger and bigger until it no longer fit very well in a little window. 61
Figure 3.4: The initial state of the HardlyAWord program in execution
Figure 3.5: The state of HardlyAWord as text is entered
62
Figure 3.6: The result of entering too much text the contents of the program’s window will come to look like the image shown in Figure 3.6. The problem is that the numbers included in a JTextArea construction to specify how many lines high and how many characters wide it should be are treated as specifications of its minimum size. As long as the text placed within the area fits within these minimum values, the text area’s size will remain fixed. If the text exceeds the minimum values, however, the text area will automatically grow to be big enough to fit the text. If necessary, it will grow so big that it might no longer fit within the program’s window, as we can see in Figure 3.6. As a result of this problem, it is unusual to use a JTextArea by itself. Instead, it is typical to use a JTextArea together with another type of component called a JScrollPane. A JScrollPane can hold other components just as a JPanel can. If the components it holds become too big to fit in the space available, the JScrollPane solves the problem by providing scroll bars that can be used to view whatever portion of the complete contents of the scroll pane the user wants to see. It is very easy to associate a JScrollPane with a JTextArea. We simply provide the JTextArea as an argument in the construction of the JScrollPane. For example, to use a scroll pane in our HardlyAWord program we would just replace the line contentPane.add( new JTextArea( 6, 20 ) ); with the line contentPane.add( new JScrollPane( new JTextArea( 6, 20 ) ) ); When this new program is run, its window will initially look the same as it did before (see Figure 3.4). A JScrollPane does not add scroll bars until they become necessary. Once we entered the text we showed earlier, however, the window would take on the appearance shown in Figure 3.7. We still can’t see all the text that has been entered, but we can use the scroll bars to examine whatever portion is of interest. JTextArea Methods In some programs, JTextAreas are used to provide a place in which the program’s user can enter text as in our HardlyAWord example. In such programs, the most important method associated with JTextAreas is the accessor method getText. Just as it does when applied to a JTextField, this method returns a string containing all of the text displayed within the text area. 63
Figure 3.7: A JTextArea displayed within a JScrollPane In other programs, a JTextArea may be used to display information to the user. If all the information to be displayed is available at once, the setText method can be used in the same manner it might be used with a JTextField or JLabel. Frequently, however, the information to be displayed is added to the JTextArea bit-by-bit as it becomes available. In this case, another method named append is more useful than setText. While setText replaces whatever information had been displayed in a text area by the string provided as its argument, append simply adds the text provided as its argument to the information that was already displayed in the text area. Another method that is often used by programs that use JTextAreas to present information to users is named setEditable. By default, a user can edit the text in a JTextArea using the mouse and keyboard as we explained in our discussion of the HardlyAWord program. If a JTextArea is being used strictly as a means of communicating information to a user, it may be best to prevent the user from editing its contents. Otherwise, the user might accidentally delete or change information they might like to see later. If displayArea is a variable associated with a JTextArea, then the statement displayArea.setEditable( false ); will tell the computer not to let the user edit the contents of the text area. If appropriate, at some later point the invocation displayArea.setEditable( true ); can be used to enable editing as usual. The setEditable method can also be a applied to a JTextField. To illustrate the use of append and setEditable, suppose that a program that included a menu in its interface wanted to display the history of items that had been selected from this menu. To keep things simple, we will write the example code using a familiar example of a menu, our “Yes/No/Maybe so” menu. An image of how the program’s interface might look after its user had selected items from the menu at random 10 times is shown in Figure 3.8. The complete code for the program is shown in Figure 3.9. The JTextArea in which the selected menu items are displayed is named log. The setEditable method is applied in the constructor just before the log is added to the content pane so that it will never be editable while it is visible on the screen. The append method is used in menuItemSelected. There are two interesting features of the argument passed to append. First, since we are using getSelectedItem, we must use the toString 64
Figure 3.8: Sample of a menu item selection log method to assure Java that we will be working with a String even if getSelectedItem returns some other type of object. Second, rather than just using append to add the menu item returned by getSelectedItem to the log, we instead first use the “+” operator to concatenate the text of the menu item with the strange looking String literal "\n". To appreciate the purpose of the literal "\n", recall that when we first introduced the concatenation operation in the example code "I’m touched " + numberOfClicks + " time(s)" we stressed that if we did not explicitly include extra spaces in the literals "I’m touched " and " time(s)", Java would not include any spaces between the words “touched” and “time(s)” and the numerical value of numberOfClicks. Similarly, if we were to simply tell the append method to add the text of each menu item selected to the JTextArea by placing the command log.append( indecision.getSelectedItem().toString() ); in the menuItemSelected method, Java would not insert blanks or start new lines between the items. The text of the menu items would all appear stuck together on the same line as shown in Figure 3.10. To have the items displayed on separate lines, we must add something to each item we append that will tell the JTextArea to start a new line. The literal "\n" serves this purpose. Backslashes are used in String literals to tell Java to include symbols that can’t simply be typed in as part of the literals for various reasons. The symbol after each slash is interpreted as a code for what is to be included. The combination of the backslash and the following symbol is called an escape sequence. The “n” in the escape sequence "\n" stands for “new line”. There are several other important escape sequences. \" can be included in a String literal to indicate that the quotation mark should be included in the String rather than terminating the literal. For example, if you wanted to display the two lines 65
/* * Class MenuLog - Displays a history of the items a user selects * from a menu */ public class MenuLog extends GUIManager { private final int WINDOW_WIDTH = 100, WINDOW_HEIGHT = 270; // Dimensions of the display area private final int DISPLAY_WIDTH = 10, DISPLAY_HEIGHT = 8; // Used to display the history of selections to the user private JTextArea log; // Menu from which selections are made private JComboBox indecision; /* * Place the menu and text area in the window */ public MenuLog() { this.createWindow( WINDOW_WIDTH, WINDOW_HEIGHT ); indecision = new JComboBox( new String[]{ "Yes", "No", "Maybe so"} ); contentPane.add( indecision ); log = new JTextArea( DISPLAY_HEIGHT, DISPLAY_WIDTH ); log.setEditable( false ); contentPane.add( new JScrollPane( log ) ); }
}
/* * Add an entry to the log each time a menu item is selected */ public void menuItemSelected( ) { log.append( indecision.getSelectedItem().toString() + "\n" ); }
Figure 3.9: A program using a text area to display a simple log
66
Figure 3.10: The result of appending Strings without using "\n" What did he say? He said "No." in the JTextArea log, you could use the command log.setText( "What did he say?\nHe said \"No.\"" ); Finally, \\ is used to include a backslash as part of a literal. Using and Simulating Mouse Actions Within a JTextField or JTextArea, the position of the text insertion point or “caret” can be changed by clicking with the mouse. It is also possible to select a segment of text by dragging the mouse from one end of the segment to the other. Java provides accessor methods that can be used to obtain information related to such user actions and mutator methods that make it possible to select text and to reposition the caret under program control. The accessor method getSelectedText returns a string containing the text (if any) that the user has selected with the mouse. The method getCaretPosition returns a number indicating where the insertion point is currently located within the text. A program can change the selected text using the methods selectAll and select. The first method takes no arguments and simply selects all the text currently in the text area or text field. The select method expects two arguments describing the starting and ending positions within the text of the segment that should be selected. When you type text while using a program that has several text fields and/or text areas in its interface, the computer needs some way to determine where to add the characters you are typing. As a user, you can typically control this by clicking the mouse in the area where you want what you type to appear or by pressing the tab key to move from one area to another. A text field or text area selected to receive typed input in this way is said to have the focus. It is also possible to 67
determine which component should have the focus by executing a command within the program using a method named requestFocus.
3.3.4
Summary of Methods for GUI Components
In the preceding chapters and sections, we have introduced several types of GUI components and many methods for manipulating them. Here, we summarize the details of the methods available to you when you work with the GUI components we have introduced. In fact, this section provides a bit more than a summary. In addition to describing all the methods we have presented thus far, it includes some extra methods that are less essential but sometimes quite useful. We hope this will serve as a reference for you as you begin programming with these tools. In the description of each method, we provide a prototype of an invocation of the method. In these prototypes we use variable names like someJButton and someJComboBox with the assumption that each of these variable names has been declared to refer to a component of the type suggested by its name and associated with an appropriate component by an assignment statement. In situations where a method can be applied to or will accept as a parameter a component of any type, we use a variable name like someComponent to indicate that any expression that describes a GUI component can be used in the context where the name appears. Another convention used in these prototypes involves the use of semicolons. We will terminate prototypes that involve mutator methods with semicolons to suggest that they would be used as statements. Phrases that involve accessor methods and would therefore be used as expressions will have no terminating semicolons.
Methods Applicable to All Components We begin by describing methods that can be applied to GUI components of any type. someComponent.setForeground( someColor ); someComponent.setBackground( someColor );
68
The setForeground and setBackground methods can be used to change the colors used when drawing a GUI component on the display. The foreground color is used for text displayed. The actual parameter provided when invoking one of these methods should be a member of the class of Colors. In particular, you can use any of the names Color.BLACK, Color.DARK GRAY, Color.LIGHT GRAY, Color.GRAY, Color.CYAN, Color.MAGENTA, Color.BLUE, Color.GREEN, Color.ORANGE, Color.PINK, Color.RED, Color.WHITE, or Color.YELLOW to specify the arguments to invocations of these methods.
The setEnabled method enables or disables a component. Using true for the argument will enable the component. Using false will disable the component.
someComponent.setEnabled( true ); someComponent.setEnabled( false );
The requestFocus method tells a component that it should try to become the active component within its window. When a user enters information using the keyboard it will be directed to a JTextField or JTextArea only if that component has the focus. A program’s user can also change which component has the focus by clicking the mouse.
someComponent.requestFocus();
Methods Applicable to Components that Display Text The setText and getText methods can be used with four types of components that display text — JTextFields, JTextAreas, JLabels, and JButtons. The text displayed by the component is replaced by the text provided as the method’s argument.
someJTextField.setText( someString ); someJTextArea.setText( someString ); someJLabel.setText( someString ); someJButton.setText( someString );
The text currently displayed by the component is returned as the result of an invocation of getText.
someJTextField.getText() someJTextArea.getText() someJLabel.getText() someJButton.getText()
Methods Applicable to JTextFields and JTextAreas There are many methods that can be used with either JTextFields or JTextAreas (but not with JLabels or JButtons). The setEditable method determines whether or not the person running a program is allowed to use the keyboard and mouse to change the text displayed in a JTextArea or JTextField. An argument value of true makes editing possible. Using false as the argument prevents editing.
someJTextField.setEditable( true ); someJTextField.setEditable( false ); someJTextArea.setEditable( true ); someJTextArea.setEditable( false );
69
someJTextField.setCaretPosition( someInt ); someJTextArea.setCaretPosition( someInt );
This method is used to change the position of the text insertion point within the text displayed by the component. Positions within the text are numbered starting at 0.
This accessor method is used to determine the current position of the text insertion point within the text displayed by the component. Positions within the text are numbered starting at 0.
someJTextField.getCaretPosition() someJTextArea.getCaretPosition()
someJTextField.getSelectedText() someJTextArea.getSelectedText()
This method returns a String containing the text that is currently selected within the text area or text field.
someJTextField.selectAll(); someJTextArea.selectAll();
This method causes all the text currently within the component to become selected.
This method causes the text between the character that appears at the position start and the character that appears at position end to become selected. If the start or end value is inappropriate, invoking this method has no effect. The argument values must be integers.
someJTextField.select( start, end ); someJTextArea.select( start, end );
The append Method There is one important method that can only be applied to JTextAreas. The contents of someString are added after the text currently displayed in the text area.
someJTextArea.append( someString );
Methods Associated with JComboBoxes Many methods are available for adding, removing, and selecting menu items. In our prototypes for these methods, we will continue to pretend that only String values can be used as menu items. In some of the method descriptions, however, we provide a few clues about how a JComboBox behaves if menu items that are not Strings are used. 70
The contents of someString are added as a new menu item. In fact, as we hinted earlier, the argument does not need to be a String. If an argument of some other type is provided, the text obtained by applying the toString method to the argument will appear in the menu.
someJComboBox.addItem( someString );
The contents of someString are added as a new menu item at the position specified in the menu. As explained in the description of addItem, the first parameter does not actually have to be a String.
someJComboBox.addItemAt( someString, position );
Returns the menu item that is currently selected. Since menu items other than text strings are allowed, the result of this method might not be a String. As a consequence, it is usually necessary to immediately apply the toString method to the result of invoking getSelectedItem.
someJComboBox.getSelectedItem()
Returns the position of the currently selected menu item. Menu items are numbered starting at 0.
someJComboBox.getSelectedIndex()
Returns the number of items currently in the menu.
someJComboBox.getItemCount()
Returns the menu item found in the specified position within the menu. The position argument must be an integer. Menu items are numbered starting at 0. Since items other than text strings are allowed, it is usually necessary to immediately apply the toString method to the result of invoking getItemAt.
someJComboBox.getItemAt( someInt )
someJComboBox.setSelectedIndex( position );
71
Makes the item at the specified position within the menu become the currently selected item. Menu items are numbered starting at 0.
someJComboBox.setSelectedItem( someString );
Makes the item that matches the argument provided become the currently selected item. If no match is found, the selected item is not changed.
someJComboBox.removeAllItems();
Removes all the items from a menu.
someJComboBox.removeItem( someString );
Removes the item that matches the argument provided from the menu.
someJComboBox.removeItemAt( position );
Removes the item at the position specified from the menu. Menu items are numbered starting at 0.
JPanel Methods The methods associated with JPanels can be applied either to a JPanel explicitly constructed by your program or to the contentPane. someJPanel.add( someComponent ); someJPanel.add( someComponent, position );
Remove the specified component from the panel.
someJPanel.remove( someComponent );
3.4
Add the component to those displayed in the panel. If a second argument is included it should be an integer specifying the position at which the new component should be placed. For example a position of 0 would place the new component before all others. If no second argument is included, the new component is placed after all existing components in the panel.
Identifying Event Sources
Sometimes, it is necessary for a program not only to be able to tell that some button has been clicked, but also to determine exactly which button has been clicked. Consider the program whose interface is shown in Figure 3.11. The program displays 10 buttons labeled with the digits 0 through 9 in a configuration similar to a telephone keypad. The program also displays a text field below the buttons. We would like to discuss how to construct a program that displays such a keypad and reacts when the keypad buttons are pressed by adding to the text field the digits corresponding to the 72
Figure 3.11: A numeric keypad user interface buttons pressed. To do this, the program somehow has to know both when a button is pressed and be able to determine which of the ten buttons displayed was actually pressed. We know that we can arrange to have a set of instructions executed every time a button is pressed by placing those instructions in a method definition of the form public void buttonClicked( ) { . . . } When we introduced the notation for defining such methods, we explained what went in the method’s body, but we didn’t say much about the header. In particular, we never explained the empty pair of parentheses that appears after the name buttonClicked. We have seen that Java uses parentheses to surround the actual parameters in method invocations and constructions. Java borrows this use of parentheses from the mathematical notation for applying functions to values. Thus, when we say “sin( π2 )”, we say π2 is being used as an actual parameter to the sine function. Java also borrows the notion of formal parameter names from the notation used to describe functions in mathematics. For example, a mathematician might define: f (x) = 3x + 2 In this case, if asked for the value of f (7), you would hopefully answer 23. In this example, 7 is the argument or actual parameter. The name x is referred to as the formal parameter. It is used in the definition as a placeholder for the value of the actual parameter since that value is potentially unknown when the definition is being written. The rules for evaluating an expression like f (7) involve substituting the value 7 for each occurrence of x used in the definition. The designers of the Squint and Swing libraries realized that the instructions within a buttonClicked method might need to know what button was clicked. Therefore the libraries were designed to provide this information to the method when it is invoked. In the Java method header 73
public void buttonClicked( ) { the empty parentheses specify that the method defined expects no parameters. If we define buttonClicked in this way, the Java system assumes our particular definition of buttonClicked has no need to know which button was clicked. Therefore, the system does not provide this information to our method. If we want the system to tell us which button was clicked, we simply need to add a specification indicating that the method expects a parameter to the method header. Java is very picky about how we use names in programs. That is why we have to indicate the type of object each name might be associated with when we declare instance variables and local variables. Java treats formal parameter names in the same way. We can’t indicate that our method expects a parameter by just including the formal parameter’s name in parentheses as we do in mathematical definitions like f (x) = 3x + 2 Instead, we have to provide both the name we want to use and the type of actual parameter value with which it will be associated. The information the system is willing to provide to the buttonClicked method is a JButton. Therefore if we want to indicate that our buttonClicked method will use the name whichButton to refer to this information, we would use a header of the form public void buttonClicked( JButton whichButton ) { Just as when declaring a variable name, we are free to choose whatever name we want for a formal parameter as long as it follows the rules for identifiers. So, if we preferred, we might use the header public void buttonClicked( JButton clickedButton ) { Either way, once we include a formal parameter declaration in the header of the method we can use the formal parameter name to refer to the button that was actually clicked. Knowing this, it is fairly easy to write a version of buttonClicked that will add the digit associated with the button that was clicked to a text field. We simply apply getText to the button associated with the parameter name and then add the result to the text field. The complete code for a program illustrating how this is done is shown in Figure 3.12. Note that we cannot use the append method to add the additional digit. The append method is only available when working with a JTextArea. Since this program uses a JTextField, we must simulate the behavior of append by concatenating the current contents of the field, accessed using getText, with the digit to be added. Java is willing to provide information to other event-handling methods in the same way. If the menuItemSelected method is defined to expect a JComboBox as a parameter, then the formal parameter name specified will be associated with the JComboBox in which a new item was just selected before the execution of the method body begins. Similarly, the buttonClicked method can be defined to expect a JButton as a parameter and the textEntered method can be defined to expect a JTextField as a parameter. (Note: Entering text in a JTextArea does not cause the system to execute the instructions in textEntered). One word of caution, if you define a version of an event-handling method which includes the wrong type of formal parameter declaration, no error will be reported, but the method’s code will never be executed. For example, if you included a definition like 74
// A simple implementation of a numeric keypad GUI public class NumericKeypad extends GUIManager { // Change these values to adjust the size of the program’s window private final int WINDOW_WIDTH = 300, WINDOW_HEIGHT = 200; // Width of field used to display digits private final int DISPLAY_WIDTH = 20; // Used to display the sequence of digits selected private JTextField entry; // Create and place the keypad buttons in the window public NumericKeypad() { this.createWindow( WINDOW_WIDTH, WINDOW_HEIGHT ); contentPane.add( new JButton( "1" ) ); contentPane.add( new JButton( "2" ) ); contentPane.add( new JButton( "3" ) ); contentPane.add( new JButton( "4" ) ); contentPane.add( new JButton( "5" ) ); contentPane.add( new JButton( "6" ) ); contentPane.add( new JButton( "7" ) ); contentPane.add( new JButton( "8" ) ); contentPane.add( new JButton( "9" ) ); contentPane.add( new JButton( "0" ) ); entry = new JTextField( DISPLAY_WIDTH ); contentPane.add( entry ); }
}
/* * Add the latest digit to the display. * - parameter "clickedButton" is the button that was clicked */ public void buttonClicked( JButton clickedButton ) { entry.setText( entry.getText() + clickedButton.getText() ); }
Figure 3.12: Implementation of a numeric keypad
75
public void buttonClicked( JComboBox whichOne ) { ... } the system would essentially ignore the method’s definition.
3.5
Using Variables to Remember
So far, we have used variable and parameter names primarily to identify things. In the current version of the keypad program, for example, we use the parameter name clickedButton to identify the button that was clicked, and we use the variable name entry to identify the text field where the digits should be placed. In this section, we will use the keypad program to explore a more subtle use of variables. We will see that in addition to enabling us to identify things, variables can also help us remember things. To illustrate this, consider how to add a simple, cosmetic feature to the interface provided by the keypad. In particular, let’s think about how to change the program so that the last button clicked is highlighted by displaying the number on that button in orange instead of black. It is quite easy to make the label of the button that was just clicked turn orange. This can be done by adding the statement clickedButton.setForeground( Color.ORANGE ); to the buttonClicked method (as long as we also remember to import java.awt.*). Unfortunately, if this is all we do, the program won’t work quite the way we want. Each time we click a button it will turn orange and then stay orange. Eventually all the buttons will be orange. We only want one button to be orange at a time! A simple, but inelegant solution would be to associate names with all ten buttons and add ten statements to buttonClicked that would make all ten button labels become black just before we set the color for clickedButton to be orange. This solution is inelegant because if only one button is orange at any time, then nine of the ten instructions that make buttons turn black are unnecessary. It would be nice if we could just execute a single statement that would turn the one button that was orange back to being black. To do this, we have to somehow remember which button was clicked last. We can make our program remember this information by associating an instance variable name with this button. That is, we will declare a new variable named lastButtonClicked and then add whatever statements are needed to ensure that it always refers to the last button that was clicked. If we do this, then the single statement lastButtonClicked.setForeground( Color.BLACK ); can be inserted in the buttonClicked method just before the instruction clickedButton.setForeground( Color.ORANGE ); Executing these two instructions will first make the old orange button turn black and then make the appropriate new button turn orange as we would like. The difficult part is determining what statements are needed to ensure that lastButtonClicked always refers to the button that is currently orange. If we examine the two lines that we just 76
suggested adding to the buttonClicked method, we can already see a problem. Suppose that the last button that was clicked was the “3” key and now the user has clicked on “7”. We would then expect that when the two statements lastButtonClicked.setForeground( Color.BLACK ); clickedButton.setForeground( Color.ORANGE ); began to execute, the variable lastButtonClicked would be associated with button 3 and clickedButton would be associated with button 7. When the statements have finished executing, button 7 will be orange. It is now the “last button clicked”. The variable lastButtonClicked, however, would still refer to button 3. This is wrong, but easy to fix. We need to change the meaning of the variable lastButtonClicked as soon as we finish executing the two lines shown above. In the example we just considered, we would like lastButtonClicked to refer to button 7 after the statements within the buttonClicked method are complete. This is the button that is associated with the formal parameter name clickedButton during the method’s execution. In fact, it will always be the case that after the method finishes, the name lastButtonClicked should refer to the button that had been associated with clickedButton during the method. We can accomplish this by adding an assignment statement of the form lastButtonClicked = clickedButton; as the last statement in the method. This statement tells the computer to associate the name lastButtonClicked with the same object that is associated with clickedButton at the time the statement is executed. Since clickedButton always refers to the button being clicked as the method executes, this ensures that after the method’s execution is over, the name lastButtonClicked will refer to the button that was just clicked. It will then remember this information until the buttonClicked method is executed again. There is one remaining detail we have to resolve. How will this code behave the first time a button is clicked? If the only changes we make to the program are to add a declaration for lastButtonClicked and to add the three statements lastButtonClicked.setForeground( Color.BLACK ); clickedButton.setForeground( Color.ORANGE ); lastButtonClicked = clickedButton; to the end of the buttonClicked method, then the first time that a button is clicked, no meaning will have been associated with the name lastButtonClicked. Although it has been declared, no assignment statement that would give it a meaning would have been executed. As a result, the first time the computer tried to execute the statement lastButtonClicked.setForeground( Color.BLACK ); the name lastButtonClicked would be meaningless. Unfortunately, Java gets very upset when you try to apply a method using a name that is meaningless. Our program would come to a screeching halt and the computer would display a cryptic error message about a NullPointerException.1 1
Although the name NullPointerException may appear odd to you at the moment, if you take nothing else out of this section, you should try to remember that an error message containing this word means that you told Java to apply a method using a name to which you had not yet assigned any meaning. This is a fairly common mistake, so knowing how to interpret this error message can be quite helpful. In fact, if you examine the contents of such a message carefully you will find that Java tells you the name of the method within your code that was executing at the time the error occurred and the exact line on which the error was detected.
77
Later, we will see that Java provides a way to check whether a name is meaningless before using it. At this point, however, there is a simple, safe way to give the name a meaning and make our program function correctly. Clearly there is no way to give the name a meaning that is really consistent with its purpose. Before the first button has been clicked, there is no “correct” button to associate with the name lastButtonClicked. If we look at how the name is used, however, we can see that it is easy to give the name a meaning that will lead the program to behave as we desire. All we do with the name lastButtonClicked is use it to turn a button black. If we associate it with a button that is already black when the program starts, then using it the first time a button is clicked will just tell a button that is already black to turn black again. For example, we could associate lastButtonClicked with button 0 when the program starts. A complete version of the keypad program that uses this technique is shown in Figure 3.13
3.6
Summary
In this chapter, we have pursued two main goals. One obvious goal was to expand your knowledge of the set of methods with which you can manipulate GUI components. A very significant portion of this chapter’s text was devoted to the enumeration of available methods and their behaviors. Our second goal was to solidify your knowledge of some of the most basic mechanisms of the Java language. First, we introduced an entirely new class of methods, accessor methods, that provide the ability to get information about the state of an object. Next, we examined the grammatical structure of Java’s instructions to distinguish two major types of statements, assignments and invocations. In addition, we identified an important collection of grammatical phrases that are used as sub-components of statements called expressions. We learned that expressions are used to describe the objects and values on which statements operate. Finally, we learned about a new type of name that can be used to refer to objects, formal parameters, and saw how these names provide a way to determine which GUI component caused the execution of a particular event-handling method.
78
// A simple implementation of a numeric keypad GUI public class HighlightedKeypad extends GUIManager { private final int WINDOW_WIDTH = 300, WINDOW_HEIGHT = 200; // Width of field used to display digits private final int DISPLAY_WIDTH = 20; // Used to display the sequence of digits selected private JTextField entry; // Remember which button was clicked last private JButton lastButtonClicked; // Create and place the keypad buttons in the window public HighlightedKeypad() { this.createWindow( WINDOW_WIDTH, WINDOW_HEIGHT ); contentPane.add( contentPane.add( contentPane.add( contentPane.add( contentPane.add( contentPane.add( contentPane.add( contentPane.add( contentPane.add(
new new new new new new new new new
JButton( JButton( JButton( JButton( JButton( JButton( JButton( JButton( JButton(
"1" "2" "3" "4" "5" "6" "7" "8" "9"
) ) ) ) ) ) ) ) )
); ); ); ); ); ); ); ); );
lastButtonClicked = new JButton( "0" ); contentPane.add( lastButtonClicked ); entry = new JTextField( DISPLAY_WIDTH ); contentPane.add( entry ); }
}
/* * Add the latest digit to the display and highlight its button */ public void buttonClicked( JButton clickedButton ) { entry.setText( entry.getText() + clickedButton.getText() ); lastButtonClicked.setForeground( Color.BLACK ); clickedButton.setForeground( Color.ORANGE ); lastButtonClicked = clickedButton; }
Figure 3.13: Using a variable to remember the last button clicked 79
80
Chapter 4
Let’s Talk If you made a list of programs that you use frequently, chances are that the list would include several programs that depend on network access such as your web browser, email program, or IM/chat program. Given the importance of such programs, we introduce the basic techniques used to write programs that use the network in this chapter. The features of the Java language and libraries that we will employ to write network programs are actually quite simple. If all we needed to do was present these details, then this would be a very short chapter. In addition, however, we have to give you some background on the fundamentals of communications between computers on the Internet. Basically, teaching you the Java mechanisms required to send a message through the network will be of little use to you if you don’t know what messages to send. Therefore, we will begin by exploring the nature of the “conversations” that take place between computers on the Internet. Then, we will study the Java primitives used to send and receive messages and use these primitives to construct examples of programs that use the network.
4.1
Protocols
Communications between humans depend on a vast collection of rules and conventions we share with one another. Most obviously, there are the rules of the languages we use. Beyond the grammar and vocabulary, however, there are shared expectations about the forms conversations will take. Introductory phrases like “Good morning” and “Can I ask you a question?” don’t really add much useful information to a discussion, but if a speaker doesn’t include such phrases, chances are that the flow of conversation will suffer. The aphorism “It’s not what you say, but how you say it” applies to very mundane aspects of our speech and writing. We are so familiar with such conventions that we usually take them for granted. One context where they are more explicitly recognized is when we talk on the telephone. A web search for the phrase “Telephone Etiquette” yields an extensive collection of documents providing advice on how to conduct a proper telephone conversation. For example, the University of California at Fullerton has a telephone etiquette web site for their office staff that includes little “algorithms” for handling phone calls such as: • Answer the phone by saying: “[Department name], how may I help you?” • If the caller asks to speak to the dean (for example), ask “May I tell him/her who is calling?” – Ask the caller “What is this in regard to?” (if appropriate) 81
– – – –
Press Xfer and the extension. Wait for the dean to answer. Announce the name of the caller. Wait for a response as to whether the call will be taken. ∗ If the called party wishes to take the call, press the Xfer button again. ∗ If the calling party does not wish to take the call, press the RLSE button and then the button where the caller is. SAY: “ is out of the office, may I take a message or would you like his/her voicemail?”
The site also provides somewhat amusing advice including the importance of saying “He has stepped out of the office. Would you like to leave a message on his voicemail?” rather than saying “He is in the men’s room.”1 One interesting aspect of the advice provided by such sites it that it is clear that no single script is appropriate for all telephone calls. While the instructions above correspond to the conversational pattern you would expect if you called the administrative offices at a school, you would surprise many callers if you followed these instructions when answering the phone at home or in your dorm room. We have different patterns we follow for different forms of conversation. A complete guide to telephone etiquette would have to cover how to handle calls while at home, in the office, and even when answering the phone for friends while visiting their home. It would also have to discuss placing a call to a friend, placing a call to make dinner reservations, placing a call to order a pizza, and many other scenarios. Each situation would involve different patterns and expectations. Communications between computers depend on similar rules and conventions. In fact, if anything, such rules and conventions are even more critical to computer communications than to human communications. All data sent from one computer to another will ultimately be just a sequence of binary symbols. For any information to be transferred, the designers of the software that sends the messages and the software that receives the messages must agree on a common “language” that associates meanings with such sequences of 0s and 1s. In addition, communications software must have conversational patterns to follow. When two computers communicate, they do so because they are following algorithms that specify what messages to send and when to send them. As usual, the computers do not really understand the purpose of the algorithms they are following. In particular, the computers don’t really understand the purposes of the messages they send and receive. If a person says something unexpected (or at an unexpected point) in a conversation, the listener may be surprised, but the conversation can usually continue because the individuals involved understand what they are doing well enough to adjust. Since a computer does not really understand the conversation in which it is participating, it cannot adjust to the unexpected. As a result, it is critical that communications between two computers follow carefully designed conversational plans. These conversational plans determine the form of the algorithms implemented by programs that involve network communications. A collection of rules that specify the manner in which two computers should communicate is called a protocol. Like humans, computers have different conversational rules to follow depending 1
At the time of writing, this web page could be found at: http://www.fullerton.edu/it/services/Telecomm/FAQ/etiquetteguide.asp If it is still available, it is definitely worth visiting just for its clear statement debunking the “Three Myths about Students/Callers” — 1. Students try to make things difficult; 2. Students like to complain; and 3. Students expect the impossible.
82
on the type of communications involved. For example, the collection of rules a computer on the Internet follows when it wants to ask an email server to transmit a message is called the Simple Mail Transfer Protocol or SMTP. On the other hand, when asking an email server to allow you to read mail you have received, your computer probably follows either a set of rules known as the Post Office Protocol (POP) or the Internet Mail Access Protocol (IMAP). The protocol a computer must follow when fetching a web page is called the Hypertext Transfer Protocol or HTTP. There are even protocols whose names don’t end with the word “protocol”! The rules a computer must follow when talking to AOL’s IM service are named “Open System for CommunicAtion in Realtime” (or OSCAR for short).
4.1.1
The Client/Server Paradigm
In many conversations, people participate as equals or peers. As two friends approach one another on the street, either person might start a conversation by saying “Hi.” Either person may ask a question or make a comment about the weather, what the other person is wearing, or any other subject that comes to mind. Throughout the ensuing conversation either party may change the subject when it seems appropriate, and, eventually, whoever feels like it first will say “Goodbye” and continue on their way. There are, however, many examples of situations where the participants in a conversation have very distinct roles that play a major part in determining which party says what and when they say it. Consider for example, the “conversation” that occurs when you make a call to place an order using a 1-800 number (assuming, for the sake of discussion, that you decided not to just order through the web). When you place such a call, you expect to hear a pleasant voice say something like “Thank you for calling 1-800-Flowers. My name is Brian. How can I help you today?” First, note that in such a conversation you consider it your role to start the conversation by placing the call. You would probably react very differently if, instead, your phone rang and someone said “I’m calling from 1-800-Flowers. My name is Brian. How can I help you today?” There are many other points in such a conversation where it is clear that each party has a distinct role and that these roles are not interchangeable. Near the end of the call, you expect the salesperson to ask for your credit card information and you willingly provide it. Someday, try asking the salesperson to give you his or her credit card information during one of these calls. Many computer protocols, including all the protocols identified in the preceding section, assume that the computers involved will be assigned roles somewhat similar to those we can identify in a 1-800 call. One computer plays the role of the customer or client. The other plays the role of salesperson or server. The computer playing the client role starts the conversation just as a customer is expected to place a 1-800 call. The client computer then typically provides information indicating what it wants the server computer to do and justifying the request (e.g. by providing a password). In response, the server performs the task the client requested. This may include activities like delivering an email message or providing information from a data base. In many such computer protocols, the interchange of information takes place through a series of exchanges. This style of interaction is so common in computer protocols, that it is given a name of its own — the Client/Server Paradigm. We have seen that a computer’s behavior is determined by the instructions that make up the program it is executing. From this we can conclude that the program being executed will determine whether a computer acts as a client or a server in a particular exchange of network messages. Thus, when you launch an IM chat program like AIM, Adium, or iChat on your computer, the machine 83
suddenly becomes an IM client. Similarly, when you launch a web browser like FireFox, Safari, or Internet Explorer, it becomes a web or HTTP client. Servers work the same way. There is no fundamental difference between your computer and the AOL chat server or Yahoo’s web server. What makes a machine become a server is the fact that someone installs and runs an appropriate program on the machine. Such programs are not as well known as client programs, but they definitely exist. For example, Apache and Microsoft’s Internet Information System (IIS) are two examples of web server programs. Sendmail, Eudora WorldMail, and Microsoft Exchange Server are examples of electronic mail server programs. You are probably accustomed to running several programs on your computer at the same time. For example, you might find yourself switching back and forth between a word processor, a chat program, your web browser, and a program for editing pictures from your digital camera. If several of these programs are network-based, your computer may be playing the role of client for several different protocols at the same time. Similarly, it is possible to run several server applications on a computer at the same time. Therefore, some computers are simultaneously functioning as web servers and mail servers. In fact, a single computer can be both a server and a client at the same time. For example, if you share music from your computer using iTunes, your computer is acting as a server. While it is doing this, however, you can also have it act as a client for a different protocol by using your email program or web browser. The point is that while the types of messages a computer can send as part of a single conversation are strictly constrained by the role it is playing under a given protocol, a computer can be configured to play different roles in different conversations quite flexibly.
4.1.2
Mail Servers and Clients
We can make things more concrete by examining the use of servers and clients in the protocols that are used to handle electronic mail. The Internet’s email system is based on the existence of servers that hold messages for users between the point when a message is first sent and when the person to whom the message is addressed reads the message. These mail servers are expected to be continuously available to respond to client requests. You may use a mail server provided by the same organization through which you obtain Internet access or by an independent organization. For example, while on a college campus, you probably depend on the college’s computer services department for network access. They most likely also operate a mail server that you can use. Many home users obtain network access through a telephone or cable television provider. These companies typically provide mail servers that their subscribers can use. On the other hand, there are many companies that are in the business of providing mail service that do not also provide Internet access to their users. Yahoo and Hotmail are two well-known examples. Whether you access the Internet through a school’s network or through a commercial provider you can decide to use a distinct provider like Yahoo or Hotmail for your email server. You tell your email program what mail server it should use as part of its configuration process. When you send a message, your mail program delivers the message to your mail server by sending the server a series of messages that follow the rules of the SMTP protocol. If the message is addressed to a person who uses the same mail server as you, then the server simply holds the message until the intended recipient requests to see his or her mail. Figure 4.1 depicts such a mail transfer. In the figure, the computers that look like laptops represent user computers. For this scenario, there are just two users named Alice and Bob. The monitor and keyboard between the 84
Figure 4.1: Email exchange between two users through a common mail server laptops represents a computer that acts as a mail server for both Alice and Bob. This computer has the name coolmail.com. Both users are running mail client programs on their computers. Bob is using his email client to send an email to Alice. In this case, Bob would enter something like
[email protected] as the “To” address for the message. To deliver this message, Bob’s client will exchange a series of messages through the Internet with his server as depicted by the curved, double-tipped arrow in the figure. These messages will conform to the rules of SMTP. After this exchange is complete, the text of the message will be stored on the coolmail.com server. At some later point, Alice will ask her email client to check for new mail (or it might be configured to do this automatically every few minutes). When requesting to see mail, the recipient’s mail program communicates with the server using a protocol that is different from SMTP. The two most widely used protocols for retrieving mail from a server are POP and IMAP. In the figure, Alice’s email client exchanges a series of messages that conform to the POP protocol with the server to check for new mail. This exchange is shown as a straight double-tipped arrow in the figure. After it is complete, Bob’s message will appear in the list of unread messages displayed by Alice’s email program. If a message is sent to someone who uses a different mail server, then a bit more work is required. This scenario is depicted in Figure 4.2. The email client program still passes the message to the sender’s mail server using SMTP. The sender’s mail server, however, does not just store the message until the recipient asks for it. Instead, the sender’s mail server passes the message on to the recipient’s mail server as soon as it can. The communication between the sender’s mail server and the recipient’s mail server is also conducted by following the rules of SMTP. In the figure, Bob is shown sending an email to a user named Carol. Carol uses her school’s email server which has the name myuniversity.edu. Therefore, the figure shows that two conversations based on SMTP are required to deliver the message. First, Bob’s email program delivers the message to Bob’s server, coolmail.com. Rather than simply holding the message, coolmail.com 85
Figure 4.2: Email exchange between two users with distinct mail servers will quickly attempt to forward the message to Carol’s server, myuniversity.edu, by exchanging a similar sequence of SMTP messages with that server. Ultimately, Carol will retrieve the message and any other mail she may have received by exchanging POP (or IMAP) messages with her mail server.
4.1.3
The Transmission Control Protocol
Suppose for a moment that you did set out to write a complete guide to telephone etiquette. This would involve writing guidelines for many different types of phone calls. The guidelines for calling home on Mother’s Day would clearly be different from those for calling to make dinner reservations or handling a call from a telephone solicitor. Making any call, however, requires certain common steps. You have to pick up the receiver (or push the right button on a cell phone). You have to wait for a dial tone. You have to know how to dial the number (including whether to include an area code or not). You have to know what to do if the phone just keeps ringing and ringing. You would not want to discuss these details separately in your guidelines for each type of phone call a person might make. You would instead either just assume people knew how to make calls or write a set of instructions describing the basics of making a phone call that a person could refer to as necessary while following the instructions for a particular type of phone call. Similarly, while network protocols for sending emails, fetching web pages and chatting through AOL’s IM are all different, they all involve common elements. In the Internet, many of these details 86
are collected in a protocol called the Transmission Control Protocol or TCP.2 Each of the protocols mentioned in the preceding sections is designed to support a particular application of the Internet. HTTP is designed to support communications between web browsers and web servers, and SMTP, POP, and IMAP are all designed to support email. As a result, such protocols are known as application protocols. TCP, on the other hand, is not designed to support any particular application. Instead it addresses fundamental communication issues that arise in many distinct applications. In recognition of this difference, TCP is described as a transport protocol. Within the Internet, TCP is the most commonly used transport protocol. There are two particular aspects of TCP that will become relevant as we explore how to write Java programs that use the network. The first is that TCP, like the telephone system, is based on the notion of conversations. To appreciate this assumption, you have to recognize the fact that there are forms of communications that can’t really be called conversations. Contrast the way you talk to someone on the telephone with the way you communicate by email. When you are talking to someone on the phone you don’t try to say everything you wanted to say at once. Instead, you provide a little information, wait to hear how the person to whom you are talking responds, and then repeat that process until you are done. With email, however, you typically put everything you want to say in one message. Normally, the first thing you say when you make a phone call is “Hi,” possibly also taking the time to say who you are. On the other hand, it would be very odd to send someone an email that simply said “Hi. This is Tom.” The expectation that a person you are addressing will respond is integral to our notion of a conversation. If you sent someone an email in the morning suggesting that they meet you for lunch and they showed up for lunch without sending you a response, you would not be terribly surprised. On the other hand, if you called someone to suggest lunch in the morning and they hung up without agreeing or at least saying “See you then,” you would assume that you were accidentally disconnected and try to call them again. Of course, you can only be “disconnected” if you thought you were “connected.” This notion of a “connection” is the concrete way that both the phone system and TCP make the concept of a conversation a part of the communication process. When you want to send an email, you just send it. When you want to talk to someone on the phone, you have to first “call” their number to get your phone “connected” to theirs. After you have sent an email to someone, there is no way that your computer can tell whether or not you will send another email to the same person in the near future. On the other hand, when a phone conversation is finished, you let the phone company know by hanging up. TCP depends on a similar notion of connections. When one program wants to talk to another it begins by making a connection to the other program. Just as we have written programs that “make” JButtons and JTextFields by executing constructions, you will learn how to write a construction that makes a new network connection, essentially “calling” the other computer. Once the connection is established, the computers at either end can send each other messages through the connection. After the programs have exchanged all desired messages, they can “hang up” by invoking a method to close the connection. The other aspect of TCP that you will need to understand involves how a program identifies the other computer to which it wants to be connected. In order to call someone on the phone, you need to know the other person’s phone number. 2
You may have encountered the abbreviation TCP/IP while configuring your computer’s network preferences or elsewhere. This abbreviation is used to refer to the suite of communication protocols used on the Internet. The fact that TCP is included in this abbreviation reflects that fact that it is a very important component of the collection of Internet protocols.
87
More basically, however, you have to know how phone numbers work. That is, you have to know things like when to include an area code and how to decide when to start by dialing 1. This may seem trivial to you, but that is only because you use the system every day. Dealing with an unfamiliar phone system quickly makes it obvious that some basic knowledge of the structure of phone numbers is essential. For example, we searched the web yellow pages for some Australian airlines and found the following entries: Jetstar — For All Day, Every Day, Low Fares ph: 13 1538 Royal Brunei Airlines — Value Fares To Asia, Middle East & Europe. ph: (02) 8267 5300 Freedom Air — “Really, Really Small Fares” ph: 1800 122 000 Based on these entries, how many digits long do you think an Australian phone number is? Do they have area codes? How long are their area codes? You are almost certainly familiar with some aspects of the mechanisms TCP uses to identify the endpoint of a connection. Email addresses and web page addresses usually contain names like hotmail.com or www.google.com. These names are called domain names. They can be used within a program to identify the remote machine with which the program wants to establish a connection. Each domain name consists of a series of short identifiers separated from one another by periods. You may also have seen machines identified using sequences of number separated by periods. For example, the sequence 64.233.161.147 is (at least at the moment this paragraph is being written) another way of identifying the machine called www.google.com. Such a sequence of numbers is called an Internet Address or IP address for short. I can access the Google web site by entering either the web address http://www.google.com or http://64.233.161.147. IP addresses are TCP’s equivalent of telephone numbers. To create a TCP connection to another machine, a computer needs to know the IP address of the other machine. Fortunately, the Internet provides a service called the Domain Name System that acts like a telephone directory for the Internet. Given a domain name, a computer can use the domain name system to determine the IP address associated with the domain name. The software that implements TCP performs domain name lookups automatically. As a result, a programmer can either provide an IP address or a domain name to create a connection. Identifying the machine that you want to talk to, however, is not enough. As we explained earlier, a single machine may be running a program that makes it act as a web server at the same time that it is running another program that makes it act as a mail server. As a result, it isn’t enough to send a message to a particular machine. You instead have to send each message to a particular program on a particular machine. An IP address alone only identifies a machine. Therefore, TCP requires a bit more addressing information for the messages it delivers. The extra information TCP uses to identify the particular program a message should be delivered to is called a port number. Continuing with our analogy with the telephone system, a good way to think of a port number is that it is much like a telephone extension number. Many large organizations have a single telephone number. Within the organization, departments and/or individuals are assigned extension numbers. When you call the organization’s telephone number, an operator or an automatic menu system asks you to provide the extension for the person you are trying to contact and then connects you with the requested extension. Similarly, within a computer 88
running several programs that use the network, each program is assigned a port number. When you want to create a connection to a particular program on a machine, you use the machine’s IP address together with the port number assigned to the program as the complete address. By convention, particular port numbers are associated with programs providing common network services. For example, port 80 is associated with web servers and port 25 is associated with servers designed to accept email for delivery using the SMTP protocol. The complete address used to connect to the Yahoo web server would therefore be (www.yahoo.com, 80) or (64.233.161.147, 80) while the address for the mail server at Hotmail is (mail.hotmail.com, 25) or (65.54.245.40, 25).
4.1.4
Talking SMTP
As a last bit of background before we discuss the mechanisms used within a Java program to send messages through the network, we will explore the rules of one important Internet application protocol, the Simple Mail Transfer Protocol (SMTP). We will later use examples from this protocol to illustrate the use of Java network programming mechanisms. Internet protocols are described in documents know as RFCs (Requests for Comment). The complete details of the SMTP protocol are provided in one of these documents. RFCs are identified by number. SMTP is described by RFC 2822. If you wish to learn more about SMTP than we provide below, an online copy of this document can be found at http://www.ietf.org/rfc/rfc2821.txt One rule of the SMTP protocol is that it is the client program’s responsibility to start the process of communication. The client does this by establishing a connection to the SMTP server. The protocol does not actually require that this be a TCP connection, but TCP is the mechanism most commonly used for SMTP connections. The protocol also states that as soon as the connection is established, the server should send a message to the client identifying itself. For example, if a program makes a connection to port 25 on the server mail.adelphia.com, it will quickly be sent a message like: 220 mta9.adelphia.net ESMTP server (InterMail vM.6.01.05.02 201-2131-123-102-20050715) ready Wed, 28 Jun 2006 11:24:37 -0400
On the other hand, if it connects to port 25 on mail.hotmail.com, the program will receive a message like: 220 bay0-mc1-f10.bay0.hotmail.com Sending unsolicited commercial or bulk email to Microsoft’s computer network is prohibited. Other restrictions are found at http://privacy.msn.com/Antispam/. Violations will result in use of equipment located in California and other states. Wed, 28 Jun 2006 22:42:26 -0700
Obviously, although the SMTP protocol governs the form of messages exchanged between a client and server, it still leaves a great deal of flexibility. While mail.adelphia.com appears to introduce itself using computerese, Microsoft’s Hotmail server clearly prefers legalese. It is a bit hard to see how two messages that are so different could be conforming to the same guidelines. In fact, these two messages reveal quite a few interesting aspects of the SMTP protocol. First, both of these messages are composed entirely of text. That is, while the actual messages that travel between the two computers are just sequences of 0s and 1s, when SMTP is being used 89
Reply Code 220 221 250 354 450 452 500 501
Interpretation Service ready Service closing transmission channel Requested mail action completed Start mail input Requested mail action not taken: mailbox unavailable Requested action not taken: insufficient system storage Syntax error, command unrecognized Syntax error in parameters or arguments
Figure 4.3: A sampling of SMTP server reply codes
these sequences are all interpreted as text encoded using a standard encoding system called ASCII (American Standard Code for Information Interchange). The designers of SMTP could have instead used special binary codes to reduce the number of bits required in many cases. We can speculate that the use of text for all SMTP messages was motivated by the effort required to correct mistakes in early implementations of the protocol. If someone wrote a program that was intended to act as an SMTP client or server, and the program did not work as expected, it would likely be necessary to examine the messages exchanged as part of the process of isolating and correcting the mistake. Messages encoded in ASCII could be examined using standard tools for text processing. If SMTP had used a specialized encoding scheme, specialized tools would have been required. In addition to using text, the designers of SMTP gave those implementing server programs considerable leeway to provide information that might be useful to a human reader beyond the information required by the protocol for use by the client program. The introductory messages received from the two servers above each start with two required fields: the code “220” and the official domain name of the server to which the client has connected.3 The server is free to provide any additional information it feels might be useful in the remainder of the message. The additional information included by the server mail.adelphia.com seems designed to help someone struggling to diagnose a problem with mail software. It provides a description of the mail server program being run on mail.adelphia.com, InterMail, including what appears to be a precise version number. It also includes the time and date at which the message was sent. The message sent by the Hotmail server, on the other hand, suggests that Microsoft might be less concerned with helping someone debug a mailer than with establishing a legal basis for enforcing their use policies. This must be because their software does not contain any bugs. The code “220” at the beginning of these two server messages is actually the most important piece of information from the point of view of the client software. Each message an SMTP server sends starts with such a three digit code. A list of the codes used and their interpretations is included in the specification of the protocol. A portion of this list is reproduced in Figure 4.3. As indicated in the figure, the code 220 simply indicates that the server is ready. In many cases, the code is the only information required in the message. All messages the server sends to the client during an SMTP exchange are sent in reply to actions performed by the client. The introductory “220” message is sent in response to the client creating a 3
A machine on the Internet can be associated with several “nicknames” in addition to its official name. Thus, in both the examples shown, the name that follows the “220” code is somewhat different from the name of the host to which we said we were connecting.
90
connection. All other server messages are sent in response to messages sent by the client. Messages sent by the client are called commands. While each server reply starts with a three digit numeric code, each command sent by the client must begin with a four character command name. The use of a fixed length for all command names simplifies writing client software, but it leads to some odd spellings. For example, the first “command” the client is expected to sent is a “Hello” message in which the client identifies itself in much the same way the server is identified within the “220” reply message. The command name used in the message is therefore “HELO”.4 The command code should be followed by the name of the client machine. Therefore, a typical HELO command might look like: HELO tcl216-44.cs.williams.edu The server must send a reply to every client command. If the server is able to process a client command successfully, it sends a reply starting with the code 250. In the case of the HELO command, most servers define success rather loosely. Typical servers will respond to any HELO command with a 250 reply, even if the machine name provided is clearly incorrect. For example, sending the command HELO there to the SMTP server at mail.yale.edu elicits a reply of the form 250 po09.its.yale.edu Hello tom.cs.williams.edu [137.165.8.83], pleased to meet you
The server clearly knows that the domain name included in the command is incorrect since it includes the correct domain name for my machine in its reply. Also note that this particular server program takes advantage of the fact that most of the text in its reply is ignored by the client software by including a cute little “pleased to meet you” in the message. The actual transfer of a mail message is accomplished through a sequence of three client commands named MAIL, RCPT, and DATA. The MAIL command is used to specify the return address of the individual sending the message. The command name is followed by the word “FROM” and the sender’s email address. Thus, if a mail client was trying to deliver the message from Bob to Carol discussed in section 4.1.2, it might start by sending the command MAIL FROM: The server will usually respond to this command with a 250 reply such as 250 ...
Sender ok
Next, the client specifies to whom the message should be delivered by sending one or more RCPT (i.e., recipient) commands. In each such command, the command name is followed by the word “TO” and the email address of a recipient. In the case of Bob’s email program trying to deliver a message to Carol, this command might look like RCPT TO: 4
To support extensions to the original protocol, the current version of SMTP allows clients to substitute an “EHLO” command for the “HELO” command. Use of this peculiar spelling informs the server that the client would like information about which SMTP protocol extensions the server supports.
91
and would elicit a reply such as 250 ...
Recipient ok
from the server. Finally, the client initiates the transmission of the actual contents of the mail message by sending the command DATA to the server. The server will probably respond to this message with a reply of the form 354 Enter mail, end with "." on a line by itself The server uses the 354 reply code rather than 250 to indicate that it has accepted but not completed the requested DATA command. It needs to receive the contents of the mail message before it can complete the command. After the 354 reply code, it kindly tells us how to send the message (even though any mail client program that received this reply should already know!). After sending a DATA command, a mail client sends the actual contents of the mail message to the server line by line. When it is done, it informs the server by sending a single period on a line by itself. Once it sees the period, the server will try to deliver the message and send a 250 reply code if it can. There are several additional commands and many more reply codes than we have discussed. For our purposes, however, we only need to use one additional command. When the client has finished sending messages to the server it sends the server a command of the form QUIT The server will then send a 250 reply message and disconnect from the client. That is, while it is the client’s job to create the connection to the server, it is the server that gets to “hang up” first when they are done.
4.2
Using NetConnections
We noted that all command and reply messages sent using SMTP are encoded as text using the ASCII code. Many other important Internet protocols share this property, including POP, IMAP and HTTP. There are, however, examples of protocols that depend on more specialized encodings of information in binary including the OSCAR instant messaging protocol and the DNS protocol used to translate domain names into IP addresses. The Squint library contains several classes designed for implementing programs that involve network communications. Among these are two classes named TCPConnection and NetConnection. The TCPConnection class provides general purpose features that make it flexible enough to work with specialized encoding schemes. It provides the functionality needed to implement clients and servers based on protocols like OSCAR and DNS. NetConnection, on the other hand, provides primitives for network communication that are specialized to make it easy to implement programs that use text-based protocols. To simplify our introduction to network programming in Java, we will restrict our attention to such text-based protocols in this chapter. We will introduce the use of the NetConnection class and, as an example, present the implementation of a very simple mail client. 92
Figure 4.4: GUI interface for a simple SMTP client
4.2.1
An Interface for an SMTP Client
The GUI interface for the program we will implement is shown in Figure 4.4. The program is really only half of a mail client. It can be used to send mail, but not to read incoming mail messages. As a result, it only sends messages based on the SMTP protocol, while a complete mail program would also have to use POP or IMAP. The program provides two text fields and a text area where the user can enter the destination address for the email message, the user’s own address, and the body of the message to be sent. Once the correct information has been placed in these areas, the user can tell the program to send the message by pressing the “Send” button. Unlike most mail client programs, this program provides no mechanism that allows the user to specify the name of the SMTP server to contact when a message is to be delivered. That information is included in the actual text of the program. This is not a desirable feature, but it will make the example a bit simpler. The text area at the bottom of the program window is used to display the reply messages received from the SMTP server. This information would not be displayed by a typical mail client, but it is displayed by our program to make it clear how the process depends on the underlying protocol. The snapshot shown in Figure 4.4 shows how the window would look shortly after the user pressed the “Send” button. At this point, we can see the complete list of replies from the server displayed in the area at the bottom of the window. The instance variable declarations and the constructor for such a program are shown in Figures 4.5 and 4.6. None of this code actually involves using the network. Instead, it only creates the GUI components described above and adds them to the program’s window. The only real clues that this program will involve network access are the declarations of the variables SMTP SERVER and SMTP PORT. These variables are associated with the name of the server the program will con93
import squint.*; import javax.swing.*; // A simple client program that can be used to send email messages // through an SMTP server. public class SMTPClient extends GUIManager { // Change these values to adjust the size of the program’s window private final int WINDOW_WIDTH = 450, WINDOW_HEIGHT = 460; // Amount of space to allow in text fields and text areas private final int ADDR_WIDTH = 14; // How many characters wide program’s text areas should be private final int AREA_WIDTH = 35; // How many lines tall the message area should be private final int MESSAGE_LINES = 10; // How many lines tall the log area should be private final int LOG_LINES = 10; // Address of SMTP server to use private final String SMTP_SERVER = "smtp.cs.williams.edu"; // Standard port number for connection to an SMTP server private final int SMTP_PORT = 25; // Fields for to and from addresses private JTextField to; private JTextField from; // Area in which user can type message body private JTextArea message; // Area in which responses from server will be logged private JTextArea log; Figure 4.5: Instance variable declarations for an SMTP client
94
// Place fields and text areas on screen to enable user to // enter mail. Provide a "Send" button and a text area in which // server replies can be displayed. public SMTPClient() { // Create window to hold all the components this.createWindow( WINDOW_WIDTH, WINDOW_HEIGHT ); // Create fields for to and from addresses JPanel curPane = new JPanel(); curPane.add( new JLabel( "To:" ) ); to = new JTextField( ADDR_WIDTH ); curPane.add( to ); contentPane.add( curPane ); curPane = new JPanel(); curPane.add( new JLabel( "From:" ) ); from = new JTextField( ADDR_WIDTH ); curPane.add( from ); contentPane.add( curPane ); // Create the message entry area contentPane.add ( new JLabel( "Enter your message below") ); message = new JTextArea( MESSAGE_LINES, AREA_WIDTH ); contentPane.add( new JScrollPane( message ) ); // Add the Send button contentPane.add( new JButton( "Send" ) ); // Create the server response log log = new JTextArea( LOG_LINES, AREA_WIDTH ); contentPane.add( new JScrollPane( log ) ); log.setEditable( false ); }
Figure 4.6: Constructing the interface for an SMTP client
95
tact, smtp.cs.williams.edu, and the standard port through which an SMTP server can be contacted, port 25. In this program, all the code that involves accessing the network will fall in the buttonClicked method that is discussed in the following sections.
4.2.2
Making Connections
To communicate with another computer using TCP, a program must establish a connection with a program on the other computer. This can be accomplished by constructing a NetConnection. We have seen many examples of constructions in the preceding chapters. We know that by including an expression of the form new JTextArea( ... ) in a program we can cause the computer to create a text area that we will eventually be able to see on the screen. We can similarly cause a computer to create a network connection by executing an expression of the form new NetConnection( ... ) The difference is that constructing a NetConnection doesn’t produce anything we can ever see on the screen. From the program’s point of view, however, it does not really matter whether an object can be seen or not. Our programs never see text areas either. Once a text area is constructed, however, statements within the program can apply methods like getText and setText to the text area to display information for the program’s user or to access information provided by the user. Similarly, once a NetConnection is constructed, we can apply methods to the NetConnection to send information to the computer at the other end of the connection or to access information sent by the program at the other end of the connection. Of course, to apply methods to a NetConnection we must associate a name with the object constructed. Therefore, we will typically include such constructions in assignment statements or in a declaration initializer. For example, if we decided to use the name connection to refer to a NetConnection we might use the declaration NetConnection connection = new NetConnection( ... ); to create the connection and associate it with its name. When we construct GUI components, we provide parameters in the constructions that specify details of the object to be constructed like the width of a text field or the label to appear on a button. When we construct a NetConnection we need to provide two critical pieces of information as parameter values: the name or address of the machine with which we wish to communicate and the port number associated with the program to which we are connecting. The first value will be provided as a String specifying either a domain name or an IP address. The second can either be a String or an int value. Therefore, we could construct a connection to the Yahoo web server using the construction new NetConnection( "www.yahoo.com", 80 ) Alternately, we can use a String value to describe the port to use as in new NetConnection( "www.yahoo.com", "80" ) 96
or, assuming that 209.73.186.238 is the IP address for the machine named www.yahoo.com, we could type new NetConnection( "209.73.186.238", 80 ) In the SMTP client program we described in the preceding section, we will want to construct a NetConnection to an SMTP server as soon as the user clicks the “Send” button. The name of the server and the SMTP port number (25) are associated with the names SMTP SERVER and SMTP PORT in the program’s instance variable declarations as shown in Figure 4.5. Therefore, within the buttonClicked method we can create the desired NetConnection by including a declaration of the form: NetConnection connection = new NetConnection( SMTP SERVER, SMTP PORT );
4.2.3
The Ins and Outs of NetConnections
Once a connection is established, it is easy to use the NetConnection to send and receive lines of text through the network. There is a method named nextLine that is used to access each line received through the connection and a method named println (pronounced “print line”) that is used to send a line of data through the connection.5 The surprise, however, is that these methods are not applied to the connection itself. They are instead applied to subcomponents of the connection. In the diagrams shown in Figures 4.1 and 4.2, we depicted TCP connections as double-tipped arrows because information flows back and forth between server and client. It would, however, more accurately reflect the structure of Squint NetConnections to instead use pairs of singletipped arrows to represent each TCP connection as shown in Figure 4.7. Each of these arrows represents a one-way flow of data through the network. Java provides a variety of classes for handling such one-way flows of data called streams. A NetConnection is basically a pair of such streams. Within a given NetConnection the stream that carries data from the program that constructed the NetConnection to the remote machine is named out (since it carries data out of the program), and the stream through which data is received is named in. The println method mentioned above is applied on the out stream while the nextLine method is applied to the in stream. For example, we know that immediately after a program establishes a connection to an SMTP server by evaluating a construction like: NetConnection connection = new NetConnection( SMTP SERVER, SMTP PORT ); the server will send a line to indicate it is ready that will look something like: 220 smtp.cs.williams.edu ESMTP Sendmail 8.13.1/8.13.1; Fri, 30 Jun 2006 10:23:31 -0400 (EDT)
The program can access whatever line the server sends by evaluating an expression of the form connection.in.nextLine() 5
The name println is a historical artifact lingering from a time when a program that was sending data anywhere was probably sending it to an attached printer rather than to another computer. The name sendLine might be more appropriate, but the designers of the Java libraries opted to be faithful to the more traditional name.
97
Figure 4.7: Email exchange between two users showing two-way traffic through connections The sample program we wish to write is supposed to display all lines received form the server, including this introductory line, in the text area named log. Therefore, for that program we should include the invocation of nextLine within an invocation that will add the text received to that displayed in the log. Such an invocation would be log.append( connection.in.nextLine() + "\n"); Similarly, we can send lines by applying the println method to the stream identified as connection.out. Consider, for example, how we would send the “QUIT” command that must be sent at the end of the interaction with the server. This is one of the simplest SMTP commands. The client program is not expected to send anything after the word “QUIT”. As a result, we can send this command by including the single line connection.out.println( "QUIT" ); in our buttonClicked method. Very similar code can be used to send a DATA command. Sending the other SMTP commands to the server is not much more complicated. For example, the “MAIL” command sent to initiate the transmission of a message is supposed to include the return address that the person using our program entered in the text field named from. We can specify the argument to an invocation of println by using an expression to describe how to construct the desired value out of simpler parts. Thus, we can use a statement of the form connection.out.println( "MAIL FROM:" ); 98
to send a MAIL command to the server. If the user types the text
[email protected] in the from text field, this command will send the line MAIL FROM: Probably the most interesting use of println that occurs in this program is in the commands used to send the body of the email message to the server. This task is interesting because, unless the user has very little to say, this will require sending several lines to the server rather than just one. The surprise is that a single invocation of println can send many lines. If we execute the commands connection.out.println( message.getText() ); connection.out.println( "." ); our program will send all the lines of text that the user has entered in the text area named message to the server followed by the period on a line by itself. (Recall that this final period is required by the rules of SMTP to indicate the end of the message body.) Obviously, the name println is a bit misleading! This method is not limited to sending a single line. It can send many lines. When we discussed text areas we saw that you could force text to appear on separate lines by including the special symbol \n in a string. This is because \n corresponds to a special ASCII code that represents the end of a line to a text area. println is named println instead of just print because it inserts a similar code after the end of whatever data it sends. This ensures that the receiver will identify the end of the data as the end of a line. There is, in fact, another method named print that just sends the data specified without adding any codes to indicate the end of a line. If, however, we replaced the code above with the statements connection.out.print( message.getText() ); connection.out.println( "." ); our program would malfunction in certain situations. If the user did not press the return key after the last line entered in the text area, there would be no end of line code between the end of the user’s message and the period sent by the second statement. To the server, the period would appear at the end of the last line the user typed rather than on a line by itself. As a result, the server would not realize the message was complete. Many of the Internet’s text-based protocols require that commands be sent on separate lines, so it will be critical that you use println rather than print. According to the SMTP protocol specification, our client program should include the name of the machine on which it is running in the HELO command it sends to the server. To make it easy to obtain this information, there is a getHostName method associated with the GUIManager class. Within a class that extends GUIManager, an expression of the form this.getHostName() produces a string containing the name of the machine running the program. This makes it possible to use the statement connection.out.println( "HELO " + this.getHostName() ); to send the HELO command. 99
// Send a message when the button is clicked public void buttonClicked( ) { // Establish a NetConnection and say hello to the server NetConnection connection = new NetConnection( SMTP_SERVER, SMTP_PORT ); log.append( connection.in.nextLine() + "\n" ); connection.out.println( "HELO " + this.getHostName() ); log.append( connection.in.nextLine() + "\n" ); // Send the TO and FROM addresses connection.out.println( "MAIL FROM: " ); "\n" ); to.getText() +">" ); "\n" );
// Send the message body connection.out.println( "DATA" ); log.append( connection.in.nextLine() + "\n" ); connection.out.println( message.getText() ); connection.out.println( "." ); log.append( connection.in.nextLine() + "\n" ); // Terminate the SMTP session connection.out.println( "QUIT" ); log.append( connection.in.nextLine() + "\n" ); connection.close(); } Figure 4.8: The buttonClicked method of a simple SMTP client
4.2.4
A Closing Note
Just as saying “Goodbye” is not the same as hanging up the phone, sending a QUIT command to an SMTP server is not the same as ending a TCP connection. As a result, after the QUIT command is sent and the server’s reply is received, our program’s buttonClicked method still has to invoke a method to end the TCP connection. This is done by applying the close method to the connection itself (rather than to its in or out streams) using a statement like connection.close(); With this detail, we can now present the complete code for our SMTP client’s buttonClicked method. This code can be found in Figure 4.8.
4.2.5
What’s Next
Just as the out stream associated with a NetConnection provides both a method named println and a method named print, there is a method named next that can be applied to the in stream 100
Figure 4.9: SMTP client displaying next items rather than next lines in addition to the nextLine method. While the nextLine method produces the next line of text received through the connection, the next method is defined to return the next token received. A token is just a sequence of symbols separated from other symbols by blanks, tabs, or by the end of a line. Informally, a token is just a word. For example, if we had used the expression connection.in.next() in place of all seven occurrences of the expression connection.in.nextLine() in the buttonClicked method shown in Figure 4.8, then the output displayed in the log of messages received from the server would appear as shown in Figure 4.9. If you look back at the output produced by the original version of the program, as shown in Figure 4.4, you will see that the first line sent from the server: 220 smtp.cs.williams.edu ESMTP Sendmail 8.13.1/8.13.1; Fri, 30 ... has been broken up into individual “words”. Each time the next method is invoked it returns the next word sent from the server. In fact, there are many other methods provided by the in stream that make it possible to interpret the tokens received in specific ways. For example, if immediately after creating the NetConnection we evaluate the expression connection.nextInt() 101
// Send a message when the button is clicked public void buttonClicked( ) { // Establish a NetConnection and introduce yourself NetConnection connection = new NetConnection( SMTP_SERVER, SMTP_PORT ); connection.out.println( "HELO " + this.getHostName() ); // Send the to and from addresses connection.out.println( "MAIL FROM: " ); connection.out.println( "RCPT TO: " ); // Send the message body connection.out.println( "DATA" ); connection.out.println( message.getText() ); connection.out.println( "." ); // Terminate the SMTP session connection.out.println( "QUIT" ); // Display the responses from the server log.append( connection.in.nextLine() + "\n" log.append( connection.in.nextLine() + "\n" log.append( connection.in.nextLine() + "\n" log.append( connection.in.nextLine() + "\n" log.append( connection.in.nextLine() + "\n" log.append( connection.in.nextLine() + "\n" log.append( connection.in.nextLine() + "\n"
); ); ); ); ); ); );
connection.close(); } Figure 4.10: The buttonClicked method of a simple SMTP client the value returned will still be 220, but it will be returned as an int rather than a String. This would make it possible for the program to perform arithmetic operations on the value. One interesting thing to note about the way in which the next method behaves, is that all of the words displayed in Figure 4.9 come from the first line sent by the server. Even though each invocation of next comes immediately after a line that sends a request to the server, the system does not assume that it should return a token from the server’s response to that request. Instead it simply treats all the data sent by the server as a long sequence of words and each invocation of next returns the next word from this sequence. We emphasize this because the nextLine method behaves in a similar way. It treats the data received from the server as a sequence of lines. Each invocation of nextLine produces the first line from the sequence that has not previously been accessed through an invocation of nextLine. For example, suppose that we revise the code of the buttonClicked method as shown in Figure 4.10. Here, rather than using nextLine to access each response sent by the server immediately 102
after our program sends a request, we group all the invocations of nextLine at the end of the method. Somewhat surprisingly, this version of the program will produce the same results as the version shown in Figure 4.8. Even though the first invocation of nextLine appears immediately after the statement that sends the QUIT command to the server, the system will return the first line sent by the server rather than the server’s response to the QUIT command as the result of this invocation. Each of the other six consecutive invocations of nextLine shown in this code will return the next member of the sequence of lines sent by the server. While we can move all of the invocations of nextLine to the end of this method without changing the result the method produces, it is worth noting that moving invocations of nextLine earlier in the method will cause problems. Suppose, for example, that we interchange the third and fourth lines of the original buttonClicked method so that the first four lines of the method are: NetConnection connection = new NetConnection( SMTP_SERVER, SMTP_PORT ); log.append( connection.in.nextLine() + "\n" ); log.append( connection.in.nextLine() + "\n" ); connection.out.println( "HELO " + this.getHostName() ); The server will send one line to the client as soon as the connection is established, but it won’t send a second line until after it receives the HELO command. The computer, however doesn’t understand this. Therefore, with the revised code, when the third line is executed, and the client program attempts to access the line sent, the computer will realize that no line has arrived yet and decide that it should wait for one to arrive. If allowed to do so, it would wait forever! No second line will arrive until it sends the HELO command, but it believes it must wait until the second line arrives before it sends any HELO command. The program will freeze up and the user will have to resort to whatever mechanism the operating system or IDE provides to “force quit” the program.
4.2.6
Network Event Notification
Under SMTP and many other protocols, the server only sends packets as immediate responses to requests received from the client. When writing a client that uses such a protocol, it is safe to simply perform nextLine invocations after sending requests. There are other protocols, however, where the server may send a message to the client at any time, independent of whether the client has recently sent a request. The IM protocol is a good example of this. The server will send the client a message whenever any of the user’s buddies send a message to the user. While many such messages arrive in response to a message the user sent, it is also common to receive unsolicited messages saying “Hi” (or something more important). Consider, then, how one could write an IM client. Recall that when a program invokes nextLine, it waits patiently (i.e., it does not execute any other instructions) until a message from the server is available. Therefore, we can’t handle unexpected messages from a server by just constantly doing a nextLine. If that is what our IM client did, it would not do anything else. The solution is to treat the arrival of messages from the server like button clicks and other events involving GUI components. We have seen that for many GUI components, we can write special methods like buttonClicked, textEntered, and menuItemSelected that contain the code that should be executed when an appropriate event occurs. A similar mechanism is available for use with network connections. We can place code in a method named dataAvailable if we want that code executed when messages are received through a network connection. The header for such a method looks like 103
public void dataAvailable( NetConnection whichConnection ) { The connection through which data becomes available will be associated with the formal parameter name supplied. The code placed in a dataAvailable method should include an invocation of nextLine, next, or one of several other similar methods. Unlike the event-handling methods for GUI components, the system does not automatically execute the code in a dataAvailable method if we define one. In addition to defining the method, we have to explicitly tell the NetConnection to notify our program when interesting events occur. We do this by executing an invocation of the form someNetConnection.addMessageListener( this ); (Recall that the word this is Java’s way of letting us talk about our own program). If a program uses addMessageListener to request notification when interesting events happen to a NetConnection there is another special event-handling method that can be defined. The header for this method looks like: public void connectionClosed( NetConnection whichConnection ) { The code in this method will be executed when the server terminates the connection. As a simple example of the use of such event-handling methods in a network application, we present another replacement for the buttonClicked method of our SMTP client in Figure 4.11. This time, we have not simply replaced one version of buttonClicked with another version. Instead, we have added definitions for two additional methods, dataAvailable and connectionClosed. We have changed the code in three ways: 1. We have added the line connection.addMessageListener( this ); after the line that constructs the new connection. This informs the NetConnection that we want the dataAvailable and connectionClosed methods to be invoked when new data arrives or when the server terminates the connection. 2. We have removed all seven lines of the form log.append( connection.in.nextLine() + "\n" ); from the buttonClicked method. Instead, we have placed a single line of the form log.append( incomingConnection.in.nextLine() + "\n" ); in the body of the dataAvailable method. This line will be executed exactly seven times because the dataAvailable method will be invoked each time a new line becomes available. 3. We have removed the line connection.close(); 104
// Send a message when the button is clicked public void buttonClicked( ) { // Establish a NetConnection and introduce yourself NetConnection connection = new NetConnection( SMTP_SERVER, SMTP_PORT ); connection.addMessageListener( this ); connection.out.println( "HELO " + this.getHostName() ); // Send the to and from addresses connection.out.println( "MAIL FROM: " ); connection.out.println( "RCPT TO: " ); // Send the message body connection.out.println( "DATA" ); connection.out.println( message.getText() ); connection.out.println( "." ); // Terminate the SMTP session connection.out.println( "QUIT" ); } // Display any messages from server in the log area public void dataAvailable( NetConnection incomingConnection ) { log.append( incomingConnection.in.nextLine() + "\n" ); } // Close the connection right after the server disconnects public void connectionClosed( NetConnection closingConnection ) { closingConnection.close(); } Figure 4.11: Using NetConnection event handling in an SMTP client
105
from the buttonClicked method and placed a similar line in a new connectionClosed method. If we had left the invocation of close in buttonClicked, the program would not always display all of the lines sent by the server. The connection would be closed as soon as the client sent the QUIT command. This would definitely mean that it was closed before the server’s response to this command. Once the NetConnection has been closed, the program will ignore any messages from the server. The dataAvailable method will not be invoked when such messages arrive. By placing the close in the connectionClosed method, we don’t close the connection until we know that we have received everything the server will send because we know that the server has closed its end of the connection. Note that we use the parameter names incommingConnection and closedConnection to refer to the NetConnection within the two network event handling methods. Alternately, we could have changed the program so that connection was declared as an instance variable rather than as a local variable within buttonClicked and then used this variable in all three methods.
4.2.7
Summary of NetConnection constructions and methods
A new NetConnection can be created by evaluating a construction of the form new NetConnection( host-name, port-number ) where host-name is an expression that describes a string that is either the domain name or the IP address of the machine on which the server you would like to contact is running, and port-number is an expression that evaluates to the number of the port used to contact the server program. The port number can be described using either an int or a String. For example, the construction new NetConnection( "www.google.com", 80 ) would create a connection to the web server port on the machine www.google.com. There are four basic methods used to send and receive data through a NetConnection. These methods are associated with data streams named in and out that are associated with the connection. Each invocation of nextLine returns a String containing one line of text received from the server. As long as the server has not closed the connection, your program will wait until a line of text is received from the server. If the remote server has terminated the connection, your program will terminate with an error.
someConnection.in.nextLine()
Each invocation of next returns a String containing one token/word of text received from the server.
someConnection.in.next()
someConnection.out.println( someString );
106
An invocation of println causes the program to send the contents of its argument to the server followed by an end of line indicator.
An invocation of print causes the program to send the contents of its argument to the server.
someConnection.print( someString );
In addition, the NetConnection class provide two methods to control the connection itself. The close method should be invoked to terminate the connection to the server once no more messages will be sent and all expected messages have been received.
someConnection.close();
someConnection.addMessageListener( someGUIManager ); The addMessageListener method should be used to inform the NetConnection that the program has defined methods named dataAvailable and connectionClosed and that these methods should be invoked when new messages are received through the connection or when the connection is closed.
4.3
Summary
In this chapter we have introduced two closely related topics: the techniques used to write Java programs that send and receive network messages and the nature of the conventions computers must follow to communicate effectively. We presented the general notion of a communications protocol, a specification describing rules computers must follow while communicating. We explained that the Internet relies on many protocols that are each specialized to accomplish a particular application. We also explained that many of these application protocols depend on a protocol named TCP that specifies aspects of communications that are common to many application protocols. We described the addresses used to identify computers and programs when using TCP and introduced the notion of a connection. We also explored a new library class named NetConnection that can be used to write programs based on TCP. We explained that although a NetConnection is designed for 2-way communications, it is actually composed of two objects called streams that support 1-way communications. We showed how to send messages to a remote computer using one of these streams and how to receive messages sent to our program using the other. Finally, to clarify the connection between our abstract introduction to protocols and our concrete introduction to NetConnections, we showed how NetConnections could be used to implement a program that followed one of the Internet’s oldest, but still most important protocols, the mail delivery protocol SMTP.
107
108
Chapter 5
Pro-Choice In order to behave in interesting ways, programs need to be able to make choices. To construct such programs, we need a way to write commands that are conditioned on user input and events that have already occurred. For example, instead of only being able to say “send the message”, we need to learn how to say “if the user entered a valid password, send the message.” In this chapter we will present a new form of instruction called the if statement. This type of statement is designed precisely to enable us to express choices in Java. Learning about if statements will enable you to write much more complex programs. As a result, it is important not just to learn the grammatical structure of this new language mechanism, but also to develop an understanding of how to use it to construct programs that are clear and easy to understand. With this in mind, we both present the basic syntax associated with the Java if statement and explore some common patterns that can be employed when using if statements in programs.
5.1
Either/or Questions
To illustrate the Java if statement, we will explore the implementation of a calculator program based on the numeric keypad interface we introduced in Section 3.4. Rather than plunging into an attempt to implement a full-featured calculator, we will start by writing a very simple calculator program. Figure 5.1 shows the interface for the program we have in mind and illustrates how it will respond as a user clicks on some of the buttons in its interface. The program displays ten buttons labeled with digits and one button labeled “Add to total”. It also contains two text fields. Each time a digit button is pressed, its label will be added to the end of the sequence of digits in the first text field. When the “Add to total” button is pressed, the numerical value of the digits in the first text field will be added to the value displayed in the second text field, the result will appear in the second text field, and the first text field will be cleared. Obviously, it might be more accurate to describe this program as an “adding machine” than as a calculator. In Figure 5.1 we show how the program would behave if a user pressed the sequence of buttons “4”, “2”, “Add to total”, “8”, and then “Add to total” again. The image in the upper left corner of the figure shows how the program should look when it first begins to execute. After button “4” was pressed, the digit “4” would be added to the first text field as shown in the image at the upper right in the figure. The arrow labeled “2” leads to a picture of how the window would look after the 109
Figure 5.1: Interface for an “adding machine” program
110
// A program that acts like a calculator that only does additions public class AddingMachine extends GUIManager { // Change these values to adjust the size of the program’s window private final int WINDOW_WIDTH = 300, WINDOW_HEIGHT = 260; // Dimensions for fields to display entry and total private final int ENTRY_WIDTH = 20; private final int DISPLAY_WIDTH = 15; // Used to display sequence of digits selected private JTextField entry; // Used to display current total private JTextField totalDisplay; // Used to request that the total be updated private JButton addButton; // Keeps track of the current sum private int total = 0; Figure 5.2: Instance variables for an adding machine next button, “2”, had been pressed. The number “42” would be displayed in the first text field. At that point, we assume the user pressed “Add to total”. Since nothing had previously been added to the total, its value would be 0. Adding 42 to 0 produces 42, which therefore would appear in the “Total =” text field at the bottom of the program window. At the same time, the upper text field would be cleared. Therefore, when the next button, “8” was pressed, the digit 8 would appear alone in the upper text field. Finally, pressing “Add to total” again would cause the program to add 8 to 42 and display the result, 50, in the total field. The code required to create this program’s interface is shown in Figures 5.2 and 5.3. The first figure shows the instance variables declared for this program, and Figure 5.3 shows the declaration of the constructor for the class. This code is quite similar to the code we showed earlier in Figure 3.12 while discussing how to implement a simple numeric keypad, but there are two significant differences. For this program, we need to add a button labeled “Add to total”. Unlike the buttons that display the digits, we will need to have a variable name associated with this special button. Accordingly, we include a declaration for the needed variable, addButton, before the constructor and initialize this variable’s to refer to a new button within the constructor. We also need to keep track of the total and display it on the screen. This requires two variables. First, we define an int variable named total to hold the current value of the sum of all numbers that have been entered. Second, we declare and initialize a variable, totalDisplay that refers to a JTextField used to display the total. The construction used to create totalDisplay includes the parameter value "0" so that this field will display the initial value associated with total when the program begins execution. 111
// Create and place the keypad buttons in the window public AddingMachine() { this.createWindow( WINDOW_WIDTH, WINDOW_HEIGHT ); contentPane.add( contentPane.add( contentPane.add( contentPane.add( contentPane.add( contentPane.add( contentPane.add( contentPane.add( contentPane.add( contentPane.add(
new new new new new new new new new new
JButton( JButton( JButton( JButton( JButton( JButton( JButton( JButton( JButton( JButton(
"1" "2" "3" "4" "5" "6" "7" "8" "9" "0"
) ) ) ) ) ) ) ) ) )
); ); ); ); ); ); ); ); ); );
entry = new JTextField( ENTRY_WIDTH ); entry.setEditable( false ); // Prevent the user from typing in the field contentPane.add( entry ); addButton = new JButton( "Add to total" ); contentPane.add( addButton ); JPanel totalPane = new JPanel(); totalPane.add( new JLabel( "Total = " ) ); totalDisplay = new JTextField( total, DISPLAY_WIDTH ); totalPane.add( totalDisplay ); contentPane.add( totalPane ); } Figure 5.3: Constructor for an adding machine
112
5.1.1
Numbers and Strings
Unlike other programs we have considered, the action performed when a button is clicked in this program will depend on which button is pressed. If any of the digit keys is pressed, the corresponding digit should simply be added to the entry field. If the “Add to total” button is pressed, on the other hand, the contents of the entry field should be added to the contents of the total field. In the next section, we will see how to use an if statement to specify when each of these actions should be performed. Before considering how we can use an if statement, we should make sure we know exactly how to write code that will perform the desired actions individually. Both of the actions that might be performed when a button is clicked involve working with numbers. When writing Java programs that manipulate numbers, it is important to understand that there are several distinct ways to represent numbers. The programmer must select the approach to representing numbers that is most appropriate for the task at hand. We have, in fact, already introduced two of the ways that numbers can be represented in a Java program. First, we have used the type int to represent numeric data. In the preceding section, we suggested that we would use an int variable to represent the total of all the numbers added together using our simple calculator. The other way we have seen that numbers can be represented is as Strings. Anything that is typed in quotes or associated with a String variable name in Java is treated as a String by the language, even if it also looks like a number. Thus, while it is clear that the value represented by "Click me" is a String, Java also sees the value "42" as a String rather than as a number because the digits are surrounded by quotes. The distinction within the Java language between a number represented as an int and a number represented as a String provides a means by which you can tell Java exactly how you want certain operations to be performed on a number. Consider again the example used in the preceding section. In that example, we assumed a user pressed the buttons “4”, “2”, “Add to total”, “8”, and finally “Add to total” in sequence. Figure 5.1 showed the expected response to each of these actions. We indicated that the last user action, pressing the “Add to total” button, should cause the program to “add” 8 to 42 yielding 50. Suppose, that the user had not pressed the “Add to total” button between pressing the “2” key and the “8” key. In that case, pressing the “8” key would be interpreted as specifying a third digit for the number being entered. Therefore, we would expect the program to “add” the digit 8 to the digits already entered, 4 and 2, and display the number 428 in the text field above the “Add to total” button. From this example, we can see that there are two different interpretations we might associate with the word “add”. When we see the digits as parts of a larger number, then we think of numerical addition when we say “add”. When we think of the digits as individual symbols, then when we say “add” we mean that a digit should be appended or concatenated to an existing collection of digits. In Java, the plus sign operator is used to describe both of these possible interpretations of “add”. When a program applies the plus sign to operands represented as int values, Java interprets the plus sign as numeric addition. On the other hand, if either of the operands of a plus sign is a String, Java interprets the operator as concatenation, even if all of the symbols in the String 113
are digits. Accordingly, to ensure that Java applies the correct interpretation to the + operator in our calculator program, we must ensure that the operands to the operator are int values when we want addition and String values when we want concatenation. To do this, we have to understand how Java decides whether a particular value in our program should be treated as a String or as an int. Recall that values in our programs are described by expressions and that we have identified five types of expressions: literals, variables, accessor method invocations, constructions and formulas. Java has simple rules for determining the type of data described by each of these forms of expressions. When we use a literal to describe a value in a program, Java treats the value as a String if we surround it by quotes even if all of the symbols between the quotes are digits. On the other hand, if a literal is a sequence of digits not surrounded by quotes, then Java treats the value as an int. When we use a variable as an expression, Java depends on the type name the programmer used in the variable’s declaration to determine how to interpret the value associated with the variable name. If we declare String entry; int total; then Java assumes that the expression “entry” describes a String and that the expression “total” describes an int. The type of an invocation depends on the method used in the invocation. When you write programs in which you define your own accessor methods, you will have to provide the name of the type of value an invocation will produce in the definition of the method. For methods provided as part of existing libraries, the type of value produced when the method is invoked is provided in the documentation of the library. For example, the getText method associated with JTextFields, JButtons, and JLabels is known to produce a String value as its result, while the getCaretPosition method associated with JTextFields and JTextAreas produces an int result. A construction of the form new SomeName( . . . ) produces a value of the type whose name follows the word new. Determining the type of value described by a formula can be a bit trickier because the type produced often depends on the types of the operands used. As explained above, if we write an expression of the form a + b Java may either interpret the plus sign as representing numeric addition or concatenation, depending on the types it associates with a and b. If Java’s rules for associating types with expressions lead to the conclusion that both a and b produce int values, then Java will assume that a + b also produces an int value. On the other hand, if either a or b describes a String value, then Java will interpret the plus sign as concatenation and also conclude that a + b describes a String. Within our adding machine program, we want Java to apply the concatenation operation when the user presses any of the buttons for the digits 0 through 9. This is easy to do. In the code for our simple keypad program shown in Figure 3.12 we used the instruction entry.setText( entry.getText() + clickedButton.getText() ); 114
to add digits to the display as numeric keys were pressed. Because both of the operands to the plus sign in this statement are produced by getText, they will both be Strings. Java will therefore associate the plus sign with concatenation. As a result, the same code can be used when any of the digit keys are pressed in our adding machine program. The instructions we should use when the “Add to total” button is pressed require a bit more thought. We want code that will add the contents of the entry text field to our total using numeric addition. The obvious code to write would be total = entry.getText() + total; Unfortunately, Java will consider this statement illegal. The statement says to associate the name total with the result produced by the expression to the right of the equal sign. Because the getText method returns a string, Java will interpret the plus sign in this statement as a request to perform concatenation rather than addition. Concatenation produces a String value. Since we plan to declare total as an int variable, Java will conclude that this name cannot be associated with the String produced by concatenation and reject the statement. In a situation like this, we have to help Java by adding phrases to our code that explicitly instruct it to attempt to convert the digits in the string produced by entry.getText() into an int value. For such situations, Java includes a method named Integer.parseInt. Integer.parseInt takes a String as a parameter and returns its value when interpreted as an int.1 Thus, assuming that the entry field of our program contains the string "8", then Integer.parseInt( entry.getText() ) would produce the integer value 8, and 42 + Integer.parseInt( entry.getText() ) would produce 50. Therefore, total = total + Integer.parseInt( entry.getText() ); is a statement we can use to tell Java to add the value of the digits in the text field to our running total. There is one last representation issue we need to deal with while completing the body of this program’s buttonClicked method. After we have updated the total, we need to update the contents of the totalDisplay text field to display the new result. We cannot simply say totalDisplay.setText( total ); because just as getText produces a String value, the setText method expects to be provided a String to display rather than an int. Again, we have to do something more explicit to tell Java to convert between one representation and another. We do not, however, need a special method like Integer.parseInt to convert an int to a String. Instead, we can take advantage of the way Java interprets the plus sign. Consider the expression 1
When Integer.parseInt is used, the argument provided must be a string that contains only digits. If its argument contains letters or anything else other than digits, an error will result as your program runs. To make sure that this will not happen to our program, we have used setEditable to ensure that the user cannot type arbitrary data into the field.
115
// Add digits to the display or add the display to the total public void buttonClicked( JButton clickedButton ) { if ( clickedButton == addButton ) { total = total + Integer.parseInt( entry.getText() ); totalDisplay.setText( "" + total ); entry.setText( "" ); } else { entry.setText( entry.getText() + clickedButton.getText() );
}
}
Figure 5.4: buttonClicked method for an adding machine "" + total The first operand in this formula a very special String, the String containing no symbols at all. It is usually called the empty string. Even though it is empty, this String will cause Java to interpret the plus sign in the expression as a request to perform concatenation. Of course, concatenating the digits that represent the value of total onto a String that contains nothing will produce a String containing just the digits that represent the value of total. Accordingly, we can use the statement totalDisplay.setText( "" + total ); to update the display correctly.
5.1.2
A Simple if Statement
Now that we know the correct instructions for the actions that our adding machine might perform when a button is clicked, we can learn how to use an if statement to specify how the computer should determine which set of instructions to follow. This code will all be placed in the definition of our program’s buttonClicked method. To choose the right code to execute, we will have to know which button was clicked. Therefore, the header for the buttonClicked method must tell the system that we want to associate a name with the button that was clicked. We will use the method header public void buttonClicked( JButton clickedButton ) { so that we can use the name clickedButton to refer to the button that was clicked. When the computer starts to execute the code in buttonClicked there are two cases of interest. Either the “Add to total” button was clicked, in which case the formal parameter name clickedButton will refer to the same button as the instance variable addButton, or one of the digit buttons was pressed, in which case clickedButton and addButton will refer to different buttons. Based on this observation, we can tell the computer to decide which instructions should be executed by writing the if statement shown in the definition of buttonClicked found in Figure 5.4 116
The if statement is a construct that lets us combine simpler commands to form a larger, conditional command. The following template shows the general structure of the type of if statement we are using in Figure 5.4: if ( condition ) { sequence of statements } else { sequence of statements } The statement starts with the word if followed by what is called a condition. We will give a precise definition of a condition later, but basically a condition is a question with a yes or no answer. In our buttonClicked method, we use the condition clickedButton == addButton The double equal sign in Java indicates a test for equality. Thus, this condition asks if the two names refer to the same thing. After the condition, we place two sequences of statements each surrounded by curly braces and separated by the word else. If the answer to the condition is “yes”, then the computer will follow the instructions included in the first sequence of statements. Thus, the if statement in our buttonClicked method instructs the computer to update the total if clickedButton and addButton refer to the same button. If the answer to the condition in an if statement is “no”, then the computer follows the instructions in the second sequence of statements. In our example, this is a sequence of just one instruction, the instruction that adds a single digit to the entry display.
5.2
if Statements are Statements
Consider the sentence if it is raining, we will take the car. According to the rules of English, this is indeed a sentence. At the same time, two of its parts it is raining and we will take the car would also be considered sentences if they appeared alone. As a result, the original sentence is classified as a compound sentence. The Java if statement exhibits similar grammatical properties. An if statement is considered to be a form of statement itself, but it always contains subparts that would be considered statements if they appeared alone. Because it is composed of smaller components that are themselves statements, the if statement is an example of a compound statement. Anywhere that we have said that Java expects you to provide a statement, you can use any kind of statement the language recognizes. In particular, the statements that form the subparts of an if statement do not have to be simple statement. They can instead be compound statements. 117
Figure 5.5: Interface for an adding machine with a “Clear total” button This means that it is possible to include if statements among the sequences of statements that form the parts of a larger if statement. Such constructs are called nested if statements. Even though the basic form of an if statement offers only two possibilities, by nesting them it is possible to express choices involving more options. To explore this ability, let’s add just one option to our adding machine program. As described in the preceding sections, our program is capable of adding up one sequence of numbers. Suppose that we had more than one sequence that we needed to total. At this point, the only way we could do this with our program would be to quit the program after computing the first total and then start it up again to add up the second sequence of numbers. Let’s fix this by adding a button to reset the total to zero. A picture of what this improved program might look like is shown in Figure 5.5. To construct this interface, we need to add just one JButton to our window. We will assume that as part of this addition, we include the instance variable declaration private JButton clearButton; and an assignment of the form clearButton = new JButton( "Clear Total" ); so that the name clearButton can be used to refer to the new button in our code. As we did in the previous example, we should first determine the instructions that should be executed in each of the cases the program must handle. We already discussed the code needed for the cases in which the “Add to total” button or one of the numeric buttons is pressed. All that remains is the case where the “Clear total” button is clicked. In this situation, we want to set the total to 0 and clear the field used to display the total. This can be done using the instructions total = 0; totalDisplay.setText( "0" ); 118
if ( clickedButton == addButton ) { total = total + Integer.parseInt( entry.getText() ); totalDisplay.setText( "" + total ); entry.setText( "" ); } else { . . . // Need to find code to handle all the other buttons } Figure 5.6: Skeleton of if statement to support “Add to total” and “Clear total” buttons Now, let us consider how to distinguish the three options that are possible with the addition of a “Clear total” button. A good place to start is by noticing that the if statement we used in Figure 5.4 would do one part of the job correctly. It selects the right code for the case when the button clicked is the “Add to total” button. Unfortunately, it does not always select the right code when a different button is used. Based on this observation, consider the skeletal code that is left if we keep the parts of that if statement that seem to correctly describe what we want in this situation, and temporarily replace the code that isn’t quite appropriate for this new task with “...” as shown in Figure 5.6 Obviously, we still need to decide what statement(s) to use in the else branch where we have currently written “...” If the computer decides it should execute the statements in the else branch, that means it has already checked and determined that the button clicked was not the “Add to total” button. That is, if the computer gets to the else part of this if statement, there are no longer three possibilities to worry about! There are only two possibilities remaining. Either the user clicked on the “Clear total” button or the user clicked on a numeric button. We already know how to deal with 2-way choices like this. We can use an if statement of the form if ( clickedButton == clearButton ) { total = 0; totalDisplay.setText( "0" ); } else { entry.setText( entry.getText() + clickedButton.getText() ); } The critical observations are a) that the if statement shown above is itself a statement, and b) that this if statement correctly handles the two cases remaining when we know that the “Add to total” button was not clicked. Therefore, we can insert it where we had placed the comment saying we needed “to find code to handle all the other buttons” to produce the construct shown in Figure 5.7. The construct in Figure 5.7 is an example of a nested if statement. When the computer needs to execute this code, it firsts checks to see if clickedButton and addButton refer to the same button. If they do, the group of statement that use Integer.parseInt to add the digits in the entry field to the total are executed. If clickedButton and addButton refer to different buttons, then the computer will begin to execute the statements after the word else. In this case, this means it will begin to execute another if statement. The computer begins the execution of this nested if statement by checking to see if clickedButton and clearButton refer to the same button. If they do, then the statements that set total equal to 0 will be executed. Otherwise, the execution of the 119
if statement will complete with the statement that adds the digit on the button clicked to entry. —————————————————————————————————————— if ( clickedButton == addButton ) { total = total + Integer.parseInt( entry.getText() ); totalDisplay.setText( "" + total ); entry.setText( "" ); } else { if ( clickedButton == clearButton ) { total = 0; totalDisplay.setText( "" ); } else { entry.setText( entry.getText() + clickedButton.getText() ); } } Figure 5.7: Using a nested if statement to distinguish three cases —————————————————————————————————————— The ability to nest statements is not limited to a single level of nesting. The if statement shown in Figure 5.7 could itself be nested within a larger if statement. Just as the nesting of if statements in this example was used to handle a 3-way choice, deeper nesting can be used to handle even larger multi-way choices.
5.3
The Truth about Curly Braces
In this section, we provide a more precise explanation of how curly braces should be used when writing if statements. While the explanation and examples we have provided thus far accurately describe how curly braces are commonly used in Java if statements, they don’t describe the exact rules of Java’s grammar that determine correct usage. We have indicated that the general form of an if statement in Java is if ( condition ) { sequence of statements } else { sequence of statements }
This is not quite accurate. The actual rules of Java’s grammar specify that the form of an if statement is if ( condition ) statement else statement 120
That is, there are no curly braces and there are exactly two statements that are considered part of the if statement, the ones that appear before and after the word else. Following this rule the statement if ( clickedButton == clearButton ) total = 0; else entry.setText( entry.getText() + clickedButton.getText() ); is a valid if statement, but all of the other examples of if statements we have provided in this chapter appear to be invalid! All our examples have had curly braces and many have had multiple statements between the condition and the else. How can these examples be legal if the actual rules for the if statement don’t include these features? The resolution of this apparent inconsistency rests on understanding exactly what the word “statement” means. In some situations, Java is willing to consider a construct composed of several statements as a single, albeit more complicated statement in its own right. As an example, the construct just shown above if ( clickedButton == clearButton ) total = 0; else entry.setText( entry.getText() + clickedButton.getText() ); is a single Java statement even though it contains two lines that are themselves Java statements. In an if statement, the fact that several independent statements are combined to form one logical statement is a secondary effect. Java, however, also provides a construct whose primary purpose is to group a sequence of statements into a unit that is logically a single statement. This construct is called the compound statement or block. If we place curly braces around any sequence of statements and local variable declarations, Java considers the bracketed sequence of statements as a single statement. For example, while total = 0; totalDisplay.setText( "0" ); is a sequence of two statement, the construct {
total = 0; totalDisplay.setText( "0" );
} is actually a single statement. It clearly consists of two smaller statements, but from Java’s point of view it is also a single compound statement. As a trivial case, we can also turn a single statement into a compound statement as in {
entry.setText( entry.getText() + clickedButton.getText() );
} Thus, the if statement 121
if ( clickedButton == clearButton ) { total = 0; totalDisplay.setText( "0" ); } else { entry.setText( entry.getText() + clickedButton.getText() ); } and all the other if statements we have shown in this chapter actually follow Java’s rule that we should place a single statement before and after the word else. In these statements, however, the “single” statements used as the components of the if statements are all compound statements. In some of the if statements we have shown, there have been examples where the curly braces included are not essential. The statement shown above, for example, could be rewritten as if ( clickedButton == clearButton ) { total = 0; totalDisplay.setText( "0" ); } else entry.setText( entry.getText() + clickedButton.getText() ); without changing its meaning in any way. Technically, wherever we have placed curly braces around a single statement, removing those braces will not change the behavior of the program. However, in all but one situation, we strongly encourage you to include curly braces around the statements you place in if statements. Doing so decreases the likelihood that you will accidentally make a fairly common programming mistake. Often, in a context where you originally thought you only needed to put a single statement in the else part of an if statement, you later discover that you need to add more statements. If you are careful, you will always remember to add the needed curly braces while adding the extra statements. It is very easy, unfortunately, to forget to add the curly braces. Java typically can’t identify this as an error. It simply fails to understand that you intended to include the additional statements as part of the else. Instead, it views them as independent statements that should always be executed after completing the execution of the if statement. Such errors can be hard to find, particularly if you use indentation appropriately to suggest your intended meaning while entering the additional statements. Java ignores the indentation, but you and anyone trying to help you understand why your program isn’t working are likely be confused.
5.3.1
Multi-way Choices
There is one context where we do suggest that you leave out unnecessary curly braces. We suggest you do this when • the curly braces surround an if statement that appears as the else branch of a larger if statement, and 122
if ( clickedButton == addButton ) { total = total + Integer.parseInt( entry.getText() ); totalDisplay.setText( "" + total ); entry.setText( "" ); } else if ( clickedButton == clearButton ) { total = 0; totalDisplay.setText( "0" ); } else { entry.setText( entry.getText() + clickedButton.getText() ); } Figure 5.8: Formatting a multi-way choice • the intent of the nested collection of if statements is to select one of three or more logically related alternatives. In this case, eliminating the extra curly braces helps lead to a style of formatting that can make it easier for a reader to discern that the code is making a multi-way choice. As an example, consider the 3-way choice made by the statement shown in Figure 5.7. If we remove the curly braces around the inner if statement, and then adjust the indentation so that the statements executed in all three cases are indented by the same amount, we obtain the code shown in Figure 5.8. Java considers these two versions of the code absolutely equivalent to one another. If you develop the habit of structuring multi-way choices as shown in Figure 5.8, however, you will find that it is easier to identify the choices being made and the code that goes with each choice than it is when the statements are formatted in a way that reflects the nesting of their grammatical structure. Note that we have not removed all of the optional curly braces in Figure 5.8. We have only removed the curly braces surrounding nested if statements. The final curly braces could also be removed if our goal was to minimize the number of curly braces used, but all we want to do is remove enough braces to clarify the structure of the multi-way choice make by the nested if statements.
5.4
Something for Nothing
All of the if statements we have seen have been used to choose between several alternative sequences of statements. In certain programs, we use if statements to make a different kind of choice. In these programs we need to choose between doing something or doing nothing. For such programs, Java provides a second form of if statement in which the word else and the statement that follows is omitted. The grammatical rule for such if statements is if ( condition ) statement 123
Given our advice on the use of curly braces, however, we hope that when you write such if statements they will have the form if ( condition ) { sequence of statements } As an example of the use of this form of if statement, let’s think about a simple problem with the current version of our adding program. Suppose that as soon as we start running the program we decide to test every button on our program’s keypad. With this in mind, we key in the number 9876543210 and press the “Add to total” button. We expect that this large number will show up in the “Total” field. In reality, however, what happens is that the development environment we are using pops up a new window displaying a rather mystifying collection of messages that starts with something that looks like the text below. java.lang.NumberFormatException: For input string: "9876543210" at java.lang.NumberFormatException.forInputString(NumberFormatException.java:48) at java.lang.Integer.parseInt(Integer.java:480) at java.lang.Integer.parseInt(Integer.java:518) at AddingMachine.buttonClicked(AddingMachine.java:65) . . .
This ugly text is an example of a run-time error message. The computer is trying to tell us that something has gone wrong with our program. Even if we cannot understand every detail in this message, a few key words that appear in the message will give us some good clues. The first line of the message describes the problem as a “NumberFormatException” (read as “number format exception”) for the string 9876543210. The third and fourth lines mention the Interger.parseInt method we use in our program to convert Strings into int values. Apparently, something went wrong when we tried to convert the string 9876543210 to an int. The most common situation in which one encounters a number format exception is when your program tries to use parseInt to convert a string that isn’t a number into one. For example, it is clear that the invocation Integer.parseInt( "think of a number" ) should be treated as an error. Unlike "think of a number", however, the text "9876543210" certainly looks like a valid number. In fact, it looks like a very big number. That is the source of the problem. The number 9876543210 is actually too big for parseInt. To allow us to manipulate numbers in a program, a computer’s hardware must encode the numbers in some electronic device. For each digit of a number there must be a tiny memory device to hold it. Some fixed, finite number of these devices has to be set aside to represent each number. If a number is too big for its digits to fit in the memory devices set aside for it, the computer cannot handle the number. In Java, the number of devices set aside for an int is too small to handle the number 9876543210. Therefore, the computer has to treat the attempt to convert a string describing this large number as an error. In a computer’s memory, numbers are stored in binary, or base 2. Thirty-one binary digits are used to store the numeric value of each int. Just as the number of digits included in a car’s 124
odometer limits the range of mileage values that can be displayed before the odometer flips back to “000000”, the number of binary digits used to represent a number limit the range of numbers that can be stored. As a result, the values that can be processed by Java as ints range from -2,147,483,648 ( = −231 ) to 2,147,483,647 ( = 231 − 1 ). If you try to use a number outside this range as an int value, Java is likely to complain that your program is in error or, worse yet, throw away some of the digits yielding an incorrect result. Real calculators cannot display ugly messages like the one shown above if a user tries to enter too many digits. Instead, they typically just limit the size of the numbers that can be entered based on the number of digits included in the calculator’s display. If there are only 9 digits in the display, the typical calculator just ignores you if you try to enter more than 9 digits. We can solve our problem by making our adding machine behave in the same way. In order to make the program ignore button clicks if the entry is already 9 digits long, we first need to change our program so that it keeps track of how many digits are currently in entry. In Figure 2.10 we showed a program that used an integer variable named numberOfClicks to keep track of how often a button had been clicked. We can keep track of how many digits are in the entry field by using a similar technique to count the clicks of the buttons of our adding machine program. For this purpose, we will introduce a variable named digitsEntered. We will add one to the value of this variable each time a digit key is pressed and assign the value 0 to digitsEntered when the entry field is cleared because the “Add to total” button was pressed. To make it impossible for a person using our program to enter more than 9 digits, we can now simply place the code that adds digits to the entry field in an if statement that tests whether the value of digitsEntered is still less than 9. This if statement will choose between adding a digit to the entry field and doing nothing at all. Therefore, it will have no else part. The resulting statement will look like: if ( digitsEntered < MAX_DIGITS ) { entry.setText( entry.getText() + clickedButton.getText() ); } This code assumes that our program contains the instance variable declaration private final int MAX_DIGITS = 9; to associate the name DISPLAY SIZE with the maximum number of digits allowed. It also uses a new form of condition. Java allows us to form conditions by comparing values. We have already seen that we can ask if two values are equal using the symbol ==. When working with numbers, we can also use the symbols , = to test for “less than”, “greater than”, “less than or equal to”, and “greater than or equal to”, respectively. These symbols are called relational operators. Java will also produce an error message if we apply Integer.parseInt to the empty string. This will happen if the user clicks “Add to total” twice in a row. To avoid this error, we should ignore any click on the “Add to total” button that occurs when the number of digits entered is zero. The body of the complete buttonClicked method modified to make sure that the number of digits entered falls between 1 and 9 is shown in Figure 5.9. Notice that we assign zero to digitsEntered in the code that is executed when addButton is pressed and increase this variable’s value by one whenever a digit button is pressed. 125
public void buttonClicked( JButton clickedButton ) { if ( clickedButton == addButton ) { if ( digitsEntered > 0 ) { total = total + Integer.parseInt( entry.getText() ); totalDisplay.setText( "" + total ); entry.setText( "" ); digitsEntered = 0; } } else if ( clickedButton == clearButton ) { total = 0; totalDisplay.setText( "0" ); } else {
}
}
digitsEntered = digitsEntered + 1; if ( digitsEntered < MAX_DIGITS ) { entry.setText( entry.getText() + clickedButton.getText() ); }
Figure 5.9: A buttonClicked method that ignores button clicks if entry is full or empty
5.5
Synonyms, Homographs, and Scopes
English contains many words that share common meanings. Groups of such words are known as synonyms. For example, while you might think of yourself as a student, others might call you a pupil, or a trainee. In English, there are not only words that mean the same thing even though they are spelled differently, there are also words that mean different things even though they are spelled the same! Such words are called homographs. Consider the word “left”. In certain contexts, this word refers to a side of the body as in “Take a left turn.” In other context, it describes the action of departing. For example, you might say “Has everyone left?” Interestingly, in addition to describing the action of departing, “left” can be used to describe the action of remaining as in “Is there any food left?” Thus, in some sense, instead of talking about the single word “left” it is fair to talk about the three words “left”, ”left”, and ”left”! It is also possible to have two names that are spelled exactly the same but have different meanings in a Java program. Determining the correct meaning to associate with a name that has multiple meanings in a Java program is a bit simpler than determining the correct meaning to associate with an English homograph like “left”. It depends strictly on the context in which the use of the name occurs. A good analogy might be the use of a name like “the president” in English. If one of your classmates says “Now I am the president,” she might have been chosen as president of the class or president of the chess club. On the other hand, if someone named Bush or Clinton said the same thing, the secret service would probably be close behind. The context required to correctly interpret the name “the president” is the social group involved (i.e., the chess club, the 126
senior class, or the entire country). The Java equivalent of the social groups that provide context in “the president” analogy are called scopes. The entire text of a Java class definition forms a scope. The constructor and each of the methods within a class are considered separate scopes. Note that the scopes corresponding to the constructor and the methods are also part of the larger scope corresponding to the entire class, just as a social group like the senior class may be part of another, larger group like all students on a campus or all residents of a certain country. Within Java, curly braces indicate scope boundaries. The scopes we have already described, class and method bodies, are always enclosed in curly braces. In addition, within a method’s body, each collection of statements and local variable declarations surrounded by their own pair of curly braces forms a smaller scope. To clarify these ideas, Figure 5.10 shows the skeleton of our adding machine program with each of its distinct scopes highlighted by an enclosing rectangle. The largest rectangle corresponds to the scope associated with the entire class. The constructor and the buttonClicked methods are surrounded with rectangles to indicate that their bodies are both parts of the scope of the entire class and also represent smaller, more local scopes. Within the buttonClicked method the body of each of the if statements used is enclosed in curly braces. Therefore, we have also included rectangles to indicate that each of these collections of statements forms a scope. The only subtle point to notice about this figure is that the scopes corresponding to classes, methods and constructors include not just the text between the curly braces, but also the header lines that precede the opening curly braces. When a name is used within a Java program, the computer determines how to interpret the name by looking at the structure of the scopes within the program. We have already emphasized that every name that is to be used in a Java program must be declared somewhere in the program. In fact, a Java program must conform to a slightly stricter rule. Each use of a name within a Java program must be contained within the smallest scope that contains the declaration of the name. Applying this rule to the program skeleton shown in Figure 5.10 is actually not very interesting because almost all of the names used in the program are declared as instance variables. The smallest scope that contains an instance variable’s declaration is the scope of the entire class. Therefore, all references to instance variables within the program satisfy the “stricter” requirement trivially. The one name in the program that is not declared in the scope of the full class is the formal parameter name clickedButton. The smallest scope containing the declaration of clickedButton is the scope of the buttonClicked method. All of the uses of this name fall within the same scope and are therefore valid. Suppose, however, that the programmer tried to include the statement clickedButton.setEnabled( false ); within the body of the constructor for this class. This statement would violate Java’s rule for the declaration of names because this use of the name would not be enclosed within the smallest scope that contains the declaration of the name clickedButton ( i.e., the scope of the buttonClicked method). If you tried to compile such a program, you would receive an error message warning you that the reference to clickedButton within the constructor was invalid. This makes sense. Trying to use the value associated with the name clickedButton within the constructor would be silly since the computer cannot associate a meaning with this name until a button is actually clicked and the buttons will not even appear on the screen until the execution of the statements in the constructor are complete. 127
public class AddingMachine extends GUIManager { // Remember the number of digits entered so far private int digitsEntered = 0; // Used to display sequence of digits selected private JTextField entry; // Used to display current total private JTextField totalDisplay; // Used to request that the total be updated private JButton addButton; // Keeps track of the current sum private int total = 0; ... public AddingMachine() { this.createWindow( WINDOW_WIDTH, WINDOW_HEIGHT ); ... } // Respond when user clicks on a digit or control buttons public void buttonClicked( JButton clickedButton ) { if ( clickedButton == addButton ) { if ( digitsEntered > 0 ) {
total = total + Integer.parseInt( entry.getText() ); totalDisplay.setText( "" + total ); entry.setText( "" ); digitsEntered = 0;
}
} else if ( clickedButton == clearButton ) { total = 0; totalDisplay.setText( "0" );
} else {
digitsEntered = digitsEntered + 1; if ( digitsEntered < Max_DIGITS ) {
entry.setText( entry.getText() + clickedButton.getText() );
} }
}
}
Figure 5.10: Structure of declaration scopes within adding machine program 128
The existence of scopes becomes more interesting in programs that contain multiple declarations of a single name. In such programs, names can behave as homographs. That is, a single name can have distinct meanings in different scopes. To illustrate this, suppose that we decided that we could make the code in the buttonClicked method a bit clearer by associating a local variable name with the contents of the entry text field. That is, suppose that we replaced the code in the first branch of the three-way if statement within buttonClicked with the following code: if ( digitsEntered > 0 ) { String entryDigits; entryDigits = entry.getText(); total = total + Integer.parseInt( entryDigits ); totalDisplay.setText( "" + total ); entry.setText( "" ); digitsEntered = 0; } The first line in the body of this new if statement declares entryDigits as a local variable, the second line associates the contents of the entry text field with this name, and the third line references this new local variable. Admittedly, the introduction of the name entryDigits does not significantly improve the readability of this code. That is not the point. The goal of introducing this name is to present an example of reasonable code that leads to unreasonable problems if just a few more changes are made. To see how problems can arise, suppose that while choosing a name for the local variable we didn’t think about what other names were already being used in the program and decided to use the name digitsEntered instead of entryDigits to refer to the contents of the text field. A skeleton of the key parts of the program showing this change and the scopes involved can be found in Figure 5.11. Note that in this version of the program the name digitsEntered is declared twice — once as an instance variable and once as a local variable within the if statement we just modified. In addition to containing the declaration String digitsEntered; the scope associated with the body of the if statement that handles the “Add to total” button now contains three references to the variable named digitsEntered. These occur in the two lines immediately following the declaration and in the last line of the body of the if statement: digitsEntered = 0; This last reference to digitsEntered was part of the original version of the program. It is supposed to set the value of the instance variable named digitsEntered back to 0 after an addition is performed. Unfortunately, in the revised program, Java will not interpret this line as a reference to the instance variable. This is because each reference to a name in a Java program is associated with the declaration of that name found in the smallest scope that contains the reference in question. The statement to set digitsEntered to 0 occurs within the same scope as the declaration of the local variable named digitsEntered. Therefore, this reference to digitsEntered will be associated with the local variable declaration. On the other hand, the references to digitsEntered that appear 129
public class AddingMachine extends GUIManager { // Remember the number of digits entered so far private int digitsEntered = 0; ... // Respond when user clicks on a digit or control buttons public void buttonClicked( JButton clickedButton ) { if ( clickedButton == addButton ) { if ( digitsEntered > 0 ) {
String digitsEntered; digitsEntered = entry.getText(); total = total + Integer.parseInt( digitsEntered ); totalDisplay.setText( "" + total ); entry.setText( "" ); digitsEntered = 0;
}
} else if ( clickedButton == clearButton ) { total = 0; totalDisplay.setText( "0" );
} else {
digitsEntered = digitsEntered + 1; if ( digitsEntered < Max_DIGITS ) {
entry.setText( entry.getText() + clickedButton.getText() );
} }
}
}
Figure 5.11: Incorrect code using a name as both a local and instance variable
130
elsewhere in the program are associated with the declaration of digitsEntered as an instance variable. For example, the statement digitsEntered = digitsEntered + 1; that appears in the third branch of the main if statement of the buttonClicked method will increase the value associated with the instance variable. In this program, therefore, the name digitsEntered behaves like an English homograph. It has different meanings in different contexts. In some sense, the local variable digitsEntered is a completely different name from the instance variable digitsEntered. Even though they are spelled the same, one name refers to a String while the other refers to an int. As a consequence of the misinterpretation of the reference to digitsEntered within the statement digitsEntered = 0; the program whose skeleton is shown in Figure 5.11 will not compile correctly. Since the local variable digitsEntered is declared to refer to a String value, the Java compiler will be unhappy with this assignment that tries to associate it with the numeric value 0 instead of with a String. If you try to run this program, the Java compiler will report an error on this line and refuse to run the program. Things could be worse. Suppose that instead of using the local variable digitsEntered to refer to the String in the field named entry, we decided to make it refer to the value produced by applying Integer.parseInt to that String. In this case, we would use the following code for the if statement: if ( digitsEntered > 0 ) { int digitsEntered; digitsEntered = Integer.parseInt( entry.getText() ); total = total + digitsEntered; totalDisplay.setText( "" + total ); entry.setText( "" ); digitsEntered = 0; } These changes won’t have any impact on the way Java’s scope rules associate uses of the name digitsEntered with the two declarations of the name. The reference to digitsEntered in the statement digitsEntered = 0; will still refer to the local variable rather than the instance variable. Now, however, since the local variable is declared as an int, the Java compiler will see nothing wrong with the code. The program will compile correctly. Unfortunately, it won’t work as intended. Since the final assignment sets the local variable to 0 rather than setting the instance variable to 0, the value of the instance variable will never be reset to 0. Once more than 9 digits have been entered, the adding machine program will refuse to let its user enter any more digits. Such an error can be difficult to diagnose. 131
The best way to avoid this problem is to use different names for the local variable and the instance variable. To refine your understanding of scope rules, however, we want to point out that there is another way we could change the code so that it would work correctly even though both variables still had the same name. The key is to simply move the assignment that resets digitsEntered to 0 out of the body of the if statement in which the local variable is declared. A skeleton of the code for the program that would result is shown in Figure 5.12. Now, the smallest scope that contains both the assignment and a declaration of the name digitsEntered is the scope of the entire class. Therefore, Java will associate this reference to digitsEntered with the instance variable declaration of the name as desired.
5.6
Summary
When we introduced Java in Chapter 1, we suggested that the process of learning Java or any new language typically involved learning bits of grammar and bits of vocabulary concurrently. This chapter has been something of an exception to that rule. In this chapter, we focused primarily on grammatical forms. We learned two ways in which Java statements can be combined to form larger, compound statements. Our primary focus was on the if statement, a grammatical construct used to express commands that require a program to choose between two alternative execution paths. We learned that there are two forms of if statements. One form is used to describe situations where the program needs to choose whether or not to execute a sequence of one or more statements. The other form is used when a program needs to choose between two distinct sets of statements. Although Java’s grammatical rules only explicitly provide forms of the if statement targeted at simple 2-way choices, we learned that these forms were flexible enough to let us express more complex, multi-way choices. The key to this is the fact that we can use one if statement as a part of a larger if statement forming what is called a nested if statement. With the introduction of if statements, the number of curly braces in our programs increased dramatically. In our examples, curly braces were placed around the sequences of statements whose execution was controlled by an if statement. We learned that under Java’s grammatical rules, such curly braces were actually part of a very simple form of compound statement. By simply surrounding a sequence of statements with curly braces we tell Java that we want those statements to be treated as a single, compound statement. Finally, the introduction of if statements involved the introduction of conditions used to tell Java how to make choices when executing an if statement. The conditions we used in this chapter all involved telling Java to compare values either to see if two names referred to the same object or to see if one number was larger than another. We will see in a few chapters that many other forms of conditions can be used in if statements and in other contexts.
132
public class AddingMachine extends GUIManager { // Remember the number of digits entered so far private int digitsEntered = 0; ... // Respond when user clicks on a digit or control buttons public void buttonClicked( JButton clickedButton ) { if ( clickedButton == addButton ) { if ( digitsEntered > 0 ) {
String digitsEntered; digitsEntered = entry.getText(); total = total + Integer.parseInt( digitsEntered ); totalDisplay.setText( "" + total ); entry.setText( "" );
} digitsEntered = 0; } else if ( clickedButton == clearButton ) { total = 0; totalDisplay.setText( "0" );
} else {
digitsEntered = digitsEntered + 1; if ( digitsEntered < Max_DIGITS ) {
entry.setText( entry.getText() + clickedButton.getText() );
} }
}
}
Figure 5.12: Correct (but unpleasant) code using a name as both a local and instance variable
133
134
Chapter 6
Class Action In Chapter 1, we explained that Java uses the word class to refer to “A set, collection, group, or configuration containing members regarded as having certain attributes or traits in common.” We have seen that this description applies quite accurately to the classes provided by Java’s Swing library. We have constructed groups of JTextFields and groups of JLabels as parts of the interface provided by a single program. In each case, the objects created using a given class were distinct from one another but shared many common attributes. Some of the similarities are discernible by just looking at a program’s window as it runs. For example, all JTextFields look quite similar. Other shared attributes are only visible to the programmer. Different sets of methods are associated with each class. For example, while all JComboBoxes support the getSelectedItem method, this method is not provided for members of the JTextField class. When we first discussed the word class, however, we were not talking about library classes. We were explaining why the word class appears in the header lines of our sample Java programs. At this point, it should be clear that there is some connection between the library classes you have been using and the classes you define when you write programs. Primarily, both types of classes involve methods. You define methods within the classes you write and you invoke methods associated with library classes. At the same time, the classes you write seem very different from library classes. You invoke methods associated with library classes, but you don’t invoke the buttonClicked or textEntered methods included in your class definitions. The instructions included in these methods get executed automatically in response to user actions. In this chapter, we will see that there is actually no fundamental difference between classes you define and the classes provided by the Java libraries. While the programs we have considered thus far have all involved writing only one new class, this is not typical of Java programs. Most Java programs involve the definition of many classes designed just for that program. All Java programs involve one “main” class where execution begins. This class typically constructs new objects described by additional class definitions written by the program’s author or included in libraries and invokes methods associated with these objects. We will explore the construction of such programs in this chapter.
135
Figure 6.1: Stickies among other windows on a Mac OS system
6.1
Second Class
All the classes we have defined in earlier examples have described the behavior of a single window on the computer’s screen. Accordingly, the simplest way we can introduce programs that involve two or more class definitions is to consider how to write programs that display several distinct windows. It isn’t hard to think of examples of such programs. While the main window displayed by a word processor is used to display the document being edited, the program will often display separate “dialog box” windows used to handle interactions like selecting a new file to be opened or specifying a special font to use. In addition, when multiple documents are opened, each is displayed in a separate window. A word processor is a bit too complicated to present here, so we will instead examine a version of what is probably the simplest, useful, multi-window program one could imagine. The program we have in mind is distributed under the name Stickies under Apple’s Mac OS X system. In addition, several shareware versions of the program are available for Windows. The goal of the program R is to provide a replacement for the handy sticky notes marketed as Post-its� . Basically, all that the program does is enable you to easily create little windows on your computer’s screen in which you can type notes to remind yourself of various things. An example of what some of these little windows might look like is shown in Figure 6.1. We already know enough to write a program that would create a single window in which a user could type a short reminder. All we would need to do is place a JTextArea in a program’s window. We show an example of how the window created by such a program might look in Figure 6.2 and the code for the program in Figure 6.3. The people who wrote the Stickies program were obviously afraid that they would be sued by R the 3M company if they named their program “Post-its� ,” and we are afraid that the people who wrote Stickies might sue us if we named our version of this program “Stickies.” Accordingly, we 136
Figure 6.2: A single reminder window created by running the program shown in Figure 6.3 have given our class the clever name Reminder. Its code is rather trivial. Its constructor simply creates a window on the screen and then places an empty JTextArea in the window. When running the actual Stickies program, you can create multiple reminder windows by selecting “New Note” from the File menu. We haven’t discussed how to create programs with File menus. We can, however, provide an interface that will enable a user to create multiple reminder windows. In particular, what we can do is write another program named ReminderMaker that displays a window like the one shown in Figure 6.4. Then, we will place code in the buttonClicked method of the ReminderMaker program so that each time the button is clicked a new reminder window of the form shown in Figure 6.2 will appear on the screen. It is surprisingly simple to write the code that will make new reminder windows appear. We have seen many examples where we have told the computer to create a new instance of a library class by using a construction such as new JButton( "Click Here" ); In all the constructions we have seen, the name following the word new has been the name of a library class. It is also possible, however, to construct an instance of a class we have defined ourselves. Therefore, we can construct a new reminder window by executing a construction of the form new Reminder() Based on these observations, the code for the ReminderMaker program is shown in Figure 6.5. This is a very simple class, but it is also our first example of a class whose definition depends on another class that is not part of a standard library. The ReminderMaker class depends on our Reminder class. Thus, in some sense, we should not consider either of these classes to be a program by itself. In this case, it is the definition of the two classes together that form the program we wanted to write. In most integrated development environments, when a program is composed of several classes, the text of each class is saved in a separate file and all of these files are grouped together as a single project. In our overview of IDEs in Section 1.4, we showed that after creating a project, we could add a class definition to the project by either clicking on a “New Class” button or selecting a “New 137
// Class Reminder - Creates a window in which you can type a reminder public class Reminder extends GUIManager { // The initial size of the windows private final int WINDOW_WIDTH = 250, WINDOW_HEIGHT = 200; // The size of the JTextArea private final int TEXT_WIDTH = 20, TEXT_HEIGHT = 10;
}
// Create a window in which user can type text public Reminder() { this.createWindow( WINDOW_WIDTH, WINDOW_HEIGHT ); contentPane.add( new JTextArea( TEXT_HEIGHT, TEXT_WIDTH ) ); }
Figure 6.3: A simple Reminder class definition
Figure 6.4: A window providing the means to create reminders // Class ReminderMaker - Allows user to create windows to hold brief reminders public class ReminderMaker extends GUIManager { // The size of the program’s window private final int WINDOW_WIDTH = 200, WINDOW_HEIGHT = 60; // Add the button to the program window public ReminderMaker() { this.createWindow( WINDOW_WIDTH, WINDOW_HEIGHT ); contentPane.add( new JButton( "Make a new reminder" ) ); }
}
// Create a new reminder window public void buttonClicked( ) { new Reminder(); }
Figure 6.5: Definition of the ReminderMaker class 138
Figure 6.6: A Reminder window with a summary in the title bar Class” menu item. For a program that involved multiple user-defined classes, we can simply create several classes in this way. The IDE will then provide separate windows in which we can edit the definitions of these classes.
6.2
Constructor Parameters
In most of the constructions we have used, we have included actual parameters that specify properties of the objects we want to create. For example, in our ReminderMaker class we use the construction new JButton( "Make a new reminder" ) rather than new JButton( ) In the construction that creates new Reminder objects, on the other hand, we have not included any actual parameters. In this section, we will add some additional features to our Reminder program to illustrate how to define classes with constructors that expect and use parameter values. The first feature we will add is the ability to place a short summary of each reminder in the title bar of the window that displays the complete description. With this change, the windows created to hold reminders will look like the window shown in Figure 6.6 rather than like that shown in Figure 6.2. There are a few things we have to consider before we can actually change our Reminder class to include this feature. In the first place, we have to learn how to place text in the title bar of a window. Then, we have to revise the ReminderMaker class to provide a way for the user to enter the summary that should be displayed in the title bar of each reminder. We will address both of these concerns together by redesigning the ReminderMaker class so that it both provides a way to enter a summary and displays a title in its own window. We will associate new names with the two classes we present in this section to avoid confusing them with the very similar classes discussed in the preceding section. We will call the revised classes TitledReminder and TitledReminderMaker. 139
Figure 6.7: Revised interface for creating reminders with titles Within a TitledReminderMaker window, we will place a JTextField that will be used to enter a topic for each reminder window to be created. We will also get rid of the “Make a new reminder” button. Instead of creating a new reminder each time a button is pressed, we will create a new reminder whenever the user presses return after entering a summary. As a result, in the TitledReminderMaker class, new reminders will be created in the textEntered method rather than the buttonClicked method. An example of this new interface is shown in Figure 6.7. If you look carefully at Figure 6.7, you will notice that we have added the title “Reminders” to the title bar of the ReminderMaker window. This is actually quite easy to do. The createWindow method accepts a title to place in the new window’s title bar as a third parameter. Therefore, we can simply add the desired title as a third parameter to the invocation of createWindow as shown below: this.createWindow( WINDOW WIDTH, WINDOW HEIGHT, "Reminders" ); The only remaining change to the original ReminderMaker class is that we want this new code to pass the text of the desired title as a parameter when it constructs a new reminder. We know that the text to be used will be entered in the JTextField provided in the program’s interface. Assuming that we associate the name topic with this text field, we can pass the text to the reminder constructor by saying new TitledReminder( topic.getText() ); This will require that we design the TitledReminder class so that it expects and uses the actual parameter information. We will discuss those changes in a moment. Meanwhile, the complete code for the revised TitledReminderMaker class is shown in Figure 6.8. We showed in Section 3.4 that by including a formal parameter name in the declaration of a method, we can inform Java that we expect extra information to be provided when the method executes and that we want the formal parameter name specified to be associated with that information. For example, in the definition of buttonClicked shown below, public void buttonClicked( JButton clickedButton ) { entry.setText( entry.getText() + clickedButton.getText() ); } (which we originally presented in Figure 3.12) we inform Java that we expect the system to tell us which button was clicked and that we want the formal parameter name clickedButton associated with that button. Formal parameter names can be used in a similar way in the definitions of constructors. If we use the following header when we describe the constructor for the TitledReminder class 140
/* * Class TitledReminderMaker - Make windows to hold reminders */ public class TitledReminderMaker extends GUIManager { // The size of the program’s window private final int WINDOW WIDTH = 270, WINDOW HEIGHT = 60; // Size of field used to describe a reminder private final int TOPIC_WIDTH = 15; // Used to enter description of a new reminder private JTextField topic; // Add the GUI controls to the program window public TitledReminderMaker() { this.createWindow( WINDOW WIDTH, WINDOW HEIGHT, "Reminders" ); contentPane.add( new JLabel( "Topic: ") ); topic = new JTextField( TOPIC_WIDTH ); contentPane.add( topic ); }
}
// Create a new reminder window when a topic is entered public void textEntered( ) { new TitledReminder( topic.getText() ); } Figure 6.8: Code for the TitledReminderMaker class
141
public TitledReminder( String titleLabel ) we inform Java that we expect any construction of the form new TitledReminder( . . . ) to include an actual parameter expression that describes a string, and that the string passed should be associated with the name titleLabel while the instructions in the body of the constructor are executed. In particular, we want to use the String passed to the constructor to specify a window title when we invoke createWindow. With this in mind, the definition for the constructor of the TitledReminder class would look like: // Create a window in which user can type text public TitledReminder( String titleLabel ) { this.createWindow( WINDOW_WIDTH, WINDOW_HEIGHT, titleLabel ); contentPane.add( new JTextArea( TEXT_HEIGHT, TEXT_WIDTH ) ); } The only other difference between Reminder and TitledReminder would be the class name.
6.2.1
Parameter Correspondence
We have used actual parameters in many previous examples. We have passed actual parameters in constructions like new JTextField( 15 ) and in method invocations like clickedButton.setForeground( Color.ORANGE ); In all the previous examples in which we have used actual parameters, the parameters have been passed to methods or constructors defined as part of Squint or the standard Java libraries. We have learned that there are restrictions on the kinds of actual parameters we can pass to each such method. For example, we can pass a color to the setForeground method and a number to the JTextField constructor but not the other way around. If we pass the wrong type of actual parameter to a library method or constructor, our IDE will produce an error message when we try to compile the program. Now we can begin to understand why our parameter passing options have been limited. Java requires that the actual parameter values passed in an invocation or construction match the formal parameter declarations included in definitions of the corresponding methods or constructors. If we are using a method or constructor defined as part of Squint, Swing or any other library, we are constrained to provide the types of actual parameters specified by the authors of the code in the library. Passing the title to be placed in a window’s title bar as an actual parameter to the TitledReminder constructor is the first time that we have both passed an actual parameter and declared the formal parameter with which it would be associated. As a result, this is the first example where we can see that the limitations on the types of actual parameters we can pass are a result of the details of formal parameter declarations. 142
Formal parameter declarations not only determine the types of actual parameters we can pass, they also determine the number of parameters expected. We have seen that some constructors expect multiple parameters. In particular, when we construct a JTextArea we have provided two actual parameters specifying the desired height and width of the text area. We can explore the definition of constructors that expect multiple parameters by adding another feature to our reminders program. The Stickies program installed on my computer provides a menu that can be used to select colors for the windows it creates. This may not be obvious when you look at Figure 6.1 if you are reading a copy of this text printed in grayscale, but on my computer’s screen I get to have green stickies, pink stickies, and purple stickies. When I first create a new window it appears in a default color. If I want, I can change the default, or I can change an individual window’s color after it has been created. We can easily add similar features to our Reminders program. Once again, since we will be working with revised versions of the two classes that comprise our program, we will given them new names. We will call the new classes ColorfulReminder and ColorfulReminderMaker. When we create a ColorfulReminder we will want to specify both a string to be placed in the window’s title bar and the color we would like to be used when drawing the window. That is, it should be possible to create a ColorfulReminder using a construction of the form new ColorfulReminder( "Proposal Due!", Color.RED ) This construction involves two actual parameters. The first is a String. The second a Color. Accordingly, in the header for the constructor for the ColorfulReminder class we will need to include two formal parameter declarations. We declare these parameters just as we would declare single formal parameters, except we separate the declarations from one another with a comma. Therefore, if we decided to use the names titleLabel and shade for the parameters, the constructor would look like: public ColorfulReminder( String titleLabel, Color shade ) { // Create window to hold a reminder this.createWindow( WINDOW_WIDTH, WINDOW_HEIGHT, titleLabel ); JTextArea body; body = new JTextArea( TEXT_HEIGHT, TEXT_WIDTH ); contentPane.add( body ); // Set the colors of both the text area and the window that contains it body.setBackground( shade ); contentPane.setBackground( shade ); } When multiple formal parameter declarations are included, they must be listed in the same order that the corresponding actual parameters will be listed. That is, since we placed the declaration of titleLabel before the declaration of shade, we must place the argument "Proposal Due!" before Color.RED . If we had used the header public ColorfulReminder( Color shade, String titleLabel ) 143
then the construction new ColorfulReminder( "Proposal Due!", Color.RED ) would be considered an error since the first actual parameter provided is a string while the first formal parameter declared indicates a Color is expected. Of course, if we can define a constructor that expects two parameters, it is also possible to define a constructor that expects even more parameters. For example, if we wanted to make it possible to change the initial size of reminder windows, we might define a class with the constructor public FlexibleReminder( int width, int height, String titleLabel, Color shade ) { // Create window to hold a reminder this.createWindow( width, height, titleLabel ); JTextArea body; body = new JTextArea( TEXT_HEIGHT, TEXT_WIDTH ); contentPane.add( body ); // Set the colors of both the text area and the window that contains it body.setBackground( shade ); contentPane.setBackground( shade ); } In this case, we could use a construction of the form new FlexibleReminder( 400, 300, "Proposal Due", Color.RED ) to construct a reminder window.
6.2.2
Choosing Colors
Including a Color as one of the formal parameters expected by the ColorfulReminder class makes it possible to set the color of a reminder window when it is first created. As mentioned above, however, it should also be possible to change a window’s color after it has been created. We will explore how to add this feature in the next section. To prepare for this discussion, we will conclude this section by introducing an additional feature of Java’s Swing library, a Swing mechanism that makes it easy to let a program’s user select a color. Swing includes a method that can be used to easily display a color selection dialog box. A sample of this type of dialog box is shown in Figure 6.9. Understanding this figure will require a bit of imagination if you are reading a grayscale copy of this text. The small squares displayed in the grid in the middle of the window are all squares of different colors. The mouse cursor in the figure is pointing at a square that is actually bright yellow. A user can select a color by clicking on one of the squares and then clicking on the “OK” button. The method that produces this dialog box is named JColorChooser.showDialog. It expects three parameters: the name of the program’s GUIManager, typically this, a string to be displayed as instructions to the user, and the default color to select if the user just clicks “OK”. An invocation of this method might therefore look like: 144
Figure 6.9: Dialog box displayed by the JColorChooser.showDialog(...) method JColorChooser.showDialog( this, "Select a Color", Color.WHITE ) JColorChooser.showDialog is an accessor method. It returns the color the user selected as its result. As an example of the use of JColorChooser.showDialog, the definition of a class designed to work with the ColorfulReminder class discussed above is presented in Figure 6.10. The user interface this program provides is shown in Figure 6.11. Like the TitledReminderMaker class, this user interface allows a user to create a new reminder window by typing the topic for the reminder in a JTextField and then pressing return. It also provides a button the user can press to select a new color for the reminder windows. It uses a variable named backgroundColor to remember the color that should be used for the next reminder window created. This variable is initially associated with the color white. When the user presses the “Pick a Color” button, the variable is associated with whatever color the user selects using the dialog box. Each time a new reminder window is created, the current value of backgroundColor is passed as an actual parameter to the ColorfulReminder constructor. Therefore, once the user has selected a color, it will be used for all windows created until a new color is chosen.
6.3
Method Madness
While the revisions we have made to our reminder program make it much more colorful, the program still doesn’t provide as much flexibility as the Stickies program that inspired it. Our program provides no way to change a window’s color once it has been created. The Stickies program, on the other hand, lets you change the color of a window even after it has been created. We will explore how to add such flexibility to our program as a means of introducing a very important aspect of 145
/* * Class ColorfulReminderMaker - Make windows to hold reminders */ public class ColorfulReminderMaker extends GUIManager { // The size of the program’s window private final int WINDOW_WIDTH = 270, WINDOW_HEIGHT = 100; // Size of field used to describe a reminder private final int TOPIC_WIDTH = 15; // Used to enter description of a new reminder private JTextField topic; // The color to use for the background of the next reminder private Color backgroundColor = Color.WHITE; // Add the GUI controls to the program window public ColorfulReminderMaker() { this.createWindow( WINDOW WIDTH, WINDOW HEIGHT, "Reminders" ); contentPane.add( new JLabel( "Topic: " ) ); topic = new JTextField( TOPIC_WIDTH ); contentPane.add( topic ); contentPane.add( new JButton( "Pick a Color" ) ); } // Select a new background color public void buttonClicked( ) { backgroundColor = JColorChooser.showDialog( this, "Select a Color", backgroundColor ); }
}
// Create a new reminder window public void textEntered() { new ColorfulReminder( topic.getText(), backgroundColor ); } Figure 6.10: Complete code for the ColorfulReminderMaker class
146
Figure 6.11: User interface of the ColorfulReminderMaker program writing programs composed of multiple classes, the ability to pass information between objects through method invocations. When using library classes, we have seen that in addition to specifying the details of an object through constructor parameters, we can later modify such details using a method invocation. For example, in the TouchCounter program presented in Figure 2.10, we specified the initial text displayed by the label named message in its constructor: message = new JLabel( "Click the button above" ); Our program later changes its contents to display the number of times the user has clicked using the setText mutator method: message.setText( "I’ve been touched " + numberOfClicks + " time(s)" ); The ability to change the contents of a JLabel is provided through the setText method. Similarly, we can provide the ability to change the color of a ColorfulReminder by including the definition of an appropriate method within our ColorfulReminder class. Until now, we have only defined event-handling methods such as buttonClicked, and we have only invoked methods that were defined within the Squint or Swing libraries. It is, however, possible for us to define methods other than event-handling methods and then to invoke these methods. Best of all, the process of defining such methods is very similar to the process of defining an event-handling method. Like the definition of an event-handling method, the definition of our method to set the color of a reminder will begin with the words public void followed by the name of the method and any formal parameter declarations. For this method, we will want just one formal parameter, the Color to display in the reminder window. We will use the parameter name newShade. Unlike event-handling methods, we get to pick any name for the method that is appropriate. We could choose the name setBackground to be consistent with the name of the method provided to set the color of Swing GUI components, or we could instead chose a different name like setColor or changeWindowColor. In fact, we could use a name like cuteLittleMethod, but it would be hard to claim that name was appropriate. To illustrate that we do have the freedom to choose the name, we will use the appropriate, but not quite standard name setColor for our method. Accordingly, our method header will be public void setColor( Color newShade ) A complete class definition incorporating the setColor method is shown in Figure 6.12. Once again, we have renamed the class to distinguish it from earlier versions. ColorableReminder is 147
/* * Class ColorableReminder - A window you can type a message in */ public class ColorableReminder extends GUIManager { // The size of the reminder window private final int WINDOW_WIDTH = 250, WINDOW_HEIGHT = 200; // The size of the JTextArea private final int TEXT_WIDTH = 20, TEXT_HEIGHT = 10; // Area used to hold text of reminder private JTextArea body; // Add GUI components and set initial color public ColorableReminder( String label, Color shade ) { // Create window to hold all the components this.createWindow( WINDOW_WIDTH, WINDOW_HEIGHT, label ); body = new JTextArea( TEXT_HEIGHT, TEXT_WIDTH ); contentPane.add( body ); // Set the colors of both the text area and the window that contains it body.setBackground( shade ); contentPane.setBackground( shade ); }
}
// Change the color of the window’s background public void setColor( Color newShade ) { body.setBackground( newShade ); contentPane.setBackground( newShade ); }
Figure 6.12: The code of the ColorableReminder class
148
now its name. When the setColor method in this class is invoked, it must set the background color of both the JTextArea and the contentPane so that the whole window will display a single color. Accordingly, the name body, which was previously declared as a local variable within the constructor must now be declared as an instance variable. Unsurprisingly, the body of the setColor method contains two instructions that are nearly identical to the instructions used to set the color in the constructor. The only difference is that in this context the name newShade is used as an actual parameter in the invocations of setBackground. To illustrate the use of our new setColor method, we will now modify the reminder maker class. In the new version, which we will name ColorableReminderMaker, when the user picks a new color, the program will immediately change the color of the last reminder created. The code for this version of the class is shown in Figure 6.13. To invoke a method, we have to provide both the name of the method and the name of the object to which it should be applied. Therefore, to use setColor as we have explained, we have to associate a name with the last reminder created. We do this by declaring an instance variable named activeReminder. An assignment within the textEntered method associates this name with each new reminder window that is created. Then, in the buttonClicked method, we execute the invocation activeReminder.setColor( backgroundColor ); to actually change the color of the most recently created window.1 This invocation tells Java to execute the instructions in the body of our definition of setColor, thereby changing the color of the window’s background as desired. In this example, the method we defined expects only a single parameter. It is also possible to define methods that expect multiple parameters. In all cases, as with constructors, Java will insist that the number of actual parameters provided when we invoke a method matches the number of formals declared in the method’s definition and that the types of the actual parameters are compatible with the types included in the formal parameter declarations. Java will associate the actual parameter values with the formal parameter names in the order in which they are listed and then execute the instructions in the method’s body.
6.4
Analyze This this (pronoun, pl. these ) 1. used to identify a specific person or thing close at hand or being indicated or experienced, as in : He soon knew that this was not the place for him. (From the New Oxford American Dictionary
(via Apple’s Dictionary program)
)
Our example program now consists of two classes with very different structures and roles. Both of the methods defined in ColorableReminderMaker are event-handling methods while the setColor method in ColorableReminder is not designed to respond to user events. The ColorableReminderMaker 1
To ensure that we don’t try to change the color of the most recently created reminder before any reminders have been created at all, we don’t enable the “Pick a Color” button until after a reminder has been created.
149
// Class ColorableReminderMaker - Make windows to hold reminders public class ColorableReminderMaker extends GUIManager { // The size of the program’s window private final int WINDOW_WIDTH = 270, WINDOW_HEIGHT = 100; // Size of field used to describe a reminder private final int TOPIC_WIDTH = 15; // Used to enter description of a new reminder private JTextField topic; // Used to change the color of new reminder backgrounds private JButton pickColor; // The color to use for the background of the next reminder private Color backgroundColor = Color.WHITE; // The most recent reminder created private ColorableReminder activeReminder; // Add the GUI controls to the program window public ColorableReminderMaker() { this.createWindow( WINDOW WIDTH, WINDOW HEIGHT, "Reminders" ); contentPane.add( new JLabel( "Topic: " ) ); topic = new JTextField( TOPIC_WIDTH ); contentPane.add( topic ); pickColor = new JButton( "Pick Background Color" ); pickColor.setEnabled( false ); contentPane.add( pickColor ); } // Select a new background color for current and future reminders public void buttonClicked( JButton which ) { backgroundColor = JColorChooser.showDialog( this, "Select a Color", backgroundColor ); activeReminder.setColor( backgroundColor ); }
}
// Create a new reminder window public void textEntered() { activeReminder = new ColorableReminder( topic.getText(), backgroundColor ); pickColor.setEnabled( true ); }
Figure 6.13: Complete code for the ColorablelReminderMaker class 150
creates ColorableReminders and tells them what to do through method invocations (i.e., when to change color). The ColorableReminderMaker acts as the boss and the ColorableReminders just listen passively. In the following section, we will see that it is possible for the communications that occur between objects of different classes to be much more interesting. By the end of the next section, both of the classes in our program will include methods designed to handle events and methods like setColor that do not handle events but are instead invoked explicitly by code in the other class. We will begin the construction of this version of the program by making a rather small change to the ColorableReminder class. We will make it talk to itself! The code in the ColorableReminder constructor is designed to perform three steps: 1. Create an empty window, 2. Place a text area in the window, and 3. Set the background color used. The setColor method that we added to the class in the last section is designed to perform the third of these steps. Therefore, it should be possible to replace the last two invocations in the constructor with a single invocation of the setColor method. Recall, however, that when we invoke a method we need to provide both the name of the method and the name of the object to which it should be applied. What name should we use within the constructor to tell Java that we want to apply the setColor method to the object being constructed? The answer to this question is actually apparent if we look at the first line of the constructor’s body. In that line we invoke the createWindow object using the name this. By writing such an invocation, we are telling Java that we want the object being created to create a window for itself. That is, we are applying the createWindow method to the object being constructed. The name this can be used in a constructor to refer to the object being constructed or within a method to refer to the object to which the method is being applied. Thus, we can replace the last two lines of the ColorableReminder constructor with the invocation this.setColor( shade );
6.5
Talking Back
The name this can also be used as a parameter in a construction or method invocation. When this is done, the object executing the code containing the construction or invocation is passed as an actual parameter. This provides a way for one object to identify itself to another, making it possible for the other object to communicate with it later. To illustrate how the name this can be used to facilitate such two-way communications, we will modify our Reminder program to make it even more like the Stickies program. Our program currently only provides a way to change the color of the most recent reminder created. On the other hand, it is possible to change the color of any window created by the Stickies program at any time. The interface provided by Stickies is quite simple. When the user clicks on any window, it becomes the active window. When the user selects a color from the color menu, the program changes the color of the active window rather than of the most recently created window. 151
Obviously, implementing this behavior will require some modifications to our example classes. Accordingly, we will once again give the new versions new names. This time we will call them ReactiveReminder and ReactiveReminderMaker. Like the Stickies program, our program already has some notion of an “active window”. If you create several reminder windows and then start typing text, the text you type will appear in one of your reminder windows. If you want to change which window your text appears in, you merely have to click on a different window. After you click, text you type will be inserted in the window you just clicked on. That window is now the active window. In the terminology of Java’s Swing library, we say that the window you clicked on has gained the focus. There is an event handling method that you can define if you want to take some special action when your window gains the focus. The method is named focusGained. If you include a method definition of the form public void focusGained() { . . . } within a class that extends GUIManager then the instructions in the body of the method will be executed whenever one of the GUI components in the GUIManager’s content pane gains the focus. When you click on a reminder window, the JTextArea in the window gains the focus. Therefore, if we include a definition of focusGained in our reminder class, it will be executed when the user clicks on a reminder window. This is a start. It means that it is possible for a reminder window to become aware that it has become the active window. Unfortunately, this is not enough. To change the color of a reminder window, the user will click on the “Pick a Color” button in the reminder maker window. To actually change a reminder’s color, the reminder maker needs to invoke setColor on the active window. Therefore, it isn’t enough for a reminder to know that it is active. Somehow, a reminder needs a way to tell the reminder maker that it has become the active window. One object can provide information to another object by invoking one of the methods associated with the other object and passing the information as an actual parameter. We have already seen the reminder maker pass information to a reminder by invoking setColor. Now, we have to define a method in the reminder maker that a reminder can invoke to tell the reminder maker that it has become the active window. We will call this method reminderActivated. We will invoke this method from the body of the focusGained method in the reminder class. It will expect to be passed the window that has become active as a parameter when it is invoked. It will simply associate the name activeReminder with this parameter so that the reminder maker can “remember” which window is now active. Therefore, we will define reminderActivated as follows: // Notice when the active reminder window is changed public void reminderActivated( ReactiveReminder whichReminder ) { activeReminder = whichReminder; } We know that the invocation of reminderActivated that we place in the reminder class must look something like: x.reminderActivated( y ); 152
The interesting part is deciding what to actually use where we have written “x” and “y”. Here “y” represents the actual parameter that should be passed when reminderActivated is invoked. We said that we needed to pass the reminder that was becoming active to the reminder maker. This is the same as the window that will be executing the focusGained method. Therefore, we can use the name this to refer to the window. Now we know that our invocation must look like x.reminderActivated( this ); We will also use this to determine the correct replacement for “x”. The problem is that whatever we use for “x” should refer to the reminder maker, not a reminder window. If we use the name this within the ReactiveReminder class, it will refer to a reminder window, but if we use it within the ReactiveReminderMaker class it will refer to the reminder maker. The solution, then, is to pass this from the reminder maker in each reminder construction it executes. If we view the parameters to the constructor as a message sent to the new object, including this in the list is like putting a return address on the envelope. It tells the new object who created it. To accomplish this, we first have to both add this as an actual parameter in the construction: activeReminder = new ReactiveReminder( topic.getText(), backgroundColor, this ); and add a formal parameter declaration that associates a name with the extra parameter in the header of the constructor for the ReactiveReminder class; public ReactiveReminder( String label, Color shade, ReactiveReminderMaker creator ) { At this point, we are close, but not quite done. The name creator can now be used to refer to the reminder maker within the reminder constructor. Formal parameter names, however, can only be used locally within the constructor or method with which they are associated. Therefore, we cannot use the name creator to refer to the reminder maker within the body of focusGained. To share information between a constructor and a method (or between two distinct invocations of methods) we must take the information and associate it with an instance variable. We will do this by declaring an instance variable named theCreator and associating it with the reminder maker by executing the assignment theCreator = creator; within the body of the constructor. Then, we can place the invocation theCreator.reminderActivated( this ); in the focusGained method. A complete copy of the revised classes can be found in Figures 6.14 and 6.15. Both of the classes in this version of the program include methods that are designed to handle GUI events and other methods that are invoked explicitly within the program itself. ReactiveReminder defines the event-handling method focusGained in addition to the simple mutator method setColor. The ReactiveReminderMaker class included two methods that handle GUI events, textEntered and buttonClicked, in addition to the reminderActivated method which is invoked by code in the ReactiveReminder class. 153
/* * Class ReactiveReminder - A window you can type a message in */ public class ReactiveReminder extends GUIManager { // The size of the reminder window private final int WINDOW_WIDTH = 250, WINDOW_HEIGHT = 200; // The size of the JTextArea private final int TEXT_WIDTH = 20, TEXT_HEIGHT = 10; // Area used to hold text of reminder private JTextArea body = new JTextArea( TEXT_HEIGHT, TEXT_WIDTH ); // The ReactiveReminderMaker that created this reminder private ReactiveReminderMaker theCreator; // Add GUI components and set initial color public ReactiveReminder( String label, Color shade, ReactiveReminderMaker creator ) { // Create window to hold all the components this.createWindow( WINDOW_WIDTH, WINDOW_HEIGHT, label ); theCreator = creator; contentPane.add( body ); this.setColor( shade ); } // Change the color of the window’s background public void setColor( Color newShade ) { body.setBackground( newShade ); contentPane.setBackground( newShade ); }
}
// Notify the manager if the user clicks on this window to make it active public void focusGained() { theCreator.reminderActivated( this ); }
Figure 6.14: Code for the ReactiveReminder class
154
// Class ReactiveReminderMaker - Make windows to hold reminders public class ReactiveReminderMaker extends GUIManager { // The size of the program’s window private final int WINDOW_WIDTH = 270, WINDOW_HEIGHT = 100; // Used to enter description of a new reminder private JTextField topic = new JTextField( 15 ); // Used to change the color used for new reminder backgrounds private JButton pickColor = new JButton( "Pick a Color" ); // The color to use for the background of the next reminder private Color backgroundColor = Color.WHITE; // The most recent reminder created private ReactiveReminder activeReminder; // Add the GUI controls to the program window public ReactiveReminderMaker() {
this.createWindow( WINDOW WIDTH, WINDOW HEIGHT, "Reminders" ); contentPane.add( new JLabel( "Topic: " ) ); contentPane.add( topic ); pickColor.setEnabled( false ); contentPane.add( pickColor ); } // Select a new background color for current and future reminders public void buttonClicked() { backgroundColor = JColorChooser.showDialog( this, "Select a Color", backgroundColor ); activeReminder.setColor( backgroundColor ); } // Create a new reminder window public void textEntered() { activeReminder = new ReactiveReminder( topic.getText(), backgroundColor, this ); pickColor.setEnabled( true ); }
}
// Notice when the active reminder window is changed public void reminderActivated( ReactiveReminder whichReminder ) { activeReminder = whichReminder; } Figure 6.15: Code for the ReactiveReminderMaker class 155
It is worth observing that if you look at just the code for the ReactiveReminderMaker class, the reminderActivated method might easily be mistaken for an event handling method. Like the other two methods in this class, the instructions in its body are designed to make the program react to a user action appropriately. The only reason we distinguish the other two methods from reminderActivated is that buttonClicked and textEntered are executed by some mysterious mechanism in the Java system while reminderActivated is executed when the code we wrote in ReactiveReminder explicitly invokes it. We point this out to make the “mysterious mechanism” less mysterious. Just as we explicitly invoke reminderActivated, it should now be clear that somewhere in the code of the Squint or Swing library there are statements that explicitly invoke textEntered and buttonClicked. There is really no fundamental difference between an eventhandling method and any other method we define.
6.6
Defining Accessor Methods
In Chapter 3 we introduced the distinction between mutator methods and accessor methods. Any method whose purpose is to change some aspect of an object’s state is classified as a mutator method. For example, because the setText method changes the contents of a GUI component, it is classified as a mutator. Similarly, the setColor method we defined in our reminder class would be classified as a mutator method. Accessor methods serve a different role. An accessor method provides a way to obtain information about an object’s state. The getText and getSelectedItem methods are good examples of accessor methods. The two examples of methods presented so far in this chapter, setColor and reminderActivated, are both examples of mutator methods. One changes a clearly visible property of an object, its color. The other changes the reminder associated with the variable activeReminder within the reminder maker. While this change is not immediately visible, it does determine how the program will react the next time the user presses the “Pick a Color” button. Our goal in this section is to introduce the features used to define accessor methods. We will use a very simple example. If we have a setColor method in our reminder class, it might be handy to have a getColor method. In fact, introducing such a method will enable us to fix a rather subtle flaw in the current version of our program. If you look back at the invocation that causes the color selection dialog box to appear: backgroundColor = JColorChooser.showDialog( this, "Select a Color", backgroundColor ); you will notice that most of the actual parameters included in this invocation are rather mysterious. The second parameter is the only obvious one. It determines what prompt the user will see in the dialog box. The first parameter is included because each dialog box created by Swing must be associated with some existing window on the screen. In this context, this refers to the reminder maker window. The last parameter is the one we are really interested in. The color dialog is typically used to change something’s color. The third parameter is supposed to specify the color you are starting with. This enables the system to include a patch of the original color in the dialog box so that the user can compare it to the alternative being chosen. As currently written, our program isn’t really using this third parameter correctly. The name backgroundColor in our program will be associated with the background color of the last window whose color was changed. This may not be the same as the background color of the currently active window. 156
If there was a getColor method defined in the ReactiveReminder class we could fix this problem quite easily. Since the variable activeReminder is always associated with the active window, we could rewrite the invocation that creates the color chooser dialog as: backgroundColor = JColorChooser.showDialog( this, "Select a Color", activeReminder.getColor()); Now, all we have to do is actually define the getColor method! The process of defining an accessor method is very similar to that of defining a mutator method. We must write a header including the name of the method and declarations of any formal parameters it expects. We also write a body containing a list of instructions to be executed when the method is invoked. The difference is that the purpose of the instructions we write will be to determine what information to return as the “answer” to the question being asked when the method is invoked. Java therefore requires that the definition of an accessor method contains two special components. The first describes the type of the information that will be returned as an answer. The second specifies the actual answer to be returned. The specification of the type of the answer produced by an accessor method appears in its header. In all of the method definitions we have seen, the second word has been void. This actually describes the information the method will return. A mutator method returns void, that is, nothing. In the definition of an accessor method, we will replace void with the name of the type of information the method is designed to produce. This type is called the method’s return type For example, since getColor should obviously produce a Color, its header will look like public Color getColor() { In addition, somewhere in the instructions we have to explicitly tell Java what answer our method should return to the code that invoked it. This is done by including an instruction of the form return expression; in the method body. The value or object described by the expression in the return statement will be used as the result of the invocation. For example, to return the color of a reminder, we could use the return statement return contentPane.getBackground(); or return body.getBackground(); Therefore, the complete definition of the setColor method might be public Color getColor() { return contentPane.getBackground(); } When a return statement is executed, the computer immediately stops executing instructions in the method’s body and returns to executing instructions at the point from which the method was invoked. As a result, a return statement is usually included as the last statement in the body 157
of an accessor method. return statements may be included at other points in a method’s body, but the last statement executed by an accessor method must be a return. In our example, this is not an issue since the return statement is actually the only statement in the body. This is because it is very easy to determine the color of a reminder. If a more complicated process that involved many statements was required, all these statements could appear in the body of our method followed by a return.
6.7
Invisible Objects
Most of the objects we have considered thus far appear as something concrete and visible on your computer screen. When you say contentPane.add( new JButton( "Click Me" ) ); you know that you made the computer construct a new button because you can see it on the screen. It is important to realize, however, that it is possible to create an object that never becomes visible. For example, if you create a button by saying JButton invisibleButton; invisibleButton = new JButton( "Click Me" ); and don’t say add( invisibleButton ); Java still has to create the button even though you can’t see it. Somewhere inside the computer’s memory, Java keeps information about the button because it has to remember what the button is supposed to look like in case you eventually do add it to your content pane. For example, if you execute the statement invisibleButton.setText( "Click me if you can" ); Java has to have some way to record the change even though it doesn’t have any visible effect. Invisible buttons are clearly not very useful. The idea that creating an object forces Java to keep track of information about the object even if it isn’t visible, on the other hand, is very useful and important. In this section, we will explore an example in which we define a class of objects that will never be visible on the screen. They will be used to record information that will be displayed, but the objects themselves will remain invisible. It probably will come as no shock that the example we have in mind is yet another variant of the Reminders program. The good news is that this variant will be very different from the programs we have presented in the preceding sections. The idea is that a program to keep track of a set of reminders doesn’t need to have a separate window to display each reminder. An alternate interface would be to have a single window that could display the contents of one reminder together with a menu from which one could select any of the reminders when one wanted its contents to be displayed. To make this concrete, Figure 6.16 shows how information might be presented by such a program. The snapshot presented in Figure 6.16(a) shows how the program would look while a user was simply examining one reminder. Figure 6.16(b) shows how the user would request to see the 158
(a)
(b)
(c)
(d)
Figure 6.16: An alternate interface for viewing reminders
159
contents of a different reminder. When the mouse is depressed on the menu in the window, a list of the topics of all the reminders would be displayed. The user could select any item in the list. If the user selected the second item as shown in Figure 6.16(b), then, when the mouse was released, the program would display the contents of the selected reminder as shown in Figure 6.16(c). Whenever a given reminder was displayed, the user could edit the contents of the text field and text area displayed in the window to update, correct, or extend the information previously entered. In particular, as shown in Figure 6.16(d), if the user clicked on the “New Reminder” button, the program would display a reminder with a default topic such as “Reminder 4”. The user could then edit the topic and contents to include the new reminder in the collection maintained by the program. In the previous versions of the reminder program, a Reminder2 was actually a window displayed on the screen that contained a text area in which the desired text was displayed. If the program was keeping track of four reminders, there would be four windows displayed. In this new version of the program, a reminder will not itself correspond to anything visible on the screen. The program displays one text field and one text area. At various times these two components are used to display the text of various reminders, but when we create a new reminder, the program does not create and display a new text area or text field. It just uses setText to change what an existing component displays. A reminder is no longer a window or even a GUI component. A reminder is just a pair of strings. Basically, a reminder is a piece of information, not the means used to display it. It is still very useful, however, to define a Reminder class so that we can create objects to represent the contents of various reminders. The definition of such a class is shown in Figure 6.17. The new class is named InvisibleReminder. It differs from all the other classes we have defined so far in a very significant way. Every other class we have seen has included the phrase extends GUIManager in its header. This class does not. The phrase extends GUIManager indicates that a class definition describes how to respond to GUI components within a window. As we have seen, each time we construct an object of a class that extends GUIManager, we end up with a new window. Since this class does not extend GUIManager, creating a new InvisibleReminder will not create a new window. In fact, it you try to reference the contentPane or invoke this.createWindow(...) within such a class, your IDE will identify that code as an error. The fact that we cannot see an InvisibleReminder does not mean that it is impossible to write a program that displays its contents. Within the definition of the class, we have included accessor methods that make it possible to determine what the contents of a given reminder are. To construct a program to provide an interface like that shown in Figure 6.16, we would define a second class that would build a GUI interface including a text field and a text area. Within the code of that class, we would associate names with the text field, text area, and the InvisibleReminder the user had most recently selected from the menu. This class could then use the accessor methods associated with an InvisibleReminder together with the setText method to display a reminder. In particular, assuming that the text field is named topic, the text area is named reminder, and the InvisibleReminder is named currentReminder, we could display the desired information by executing the instructions topic.setText( currentReminder.getLabel() ); 2
Even though we used a variety of names to distinguish various versions of our reminder class from one another, we now use the name of the original version of the class, Reminder, to refer to all of the versions since we are discussing properties shared by all the variations of the class we presented.
160
/* * InvisibleReminder --- Holds the contents and summary of a reminder */ public class InvisibleReminder { // The strings that make up the contents of the reminder private String label; private String body; // Turn a pair of strings into a reminder public InvisibleReminder( String myLabel, String myBody ) { label = myLabel; body = myBody; } // Get the short summary of a reminder’s contents public String getLabel() { return label; } // Get the full details of a reminder public String getBody() { return body; }
}
// Change the strings that are the contents of a reminder public void setContents( String myLabel, String myBody ) { label = myLabel; body = myBody; }
Figure 6.17: The definition of the InvisibleReminder class
161
reminder.setText( currentReminder.getBody() ); The only subtle aspect of constructing such a program is arranging to have the currentReminder variable associated with the latest menu item selected by the user. While perhaps subtle, this is actually quite easy if we take full advantage of the flexibility provided by the JComboBox class defined within Swing. In all of our previous examples that used JComboBoxes, all the items we added to the menu were strings. When we discussed JComboBoxes, however, we explained that Swing would let us add objects other than strings to a menu. That is why Java insists that we say someJComboBox.getSelectedItem().toString() rather than simply saying someJComboBox.getSelectedItem() when we want to get the string a user has selected from a menu. If a menu contains items other than strings, someJComboBox.getSelectedItem() may return something other than a string. In particular, if we use the addItem method to place InvisibleReminders in a JComboBox, then when we execute someJComboBox.getSelectedItem() the value returned will be an InvisibleReminder. Unfortunately, just as Java will not let us assume that getSelectedItem will return a string, it will not let us assume it returns an InvisibleReminder. We must tell it explicitly to treat the item selected in the menu as an InvisibleReminder. There is no toInvisibleReminder method to accomplish this. Instead, there is a form of expression called a type cast that provides a general way to tell Java that we want it to assume that the values produced by an expression will have a particular type. A type cast takes the form ( type-name ) expression That is, we simply place the name of the type of value we believe the expression will produce in parentheses before the expression itself. In the case of extracting an InvisibleReminder from a menu, we might say currentReminder = (InvisibleReminder) reminderMenu.getSelectedItem(); While we no longer use the toString method when we invoke getSelectedItem, the toString method still plays an important role when we want to build a menu out of items that are not Strings. If we build a menu by adding InvisibleReminders as items to the menu, Java still needs some way to display strings that describe the items in the menu. To make this possible, it assumes that if it applies the toString method to any object we add to a JComboBox, the result returned will be the string it should display in the menu. Right now, our definition of InvisibleReminder does not include a definition of toString, so this will not work as we desire. We can fix this by simply adding the defintion 162
public String toString() { return this.getLabel(); } to our InvisibleReminder class. To illustrate these ideas, a complete definition of a ReminderViewer class that would provide an interface like that shown in Figure 6.16 is presented in Figures 6.18 and 6.19. In all of our previous examples of code, we have avoided the use of initializers in instance variable and local variable declarations. As we explained in Section 2.6, we did this to ensure that you learned to clearly distinguish the roles of declarations and assignments in Java. In this example and the remainder of the examples we present in this text, however, we will assume that you are comfortable enough with the use of declarations and assignments that we can begin to use initializers without confusion. In particular, you will note that in this example we use initializers to create the GUI components named reminderMenu, topic, and reminder. Begin by looking at the code for the menuItemSelected method in Figure 6.19. When the user selects a new item from the menu, this ensures that the contents of the selected reminder are displayed. As explained above, we want to allow the program’s user to update the text of a reminder while it is displayed. Therefore, the first step in this method is designed to make sure any such changes are recorded. It uses the setContents mutator method to replace the previous contents of the reminder with the text found in the text field and text area. Next, the method uses a type cast with the getSelectedItem method to associate the newly selected reminder with the currentReminder variable. Finally, it displays the contents of the reminder using the getLabel and getBody methods. Once this method’s function is understood, it should be quite easy to understand the code in the buttonClicked method. Like menuItemSelected, it begins by saving any updates to the currently displayed reminder. Then it creates a new reminder with a default label of the form “Reminder N”. It displays the (not very interesting) initial contents of the reminder in the text field and text area. Then it adds the new reminder to the menu. The interesting thing about this program is how important the role played by the InvisibleReminder class is even though we never actually see an InvisibleReminder on our screen. In our introduction to Java, we have deliberately focused our attention on classes that describe objects that have a visible presence on the screen. We believe that starting with such objects makes it easier to grasp programming concepts because “seeing is believing.” As you learn more about programming, however, you will discover that the most interesting classes defined in a program are often the ones you cannot see. They represent abstract information that is critical to the correct functioning of the program, even though they may not have any simple, visual representation.
6.8
Private Parts
We have already noted that it is possible for the code we place in the body of a method or constructor within a class to invoke another method defined in the same class. We saw in Section 6.4 that we could use the invocation this.setColor( shade ); within the constructor of the ColorableReminder class. In some cases, in fact, it is worth writing methods that are only invoked from code in the class in which they are defined. When we are 163
// Class ReminderViewer - Provide menu-based access to a collection // of reminder notes through a single window public class ReminderViewer extends GUIManager { // The size of the program’s window private final int WINDOW_WIDTH = 300, WINDOW_HEIGHT = 200; // The size of the JTextArea private final int TEXT_WIDTH = 20, TEXT_HEIGHT = 6; // Menu used to select reminder to view/edit private JComboBox reminderMenu = new JComboBox(); // Field used to enter, display, and edit reminder topics private JTextField topic = new JTextField( TEXT_WIDTH ); // Text Area used to enter, display and edit reminder messages private JTextArea reminder = new JTextArea( TEXT_HEIGHT, TEXT_WIDTH ); // Count of the number of reminders created so far private int reminderCount = 0; // The current reminder private InvisibleReminder currentReminder; // Place button, menu, a summary field, and a text area in a window public ReminderViewer() { this.createWindow( WINDOW_WIDTH, WINDOW_HEIGHT, "Reminders" ); // Create a new Reminder reminderCount = reminderCount + 1; currentReminder = new InvisibleReminder( "Reminder "+reminderCount, "" ); reminderMenu.addItem( currentReminder ); // Display contents of new reminder topic.setText( currentReminder.getLabel() ); // Add all the GUI components to the display contentPane.add( reminderMenu ); contentPane.add( topic ); contentPane.add( reminder ); contentPane.add( new JButton( "New Reminder" ) ); } Figure 6.18: Variable and constructor for the ReminderViewer class 164
// Save the current reminder contents and create a new reminder public void buttonClicked( ) { // Save changes made to current reminder currentReminder.setContents( topic.getText(), reminder.getText() ); // Create a new reminder reminderCount = reminderCount + 1; currentReminder = new InvisibleReminder( "Reminder "+reminderCount, "" ); // Display contents of new reminder topic.setText( currentReminder.getLabel() ); reminder.setText( currentReminder.getBody() ); // Change menu to select new reminder reminderMenu.addItem( currentReminder ); reminderMenu.setSelectedItem( currentReminder ); } // Save the current reminder and display the reminder selected from menu public void menuItemSelected() { // Save changes made to current reminder currentReminder.setContents( topic.getText(), reminder.getText() ); // Access reminder selected through menu currentReminder = (InvisibleReminder) reminderMenu.getSelectedItem(); // Display conents of new reminder topic.setText( currentReminder.getLabel() ); reminder.setText( currentReminder.getBody() ); }
}
Figure 6.19: Method definitions for the ReminderViewer class
165
trying to understand a large program composed of many classes, it is useful to be able to easily distinguish those parts of a class definition that are relevant to other classes from those that are only of local interest. We do this by using the word private. By placing the word private before variable declarations in our classes, we are saying that they can only be used within the class in which they are defined. Similarly, if we find that we want to define a method that is only intended for use within its own class, then that method should be declared as private rather than public. The ReminderViewer class presented in the last section provides a good example to illustrate the usefulness of such private methods. If you compare the steps performed by the buttonClicked and menuItemSelected methods, you will notice that they have a lot in common. They both start with the instruction currentReminder.setContents( topic.getText(), reminder.getText() ); and they both end with the statements topic.setText( currentReminder.getLabel() ); reminder.setText( currentReminder.getBody() ); It would be nice if we could avoid repeating these statements in two methods. Doing so would obviously save us a little typing time. It might also make our program easier to modify. If we decided later that we wanted to display the contents of a reminder in some different way (perhaps concatenated together in a single text area rather than in two components), we would currently have to change both copies of the instructions at the ends of these methods. Having only one copy to change would make things easier and decrease the likelihood of making errors while incorporating such changes. The best way to approach the task of eliminating such repeated code is not just to look for repetition, but to try to find a logical, abstract way to describe what the original code is doing. This will often enable one to identify good ways to regroup statements into separate methods. In this situation, one way to describe what these two methods have in common is that they both seek to replace the currently displayed reminder. The function of the buttonClicked method can be summarized as: 1. Create a new reminder 2. Replace the currently displayed reminder with the new reminder The function of the menuItemSelected method can be described as 1. Identify the item currently selected in the menu 2. Replace the currently displayed reminder with the selected reminder Apparently, the task of replacing the displayed reminder is a common element of both of these processes. Therefore, it might help to define a private replaceReminder method to perform this task. It would be defined to take the new reminder as a parameter so that it would be possible to either pass it a newly created reminder or a reminder selected through the menu. In Figure 6.20 we provide a definition for replaceReminder together with revised versions of buttonClicked and menuItemSelected that use this private method. The code in this figure would serve as a replacement for the code shown in Figure 6.19. You may notice that it isn’t clear that eliminating the repeated code has really reduced the amount of typing that would be required to enter this program. Eliminating such repetition, however, is usually worthwhile simply because it can simplify the process of debugging new code and the process of modifying existing code. 166
// Replace the currently displayed reminder with a different reminder private void replaceReminder( InvisibleReminder replacement ) { // Save changes made to current reminder currentReminder.setContents( topic.getText(), reminder.getText() ); currentReminder = replacement; // Display contents of new reminder topic.setText( currentReminder.getLabel() ); reminder.setText( currentReminder.getBody() ); // Change menu to select new reminder reminderMenu.setSelectedItem( currentReminder ); } // Save the current reminder contents and create a new reminder public void buttonClicked( ) { // Create and display a new reminder reminderCount = reminderCount + 1; InvisibleReminder newReminder = new InvisibleReminder( "Reminder " + reminderCount, "" ); reminderMenu.addItem( newReminder ); this.replaceReminder( newReminder ); } // Save the current reminder and display the reminder selected from menu public void menuItemSelected() { // Access reminder selected through menu and display its contents this.replaceReminder( (InvisibleReminder) reminderMenu.getSelectedItem() ); } Figure 6.20: Using the private method replaceReminder
167
6.9
Summary
In the preceding chapters, much of the functionality of the programs we constructed depended on classes like JTextArea and NetConnection provided as part of Java libraries. These classes define types of objects that play important roles as components of the programs we have written. In this chapter, we showed that we can define classes of our own to implement components of our programs that do not correspond to types already available in the libraries. When we use these mechanisms to decompose our program into separate components, it is usually necessary for the components to exchange information as the program executes. This can be accomplished in several ways. The methods and constructors we define can be designed to accept information they need as parameters. We also showed that by associating information received as a parameter value with an instance variable name a method or constructor can make that information directly accessible to other methods within its class. Accessor methods provide another means for information to flow from one class to another. When an accessor method is defined, it is necessary to specify both the type of information the accessor method will produce in its header and the particular value to be returned using a return statement. While it is often essential to exchange information between classes, another important role of classes is to limit the flow of information. One goal of decomposing our program into separate classes is to make each class as independent of the detailed information maintained by other classes as possible. This can make programs much easier to construct, understand, and maintain. With this in mind, we stressed the importance of private components of classes. In general, all variables declared in a class should be private, and any method that is designed only to be used by other methods within its own class should also be private.
168
Chapter 7
Primitive Technology Early applications of computers, from tabulating census data to calculating projectile trajectories, focused primarily on numeric calculations. By contrast, the most complicated calculation we have considered thus far was to count how often a button had been clicked. This reflects the fact that current applications of computers are much less numerically oriented than their predecessors. Nevertheless, some basic familiarity with the techniques used to work with numbers in a program is still essential. In this chapter, we will explore Java’s mechanisms for numeric computation. We will learn more about the type int and that there are several types other than int that can be used to represent numeric values in Java. We will see that all of these types, which Java classifies as primitive types, are different in certain ways from types defined as classes. Finally, we will explore Java’s only non-numeric primitive type, boolean. This type contains the values used to represent the results of evaluating conditions found in if statements.
7.1
Planning a Calculator
In Chapter 5, we showed how to write a simple adding machine program. The adding machine we developed in that chapter isn’t very impressive. In fact, it is a bit embarrassing. Any calculator you can buy will be able to at least perform addition, multiplication, subtraction, and division. If you pay more than $10 for a calculator, it will probably include trigonometric functions. Meanwhile, all our efforts have produced is a program that will enable your computer, which probably costs at least 100 times as much as a basic calculator, to do addition. In this chapter, we will extend our adding machine program to provide the functionality of a simple, inexpensive calculator. Our goal will be a program that can add, multiply, subtract, and divide. Constructing a program that simulates a calculator requires a bit of thought because most calculators are a bit more subtle than our adding machine. As we did for our adding machine program, we provide a series of screen images showing how we would expect our calculator to perform in Figure 7.1. The behavior illustrated in this figure is identical to what one would expect from any basic calculator. The image in the upper left corner of the figure shows how the calculator’s interface would appear just after the program begins to run. The constructor definition that creates this interface is shown in Figure 7.2 and the beginning of the class definition for such a program including all 169
Figure 7.1: Interface for a 4-function calculator program 170
// Create and place the calculator buttons and display in the window public IntCalculator() { this.createWindow( WINDOW_WIDTH, WINDOW_HEIGHT ); contentPane.add( contentPane.add( contentPane.add( contentPane.add(
new JButton( "1" ) ); new JButton( "2" ) ); new JButton( "3" ) ); divide );
contentPane.add( contentPane.add( contentPane.add( contentPane.add(
new JButton( "4" ) ); new JButton( "5" ) ); new JButton( "6" ) ); times );
contentPane.add( contentPane.add( contentPane.add( contentPane.add(
new JButton( "7" ) ); new JButton( "8" ) ); new JButton( "9" ) ); minus );
contentPane.add( contentPane.add( contentPane.add( contentPane.add(
new JButton( "0" ) ); clear ); equals ); plus );
entry.setHorizontalAlignment( JTextField.RIGHT ); contentPane.add( entry ); } Figure 7.2: The constructor for a simple calculator program of the instance variables used in the constructor is shown in Figure 7.3. The only new feature exhibited in this code is the invocation of a method named setHorizontalAlignment in the next to last line of the constructor. This invocation causes the value displayed in the calculator’s text field to be right justified within the field. The first five images in in Figure 7.1 show the program being used to perform the calculation “6 + 5 = 11”. This is accomplished by entering “6 + 5 =” on the calculator’s keypad with the mouse. The important thing to notice is that the “+” key on this calculator is not simply a replacement for the “Add to total” button in our adding machine program. When the “+” key is pressed, nothing actually changes in the program’s window The calculator cannot perform the addition because the second operand, 5 in this example, has not even been entered. Instead, the program waits until the second operand has been entered and the “=” key is pressed. At that point, it adds the two operands together. The “=” key, however, is also more than a replacement for the “Add to total” button. Pressing it does not always cause the program to add its operands. The operation performed depends on which keys had been pressed earlier. If the user had entered “6 - 5 =”, then the program should perform a subtraction when the “=” key is pressed. The program must 171
// A $5 Calculator public class IntCalculator extends GUIManager { // Change these values to adjust the size of the program’s window private final int WINDOW_WIDTH = 380, WINDOW_HEIGHT = 220; // Maximum number of digits allowed in entry private final int MAX_DIGITS = 9; // Used to display sequence of digits selected and totals private JTextField entry = new JTextField( "0", 25 ); // Operator buttons private JButton plus = new JButton( "+" ); private JButton minus = new JButton( "-" ); private JButton times = new JButton( "x" ); private JButton divide = new JButton("÷" ); private JButton equals = new JButton( "=" ); // The clear button private JButton clear = new JButton( "C" ); // Remember the number of digits entered so far private int digitsEntered = 0; // Value of current computation private int total = 0;
Figure 7.3: Instance variable declarations for a simple calculator program
172
somehow remember the last operator key pressed until the “=” key is pressed. The remaining screen images in Figure 7.1 show how the program should behave if after computing “6 + 5 = 11”, the person using the calculator immediate enters “4 x 3 ÷ 2 =”. The interesting thing to notice is that when the user presses the ÷ key, the calculator displays the result of multiplying 4 and 3. This is exactly what the calculator would have done if the user had pressed the “=” key instead of the ÷ key at this point. From this we can see that the “=” key and all of the arithmetic operator keys behave in surprisingly similar ways. When you press any of these keys, the calculator performs the operation associated with the last operator key pressed to combine the current total with the number just entered. The only tricky cases are what to do if there is no “last operator key pressed” or no “number just entered”. The no “last operator key pressed” situation can occur either because the program just started running or because the last non-numeric key pressed was the “=” key. In these situations, the calculator should simply make the current total equal to the number just entered. The no “number just entered” situation occurs when the user presses two non-numeric keys in a row. Real calculators handle these situations in many distinct ways. For example, on many calculators, pressing the “=” key several times causes the calculator to perform the last operation entered repeatedly. We will take a very simple approach to this situation. If the user presses several non-numeric keys in a row, our calculator will ignore all but the first non-numeric key pressed. From this description of the behavior our calculator should exhibit, we can begin to outline the structure of the if statements that will be used in the buttonClicked method. Looking back at the code in the buttonClicked method of the last version of our adding machine program provides a good starting point. That code is shown in Figure 5.9. The if statement used in that method implemented a three-way choice so that the program could distinguish situations in which the user had pressed the “Clear Total” button, the “Add to Total” button, or a numeric key. From the discussion above, we can see that our calculator program must make a similar three-way choice. The cases it must distinguish are whether the user has pressed the clear button, a numeric key, or any of the other non-numeric keys (i.e., an operator key or the “=” key). In the case that the user has pressed an operator key, it needs to make a second decision. If no digits have been entered since the last operator key was pressed, it should ignore the operator. Based on these observations, we can sketch an outline for this program’s buttonClicked method as shown in Figure 7.4. Obviously, we cannot type a program containing code like the outline shown in this figure into our IDE and expect to run it. We can, however, type such an outline in and then use it as a template in which we “fill in the blanks” as we complete the program. With this in mind, we have indicated the places in our outline where detailed code is missing using ellipses preceded by comments explaining what the missing code should do. Writing such an outline can be a very useful step in the process of completing a program. Much as outlining a paper allows you to work out the overall organization of your thoughts without worrying about the precise wording you will use for every sentence, outlining a program enables you to focus on the high-level structure of your program. With a good understanding of this structure, it is generally much easier to fill in the many details needed to complete a program.
7.2
Smooth Operators
One detail we obviously need to explore to complete our calculator is how to perform arithmetic operations other than addition. Performing arithmetic operators in Java is actually quite simple. 173
// Accept digits entered and perform arithmetic operations requested public void buttonClicked( JButton clickedButton ) { if ( /* clickedButton is an operator or the = key */ ... ) { if ( /* the last key pressed was not an operator or = key */ ... ) { // Apply last operator to the number entered and current total . . . } } else if ( clickedButton == clearButton ) { // Zero the total and clear the entry field . . .
}
} else { // If clickedButton is a numeric key, add . . . }
digit to entry
Figure 7.4: Outline for the buttonClicked method of a calculator program
174
In addition to the plus sign, + Java recognizes operators for the other three standard arithmetic operations. The minus sign, -, is used for subtraction, - the slash, /, is used for division, and the asterisk, *, is used for multiplication. Thus, just as we used the statement total = total + Integer.parseInt( entry.getText() ); in our adding machine program, we can use a statement like total = total - Integer.parseInt( entry.getText() ); to perform subtraction1 , or statements like total = total * Integer.parseInt( entry.getText() ); and total = total / Integer.parseInt( entry.getText() ); to perform multiplication and division. * / As we noted in the previous section, the operation performed by our calculator when an operator key or the “=” key is pressed is actually determined by which of these keys was the last such key pressed. Therefore, we will have to include an instance variable in our class that will be used to keep track of the previous operator key that was depressed. We can do this by adding a declaration of the form // Remember the last operator button pressed private JButton lastOperator = equals; to those already shown in Figure 7.3. We will use this variable in the buttonClicked method to decide what operation to perform. We will have to include code in the buttonClicked method to change the value of lastOperator each time an operator key is pressed. We have initialized lastOperator to refer to the equals key because when it first starts to run we want our calculator to behave as it does right after the “=” key is pressed. The code required to use lastOperator in this way is included in Figure 7.5. The code we have added in this figure begins by using Integer.parseInt to convert the digits entered by the user into a number. Then, we use a series of if statements to make a 5-way choice based on the previously pressed operator key by comparing the value of lastOperator to the names that refer to each of the operator keys. Each of the five lines that may be selected for execution by these if statements updates the value of the total variable in the appropriate way. Next, we display the updated value of total in the entry text field. Finally, but very importantly, we use an assignment statement to tell the computer to associate the name lastOperator with the button that was just pressed. This ensures that the next time an operator key is pressed, the program will be able to perform the correct operation. 1
In Java, the minus sign can also be used with a single operand. That is, if the value of total is 10, then executing the statement total = - total; will change the value to -10.
175
// Accept digits entered and perform arithmetic operations requested public void buttonClicked( JButton clickedButton ) { if ( /* clickedButton is an operator or the = key */ ... ) { if ( /* the last key pressed was not an operator or = key */ ... ) { // Apply last operator to the number entered and current total int numberEntered = Integer.parseInt( entry.getText() ); if ( lastOperator == plus ) { total = total + numberEntered; } else if ( lastOperator == minus ) { total = total - numberEntered; } else if ( lastOperator == times ) { total = total * numberEntered; } else if ( lastOperator == divide ) { total = total / numberEntered; } else { total = numberEntered; } entry.setText( "" + total ); lastOperator = clickedButton; . . . } } else if ( clickedButton == clearButton ) { // Zero the total and clear the entry field . . .
}
} else { // If clickedButton is a numeric key, add . . . }
digit to entry
Figure 7.5: Refined outline for calculator buttonClicked method
176
7.2.1
Relational Operators and boolean Values
In the instance variable declarations for our calculator program (shown in Figure 7.3), we included a variable named digitsEntered. In the final version of our adding machine program we used a similar variable to keep track of the number of digits in the value the user was currently entering so that a user could not enter a value too big to be represented as an int. In our calculator program, this variable will serve two additional roles. First, we indicated earlier that our program should ignore all but the first operator key pressed when several operator keys are pressed consecutively. We will use digitsEntered to detect such situations. When an operator key is pressed, our program “consumes” the most recently entered number. We can therefore determine whether two operator keys have been pressed in a row by checking whether the value of digitsEntered is 0 when an operator key is pressed. Second, when the user presses an operator key, our program will display the current value of total in the entry field. This value should remain visible until the user presses a numeric key (or the clear button). As a result, our program must perform a special step when handling the first numeric key pressed after an operator key. It must clear the entry field. Again, we can use the value of digitsEntered to identify such situations. A revised version of our outline of the buttonClicked method, extended to include the code that updates and uses digitsEntered, is shown in Figure 7.6. Actually, it is a bit of a stretch to still call this an “outline”. The only detail left to be resolved is the condition to place in the if statement at the very beginning of the method. In the branch of the method’s main if statement that handles operator keys, we have added an assignment to associate 0 with the name digitsEntered. We have also filled in the branches of this if statement that handle the clear button and the numeric keys. The code for the clear button sets the total and the number of digits entered to zero. It also clears the entry field. Finally, it lies just a little bit by associating the “=” key with lastOperator. After the clear key is pressed we want the program to behave as if the last operator key pressed was “=”. The code for numeric keys begins by clearing the entry text field if the value of digitsEntered is 0. That is, it clears the text field when a numeric key is pressed immediately after one of the non-numeric keys has been pressed. The rest of the code for handling numeric keys is identical to the code we used in our adding machine program. Finally, we have replaced the comment in the if statement: if ( /* the last key pressed was not an operator or = key */ ... ) { with the condition digitsEntered > 0 The symbols ==, !=, are examples of what we call relational operators. The operator > can be used to make Java check whether one value is greater than another. The operator >= tells Java to check whether one value is greater than or equal to another. That is, >= is the equivalent of the mathematical symbol ≥. For example, as an alternative to the if statement if ( digitsEntered > 0 ) { we could have written 177
// Accept digits entered and perform arithmetic operations requested public void buttonClicked( JButton clickedButton ) { if ( /* clickedButton is an operator or the = key */ ... ) { if ( digitsEntered > 0 ) { // Apply last operator to the number entered and current total int numberEntered = Integer.parseInt( entry.getText() ); if ( lastOperator == plus ) { total = total + numberEntered; } else if ( lastOperator == minus ) { total = total - numberEntered; } else if ( lastOperator == times ) { total = total * numberEntered; } else if ( lastOperator == divide ) { total = total / numberEntered; } else { total = numberEntered; } entry.setText( "" + total ); digitsEntered = 0; lastOperator = clickedButton; } } else if ( clickedButton == clearButton ) { // Zero the total and clear the entry field total = 0; digitsEntered = 0; entry.setText( "0" ); lastOperator = equals; } else { // If clickedButton is a numeric key, add if ( digitsEntered == 0 ) { entry.setText( "" ); }
}
}
digit to entry
digitsEntered = digitsEntered + 1; if ( digitsEntered < MAX_DIGITS ) { entry.setText( entry.getText() + clickedButton.getText() ); }
Figure 7.6: Calculator outline extended with details of using digitsEntered 178
if ( digitsEntered >= 1 ) { Similarly, the operator 0 as expressions and we have to be able to identify the type of value each such expression describes. The value described by an expression like x > 0 will not be another int or any of the other types we have encountered thus far. Instead, Java includes an additional type called boolean that consists of the values described by expressions involving relational operators. This type contains just two values described by the literals true and false. If the value associated with the variable x is 14, then we would informally say that it is true that x is greater than 0. In Java, therefore, if the value of x is 14, then the value described by the expression x > 0 is true. On the other hand, if x is 0 or any negative number then the value described by x > 0 is false. We will see in the next few sections, that the values of the type boolean can be manipulated in many of the same ways we can manipulate values like ints. We can declare variables that will refer to boolean values. There are operators that take boolean values as operands. We can describe boolean values in our program using the literals true and false just as we describe int values by including literals like 1 and 350 in our code. In addition, the type boolean plays a special role in Java. Expressions that produce boolean values are used as conditions in if statements and other structures used to control the sequence in which a program’s instructions are executed.
7.2.2
Primitive Ways
It is important to note that there are several ways in which Java treats ints differently from many other types of information we manipulate in our programs. When we want to perform an operation on a JTextField or a JButton, we use method invocations rather than operators. The designers of the Java language could have also provided methods for the operations associated with arithmetic and relational operators. That is, we might have been expected to type things like x.plus(y) 2
Note: Although == can be used to compare any two values, we will soon see that it is often more appropriate to use a method named equals to compare certain types of values.
179
rather than x + y or x.greaterthan(0) rather than x > 0 Obviously, Java’s support for operator symbols is a great convenience to the programmer. Operator notation is both more familiar and more compact than the alternative of using method invocations to perform simple operations on numbers. At the same time, the decision to provide operator symbols within Java represents a more fundamental difference between numbers and objects like JTextFields. First, it is worth noting that within Java we can manipulate numbers using many of the same mechanisms that are used with GUI components and other objects. We can declare variables of type int just as we can declare variables to refer to JButtons and JTextFields. We have seen some examples where GUI components are passed as parameters (e.g., to contentPane.add) and others where numbers are passed (e.g., to this.createWindow). At the same time, numbers and objects like JPanels and JTextAreas are treated differently in several important ways. As we just observed, operators are used to manipulate numbers while methods are used to manipulate GUI components and other objects. In addition, while we use constructions when we want to describe a new GUI component, Java doesn’t make (or even let) us say int x = new int( 3 ); These differences reflect that fact that Java views numbers as permanent and unchanging while GUI components and many other types of objects can be changed in various ways. In some oddly philosophical sense, Java doesn’t let us say int x = new int( 3 ); because it makes no sense to talk about making a new 3. The number 3 already exists before you use it. How would the new 3 differ from the old 3? On the other hand, Java will let you say JLabel homeScore = new JLabel( "0" ); JLabel visitorsScore = new JLabel( "0" ); because each of the constructions of the form new JLabel( "0" ) creates a distinct JLabel. They might look identical initially, but if we later execute an invocation such a homeScore.setText( "2" ); it will become very clear that they are different. This notion also underlies the distinction between operators and methods. Operations performed using method invocations often change an existing object. As we just showed, the use of setText in the invocation homeScore.setText( "2" ); 180
changes the state of the JLabel to which it is applied. On the other hand, if we declare int x = 3; and then evaluate the expression x * 2 neither x nor 2 turn into 6. The expression tells the computer to perform an operation that will yield a new value, but it does not change the values used as operands in any way. This remains true even if we include the expression in an assignment of the form x = x * 2; The assignment statement now tells Java to change the meaning associated with the name x so that x refers to the value produced by the expression, but evaluating the expression itself does not change either of the two numbers used as operands to the multiplication operator. This distinction becomes most obvious when two different names are associated with a single value. For example, suppose that instead of creating two distinct JLabels for the scores of the home team and the visitors as shown above, we write the declarations JLabel homeScore = new JLabel( "0" ); JLabel visitorsScore = homeScore; This code creates a single JLabel and associates it with two names. If we then execute the invocation homeScore.setText( "2" ); the computer will change this JLabel rather than creating a new JLabel with different contents. Since both names refer to this modified JLabel the invocations homeScore.getText( ); and visitorsScore.getText( ); will both produce the same result, "2". On the other hand, if we declare int x = 3; int y = x; and then execute the assignment x = x * 2; the value of x will be changed to 6, but the value y refers to will still be 3. There are two reasons for this. First, the multiplication x * 2 identifies a new value, 6 in this case, rather than somehow modifying either of its operand values to become 6. Second, you must realize that variable’s refer to values, not to other variables. Therefore, when we say 181
int x = 3; int y = x; we are telling Java that we want y to refer to the same value that x refers to at the point that the computer evaluates the declaration of y. This will be the value 3. Later, executing the assignment x = x * 2; makes the name x refer to a new value, 6, but does not change the value to which y refers. The integers are not the only Java type that has these special properties. The boolean values introduced in the preceding section have similar properties. You cannot create a “new” true or false. There are no methods associated with the type boolean, but, as we will see in the next section, there are several operators that can be used to manipulate boolean values. In addition, there are several other arithmetic types that behave in similar ways. Java refers to pieces of information that we construct using new and can manipulate with methods as objects and the types composed of such items are called object types or classes. On the other hand, pieces of information that are described using literals and manipulated with operators rather than methods are called primitive values and types composed of primitive values are called primitive types. To make it easy for programmers to remember which types are primitive types and which are classes, the designers of Java followed the helpful convention of using names that start with lower-case letters for primitive types and names that start with upper-case letters for the names of classes.
7.2.3
Logical Arguments
There is a common mistake made by novice programmers when using relational operators. This mistake reveals an interesting difference between Java’s relational operators and mathematical symbols like ≤ and ≥. In mathematics, it is common to describe the fact that a variable falls in a specific range by writing something like 1 ≤ x ≤ 10
As a result, new programmers sometimes write if statements that look like if ( 1


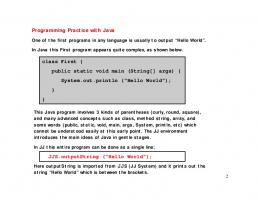


![[PDF Download] Introduction to Computing and Programming with Java](https://m.moam.info/img/260x300/pdf-download-introduction-to-computing-and-program_647715d4097c474b228ba979.jpg)
