QuickGuide to Picture Style. Settings and Customization. 1. 2. 3. Canon Picture
Styles are preset yet adjustable parameters that determine how your EOS DSLR
...
Available Picture Styles
Standard: Provides crisp, vivid images with increased saturation, contrast and sharpening. Default on EOS DSLRs.
Faithful: Similar to Neutral but produces images that are colorimetrically almost identical to the actual colors when shot under standard daylight conditions (i.e., an average color temperature of 5200° Kelvin.)
QuickGuide to Picture Style Settings and Customization Canon Picture Styles are preset yet adjustable parameters that determine how your EOS DSLR will process and render its images. Picture Styles are applied to JPEG (still) and MOV (video) files during exposure. They are permanent to the extent that the rendering is "baked in" and cannot be completely undone. Picture Styles can also be applied to RAW files, either during or after exposure. For RAW files the Picture Style affects only how images are rendered on the camera’s LED display. The closer the Picture Style is to your intended rendering, the more accurate your image preview will be. For example, if you intend to convert RAW images to black and white, the Monochrome Picture Style will provide a preview of the image in black and white while retaining all original color information in the RAW file. (Monochrome JPEG or MOV images can not be reconverted back to color.)
Portrait: Optimizes skin color tones and saturation. Reduces edge sharpening for smoother skin texture.
Landscape: Produces punchier greens and blues with stronger sharpening for crisper-edged mountain, tree and building outlines.
Any Picture Styles applied to RAW files can later be changed or modified. When applied during post-processing with the Canon Digital Photo Professional (DPP) raw developer you can apply any Picture Style you like, whenever you like. The Picture Style you choose will not become a permanent part of the rendering until you export the RAW file as a JPEG or TIFF. This option is not available with many third-party applications, which often apply a preset rendering regardless of the Picture Style you have set.
Neutral: Has lower contrast and saturation than Standard. It is therefore ideal for images you intend to post-process by selectively adjusting the color, saturation, contrast and sharpening of individual images.
1
2
Monochrome: For black and white photos. Also includes four optional B&W contrast filter effects (yellow, orange, red and green) and toning effects (sepia, blue, purple and green). Auto (EOS T3i only): This option will automatically applies a Picture Style (other than Monochrome) based on the EOS Scene Detection System’s analysis. Auto may therefore produce slight differences in rendition from one image to the next, depending on the scene. The other Picture Styles are applied consistently to all scenes. User-Defined Styles: You can also add up to three UserDefined Styles that you have created with the Canon Picture Style Editor (see reverse side). How to Apply Picture Styles In-Camera 1. Select the second Shooting Menu tab (or press the Picture Style button on EOS digital SLRs that have this feature). 2. Scroll down to [Picture Style], then press Set. 3. Select a Picture Style, then press Set. When using cameras that have a Quick Control Menu, first select the Picture Styles icon on the screen, then follow steps 2 – 3. Refer to Picture Style Menu on reverse side.
3
EOS 60D Picture Style Menu with icons to left of name Further Fine-tuning of Each Picture Style
How to Customize Picture Styles In-Camera 1. Select the second Shooting Menu tab. 2. Scroll down to [Picture Style], then press Set. 3. Select a Picture Style that you want to modify and save, then press the Info button on the back of your camera. 4. Select an adjustment parameter, then press Set. 5. Use the < or > scroll control on your camera to adjust the parameter up or down. 6. Press the Menu button to save the adjustment. For your reference, any settings different from the default settings will be displayed in blue. When using cameras that have a Quick Control Menu, first select the Picture Styles icon on the screen, then follow steps 2 – 3. In-Camera RAW Processing
EOS 60D Detail set. menu and adjustment parameters Each Picture Style has four adjustment parameters: • Sharpness – increases or decreases the apparent contrast between edges • Contrast – increases or decreases the visual difference between light and dark areas • Saturation – increases or decreases the intensity of colors • Color Tone – shifts skin tones to either a more yellowish (plus) or reddish (minus) rendering. Depending on the Picture Style, each parameter has a different offset from the baseline. For example, the medium contrast setting for Standard is higher than the medium contrast setting for Neutral and Faithful. 4
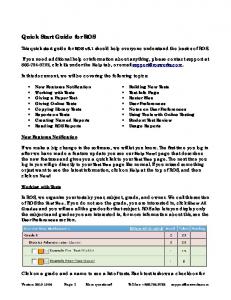
EOS 60D In-Camera RAW processing menu The EOS 60D and Rebel T3i allow you to shoot a RAW image, re-process the image in-camera, and save the reprocessed image as JPEG copy on the camera’s memory card. To select and modify a Picture Style: 1. Press the button. 2. Select [RAW image processing]. 3. Select an image to process. 4. Press the button to process the image. 5. Press the arrow keys to select an option and turn the Quick Control Dial to change the setting. 6. Save the image by selecting the SAVE icon (second column from left, last row), press , then select [OK] to save. 5
How to Apply Picture Styles in DPP To apply a Picture Style to an RAW (.CR2) image you have previously stored on your computer hard drive: 1. Select an image. 2. Click the [Edit Image Window] button or Command/Control-T for Edit mode. 3. The Picture Style on the drop-down menu (3rd from top) shows the Picture Style currently attached to the image. To attach a different style simply select it from those listed on the dropdown menu. (Optional: Click the “Browse” button to the right of the menu to find previously saved custom/user-defined Picture Styles and add them to the menu.) Any visual changes to Picture Style will be indicated on screen in real time. Customizing Picture Styles with Picture Style Editor In addition to the standard adjustment parameters, Picture Style editor allows you to customize how an existing Picture Style handles any single color and save your changes as a new Picture Style File. You can target up to 100 individual colors. For example, if you like everything about the Landscape Picture Style except how it handles greens, you could modify the hue, saturation and brightness of green tones to create a new Picture Style File based on Landscape but modified to handle greens as you prefer. Note that changes to standard adjustment parameters such as Color Saturation or Contrast are “global” and affect the entire color palette universally. You may use your customized Picture Style in-camera by uploading it into an EOS camera via EOS Utility software. You may save it to one of the three “User-Defined” Picture Style spaces. You may also save your User-Defined Style as a file on your hard drive and use it with DPP to process RAW images. To do this, select Picture Style, the click “browse” to locate your custom. Once you select it, it becomes an available Picture Style option in DPP, along with the six original Picture Style options.
6