Session 6B3 TEACHING PRESENTATION SKILLS: ENHANCING THE COMMUNICATION ABILITY OF TECHNICAL STUDENTS Ronald H. Rockland1 Abstract Communication skills are considered to be a necessary achievement of a college graduate, both as a requirement in accreditation of U.S. Engineering and Engineering Technology programs and as a desired skill for employment in industry. As part of the NJIT’s Gateway Engineering Coalition grant, with support from the National Science Foundation, a mini-workshop was given to over 100 engineering freshman students. This mini-workshop was also given to upper division engineering technology transfer students. The concept of the lecture was to initially teach students how to present, as oppose to just how to use various presentation software applications. This presentation covers seven key areas that relate to presentations, primarily in a technical environment. This paper will review the material presented to these students. Index Terms Communication skills, PowerPoint, technical presentations.
are based on the author’s fifteen years experience as a marketing executive in various technical companies, where numerous presentations to customers, salespeople and corporate meetings were required. This paper is also based on observations by the author on presentation errors and problems that students have made in various classes. This paper describes seven key areas that relate to presentations, primarily in a technical environment. These areas are planning a presentation, reducing anxiety, creation of the presentation, delivery of the presentation, enhancing a presentation, making technical information more interesting, and how to practice a presentation. These are points that students should follow to give an effective technical presentation in either a classroom environment or to any other group, and the information in this paper can be incorporated into a lecture on presentation skills. The points that are presented in this paper can be delivered as a lecture to students.
INTRODUCTION
PLANNING YOUR PRESENTATION
Oral and written communication skills are important for students graduating into today's industrial climate, as well as helping institutions meet accreditation requirements. In a recent advertisement for a development engineer, a major medical instrumentation company listed three qualifications: the first was a BSEE or equivalent, the second was low signal and low-noise analog development experience, and the third qualification was written and verbal communication skills. Companies believe that those with superior communication skills, rather than technological skills, will be the companies on the cutting edge [1]. With today's computer technology, communication to groups of people can be best accomplished using presentation software packages, such as Microsoft PowerPoint®. Effective use of this type of package requires more than just an understanding of how to use the software. What is also needed is an understanding of basic concepts of presentation techniques. These skills are independent of the type of application used, although use of standard word processing applications usually results in poor presentations. The author has incorporated this teaching of basic presentation techniques into several upper division engineering technology courses [2]. In addition, the material in this paper has been presented to several sections of the Freshman Engineering Design (FED) course, sponsered under the NSF Gateway Coalition grant. These techniques
In developing a software program or building a circuit, planning is a key element in a successful outcome. There is an old saying, “plan your work; then work your plan” [3]. The same is true for a presentation. Several questions need to be addressed by the presenter before creating the presentation. Who is the audience? The technical sophistication of the audience should be known in advance, if possible. When presenting to an audience unfamiliar with the topics or the vocabulary, time should be taken in the presentation to explain any acronyms and specialized words. If the audience is very technical, then you should reduce the amount of background material, and get to the main points quicker. If the audience sophistication is unknown, then it is best to consider that they are not technically sophisticated. What are the goals of the audience? Speeches are generally designed to educate, persuade, sell or inform. For student presentations, the goal should be to inform. However, does the audience want to learn about a new technology, or how to apply that technology to a specific purpose? If the presenter understands what information the audience wants to “take away” from the presentation, then the presentation will be considered a success. What is going to be presented? Start by outlining a plan of what you want to talk, using the top down approach previously discussed. If the student is very familiar with
1
Ron Rockland, New Jersey Institute of Technology , Dept. of Engineering Technology, University Heights, Newark, NJ 07102
[email protected]
International Conference on Engineering Education
August 6 – 10, 2001 Oslo, Norway 6B3-1
Session 6B3 topic, a bottom up approach can also be used (the author has used this approach many times). In this method, slides are created in a “brainstorming” type fashion, where topics are not necessarily related in any order. Once the slides are created, the order can be changed, and additional slides are created to fill in missing information. How is the presentation going to be given? The equipment, whether it is an overhead or projector can determine the colors, font size, background and how bullets will be shown. If a computer is going to be used with a projector, the presentation will be shown as a slide show. If overheads are going to be used, then the presentation should be viewed in black and white, unless you have capability to create color overheads. One should be careful about using a projector. The brightness of the image depends on the quality of the projector, the ambient light in the room, and the ability to control the lighting in the room. The computer monitor that is used to view a presentation is usually much brighter than a projected image on a screen.. This anomaly can give the impression to the presenter that the choice of background and text colors is appropriate. However, when viewed with the appropriate equipment the color combination can be difficult to see. A method to simulate this problem would be to decrease the brightness of the monitor by about 30%, and view the color choices. If the colors look washed out or difficult to see, the colors should be changed.
REDUCING ANXIETY Whenever people are new to public speaking, and find themselves in front of an audience, they will feel great anxiety. This is especially true of students. Most of this anxiety is the fear of failure, especially forgetting something important. Preparation is critical. The better prepared a student is, the more confident the student will feel, and the student will therefore be more relaxed [4]. There are many ways to overcome this anxiety: Know the material by practicing the full presentation at least 5-6 times, but don’t memorize it. Students who try to memorize the presentations tend to forget key portions, as well as look up (while they are trying to remember) rather than at the audience. During the practice, determine what slides are problem slides, in terms of not being able to remember certain phrases or words, and add additional bullets or sub-bullets for those phrases. If the presenter has difficulty with a word, try substituting this word, if possible. Add enough information on each slide, or add additional slides, so you don’t need to hold any notes. Students can get very nervous when they read from written notes rather than from the slides.
Try to build rapport with the audience. One effective way is to start off the presentation with a question that would involve either a yes/no. Be yourself. Try to talk to the audience as if addressing a group of friends. Approach the presentation as if you were telling a story rather than just trying to read phrases. Try humor early on in the presentation as an “icebreaker”, which means establishing rapport with the audience. Laughter by the audience will help reduce tension in the speaker. Even if there is no laughter, the use of humor will lighten the subject matter. Most of all, have the students practice. The student’s anxiety will decrease after several presentations. It is important to implement this concept across the curriculum.
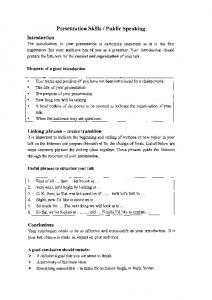
CREATING THE PRESENTATION The presentation opening should follow a standard structure. A title slide, with some attractive graphics or lettering, from an application such as WordArt ®, should be on the first slide. This title slide should also include the student’s name(s) and the class. Either an agenda slide or an introductory phrase slide should follow this. An agenda slide would list the main points that will be covered in the presentation. These bullets could be the titles of subsequent slides, so the presentation is tied to this agenda. A better way of structuring the opening would be to include an introductory phrase slide between the title slide and an agenda slide. This type of slide would have an opening remark, quote, or a few key bullets that would justify why the following material is being presented. This slide could relate a story, be humorous, or refer to a quotation that is applicable to the topic. One excellent source of quotations, both for the introductory slide as well as other slides, can be found on the Internet at the following home page: http://www.columbia.edu/acis/bartleby/bartlett/. This is an electronic version of Bartlett’s Quotations, developed as Project Bartleby by Columbia University. If you use an introductory phrase slide, an agenda slide should always follow. The introductory slide can also include a directed question, intended to provoke a simply yes or no from the audience. Too often, students try to put their entire presentation on 2 or 3 slides, where they should have used twice that amount. Limit what is put on each slide [5] to a maximum of 5-6 main bullets. Otherwise, the slides will look cluttered and the audience will spend a great deal of time trying to read the material. If there are many sub-bullets, this number of main bullets should be limited to 3-4. Bullets, for the most part, should be limited to one sentence. If the bullet is going to be very long, break it up into sub-bullets. This method is the same as taking a sentence or paragraph and breaking it up into key phrases. Bullets are meant to be a key for remembering longer phrases, and visual cues for the audience to understand what
International Conference on Engineering Education
August 6 – 10, 2001 Oslo, Norway 6B3-2
Session 6B3 will be discussed during that slide. The only exception to this format would be if the presenter is using a short quote in the introductory phase slide. This is a very difficult process for students – the ability to take paragraphs and break them into bullets and sub-bullets. Figure 1 shows an example of how to create bullets from paragraphs. FIGURE I HOW TO CREATE BULLETS FROM PARAGRAPHS
Effective presentations require an adequate time for each slide. Slides shouldn’t be flashed one after another. However, the opposite of this is a very common mistake among new presenters – displaying a slide too long. If the discussion is about a topic not related to the bullets or graphics on the current slide, create a new slide. From the author’s experience, a slide should be on for a minimum of 20 seconds, and no more than 2 minutes. If the slide is going to be on longer, consider breaking the contents up into two slides. Otherwise, the audience will get bored looking at the same slide. A more critical issue than timing is to coordinate what is being said with what is being shown. One of the most common errors students make is that a slide is initially shown that relates to what the student is discussing, and then the student starts discussing something else. The need for this interrelation between the spoken word and the slide bullets is based on how students learn [6]. If the visual (the slide) does not correlate with the audible presentation, the student has lost all the visual learners. If another topic is being discussed, then another slide should be created. The end of a presentation should include a summary slide, listing the key points and conclusions made during the presentation. It is very easy for the audience to lose track of all the points that were covered during a 10, 15 or 20-minute presentation.
DELIVERY OF PRESENTATION When talking to a group, students must project their voice so that the person sitting furthest from the speaker can hear. Voice inflection, which includes both pitch and strength of the voice, should be varied. When a specific point needs to
be shown, there are visual effects, such as bolding, color change and text size that can emphasize this point. However, the visual effect needs to be complemented by the audible effect, that is, voice inflection. Using voice effectively also means using appropriate pauses. When a point needs to be made, the speaker should pause for a second, so the audience can understand what has been said as well as shown on the slide. Also, the speaker must enunciate all words [7]. While the audience will see the bullets and sub-bullets, the presenter will cover additional information verbally. The information should be spoken clearly. Pauses are also effective to avoid what is called filler words. When presenters are not sure what to say, they often use filler words, also known as paralanguage [8]. This paralanguage includes words such as Uh, Um, OK, Yes, Like, You know or Right. This might be acceptable once or twice during a presentation, but all too often new speakers constantly use these words. The reason these words are used is that the speaker is not sure what to say, so the speaker pauses. Rather than have silence, the speaker fills in the silence with one of these words. The best method to overcome this paralanguage is to actually pause, instead of filling in with these words. Not only will the paralanguage words be eliminated, but also the speaker tends to slow down, and at the same time appears to be making a point with the pause. The audience is looking at the overheads, listening to the speaker and also looking at the speaker. In studies on effective presentations, over 50% of the message are received by the audience through body language [9]. Too often, there is a tendency to lean on the podium or desk. Instead, keep the posture erect during the presentation by keeping your chin parallel to the floor and distributing weight evenly on both feet [10]. The speaker should relax the hands, and use broad gestures when needed. Avoid talking with the hands at all times. Instead, hand gestures should only be used to emphasize points. Also, students should not stand in just one spot. Movement can create visual interest, and help stimulate an audience. However, the student should not pace up and down in an unfocused manner.
ENHANCING A PRESENTATION There is nothing more boring than a title slide followed by 10-20 bulleted slides, all looking alike. Most presentation software provides several different ways to vary these slides. Some of the more common ways are: When comparing two lists, consider using a 2-column text slide. While the format is still a bulleted slide, the slide will appear different. Emphasize key words by either changing color, if a slide show is being used, and/or font attributes.
International Conference on Engineering Education
August 6 – 10, 2001 Oslo, Norway 6B3-3
Session 6B3 Most presentation software packages allow variation in the bullet style. For example, a checkmark bullet could be used for a list of items that describe a checklist. Another way that the look of a slide can be varied is to use clip art. Clip art are pictures that can be resized and recolored. Using the ungroup feature can also modify these pictures. Modifying clipart (such as removing a pointer from the hand of a teacher image) allows more flexibility in choosing an appropriate figure. Clip art can be used for humor. This use of clip art will not only help with the presentation, but also relieve some of the anxiety of the presentation. However, be careful about not offending the audience with this humor, and making sure that the graphic does not dominate the slide. When presenting a slide with numerous bullets, the tendency for the audience is to read all the bullets, even though the student might be talking about the first bullet. To control the presentation, bullets can be animated to appear on a slide show one at a time. This process is called bullet builds. When subsequent bullets appear, changing their color, which would blend with the background, can dim the previous bullets. In this manner, the audience will understand that there are multiple bullets for this slide, but only the bullet that is currently being discussed is clearly visible. This feature is not a gimmick, but rather an very useful feature that enables the speaker to place adequate emphasis on each point. A similar method can be used with overheads by covering up each point, although it is not as effective.
DEALING WITH TECHNICAL S LIDES In a technical presentation, flowcharts or schematics may be used. The problem with using these graphics is that the drawings are usually very detailed, and hard to see. Also, since there is a lot of detail, the tendency is to talk about this one slide for a long time. One way to avoid both of these problems with technical drawings is to provide a single slide with the complete drawing, showing different sections. This slide would be briefly discussed. On subsequent slides, only show a portion of the drawing, and have related bullets. Copying the original drawing several times and then using the crop tool will produce these portions. Another common error with technical slides is copying and pasting entire tables or charts, usually obtained from journals or textbooks. In most cases, these tables are unreadable by the audience. Instead, the presenter should incorporate just the pertinent information from these tables or charts in bullets, and reference where the information was obtained. Where numerical data is going to be presented, try to use graphs. Graphs can either be used by themselves or with bullets on the left side and the graph on the right side of the particular slide. Combining bullets with graphs would be the preferably method, since it would aid the visual learners.
Graphs can be created either directly with presentation software or by using the copy/paste feature from another software application, such as a spreadsheet. The author has found that creating graphs in spreadsheet applications offers is a more powerful approach to embedding graphs in slides, and gives the greatest flexibility in styles. When equations are used in a presentation, applications such as Equation Editor® or Mathtype® should be used. The equations produced by these applications are more readable. These equations can be used in conjunction with bullets, graphs, or other technical drawings. Only the key equations should be displayed. If there are many equations, the student should blank the screen and write these equations on the board. The number of equations on each slide should be kept to a maximum of three, and the size of the equation should be larger than the font for the bullet.
PRACTICE While listening to a presentation, the audience will be busy trying to take notes if they think the information is important. Presentation software applications have the ability to print out audience handouts, usually as multiple slides per page. This could help the audience write down only additional information that the presenter is speaking about, rather than everything that is already on the slide. While there is a potential problem with these handouts, in that people will try to read ahead, instead of listening to you, the author has found this to be a minimal problem. Audiences will pay less attention if they believe they have to write down all the information. The presentation should be practiced at least 5-6 times, and should be practiced with the presenter standing in front of a computer screen, and talking out loud. This practice will not only reduce anxiety, but also enable the speaker to develop the best presentation. During each practice, the presentation should be reviewed for clarity, eye appeal, quality of the presentation, logical flow, mix of styles, clarification of all points and timing. Placement of clip art on specific slides should be determined during one of these practices, rather than trying to place the appropriate clip art when initially creating the slides. Students should not try to review all these points at once, but rather choose only one or two for each practice session. The best way to practice is also to wait at least 1-2 days between sessions. Try to determine what questions the audience might ask, and are the answers either in the presentation or readily available as extra slides or notes. If a video camera is available, use it after the 3rd or 4th practice. If one is not available, ask someone to hear and critique the presentation. If possible, practice with the equipment that will be used during the actual presentation. When using another computer, the screen resolution and color palette may not be the same as the computer that was used to create the presentation. The color palette is especially important, since
International Conference on Engineering Education
August 6 – 10, 2001 Oslo, Norway 6B3-4
Session 6B3 if the choice of colors is too low, a grainy presentation will appear.
IMPLEMENTATION OF M ATERIAL To implement the material presented in this paper, students should be given an evaluation methodology before their presentation. Figure 2 shows a presentation evaluation form that has been used in several engineering technology classes. FIGURE II EVALUATION SHEET
can compare the two evaluation forms to see if there is improvement. The most common mistakes that students first make are lack of slides, the slide shown is not relevant to what the student is discussing, use of filler words, and poor summary slides.
SUMMARY By understanding good presentation skills, students can better utilize the software application that is available to them. If they are more confident that they can be effective in creating a great presentation, then anxiety in speaking before their peers will be reduced. The information that has been presented in this paper can be incorporated in technical courses to enhance the student’s oral communication skills. Table I shows websites that will provide additional information on presentation skills. TABLE I WEBSITES FOR P RESENTATION SKILLS
Website
Description
www.arundel.co.uk
This evaluation sheet can have several purposes. First, the instructor can use it as a grading tool. Second, because it is given to students prior to their presentation, it helps them focus on what is needed for good presentations. Third, by having students who are not presenting fill out the evaluation sheet as a peer review, it can reinforce good presentation skills. If possible, there should be two presentations during a course. The first one can be a trial presentation, where various problems can be revealed. The instructor should still fill in the evaluation form, and give a copy to the students. The second presentation would be graded, and the instructor
International Conference on Engineering Education
Hi-Tech Hi-Touch Hot List is a site that describes various presentation styles, including links to other presentation sites www.brodycomm.com Archives of Marjorie Brody’s column, which includes features such as Presentations 101: Dealing with Hostile Audiences www.powerpointers.com A clearinghouse of articles from professional speakers, teachers and designers on presentation skills www.presentations.com Website of Presentations Magazine www.presentersuniversity.com A site for online tutorials, clipart, sound files and templates for presentations
August 6 – 10, 2001 Oslo, Norway 6B3-5
Session 6B3 REFERENCES [1]
R.L.Ray, “Communications in Corporate Settings: Trends for the 21 st Century – The Effects of Presentation Skills Training”, Proceedings of the Annual Meeting of the Eastern Communication Association, Pittsburgh, PA 1991
[2]
R.H. Rockland., “Enhancing Communication Skills in a Laboratory Course through Computer Application Training”, Proceedings of the 1998 ASEE Annual Meeting, Seattle, WA 1997
[3]
T.K. Kollins, “Tips for Speakers”, Association Management”, August 1996, pgs. 175-176
[4]
M. Messmer, “Building Your Presentation Skills”, Strategic Finance Magazine, January 2000, pages 10-11
[5]
P. Calderon, “Anatomy of a Great Presentation”, Windows Magazine, June 1998, pgs. 200-213
[6]
R.M.Felder, “Matter of Style”, ASEE Prism, 6(4), December 1996, pgs. 18-23
[7]
R.Payne, “Presenting with Confidence”, Journal of Environmental Health , May 2000, pgs. 32-33
[8]
G.L.Manning, B.L. Reece, Selling Today, 6th edition, Prentice Hall, Upper Saddle River, NJ 1998
[9]
R.B. Marks, Personal Selling – A Relationship Approach, 6 th edition, Prentice Hall, Upper Saddle River, NJ 1997
[10] Stephen Hall, “Integrating Pronunciation for Fluency in Presentation Skills”, Proceedings of the Annual Meeting of the Teachers of English to Speakers of Other Languages, Orlando, FL, 1997
International Conference on Engineering Education
August 6 – 10, 2001 Oslo, Norway 6B3-6