passages in a review, with the exception of reproducible pages, which are
identified by the Engligh ... 34 • English Proficiency Level 36 • Academic History
in the L1 and L2 46 ... Language Structures 129 • Teaching Content-Specific
Vocabulary 141 • ... Workshop Minilesson 167 • Reading Conference 172 •
Guided Reading.
Celic fm
8/13/09
10:25 AM
Page iii
E NGLISH LANGUAGE LEARNERS Day by Day, K–6
R A Complete Guide to Literacy, Content-Area, and Language Instruction
Christina M. Celic
Purchase this book now at heinemann.com
HEINEMANN Portsmouth, NH
Celic fm
8/13/09
10:25 AM
Page iv
Heinemann 361 Hanover Street Portsmouth, NH 03801–3912 www.heinemann.com Offices and agents throughout the world © 2009 by Christina M. Celic All rights reserved. No part of this book may be reproduced in any form or by any electronic or mechanical means, including information storage and retrieval systems, without permission in writing from the publisher, except by a reviewer, who may quote brief passages in a review, with the exception of reproducible pages, which are identified by the Engligh Language Learners Day by Day credit line and may be photocopied for classroom use only. “Dedicated to Teachers” is a trademark of Greenwood Publishing Group, Inc.
Library of Congress Cataloging-in-Publication Data Celic, Christina M. English language learners day by day, k–6 : a complete guide to literacy, content-area, and language instruction / Christina M. Celic. p. cm. Includes bibliographical references and index. ISBN-13: 978-0-325-02682-4 ISBN-10: 0-325-02682-3 1. English language—Study and teaching (Primary). 2. Language arts—Study and teaching (Primary). 3. Content-area reading. I. Title. LB1528.C45 2009 372.6—dc22 Editors: Yvonne S. Freeman and David E. Freeman Production: Patricia Adams Typesetter: Eric Rosenbloom, Kirby Mountain Composition Cover design: Bernadette Skok Manufacturing: Steve Bernier Printed in the United States of America on acid-free paper 13 12 11 10 09 VP 1 2 3 4 5
2009025713
Celic fm
8/13/09
10:25 AM
Page vii
Contents
Foreword by Ofelia García . . . . . . . . . . . . . . . . . . . . . . . . . . . . . . . . . . . . . . . . . . . . . . . . . . ix Acknowledgments . . . . . . . . . . . . . . . . . . . . . . . . . . . . . . . . . . . . . . . . . . . . . . . . . . . . . . . . xiii Introduction . . . . . . . . . . . . . . . . . . . . . . . . . . . . . . . . . . . . . . . . . . . . . . . . . . . . . . . . . . . . . xv PREPARATIONS FOR INSTRUCTION 1. Setting Up a Classroom for English Language Learners . . . . . . . . . . . . . 1 Examining Your Room Through the Eyes of an English Language Learner 2 • Creating a Layout 3 • Establishing the Classroom Library 4 • Organizing Collaborative Work Areas 12 • Making Effective Centers 14 • Labeling the Classroom 24 • Final Thoughts 25 2. Getting Ready to Teach English Language Learners from Day One . . . 27 Using a Whole-Class Profile 28 • Native Language 32 • Country of Origin 34 • English Proficiency Level 36 • Academic History in the L1 and L2 46 • Reading in the L1 and L2 49 • Writing in the L1 and L2 53 • Math in the L1 and L2 55 • The Big Picture of the First Week of School 56 • Communicating with Families 56 • Final Thoughts 59 3. Classroom Management with English Language Learners . . . . . . . . . . 63 Benefits of Classroom Management for ELLs 65 • Setting Up a Daily Schedule 66 • Literacy Components in a Daily Schedule 67 • Practicing Classroom Routines 74 • Establishing Class Rules 78 • Developing a System for Accountability 80 • Structuring Homework Procedures 83 • Final Thoughts 89
vii
Celic fm
8/13/09
10:25 AM
Page viii
TEACHING ENGLISH LANGUAGE LEARNERS 4. Integrating Literacy and Content-Area Instruction . . . . . . . . . . . . . . . . 93 Benefits of Integrated Instruction with ELLs 94 • Planning the Big Picture for Yearlong Integrated Instruction 96 • Planning an Integrated Unit for ELLs 100 • Example of an Integrated Unit in Action 102 • Final Thoughts 119 5. Teaching Academic Language Through the Curriculum . . . . . . . . . . . . 123 Developing Language Objectives 125 • Modeling and Practicing Language Structures 129 • Teaching Content-Specific Vocabulary 141 • Final Thoughts 151 6. Snapshots of Differentiated Instruction with English Language Learners . . . . . . . . . . . . . . . . . . . . . . . . . . . . . . 155 Keys to Success with ELLs 155 • The Classroom Setting for the Snapshots of Instruction 156 • Read-Aloud 157 • Shared Reading 162 • Reading Workshop Minilesson 167 • Reading Conference 172 • Guided Reading 175 • Writing Workshop Minilesson 178 • Writing Conferences 183 • Published Writing 186 • Final Thoughts 188 APPENDICES A. Whole-Class Profiles . . . . . . . . . . . . . . . . . . . . . . . . . . . . . . . . . . . . . . . . . . . . . . . . 192 B. English Proficiency Levels Chart and Checklist . . . . . . . . . . . . . . . . . . . . . . . . . . 195 C. Family Survey . . . . . . . . . . . . . . . . . . . . . . . . . . . . . . . . . . . . . . . . . . . . . . . . . . . . . . 197 D. Conference Forms for ELLs . . . . . . . . . . . . . . . . . . . . . . . . . . . . . . . . . . . . . . . . . . 198 E. Planning an Integrated Unit . . . . . . . . . . . . . . . . . . . . . . . . . . . . . . . . . . . . . . . . . . 200 F. Developing Language Through Reading Comprehension Strategies . . . . . . . . . 201 G. Using Graphic Organizers with ELLs . . . . . . . . . . . . . . . . . . . . . . . . . . . . . . . . . . 213 Study Guide . . . . . . . . . . . . . . . . . . . . . . . . . . . . . . . . . . . . . . . . . . . . . . . . . . . . . . . . . . . 223 References . . . . . . . . . . . . . . . . . . . . . . . . . . . . . . . . . . . . . . . . . . . . . . . . . . . . . . . . . . . . . 233 Index . . . . . . . . . . . . . . . . . . . . . . . . . . . . . . . . . . . . . . . . . . . . . . . . . . . . . . . . . . . . . . . . . 241
viii
■ CONTENTS
Celic-ch1
8/13/09
10:20 AM
Page 1
C HA P TE R
1
Setting Up a Classroom for English Language Learners
T
here was nothing more terrifying for me, professionally speaking, than when I was a first-year teacher unlocking the door to what would be my future classroom. It was six weeks into the school year and I had been hired to take over a bilingual fourth- and fifth-grade class whose teacher had unexpectedly moved to another state. Two languages, two grades, two curricula, and twenty-eight ELLs on my roster had turned me into a totally overwhelmed beginning teacher, and I had only one weekend before my first day with the students. To make matters worse, the classroom wasn’t at all organized. Everywhere I looked there were stacks of boxes and piles upon piles of materials, supplies, and papers invading every learning space in the classroom. I didn’t know where to start, but I knew I had to get the classroom space under control before my first day with my new class. I began by unpacking the boxes and organizing the books. I found storage places for all the materials and supplies and created different centers in the classroom. I brought in a rug and a rocker to create an attractive reading area, and I put some plants on the windowsill. By the end of the weekend I looked around the room and was happy to see how welcoming it looked. I began imagining all the amazing things that were going to take place in the room that year with my group of ELLs. However, when my class arrived and instruction began, I realized that I hadn’t considered how the classroom itself could be a teaching tool to support my ELLs’ learning. Instead of just being visually attractive and organized, I wondered how I could tailor each area of the room to help my ELLs learn both English and the grade-level content. As a new teacher, my to-do list that year was endless, but little by little I began a classroom makeover to turn it into a resource that would facilitate my ELLs’ language learning and academic development.
1
Celic-ch1
8/13/09
10:20 AM
Page 2
I begin this book with a chapter on setting up the classroom because no matter how many times I start a new school year, I always feel like I have to get my physical space under control before I’m mentally ready to tackle anything else. As teachers who work with ELLs, when we begin the task of setting up the classroom it’s important to consider how we can design each area to maximize our ELLs’ ability to develop both linguistic and academic skills. In this chapter I show how you can • take into account the needs of your ELLs when you design your classroom • plan a layout for your classroom that makes sense to ELLs • form a classroom library with appropriate resources • provide collaborative work areas • create centers that help ELLs learn both language and content
Examining Your Room Through the Eyes of an English Language Learner As you set up your classroom, it helps to think of it as an environment that should support your ELLs in learning language and grade-level content at the same time (Freeman and Freeman 2007; Gibbons 2002). It may be difficult to determine whether or not your classroom is truly a place where ELLs can achieve this dual focus of learning language and learning content. Imagine for a moment that you’re an English language learner, trying to learn English and keep up academically with your classmates. As you look around your classroom from this perspective, think about the following: • the written language (on charts, the board, posters, word walls) ■
■
■
Is the written language supported with pictures, photos, examples, or graphic organizers that would give you clues to understanding the content? Does the written language include familiar words that you have been explicitly taught during lessons? Would you even know what content area or topic the writing is related to?
• vocabulary development ■
■
Are there any visual resources like word walls, charts, or labels in the classroom that would help you learn important vocabulary words and understand their meaning? Are there ways you could meaningfully practice the vocabulary?
• the resources available for reading ■
■
■
2
Are there books and other texts at an appropriate level that would help you develop your reading skills in English? Or would you be expected to wait to read in English until you’d learned more of the language? Are there books in your native language that would help you continue to develop your reading skills? Are there books and other texts about topics and people you can relate to?
■ E N G L I S H L A N G U A G E L E A R N E R S D AY B Y D AY, K – 6
Celic-ch1
8/13/09
10:20 AM
■
■
Page 3
Are there resources such as a listening center that would let you listen to the language as you were reading? Are there language charts in the classroom that would help you learn the letters and sounds of English?
• the resources available for writing ■
Are there resources available that would help you start writing in the new language (modeled writing displayed on charts, word walls, bilingual picture dictionaries, a variety of paper choices)? Or would you be expected to wait to write in English until you’d learned more of the language?
• the spaces for learning ■
Are desks and other areas set up so you could collaborate with your peers in learning English and grade-level content? Or would you be expected to always work alone?
• your native language ■
■
Are there any materials or resources available in your native language to help you understand new concepts and build literacy skills? Have you been partnered up with anyone who speaks your native language?
When you think about a classroom from this perspective, you can begin to see what it would be like for an English language learner, particularly in the early stages of language development, to learn the language and keep up academically with the rest of the class. Once you’re aware of how the classroom can be a resource to support your ELLs’ progress, you can begin transforming it into a place where all students can be successful in their learning. Remember that organizing a classroom with the needs of ELLs in mind is an ongoing process. The beauty of teaching is that every year is a chance to start fresh, reflecting on what could be done differently as well as what you want to keep the same.
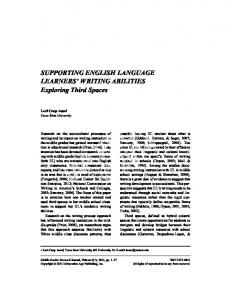
Creating a Layout The layout of your classroom should be logical and organized so your ELLs know where to find information and resources for each subject. For example, my math word wall, math charts, and math manipulatives are all grouped together in one section of the room. My ELLs know they can find anything they need related to math in that area. This is particularly important for beginning ELLs who don’t understand most of the environmental print in the classroom. When ELLs know where they can consistently look for information, vocabulary, or materials related to a particular subject, it supports their ability to learn in the classroom. Figure 1–1 shows an example of how I structured my classroom layout one year. In the layout you can see how resources for each subject are clustered together. As I describe how to set up each part of the classroom with ELLs in mind, you can refer to this layout to see how the areas can all fit together. Finding a space for everything can be a challenge because classrooms range widely in size and shape. But with a little creativity and input from other teachers you can usually find ways to make it all fit. In this layout you can see that about a quarter of the space was sectioned off to be an office for an out-of-classroom teacher, so I didn’t have a full room to work with.
Setting Up a Classroom for English Language Learners ■
3
8/13/09
10:20 AM
Page 4
Overhead Screen & Pull-Down Maps
Math Charts (on Wall) Math Manipulatives
Math Word Wall & Routines
Easel
Bookshelf
Chair
Sink
Coat & Backpack Racks
Listening Center
Writing Center Work Table & Teacher Table
File Cabinet
Computers Printer
Read-Aloud Book Storage
Sectioned-Off Part of the Classroom for an Out-of-Classroom Teacher to Use as an Office
Cubby Shelves for Teacher Use
High-Frequency Word Wall (Hanging) Writing & Word Work Charts (Hanging)
Social Studies Charts & Science Charts (Hanging)
Radiator
Guided Reading Books
Social Studies Word Wall Science Word Wall
Storage Cabinets
Classroom Library & Meeting Area
Reading Charts (Hanging)
Overhead Cart
Bookshelf
Storage Above Cabinets Calendar
White Board
Reading Charts (on Wall) Pocket Chart
Bookshelf
Door
Management Charts
Celic-ch1
Figure 1–1 Classroom layout
Establishing the Classroom Library I typically begin by setting up the classroom library because this large space affects where everything else in the room is placed. This is the heart of the classroom where you’ll be gathering students for minilessons, read-alouds, and possibly shared reading, shared writing, interactive writing, and class meetings (Taberski 2000; Calkins 2001). There are certain resources and materials you can include in this area that will improve your ELLs’ ability to understand what you’re teaching in your minilessons, develop their literacy skills, and develop their language skills.
Easel with a Whiteboard When you teach minilessons in the classroom library area, it’s essential to have resources that make the instruction visual for your ELLs. An easel with a whiteboard next to your chair gives you a place to write down examples of the reading or writing strategy that you’re modeling for ELLs. Instead of relying purely on listening skills, ELLs can see the strategy in action. This scaffolds the language for ELLs with early levels of L2 proficiency, increasing their comprehension of the strategy. If you’re using a big book during a minilesson, read-aloud, or shared reading, the easel can be a place to display it so ELLs are able to see the enlarged text as they’re hearing the language. The easel can
4
■ E N G L I S H L A N G U A G E L E A R N E R S D AY B Y D AY, K – 6
Celic-ch1
8/13/09
10:20 AM
Page 5
also support chart paper tablets that you can use for shared writing, interactive writing, and shared reading. Near the easel I keep a basket with materials I may need during instruction. I have a supply of differently colored dry-erase markers to make my writing on the whiteboard more visual and comprehensible for my ELLs. The variety of colors also helps me make more realistic sketches on the board to clarify the written language. Highlighting tape or highlighting markers are useful during literacy instruction to help ELLs focus on a particular letter, word, or sentence in a text that you have written on chart paper. For shared reading texts that I display on the easel, I always keep a stock of sticky notes that I can use to cover up key words or parts of words. That way my ELLs can predict what’s missing based on context clues and what they know about the language. If a particular shared reading text has a rhythm or rhyme I want my ELLs to pay attention to, I pull out some maracas and tambourines from the materials basket. Hearing the rhythm of the text with the percussion instruments helps ELLs build fluency in the language and is a great way for them to physically participate in the reading. Finally, I keep a stock of extra pens and pencils so I can take note in my assessment binder of how my ELLs are using the language during instruction and how they’re progressing with their literacy skills (see Chapter 2).
Pocket Chart for Language Development Many primary-grade teachers have pockets charts in the classroom library where they develop vocabulary with the class or build a text with sentence strips. However, a pocket chart is a great resource to have in any grade with ELLs. I hang a pocket chart in the classroom library to display vocabulary or language structures my ELLs need to know for our literacy and content-area studies. In a basket next to the pocket chart I keep a supply of index cards, sentence strips, and markers so I can easily add new words or sentences to the pocket chart during instruction.
Stuffed Animals and Finger Puppets In the classroom library I also have some physical objects close at hand to help my ELLs understand the texts we’re reading. I keep a bin with a wide variety of small stuffed animals so that whenever we read a fiction or nonfiction text related to animals we can act out the different parts or demonstrate the information we’re learning. I also collect stuffed animals and dolls of characters from books that I read to the class. Frog and Toad, Corduroy, and Ramona have been some of my ELLs’ favorites, which they’ve used to retell the important parts of the story or to re-create the dialogue between the characters. Finger puppets also work well for this kind of activity. All of these hands-on resources are a great way for ELLs at different L2 proficiency levels to participate in the reading and to increase their comprehension of the text. It also helps beginning ELLs take more risks with the language because they’re not the ones speaking; the stuffed animals or finger puppets are.
Literacy Charts Whenever I create visual examples on the whiteboard during reading and writing minilessons, I later re-create them on chart paper so my ELLs can refer to the literacy concept, the language structures, and the vocabulary in the future. I try to make the charts as visual and as clear as possible so ELLs at any L2 proficiency level can understand the concept. For charts to be most effective, they should be based on the examples that
Setting Up a Classroom for English Language Learners ■
5
Celic-ch1
8/13/09
10:20 AM
Page 6
ELLs are familiar with from the minilessons. Debbie Miller (2002) has excellent examples of visually oriented reading comprehension charts that can easily be adapted to upper grades as well. Hanging or mounting your reading charts in the classroom library area will help your ELLs know exactly where to look to find everything related to reading. Instead of preparing charts before the first day of school, make them as you teach new strategies throughout the year so your ELLs are familiar with the concept and the language. As the year goes on, you’ll replace earlier charts with new ones, but it helps to keep all the charts for reference. One way to do this is to staple the first charts to the bottom of a bulletin board and then staple others on top in a way that lets you and your ELLs flip through them.
Language Charts There are certain premade language reference charts that you can have set up in the classroom library area by the first day of school. These include an alphabet chart, a vowel chart, and a blends and digraphs chart. While primary classrooms traditionally have these as instructional staples, upper-grade classrooms should also have them available as ELLs learn the letters and corresponding sounds of the new language. Bilingual classrooms will have these charts in both languages, but ESL and mainstream classrooms can also have bilingual alphabet and sound charts to help ELLs compare and contrast sounds and letters in the L1 and the L2. Explicitly drawing attention to the connections between languages helps ELLs transfer what they know from one language to another (García 2006; Cummins 1981). I like to refer to these language charts when I work with ELLs during shared reading and word study, as well as when we create texts during interactive writing and shared writing.
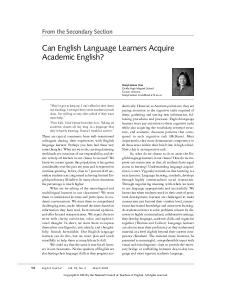
Leveled Books Having books in your library that support ELLs in developing their L1 and L2 literacy skills is a critical aspect of setting up your classroom. When you begin organizing the books in your classroom library, you’ll want to think about how to divide them into leveled and nonleveled book baskets. Figure 1–2 shows the library in my self-contained ESL classroom with a section of leveled book baskets in English, using the Fountas and Pinnell levels, and another section of nonleveled book baskets organized by topic and genre. There is also an area with baskets for bilingual books, picture books in Spanish, and a range of leveled chapter books in Spanish. Many of the classroom library books should be leveled so ELLs can read texts that are appropriate for their current reading ability, also referred to as their independent reading level. Providing students with books at their independent reading level is an essential way to help them improve their reading ability (Calkins 2001; Fountas and Pinnell 2006). It ensures that they’re reading texts that are neither too easy nor too challenging, which develops their decoding, comprehension, and fluency skills. Since each student reads books at her independent level, it’s a key way to differentiate instruction for your ELLs’ diverse literacy needs. These just-right books also build ELLs’ vocabulary base in English and provide models of how the language is structured (Chen and Mora-Flores 2006). Many schools pass along students’ reading levels from one grade to the next, which lets you know what levels you’ll need to have available in your library. Chapter 2 details how you can determine your ELLs’ current reading levels through assessments. In a mainstream classroom with ESL students, you’ll have leveled book baskets in English, but you can also provide baskets of picture books and chapter books in your
6
■ E N G L I S H L A N G U A G E L E A R N E R S D AY B Y D AY, K – 6
Celic-ch1
8/13/09
10:20 AM
Page 7
Figure 1–2 Classroom library with leveled and nonleveled book baskets
ELLs’ native languages. Encouraging ELLs to read in their native language is important because it helps them continue to develop higher-level reading skills in the L1 while working on more basic reading skills in English. Studies show that the literacy skills ELLs develop in one language transfer to another, so any time invested in building literacy skills in the native language will increase ELLs’ ability to read successfully in English (Goldenberg 2008; August, Carlo, and Calderón 2002; Thomas and Collier 1995). It also affirms for ELLs that their native language is an asset, not a detriment, and that it’s valued in your classroom. In addition to the leveled books your ELLs read in English, set up a system where they can choose several books in the native language each week to read independently or with their family. When setting up a leveled library in a bilingual or dual language classroom, separate the book baskets by language. One section of the library should have baskets of leveled books in the L1, and another section can have baskets of leveled books in the L2. That way, students can easily choose books in each language depending upon their reading level in the L1 and the L2. You can do the same for nonleveled book baskets. Many teachers color-code language in bilingual classrooms, using one color for the L1 and another for the L2. You can use this same color-coding system with the color of your book baskets as well to help students keep the two (or more) languages separate.
Building a Leveled Library Gathering enough books that reflect the entire range of your ELLs’ reading levels is a common problem, especially when first establishing a leveled classroom library. If you have beginning ELLs in your classroom, you’ll need books in English starting at the earliest reading levels. While this doesn’t pose a problem for kindergarten and first-grade teachers, most second- through sixth-grade teachers don’t have books at those early levels. In a classroom with ELLs spanning all L2 proficiency levels, it’s quite possible
Setting Up a Classroom for English Language Learners ■
7
Celic-ch1
8/13/09
10:20 AM
Page 8
that you’ll need books ranging from Level A all the way to the highest reading levels for your grade. Once you know your ELLs’ reading levels you can approach your administration about ordering independent reading books at the levels you need. This doesn’t help in the short term, however, since getting funds and ordering books can be a lengthy process. In the meantime, one solution is to enlist the help of other teachers who have books at the levels your ELLs need. When I started teaching in a fourth- and fifth-grade self-contained ESL classroom, I had ELLs at every English proficiency level and spanning reading levels from A to P. Unfortunately, my new classroom didn’t have any leveled books below Level H. Until I was able to get my own books for the missing levels, I paired up with several first-grade teachers. They agreed to let my group of ELLs who were reading at those earlier levels come to their rooms once a week to borrow justright books. A few months into the year, the school was able to order the leveled books I needed for my classroom library. Near the end of the school year, another issue surfaced as a number of my ELLs with an advanced English proficiency level approached grade level in reading. Although this was certainly a good issue to have, I found myself scrambling for books from Levels Q to T. This time around I coordinated with several upper-grade teachers, who let these ELLs borrow books from their leveled libraries on a weekly basis. Another way to expand your leveled library is to print off leveled books from a website such as Reading A–Z (www.readinga-z.com/). With a subscription you get access to hundreds of illustrated fiction and nonfiction texts at every reading level that you can print out and staple together to make your own books. These leveled books are available in English, Spanish, and French. Another website to try is Scholastic Mini-Books (minibooks.scholastic.com/minibooks/home/), which has fiction and nonfiction leveled books in English that you can print with a subscription. This website has some leveled books in Spanish as well. While printing leveled books from websites certainly doesn’t replace having real books in your library, it can be a way to quickly get your ELLs reading books that match their reading abilities. And, with the wide variety of topics that the books touch upon, you can easily find books that coordinate with different contentarea units of study. Another benefit to using these books is that you can print off multiple copies and use them for instruction with guided reading groups. Assembling books you print from websites can be time-consuming if you’re relying on them to make up a substantial part of your classroom library. To get around this, I occasionally invite small groups of ELLs to have lunch with me in the classroom, and after eating we spend the rest of the time cutting the pages, putting them in order, and stapling them into books. You can also ask ELLs’ families to help assemble the books at home, which is a wonderful way for them to get involved in an important part of their children’s learning. Families don’t have to speak the L2 to put together the books, and they know they’re making a significant contribution to the classroom.
Organizing Leveled Books Although there are different systems for leveling books, one that’s widely used in classrooms across the United States is Guided Reading (Fountas and Pinnell 2006, 1999). Each grade has certain corresponding alphabetic reading levels, ranging from A to Z: Kindergarten: A–C First grade: D–I Second grade: H–M 8
■ E N G L I S H L A N G U A G E L E A R N E R S D AY B Y D AY, K – 6
Celic-ch1
8/13/09
10:20 AM
Page 9
Third grade: L–P Fourth grade: O–T Fifth grade: S–W Sixth grade: V–Y Seventh and eighth grades: X–Z If you’re just beginning to level your library, use the resources in Figure 1–3 to find out the levels of certain common books. Many of these resources also indicate the correlation between A–Z levels and other leveling systems such as Reading Recovery and Developmental Reading Assessment (DRA). In order to level books with any system, you need to have a strong understanding of exactly what distinguishes one reading level from the next. Knowing the characteristics a text has at each level lets you know what you’ll need to teach students to help them improve as readers (Calkins and the Teachers College Reading and Writing Project 2002; Fountas and Pinnell 2006, 1999). Some characteristics of text include the amount of text per page, the complexity of the language and vocabulary, the use of repetitive patterns, and the amount of picture support. These all affect the difficulty level of a text. One way to begin leveling a library is to start with some baseline books that are typical of a particular level that you can use to compare with other books. For example, knowing that Rain (Kalan and Crews 1991) is a Level C book or that The Carrot Seed (Krauss and Johnson 1945) is a Level G book, you can compare it with other books in your classroom and temporarily group together the ones that are similar. Likewise, knowing that Suzy Kline’s Horrible Harry books are at Level L or that most Beverly Clearly books are at Level O lets you determine what other books are at a similar level of difficulty and group them together for the time being. As the school year progresses, level your books more accurately to provide ELLs with books that are the best match for their reading abilities. In Figure 1–3 I provide a list of books and websites that can help you level the books in your classroom library. While there are many resources for leveling books in English, there is less available on leveling books in other languages. Many books in English are translated into other languages, particularly Spanish, but that doesn’t necessarily mean they have the same reading level. For example, the Spanish translation may use a higher level of language complexity than the English version, making it more challenging to read. Or a translation may include less picture support or more text per page, which also alters the difficulty level. As a starting point, you can level a book according to its English counterpart, but be prepared to adjust the levels as you become more familiar with difficulties your students encounter with the books in the other language. Most importantly, keep in mind that leveling a classroom library is a process. This could easily take up all your time before the school year begins, so as you sort and level books, know that you’ll continue this organization as the year gets under way. Calkins (2001) recommends that if you level just 30 percent of your library, there will be enough books for students to get started with during independent reading.
Nonleveled Books Other books in the library are nonleveled, giving ELLs the opportunity to read texts that are of interest to them, even if they’re not precisely at their reading level (Cappellini 2005). This includes nonfiction books organized by topic, books relating to content-area units of study, seasonal books, books in particular genres such as poetry, folktales, biographies, Setting Up a Classroom for English Language Learners ■
9
Celic-ch1
8/13/09
10:20 AM
Page 10
Books Calkins, Lucy. 2002. A Field Guide to the Classroom Library A–G. 7 vols. Portsmouth, NH: Heinemann. Fountas, Irene C., and Gay Su Pinnell. 2006. Leveled Books K–8: Matching Texts to Readers for Effective Teaching. Portsmouth, NH: Heinemann. ———. 2009. The Fountas and Pinnell Leveled Book List, K–8+: 2009–2011 Edition. Portsmouth, NH: Heinemann. Websites • Fountas and Pinnell Leveled Books K–8 (www.fountasandpinnellleveledbooks .com/): With a subscription, you’ll have access to thousands of leveled books and other reading resources, including the levels of recently published books. • Teacher Book Wizard (bookwizard.scholastic.com/): Search the company’s book selection to find levels of English, Spanish, or bilingual books. • Leveled and Guided Reading (rigby.harcourtachieve.com/en-US/lgr?=rigby): Search the company’s book selection to find the Fountas and Pinnell levels of books in English and Spanish, as well as DRA and Reading Recovery levels. • Beaverton School District Leveled Books Database (registration.beavton.k12.or .us/lbdb/): This is a free resource from a school district where you can search for reading levels of books in English or Spanish. • Leveled Books Database (books.atozteacherstuff.com/leveled-books/): With this free resource you can search for thousands of A–Z leveled books (referred to also as Guided Reading levels) as well as Reading Recovery and Accelerated Reading levels. Figure 1–3 Resources for leveling books mysteries, and historical fiction, and books that examine the language such as alphabet books, sound books, or high-frequency word books (Miller 2002; Taberski 2000). Encouraging ELLs to read nonleveled books is an important way to maintain their engagement in reading (Cappellini 2005). And tackling a high-interest, yet more challenging text can help ELLs stretch their reading skills. For example, when Joaquin started third grade with me, he was a Level 2 ELL reading at approximately Level E in English. Joaquin was fanatical about animals, and in particular he was an expert on sharks. Even though the nonfiction shark books I had in the library were higher than Level E, Joaquin was able to read and understand quite a lot of the text because he had such strong background knowledge on the topic. Reading a combination of Level E books and nonleveled books of interest helped Joaquin progress to increasingly higher reading levels throughout the year and at the same time stay excited about what he was reading. The nonleveled book baskets you create in the classroom library will depend entirely upon the books you have available to you. As you’re organizing books by level, be on the lookout for books that could be used in different nonleveled baskets. Whenever possible, add a multicultural focus to your book baskets so they represent the experiences and backgrounds of your ELLs. For example, if you have a book basket on families, try to include books that show how families from different cultures live. If you have a genre basket for poetry, look for collections written by authors from different cultural
10
■ E N G L I S H L A N G U A G E L E A R N E R S D AY B Y D AY, K – 6
Celic-ch1
8/13/09
10:20 AM
Page 11
backgrounds. This gives all students a broader worldview and also shows your ELLs that their experiences are an important part of learning in the classroom (Kottler, Kottler, and Street 2008). Figure 1–4 gives examples of the types of nonleveled book baskets you could create for your classroom library, including ways to make them multicultural.
Nonfiction Social Studies Baskets • families (representative of different cultures) • communities (neighborhood, city, state, around the world) • countries (one basket per country) • regions of the world (South America, the Caribbean, the Middle East, Asia, etc.) • jobs/professions • geography (maps, landforms, atlases, etc.) • U.S. history (Colonies, American Revolution, immigration, westward expansion, etc.) • indigenous groups (from regions in the United States and around the world) • explorers (to the United States and other parts of the world) • sports and players (from around the world) Nonfiction Science Baskets • life cycles • plants • ecosystems (desert, rain forest, ocean, plains, etc.) • animals (if possible, make more specific baskets like jungle animals, ocean creatures, etc.) • insects (if possible, make more specific baskets like butterflies, flying insects, creepy crawlies, etc.) • dinosaurs • human body • magnets • simple machines • solar system and Earth • experiments/how-to books Seasonal Baskets These can be a combination of fiction and nonfiction books. • holidays and celebrations (in the United States and other countries) • fall, winter, spring, summer Read-Aloud Books This basket contains books you’ve previously read-aloud to the class.These books can also be
recorded on tape for ELLs to listen to and read in the listening center. Other Genre Baskets Choose books for these baskets that represent a range of cultures whenever possible. • poetry • folktales/legends/fairy tales • biographies • mysteries • historical fiction • nursery rhymes Concept Books These are common in early primary grades but also helpful for beginning ELLs in any grade to acquire basic vocabulary in the L2. • alphabet/sound books • shape books • color books • opposite books • number books Author Baskets Try to include collections of books from authors who write about different cultural perspectives. • Arthur Dorros • Allen Say • Alma Flor Ada • Tomie dePaola • Gary Soto • Eve Bunting Bilingual Books and Native Language Books If you teach in a mainstream classroom with ESL students, you can create baskets of picture books and chapter books in students’ native languages (Freeman and Freeman 2007; Herrell 2000). Development of native language literacy skills improves your ELLs’ reading skills in English (Goldenberg 2008).
Figure 1–4 Examples of nonleveled book baskets for ELLs
Setting Up a Classroom for English Language Learners ■
11
Celic-ch1
8/13/09
10:20 AM
Page 12
Choosing Books It’s important to develop a system where students can “go shopping” for books, or choose new books to read from the library on a regular basis. Many teachers like to have students store these books in a sturdy plastic book bag to keep them organized. From a management perspective, scheduling this book exchange once a week can be an easy solution. It could be that each group of students has a specific day when they choose new books, or all students could do it on the same day, such as Friday. The number of books ELLs need to borrow each week depends entirely on their reading level. ELLs reading at a lower level, whether they’re in primary or upper grades, are reading shorter books and therefore need a much higher quantity to be able to sustain independent reading throughout the week. On the other hand, ELLs reading at a higher level may need only one or two leveled chapter books to sustain their independent reading for the week. Since the amount of books will be different for every ELL, when you initially assess their reading levels you can let them know what leveled book basket they should take their books from and how many they should take each week. Students in bilingual programs typically have this quantity of leveled books split between the two languages they’re reading in, whereas students in ESL programs will have most of their books in English with perhaps some books in the native language to continue progressing as readers in their L1. While the majority of books ELLs choose are from the leveled book baskets, they should also choose several books they’re interested in from the nonleveled baskets.
Organizing Collaborative Work Areas English language learners in both primary and upper grades benefit greatly from working with other students collaboratively (Hill and Flynn 2006; Freeman and Freeman 2001; Faltis and Hudelson 1998; García 1991). Working collaboratively provides ELLs with more models of the L2 because more language is directed at them as they work with their partner or group, and they also have more opportunities to practice the language because there is more interaction (Gibbons 2002). Since the language ELLs hear in collaborative situations is contextualized around a particular learning activity, it’s also more meaningful for them, helping them develop their understanding of how the language works.
Collaborative Group Arrangements Collaborative interaction can be facilitated when ELLs are seated in small groups (Freeman and Freeman 2001; Hill and Flynn 2006). Groups of four work very well because each student has a partner seated next to him. When groups are larger than four, some students will have classmates seated on both sides, which can be distracting. It’s also more intimidating for ELLs to share ideas collaboratively when they are in large numbers. However, because of space issues, sometimes there is no choice but to make larger groups with six students. When you get your ELLs’ cumulative records, look through them to find out what level of language proficiency each student tested at in English. TESOL identifies the following levels of English proficiency: Level 1: starting, Level 2: emerging, Level 3: developing, Level 4: expanding, and Level 5: bridging (Gottlieb et al. 2006). See Chapter 2 for a more detailed description of how to determine an ELL’s proficiency level. With this
12
■ E N G L I S H L A N G U A G E L E A R N E R S D AY B Y D AY, K – 6
Celic-ch1
8/13/09
10:20 AM
Page 13
data, you can begin strategically grouping ELLs together. The goal is to create completely heterogeneous groupings of ELLs so that every student has someone in the group who can act as a linguistic support. Mixing ELLs with proficiencies from Levels 1 to 5 ensures that group members will be able to work collaboratively and maximize their learning. If you have any newcomers, seat them next to another student who speaks the same L1, if possible (Freeman and Freeman 2007; Gibbons 1991). Figure 1–5 shows some possible groupings of ELLs based on their L2 proficiency levels. In each example in Figure 1–5 I have tried to ensure that ELLs are seated next to and across from someone with a slightly different L2 proficiency level (Chen and MoraFlores 2006). Whenever possible, I don’t seat a Level 1 ELL next to or across from another Level 1 ELL. This unsupportive arrangement would create unnecessary confusion as both newcomers attempted to understand the new language and content. I also try to avoid seating Level 1 ELLs next to Level 5 ELLs. There’s such a vast difference between their proficiency levels that it can easily become frustrating for the more linguistically proficient ELL to constantly support the newcomer. Whereas Level 5 ELLs have little to gain, linguistically speaking, from being partnered with Level 1 ELLs, a Level 3 ELL can put her growing command of English to use in helping a newcomer learn the language. If there are several Level 1 ELLs in a group, I try to seat them on opposite sides of the group so they each have a different partner. Another consideration is that ELLs should never have newcomers seated on both sides of them. This arrangement limits how much they can help each newcomer, and most importantly they need to have another student nearby with a higher English proficiency level who will challenge and expand their own language use. So, if I seat a Level 1 ELL on one side of a Level 3 ELL, then I try to seat a Level 4 or 5 ELL on the other side. Since dual language programs have students who are English language learners as well as native English-speaking students who are learning the second language, you’ll need to mix these two language groups in your seating arrangements. The goal is to not only mix language proficiency levels but also mix native language speakers. For example, you would try to avoid pairing up a Level 1 English language learner with a Level 1 Spanish language learner because they wouldn’t be able to support each other linguistically. However, a Level 1 ELL could be seated next to a Level 3 Spanish language learner, who could be next to a Level 5 ELL.
4
1
1
4
2
1
3
2
5
3
3
5
4
3
5
4
2
3
1
2
(2)
(1)
(4)
(3)
Figure 1–5 Grouping ELLs based on L2 proficiency level
Setting Up a Classroom for English Language Learners ■
13
Celic-ch1
8/13/09
10:20 AM
Page 14
Taking the time to purposefully place ELLs in collaborative groups will pay off later because they’ll have the linguistic support they need to learn in the classroom. Create mock versions of your desk arrangements on paper and play around with combinations of ELLs until you strike a balance between their linguistic needs and, as you get to know them during the school year, their academic and behavioral needs. Keep in mind that these heterogeneous groupings are designed for collaborative activities that ELLs engage in during different subject areas. However, there are also times when you’ll create homogenous groupings for a particular purpose (Hill and Flynn 2006; Cappellini 2005), such as for guided reading groups, small interactive writing groups, and reading partners. It’s common for new ELLs to arrive during the first weeks of school, particularly at schools with a high population of immigrant students. Having several extra desks or table spots available at the beginning of the year is highly advisable. This (along with extra sets of class textbooks, materials, and forms to be sent home) makes the newcomers’ transition into the classroom much smoother—for them as well as for you.
Collaborative Work Tables Having one or more work tables in the classroom allows you to • meet with guided reading groups • work with a small group of ELLs who need extra help in a particular area • have ELLs work together on a project • have a push-in teacher work with a small group of ELLs • meet with ELLs for reading or writing conferences You can maximize the classroom space even further by using one of the work tables as your desk. A work table can be a perfect place to prepare lessons and do paperwork, and it eliminates the need for a bulky teacher’s desk. However, to make this system work, set up an off-limits area near the work table where you can store all the supplies you’ll need for lesson planning and completing paperwork. It’s also helpful to have a file cabinet and personal cubbyholes nearby to store paperwork.
Making Effective Centers With the classroom library, groups of desks, and work tables placed in the classroom, you can think about where to set up centers for different subject areas. Centers are areas of the room where ELLs can find everything they need to help them understand the language and content of a particular subject area, including interactive word walls to practice key vocabulary and class charts to refer to what they’ve learned in the subject area. ELLs rely on these visual aids to understand the content they’re learning (Rea and Mercuri 2006; Freeman and Freeman 2007). They also depend on consistency to know where to find information related to a particular subject. When looking for a space to put each center, think vertically. The center can include floor space for storing materials in a bookshelf or other piece of furniture, wall space for mounting a word wall or charts, and air space for hanging charts on a clothesline. Some centers, such as the listening center, may also have an area where ELLs can gather to work together.
14
■ E N G L I S H L A N G U A G E L E A R N E R S D AY B Y D AY, K – 6
Celic-ch1
8/13/09
10:20 AM
Page 15
Math Center Interactive Math Word Wall An interactive math word wall is one way for ELLs to practice the academic vocabulary they need to be successful in math. While there are a number of ways to set up and use a word wall, the interactive version I describe helps ELLs manipulate the words and develop a stronger comprehension of the language. The math word wall is created little by little as your ELLs learn new vocabulary in each math lesson. 1. Identify the math content words ELLs will be encountering in a particular unit of study. 2. Create two flash cards for each word: one with the math word written on it, which can be written bilingually in English and the students’ L1, and another card with a picture or example representing that word. 3. After ELLs have encountered the words through the context of a math lesson, explicitly teach the words (as described in Chapter 5). Place the word and picture cards next to each other in a pocket chart. 4. On a regular basis throughout the rest of the math unit, have students interactively practice the math words and their meaning. 5. Refer to the word cards whenever using those vocabulary words in math lessons to help ELLs connect the spoken word with the written word and mathematical concept. Repetition of practice helps ELLs internalize the content-area vocabulary. It’s helpful for ELLs to be able to manipulate the word and picture cards through a variety of vocabulary activities, so I suggest using a pocket chart for your math word wall. Figure 1–6 on page 16 shows an example of my interactive math word wall during a unit on multiplication and division. I added the word and picture cards little by little as we learned the new vocabulary words in the context of the math lessons.
Math Charts Math charts should summarize in a very visual way the key math concepts ELLs have already learned. You won’t have any charts in the math center when the school year starts, but as you begin teaching different math concepts during the first weeks of school, the space will begin to fill up. Keep in mind that the charts should • be focused on one concept ELLs have already learned • provide several clear, visual examples of the concept • if applicable, clearly outline the steps involved in solving a problem • be mainly visual with a few key words or sentences summarizing the concept • be referred to in future lessons to help connect the oral language with the written language and the concept For example, I made a series of math charts during a unit on geometry. One chart was based on a picture-sorting activity my ELLs did with their collaborative groups. They first determined which shapes were polygons and which were not polygons, explaining the rules for what makes a polygon. Then they sorted the polygons into two categories: convex and concave. On the chart I put the definition of a polygon at the top and then drew how the class had sorted the shapes into the three categories. Another
Setting Up a Classroom for English Language Learners ■
15
Celic-ch1
8/13/09
10:20 AM
Page 16
chart was a visual reminder of the difference between line segments, lines, and rays, with pictures of each on the left and definitions the class had developed on the right. I also included examples of how to name and label line segments, lines, and rays. A third chart used the universal symbol for no (a red circle with a diagonal line through it) to show which shapes are parallelograms and which ones are not. I also color-coded the parallel sides of the parallelograms to help ELLs identify this defining characteristic. Whenever we discussed these geometry concepts in later lessons, I consistently pointed to the charts to remind my ELLs of the language and the math concepts.
Wipe-Off Math Charts One of the best materials I’ve found for math lessons with ELLs is a wipe-off math chart. You can see two of these charts in Figure 1–7: “What’s My Rule?” and “PlaceValue Chart.” Each wipe-off chart I use targets a different math skill or concept, and you can create endless examples and opportunities for practice with ELLs, such as the list of examples my ELLs and I put on the place-value chart. This repetition of practice with place value helped my ELLs develop a fuller understanding of the math concept and learn the mathematical language involved in expressing large numbers in English. The visual support in these charts is also an excellent scaffold for ELLs. These wipe-off charts are available from the Everyday Mathematics program.
Math Routines Many teachers, particularly in the primary grades, begin the day with a morning meeting that includes different math routines. Upper-grade teachers can also incorporate math routines, either as whole-class activities or as class jobs for different ELLs to complete each day. The benefit of using math routines is that the repetition of practice builds academic language skills as well as math concepts for ELLs. Figure 1–10 at the
Figure 1–7 Wipe-off math charts and math routines
Figure 1–6 Interactive bilingual math word wall
16
■ E N G L I S H L A N G U A G E L E A R N E R S D AY B Y D AY, K – 6
Celic-ch1
8/13/09
10:20 AM
Page 17
end of the chapter shows how I set up a number of math routines on the bulletin board in my math center. Math routines can include, but are certainly not limited to, the following: • Calendar activities: These can be used in a number of different mathematical ways in the primary and upper grades to help ELLs visually develop the concepts of counting, grouping, even and odd, patterns, finding factors of numbers, periods of time, or as a basis for number stories. I use a calendar where the days for each month have a different pattern for students to identify such as ABAB, AABB, or AABBCC, which is a skill they need to demonstrate on state testing (see Figure 1–10 at the end of this chapter). • Number chart (to one hundred): This reinforces concepts of number, such as counting by ones, twos, fives, and tens. It’s helpful for ELLs to practice different ways of counting in the L2 to learn the names of numbers and to make their recollection more automatic. This language development improves their comprehension during math lessons and their ability to orally participate in math activities. You can have a partner practice this counting with a beginning ELL on a daily basis during transition times. • Clock activities: These reinforce the language connected with concepts of time. Have ELLs match the time written out in words with different clock faces or practice saying the time aloud. Phrases like o’clock, half past, quarter past, and quarter to are linguistically complex. • “Days of the Week” chart: ELLs can label the days of the week with the sentence starters Yesterday was, Today is, and Tomorrow will be and practice saying the complete sentences. • Tally chart: Students add to a tally chart daily, possibly to record data for the type of weather (cloudy, sunny, rainy). This builds weather-related vocabulary for ELLs and the math concept of how to create a tally chart. • Bar graph: Students add to a bar graph daily, possibly to record data regarding students’ daily attendance. You can also label the parts of a bar graph to help ELLs learn the language of what to include when making this type of graph (x-axis, y-axis, title, labels, scale). • Line graph: Students add to a line graph daily, possibly to record data for the high temperatures predicted for the day. As with bar graphs, ELLs benefit from written labels of the parts of a line graph.
Group Baskets of Commonly Used Math Manipulatives Using manipulatives is critical to help ELLs visualize math concepts (Coggins et al. 2007). However, it can be very time-consuming to organize these materials for each lesson. One way to avoid this is to create baskets of commonly used manipulatives for each group of students to use. This system works very well for managing the manipulatives you have students use frequently, such as pattern blocks, counting cubes, coins, base ten blocks, measuring tapes, rulers, and decks of cards. You can organize different types of manipulatives in zip-top bags inside the baskets. While not necessary for the beginning of the school year, having these group baskets of manipulatives cuts down significantly on prep time.
Setting Up a Classroom for English Language Learners ■
17
Celic-ch1
8/13/09
10:20 AM
Page 18
Overhead Transparency Manipulatives Another resource that supports ELLs during math lessons is an overhead transparency version of the manipulatives. For example, during a unit on fractions I use transparent base ten blocks with an overhead projector to visually model the concept of fractions to the tenths and hundredths places. Then I have my ELLs practice the concept using the base ten blocks in their group baskets.
Writing Center Writing Supplies The writing center is a place to store supplies students need during the writing process, such as paper choices, extra pencils, pens for editing, staplers, pencil sharpeners, and materials for publishing writing like construction paper, markers, and colored pencils. Have the basics, like extra pencils, pens, and pencil sharpeners, ready by the first day, because some ELLs, especially newcomers, may not come with the necessary school supplies.
Paper Choices English language learners benefit from having different types of paper to use during the writing workshop, depending on their proficiency in the target language (Calkins et al. 2006; Chen and Mora-Flores 2006). While this is a common practice in the primary grades, where students are just beginning to develop as writers, most upper-grade classrooms strictly use lined paper. Having choices available in every grade, and modeling for ELLs how they can use each type of paper, will help transition them into the challenging task of writing in a second language. These paper choices should be photocopied and available in the writing center by the first week of school so that all ELLs can be productive during independent writing time. • Paper with a large picture box and a few lines: Allows Levels 1 and 2 ELLs in primary and upper grades to focus on drawing a picture related to the type of writing the class is doing, placing less emphasis on the unrealistic expectation of creating an extended amount of writing in the L2. You can show these ELLs how to use a picture dictionary to label parts of their drawing in the L2, if it’s age appropriate. • Paper with a small picture box and many lines: Appropriate for Levels 1 and 2 ELLs who already have a literacy base in their native language. You can have them write in the L1 and draw a picture that shows what the writing is about. You can again show these ELLs how to label their drawing in the L2 using a picture dictionary, if it’s age appropriate. This type of paper is also appropriate for Levels 3 and 4 ELLs who still benefit from combining written language with a visual. • Lined paper: Appropriate for ELLs with developed literacy skills in their native language. They can use the lined paper to write in the L1 in bilingual or mainstream classrooms. Lined paper can also be used with Levels 3, 4, and 5 ELLs for writing in the L2. • Story sequencing paper: This graphic organizer can help ELLs plan how their story will go from beginning, to middle, to end. Depending on the grade level, it could have anywhere from three to six picture boxes, possibly with a few lines under each box. Any student, proficient English speaker, or English language
18
■ E N G L I S H L A N G U A G E L E A R N E R S D AY B Y D AY, K – 6
Celic-ch1
8/13/09
10:20 AM
Page 19
learner, can benefit from using this graphic organizer. However, it particularly gives support to ELLs because it allows them to visually represent their story idea.
Bilingual Picture Dictionaries Beginning ELLs benefit enormously from having picture dictionaries available in the writing center to use as a resource during the writing workshop. The thematic organization of the picture dictionaries can help ELLs add vocabulary into their beginning writing in the L2, greatly increasing the quantity of writing they are able to independently produce. The picture dictionaries are also a lifesaver for helping beginning ELLs stay focused on their writing for extended periods of time, once they know how to use them to label their writing with words from the L2 or use the words to fill in basic form sentences. For example, when my class was writing narratives, one of my newcomers, Brando, drew a picture of himself seated on an airplane that was landing in New York. He had drawn all the new things he had seen when he had arrived. I wrote the basic form sentence, “I see ,” and I modeled how he could use words from the picture dictionary to complete the sentence. His eyes lit up, and he wrote an entire list of the completed form sentences that related to the things he had drawn, along with a little illustration next to each one to remember what the English vocabulary word meant in Spanish. After doing this writing in English, Brando wrote a detailed narrative in Spanish about the same topic of moving to New York. Picture dictionaries are most effective if they’re bilingual in English and the student’s native language. Figure 1–8 shows Diana, a newcomer from Colombia, using a SpanishEnglish bilingual picture dictionary to add English words to her writing. This helped Diana work productively during independent writing and begin expanding her vocabulary base in English. One source you can try is the Oxford Picture Dictionaries for Kids. In addition to their monolingual English version, they have Spanish-English and Japanese-English bilingual versions for primary and intermediate grades.
High-Frequency Word Wall The high-frequency word wall is a common element in primary-grade classrooms (Tompkins 1997), but many upper-grade teachers bypass a high-frequency word wall
Figure 1–8 Diana uses a bilingual picture dictionary during independent writing
Setting Up a Classroom for English Language Learners ■
19
Celic-ch1
8/13/09
10:20 AM
Page 20
since they feel students have already learned those words in the primary grades. Keep in mind that upper-grade ELLs have probably not learned all the necessary high-frequency words in the L2, and many English-proficient students in the upper grades also struggle with some of these words. Primary-grade teachers often follow a set curriculum that dictates which highfrequency words they introduce each week. In the upper grades, the word wall can serve as a place to review whatever high-frequency words you observe your students misspelling during writing activities. You can start adding high-frequency words to the word wall during the first week of school, so have the space prepared with an area for each letter of the alphabet. This space could be on a wall, a bulletin board, or even chart paper hanging from a clothesline. In addition to the word wall, you can also set up personal word lists for individual ELLs. This can be a two-page alphabetical reference where ELLs write down the highfrequency words you teach them through different literacy activities. In Brando’s case, after learning and practicing the high-frequency words I and see, he added them to his personal word list as a reference for how to spell those words when independently writing in the future. He also added the basic sentence he used in his writing to remember how the high-frequency words could be combined together.
Writing and Language Charts As you teach ELLs the routines of the writing workshop and different strategies for writing, you’ll begin making charts they can refer to. Many of these charts will show models for writing certain kinds of text. These could be examples of writing you model during writing minilessons, shared writing pieces you create with the class, or interactive writing texts you create with the class. As with all the charts in your room, they should be made as you teach the concepts and skills so your ELLs understand the writing and can refer to them independently. Reserve a space for hanging these charts near the other writing resources. Figure 1–9 shows some of the writing charts I hung as a reference for our unit on writing personal narratives (Calkins et al. 2006). The chart in the middle illustrates how to use a story sequencer to plan the rising action and resolution in a narrative. On the left is a model for how to take the story sequencer and turn it into a narrative. On the right is a writing chart that gives visual examples of how to add detail to a narrative through dialogue, emotions, thoughts, and sensory images. You’ll also be making charts that highlight important things the class has learned about how the language works. For example, below the hanging charts in Figure 1–9 is a pocket chart where the students brainstormed other words they could use in their narratives instead of went and said. Another language objective we had during this unit of study was to learn how to change regular and irregular verbs from the present tense to the past tense. We posted an ongoing language chart where ELLs added examples of past tense verbs from their narratives, as well as from the books they were reading.
Listening Center A listening center is most common in primary-grade classrooms, but it’s a wonderful resource for ELLs of any age. Listening to texts repeatedly can help students build fluency in reading (Rasinski 2003) and it helps ELLs connect the sounds of the new language with the print on the page (Fu 2003). This is particularly important for beginning ELLs so they can develop literacy skills in the L2 and sustain independent reading.
20
■ E N G L I S H L A N G U A G E L E A R N E R S D AY B Y D AY, K – 6
Celic-ch1
8/13/09
10:20 AM
Page 21
Figure 1–9 Charts that model writing for ELLs
Listening to these recorded texts also develops your ELLs’ ear for the language, which supports their listening and speaking skills.
Tape Players I invested in purchasing individual tape players for each of my Level 1 and Level 2 ELLs to use. That way they could take advantage of listening to recorded texts at a level appropriate for their L2 proficiency. I store each individual tape player in a separate bag in the Listening Center. At the beginning of independent reading time, my Levels 1 and 2 ELLs take their listening bag, which has the tape player they’ve been using and their books on tape inside. I make sure their books on tape are at early reading levels so they can more easily follow along with the text as they listen. I model for my ELLs how to listen to a text multiple times, how to quietly read along with parts of the text, and how to practice reading the text on their own (Fu 2003). I also teach them how to choose new books on tape each week from the leveled bins in the listening center. Listening to texts on tape is beneficial for Levels 3–5 ELLs as well. They can listen to a text that is slightly more difficult than their independent reading level to build reading fluency, word recognition, and comprehension skills. I have found individual tape players to be a worthwhile purchase if your school doesn’t have any because they allow each beginning ELL to listen to appropriate texts on a daily basis. If you have a large tape player with hookups for multiple students, which is typical in many schools, make sure you set up a system where beginning ELLs can use it frequently. In this case, the listening center should be located in an area where a small group of students can sit around the player.
Recorded Texts For a listening center to be effective, you need to have a supply of recorded texts at a range of reading levels. Buying tape-and-book sets can be expensive, and recording your own texts can be very time-consuming. Try enlisting the help of your family members and friends to record books on tape. Having a variety of voices and accents can help your ELLs hone their listening comprehension skills. It’s worth the time to offer your volunteers a brief training session, reminding them to read naturally but not too quickly,
Setting Up a Classroom for English Language Learners ■
21
Celic-ch1
8/13/09
10:20 AM
Page 22
so your ELLs can follow along. Also have them give a recognizable signal for turning the page. Another time-saver is to record a text during literacy activities. For example, as you read aloud a book to the class, record it on tape, and later add that read-aloud book and tape to the listening center. You can do the same with a shared reading text you present to the whole class, or a shared reading text you work on with a small group of ELLs. Since your ELLs will have heard and practiced the text with you, they’ll be able to use the tape to continue improving their ability to read that text. Listening to recorded texts can also be very effective with ELLs who have limited formal education. One year I had a Level 2 ELL in my fifth-grade class who had sporadically attended school in the Dominican Republic and had limited reading and writing skills in Spanish. Since he faced the enormous challenge of learning English as well as learning how to read and write, he often felt frustrated and discouraged. I began recording texts for him based on what we had read together in class, and I let him take home the tape player every night to practice his reading at home. The following week when I took my class outside for dismissal, I saw his grandmother waiting for us. She came up to me and said that for the first time she saw her grandson excited about reading. She said that every evening while she was making dinner he would play the tape over and over again, practicing the sentences along with my voice and trying to read the books on his own. You never know what will connect with different students, but this interactive support can be engaging for even the most struggling readers.
Computer Programs Most schools hold on to older technology, which is why I suggest the use of tape players in a listening center. However, there are also websites where ELLs can listen to texts and read along at the same time on the computer. One example is Raz-Kids (www.razkids.com/), which with a subscription gives students access to listen to and read books in English at every reading level. The audio recordings highlight words or phrases so ELLs can follow along as they listen, and they include different voices and sounds to make the books come to life.
Science and Social Studies Centers Interactive Science and Social Studies Word Walls These two word walls contain the specific content-area vocabulary that ELLs need to understand science and social studies concepts (Rea and Mercuri 2006; Freeman and Freeman 2007). I like to make the word wall interactive, as I described in the section on the math word wall. That way ELLs can match the vocabulary words with a corresponding image and then use those words for the different vocabulary activities I describe in Chapter 5. The images can be photographs, drawings, illustrations, or realia that you display next to the words (Calderón and Minaya-Rowe 2003). You’ll start adding words during the first weeks of school as you begin your content-area units of study, so have a space set aside for each word wall. In addition to the word wall, you may also label bulletin board displays or reference charts with key vocabulary words. For example, on a world map I label the names of the continents and other geographical terms we’re learning.
Science and Social Studies Charts During integrated units of study, it’s helpful to make charts that illustrate the key concepts or the relationships between concepts (Hill and Flynn 2006). ELLs can use
22
■ E N G L I S H L A N G U A G E L E A R N E R S D AY B Y D AY, K – 6
Celic-ch1
8/13/09
10:20 AM
Page 23
graphic organizers during a learning activity to collaboratively summarize the key concepts and language they’ve learned, and then you can display them in the classroom on chart paper (Calderón and Minaya-Rowe 2003; Rea and Mercuri 2006). These graphic organizers could include webs, T-charts, and Venn diagrams. Appendix G gives examples of how to use these graphic organizers with ELLs in the content areas. I also like to create a time line that wraps around the walls of the classroom. When we learn something new about U.S. or world history, we use interactive writing to create a summary of the event and then add it to the time line, along with images my ELLs find or create. For example, during a unit on colonial life my ELLs helped me write the sentence, “1607: The English settled their first (1st) colony at Jamestown,” and they included an image of Jamestown they found on the Internet. This helps ELLs put events into historical perspective and is a visual reference throughout the year when we learn about other parts of history. It’s also a way to record important current events.
Science and Social Studies Resources Science and social studies textbooks are one type of resource that supports learning throughout the year. You’ll also want to collect other resources to use during your integrated units of study. For example, there are many nonfiction and fiction trade books that center around social studies and science topics. There are also poems, big books, and periodicals such as National Geographic Explorer!, Scholastic News, Weekly Reader, Time for Kids, and Your Big Backyard. National Geographic Explorer! translates some articles into Spanish on its website, which you can print out, and Scholastic News has a Spanish edition of its K–3 magazines. Chapter 4 explains how to use these resources throughout the instructional day in an integrated unit of study.
Computer Center The computer center is traditionally made up of several desktop computers that students can access to support different areas of learning. Technology is of course constantly advancing, and many schools are replacing desktop computers with laptops and wireless Internet, which gives you more flexibility for where you can store and use the computers. When you set up your computer center, think about what computer programs and websites will be most supportive of your ELLs’ language development, literacy development, and content-area learning. English language learners benefit from using programs and websites that provide visual support, audio support, clear content, and bilingual materials. Supportive websites and computer programs also engage ELLs in activities that allow for repetition and reinforcement in developing skills and comprehension (Kottler, Kottler, and Street 2008). Following are a few examples: • Kidspiration and Inspiration: These two computer programs help ELLs visually express their ideas and learning through graphic organizers and images. • The International Children’s Digital Library (en.childrenslibrary.org/): This website has over twenty-five hundred books in forty-eight languages that have been digitally scanned so ELLs can read them on the computer. • Starfall.com (www.starfall.com/): On this website, ELLs can interactively learn the English alphabet, letter sounds, and phonics skills, and develop beginning reading skills, all with excellent audio support.
Setting Up a Classroom for English Language Learners ■
23
Celic-ch1
8/13/09
10:20 AM
Page 24
• National Geographic Kids (kids.nationalgeographic.com/): This website has a large collection of short videos related to science and social studies topics. If you connect your computer to an LCD projector, the whole class can watch a video together to support content-area learning. • World Book (www.worldbookonline.com/): With a subscription, this highly visual encyclopedia provides resources for children in English, Spanish, and French.
Labeling the Classroom When your classroom is set up, think about what things within the room should be labeled for ELLs. Labeling key areas, supplies, and objects helps beginning ELLs understand the basic vocabulary they’ll be hearing you and the other students refer to in the classroom. Along with the label you can include a sentence that shows how the label can be used in context. Refer to the labels and sample sentences when talking to beginning ELLs, and later you can use those sample sentences as language models for them to practice producing the L2. Figure 1–10 shows how I labeled areas and objects in one part of the classroom with orange sentence strips and how I put model sentences on blue sentence strips. In a bilingual classroom, labels and sentences should be in both languages, and in an ESL or mainstream classroom, you can consider labeling in multiple languages (Freeman and Freeman 2007). If you do this, make sure that all the languages spoken in the classroom are included.
Figure 1–10 Classroom labels and model sentences for ELLs
24
■ E N G L I S H L A N G U A G E L E A R N E R S D AY B Y D AY, K – 6
Celic-ch1
8/13/09
10:20 AM
Page 25
Final Thoughts The photos in this chapter reflect the changes I’ve made over the years to the way I set up the learning environment, after I realized the important role the physical classroom could play in supporting my ELLs’ linguistic and academic growth. When I think back to how I first set up my classroom as a new teacher, I realize how all of these little changes I’ve made have improved my ELLs’ ability to learn both language and the grade-level content. I think my ELLs from that first year of teaching would have experienced greater success if I had thought about designing my classroom as a place where they could learn language and content, regardless of their L2 proficiency level. Since your classroom is a place for a unique group of students to learn, it’s helpful to know a little about your ELLs’ language proficiency levels and academic background before the school year begins so you can set up your room with those particular needs in mind. The next chapter explains how to find out this important information about your ELLs.
Reflecting on the Keys to Success Raise the Bar • Is my classroom designed to be a place where ELLs can learn the grade-level curriculum? • Do I have the resources I need to teach the grade-level curriculum? If not, have I made a plan for how to get those resources?
Teach Language and Content Together • Do I have interactive word walls in place that visually teach the language connected to math, science, and social studies? • Do I display charts that clearly summarize key concepts using the academic language my ELLs have learned? • Do I have a variety of fiction and nonfiction books at a range of reading levels that help ELLs learn about different content-area topics?
Differentiate Instruction • Have I arranged desks in groups for collaborative learning? • Do these groups have a mixture of ELLs with different L2 proficiency levels? • Have I set up work tables or other areas for small-group instruction? • Do I have leveled books in the classroom library that reflect the reading levels of all of my ELLs? • Do I have listening center materials to support ELLs with varying reading levels in the L2? • Have I made the classroom visually oriented for my ELLs through interactive word walls, charts, labels, and the materials I plan to use in minilessons? • Have I organized math manipulatives to help my ELLs visualize new concepts?
Setting Up a Classroom for English Language Learners ■
25
Celic-ch1
8/13/09
10:20 AM
Page 26
Connect Learning to Students • Do I have fiction and nonfiction books in the classroom library that are culturally relevant to the ELLs in my class?
Use Students’ Native Languages to Support Learning • Do I have books in the classroom library in my students’ L1 that they can read during independent reading or take home to read? • Have I set up seating arrangements so that beginning ELLs are partnered with a native language peer whenever possible? • Do I have bilingual picture dictionaries available in the writing center? • Do I have bilingual word walls? • Do I have websites available in the computer center that utilize students’ L1?
Be Consistent • Does my classroom have a consistent structure that helps ELLs know where to find information and materials related to different subject areas?
References for Further Reading Organizing a Classroom Library and Making Reading Strategies Visual Miller, Debbie. 2002. Reading with Meaning: Teaching Comprehension in the Primary Grades. Portland, ME: Stenhouse. Taberski, Sharon. 2000. On Solid Ground: Strategies for Teaching Reading K– 3. Portsmouth, NH: Heinemann.
Creating a Leveled Library Calkins, Lucy, and the Teachers College Reading and Writing Project, Columbia University. 2002. A Field Guide to the Classroom Library: Volumes A–G. 7 vols. Portsmouth, NH: Heinemann. Fountas, Irene C., and Gay Su Pinnell. 2006. Leveled Books K–8: Matching Texts to Readers for Effective Teaching. Portsmouth, NH: Heinemann.
Creating a Listening Center with ELLs Fu, Danling. 2003. An Island of English: Teaching ESL in Chinatown. Portsmouth, NH: Heinemann.
Purchase this book now at heinemann.com
26
■ E N G L I S H L A N G U A G E L E A R N E R S D AY B Y D AY, K – 6
Thank you for sampling this resource. For more information or to purchase, please visit Heinemann by clicking the link below: http://www.heinemann.com/products/E02682.aspx
Use of this material is solely for individual, noncommercial use and is for informational purposes only.