1.1 Siebel 7 system architecture overview . ... 1.3 Siebel 7 database
administration overview . ... Installing the Siebel 7 system environment . . . . . . . . . .
. . . . . 21.
Front cover
Siebel 7 with DB2 for z/OS: Database Implementation and Administration Guide Installing and customizing Siebel database for production Database administration
Monitoring for performance
Viviane Anavi-Chaput Steve Baker Richard Corrihons Rich Dale Lou Doran Debra Scott, Lee Siegmund Xuan Nhut Tran, Marion Wilmot
ibm.com/redbooks
International Technical Support Organization Siebel 7 with DB2 for z/OS: Database Implementation and Administration Guide March 2003
SG24-6868-00
Note: Before using this information and the product it supports, read the information in “Notices” on page vii.
First Edition (March 2003) This edition applies to z/OS 1.2, DB2 UDB for OS/390 and z/OS V7.1, DB2 Connect EE V7.2, AIX V5L, Windows 2000, and Siebel 704.
© Copyright International Business Machines Corporation 2003. All rights reserved. Note to U.S. Government Users Restricted Rights -- Use, duplication or disclosure restricted by GSA ADP Schedule Contract with IBM Corp.
Contents Notices . . . . . . . . . . . . . . . . . . . . . . . . . . . . . . . . . . . . . . . . . . . . . . . . . . . . . . vii Trademarks . . . . . . . . . . . . . . . . . . . . . . . . . . . . . . . . . . . . . . . . . . . . . . . . . . . viii Preface . . . . . . . . . . . . . . . . . . . . . . . . . . . . . . . . . . . . . . . . . . . . . . . . . . . . . . . ix The team that wrote this redbook . . . . . . . . . . . . . . . . . . . . . . . . . . . . . . . . . . . . ix Become a published author . . . . . . . . . . . . . . . . . . . . . . . . . . . . . . . . . . . . . . . . xi Comments welcome . . . . . . . . . . . . . . . . . . . . . . . . . . . . . . . . . . . . . . . . . . . . . . xi Chapter 1. Overview of Siebel 7 with DB2 for z/OS database . . . . . . . . . . . 1 1.1 Siebel 7 system architecture overview . . . . . . . . . . . . . . . . . . . . . . . . . . . . 2 1.2 Siebel 7 database implementation overview . . . . . . . . . . . . . . . . . . . . . . . . 3 1.3 Siebel 7 database administration overview . . . . . . . . . . . . . . . . . . . . . . . . . 3 1.4 DB2 for z/OS V7 functions that benefit Siebel 7 . . . . . . . . . . . . . . . . . . . . . 4 1.4.1 Correlated subquery for UPDATE joins . . . . . . . . . . . . . . . . . . . . . . . 5 1.4.2 Self-referencing subselect with UPDATE/DELETE. . . . . . . . . . . . . . . 5 1.4.3 Online system parameters . . . . . . . . . . . . . . . . . . . . . . . . . . . . . . . . . 6 1.4.4 Scrollable cursors . . . . . . . . . . . . . . . . . . . . . . . . . . . . . . . . . . . . . . . . 6 1.4.5 MEMBER ID for sysplex scalability . . . . . . . . . . . . . . . . . . . . . . . . . . . 6 1.4.6 Realtime statistics . . . . . . . . . . . . . . . . . . . . . . . . . . . . . . . . . . . . . . . . 7 1.4.7 FETCH FIRST n ROWS . . . . . . . . . . . . . . . . . . . . . . . . . . . . . . . . . . . 7 1.4.8 Asynchronous preformatting . . . . . . . . . . . . . . . . . . . . . . . . . . . . . . . . 7 1.4.9 Catalog row-level locking . . . . . . . . . . . . . . . . . . . . . . . . . . . . . . . . . . 8 1.4.10 REORG enhancements . . . . . . . . . . . . . . . . . . . . . . . . . . . . . . . . . . 8 1.4.11 Statistics HISTORY . . . . . . . . . . . . . . . . . . . . . . . . . . . . . . . . . . . . . . 9 1.4.12 New monitoring indicators . . . . . . . . . . . . . . . . . . . . . . . . . . . . . . . . 10 1.5 DB2 Connect EE V7 database connectivity . . . . . . . . . . . . . . . . . . . . . . . 10 1.5.1 DB2 database connection types . . . . . . . . . . . . . . . . . . . . . . . . . . . . 11 1.5.2 DB2 Connect EE setup overview . . . . . . . . . . . . . . . . . . . . . . . . . . . 13 1.6 Siebel 7 database connection pooling. . . . . . . . . . . . . . . . . . . . . . . . . . . . 18 Chapter 2. Installing the Siebel 7 system environment . . . . . . . . . . . . . . . 21 2.1 System configuration . . . . . . . . . . . . . . . . . . . . . . . . . . . . . . . . . . . . . . . . . 22 2.1.1 Siebel 7 client tier . . . . . . . . . . . . . . . . . . . . . . . . . . . . . . . . . . . . . . . 22 2.1.2 Siebel 7 mid-tier . . . . . . . . . . . . . . . . . . . . . . . . . . . . . . . . . . . . . . . . 23 2.1.3 Siebel 7 database tier . . . . . . . . . . . . . . . . . . . . . . . . . . . . . . . . . . . . 23 2.2 z/OS security setup . . . . . . . . . . . . . . . . . . . . . . . . . . . . . . . . . . . . . . . . . . 24 2.2.1 RACF - userids and groups. . . . . . . . . . . . . . . . . . . . . . . . . . . . . . . . 25 2.2.2 DB2 UDB for z/OS and OS/390 authorization. . . . . . . . . . . . . . . . . . 25 2.3 DB2 for OS/390 and z/OS setup . . . . . . . . . . . . . . . . . . . . . . . . . . . . . . . . 26
© Copyright IBM Corp. 2003. All rights reserved.
iii
2.3.1 DSNZPARM values. . . . . . . . . . . . . . . . . . . . . . . . . . . . . . . . . . . . . . 26 2.3.2 Buffer pools and storage group . . . . . . . . . . . . . . . . . . . . . . . . . . . . . 28 2.3.3 DB2 objects for Siebel. . . . . . . . . . . . . . . . . . . . . . . . . . . . . . . . . . . . 28 2.3.4 Stored procedures. . . . . . . . . . . . . . . . . . . . . . . . . . . . . . . . . . . . . . . 29 2.4 Mid-tier setup. . . . . . . . . . . . . . . . . . . . . . . . . . . . . . . . . . . . . . . . . . . . . . . 29 2.4.1 AIX V5L configuration . . . . . . . . . . . . . . . . . . . . . . . . . . . . . . . . . . . . 29 2.4.2 SAMBA install and setup. . . . . . . . . . . . . . . . . . . . . . . . . . . . . . . . . . 30 2.4.3 HTTP Web server install and setup . . . . . . . . . . . . . . . . . . . . . . . . . 31 2.4.4 DB2 Connect EE V7.2 installation. . . . . . . . . . . . . . . . . . . . . . . . . . . 33 2.4.5 DB2 Connect Fix Pack 5s installation . . . . . . . . . . . . . . . . . . . . . . . . 37 2.4.6 DB2 Connect configuration . . . . . . . . . . . . . . . . . . . . . . . . . . . . . . . . 39 2.5 Installation of Siebel 7 servers . . . . . . . . . . . . . . . . . . . . . . . . . . . . . . . . . 40 2.5.1 Installation of Siebel 7 Gateway server . . . . . . . . . . . . . . . . . . . . . . . 40 2.5.2 Installation of Siebel 7 Application server . . . . . . . . . . . . . . . . . . . . . 43 2.5.3 Installation of Siebel 7 database scripts . . . . . . . . . . . . . . . . . . . . . . 53 2.5.4 Installation of Siebel 7 maintenance - 7.0.4.200 . . . . . . . . . . . . . . . . 55 2.5.5 Installation of Siebel 7 database schema . . . . . . . . . . . . . . . . . . . . . 55 2.5.6 Post-installation tasks . . . . . . . . . . . . . . . . . . . . . . . . . . . . . . . . . . . . 61 2.6 Installation of Siebel 7 Web server and extensions. . . . . . . . . . . . . . . . . . 62 2.6.1 Customizing the Siebel 7 Web server . . . . . . . . . . . . . . . . . . . . . . . . 66 2.7 Installation of Siebel 7 Web server maintenance - 7.0.4.200 . . . . . . . . . . 66 Chapter 3. Modifying the Siebel schema for a production environment . 67 3.1 Extracting a current storage control file . . . . . . . . . . . . . . . . . . . . . . . . . . . 68 3.2 Modifying the storage control file - table space partitioning . . . . . . . . . . . 69 3.2.1 Running the Siebel Database Configuration utility . . . . . . . . . . . . . . 69 3.2.2 Creating a backup table . . . . . . . . . . . . . . . . . . . . . . . . . . . . . . . . . . 72 3.2.3 Synchronize schema definition - produce a new schema file . . . . . . 72 3.2.4 Applying the schema changes . . . . . . . . . . . . . . . . . . . . . . . . . . . . . 74 3.2.5 Saving the storage control file . . . . . . . . . . . . . . . . . . . . . . . . . . . . . . 74 Chapter 4. Migration from development to the production system . . . . . 75 4.1 Running dev2prod . . . . . . . . . . . . . . . . . . . . . . . . . . . . . . . . . . . . . . . . . . . 76 4.2 Reviewing the schema file - applying the DDL to the production system . 85 4.3 Activating the repository imported from development . . . . . . . . . . . . . . . . 85 Chapter 5. Identifying and removing unused, non-unique indexes . . . . . 89 5.1 Why remove indexes . . . . . . . . . . . . . . . . . . . . . . . . . . . . . . . . . . . . . . . . . 90 5.2 Which indexes to remove . . . . . . . . . . . . . . . . . . . . . . . . . . . . . . . . . . . . . 90 5.3 Siebel functional areas of interest . . . . . . . . . . . . . . . . . . . . . . . . . . . . . . . 90 5.4 Identifying unused, non-unique indexes . . . . . . . . . . . . . . . . . . . . . . . . . . 91 5.4.1 In the EIM load process . . . . . . . . . . . . . . . . . . . . . . . . . . . . . . . . . . 91 5.4.2 In Siebel online . . . . . . . . . . . . . . . . . . . . . . . . . . . . . . . . . . . . . . . . . 92 5.4.3 Index identification procedure . . . . . . . . . . . . . . . . . . . . . . . . . . . . . . 92
iv
Siebel 7 with DB2 for z/OS: Database Implementation and Administration Guide
5.5 Inactivation of unused indexes . . . . . . . . . . . . . . . . . . . . . . . . . . . . . . . . . 94 Chapter 6. Partitioning method using DB2 utilities . . . . . . . . . . . . . . . . . . 97 6.1 Planning steps for partitioning Siebel tables . . . . . . . . . . . . . . . . . . . . . . . 98 6.2 Identifying candidate tables and partition columns . . . . . . . . . . . . . . . . . . 98 6.3 Planning for REXX procedures . . . . . . . . . . . . . . . . . . . . . . . . . . . . . . . . . 99 6.4 Unloading the tables . . . . . . . . . . . . . . . . . . . . . . . . . . . . . . . . . . . . . . . . 100 6.4.1 Reference table . . . . . . . . . . . . . . . . . . . . . . . . . . . . . . . . . . . . . . . . 100 6.4.2 Unloading the data . . . . . . . . . . . . . . . . . . . . . . . . . . . . . . . . . . . . . 101 6.5 Creating new tables with partitions . . . . . . . . . . . . . . . . . . . . . . . . . . . . . 102 6.6 Loading the tables . . . . . . . . . . . . . . . . . . . . . . . . . . . . . . . . . . . . . . . . . . 103 6.7 Reorganizing the tables. . . . . . . . . . . . . . . . . . . . . . . . . . . . . . . . . . . . . . 104 Chapter 7. Monitoring dynamic SQL . . . . . . . . . . . . . . . . . . . . . . . . . . . . . 105 7.1 Monitoring dynamic SQL in the DSC. . . . . . . . . . . . . . . . . . . . . . . . . . . . 106 7.1.1 DB2 PM Workstation Online Monitor tool . . . . . . . . . . . . . . . . . . . . 106 7.1.2 Explaining SQL statement from the cache . . . . . . . . . . . . . . . . . . . 109 7.1.3 Identifying inefficient SQL . . . . . . . . . . . . . . . . . . . . . . . . . . . . . . . . 112 7.1.4 Considerations on parameter markers . . . . . . . . . . . . . . . . . . . . . . 113 7.2 Siebel SQL tracing . . . . . . . . . . . . . . . . . . . . . . . . . . . . . . . . . . . . . . . . . 114 7.2.1 Object Manager. . . . . . . . . . . . . . . . . . . . . . . . . . . . . . . . . . . . . . . . 114 7.2.2 Dedicated Web client . . . . . . . . . . . . . . . . . . . . . . . . . . . . . . . . . . . 119 7.2.3 EIM performance considerations . . . . . . . . . . . . . . . . . . . . . . . . . . 119 Chapter 8. Monitoring the Siebel 7 database . . . . . . . . . . . . . . . . . . . . . . 121 8.1 DB2 installation considerations . . . . . . . . . . . . . . . . . . . . . . . . . . . . . . . . 122 8.1.1 Database objects . . . . . . . . . . . . . . . . . . . . . . . . . . . . . . . . . . . . . . 122 8.1.2 Free space . . . . . . . . . . . . . . . . . . . . . . . . . . . . . . . . . . . . . . . . . . . 124 8.1.3 EDM pool size . . . . . . . . . . . . . . . . . . . . . . . . . . . . . . . . . . . . . . . . . 124 8.1.4 Buffer pools . . . . . . . . . . . . . . . . . . . . . . . . . . . . . . . . . . . . . . . . . . . 125 8.2 DB2 statistics. . . . . . . . . . . . . . . . . . . . . . . . . . . . . . . . . . . . . . . . . . . . . . 126 8.2.1 Why collect statistics . . . . . . . . . . . . . . . . . . . . . . . . . . . . . . . . . . . . 126 8.2.2 What statistics should you gather for Siebel . . . . . . . . . . . . . . . . . . 126 8.2.3 Monitoring VSAM data set extents . . . . . . . . . . . . . . . . . . . . . . . . . 126 8.3 DB2 history statistics . . . . . . . . . . . . . . . . . . . . . . . . . . . . . . . . . . . . . . . . 127 8.3.1 Monitoring space growth . . . . . . . . . . . . . . . . . . . . . . . . . . . . . . . . . 128 8.3.2 Monitoring the rebuild of the compression dictionary . . . . . . . . . . . 129 8.4 DB2 realtime statistics . . . . . . . . . . . . . . . . . . . . . . . . . . . . . . . . . . . . . . . 129 8.5 Database reorganization . . . . . . . . . . . . . . . . . . . . . . . . . . . . . . . . . . . . . 130 8.6 Siebel-DB2 database recovery . . . . . . . . . . . . . . . . . . . . . . . . . . . . . . . . 132 8.6.1 Recovery to currency . . . . . . . . . . . . . . . . . . . . . . . . . . . . . . . . . . . 132 8.6.2 Disaster recovery . . . . . . . . . . . . . . . . . . . . . . . . . . . . . . . . . . . . . . 132 8.6.3 Point-in-time recovery . . . . . . . . . . . . . . . . . . . . . . . . . . . . . . . . . . . 133
Contents
v
Appendix A. DB2 parameters . . . . . . . . . . . . . . . . . . . . . . . . . . . . . . . . . . . 147 A.1 DSNZPARM values used for the Siebel 7 installation . . . . . . . . . . . . . . 148 Appendix B. Sample Siebel 7 generate DDL output . . . . . . . . . . . . . . . . 157 B.1 Sample generate DLL output . . . . . . . . . . . . . . . . . . . . . . . . . . . . . . . . . 158 Appendix C. Batch jobs for table space partitioning . . . . . . . . . . . . . . . . 167 C.1 Batch job used to create a backup table space . . . . . . . . . . . . . . . . . . . 168 C.2 Batch job used to create a partitioned table space . . . . . . . . . . . . . . . . . 171 Appendix D. REXX procedures for table space partitioning . . . . . . . . . . 177 D.1 Reference table . . . . . . . . . . . . . . . . . . . . . . . . . . . . . . . . . . . . . . . . . . . 177 D.2 Unload jobs and procedures . . . . . . . . . . . . . . . . . . . . . . . . . . . . . . . . . . 178 D.3 Load jobs and procedures . . . . . . . . . . . . . . . . . . . . . . . . . . . . . . . . . . . 194 Appendix E. REXX program for EXPLAIN . . . . . . . . . . . . . . . . . . . . . . . . . 205 Appendix F. Additional material . . . . . . . . . . . . . . . . . . . . . . . . . . . . . . . . . 211 Locating the Web material . . . . . . . . . . . . . . . . . . . . . . . . . . . . . . . . . . . . . . . 211 Using the Web material . . . . . . . . . . . . . . . . . . . . . . . . . . . . . . . . . . . . . . . . . 211 How to use the Web material . . . . . . . . . . . . . . . . . . . . . . . . . . . . . . . . . . 212 Related publications . . . . . . . . . . . . . . . . . . . . . . IBM Redbooks . . . . . . . . . . . . . . . . . . . . . . . . . . . . Other resources . . . . . . . . . . . . . . . . . . . . . . . . Referenced Web sites . . . . . . . . . . . . . . . . . . . . . . How to get IBM Redbooks . . . . . . . . . . . . . . . . . . . IBM Redbooks collections . . . . . . . . . . . . . . . . .
...... ...... ...... ...... ...... ......
....... ....... ....... ....... ....... .......
...... ...... ...... ...... ...... ......
. . . . . .
213 213 213 214 214 214
Index . . . . . . . . . . . . . . . . . . . . . . . . . . . . . . . . . . . . . . . . . . . . . . . . . . . . . . . 215
vi
Siebel 7 with DB2 for z/OS: Database Implementation and Administration Guide
Notices This information was developed for products and services offered in the U.S.A. IBM may not offer the products, services, or features discussed in this document in other countries. Consult your local IBM representative for information on the products and services currently available in your area. Any reference to an IBM product, program, or service is not intended to state or imply that only that IBM product, program, or service may be used. Any functionally equivalent product, program, or service that does not infringe any IBM intellectual property right may be used instead. However, it is the user's responsibility to evaluate and verify the operation of any non-IBM product, program, or service. IBM may have patents or pending patent applications covering subject matter described in this document. The furnishing of this document does not give you any license to these patents. You can send license inquiries, in writing, to: IBM Director of Licensing, IBM Corporation, North Castle Drive Armonk, NY 10504-1785 U.S.A. The following paragraph does not apply to the United Kingdom or any other country where such provisions are inconsistent with local law: INTERNATIONAL BUSINESS MACHINES CORPORATION PROVIDES THIS PUBLICATION "AS IS" WITHOUT WARRANTY OF ANY KIND, EITHER EXPRESS OR IMPLIED, INCLUDING, BUT NOT LIMITED TO, THE IMPLIED WARRANTIES OF NON-INFRINGEMENT, MERCHANTABILITY OR FITNESS FOR A PARTICULAR PURPOSE. Some states do not allow disclaimer of express or implied warranties in certain transactions, therefore, this statement may not apply to you. This information could include technical inaccuracies or typographical errors. Changes are periodically made to the information herein; these changes will be incorporated in new editions of the publication. IBM may make improvements and/or changes in the product(s) and/or the program(s) described in this publication at any time without notice. Any references in this information to non-IBM Web sites are provided for convenience only and do not in any manner serve as an endorsement of those Web sites. The materials at those Web sites are not part of the materials for this IBM product and use of those Web sites is at your own risk. IBM may use or distribute any of the information you supply in any way it believes appropriate without incurring any obligation to you. Information concerning non-IBM products was obtained from the suppliers of those products, their published announcements or other publicly available sources. IBM has not tested those products and cannot confirm the accuracy of performance, compatibility or any other claims related to non-IBM products. Questions on the capabilities of non-IBM products should be addressed to the suppliers of those products. This information contains examples of data and reports used in daily business operations. To illustrate them as completely as possible, the examples include the names of individuals, companies, brands, and products. All of these names are fictitious and any similarity to the names and addresses used by an actual business enterprise is entirely coincidental. COPYRIGHT LICENSE: This information contains sample application programs in source language, which illustrates programming techniques on various operating platforms. You may copy, modify, and distribute these sample programs in any form without payment to IBM, for the purposes of developing, using, marketing or distributing application programs conforming to the application programming interface for the operating platform for which the sample programs are written. These examples have not been thoroughly tested under all conditions. IBM, therefore, cannot guarantee or imply reliability, serviceability, or function of these programs. You may copy, modify, and distribute these sample programs in any form without payment to IBM for the purposes of developing, using, marketing, or distributing application programs conforming to IBM's application programming interfaces.
© Copyright IBM Corp. 2003. All rights reserved.
vii
Trademarks The following terms are trademarks of the International Business Machines Corporation in the United States, other countries, or both: AIX® AIX 5L™ CICS® DB2® DB2 Connect™ DRDA® FlashCopy® Hummingbird®
IBM® ^™ IMS™ MVS™ Netfinity® OS/390® Parallel Sysplex® QMF™
RACF® Redbooks™ Redbooks (logo)™ RS/6000® S/390® z/OS™ zSeries
The following terms are trademarks of other companies: Siebel and the Siebel Logo are trademarks of Siebel Systems, Inc., and may be registered in certain jurisdictions. ActionMedia, LANDesk, MMX, Pentium and ProShare are trademarks of Intel Corporation in the United States, other countries, or both. Microsoft, Windows, Windows NT, and the Windows logo are trademarks of Microsoft Corporation in the United States, other countries, or both. Java and all Java-based trademarks and logos are trademarks or registered trademarks of Sun Microsystems, Inc. in the United States, other countries, or both. C-bus is a trademark of Corollary, Inc. in the United States, other countries, or both. UNIX is a registered trademark of The Open Group in the United States and other countries. SET, SET Secure Electronic Transaction, and the SET Logo are trademarks owned by SET Secure Electronic Transaction LLC. Other company, product, and service names may be trademarks or service marks of others.
viii
Siebel 7 with DB2 for z/OS: Database Implementation and Administration Guide
Preface In this IBM® Redbook, we describe the implementation, customization, and administration of the Siebel 7 database with DB2® UDB for z/OS™ and OS/390® V7 using AIX® V5L or Win2000 Siebel Servers, and we discuss the following topics: Installation tasks for setting up a three-tier configuration, with the application middle tier residing on AIX/Win2000 and the database tier residing on z/OS. The DB2 Connect™ EE V7 setup required to connect the Siebel application server to the DB2 database on z/OS is also discussed. Customization of the Siebel schema for a production environment. Migration from a development system to a production system. Database administration tasks, including: – – – – – –
Identifying and inactivating unused indexes Table space partitioning Monitoring dynamic SQL Monitoring the Siebel 7 database Statistics gathering Reorg, backup, and recovery
The team that wrote this redbook This redbook was produced by a team of specialists from around the world working at the International Technical Support Organization, Poughkeepsie Center. Viviane Anavi-Chaput is a Senior IT Specialist for BI and ERP at the IBM ITSO Poughkeepsie Center. She writes extensively, teaches worldwide, and presents at international conferences on all areas of Business Intelligence and DB2 for OS/390. She was also an ITSO Specialist for DB2 at the San Jose Center from 1990 to 1994. Steve Baker is a Senior Technical Consultant for Baker Consultants Ltd. in the United Kingdom. He has 22 years of experience working with databases and middleware in a variety of environments including AIX, MVS™, and Linux. Steve's current focus is Siebel support, legacy system integration, and data migration.
© Copyright IBM Corp. 2003. All rights reserved.
ix
Richard Corrihons is a DB2 for z/OS Specialist with the IBM Products and Solutions Support Center (PSSC) in Montpellier, France. Richard specializes in customer proofs of concept and benchmarks mainly in the CRM and ERP areas. He holds an Electronic Engineering degree from the Conservatoire National des Arts et Metiers. Rich Dale is a Senior IT Specialist in the IBM Americas Data Management organization. He has been with IBM for 28 years and has extensive experience in DB2 on MVS, AIX, and Intel-based operating systems. He has specialized in Siebel systems running on DB2 since 1999. Lou Doran is a Consulting IT Specialist in the Americas e-business Technical Sales organization. He has 30 years of experience in the IT field, and has spent the last six years working with the ERP/CRM Solutions on the IBM ^™ zSeries with DB2. Debra Scott is a DB2 specialist working on the Technical Alliance Management team in the IBM Data Management Support & Services organization at Silicon Valley Lab in California. She has 15 years of experience in the field of IT, including DB2 for OS/390. Her current focus is on Siebel support and Technical Support Marketing for Siebel Data Management. Lee Siegmund is a Consulting Marketing Support Representative and Certified IT Specialist from the IBM DB2 Relational Support Unit of the IBM Dallas Systems Center. He has been with IBM for 33 years, and for the past 19 years he has supported DB2, from Version 1 Release 1 to the current Version 7. Xuan Nhut Tran is a lead DBA at Siebel Systems in California. He has 17 years of experience in IT, with extensive experience in DB2 for OS/390. His primary responsibilities are in the areas of high availability, performance, and disaster recovery. Marion Wilmot is a member of the Technical Support group at Siebel Systems in UK. She has many years of experience with database and mainframe technologies, including DB2 for OS/390. Thanks to the following people for their contributions to this project: Richard Conway, Vasilis Karras IBM International Technical Support Organization, Poughkeepsie, NY, USA Miguel de Andrade Siebel, Inc., UK Blaine Lucyk, Svetlana Sicular Siebel, Inc., CA, USA
x
Siebel 7 with DB2 for z/OS: Database Implementation and Administration Guide
James Guo, Eva Hu, Gopal Krishnan, Rick Levin, James Pickel, Hugh Smith, Annie Tsang, Yun Wang, Casey Young IBM Silicon Valley Laboratory, CA, USA Rick Kumar IBM Competency Center for Siebel, CA, USA Eric Cicchiello, Jean-Marc Darees, Stefano Delle Chiaie, Noel Richard IBM Products and Solutions Support Center (PSSC), Montpellier, France Namik Hrle, Norbert Jenninger IBM Boeblingen Laboratory, Germany Kent Burel, Franck Hatchett, Vincent Patruno, Jeff Wiese IBM IT Specialist, ATS and FTSS, USA Thanks also to Terry Barthel, Alison Chandler, and Alfred Schwab for their editorial assistance, and Ella Buslovich for her graphics assistance.
Become a published author Join us for a two- to six-week residency program! Help write an IBM Redbook dealing with specific products or solutions, while getting hands-on experience with leading-edge technologies. You'll team with IBM technical professionals, Business Partners and/or customers. Your efforts will help increase product acceptance and customer satisfaction. As a bonus, you'll develop a network of contacts in IBM development labs, and increase your productivity and marketability. Find out more about the residency program, browse the residency index, and apply online at: ibm.com/redbooks/residencies.html
Comments welcome Your comments are important to us! We want our Redbooks™ to be as helpful as possible. Send us your comments about this or other Redbooks in one of the following ways: Use the online Contact us review redbook form found at: ibm.com/redbooks
Preface
xi
Send your comments in an Internet note to:
[email protected]
xii
Siebel 7 with DB2 for z/OS: Database Implementation and Administration Guide
Mail your comments to: IBM Corporation, International Technical Support Organization Dept. HYJ Mail Station P099 2455 South Road Poughkeepsie, NY 12601-5400
Preface
xiii
xiv
Siebel 7 with DB2 for z/OS: Database Implementation and Administration Guide
1
Chapter 1.
Overview of Siebel 7 with DB2 for z/OS database In this section we give an overview of Siebel 7 architecture and introduce the implementation tasks and administration issues to consider. We also summarize DB2 V7 enhancements used by Siebel 7. Overview of Siebel 7 architecture, implementation and administration DB2 for z/OS V7 functions used by Siebel 7 Siebel 7 database connectivity overview
© Copyright IBM Corp. 2003. All rights reserved.
1
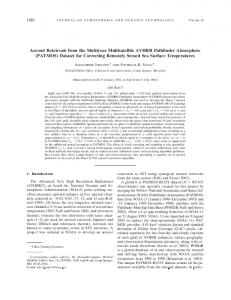
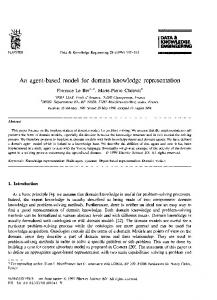
1.1 Siebel 7 system architecture overview Figure 1-1describes Siebel 7 system architecture on IBM AIX and DB2 UDB for z/OS and OS/390. Siebel Client
Application Servers
Siebel Server Manager
Siebel Web Siebel Clients Mobile Clients
Siebel Application Server
AIX
DB2 UDB for z/OS and OS/390
Database Connector Database Connector DB2 Connect EE DB2 Connect EE
Siebel Gateway Server
Siebel Web Siebel Web Server/IHS on Server AIX IHS on AIX
Client connector Resonate
Siebel Tools
Siebel Web Siebel Clients Web Clients
Database Server
Siebel Data Siebel Repository
Siebel Application Definitions
Siebel Tools DB2 Connect PE
Figure 1-1 Siebel 7 system architecture on IBM AIX and DB2 UDB for z/OS and OS/390
For its client connectivity, Siebel uses Resonate as a distributor of messages received from the Web gateway servers to the application servers via the Siebel gateway. For its database connectivity, Siebel uses the DB2 Connect Enterprise Edition (EE) database connector to connect the application server to the database server on DB2 UDB for z/OS and OS/390. DB2 Connect EE servers provide transparent database connections for many simultaneous requests from application servers. Using connection concentrator (also called transaction pooling), DB2 Connect EE provides connection load balancing to the DB2 data sharing group in a Parallel Sysplex® configuration, as well as failover routing in case of failure of a sysplex member.
2
Siebel 7 with DB2 for z/OS: Database Implementation and Administration Guide
This book focuses on Siebel 7 database implementation with DB2 for z/OS and OS/390, including connectivity to the DB2 database using DB2 Connect EE V7. We also discuss DB2 database administration issues in the context of Siebel 7.
1.2 Siebel 7 database implementation overview The following sections of the book describe Siebel 7 installation using the AIX V5/Windows 2000 application server and DB2 for z/OS and OS/390 V7 database on series, which is the most popular three-tier configuration implemented for Siebel with a database on IBM ^™ zSeries. Siebel 7 basic three-tier installation is described in Chapter 2, “Installing the Siebel 7 system environment” on page 21. We describe the client-tier, mid-tier, and database-tier implementations. Schema modifications done after the basic installation are described in Chapter 3, “Modifying the Siebel schema for a production environment” on page 67. For this exercise, we show how to partition tables that were originally created as non-partitioned during Siebel 7 basic installation. We discuss partitioning techniques for small and large tables. Migrating schema modifications from development to production is described in Chapter 4, “Migration from development to the production system” on page 75.
1.3 Siebel 7 database administration overview The administration sections of the book consider the major database administration issues a DBA will have to handle in the context of Siebel 7 using DB2 on zSeries. Partitioning techniques for small and large tables are described in Chapter 3, “Modifying the Siebel schema for a production environment” on page 67. Managing unused indexes is described in Chapter 5, “Identifying and removing unused, non-unique indexes” on page 89. Dynamic SQL tuning and monitoring are described in Chapter 7, “Monitoring dynamic SQL” on page 105. DB2 database administration issues are described in Chapter 8, “Monitoring the Siebel 7 database” on page 121, including: – Initial tuning of DB2 objects and subsystem parameters
Chapter 1. Overview of Siebel 7 with DB2 for z/OS database
3
– How to collect and use DB2 statistics to monitor the database environment – Database reorganization – Database backup and recovery techniques We gathered many application and SQL tuning recommendations at the IBM zSeries Benchmark Centers in Montpellier, France, based on lessons learned from the proof of concept and performance benchmarks they run for Siebel customers. We consulted the DB2 Silicon Valley Laboratory to get their recommendations for the initial tuning of the DB2 database for optimal performance with Siebel applications. Those recommendations were based on the performance benchmarks the DB2 Lab runs specifically for the Siebel-DB2 database. Finally, we had excellent support from Siebel developers, expert services, and system administrators to constantly fuel the project with the best practices they would recommend to technical professionals having to implement, customize, tune and monitor a Siebel-DB2 environment—they are all documented in this book! Before discussing Siebel 7 database implementation and administration, however, we first introduce the new features of DB2 for z/OS and OS/390 that benefit Siebel 7. Understanding these enhancements will help you to understand the implementation options and administration decisions suggested and explained further in this book.
1.4 DB2 for z/OS V7 functions that benefit Siebel 7 DB2 V7 brings several enhancements used by Siebel 7. The following describes the DB2 V7 functions that are beneficial to Siebel on z/OS and OS/390:
4
Correlated subquery for UPDATE joins Self-referencing subselect with UPDATE/DELETE Online system parameters Scrollable cursors MEMBER-ID for sysplex scalability Realtime statistics FETCH FIRST N ROWS Asynchronous preformatting Catalog row-level locking REORG enhancements Statistics HISTORY New monitoring indicators
Siebel 7 with DB2 for z/OS: Database Implementation and Administration Guide
In the following sections, we explain these in more detail and offer examples of usage.
1.4.1 Correlated subquery for UPDATE joins Application systems, such as Siebel, require certain stage 2 subquery predicates to be transformed into join operations. The requirement is for UPDATE, DELETE, and SELECT queries with IN, =ANY, or EXISTS subquery predicates that are currently evaluated as stage 2 predicates. By transforming the query into a join of the outer query table and the subquery table, DB2 can significantly improve performance in many cases because it can choose the most efficient join order for the tables. Users can rewrite SELECT statements of this type as joins in some cases, but they cannot do the same for UPDATE or DELETE.
Example UPDATE T1 A SET A.C1 = 1 WHERE A.C2 IN (SELECT B.C2 FROM T2 B WHERE A.C3 = B.C3);
Siebel applications greatly benefit from this enhancement. The transaction router, EIM, and some client SQL use this function.
1.4.2 Self-referencing subselect with UPDATE/DELETE Allow DB2 UPDATE/DELETE FROM TABLE with a subselect from the same table.
Example 1 Give each employee whose salary is below the average a salary increase of 10%. UPDATE EMP X SET SALARY * 1.10 WHERE SALARY < (SELECT AVG(SALARY) FROM EMP Y WHERE X.WORKDEPT = Y.WORKDEPT);
Example 2 For each department, delete the employee with the most absences. DELETE FROM EMP X WHERE ABSENT = (SELECT ABSENT = (SELECT MAX(ABSENT) FROM EMP Y WHERE X.WORKDEPT = Y.WORKDEPT);
Chapter 1. Overview of Siebel 7 with DB2 for z/OS database
5
This enhancement makes SQL in DB2 more powerful, thus reducing the need for temporary tables and application programming. Siebel's EIM import and delete use this function.
1.4.3 Online system parameters DB2 V7 makes it possible to change the subsystem parameters dynamically when DB2 is currently up. The new -SET SYSPARM command allows the reloading of the DSNZPxxx (subsystem parameters) load module. With previous DB2 versions, you had to stop Siebel application servers to recycle (stop and start) DB2, and then restart Siebel application servers, in order to take the new subsystem parameters into account. This is not needed with DB2 V7. Thus, this function provides more availability and flexibility to Siebel applications. Use the DB2 command SET SYSPARM to change the system parameters values.
1.4.4 Scrollable cursors Scrollable cursors provide application programs with a mechanism to have random access to a result table with simple SQL and simple logic. Scrollable cursors are most useful to screen-based applications in which the user scrolls backwards and forwards through the data. Previous DB2 versions provided forward-only cursors, which force screen-based applications to cache the result table locally and perform scrolling themselves. Alternatively, to access a previously fetched row, applications had to close the cursor, reopen the cursor, and fetch forward until the desired row was fetched. The scrollable cursors provide a solution that enables applications to use a powerful new set of SQL to fetch data via cursor in random order—with optimal performance, no extra cache requirements in the application, and simple logic, while also providing a means to indicate whether the fetched row must be current.
1.4.5 MEMBER ID for sysplex scalability The sysplex MEMBER ID is now utilized by Siebel 7 for partitioning transaction logging table S_DOCK_TXN_LOG so the logging will take place on the same member of the data sharing group. This is beneficial for Siebel remote mobile users because all transactions are being logged and stored in the S_DOCK_TXN_LOG table for the mobile users’ synchronization.
6
Siebel 7 with DB2 for z/OS: Database Implementation and Administration Guide
Siebel table S_DOCK_TXN_LOG is used to keep track of all changed records for Siebel 7 remote mobile users. Note that, by default, transaction logging is ON. If the user is not using remote mobile users, this table is not used and the logging activity should be disabled by turning Siebel Transaction logging OFF.
1.4.6 Realtime statistics Most DBA operations are triggered by analyzing catalog statistics collected and updated by RUNSTATS. However, this approach gives no indication when RUNSTATS itself should be run, so the statistics can quickly become outdated and misleading. The realtime statistics tables and standard catalog tables include new columns that should be used when deciding when a table space or index needs reorganization:
Number of extents Number of data sets Number of pseudo-deleted index entries Number of near-off and far-off index page splits
An index split page is considered “near-off” the present page if the difference is less than 16, and “far off” if the difference is 16 or more. If 10 percent of all pages are near-off or far-off, consider performing an index reorg.
1.4.7 FETCH FIRST n ROWS The new FETCH FIRST n ROWS option speeds up fetch processing in cases in which the number of rows that need to be fetched is known in advance. Another usage is to check if a table is empty. Use the following query: SELECT 1 FROM TAB FETCH FIRST 1 ROW.
Unless explicitly specified, OPTIMIZE FOR n ROWS is implied.
1.4.8 Asynchronous preformatting Prior to DB2 V7, mass insert processing is affected by space preformatting. Namely, when the formatted space is exhausted, a synchronous task for formatting the additional space is scheduled. Inserts must wait until this task completes its processing. During heavy insert processing, these situations can appear often and significantly slow down the overall process.
Chapter 1. Overview of Siebel 7 with DB2 for z/OS database
7
With DB2 V7, the preformatting is an asynchronous process that gets triggered before the formatted space is exhausted. When a new page for insert is close to the end of formatted pages and there is more allocated and unformatted space in the data set, an asynchronous format task will format the next range of pages. This will ensure that insert rarely has to wait for the page to be formatted. Additionally, the space search performance is improved because the search will not happen at each logical extent, but only at each physical extent. This feature is internal to DB2, and no user specification is needed.
1.4.9 Catalog row-level locking Earlier DB2 versions do not allow ALTER LOCKSIZE against catalog table spaces. In most cases, the catalog table spaces use page-level locking and that can create lock contention, especially during massive, parallel DDL executions. In DB2 V7, ALTER TABLESPACE LOCKSIZE is supported for table spaces of the DB2 catalog that do not contain links—all the table spaces except SYSDBASE, SYSPLAN, SYSVIEWS, SYSDBAUT, and SYSGROUP. Attempts to ALTER TABLESPACE LOCKSIZE for one of those table spaces still returns the SQL code -607.
1.4.10 REORG enhancements DB2 V7 brings the following REORG enhancements.
Avoid data set renames in the switch phase Before DB2 V7, online REORG tried to fully preserve the underlying data set names for table space and indexspaces via a series of AMS RENAMEs that took place during the REORG switch phase. But this process can cause significant contention in the system because the duration of the switch phase (during which the object being reorganized cannot be accessed) is directly proportional to the number of underlying data sets. At least one data set exists for each table space and each index. With DB2 V7, you can avoid data set renames in the switch phase. The fifth data set qualifier (called the instance node) changes from a fixed value (I0001) to a variable value alternating between I0001 and J0001. In the UTILINIT phase, if the original object's instance node starts with an “I”, the shadow object's instance node starts with a “J”, and vice versa. In the switch phase, the catalog is updated (the IPREFIX column in SYSTABLEPART and SYSINDEXPART), and the shadow object becomes the active object. In the UTILTERM phase, the original object is deleted.
8
Siebel 7 with DB2 for z/OS: Database Implementation and Administration Guide
Specifying the FASTSWITCH option on the REORG statement activates the new no-rename behavior in the REORG switch phase.
REORG timeout and drain retry options Before DB2 V7, the timeout value for REORG was at least equal to the value specified as the transactions timeout. It was calculated as a product of the system parameters IRLMRWT (the transactions timeout value) and UTIMOUT, the utility timeout factor (greater or equal to 1) that allows REORG to wait longer for a resource than a regular statement would. In DB2 V7, the new REORG option DRAIN_WAIT (with possible values of 1 to 1,800 seconds) specifies how long REORG will wait to acquire drains. (Draining is a mechanism used to take over an object and serialize access to it.) The new option applies to drains in the UNLOAD, LOG, and SWITCH phases. When multiple objects need draining (for example, a table space and its index), the DRAIN_WAIT value is the aggregate time. Use the DRAIN_WAIT option in conjunction with the new retry logic that preserves REORG processing done before DRAIN_WAIT was exhausted. Otherwise, after a timeout, the REORG process would terminate without accomplishing anything. With the retry logic, the failed draining can be periodically retried. The new option RETRY_DELAY specifies how long REORG will wait before retrying the failed drain process. Another option, RETRY, specifies how many times this whole cycle would be repeated. During the RETRY_DELAY period, online transactions continue to access the data. REORG will have more opportunities (RETRY times) to drain the resources and complete successfully. If the switch phase drain fails, online REORG will go back into the log apply phase, allowing the writers to resume. After the RETRY_DELAY time, writers will have to be drained again, followed by the last log apply phase and, finally, a readers drain.
1.4.11 Statistics HISTORY DB2 V7 RUNSTATS includes a new option, HISTORY. If specified, every time the corresponding catalog tables are inserted or updated, the following fields are copied to the new catalog history tables: SYSCOLDIST_HIST, SYSCOLUMNS_HIST, SYSINDEXES_HIST, SYSINDEXPART_HIST, SYSINDEXSTATS_HIST, SYSLOBSTATS_HIST, SYSTABLEPART_HIST, SYSTABLES_HIST, and SYSTABSTATS_HIST.
Chapter 1. Overview of Siebel 7 with DB2 for z/OS database
9
Data can now be stored in the DB2 catalog on a historical basis that will enable you to do trend analysis. When RUNSTATS stores new information in the DB2 catalog tables, it will also store that information in the DB2 Version 7 catalog history tables, so that the catalog will hold the current statistics, and the catalog history tables will hold historical (including current) statistics. The MODIFY STATISTICS command will be used to delete the outdated statistics in the history tables. This results in preserving the relevant statistics data across multiple RUNSTATS executions, creating a basis for monitoring the database object growth and providing assistance in determining optimal allocation quantities. Additionally, the historical data could be used for reinstating old catalog statistics in case of access-path degradation. RUNSTATS can run from the Siebel server, or natively.
1.4.12 New monitoring indicators New performance indicators for faster identification of potential tuning areas include: Improved accounting class 3 granularity for data sharing global contention for locks. The “global contention for locks” bucket is broken out into six separate buckets: Parent L-lock; Child L-lock; other L-lock; Pageset/partition P-lock; Page P-lock; other P-lock. Page P-lock counters reported at the group bufferpool (GBP) level for accounting and statistics. Because page P-locks are such a critical performance factor in data sharing environments, reporting the P-lock activity at the GBP level will enable more effective monitoring and tuning of P-locking activity. The new indicators include page P-locking requests, suspensions, and negotiations for space map pages, data pages, and index leaf pages. Number of times pages are added to the logical page list per buffer pool. Internal resource lock manager settings such as PC, DEADLOCK time, and cycle and actual TIMEOUT are now available via IFI. Faster detection of lock conflicts in the system. Synchronizing DB2 statistics trace across data sharing members (system parameter SYNCVAL).
1.5 DB2 Connect EE V7 database connectivity We describe, in this section, the DB2 Connect EE V7.2 database connectivity options you have between the application server and the DB2 for z/OS V7 data
10
Siebel 7 with DB2 for z/OS: Database Implementation and Administration Guide
sharing environment on z/OS. We also describe the new DB2 Connect EE V7 functions available for building connections between the Siebel application server and the DB2 database on z/OS.
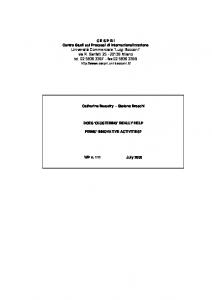
1.5.1 DB2 database connection types Figure 1-2 provides an overview of the different types of DB2 database connections.
Dedicated connection App Server1
App Server2
DB2 Connect EE Dedicated connection
DB2 Connect EE Sysplex aware connections
DB2 V7 D7R1
DB2-Siebel db
DB2 V7 D7R2
Sysplex-aware connection DB2-Siebel db App Server3
DB2 Connect EE
Transaction Pool
DB2 V7 D7R2
Connection concentrator (or Transaction pooling)
Figure 1-2 DB2 database connection types
Now let’s discuss the following connection types in some detail: Dedicated connections Sysplex-aware connections Connection concentrator also called transaction pooling
Dedicated connections Prior to connection concentrators, each time a client needed a connection to DB2, an agent task would be created on the DB2 Connect EE server. This agent serviced the client’s connection requests to DB2 until the client issued a disconnect. During the entire connection time, all system resources (for example, CPU and memory) are tied up until disconnect occurs, regardless of whether or not the client is actively using the target DB2 database. All connection requests from a given application server are always routed to the same DB2 member. This is reflected in the example of App Server1, in Figure 1-2 on page 11, which is configured to always connect to D7R1.
Chapter 1. Overview of Siebel 7 with DB2 for z/OS database
11
Sysplex-aware connections Connection requests coming from a given application server can be handled more intelligently. When DB2 Connect EE is sysplex-aware, requests can be routed to any available DB2 data sharing group member. The most suitable member gets the connection. DB2 Connect EE in this case is aware of the sysplex and data sharing configuration, and receives information from both DB2 and Workload Manager (WLM) to enable connection load balancing between the members of the data sharing group. DB2 Connect EE receives this information at the creation of each new connection. This is the example shown for App Server2, in Figure 1-2 on page 11, whose database connection requests can go either to D7R1 or D7R2.
Connection concentrator (or transaction pooling) DB2 Connect EE V7 uses connection concentrator (which is also called transaction pooling). This technique provides reuse of DB2 Connect server agents, and avoids repeated connect/disconnect processing. In this case, after a client commits, DB2 Connect EE leaves the agent task with its corresponding host connection in place. When another client connection request is received, DB2 Connect EE checks to see if there is a free pooled agent task available. If there is, DB2 Connect EE then signs on the new user over the existing host connection, and processing continues from there with a lower cost than a full sign-on. The example of App Server3 in Figure 1-2 on page 11 illustrates connection concentrator. DB2 Connect EE V7 connection concentrator provides improved load balancing in sysplex data sharing configurations. When DB2 Connect EE is accessing DB2 data sharing groups in connection concentrator mode, it is frequently receiving sysplex status information on the members of the group. DB2 Connect EE uses this information to continually balance the number of connections it has to each member of the group, as well as to determine to which member a client's next transaction should be routed. The main benefit of the connection concentrator is that when a connection drops, only those logical agents that are processing transactions in the failed data sharing group member experience difficulty; all other clients remain connected to DB2 or continue their transactions via other members of the data sharing group as identified in the server list. Connection concentrator is not recommended by Siebel.
12
Siebel 7 with DB2 for z/OS: Database Implementation and Administration Guide
1.5.2 DB2 Connect EE setup overview It is important to have a good naming convention defined for the DB2 data sharing group components because after installation, some names (such as the group name and member names) cannot be changed. In the mid-tier AIX environment where the DB2 Connect EE setup takes place, the same consideration should be applied to the DB2 Connect EE catalog entries and ODBC settings used. To avoid confusion, it is best to use the same names defined at the z/OS level platform whenever possible. The DB2 and Siebel component names we used for this discussion are as follows: ClientA ClientB DB7R wtsc04oe.itso.ibm.com D7R1
First Siebel application server (AIX) Second Siebel application server (AIX) DB2 location name (z/OS) First host name (z/OS) DB2 data sharing group member on z/OS host wtsc04oe.itso.ibm.com wtsc67oe.itso.ibm.com Second host name (z/OS) D7R2 DB2 data sharing group member on z/OS host wtsc67oe.itso.ibm.com Table 1-1 shows the DB2 database manager configuration parameters which need to be set for the DB2 Connect EE instance.
Table 1-1 Database manager configuration parameters Parameter
Description
Setting
RQRIOBLK
Maximum size network I/O blocks
32767
DIR_CACHE
Cache directory information
YES
DRDA_HEAP_SZ
DRDA® heap size
512
MON_HEAP_SZ
Database system monitor heap size
1024
A Siebel component parameter named OM Read Config from Server for the Object Manager should be set to False. When set to True, settings are taken from the Siebel Enterprise Server and settings from Siebel configuration files are ignored. With the Siebel application server using DB2 Connect agents, we must pass SQL to DB2 agents in DB2 Connect by using the following command: db2set DB2CONNECT_IN_APP_PROCESS=NO
Chapter 1. Overview of Siebel 7 with DB2 for z/OS database
13
This tells DB2 Connect EE to use DB2 connection agents and reference the DB2 database manager configuration for parameter settings. The traditional DB2 API establishes connectivity to DB2 directly via application executables. For example, when we write a traditional COBOL program to access DB2, the DB2 API is used. The program is built and the executable module communicates directly with DB2. The DB2 Connect is in the application process. DB2CONNECT_IN_APP_PROCESS=YES represents this situation.
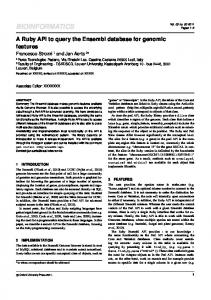
Dedicated connections setup This option is the simplest form of DB2 connection between Siebel Application Servers and the DB2 database. Each Siebel application server client uses a dedicated DB2 Connect EE (real agent). The real agent references a dedicated data sharing group member to gain access to the shared database. Figure 1-3 on page 15 illustrates a dedicated connection. The Siebel App Server Client A uses DB2 connection (DB7R) to access the z/OS database (location DB7R) via the data group member D7R1 on host wtsc04oe.itso.ibm.com, port 33750. The Siebel App Server Client B uses DB2 connection (DB7R) to access the z/OS database (location DB7R) via the data group member D7R2 on host wtsc67oe.itso.ibm.com, port 33750. The DB2 connection is named DB7R on each instance of DB2 Connect EE to reference the physical database. This is a convention; the names could be anything.
14
Siebel 7 with DB2 for z/OS: Database Implementation and Administration Guide
A IX
A IX
S ie b e l A p p S e rv e r C lie n t B
S ie b e l A p p S e rv e r C lie n t A
R eal Agent DB7R
D B 2 C onnect E E
R eal Agent DB7R
D e d ic a te d c o n n e c tio n s
d 7 r1 w ts c 0 4 o e .its o .ib m .c o m (p o rt 3 3 7 5 0 )
d 7 r2 w ts c 6 7 o e .its o .ib m .c o m (p o rt 3 3 7 5 0 )
D B 2 fo r z /O S a n d O S /3 9 0 L o c a tio n D B 7 R
Figure 1-3 Dedicated connections
The DB2 Connect setup for dedicated connections is as follows: The DB2 registry variable DB2CONNECT_IN_APP_PROCESS must be disabled (do not set it to NO, for example, because you would be wasting memory and consuming extra CPU for no benefit). As db2admin on the Siebel Client A machine, use DB2 Connect EE to issue catalog entries: catalog tcpip node d7r1 remote wtsc04oe.itso.ibm.com server 33750
Note: The port number (33750) must match the port number defined for the data group member. This must be the same for all DB2 hosts defined to all environments participating in data sharing. We have named the node d7r1 to match the data group member; this is a convention, but not required. catalog dcs db db7r as db7r
Note: The first DB7R names the dcs db and can be any name you wish; the second must reference the DB2 location for the z/OS database. catalog db db7r as db7r at node d7r1 authentication dcs
Chapter 1. Overview of Siebel 7 with DB2 for z/OS database
15
As db2admin, connect to DB2 for z/OS and bind the utilities and applications connect to db7r bind $HOME/bnd/@ddcsmvs.lst blocking all grant public
As db2admin on the Siebel client B machine, use DB2 Connect EE to issue catalog entries: catalog tcpip node d7r2 remote wtsc67oe.itso.ibm.com server 33750 catalog db db7r as db7r at node d7r2 authentication dcs catalog dcs db db7r as db7r
This configuration has no load balancing capability. Every Siebel process or user that is routed through Siebel App Server Client A will access DB2 via its connection through data sharing group member d7r1. App Server Client B will access DB2 via its connection through data sharing group member d7r2. This configuration has no failover possibilities, either. If a member fails, all connections routed through this member will also fail.
Sysplex-aware connections setup The configuration for this option is the same as a dedicated connection, except the catalog command includes the “sysplex” parameter. This syntax makes the catalog entry “sysplex-aware”. catalog tcpip node d7r2 remote wtsc67oe.itso.ibm.com server 33750 catalog db db7r as db7r at node d7r2 authentication dcs catalog dcs db db7r as db7r parms ‘,,,,,sysplex’
Sysplex-aware means that DB2 Connect EE gets sysplex information and is capable of load balancing the connections between the different members of the data sharing group participating in the sysplex configuration. Also, the DB2 registry variable DB2CONNECT_IN_APP_PROCESS must be enabled and set to NO if local processes to the DB2 Connect EE server code want to be sysplex-aware. Figure 1-4 illustrates a dedicated and a sysplex-aware connection.
16
Siebel 7 with DB2 for z/OS: Database Implementation and Administration Guide
A IX
A IX
S iebe l App S erv er C lient A
R eal Agent D B 7R
S iebel A pp S erver C lient B
D B 2 C o nn e ct E E
R eal Agen t DB 7R S ysplex-aw a re co n n ectio n s
D e dicate d con n e ction
d7r1 w tsc04oe.itso.ibm .com (port 33750)
d7r2 w tsc67oe.itso.ibm .com (port 33750)
D B 2 for z/O S and O S /390 Location D B 7R
Figure 1-4 Dedicated connection and sysplex-aware connection
Client B has two host connections. When the Siebel Client B requests information from the database DB7R, DB2 Connect EE has the choice of using data sharing group member D7R1 or D7R2 to access the database. Siebel Client A is not aware of sysplex, and all connect activity is accommodated by data sharing group member D7R1. When Client B initially contacts DB7R, it is passed a listing of all connections available for use from the Workload Manager (WLM). The Workload Manager has technology in the z/OS environment for maintaining a list of servers in a ready state. The Workload Manager also sets weights for each server according to configurable policies like workload and capacity. The sysplex routes requests between datasharing group members according to these policies; refer to OS/390 Workload Manager Implementation and Exploitation, SG24-5326, for details. When this facility is used, the hostname defined in the catalog tcpip node... command establishes the primary data sharing group member for the connection. If this connection fails, or if the data sharing group member is otherwise unavailable, then the connection fails and cannot be reestablished until these are reinstated.
Chapter 1. Overview of Siebel 7 with DB2 for z/OS database
17
Connection concentrator setup In order to use connection concentrator (or transaction pooling), the DB2 registry variable DB2CONNECT_IN_APP_PROCESS must be set to NO. Table 1-2 lists the DB2 Connect parameters to define connection concentrator. Table 1-2 Database manager configuration parameters for connection concentrator Parameter
Description
Setting
MAX_LOGICAGENTS (new parm for transaction pooling)
Maximum number of logical agents
Set to maximum application client agents
MAXAGENTS
Maximum number of worker agents
Concurrent connections to DB2 for z/OS
NUM_POOLAGENTS
Maximum number of idle pool agents
Concurrent connections to DB2 for z/OS
MAX_COORDAGENTS
Maximum number of coordinating agents
Concurrent connections to DB2 for z/OS
Normally, MAX_LOGICAGENTS is set to the number of Siebel clients, and the other three parameters are set to the number of connections to DB2. The MAXAGENTS, MAX_COORDAGENTS, and NUM_POOLAGENTS should all be the same; this is the number of real agents that are retained in the pool.
1.6 Siebel 7 database connection pooling Siebel 7 connection pooling (Database Connection Multiplexing) saves the overhead of opening and closing a new connection for every query. If you do not enable this option, each query sent to the underlying database will open a new connection. To allow a single database connection to remain open for the specified time for use by future query requests, Siebel connection pooling must be enabled. Siebel recommends a ratio of 10 users per database connection. In other words, set the three DB Multiplex settings to number of concurrent users/10. This is also assuming 30-second think time between user operations. Adjust the ratio proportional to the actual user think time for a particular implementation. Set the parameters MinSharedDbConns, MaxSharedDbConns, MinTrxDbConns for each component, using srvrmgr to /10.
18
Siebel 7 with DB2 for z/OS: Database Implementation and Administration Guide
Table 1-3 Siebel database connection multiplex settings Parameter
Description
Setting
MinTrxDbConns
Minimum number of dedicated database connections
Minimum number of dedicated database connections used for write/update/delete operations
MinSharedDbConns
Minimum number of shared database connections
Minimum number of shared database connections used for read-only operations
MaxSharedDbConns
Maximum number of shared database connections
Maximum number of shared database connections used for read-only operations
For example, set the DBConn parameters to 100 for 1000 users, using a ratio of 10 users/DbConns. To disable database connection pooling, set parameters back to -1. For more information on setting up Siebel database connection pooling, refer to Technical Note 388: How to configure Siebel Object Manager (SOM) in Siebel 7 on Siebel Support Web.
Chapter 1. Overview of Siebel 7 with DB2 for z/OS database
19
20
Siebel 7 with DB2 for z/OS: Database Implementation and Administration Guide
2
Chapter 2.
Installing the Siebel 7 system environment In this chapter, we describe the installation tasks required for Siebel 7 using AIX V5L application servers and a DB2 UDB for z/OS and OS/390 V7 database server. The z/OS environment was a Parallel Sysplex, and we used a two-member DB2 data sharing group. We considered this system to be our “development” environment. This chapter discusses the following: System configuration z/OS security setup DB2 UDB for z/OS and OS/390 V7 setup Mid-tier setup Installation of Siebel 7 servers Installation of Siebel 7 Web clients Validation of Siebel 7 database
© Copyright IBM Corp. 2003. All rights reserved.
21
2.1 System configuration Figure 1-1outlines the configuration we used at the ITSO for the installation of Siebel 7.
DB2 Connect PE
IBM G6
Mobile client Fast Ethernet
Parallel Sysplex-
RS/6000 S7A AIX V5L
LPAR1 - SC04 z/OS 1.2
SIEBEL 704
Web client Fast Ethernet
H T T P
XCF XCF
LPAR2 - SC67 z/OS 1.2
DB2 V7 D7R1
DB2 V7 D7R2
DB2 V7 D7U1
DB2 V7 D7R2
DB2 Connect EE
File System
GBit Ethernet
SAMBA
DB2-Siebel db Development DSG1 (DB7R)
DB2-Siebel db Production DSG2 (DB7U)
Figure 2-1 ITSO system configuration
2.1.1 Siebel 7 client tier The Siebel 7 client tier includes two types of clients, with the following hardware and software.
Siebel 7 Web client Hardware – Netfinity® A40 PIII 1.0 GHz processor Software – Windows 2000 - Service Pack 3 – IE5.5 Service Pack 2 – JVM3805, QFE Q303750 and QFE Q320721
22
Siebel 7 with DB2 for z/OS: Database Implementation and Administration Guide
Siebel 7 Tools Client Hardware – Netfinity A40 PIII 1.0 GHz processor Software – – – –
Windows 2000 - Service Pack 3 IE5.5 Service Pack 2 JVM3805, QFE Q303750 and QFE Q320721 DB2 Connect PE V7.2 Fix Pack 5s or DB2 V7.2 Runtime Client Fix Pack 5s with an available DB2 Connect EE V7.2 Gateway Server
2.1.2 Siebel 7 mid-tier The Siebel 7 mid-tier includes the following. Hardware – RS/6000® S7A with 2 GB Memory, (3) 18.2 GB Drives, (2) 9.1 GB Drives, and a 1 Gb Enet Adapter Software – – – – – – – –
AIX 5.1.0.25 (Siebel requires minimum maintenance level 1) Samba 2.2.3a IBMIHS 2.0.30 with Siebel 7 Web Server Plug-in DB2 Connect EE V7.2 Fix Pack 5s Siebel 7 Gateway Server (minimum patch level 7.0.4.100) Siebel 7 Enterprise Server (minimum patch level 7.0.4.100) Siebel 7 Application Server (minimum patch level 7.0.4.100) Siebel 7 Web Server Extension (minimum patch level 7.0.4.100)
2.1.3 Siebel 7 database tier The DB2 UDB for z/OS and OS/390 environment includes the following: Hardware – – – – –
9672-x77 G6 (two LPARs) 1 Gb OSA Adapter 6 GB DASD Sysplex environment Cross-System Coupling Facility (XCF)
Software – z/OS 1.2 – DB2 UDB for z/OS and OS/390 V7 with maintenance from APAR II13012 – Two-member data sharing group
Chapter 2. Installing the Siebel 7 system environment
23
2.2 z/OS security setup The Siebel server, Siebel dedicated Web client, Siebel Mobile client, and the Siebel Tools client will use the DB2 Connect middleware to pass the user name and password used to access the Siebel eBusiness applications to DB2 UDB for z/OS and OS/390 to establish a connection. The user name and password can be user credentials supplied by the external security, if this option has been implemented. All user names and passwords must have been preregistered with the OS/390 security package. The user name can be associated by the OS/390 security administrator with a group ID within the security package to simplify database security privilege administration. To run the installation tasks and tests, RACF® user IDs and groups were set up with DB2 authorizations assigned to them. The authorizations, userids, and groups are defined in 2.2.1, “RACF - userids and groups” on page 25. User authorizations are managed by RACF, DB2, and Siebel security options. Regarding client user authorizations, there can be many approaches to implementing them in a Siebel environment. Their granularity should be based on business requirements. The greater the granularity, the greater the complexity of the administration tasks. The Siebel DB2 subsystem consists of many databases, table spaces and tables. It is difficult to know exactly which tables are used in each application. Thus, it is difficult to control access to the data by allowing users selective access at the table level. There is a sample file /sieb704/dbsrvr/DB2390/gen_grantstat.sql, which gives an example of how to generate GRANTs to the interface (EIM) tables. Using this example, different types of grant statements with other criteria could be generated. Our approach was to let Siebel security functions control user access to the various applications. These steps are described in detail in this chapter. Because of security constraints, RACF user IDs/passwords will periodically expire. Siebel eBusiness Applications support the ability to change passwords from the login screen once they expire without administrative intervention. To be able to change the OS/390 passwords from the remote client machines, DB2 for OS/390 and z/OS must have the Extended Security option (extsec) set to YES. The default DB2 value is NO. This can be accomplished by setting the DSNZPARM EXTSEC=YES in the DSN6SYSP macro. When LDAP or a similar security package is used, it is possible to have a single userid to log on to DB2. LDAP checks for the necessary userid authorization
24
Siebel 7 with DB2 for z/OS: Database Implementation and Administration Guide
(password), and sends to DB2 a different userid that is common to the entire enterprise. In this case, EXTSEC should be set to NO as only the administrator should be able to change the password.
2.2.1 RACF - userids and groups We created RACF group IDs SIEBEIM and SIEBGRP: The SIEBGRP group is the Siebel users group. The SIEBEIM group is the Siebel administrator group. We created RACF user IDs SIEBTBO and SIEBADM: SIEBTBO is the Siebel table owner ID. SIEBADM is the Siebel administrator ID. Both SIEBTBO and SIEBADM user IDs were connected to the RACF group SIEBEIM. We created RACF user IDs SIEBEL1 to SIEBEL5: SIEBEL1-5 are the Siebel user IDs. We connected SIEBEL1-5 to the RACF group SIEBGRP.
2.2.2 DB2 UDB for z/OS and OS/390 authorization The installation of Siebel eBusiness Applications does not require the use of a SYSADM ID; however, the creation of some underlying DB2 resources will. Refer to the SIEBEL 7 document “Implementing Siebel eBusiness Applications on DB2 UDB for z/OS and OS/39” for specific details on roles and permissions required for the installation of the Siebel system. We granted SIEBTBO and SIEBADM SYSADM authority at the ITSO, so we could execute all the required DB2 management tasks. The Siebel administrator “SIEBADM” ID only requires DBADM authority, but a DB2 system administrator will have to participate in the installation process. The Siebel administrator does not require DBADM in the situation described in this installation, because the DDLs are being generated into files, and applied later on by the DBA. The Siebel user IDs are all connected to the RACF group SIEBGRP. The DB2 authorizations for these user IDs is granted to the RACF group during the schema build process created by Siebel. The RACF group SIEBGRP was granted the following privileges: select, insert, update, delete.
Chapter 2. Installing the Siebel 7 system environment
25
The use of the DB2 group authorizations by Siebel requires that the DB2 secondary user authorization exit be enabled. For more information on this, refer to DB2 UDB for z/OS and OS/390 - Installation Guide for Version 7.
2.3 DB2 for OS/390 and z/OS setup As mentioned, we were using a two-member data sharing group at the ITSO. The data sharing group name was D7RU, with members D7R1 and D7R2. These members were in separate Logical Partitions (LPARs) at the ITSO. The location name for the Data Distribution Facility (DDF) was DB7R, and was listening on port 33750. This information is required for DB2 Connect setup. The DB2 secondary authorization exit was enabled on both systems.
2.3.1 DSNZPARM values The following DSNZPARMs are required by Siebel when running the Siebel eBusiness Applications: DSN6SPRM MACRO – CACHEDYN=YES - turns on dynamic statement caching. – CDSSRDEF=1 - turns off parallelism for dynamic statements. – MXTBJOIN=70 (or greater) - maximum number of table joins. – PARTKEYU=YES - allows update of partitioning keys. – RETVLCFK=NO - turns off index only access of varying length characters. DSN6SYSP MACRO – EXTSEC=YES - allows DB2 Connect to receive more complete error messages. Allows the changing of passwords via DB2 Connect. A sample of DSNZPARMs used is in Appendix A, “DB2 parameters” on page 147. The values used are from Siebel recommendations and the work done at the IBM Silicon Valley Lab for Scalability Characterization of Siebel 7 on DB2 UDB for z/OS and OS/390. These values are recommendations and are installation-dependent. The following DSNZPARM values do require some comments: CTHREAD – Example from Appendix A: CTHREAD=70. – CTHREAD stands for the maximum number of non-distributed allied threads, that is, TSO, CICS®, IMS™, batch (including utilities), and CAF/RRSAF. Siebel uses distributed threads so it is not affected by this value. CONDBAT – Example from Appendix A: CONDBAT=25000. – Controls the number of connected clients.
26
Siebel 7 with DB2 for z/OS: Database Implementation and Administration Guide
MAXDBAT – Example from Appendix A: MAXDBAT=500. – The accepted standard definition for the “active users” from a Siebel perspective is the number of logged-on users (to the Siebel application) and also connected (via DB2 Connect) to DB2. As long as the Siebel user is viewing information within the application, this user is considered just connected to DB2. The maximum number of this kind of user to a DB2 subsystem is 150,000. There can be up to 32 DB2 instances in a data sharing configuration. So, the maximum active Siebel users could be 32 X 150,000. However, if the Siebel user is actively doing processing that requires database accesses, then this connected DB2 user requires the use of a database access thread (DBAT). The theoretical limit to the maximum number of concurrent database active threads is 1999. A DBAT utilizes a certain amount of DB2 database manager storage, which is acquired from the same storage area as that used for database manager buffers. To minimize the impact of concurrent DBATs on the use of this storage, the maximum number of concurrent DBATs should be limited to about 500. EDMPOOL – Example from Appendix A: EDMPOOL=40000. – Due to large Siebel DBDs, this needs to be large. The correct value really depends on the Siebel installation. SRTPOOL – Example from Appendix A: SRTPOOL=12000. – This field specifies the amount of storage needed for the sort pool. Siebel does many sorts. POOLINAC – Example from Appendix A: POOLINAC=120. – The approximate time, in seconds, that a database access thread (DBAT) can remain idle in the pool before it is terminated. Since maximum concurrency is desired for Siebel, a lower amount is recommended. STARJOIN – Example from Appendix A: STARJOIN=DISABLE. – In general, Siebel applications will not do well with star join because they do not have the suitable indexes on their tables to allow efficient star join processing. It is wise to use the system-wide DSNZPARM to disable star join for now.
Chapter 2. Installing the Siebel 7 system environment
27
NUMLKTS – Example from Appendix A: NUMLKTS=1000. – Number of locks allowed per table space. We recommend the default of 1000, even though we used a larger number for testing. The number needs to be monitored for row-level locking. NUMLKUS – Example from Appendix A: NUMLKUS=100000. – Number of locks allowed per user. 100 K is the default that we recommend, although we did not use that for the test.
2.3.2 Buffer pools and storage group In this section, we describe buffer pool and storage group definitions.
Buffer pool definitions The buffer pools used at the ITSO for the Siebel 7 installation are as follows, and were defined on both members: ALTER ALTER ALTER ALTER ALTER
BUFFERPOOL BUFFERPOOL BUFFERPOOL BUFFERPOOL BUFFERPOOL
(BP1) VPSIZE (20000) ‘Used for 4 K table spaces (BP2) VPSIZE (20000) ‘Used for Indexes (BP7) VPSIZE (60000) ‘Used for Sort (BP16K1) VPSIZE (12000) ‘Used for 16 K table spaces (BP32K1) VPSIZE (1000) ‘Used for 32 K table spaces
The following commands were used to grant use of the bufferpools: GRANT GRANT GRANT GRANT
USE USE USE USE
OF OF OF OF
BUFFERPOOL BUFFERPOOL BUFFERPOOL BUFFERPOOL
BP1 TO BP2 TO BP16K1 BP32K1
PUBLIC; PUBLIC; TO PUBLIC; TO PUBLIC;
Storage group definition The following describes the commands used to create the DB2 Storage Group. CREATE STOGROUP SIEBSTO VOLUMES (‘*’) VCAT SIEB; GRANT USE OF STOGROUP SIEBSTO TO PUBLIC;
2.3.3 DB2 objects for Siebel Siebel 7 Financial Services, which we installed at the ITSO, has the following Database Objects: 22 Databases containing Siebel tables 181 Segmented table spaces containing Siebel tables 2,485 Tables 13,244 Indexes
28
Siebel 7 with DB2 for z/OS: Database Implementation and Administration Guide
Due to the large number of database objects, we created 450 track Volume Table of Contents (VTOC) on each pack of the storage group. We also created a large VSAM user catalog to accommodate all the index data sets for Siebel. The VCAT entry of “SIEB” becomes the high-level qualifier for the VSAM files. You may want to make sure this is an alias entry; otherwise, all of the many index VSAM files will be cataloged in the master catalog.
2.3.4 Stored procedures Siebel utilizes the stored procedure DSNUTILS to run RUNSTATS. You need to insure the following: The DSNUTILS stored procedure was successfully created in DB2 installation job DSNTIJSG. The Workload Manager (WLM) is enabled to support the stored procedure. See Appendix B of DB2 Utility Guide and Reference for an example of how to customize a WLM proc for DSNUTILS. The information for installation and enablement of the Stored Procedure is covered in the DB2 UDB for z/OS and OS/390 V7 Installation Guide.
2.4 Mid-tier setup Our base platform consisted of: AIX 5L™, the April 2002 refresh (v5.1.0.25); IBM Developer kit for Java platform v1.3 and IBM C++ Runtime v5.0.2.2 on an RS/6000 S7a with 2 GB of RAM; three 18.2 GB; two 9.1 GB SCSI disks; a 1 Gb Ethernet adapter.
2.4.1 AIX V5L configuration For the purpose of clarity in this redbook, the following environmental variable was added to all user ids as they were created: export PS1=’(${LOGNAME})${PWD}->’
This allowed all examples to display the userid and current path. We used the following directory structure for our installation: /xdb7r /sieb704/gtwysrvr /sieb704/siebsrvr
The home directory for our DB2 Connect instance “xdb7r” The installation directory for the Siebel gateway server The installation directory for the Siebel server
Chapter 2. Installing the Siebel 7 system environment
29
/sieb704/dbsrvr
The installation directory for the Siebel database server /sieb704/eappweb The installation directory for the Siebel Web server and Web server extension /siebfile The Siebel file system /work (and /work/temp) Space for untarring IBMIHS and Samba in preparation for their installation
2.4.2 SAMBA install and setup Samba is a UNIX Network File Systems (NFS) server for NetBios (Windows) clients. Samba is needed in order to allow Windows Siebel clients access to the Siebel file system (/siebfile). Samba is not required if using Siebel 7 Web Clients. Siebel 7 has a new component (FSM), which takes care of file attachments. Samba 2.2.3 is available in installp format from http://www.bullfreeware.com
We copied samba-2.2.3.0.exe to the directory /work, unzipped the files into /work/temp, created an installp table of contents (inutoc), and started smit as shown in Figure 2-2.
Figure 2-2 Preparing to install Samba
Note the blank space and dot (.) following inutoc; this forces inutoc to create the table of contents in the current directory. We proceeded through the install process by entering /work/temp as the Input device/directory of software, and selecting 2.2.3.0 SAMBA, SMB client. as the software to install. The SMIT completion screen then showed freeware.samba.rte 2.2.3.0 installed. This version and release of Samba did not install correctly. To correct the problem, we had to create the following directories: /usr/local/samba/lib /usr/local/samba/var/locks
30
Siebel 7 with DB2 for z/OS: Database Implementation and Administration Guide
We then had to move the information in /usr/local/lib to /usr/local/samba/lib. We also copied /usr/local/samba/lib/samba-2.2.3a/examples/smb.conf.default to /usr/local/samba/lib/smb.conf, and modified the “publicly accessible directory” stanza as follows:
[siebfile] comment = Siebel File System path = /siebfile public = yes writable = no printable = no write list = @xsiebeim
Note: This group will not exist until DB2 Connect is installed. To start the samba daemons (after the “xsiebeim” group has been created), we entered the following commands: /usr/local/bin/nmbd -D /usr/local/bin/smbd -D
Figure 2-3 shows Samba successfully installed.
Figure 2-3 Successful installation of Samba
2.4.3 HTTP Web server install and setup IBM HTTP server V2 is available for Siebel installations from: http://www.ibm.com/software/webserver/httpservers/siebel_ihs20.html
Chapter 2. Installing the Siebel 7 system environment
31
We installed the HTTP server by copying IBMHTTPserver.aix.EN.tar to /work, untarring it into /work/temp, and then executing installIHSaix.bin from an X11 session; see Figure 2-4. (At the ITSO, we used Hummingbird®’s Exceed to serve X11 sessions on our terminals).
Figure 2-4 Preparing to install IBMHTTP server
This started the Java installation GUI, through which we followed the prompts and accepted the defaults, to finish installing the IBMIHS HTTP server. During the install, a file called httpd.conf is created in the /usr/IBMIHS/conf directory. This file will be updated during the Siebel SWSE installation. Siebel also recommends that the worker.c stanza in the httpd.conf file be updated with the following information:
32
# worker MPM # StartServers: initial number of server processes to start # MaxClients: maximum number of simultaneous client connections # MinSpareThreads: minimum number of worker threads which are kept spare # MaxSpareThreads: maximum number of worker threads which are kept spare # ThreadsPerChild: constant number of worker threads in each server process # MaxRequestsPerChild: maximum number of requests a server process serves
Siebel 7 with DB2 for z/OS: Database Implementation and Administration Guide
StartServers - 1 ServerLimit - 1 ThreadLimit - 1024 MaxClients - 1024 MinSpareThreads - 1 MaxSpareThreads - 1024 ThreadsPerChild - 1024 MaxRequestsPerChild - 0
To start the IBMIHS HTTP server, we logged on as root and entered: (root)/-> /usr/IBMIHS/bin/apachectl start
Note: After installing the Siebel SWSE, we started IBMIHS by using: /usr/IBMIHS/bin/startapa . (This file, and “stopapa”, will be created by the Siebel Web Server installation process.)
2.4.4 DB2 Connect EE V7.2 installation We mounted the DB2 Connect EE CD and executed /cdrom/db2setup to begin the installation. Note: Throughout the DB2 installation screens, use either the tab or the arrow keys to move between fields, and use the spacebar to select/deselect options.
Figure 2-5 Customize the Administration Client
We pressed the spacebar to select DB2 Administration Client, then tabbed to highlight [Customize] and pressed .
Chapter 2. Installing the Siebel 7 system environment
33
Figure 2-6 Select Control Center
We tabbed to Control Center, pressed the spacebar to select it, and then tabbed until we highlighted [OK] and pressed to return to the Install DB2 V7 panel.
Figure 2-7 Select DB2 Connect Enterprise Edition
34
Siebel 7 with DB2 for z/OS: Database Implementation and Administration Guide
We tabbed to DB2 Enterprise Edition, used the spacebar to de-select it, and then tabbed to DB2 Connect Enterprise Edition and selected that option with the spacebar. We then tabbed to highlight [OK] and pressed .
Figure 2-8 Create an instance
When we used the spacebar to select Create a DB2 Instance, DB2setup automatically jumped to the Customize panel.
Figure 2-9 Create DB2 instance (continued)
In this panel we entered the instance name, the instance primary group name and instance password, and then tabbed to highlight [Properties] and pressed .
Chapter 2. Installing the Siebel 7 system environment
35
Figure 2-10 Select the instance TCP/IP properties panel
In the DB2 Instance Properties panel, we tabbed to TCP/IP [Properties] and pressed .
Figure 2-11 Change the instance TCP/IP calling port
Note: The calling port name is db2cinstancename.
36
Siebel 7 with DB2 for z/OS: Database Implementation and Administration Guide
Here we changed the TCP/IP services calling port name to match the name of our instance, and then tabbed to [OK] and pressed . We selected [OK], accepting the defaults on the successive panels, until we returned to the Create DB2 Services panel.
Figure 2-12 Select Create the Administration Server
On this panel, we used the spacebar to select Create the Administration Server. The db2setup jumped directly to the customize Administration Server panel. We accepted the defaults on all of the panels that followed, to complete the installation of DB2.
2.4.5 DB2 Connect Fix Pack 5s installation As of the time of writing, DB2 Connect Fix Pack 5s was the current certified Fix Pack for Siebel installations. The latest Siebel certified DB2 Connect Fix Pack can be found at: ftp://ftp.software.ibm.com/ps/products/db2/fixes/english/siebel/siebel7/
Before installing the Fix Pack, we stopped all db2 processes, as follows. (root)/-> su - xdb7r (xdb7r)/xdb7r-> db2 force applications all (xdb7r)/xdb7r-> db2 terminate (xdb7r)/xdb7r-> db2stop (xdb7r)/xdb7r-> db2licd end (xdb7r)/xdb7r-> exit (root)/-> su - db2as $ db2admin stop $ exit (root)/-> /usr/sbin/slibclean
Chapter 2. Installing the Siebel 7 system environment
37
To install the Fix Pack, we untarred the Fix Pack file into /work, which created a directory /work/special_5066_fp32/. We issued the following command: (root)/work-> smitty update_all
Figure 2-13 Input the Fix Pack directory
We entered the full path for the directory of the Fix Pack and pressed to continue.
Figure 2-14 Install Fix Pack 5s
We changed Preview only? to no and pressed on this panel and on the following panel to install the Fix Pack. The next step was to update the db2 instance and the administrative instance, as shown: (root)/-> cd /usr/lpp/db2_07_01/instance (root)/usr/lpp/db2_07_01/instance-> db2iupdt xdb7r (root)/usr/lpp/db2_07_01/instance-> dasiupdt db2as
38
Siebel 7 with DB2 for z/OS: Database Implementation and Administration Guide
Our final step was to make xdb7r the owner of the /xdb7r directory (this was necessary because we created the directory manually before installing DB2 Connect): (root)/-> chown xdb7r:xsiebeim /xdb7r
2.4.6 DB2 Connect configuration There are two DB2 instance-level environment variables that must be set when running the Siebel application server on AIX (or Solaris): (siebadm)/home/siebadm-> db2set DB2CONNECT_IN_APP_PROCESS=NO (siebadm)/home/siebadm-> db2set DB2ENVLIST=EXTSHM Note that export EXTSHM=0 must be set for the DB2 Instance owner and each DB2 Connect user. By default, AIX does not allow applications to attach more than 11 shared memory segments per process. Setting this variable specifies that the connection from the Siebel server to DB2 Connect EE will take place in the db2agent process that is part of DB2 Connect and its address space, rather than in the db2agent process of Siebel server. There are several database manager configuration parameters, as follows: (siebadm)/home/siebadm-> (siebadm)/home/siebadm-> (siebadm)/home/siebadm-> (siebadm)/home/siebadm-> (siebadm)/home/siebadm-> (siebadm)/home/siebadm-> (siebadm)/home/siebadm-> (siebadm)/home/siebadm->
db2 db2 db2 db2 db2 db2 db2 db2
update update update update update update update update
dbm dbm dbm dbm dbm dbm dbm dbm
cfg cfg cfg cfg cfg cfg cfg cfg
using using using using using using using using
DIR_CACHE YES RQRIOBLK 32767 MON_HEAP_SZ 1024 DRDA_HEAP_SZ 512 MAXAGENTS 1000 NUM_POOLAGENTS 1000 MAX_LOGICAGENTS 3000 MAX_COORDAGENTS 1000
Important: We used those settings for the purpose of our project. Siebel recommends Siebel Database Connection Pooling to be used instead of DB2 Connect Connection Concentrator for production deployments (refer to 1.6, “Siebel 7 database connection pooling” on page 18). MAX_LOGICAGENTS should equal MAX_COORDAGENTS when Connection Concentrator is not being used: (siebadm)/home/siebadm->db2 update dbm cfg using MAX_LOGICAGENTS 1000
Catalog the database: db2 CATALOG TCPIP NODE D7R1 REMOTE wtsc04oe.itso.ibm.com SERVER 33750 OSTYPE MVS
Chapter 2. Installing the Siebel 7 system environment
39
db2 CATALOG DATABASE DB7R AT NODE D7R1 AUTHENTICATION DCS db2 CATALOG DCS DATABASE DB7R AS DB7R parms “',,,,,sysplex'”
Note: wtsc04oe.itso.ibm.com was one of the members of our data sharing group listening on TCP/IP port 33750. DB7R was the location name for our DB2 subsystem. We tested the connection: (siebadm)/home/siebadm-> db2 connect to db7r user siebadm using siebadm
This produced the following (when the node and database are correctly cataloged): Database Connection Information Database server SQL authorization ID Local database alias
= DB2 OS/390 7.1.1 = SIEBADM = DB7R
The installation and configuration of DB2 Connect EE with Fix Pack 5s was complete.
2.5 Installation of Siebel 7 servers Siebel 7 servers include the following: Gateway server Application server Database server
2.5.1 Installation of Siebel 7 Gateway server We initiated the installation of the Siebel gateway server (from AIX Server Program CD #1 of 2) by creating user xsiebadm, in group xsiebeim, and assigning a temporary password to xsiebadm. Next we changed ownership of /siebfile to xsiebadm: (root)/-> chown xsiebadm:xsiebeim /siebfile
We added the following line to the xsiebadm’s.profile: . /xdb7r/sqllib/db2profile
Next, we logged in as xsiebadm, changed xsiebadm’s password to siebel, changed our umask to 027 for the install, and proceeded as follows:
40
Siebel 7 with DB2 for z/OS: Database Implementation and Administration Guide
(xsiebadm)/home/xsiebadm-> umask 027 (xsiebadm)/home/xsiebadm-> cd /cdrom/unix_server_aix_1_enu/gtwysrvr/install (xsiebadm)/cdrom/unix_server_aix_1_enu/gtwysrvr/install-> ./install_gateway
We accepted the default language, then specified /sieb704/gtwysrvr as the installation directory, to continue with the installation of the gateway server.
Figure 2-15 Beginning the Siebel gateway server installation
We accepted the default gateway server port [2303] to continue.
Chapter 2. Installing the Siebel 7 system environment
41
Figure 2-16 Installing the gateway server
We accepted the next two defaults to continue; see Figure 2-17.
Figure 2-17 Installing the gateway server (continued)
We entered N at the next prompt, to bypass configuring autostart and complete the gateway server installation.
42
Siebel 7 with DB2 for z/OS: Database Implementation and Administration Guide
Figure 2-18 Completion of the gateway server installation
At the end of the gateway server installation, the gateway name server started, which is required for the installation of the Siebel server. We used the following commands to manually start the gateway server, when that was needed: (xsiebadm)/-> cd /sieb704/gtwysrvr (xsiebadm)/sieb704/gtwysrvr-> . ./siebenv.sh (xsiebadm)/sieb704/gtwysrvr-> cd bin (xsiebadm)/sieb704/gtwysrvr/bin-> ./start_ns
2.5.2 Installation of Siebel 7 Application server To install the Siebel application server, as xsiebadm (with umask = 027), we first unset the environment variable SIEBEL_ROOT to avoid the possibility of installing the Siebel server in the same directory as the gateway server: (xsiebadm)/sieb704-> unset SIEBEL_ROOT
Then we changed directory to the siebsrvr/install directory on the CD-ROM: (xsiebadm)/sieb704-> cd /cdrom/unix_server_aix_1_enu/siebsrvr/install
We started the installation: (xsiebadm)/cdrom/unix_server_aix_1_enu/siebsrvr/install->install_server
We accepted the default language and entered our intended siebsrvr directory.
Chapter 2. Installing the Siebel 7 system environment
43
Note: If you are not prompted to specify the directory into which Siebel should be installed, the environment variable SIEBEL_ROOT is defined and will determine the installation directory for the Siebel server. If you wish to change the directory at this point, you can use to get out of the install script, then change or unset SIEBEL_ROOT, and restart install_server.
Figure 2-19 Beginning the Siebel application server installation
We accepted the default address (erps7A) of the gateway server (which is not shown here). We also accepted the default gateway server port and N for Resonate to continue with the installation.
44
Siebel 7 with DB2 for z/OS: Database Implementation and Administration Guide
Figure 2-20 Siebel server installation (continued)
We accepted the default language (not shown) and entered N to the question “Would you like to accept these settings”. We then individually selected or rejected components, to enable the following at the Siebel server startup; see Figure 2-21 on page 46.
Chapter 2. Installing the Siebel 7 system environment
45
Figure 2-21 Siebel server installation (continued)
We entered a non-default name for our development siebel server (siebdev) and at the next prompt, we entered the path of our Siebel file system.
46
Siebel 7 with DB2 for z/OS: Database Implementation and Administration Guide
Figure 2-22 Siebel server installation (continued)
We accepted the default to “apply settings” and for the description of the enterprise, then entered 3 to select IBM DB2 UDB for z/OS and OS/390. At the following prompts, we entered the name of our database, then the table owner (siebtbo), SQLID (group name - siebgrp), and our administrator name (we used siebadm instead of sadmin).
Chapter 2. Installing the Siebel 7 system environment
47
Figure 2-23 Siebel server installation (continued)
Next, we entered siebadm’s password (twice), accepted the default Synchronization Manager port, the default for the FirstLogic Directory, and then pressed at the Chart Server prompt. Then we entered siebadm’s password, accepted the default Synchronization Manager port, the default for the FirstLogic Directory, and pressed at the Chart Server prompt.
48
Siebel 7 with DB2 for z/OS: Database Implementation and Administration Guide
Figure 2-24 Siebel server installation (continued)
At the next prompt we entered 2 to verify that we were not using a Chart Server host, then accepted the default Chart Image format and Encryption type.
Figure 2-25 Siebel server installation (continued)
We pressed to accept the parameters; see Figure 2-26 on page 50.
Chapter 2. Installing the Siebel 7 system environment
49
Figure 2-26 Siebel server installation (continued)
We accepted the default for our new Siebel server (erps7a) and entered a description; at the next prompt, we entered the home directory of our DB2 instance.
Figure 2-27 Siebel server installation (continued)
We entered 3 for eBriefings, and N to select not to configure SynchMgr; see Figure 2-28 on page 51.
50
Siebel 7 with DB2 for z/OS: Database Implementation and Administration Guide
Figure 2-28 Siebel server installation (continued)
We entered N to select not to configure autostart.
Figure 2-29 Siebel server installation (continued)
We accepted Y to apply these settings, then accepted Y again to start the server and complete the installation; see Figure 2-30 on page 52.
Chapter 2. Installing the Siebel 7 system environment
51
Figure 2-30 Siebel server installation (continued)
Next, we updated /sieb704/siebsrvr/siebenv.sh by adding the following lines: export LDR_CNTRL=LOADPUBLIC@MAXDATA=0x50000000 export MW_GMA_VADDR=0xb0000000 export AIXTHREAD_SCOPE=S export MALLOCMULTIHEAP=considersize,heaps:4 # rule: heaps:n, where n_is the number of cpus export SIEBEL_ASSERT_MODE=0 export NUMBER_OF_USERS=1000 export SIEBEL_OSD_NLATCH=`print "((7 * $NUMBER_OF_USERS) + 1000)" | bc` # rule: SIEBEL_OSD_NLATCH = 7*(Max Tasks) +1000 export SIEBEL_OSD_LATCH=`print "((1.2 * $NUMBER_OF_USERS)/1)" | bc` # rule: SIEBEL_OSDHLATCH = 1.2*(Max Tasks)
We added the following line to /sieb704/siebsrvr/db2cli.ini: DISABLEUNICODE=1
Note: The preceding parameter must be added to the db2cli.ini file of any dedicated clients. The final step was to update /seib704/siebsrvr/bin/siebmtshw by adding the following lines: export export export export export
52
AIXTHREAD_SCOPE=S AIXTHREAD_MUTEX_DEBUG=OFF AIXTHREAD_RWLOCK_DEBUG=OFF AIXTHREAD_COND_DEBUG=OFF MW_GMA_VADDR=0xb0000000
Siebel 7 with DB2 for z/OS: Database Implementation and Administration Guide
export MALLOCMULTIHEAP=considersize,heaps:4 # rule: heaps:n , where n is the number of cpus
The steps to start the Siebel server are: (xsiebadm)/-> cd /sieb704/siebsrvr (xsiebadm)/sieb704/siebsrvr-> . ./siebenv.sh (xsiebadm)/sieb704/siebsrvr-> cd bin (xsiebadm)/sieb704/siebsrvr/bin-> ./start_server
This concluded our Siebel server installation.
2.5.3 Installation of Siebel 7 database scripts To install the Siebel database server scripts, as xsiebadm (with umask = 027), we first unset the environment variable SIEBEL_ROOT to avoid the possibility of installing the Siebel database server scripts in the same directory as the gateway server or Siebel server: (xsiebadm)/sieb704-> unset SIEBEL_ROOT
Then we changed directory to the dbsrvr/install directory on the UNIX CD-ROM #2: (xsiebadm)/sieb704-> cd /cdrom/unix_server_aix_2_enu/dbsrvr/install
We started the installation: (xsiebadm)/cdrom/unix_server_aix_2_enu/dbsrvr/install->./install_dbsrvr
We accepted the default language; refer to Figure 2-31.
Figure 2-31 Beginning the Siebel database server installation
Chapter 2. Installing the Siebel 7 system environment
53
At the next prompt, we entered the installation directory (/sieb704/dbsrvr).
Figure 2-32 Siebel database server installation (continued)
We entered N to change the default settings, and responded N to DB2 for Unix and Windows. We responded Y to DB2 for OS/390, and N to Oracle, and Y to Sample File Attachments. We then responded Y, to accept these settings.
Figure 2-33 Siebel database server scripts install (continued)
54
Siebel 7 with DB2 for z/OS: Database Implementation and Administration Guide
We entered Y again, to accept the default language, and then accepted the value for SIEBEL_ROOT and ENU.
Figure 2-34 Siebel database server installation (continued)
2.5.4 Installation of Siebel 7 maintenance - 7.0.4.200 The installation process for Siebel maintenance is the same for each component. We mounted the Siebel AIX Server Programs (CD 1 of 5), navigated to the appropriate installation directory, and executed the following install scripts: export SIEB_OVERRIDE_COMPATIBILITY_CHECK=Y cd /cdrom/unixserver_aix_1 ./unix_server_aix_1_enu/gtwysrvr/install/install_gateway -F ./unix_server_aix_1_enu/siebsrvr/install/install_server -F ./unix_server_aix_2_enu/dbsrvr/install/install_dbsrvr -F
We followed the scripts, using the same parameters as the initial installation of the components
2.5.5 Installation of Siebel 7 database schema To begin the installation of the database schema, we navigated to the siebsrvr directory (/sieb704/siebsrvr) and sourced siebenv.sh to set our environment: (xsiebadm)/sieb704/siebsrvr-> . ./siebenv.sh
We changed the directory to the bin directory, and executed dbsrvr_config.ksh to start the Siebel Schema installation. (xsiebadm)/sieb704/siebsrvr-> cd bin (xsiebadm)/sieb704/siebsrvr/bin->dbsrvr_config.ksh
We entered Y to accept SIEBEL_ROOT and Language; see Figure 2-35 on page 56.
Chapter 2. Installing the Siebel 7 system environment
55
Figure 2-35 Siebel database schema installation
We pressed Enter at the next screen to accept SIEBEL_ROOT.
Figure 2-36 Siebel database schema installation (continued)
Next, we entered the Siebel database root directory; see Figure 2-37.
Figure 2-37 Siebel database schema installation (continued)
On the next twenty-one prompts (which are not shown here), we selected/entered: 2 - IBM DB2 UDB for z/OS and OS/390 1 - Install Database 1 - Install Siebel Database
56
Siebel 7 with DB2 for z/OS: Database Implementation and Administration Guide
1 - English “siebsrvr_siebdev” for the ODBC Data Source Name “SIEBADM” for the Database User Name “SIEBADM” for the Database Password “SIEBTBO” for the Siebel Schema Qualifier “SIEBGRP” for the Group Authorization ID 1 - Standard Install 1 - Generate DDL into a File to accept the default DDL Output Directory 1 - Multiple Tables per Table Space schema layout “SIEBSTO” to specify our table space storage group name “SIEBTBO” again, to use the same storage group for indexes to accept BP1 for the 4 k buffer pool to accept BP16k for the 16 k buffer pool to accept BP32k1 for the 32 k buffer pool to accept BP2 for the Index buffer pool “SIEB” to specify the Database Name Prefix 1 to specify ASCII
Finally, we entered Y to start the Siebel Upgrade Wizard (srvrupgwiz), as shown in Figure 2-38; this is used in AIX to start the Siebel Upgrade Wizard. The Upgrade Wizard generates all DDL changes in the Siebel application, and is used for the Siebel install, upgrade, and database utilities.
Figure 2-38 Siebel database server installation (continued)
Next, we stopped to build the database schema on the zSeries (as shown in Figure 2-39 on page 58).
Chapter 2. Installing the Siebel 7 system environment
57
Figure 2-39 Ready to create the schema
We transferred the file sieb704/dbsrvr/db2390/dboutput/install/schema.sql using FTP with the following commands: quote site cylinders primary=10 secondary=5 quote site recfm=fb lrecl=80 blksize=0 put schema.sql
We used this file in a DB2 batch job and created the Siebel schema. Refer to Appendix B, “Sample Siebel 7 generate DDL output” on page 157, to review the sample DDL that we used to create the schema on our system. After creating the schema, we restarted the Siebel Upgrade Wizard (srvrupgwiz): (xsiebadm)/sieb704/siebsrvr/bin-> srvrupgwiz /m master_install_mf.ucf
58
Siebel 7 with DB2 for z/OS: Database Implementation and Administration Guide
Figure 2-40 Siebel database schema installation (continued)
The restart created the Siebel file /sieb704/dbsrvr/db2390/dbouput/install/ddlview.sql. This was FTPed to the OS/390 and included in a DB2 batch job. The Siebel Upgrade Wizard (srvrupgwiz) was restarted a second time, which then inserted the Siebel seed data into the new OS/390 DB2 Siebel schema. After the seed data was installed, we followed these steps: 1. We executed the following: (xsiebadm)/sieb704/siebsrvr/bin->./dbsrvr_config.ksh
2. We accepted the SIEBEL_ROOT and Language values on the first screen. 3. We accepted the Siebel server root directory on the second screen. 4. On the third screen, we entered /sieb704/dbsrvr for the database server root directory, and entered 2 for IBM DB2 UDB for z/OS and OS/390. 5. On the next screen, we entered 3 to select Import/Export Repository.
Chapter 2. Installing the Siebel 7 system environment
59
Figure 2-41 Siebel database schema installation (continued)
On the next screen, we entered 1 to select Import Repository; refer to Figure 2-42.
Figure 2-42 Siebel database schema installation (continued)
On the next screen, we entered 1 to select Import Standard Siebel Repository; refer to Figure 2-43.
Figure 2-43 Siebel database schema installation (continued)
60
Siebel 7 with DB2 for z/OS: Database Implementation and Administration Guide
On the next eight prompts (which are not shown here), we selected/entered:
1 - English “siebsrvr_siebdev”’ for the ODBC Data Source Name “SIEBADM”’ for the Database User Name “SIEBADM” for the Database Password “SIEBTBO” for the Siebel Schema Qualifier “SIEBGRP” for the Group Authorization ID Pressed Enter for default Repository Name Pressed Enter to accept the default repository file name
We then entered Y to accept the values for the Import Repository and run srvrupgwiz; see Figure 2-44.
Figure 2-44 Siebel database schema installation (continued)
The srvrupgwiz wizard then installed the Siebel Repository.
2.5.6 Post-installation tasks The following tasks were performed at the end of the Repository Import. Grant Table privileges – Edit and run the grantstat.sql script. We edited the file /sieb704/dbsrvr/db2390/grantstat.sql by replacing &1 with the Siebel Admin Group ID “SIEBEIM”.
Chapter 2. Installing the Siebel 7 system environment
61
We then did a DB2 Connect to the OS/390 database as the Siebel table owner “SIEBTBO” (which has SYSADM authority), and ran the job: (xsiebadm)/sieb704/dbsrvr/db2390-> db2 connect to db7r user siebtbo using siebadm (xsiebadm)/sieb704/dbsrvr/db2390-> db2 -tvf grantstat.sql
– Load Statistics. We edited the file /sieb704/dbsrvr/db2390/loadstat.sql by replacing “SIEBELTABLECREATOR” with “SIEBTBO”. We then did a DB2 connect to the OS/390 database as the Siebel Table Owner “SIEBTBO” (which has SYSADM authority), and ran the job. (xsiebadm)/sieb704/dbsrvr/db2390->db2 connect to db7r user siebtbo using siebtbo (xsiebadm)/sieb704/dbsrvr/db2390->db2 -tvf grantstat.sql
– Validate the Siebel Database. We executed dbchck to verify the physical schema with the Repository. (xsiebadm)/sieb704/siebsrvr/bin-> ./dbchck /u SIEBADM /p SIEBADM /t SIEBTBO /r “Siebel Repository” /l dbchck.log /dict /all /s siebsrvr_siebdev
We checked the dbchck.log file for errors at the end. – Populate the Siebel File System. We copied the all the files except KB.kb from /sieb704/dbsrvr/files to /siebfile/att. We then copied /sieb704/dbsrvr/files/KB.kb to /siebfile/cms.
2.6 Installation of Siebel 7 Web server and extensions We made xsiebadm the owner of the IBMIHS instance. (root)/usr-> chown -R xsiebadm:xsiebeim IBMIHS
We changed directory to the eappweb/install directory on the first server CD-ROM: (xsiebadm)/sieb704-> cd /cdrom/unix_server_aix_1_enu/eappweb/install
We then started the installation: (xsiebadm)/sieb704-> unset SIEBEL_ROOT (xsiebadm)/cdrom/unix_server_aix_1_enu/eappweb/install->install_eappweb
62
Siebel 7 with DB2 for z/OS: Database Implementation and Administration Guide
At the following prompts, we accepted the default language, the default Web server directory, “N” for Resonate, “eps7a’ for our Gateway Server, the default Gateway Server port of 2320, and “siebdev” for our enterprise name.
Figure 2-45 Siebel Web server and extension installation (continued)
We accepted erps7a for our Siebel server name, accepted 1 for compression type, accepted 1 for encryption type, accepted 1 for logging level, accepted 80 for the Web Server HTTP Port, and accepted 443 for the Web Server HTTPS Port; see Figure 2-46 on page 64.
Chapter 2. Installing the Siebel 7 system environment
63
‘
Figure 2-46 Siebel Web server and extension installation (continued)
We then entered the Web Update Protection Key, the First Internet Address of the Web Server, the Alternate Internet Address of the Web Server, the anonymous login userid, the password (twice), and the anonymous login contact name and password (twice); see Figure 2-47.
Figure 2-47 Siebel Web server and extension installation (continued)
We then entered Y to accept ALL the settings, and Y for ENU.
64
Siebel 7 with DB2 for z/OS: Database Implementation and Administration Guide
Figure 2-48 Siebel Web server and extension installation (continued)
We chose not to restart the IBMIHS Web Server, and the Siebel Web Server and Extension install completed; see Figure 2-48.
Figure 2-49 Siebel Web server and extension installation (continued)
Chapter 2. Installing the Siebel 7 system environment
65
2.6.1 Customizing the Siebel 7 Web server We completed a few final customization steps for the Siebel Web server and IBMIHS, as follows: We gave all users rights to the eappweb directory: (xsiebadm)/-> chmod -R 777 /sieb704/eappweb
We added the following environment variables to /usr/IBMIHS/bin/startapa: export RT_GRQ=ON export MW_GMA_VADDR=0xb0000000 export YIELDLOOPTIME=1 export SPINLOOPTIME=1000 export SIEBEL_ASSERT_MODE=0 export MALLOCTYPE=buckets export MALLOCMULTIHEAP=considersize,heaps:4 # rule: heaps:n, where n_is the number of cpus
2.7 Installation of Siebel 7 Web server maintenance 7.0.4.200 The installation process for Siebel maintenance is the same for the Web component. We mounted the Siebel AIX Server Programs (CD 1 of 5), navigated to the appropriate installation directory, and executed the following install script: export SIEB_OVERRIDE_COMPATIBILITY_CHECK=Y cd /cdrom/unixserver_aix_1 ./unix_server_aix_1_enu/eappweb/install/install_eappweb -F
We followed the script, using the same parameters as the initial installation of the Web component.
66
Siebel 7 with DB2 for z/OS: Database Implementation and Administration Guide
3
Chapter 3.
Modifying the Siebel schema for a production environment In this chapter, we describe the process we used to create a partitioned table space in the DB2 Siebel production database. Our production database was created on DB2 for z/OS using the Siebel-provided, one table per table space, non-partitioned, storage control file. The production Siebel enterprise was installed on a Windows 2000 Server (TOT85.itso.ibm.com). We used table “S_ACT_EMP” to illustrate the steps involved in partitioning a table. This chapter includes the following sections: Extracting a new storage control file from our existing database and modifying the storage control file to add partitioning to a table Creating a backup table and table space Using the Siebel Upgrade Wizard to produce the new DDL Creating the partitioned table space Creating a new Siebel storage control file reflecting the new Siebel schema
© Copyright IBM Corp. 2003. All rights reserved.
67
3.1 Extracting a current storage control file We extracted a storage control file (prod_stroage.ctl) reflecting the current production database schema. We started the Configure DB Server: Start > Programs > Siebel Enterprise Server 7.0.4 > Configure DB Server
On the next 16 screens: 1. We entered the Gateway server address TOT85 and our “production” Enterprise name: SIEBPROD. 2. We accepted the default for the Siebel Server directory. 3. We accepted the default for the DB Server directory. 4. We selected Run Database Utilities. 5. We selected Configure Database. 6. We selected Extract Storage Control File. 7. We accepted SiebSrvr_siebprod as our ODBC Data Source Name. 8. We entered: PRODADM as the database user name and password. 9. We entered: PRODTBO as the Siebel Schema Qualifier. 10.We entered: PRODGRP as our Group Authorization ID. 11.We selected Extract from Catalog. 12.We entered a name for the new storage control file: C;\sea704\dbsrvr\db2390\prod_storage.ctl. 13.We reviewed all of the variables and clicked Finish. 14.We clicked OK to “Apply the configuration now” and create a new ddl file. 15.We clicked OK to begin the upgrade. 16.We clicked OK when the Siebel Upgrade Wizard completed.
68
Siebel 7 with DB2 for z/OS: Database Implementation and Administration Guide
3.2 Modifying the storage control file - table space partitioning The Database Storage Configuration utility is shipped in the form of a Microsoft Excel macro. It is used to prepare and validate a storage control file for use by the Siebel database configuration utilities to generate the appropriate DDL to build the Siebel schema. The utility is dbconf.xls in the database server\DB2390 directory. Siebel provides a number of standard storage control files in this directory. It is possible to update a storage control file at any time to indicate that a table that was previously non-partitioned is to become a partitioned table. If a current storage control file already exists, then this can be amended using the Database Storage Configuration Utility to reflect the new definitions. If no current storage control file exists, then one can be extracted from the existing database. The Siebel utilities will not carry out the DB2 work necessary to change a table from non-partitioned to partitioned; this will need to be done by the DBA. The steps that we took to change S_ACT_EMP from a non-partitioned table to a partitioned table are detailed in the following sections.
3.2.1 Running the Siebel Database Configuration utility We started the Siebel Database Storage Configurator Excel spreadsheet (dbconf.xls), enabling macros (see Figure 3-1 on page 70) and importing our control file prod_storage.ctl.
Chapter 3. Modifying the Siebel schema for a production environment
69
Figure 3-1 The Database Storage Configurator
In the Table tab, we executed a find on S_ACT_EMP and noted that it was in table space H0393000. For security reasons we decided to put the modified table into a new table space, which we called S6001000. By executing a find on S6001000, we determined that there were no other tables in table space S6001000. With S_ACT_EMP highlighted, we clicked Partition Table, entered 10 in the partitions pop-up window, then clicked OK to the pop-up message: Creating 10 partitions for tablespace ‘S6001000’, please review partitioning index...: We entered S_ACT_EMP_P99 in the next pop-up box for the name of the partitioning index, clicked OK to the pop-up message: Creating 10 index partitions for ‘S_ACT_EMP_P99, enter the limitKey values in this page., then clicked OK to the next pop-up message. Next, we entered the following columns for the partitioning index, using the standard Siebel partitioning key specifications from the sample partitioning control file (storage_p_group.ctl): Name = S_ACT_EMP_P99 Table = S_ACT_EMP Partitions = 10 SpecialCol = PARTITION_COLUMN WCHAR(2) NOTNULL DEFAULT ' ' Function = WHEN (N.EMP_ID IS NOT NULL) BEGIN ATOMIC SET N.PARTITION_COLUMN = RIGHT(N.EMP_ID, 2); END Column 1 = PARTITION_COLUMN ASC Column 2 = EMP_ID ASC
70
Siebel 7 with DB2 for z/OS: Database Implementation and Administration Guide
Figure 3-2 Adding the partitioning index
We clicked Show Index Parts (Figure 3-2) and clicked OK to the message: Creating 9 partitions for ‘S_EVT_ACT_P99’, enter the LimitKey values in this page. We entered the Limit Keys (Figure 3-3).
Figure 3-3 Entering the Limit Keys
Note: As shown in Figure 3-3, there are two single quotes preceding the highlighted LimitKey. These quotes must be used in order to set this value
Chapter 3. Modifying the Siebel schema for a production environment
71
(however, they do not appear until you actually select the field). When working in this field, do not change or delete these two single quotes. We then clicked the Tablespace tab and altered table space S6001000 by changing PriQty to 48, SecQty to 1440 and clearing the SegSize cell. We finished by clicking the Show TSPARTs tab and clicking OK to the pop-up message: Creating 9 partitions for tablespace ‘S6001000’, please review partitioning index...: To create the new control file, we returned to the Home tab, clicked the Export tab, entered a name, and clicked Save. The Excel macro validated and exported our new control file.
3.2.2 Creating a backup table We ran a batch job to create a backup table space and table, populated the backup table, and dropped the original table space and table. The job we ran is listed in Appendix C.1, “Batch job used to create a backup table space” on page 168. The INSERT method we used here is suitable for small tables only. With the INSERT method, each inserted row is logged and this can fill up the log data set very quickly. Locking of million of rows can also be very expensive. Furthermore, in case of failure, rollback could be a major issue for long-running INSERTs with no commits to break down the unit of work. This is why the INSERT method is not recommended for large tables. For large tables, we recommend the method described in Chapter 6, “Partitioning method using DB2 utilities” on page 97.
3.2.3 Synchronize schema definition - produce a new schema file We followed this path to get started: Start -> Programs -> Siebel Enterprise Server 7.0.4 -> Configure DB Server We entered our Win2000 gateway server name TOT85 and our enterprise server name SIEBPROD.
72
Siebel 7 with DB2 for z/OS: Database Implementation and Administration Guide
Figure 3-4 Starting the Siebel Database Server Configuration utility
On the next 14 screens: 1. We accepted the default for the Siebel Server directory. 2. We accepted the default for the Siebel Database Server directory. 3. We selected BM DB2 UDB for z/OS and OS/390. 4. We selected Run Database Utilities. 5. We selected Synchronize Schema Definition. 6. We accepted SiebSrvr_siebprod as our ODBC Data Source Name. 7. We entered: PRODADM as the database user name and password. 8. We entered: PRODTBO as the Siebel Schema Qualifier. 9. We entered: PRODGRP as our Group Authorization ID. 10.We selected Generate DDL into Files. 11.We accepted the default output directory and entered our modified storage control file: C\sea704\dbsrvr\db2390\prod_p_storage.ctl. 12.We accepted the name of our current repository Siebel Repository. 13.We reviewed all variables and clicked Finish. 14.We clicked OK to “Apply the configuration now” and create a new ddl file.
Chapter 3. Modifying the Siebel schema for a production environment
73
3.2.4 Applying the schema changes We extracted, from the new schema.sql file, the ddl necessary to create the new partitioned table space, table, indexes, and trigger (sometimes required to populate the partitioning column). We FTPed this DDL file to the OS/390 and included it in a batch job which created the new objects, granted privileges on the new table, populated the table, and dropped the temporary objects. This batch job is in Appendix C.2, “Batch job used to create a partitioned table space” on page 171. Note: The batch job was run using the forward slash (/) as the delimiter. This was done because the create trigger statement contains a semi-colon (;) in the syntax.
3.2.5 Saving the storage control file Our last step is to save the storage control file created for production, so it would be easy to track later. The Excel spreadsheet can be saved with a different name (for example, the same name as the storage control file prod_p_stolage.xls). This spreadsheet can be used later for reference or modification.
74
Siebel 7 with DB2 for z/OS: Database Implementation and Administration Guide
4
Chapter 4.
Migration from development to the production system In this chapter, we describe the process used to migrate the work of the development team to the new production system. To illustrate development work, we used our Siebel 7 Tools client to add a column X_TEST to table S_EVT_ACT in our development system. Note: We built our original production Siebel server on the Windows server TOT85. For logistical reasons, we switched to a new Win2000 Siebel server T21a with a Siebel installation path of E:\sea704\ for this migration chapter. This chapter includes the following sections: Running dev2prod to migrate a copy of the development repository to our production system and create a new schema.sql file with schema updates for production Reviewing and editing the new schema.sql file and applying the changes Activating the new repository
© Copyright IBM Corp. 2003. All rights reserved.
75
4.1 Running dev2prod Migrating the development respiratory to the production system is facilitated by the Siebel supplied utility dev2prod. This utility can be run from the Configure DB Server GUI: Start -> Programs -> Siebel Enterprise Server 7.0.4 -> Configure DB Server We entered our Gateway Server (note the new server name T21a) and Enterprise Server names; see Figure 4-1.
Figure 4-1 Starting Configure DB Server
We accepted the default for the Siebel Server directory; see Figure 4-2 on page 77.
76
Siebel 7 with DB2 for z/OS: Database Implementation and Administration Guide
Figure 4-2 The default Siebel Server directory
We accepted the default for the Siebel Database Server directory; see Figure 4-3.
Figure 4-3 The default database server directory
We selected IBM DB2 UDB for z/OS and OS/390, as shown in Figure 4-4 on page 78.
Chapter 4. Migration from development to the production system
77
Figure 4-4 Selecting DB2 UDB for z/OS and OS/390
We selected Migrate Repository, as shown in Figure 4-5.
Figure 4-5 Selecting Migrate Repository
We next entered the database name of our development system (cataloged as db7r when we built this new Siebel server, T21a); see Figure 4-5 on page 78.
78
Siebel 7 with DB2 for z/OS: Database Implementation and Administration Guide
Figure 4-6 Database name of our development system
We entered the Siebel administrator name and password from the development system; see Figure 4-7.
Figure 4-7 Siebel administrator on db7r
We entered the Siebel Schema Qualifier of the development system; see Figure 4-8 on page 80.
Chapter 4. Migration from development to the production system
79
Figure 4-8 Development system schema qualifier
We entered a name to be used in the production system for the imported copy of the development repository (Dev Siebel Repository); see Figure 4-9.
Figure 4-9 The source and target repositories
We indicated the target database platform; see Figure 4-10 on page 81.
80
Siebel 7 with DB2 for z/OS: Database Implementation and Administration Guide
Figure 4-10 Target DB platform
We entered the target database ODBC name; see Figure 4-11.
Figure 4-11 Production database ODBC name
Then we entered the Siebel administrator name and password on the production system; see Figure 4-12 on page 82.
Chapter 4. Migration from development to the production system
81
Figure 4-12 Production Siebel administrator name and password
We entered the Production system schema qualifier and group authorization ID; see Figure 4-13.
Figure 4-13 Production schema qualifier and group authorization ID
We selected the option to generate a file with the DDL, which we will apply in a batch job; see Figure 4-14 on page 83.
82
Siebel 7 with DB2 for z/OS: Database Implementation and Administration Guide
Figure 4-14 Option to generate a file with the DDL
In Chapter 3, “Modifying the Siebel schema for a production environment” on page 67, in which we describe how to partition a table in our new production database, we extracted a current storage control file (TOT85\\c:\sea704\dbsrvr\db2390\new_storage.ctl). We now copied that file to our new Siebel server (T21a) and specified it as the storage control file to be used in the dev2prod process; see Figure 4-15.
Figure 4-15 Specify the DDL output directory and the storage control file
Chapter 4. Migration from development to the production system
83
We reviewed the parameters and clicked Finish; see Figure 4-16.
Figure 4-16 Review parameters
We clicked OK to confirm; see Figure 4-17.
Figure 4-17 Apply the configuration
84
Siebel 7 with DB2 for z/OS: Database Implementation and Administration Guide
4.2 Reviewing the schema file - applying the DDL to the production system The new schema.sql file (E:\sea704\dbsrvr\db2390\dboutput\dev2prod\schema.sql) contains extraneous DDL statements (we installed Siebel 7.0.4.200). We edited our schema.sql file to contain only the required ALTER statements. At this point, the DBA has the choice (as in previous chapters) of executing the DDL from the Siebel server or transferring the DDL (via ftp) to the zSeries for execution by the DBA in a batch job. In our case, there was only one statement: ALTER TABLE PRODTBO.S_EVT_ACT ADD X_TEST VARCHAR(26)
4.3 Activating the repository imported from development To apply the development system modifications to the production system, we used Siebel Tools, logging on to production, in order to switch to the repository we imported from development. Start -> Programs -> Siebel Tools 7.0.4 -> Siebel Tools By default, Repository is not listed in the Object Explorer list. To add Repository to your Object Explorer, follow this path: View -> Options -> Object explorer -> Repository Click the right arrow to add, then click OK. To rename the current repository to a backup name, we selected Repository in the left pane, as shown in Figure 4-18 on page 86.
Chapter 4. Migration from development to the production system
85
Figure 4-18 Rename the current Siebel repository
We clicked the name of the current repository and changed the name to Original Siebel Repository; see Figure 4-19.
Figure 4-19 Rename the current Siebel repository (continued)
86
Siebel 7 with DB2 for z/OS: Database Implementation and Administration Guide
Next, we selected Dev Siebel Repository and renamed it to Siebel Repository; see Figure 4-20.
Figure 4-20 Renaming Dev Siebel Repository
We exited Siebel Tools. Our development repository had been migrated to our production system.
Chapter 4. Migration from development to the production system
87
88
Siebel 7 with DB2 for z/OS: Database Implementation and Administration Guide
5
Chapter 5.
Identifying and removing unused, non-unique indexes In this chapter, we describe a procedure for dealing with DB2 indexes in Siebel. The elimination of unused, non-unique indexes benefits performance for inserts, deletes, and updates, particularly in a data sharing environment. The discussion involves two topics: Identifying indexes within Siebel applications that can be eliminated Removing indexes physically from the Siebel schema, and logically from the Siebel repository Important: It is mandatory that you seek approval for dropping indexes from Siebel prior to proceeding. Removing some indexes from the Siebel schema will impact product performance. The Siebel support policy for inactivating and dropping unused indexes is rigidly followed. This support policy can be found in a Siebel technical services paper called Dropping Indexes Process. You should ask your Siebel Technical Account Manager for guidance.
© Copyright IBM Corp. 2003. All rights reserved.
89
5.1 Why remove indexes Siebel uses many indexes to insure good performance regardless of the configuration that the customer deploys for their Siebel environment. For example, insurance companies have different processing patterns than banks, and individual banks will have unique processing patterns. The Siebel application comes prepackaged with indexes for all potential, generic configurations. Are all of these indexes used at any one customer site? Probably not. So, once the Siebel implementation is configured, it is very likely that some of the indexes can be eliminated.
5.2 Which indexes to remove All unique indexes, such as P1 and U1 indexes, are not candidates to be inactivated or dropped. Dropping any unique index can result in data integrity conflicts that cannot be detected during processing. Indexes for the Siebel Repository and Siebel logging tables, such as S_DOCK_TXN_LOG, are not valid candidates to be dropped either. Only unused, non-unique secondary indexes can be dropped. This group includes indexes on unused Foreign Keys that only store the Null value entry. These indexes are further identified by a cardinality of 1, which indicates these indexes are not being effectively used in the specific deployment.
5.3 Siebel functional areas of interest There are two parts to any Siebel application. The first is the load of Siebel base tables using a process called EIM, and the second is Siebel online. In general, it is assumed that reviewing EIM indexes would take place as an installation activity; Siebel online would take place during a post-implementation phase. The procedure for each is very similar, but the relevant indexes are very different. It is very likely that the indexes we remove to optimize EIM initial load performance are critical to the Siebel online application. Each part of Siebel needs to be treated as a distinct application in order to gain maximum performance benefits from dropping unused, non-unique indexes. The initial EIM load is normally a one-time activity. A substantial quantity of data is loaded from legacy systems. It is during initial load that we find the most potential benefit from dropping indexes.
90
Siebel 7 with DB2 for z/OS: Database Implementation and Administration Guide
Testing has shown that incremental loads done as part of the daily, weekly, or monthly cycle can normally handle indexes that are needed for online processing. The online Siebel application is obviously the purpose of having the software. Online performance is critical. If you follow the processes outlined in the following sections, the indexes that remain are those that enforce table uniqueness and provide optimal access path for EIM incremental loads and Siebel online processing.
5.4 Identifying unused, non-unique indexes The procedure for identifying indexes for removal is the same regardless of the application (EIM or Siebel online). At IBM, we use the DB2 Performance Monitor for OS/390 product (DB2 PM) to help perform this task. Potentially, non-IBM monitors can be used as well, although we have not verified their capabilities. The procedure discussed uses DB2 PM. Information regarding the setup and configuration of DB2 PM can be found in 12.5, “Using the performance database of DB2 PM” in the IBM Redbook Squeezing the most out of dynamic SQL with DB2 for z/OS and OS/390, SG24-6418.
5.4.1 In the EIM load process The EIM process uses data extracted from legacy data stores to load into a set of staging tables, called EIM tables. The EIM process extracts the data from the EIM tables, validates the data according to internal Siebel rules, and loads it into the Siebel base tables. Once the sample data is loaded into the EIM tables, follow the procedure described in 5.4.3, “Index identification procedure” on page 92. The load for this exercise is a proportional subset of the typical EIM load that represents all the tables to be loaded. We recommend that 5% provides a reasonable sample. Once the exercise is complete, insure you have the DDL for the indexes you have identified, and then drop them. Complete the initial load from the EIM tables to the Siebel base tables, then recreate the dropped indexes. The indexes must be recreated, because the EIM portion of the Siebel application has different characteristics and access requirements than the online portion of the application. Siebel online will be adversely impacted if these indexes are not present.
Chapter 5. Identifying and removing unused, non-unique indexes
91
5.4.2 In Siebel online Once the application is configured and running for a while, online requests will be fairly standardized. Create a list of transactions that your configuration uses frequently and which should be fine-tuned. Perform the procedure described in 5.4.3, “Index identification procedure” on page 92. The load for this exercise is your list of transactions. Once the exercise is complete, insure you have the DDL for the indexes you have identified and then drop them. Rerun your transaction list to insure that there is no performance degradation. If there is, double-check that you have only dropped indexes from the list. When new functionality is deployed and performance degradation occurs, use normal SQL analysis techniques in combination with the list of dropped indexes to determine if replacing an index will help the transaction.
5.4.3 Index identification procedure 1. Stop the DB2 subsystem and then restart it; this flushes the dynamic cache. (Note that you can also run RUNSTATS to flush the dynamic cache). 2. Insure that the GTF data set is available and sufficiently large to contain the results. 3. Turn on the performance trace: START TRA(P) CLASS(30) IFCID(22,63) DEST(GTF)1
4. Apply load to the DB2 database (as described individually for EIM and Siebel online in the preceding section). 5. Stop the performance trace: STOP TRA(P) CLASS(30)
Once the trace has been completed, use DB2 PM to obtain the results. Example 5-1 on page 93 shows a sample DB2 PM record trace job to format DB2 data and store it in sequential data sets suitable for use by the DB2 load utility. The record is loaded into DB2 tables, and you produce reports using a reporting facility such as Query Management Facility (QMF™).
1 We use GTF as the target for our trace data, but SMF can also be used. It means using SMF in the DEST parameter of the TRACE command rather than GTF. It also means using the GTF data set as the input file for the Performance Monitor report.
92
Siebel 7 with DB2 for z/OS: Database Implementation and Administration Guide
Example 5-1 Sample record trace job for IFCID 22 and 63 //PMREPORT // //REPORT //STEPLIB //SYSPRINT //SYSUDUMP //JOBSUMDD //RTFILDD1 // // //INPUTDD //SYSIN DD RECTRACE
JOB (),CLASS=A,NOTIFY=&SYSUID,MSGCLASS=X, REGION=0M EXEC PGM=DB2PM DD DSN=DSN710.DGO.SDGOLOAD,DISP=SHR DD SYSOUT=* DD SYSOUT=* DD DUMMY DD DSN=SIEBEL1.DB2PM.IFCD2263.DG.FILE, DISP=(NEW,CATLG,DELETE), SPACE=(CYL,(1,10),RLSE),UNIT=SYSALLDA DD DISP=SHR,DSN=SIEBEL1.DB2PM.IFCD2263.DG * FILE INCLUDE(IFCID(22,63))
EXEC
Several sample table create statements and load control statements come with DB2 PM in the SDGOSAMP library. Use the create table statement members DGONCFMB and DGONCFSQ initially to set up the environment and create tables as a one-time activity. The load control statement members DGONLFMB and DGONLFSQ use a LOAD REPLACE utility to load the DB2 tables. Once the tables are loaded, run the query shown Example 5-2. The query output contains a DROP INDEX statement line for each non-unique index that is not being used in the application being tested. Example 5-2 Query to obtain a DROP INDEX list for the unused non-unique indexes SET CURRENT SQLID='SIEBTBO' ; SELECT ' DROP INDEX SIEBTBO.'||A.NAME||' ;' FROM SYSIBM.SYSINDEXES A, SYSIBM.SYSINDEXPART B WHERE NOT EXISTS ( SELECT ACCESSNAME FROM DB2PM.DB2PMFRTRC_MINIPLN WHERE ACCESSNAME=A.NAME AND ACCESSCREATOR=A.TBCREATOR) AND UNIQUERULE ='D' AND A.TBCREATOR='SIEBTBO' AND B.PARTITION=0 AND A.NAME=B.IXNAME AND A.CREATOR=B.IXCREATOR ;
However, there is probably no need to drop and recreate later all indexes on Siebel tables that are not used during EIM and used, for example, during online
Chapter 5. Identifying and removing unused, non-unique indexes
93
Siebel. This is a waste of time and resource. So, when you know all the tables used during a specific application, you can append the lines in Example 5-3 to the query in Example 5-2, along with the proper table list. Example 5-3 Lines to append to query in Example 5-2 to reduce list of indexes to drop AND A.TBNAME IN ( 'EIM_ACCOUNT ' 'EIM_ACTIVITY ' ................... ................... 'S_PARTY ' 'S_USER '
, , , , , ) ;
Important: Ensure you have the create statements for all these indexes in an easily accessed file. For EIM, you must recreate all the indexes following the load. For Siebel online, the indexes are likely to be required later when new transactions are adopted.
When you are satisfied that everything is as required, drop the indexes in your list.
5.5 Inactivation of unused indexes Before doing any development work for zSeries, such as inactivating indexes, you must check the “Developing for deployment on DB2 for zSeries” checkbox found by selecting View -> Options -> Database in Siebel Tools (Figure 5-1 on page 95).
94
Siebel 7 with DB2 for z/OS: Database Implementation and Administration Guide
Figure 5-1 Checkbox to indicate development on zSeries
Once you have identified and dropped indexes, you need to inactivate them in the Siebel Repository. Inactivating an index in the Siebel Repository prevents that index from being recreated when changes are migrated from one environment to another. Here we show you how to inactivate the EIM_AGREEMENT_T05 index. (We picked this index randomly simply to describe the steps.) With this box selected, we carried out the following procedure to inactivate index EIM_AGREEMENT_T05. We selected the table EIM_AGREEMENT and locked the project (Tools -> Lock Project) so that we could inactivate the index. Next, we checked the Inactive column in the EIM_AGREEMENT_T05 row. Figure 5-2 on page 96 shows the inactivated index in red just after we moved the cursor on the next row.
Chapter 5. Identifying and removing unused, non-unique indexes
95
Figure 5-2 EIM_AGREEMENT_T05 inactivated
Now the index is dropped from the DB2 schema and inactivated from the Siebel repository. The Siebel repository and the DB2 database layout are in sync.
96
Siebel 7 with DB2 for z/OS: Database Implementation and Administration Guide
6
Chapter 6.
Partitioning method using DB2 utilities In Siebel 7, customers can choose to install the Siebel-DB2 database with one, or many, tables per table space, and with partitioned, or non-partitioned, table spaces. When tables grow large enough, the need to partition table spaces arises. In this chapter, we present a table space partitioning method using DB2 utilities with REXX programming to automate the process. This method is suitable for partitioning large-volume tables. The REXX procedures build the appropriate JCL streams and control cards to automate the execution of the process. The REXX procedures, jobs, and DB2 data definition language (DDL) required to prepare and run the partitioning process are described in this chapter, and the code samples are provided in Appendix D. You can also download them from the ITSO Web site; see Appendix F, “Additional material” on page 211 for downloading instructions.
© Copyright IBM Corp. 2003. All rights reserved.
97
6.1 Planning steps for partitioning Siebel tables Partitioning a DB2 table is not a complex process, but it does require some thought and planning. The following is a checklist of the planning steps: 1. Identify the tables to be partitioned and determine the partitioning columns. 2. Plan for REXX procedures to automate the table partitioning process. 3. Unload the tables you want to partition: a. Create and populate a reference table which contains informations on the tables to partition. This reference table is needed for the REXX procedure. b. Use a REXX procedure to generate the JCL for unloading the tables. c. Execute the generated JCL to unload the tables. 4. Create the new tables with partitions: – – – – –
Drop the old tables. Create the new partitioned table spaces. Create the new tables in their partitioned table spaces. Create indexes and triggers (if needed). Grant authorizations.
5. Load the new tables: a. Use a REXX procedure to generate the JCL for reloading the new tables. b. Execute the generated JCL to re-load the new partitioned tables. 6. Reorg the table spaces (if needed).
6.2 Identifying candidate tables and partition columns You need to identify the candidate tables for partitioning and determine the partitioning column you want to use to partition these tables. Partitioning strategy is explained in Chapter 3 of Implementing Siebel eBusiness Applications on DB2 UDB for OS/390 and z/OS, Version 7.0.4. You want a partition column that contains a good spread of values, so that data is distributed evenly. The partitioning solution can use an additional column and a trigger on any table where there is no index that can be used as a candidate for a partition index. In general, this is accomplished by using a combination of user keys, a partial user key, and Siebel row IDs. However, because the row IDs are generated automatically and, most of the time, in sequential order, these columns are not good candidates for partitioning. The partition column and a trigger can be used to generate a more random
98
Siebel 7 with DB2 for z/OS: Database Implementation and Administration Guide
number by extracting the last 2 bytes of a row ID column and storing this in the partition column. This number should provide a reasonable distribution. Since partitioning and clustering go together, in general, the partition index structure should be similar to the original clustering index (that is, if the original clustering index contains more than one column, these additional columns should also be added to the partitioning index in order to ensure clustering order). Important: Some tables may not have default partition columns. There may be situations when the DBA knows from data analysis that better partitioning columns exist than those recommended by Siebel. This situation would need to be reviewed by the Siebel Technical Account Manager.
6.3 Planning for REXX procedures Plan for REXX procedures if you want to automate the process of table partitioning and simplify your task by partitioning many tables in one pass. The REXX procedures offer the possibilities to unload data from the old non-partitioned tables, generate the partition column value during the unload process, and reload data, including the partition column value, into the new partitioned tables. The REXX procedures are particularly helpful for doing initial partitioning of tables in which the partitioning column will be subsequently populated using a DB2 trigger function. Prepare your environment as follows: Verify that DSNREXX is installed and bound in your environment; otherwise, run DSNTIJRX from the SDSNSAMP library (this will install DSNREXX). The core REXX procedure itself is generic and does not require customization. However, the members which call the procedure and the members called by the procedure are environment-specific and need to be customized. You need to customize DB2 and ISPF libraries to suit your installation and standards. The following members have to be customized: ISPBAT TBLUNLD LOADJOBC LOADSKEL UNLDJ LOADGENJ
ISPF Proc DSNTIAUL unload proc JCL job card Load skeleton member Unload job generator Load job generator
Chapter 6. Partitioning method using DB2 utilities
99
6.4 Unloading the tables You can use a REXX procedure to unload data from the non-partitioned tables. The unload REXX procedure requires a reference table to be built with the list of all tables that will be partitioned.
6.4.1 Reference table The REXX procedure to unload the tables is driven by a reference table with the following columns: TBNAME PART_COL PART_SRC COL_FUNC CARD IDX_CNT
Name of tables to be partitioned. Partitioning column. Some tables may require an additional partitioning column; otherwise, leave blank. The source column to populate the partitioning column. The column function which will be used to generate data for the PART_COL partitioning column Number of rows to be unloaded; should be set to 0. Number of indexes for this table; should be set to 0.
An example of how to create this table is shown in Example: D-1, “REFTBDDL member” on page 177. Populate the reference table by loading a list of tables to be converted to partition by using SYSPUNCH card member TBL00001, as illustrated in Example 6-1. Example 6-1 Reference table - list of tables to partition TBNAME PART_COL PART_SRC COL_FUNC ======================================================================= S_EVT_ACT PARTITION_COLUMN OPTY_ID CHAR(RIGHT(OPTY_ID,2),2) S_ACT_EMP PARTITION_COLUMN EMP_ID CHAR(RIGHT(EMP_ID,2),2) S_ADDR_ORG PARTITION_COLUMN OU_ID CHAR(RIGHT(OU_ID,2),2) S_OPTY S_ADDR_PER PARTITION_COLUMN PER_ID CHAR(RIGHT(PER_ID,2),2) S_APPLD_CVRG PARTITION_COLUMN ASSET_ID CHAR(RIGHT(ASSET_ID,2),2) S_ASSET PARTITION_COLUMN ROW_ID CHAR(RIGHT(ROW_ID,2),2) S_ASSET_CON PARTITION_COLUMN ASSET_ID CHAR(RIGHT(ASSET_ID,2),2) S_ASSET_POSTN PARTITION_COLUMN ASSET_ID CHAR(RIGHT(ASSET_ID,2),2) S_CONTACT S_COMMUNICATION PARTITION_COLUMN ROW_ID CHAR(RIGHT(ROW_ID,2),2)
Tables that do not require an additional partitioning column value to be provided have only the TBNAME column populated in the reference table (such as the S_OPTY and S_CONTACT tables shown in Example 6-1). These tables are downloaded as a whole.
100
Siebel 7 with DB2 for z/OS: Database Implementation and Administration Guide
In this case, a regular DSNTIAUL (parm DB2) unload of the table is generated by the REXX procedure (refer to Example: D-8, “DSNTIAUX member” on page 193). The tables which require an additional partitioning column value to be provided have the PART_COL, PART_SRC, and COL_FUNC columns populated in the reference table. Those tables are unloaded by specifying each column name. The REXX procedure, in this case, generates an SQL SELECT statement which builds the value to populate the partitioning column during the unload process. The unload REXX procedure builds the SELECT statement using the SQL function provided in the COL_FUNC column of the reference table. (This SQL function is the same as the one which will be used by the DB2 Trigger to populate the partitioning column later in the everyday usage of the table.) In this case, a DSNTIAUL (parm SQL) unload of the table is generated by the REXX procedure (refer to Example: D-7, “DSNTIAUI member” on page 192). The CHAR function in the COL_FUNC column ensures that the output is a character field with a fixed length of 2 bytes (the same attribute we need to populate the PARTITION_COLUMN). Without the CHAR function, the RIGHT function returns a varying length field, that is, VARCHAR.
6.4.2 Unloading the data The unload process uses the DB2 DSNTIAUL utility to unload the tables. We have an unload job UNLDJ (refer to Example: D-3, “UNLDJ member” on page 178) which drives the unload process. When UNLDJ executes, it calls ISPBAT, which calls the REXX procedure UNLDGEN. UNLDGEN generates unload jobs based on the list of tables supplied in the reference table. The process is as follows: UNLDJ executes ISPBAT (see Example: D-4, “ISPBAT member” on page 179), ISPBAT generates a batch ISPF environment. It executes the UNLDGEN REXX procedure (see Example: D-6, “UNLDGEN member” on page 181), which runs in ISPF batch mode. The UNLDGEN REXX procedure performs the following: – It reads a SYSIN parm card (refer to the last section in Example: D-3, “UNLDJ member” on page 178) to get the following input parameters required to generate the unload jobs: SSID TABLEOWNER
DB2 subsystem ID Table owner
Chapter 6. Partitioning method using DB2 utilities
101
BUILD OUT_HLQ TABLEINP BASEPDS DELLOADCRDS
BUILD number used as the output PDS second level qualifier Output PDS high level qualifier Fully qualified DB2 reference table name An existing model PDS to allocate output Delete existing output PDS, if any
– It allocates the following SYSPUNCH PDS and SYSREC output files which will contain the unload jobs: HLQ.build#.UNLDDATA.LOADCRDS A common PDS file HLQ.build#.UNLDDATA.TBL# One sequential file for each table – It reads the reference table to get the list of the tables to unload. – It generates the unload jobs which will use DSNTIAUL to unload the tables (refer to Example: D-7, “DSNTIAUI member” on page 192, Example: D-8, “DSNTIAUX member” on page 193, and Example: D-9, “TBLUNLD member” on page 193). – It generates an index cross-reference ($README) in the output PDS. The index cross-reference contains a reference number and a table name, which is useful information to use for debugging purposes. – It submits, automatically, the unload jobs. The UNLDGEN REXX procedure submits these jobs via the internal reader. Results of the unload jobs go into the SYSPUNCH PDS and SYSREC output files.
6.5 Creating new tables with partitions To create new tables with partitions, you need to do the following:
Drop the old tables Create the new partitioned table spaces Create the new tables in their partitioned table spaces Create indexes and triggers (if needed) Grant authorizations
Creating the new tables Use the Siebel DDLIMP tool to generate the DDL which will create the partitioned table spaces, tables with partitioning columns, indexes and triggers. Review and update the generated DDL with correct space allocation, and add appropriate Grants. Drop all tables to be converted to partition. If the original tables were installed using one table per table space, drop their table space as well.
102
Siebel 7 with DB2 for z/OS: Database Implementation and Administration Guide
Execute the generated and customized DDL (from ddlimp) to create the partitioned objects.
6.6 Loading the tables The load process uses the DB2 LOAD utility to load the tables. We have a LOADGENJ job (refer to Example: D-11, “LOADGENJ member” on page 194) which drives the table load process. When LOADGENJ executes, it calls the REXX procedure LOADGEN, which generates a load job for each table. The process is as follows: LOADGENJ executes the LOADGEN REXX procedure (seeExample: D-12, “LOADGEN member” on page 195). LOADGEN performs the following: – It reads a SYSIN parm card (refer to the last section in Example D-11 on page 194) to get the following input parameters required to generate the load jobs: SSID TABLEOWNER BUILD LOADPDS DELOUTPDS MACRO_NAME TABLEINP
Source subsystem ID Table owner BUILD number Template PDS generated from UNLDJ Delete loadcard PDS if exist flag Name of edit macro to edit load card DB2 reference table name that contains a list of tables already unloaded
– It allocates a new PDS file which will contain the load jobs HLQ.build#.UNLDDATA.ssid – It copies all load card members from the previous unload PDS file (LOADCRDS) – It modifies load card members to add appropriate SORTKEYS values, LOG NO, RUNSTATS and NOCOPYPEND options (see Example: D-14, “CARDEDIT member” on page 204). – It generates one load job for each table. All generated load jobs are put in member JCL2LOAD. Review the JCL2LOAD member carefully, and submit it when you are satisfied with the results.
Chapter 6. Partitioning method using DB2 utilities
103
6.7 Reorganizing the tables After all jobs have completed successfully, review the clustering index statistic for each table to verify that the cluster ratio is low. If not, reorg tables accordingly.
104
Siebel 7 with DB2 for z/OS: Database Implementation and Administration Guide
7
Chapter 7.
Monitoring dynamic SQL In this chapter, we discuss how to use the DB2 Performance Monitor for OS/390 (DB2 PM) Workstation Online Monitor and Siebel SQL traces to identify and monitor poorly performing dynamic SQL statements in Siebel. A comprehensive description of dynamic SQL analysis and usage of the DB2 Performance Monitor for OS/390 (DB2 PM) Workstation Online Monitor tool can be found in the following IBM Redbooks: Squeezing the Most out of Dynamic SQL with DB2 for z/OS and OS/390, SG24-6418 DB2 for z/OS and OS/390 Tools for Performance Management, SG24-6508
© Copyright IBM Corp. 2003. All rights reserved.
105
7.1 Monitoring dynamic SQL in the DSC The Siebel application uses dynamic SQL for all data retrieval. The dynamic statement cache (DSC), where the SQL are cached, is the best place to monitor ongoing SQL activity. Siebel requires you have the DSC turned on, and this is done by setting the CACHEDYN ZPARM parameter to YES. DB2 Instrumentation Facility Component Identifiers (IFCIDs) 316, 317, 318 have been specifically implemented to monitor the DSC. To obtain DSC information, an IFI program has to request IFCIDs 316, 317 and 318. These IFCIDs are available when DB2 monitor trace class 1 is active. We discuss these in more detail in “IFCID 316, IFCID 317, and IFCID 318” on page 108.
7.1.1 DB2 PM Workstation Online Monitor tool The DB2 PM Workstation Online Monitor tool provides access to the Dynamic Statement Cache to analyze the performance of cached dynamic SQL statements. It reads the previously mentioned IFCIDs with the help of a host server task (the data collector), which collects DB2 performance data through the instrumentation facility interface (IFI). For data-sharing installation, the data collector has to be started for each DB2 member to monitor, because each member has its own DSC. The DB2 PM Workstation Online Monitor client GUI presents this data to you in a user-friendly format. Figure 7-1 on page 107 illustrates how the DB2 PM Workstation Online Monitor provides a detailed look into the dynamic statement cache.
106
Siebel 7 with DB2 for z/OS: Database Implementation and Administration Guide
Click this button to refresh the screen
Click to start IFCID 318 Click to stop IFCID 318
Click to sort
Check this box to receive DSC information Use to filter to reduce the number of cache entries
Figure 7-1 Monitoring the dynamic statement cache: statement string and some counters
When you first open this window, it may be blank because a filter is activated to limit the number of rows displayed. You can disable filtering, or modify the filter to an appropriate value, to get information about statements in the cache. Click the check box to enable data to be transferred from the DSC. Note: The information is only downloaded from the host (data collector) when you request it, so ensure that the check box is checked. To update the information, use the Refresh button on the upper toolbar.
Chapter 7. Monitoring dynamic SQL
107
Detailed information about the statement cache is only available to DB2 PM Workstation Online Monitor functions. The information cannot be externalized to SMF or GTF and processed by a DB2 PM batch job.
IFCID 316, IFCID 317, and IFCID 318 As mentioned, in order to obtain cache information, the IFI program has to request IFCIDs 316, 317, and 318, and these IFCIDs are available when DB2 monitor trace class 1 is active. IFCID 316
This contains a large number of fields. It contains the first 60 bytes of SQL and by default only gathers basic status information, such as when the statement was inserted in the cache and the number of time it was reused. Other statistics are filled when triggered by IFCID 318. If accounting class 3 is active, six suspension timers are also collected.
IFCID 317
This can be used in addition to IFCID 316 to obtain the full SQL statement text.
IFCID 318
This acts as a switch for IFCID 316 to collect all available information. It does not itself contain any data; it simply indicates to fill in all available fields in IFCID 316 including the statistic fields. However, if you want to collect the six suspension timers (wait times), you must also have DB2 accounting class 3 active.
You can start IFCID 318 any time you wish. From that moment, DB2 starts collecting DSC statistics for each statement that is already in the cache, or for each new statement inserted into the cache. Each time you press the refresh button, you get the statement statistics since the last time IFCID 318 was started. As soon as you stop IFCID 318, the statistic counters are not collected anymore, and their values are set to zero. Statements that are not executed for a while can be pushed out of the cache, at which time their statistics are lost. Statements that are executed frequently can stay in the cache for weeks. This means that if IFCID 318 is always turned on, you do not know the exact starting point for statement statistics—and without it, it is difficult to compare the impact of different statements. Therefore, it is helpful to stop and restart IFCID 318 periodically when doing DSC analysis (for example, each morning), and then view the statistics during the day, to examine the SQL run during that day. If you do not start IFCID 318 at all, you will still be able to retrieve the content of the DSC, but as the counters will be zeros, you will not be able to sort the SQL
108
Siebel 7 with DB2 for z/OS: Database Implementation and Administration Guide
statements in order to identify the poor performers. In this case, you will not be able to identify the inefficient SQLs described in the next section. Note: If you are CPU-conservative, you can choose to start IFCID 318 only when you encounter a problem, then perform your analysis, and then stop it. You can also sort the content of the DSC on any column you want by simply clicking it. Once you’ve found a statement of a particular interest, then double-click on its row to zoom in on it (for more detail, refer to 7.1.3, “Identifying inefficient SQL” on page 112). Also keep in mind that most of the numbers in the SQL statement window are updated at the end of the SQL execution—except for cursor counters, which are incremented at the end of open cursor and fetch cursor operations. (In this case, you do not have to wait until the cursor closes before the numbers get incremented.) But in general, the numbers here are not as accurate as the numbers you might get, for example, in DB2 accounting, where the counter is updated as the event takes place. Therefore, if a query scans a lot of rows before a qualifying row is returned between fetch operations, the counters do not get updated for a long time, so using the statement cache information to monitor long-running queries should be used with this information in mind.
7.1.2 Explaining SQL statement from the cache Figure 7-2 on page 110 shows a specific SQL statement we selected, as well as all the information stored in the DSC that relates to this statement.
Chapter 7. Monitoring dynamic SQL
109
Figure 7-2 Full picture of the cached statement
You get the complete SQL statement text, and if you have Visual Explain installed on your workstation, you simply have to click the Explain button to get the explanation of this statement. A Visual Explain window will give you the access path graph, as shown on Figure 7-3 on page 111.
110
Siebel 7 with DB2 for z/OS: Database Implementation and Administration Guide
Figure 7-3 Visual Explain graph for a cached statement
Be aware that Visual Explain re-prepares the statement using the actual catalog information to present this information. The explained access path is not necessarily the same as the cache statement used. Visual Explain uses catalog table information, like sysibm.sysindexes available at explain time; they will be different when indexes have been created or dropped. The real access path that is used resides in the cache and can be different from the Explain as discussed. You must have a trace active to capture IFCID 22 (the mini-plan) at the time the statement is inserted into the cache to verify the access path used by DB2 when the SQL statement was added. IFCID 63 is also used for this purpose, but the large SQL statements built by Siebel are frequently too large and get truncated above 5 K. (This 5 K limitation may be dropped in DB2 for z/OS V8.)
Chapter 7. Monitoring dynamic SQL
111
7.1.3 Identifying inefficient SQL The key indicators of inefficient SQL are:
High getpages and low rows processed High rows examined and low rows processed Long statement average elapsed time User complaints
When searching the DSC for inefficient SQL, it is helpful to sort the statement entries by total getpages, total rows processed, or total elapsed time, and then use these indicators to find individual problem statements. The sort presents the high impact statements on the top of the list.
High getpages and low rows processed (per execution) A getpage occurs when DB2 loads a table or index page to check the contents of the page. Examining numerous pages uses additional CPU, and contributes to pressure on the buffer pools. High “getpages per row processed” indicators are seen when: Predicates contain columns that are not indexed, or not in the index used to access the table. SQL contains range predicates - these will sometimes cause index columns to the right of the range predicate to not be indexable. Index screening, where there are gaps in matching index columns from the predicate columns.
High rows examined and low rows processed (per execution) A row is examined when DB2 checks it physically to determine if it satisfies the predicate criteria. When a row can be disqualified based on index access, it does not count as a “row examined”. When DB2 reads rows rather than indexes, then “rows examined per row processed” is high. This commonly happens when: Predicates contain columns which are not indexed, or not in the index used to access the table SQL contains range predicates - these will sometimes cause index columns to the right of the range predicate to not be indexable After finding a statement with high “rows examined per row processed”, you should also check the average number of rows examined and rows processed, to confirm that the statement is inefficient.
Long “average elapsed time” per execution There are a number of reasons why one execution of a statement may take a long time. In the case where the statement fetches, inserts, or changes hundreds
112
Siebel 7 with DB2 for z/OS: Database Implementation and Administration Guide
or thousands of rows, it is normal. Check “Avg rows processed” to see the number of rows returned per execution. In the situation where only few rows are processed on each execution, or the time per row processed is long, it could point to one of several things: I/O constraint on the disk where the table or index resides Logical row lock contention (because of INSERT,UPDATE,DELETE, and so on) Inefficient SQL, as described above DB2 contention on page latches CPU-constrained or storage-constrained machine
7.1.4 Considerations on parameter markers Siebel uses dynamic SQL. Statements are first prepared with parameter markers, which are placeholders for the execution-time parameters. Since parameter markers are used for prepare, DB2 cannot make use of all the optimizer capabilities. For example, the column distribution statistics gathered with RUNSTATS FREQVAL (the TYPE=F statistics in SYSIBM.SYSCOLDIST), which track the values that most often occur in a column, are not used when optimizing dynamic SQL prepared with parameter markers. When the TYPE=F statistics are not used, it can cause situations where DB2 does not choose an index that would be the most efficient way to access the data. Generally, these are situations where the SQL has a predicate referencing an index with a low cardinality column (for example, a column that is a flag for processing status, which might have only a few possible values). When the statement is optimized with parameter markers, DB2 does not know whether the statement is searching for the small percentage of unprocessed rows, or the large percentage of processed rows, and it chooses another way to access the data, rather than the low cardinality index. If the statement is re-optimized at execution, then DB2 will see the value of the predicate variable, and be able to compare it against the column distribution data—and can then choose the best access path by determining whether the value occurs frequently or rarely in the column. In most cases the values of host variables are not known at prepare time. Consequently, the optimizer cannot take advantage of columns values distribution. This can result in severe access path problems.
Chapter 7. Monitoring dynamic SQL
113
7.2 Siebel SQL tracing In this section, we describe the options available to the Siebel and/or database administrator to identify the SQL statements issued by Siebel to assist with any performance investigation: Ways of identifying the SQL issued by the Siebel user interface EIM performance hints and tips
7.2.1 Object Manager To set tracing at the Object Manager level, navigate to View -> Site Map -> Server Administration -> Components -> Component Event Configuration and select the required Object Manager. Since we were using the Siebel Call Center, we selected the Call Center Object Manager, shown in Figure 7-4 on page 115.
114
Siebel 7 with DB2 for z/OS: Database Implementation and Administration Guide
Figure 7-4 Set Object Manager SQL Log event = 4
This same level of tracing can be set by starting the server manager from the command line. This is done by issuing the following command from the siebsrvr/bin directory: srvrmgr /g erps7a /e siebdev /s erps7a /u SIEBADM /p SIEBADM
where:
/g /e /s /u /p
- Gateway server - Enterprise server - Siebel server - Userid - Password
Chapter 7. Monitoring dynamic SQL
115
We ran the command list component to determine the name of the Call Center Object Manager and found that this was SCCObjMgr. We then ran the following command to switch SQL tracing on for this Object Manager: change evtloglvl ObjMgrSqlLog=4 for comp SCCObjMgr
Figure 7-5 Server Manager command to set Object Manager SQL tracing on
Setting this level of tracing will cause details of the SQL statements issued by the Siebel Object Manager to be written to a log file called SCCObjMgr_nnnnn.log. In our environment, these log files were written to a directory called /sieb704/siebsrvr/enterprises/siebdev/erps7a/log. These files can be reviewed, to identify particular SQL statements to investigate further, by using tools such as the DB2 explain plan feature. Tracing can be turned off by resetting the value back to 1 (which is the default). When setting the SQL tracing at the Object Manager level, individual log files will be produced for all users who connect to this Object Manager, as shown in Figure 7-6.
Figure 7-6 Call Center Object Manager log files
The SQL detailed in the Object Manager trace logs shown in Figure 7-7 can be used as input to a DB2 explain plan process, but not directly; they have to be “processed” first. In the following sections, we describe two methods for doing explain, the first one directly on the host, and the second one using the DB2 command center on AIX.
116
Siebel 7 with DB2 for z/OS: Database Implementation and Administration Guide
Figure 7-7 Extract from an Object Manager trace log
Doing explain on the host The Object Manager logs may have lines that are greater than the 72-character limit of SPUFI or DSNTEP2. In addition, information other than SQL statements are present, that will generate explain errors if used directly. We used a REXX program to filter out unneeded information and to cope with the 72-character limit. The REXX also adds “DELETE FROM PLAN_TABLE WHERE QUERYNO = xxx”, “DELETE FROM DSN_STATEMNT_TABLE WHERE QUERYNO = xxx” and an “EXPLAIN ALL SET QUERYNO = xxx FOR” for each SQL to explain. Therefore, the REXX output file can be directly used as input for explain.
Chapter 7. Monitoring dynamic SQL
117
Use the following process to explain the SQL statements: 1. Upload the Object Manager trace log to the host. We used FTP to transfer it to a variable blocked (VB) sequential file, with a record length of 1024. We used ASCII parameter for the transfer. We called it SIEBEL.EIM.LOG. 2. Edit the SIEBEL.EIM.LOG host file, and use c x’05’ ‘ ‘ all to replace incorrect 05 hexadecimal characters with space characters. 3. Run the REXX program. We used a job that calls the REXX program providing the SIEBEL.EIM.LOG file as input. The REXX output file name was SIEBEL.EIM.OUT. 4. Review the SIEBEL.EIM.OUT file. ODBC Functions like { ts '2002-10-15 12:21:06' } need to be replaced with TIMESTAMP('2002-10-15-12.21.06') in order for explain to execute correctly. 5. Run explain using the SIEBEL.EIM.OUT file through SPUFI or DSNTEP2. From that point, use regular plan table analysis to identify poor access paths. Note: The REXX program and a sample job to call it can be found in Appendix E, “REXX program for EXPLAIN” on page 205.
Doing explain with the DB2 command center on AIX In order to run an explain plan, we first needed to create the plan tables on the DB7R instance. We changed the default DB2 Command Center settings to set the semi-colon (;) as the termination character by selecting Tools -> Tools Settings and checking the box Use statement termination character. We then copied one the SQL statements from the Object Manager trace log and pasted it into the DB2 Command Center script window. We added the text explain plan set queryno = 666 for before the SQL statement, as shown Figure 7-8 on page 119, and then clicked execute to run the explain plan.
118
Siebel 7 with DB2 for z/OS: Database Implementation and Administration Guide
Figure 7-8 Explain plan run from the DB2 Command Center
We retrieved the detailed explain plan information from the DB2 plan table using the following SQL statement: select * from siebadm.plan_table where queryno = 666;
7.2.2 Dedicated Web client It is also possible to install a dedicated Web client and request that the SQL be written to a log file. To do this, you need to set the /s parameter on the properties of the dedicated Web client. The SQL log file produced will be found in the client\bin directory, if the full path details are not provided with the filename.
7.2.3 EIM performance considerations This section highlights how to identify any SQL statements from an EIM task that may need to be reviewed as part of a performance review.
Chapter 7. Monitoring dynamic SQL
119
We issued the following commands from the Server Manager command line interface, to ensure that EIM produced a log file containing the details of the SQL processed: change evtloglvl SQL=4 for comp EIM change evtloglvl SQLSummary=4 for comp EIM change evtloglvl Trace=3 for comp EIM
We then ran EIM to import data into S_ASSET using the SQLPROFILE parameter on the IFB file, as shown in Example 7-1. Example 7-1 Sample IFB file using the SQLPROFILE parameter [Siebel Interface Manager] PROCESS = Import UPDATE STATISTICS = FALSE SQLPROFILE = sql.log [Import] TYPE = IMPORT BATCH = 1 TABLE = EIM_ASSET
Once EIM had completed, we were able to review the file topsql.log, produced by EIM, which showed us the longest-running SQL statements; refer to Figure 7-9.
Figure 7-9 Extract from log file produced by the SQLPROFILE parameter
The SQL statements identified can also be obtained from the log file, if needed.
120
Siebel 7 with DB2 for z/OS: Database Implementation and Administration Guide
8
Chapter 8.
Monitoring the Siebel 7 database In this chapter, we describe the database monitoring and administration tasks. We discuss the following: Installation considerations Database objects Monitoring using DB2 Statistics Database reorganization Backup and recovery
© Copyright IBM Corp. 2003. All rights reserved.
121
8.1 DB2 installation considerations We recommend that you create a separate DB2 subsystem for Siebel. The reason for this is because point-in-time recovery scenarios, discussed later in this chapter, are difficult to manage and implement in a DB2 subsystem shared with other applications. Siebel installations with DB2 for z/OS and OS/390 require some PTFs to be installed. A list of recommended PTFs for OS/390 Siebel installations may be found in the following IBM informational APARs: APAR ii13012 for Siebel 7.0.4 and APAR ii13487 for Siebel 7.5.x. Make sure you have those PTFs installed. When you install Siebel 7 in a DB2 for z/OS and OS/390 V7 data sharing environment, you may want to consider the observations and recommendations on the following DB2 issues:
Database objects Free space EDM pool Buffer pools
8.1.1 Database objects The Siebel 7 installation process (for Multiple Tables per Table Space schema layout) produces several Siebel-DB2 objects; the number varies, depending on the Siebel implementation. The following numbers are approximate. 22 DB2 databases are defined. All databases have the same creator SIEBTBO. The databases are named as follows: – SIEBDB00 through SIEBDB21 (22 databases) The database SIEBDB15 alone contains 54 table spaces. The other databases contain 1 to 18 table spaces each. 181 table spaces are defined. All table spaces have the same creator SIEBTBO. 160 of those table spaces have tables defined in them. 22 table spaces have no tables defined in them. There are 2485 tables and 3 views defined. All of the tables and views have the same creator - SIEBTBO. The table spaces are defined with page sizes of 4 K, 16 K, or 32 K. 83% of the tables have 4 K pages. The remaining tables have 16 K or 32 K pages. The larger page size is due to the fact that approximately 60% of the columns defined in the tables are Varchar or Long Varchar.
122
Siebel 7 with DB2 for z/OS: Database Implementation and Administration Guide
There are 5 table spaces with 103 to 282 tables defined in them. There are 33 table spaces with 20 to 70 tables defined in them. This can have major implications on the use of the REORG utility discussed later in this book. Given the number of tables and the challenge of managing the data sets containing those tables (a DB2 table space maps to a VSAM data set), the Siebel 7 installation option of multiple tables per table space represents, in general, a practical strategy. There are 13,244 indexes defined on the 2,485 tables. All of the indexes have the same creator - SIEBTBO. There is an average of 5 indexes per table in Siebel 7. 25 tables have between 30 and 70 indexes. The high number of indexes can stress performance during data load processes, and during REORG. However, Siebel 7 applications contain a large amount of text, which suggests a preponderance of single-row processing (multiple-row processing tends to involve data summarization, which does not apply in general to text applications). Consequently, the large number of indexes appears to support single-row SQL processing, which is a characteristic of text applications. There is another characteristic of Siebel 7 indexes that requires planning. The indexes frequently contain Varchar data columns. DB2 pads Varchar index columns to the maximum size of the column. This means that the DASD space requirements for the indexes could be significant. Varchar field length reduction is described in Chapter 7 in Implementing Siebel eBusiness Applications on DB2 UDB for OS/390 and z/OS, Version 7.0.4. Adhering to the Siebel 7 install process will cause indexes to be generated with a primary allocation of 48 K and a secondary allocation of 1440 K. We believe that these allocations may be inadequate for some indexes. However, our testing did not enable us to identify specific indexes that would require a greater DASD allocation. We recommend that you leave the primary allocation to 48 K (keep it small), but raise secondary allocation for the indexes to 9600 K. In this way, small indexes will take minimal space (perhaps as little as the primary allocation of 48 K), and larger indexes will not exceed the maximum number of extents. Some Siebel databases contain a relatively large number of objects. Be aware of the impact of such databases: The DB2 Database Descriptor (DBD) will be large. The DBD must be loaded contiguously into the DB2 Environmental Descriptor Manager (EDM) pool. DB2 will not load a DBD into an EDM pool if it is larger than 25% of the pool size. In the DB2 V7 Installation Guide, GC26-9936, it is recommended that the EDM pool generally should be 10 times the size of the
Chapter 8. Monitoring the Siebel 7 database
123
largest database descriptor (DBD) or plan, whichever is greater. The Installation Guide gives techniques for determining DBD sizes. Log activity may be significant. DB2 logs the necessary undo/redo information for the unit of recovery in which the DBD was changed. Updating large DBDs can cause significant logging. Contention should be considered. Create, Alter, or Drop of a DB2 object locks the DBD. This may cause contention. The contention on active databases may cause DDL (Data Definition Language - SQL statements) to time out, or users may be locked out while DDL is being executed. For these reasons, you may want to consider splitting databases that contain a large number of DB2 objects.
8.1.2 Free space Most of the indexes and table spaces are defined with free space of 30%. Given the large amount of Varchar and Long Varchar data (approximately 60% of the columns), the 30% free space appears reasonable. However, this free space may add significantly to your DASD requirements.
8.1.3 EDM pool size The EDM pool size for Siebel implementations may range from 20 MB to 150 MB. The major variants are the number of objects included in the database and the amount of storage devoted to the dynamic statement cache (or global cache). Siebel only uses dynamic SQL, so for performance reasons, the EDM pool size should allow a good reuse for the cached statements, to avoid the need to frequently reprepare the same SQL statements. You can calculate the Global Cache Hit Ratio as follows: Global Cache Hit Ratio (%) = short prepares / (full prepares + short prepares)
The value should be above 90 to 95%; if it is not, then increase the EDM pool size. If you are close to the 2 GB addressability limit for the DBM1 address space, then you can use a data space for the part of the EDM pool used for global caching. In such a case, make sure that the data space is backed by real storage, to avoid increasing the system’s paging activity significantly.
124
Siebel 7 with DB2 for z/OS: Database Implementation and Administration Guide
8.1.4 Buffer pools The following recommendations are for initially configuring the DB2 buffer pools in support of Siebel 7. These recommendations assume that the DB2 subsystem is dedicated to Siebel. BP0: restrict BP0 to the DB2 catalog and directory. This is a general DB2 data sharing recommendation which improves the performance of the dynamic SQL that Siebel executes. BP1: Siebel data BP2: Siebel indexes BP7: supports DB2 temporary storage (DSNDB07). The SQL Order By or Group By, for example, have the potential to require a DB2 sort, which DB2 supports through the use of the DSNDB07 work database. Siebel does a lot of sort. BP9: large Siebel table spaces (split out of existing table space) BP10: indexes for large Siebel table spaces BP16K1: Siebel data for 16 K table spaces BP32K1: Siebel data for 32 K table spaces Based on this initial setup, you should monitor your environment and adapt accordingly. The following is the buffer pools setup for a Siebel 7 environment with 5000 online users - a test performed in the DB2 Silicon Valley Lab. BP0: catalog and directory, 5000 buffers BP1: Siebel data, 20000 buffers BP2: Siebel indexes, 20000 buffers BP7: sort, 60000 buffers BP9: Not used BP10: Not used BP16K1: Siebel data for 16 K table spaces, 12000 buffers BP32K1: Siebel data for 32 K table spaces, 1000 buffers There are two major differences between those two setups: Notice the sort buffer pool size (60000 buffers) compared to BP1 and BP2. BP9 and BP10 were not used; the performance achieved with BP1 and BP2 met the test targets, so it was not necessary to isolate large Siebel table spaces and associated indexes in their own buffer pools.
Chapter 8. Monitoring the Siebel 7 database
125
8.2 DB2 statistics In this section we describe which DB2 statistics to collect for Siebel 7, and how to use them to monitor the database.
8.2.1 Why collect statistics Statistics about the data contained within DB2 objects are required for two main reasons: To provide information about the space occupied by the data and the state of the underlying data sets. These figures can be used to: – – – – –
Determine the optimum sizing for the underlying data sets Determine the correct settings for PCTFREE and FREEPAGE Determine when to reorganize the data Monitor growth for capacity planning Monitor the effectiveness of the compression dictionary
To provide data that the DB2 optimizer can use to determine the correct access path to the data, for queries, at either BIND or PREPARE time.
Both sets of statistics can also be used by DBAs to reevaluate physical database design.
8.2.2 What statistics should you gather for Siebel Gathering statistics can be performed from the Siebel server, but can also be run natively from DB2. For tables with data, we recommend that you gather statistics on all columns. For indexes with data, we recommend that you gather statistics with KEYCARD and FREQVAL parameters (use defaults for FREQVAL). Note: Columns in SYSCOLDIST contain statistics about distributions and correlated key values. Specifying the KEYCARD option of RUNSTATS allows you to collect key cardinality statistics between FIRSTKEYCARDF and FULLKEYCARDF (which are collected by default). Specifying the FREQVAL option of RUNSTATS allows you to specify how many key columns to concatenate, and how many frequently occurring values to collect. By default, the 10 most frequently occurring values on the first column of each index are collected.
8.2.3 Monitoring VSAM data set extents DB2 statistics can help in monitoring VSAM data set extents.
126
Siebel 7 with DB2 for z/OS: Database Implementation and Administration Guide
The maximum number of extents has increased from 119 to 251 with DFP 1.4. Although this was a concern in older devices, it is less a performance issue with new devices like RVA and ESS, where data is physically stored in small pages all over the I/O devices. Nevertheless, it is still a performance issue during open/close and the SWITCH phase of online REORG. There are upper bounds to the number of extents. The size of each extent may influence the limit of maximum volumes per data set (59 volumes per data set and 133 volumes per STOGROUP). Continuous monitoring of the extents in SYSTABLEPART and SYSINDEXPART is necessary to track objects that exceed the number of extents past the threshold value of 50 (this can be done through the EXTENTS field of those two tables). When this value is exceeded, REORG should be scheduled for the object (TS or IX). You will need to review the values of PRIQTY and SECQTY. If one or both of these values have changed, then avoid the REUSE parameter, so that the data set can be deleted and recreated with the new extents. PCTFREE and FREEPAGE may also be reduced, to squeeze more data into less space. With DB2 V7 enhancements to parallel data set open, FASTSWITCH for online REORG, and the disk capabilities provided by PAV, the requirement to reduce the number of extents is certainly not so critical in terms of performance. However, it is good practice to keep the environment under control in terms of DSMAX and VTOC size.
8.3 DB2 history statistics DB2 Version 7 introduces the ability to keep historical statistics relating to objects. The use of history statistics provides a way to study trends, to determine when utilities (such as REORG) should be run for maintenance, and to aid in space management. Additionally, the historical data could be used for reinstating old catalog statistics in case of access-path degradation. By using the HISTORY option either during RUNSTATS or inline REORG, DB2 will update the following new history catalog tables:
SYSIBM.SYSCOLDIST_HIST SYSIBM.SYSCOLUMNS_HIST SYSIBM.SYSINDEXES_HIST SYSIBM.SYSINDEXPART_HIST SYSIBM.SYSINDEXSTATS_HIST SYSIBM.SYSLOBSTATS_HIST SYSIBM.SYSTABLEPART_HIST
Chapter 8. Monitoring the Siebel 7 database
127
SYSIBM.SYSTABLES_HIST SYSIBM.SYSTABSTATS_HIST Those new catalog tables provide historical statistics for other catalog tables. For instance, SYSIBM.SYSTABLESPACE_HIST provides statistics for activity in SYSIBM.SYSTABLESPACE, SYSIBM.SYSTABLEPART_HIST provides statistics for activity in SYSIBM.SYTABLEPART, and so on. When DB2 adds or changes rows in a catalog table, DB2 might also write information about the rows to the corresponding catalog history table. Although the catalog history tables are not identical to their counterpart tables, they do contain the same columns for access path information and space utilization information. In the following sections, we show two examples of how to take advantage of those new historical statistics tables for a Siebel implementation.
8.3.1 Monitoring space growth Table SYSTABLEPART_HIST has two fields, CARDF and SPACEF, which contain the values for total number of rows and total amount of DASD space allocated to the table space or partition space, respectively. Similar fields also exist for index space in SYSINDEXPART_HIST. CARDF and SPACEF can be tracked regularly for space growth of an object. Assuming constant growth over time, these numbers can be used to derive growth trends to plan for future needs. Consider the sample SQL shown in Example 8-1. Example 8-1 Query to get table space growth information SELECT MAX(CARDF),MIN(CARDF),((MAX(CARDF)-MIN(CARDF))*100)/MIN(CARDF), (DAYS(MAX(STATSTIME))-DAYS(MIN(STATSTIME))) FROM SYSIBM.SYSTABLEPART_HIST WHERE DBNAME='DB'AND TSNAME='TS';
Assuming that the number of rows is constantly increasing, so that the highest number is the latest, the query shows the percentage of rows added over a specific time period. This could be extrapolated to scale on a monthly or yearly basis. A similar query can be run against SYSINDEXPART_HIST to get index spaces growth information.
128
Siebel 7 with DB2 for z/OS: Database Implementation and Administration Guide
COPY utility The space growth and SYSCOPY entries of a DB2 object can be used in determining the requirement for an image copy. If the space growth is greater than a pre-determined percentage growth value since the last full image copy, then the COPY utility can be triggered to take a full image copy of the object.
8.3.2 Monitoring the rebuild of the compression dictionary When COMPRESS YES is set for a table space, the compression dictionary is initially built either via LOAD or REORG utility. The PAGESAVE field in SYSTABLEPART and SYSTABLEPART_HIST gives the percentage of pages saved due to the compression. The performance of the compression and decompression dictionary depends on the update activity on the table space. Over a time period, the PAGESAVE can be reduced below a threshold_limit value, and the DBA needs to rebuild the dictionary. Regularly building the dictionary is expensive, and it should be avoided. The PAGESAVE value in SYSTABLEPART_HIST can be used to monitor the effectiveness of the dictionary. Assume the following situation occurs: (max(pagesave)-min(pagesave))*100 /max(pagesave) > threshold_limit In this case, you should remove the keyword KEEPDICTIONARY from the REORG or LOAD utility. The utility will build a new dictionary, or else code the keyword in the utility command. We recommend a threshold_limit of 10%.
8.4 DB2 realtime statistics The objective of this new function, made available through maintenance on DB2 V7, is to help in the database administration of DB2. DB2 now provides realtime statistics (RTS) to be used by database administrators or the automated task scheduler to determine which objects require REORG, RUNSTATS, or COPY. The first planned users of this function are the DB2 Control Center for OS/390 and DB2 tools such as the DB2 Automation Tool. Some of the statistics collected are: The number of rows, LOB values or index entries modified since last REORG, RUNSTATS, or COPY The physical space information such as the number of pre-formatted pages, allocated space, and the number of extents
Chapter 8. Monitoring the Siebel 7 database
129
The number of distinct pages updates and the time of first update since the last COPY DB2 always generates realtime in memory statistics for each table space and index space on your system. Statistics are generated for each partition for partitioned table spaces, and indexes. Optionally, these in-memory statistics can be externalized to two DB2 tables based on a user-specific interval (STATSINT in ZPARM), or when necessary. When externalizing in-memory statistics, DB2 inserts a row for each partition or non-partitioned page set in SYSIBM.TABLESPACESTATS or SYSIBM.INDEXSPACESTATS. If a row exists, it will be updated. The absolute statistic values (for example, TotalRows) are replaced with the new values, and incremental values are summed with the in-memory statistics. Those two new tables are placed in the DSNRTSDB.DSNRTSTS table space. You can decide when to run REORG, RUNSTATS and COPY utilities, or when to enlarge your data sets, by querying these tables. A new sample stored procedure, DSNACCOR, is provided to help you in this task. The default scope for this stored procedure is to scan “all” data in the RTS tables and provide recommendations for “any” condition previously mentioned. To override either the scope of the data queried or the type of recommendation evaluated, the caller will pass along the appropriate parameter with the call to the stored procedure. Parameters can also be passed that override the default threshold settings. Calls to the stored procedure that do not provide parameters will employ default parameters (or thresholds), where appropriate. The stored procedure reports back the objects that require REORG, RUNSTATS, or COPY. Note: The RTS tables are not used for access path determination by the DB2 optimizer. Executing RUNSTATS is still required to update the traditional catalog tables used by the DB2 optimizer. For data sharing installation, RTS must be started on each member in order to get total statistics. You can find further information about RTS in DB2 UDB for OS/390 and z/OS Version 7 Administration Guide, SC26-9931, Appendix G and H. You can get the latest version of this book from the following link: http://www.ibm.com/software/data/db2/os390/v7books.html
8.5 Database reorganization The need for REORG is mainly driven by changes in the data. These changes can lead to disorganization of the data and cause, among other effects, longer I/O time to return data.
130
Siebel 7 with DB2 for z/OS: Database Implementation and Administration Guide
The need for REORG can also be driven by the need to activate compression, or to take into account the new space allocation induced by an ALTER TABLESPACE/INDEXSPACE PRIQTY and SECQTY. There are many statistics in the DB2 catalog that can indicate when a REORG should be run; these include LEAFDIST, NEAROFFPOS, and FAROFFPOS, among others. Degradation of performance indicates that a REORG may be necessary, and the number of extents allocated to a DB2 object can also indicate a REORG is needed. We recommend that the Siebel 704 table spaces be reorganized online with a frequency that supports application performance. If you’re looking for continuous availability, the SHRLVL CHANGE option is the one that gives almost 100% read/write access to the data during the REORG process. Due to the fact that there are many indexes on several of the tables, the FASTSWITCH - YES feature of the DB2 V7 online REORG utility will be highly desirable. The REORG utility is invoked at the table space level. When there are multiple indexes on multiple tables within the table space, the Switch phase of REORG is exposed to a potentially long duration due to the renaming of underlying VSAM data sets. Without FASTSWITCH, DB2 must change data set names using AMS RENAME function, which can be time-consuming. With FASTSWITCH, no VSAM rename is needed; the fifth data set qualifier changes from a fixed value (I0001) to a variable one, alternating between I0001 and J0001. Measurements have shown that DB2 with FASTSWITCH can effect the name change in approximately 10% of the time. However, even with FASTSWITCH, we recommend doing online REORG at quiet time. The REORG utility can also be invoked at the index level. There are benefits to reorganizing indexes, such as reclaiming free space, establishing free space, consolidating extents, removing pseudo-deleted keys, and so on. Use online REORG against Siebel indexes to significantly reduce the impact of this process. Since Version 6 of DB2, it is possible to gather the statistics during the execution of the REORG utility. Using this option reduces the elapsed time of a REORG followed by RUNSTATS. This is achieved by eliminating the need for RUNSTATS to scan the data to collect the statistics. Instead, this is achieved by reading the data during the REORG. The STATISTICS keyword allows this inline statistics gathering. DB2 Version 7 added the collection of historical statistics. They are collected when the HISTORY keyword is added to the REORG utility sysin.
Chapter 8. Monitoring the Siebel 7 database
131
8.6 Siebel-DB2 database recovery In a Siebel-DB2 V7 environment, you should consider the following recovery requirements: Recovery to currency Disaster recovery Point-in-time recovery (PIT)
8.6.1 Recovery to currency “Recovery to currency” focuses on how to handle a hardware failure, like the loss of a DASD device. From the perspective of the Siebel environment, recovery to currency considerations are the same as for any DB2 environment. If you are an experienced DB2 user, your present recovery to currency strategy can be applied to your Siebel environment.
8.6.2 Disaster recovery Disaster recovery addresses how you would handle the loss of your computing center. From the perspective of the Siebel environment, disaster recovery considerations are the same as for any DB2 environment. If you have disaster recovery procedures that address your current DB2 environment, they will also likely address your Siebel disaster recovery requirements. If you do not presently have DB2 disaster recovery procedures, you will want to evaluate the following potential starting points for disaster recovery support: Disaster recovery using Dump/Restore This is a frequent starting point for disaster recovery support. The scenario “PIT recovery using Dump/Restore utilities” on page 136 could also provide a starting point in addressing your disaster recovery requirements. Documented disaster recovery scenario In DB2 Administration Guide V7, SC26-9931, the index entry “disaster recovery” refers you to a section on preparing for disaster recovery, and to a disaster recovery scenario. If you ship copies of both your image copies and archive logs offsite, the documented scenario will enable you to recover to the last completed DB2 unit of recovery on the last archive you sent offsite. The scenario is popular; however, it does require practice.
132
Siebel 7 with DB2 for z/OS: Database Implementation and Administration Guide
Disaster recovery with additional hardware This is a broad topic that varies widely in both user requirement and scenario implementation. The scenario “PIT recovery using suspension of DB2 updating” on page 139 could provide a starting point in addressing your disaster recovery requirements. This scenario will require high-speed hardware to get copies of your DB2 log, BSDS, and data offsite.
8.6.3 Point-in-time recovery The usual reason for a point-in-time recovery is an application programming error or a flawed operational procedure. This exposure is always present, regardless of your hardware/software configuration. A point-in-time recovery, in a Siebel environment, has the potential to be the most disruptive outage you are likely to encounter. Note: The discussion on recovery in this section relates to the DB2 database only. Keep in mind that if you perform a PIT recovery on the database you also need to recover the Siebel file system to the same point in time as the database. You may need to recover all Siebel-DB2 objects to a prior point in time. Depending on how you have mapped your tables to table spaces, this could mean recovering 181 table spaces and 13,244 indexes to a prior point of consistency. Your usual point-in-time recovery techniques, which you probably regard as conventional at this time, may be insufficient in this environment. A failure in the application caused by a programming defect, or in a flawed operational procedure, such as running a job twice, introduces the requirement for point-in-time recovery. As much as possible, you will want to avoid PIT recovery with preventive measures such as increased attention to: Change management Problem management Testing Each of these disciplines is procedure-oriented and management-driven. As attention to these disciplines is increased, the need for point-in-time recovery is usually decreased. Unfortunately, the need for point-in-time recovery is never entirely eliminated. Consequently, you will want to make every effort to avoid having to do a point-in-time recovery, but you should be prepared to do one if required.
Chapter 8. Monitoring the Siebel 7 database
133
Unless you are facing an application error and you have guidance from Siebel on which exact subset of tables requires PIT recovery, you will be required to reset all Siebel tables to a prior point of consistency. There are several techniques to effect a point-in-time recovery, including: PIT recovery using user-written application programs PIT recovery using DB2 utilities The DB2 Quiesce and Copy utilities are the primary tools. PIT recovery using a Dump/Restore scenario This scenario typically employs non-DB2 utilities. PIT recovery using a DB2 conditional restart Any conditional restart scenario is potentially risky. The benefit of this scenario is the “effectively free” definition of the candidate points of consistency. Candidate points of consistency are a set of points on the log. Consistency may be established at any point in the set that you choose. PIT recovery using suspension of DB2 updating DB2 update activity is suspended using the SET LOG command to SUSPEND/RESUME logging. This function was introduced into DB2 in V6. In the following sections, we discuss these techniques in more detail.
PIT recovery using user-written application programs This is a strategic direction and not a scenario. It acknowledges that data can be corrupted due to program error. If this happens, you may attempt to correct the contaminated data with application programs. If you fail to correct the data with application programming, a scenario such as one of those following could be used as a last resort. This approach is gaining favor among users striving for high availability. In implementing an approach like this, it is important to determine which transactions will make the data more corrupt or propagate the errors. This information then can either be communicated to end users, or the DBA can use it to disable the erroneous processes.
PIT recovery using DB2 utilities The scenario for a PIT recovery using DB2 utilities is as follows: Execute the QUIESCE utility on all of the tables that are candidates to be reset if a PIT recovery is required. This causes the DB2 buffers for the quiesced tables to be externalized to DASD.
134
Siebel 7 with DB2 for z/OS: Database Implementation and Administration Guide
Execute the COPY utility on all the table spaces that are candidates to be reset if a PIT recovery is required. The obvious reason for this step is to back up the data. However, COPY will fail if it cannot externalize the DB2 buffers to DASD. That is the reason we invoked the QUIESCE utility first (to remove one reason why COPY may fail). You may want to place your Image Copy output on DASD. With image copies on DASD, there is no error-prone and time-consuming tape handling. Both DASD and tape-resident image copies enable parallelism in the COPY and RECOVER utilities. For the second time, execute the QUIESCE utility on all the tables that are candidates to be reset if a point-in-time recovery is required. This invocation of QUIESCE will establish a log Relative Byte Address/Log Record Sequence Number (RBA/LRSN) that will be the point of consistency. When it is necessary to recover to this point of consistency, RECOVER to the RBA/LRSN established by the second invocation of the QUIESCE utility. With the combination of the COPY and the second QUIESCE, the RECOVER TORBA/TOLOGPOINT (RECOVER TOLOGPOINT is used to recover to a LRSN) will perform as efficiently as a RECOVER TOCOPY would perform, assuming no logging during the execution of this scenario. When it is necessary to recover to this point of consistency, RECOVER all indexes on all the tables that have been reset to the prior point of consistency. The indexes must be synchronized with the data in the recovered table spaces. DB2 V6 added the functional capability to recover the index from an image copy. The recovery of an index from an image copy, which was introduced in DB2 V6, is a significant performance benefit over prior versions of DB2 that rebuild the index (this includes reading the table to unload and construct all keys, sorting the keys, and then rebuilding the index). If you are going to use this scenario, it is recommended that you recover your indexes using image copies. The benefits of this scenario are: There is minimal disruption to the user in preparing for the scenario. The user may see some slowness in response during the execution of the QUIESCE utility, but this can likely be scheduled during off-hours to minimize the disruption. There is no disruption to the user when COPY is run with Share-Level Change. COPY - Share-Level Change allows updates concurrent with COPY utility execution.
Chapter 8. Monitoring the Siebel 7 database
135
The recovery of the table spaces will be efficient. RECOVER TORBA/TOLOGPOINT will perform as well as RECOVER TOCOPY, assuming no logging between the execution of the COPY utility and the second execution of QUIESCE. There is also a disadvantage to this scenario: the requirement to recover many objects may take too long, thus making this scenario impractical. However, given the performance improvements introduced in DB2 V6 (which includes parallelism in COPY and RECOVER, Fast Log Apply, and RECOVER of indexes from image copies), this scenario may meet your performance requirements. If you are evaluating the use of this scenario, time it to determine if it meets your availability requirements.
PIT recovery using Dump/Restore utilities This scenario uses a DB2 command and usually a non-DB2 Dump/Restore utility program. Use the DB2 STOP DATABASE command to stop all of the table spaces. The STOP DATABASE command will cause the DB2 buffers to be externalized to DASD, and will cause the VSAM data sets that hold the DB2 data to be closed. While the table spaces are stopped, the data will be unavailable to users. You may evaluate bringing down DB2 as an alternative to the STOP DATABASE command. Dump the table space and index data sets, the DB2 log, and the BSDS using your installation's high-speed Dump utility. You may consider using FlashCopy® or SnapShot to dump the data sets. The dumped data sets represent your point of consistency. When it is necessary to recover to this point of consistency, do the following: – Stop DB2. – Restore the data sets that were dumped in the previous step. – Restart DB2. Because the table spaces were stopped when backed up, there were no outstanding units of recovery, and the data was consistent. The restored data consists of the table spaces and associated indexes, the DB2 log, and the BSDS. The recovery portion of this scenario is faster than the previous one, but preparing for it is more disruptive to the user. The data is unavailable to the user while the table spaces are stopped and while the data is being dumped. The length of time that data is unavailable can be lessened by using FlashCopy or SnapShot. See the IBM Redbook Implementing ESS Copy Services on S/390®, SG24-5680, for more information on FlashCopy.
136
Siebel 7 with DB2 for z/OS: Database Implementation and Administration Guide
PIT recovery using DB2 conditional restart This scenario will likely appeal to the more experienced DB2 user. The scenario requires a DB2 conditional restart, which is a part of DB2 not frequently exercised by users. Its key advantage is an “almost free” establishment of a candidate point of consistency. The first three steps of the scenario are new and will receive the major part of our attention here. Once those steps are complete, the remainder of this scenario is conceptually similar to the later steps of the scenario “PIT recovery using DB2 utilities” on page 134, with the difference that you will recover to currency and not to RBA/LRSN. Identify a set of candidate points of consistency. Consider a list that contains many items (or rows). Each list item has two entries in columns: The first column is a timestamp, and the second column is the DB2 Log RBA/LRSN associated with that time. The list can be quite long (that is, showing many timestamps). This list of timestamps is your set of candidate points of consistency. The list of candidate points of consistency might have an entry for each hour in the day or for each minute in the day. For each entry in the list, you have a timestamp and the corresponding DB2 Log RBA/LRSN. This allows you to map a specific time to a DB2 Log RBA/LRSN. How do you build a list of timestamps and the associated Log RBA/LRSN? You start by defining a dummy database and table space. This will be a real DB2 database and table space, but there will be no activity against the dummy table space. Siebel will not know about this table space. Once the dummy table space is defined, initiate a user-developed procedure that will periodically QUIESCE that dummy table space. Since you will allow no activity against the dummy table space, the QUIESCE will be fast. The QUIESCE will cause the Log RBA/LRSN and the timestamp to be entered into SYSIBM.SYSCOPY. The entries within SYSIBM.SYSCOPY for the dummy table space make up your list of candidate points of consistency. If you do the QUIESCE each hour, there will be an entry for the dummy table space in SYSIBM.SYSCOPY each hour. Note that the defined dummy table is only used as an aid in determining the RBA/LRSN in the log that corresponds to a given time. It is possible to calculate the RBA/LRSN without the dummy table but the calculation is complex; use of the table is simpler and less prone to error. As an alternative, use DSNJU004 to print the bootstrap dataset and examine the list of recent checkpoints to get a time / LRSN table. The information may also be available in the logs in checkpoint records using dsn1logp.
Chapter 8. Monitoring the Siebel 7 database
137
Select the candidate point of consistency that best meets your requirements. Suppose you determine that because of an application programming error, data in your Siebel system is inconsistent. This part cannot be automated. You must determine when the inconsistencies began to enter your system. Suppose you determine that at 5:00 PM on January 14, 2002, erroneous data began to enter your system. You make the determination that you want to take your system back before that point in time. You have one more task: query SYSIBM.SYSCOPY for the dummy table space entry before 5:00 PM on January 14, 2002. Once you determine that entry from the list, note the DB2 Log RBA/LRSN. Where do you stand now? You have the Log RBA/LRSN of the nearest time before the data inconsistencies entered your system. You are now ready to make that Log RBA/LRSN, which relates to a candidate point of consistency, into a true point of consistency. Make the candidate point of consistency into a true point of consistency. This is the point at which you do the conditional restart. The conditional restart makes your candidate point of consistency the true point of consistency on the DB2 Log. There is probably data inconsistency at the Log RBA/LRSN you identified. You are running an active Siebel system and it is likely that at the time you have identified, there was work in process (including in-flight units of recovery). However, you can make that Log RBA/LRSN a true point of consistency. By doing a DB2 conditional restart, you can make the Log RBA/LRSN you identified into a point of consistency. You will use the CHANGE LOG INVENTORY DB2 utility to create a conditional restart control record using the following statement, where XXXX is the true point of consistency you determined from your SYSIBM.SYSCOPY query: CRESTART CREATE,FORWARD=YES,BACKOUT=YES,ENDRBA/ENDLRSN=XXXX
The conditional restart causes DB2 to truncate the log at your true point of consistency. Log entries beyond that point are disregarded. Additionally, DB2 removes from SYSIBM.SYSLGRNGX and SYSIBM.SYSCOPY any entries that occurred after the true point of consistency. Recover all table spaces to the true point of consistency. The conditional restart positions you to recover all your table spaces. Because of the conditional restart, use RECOVER to currency, not
138
Siebel 7 with DB2 for z/OS: Database Implementation and Administration Guide
RECOVER TORBA/TOLOGPOINT (recovery to an RBA or LRSN is common in most point-in-time recovery scenarios). Recover all indexes on the tables that have been reset to the prior point of consistency. The indexes must be synchronized with the data in the recovered table spaces.
PIT recovery using suspension of DB2 updating This scenario is functionally similar to the scenario “PIT recovery using Dump/Restore utilities” on page 136. The salient features of both scenarios are:
Determine the set of objects requiring backup and recovery. Stop processing. Dump the set of objects. Restore the set of objects and restart DB2.
The unique characteristic of the “Point-in-time recovery using suspension of DB2 updating” scenario is the technique to stop DB2 update processing. Stopping update processing and then starting it again is accomplished by the SET LOG SUSPEND/RESUME command introduced in DB2 V6. The specific characteristics of this “Point-in-time recovery using suspension of DB2 updating” scenario are: Determine the set of objects requiring backup and recovery. This is your entire Siebel system. Stop processing. The unique feature of this scenario is the method for stopping the processing which is the ability to “suspend” and “resume” DB2 logging. This has the effect of “freezing” updates to your DB2 data while you make copies of the DB2 data, the DB2 log and the BSDS. Specifically, after logging is “suspended”, the DB2 log, BSDS, and the data are consistent. When the SET LOG SUSPEND command is issued, the following occurs: – A system checkpoint is taken. The scope of the command is single system-only. In a data sharing environment, the command will have to be entered for each member. Unwritten log buffers are externalized to DASD. The BSDS is updated with the high-written log RBA. A log-write latch is obtained to prevent further logging. Logging is suspended until the SET LOG RESUME command is issued. Dump the set of objects.
Chapter 8. Monitoring the Siebel 7 database
139
To take maximum advantage of this scenario, you must have a high-speed dump capability like FlashCopy or SnapShot. With this scenario, you include the DB2 log and BSDS to your list of objects to be dumped. The function of SUSPEND/RESUME logging makes the log consistent with the DB2 data. Restore the set of objects and restart DB2. You restore the DB2 data, the BSDS, and the log. Since the log is consistent with the data, the point-in-time recovery scenario requires only a normal DB2 restart. In-flight units of recovery are backed out, just as with any normal DB2 restart. After the normal DB2 restart, the data will include committed units of recovery at the time that logging was initially suspended.
PIT recovery considerations Your strategy should be to avoid a point-in-time recovery if possible, but also to provide a process that allows it to be performed when necessary. If a point-in-time recovery must be done, then choose the most effective recovery scenario consistent with your requirements. Following are the considerations for the five options previously discussed.
PIT recovery using user-written application programs This is a preferred approach among users when possible. It has the following benefits: There is little or no disruption to the user. Data that has not been corrupted will be available to the user. However, the user may see the erroneous data prior to the recovery. There is no loss of data entered between the time when the data contamination was introduced into the system, and the time when the contaminated data was corrected. Fewer processor resources are likely to be required than using either of the other techniques. Remember that this is an ideal and not a rigorous scenario that can be documented and tested. You must be prepared to reset your system by doing the point-in-time recovery when a “programming fix” is not possible or practical. Application programming may not be able to repair Siebel data; if Siebel defects exist, other point-in-time recovery techniques may be the only alternative.
PIT recovery using DB2 utilities This scenario is preferred when few table spaces and indexes are to be recovered. However, the recovery of the number of table spaces and indexes in a Siebel system may imply an outage of many hours, making this scenario potentially impractical. If you believe that this scenario may be workable in your
140
Siebel 7 with DB2 for z/OS: Database Implementation and Administration Guide
environment, run a benchmark to make sure that your availability requirements can be met. In running that benchmark, be sure to integrate the recovery performance enhancements introduced in DB2 V6, including parallel COPY/RECOVER, Fast Log Apply, and COPY support for indexes.
PIT recovery using Dump/Restore utilities The issue regarding this scenario is the number of table spaces and indexes that must be recovered to an established point of consistency. As the number of tables and indexes to be recovered grows, dump-restore may become the practical alternative. Dumping packs and restoring data (using features like FlashCopy or SnapShot) is faster than a recovery-based scenario if the regularly scheduled dumping activities and database non-availability can be tolerated. Note that recovery is required only when errors occur, while backup occurs on a scheduled basis even if no errors ever occur. The major disadvantage to this scenario is that the dumping of the data is disruptive to the user and occurs on a regular basis (usually daily). The Siebel system must be stopped in order to dump data that is consistent. Other applications must also be stopped if they are affected by Siebel being unavailable. An additional disadvantage (affecting all PIT recovery scenarios to some degree, but particularly noticeable in this one) is that work is lost when data is reset to a prior point of consistency. Considering a once-per-week backup schedule, then on average, production data for half of a week is lost when a point-in-time recovery is executed using this scenario.
PIT recovery using a DB2 conditional restart The main benefit to this scenario is that there is effectively no impact on the user to create the list of candidate points of consistency. The time required to actually recover the table spaces and indexes will likely be somewhat longer than the time required to do the recovery described in the scenario “PIT recovery using DB2 utilities” on page 134, because this scenario will likely require more DB2 log processing during the recovery. Since this scenario contains a conditional restart, anyone using it must first practice it. An improperly done conditional restart has the potential of severely damaging your DB2 subsystem. In summary, users should consider this scenario when: Having no disruption in defining the candidate points of consistency is of the greatest significance.
Chapter 8. Monitoring the Siebel 7 database
141
The long outage to actually perform recovery is acceptable. You are willing to practice conditional restart to develop and maintain the skills necessary for its success.
PIT recovery using suspension of DB2 updating This scenario has the advantages of the scenario “PIT recovery using Dump/Restore utilities” on page 136, with the added benefit that suspended logging is less disruptive to the user than stopping/restarting the DB2 subsystem. Data consistency is assured with this scenario through copying the log and BSDS in addition to the data, and then by executing a normal DB2 restart. In addition, the SET LOG SUSPEND/RESUME feature may serve as a basis, providing a starting point for your offsite disaster recovery support.
Choosing a PIT recovery scenario In choosing a point-in-time recovery scenario, you must evaluate three things: First you must evaluate the cost of preparing for the point-in-time recovery. The factors you will consider are the time it takes to back up your data, and the disruption the backup will cause your users. After evaluating the cost of preparing for the PIT recovery, you must then evaluate the cost of actually performing your PIT recovery scenario. You will evaluate the duration of the outage. And finally, you must evaluate the impact of lost data inherent in PIT recovery. In the following sections, we examine these issues in more detail.
Evaluate the user impact when preparing for the PIT recovery Although preparation or taking backups is much less time-consuming than the actual point-in-time recovery, it is potentially more disruptive because you prepare or take backups weekly, daily, or even hourly based upon your requirements. Since you may never actually do a point-in-time recovery, the preparation costs must be carefully weighed. Example 8-1 on page 143 rates the previously discussed PIT recovery scenarios in terms of time required and disruption to the user. The rating scale is 1 through 4, with 1 being the best.
142
Siebel 7 with DB2 for z/OS: Database Implementation and Administration Guide
Table 8-1 PIT recovery scenarios - rating time required and disruption to user Scenario
Rating
Conditional Restart
1
Suspend Logging
2/3
DB2 Utilities
2/3
Dump/Restore
4
The Conditional Restart scenario is effectively non-disruptive. It is enabled by the periodic QUIESCE of a dummy table that later enables mapping a point on the log to a date and time. The Suspend Logging scenario has the potential to be non-disruptive if managed properly. At issue is the duration of suspended logging. Suspended logging can cause update transactions to time out. You can limit this exposure by using a fast dump facility like FlashCopy. Also you can suspend the logging at a time when there is little or no updating going on in your system. The potential disruption of the DB2 Utilities scenario is influenced by two things. First, image copies are required for the later recovery. Since COPY can be run “Sharelevel - Change”, your users should see no disruption in backing up the data. However, a QUIESCE is also required, and it can disrupt your system availability. As with the Suspend logging scenario, this can be minimized by scheduling the process during a time of little or no update activity. The Dump/Restore scenario is the most disruptive to end-user system availability. It requires either stopping all objects or bringing down DB2. Although you might consider this scenario in a non-data sharing environment, it is unlikely that you would use it in a data sharing environment. Bringing down a data-sharing system (the most straightforward way to implement this scenario) runs contrary to the high availability reason for choosing data sharing in the first place.
Evaluate the impact of executing of the PIT recovery scenario There are two factors that must be considered when evaluating the execution of a PIT recovery scenario: the amount of time it is likely to require to do the recovery, and the amount of potential data loss. Unfortunately, the faster-running scenarios carry the potential of greater data loss. Consequently, two ratings will be presented: the first based upon the time to do the recovery, and the second based upon the potential for data loss.
Chapter 8. Monitoring the Siebel 7 database
143
Evaluate the time to do the PIT recovery Table 8-2 rates the previously discussed PIT recovery scenarios in terms of time required to do the recovery. The rating scale is 1 through 4, with 1 being the best. Table 8-2 PIT recovery scenarios - rating time required to do the recovery Scenario
Rating
Suspend Logging
1/2
Dump/Restore
1/2
DB2 Utilities
3
Conditional Restart
4
The Suspend Logging scenario and the Dump/Restore scenario are significantly faster than the other alternatives because they require only a restart of DB2 after restoring the data. No further recovery is required. Both the DB2 Utility and the Conditional Restart scenarios require recovery of the entire subsystem data. The DB2 Utility scenario is likely to be faster because there is likely to be less log processing. Since the QUIESCE is done at the time the image copies are made, minimum log processing is likely. However, with the DB2 Utility scenario, you may choose to QUIESCE more frequently than you COPY or back up the data in order to establish more points of consistency. If you do this, there will be more log processing if you select a QUIESCE point that is not the same as the point of the backup copies. Note: You may consider more frequent invocations of the QUIESCE utility when using the DB2 Utility scenario, to more effectively manage the loss of data.
Evaluate impact of lost data using the PIT recovery scenarios Table 8-3 on page 145 rates the previously discussed PIT recovery scenarios in terms of the potential loss of data. Since data is being reset to a prior point of consistency, data entered after that point of consistency is lost. The rating scale is 1 through 4, with 1 being the best.
144
Siebel 7 with DB2 for z/OS: Database Implementation and Administration Guide
Table 8-3 PIT recovery scenarios - rating the potential loss of data Scenario
Rating
Conditional Restart
1
DB2 Utilities
2
Suspend Logging
3
Dump/Restore
4
The Conditional Restart scenario offers the capability to recover to the point in time nearest to the start of data corruption. This is enabled by the frequent QUIESCE of the dummy table to establish many candidate points of consistency. Consequently, the loss of data is more effectively minimized with this scenario. There are some similarities in potential data-loss characteristics between the DB2 Utility scenario and the Suspend Logging scenario. Both are driven mainly by the frequency with which the point of consistency is established. The point of consistency is established in the DB2 Utility scenario by execution of the QUIESCE utility. The point of consistency for the Suspend Logging scenario is established when the data is FlashCopied. It is easier to QUIESCE more frequently (perhaps several times a day) than it is to execute a FlashCopy process. Additionally, management of the resulting backup points of consistency is easier with the DB2 Utility scenario. The QUIESCE point is maintained by DB2 in SYSIBM.SYSCOPY. Managing multiple FlashCopies is a greater challenge. Consequently, since both scenarios enable more frequent backups, but since the establishment of the point of consistency and management of the backups is easier with the DB2 Utility scenario, the DB2 Utility scenario is rated 2 and the Suspend Logging scenario is rated 3. Since the backup for the Dump/Restore scenario is the most disruptive, it is the scenario that is least likely to be executed more than daily. Consequently, this scenario has the greatest exposure to data loss. In all cases, you also need to develop a strategy to recover the data that you have lost between the point in time to which you recovered and the current time. You will have to rerun the applications that occurred after the point in time to which you recovered.
Chapter 8. Monitoring the Siebel 7 database
145
Summary: Choosing a PIT recovery scenario Choosing an PIT recovery scenario is ultimately a business decision. You have three key factors to evaluate. They are: The disruption caused by taking the backup The disruption caused by executing a PIT recovery The potential for lost data When selecting your PIT recovery strategy, keep your business requirements in mind as you prioritize each of these factors.
146
Siebel 7 with DB2 for z/OS: Database Implementation and Administration Guide
A
Appendix A.
DB2 parameters In this appendix, we describe the DB2 parameters we used at the ITSO. These parameters include the required DSNZPARMS for Siebel, and the values used at the IBM Silicon Valley Lab during the Scalability Characterization tests.
© Copyright IBM Corp. 2003. All rights reserved.
147
A.1 DSNZPARM values used for the Siebel 7 installation //D7R1JUN JOB (999,POK),'D7R1 INSTALL',CLASS=A,MSGCLASS=T, // NOTIFY=RC04,TIME=1440,REGION=0M /*JOBPARM SYSAFF=SC04,L=9999 // JCLLIB ORDER=(DB7RU.PROCLIB) //********************************************************************* //* JOB NAME = DSNTIJUZ //* //* DESCRIPTIVE NAME = INSTALLATION JOB STREAM //* //* LICENSED MATERIALS - PROPERTY OF IBM //* 5675-DB2 //* (C) COPYRIGHT 1982, 2000 IBM CORP. ALL RIGHTS RESERVED. //* //* STATUS = VERSION 7 //* //* FUNCTION = DSNZPARM AND DSNHDECP UPDATES //* //* PSEUDOCODE = //* DSNTIZA STEP ASSEMBLE DSN6.... MACROS, CREATE DSNZPARM //* DSNTIZL STEP LINK EDIT DSNZPARM //* DSNTLOG STEP UPDATE PASSWORDS //* DSNTIZP STEP ASSEMBLE DSNHDECP DATA-ONLY LOAD MODULE //* DSNTIZQ STEP LINK EDIT DSNHDECP LOAD MODULE //* DSNTIMQ STEP SMP/E PROCESSING FOR DSNHDECP //* //* NOTES = STEP DSNTIMQ MUST BE CUSTOMIZED FOR SMP. SEE THE NOTES //* NOTES PRECEDING STEP DSNTIMQ BEFORE RUNNING THIS JOB. //* //*********************************************************************/ //* //DSNTIZA EXEC PGM=ASMA90,PARM='OBJECT,NODECK' //SYSLIB DD DISP=SHR, // DSN=DB7R7.SDSNMACS // DD DISP=SHR, // DSN=SYS1.MACLIB //SYSLIN DD DSN=&&LOADSET(DSNTILM1),DISP=(NEW,PASS), // UNIT=VIO, // SPACE=(800,(50,50,2)),DCB=(BLKSIZE=800) //SYSPRINT DD SYSOUT=* //SYSUDUMP DD SYSOUT=* //SYSUT1 DD UNIT=VIO,SPACE=(800,(50,50),,,ROUND) //SYSUT2 DD UNIT=VIO,SPACE=(800,(50,50),,,ROUND) //SYSUT3 DD UNIT=VIO,SPACE=(800,(50,50),,,ROUND) //SYSIN DD * DSN6ENV MVS=XA DSN6SPRM RESTART,
148
Siebel 7 with DB2 for z/OS: Database Implementation and Administration Guide
ALL, ABEXP=YES, ABIND=YES, AUTH=YES, AUTHCACH=1024, BINDNV=BINDADD, BMPTOUT=4, CACHEDYN=YES, CACHEPAC=32768, CACHERAC=32768, CATALOG=DB7RU, CDSSRDEF=1, CHGDC=NO, CONTSTOR=YES, 0 then do queue StringToPrint EndPos = 0 StringToPrint = '' end else nop
return NOGO: Say "EIM Log dataset "eimdts" does not exist" exit 8
208
Siebel 7 with DB2 for z/OS: Database Implementation and Administration Guide
Example 8-3 sample job to call the eimrexx REXX program //EIMREXJ JOB REGION=0M, // MSGLEVEL=(1,1),MSGCLASS=X,NOTIFY=&SYSUID /*JOBPARM SYSAFF=ANY //******************************************************************* //******************************************************************* //SUBMIT EXEC PGM=IKJEFT01,DYNAMNBR=20 //SYSTSPRT DD SYSOUT=* //SYSPRINT DD SYSOUT=* //SYSUDUMP DD SYSOUT=* //SYSTSIN DD * EX 'SIEBEL.REXX.CNTL(EIMREXX)' 'SIEBEL.EIM.LOG' //*
Appendix E. REXX program for EXPLAIN
209
210
Siebel 7 with DB2 for z/OS: Database Implementation and Administration Guide
F
Appendix F.
Additional material This redbook refers to additional material that can be downloaded from the Internet as described below.
Locating the Web material The Web material associated with this redbook is available in softcopy on the Internet from the IBM Redbooks Web server. Point your Web browser to: ftp://www.redbooks.ibm.com/redbooks/SG246868
Alternatively, you can go to the IBM Redbooks Web site at: ibm.com/redbooks
Select the Additional materials and open the directory that corresponds with the redbook form number, SG246868.
Using the Web material The additional Web material that accompanies this redbook includes the following files:
File name Partition.zip
Description Zipped code samples of table partitioning method
© Copyright IBM Corp. 2003. All rights reserved.
211
Eimrexx.zip
Zipped code sample of Rexx program for EXPLAIN
How to use the Web material Create a subdirectory (folder) on your workstation, and unzip the contents of the Web material zip file into this folder.
212
Siebel 7 with DB2 for z/OS: Database Implementation and Administration Guide
Related publications The publications listed in this section are considered particularly suitable for a more detailed discussion of the topics covered in this redbook.
IBM Redbooks For information on ordering these publications, see “How to get IBM Redbooks” on page 214. Implementing Siebel eBusiness Applications with DB2 UDB on AIX/NT, SG24-6211 Siebel 2000 Database Implementation on OS/390 Using NT Siebel Servers, SG24-5953 Migrating Siebel Database from DB2/Oracle for NT to DB2 for OS/390, SG24-6236 DB2 UDB Server for OS/390 and z/OS Version 7: Presentation Guide, SG24-6121 Squeezing the Most Out of Dynamic SQL with DB2 for z/OS and OS/390, SG24-6418 DB2 for z/OS and OS/390 Tools for Performance Management, SG24-6508 Implementing ESS Copy Services on S/390, SG24-5680
Other resources These publications are also relevant as further information sources: Implementing Siebel eBusiness Applications on DB2 UDB for OS/390 and z/OS, Version 7.0.4, April 2002 (product publication) DB2 UDB for z/OS and OS/390: Installation Guide, Version 7, GC26-9936 DB2 UDB for z/OS and OS/390 V7 Administration Guide, Version 7, SC26-9931 DB2 UDB for z/OS and OS/390 V7 Utility Guide and Reference, Version 7, SC26-9945 DB2 UDB for OS/390 and z/OS V7 Release Planning Guide, Version 7, SC26-9943
© Copyright IBM Corp. 2003. All rights reserved.
213
IBM DB2 Connect Enterprise Edition for UNIX: Quick Beginnings, Version 7, GC09-2952 IBM DB2 Connect: User’s Guide, Version 7, SC09-2954 IBM DB2 Connect: Connectivity Supplement, Version 7, SDB2-CONN-SU, available at: www.ibm.com/software/data/dbe/library/
Dropping Indexes Process, Siebel Technical Services, March 4, 2002. The Siebel site is: www.siebel.com
Siebel 7 on DB2 UDB for OS/390 and z/OS V7: Scalability Characterization, White Paper, July 11, 2002
Referenced Web sites These Web sites are also relevant as further information sources: Samba http://www.bullfreeware.com
IBM HTTP Server for Siebel installations http://www.ibm.com/software/webserver/httpservers/siebel_ihs20.html
DB2 bibliography http://www.ibm.com/software/data/db2/os390/v7books.html
How to get IBM Redbooks You can order hardcopy Redbooks, as well as view, download, or search for Redbooks at the following Web site: ibm.com/redbooks
You can also download additional materials (code samples or diskette/CD-ROM images) from that site.
IBM Redbooks collections Redbooks are also available on CD-ROMs. Click the CD-ROMs button on the Redbooks Web site for information about all the CD-ROMs offered, as well as updates and formats.
214
Siebel 7 with DB2 for z/OS: Database Implementation and Administration Guide
Index A AIX configuration 29 application server 43 architecture 1–2 asynchronous preformatting 8
B buffer pools 28, 125
C catalog row-level locking 8 compression dictionary 129 connection concentrator 12, 18 connection pooling 18, 39 COPY 129 correlated subquery 5
D database configuration 69 connectivity DB2 Connect 10 Siebel connection pooling 18 implementation 3 objects 122 server 53 DB2 126 authorization 25 functions that benefit Siebel 4 asynchronous preformatting 7 catalog row-level locking 8 correlated subquery 5 FETCH FIRST n ROWS 7 monitoring indicators 10 online system parameters 6 realtime statistics 7 REORG enhancements 8 scrollable cursors 6 self-referencing subselect 5 statistics HISTORY 9 sysplex MEMBER ID 6 setup 26
© Copyright IBM Corp. 2003. All rights reserved.
buffer pool 28 databases 28 DSNZPARM 26 indexes 28 storage group 28 stored procedures 29 table spaces 28 tables 28 statistics 126 DB2 Connect 2, 13, 33, 37 configuration 39 connections 10 connection concentrator 12, 18 dedicated 11, 14 sysplex-aware 12, 16 Fix Pack 37 DB2 Performance Monitor for OS/390 105 DB2 PM 105 DB2 PM Workstation Online Monitor 106 dedicated connections 11, 14 dev2prod 76 DSC 106 DSNZPARM 26 dynamic SQL dynamic statement cache 106 monitoring 105 dynamic statement cache 106
E EDM pool 124 EIM 91 EXPLAIN 109, 118, 205
F FETCH FIRST n ROWS 7 free space 124
G gateway server 40
H history statistics 127
215
HTTP Web server 31
I IFCIDs 106, 108 indexes 89 unused, non-unique 89 identifying 91 in EIM load process 91 in Siebel online 92 procedure 92 inactivation 94 installation post-installation tasks 61 security 24 Siebel servers 40 system configuration 22 Instrumentation Facility Component Identifiers 106
M mid-tier setup 29 AIX configuration 29 DB2 Connect 33 HTTP Web server 31 Samba 30 monitoring dynamic SQL 106 EIM performance 119 EXPLAIN 109, 117, 205 inefficient SQL 112 parameter markers 113 Siebel database 121 buffer pools 125 EDM pool size 124 free space 124 history statistics 127 installation 122 objects 122 realtime statistics 129 rebuild of compression dictionary 129 recovery 132 reorganization 130 Siebel SQL tracing 114 space growth 128 VSAM data set extents 126
O online system parameters 6
216
P parameter markers 113 partitioning Siebel table spaces using DB2 utilities 97 candidate tables 98 creating the new tables 102 loading the tables 103, 194 partition columns 98 reference table 177 reorganizing the tables 104 REXX procedures 97, 99 unloading the tables 100, 178 using SQL INSERT 69, 72 applying the schema changes 74, 171 creating a backup table 72, 168 database configuration utility 69 saving the storage control file 74 PIT recovery choosing a scenario 142 DB2 conditional restart 137, 141 DB2 utilities 134, 140 dump/restore utilities 136, 141 evaluate execution 143 evaluate impact of lost data 144 evaluate recovery time 144 evaluate user impact 142 suspension of DB2 updating 139, 142 user-written application programs 134, 140 production system migration 75
R RACF 25 realtime statistics 7, 129 recovery 132 disaster 132 point-in-time 133 to currency 132 Redbooks Web site 214 Contact us xi reference table 100, 177 REORG 8, 130 repository 78, 85 resonate 2 REXX procedures 97, 177, 205
S SAMBA 30
Siebel 7 with DB2 for z/OS: Database Implementation and Administration Guide
schema 55, 67, 72, 74 schema.sql file 72, 74, 85 scrollable cursors 6 security 24 DB2 authorization 25 RACF 25 self-referencing subselect 5 Siebel connection pooling 18, 39 database configuration utility 69 EIM 91 maintenance 55 repository 78, 85 schema 55, 67, 72, 74 scripts 53 servers 40 application 43 database 53, 55 gateway 40 Web 62, 66 SQL tracing 114 storage control file 68–69, 74 system configuration client tier 22 database tier 23 mid-tier 23 statistics history 10 storage control file 68–69, 74 storage group 28 stored procedures 29 sysplex MEMBER ID 6 sysplex-aware 11 sysplex-aware connections 12, 16
T transaction pooling 12, 18
V VSAM data set extents 126
W Web server 62, 66
Index
217
218
Siebel 7 with DB2 for z/OS: Database Implementation and Administration Guide
Siebel 7 with DB2 for z/OS: Database Implementation and Administration Guide
(0.2”spine) 0.17”0.473” 90249 pages
Back cover
®
Siebel 7 with DB2 for z/OS:
Database Implementation and Administration Guide Installing and customizing Siebel database for production
In this IBM Redbook, we describe the implementation, customization, and administration of the Siebel 7 database with DB2 UDB for z/OS and OS/390 V7 using AIX V5L or Win2000 Siebel Servers, and we discuss the following topics.
Database administration Monitoring for performance
Installation tasks for setting up a three-tier configuration, with the application middle tier residing on AIX/Win2000 and the database tier residing on z/OS. The DB2 Connect EE V7 setup required to connect the Siebel application server to the DB2 database on z/OS is also discussed.
Customization of the Siebel schema for a production environment.
Migration from a development system to a production system.
Database administration tasks, including: –
Monitoring dynamic SQL
–
Identifying and inactivating unused indexes
–
Table space partitioning
–
Statistics gathering
–
Reorg, backup, and recovery
INTERNATIONAL TECHNICAL SUPPORT ORGANIZATION
BUILDING TECHNICAL INFORMATION BASED ON PRACTICAL EXPERIENCE IBM Redbooks are developed by the IBM International Technical Support Organization. Experts from IBM, Customers and Partners from around the world create timely technical information based on realistic scenarios. Specific recommendations are provided to help you implement IT solutions more effectively in your environment.
For more information: ibm.com/redbooks SG24-6868-00
ISBN 073842806X