... on spark plug base. If carbon is present, remove it with a spark plug cleaning ...
Also, be sure to replace spark plug if it has a broken insulator, damaged thread ...
2-8
PERIODIC MAINTENANCE
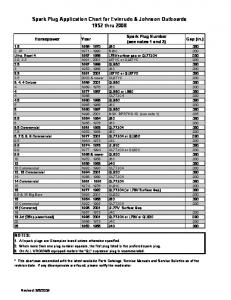
SPARK PLUG • Inspect every 100 hours (6 months). • Replace every 200 hours (12 months). Standard spark plug: NGK BKR6E Only resistor (R) type spark plugs must be used with this engine. Using a non-resistor spark plug will cause ignition and fuel injection system malfunctions. REMOVAL • Disconnect ignition coil connector, then remove the bolt securing the ignition coil. • Remove the ignition coil and spark plug. CARBON DEPOSIT Inspect for a carbon deposit on spark plug base. If carbon is present, remove it with a spark plug cleaning machine or by carefully using a pointed tool.
SPARK PLUG GAP Measure spark plug gap with a thickness gauge. Adjust to within specified range if gap is out of specification. Spark plug gap: 0.7 – 0.8 mm (0.028 – 0.031 in) 09900-20803: Thickness gauge
CONDITION OF ELECTRODE Inspect electrode for a worn or burnt condition. If it is extremely worn or burnt, replace spark plug. Also, be sure to replace spark plug if it has a broken insulator, damaged thread, etc. Confirm the thread size and reach when replacing the plug. If the reach is too short, carbon will be deposited on the threaded portion of the plug hole resulting in possible engine damage.
Gap
PERIODIC MAINTENANCE
2-9
INSTALLATION Installation is reverse order of removal. Spark plug: 28 N·m (2.8 kg-m, 20.0 lb-ft)
TAPPET CLEARANCE Inspect every 200 hours (12 months). The tappet clearance specification is different for intake and exhaust valves. Too small a tappet clearance may reduce engine power, too large a tappet clearance increases valve noise and hastens valve and seat wear. When the tappets are set to the specified clearance, the engine will run without excessive noise from the valve mechanism and will deliver full power. In this engine, the tappet clearance is increased or decreased by replacing the shim disc, made of a special wear resistant material, fitted to the top of the tappet. Using the proper tools provides for easy removal and installation of the shim disc. Tappet clearance adjustment should be checked and adjusted: • during scheduled periodic inspection. • when valve mechanism is serviced. • when camshafts are disturbed by removing them for inspection. CHECKING AND ADJUSTING TAPPET CLEARANCE 1. To remove the cover 1, pull the upper part outward, then lift up.
2. Remove following parts: • Engine side lower cover (See page 7-2.) • Ring gear cover and air intake silencer case (See page 6-2.) • Ignition coils • Spark plugs
1
3. Remove the cylinder head cover. (See page 6-11.) 1. Cylinder head cover
2-10
PERIODIC MAINTENANCE
4. Rotate crankshaft counterclockwise to bring cam nose vertical to shim surface. 5. Measure tappet clearances by inserting thickness gauge between cam and shim surface.
90˚
Tappet clearance (cold engine condition): IN.: 0.23 – 0.27 mm (0.009 – 0.011 in) EX.: 0.30 – 0.34 mm (0.012 – 0.013 in) 09900-20803: Thickness gauge This is a left hand (LH) rotation powerhead. Rotate crankshaft counterclockwise to prevent water pump impeller damage. NOTE: • Rotate crankshaft and measure clearance for each tappet respectively by bringing cam nose vertical to shim surface. • All tappet clearances can be measured during two crankshaft rotations. 6. If out of specification, adjust tappet clearance by changing shim. ADJUSTMENT Tappet clearances are adjusted by replacing tappet shim. 1. With cam nose vertical to valve, turn tappet cut-away towards center of cylinder head as shown in figure.
� Cut section of the tappet Shim ! Plug hole 2. Rotate crankshaft to open (lift up) valve and then remove camshaft housing bolts where shim is to be replaced. 3. Install special tool with camshaft housing bolts as shown in figure. 09916-69310: Tappet holder
� Camshaft housing bolt Plug hole
PERIODIC MAINTENANCE
2-11
4. Rotate top of cam 90 degree counterclockwise and remove shim from cut-away at tappet. (Two tappets can be adjusted at the same time.) • Do not put your finger between camshaft and tappet while the tappet is being held with the tappet holder. • Use a magnet to remove and install shim. • When installing shim, identification mark on the shim should face down (towards tappet).
� Magnet Shim
5. After removing shim, measure thickness of original shim and determine correct thickness of shim for proper tappet clearance as calculated by following formula. 09900-20205: Micrometer IN. side: A = B + (C – 0.25 mm) EX. side: A = B + (C – 0.32 mm)
� Removed shim
A: Correct thickness of shim for proper tappet clearance (mm) B: Thickness of original shim (mm) C: Original tappet clearance (mm) I.D No.
Thickness (mm)
I.D No.
Thickness (mm)
I.D No.
Thickness (mm)
218 220 223 225 228 230 233 235 238 240 243 245
2.18 2.20 2.23 2.25 2.28 2.30 2.33 2.35 2.38 2.40 2.43 2.45
248 250 253 255 258 260 263 265 268 270 273 275
2.48 2.50 2.53 2.55 2.58 2.60 2.63 2.65 2.68 2.70 2.73 2.75
278 280 283 285 288 290 293 295 298 300
2.78 2.80 2.83 2.85 2.88 2.90 2.93 2.95 2.98 3.00
I.D No. 2.50 mm
250
2-12
PERIODIC MAINTENANCE
6. Install shim. Identification number should face down (towards tappet). 7. Rotate crankshaft to be open (lift up) valve. 8. Remove tappet holder 1 and tighten camshaft housing bolts to specified torque. Camshaft housing bolt: 12 N·m (1.2 kg-m, 8.5 lb-ft)
� Special tool Tappet ! Camshaft
9. Recheck tappet clearance. NOTE: After completing tappet clearance adjustment and securing camshaft housing bolts, inspect tappet clearance again.
REASSEMBLY After checking and adjusting all valves, reinstall parts removed earlier. Installation is reverse order of removal.
Cylinder head cover Install the cylinder head cover. (See page 6-13.) NOTE: Examine cylinder head cover gasket for damage. Always replace gasket if sealing performance is suspect.
1
1. Head cover gasket
PERIODIC MAINTENANCE
• Tighten cylinder head cover bolts to specification. Cylinder head cover bolts: 11 N·m (1.1 kg-m, 8.0 lb-ft)
OCV (Oil control valve) • Install gasket and OCV, and then tighten bolts securely. NOTE: Position the OCV gasket tab as shown the right. Do not reuse OCV gasket. Always replace with new one.
1 1. OCV gasket
OCV bolt: 12 N·m (1.2 kg-m, 8.5 lb-ft)
FINAL ASSEMBLY CHECK • All parts removed have been returned to their original positions. • Check hose and wire routing. (See page 11-4 to 11-18.) • Check oil leakage.
2-13