APPLICATION: Honda VTX1800 motorcycles converted to trike. PRODUCT: ...
VTX1300 “R” model risers will work. Remove the brake calipers ... Remove the
two handlebar riser nuts and lay the bars on the tank (protect the tank). Remove
the ...
please contact Howe Performance 619 561-7764 or howeperformance@
sbcglobal.net.) CAUTION. All air must be bled out of the system before engine
startup.
This pump and bracket is designed to fit all Toyota V6 3.0 Pickups and 4Runners
from 1989-1995. ... Disconnect the vacuum lines from the power steering.
MERCEDES BENZ 190 (W201), 5-dr Wagon, *84-93. MERCEDES BENZ 200-
500 (W124), 4-dr Sedan, 85-95. MERCEDES BENZ 200-500 (W124), 5-dr Estate,
...
Follow this Wiring Diagram at all times. Wire the Solar Panel Kit up in Order from
1-6 shown on the Sun Saver Solar Controller.
Gleason gear design manuals, Dana Spicer instruction manuals, technical ...
However, any gear misalignment or deflection under load caused by worn or ...
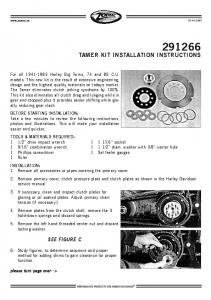
For all 1941-1983 Harley Big Twins, 74 and 80 C.U. models. This new kit is ...
This kit also eliminates all clutch drag and lunging while in gear and stopped plus
...
The Tabernacle is the original pattern of the church we all go to, but it also tells us a great deal about our God and a
This kit is designed to replace the IFS suspension on 1986-1995 Toyota Pickup's
and 4Runners. Installation time is typically 2 to 3 days. In addition to common ...
For all 1941-1983 Harley Big Twins, 74 and 80 C.U. models. This new kit is ...
This kit also eliminates all clutch drag and lunging while in gear and stopped plus
...
Chevy/GMC 2500 & 3500 HD 4WD | 2001-2010. Rev. 021014 ... Secure and
properly block vehicle prior to installation of BDS Suspension ... Your truck is
about to be fitted with the best suspension system on the market today. ....
Disconnect the sway
or this product is for the purpose of identifying it and shall not be deemed to
create an express warranty. 3128.001. U.S Models Only. 1989-2001 Suzuki
GS500E.
Red / blue are one pair and green / black the other pair. ..... It is vital that the power connections to the Melzi make
Voilé Split Kit Instructions. Note: Read all instructions completely before you
begin. If you do not feel confident to perform any of the steps contact Voile directly
at.
4) It is ALWAYS best to refill a cartridge when it is fresh â avoid as much as ..... begin twisting the screw into the
cannot solve. APPLICATION: HDST (Harley-Davidson Fatboy or Heritage trike) ...
noticeable. Refer to your service manual for adjusting proper end-play and fall.
ROADSMITH TRIKE CONVERSIONS BY
THE TRI KE SHOP
Please thoroughly review the instructions before and during installation. Keep in mind that this product was designed to be installed by trained dealer technicians. If you are a do-it-yourselfer, be patient, trust your common sense, and if necessary call your dealer or contact The Trike Shop at 800-331-0705 if you run into any problems you cannot solve.
APPLICATION: HDST (Harley-Davidson Fatboy or Heritage trike) PRODUCT: Replacement triple tree set for Fatboy or Heritage VERSION: 1 WARNING: Front-end performance is a critical safety item WARNING: Triple-trees should be installed by a qualified service technician WARNING: Use only hard-chrome plated fork tubes – show-chrome tubes are not recommend 1. Make sure the motorcycle is properly secured when raised. Remember to balance it properly as you will be removing the complete front end. 2. Remove the front wheel assembly and fender 3. Remove the handlebars, front and rear fork covers, headlight, fork tube assemblies and mounting hardware as these will be reused. Finish removing the remaining triple tree assembly. 4. Fork stops for the new triple trees are machined as an integral part of the lower tree for 2000 and later model bikes. 1999 and earlier models will require the installation of the supplied spacers and 3/8-16 cap screws in the lower tree to control proper turning radius. 5. Replace the lower steering cup bearing race at this time if there are any signs of wear. Use the new lower neck bearing supplied. 6. Clean and repack the upper neck bearing with EP grease or replace if necessary. Apply anti-seize to the threads of the neck stem. 7. Slide the neck stem through the lower tree and place the dust shield and bearing over the stem. Install the assembly into the bottom of the frame neck. 8. Place the upper bearing and dust shield over the protruding stem,set the top tree in place and start the stem into the threads by hand. DO NOT FORCE THE THREADS. (Cross threading is not covered by warranty). The stem is machined to accept a 3/8” ratchet drive. 9. Snug the stem and test for smooth movement of the tree assembly. Do not tighten at this time. Proper neck stem torque is accomplished when no end-play is noticeable. Refer to your service manual for adjusting proper end-play and fall away. This will be done once the fork assembly and front wheel are installed. 10. Remove the stock fork tube plug from each tube by clamping the fork tube plug securely in a vise and turning the fork tube. CAUTION: TUBES ARE SLIGHTLY SPRING LOADED.
11. It is recommended the fork oil be changed at this time. Refer to your service manual. 12. After filling with new oil, install the supplied dual threaded fork tube plug. Be sure to install the o-ring on the large threaded side of the plug and the pipe plug on the opposite side. Use pipe dope or Teflon tape to seal the plug. Place the plug over the spring and compress the spring into the fork tube until the treads meet. This is best accomplished by clamping the fork tube plug in a vise and using the fork tube to compress the spring. Thread the tube onto the insert and tighten the assembly by hand. 13. Install new lower fork covers at this time. 14. Next, apply a small amount of anti-seize to the Apply blue loctite to the screw threads. Insert assembly into the lower tree clamp hole leaving in the clamp bushing with the fork tube hole to through.
clamp bushing outside diameter. the 2-piece clamp bushing the screw loose. Align the gap allow the fork tube to pass
15. Check the fork tube hole for any sharp edges or burrs and completely remove before installing fork tubes. Apply anti-seize to the threaded end of the fork tube assembly. Install the tubes through the lower tree and thread into the upper tree as tight as possible BY HAND. 16. Secure tubes by tightening both clamp bushing screws to approximately 10ftlbs. 17. Check and adjust neck-bearing and-play and install set screw into rear of lower tree and tighten to lock steering stem in place. 18. Check for clearance with gas tank when turning front forks fully. 1999 and earlier models require the use of the supplied cap screws to maintain proper turning radius. 19. Reinstall front wheel and other components.