Systems Engineering for the Kepler Mission: A Search for Terrestrial Planets Riley Duren*a, Karen Dragona, Steve Guntera, Nick Gautiera , Eric Bachtellb, Dan Petersb, Adam Harveyb, Alan Enosb, c Dave Koch , Bill Boruckic, Charlie Sobeckc, Dave Mayerc, Jon Jenkinsd, Rick Thompsone a
Jet Propulsion Laboratory, 4800 Oak Grove Drive, M/S: 300-450, Pasadena, CA, USA 91109; b Ball Aerospace & Technologies Corp, Bldg AR-1, Boulder, CO, USA; c NASA Ames Research Center, M/S 244-30, Mountain View, CA, USA; d SETI Institute, Mountain View, CA, USA; e Orbital Science Corporation, Mountain View, CA, USA ABSTRACT
The Kepler mission will launch in 2007 and determine the distribution of earth-size planets (0.5 to 10 earth masses) in the habitable zones (HZs) of solar-like stars. The mission will monitor > 100,000 dwarf stars simultaneously for at least 4 years. Precision differential photometry will be used to detect the periodic signals of transiting planets. Kepler will also support asteroseismology by measuring the pressure-mode (p-mode) oscillations of selected stars. Key mission elements include a spacecraft bus and 0.95meter, wide-field, CCD-based photometer injected into an earth-trailing heliocentric orbit by a 3-stage Delta II launch vehicle as well as a distributed Ground Segment and Follow-up Observing Program. The project is currently preparing for Preliminary Design Review (October 2004) and is proceeding with detailed design and procurement of long-lead components. In order to meet the unprecedented photometric precision requirement and to ensure a statistically significant result, the Kepler mission involves technical challenges in the areas of photometric noise and systematic error reduction, stability, and false-positive rejection. Programmatic and logistical challenges include the collaborative design, modeling, integration, test, and operation of a geographically and functionally distributed project. A very rigorous systems engineering program has evolved to address these challenge. This paper provides an overview of the Kepler systems engineering program, including some examples of our processes and techniques in areas such as requirements synthesis, validation & verification, system robustness design, and end-to-end performance modeling. Keywords: systems engineering, extra-solar planets, Kepler mission, validation & verification, performance modeling
1. INTRODUCTION Systems engineering is an important discipline in the development and execution of space-astronomy missions. As observatories and instruments grow in size, complexity, and capability, we are forced to deal with new performance regimes – in many cases forcing us to find solutions to issues and error sources that could be safely ignored on past missions. Additionally, as recent attempts to increase the number of relatively low-cost missions have shown, the spacescience community is still learning to manage the risks. Notably, the successes of projects such as the Spitzer Space Telescope (SIRTF), Galaxy Explorer (GALEX), and Mars Exploration Rovers (MER) have been offset by the catastrophic losses of the WIRE, Mars 98, CONTOUR, and Beagle missions. Mishap reports for the latter missions repeatedly identify root causes in the area of systems engineering.1-4 Systems engineering, if applied rigorously and judiciously, can bring to bear a suite of processes and tools that can help balance risk, cost, and mission success. In this paper we will provide some examples of systems engineering techniques being applied to NASA’s Kepler mission. Some of these techniques have been recognized as “innovative” by external peers and can be readily applied on other space missions.
*
[email protected], phone 1 818 354 – 5753
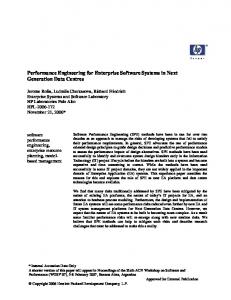
2. MISSION OVERVIEW A brief overview of the Kepler mission is provided here for context. Our companion paper at this conference by Koch, et al. provides a more comprehensive description.5 The Kepler mission has been optimized to search for Earth-size planets (0.5 to 10 earth masses) in the habitable zone (HZ) of solar-like stars.6 Given this design, the mission will be capable of not only detecting Earth analogs, but a wide range of planetary types and characteristics ranging from Mars-size objects and orbital periods of days to gas-giants and decade long orbits. The mission is designed to survey the full range of spectral-types of dwarf stars. Kepler utilizes photometry to detect planet’s transiting their parent star. Three or more transits of a star with a statistically consistent period, brightness change and duration provide a rigorous method of detection. From the relative brightness change the planet size can be calculated. From the period the orbital size can be calculated and its location relative to the HZ determined. cover Sun Shade Photometer Focal plane radiator Solar Arrays High Gain Antenna S/C Bus Structure (with S/C & Photometer Electronics)
Figure 1 – Photometer
Reaction Control System tanks
Figure 2 – Spacecraft (integrated w/ Photometer)
2.1 Key Mission Requirements Key considerations when looking for planetary transits are the probability for the orbital plane to be aligned along the line of sight and the number of stars to monitor. The probability of orbital alignment is simply the ratio of the stellar diameter to the orbital diameter. For the Sun-Earth analogy the probability is 0.5%. Hence, one needs to monitor many thousands of stars before one can arrive at a statistically meaningful result, null or otherwise. In addition, a sequence of transits with a consistent period, depth and duration must be detected to be confident and to confirm the existence of a planet. A Sun-Earth-like transit produces an apparent change in brightness of the star of 84 parts per million (ppm) with a duration of 13 hours, if it crosses near the center of the star. For a statistically significant detection, the minimum single transit Signal to Noise Ratio (SNR) requirement is taken to be 4σ, leading to a combined average significance of 8σ for 4 such transits. The detection threshold is set at 7σ, yielding a detection rate of 84% while controlling the total number of expected false alarms to no more than one for the entire experiment. The total system noise, defined to be the Combined Differential Photometric Precision or CDPP, must be less than 21 ppm in 6.5 hours (half of a central transit duration). The resulting driving requirements for the Kepler Mission are: 1. 2. 3.
A CDPP of 20 ppm in 6.5 hrs and the ability to detect a single Earth-like transit with an SNR>4; The capability to monitor >100,000 stars simultaneously (>170,000 stars in the first year); and A mission duration of at least four years.
2.2 Flight Segment The Kepler instrument is a Photometer consisting of a 95 cm diameter aperture with a large field-of-view (FOV). The photometer and its supporting spacecraft will be launched on a Delta II into a SIRTF-like Earth-trailing heliocentric orbit, such that after four years the spacecraft will have drifted less than 0.5 AU away. The Photometer is a based on a Schmidt camera design consisting of a graphite-cyanate ester metering structure, sunshade, 95 cm diameter Schmidt corrector, a 1.4 m diameter primary mirror, field-flattening lenses and an array of 42 CCDs with an active FOV of greater than 100 square degrees. The CCDs are back-illuminated devices with dual outputs and 1024x2200 27 µm pixels. The CCDs are passively cooled by a radiator panel. The data are recorded with a cadence of 15min for the planetary target stars and at 1-min cadence for p-mode target stars. Since the targets will be pre-selected, the entire image is not transmitted, but rather only the pixels relevant to each target. This amounts to only about 3% of the pixels, saving a tremendous amount of on-board storage and communications link time. The Photometer is shown in Figure 1. Although the 84 outputs from the CCDs are single string, no single credible failure in the Photometer will cause the complete loss of mission. The Photometer does not have a shutter and the only moving parts are the three mirror focus mechanisms and the one-time deployable aperture cover. The spacecraft, shown in Figure 2 with the Photometer, provides the necessary support functions for the photometer including power, pointing control, and avionics. The spacecraft will provide three-axis stabilization. Fine guidance sensors are mounted on the scientific focal plane. The entire mission is spent viewing a single star field. The only attitude maneuvers occur every three months when the spacecraft is rotated about the photometer axis by 90° to maintain the solar array pointed towards the Sun and the radiator towards deep space. Given Kepler’s heliocentric orbit, there is no torquing due to magnetic moments, gravity gradient or atmospheric drag; only a very low torquing due to solar pressure. Periodic momentum dumping will be handled by a hydrazine reaction control system which also serves to despin/detumble the spacecraft following separation from the launch vehicle and for contingency safe mode pointing control. No propulsive capability for on-orbit delta-V is required since drift-away is constrained by control of launch vehicle dispersion errors. Uplink commanding and downlink real-time engineering data transmission are performed using omni-directional X-band antennas. All stored science and engineering data are downlinked using a high-gain (HGA) Ka-band system. The solar arrays are rigidly mounted to the spacecraft and also help to provide shielding of the Photometer from the Sun. The only moving parts on the spacecraft other than reaction-wheels and gyros are the one-time HGA antenna deployment and HGA two-axis gimbal. All spacecraft sub-systems are fully redundant. During Science Operations, communications with the spacecraft are planned to occur approximately every four days, with each Deep Space Network (DSN) pass typically lasting 4 - 6 hours. 2.3 Ground Segment A collection of facilities known as the Ground Segment (GS), shown in figure 3, is used to operate the Flight Segment and analyze the data. Overall mission direction will be provided from the Mission Management and Science Offices hosted by the Science Operations Center (SOC) at NASA Ames Research Center (ARC) in Mountain View, California. Strategic mission planning and target selection is done at the SOC. Target selection will utilize an input catalog especially generated by a team of Co-Investigators (Co-Is) led by the Smithsonian Astrophysical Observatory (SAO) that will provide the means to discriminate between dwarf and giant stars. Scientific data analysis, direction for the Follow-up Observing Program (FOP) implemented by Co-Is, and final interpretation will also be performed at NASA Ames. Flight Segment operations management, tactical mission planning, sequence validation, and engineering trend analysis will be directed by a Flight Planning Center (FPC) at Ball Aerospace Technologies Corporation (BATC) in Boulder, Colorado. Command and data processing, Flight Segment health & status monitoring, DSN scheduling, and spacecraft ephemeris propagation is the responsibility of the Mission Operations Center (MOC) at Honeywell Technology Solutions Inc’s (HTSI) facility in Columbia, Maryland. Uplink and downlink telecommunications will use NASA’s JPL Deep Space Mission System (DSMS, i.e., the Deep Space Network) 34 meter antennas located around the world. The Data Management Center (DMC) at the Space Telescope Science Institute (STScI) in Baltimore, Maryland receives the “raw” Level 1 data and performs pixel-level calibration. The resulting Level 2 data set is archived by the DMC and forwarded to the SOC for further processing. The SOC processing includes generation of calibrated photometric light curves (returned to the DMC as a Level 3 data set for inclusion in the Kepler public archive) and transit detection. STScI also provides p-mode analysis. After an extensive data validation process, follow-up observations on each planetary candidate will be performed. The FOP is necessary to eliminate intrinsic false positives due to grazing-eclipsing binaries and extrinsic
Flight Segment • acquires pixel data for SOC-defined “postage-stamp” apertures (avg 32 pixels per star) at 15 minute & 1 minute cadences + collateral pixel data to support calibration • downlink 20 Gbits stored science data every 4days (@ 2Mbps) + engineering data via Ka-band • uplink & real-time downlink via X-band
DSN Uplink JPL DSMS
Mission Operations Center (MOC) HTSI
command loads
Engineering data archival
Flight Planning Center (FPC)
Data quantity, completeness, continuity checks
Flight Segment Trend Analysis, Debug, Anomaly Resolution
Science Office
Other observations
Follow-up Observ Program (FOP) Co-Investigators
Health, Safety & Quick-look performance monitoring
BATC
Flight Operations Management & Mission Planning
Stellar Classification Program (SCP) Co-Investigators
DSN Downlink JPL DSMS
Target selection & definition (pixel map), define CCD parameters
Mission Management Office Science Operations Center (SOC) ARC
Science team analysis/ interpretation Transit Data Validation & False-Positive Rejection candidates
Level 1 data (compressed)
Photometry (light-curves), error redux, transit search, reflected light analysis, etc
Data Management Center (DMC) STScI Level 2 data
Pipeline data processing (decompr./ calib.) & archival (L2 & L3)
Level 3 data
p-mode analysis & independent photometry
Figure 3 – Ground Segment (relative to Flight Segment) false positives due to background eclipsing binaries or discriminate between terrestrial transits of the target star and giant planet transits of a background star.
3. SYSTEMS ENGINEERING ORGANIZATION While there are 6 major partners involved in the Kepler mission, the bulk of the systems engineering work at the Mission/Project System-level and Segment-levels is performed via collaborative effort between JPL, ARC, and BATC. The distribution of effort can be split into 4 major tasks: Science Systems Engineering, Mission/Project Systems Engineering, Flight Segment Systems Engineering, and Ground Segment Systems Engineering. Given the Kepler team structure, these 4 tasks are covered in a distributed fashion. For example, the Science Office at ARC leads the “Science Systems Engineering” effort – which primarily involves science requirements synthesis and follow-up observing program planning - and receives Project System Engineering (JPL)
Science System Engineering (ARC)
Mission Requirements & Interfaces Validation & Verification End-to-End Information System Launch Vehicle Interface Navigation/Trajectory Performance Analysis
Flight Segment Systems Engineering (BATC) FS Requirements & Interfaces Performance Analysis Spacecraft Systems Engineering Photometer Systems Engineering Integration & Test Fault Protection Mission Engineering Thermal Analysis Structural Analysis
Science Requirements Follow-up Observing
Ground Segment Systems Engineering (ARC) GS Requirements & Interfaces Performance Analysis Operations Scenarios Science Operations Data Reduction Algorithms Data Management Deep Space Network Mission Planning
Figure 4 - System Engineering Roles & Responsibilities
significant support from the Ground Segment Systems Engineer at ARC and the Project System Engineer and Mission Scientist at JPL in the areas of requirements sub-allocation and validation. Likewise, the Project System Engineer leads mission-level engineering efforts but receives substantial support from the Flight Segment System Engineer at BATC in the areas of end-to-end performance modeling, mission-level technical performance metric tracking, launch vehicle interface definition, and mission planning and trajectory design. Given the potential for confusion and/or gaps in the lines of roles and responsibilities (an issue which seriously impacted some past missions), the Kepler project was careful to establish the diagram in Figure 4 which clarifies those relationships. It’s worth highlighting the need for tight coupling of science and engineering on space missions. Care must be taken to avoid misunderstandings and gaps between science needs and engineering implementations. On Kepler, we have established a very tightly knit systems engineering team, which includes representation from the Science Team in the form of the Deputy PI and Mission Scientist – together with the Project System Engineer, they have “one foot rooted in each camp”.
4. REQUIREMENTS SYNTHESIS The process of requirements synthesis (definition and flow-down of the mission’s functional and performance needs) is a complex topic that has been covered elsewhere in the literature.7 However, two examples from Kepler are provided here to highlight some concepts to consider when defining requirements for space-astronomy missions: 1) Be aware of the far-reaching implications (cross-cutting) scope of requirements. Example 1: Data Completeness 2) Be wary of non-zero residuals from calibration processes. Example 2: Systematic Error Reduction. Figure 5 depicts the flow-down of a driving science requirement on the Kepler Mission System (KMS) to acquire data over 94% over the mission life. At first glance, the sub-allocation of 96% “observing efficiency” on the Flight Segment (FS), “downlink/archive 99%” on the Ground Segment, and 1% margin seems straightforward. However, when digging further into the implications of meeting the 99% Ground Segment sub-allocation one finds that this in fact involves a cross-cutting SRD 053 KMS acquire data over 94% mission life MRD 435 FS acquire 96% (“observing efficiency”)
1% margin
FS loss-budget (nominal & contingency down-time)
Data throughput (single-pass)
Be aware of cross-cutting issues
MRD 286 KMS archive 99% of data acquired by FS Loss-budget Retransmit (missed contacts strategy/capability & drop-outs) SSR size, protocols, etc
DSMS Performance (single-pass)
Single-pass duration
Traj params: C3, RLA, Launch Az, DLA, etc
Max Earth-S/C Range @ time X Launch dispersions
Telecom h/w capability
Compression
PCS, Mass, 3rd stag perf, etc
Figure 5 – Example 1: Data Completeness Requirement (cross-cutting issues) suite of requirements spanning the KMS including single-pass performance of the Deep Space Network, spacecraft telecom h/w performance, onboard data handling and retransmission protocols, data compression, launch vehicle performance, and trajectory design. Rigorous identification and resolution of such diverse requirements in a coherent fashion is necessary to ensure the driving requirement can be met. While by no means a comprehensive description of the Kepler data-reduction pipeline architecture, Figure 6 provides a highlevel summary of the relationships of various factors affecting another key requirement: the detection SNR. At first glance,
the implications of this requirement on the Flight and Ground Segments seem straightforward to understand. Since the nominal magnitude of the transit Signal for an Earth-size planet around a solar-size star is a predictable quantity, it seems that one simply needs to specify the required photometric precision of the measurement. We refer to the latter key performance figure as the Combined Differential Photometric Precision (CDPP), depicted on the left-hand side of Figure 6, which can be thought of the Noise associated with the Kepler Mission System (KMS). CDPP is sub-allocated to the Flight Segment (FS) as Raw Photometric Precision - to be controlled by design of the photometer, spacecraft attitude control subsystem, etc - and various terms provided by nature such as shot-noise (set by the size of the aperture) and Stellar Variability (a source over which we have no control but include in our error-budgets). While it is true that CDPP and its subordinate terms are of paramount performance in meeting the SNR requirement, it’s likewise important to recognize the potential of additional Noise that can creep into CDPP “from the side” and unwanted residual Signals that can “pollute” the desired Signal and thus impact SNR. The right-hand side of Figure 6 captures this concept by sub-allocating a requirement on the Ground Segment (GS) - which performs the critical photometric pipeline data reduction - such that it will reduce systematic errors in a balanced fashion (i.e., minimize systematic errors to the extent possible without introducing an arbitrary amount of random noise in the process or allow unwanted residuals to leak through). Key point: one can in fact remove all systematic errors (unwanted signals) but if not careful can also wash out the desired signals while doing so! This concept is fairly subtle but should be consideration when setting requirements on complex signal processing systems.
Example: Systematic Error Reduction KMS
Transit Detection Confidence
Be wary of residuals
KMS
SNR KMS
GS
Noise
Optimize SNR by reducing systematic errors to limit of stochastic noise for errors w/ time-scales < 3 days (TBR)
(CDPP: 20 ppm, 6.5 hs, G2V, mv=12)
KMS
FS
Raw Photometric Precision (RPP)
Stellar Variability 10 ppm (6.5 hours)
17.35 ppm, 6.5 hs, G2V, mv=12
Residuals after collateral data smear, black, & dark corrections and systematic error rejection techniques applied
Signals & Systematic Errors Random-noise under control of FS (pointing jitter, shot-noise, etc)
Dictated by NATURE (beyond our control but include in error budgets)
Note: Signals/Errors are estimated & removed by GS but associated shot-noises cannot be removed and are part of FS RPP
KMS
Signal from B/G stars & Local Zodi 22.0 mag star per sq-arcsec
FS other
Signals & Errors (Smear, Black, Dark, Linearity, etc)
Figure 6 – Example 2: Systematic Error Reduction (residuals)
5. ROBUSTNESS AND PERFORMANCE MODELING We’re blazing new trails with the next generation of space-astronomy missions – so there’s a moderate risk they won’t work exactly as predicted in flight. This means the system design must be robust to adverse changes in performance and functionality due to “unknown unknowns”. This is the concept of graceful degradation which can be enabled by treating functional and performance robustness as a major design and validation tenant. There are a number of techniques available for addressing functional robustness such as Mission-level Fault Tree Analysis (FTA), Failure Modes and Effects Analysis (FMEA), Probabilistic Risk Assessment (PRA), etc. Such analyses are important both in validating the system requirements during Definition Phase and for validating the as-built system robustness using stress-testing, mission scenario testing, etc. More detailed recommendations on how such techniques should be applied can be found elsewhere in the literature.8,9
In this section, we address the concept of performance robustness. There are two aspects to assessing performance robustness: End-to-End Performance Modeling Science Sensitivity Analysis 5.1. End-to-End Performance Modeling End-to-end models are important for understanding the true system performance. A companion paper at this conference describes the Kepler End-to-End Model (ETEM) in detail.10 General lessons-learned on performance modeling are documented elsewhere11 but some recommendations are offered here on designing such models. First, the scope of a truly end-to-end performance model should be “3 dimensional” in nature in that its spans the mission system in the following senses9: 1) Top-to-bottom (error-budget perspective) 2) Front-to-back (end-to-end data-flow perspective) 3) Time (evolution over the project life-cycle) Second, system-level error budgets and models sometimes contain holes in the form of wrong assumptions about “negligible terms”. When error budgeting we sometimes wave our hands at error sources that seem negligible based on engineering intuition and past experience. However, in dealing with cutting-edge instruments, one must be rigorous in identifying ALL conceivable errors sources and explicitly listing them in related error-budgets. Even if the source is truly negligible compared to other terms, this systematic approach minimizes the potential for surprises. Projects should develop, maintain, and peerreview a master list of error sources (including those deemed “insignificant”). 5.2. Science Sensitivity Analysis Quantifying the science sensitivity to key mission parameters is necessary in order to: Manage margins (share the pain between different project elements and components) Identify “soft spots” that warrant additional attention to beef-up Ensure the system design doesn’t put us near any “cliffs” in terms of performance (illustrated in Figure 7). On Kepler, we enlisted our Principal Investigator to develop a “Science Merit Function” to assess the science sensitivity to key mission parameters. This fairly unprecedented concept is illustrated in Figure 8. This shows how the overall “science goodness” varies with respect to the driving mission performance requirements – alternatively, “what’s the partial derivative of the science goodness with respect to the mission parameters?” This provides the science team and system engineering team with a powerful tool for assessing performance robustness and providing quantitative guidance on trade studies and risk management.
Baseline Science Need
X
Region of Nominal Operation Region of Robust Operation
Science Floor Region of Non-graceful Degradation
Science yield
Required Noise
Instrument Noise
The message…. Design your system to deliver Nominal Operation But ensure (through design and V&V) that it will degrade gracefully in the Region of Robust Operation in the event of contingencies And stay far away from here!
*this is an idealized example in which the system has been cost-optimized such that the science floor intersects the knee in the curve – clearly, we like some margin
Figure 7 - Performance Robustness concept
Also, the results of these sensitivity analyses can be used to guide system-level performance stress-testing. The system response to conditions beyond the nominal but within the region of robust operation as described in Figure 7 should be assessed.
Science Objective (Need): Statistical frequency of terrestrial planets in the habitable zones of solar-type stars Planet size detection limit
Detection confidence level (total SNR)
# of suitable stars observed (Nstars rqmt)
Transit SNR rqmt
# of transits seen per target (Nyears rqmt)
Combined Differential Photometric Precision rqmt
Mission Life rqmt
Source variation rqmt (limiting assumption)
Raw Precision rqmt
Spacecraft Jitter rqmt
Ground error reduction rqmt
Instrument noise rqmt
The system engineer must understand the science sensitivity to key mission parameters – use Merit Functions to assess “partial derivatives of Science Goodness”as functions of these parameters
Stellar Magnitude limit
Field of View rqmt
Data Completeness rqmt
∂(S )
,
∂(S )
,
∂ ( SNR ) ∂ (CDPP)
∂(S ) ∂( N
stars
,
)
∂(S ) ∂( N
years
)
where Science goodness S = f(CDPP, SNR, Nstars, Nyears) CDPP = combined differential photometric precision SNR = detection signal-to-noise ratio Nstars = number of stars observed Nyears = number of years observed
Figure 8 – Merit Function concept
6. VALIDATION & VERIFICATION While Validation and Verification is a critical function for all deep-space missions and is treated in detail elsewhere9, some key aspects are presented here, namely: 1. 2.
Validation of requirements Validation of models
The main objectives of a V&V program are: a. b. c. d.
Validate requirements in phase A/B (prove our requirements will meet the Need before building the thing) Validate models – ongoing (prove our mission-critical models reflect reality) Verify the as-built system in phase C/D (prove what we built meets the requirements we wrote) Validate the as-built system in phase C/D (prove what we built truly meets the Need and is ROBUST)
Validation is ALWAYS tricky on projects because it makes us think “out of the box”. How will the system respond if X happens? Will the system do what we want in flight, considering nobody’s ever done this before? Verification is more complex on large observatories than other missions because we typically cannot do end-to-end tests on the flight system – rather, “piecewise verification”.
6. 1 Developing a V&V Program As with Performance Modeling, the first step in implementing a successful Validation & Verification program is to expend some effort into early planning. Projects should develop a V&V Plan (draft in Phase A, final by PDR) that illustrates how the four aspects of V&V discussed above will be addressed.
The V&V plan plays a critical role in identifying mission critical models – defined as those models to be used for “verification by analysis” (things that can’t be demonstrated by test). Such things should be captured in story-board format that identifies how each link in the V&V chain is covered. With the mission-critical models thus highlighted, the system engineering team can ensure they are rigorously validated prior to use in verification. Need
ongoing checks against the Need
Requirements synthesis
Draft Requirements
V&V storyboard & model needs assessment
Model Validation
Initial Models/ Simulations Final Models/ Simulations
Requirements Validation
Performance Risk Analysis Assessment & (FTA, PRA, etc) Sensitivity Analysis
Independent analysis Model evolution
Prototype Testing Test/Cal data Completed V&V Matrices
Validated System
Validated Requirements
Testing & Calibration
Analysis/ Modeling/ Simulation
V&V Rqmts & Matrices System Verification & Validation
Inspection & Comparison
Figure 9 - Validation & Verification Program Architecture As discussed above about modeling, system engineers should recognize the 3 dimensional nature of the project system when defining the V&V program – looking at the problem from three different perspectives typically yields a good integrated picture. Finally, use the V&V plan to help balance what’s desired with what’s needed. Projects have freedom to tailor the program as needed but a detailed plan is required to make intelligent choices between cost-management and risk-mitigation. 6.2 Requirements Validation As shown in Figure 9, the draft set of mission requirements should be validated before proceeding with detailed system design, implementation, and ultimately, verification. System engineers can create a validation matrix to help track validation of requirements (just as verification matrices are used during verification). The validation matrix should indicate how each requirement is validated (i.e., via analysis/modeling, similarity, proto-type test, etc). As always, when trying to balance riskmanagement with available resources, the system engineer should focus on the “tough nuts” (unique and/or challenging requirements) for rigorous validation and de-emphasize formal validation of the more mundane requirements as needed. In validating each requirement, the system engineer must ask the following questions: 1. 2. 3. 4. 5.
Is it complete? (no holes or confusion) Is it correct? (meets the ultimate need) Is it achievable? (within project scope) Is it verifiable? (can be tested &/or modeled) Is it robust? (far from “cliffs”)
In this context, achievability refers to project scope in terms of budget and schedule. The concept of robustness was highlighted earlier in Figure 7. System engineers must ensure the requirements don’t result in a brittle design. 6.3 Model Validation From the 1998 Mars Polar Lander Mishap Report: “…the propulsion system, employed analysis as a substitute for test in the verification and validation of total system performance...end-to-end validation of the system through simulation and other analyses was potentially compromised in some areas when the tests employed to develop or validate the constituent models were not of an adequate fidelity level to ensure system robustness”2.
Repeated lessons-learned in the space community point to the need for rigorous validation of mission-critical models – those used in “verification by analysis” to span gaps in a project’s test program. This is even more critical for interferometers for the simple fact that they are notoriously difficult to test in an end-to-end sense on the ground. Figure 10 depicts a draft verification “story-board” for Kepler photometric performance, including the top-level Signal-to-Noise Ratio (SNR) and Combined Differential Photometric Precision (CDPP) parameters. The critical models used to span gaps in this verification program have been identified: End-to-End Model (ETEM), Attitude Control Console, and Instrument Test Operations Test Console (ITOC). This reminds the team that those models must be rigorously validated before use. Project V&V Plans should include such story-boards to identify mission-critical models early in order to structure a validation program for them. As for how to validate models, there are many techniques for doing so but the following list represents the major categories.9 Note that using multiple methods to validate a single model in a complementary fashion is often warranted to gain confidence, particularly when the preferred method – test, or “empirical validation”, is often difficult to implement comprehensively. 1) Face Validation: review model results by subject-matter experts – do results “seem believable”? 2) Peer Review: review model itself (equation/code) for correctness 3) Functional Decomposition & Test: piece-wise testing of individual code modules (inject test inputs and examine outputs) 4) Empirical Validation: compare model results with those from a test of the real system or some analog Total SNR (detectability) verified
# stars verification
# years verification
As needed, correct FS &/or GS to address discovered “unknowns” & iterate
QL process data
•Test assessment FPAA Performance Test
Photometer comp Thermal/vac tests
Photometer Performance Test
Update ETEM (validation)
“clean” data
Apply missing confounding sources & numerically inject transits (ETEM)
Correct drift terms Pointing error PSD
ADCS component performance tests
ADCS Performance Verification (Attitude Control Console)
FS modal tests
TEST of Real Flight Segment H/W &/or S/W
TEST of Real Ground Segment S/W
Data “packaging” tests
TEST of EM Flight Segment H/W and Prototype FS & GS s/w
SIMULATION/ MODEL
MOC/DMC/SOC process data
•Measure noise4 & xfer function4 •Inject 1%optical transits
Measure noise3 & xfer function3
Single-String Test 2 (w/o confound. sources)
•Measure noise2 & xfer function2 •Inject 0.01% transits
CDPP verified
Transits approach
Single-String Test 1 (w/confound. sources)
•Measure noise1 & xfer function1 •Inject 0.01% transits
Noise-only approach
Single Transit SNR verified
“noisy data” (w/ & w/o 0.01% numerical transits, & 1% optical transits)
Update ITOC (validation)
ANALYSIS & corrective action (as needed)
Formal verification item
Figure 10 – Photometric Performance Verification Storyboard (& Legend)
Package Data (ITOC)
7. SUMMARY In this paper we’ve provided a few brief examples of systems engineering techniques being applied to NASA’s Kepler mission. Many of the techniques may be applicable to other space-astronomy projects. Some recommendations include: 1) 2) 3) 4) 5) 6) 7) 8) 9) 10) 11)
Clearly identify Systems Engineering Roles & Responsibilities across the project to avoid gaps Make robustness a key design attribute Validate the system performance in the Robust Region of Operation Think in “3D” when designing the scope/architecture of models (top-bottom, end-to-end, project life-cycle) Use Merit Functions to quantify science sensitivities to mission parameters Make sure models include all error sources (including those seeming insignificant) Beware residuals from systematic errors when sub-allocating data reduction requirements Be aware of highly cross-cutting requirements Validate project requirements before commencing detailed design phase Use Verification Storyboards to identify Critical Models/Simulations Validate Critical Models/Simulations
The reader is encouraged to review the references for additional systems engineering recommendations, particularly references 9 and 11.
8. ACKNOWLEDGEMENTS The authors are grateful for the contributions of the entire Kepler Project System Engineering team in establishing the processes and tools described here. The research described here was carried out at the Jet Propulsion Laboratory, California Institute of Technology and our mission partners and was sponsored by the National Aeronautics and Space Administration.
9. REFERENCES 1
Branscome, Darrell R., “WIRE Mishap Investigation Board Report”, URL: http://klabs.org/richcontent/Reports/wiremishap.htm, June 8, 1999 [cited August 3, 2003]. 2 Casani, John, “Report on the Loss of the Mars Polar Lander and Deep Space 2 Missions”, URL: http://spaceflight.nasa.gov/spacenews/releases/2000/mpl/mpl_report_1.pdf, March 22, 2000 [cited August 8, 2003] 3 Stephenson, Arthur G.,“Report on Project Management Within NASA by the Mars Climate Orbiter Mishap Investigation Board”, URL: http://www.space.com/media/mco_report.pdf, March 13, 2000 [cited August 8, 2003]. 4 Bradley, Theron, et al, “CONTOUR Mishap Investigation Board Report”, http://discovery.larc.nasa.gov/discovery/Contour_Mishap_Investigation.pdf , May 21, 2003 [cited May 14, 2004] 5 Koch, D., Borucki, W., et al., “Overview and status of the Kepler mission”, Proc. SPIE 5487, 2004 6 Borucki, William J., Koch, David G., et al, “The Kepler mission: a wide-field-of-view photometer designed to determine the frequency of Earth-size planets around solar-like stars”, Proc. SPIE 4854, pp. 129-140, 2003. 7 Hoban, Frank, Hoffman, Ed, “NASA Systems Engineering Handbook”, NASA SP-610S, June 1995 8 Beutelschies, Guy, “That One’s Gotta Work – Mars Odyssey’s use of a Fault Tree Driven Risk Assessment Process”, Proc. IEEE Aero 6599-2, 2001. 9 R. Duren, “Verification and Validation of Deep-Space Missions”, AIAA J. Spacecraft and Rockets, in press, 2004. 10 Jenkins, J., Peters, D., Murphy, D., “An Efficient End-To-End Model for the Kepler Photometer”, Proc. SPIE 5497, 2004. 11 R. Duren, “Systems Engineering for Spaceborne Optical Interferometers”, Proc. IEEE Aero, 2004.