In reading this ebook, you may get stuck if you don't know certain basic facts
about Mac OS X, some particular aspects of Mac OS X permissions, or Take
Control ...
Table of Contents (Version 1.0) Read Me First ......................................................2 Introduction ........................................................5 Permissions Quick Start .......................................6 Problems and Solutions .......................................7 About Permissions ...............................................8 The Anatomy of Permissions .............................. 10 Choose a Method of Setting Permissions ............ 15 Set Permissions Using the Info Window.............. 17 Set Permissions Using Third-Party Tools............. 20 Use Access Control Lists .................................... 26 Understand Default Permissions......................... 31 Work with User Names, UIDs, and GIDs............. 48 Understand Ignore Ownership............................ 60 Repair Permissions with Disk Utility.................... 63 Learn Advanced Unix Techniques ....................... 66 Appendix A: Fixes for Common Problems ........... 78 Appendix B: Converting To Octal ....................... 83 Appendix C: Use the man Command.................. 86 About This Ebook .............................................. 87 ISBN 1-933671-00-9
This is a free sample of “Take Control of Permissions in Mac OS X.” Click here to buy the full 90-page ebook for only $10!
READ ME FIRST Welcome to Take Control of Permissions in Mac OS X, version 1.0. This ebook helps you take control of the sometimes-perplexing world of permissions in Mac OS X. It explains how permissions work, how to resolve common problems, and how to best control access to your files in a variety of situations. This ebook was written by Brian Tanaka, edited by Tonya Engst, and published by TidBITS Electronic Publishing. You can contact TidBITS Electronic Publishing by sending email to
[email protected] and view the Take Control Web site and catalog at http://www.takecontrolbooks.com/. You can read About This Ebook to learn about the author, the publisher, and the Take Control series. The copyright page contains copyright and legal info. The price of this ebook is $10. If you want to share it with a friend, please do so as you would with a physical book, meaning that if your friend uses it regularly, your friend should buy a copy. The Help a Friend button on the cover makes it easy for you to give your friend a discount coupon. We may offer free minor updates to this ebook. Click the Check for Updates button on the cover to access a Web page that informs you of any available or upcoming updates. On that page, you can also sign up to be notified about updates via email.
Onscreen Reading Tips We carefully designed the Take Control ebooks to be read onscreen, and although most of what you need to know is obvious, note the following for the best possible onscreen reading experience: • Blue text indicates links. You can click any item in the Table of Contents to jump to that section. Cross-references are also links, as are URLs and email addresses. • Work with the Bookmarks tab or drawer showing so that you can always jump to any main topic by clicking its bookmark.
Page 2
This is a free sample of “Take Control of Permissions in Mac OS X.” Click here to buy the full 90-page ebook for only $10!
• In Adobe Acrobat Pro version 6 or 7, set your preferences to view Web URLs in a Web browser: choose Acrobat > Preferences, switch to the Web Capture pane, and choose In Web Browser from the Open Web Links pop-up menu. • Find more tips at http://www.takecontrolbooks.com/readingtips.html.
Printing Tips Although our layout is aimed at making online reading an enjoyable experience, we’ve made sure that printing remains a reasonable option. Please review these tips before you print: • Use the Check for Updates button on the cover to make sure you have the latest version of the ebook and to verify that we don’t plan to release a new version shortly. If you want to commit this ebook to paper, it makes sense to print the latest possible version. • Don’t throw out your PDF after you print! You must click the Check for Updates button on the cover to get future updates. The link must be accessed from the cover of your PDF. • For a tighter layout that uses fewer pages, check your printer options for a 2-up feature that prints two pages on one piece of paper. For instance, your Print dialog may have an unlabeled popup menu that offers a Layout option; choose Layout, and then choose 2 from the Pages per Sheet pop-up menu. You may also wish to choose Single Hairline from the Border menu. • When printing on a color inkjet printer, to avoid using a lot of color ink (primarily on the yellow boxes we use for tips and figures), look for an option to print entirely in black-and-white. • In the unlikely event that Adobe Acrobat or Adobe Reader cannot successfully print this PDF, try Preview; several readers have solved printing problems by using Preview.
Basics In reading this ebook, you may get stuck if you don’t know certain basic facts about Mac OS X, some particular aspects of Mac OS X permissions, or Take Control syntax for things like working with menus or finding items in the Finder. Please note the following: Page 3
This is a free sample of “Take Control of Permissions in Mac OS X.” Click here to buy the full 90-page ebook for only $10!
• Path syntax: I occasionally use a path to show the location of a file or folder in your file system. Path text is formatted in bold type. For example, Mac OS X stores most utilities, such as Terminal, in the Utilities folder. The path to Terminal is: /Applications/Utilities/Terminal. The slash at the beginning of a Finder path tells you to start from the root level of the disk. You will also encounter paths that begin with ~ (tilde), which is a shortcut for any user’s home directory. For example, if a person with the user name joe wants to install fonts that only he can access, he would install them in his ~/Library/Fonts folder, which is just another way of writing /Users/joe/Library/Fonts. • Menus: When I describe choosing a command from a menu in the menu bar, I use an abbreviated description. For example, the abbreviated description for the menu command that opens an Info window on a file or folder from the Finder is “File > Get Info.”
Page 4
This is a free sample of “Take Control of Permissions in Mac OS X.” Click here to buy the full 90-page ebook for only $10!
INTRODUCTION Even if you don’t know a thing about permissions, if you’re using Mac OS X, you’re using them right now. Every file and folder on your computer carries permissions from the moment it’s created until the moment it’s deleted. Because permissions are literally everywhere on your computer and because they control who can access what, it’s tremendously advantageous to understand them. You’ll have better control over your Mac, and you’ll be able to share items and access shared items with greater ease. Problems arising from improperly set permissions are common and can be frustrating: Sharing files among users on one computer can be problematic if you don’t understand permissions, and sharing items on a network raises yet another set of potential problems. In this ebook I teach you how to prevent and fix permissions problems with ease and much more. You’ll learn how to interpret and manipulate permissions with the Info window in the Finder, Disk Utility, third-party tools, and Unix commands. You’ll learn about accounts and groups, and how permissions control them; how default permissions work; how to repair permissions; and how to ignore permissions on an attached volume. Equipped with this expertise, you’ll be able to handle permission problems when sharing files locally or across networks, booting from multiple volumes, exchanging files with other users, running FTP and Web servers, and much more.
Page 5
This is a free sample of “Take Control of Permissions in Mac OS X.” Click here to buy the full 90-page ebook for only $10!
PERMISSIONS QUICK START The first sections of this ebook teach the basics of permissions and how to set them. The remaining sections explore more advanced techniques and concepts that help you solve problems. Learn about permissions: • Find out what permissions are, and why you need them. See About Permissions. • Permissions are composed of simple interrelated parts. Discover how they work together. See The Anatomy of Permissions. Set permissions: • There’s more than one way to set permissions. See Choose a Method of Setting Permissions. • Learn to Set Permissions Using the Info Window and to Set Permissions Using Third-Party Tools. And, if you need more finegrained tools for controlling permissions, read Use Access Control Lists. • To solve a permissions-related problem, see Problems and Solutions, on the next page, for a quick index to helpful info. • If you enjoy working in Unix or need the fine-grained control that Unix can provide, you can Learn Advanced Unix Techniques. Delve deeper into permissions: • Discover how your Mac assigns default permissions in Understand Default Permissions, and increase your permissions IQ by reading Work with User Names, UIDs, and GIDs. • Learn to use two important Mac OS X features in Understand Ignore Ownership, and Repair Permissions with Disk Utility. • Unix commands empower you to do things you can’t do from the graphical user interface, which you’ll see when you Learn Advanced Unix Techniques.
Page 6
This is a free sample of “Take Control of Permissions in Mac OS X.” Click here to buy the full 90-page ebook for only $10!
PROBLEMS
AND
SOLUTIONS
I discuss a variety of common problems in Appendix A: Fixes For Common Problems, but you will find help with solving other problems throughout the ebook. Use the links below to navigate to info that will help you with specific problems: • I’m having trouble with the Shared Folder. See The Shared Folder. • The Info window doesn’t show permissions settings I know exist. See Set Permissions Using Third-Party Tools and Learn Advanced Unix Techniques. • I don’t own my own files! See Work with User Names, UIDs, and GIDs. • I am concerned about the privacy of files and folders that I created and saved in my user account and I want to make sure that others on the computer cannot access them in any way. Read The Case of the Promiscuous Folder. • When do I use Ignore Ownership on This Volume? See Understand Ignore Ownership. • Everyone tells me to use Repair Permissions but I don’t understand what it does. What’s the real story? See Repair Permissions with Disk Utility. • I can see why understanding octal is useful when setting permissions, but I can’t seem to get my head around it. See Appendix B: Converting To Octal. • When I copy or create items, I can’t predict what the permissions will be. It’s driving me batty! See Understand Default Permissions.
Page 7
This is a free sample of “Take Control of Permissions in Mac OS X.” Click here to buy the full 90-page ebook for only $10!
ABOUT PERMISSIONS Like all Unix-based operating systems, Mac OS X is designed to make it easy for multiple people, termed users, to share the same computer. Each user has a user account (or more than one in some situations). Having your own personal user account is useful and convenient for a number of reasons. It enables you, for instance, to customize your account settings and preferences without affecting other users. It also enables you to store and organize your personal files and folders in your home folder—a special folder reserved for your exclusive use. NOTE I discuss user accounts in this ebook enough to help you understand permissions. If you want more info, I highly recommend reading Take Control of Users & Accounts in Tiger. http://www.takecontrolbooks.com/tiger-users.html In addition to an account for each user, Mac OS X computers have other types of accounts organized in a system based on Unix account management. Traditionally, in Unix there is an all-powerful account called root. Root has absolute authority and can, among other things, override permissions on items and change item ownership without restriction. All other accounts fall into two categories: user accounts, which are accounts used by actual humans, and system accounts, which are not associated with specific users and exist to perform tasks requiring special authority but not the absolute authority of root. User accounts, on Unix systems, can be granted the power to run individual programs as root, most commonly via the sudo facility. In Mac OS X, this highly flexible system of root account, system, and user accounts, and the granting of arbitrary administrative power, is nicely presented in a simplified form. Specifically, it offers three types of accounts: • Root: The root account is authorized to do anything. • Administrator: Administrator accounts can perform certain administrative tasks that require authorization beyond that of standard accounts, such as: changing global system preferences; Page 8
This is a free sample of “Take Control of Permissions in Mac OS X.” Click here to buy the full 90-page ebook for only $10!
creating, managing, and deleting user accounts; and changing permissions on items. This is the default account type for the first user account created on a newly installed Mac OS X computer. • Standard: Standard accounts have limited authority on the computer, mostly restricted to activities that affect their accounts alone. This is the default account type for ordinary users. Every item on your computer belongs to, or is owned by, an account. (For the sake of brevity, I use item as a general term meaning “file, folder, or disk” except where I need to be more specific.) For instance, when you create a new file, that new file is owned by your user account. If another user, logged into her own account, creates a file, that file will be owned by her user account. In addition to being owned by a particular user account, every item on your computer carries with it a set of permissions that control which user accounts can access it and what kind of access they have. That, in a nutshell, is the purpose of permissions: they control who can do what to which files, folders, and disks. Permissions, combined with accounts and ownership, are exceedingly useful for a number of reasons, including: • Security: Permissions are a critical component in the security model of all Unix-based operating systems, including Mac OS X. For instance, if a standard user account is compromised in some way by a malicious attacker, the attacker should not be able to alter critical system files because the permissions on those files disallow tampering by non-administrator accounts. • Privacy: Permissions on your private files and folders can be set so that user accounts other than your own have limited access or no access at all. • Controlled sharing: Because permissions are powerful and flexible, you can exercise a significant degree of control over which users can access items you choose to share and what those users can do with the shared items. • System integrity: Permissions prevent non-administrator accounts from damaging the system by altering important system items, and they prevent users from tampering with other users’ items. Page 9
This is a free sample of “Take Control of Permissions in Mac OS X.” Click here to buy the full 90-page ebook for only $10!
THE ANATOMY
OF
PERMISSIONS
As I mentioned in the previous section, every item on your computer is owned by an account and carries a set of permissions. These permissions control the access that each of three classes—owner, group, and other—has to an item. Here’s a quick explanation of what I mean by owner, group, and other: • Owner: The owner is the user account that owns an item, such as a file, folder, or disk. Every item is owned by an account. (Traditionally in Unix, this is known as the user class, and Unix commands abbreviate it with a u.) • Group: In addition to being owned by a user account, every item is also owned by a group. A group is a set of user accounts conceptually clumped together so permissions can apply to its members collectively. Mac OS X provides a number of default groups, and you can create additional groups. • Other: Everyone else! Other refers to all user accounts on the system other than the owner and members of the group. You will see this type referred to as “others” (in the Finder’s Info window) and “world” (by other tools). Permissions for an item say whether owner, group, and other have these three permissions, which Table 1 further explains: • Read: View the contents of the item. • Write: Change the item. • Execute: Execute the item.
Page 10
This is a free sample of “Take Control of Permissions in Mac OS X.” Click here to buy the full 90-page ebook for only $10!
CHOOSE
A
METHOD
OF
SETTING PERMISSIONS
You can set permissions in Mac OS X in more than one way. Namely, you can use: • The Info window in the Mac OS X Finder • Third-party tools • Unix commands Each method has relative advantages and disadvantages, as you can see in Table 2. Table 2: Methods of Setting Permissions Method
Advantages
Disadvantages
Info window
Easier and more intuitive than Unix commands.
Limited capabilities. Not as powerful or flexible as Unix commands.
Third-party tools
More features than the Info window.
Not present by default. May require additional expense.
Unix commands
More powerful and flexible than the Info window. May be faster if you are familiar with Unix.
Less intuitive than the Info window.
Deciding which method to use in any given situation is up to you, and depends on the demands of the situation at hand. Personally, I prefer to set permissions from the Terminal using Unix commands. I find that it’s the fastest, easiest, and most flexible way to handle simple and complex permissions. For simple situations, the amount of time and effort I expend is roughly the same or less than I would expend setting permissions via a graphical user interface such as the Info window or a third-party tool. And, for more complicated tasks, I save a huge amount of time and effort not only because the command line Unix tools themselves are tremendously effective, but also because I can combine those tools with the power of the Unix shell and other Unix tools. Unfortunately, if you are unfamiliar with Unix, you must climb a bit of a learning curve before taking control of permissions from the Page 15
This is a free sample of “Take Control of Permissions in Mac OS X.” Click here to buy the full 90-page ebook for only $10!
SET PERMISSIONS USING
THE
INFO WINDOW
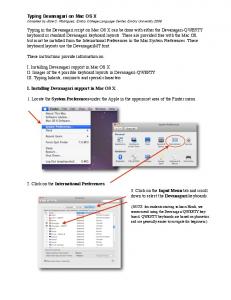
For simple tasks, set permissions using the Finder’s Info window. The Info window does not provide the degree of control that Unix commands do. You cannot, for instance, manipulate individual Unix permissions. However, setting permissions via the Info window is quite easy, and is perfectly adequate for most day-to-day situations. Set permissions with the Info window by following these steps: 1. Working in the Finder, select an item. 2. Choose File > Get Info (Command-I). You may need to click the Ownership & Permissions triangle to reveal more detail, as shown in Figure 1. FIGURE 1
Ownership and permissions for a typical file as viewed in the Info window.
3. Now, do one or more of the following: • Set access permissions: Choose your access permissions from the You Can pop-up menu. The menu item will be dimmed if you lack sufficient permissions to change the item. • Set owner permissions: Click the Details triangle to change permissions for owner, group, and others (Figure 2).
Page 17
This is a free sample of “Take Control of Permissions in Mac OS X.” Click here to buy the full 90-page ebook for only $10!
SET PERMISSIONS USING THIRD-PARTY TOOLS The Info window is adequate for most day-to-day, basic permissions editing. However, it has a limited feature set and cannot handle many permissions-related tasks. Fortunately, several third-party tools perform these missing tasks. I cover three popular ones here: FileXaminer, Super Get Info, and XRay. All three tools do what the Info window does and more, and provide finer control over permissions. The interfaces and features—at least as far as permissions are concerned—are very similar, and they all provide good help documentation and contextual menus. Because they are so similar, I find myself hard pressed to strongly recommend one over the others, but Table 4 contains some factors to consider: Table 4: Suggested Third-Party, Graphical Permission Tools Software
Cost
Notes
FileXaminer
$10
Most features overall. Fewer configurable preferences. Shorter demo period (7 days versus 14 days). http://www.gideonsoftworks.com/filexaminer.html
Super Get Info
$20
Uncluttered, intuitive interface. Most expensive. Does not support set UID bit, set GID bit, or sticky bit. http://www.barebones.com/
XRay
$10
Nice interface. Highly rated by users. Plug-in architecture (allows development of new features by other developers). http://www.brockerhoff.net/xray/
FileXaminer The $10 FileXaminer from Gideon Softworks (http://www.gideonsoftworks.com/filexaminer.html) has several advantages over the Info window. A partial list of its permissionsrelated features includes: • Batch edit: You can change permissions (and other settings) on multiple items simultaneously. • Manage groups: This feature simplifies the management of Unix groups considerably. (At the time of this writing, the current Page 20
This is a free sample of “Take Control of Permissions in Mac OS X.” Click here to buy the full 90-page ebook for only $10!
USE ACCESS CONTROL LISTS Beginning with Tiger, Mac OS X offers access control lists (ACLs). ACLs supplement Unix permissions and provide more detailed control over permissions. They also provide better interoperability with Samba and Windows. ACLs provide advantages over simply using traditional Unix permissions, but the average Mac user running the non-server version of Tiger may never need them. If you are not supporting multiple users with complex sharing requirements, you may want to skim or skip this section.
Advantages of ACLs Though Unix permissions are adequate for most situations, ACLs provide some clear advantages, including: • ACLs offer more kinds of permissions than read, write, and execute. For example, ACLs provide a delete permission. • ACLs are tremendously valuable if you have multiple individuals or groups working on collaborative projects, because they work around the “single user, single group” problem, which is perhaps the biggest limitation of traditional Unix permissions. For example, if you have a file that’s owned by the user bob and the group developers, you cannot grant permissions for a user who is not bob or in the group developers. However, with ACLs, you can specify that user frida can, for instance, write to the file even though she is not in the developers group. Likewise, you can specify permissions for another group such as, for example, one called designers. • ACLs coexist nicely with traditional Unix permissions. ACLs are evaluated, and, if none apply, the Unix permissions on the item apply.
Apply ACLs On the standard, non-server version of Tiger, ACLs are disabled by default. To see if ACLs are enabled on your computer, enter the following command in Terminal: /usr/sbin/fsaclctl -p / Page 26
This is a free sample of “Take Control of Permissions in Mac OS X.” Click here to buy the full 90-page ebook for only $10!
UNDERSTAND DEFAULT PERMISSIONS Because all items have permissions, Mac OS X must decide which permissions to apply when an item is created, copied, moved, extracted from an archive, and so on. Understanding these default behaviors is invaluable. You’ll know what to expect, and you’ll identify problems quickly and fix them by changing permissions to suit your needs.
Permissions on New Items Various factors influence the default, initial permissions on new items. At the most fundamental level, a global bit mask turns off certain permission bits by default. A bit mask is a pattern of zeros and ones that influences the pattern of another series of zeros and ones, as I show in the examples ahead. The global bit mask in Mac OS X is 000 010 010. NOTE In Unix documentation, you will see this global bit mask expressed as 022 octal. Octal is the base-8 numberings system. Counting in octal is simple: 1, 2, 3, 4, 5, 6, 7, 10, 11, 12, 13, 14, 15, 16, 17, 20, 21, 22, and so on. Octal skips 8 and 9, as well as 18 and 19. The base permissions—the original permissions used in conjunction with the global bit mask to calculate default permissions—are: • For folders: 111 111 111 (rwxrwxrwx) • For files: 110 110 110 (rw-rw-rw-) When the base permission bits “drop through” the mask, any 1 that encounters another 1 in the mask is cleared, that is, changed to 0. So, after dropping the base permissions for a folder: 111 111 111 through a global bit mask of: 000 010 010 the resulting bit pattern would be: 111 101 101 Page 31
This is a free sample of “Take Control of Permissions in Mac OS X.” Click here to buy the full 90-page ebook for only $10!
WORK WITH USER NAMES, UIDS,
AND
GIDS
Since Mac OS X displays the user name of the account that owns a folder or file, it’s easy to assume that that account with that user name owns the item. In reality, it’s not quite so simple. The owner is actually determined by a number called the UID—the user identification number, not by the user name. In addition the group is, in fact, determined by the GID—the group identification number.
How They Work A famous quotation from Romeo and Juliet reads: “What’s in a name? That which we call a rose by any other name would smell as sweet.” Deep down in Unix and Mac OS X, names—or, rather, user names—are just as incidental. Every account has a user name (Mac OS X calls it the short name), a numeric UID, and a numeric GID. User names, such as rose, are strictly for the convenience of we humans who use the accounts. After all, it’s easier, if your name is Rose, to remember rose than some number, such as 501. When it comes to file ownership, however, the operating system doesn’t care if your user name is rose. It cares only about the UID. So, when it assigns or determines ownership, it uses the UID, not the user name, and it uses a numeric GID to identify an item’s group ownership. To reveal your account’s UID and primary GID, type id in a Terminal window. The output of the id command looks like this: uid=502(btanaka) gid=20(staff) groups=20(staff), 80(admin) As you can see, my account’s UID is 502. My account’s primary group is staff, which is GID 20. My account also belongs to group 80: admin. (An account can belong to multiple groups. I discuss groups in Manage Groups.) To view the same information for another user, use the id command with the user name. For instance, if I want to know the UID for bob, I type: id bob. You can also use NetInfo Manager or the nidump command (enter: nidump passwd .) to see the UID of every account on the system. Page 48
This is a free sample of “Take Control of Permissions in Mac OS X.” Click here to buy the full 90-page ebook for only $10!
UNDERSTAND IGNORE OWNERSHIP You can tell Mac OS X to ignore ownership of all files and folders on a non-boot volume. Since permissions depend on ownership, when you ignore ownership, permissions are much less effective. This can be helpful in a variety of situations, such as sharing files with a group of people or dealing with ownership problems resulting from having multiple boot volumes. Although ignoring permissions makes them less effective, it does not make them totally irrelevant, because, despite the name of the option, ignoring ownership doesn’t actually ignore ownership. Instead, each item on the volume takes on a special UID and GID that tell the operating system to act as if any account that accesses the item is the item’s owner. (Ownership of items created before ignore permissions was enabled reverts to the original owners when the ignore ownership option is disabled.) For example, if you ignore ownership on a volume, the operating system will report that whichever account you’re using owns all items on that volume. If a different account looks at items on the volume, the operating system will report that that account is the owner. It’s like setting a box with your name written on it on a table and leaving the room. When the next person walks in, he sees his name written on the box. If another person walks in and stands beside the first person, she will see her name. To whom does the box belong? Anyone who looks at it! Magic! However, when an account attempts to work with the item, the permissions relevant to the item’s owner apply, as usual. If, for instance, the permissions allow the owner read permission only, then that item is read-only. Still, for the vast majority of typical items on a typical volume, this effectively means that all accounts have free access to all items since most items have liberal permissions for the owner. The net effect then, is that ownership is ignored, and permissions are not a hindrance. Some people refer to this phenomena as floating permissions, although that’s an inaccurate, unofficial term: the ownership floats, not the permissions. Page 60
This is a free sample of “Take Control of Permissions in Mac OS X.” Click here to buy the full 90-page ebook for only $10!
REPAIR PERMISSIONS
WITH
DISK UTILITY
Mac OS X’s Disk Utility can verify and repair permissions on some files and folders. To be accurate, it doesn’t actually repair permissions. Rather, it simply resets permissions according to guidelines I discuss later in this section. Further, to say Disk Utility repairs permissions implies that permissions can “go bad” or become corrupted over time and therefore need repairing because they’re broken. This is not true. Permissions stay the way they are set until someone or something comes along and sets them another way. So, if permissions stay the way they are, what’s setting them long after they’re initially set and causing all the fuss? In other words, why do we need the Repair Permissions feature at all? A number of things can be at fault: • Installers: Some installers change permissions on existing files and folders as a necessary part of the installation process, but fail to return them to their proper settings. To guard against slovenly installers, try running Verify or Repair Permissions after installing software, especially third-party software. • User error: Mistakes can lead to problems requiring use of Disk Utility. A simple mistake with the chmod command, for instance, can play havoc with permissions, requiring correction by Disk Utility. Much of the software you install on your computer is installed from packages. When a package is installed, the installer creates a Bill of Materials (.bom) file in that package’s receipts file. Installation receipts are stored in /Library/Receipts/. The Bill of Materials file lists the files installed by the package and the initial permissions for those files. NOTE To list all files installed by a package, use the lsbom command.
Page 63
This is a free sample of “Take Control of Permissions in Mac OS X.” Click here to buy the full 90-page ebook for only $10!
LEARN ADVANCED UNIX TECHNIQUES I saved this more advanced portion for the end of the ebook because many readers want to dive in and use tools that are familiar to them; therefore, I first discussed tools offering a graphical user interface. This section is for those who want to take control of the command line and harness its power. Because Unix is a broad and deep subject, this section is meant more as a practical overview than an exhaustive exploration. These advanced techniques are not required for taking control of permissions, and we’ve covered quite a bit of ground already, so don’t feel bad if you’ve hit information overload and want to skip this section. NOTE WHY USE UNIX? Unix has a reputation for being hard to learn. Though this is often true, it’s also paradoxically easy to use. Once you clear the initial learning hurdle, the power and flexibility at your fingertips makes working with your computer easier. TIP Tiger users have a choice of two (almost identically-named) Dashboard widgets that translate Unix permissions between symbolic and absolute mode: Unix Permissions Calculator (http://vocaro.com/trevor/software/widgets/) and Unix Permission Calculator (http://liepins.org/dashboard/). The permissions-related commands are: • ls: List files. • chmod: Change file mode. • chown: Change owner. • chgrp: Change group owner. • chflags: Change flag.
Page 66
This is a free sample of “Take Control of Permissions in Mac OS X.” Click here to buy the full 90-page ebook for only $10!
APPENDIX A: FIXES
FOR
COMMON PROBLEMS
This section explores and solves a variety of permission problems.
Can’t Give a File to Another User Perhaps the simplest and most common permissions problem arises when you need to give a file to another user on the same computer. Fortunately, this isn’t a problem in the sense that something is wrong. Rather, the existing permissions, which are right, are not working the way you expect them to work. Let’s say you want to give a file called foo.txt to user account bob. If you try to simply drag the file from your home folder to bob’s home folder, you’ll receive an error because your user account does not have permission to write to that folder. (Figure 10) FIGURE 10
Trying to copy a file to another user’s home folder results in this error.
You cannot write to bob’s home folder because, by default, each user’s home folder is writeable only by that user. In this way, Mac OS X protects files and folders from other users. In this case, only bob can write to his home folder, and you are denied. If you view the Info window for bob’s home folder, you will see in the Ownership & Permissions area, that “You can read only.” Likewise, if bob were to try to drop a file into my home folder, he would receive the “could not be moved” error dialog. There are many ways to get the file to bob. Two of the best are to use bob’s Drop Box or to override the permissions by authenticating as an administrator. Let’s explore both of these methods. Use the Drop Box folder Every home folder includes a special folder called Public, and inside that folder is another special folder called Drop Box. As its name Page 78
This is a free sample of “Take Control of Permissions in Mac OS X.” Click here to buy the full 90-page ebook for only $10!
APPENDIX B: CONVERTING TO OCTAL Converting from something like rwxr-xr-x to 755 octal can be a bit confusing at first. Once you understand how it works, you’ll find it’s quite easy. As an example, let’s convert rw-r--r-- to octal. Split the permissions into three groups of three: rw- r-- r-Substitute 4 for r, 2 for w, 1 for x, and 0 for dash to get: 420 400 400 Now add the numbers in each of the three groups: 6 4 4 And smush the digits together: 644 Et voilà! rw-r--r— is 644 octal. Now I know some of you are thinking, “Great. But what about the set UID, set GID, and sticky bits?” Good question. The set UID, set GID and sticky bits have the same “4, 2, and 1” values. So: set UID equals 4, set GID equals 2, and sticky bit equals 1. For example, the 1 at the beginning of 1755 indicates that this folder has its sticky bits set. As wacky as it sounds, the octal numbers (eg. 644, 1755) we’ve constructed via this quick shortcut are both individual digits smushed next to each other (as we’ve done so far) and, taken as whole numbers, the correct octal values for the permissions they describe. In other words: 644, the three digit octal number, is equal to 110100100, the nine digit binary number. That means, for instance, that write permission for group is literally 20 octal, and, for another instance, set UID is literally 4000 octal! Understanding that principle isn’t necessary for day-to-day work; Unix nerds all over lead perfectly happy, productive lives without knowing about it. But, if you’re curious about the math behind all this, read on.
Page 83
This is a free sample of “Take Control of Permissions in Mac OS X.” Click here to buy the full 90-page ebook for only $10!
APPENDIX C: USE
THE MAN
COMMAND
Some Unix gurus like to say “RTFM!” (are-tee-eff-em!) when asked how to do something in Unix. If offered in a helpful way, RTFM stands for “read the fine manual.” If offered in a grumpier way, RTFM stands for “read the %*#@$ manual.” Whichever way it’s offered, RTFM is good advice. The Unix manual has a wealth of information, and knowing how to find what you need in it is extremely valuable. To see the manual page (or, simply: man page) for a command, at a shell prompt enter man followed by the name of the command. For example: man ls. But what if you don’t know the name of the command? You can search by keyword with the apropos command. Enter: apropos keyword, where keyword is the term you’re looking for. For example, enter: apropos cron. The results are: cron(8) - daemon to execute scheduled commands (Vixie Cron) crontab(1) - maintain crontab files for individual users (V3) crontab(5) - tables for driving cron
Note the numbers in parentheses. Those are the section, or chapter, numbers. To see any page in chapter 1, simply enter: man command. However, to see pages in other chapters, enter: man section commnd. For example: man 5 crontab. For more information about man, enter (wait for it): man man. For more info about apropos, enter: man apropos.
Page 86
This is a free sample of “Take Control of Permissions in Mac OS X.” Click here to buy the full 90-page ebook for only $10!
ABOUT THIS EBOOK In contrast to traditional print books, Take Control ebooks offer clickable links, full-text searching, and free minor updates. We hope you find them both useful and enjoyable to read. Keep reading in this section to learn more about the author, the Take Control series, and the publisher.
About the Author Since 1993, Brian Tanaka has worked for a variety of companies including The Well, SGI, Intuit, Nintendo of America, and RealNetworks. He has contributed articles to Sysadmin Magazine and Linux Journal.
Author’s Acknowledgements I want to thank, first and foremost, Tonya Engst for her patience, encouragement, and invaluable editing. I also want to thank Adam Engst, Chris Pepper, Glenn Fleishman, Kirk McElhearn, Dan Frakes, Joe Kissell, Andy Affleck, Matt Neuburg, David Gabbe, and Greg Gilmore for providing invaluable tips, comments, and advice.
Take Control: The Series Take control of computing with the Take Control series of highly practical, tightly focused electronic books! Written by leading authors, edited by TidBITS, and delivered to your electronic doorstep within moments of “going to press,” Take Control ebooks provide just the technical help you need. http://www.takecontrolbooks.com/ • Take Control of Users & Accounts in Tiger, by Kirk McElhearn http://www.takecontrolbooks.com/tiger-users.html • Take Control of Sharing Files in Tiger, by Glenn Fleishman http://www.takecontrolbooks.com/tiger-sharing.html • Take Control of Mac OS X Backups, by Joe Kissell http://www.takecontrolbooks.com/backup-macosx.html
Page 87
This is a free sample of “Take Control of Permissions in Mac OS X.” Click here to buy the full 90-page ebook for only $10!
About TidBITS Electronic Publishing Take Control ebooks are a project of TidBITS Electronic Publishing. TidBITS Electronic Publishing has been publishing online since 1990 when publishers Adam and Tonya Engst first created their online newsletter, TidBITS, about Macintosh- and Internet-related topics. TidBITS has been in continuous, weekly production since then, and it is the leading online Macintosh newsletter. To stay up to date on Macintosh topics, be sure to read TidBITS each week. At the TidBITS Web site you can subscribe to TidBITS for free, participate in TidBITS Talk discussions, or search 15 years of news, reviews, and editorial analysis (http://www.tidbits.com/). Adam and Tonya are well-known in the Macintosh world as writers, editors, and speakers, and they have written innumerable online and print publications. They are also parents to Tristan, who thinks ebooks about trains, ships, and dinosaurs would be cool.
Production Credits • Cover: Jeff Carlson, http://www.necoffee.com/ • Take Control logo: Jeff Tolbert, http://jefftolbert.com/ • Editor in Chief: Tonya Engst, http://www.tidbits.com/tonya/ • Publisher: Adam Engst, http://www.tidbits.com/adam/
Page 88
This is a free sample of “Take Control of Permissions in Mac OS X.” Click here to buy the full 90-page ebook for only $10!
Copyright © 2005, Brian Tanaka. All rights reserved. Take Control of Permissions in Mac OS X ISBN: 1-933671-00-9 TidBITS Electronic Publishing 50 Hickory Road, Ithaca, NY 14850 USA http://www.takecontrolbooks.com/ October 2005. Version 1.0 Take Control ebooks help readers regain some measure of control in an oftentimes out-of-control universe. Take Control ebooks also streamline the publication process so that information about quickly changing technical topics can be published while it’s still relevant and accurate. Please send comments to
[email protected]. This ebook does not use copy protection because copy protection makes life harder for everyone. So we ask a favor of our readers. If you want to share your copy of this ebook with a friend, please do so as you would a physical book, meaning that if your friend uses it regularly, he or she should buy a copy. (Use the Help a Friend offer on the cover of this ebook to give your friend a discount!) Your support makes it possible for future Take Control ebooks to hit the Internet long before you’d find the same info in a printed book. Plus, if you buy the ebook, you’re entitled to any free updates that become available. Although the author and TidBITS Electronic Publishing have made a reasonable effort to ensure the accuracy of the information herein, they assume no responsibility for errors or omissions. The information in this ebook is distributed “As Is,” without warranty of any kind. Neither TidBITS Electronic Publishing nor the author shall be liable to any person or entity for any special, indirect, incidental, or consequential damages, including without limitation lost revenues or lost profits, that may result (or that are alleged to result) from the use of these materials. In other words, use this information at your own risk. Many of the designations used to distinguish products and services are claimed as trademarks or service marks. Any trademarks, service marks, product names, or named features that appear in this title are assumed to be the property of their respective owners. All product names and services are used in an editorial fashion only, with no intention of infringement of the trademark. No such use, or the use of any trade name, is meant to convey endorsement or other affiliation with this title. Take Control of Max OS X Permissions is an independent publication and has not been authorized, sponsored, or otherwise approved by Apple Computer, Inc. Apple, Finder, Macintosh, Mac, Mac OS, Panther, and Tiger are trademarks or registered trademarks of Apple Computer, Inc.
Page 89
This is a free sample of “Take Control of Permissions in Mac OS X.” Click here to buy the full 90-page ebook for only $10!
What do you get when you buy from Small Dog Electronics?
Now, 5 off your next web order!
Redeem your coupon on-line at www.smalldog.com Limited to one use per customer. Enter coupon # XXXXXXXXXXXXX at check out.
1-800-511-MACS
We measure success in more than just dollars. This is a free sample of “Take Control of Permissions in Mac OS X.” Click here to buy the full 90-page ebook for only $10!