Overview. This tutorial demonstrates how to work with data access objects in the
spring framework. It implements the Spring Data Access Object with JDBC. Data.
Tutorial for Spring DAO with JDBC Prepared by: Nigusse Duguma
Overview This tutorial demonstrates how to work with data access objects in the spring framework. It implements the Spring Data Access Object with JDBC.
Data
Access Objects exist to provide a means to read, write or modify data in the database. In this tutorial basic ways of bean definition and good features of spring like Dependency Injection (setter injector in this case) and ways of declaring beans in the Spring configuration file are demonstrated. In addition a Junit test is used to test the code. Eclipse 3.1 is used as implementation environment. And MySQL is used for the database. Table of Contents:
Creating the Database Schema and a table.
Setting up the environment Creating the Project in Eclipse Creating folders for organizing the Java source codes configuring logging
Creating the Beans Interfaces and Implementations Creating Configuration file Testing the Application Steps. 1. Create a database schema named DEMO, on your database server. 2. Using following SQL Script to create the USER Table under the database
DEMO . CREATE TABLE DEMO.USER ( UID INTEGER UNSIGNED NOT NULL AUTO_INCREMENT, USERNAME VARCHAR(45) NOT NULL, PASSWORD VARCHAR(45) NOT NULL, PRIMARY KEY (`UID`) );
Page
1
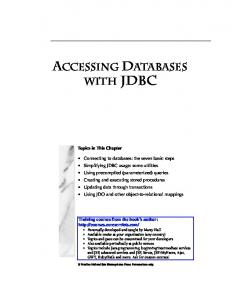
3. Start Eclipse and create a new Project. You may create a new Java project. Name the project as springJdbcDemo . 4. Under this project create a folder called Jsrc where all your Java Source Codes will be stored. 5. Under Jsrc create a folder called User To organize our objects let's create the following packages under Jsrc > user The DAO Interface class will be stored here user > DAO The implementation of the DAO interface will be stored here. > DAO > Impl The JUnit test code will be stored here. > DAO > Test All the domain objects will be stored here. Eg. User.java. user > Domain The project structure will look like as in the following picture.
Page
2
Configuring logging Spring depends on Log4j. Make sure that the Log4j JAR file is in the applications classpath. If it is not already provided with the spring libraries you can find it at http://logging.apache.org/log4j/docs/index.html. Download the file log4j and copy it to the lib folder under your project. Creating the Beans Spring allows to use the so-called Plain Java Objects for the domain classes or of the business logic. The
class User is a normal Java bean with private
attributes and public getter/setters and constructor method. 6. Create the domain object user.domain.User.java, This is a plain old Java object to represent the table USER. A partial implementation is as follows: you complete the getters and setters package user.domain; public class User { private Integer uid; private String username; private String password; public User(Integer uid, String username, String password) { this.setUId(uid); this.SetUsername(username); this.Password(password); } // Add Getters and Setters here } Interface class and its Implementation 7. Next create an Interface class UserDao.java under, user.DAO which tell the contract that the UserDaoImpl.java implements. package user. Dao; import user.domain.User; public interface UserDao { int insertUser(User record); int updateUser(User record); void deleteUser(int key); User selectUser(int key); } Page
3
Configuration with Spring config files 7. Let's now create the configuration file called appContext..xml under config directory. The following init method initializes the applicationContext which gives us the Spring core container from the configuration files. public synchronized void init() {
}
if (appContext == null) { try { String path = System.getProperty("user.dir"); String slash = System.getProperty("file.separator"); String configDir = path + slash + "config" + slash; appContext = new FileSystemXmlApplicationContext( new String[] {configDir + "appContext.xml"}); } catch(Exception e) { System.err.println(e.getMessage()); } }
8. The Spring XML configuration file is the base for the Spring Core Container. The elements are the most basic configuration unit in spring.
9. First let's define the DataSource
bean. This tells spring the url, user
name, password and driver of the database. We can also add other parameters for pooling too. We need to add the commons-dbcp-1.2.2.jar
Page
4
and commons-pool-1.3.jar files in to our library. These are freely available on www.apache.org web site. Download and add them to the folder lib. 10. We next define the transactionManager bean which helps to create the JDBC transaction manager for the DataSource. 11. Next let's implement UserDao.java interface using UserDaoImpl.java class. This class needs DataSourceTransactionManager to access the database. Declare a private variable DataSourceTransactionManager .
The bean
definition for the UserDao object will be as follows: For simplicity let's get our data source object from the transaction manager, which will help us to create spring JdbcTemplate object. We can use the JdbcTemplate instance variable to execute SQL Scripts. We initialize the JdbcTemplate on the constructor.
Page
5
The full implementation of the UserDaoImpl.java is given as follows. Here Spring's setter injection method is used. (Note the comments for detail implementation of each method.)
package user.dao.impl; import java.sql.ResultSet; import java.sql.SQLException; import java.sql.Types; import javax.sql.DataSource; import org.springframework.jdbc.core.JdbcTemplate; import org.springframework.jdbc.core.RowCallbackHandler; import org.springframework.jdbc.datasource.DataSourceTransactionManager; import user.dao.UserDao; import user.domain.User; public class UserDaoImpl implements UserDao { private DataSourceTransactionManager transactionManager; private JdbcTemplate jdbcTemplate; public UserDaoImpl() { super(); DataSource dataSource = transactionManager.getDataSource(); jdbcTemplate = new JdbcTemplate(dataSource); } // Spring setter injector used public void setTransactionManager(DataSourceTransactionManager transactionManager) {this.transactionManager = transactionManager; } public int insertUser(User record) { // SQL to insert User Id, User Name & Password String sql = "Insert Into DEMO.USER (UID, USERNAME, PASSWORD) values (?, ?, ?)";
// Set parameters and JDBC types Object[] params = new Object[] {record.getUid(), record.getUsername(), record.getPassword()}; int[] types = new int[] {Types.INTEGER, Types.VARCHAR, Types.VARCHAR}; }
return jdbcTemplate.update(sql, params, types); public User selectUser(int key) { String sql = "select UID, USERNAME, PASSWORD from DEMO.USER where UID = ?";
final Object[] params = new Object[] {key};
Page
6
// Creating object being queried final User user = new User(); // Process query results jdbcTemplate.query(sql, params, new RowCallbackHandler() { public void processRow (ResultSet rs) throws SQLException { user.setUid(new Integer(rs.getInt("UID"))); user.setUsername(rs.getString("USERNAME")); user.setPassword(rs.getString("PASSWORD")); } }); }
return user;
// returns queried object
public void deleteUser(int key) {
}
String sql = "delete from DEMO.USER where UID = ? "; Object[] params = new Object[] {key}; jdbcTemplate.update(sql, params);
public int updateUser(User record) { String sql = "update DEMO.USER (USERNAME, PASSWORD) set (?, ?) where UID = ?";
// passing parameters and types
Object[] params = new Object[] {record.getUsername(), record.getPassword(), record.getUid()};
}
}
int[] types = new int[] {Types.VARCHAR, Types.VARCHAR, Types.INTEGER}; return jdbcTemplate.update(sql, params, types);
Testing Using Junit Test Junit is a testing framework. Creating tests in Junit is simply a matter of extending the junit.framework.TestCase class and implementing one or more test method. Therefor we use a JUNIT Test to test the methods implemented above work as intended and to see the results of data insertion. For more details about Junit test you can visit www.junit.org . The UserDAOTest class tests weather the classes are implemented with out error and show the result of writing data to the table User
Page
7
package User.dao.test; import junit.framework.Test; import junit.framework.TestCase; import junit.framework.TestSuite; import org.apache.log4j.xml.DOMConfigurator; import org.springframework.context.ApplicationContext; import org.springframework.context.support.FileSystemXmlApplicationContext; import User.dao.UserDao; import User.domain.User; public class UserDaoTest extends TestCase{ private static final Integer UID = new Integer(1); private static final String USRID = "username"; private static final String PSWD = "password"; protected static ApplicationContext appContext; private UserDao userDao; public UserDaoTest(String arg) { super(arg); } public static Test suite() { TestSuite suite = new TestSuite(); suite.addTest(new UserDaoTest("testUserDAO")); return suite; } public void setUp() throws Exception { init(); userDao = (UserDao) getBean("userDao"); } public static void main(String[] args) { junit.textui.TestRunner.run(suite()); } public synchronized void init() { if (appContext == null) { try { String path = System.getProperty("user.dir"); String slash = System.getProperty("file.separator"); String configDir = path + slash + "config" + slash; DOMConfigurator.configure(configDir + "log4j.xml"); appContext = new FileSystemXmlApplicationContext(
Page
8
}
}
new String[] {configDir + "appContext.xml"}); } catch(Exception e) { System.err.println(e.getMessage()); }
protected Object getBean(String beanName) { return appContext.getBean(beanName); } public void testUserDAO() { User record = new User(); record.setUid(UID); record.setUsername(USRID); record.setPassword(PSWD); UserDao.insertUser(record); System.out.println("User is Inserted [" + UID + ", " + USRID + ", " + PSWD + "]"); User user = UserDao.selectUser(UID); assertEquals(USRID, user.getUsername()); System.out.println("User Selected [" + user.getUid() + ", " + user.getUsername() + ", " + user.getPassword() + "]"); record.setUsername("ANOTHERUSER"); int rowsAffected = UserDao.updateUser(record); assertEquals(1, rowsAffected); user = UserDao.selectUser(UID); assertNotSame(USRID, user.getUsername()); System.out.println("User is Updated [" + user.getUid() + ", " + user.getUsername() + ", " + user.getPassword() + "]"); userDao.deleteUser(UID); user = userDao.selectUser(UID); assertEquals(null, user.getUsername()); System.out.println("User is Deleted [" + user.getUid() + ", " + user.getUsername() + ", " + user.getPassword() + "]"); } }
When run within a Junit runner this test can prove weather the data are inserted or not. If it runs successfully you will see the following result displayed. User is Inserted [1, username, password] User Selected [1, username, password] User is Updated [1, ANOTHERUSER, password] User is Deleted [null, null, null] Page
9
The screen snap shot of UserDaoTest shows the test is successful and the data are inserted.
End of the Tutorial!
Page
10


![[PDF]} Spring MVC: A Tutorial - Google Sites](https://m.moam.info/img/260x300/pdf-spring-mvc-a-tutorial-google-sites_6477ea19097c4744708c3e73.jpg)


