The Interconnect Penalty of Small Size Switches. Jean-François Labourdette. Tellium. Carriers are often faced with the need to scale the switching capacity of a ...
Particular attentiont to adaptation in Web applications ... It varies more with mobile devices than desktop ones ... Avoid overloading the user interface with many.
In a previous column1, I talked about the interconnect penalty incurred when building a switching node complex with small size switches. In this column, we.
Disini kita akan mencoba menghilangkan jerawat dengan cepat dan mudah ...
Atur diameter/besar lingkaran Healing dengan ukuran jerawat (untuk mengganti
...
Jul 6, 2007 ... 1. IMS tutorial: Is the IMS Service Platform a. Solution for Next Generation.
Network Providers to Be. More Than Bit Carriers? Dr. Antonio ...
Dimensional Modeling. Mohammad A. Rob. 1. Basics of Dimensional Modeling.
Data warehouse and OLAP tools are based on a dimensional data model.
SolidWorks Motion Analysis allows you to study two major types of problems
relating to the motion of ..... This is the appearance in SolidWorks 2012 version.
IAR Embedded Workbench tutorial describes a typical development cycle using
the ... The C programming language and the IAR MSP430 assembly language.
Page 1 ..... with MPC_Printf. â Printing hostname of the machine executing host-process ... The second difference is the construct [host] before printf function call.
How to join OmniJoin group video call. TheInnerRevolution.Org ... conferencing platform from Brother: ... you can't get
Hive with Hortonworks HDP 2.0. Learn how to create an SAP BusinessObjects
Universe on top of Apache Hive 2 using the Hortonworks HDP 2.0 distribution.
Sep 24, 2008 - APAC. 17.9 M. (2007.9). Japan. 12.2 M. (2008.3). Number of FTTH Subscribers in the W orld ..... Center. Distribution. Center. Roppongi. Odaiba. Itabashi. Musashi- .... FTV got strong support from industry in response to the call.
Se completeaza campurile, Numar factura si Data, cu numarul, respectiv data
facturii primite. Numar NIR se completeaza daca este cazul. In campul DOC.
Aug 13, 2014 - 1If you want to learn how to create reference tracks, please refer to the .... be saved from this Workflow when it is run - in this case, the output of ...
Tutorial. How to join OmniJoin group video call ... In order to join our group video calls, just click on ... your PC or
The primary electron/hole pair is amplified (photodetector with internal gain). From photons to an .... PIN photodiodes first large scale application of Si sensors for low light level detection. They were ...... Sourcemeter. Interactive SiPM demo ...
ECOTECT. SIMULATIONS AND ANALYSIS. Shadows Range. Daylighting. Visual
Impact. Solar Radiation. Acustics. Wind. URBAN SCALE. Estefania Tapias ...
Jul 27, 2004 ... This command will test each element of sex to see whether or not it is equal to F.
If it is, the ... The plots in this tutorial have been inserted.
Tutorial. Setup. Reference http://www.openflowswitch.org/foswiki/bin/view/
OpenFlow/MininetGettingStarted for more thorough Mininet walkthrough if
desired.
Figure 3. The StandardDataSets directory in the CTS hierarchy. the CTS
hierarchy. Getting Started. Getting Started. In order to run the COLLADA
conformance.
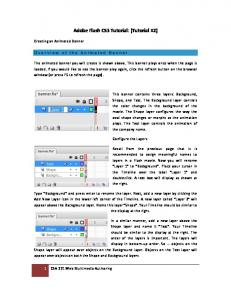
1 CSA 221 Web Multimedia Authoring. Adobe Flash CS3 Tutorial: (Tutorial #2).
Creating an Animated Banner. Overview of the Animated Banner. The animated ...
Figure 2.2.1-1 provides details of the anatomy of the human eye as ... the anterior and vitreous humors, the rays are bent significantly according to Snell's Law.
1. Introduction. At the end of this tutorial you should be able to create three
diagrams in Rational Rose, the use-case diagram, the sequence diagram, and
the ...
This chapter provides an overview of the modeling process with PMWIN,
describes the basic skills you need to use PMWIN, and takes you step by step
through a ...
Tutorial – CalculiX meshing for OpenFOAM: pipe mesh. Previous steps: The 2D
mesh was created in Blender with the use of the fbd export script.
tutorial How To extrude 2D mesh into 3D in Calculix – pipe mesh example
Tutorial – CalculiX meshing for OpenFOAM: pipe mesh
Previous steps: The 2D mesh was created in Blender with the use of the fbd export script. The generation of the 2D mesh itself is the subject of an other Tutorial document.
Starting up and opening the 2D mesh: Start up CalculiX: cgx b cylinder3.fbd
The next step is to swep the 2D mesh in 3D among a strait line. Let's call the other end of the pipe “top”. All the entities (points, lines, surfaces imported) are stored in the “all” selection at the beginning. We will use a translation vector of [0,0,18] – z direction: swep all top tra 0 0 18
1
Tutorial – CalculiX meshing for OpenFOAM: pipe mesh
Check what is the default division for the lines. We would like to use hexahedron cells, all the 2
Tutorial – CalculiX meshing for OpenFOAM: pipe mesh
lines will be divided due to its division definition. The division definition can be visulaized for example for all the lines in the model: plot ld all
Note that the new lines – the ones parallel to the z axis - have 4 as division! Change the division of these lines! Switch the “+x” view:
3
Tutorial – CalculiX meshing for OpenFOAM: pipe mesh
Now change the division: qdiv
Selection mode “all”: a
Define the opposite corners of the selection rectangle: r r
4
Tutorial – CalculiX meshing for OpenFOAM: pipe mesh
Hit “r”!
Hit “r”!
Type in the new division definition (for two digit definitions type a before the numbers!): 99
Quit the division definition command: q
Now define the cell type which the mesher should use as hexahedrons
elty all he8
Start meshing: mesh all
The reply is the following: please wait for 'ready'
5
Tutorial – CalculiX meshing for OpenFOAM: pipe mesh
Tutorial – CalculiX meshing for OpenFOAM: pipe mesh
Switch visualization for element face visualization for smaller memory usage: plot f all
Now create selections for inlet, outlet and wall. To do the selection the first letter of the element name should be typed in – p for points, l for lines, s for surfaces, etc.. For the boundary conditions element faces should be selected (f). Let's begin with the inlet boundary (“in”): qadd in a r r f q
7
Tutorial – CalculiX meshing for OpenFOAM: pipe mesh
Check what was selected (with green color): plot f all plus f in g
8
Tutorial – CalculiX meshing for OpenFOAM: pipe mesh
Remove non necessary faces from selection: qrem in a r r f q
Create the outlet (“out”) and wall (“wall”) selections on the similar way. Visulizing the result “in” with green, “out” with red and “wall” with blue: plot f all plus f in g plus f out r plus f wall b
9
Tutorial – CalculiX meshing for OpenFOAM: pipe mesh
Check what selections are existing with what content: prnt se
Export mesh in OpenFOAM format with the existing face selections (“in” - patch type, “out” patch type and “wall” - wall type): send all foam patch in patch out wall wall
Reply: please wait for 'ready' use boundary: type:patch set:in use boundary: type:patch set:out use boundary: type:wall set:wall
10
Tutorial – CalculiX meshing for OpenFOAM: pipe mesh
wrote foam mesh ready
The mesh is ready to be used in OpenFOAM now! You can quit CalculiX: quit